

Page 1
Wilbur Curtis Co., inC.
Service Manual – TFT FreshTrac™ Coffee Server
Brewing into the TFT Server
The TFT server is designed to be used exclusively with coffee and water.
1. Place the clean, empty server centered under the brew cone of the coffee brewer.
Remove the top cap from the FreshTrac™ lid
2. Fill brew cone with ground coffee. Insert it into the brew rails.
3. On the electronic controller of the brewer, press the brew button to start the brew
cycle.
4. Allow the coffee brewer to complete the brew cycle. Make sure the brew cone has
drained completely before removing the TFT server coffee server.
Models
TFT15G
TFT1G
WARNING – Servers may be heavy when lled.
Care must be taken when transporting to avoid dropping or spilling.
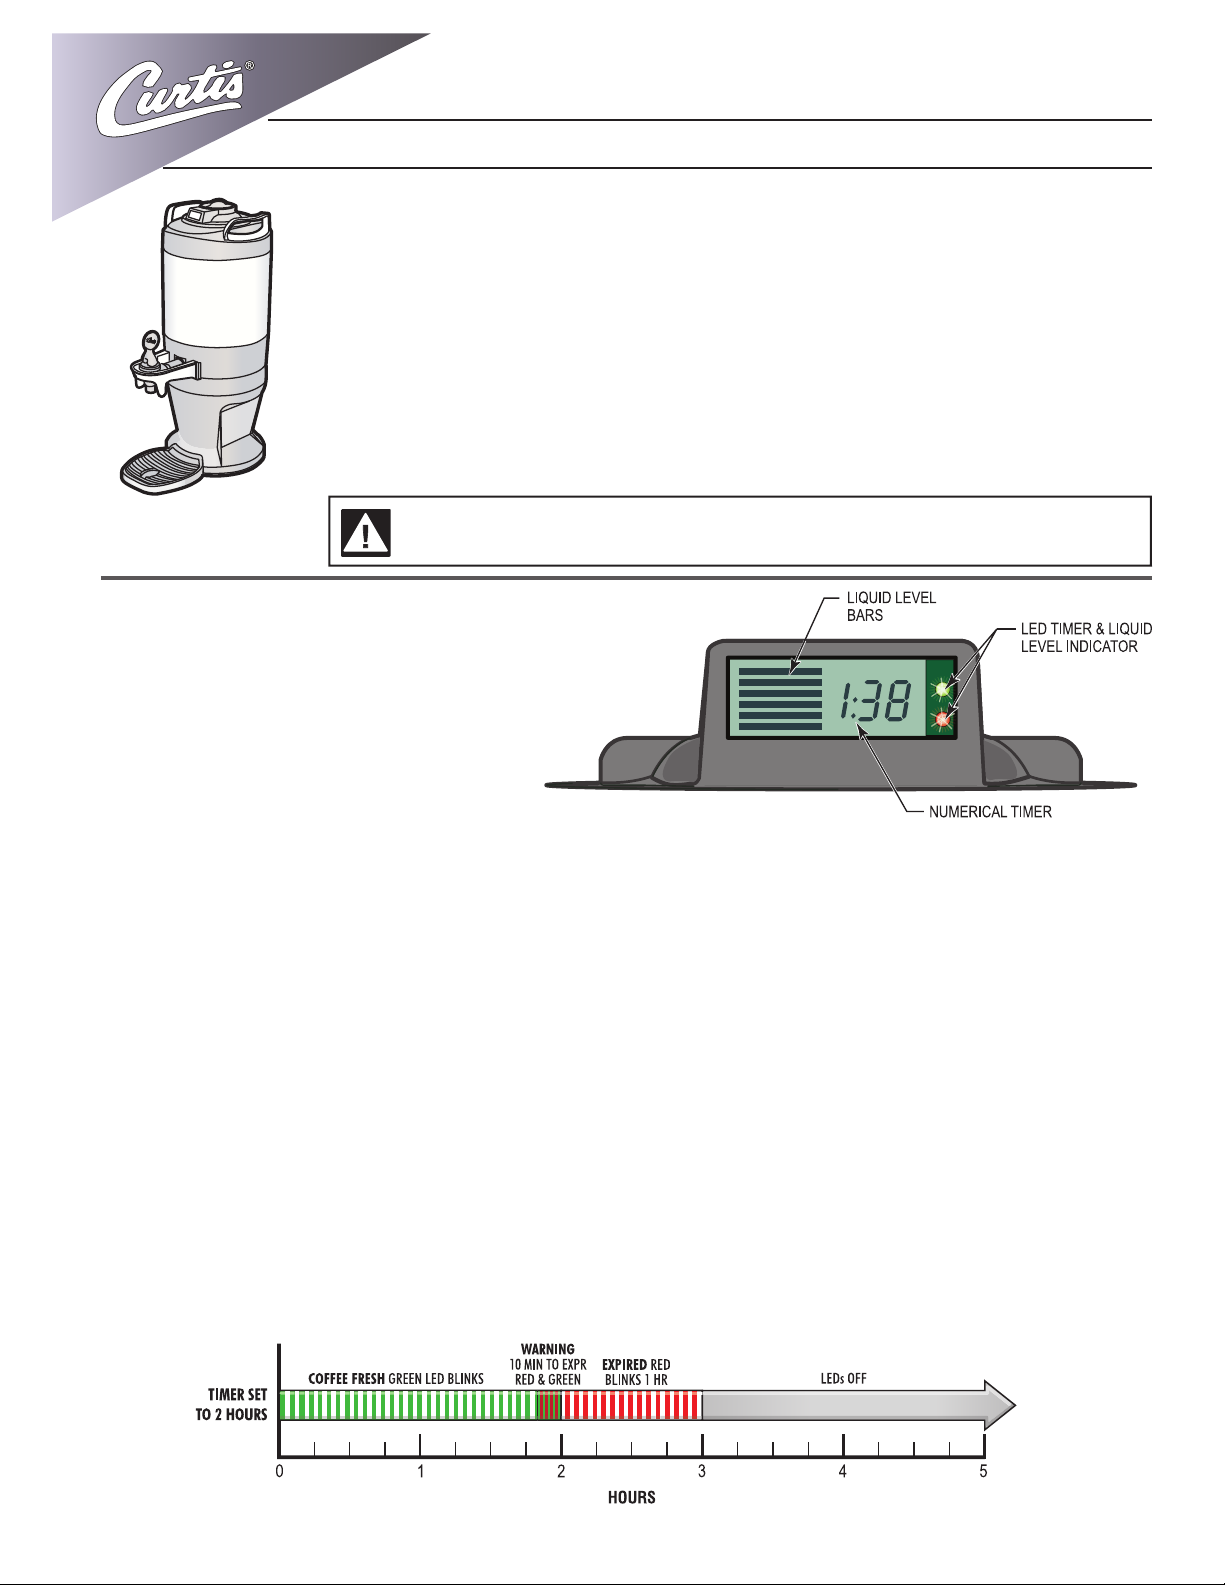
FreshTrac™ Combination Liquid
Level Gauge & Coffee Timer
The FreshTrac™ TFT coffee server uses a
lid that has a combination gauge. This lid
contains three indicators: A liquid level measure, a coffee quality timer, and LED lights.
The FreshTrac™ activates as soon as
brewed coffee starts owing into the server.
At this time the two indicator lights ash green-red-green and the numeric timer starts counting down. Sensors within the lid measure the coffee as it lls the server. The segments of the liquid level gauge will start to
ll in as the volume increases.
LED Lights
The two lights (Red & Green) are non-programmable.
1. Coffee is Fresh Mode — Green LED light blinks every 6 seconds to designate coffee is fresh. The Green
LED is set to blink for 1 hour and 50 minutes.
2. Warning Mode – The Green and Red LEDs blink alternately – 6 seconds Green, 6 seconds Red, when
either of these two conditions are true:
a. Digital Numeric Timer is 10 minutes or less from expiration.
b. Volume in server is between 12 and 24 ounces.
3. Timer Expired and/or Dispenser is (nearly) Empty – the Red LED blinks every 6 seconds for 60 minutes
once any of the conditions below are true:
a. Numeric Timer has expired.
b. Dispenser is (nearly) empty – 12 ounces or less of volume remains.
1
Page 2
LED Lights
4. The Red LED will stop blinking and turn off after 60 minutes have elapsed.
5. When the server times-out or is empty, the LCD display screen will blink simultaneously with the LED.
6. When the time has expired or the server is empty and the Red LED has blinked for 60 minutes, the LCD
screen will turn off.
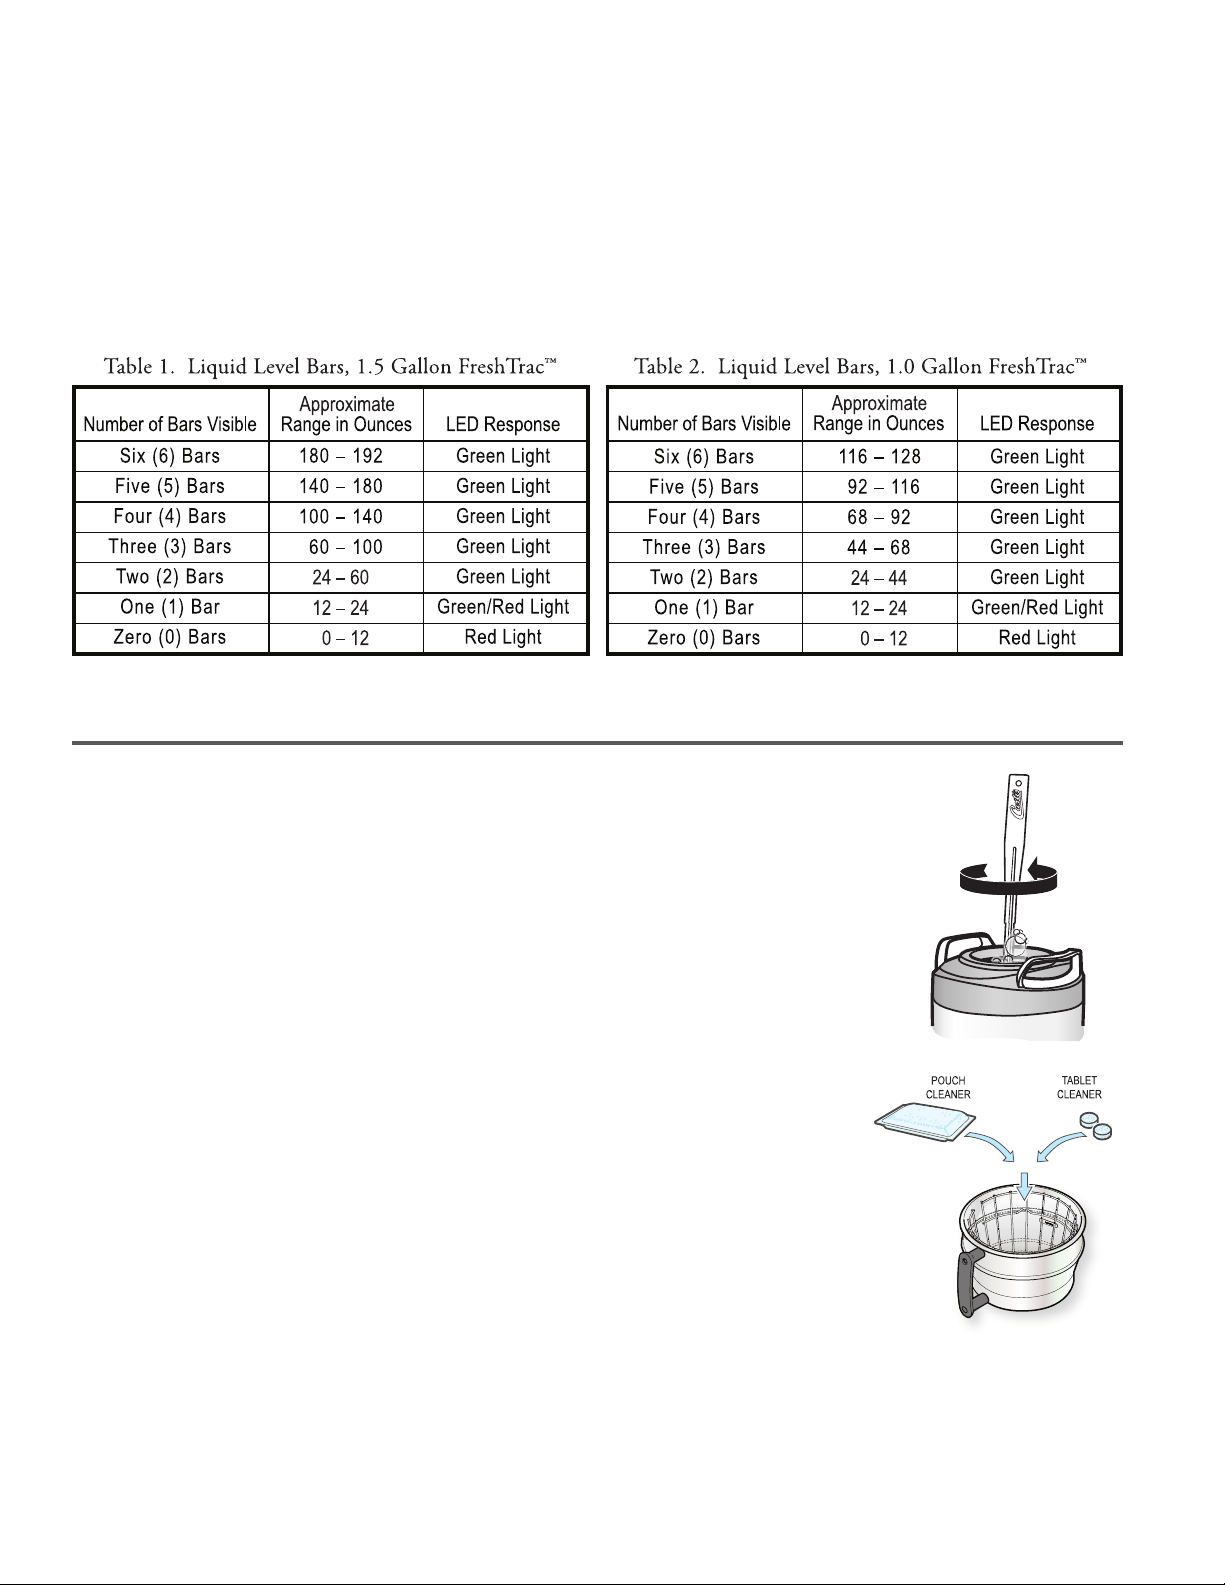
LCD – Liquid Level Bars
There are six bars on the LCD screen to represent the volume of coffee within the server. Table 1 and 2,
below, will explain the volume range for each bar, as well as the response from the LED indicators as the
volume decreases.
LCD – Numeric Timer
The FreshTrac™ digital numeric timer (Fresh Coffee Timer) defaults to 2 hours, counting down.
CLEANING TFT Coffee Server
1. In a container, mix a mild detergent and warm water solution for cleaning the coffee
server.
2. Discard old coffee from the coffee server.
3. Remove and clean the lid.
4. Clean inside the coffee server with a sponge brush soaked in detergent solution.
5. An easy way to remove mineral deposits from the brew cone and the coffee server is to
use a pouch or tablet cleaner.
a. Place two tablets or one pouch (refer to manufacturers’ recommendation) into the
brew cone.
b. Place the empty coffee server onto the brew deck.
c. Start a coffee brew cycle by pressing the Brew button on the electronic controller.
d. When the brew cycle has nished, allow the cleaning solution to sit in the coffee
server for a few minutes, then empty the coffee server.
6. Wipe the exterior surfaces with a sponge moistened with the detergent solution. Wipe
off coffee spots or stains.
7. Rinse the brew cone and coffee server with running water.
6. Dry the parts and return them to the coffee brewer.
TFT Coffee Server Precautions:
Do not immerse coffee server in water.
Do not place in dishwasher.
Do not use harsh powders or cleansers containing chlorine.
Do not use a wire brush or pot scour to clean inside liner.
2
Page 3

Illustrated Parts
TFT Coffee Server
Illustrated Parts List
Index № Part № Description
1
1A
2
3
4
5
6
7
8
9
10
WC-56076
WC-56075
WC-56028-101
WC-56030
WC-1951
WC-1953-101
WC-4320
WC-1905
WC-1906
WC-1841
WC-64079
LID ASSY, LCD/LED DISPLAY TFT15G
LID ASSY, LCD/LED DISPLAY TFT1G
TOP SERVER THREADED BLK
BOTTOM, BLACK PLASTIC
NUT, FLANGED, PLASTIC
SHANK, PLASTIC THERMOSRVER TFT
O’RING, ½” I.D.
NUT, WING PLASTIC 1-1/32-14UNF
C’ RING .917 x .760 x .090
FAUCET, ESP BLACK LOCKING
GUARD, FAUCET TXSG ZINC
Index № Part № Description
11
12
13
14
15
16
17
18
19
20
WC-43091
WC-2456
WC-4281
WC-29082-102
WC-58262
WC-56020
WC-38281
WC-61689
WC-56080
WC-1841-CH
CLAMP, WIRE HOSE
ELBOW, SILICONE STR SIDE SERV
NUT, 1/2”-14 NPSM PLASTIC
WASHER, SILICONE (BEFORE 3/15)
COVER, BOTTOM WHITE PLASTIC
BASE ASSY SERVER STRT SIDE
LABEL, DECAF
KIT, DRIP TRAY STRAIGHT SIDE SRV
CAP, LID, TFT
FAUCET, ASSY BLK HNDL CURTIS CLSC
3
Page 4

SERVICING THE TFT SERVER
REMOVING THE BASE & BOTTOM COVER
To replace the silicone elbow tting for repair or cleaning:
1. Remove the base assembly. Press down on the slide tab on the back side of the stand
and rotate the server counter clock-wise. Lift the server to separate from the base.
2. Turn the server upside down and pry off the plastic bottom cover. This will reveal the
silicone elbow tting.
3. Remove the wire hose clamps by squeezing in on the wire ears. Slide the clamp from
the soft silicone elbow at the liner drain pipe and the faucet shank and pull off the elbow.
4. Check for leaks and replace with a new part if necessary.
REMOVING THE FAUCET
The faucet will require periodic cleaning and maintenance.
1. Remove the faucet from the body of the server. Take off the faucet by unscrewing the wing nut
holding the faucet body to the shank.
2. Disassemble the faucet. Unscrew the bonnet from the body of the faucet. The handle and the
faucet parts will come off in one piece.
3. Check the silicone seat cup for wear, cracks, or hardening. If okay, then leave the seat cup at-
tached on the handle/bonnet assembly. Soak then wipe clean. Replace the faucet if damaged.
ASSEMBLY
Assemble the unit by reversing the steps for disassembly. Finger tighten the wing nut onto the faucet. Make sure all
clamps are fastened properly and silicone ttings are in good condition. Before replacing the bottom cover, pour water
into the server and check for leaks around the tting and faucet. If okay, pour out the water and replace the cover and
server base. The server is ready for coffee brewing.
TFT 1.5 Gallon
TFT 1.0 Gallon
Product Warranty Information
The Wilbur Curtis Co., Inc. certies that its products are free from defects in material and workmanship under normal use.
The following limited warranties and conditions apply:
1 Year from the Original Date of Purchase.
RETURN MERCHANDISE AUTHORIZATION: All claims under this warranty must be submitted to the Wilbur Curtis
Co., Inc. Technical Support Department prior to performing any repair work or return of this equipment to the factory.
All returned equipment must be repackaged properly in the original carton. No units will be accepted if they are dam-
aged in transit due to improper packaging. NO UNITS OR PARTS WILL BE ACCEPTED WITHOUT A RETURN MERCHANDISE AUTHORIZATION (RMA). RMA NUMBER MUST BE MARKED ON THE CARTON OR SHIPPING LABEL.
All in-warranty service calls must be performed by an authorized service agent. Call the Wilbur Curtis Co., Inc. Techni-
cal Support Department to nd an agent near you.
ECN 16562 . 5/12/15 @ 16º . rev E . v1
ECN 16257 . 11/3/14 @ 14.6 . rev D
ECN 15542 . 12/20/13 @ 9.1 . revC
ECN 15449 . 11/1/13@10.5 . revB
ECN 15371 . 10/1/13@11.1 . rev A
EDR 8830 . 7/10/13@10.3 . rev NC
WILBUR CURTIS CO., INC.
6913 Acco St., Montebello, CA 90640-5403 USA Phone: 800/421-6150 Fax: 323-837-2410
Technical Support Phone: 800/995-0417 (M-F 5:30A - 4:00P PST) E-Mail: techsupport@wilburcurtis.com
4
Printed in U.S.A. 5/2015 F-3945 Rev E
 Loading...