

Page 1
Operating instructions
Betriebsanleitung
Manuale d'uso
Dry-well temperature calibrator, micro calibration bath, multi-function
calibrator, models CTD9100, CTB9100, CTM9100
Temperatur-Blockkalibrator, Mikrokalibrierbad, Multifunktionskalibrator,
Typen CTD9100, CTB9100, CTM9100
Calibratore di temperatura a secco, microbagno di calibrazione,
calibratore multifunzione, modelli CTD9100, CTB9100, CTM9100
EN
DE
IT
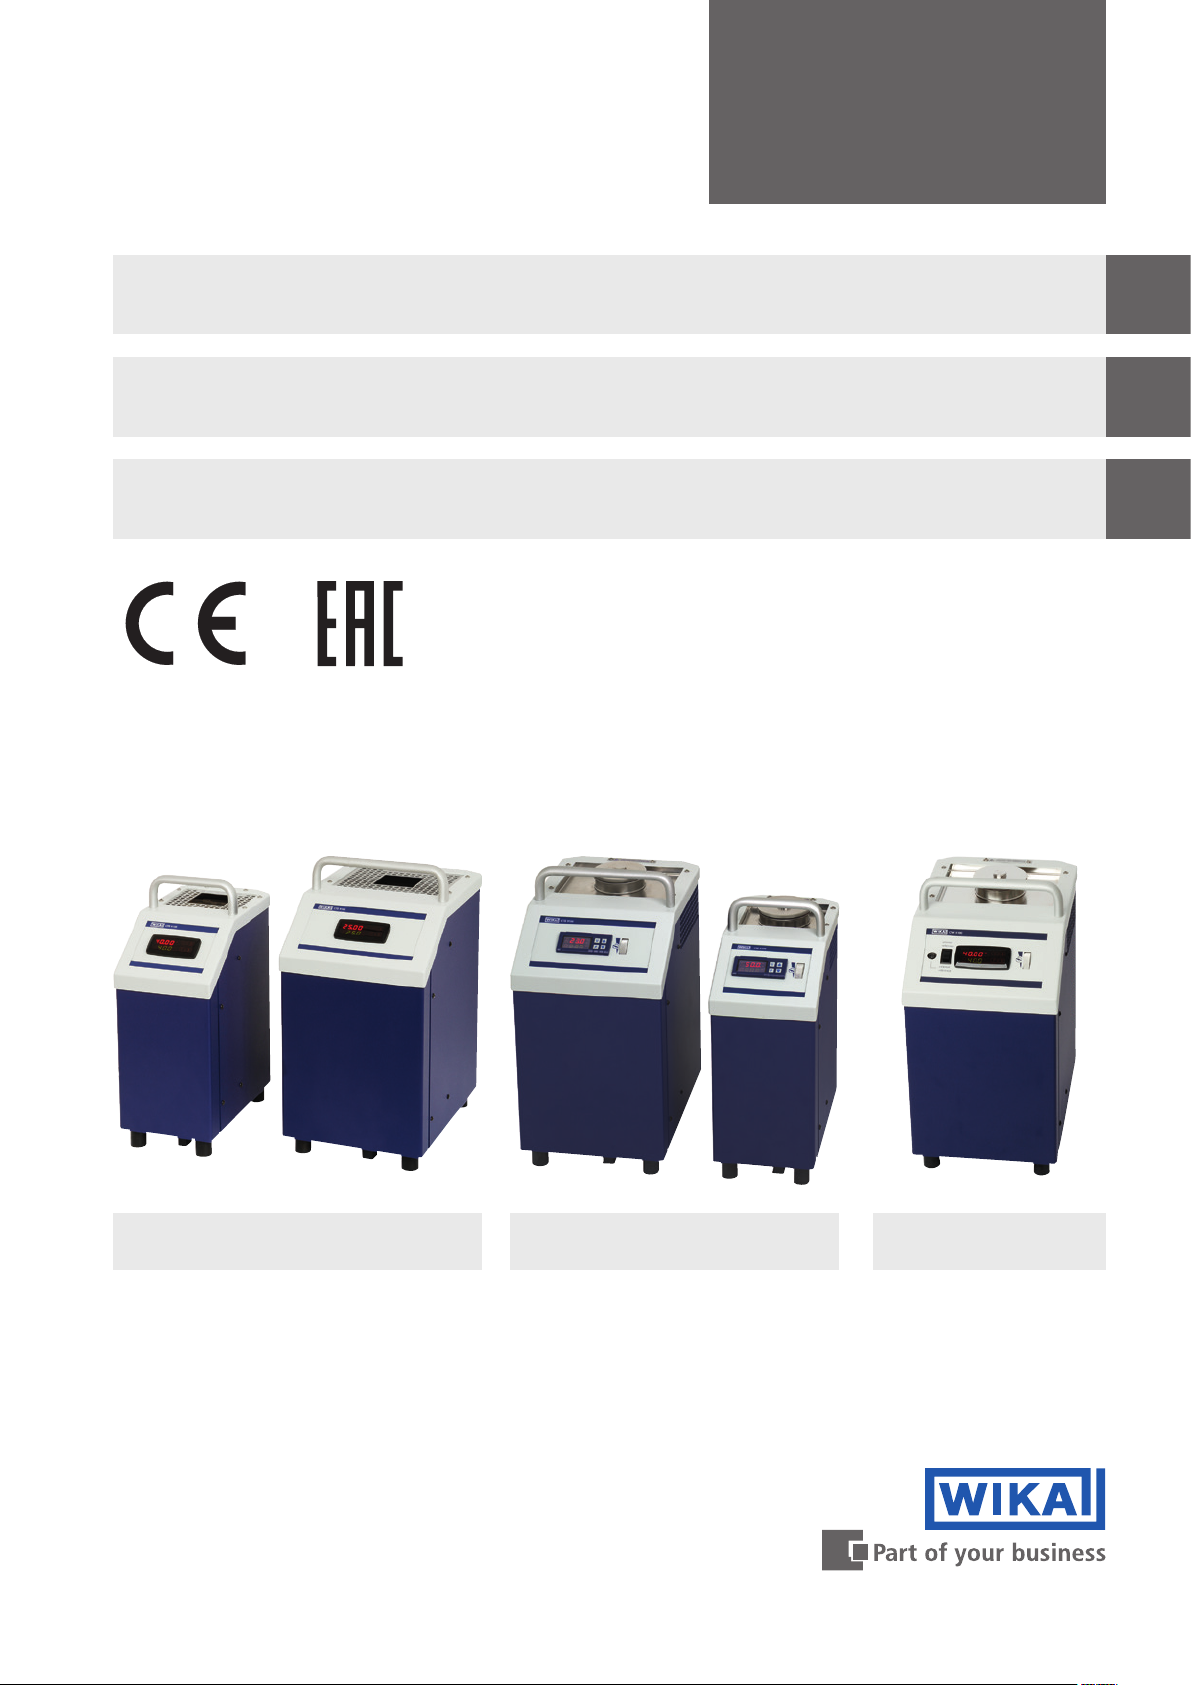
Dry-well temperature calibrator,
CTD9100 series
Micro calibration bath,
CTB9100 series
Multi-function calibrator,
model CTM9100
Page 2

Operating instructions models CTD9100, CTB9100,
EN
CTM9100
Page 3 - 50
Betriebsanleitung Typen CTD9100, CTB9100,
Seite 51 - 98
DE
CTM9100
IT
Manuale d’uso modelli CTD9100, CTB9100, CTM9100 Pagina 99 - 146
Further languages can be found at www.wika.com.
© 07/2012 WIKA Alexander Wiegand SE & Co. KG
All rights reserved. / Alle Rechte vorbehalten.
®
WIKA
is a registered trademark in various countries.
®
WIKA
ist eine geschützte Marke in verschiedenen Ländern.
Prior to starting any work, read the operating instructions!
Keep for later use!
Vor Beginn aller Arbeiten Betriebsanleitung lesen!
Zum späteren Gebrauch aufbewahren!
Prima di iniziare ad utilizzare lo strumento, leggere il manuale d‘uso!
Conservare per future consultazioni!
2 WIKA operating instructions, models CTD9100, CTB9100, CTM9100
11263911.05 03/2019 EN/DE/IT
Page 3

Contents
Contents
1. General information 5
2. Short overview 5
2.1 Overview . . . . . . . . . . . . . . . . . . . . . . . . . . . . . 5
3. Safety 6
3.1 Explanation of symbols . . . . . . . . . . . . . . . . . . . . . . . . 6
3.2 Description . . . . . . . . . . . . . . . . . . . . . . . . . . . . 6
3.3 Scope of delivery . . . . . . . . . . . . . . . . . . . . . . . . . . 6
3.4 Intended use . . . . . . . . . . . . . . . . . . . . . . . . . . . . 7
3.5 Improper use. . . . . . . . . . . . . . . . . . . . . . . . . . . . 7
3.6 Safety instructions for using calibration liquids . . . . . . . . . . . . . . . . 7
3.7 Personnel qualification . . . . . . . . . . . . . . . . . . . . . . . . 8
3.8 Personal protective equipment. . . . . . . . . . . . . . . . . . . . . . 8
3.9 Labelling, safety marks . . . . . . . . . . . . . . . . . . . . . . . . 9
4. Design and function 10
4.1 Overview of the different instrument models . . . . . . . . . . . . . . . . 10
4.2 Isometric views of the CTD9100 series dry-well temperature calibrators. . . . . . . 11
4.3 Isometric views of the CTB9100 series micro calibration baths . . . . . . . . . . 12
4.4 Isometric views of the model CTM9100-150 multi-function calibrator. . . . . . . . 13
4.5 Description of the operating elements . . . . . . . . . . . . . . . . . . 14
4.6 Data interface . . . . . . . . . . . . . . . . . . . . . . . . . . 15
4.7 Interface protocol . . . . . . . . . . . . . . . . . . . . . . . . . 15
4.8 Protective earth monitoring . . . . . . . . . . . . . . . . . . . . . . 15
5. Transport, packaging and storage 16
5.1 Transport . . . . . . . . . . . . . . . . . . . . . . . . . . . . 16
5.2 Packaging and storage . . . . . . . . . . . . . . . . . . . . . . . 16
6. Commissioning, operation 16
6.1 Operating position . . . . . . . . . . . . . . . . . . . . . . . . . 16
6.2 Inserts with metal block . . . . . . . . . . . . . . . . . . . . . . . 17
6.3 Preparation of the micro calibration bath . . . . . . . . . . . . . . . . . 17
6.3.1 Properties of the calibration liquid . . . . . . . . . . . . . . . . . 17
6.3.2 Filling the micro calibration bath . . . . . . . . . . . . . . . . . . 18
6.3.3 Operation of the magnetic stirrer . . . . . . . . . . . . . . . . . . 18
6.3.4 Insert for liquids . . . . . . . . . . . . . . . . . . . . . . . 18
6.4 Surface insert (only CTM9100-150) . . . . . . . . . . . . . . . . . . . 19
6.5 Infrared insert (only CTM9100-150) . . . . . . . . . . . . . . . . . . . 19
6.6 Testing of temperature sensors . . . . . . . . . . . . . . . . . . . . 20
6.7 Start-up procedure. . . . . . . . . . . . . . . . . . . . . . . . . 20
6.8 Switching on the calibrator/micro calibration bath . . . . . . . . . . . . . . 20
6.9 Reference and set temperature display . . . . . . . . . . . . . . . . . . 20
6.10 Control of the reference temperature . . . . . . . . . . . . . . . . . . 20
7. Operating elements of the calibrator/micro calibration bath 21
7.1 Selection of the operating modes for the CTM9100-150 . . . . . . . . . . . . 21
7.2 Method of operation in calibration mode within individual operating modes. . . . . . 21
7.3 Calibration (calibration mode) . . . . . . . . . . . . . . . . . . . . . 22
7.4 Setting a temporary set temperature (set-point mode) . . . . . . . . . . . . . 22
11263911.05 03/2019 EN/DE/IT
EN
3WIKA operating instructions, models CTD9100, CTB9100, CTM9100
Page 4

Contents
7.5 Programming (Main menu) . . . . . . . . . . . . . . . . . . . . . . 23
7.5.1 Menu structure, parameter levels. . . . . . . . . . . . . . . . . . 24
7.5.2 Switching off automatic control . . . . . . . . . . . . . . . . . . 25
7.5.3 Switching on automatic control . . . . . . . . . . . . . . . . . . 25
EN
8. Cooling down the metal blocks or micro calibration baths 32
9. Faults 33
10. Maintenance, cleaning and recalibration 34
11. Dismounting, return and disposal 35
12. Specifications 36
13. Accessories 41
14. Heating and cooling times 42
7.5.4 Switching on manual control . . . . . . . . . . . . . . . . . . . 26
7.5.5 Switching off manual control . . . . . . . . . . . . . . . . . . . 26
7.5.6 Setting and storing fixed set temperatures . . . . . . . . . . . . . . 27
7.5.7 Recalling the stored set temperatures . . . . . . . . . . . . . . . . 28
7.5.8 Setting the ramp control and a temperature profile . . . . . . . . . . . . 28
10.1 Maintenance . . . . . . . . . . . . . . . . . . . . . . . . . . 34
10.2 Cleaning . . . . . . . . . . . . . . . . . . . . . . . . . . . 34
10.2.1 Cleaning calibrators with inserts . . . . . . . . . . . . . . . . . . 34
10.2.2 Cleaning fan guards . . . . . . . . . . . . . . . . . . . . . . 34
10.2.3 Cleaning the micro calibration bath . . . . . . . . . . . . . . . . . 34
10.2.4 External cleaning . . . . . . . . . . . . . . . . . . . . . . . 34
10.3 Recalibration . . . . . . . . . . . . . . . . . . . . . . . . . . 34
11.1 Dismounting . . . . . . . . . . . . . . . . . . . . . . . . . . 35
11.2 Return . . . . . . . . . . . . . . . . . . . . . . . . . . . . 35
11.3 Disposal . . . . . . . . . . . . . . . . . . . . . . . . . . . 35
12.1 Dry-well temperature calibrator, CTD9100 series. . . . . . . . . . . . . . 36
12.2 Micro calibration bath, CTB9100 series . . . . . . . . . . . . . . . . . 38
12.3 Multi-function calibrator, model CTM9100-150 . . . . . . . . . . . . . . 40
13.1 CTD9100 series . . . . . . . . . . . . . . . . . . . . . . . . . 41
13.2 CTB9100 series . . . . . . . . . . . . . . . . . . . . . . . . . 41
13.3 Model CTM9100-150 . . . . . . . . . . . . . . . . . . . . . . . 41
14.1 Dry-well temperature calibrator, model CTD9100-COOL . . . . . . . . . . . 42
14.2 Dry-well temperature calibrator, model CTD9100-165 . . . . . . . . . . . . 42
14.3 Dry-well temperature calibrator, model CTD9100-165-X . . . . . . . . . . . 43
14.4 Dry-well temperature calibrator, model CTD9100-450 . . . . . . . . . . . . 43
14.5 Dry-well temperature calibrator, model CTD9100-650 . . . . . . . . . . . . 44
14.6 Micro calibration bath, model CTB9100-165 . . . . . . . . . . . . . . . 45
14.7 Micro calibration bath, model CTB9100-225 . . . . . . . . . . . . . . . 47
14.8 Model CTM9100-150 as a micro calibration bath. . . . . . . . . . . . . . 48
14.9 Model CTM9100-150 as dry-well temperature calibrator . . . . . . . . . . . 49
14.10 Model CTM9100-150 as an infrared black body source . . . . . . . . . . . 49
14.11 Model CTM9100-150 as surface temperature calibrator . . . . . . . . . . . 50
Declarations of conformity can be found online at www.wika.com.
4 WIKA operating instructions, models CTD9100, CTB9100, CTM9100
11263911.05 03/2019 EN/DE/IT
Page 5
1. General information / 2. Short overview
1. General information
■
The calibrator or the micro calibration bath described
in the operating instructions has been designed and
manufactured using state-of-the-art technology.
All components are subject to stringent quality and
environmental criteria during production. Our management
systems are certified to ISO 9001 and ISO 14001.
■
These operating instructions contain important information
on handling the instrument. Working safely requires that all
safety instructions and work instructions are observed.
■
Observe the relevant local accident prevention regulations
and general safety regulations for the instrument’s range
of use.
■
The operating instructions are part of the product and
must be kept in the immediate vicinity of the instrument
and readily accessible to skilled personnel at any time.
Pass the operating instructions onto the next operator or
owner of the instrument.
■
Skilled personnel must have carefully read and
understood the operating instructions prior to beginning
any work.
■
The general terms and conditions contained in the sales
documentation shall apply.
■
Subject to technical modifications.
■
Factory calibrations / DKD/DAkkS calibrations are carried
out in accordance with international standards.
■
Further information:
- Internet address: www.wika.de / www.wika.com
- Relevant data sheet: CT 41.28
CT 41.40
CT 46.30
- Application consultant: Tel.: +49 9372 132-0
Fax: +49 9372 132-406
info@wika.de
EN
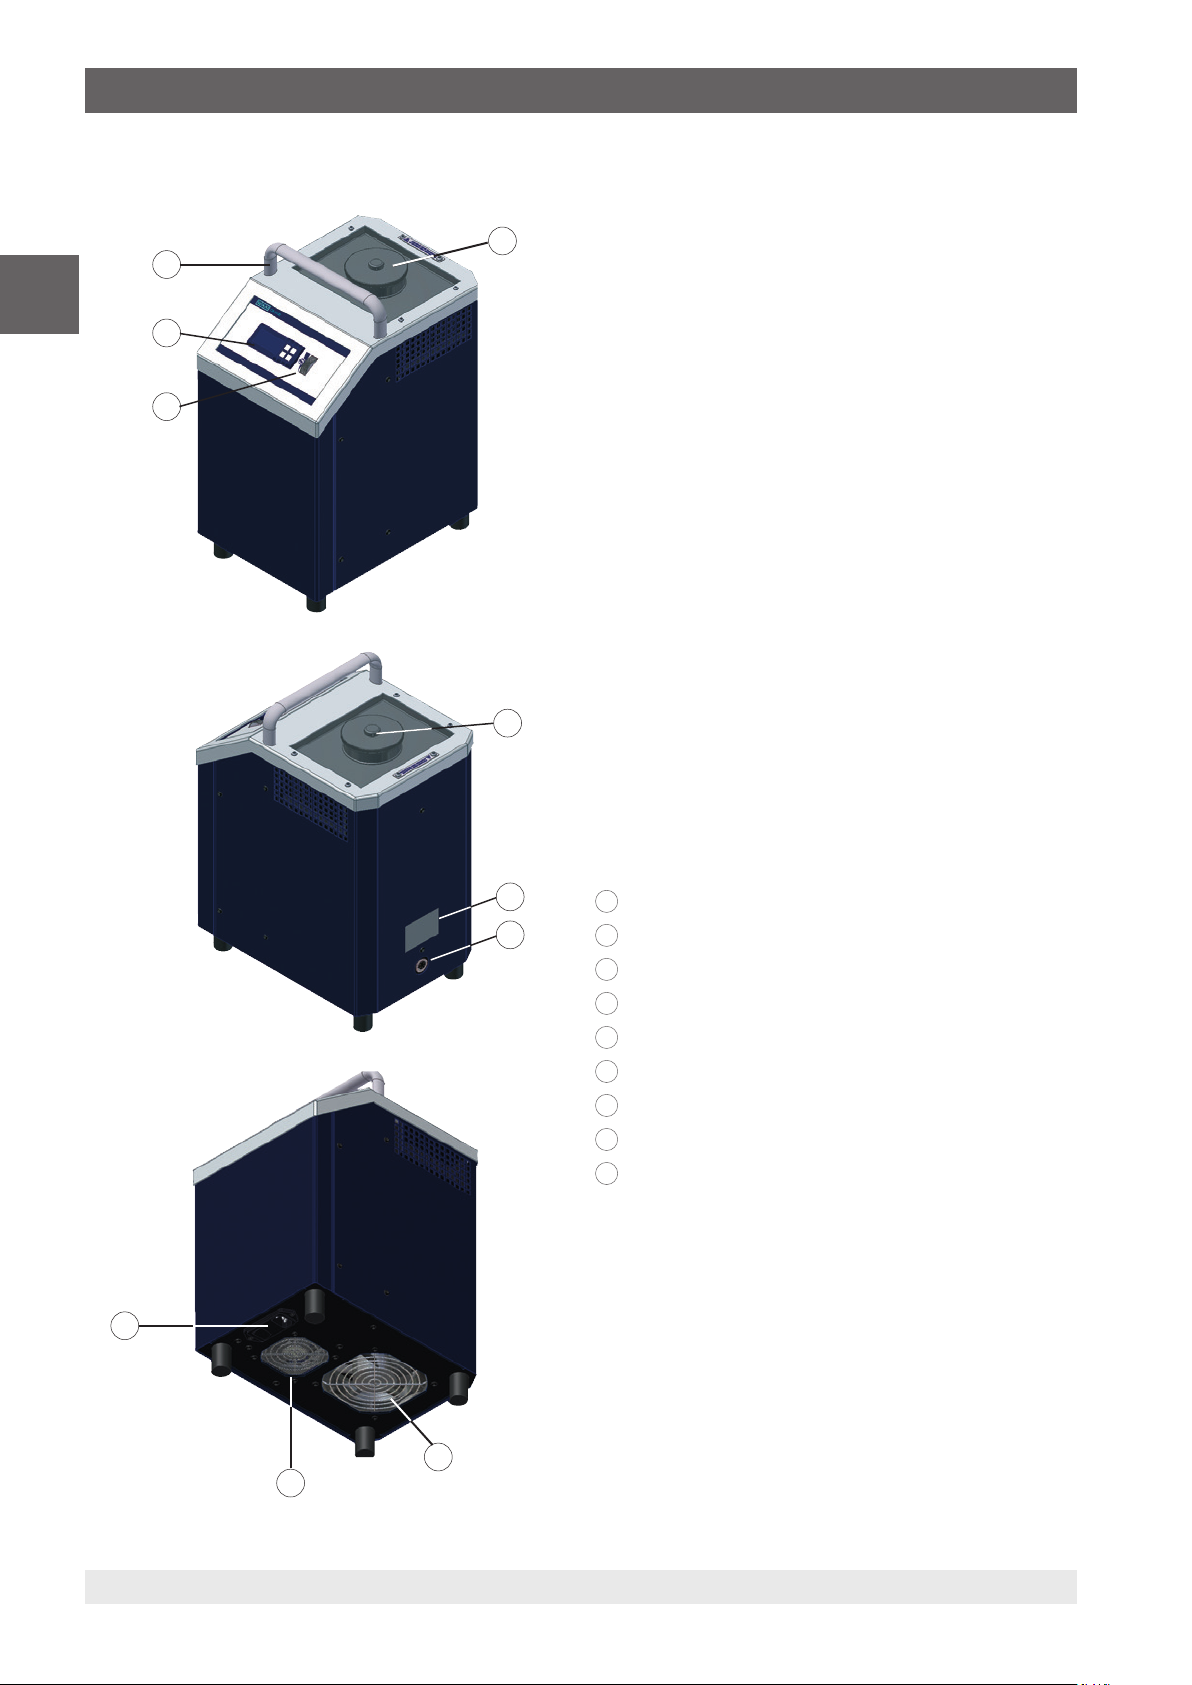
2. Short overview
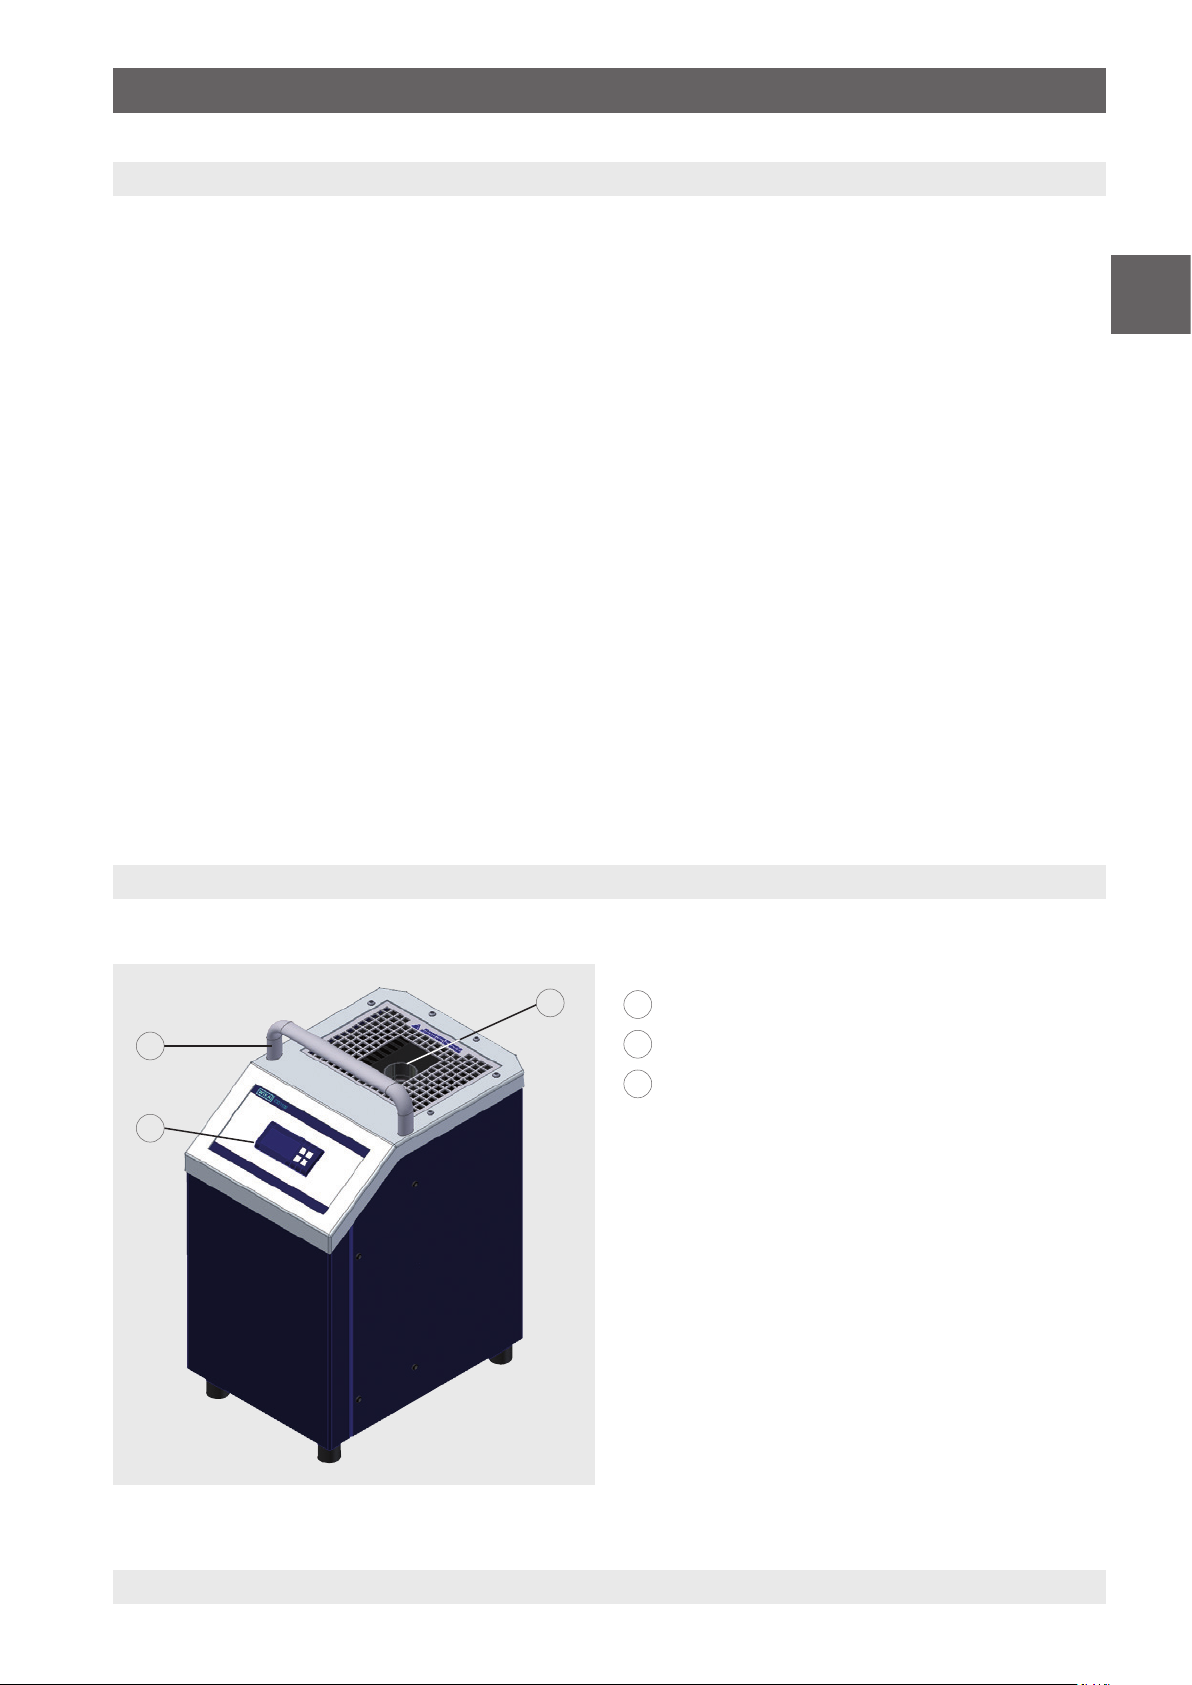
2.1 Overview
3
2
1
1
Temperature block
2
Controller
3
Handle
11263911.05 03/2019 EN/DE/IT
5WIKA operating instructions, models CTD9100, CTB9100, CTM9100
Page 6
2. Short overview / 3. Safety
2.2 Description
The calibrator or micro calibration bath is a portable unit, for
service functions and also for industrial and laboratory tasks.
The temperature calibrators and micro calibration baths
from WIKA are provided for the calibration of thermometers,
temperature switches/thermostats, resistance thermometers
EN
and thermocouples. The operational safety of the delivered
instruments is only assured if the equipment is employed for
its intended use (verification of temperature sensors). The
given limit values should never be exceeded (see chapter
12 “Specifications”).
The appropriate instrument should be selected depending on
the application; it should be connected correctly, tests carried
out and all components serviced.
The instrument is manufactured in different versions. The
individual version for any single unit can be found on the
nameplate on the calibrator/micro calibration bath.
2.3 Scope of delivery
The calibrators/micro calibration baths are delivered in
special protective packaging. The packaging must be set
aside so that the calibrator or the micro calibration bath can
be sent safely back to the manufacturer for recalibration or
repair.
Scope of delivery for the model CTD9100 dry-well
temperature calibrator
■
Calibrator
■
Insert replacement tools
■
Standard bored insert
■
Power cord
■
Calibration certificate
■
Operating instructions
Scope of delivery for the model CTB9100 micro
calibration bath
■
Micro calibration bath
■
Transport cover
■
Sensor basket
■
Magnetic stirrer
■
Magnetic lifter
■
Power cord
■
Calibration certificate
■
Operating instructions
Scope of delivery for the model CTM9100 multi-function
calibrator
■
Multi-function calibrator
■
Insert replacement tools (standard and surface)
■
Standard bored insert
■
Transport cover
■
Sensor basket
■
Magnetic stirrer
■
Magnetic lifter
■
Infrared insert
■
Surface insert
■
External reference sensor
■
Power cord
■
Calibration certificate
■
Operating instructions
Cross-check scope of delivery with delivery note.
3. Safety
3.1 Explanation of symbols
DANGER!
... indicates a directly dangerous situation
resulting in serious injury or death, if not avoided.
WARNING!
... indicates a potentially dangerous situation
that can result in serious injury or death, if not
avoided.
CAUTION!
... indicates a potentially dangerous situation
that can result in light injuries or damage to
equipment or the environment, if not avoided.
6 WIKA operating instructions, models CTD9100, CTB9100, CTM9100
DANGER!
... identifies hazards caused by electric power.
Should the safety instructions not be observed,
there is a risk of serious or fatal injury.
WARNING!
... indicates a potentially dangerous situation that
can result in burns, caused by hot surfaces or
liquids, if not avoided.
Information
... points out useful tips, recommendations
and information for efficient and trouble-free
operation.
11263911.05 03/2019 EN/DE/IT
Page 7
3. Safety
3.2 Intended use
The calibrator or micro calibration bath is a portable unit, for
service functions and also for industrial and laboratory tasks.
The temperature calibrators and micro calibration baths
from WIKA are provided for the calibration of thermometers,
temperature switches/thermostats, resistance thermometers
and thermocouples.
This instrument is not permitted to be used in hazardous
areas!
The instrument has been designed and built solely for
the intended use described here, and may only be used
accordingly.
The technical specifications contained in these operating
instructions must be observed. Improper handling or
operation of the instrument outside of its technical
specifications requires the instrument to be taken out of
service immediately and inspected by an authorised WIKA
service engineer.
Handle electronic precision measuring instruments with
the required care (protect from humidity, impacts, strong
magnetic fields, static electricity and extreme temperatures,
do not insert any objects into the instrument or its openings).
Plugs and sockets must be protected from contamination.
The manufacturer shall not be liable for claims of any type
based on operation contrary to the intended use.
3.3 Improper use
WARNING!
Injuries through improper use
Improper use of the instrument can lead to
hazardous situations and injuries.
▶
Refrain from unauthorised modifications to
the instrument.
▶
Do not use the instrument within hazardous
areas.
▶
Only ever use the supplied mains cable.
Any use beyond or different to the intended use is considered
as improper use.
Special hazards
DANGER!
Danger of death caused by electric current
Upon contact with live parts, there is a direct
danger of death.
▶
The instrument may only be installed and
mounted by skilled personnel.
▶
Before replacing the fuse, cleaning,
maintenance/servicing and in the event of
danger, the calibrator or the micro calibration
bath must be disconnected by unplugging the
mains cable from the power supply outlet.
▶
The mains socket must be freely accessible
at all times!
Thermal fuse
For safety, the calibrator or the micro calibration
bath is fitted with an independently-operating
temperature fuse, which cuts out the heater
power supply if the temperature inside the
enclosure is too high. Once the metal block and
the liquid bath have cooled down, send in the
calibrator or the micro calibration bath to WIKA
for examination.
The calibrator and the micro calibration bath
have been designed as measuring and control
instruments. With any operation of the calibrator/
micro calibration bath not expressly provided
for in these operating instructions, additional
protective measures must be taken.
Since a malfunction of the calibrator/micro
calibration bath can cause personal injury or
damage to property, the equipment must be
protected by additional electro-mechanical
safeguards.
3.4 Safety instructions for using calibration liquids
Calibration liquid, water
Only use distilled water, otherwise the calibrator
tank can become strongly scaled and soiled.
Collect spilled liquids immediately and dispose
of them properly.
EN
11263911.05 03/2019 EN/DE/IT
7WIKA operating instructions, models CTD9100, CTB9100, CTM9100
Page 8
3. Safety
Calibration liquid, silicone oil
WARNING!
Hazardous substances silicone oils
Improper handling can result to poisoning or
EN
personal injury.
▶
Wear the requisite protective equipment (see
chapter 3.6 “Personal protective equipment”).
▶
Observe the information in the material safety
data sheet for the corresponding medium.
▶
Before working with silicone oil, read the
material data safety sheet. The current
material safety data sheet can be found at
www.wika.de on the respective product page.
▶
Only use the silicone oil included within
the scope of supply or specified in these
operating instructions.
▶
When working with silicone oil, sufficient
ventilation should be ensured in the room
since it can give off pollutants.
▶
Since silicone oil is hygroscopic, after use,
always close the calibration bath using the
transport cover.
▶
Before transporting with silicone oil, allow the
calibrator or micro calibration bath to cool. The
transport cover is fitted with a safety valve. If
the micro calibration bath is closed when it is
still warm, excessive pressure can build up.
In order to avoid overpressuring, which could
lead to damage to the liquid bath, the safety
valve is activated at a pressure of approx.
2.5 bar [36 psi]. This can lead to hot vapour
escaping.
WARNING!
Risk of burns!
Touching the hot metal block or micro calibration
bath, the hot bath liquids or the test item can
lead to acute burns.
▶
Before transporting or touching the metal
block/liquid bath, make sure that it has cooled
down sufficiently.
3.5 Personnel qualification
WARNING!
Risk of injury should qualification be
insufficient!
Improper handling can result in considerable
injury and damage to equipment.
The activities described in these operating
instructions may only be carried out by skilled
personnel who have the qualifications described
below.
Skilled personnel
Skilled personnel, authorised by the operator, are understood
to be personnel who, based on their technical training,
knowledge of measurement and control technology and
on their experience and knowledge of country-specific
regulations, current standards and directives, are capable
of carrying out the work described and independently
recognising potential hazards.
Special operating conditions require further appropriate
knowledge, e.g. of aggressive media.
3.6 Personal protective equipment
The personal protective equipment is designed to protect the
skilled personnel from hazards that could impair their safety
or health during work. When carrying out the various tasks
on and with the instrument, the skilled personnel must wear
personal protective equipment.
Follow the instructions, displayed in the work area,
regarding personal protective equipment!
The required personal protective equipment must be
provided by the operating company.
Wear safety goggles!
Protect eyes from flying particles and liquid
splashes.
Collect spilled liquids immediately and dispose
of them properly.
Wear safety goggles!
Do not allow silicone oil to come into contact with
the eyes.
Wear protective gloves!
Protect hands from friction, abrasion, cuts or
deep injuries and also from contact with hot
surfaces and aggressive media.
8 WIKA operating instructions, models CTD9100, CTB9100, CTM9100
Wear protective gloves!
Protect hands from friction, abrasion, cuts or
deep injuries and also from contact with hot
surfaces and aggressive media.
11263911.05 03/2019 EN/DE/IT
Page 9
3. Safety
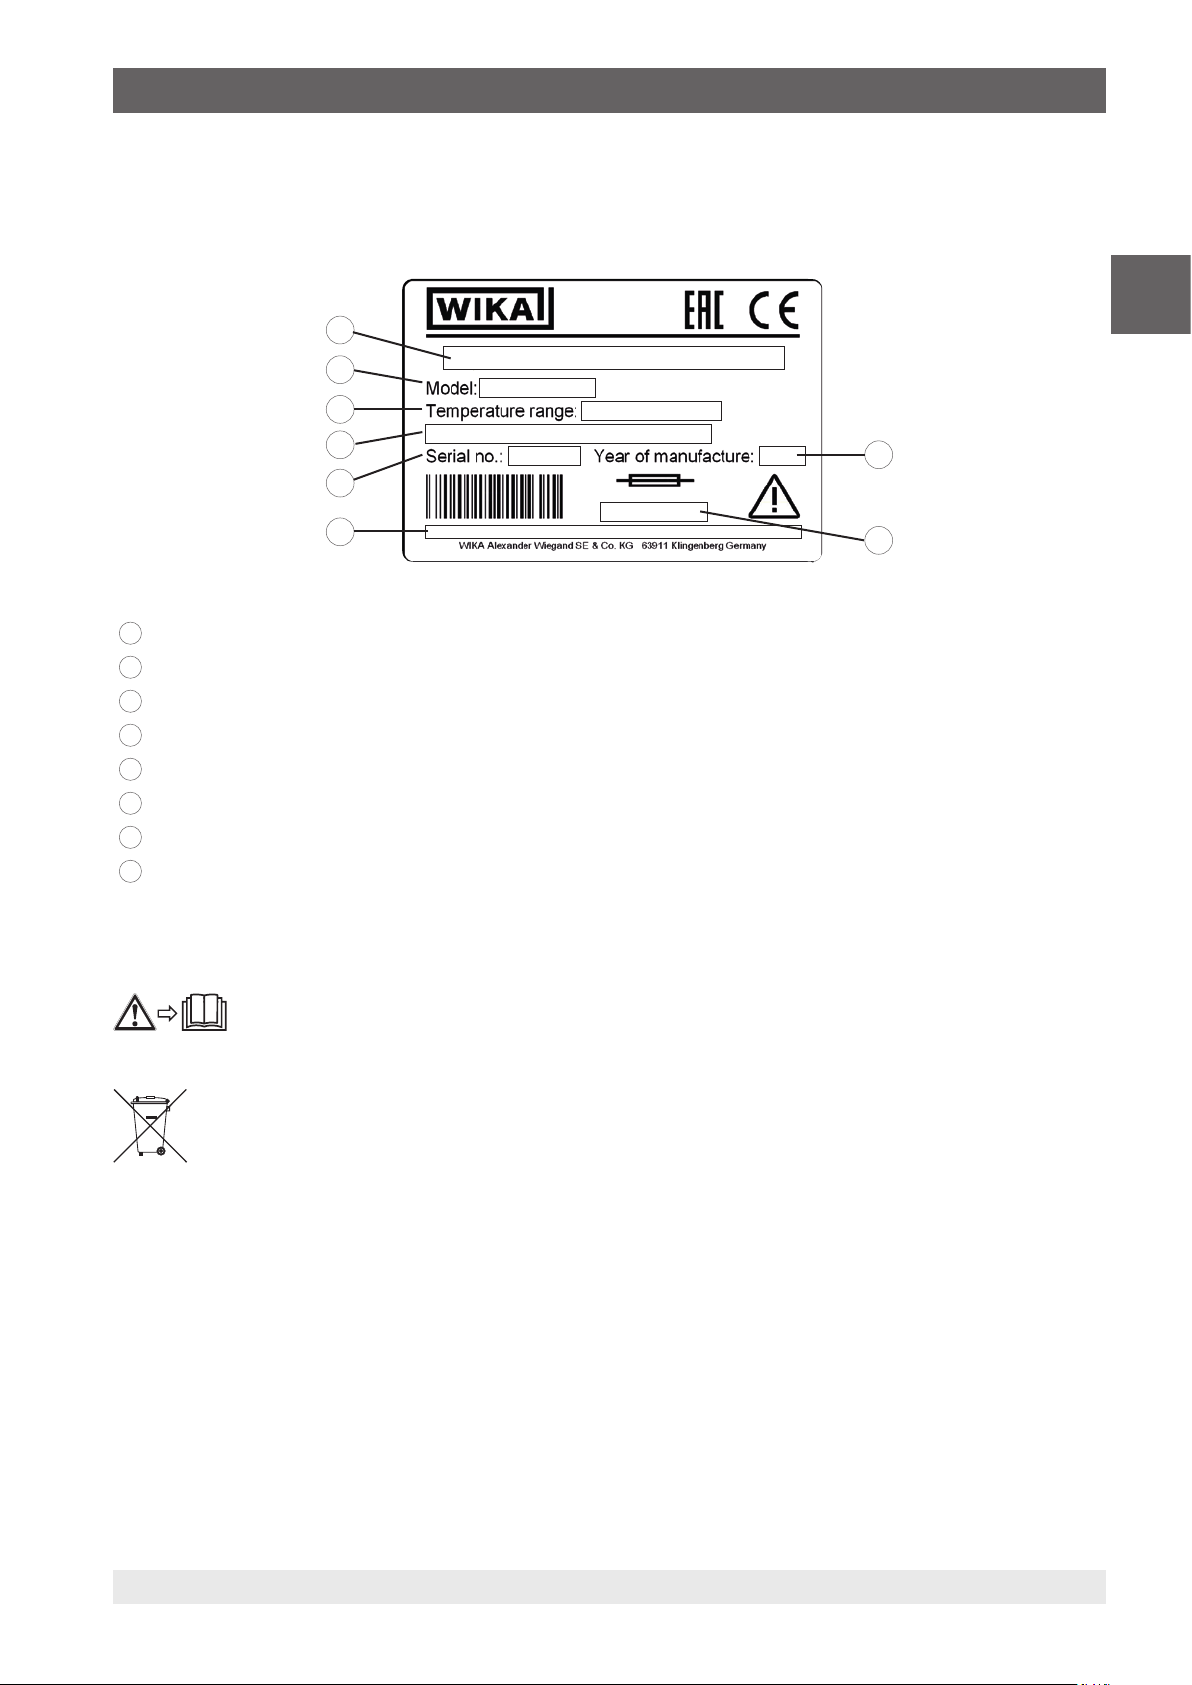
3.7 Labelling, safety marks
Product label (example)
The product label is fixed on the rear of the instrument.
8
7
6
EN
5
4
3
1
Year of manufacture
2
Fuse
3
Notes regarding the safety data sheet
4
Serial no.
5
Power supply
6
Temperature range
7
Model designation
8
Instrument designation
Explanation of symbols
Before mounting and commissioning the
instrument, ensure you read the operating
instructions!
1
2
Do not dispose of with household waste. Ensure
a proper disposal in accordance with national
regulations.
11263911.05 03/2019 EN/DE/IT
9WIKA operating instructions, models CTD9100, CTB9100, CTM9100
Page 10
4. Design and function
4. Design and function
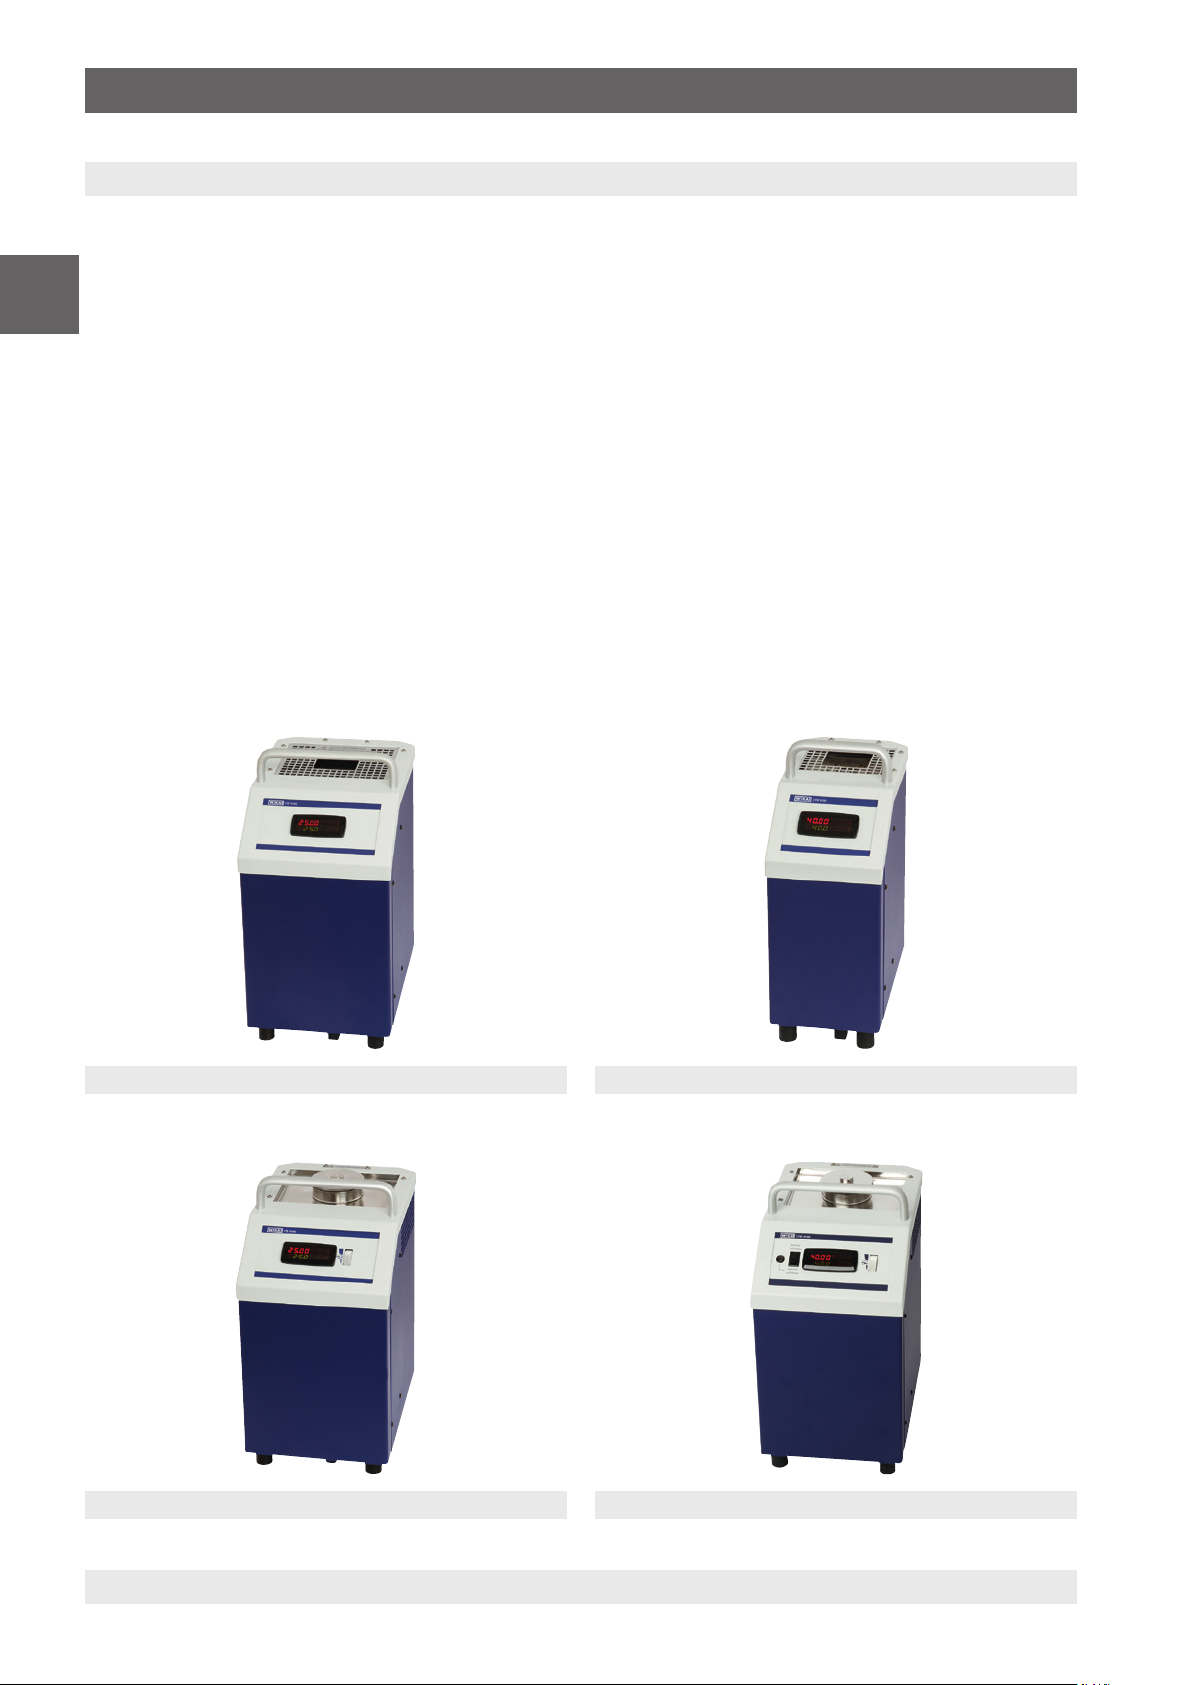
4.1 Overview of the different instrument models
Temperature calibrators
■
EN
CTD9100-COOL (cooling and heating)
■
CTD9100-165 (cooling and heating)
■
CTD9100-450 (heating)
■
CTD9100-650 (heating)
Micro calibration baths
■
CTB9100-165 (cooling and heating)
■
CTB9100-225 (heating)
Multi-function calibrator
■
CTM9100-150 (cooling and heating)
The calibrator and micro calibration bath consist of a robust,
grey-blue-painted steel enclosure, with a carrying handle on
top.
The rear part of the enclosure includes a metal block or
liquid bath with an opening for the test item, accessible from
the top.
The metal block/liquid bath incorporate the heating or cooling
elements and the temperature sensor for determining the
reference temperature.
The metal block and the liquid bath are thermally insulated.
The front part contains the complete electronic unit for
controlling the reference temperature.
Solid state relays (SSR) are used to control the heating and
cooling elements.
On the front panel is the controller, which is fitted with a
7-segment LED (2 rows of 4 digits) for the reference and set
temperature.
The micro calibration bath has an additional knob for
controlling the stirring speed.
Temperature calibrator, model CTD9100-165 Temperature calibrator, model CTD9100-650
Multi-function calibrator, model CTM9100-150Micro calibration bath, model CTB9100-165
10 WIKA operating instructions, models CTD9100, CTB9100, CTM9100
11263911.05 03/2019 EN/DE/IT
Page 11
4. Design and function
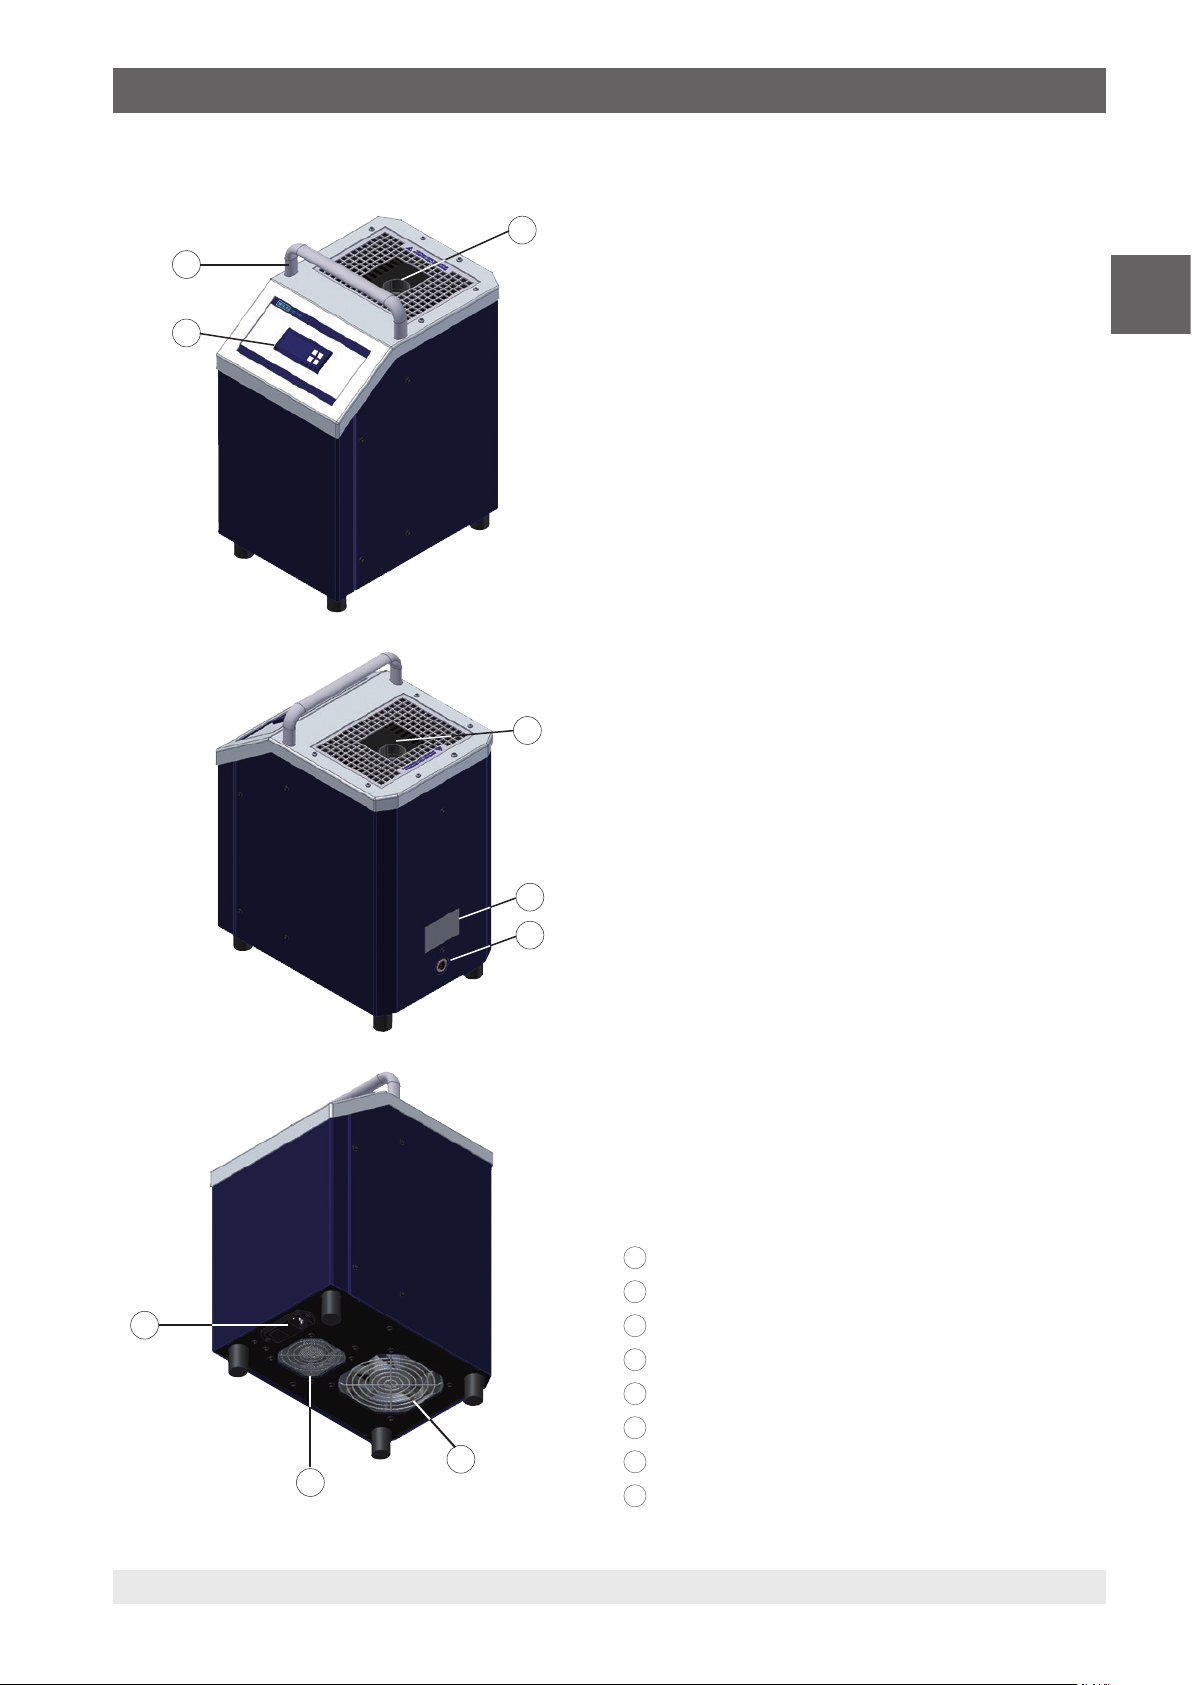
4.2 Isometric views of the CTD9100 series dry-well temperature calibrators
1
Front and top of the model CTD9100
On the top of the dry-well temperature calibrator, you will find
3
2
the dry well access opening for inserting the inserts.
■
CTD9100-COOL: Ø 28 x 150 mm [Ø 1.10 x 5.91 in]
■
CTD9100-165: Ø 28 x 150 mm [Ø 1.10 x 5.91 in]
■
CTD9100-165-X: Ø 60 x 150 mm [Ø 2.36 x 5.91 in]
■
CTD9100-450: Ø 60 x 150 mm [Ø 2.36 x 5.91 in]
■
CTD9100-650: Ø 28 x 150 mm [Ø 1.10 x 5.91 in]
EN
The controller, with display and controls, is located on the
front of the calibrator.
Rear of the instrument
On the rear of the equipment is the product label with the key
information about the particular model.
■
CTD9100-COOL: -55 ... +200 °C [-67 ... +392 °F]
■
CTD9100-165: -35 ... +165 °C [-31 ... +329 °F]
■
CTD9100-450: 40 ... 450 °C [104 ... 842 °F]
■
CTD9100-650: 40 ... 650 °C [104 ... 1.202 °F]
1
The correct mains voltage and frequency is also given.
■
AC 100 ... 240 V, 50 ... 60 Hz
■
AC 115 V, 50 ... 60 Hz
■
AC 230 V, 50 ... 60 Hz
8
11263911.05 03/2019 EN/DE/IT
4
Furthermore, the individual serial number
(e.g. S/N 550 33 44) as well as the mains voltage and the
5
fuse rating is given.
You will also find the connector for the RS-485 interface here.
Underside of the instrument
On the underside of the instrument are the mains connection
socket and the power switch with its fuse-holder.
These are located in the centre, at the front. Furthermore,
depending on the model, there are one or two air intakes
located on the underside of the instrument.
The air intakes must not be obstructed in any way.
1
Temperature block
2
Controller
3
Handle
4
Product label
5
RS-485 interface
6
Fan 1
6
7
7
Fan 2
8
Mains connection socket with power switch
11WIKA operating instructions, models CTD9100, CTB9100, CTM9100
Page 12
4. Design and function
4.3 Isometric views of the CTB9100 series micro calibration baths
EN
1
3
2
9
On the top of the micro calibration bath are the block opening
for filling Ø 60 x 150 mm [Ø 2.36 x 5.91 in].
The controller, with display and controls, is located on the
front of the calibrator.
Rear of the instrument
On the rear of the equipment is the product label with the key
information about the particular model.
Furthermore, the individual serial number
(e.g. S/N 550 33 44) as well as the mains voltage and the
fuse rating is given.
You will also find the connector for the RS-485 interface here.
Underside of the instrument
On the underside of the instrument are the mains connection
socket and the power switch with its fuse-holder.
Front and top of the model CTB9100
1
These are located in the centre, at the front. Furthermore,
depending on the model, there are one or two air intakes
located on the underside of the instrument.
The air intakes must not be obstructed in any way.
4
5
8
1
Temperature block
2
Controller
3
Handle
4
Product label
5
RS-485 interface
6
Fan 1
7
Fan 2
8
Mains connection socket with power switch
9
Controller for the stirrer
6
7
12 WIKA operating instructions, models CTD9100, CTB9100, CTM9100
11263911.05 03/2019 EN/DE/IT
Page 13
4. Design and function
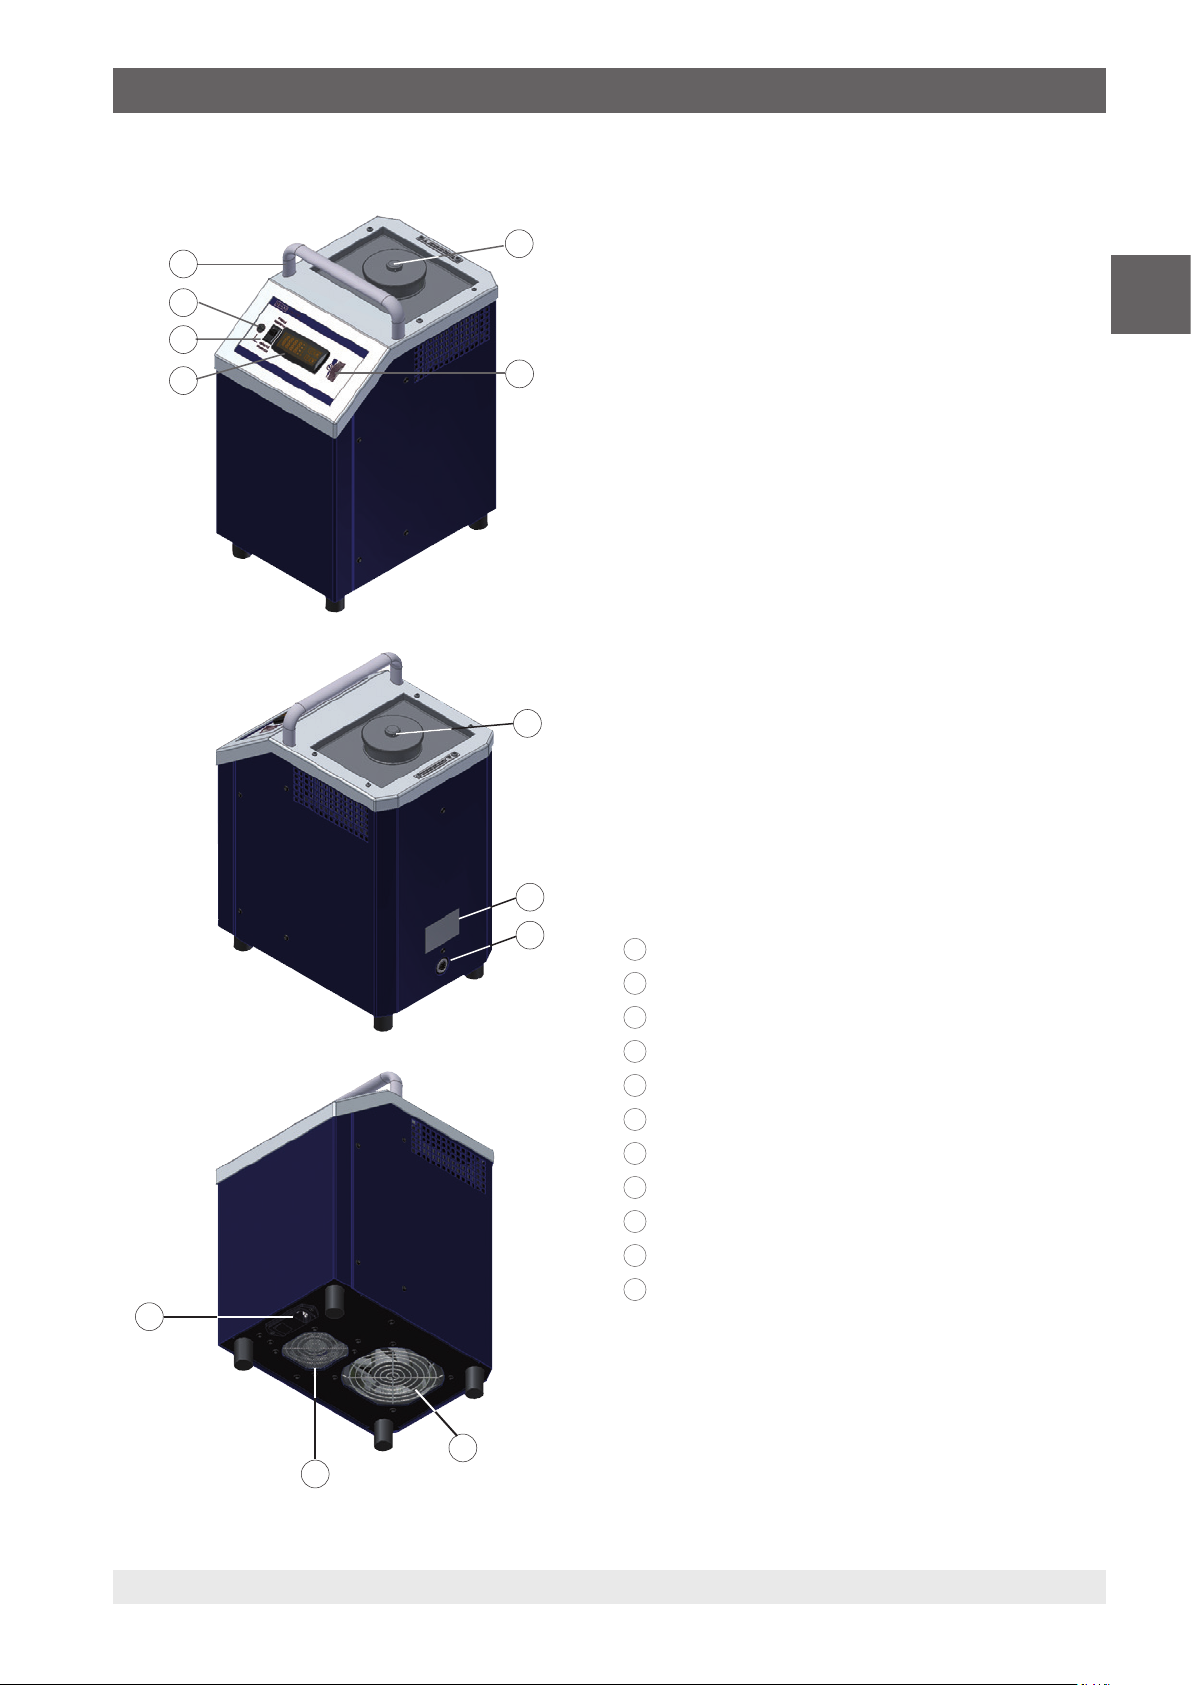
4.4 Isometric views of the model CTM9100-150 multi-function calibrator
Front and top of the model CTM9100-150
1
3
11
On the top of the multi-function calibrator, you will find the dry
well access opening for inserting the different inserts or filling
Ø 60 x 150 mm [Ø 2.36 x 5.91 in].
EN
10
The controller, with display and control elements, is located
2
9
on the front of the calibrator. In addition, the control elements
for the external reference are placed on the front.
Rear of the instrument
On the rear of the equipment is the product label with the key
information about the particular model.
Furthermore, the individual serial number
(e.g. S/N 550 33 44) as well as the mains voltage and the
fuse rating is given.
You will also find the connector for the RS-485 interface here.
Underside of the instrument
1
On the underside of the instrument are the mains connection
socket and the power switch with its fuse-holder.
These are located in the centre, at the front. Furthermore,
there are two air intakes located on the underside of the
instrument.
The air intakes must not be obstructed in any way.
4
5
8
6
7
1
Temperature block
2
Controller
3
Handle
4
Product label
5
RS-485 interface
6
Fan 1
7
Fan 2
8
Mains connection socket with power switch
9
Controller for the stirrer
10
Switch for ext. reference
11
Socket for ext. reference
11263911.05 03/2019 EN/DE/IT
13WIKA operating instructions, models CTD9100, CTB9100, CTM9100
Page 14
4. Design and function
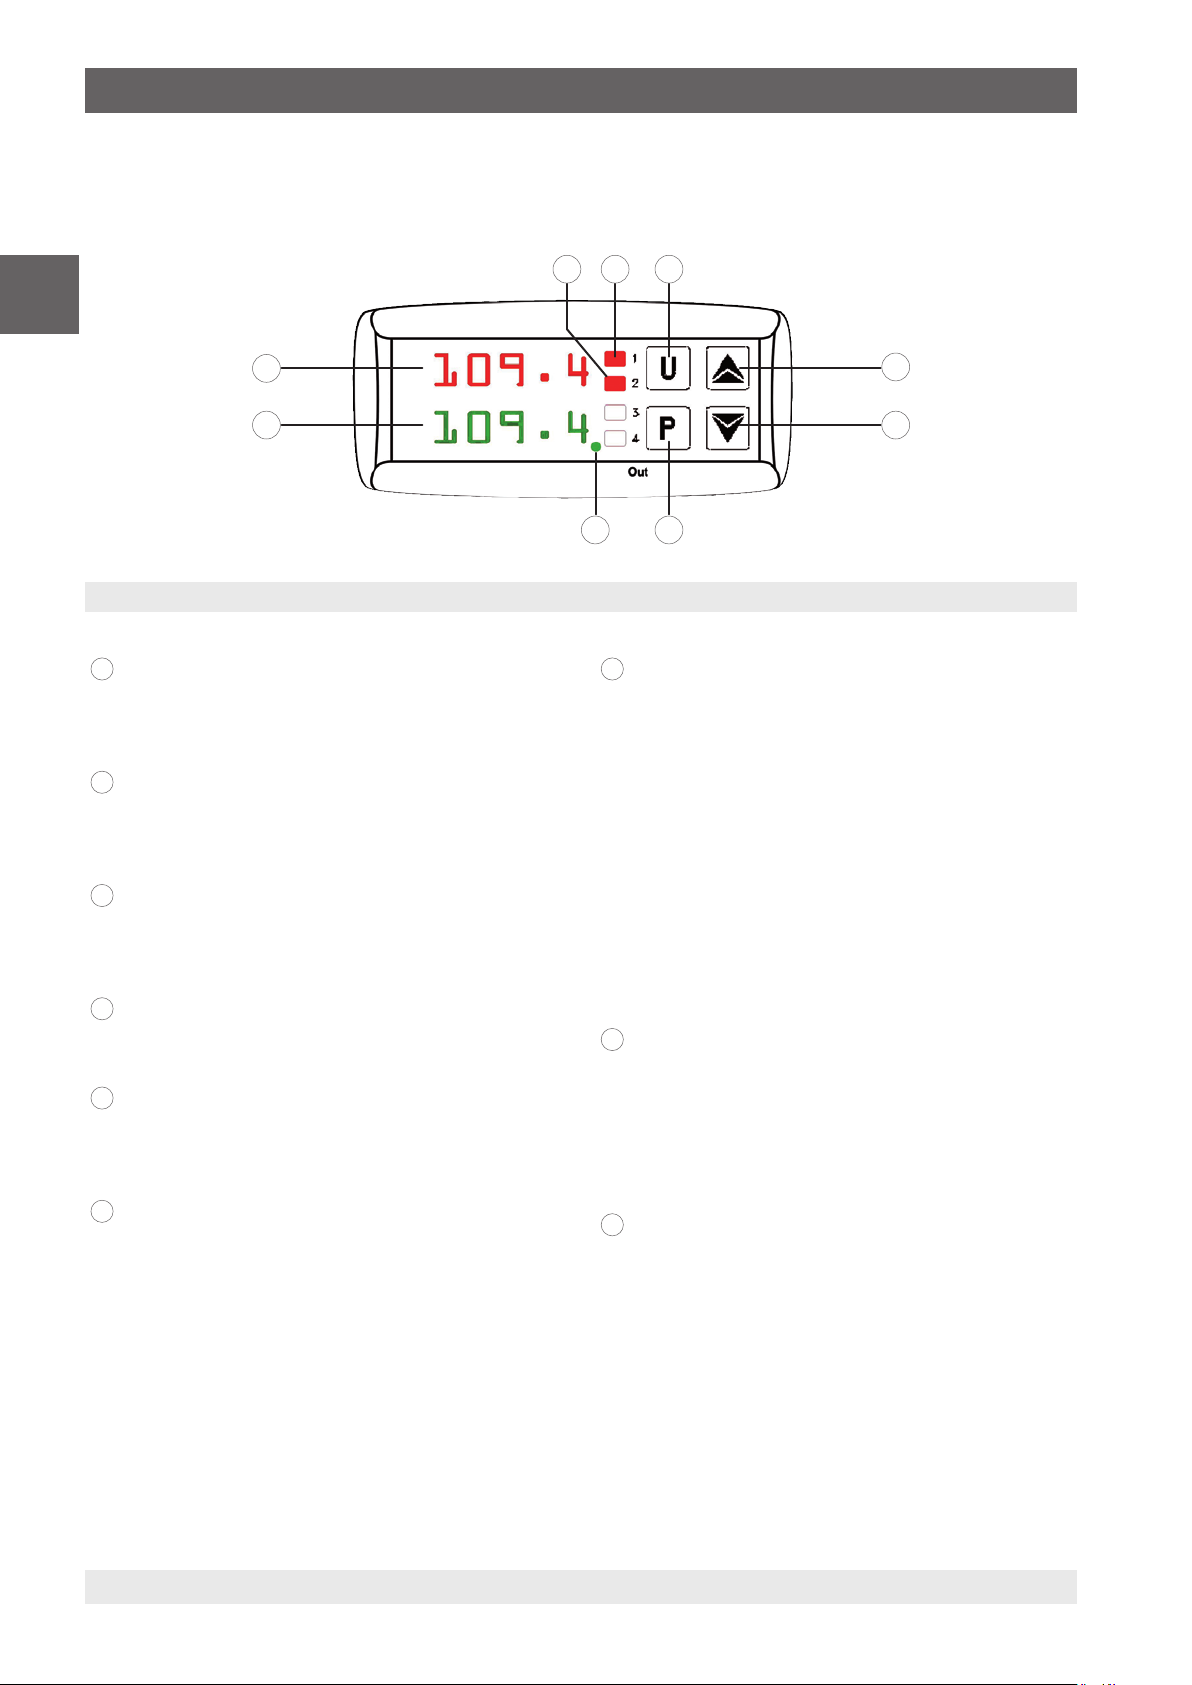
4.5 Description of the operating elements
Front of the controller
EN
7 8 9
6
5
Overview of the operating elements on the front of the controller
Button [▲]
1
■
Increasing value being set
■
Selection of individual menu item
■
Go back up one menu level
Button [▼]
2
■
Reduction of value being set
■
Selection of individual menu item
■
Go back up one menu level
Button [P]
3
■
Access to the set temperature adjustment
■
Access to the menu items and parameters
■
Input confirmation
LED SET
4
Flashing signals access to the individual menu items
and parameters
SV display
5
■
Set temperature display
■
Display of particular parameters in the individual
7
8
modes and the menu options
PV display
6
■
Indication of the current reference temperature
■
Display of the individual modes, menu items and the
9
parameters
1
2
34
LED OUT 2
a) Heating instrument
Signals the status of the outputs for the fan control
■
If LED OUT 2 is on, the fan is running at higher
speed
■
If LED OUT 2 is not on, the fan is running at lower
speed
b) Heating and cooling instrument
Signals the status of the outputs for the temperature
control
■
If LED OUT 1 is on, the calibrator or the micro
calibration bath is cooling
■
If LED OUT 1 is not on, the calibrator or the micro
calibration bath is not cooling
LED OUT 1
Signals the status of the outputs for the temperature
control
■
If LED OUT 1 is on, the calibrator or the micro
calibration bath is heating
■
If LED OUT 1 is not on, the calibrator or the micro
calibration bath is not heating
Button [U]
Recall the stored set temperatures
Further definitions
[XXX] Press XXX button
XXX Menu XXX will be displayed
14 WIKA operating instructions, models CTD9100, CTB9100, CTM9100
11263911.05 03/2019 EN/DE/IT
Page 15
4. Design and function
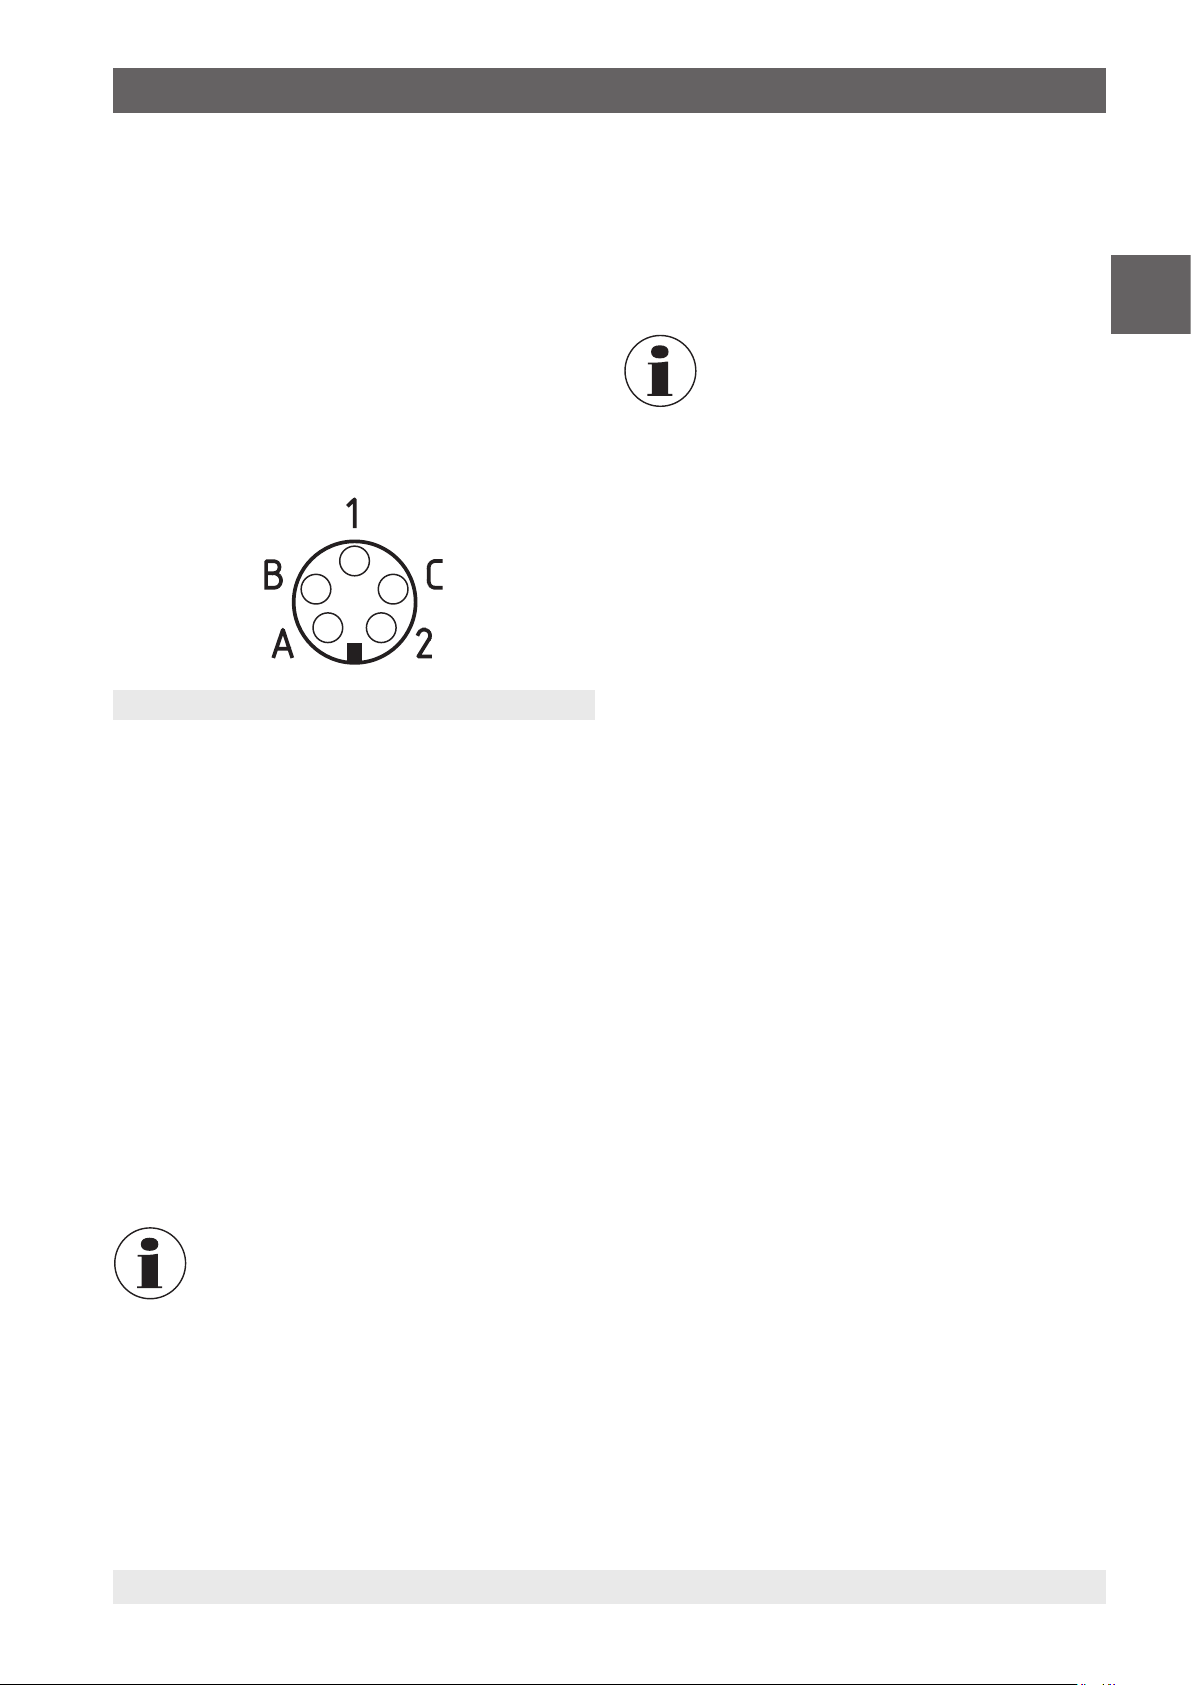
4.6 Data interface
The instruments are fitted with an RS-485 communications
interface. Via this interface one can connect to a PC, level
converter or a network.
The software protocol used is a MODBUS-RTU protocol,
which is used in may monitoring programs available on the
market.
The transmission speed (baud rate) is factory set to 9,600
baud. Upon request, other data transmission rates are
possible.
The 5-pin socket has two pins, A and B, that you connect to
the corresponding connections on the PC, level converter or
network.
Plan view of the 5-pin panel socket
4.7 Interface protocol
The interface protocol is available on request for delivery as a
specific additional document.
4.8 Protective earth monitoring
The calibrator is fitted with a protective earth
monitor to keep a check on the base isolation
of the heater. The monitoring unit works
independently of the normal controls and
switches off the heating power supply as soon as
the calibrator no longer has a connection to the
protective earth system of the isolation.
Once reconnected to the protective earth
system, the monitoring unit automatically
switches the power supply back on to the
heating circuit.
EN
To connect to a PC, the RS-485 signal must be externally
converted to an RS-232 or USB signal. The appropriate
converter, including drivers, is available as an option.
The computer records all operational data and allows
programming of all calibrator configuration parameters.
The minimum requirements for operation with a USB
converter are:
■
IBM compatible PC
■
Installed operating system, Microsoft® Windows® 98 SE,
ME, 2000, XP (Home or Prof.) or 7
■
A USB interface (USB 1.1 or USB 2.0)
A network connection enables the connection of up to 32
calibrators/micro-baths on the same network.
To connect to a network, some factory setting is required. For
this, please contact the supplier or WIKA directly.
For access to the programming via the keypad
while the serial interface is communicating, the
message “buSy” appears on the display, and
therefore indicates that it is in an “occupied”
state.
11263911.05 03/2019 EN/DE/IT
15WIKA operating instructions, models CTD9100, CTB9100, CTM9100
Page 16
4. Design and function / 5. Transport, packaging and storage
5. Transport, packaging and storage
5.1 Transport
Check the calibrator or the micro calibration bath for any
damage that may have been caused by transport.
EN
Obvious damage must be reported immediately.
CAUTION!
Damage through improper transport
With improper transport, a high level of damage
to property can occur.
▶
When unloading packed goods upon delivery
as well as during internal transport, proceed
carefully and observe the symbols on the
packaging.
▶
With internal transport, observe the
instructions in chapter 5.2 “Packaging and
storage”.
If the instrument is transported from a cold into a warm
environment, the formation of condensation may result
in instrument malfunction. Before putting it back into
operation, wait for the instrument temperature and the room
temperature to equalise.
5.2 Packaging and storage
Do not remove packaging until just before mounting.
Keep the packaging as it will provide optimum protection
during transport (e.g. change in installation site, sending for
repair).
Permissible conditions at the place of storage:
■
Storage temperature: -10 ... +60 °C [14 ... 140 °F]
■
Humidity: 30 ... 95 % relative humidity (no condensation)
Avoid exposure to the following factors:
■
Direct sunlight or proximity to hot objects
■
Mechanical vibration, mechanical shock (putting it down
hard)
■
Soot, vapour, dust and corrosive gases
■
Potentially explosive environments, flammable
atmospheres
Store the calibrator or the micro calibration bath in its original
packaging in a location that fulfils the conditions listed above.
6. Commissioning, operation
Personnel: Skilled personnel
Protective equipment: Protective gloves and safety goggles
Only use original parts (see chapter 13 “Accessories”).
WARNING!
Physical injuries and damage to property
and the environment caused by hazardous
media
Upon contact with hazardous media (e.g.
oxygen, acetylene, flammable or toxic
substances), harmful media (e.g. corrosive,
toxic, carcinogenic, radioactive), and also with
refrigeration plants and compressors, there is
a danger of physical injuries and damage to
property and the environment.
Should a failure occur, aggressive media and/
or with high temperature may be present at the
instrument.
▶
For these media, in addition to all standard
regulations, the appropriate existing codes or
regulations must also be followed.
▶
Wear the requisite protective equipment (see
chapter 3.6 “Personal protective equipment”).
6.1 Operating position
The operating position of the calibrator or the micro
calibration bath is in the vertical orientation, since this
guarantees an optimal temperature distribution in the metal
block or liquid bath.
Voltage supply
DANGER!
Danger to life caused by electric current
Upon contact with live parts, there is a direct
danger to life.
▶
Only ever use the supplied mains cable.
The voltage supply of the instrument is made via the power
cable. This is included in the scope of delivery.
16 WIKA operating instructions, models CTD9100, CTB9100, CTM9100
11263911.05 03/2019 EN/DE/IT
Page 17

6. Commissioning, operation
6.2 Inserts with metal block
In order to achieve the greatest possible accuracy, the use
of exactly matched inserts is necessary. For this, diameter of
the specimen must be accurately determined. The bore for
the insert is obtained by adding +0.5 mm [+0.02 in].
Inserts
Following use, the inserts should be removed
using the replacement tools and then the sleeve
and block should be cleaned. This prevents the
sleeves becoming jammed in the heating block.
Recommended calibration liquids for the different
temperature ranges:
Water as a calibration liquid
■
Only use distilled or demineralised water, otherwise the
calibrator tank can become strongly scaled and soiled.
Silicone oil as a calibration liquid
■
Only use the silicone oil recommended here.
■
When working with silicone oil, sufficient ventilation should
be ensured in the room since it can give off pollutants.
■
Since silicone oil is hygroscopic, after use, always close
the calibration bath using the transport cover.
Only use clean calibration liquids. The
checking of temperature sensors and other
temperature measuring devices may lead to the
contamination of the calibration liquid. These
contaminants, through the rotational movement
of the magnetic stirrer, may cause an abrasive
effect on the bottom tank.
Wear safety goggles!
Do not allow silicone oil to come into contact with
the eyes.
EN
6.3 Preparation of the micro calibration bath
In order to achieve the highest possible accuracy for a
micro calibration bath, it should be filled with an appropriate
calibration liquid.
6.3.1 Properties of the calibration liquid
Different calibration liquids, due to their specific properties,
deliver varying calibration results. A compensation to the
calibration liquid used in each case should, if necessary, be
■
Clean the tank
■
Before calibration, clean the sensors
■
Replace the worn magnetic stirrer
■
Replace the contaminated, cloudy calibration liquid
Wear protective gloves!
Protect hands from friction, abrasion, cuts or
deep injuries and also from contact with hot
surfaces and aggressive media.
performed by the manufacturer at the factory.
Medium Calibration range Flash point
Distilled water 5 ... 90 °C [51 ... 194 °F] none
Dow Corning 200 Fluid with 5 CS -40 ... +123 °C [-40 ... +253 °F] 133 °C [271 °F]
Dow Corning 200 Fluid with 10 CS -35 ... +155 °C [-31 ... +311 °F] 163 °C [325 °F]
Dow Corning 200 Fluid with 20 CS 7 ... 220 °C [45 ... 428 °F] 232 °C [450 °F]
Dow Corning 200 Fluid with 50 CS 25 ... 270 °C [77 ... 518 °F] 280 °C [536 °F]
11263911.05 03/2019 EN/DE/IT
17WIKA operating instructions, models CTD9100, CTB9100, CTM9100
Page 18
6. Commissioning, operation
6.3.2 Filling the micro calibration bath
1. Firstly, remove the transport cover.
2. Place the test item in the sensor basket.
3. Fill the tank with calibration liquid.
Following maximum filling heights are recommended:
EN
Calibrator model max. filling height
CTB9100-165 / CTM9100-150 130 mm [5.12 in]
CTB9100-165 / CTM9100-150
with removable insert
CTB9100-225 123 mm [4.84 in]
CTB9100-225 with removable insert 105 mm [4.13 in]
CTB9100-225-X 115 mm [4.53 in]
CTB9100-225-X with removable insert 95 mm [3.74 in]
Following points should be observed at the maximum
filling heights:
■
Measured from the bottom of the sensor basket
■
Non loaded tank
■
WIKA standard filling liquid
■
Pre-filling ex-works with the optimal height
110 mm [4.33 in]
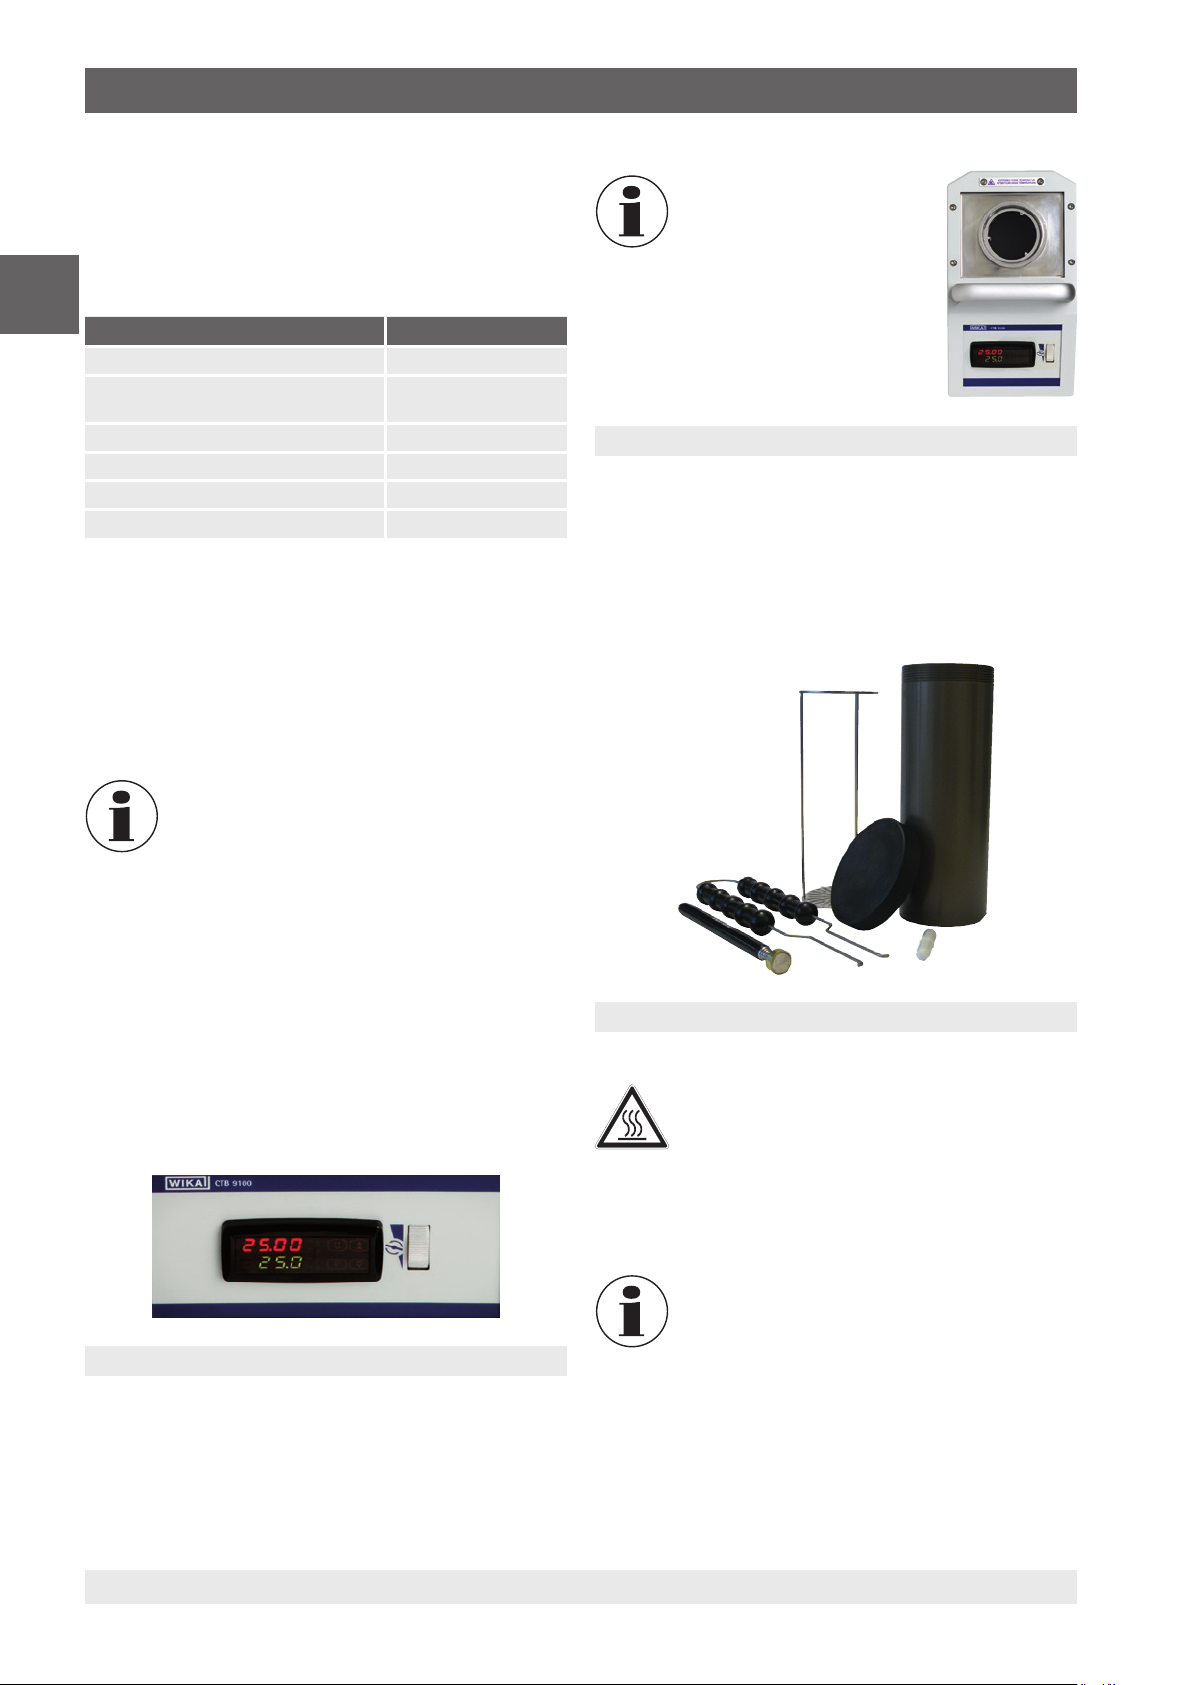
The magnetic stirrer is a
consumable.
Liquid bath
6.3.4 Insert for liquids
The insert for liquids consists of:
■
Insert with leak-proof cover
■
Sensor basket
■
Magnetic stirrer and lifter
■
Replacement tools
The transport cover is fitted with a safety valve.
If the micro calibration bath is closed when it is
still warm, excessive pressure can build up. In
order to avoid overpressuring, which could lead
to damage to the liquid bath, the safety valve
is activated at a pressure of approx. 2.5 bar
[36 psi]. This can lead to hot vapour escaping.
6.3.3 Operation of the magnetic stirrer
The greatest possible homogeneity is achieved by the
agitation of the calibration liquid via a magnetic stirrer.
Set the stirring speed to the maximum possible. Turning the
wheel upwards will increase the speed, turning it downwards
slows down the stirring speed.
Front of the controller with stirrer-speed dial
Insert for liquids
WARNING!
Risk of burns!
Hot liquids can lead to acute burns
▶
The insert for liquids must only be removed if
the calibrator is used at room temperature.
▶
The fill level must be matched the relevant
medium and the temperature.
If the insert for liquids is ordered with a new
model CTB9100 micro calibration bath or a new
model CTM9100 multi-function calibrator, the
instrument will have been matched to the insert
for liquids.
Should the insert for liquids be ordered
afterwards, a re-adjustment of the instrument at
the customer’s will be needed.
18 WIKA operating instructions, models CTD9100, CTB9100, CTM9100
11263911.05 03/2019 EN/DE/IT
Page 19
6. Commissioning, operation
6.4 Surface insert (only CTM9100-150)
The operation of the calibrator with the surface insert is
suited to a simple and the most accurate calibration possible
of surface probes.
Fit the insert, which is hollow and long from the bottom, into
the block using a special replacement tool.
The sleeve also has three bores (1 x 3 mm, 1 x 3.1 mm and
1 x 4 mm [1 x 0.12 in, 1 x 0.12 in and 1 x 0.16 in]) directly
under the surface, so that the correct surface temperature
can be controlled at all times.
Following use, the inserts should be removed using the
specific replacement tools and then the sleeve and block
should be cleaned. This prevents the sleeves becoming
jammed in the heating block.
The calibration of surface thermometers is very
difficult and not fully defined. Thermometers
mounted on surfaces dissipate heat from
the surface and create a cold zone on the
surface being measured. In the multi-function
calibrators, the calibration temperature is created
in a specially designed surface insert and an
external reference thermometer measures the
temperature directly under the surface. The
reference thermometer also determines the
temperature of the cold zone through integration
of the temperature along the sensitive length of
the reference thermometer and thus provides
a true temperature calibration of surface
temperature sensors.
6.5 Infrared insert (only CTM9100-150)
The operation of the calibrator with the infrared insert is
suited to a quick and simple calibration of non-contact
thermometers.
Fit the hollow and specially-designed insert into the
block using a special replacement tool. The sleeve also
has two bores in the edge (1 x 3.5 mm and 1 x 4.5 mm
[1 x 0.14 in and 1 x 0.18 in]) for the accurate monitoring of the
temperature.
The design and surface finish of the sleeve is important, in
order that a defined emissivity of 1 is achieved.
Following use, the inserts should be removed using the
specific replacement tools and then the sleeve and block
should be cleaned. This prevents the sleeves becoming
jammed in the heating block.
With temperatures of < 0 °C [< 32 °F] and higher
air humidity, ice or dew can form in the insert.
This can falsify the calibration. By capping the
measurement opening, the ice or dew formation
can be strongly reduced.
■
Leave the measurement opening closed as
long as possible
■
Open the measurement opening for a short
while for the measurement
■
Remove any ice or dew present by heating
EN
The sleeve is designed so that the supplied
external reference provides the best possible
result, since the depth of the bore is adjusted
to the sensitive length. If a separate external
reference is used for comparison calibration,
ensure that the sensitive length is known and it
lies in the centre of the calibration surface.
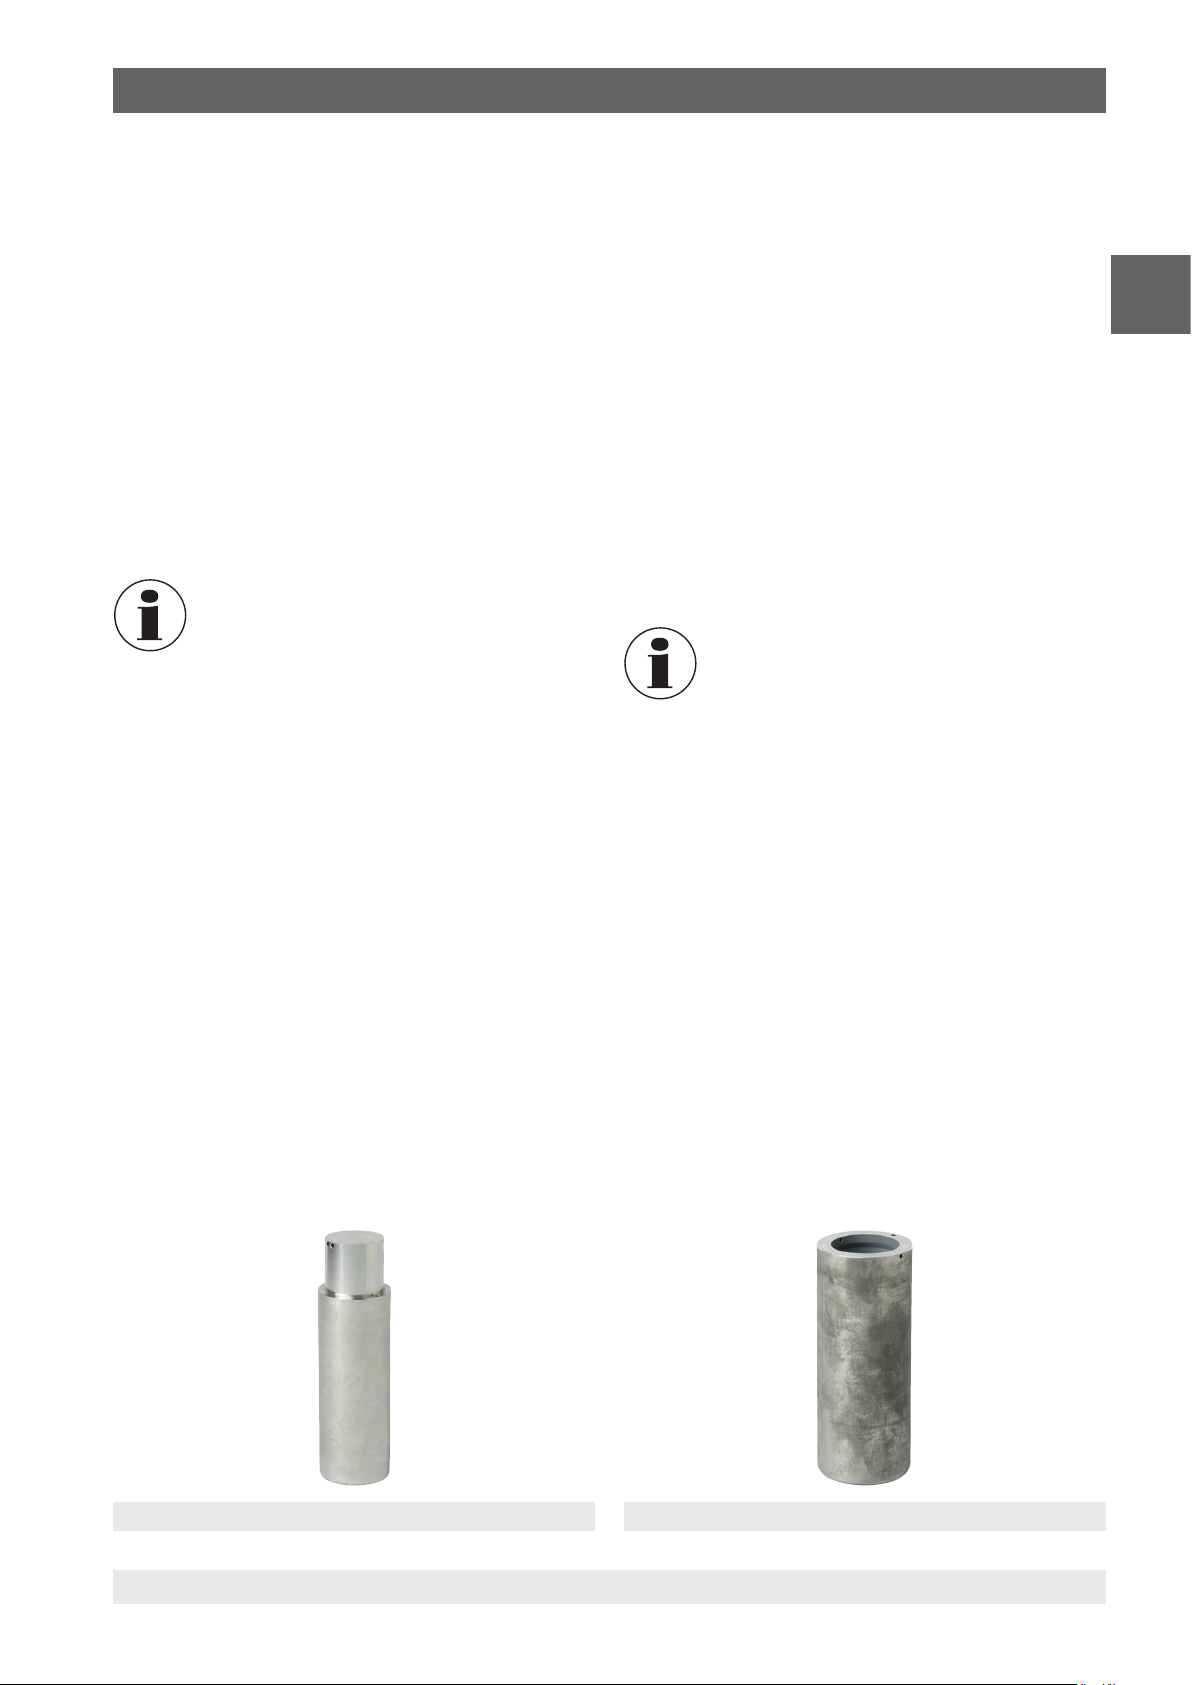
Surface insert
11263911.05 03/2019 EN/DE/IT
Insert for infrared measurements
19WIKA operating instructions, models CTD9100, CTB9100, CTM9100
Page 20
6. Commissioning, operation
6.6 Testing of temperature sensors
To test temperature sensors, connect a separate
temperature-measuring instrument to the test item. By
comparing the temperature displayed on the external
measuring instrument with the reference temperature,
there is evidence of the status of the test item. This ensured
EN
that the test item requires a short time until it reaches the
temperature of the metal block or liquid bath.
There is no possibility for calibrating earthed
thermocouples, since the heating block is
earthed and this would therefore lead to false
measurement results.
6.7 Start-up procedure
If the calibrator is not used for a long time, because of the
materials used (magnesium oxide), moisture can penetrate
the heating elements.
Following transport or storage of the calibrator in moist
environments, the heating elements must be taken to higher
temperatures slowly.
During the drying process,it should be assumed that the
calibrator has not yet reached the required insulation voltage
for protection class I. The start-up set point is T
[248 °F] with a holding time of T
= 15 min.
n
= 120 °C
anf
Once the set temperature has been reached, through short
switch impulses, the radiated heating energy from the metal
block or liquid bath is delivered, so that the temperature
within remains constant.
Reference and set temperature display
6.10 Control of the reference temperature
The red LED OUT 1 indicates that the heater is turned on.
6.8 Switching on the calibrator/micro calibration bath
1. Connect to the mains using the mains connector supplied.
2. Switch on the mains switch.
The controller will be initialised.
The upper PV display will show tEst.
In the lower SV display, the version number (e.g. rL 2.2) will
be shown.
After approx. 5 secs, the initialisation will be complete and
the calibration mode will automatically be displayed.
The built-in heating or cooling elements will temper the metal
block automatically from room temperature to the controller’s
set temperature.
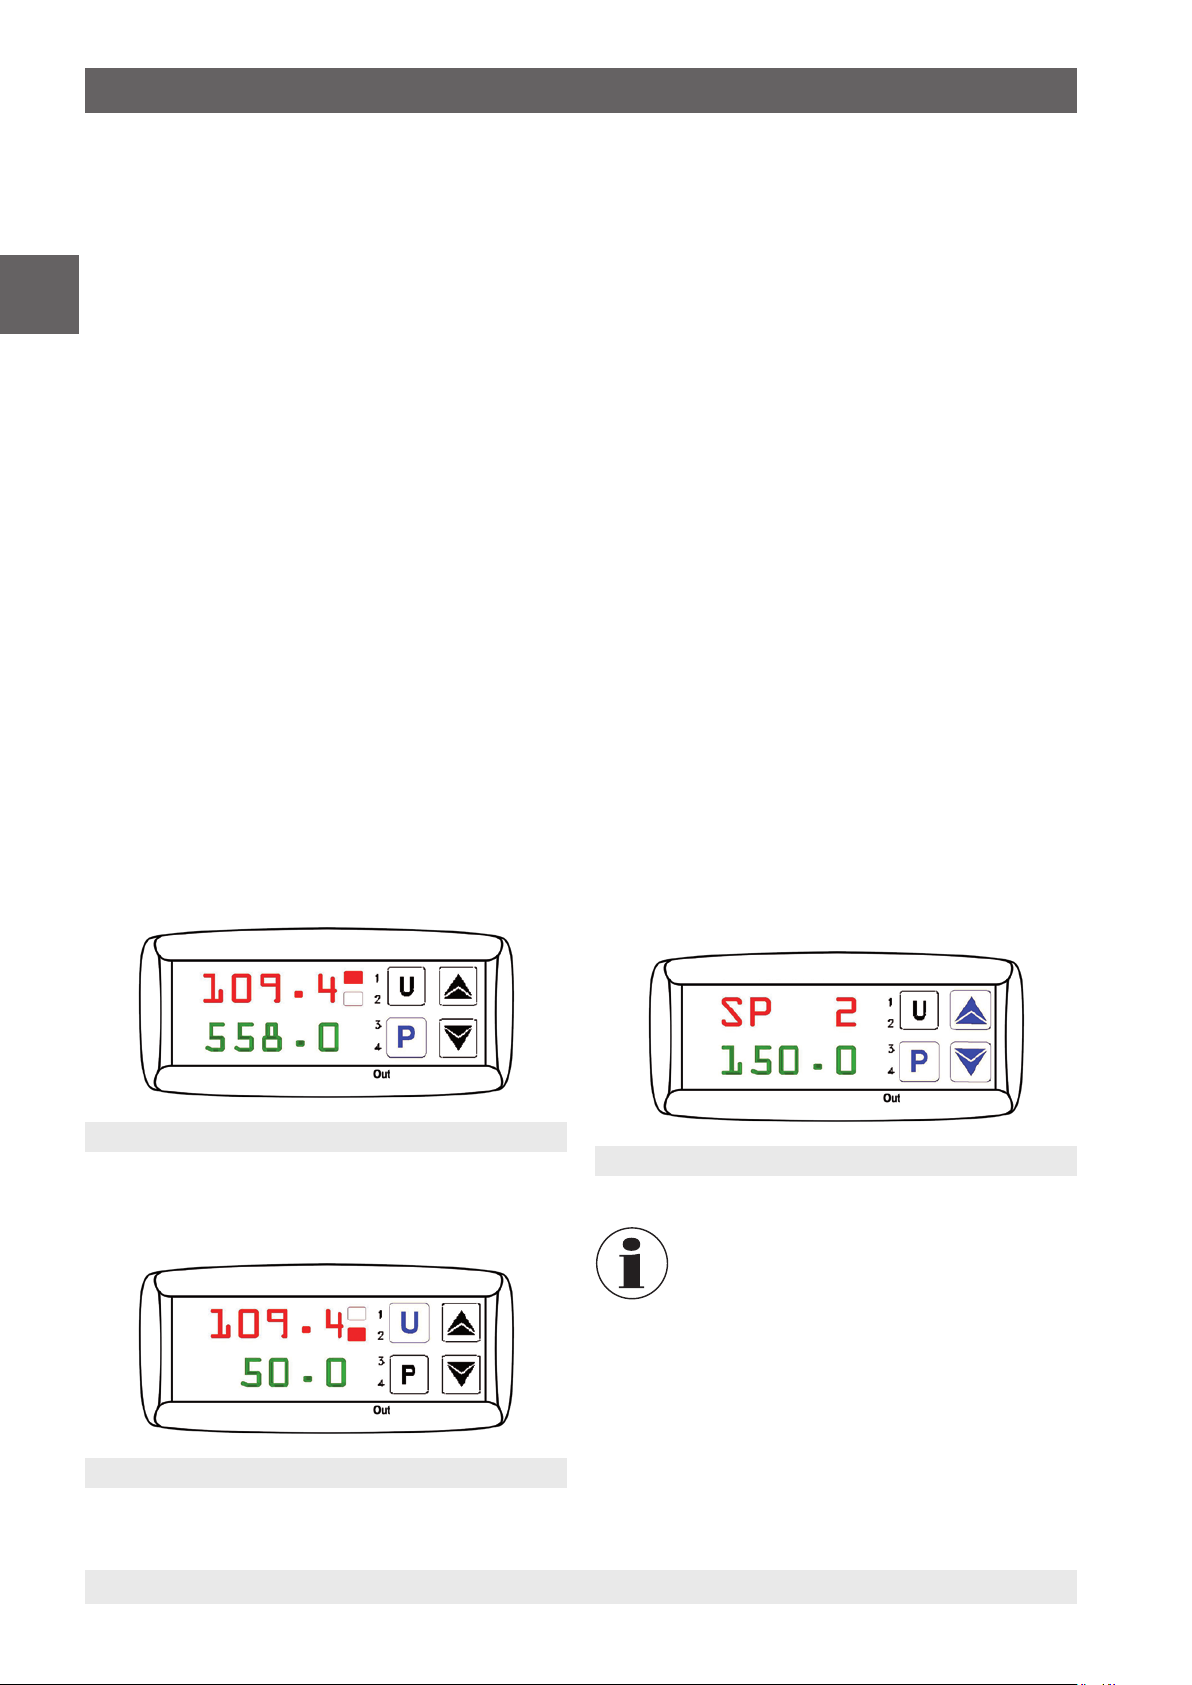
6.9 Reference and set temperature display
Upper PV display:
The red 4-digit, 7-segment display shows the current
temperature of the metal block or liquid bath.
Lower SV display:
The green, 4-digit, 7-segment display shows the current set
temperature of the metal block or the liquid bath.
Display with LED OUT 1
During the heating phase a steady light indicates that heating
energy is being supplied. A flashing LED indicates that the
reference temperature (set temperature) has almost been
reached and therefore the heating energy is only being
supplied in short bursts.
Control achieved via PID algorithm
To ensure good temperature stability, the cycle time of the
controller is set low and the control output is usually raised.
20 WIKA operating instructions, models CTD9100, CTB9100, CTM9100
11263911.05 03/2019 EN/DE/IT
Page 21

7. Operating elements of the calibrator/micro calibration bath
7. Operating elements of the calibrator/micro calibration bath
There are three modes available for operation
Calibration mode
In this standard operating state the calibration of test items
can be made.
Set-point mode
In this mode, the set temperature is entered.
Main menu
In this mode, all settings, such as specifying the desired
temperature or setting the control parameters are made.
7.1 Selection of the operating modes for the
CTM9100-150
To operate the multi-function calibrator in the desired mode
of operation, first specify the correct linearisation for the
controller. In the main menu (via the [P] button) select the
desired function using the arrow keys.
LI Operates as a micro calibration bath
DB Operates as a dry block
Ir Operates as an infrared black body source
SU Operates as a surface temperature calibrator
Select the liquid used depending upon the desired calibration
temperature.
Dry-block operating mode
1. Cleaning the tank (if needed)
2. Inserting the insert (aluminium)
3. Set the speed of the magnetic stirrer to “0”.
4. In order to ensure the correct linearisation, set DB in the
controller. For this, press the [P] button for approx. 5 secs.
and confirm the appropriate setting in the main menu with
[P].
5. Set the switch to the left of the controller to external
reference. Connect the delivered external reference in to
the socket provided and slide into the appropriate bore in
the insert.
The insert has several bores into which the thermometer
probes being calibrated and the external reference, for
comparative calibration, can be inserted. The block is either
heated or cooled to the desired calibration temperature.
Once a stable temperature has been reached, the
temperature probes to be calibrated can be compared with
the reference thermometer.
EN
The desired function is accepted using the [P] button.
On the main screen, the desired linearisation (LI, DB, Ir or
SU) is displayed in the PV line every 5 secs.
7.2 Method of operation in calibration mode within
individual operating modes
Micro calibration bath operating mode (possible with or
without insert for liquids)
1. Insert the magnetic stirrer and sensor basket.
2. Fill the micro calibration bath (see chapter 6.3.2 “Filling
the micro calibration bath”).
3. Set the speed of the magnetic stirrer, in order to achieve
the best homogeneity possible.
4. In order to ensure the correct linearisation, set LI in the
controller. For this, press the [P] button for approx. 5 secs.
and confirm the appropriate setting in the main menu with
[P].
5. Set the switch to the left of the controller to internal
reference.
Angled thermometers, large-diameter thermometers or
thermometers with special designs cannot be calibrated
with a dry-well calibrator. For this reason the multi-function
calibrator also has the possibility to function as a stirred liquid
bath. The liquid is circulated using a magnetic stirrer and thus
provides very good temperature distribution within the bath.
11263911.05 03/2019 EN/DE/IT
Infrared operating mode
1. Cleaning the tank (if needed)
2. Insert the insert (hollow, ceramic coated)
3. Set the speed of the magnetic stirrer to “0”.
4. In order to ensure the correct linearisation, set Ir in the
controller. For this, press the [P] button for approx. 5 secs.
and confirm the appropriate setting in the main menu with
[P].
5. Set the switch to the left of the controller to external
reference. Connect the delivered external reference into
the socket provided and slide it into into the appropriate
bore on the outer edge of the insert.
The measuring spot of the pyrometer being calibrated must
be smaller than the diameter of the infrared insert.
Surface operating mode
1. Cleaning the tank (if needed)
2. Insert the insert (hollow, fitted with a collar at the top)
3. Set the speed of the magnetic stirrer to “0”.
4. In order to ensure the correct linearisation, set SU in the
controller. For this, press the [P] button for approx. 5 secs.
and confirm the appropriate setting in the main menu with
[P].
5. Set the switch to the left of the controller to external
reference. Connect the delivered external reference in to
the socket provided and slide into the appropriate bore
directly under the surface of the insert.
21WIKA operating instructions, models CTD9100, CTB9100, CTM9100
Page 22
7. Operating elements of the calibrator/micro calibration bath
The calibration of surface thermometers is very difficult
and not fully defined. Thermometers mounted on surfaces
dissipate heat from the surface and create a cold zone on
the surface being measured. In the multi-function calibrator,
the calibration temperature is created in a specially designed
surface insert and an external reference thermometer
EN
measures the temperature directly under the surface. The
reference thermometer also determines the temperature
of the cold zone through integration of the temperature
along the sensitive length of the reference thermometer
and thus provides a true temperature calibration of surface
temperature sensors.
The sleeve is designed so that the supplied external
reference provides the best possible result, since the depth
of the bore is adjusted to the sensitive length. If a separate
external reference is used for comparison calibration, ensure
that the sensitive length is known and it lies in the centre of
the calibration surface.
7.3 Calibration (calibration mode)
As soon as the calibrator or micro calibration bath is switched
on, following the initialisation, it defaults to calibration mode.
On the upper PV display, the current reference temperature
is indicated.
On the lower SV display is the set temperature.
The LED OUT 1 signals the status of the outputs for the
heating control:
■
If the LED OUT 1 is on, the temperature will increase.
■
If the LED OUT 1 is not on, the heating is switched off.
a) Heating instrument
The LED OUT 2 signals the status of the outputs for the fan
control:
■
If LED OUT 2 is on, the fan is running at higher speed.
■
If LED OUT 2 is not on, the fan is running at lower speed.
b) Heating and cooling instrument
The LED OUT 2 signals the status of the outputs for the
cooling control:
■
If the LED OUT 2 is on, the temperature will decrease.
■
If the LED OUT 2 is not on, the cooling is switched off.
Two possibilities for setting the set temperature
Either a temporary set temperature is set (see chapter
7.3 “Calibration (calibration mode)”) or a fixed set
temperature (see chapter 7.4 “Setting a temporary set
temperature (set-point mode)”) is stored in the main menu.
7.4 Setting a temporary set temperature (set-point
mode)
In this operating state, a stored set temperature is temporarily
changed.
1. Press button [P] briefly.
On the upper PV display, the currently active set value
memory is displayed, e.g. SP2 (set point 2).
On the lower SV display is the corresponding set
temperature.
2. By pressing button [▲] the set temperature is increased.
By pressing button [▼] the set temperature is reduced.
3. By pressing button [P] again, the new set point is
accepted.
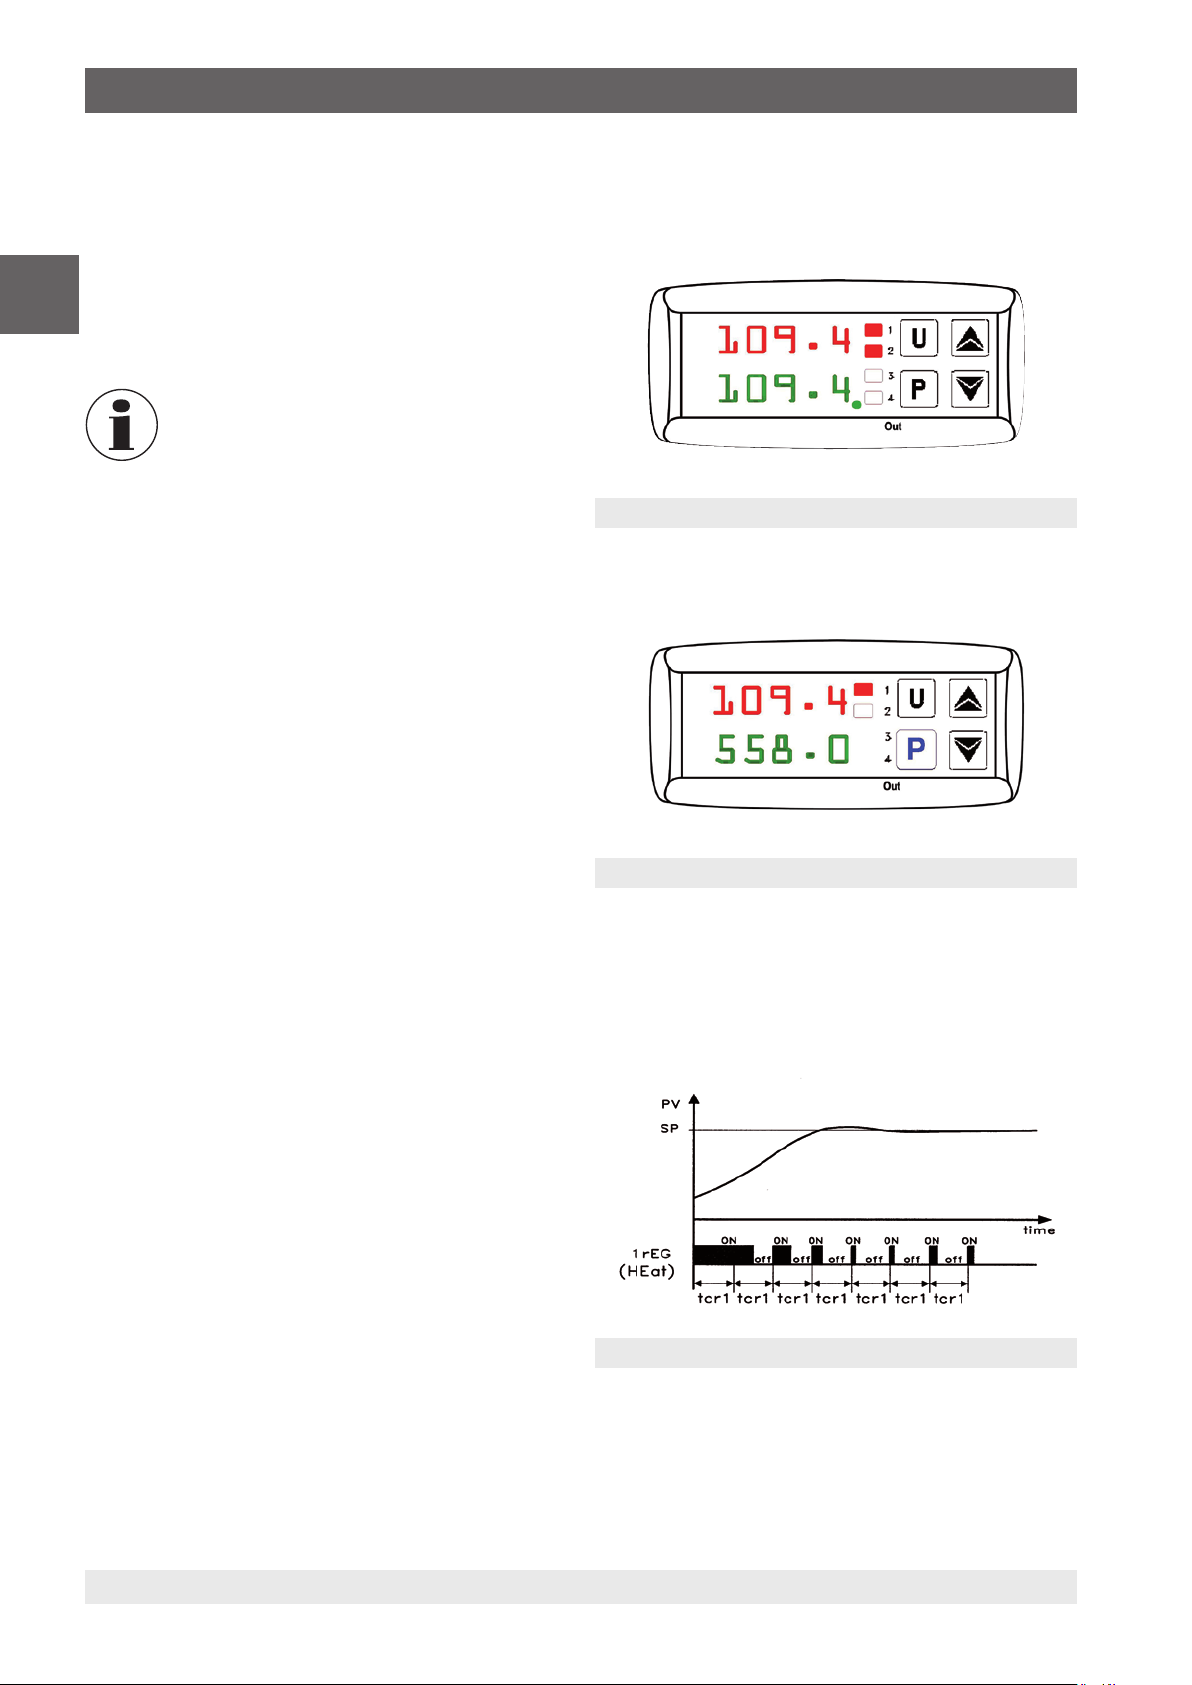
Display in HEATING calibration mode
Temporary set temperature setting
The LED OUT 2 signals the status of the outputs for the fan/
cooling control.
By pressing button [▲] or [▼] the value is
increased or decreased by 0.01 °C [0.01 °F].
If the keys are held down for at least 1 sec.,
however, the value increases or decreases more
rapidly, and after 2 secs. even faster, so that the
desired value can be reached very quickly.
If, in set-point mode, no button has been
pressed for approx. 15 secs., an automatic return
to calibration mode occurs.
Display in FAN or COOLING calibration mode
22 WIKA operating instructions, models CTD9100, CTB9100, CTM9100
11263911.05 03/2019 EN/DE/IT
Page 23
7. Operating elements of the calibrator/micro calibration bath
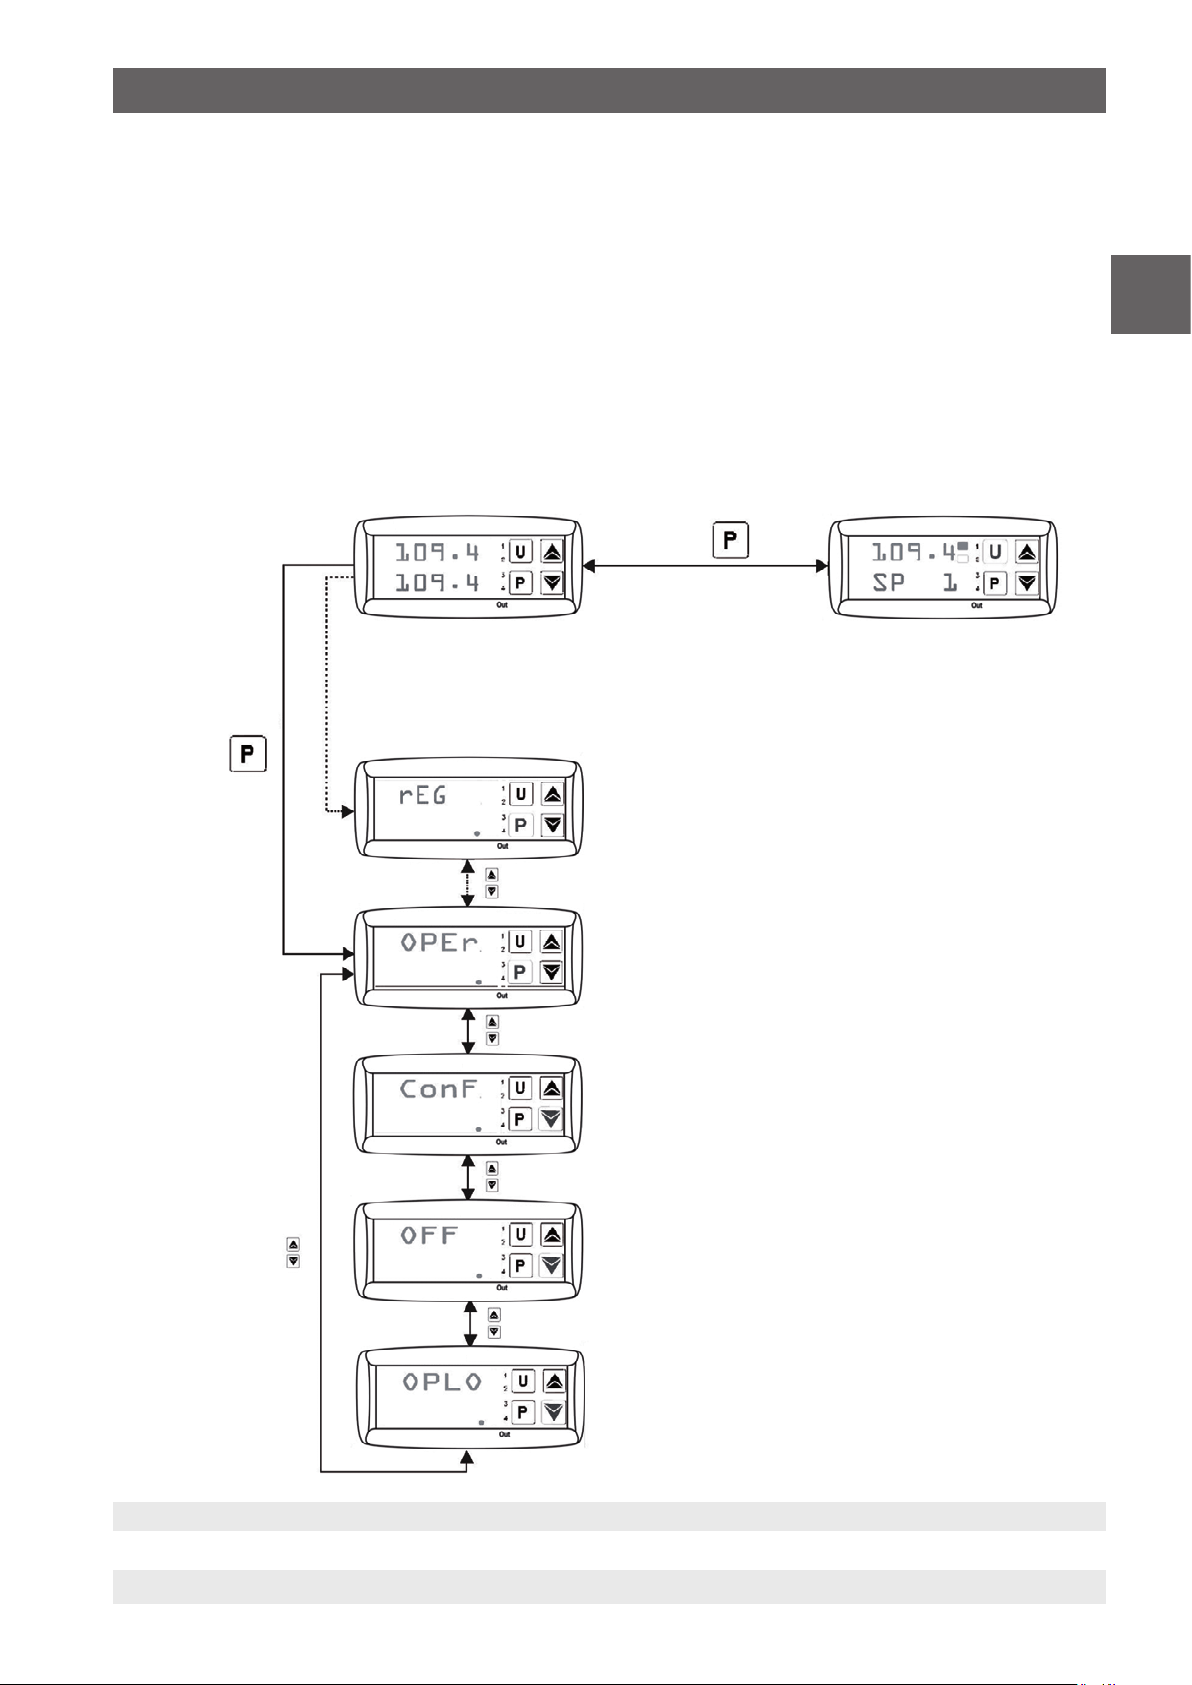
7.5 Programming (Main menu)
In this menu element, all settings can be made.
1. Press button [P] for approx. 5 secs. This opens the main
menu.
2. Select the required main menu using buttons [▲] and [▼]
(see overview).
3. Press button [P] to accept the selected menu point.
EN
approx. 5 secs.
Calibration mode
Main menu
Set-point mode
Menu structure (main menu)
11263911.05 03/2019 EN/DE/IT
23WIKA operating instructions, models CTD9100, CTB9100, CTM9100
Page 24

7. Operating elements of the calibrator/micro calibration bath
7.5.1 Menu structure, parameter levels
As shown in the menu structure, via OPEr, the groups and
parameter levels are accessible, in which the settings can
then be made.
EN
Calibration mode
approx. 5 secs.
Set-point mode
Main menu
Return to another level
If, in the main menu, no button has been pressed for
approx. 15 secs., an automatic return to one level above in
calibration mode occurs.
A return can be made by pressing button [▲] or [▼].
Group level Parameter level
Parameter input
Set point 1
Operating modes
for CTM9100-150
Set point 2
Control off
Manual
control
Micro
calibration
bath
Dry well
calibrator
Infrared Dwell time
Surface Falling ramp
Parameter level
Parameter input
Set point 3
Set point 4
Rising ramp
Menu structure
24 WIKA operating instructions, models CTD9100, CTB9100, CTM9100
11263911.05 03/2019 EN/DE/IT
Page 25
7. Operating elements of the calibrator/micro calibration bath
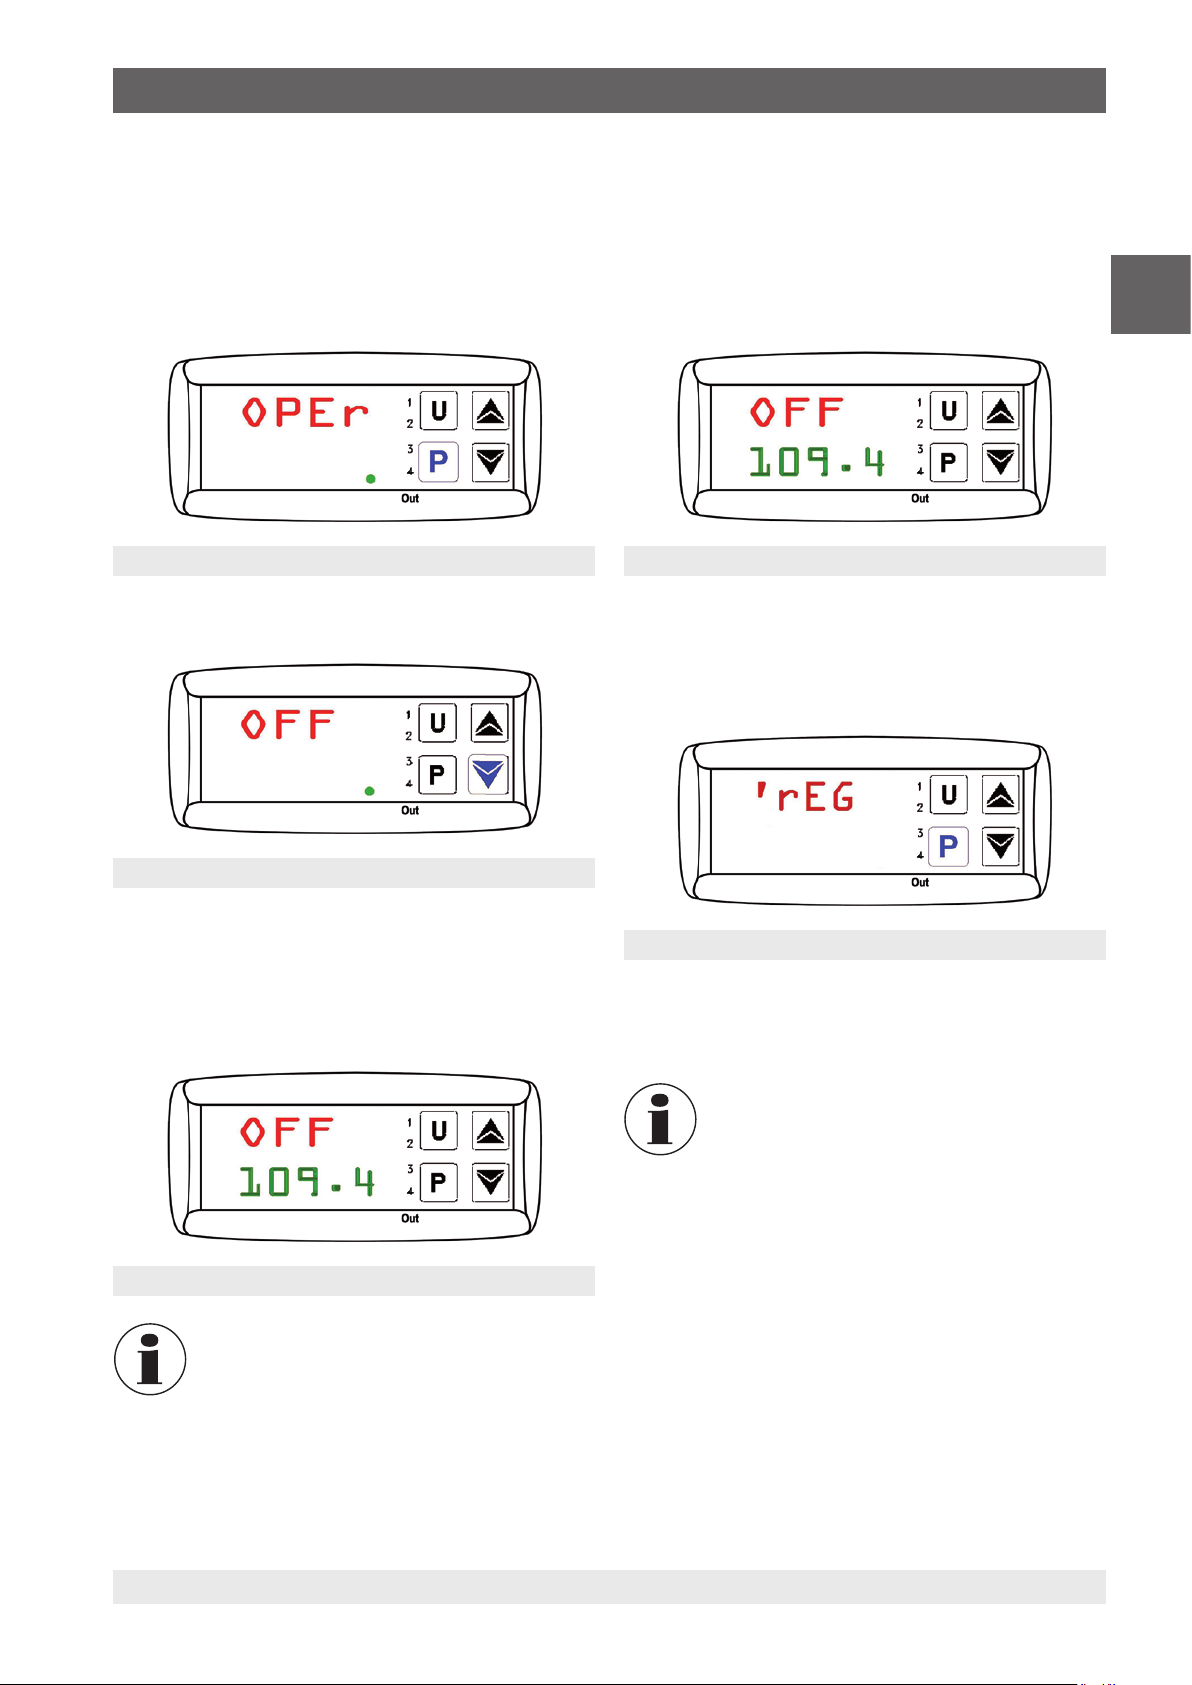
7.5.2 Switching off automatic control
For certain tasks, it is advantageous to switch off control (e.g.
to make settings on the calibrator or micro calibration bath).
In calibration mode, press button [P] for approx. 5 secs., this
opens the main menu.
The upper PV display will show OPEr.
In the lower SV display, the LED SET will blink.
Display in main menu
Press button [▲] or [▼] until OFF is displayed.
7.5.3 Switching on automatic control
The control is switched off when the following display is
shown:
On the upper PV display, the current reference temperature
and OFF are indicated alternately.
On the lower SV display, the currently-selected set
temperature is displayed.
Display with setting Control OFF
The control is switched back on by pressing button [P] for
approx. 5 secs., this opens the main menu.
The upper PV display will show ’rEG.
In the lower SV display, the LED SET will blink.
EN
Control OFF menu
Confirm with button [P].
On the upper PV display, the current reference temperature
and OFF are indicated alternately.
On the lower SV display, the currently-selected set
temperature is displayed.
Display with setting Control OFF
The control is now switched off and the reference
temperature will fall steadily, unless it is
corrected.
Display ‘rEG
Confirm switching the control on by pressing button [P].
Control is now activated. The calibrator or micro
calibration bath will default to calibration mode
and the set temperature will be reached.
11263911.05 03/2019 EN/DE/IT
25WIKA operating instructions, models CTD9100, CTB9100, CTM9100
Page 26
7. Operating elements of the calibrator/micro calibration bath
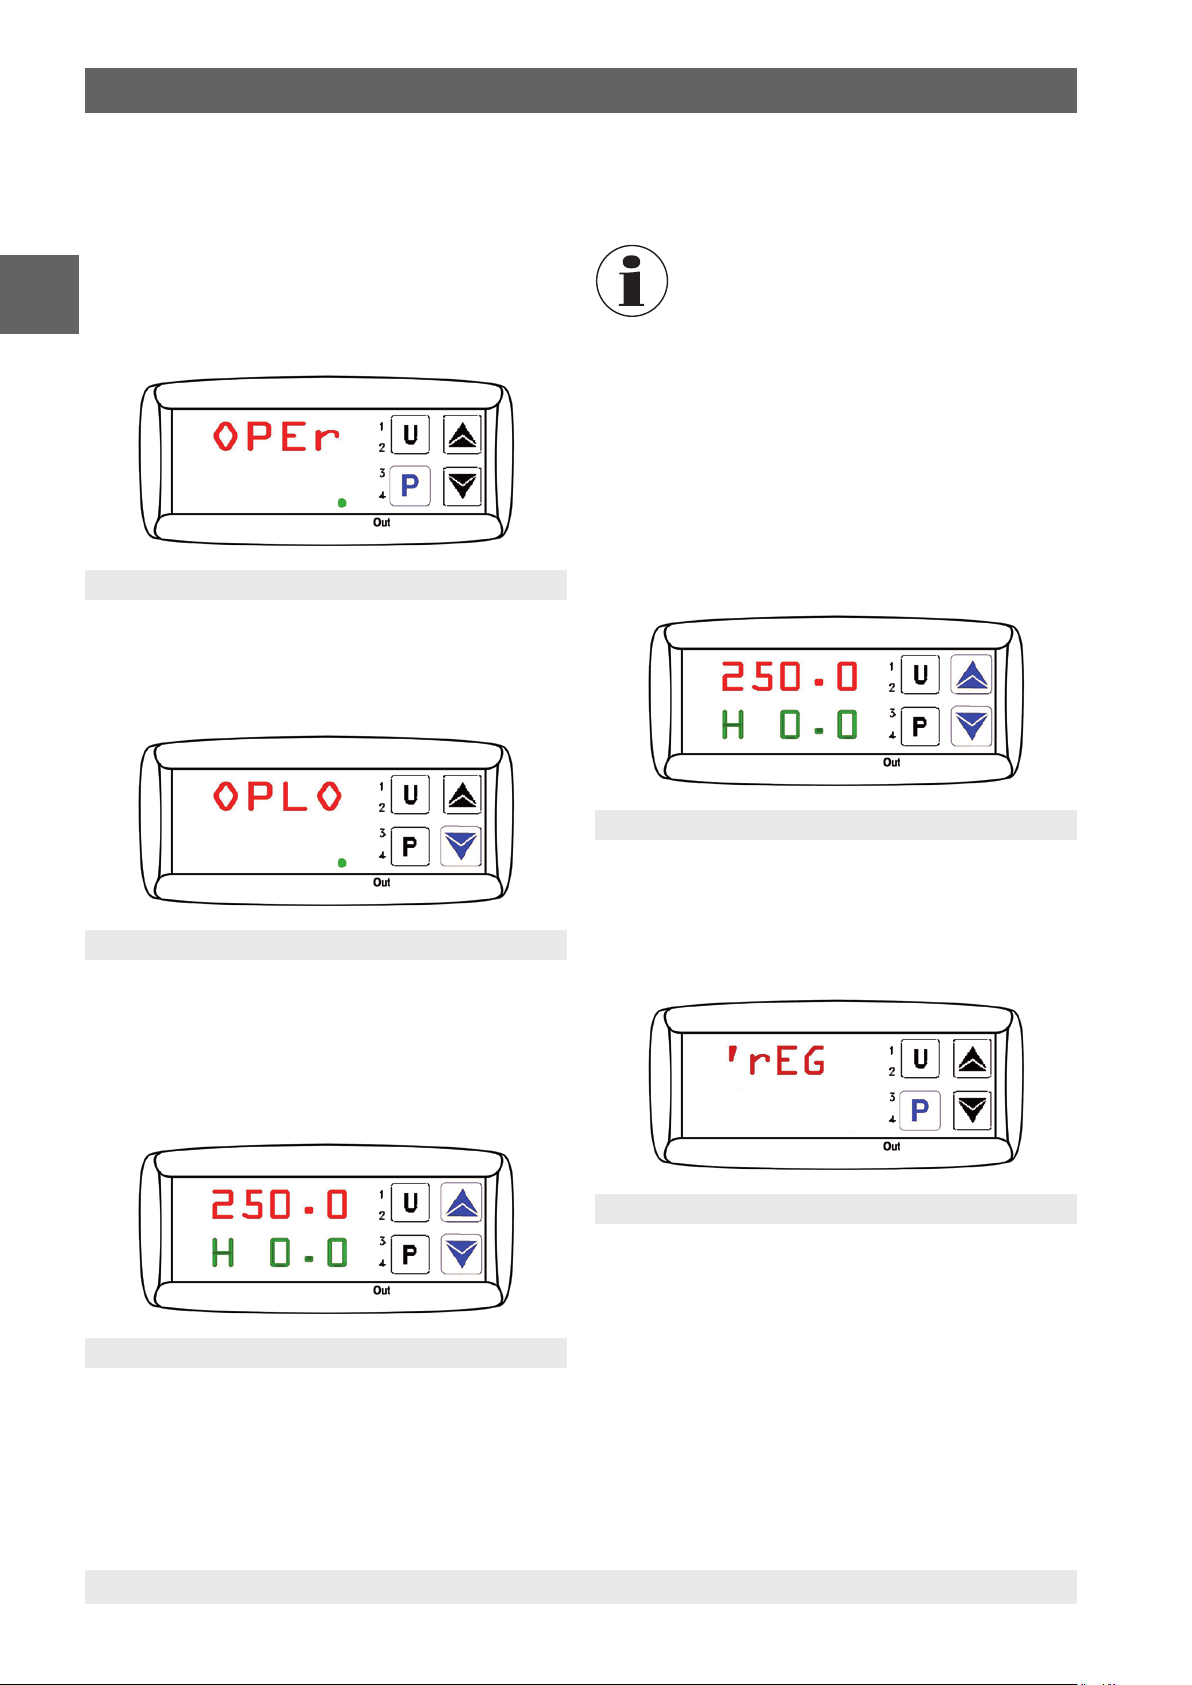
7.5.4 Switching on manual control
Switch off the automatic control of the calibrator or micro
calibration bath, and reach the required temperature with
manual control.
Press button [P] for approx. 5 secs., this opens the main
menu.
EN
The upper PV display will show OPEr.
In the lower SV display, the LED SET will blink.
Display in main menu
Press button [▲] or [▼] until OPLO is displayed.
The upper PV display will show OPLO.
In the lower SV display, the LED SET will blink.
By pressing button [▲], the output power is increased.
By pressing button [▼], the output power is decreased.
By pressing button [▲] or [▼] the value is
increased or decreased by 0.1 %. If the keys are
held down for at least 1 sec., however, the value
increases or decreases more rapidly, and after
2 secs. even faster, so that the desired value can
be reached very quickly.
7.5.5 Switching off manual control
The manual control is switched on if the following display is
shown:
On the upper PV display, the current reference temperature
is indicated.
On the lower SV display, an H and the current set output
power in % is displayed.
Manual control OPLO menu
Confirm by pressing the button [P].
On the upper PV display, the current reference temperature
is indicated.
On the lower SV display, an H and the current set output
power in % is displayed.
Display with setting manual control OPLO
Display with setting manual control OPLO
The manual control is switched back off by pressing button
[P] for approx. 5 secs., this opens the main menu.
The upper PV display will show ’rEG.
In the lower SV display, the LED SET will blink.
Display in main menu
Confirm switching the automatic control on by pressing
button [P].
26 WIKA operating instructions, models CTD9100, CTB9100, CTM9100
11263911.05 03/2019 EN/DE/IT
Page 27
7. Operating elements of the calibrator/micro calibration bath
7.5.6 Setting and storing fixed set temperatures
In order to store the set temperature in the calibrator or micro
calibration bath, the appropriate set-point memory must be
opened.
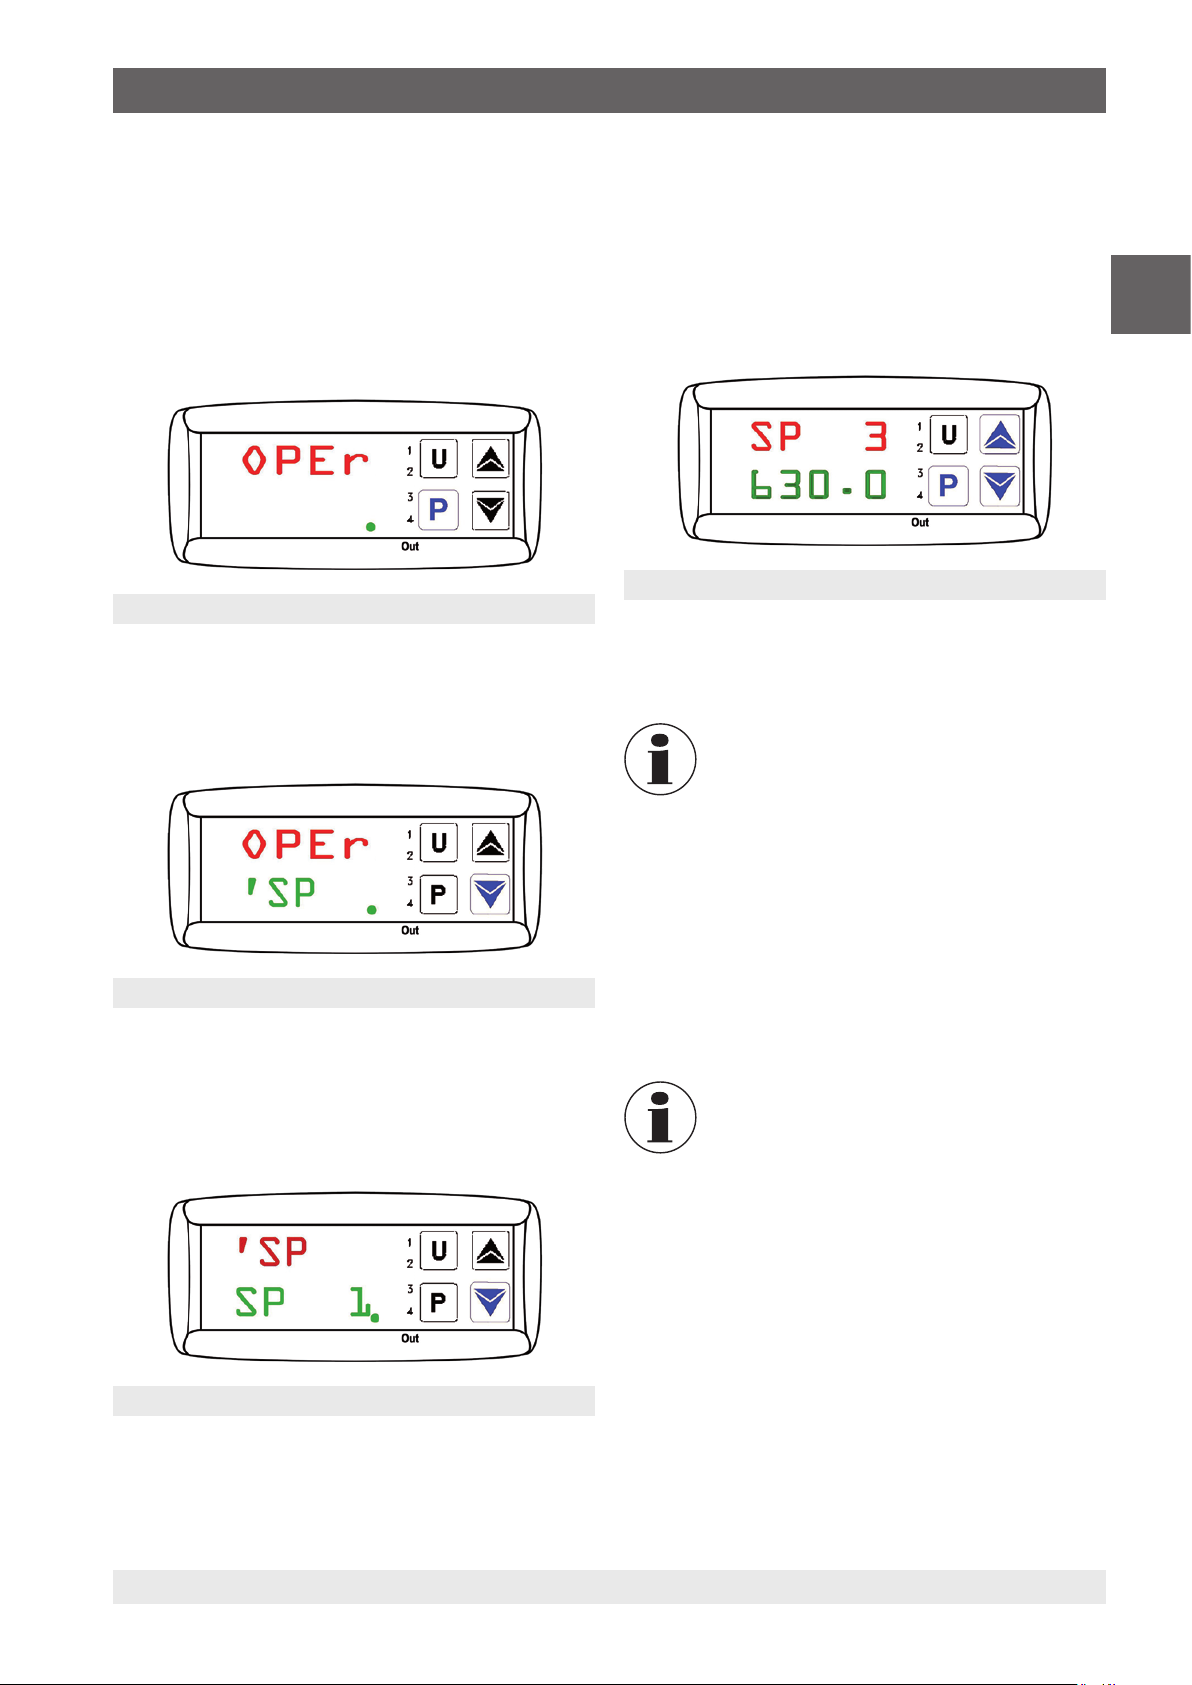
In calibration mode, press button [P] for approx. 5 secs.,
this opens the main menu.
The upper PV display will show OPEr.
In the lower SV display, the LED SET will blink.
Operator menu OPEr
If button [P] is pressed again, this opens the groups level.
The upper PV display will show OPEr.
In the lower SV display, ’SP is shown and additionally LED
SET will blink.
Select one of the four set-point memories SP1, SP2, SP3 or
SP4 using button [▲] or [▼].
By pressing button [P] the corresponding set-point memory
will then be opened.
In the upper PV display, the selected set-point memory e.g.
SP3 will blink.
On the lower SV display, the corresponding currentlyselected set temperature is displayed.
Input in set-point memory SP3
By pressing button [▲], the set temperature is increased.
By pressing button [▼], the set temperature is decreased.
By pressing button [▲] or [▼] the value is
increased or decreased by 0.01 °C [0.01 °F].
If the keys are held down for at least 1 sec.,
however, the value increases or decreases more
rapidly, and after 2 secs. even faster, so that the
desired value can be reached very quickly.
EN
’SP Group
If button [P] is pressed again, this opens the parameter
level.
The upper PV display will show ’SP.
In the lower SV display, the set-point memory SP1 and
additionally LED SET will blink.
Parameter for set-point memory SP1
By pressing button [P], the newly-set temperature is
accepted.
The set-point memory is left and the screen returns to the
parameter level.
To return to calibration mode, press button [▲] or [▼] for a
long time.
If no button has been pressed for approx.
15 secs., an automatic return to one level above
in calibration mode occurs.
11263911.05 03/2019 EN/DE/IT
27WIKA operating instructions, models CTD9100, CTB9100, CTM9100
Page 28
7. Operating elements of the calibrator/micro calibration bath
7.5.7 Recalling the stored set temperatures
The set temperature can be called up from calibration mode.
Press button [U] for approx. 2 secs. The current set-point
memory will be opened.
On the upper PV display, the current reference temperature
is indicated.
EN
On the lower SV display, the set-point memory (SP1,
SP2, SP3 or SP4) is shown for 2 secs., and then the
corresponding currently-selected set temperature is
displayed.
It initially displays the set-point memory (SP1, SP2, SP3 or
SP4).
Then it displays the stored set temperature.
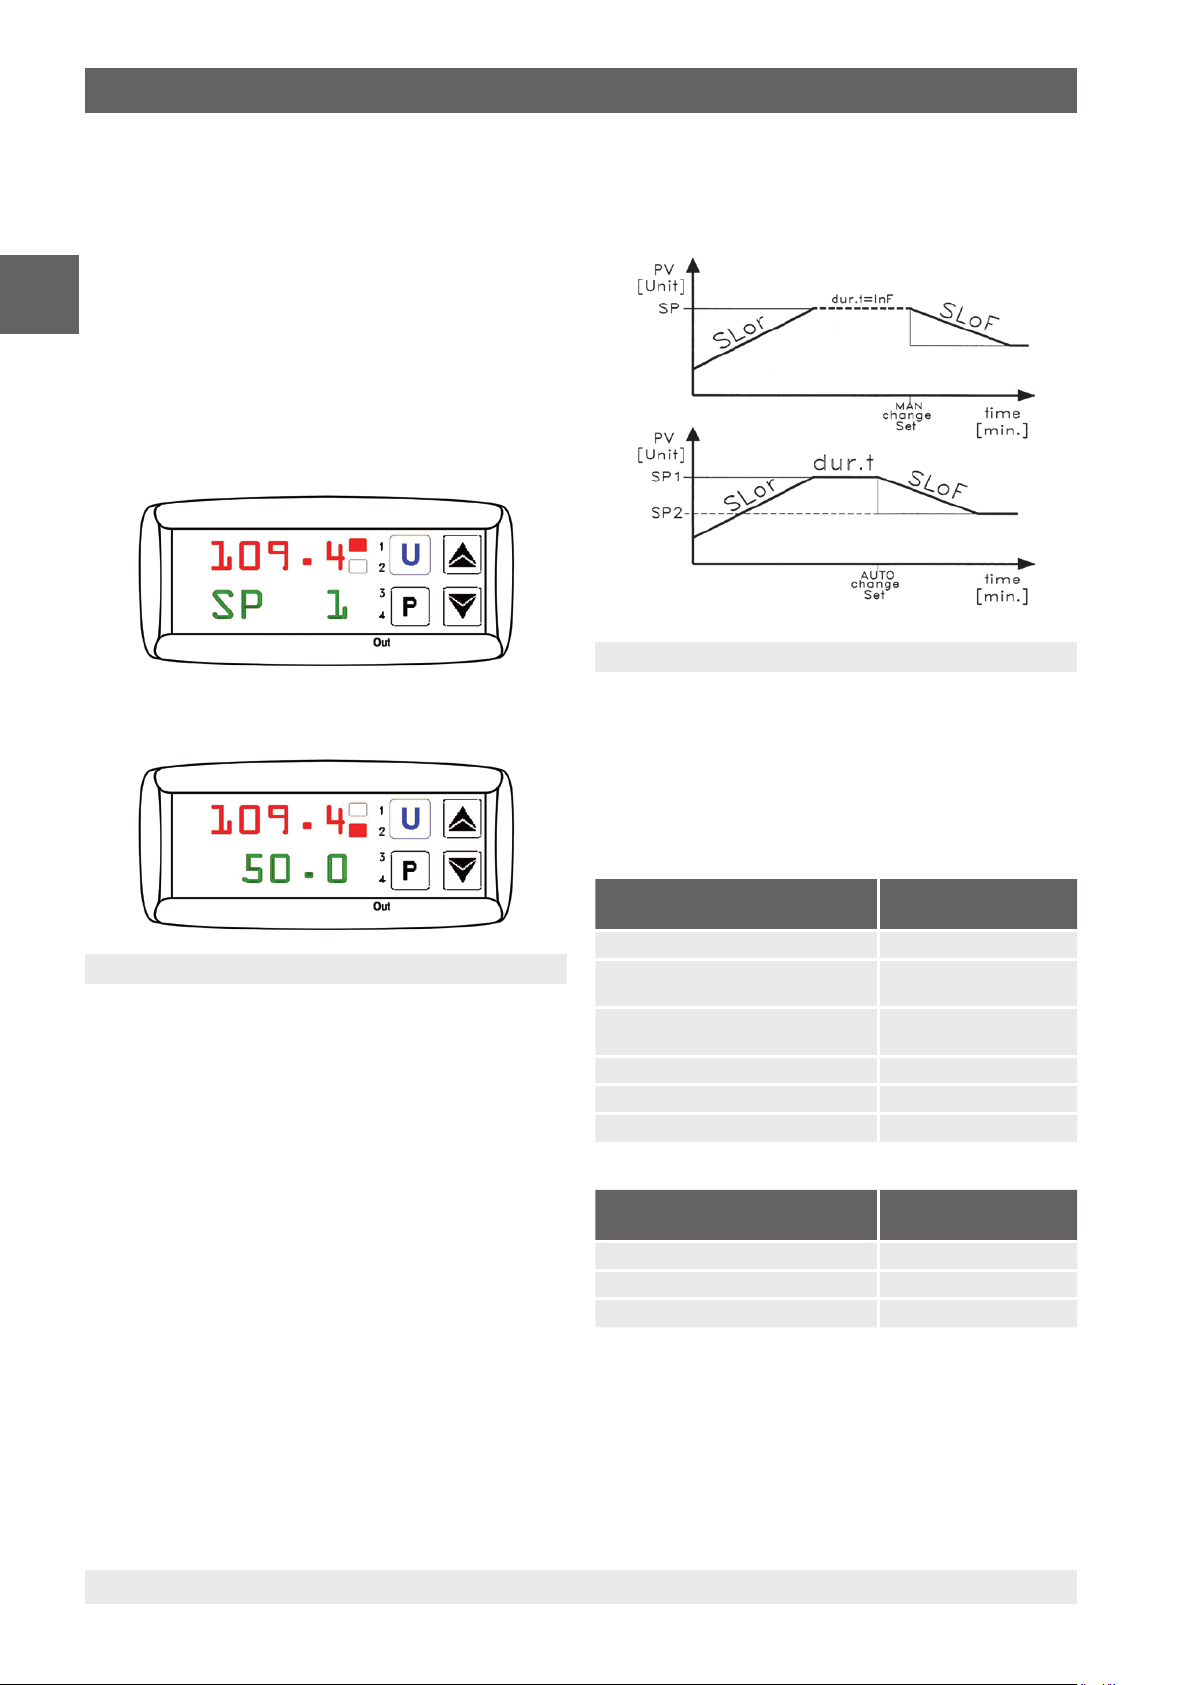
A simple temperature profile can be generated.
After switching on the calibrator or micro calibration bath, the
temperature profile will run automatically.
Ramp control and temperature profile
Heating gradient, SLor
The heating gradient, SLor, is active if the reference
temperature is lower than the set temperature.
Each calibrator model has a maximum heating output, and
thus only settings < than this heating power make sense and
actually increase the time taken to achieve a set temperature.
Display on calling the set temperature
In order to retrieve a different stored set point, press button
[U] again.
The selected temperature value will be immediately adopted
and approached.
7.5.8 Setting the ramp control and a temperature
profile
Using the ramp control, the time can be defined over
which the target temperature is achieved. This time may be
shorter or longer than that which the calibrator or the micro
calibration bath would normally require.
By changing the set temperature or turning on the calibrator
or micro calibration bath, it is automatically determined which
of the gradients to use (heating gradient, SLor, or cooling
gradient, SLoF).
In the calibrator or in the micro calibration bath, the dwell
time, dur.t, can be programmed so that the set temperature
reached is automatically switched from the set-point memory
SP1 to the set temperature in set-point memory SP2 after a
predetermined time.
Calibrator model
Setting for SLor
(heating/cooling)
CTD9100-165 < 7 °C/min [< 13 °F/min]
CTB9100-165 / CTM9100-150
with silicone oil 10 CS
CTB9100-165 / CTM9100-150
with distilled water
CTM9100-150 as calibrator < 3 °C/min [< 5 °F/min]
CTM9100-150 as infrared calibrator < 3 °C/min [< 5 °F/min]
CTM9100-150 as surface calibrator < 3 °C/min [< 5 °F/min]
Calibrator model
< 3 °C/min [< 5 °F/min]
< 5 °C/min [< 9 °F/min]
Setting for SLor
(heating)
CTD9100-450 / CTD9100-650 < 35 °C/min [< 63 °F/min]
CTB9100-225 with silicone oil 20 CS < 22 °C/min [< 40 °F/min]
CTB9100-225 with distilled water < 12 °C/min [< 22 °F/min]
11263911.05 03/2019 EN/DE/IT
28 WIKA operating instructions, models CTD9100, CTB9100, CTM9100
Page 29
7. Operating elements of the calibrator/micro calibration bath
Cooling gradient SLoF
The cooling gradient, SLoF, is active if the reference
temperature is higher than the set temperature.
Only settings that are under the heating power of the
calibrator have an effect on the cooling gradient.
Calibrator model
Setting for SLoF
(heating/cooling)
CTD9100-165 < 5 °C/min [< 9 °F/min]
CTB9100-165 / CTM9100-150
with silicone oil 10 CS
CTB9100-165 / CTM9100-150
with distilled water
CTM9100-150 as calibrator < 4 °C/min [< 7 °F/min]
CTM9100-150 as infrared calibrator < 4 °C/min [< 7 °F/min]
CTM9100-150 as surface calibrator < 4 °C/min [< 7 °F/min]
Calibrator model
< 6 °C/min [< 11 °F/min]
< 4 °C/min [< 7 °F/min]
Setting for SLoF
(heating)
CTD9100-450 / CTD9100-650
up to 300 °C [572 °F]
300 °C to 100 °C [572 °F to 212 °F]
CTB9100-225 with silicone oil 20 CS
200 °C to 50 °C [392 °F to 122 °F]
50 °C to 30 °C [122 °F to 86 °F]
CTB9100-225 with distilled water
90 °C to 50 °C [194 °F to 122 °F]
50 °C to 30 °C [122 °F to 86 °F]
< 10 °C/min [< 18 °F/min]
< 5 °C/min [< 9 °F/min]
< 4 °C/min [< 7 °F/min]
< 0,5 °C/min [< 1 °F/min]
< 2 °C/min [< 4 °F/min]
< 0,5 °C/min [< 1 °F/min]
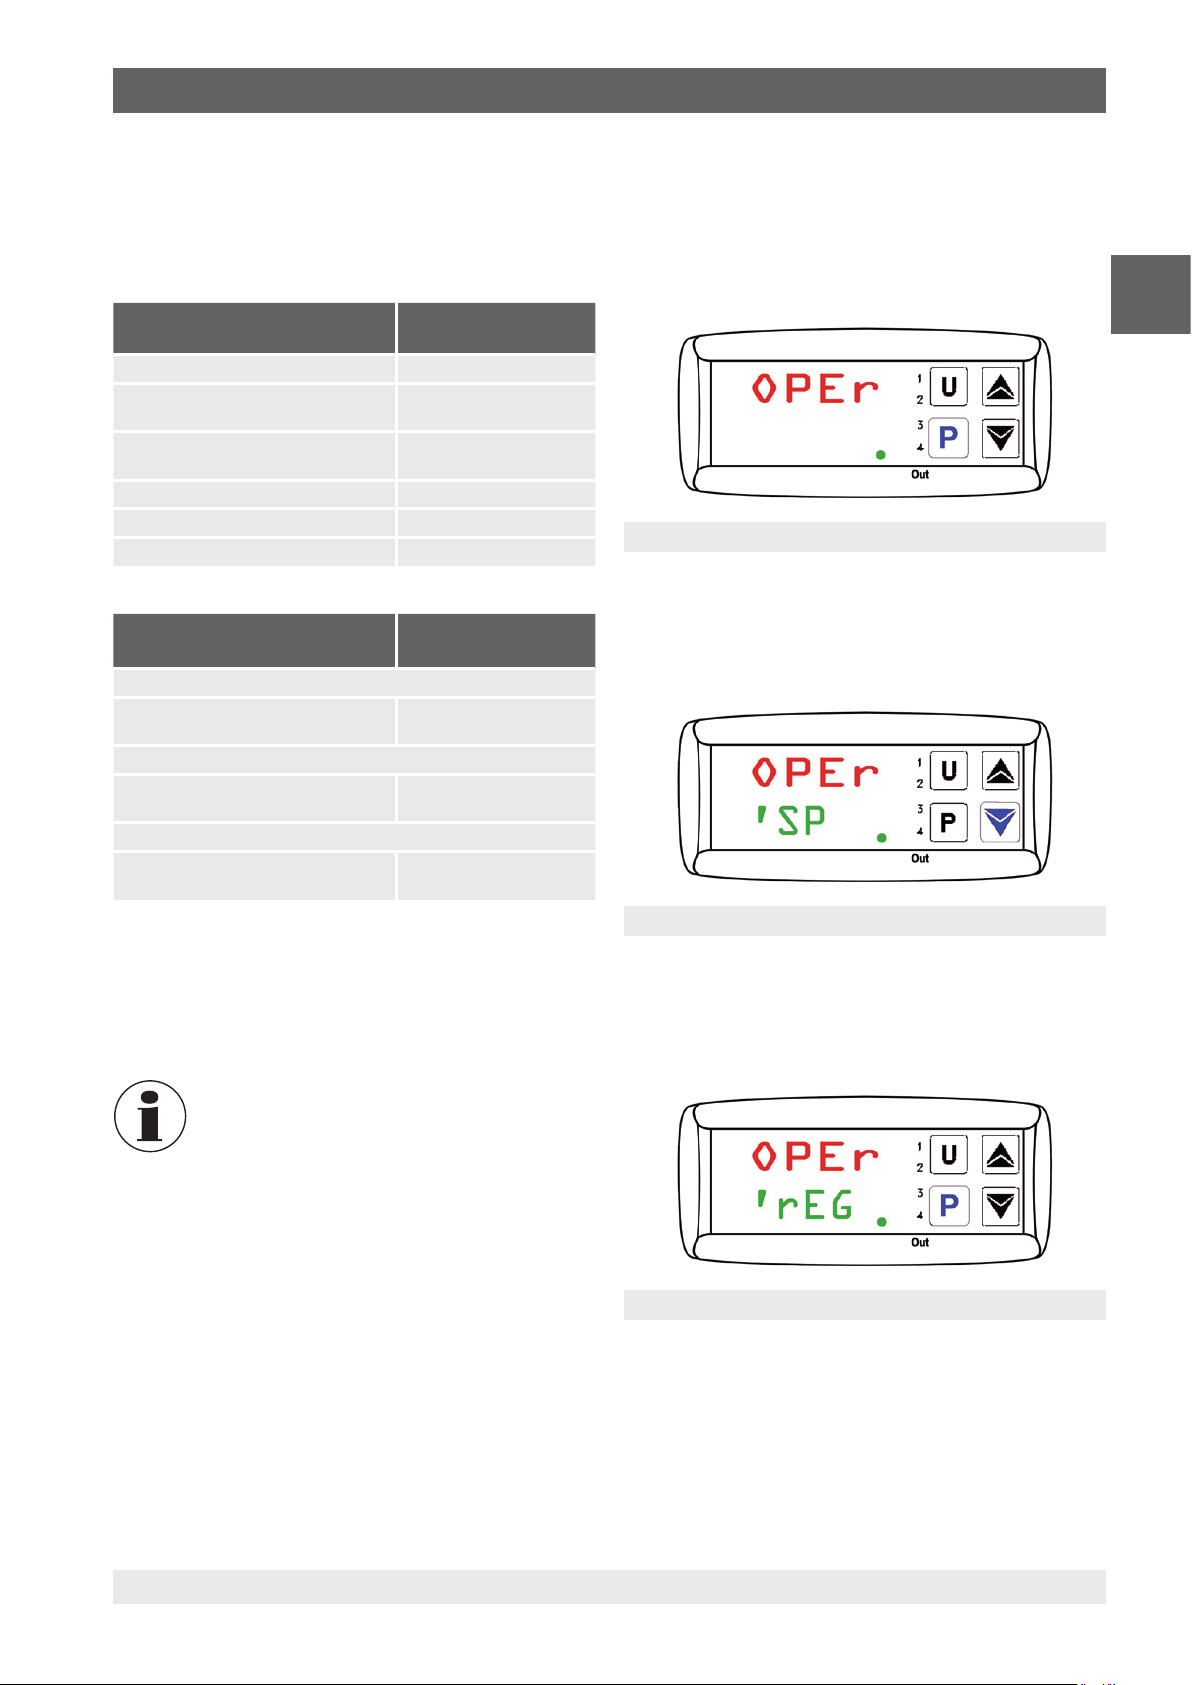
The heating and cooling gradients and the dwell time can
be set via the parameter level, ’rEG. This is achieved by
pressing button P for approx. 5 secs., this opens the main
menu.
The upper PV display will show OPEr.
In the lower SV display, the LED SET will blink.
Operator menu OPEr
If button [P] is pressed again, this opens the groups level.
The upper PV display will show OPEr.
In the lower SV display, ’SP is shown and additionally LED
SET will blink.
EN
The dwell time, dur.t, is active when the set temperature,
SP1, has been reached. Subsequently, the calibrator or micro
calibration bath automatically switches to set temperature
SP2.
If settings have been made for these three
parameters, the calibrator or the micro
calibration bath will not use the new values until
you either change the set temperature or until the
calibrator or the micro calibration bath has been
turned off and then on again.
Another approach would be to switch the
automatic control off before the parameter
change (see chapter 7.5.2 “Switching off
automatic control”), and then turning it back
on (see chapter 7.5.3 “Switching on automatic
control”).
’SP group
Select the group, 'rEG, by pressing button [▼].
The upper PV display will show OPEr.
In the lower SV display, ’rEG is shown and additionally LED
SET will blink.
’rEG group
11263911.05 03/2019 EN/DE/IT
29WIKA operating instructions, models CTD9100, CTB9100, CTM9100
Page 30

7. Operating elements of the calibrator/micro calibration bath
If button [P] is pressed again, this opens the parameter
level.
The upper PV display will show ‘rEG.
In the lower SV display, SLor will blink.
EN
Parameter for heating gradient, SLor
7.5.8.1 Setting the heating gradient
The heating gradient, SLor, is active if the reference
temperature is lower than the set temperature.
The setting range stretches from 99.99 °C/min to 0.00 °C/min
[99.99 °F/min to 0.00 °F/min].
The function is deactivated if SLor = InF (in no
Function) is set.
You are at the parameter level (as described in chapter
7.5.1 “Menu structure, parameter levels”).
The upper PV display will show ‘rEG.
In the lower SV display, SLor will blink.
By pressing button [▲], the heating gradient, SLor, will be
increased.
By pressing button [▼], the heating gradient, SLor, will be
decreased.
By pressing button [▲] or [▼] the value is
increased or decreased by 0.1. If the keys are
held down for at least 1 sec., however, the value
increases or decreases more rapidly, and after
2 secs. even faster, so that the desired value can
be reached very quickly.
By pressing button [P], the newly-set heating gradient, SLor,
is accepted.
The display returns to the parameter level and the other
parameters can be set.
If no button has been pressed for approx.
15 secs., an automatic return to one level above
in calibration mode occurs.
After the setting has been made, the calibrator
or the micro calibration bath will not use the
new values until you either change the set
temperature or the calibrator or the micro
calibration bath has been turned off and then on
again.
7.5.8.2 Setting the cooling gradient
The cooling gradient, SLoF, is active if the reference
temperature is higher than the set temperature.
The setting range stretches from 99.99 °C/min to 0.00 °C/min
[99.99 °F/min to 0.00 °F/min].
The function is deactivated if SLoF = InF (in no
Function) is set.
Parameter for heating gradient, SLor
Press button [P].
On the upper PV display, SLor will blink.
On the lower SV display, the corresponding currently-
selected heating gradient is displayed.
Input of the heating gradient
30 WIKA operating instructions, models CTD9100, CTB9100, CTM9100
You are at the parameter level (as described in chapter
7.5.1 “Menu structure, parameter levels”).
The upper PV display will show ‘rEG.
In the lower SV display, SLor will blink.
Parameter for heating gradient, SLor
11263911.05 03/2019 EN/DE/IT
Page 31

7. Operating elements of the calibrator/micro calibration bath
Select the parameter SLoF with button [▲] or [▼].
The upper PV display will show ‘rEG.
In the lower SV display, SLoF will blink.
Input of the cooling gradient
Press button [P].
On the upper PV display, SLoF will blink.
On the lower SV display, the corresponding currently-
selected cooling gradient is displayed.
After the setting has been made, the calibrator
or the micro calibration bath will not use the
new values until you either change the set
temperature or the calibrator or the micro
calibration bath has been turned off and then on
again.
7.5.8.3 Setting the dwell time
The dwell time, dur.t, is active when the set temperature,
SP1, has been reached. Subsequently, the calibrator or micro
calibration bath automatically switches to set temperature
SP2.
The setting range stretches from 99:59 [hh:min] to
0:00 [hh:min].
The function is deactivated if dur.t = InF (in no
Function) is set.
You are at the parameter level (as described in chapter
7.5.1 “Menu structure, parameter levels”).
The upper PV display will show ‘rEG.
In the lower SV display, SLor will blink.
EN
Display on cooling gradient input
By pressing button [▲], the cooling gradient, SLoF, will be
increased.
By pressing button [▼], the cooling gradient, SLoF, will be
decreased.
By pressing button [▲] or [▼] the value is
increased or decreased by 0.1. If the keys are
held down for at least 1 sec., however, the value
increases or decreases more rapidly, and after
2 secs. even faster, so that the desired value can
be reached very quickly.
By pressing button [P], the newly-set cooling
gradient, SLoF,is accepted.
The display returns to the parameter level and
the other parameters can be set.
If no button has been pressed for approx.
15 secs., an automatic return to one level above
in calibration mode occurs.
Parameter for heating gradient, SLor
Select the parameter dur.t with button [▲] or [▼].
The upper PV display will show ‘rEG.
In the lower SV display, dur.t will blink.
Parameter for dwell time, dur.t
11263911.05 03/2019 EN/DE/IT
31WIKA operating instructions, models CTD9100, CTB9100, CTM9100
Page 32

7. Operating elements ... / 8. Cooling down the metal blocks or ...
Press button [P].
On the upper PV display, dur.t will blink.
On the lower SV display, the corresponding currentlyselected dwell time is displayed.
EN
Input of the dwell time
By pressing button [▲], the dwell time, dur.t,is increased.
By pressing button [▼], the dwell time, dur.t,is decreased.
By pressing button [▲] or [▼] the value is
increased or decreased by 0.1. If the keys are
held down for at least 1 sec., however, the value
increases or decreases more rapidly, and after
2 secs. even faster, so that the desired value can
be reached very quickly.
By pressing button P, the newly-set dwell time, dur.t, is
accepted.
The screen returns to the parameter level.
If no button has been pressed for approx.
15 secs., an automatic return to one level above
in Calibration mode occurs.
After the setting has been made, the calibrator
or the micro calibration bath will not use the
new values until you either change the set
temperature or the calibrator or the micro
calibration bath has been turned off and then on
again.
8. Cooling down the metal blocks or micro calibration baths
WARNING!
Risk of burns
Touching the hot metal block or micro calibration
bath, the hot bath liquids or the test item can
lead to acute burns.
▶
Before transporting or touching the calibration
instruments, make sure that they have cooled
down sufficiently.
▶
In order that the calibration instruments can
be brought quickly from a higher to a lower
temperature, set the set temperature to a
lower temperature (e.g. room temperature).
With a heating instrument, the built-in ventilator will
automatically slowly switch to higher speed, which will
provide a cooling airflow.
The LED OUT 2 signals the status of the outputs for the
fan control. If LED OUT 2 is on, the fan is running at higher
speed, if LED OUT 2 is not on, the fan is running at lower
speed.
With a heating and cooling instrument, the controller will
switch the active cooling on. The LED OUT 2 signals the
status of the outputs for the fan control. If LED OUT 2 is on,
the active cooling is running, if LED OUT 2 is not on, the
cooling is not active.
After switching off or removing the mains
connection, no cooling air will be provided by
the built-in fan. A sufficient thermal decoupling
between the metal block and liquid bath and
body is nevertheless guaranteed.
32 WIKA operating instructions, models CTD9100, CTB9100, CTM9100
11263911.05 03/2019 EN/DE/IT
Page 33
9. Faults
9. Faults
Personnel: Skilled personnel
Protective equipment: Protective gloves and safety goggles
CAUTION!
Physical injuries and damage to property
and the environment
WARNING!
Physical injuries and damage to property
and the environment caused by hazardous
media
Upon contact with hazardous media (e.g.
oxygen, acetylene, flammable or toxic
If faults cannot be eliminated by means of the
measures listed, the instrument must be taken
out of operation immediately.
▶
Contact the manufacturer.
▶
If a return is needed, please follow the
instructions given in chapter 11.2 “Return”.
substances), harmful media (e.g. corrosive, toxic,
carcinogenic, radioactive), there is a danger of
physical injuries and damage to property and the
environment.
Should a failure occur, aggressive media and/
For contact details, please see chapter
1 “General information” or the back page of the
operating instructions.
or with high temperature may be present at the
instrument.
▶
For these media, in addition to all standard
regulations, the appropriate existing codes or
regulations must also be followed.
▶
Wear the requisite protective equipment (see
chapter 3.6 “Personal protective equipment”).
Error Causes Measures
- - - - Break in the internal reference sensor or the
internal reference sensor is defective.
Send in for repair
EN
uuuu Measured temperature under the limit value of the
internal reference sensor
(Underrange -200 °C [-328 °F])
oooo Measured temperature over the limit value of the
internal reference sensor
(Overrange +850 °C (+1.562 °F])
ErEP Possible error in the controller's EEPROM
memory.
Fan is not running Fan is defective or blocked.
The temperature switch may have been triggered
and the current supply to the heating elements
switched off.
Final temperature was not
reached
No display The controller is defective.
No function The voltage supply is not made properly or the
Solid state relay defective, or the heating-cooling
element has a short-circuit or has aged.
fuse is defective.
Press button [P]
Send in for repair
Check the voltage supply and fuse.
11263911.05 03/2019 EN/DE/IT
33WIKA operating instructions, models CTD9100, CTB9100, CTM9100
Page 34

10. Maintenance, cleaning and recalibration
10. Maintenance, cleaning and recalibration
Personnel: Skilled personnel
Protective equipment: Protective gloves and safety goggles
EN
10.1 Maintenance
The instruments described here are maintenance-free.
Repairs must only be carried out by the manufacturer.
This does not apply to the fuse replacement.
Only use original parts (see chapter 13 “Accessories”).
10.2 Cleaning
1. Cool down the calibrator or micro calibration bath as
described in chapter 8 “Cooling down the metal blocks or
micro calibration baths”.
2. Before cleaning the calibrator or the micro calibration bath,
it must be switched off and disconnected by unplugging
the mains cable from the power supply outlet.
3. Clean the instrument with a moist cloth.
Electrical connections must not come into contact with
moisture.
For contact details, please see chapter
1 “General information” or the back page of the
operating instructions.
Before replacing the fuse, the calibrator or the
micro calibration bath must be disconnected
by unplugging the mains cable from the power
supply outlet.
CAUTION!
Physical injuries and damage to property
and the environment
Improper cleaning may lead to physical injuries
and damage to property and the environment.
Residual media in the dismounted instrument
can result in a risk to personnel, the environment
and equipment.
▶
Use the requisite protective equipment.
▶
Carry out the cleaning process as described
below.
CAUTION!
Damage to the instrument
Improper cleaning may lead to damage to the
instrument!
▶
Do not use any aggressive cleaning agents.
▶
Do not use any hard or pointed objects for
cleaning.
4. Clean the instrument before returning it, in order to protect
persons and the environment from exposure to residual
media.
10.2.1 Cleaning calibrators with inserts
With calibrators with inserts, during operation, a small
amount of metallic dust can cause the block and the sleeve
to become jammed. To prevent this, on a regular basis and
before any long period out-of-use, remove the inserts from
the calibrator heating block. Blow out heating block bores
with compressed air and clean the bore and sleeve with a dry
cloth.
10.2.2 Cleaning fan guards
On the base of each calibrator is a dense fan grille, through
which the cooling air is supplied to the calibrator. Depending
on the cleanliness of the air, clean the grille at regular
intervals by vacuuming or brushing.
10.2.3 Cleaning the micro calibration bath
Remove as much of the silicone oil as possible from the tank.
Then take the sensor basket out of the tank and clean the
basket, magnetic stirrer and tank with water, in which plenty
of detergent has been added. Let everything dry thoroughly.
When distilled water has been used, remove the calibration
liquid and let the sensor basket, magnetic stirrer and tank dry
thoroughly.
10.2.4 External cleaning
Clean the outside of the instrument with a damp cloth and
some water, or with a solvent-free light detergent.
10.3 Recalibration
DKD/DAkkS certificate - official certificates:
The calibrator or the micro calibration bath has been adjusted
and tested before delivery using measuring instruments that
are traceable to nationally-recognised standards.
On the basis of DIN ISO 10012, the calibrator or the micro
calibration bath, depending on the application, should be
verified at appropriate periodic intervals.
We recommend that the instrument is regularly recalibrated
by the manufacturer, with time intervals of approx. 12 months
or approximately 500 hours of operation. The basic settings
will be corrected if necessary.
The basis of the recalibration is the guidelines of the German
Calibration Service, DKD R5-4. The measures described
here should be used and followed for recalibration.
34 WIKA operating instructions, models CTD9100, CTB9100, CTM9100
11263911.05 03/2019 EN/DE/IT
Page 35
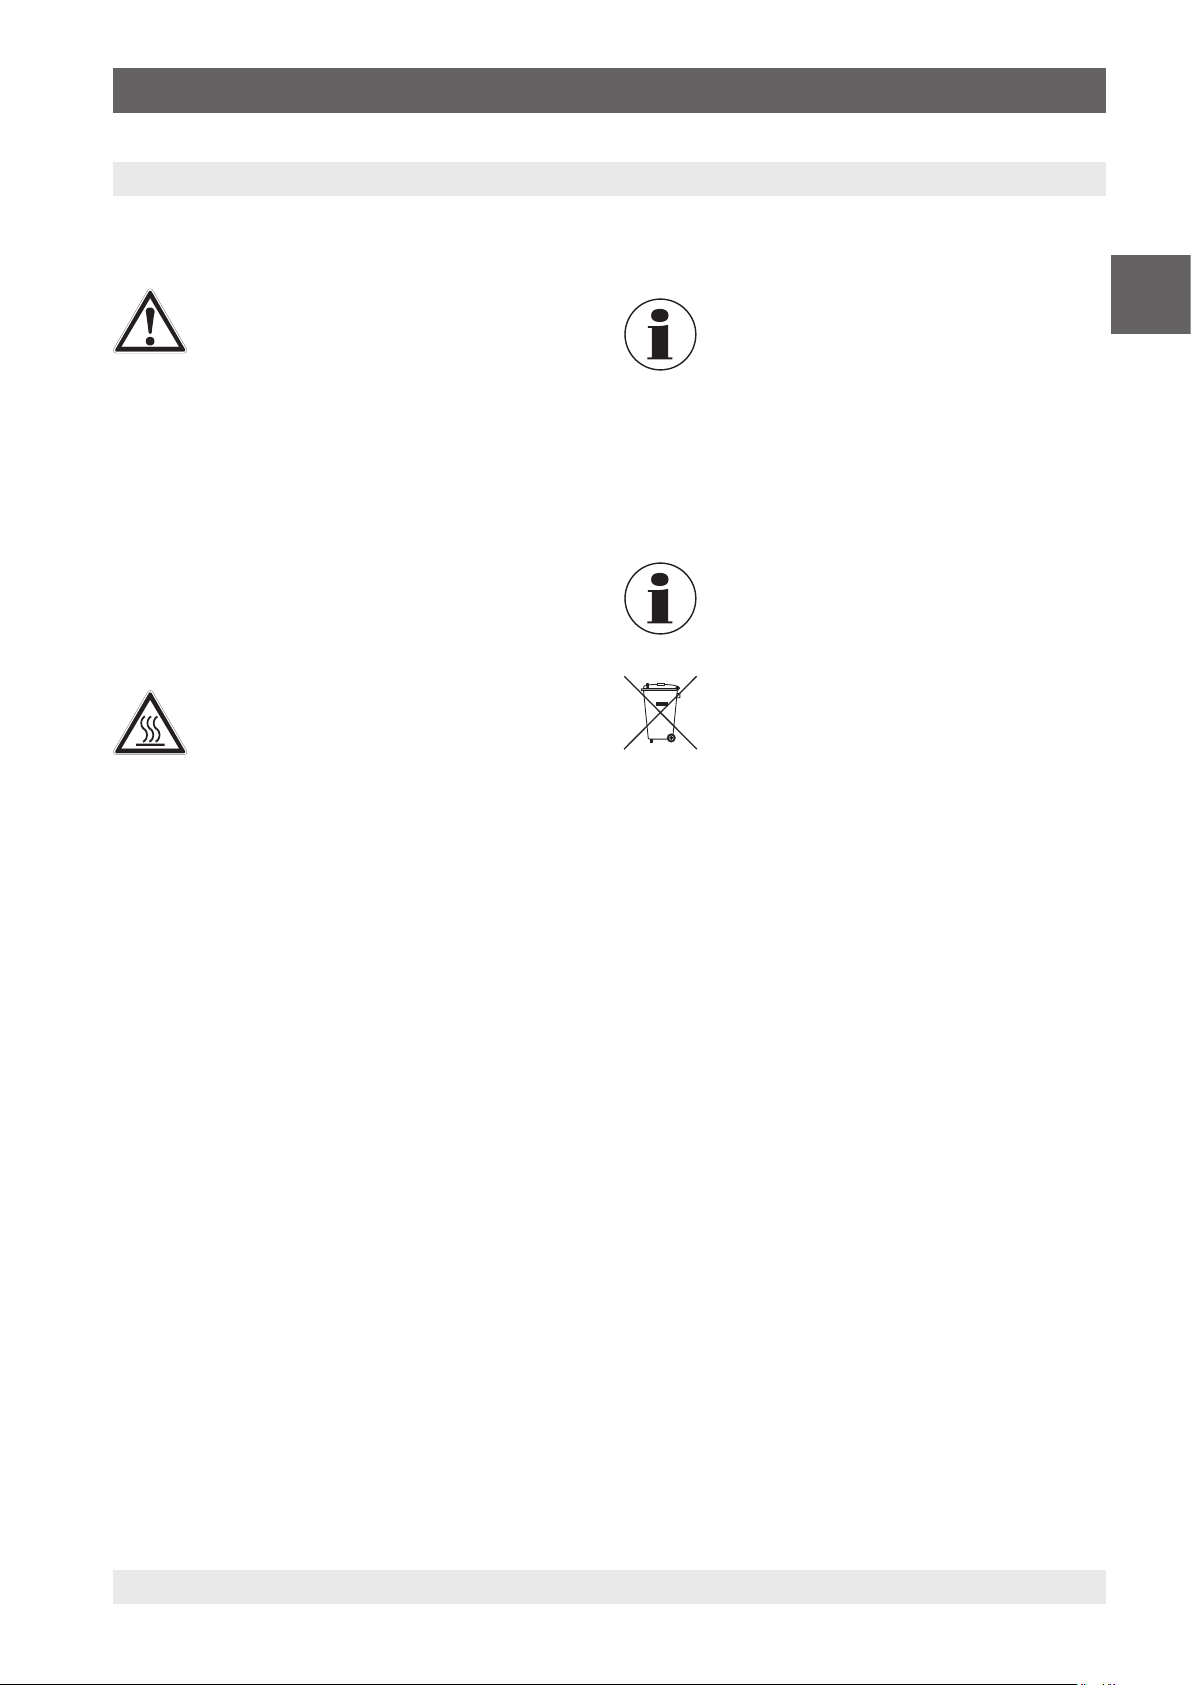
11. Dismounting, return and disposal
11. Dismounting, return and disposal
Personnel: Skilled personnel
Protective equipment: Protective gloves and safety goggles
WARNING!
Physical injuries and damage to property
and the environment through residual media
Residual media on or in the instrument can
result in a risk to persons, the environment and
equipment.
▶
Wear the requisite protective equipment (see
chapter 3.6 “Personal protective equipment”).
▶
Observe the information in the material safety
data sheet for the corresponding medium.
▶
Clean the instrument, in order to protect
persons and the environment from exposure
to residual media.
11.1 Dismounting
WARNING!
Risk of burns!
During dismounting there is a risk of dangerously
hot pressure media escaping.
▶
Let the instrument cool down sufficiently
before dismounting it!
3. Label the shipment as transport of a highly sensitive
measuring instrument.
EN
Information on returns can be found under the
heading “Service” on our local website.
11.3 Disposal
Incorrect disposal can put the environment at risk.
Dispose of instrument components and packaging materials
in an environmentally compatible way and in accordance with
the country-specific waste disposal regulations.
Dispose of the silicone oil as described in the
material data safety sheet.
Do not dispose of with household waste. Ensure
a proper disposal in accordance with national
regulations.
1. Cool down the calibration instrument as described in
chapter 8 “Cooling down the metal blocks or micro
calibration baths”.
2. Switch off the calibration instrument and pull out the mains
plug from the mains socket.
3. If it is present, remove the calibration liquid from the micro
calibration bath (see chapter 10.2.3 “Cleaning the micro
calibration bath”).
11.2 Return
Strictly observe the following when shipping the
instrument:
All instruments delivered to WIKA must be free from any
kind of hazardous substances (acids, bases, solutions etc.)
and must therefore be cleaned before being returned, see
chapter 10.2 “Cleaning”.
When returning the instrument, use the original packaging or
a suitable transport packaging.
To avoid damage:
1. Place the instrument, along with the shock-absorbent
material, in the packaging. Place shock-absorbent
material evenly on all sides of the transport packaging.
2. If possible, place a bag, containing a desiccant, inside the
packaging.
11263911.05 03/2019 EN/DE/IT
35WIKA operating instructions, models CTD9100, CTB9100, CTM9100
Page 36

12. Specifications
12. Specifications
12.1 Dry-well temperature calibrator, CTD9100 series
CTD9100-COOL CTD9100-165
EN
Display
Temperature range -55 ... +200 °C [-67 ... +392 °F] -35 ... +165 °C [-31 ... +329 °F]
Accuracy
Stability
Resolution 0.01 up to 100 °C, then 0.1 [0.01 up to 212 °F, then 0.1]
Temperature distribution
Axial homogeneity
Radial homogeneity
Temperature control
Heating time approx. 10 min from 20 °C to 200 °C
Cooling time approx. 10 min from +20 °C to -20 °C
Stabilisation time
Insert
Immersion depth 150 mm [5.91 in]
Insert dimensions Ø 28 x 150 mm [Ø 1.1 x 5.91 in] Ø 28 x 150 mm or Ø 60 x 150 mm
Insert material Aluminium
Voltage supply
Power supply AC 100 ... 240 V, 50/60 Hz
Power consumption 555 VA 375 VA
Fuse 6.3 A slow blow fuse
Power cord AC 230 V; for Europe
Communication
Interface RS-485
Case
Dimensions (W x H x D) 215 x 305 x 425 mm [8.46 x 12.00 x 16.73 in]
Weight 11 kg [24.3 lbs]
1) Is defined as the measuring deviation between the measured value and the reference value.
2) Maximum temperature difference at a stable temperature over 30 minutes.
3) Maximum temperature difference at 40 mm [1.57 in] above the bottom.
4) Maximum temperature difference between the bores (all thermometers inserted to the same depth).
5) Time before reaching a stable value.
1)
2)
3)
4)
5)
0.15 ... 0.3 K 0.15 ... 0.25 K
±0.05 K
dependent on temperature, temperature probes and their quantity
dependent on temperature, temperature probes and their quantity
[from 68 °F to 329 °F]
[from +68 °F to -4 °F]
dependent on temperature and temperature probe
approx. 25 min from 20 °C to 165 °C (X approx. 35 min)
[from 68 °F to 329 °F]
approx. 15 min from +20 °C to -20 °C (X approx. 35 min)
[from +68 °F to -4 °F]
[Ø 1.1 x 5.91 in or Ø 2.36 x 5.91 in]
The measurement uncertainty is defined as the total measurement uncertainty (k = 2), which contains the following shares:
accuracy, measurement uncertainty of reference, stability and homogeneity.
36 WIKA operating instructions, models CTD9100, CTB9100, CTM9100
11263911.05 03/2019 EN/DE/IT
Page 37
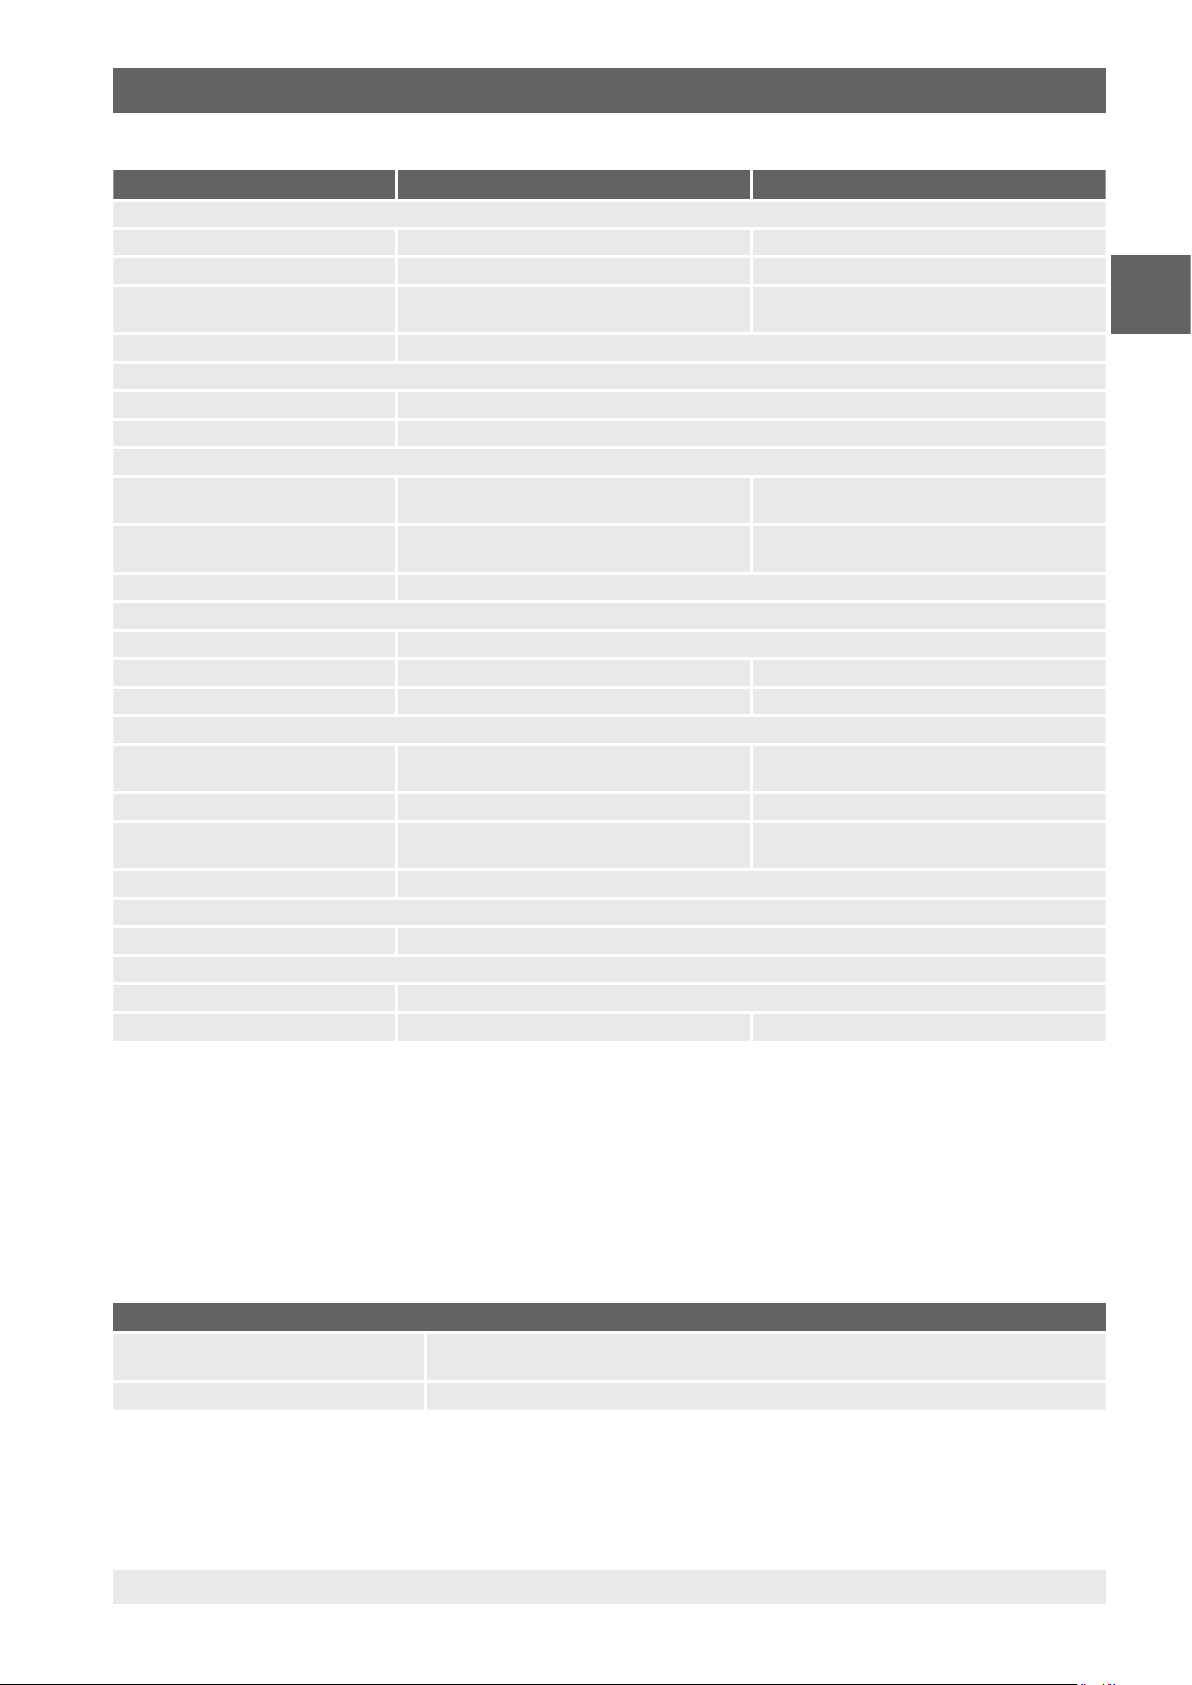
12. Specifications
CTD9100-450 CTD9100-650
Display
Temperature range 40 ... 450 °C [104 ... 842 °F] 40 ... 650 °C [104 ... 1.202 °F]
Accuracy
Stability
1)
2)
Resolution 0.01 to 100 °C, then 0.1 [0.01 up to 212 °F, then 0.1]
Temperature distribution
Axial homogeneity
Radial homogeneity
3)
4)
Temperature control
Heating time aproxx. 14 min from 20 to 450 °C
Cooling time aproxx. 60 min from 450 to 100 °C
Stabilisation time
5)
Insert
Immersion depth 150 mm [5.91 in]
Insert dimensions Ø 60 x 150 mm [Ø 2.36 x 5.91 in] Ø 28 x 150 mm [Ø 1.1 x 5.91 in]
Insert material Aluminium Brass
Voltage supply
Power supply AC 230/240 V, 50/60 Hz AC 230 V, 50/60 Hz
Power consumption 2,000 VA 1,000 VA
Fuse 10 A slow blow fuse 10 A slow blow fuse (at AC 110 V)
Power cord AC 230 V; for Europe
Communication
Interface RS-485
Case
Dimensions (W x H x D) 150 x 270 x 400 mm [5.91 x 10.63 x 15.75 in]
Weight 7.5 kg [16.5 lbs] 8 kg [17.64 lbs]
1) Is defined as the measuring deviation between the measured value and the reference value.
2) Maximum temperature difference at a stable temperature over 30 minutes.
3) Maximum temperature difference at 40 mm [1.57 in] above the bottom.
4) Maximum temperature difference between the bores (all thermometers inserted to the same depth).
5) Time before reaching a stable value.
6) Instrument design available with multi-voltage power supply
7) AC 115 V power supply must be specified on the order, otherwise an AC 230 V one will be delivered.
0.3 ... 0.5 K 0.3 ... 0.8 K
±0.05 K up to 100 °C [212 °F]
±0.1 K up to 450 °C [842 °F]
±0.05 K up to 100 °C [212 °F]
±0.1 K up to 600 °C [1,112 °F]
dependent on temperature, temperature probes and their quantity
dependent on temperature, temperature probes and their quantity
aproxx. 20 min from 20 to 600 °C
[from 68 °F to 842 °F]
[from 68 °F to 1,112 °F]
aproxx. 60 min from 600 to 100 °C
[from 842 °F to 212 °F]
[from 1,112 °F to 212 °F]
dependent on temperature and temperature probe
(AC 100 ... 240 V, 50/60 Hz)
6.3 A slow blow fuse (at AC 230 V)
6)
EN
7)
The measurement uncertainty is defined as the total measurement uncertainty (k = 2), which contains the following shares:
accuracy, measurement uncertainty of reference, stability and homogeneity..
Certificates
Certificate
Calibration Standard: 3.1 calibration certificate per DIN EN 10204
Option: DKD/DAkkS calibration certificate
Recommended recalibration interval 1 year (dependent on conditions of use)
Approvals and certificates, see website
For further specifications see WIKA data sheet CT 41.28 and the order documentation.
11263911.05 03/2019 EN/DE/IT
37WIKA operating instructions, models CTD9100, CTB9100, CTM9100
Page 38

12. Specifications
12.2 Micro calibration bath, CTB9100 series
Model CTB9100-165 Model CTB9100-225
Display
Temperature range -35 ... +165 °C [-31 ... +329 °F] 40 ... 225 °C [104 ... 437 °F]
EN
Accuracy
Stability
1)
2)
Resolution 0.1 °C
Temperature distribution
Axial homogeneity
Radial homogeneity
3)
4)
Temperature control
Heating time approx. 45 min from 20 °C to 160 °C
Cooling time approx. 30 min from +20 °C to -20 °C
Stabilisation time
5)
Tank
Insertion depth 150 mm [5.91 in]
Volume approx. 0.6 litres
Tank dimensions Ø 60 x 165 mm [Ø 2.36 x 5.91 in]
Voltage supply
Power supply AC 100 ... 240 V, 50/60 Hz AC 230 V, 50/60 Hz
Power consumption 375 VA 1,000 VA
Fuse 6.3 A slow blow fuse 10 A slow blow fuse (at AC 110 V)
Power cord AC 230 V; for Europe
Communication
Interface RS-485
Case
Dimensions (W x D x H) 215 x 305 x 425 mm [8.46 x 12.00 x 16.73 in] 150 x 270 x 400 mm [5.91 x 10.63 x 15.75 in]
Weight 12 kg [26.5 lbs] 7.9 kg [17.5 lbs]
1) Is defined as the measuring deviation between the measured value and the reference value.
2) Maximum temperature difference at a stable temperature over 30 minutes.
3) Maximum temperature difference at 40 mm [1.57 in] above the bottom.
4) Maximum temperature difference between the bores (all thermometers inserted to the same depth).
5) Time before reaching a stable value.
6) AC 115 V power supply must be specified on the order, otherwise an AC 230 V one will be delivered.
±0.2 K ±0.3 K
±0.05 K
dependent on temperature, temperature probes and their quantity
dependent on temperature, temperature probes and their quantity
[from 68 °F to 320 °F]
[from +68 °F to -4 °F]
dependent on temperature and temperature probe
optionally 40 ... 255 °C [104 ... 491 °F]
approx. 10 min from 20 °C to 225 °C
[from 68 °F to 437 °F]
approx. 30 min from 225 °C to 50 °C
[from 437 °F to 122 °F]
(AC 115 V, 50/60 Hz)
6)
6.3 A slow blow fuse (at AC 230 V)
The measurement uncertainty is defined as the total measurement uncertainty (k = 2), which contains the following shares:
accuracy, measurement uncertainty of reference, stability and homogeneity.
38 WIKA operating instructions, models CTD9100, CTB9100, CTM9100
11263911.05 03/2019 EN/DE/IT
Page 39

12. Specifications
Certificates
Certificate
Calibration Standard: 3.1 calibration certificate per DIN EN 10204
Option: DKD/DAkkS calibration certificate
Recommended recalibration interval 1 year (dependent on conditions of use)
Approvals and certificates, see website
For further specifications see WIKA data sheet CT 46.30 and the order documentation.
Bath liquids
Accessories Model CTB9100-165 Model CTB9100-225
Silicone oil DC 200.05:
-40 ... +130 °C [-40 ... +266 °F]
FP 8) = 133 °C [271.4 °F]
Silicone oil DC 200.10:
-35 ... +160 °C [-31 ... +320 °F]
8)
= 163 °C [325.4 °F]
FP
Silicone oil DC 200.20:
10 ... 220 °C [50 ... 428 °F]
8)
= 230 °C [446 °F]
FP
Silicone oil DC 200.50:
25 ... 250 °C [77 ... 482 °F]
8)
= 280 °C [536 °F]
FP
8) FP = flash point open cup
from -35 ... +130 °C [-31 ... +266 °F]
very well usable
from -35 ... +160 °C [-31 ... +320 °F]
well usable
not recommended from 40 ... 225 °C [104 ... 437 °F] well usable
not recommended from 80 ... 255 °C [176 ... 491 °F] well usable
not recommended
not recommended
EN
11263911.05 03/2019 EN/DE/IT
39WIKA operating instructions, models CTD9100, CTB9100, CTM9100
Page 40
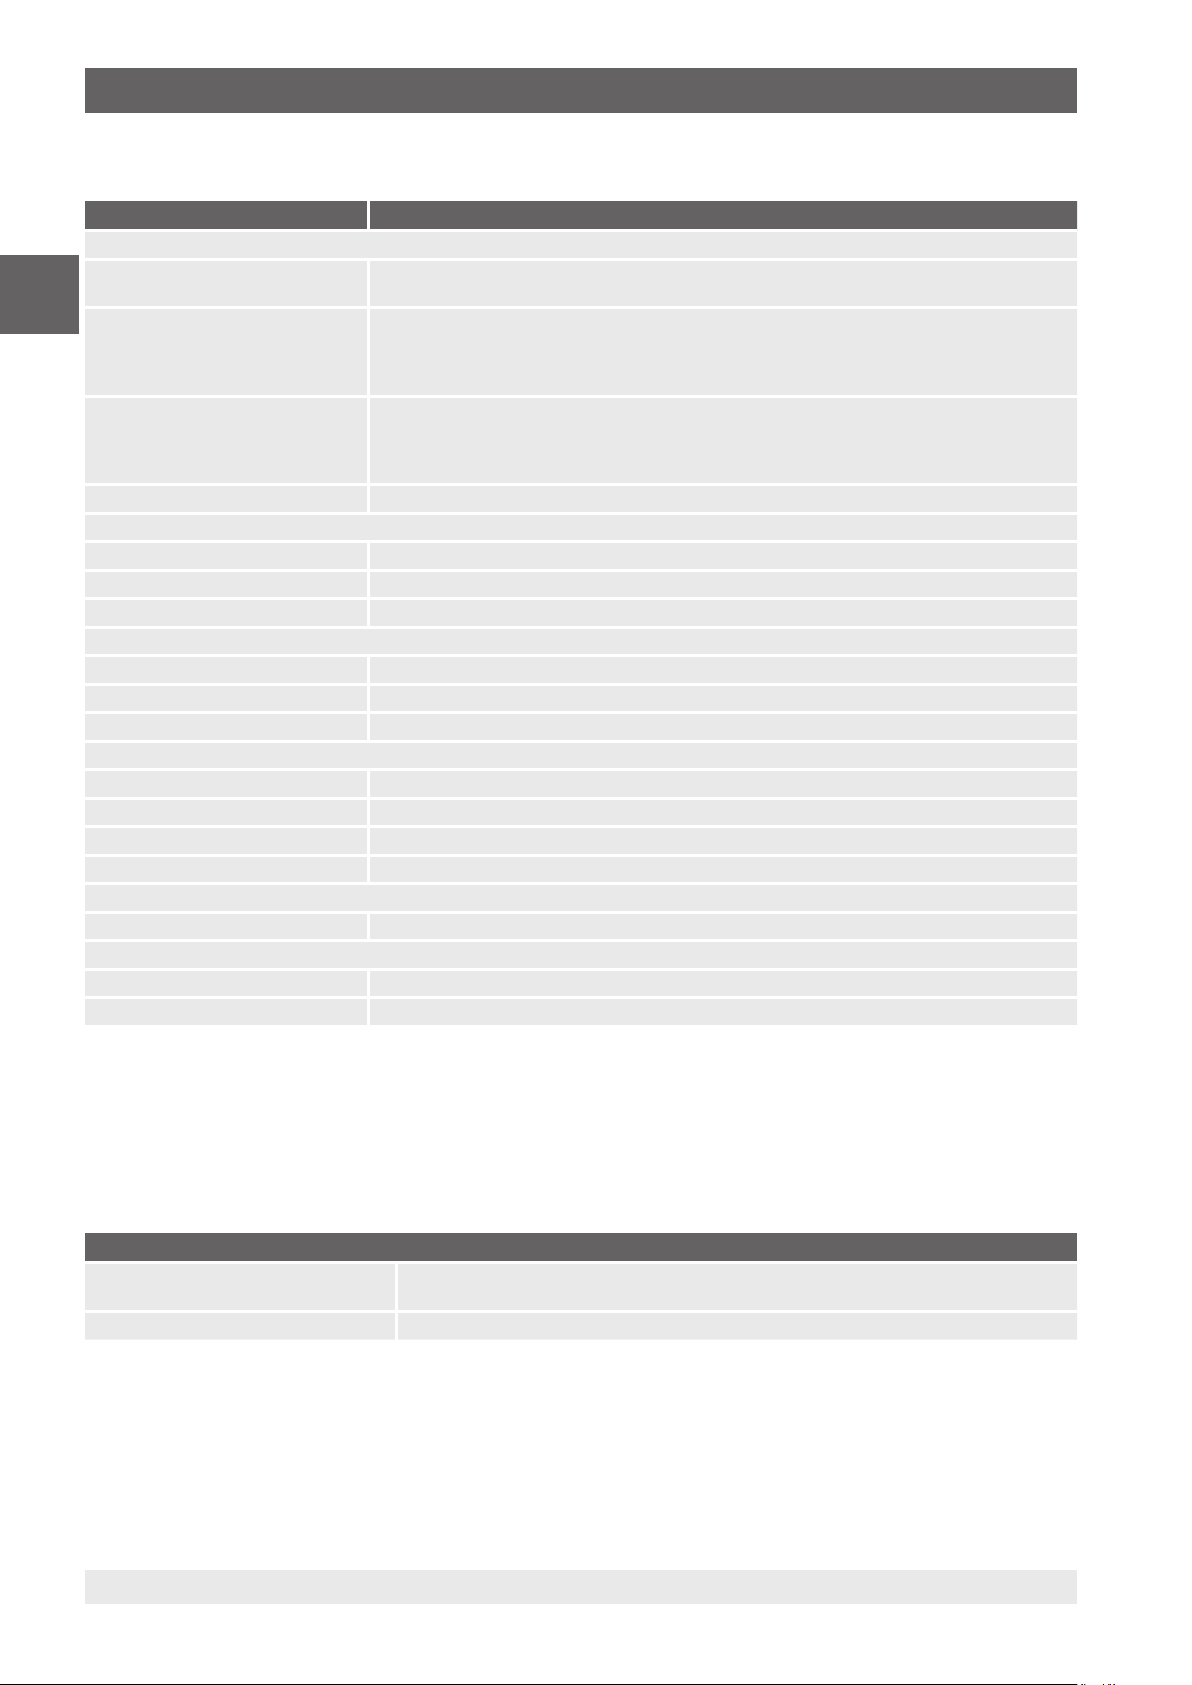
12. Specifications
12.3 Multi-function calibrator, model CTM9100-150
Specifications Model CTM9100-150
Display
Temperature range -20 ... +150 °C [-4 ... 302 °F]
EN
Accuracy
Stability
Resolution 0.01 to 100 °C, then 0.1 [0.01 up to 212 °F, then 0.1]
Temperature control
Heating time depending upon usage and area of application
Cooling time depending upon usage and area of application
Stabilisation time
Insert
Immersion depth 150 mm [5.91 in]
Insert dimensions Ø 60 x 170 mm [Ø 2.36 x 6.69 in]
Insert material Aluminium
Voltage supply
Power supply AC 100 ... 240 V, 50/60 Hz
Power consumption 400 VA
Fuse 6.3 A slow blow fuse
Power cord AC 230 V; for Europe
Communication
Interface RS-485
Case
Dimensions (W x D x H) 215 x 305 x 425 mm [8.46 x 12.0 x 16.73 in]
Weight 12 kg [26.5 lbs]
1) Is defined as the measuring deviation between the measured value and the reference value.
2) Maximum temperature difference at a stable temperature over 30 minutes.
3) Time before reaching a stable value.
1)
2)
3)
-35 ... +165 °C [-31 ... 329 °F] Use as a micro calibration bath
±0.2 K
±0.3 K
±1 K
±1 K
±0.05 K
±0.05 K
±0.2 K
±0.2 K
depending upon usage and area of application
Use as a micro calibration bath
Use as a dry-well calibrator
Use as an infrared black body
Use as a surface temperature calibrator
Use as a micro calibration bath
Use as a dry-well calibrator
Use as an infrared black body
Use as a surface temperature calibrator
The measurement uncertainty is defined as the total measurement uncertainty (k = 2), which contains the following shares:
accuracy, measurement uncertainty of reference, stability and homogeneity.
Certificates
Certificate
Calibration Standard: 3.1 calibration certificate per DIN EN 10204
Option: DKD/DAkkS calibration certificate
Recommended recalibration interval 1 year (dependent on conditions of use)
Approvals and certificates, see website
For further specifications see WIKA data sheet CT 41.40 and the order documentation.
40 WIKA operating instructions, models CTD9100, CTB9100, CTM9100
11263911.05 03/2019 EN/DE/IT
Page 41

13. Accessories
13. Accessories
13.1 CTD9100 series
Inserts and accessories
■
Drilled standard insert, depends on instrument version
■
Inserts, undrilled and drilled to specification
■
Replacement tools
Power connection
■
Power cord, 1.5 m [5 ft] with safety plug
■
Power cord for Switzerland
■
Power cord for USA/Canada
■
Power cord for UK
Software and accessories
■
Software package to operate the calibrator
■
Serial interface cable with integrated RS-485 to USB 2.0
converter
Certificates
■
3.1 calibration certificate per DIN EN 10204
■
DKD/DAkkS calibration certificate
Miscellaneous
■
Transport case
13.3 Model CTM9100-150
Inserts and accessories
■
Insert with seven holes:
Ø 1 x 2 mm, 3 x 3.5 mm, 2 x 4.5 mm, 1 x 6 mm
[Ø 1 x 0,08 in, 3 x 0,14 in, 2 x 0,18 in, 1 x 0,24 in]
■
Surface insert
■
Infrared insert
■
Replacement tool
Power connection
■
Power cord, 1.5 m [5 ft] with safety plug
■
Power cord for Switzerland
■
Power cord for USA/Canada
■
Power cord for UK
Software and accessories
■
Software package to operate the calibrator
■
Serial interface cable with integrated RS-485 to USB 2.0
converter
Certificates
■
3.1 calibration certificate per DIN EN 10204
■
DKD/DAkkS calibration certificate
EN
13.2 CTB9100 series
Bath accessories
■
Screw cover
■
Silicone oil in 1 litre plastic container
■
Magnetic stirrer and plastic or metal screw-on cap
■
Insert for liquids consisting of: insert with leak-proof cover,
sensor basket, magnetic stirrer and lifter, replacement tool
(for re-ordering a re-adjustment is necessary)
Power connection
■
Power cord, 1.5 m [5 ft] with safety plug
■
Power cord for Switzerland
■
Power cord for USA/Canada
■
Power cord for UK
Software and accessories
■
Software package to operate the calibrator
■
Serial interface cable with integrated RS-485 to USB 2.0
converter
Certificates
■
3.1 calibration certificate per DIN EN 10204
■
DKD/DAkkS calibration certificate
Miscellaneous
■
Transport case
■
External reference
■
Bath liquid and drain pump
Miscellaneous
■
Transport case
■
Drain pump
11263911.05 03/2019 EN/DE/IT
41WIKA operating instructions, models CTD9100, CTB9100, CTM9100
Page 42

14. Heating and cooling times
14. Heating and cooling times
14.1 Dry-well temperature calibrator, model CTD9100-COOL
Measuring conditions
■
EN
All times refer to a Pt100 reference sensor with Ø 6 mm
[0.24 in].
■
The reference sensor is positioned, at full depth, centrally
in the insert.
Insert
Heating up Time Cooling Time
-55 °C to -45 °C -67 °F to -49 °F 0:36 min 200 °C to 175 °C 392 °F to 347 °F 2:02 min
-45 °C to -35 °C -49 °F to -31 °F 0:25 min 175 °C to 150 °C 347 °F to 302 °F 1:41 min
-35 °C to -25 °C -31 °F to -13 °F 0:20 min 150 °C to 125 °C 302 °F to 257 °F 1:46 min
-25 °C to -15 °C -13 °F to +5 °F 0:20 min 125 °C to 100 °C 257 °F to 212 °F 2:07 min
-15 °C to 0 °C 5 °F to 32 °F 0:26 min 100 °C to 75 °C 212 °F to 167 °F 2:22 min
0 °C to 25 °C 32 °F to 77 °F 0:40 min 75 °C to 50 °C 167 °F to 122 °F 2:47 min
25 °C to 50 °C 77 °F to 122 °F 0:41 min 50 °C to 25 °C 122 °F to 77 °F 3:28 min
50 °C to 75 °C 122 °F to 167 °F 0:45 min 25 °C to 0 °C 77 °F to 32 °F 4:38 min
75 °C to 100 °C 167 °F to 212 °F 0:41 min 0 °C to -15 °C 32 °F to 5 °F 3:43 min
100 °C to 125 °C 212 °F to 257 °F 0:45 min -15 °C to -25 °C +5 °F to -13 °F 3:07 min
125 °C to 150 °C 257 °F to 302 °F 0:46 min -25 °C to -35 °C -13 °F to -31 °F 4:13 min
150 °C to 175 °C 302 °F to 347 °F 0:56 min -35 °C to -45 °C -31 °F to -49 °F 6:10 min
175 °C to 200 °C 347 °F to 392 °F 2:01 min -45 °C to -55 °C -49 °F to -67 °F 12:14 min
■
All times are transition times and do not account for the
required settling time.
■
The measurements were carried out at a room
temperature of approx. 23 °C [73 °F].
14.2 Dry-well temperature calibrator, model CTD9100-165
Measuring conditions
■
All times refer to a Pt100 reference sensor with Ø 6 mm
[0.24 in].
■
The reference sensor is positioned, at full depth, centrally
in the insert.
■
All times are transition times and do not account for the
required settling time.
■
The measurements were carried out at a room
temperature of approx. 23 °C [73 °F].
Insert
Heating up Time Cooling Time
-30 °C to -25 °C -22 °F to -13 °F 0:32 min 165 °C to 150 °C 329 °F to 302 °F 1:13 min
-25 °C to -15 °C -13 °F to +5 °F 0:56 min 150 °C to 125 °C 302 °F to 257 °F 1:54 min
-15 °C to 0 °C 5 °F to 32 °F 1:19 min 125 °C to 100 °C 257 °F to 212 °F 2:11 min
0 °C to 25 °C 32 °F to 77 °F 2:15 min 100 °C to 75 °C 212 °F to 167 °F 2:38 min
25 °C to 50 °C 77 °F to 122 °F 2:42 min 75 °C to 50 °C 167 °F to 122 °F 3:13 min
50 °C to 75 °C 122 °F to 167 °F 3:09 min 50 °C to 25 °C 122 °F to 77 °F 4:16 min
75 °C to 100 °C 167 °F to 212 °F 4:17 min 25 °C to 0 °C 77 °F to 32 °F 6:26 min
100 °C to 125 °C 212 °F to 257 °F 4:30 min 0 °C to -15 °C 32 °F to 5 °F 6:08 min
125 °C to 150 °C 257 °F to 302 °F 5:46 min -15 °C to -25 °C +5 °F to -13 °F 7:03 min
150 °C to 165 °C 302 °F to 329 °F 5:31 min -25 °C to -30 °C -13 °F to -22 °F 6:21 min
11263911.05 03/2019 EN/DE/IT
42 WIKA operating instructions, models CTD9100, CTB9100, CTM9100
Page 43

14. Heating and cooling times
14.3 Dry-well temperature calibrator, model CTD9100-165-X
Measuring conditions
■
All times refer to a Pt100 reference sensor with Ø 6 mm
[0.24 in].
■
The reference sensor is positioned, at full depth, centrally
in the insert.
Insert
Heating up Time Cooling Time
-35 °C to -30 °C -31 °F to -22 °F 1:05 min 165 °C to 150 °C 329 °F to 302 °F 2:00 min
-30 °C to -25 °C -22 °F to -13 °F 0.45 min 150 °C to 125 °C 302 °F to 257 °F 3:21 min
-25 °C to -20 °C -13 °F to -4 °F 0:26 min 125 °C to 100 °C 257 °F to 212 °F 3:57 min
-20 °C to -15 °C -4 °F to +5 °F 0:40 min 100 °C to 75 °C 212 °F to 167 °F 4:47 min
-15 °C to -10 °C 5 °F to 14 °F 0:40 min 75 °C to 50 °C 167 °F to 122 °F 5:51 min
-10 °C to 0 °C 14 °F to 32 °F 1:21 min 50 °C to 25 °C 122 °F to 77 °F 7:58 min
0 °C to 25 °C 32 °F to 77 °F 3:26 min 25 °C to 0 °C 77 °F to 32 °F 12:24 min
25 °C to 50 °C 77 °F to 122 °F 3:51 min 0 °C to -10 °C 32 °F to 14 °F 6:43 min
50 °C to 75 °C 122 °F to 167 °F 4:06 min -10 °C to -15 °C 14 °F to 5 °F 4:26 min
75 °C to 100 °C 167 °F to 212 °F 4:57 min -15 °C to -20 °C +5 °F to -4 °F 5:27 min
100 °C to 125 °C 212 °F to 257 °F 6:17 min -20 °C to -25 °C -4 °F to -13 °F 7:17 min
125 °C to 150 °C 257 °F to 302 °F 9:18 min -25 °C to -20 °C -13 °F to -22 °F 11:09 min
150 °C to 165 °C 302 °F to 329 °F 8:59 min -30 °C to -35 °C -22 °F to -31 °F 24:18 min
■
All times are transition times and do not account for the
required settling time.
■
The measurements were carried out at a room
temperature of approx. 23 °C [73 °F].
EN
14.4 Dry-well temperature calibrator, model CTD9100-450
Measuring conditions
■
All times refer to a Pt100 reference sensor with Ø 6 mm
[0.24 in].
■
The reference sensor is positioned, at full depth, centrally
in the insert.
■
All times are transition times and do not account for the
required settling time.
■
The measurements were carried out at a room
temperature of approx. 23 °C [73 °F].
Insert
Heating up Time Cooling Time
25 °C to 40 °C 77 °F to 104 °F 1:00 min 450 °C to 400 °C 842 °F to 752 °F 5:36 min
40 °C to 50 °C 104 °F to 122 °F 0:31 min 400 °C to 350 °C 752 °F to 662 °F 5:10 min
50 °C to 100 °C 122 °F to 212 °F 1:38 min 350 °C to 300 °C 662 °F to 572 °F 6:06 min
100 °C to 150 °C 212 °F to 302 °F 1:23 min 300 °C to 250 °C 572 °F to 482 °F 7:28 min
150 °C to 200 °C 302 °F to 392 °F 1:16 min 250 °C to 200 °C 482 °F to 392 °F 9:14 min
200 °C to 250 °C 392 °F to 482 °F 1:18 min 200 °C to 150 °C 392 °F to 302 °F 12:07 min
250 °C to 300 °C 482 °F to 572 °F 1:23 min 150 °C to 100 °C 302 °F to 212 °F 18:00 min
300 °C to 350 °C 572 °F to 662 °F 1:33 min 100 °C to 50 °C 212 °F to 122 °F 37:01 min
350 °C to 400 °C 662 °F to 752 °F 1:53 min 50 °C to 40 °C 122 °F to 104 °F 15:45 min
400 °C to 450 °C 752 °F to 842 °F 2:33 min 40 °C to 25 °C 104 °F to 77 °F 50:53 min
11263911.05 03/2019 EN/DE/IT
43WIKA operating instructions, models CTD9100, CTB9100, CTM9100
Page 44

14. Heating and cooling times
14.5 Dry-well temperature calibrator, model CTD9100-650
Measuring conditions
■
All times refer to a Pt100 reference sensor with Ø 6 mm
[0.24 in].
■
EN
The reference sensor is positioned, at full depth, centrally
in the insert.
Insert
Heating up Time Cooling Time
25 °C to 40 °C 77 °F to 104 °F 0:54 min 650 °C to 600 °C 1,202 °C to 1,112 °C 2:25 min
40 °C to 50 °C 104 °F to 122 °F 0:22 min 600 °C to 550 °C 1,112 °C to 1,022 °C 2:33 min
50 °C to 100 °C 122 °F to 212 °F 1:18 min 550 °C to 500 °C 1,022 °C to 932 °C 2:55 min
100 °C to 150 °C 212 °F to 302 °F 1:06 min 500 °C to 450 °C 932 °C to 842 °C 3:27 min
150 °C to 200 °C 302 °F to 392 °F 1:03 min 450 °C to 400 °C 842 °F to 752 °F 4:01 min
200 °C to 250 °C 392 °F to 482 °F 1:05 min 400 °C to 350 °C 752 °F to 662 °F 4:39 min
250 °C to 300 °C 482 °F to 572 °F 1:06 min 350 °C to 300 °C 662 °F to 572 °F 5:36 min
300 °C to 350 °C 572 °F to 662 °F 1:09 min 300 °C to 250 °C 572 °F to 482 °F 6:46 min
350 °C to 400 °C 662 °F to 752 °F 1:21 min 250 °C to 200 °C 482 °F to 392 °F 8:32 min
400 °C to 450 °C 752 °F to 842 °F 1:30 min 200 °C to 150 °C 392 °F to 302 °F 11:22 min
450 °C to 500 °C 842 °C to 932 °C 1:32 min 150 °C to 100 °C 302 °F to 212 °F 17:01 min
500 °C to 550 °C 932 °C to 1,022 °C 1:38 min 100 °C to 50 °C 212 °F to 122 °F 52:37 min
550 °C to 600 °C 1,022 °C to 1,112 °C 1:55 min 50 °C to 40 °C 122 °F to 104 °F 15:23 min
600 °C to 650 °C 1,112 °C to 1,202 °C 2:33 min 40 °C to 25 °C 104 °F to 77 °F 1:01:58 min
■
All times are transition times and do not account for the
required settling time.
■
The measurements were carried out at a room
temperature of approx. 23 °C [73 °F].
44 WIKA operating instructions, models CTD9100, CTB9100, CTM9100
11263911.05 03/2019 EN/DE/IT
Page 45

14. Heating and cooling times
14.6 Micro calibration bath, model CTB9100-165
Measuring conditions
■
All times refer to a Pt100 reference sensor with Ø 6 mm
[0.24 in].
■
The reference sensor is positioned centrally in the tank,
5 mm [0.2 in] over the strainer insert.
Distilled water
Heating up Time Cooling Time
2 °C to 25 °C 36 °F to 77 °F 5:31 min 90 °C to 75 °C 194 °F to 167 °F 3:09 min
25 °C to 50 °C 77 °F to 122 °F 6:49 min 75 °C to 50 °C 167 °F to 122 °F 7:06 min
50 °C to 75 °C 122 °F to 167 °F 8:07 min 50 °C to 25 °C 122 °F to 77 °F 10:18 min
75 °C to 90 °C 167 °F to 194 °F 6:19 min 25 °C to 2 °C 77 °F to 36 °F 14:52 min
Silicone oil 5 CS
Heating up Time Cooling Time
-30 °C to -25 °C -22 °F to -13 °F 0:56 min 120 °C to 100 °C 248 °F to 212 °F 32:24 min
-25 °C to -15 °C -13 °F to +5 °F 1:06 min 100 °C to 75 °C 212 °F to 167 °F 3:40 min
-15 °C to 0 °C 5 °F to 32 °F 1:18 min 75 °C to 50 °C 167 °F to 122 °F 4:48 min
0 °C to 25 °C 32 °F to 77 °F 2:46 min 50 °C to 25 °C 122 °F to 77 °F 6:41 min
25 °C to 50 °C 77 °F to 122 °F 2:37 min 25 °C to 0 °C 77 °F to 32 °F 8:50 min
50 °C to 75 °C 122 °F to 167 °F 3:10 min 0 °C to -15 °C 32 °F to 5 °F 10:36 min
75 °C to 100 °C 167 °F to 212 °F 4:23 min -15 °C to -25 °C +5 °F to -13 °F 15:01 min
100 °C to 120 °C 212 °F to 248 °F 5:05 min -25 °C to -30 °C -13 °F to -22 °F 23:19 min
■
All times are transition times and do not account for the
required settling time.
■
The measurements were carried out at a room
temperature of approx. 23 °C [73 °F], with the cover off the
bath.
EN
Silicone oil 10 CS
Heating up Time Cooling Time
-30 °C to -25 °C -22 °F to -13 °F 1:17 min 165 °C to 150 °C 329 °F to 302 °F 1:54 min
-25 °C to -15 °C -13 °F to +5 °F 1:17 min 150 °C to 125 °C 302 °F to 257 °F 2:37 min
-15 °C to 0 °C 5 °F to 32 °F 1:20 min 125 °C to 100 °C 257 °F to 212 °F 3:11 min
0 °C to 25 °C 32 °F to 77 °F 1:56 min 100 °C to 75 °C 212 °F to 167 °F 3:59 min
25 °C to 50 °C 77 °F to 122 °F 2:30 min 75 °C to 50 °C 167 °F to 122 °F 5:02 min
50 °C to 75 °C 122 °F to 167 °F 3:13 min 50 °C to 25 °C 122 °F to 77 °F 6:57 min
75 °C to 100 °C 167 °F to 212 °F 4:24 min 25 °C to 0 °C 77 °F to 32 °F 8:26 min
100 °C to 125 °C 212 °F to 257 °F 6:47 min 0 °C to -15 °C 32 °F to 5 °F 9:58 min
125 °C to 150 °C 257 °F to 302 °F 12:51 min -15 °C to -25 °C +5 °F to -13 °F 15:33 min
150 °C to 165 °C 302 °F to 329 °F 18:21 min -25 °C to -30 °C -13 °F to -30 °F 29:45 min
11263911.05 03/2019 EN/DE/IT
45WIKA operating instructions, models CTD9100, CTB9100, CTM9100
Page 46

14. Heating and cooling times
Silicone oil 20 CS
Heating up Time Cooling Time
-30 °C to -25 °C -22 °F to -13 °F 1:14 min 165 °C to 150 °C 329 °F to 302 °F 1:37 min
-25 °C to -15 °C -13 °F to +5 °F 1:11 min 150 °C to 125 °C 302 °F to 257 °F 2:38 min
EN
-15 °C to 0 °C 5 °F to 32 °F 1:31 min 125 °C to 100 °C 257 °F to 212 °F 3:16 min
0 °C to 25 °C 32 °F to 77 °F 2:39 min 100 °C to 75 °C 212 °F to 167 °F 3:47 min
25 °C to 50 °C 77 °F to 122 °F 2:59 min 75 °C to 50 °C 167 °F to 122 °F 4:33 min
50 °C to 75 °C 122 °F to 167 °F 4:17 min 50 °C to 25 °C 122 °F to 77 °F 5:57 min
75 °C to 100 °C 167 °F to 212 °F 5:18 min 25 °C to 0 °C 77 °F to 32 °F 7:49 min
100 °C to 125 °C 212 °F to 257 °F 7:09 min 0 °C to -15 °C 32 °F to 5 °F 10:17 min
125 °C to 150 °C 257 °F to 302 °F 12:06 min -15 °C to -25 °C +5 °F to -13 °F 15:19 min
150 °C to 165 °C 302 °F to 329 °F 21:04 min -25 °C to -30 °C -13 °F to -22 °F 20:52 min
Silicone oil 50 CS
Heating up Time Cooling Time
-30 °C to -25 °C -22 °F to -13 °F 1:53 min 165 °C to 150 °C 329 °F to 302 °F 1:59 min
-25 °C to -15 °C -13 °F to +5 °F 1:22 min 150 °C to 125 °C 302 °F to 257 °F 2:31 min
-15 °C to 0 °C 5 °F to 32 °F 1:38 min 125 °C to 100 °C 257 °F to 212 °F 2:58 min
0 °C to 25 °C 32 °F to 77 °F 2:46 min 100 °C to 75 °C 212 °F to 167 °F 3:17 min
25 °C to 50 °C 77 °F to 122 °F 3:15 min 75 °C to 50 °C 167 °F to 122 °F 4:13 min
50 °C to 75 °C 122 °F to 167 °F 3:52 min 50 °C to 25 °C 122 °F to 77 °F 6:40 min
75 °C to 100 °C 167 °F to 212 °F 5:08 min 25 °C to 0 °C 77 °F to 32 °F 9:17 min
100 °C to 125 °C 212 °F to 257 °F 6:56 min 0 °C to -15 °C 32 °F to 5 °F 11:46 min
125 °C to 150 °C 257 °F to 302 °F 11:38 min -15 °C to -25 °C +5 °F to -13 °F 16:55 min
150 °C to 165 °C 302 °F to 329 °F 17:04 min -25 °C to -30 °C -13 °F to -22 °F 23:38 min
46 WIKA operating instructions, models CTD9100, CTB9100, CTM9100
11263911.05 03/2019 EN/DE/IT
Page 47

14. Heating and cooling times
14.7 Micro calibration bath, model CTB9100-225
■
Measuring conditions
■
All times refer to a Pt100 reference sensor with Ø 6 mm
[0.24 in].
■
The reference sensor is positioned centrally in the tank,
5 mm [0.2 in] over the strainer insert.
Distilled water
Heating up Time Cooling Time
25 °C to 40 °C 77 °F to 104 °F 0:55 min 90 °C to 75 °C 194 °F to 167 °F 5:53 min
40 °C to 50 °C 104 °F to 122 °F 0:37 min 75 °C to 50 °C 167 °F to 122 °F 15:17 min
50 °C to 75 °C 122 °F to 167 °F 1:27 min 50 °C to 40 °C 122 °F to 104 °F 10:50 min
75 °C to 90 °C 167 °F to 194 °F 1:30 min 40 °C to 25 °C 104 °F to 77 °F 45:26 min
Silicone oil 5 CS
Heating up Time Cooling Time
25 °C to 40 °C 77 °F to 104 °F 0:51 min 120 °C to 100 °C 248 °F to 212 °F 3:27 min
40 °C to 50 °C 104 °F to 122 °F 0:16 min 100 °C to 75 °C 212 °F to 167 °F 5:55 min
50 °C to 75 °C 122 °F to 167 °F 0:54 min 75 °C to 50 °C 167 °F to 122 °F 10:00 min
75 °C to 100 °C 167 °F to 212 °F 1:13 min 50 °C to 40 °C 122 °F to 104 °F 7:02 min
100 °C to 120 °C 212 °F to 248 °F 1:35 min 40 °C to 25 °C 104 °F to 77 °F 34:28 min
All times are transition times and do not account for the
required settling time.
■
The measurements were carried out at a room
temperature of approx. 23 °C [73 °F], with the cover off the
bath.
EN
Silicone oil 10 CS
Heating up Time Cooling Time
25 °C to 40 °C 77 °F to 104 °F 0:52 min 165 °C to 150 °C 329 °F to 302 °F 1:40 min
40 °C to 50 °C 104 °F to 122 °F 0:22 min 150 °C to 125 °C 302 °F to 257 °F 3:17 min
50 °C to 75 °C 122 °F to 167 °F 0:52 min 125 °C to 100 °C 257 °F to 212 °F 4:14 min
75 °C to 100 °C 167 °F to 212 °F 0:53 min 100 °C to 75 °C 212 °F to 167 °F 5:59 min
100 °C to 125 °C 212 °F to 257 °F 0:59 min 75 °C to 50 °C 167 °F to 122 °F 9:59 min
125 °C to 150 °C 257 °F to 302 °F 1:12 min 50 °C to 40 °C 122 °F to 104 °F 7:00 min
150 °C to 165 °C 302 °F to 329 °F 1:03 min 40 °C to 25 °C 104 °F to 77 °F 31:40 min
Silicone oil 20 CS
Heating up Time Cooling Time
25 °C to 40 °C 77 °F to 104 °F 1:20 min 225 °C to 200 °C 437 °F to 392 °F 2:08 min
40 °C to 50 °C 104 °F to 122 °F 0:22 min 200 °C to 165 °C 392 °F to 329 °F 3:21 min
50 °C to 75 °C 122 °F to 167 °F 0:50 min 165 °C to 150 °C 329 °F to 302 °F 1:46 min
75 °C to 100 °C 167 °F to 212 °F 0:48 min 150 °C to 125 °C 302 °F to 257 °F 3:23 min
100 °C to 125 °C 212 °F to 257 °F 0:52 min 125 °C to 100 °C 257 °F to 212 °F 4:30 min
125 °C to 150 °C 257 °F to 302 °F 0:58 min 100 °C to 75 °C 212 °F to 167 °F 6:19 min
150 °C to 165 °C 302 °F to 329 °F 0:37 min 75 °C to 50 °C 167 °F to 122 °F 10:30 min
165 °C to 200 °C 329 °F to 392 °F 1:39 min 50 °C to 40 °C 122 °F to 104 °F 7:35 min
200 °C to 225 °C 392 °F to 437 °F 2:50 min 40 °C to 25 °C 104 °F to 77 °F 40:02 min
11263911.05 03/2019 EN/DE/IT
47WIKA operating instructions, models CTD9100, CTB9100, CTM9100
Page 48

14. Heating and cooling times
Silicone oil 50 CS
Heating up Time Cooling Time
25 °C to 40 °C 77 °F to 104 °F 1:18 min 225 °C to 200 °C 437 °F to 392 °F 2:37 min
40 °C to 50 °C 104 °F to 122 °F 0:21 min 200 °C to 165 °C 392 °F to 329 °F 3:25 min
EN
50 °C to 75 °C 122 °F to 167 °F 0:48 min 165 °C to 150 °C 329 °F to 302 °F 1:47 min
75 °C to 100 °C 167 °F to 212 °F 0:46 min 150 °C to 125 °C 302 °F to 257 °F 3:31 min
100 °C to 125 °C 212 °F to 257 °F 0:47 min 125 °C to 100 °C 257 °F to 212 °F 4:21 min
125 °C to 150 °C 257 °F to 302 °F 0:57 min 100 °C to 75 °C 212 °F to 167 °F 6:04 min
150 °C to 165 °C 302 °F to 329 °F 0:40 min 75 °C to 50 °C 167 °F to 122 °F 10:17 min
165 °C to 200 °C 329 °F to 392 °F 1:57 min 50 °C to 40 °C 122 °F to 104 °F 7:09 min
200 °C to 225 °C 392 °F to 437 °F 4:11 min 40 °C to 25 °C 104 °F to 77 °F 35:40 min
14.8 Model CTM9100-150 as a micro calibration bath
■
Measuring conditions
■
All times refer to a Pt100 reference sensor with Ø 6 mm
[0.24 in].
■
The reference sensor is positioned centrally in the tank,
25 mm [0.98 in] over the strainer insert.
■
All times are transition times and do not account for the
required settling time.
The measurements were carried out at a room
temperature of approx. 23 °C [73 °F], with the cover off the
bath.
■
It is controlled by the internal reference sensor.
Silicone oil 10 CS
Heating up Time Cooling Time
-20 °C to -15 °C -4 °F to +5 °F 0:25 min 150 °C to 125 °C 302 °F to 257 °F 2:01 min
-15 °C to -10 °C 5 °F to 14 °F 0:25 min 125 °C to 100 °C 257 °F to 212 °F 3:27 min
-10 °C to 0 °C 14 °F to 32 °F 0:41 min 100 °C to 75 °C 212 °F to 167 °F 3:36 min
0 °C to 25 °C 32 °F to 77 °F 2:36 min 75 °C to 50 °C 167 °F to 122 °F 4:37 min
25 °C to 50 °C 77 °F to 122 °F 2:51 min 50 °C to 25 °C 122 °F to 77 °F 6:18 min
50 °C to 75 °C 122 °F to 167 °F 3:21 min 25 °C to 0 °C 77 °F to 32 °F 9:55 min
75 °C to 100 °C 167 °F to 212 °F 3:57 min 0 °C to -10 °C 32 °F to 14 °F 6:27 min
100 °C to 125 °C 212 °F to 257 °F 5:22 min -10 °C to -15 °C 14 °F to 5 °F 4:12 min
125 °C to 150 °C 257 °F to 302 °F 9:10 min -15 °C to -20 °C +5 °F to -4 °F 5:23 min
48 WIKA operating instructions, models CTD9100, CTB9100, CTM9100
11263911.05 03/2019 EN/DE/IT
Page 49
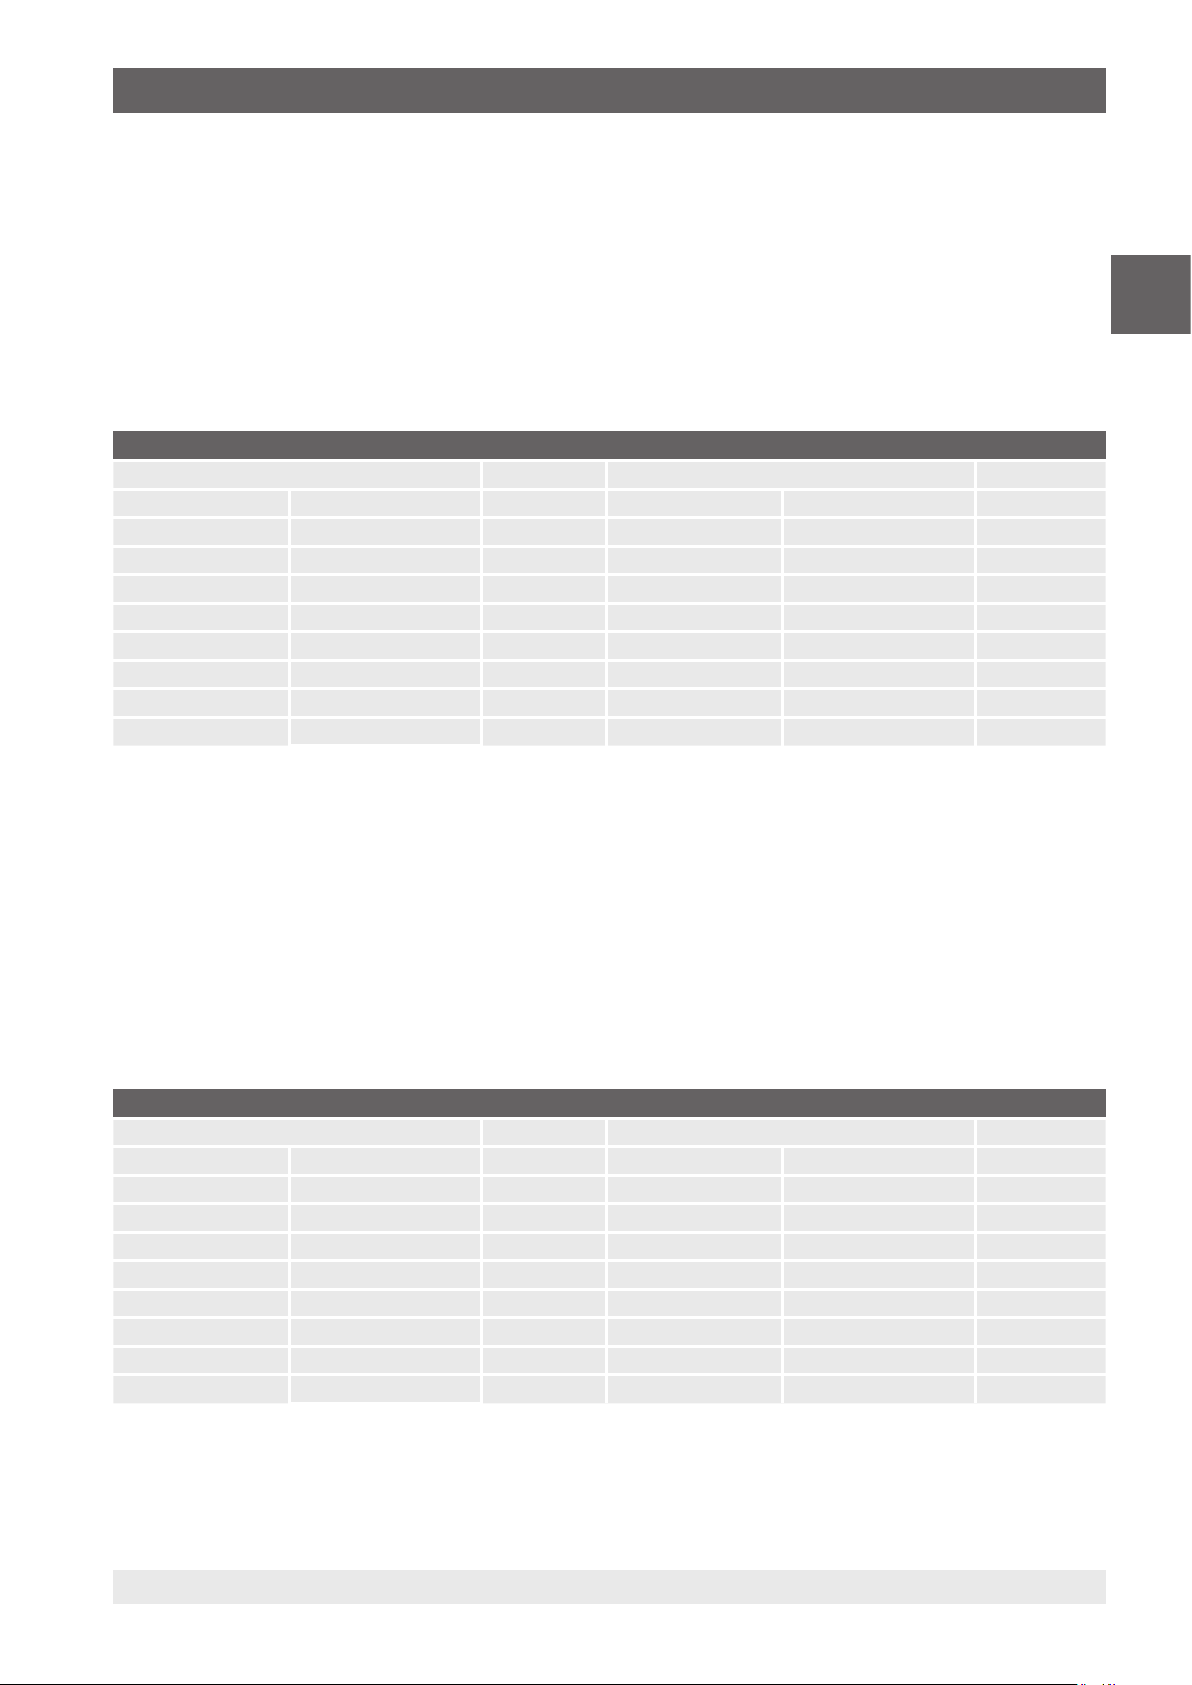
14. Heating and cooling times
14.9 Model CTM9100-150 as dry-well temperature calibrator
Measuring conditions
■
All times refer to a Pt100 reference sensor with Ø 6 mm
[0.24 in].
■
The reference sensor is located 10 mm [0.39 in] off-centre,
at a depth of 155 mm [5.91 in].
■
All times are transition times and do not account for the
required settling time.
Insert
Heating up Time Cooling Time
-20 °C to -15 °C -4 °F to +5 °F 0:42 min 150 °C to 125 °C 302 °F to 257 °F 3:37 min
-15 °C to -10 °C 5 °F to 14 °F 0:44 min 125 °C to 100 °C 257 °F to 212 °F 4:12 min
-10 °C to 0 °C 14 °F to 32 °F 1:30 min 100 °C to 75 °C 212 °F to 167 °F 5:02 min
0 °C to 25 °C 32 °F to 77 °F 3:47 min 75 °C to 50 °C 167 °F to 122 °F 6:18 min
25 °C to 50 °C 77 °F to 122 °F 4:17 min 50 °C to 25 °C 122 °F to 77 °F 8:23 min
50 °C to 75 °C 122 °F to 167 °F 4:42 min 25 °C to 0 °C 77 °F to 32 °F 12:45 min
75 °C to 100 °C 167 °F to 212 °F 5:47 min 0 °C to -10 °C 32 °F to 14 °F 7:54 min
100 °C to 125 °C 212 °F to 257 °F 7:39 min -10 °C to -15 °C 14 °F to 5 °F 5:12 min
125 °C to 150 °C 257 °F to 302 °F 12:05 min -15 °C to -20 °C +5 °F to -4 °F 6:38 min
■
The measurements were carried out at a room
temperature of approx. 23 °C [73 °F].
■
It is controlled by an external reference sensor
(3 x 300 mm [0.12 x 11.81 in]).
■
Without cap, without covering.
EN
14.10 Model CTM9100-150 as an infrared black body source
Measuring conditions
■
All times refer to a Pt100 reference sensor with Ø 3 mm
[0.12 in], L = 300 mm (11.81 in].
■
The reference sensor is inserted to a depth of 111 mm
[4.37 in].
■
All times are transition times and do not account for the
■
The measurements were carried out at a room
temperature of approx. 23 °C [73 °F].
■
It is controlled by an external reference sensor
(3 x 300 mm [0.12 x 11.81 in]).
■
Without cap, without covering.
required settling time.
Infrared insert
Heating up Time Cooling Time
-20 °C to -15 °C -4 °F to +5 °F 0:30 min 150 °C to 125 °C 302 °F to 257 °F 2:26 min
-15 °C to -10 °C 5 °F to 14 °F 0:30 min 125 °C to 100 °C 257 °F to 212 °F 2:52 min
-10 °C to 0 °C 14 °F to 32 °F 1:00 min 100 °C to 75 °C 212 °F to 167 °F 3:36 min
0 °C to 25 °C 32 °F to 77 °F 2:42 min 75 °C to 50 °C 167 °F to 122 °F 4:27 min
25 °C to 50 °C 77 °F to 122 °F 3:06 min 50 °C to 25 °C 122 °F to 77 °F 6:03 min
50 °C to 75 °C 122 °F to 167 °F 3:26 min 25 °C to 0 °C 77 °F to 32 °F 8:59 min
75 °C to 100 °C 167 °F to 212 °F 4:12 min 0 °C to -10 °C 32 °F to 14 °F 5:33 min
100 °C to 125 °C 212 °F to 257 °F 5:38 min -10 °C to -15 °C 14 °F to 5 °F 3:31 min
125 °C to 150 °C 257 °F to 302 °F 9:49 min -15 °C to -20 °C +5 °F to -4 °F 4:32 min
11263911.05 03/2019 EN/DE/IT
49WIKA operating instructions, models CTD9100, CTB9100, CTM9100
Page 50

14. Heating and cooling times
14.11 Model CTM9100-150 as surface temperature calibrator
Measuring conditions
■
All times refer to a Pt100 reference sensor with Ø 3 mm
[0.12 in], L = 150 mm [5.91 in].
■
EN
The reference sensor is inserted to a depth of 51 mm
[2.01 in], and is located under the front surface.
■
All times are transition times and do not account for the
required settling time.
Surface insert
Heating up Time Cooling Time
-20 °C to -15 °C -4 °F to +5 °F 0:46 min 150 °C to 125 °C 302 °F to 257 °F 3:11 min
-15 °C to -10 °C 5 °F to 14 °F 0:45 min 125 °C to 100 °C 257 °F to 212 °F 3:17 min
-10 °C to 0 °C 14 °F to 32 °F 1:15 min 100 °C to 75 °C 212 °F to 167 °F 3:51 min
0 °C to 25 °C 32 °F to 77 °F 2:57 min 75 °C to 50 °C 167 °F to 122 °F 5:02 min
25 °C to 50 °C 77 °F to 122 °F 3:16 min 50 °C to 25 °C 122 °F to 77 °F 6:58 min
50 °C to 75 °C 122 °F to 167 °F 3:37 min 25 °C to 0 °C 77 °F to 32 °F 11:55 min
75 °C to 100 °C 167 °F to 212 °F 4:46 min 0 °C to -10 °C 32 °F to 14 °F 9:19 min
100 °C to 125 °C 212 °F to 257 °F 6:18 min -10 °C to -15 °C 14 °F to 5 °F 7:44 min
125 °C to 150 °C 257 °F to 302 °F 10:45 min -15 °C to -20 °C +5 °F to -4 °F 12:35 min
■
The measurements were carried out at a room
temperature of approx. 23 °C [73 °F].
■
It is controlled by an external reference sensor
(3 x 300 mm [0,12 x 11,81 in]).
■
Without cap, without covering.
50 WIKA operating instructions, models CTD9100, CTB9100, CTM9100
11263911.05 03/2019 EN/DE/IT
Page 51

Inhalt
Inhalt
1. Allgemeines 53
2. Kurzübersicht 53
2.1 Überblick . . . . . . . . . . . . . . . . . . . . . . . . . . . . 53
3. Sicherheit 54
3.1 Beschreibung . . . . . . . . . . . . . . . . . . . . . . . . . . 54
3.2 Lieferumfang. . . . . . . . . . . . . . . . . . . . . . . . . . . 54
3.3 Bestimmungsgemäße Verwendung . . . . . . . . . . . . . . . . . . . 55
3.4 Fehlgebrauch . . . . . . . . . . . . . . . . . . . . . . . . . . 55
3.5 Besondere Gefahren . . . . . . . . . . . . . . . . . . . . . . . . 55
3.6 Sicherheitshinweise bei Verwendung von Kalibrierflüssigkeiten . . . . . . . . . 55
3.7 Personalqualifikation . . . . . . . . . . . . . . . . . . . . . . . . 56
3.8 Persönliche Schutzausrüstung. . . . . . . . . . . . . . . . . . . . . 56
3.9 Beschilderung, Sicherheitskennzeichnungen. . . . . . . . . . . . . . . . 57
4. Aufbau und Funktion 58
4.1 Übersicht der unterschiedlichen Gerätetypen. . . . . . . . . . . . . . . . 58
4.2 Isometrische Ansichten Temperatur-Blockkalibrator Serie CTD9100 . . . . . . . . 59
4.3 Isometrische Ansichten Mikrokalibrierbad Serie CTB9100 . . . . . . . . . . . 60
4.4 Isometrische Ansichten Multifunktionskalibrator Typ CTM9100-150 . . . . . . . . 61
4.5 Beschreibung der Bedienelemente . . . . . . . . . . . . . . . . . . . 62
4.6 Datenschnittstelle . . . . . . . . . . . . . . . . . . . . . . . . . 63
4.7 Schnittstellenprotokoll. . . . . . . . . . . . . . . . . . . . . . . . 63
4.8 Schutzleiterüberwachung . . . . . . . . . . . . . . . . . . . . . . 63
5. Transport, Verpackung und Lagerung 64
5.1 Transport . . . . . . . . . . . . . . . . . . . . . . . . . . . . 64
5.2 Verpackung und Lagerung . . . . . . . . . . . . . . . . . . . . . . 64
6. Inbetriebnahme, Betrieb 64
6.1 Betriebslage . . . . . . . . . . . . . . . . . . . . . . . . . . . 64
6.2 Einsatzhülsen bei Metallblock . . . . . . . . . . . . . . . . . . . . . 65
6.3 Vorbereiten des Mikrokalibrierbades. . . . . . . . . . . . . . . . . . . 65
6.3.1 Eigenschaften der Kalibrierflüssigkeiten . . . . . . . . . . . . . . . . . . . . . . . . . 65
6.3.2 Befüllen des Mikrokalibrierbades . . . . . . . . . . . . . . . . . . . . . . . . . . . . . 66
6.3.3 Bedienung des Magnetrührers . . . . . . . . . . . . . . . . . . . . . . . . . . . . . . 66
6.3.4 Bechereinsatz. . . . . . . . . . . . . . . . . . . . . . . . . . . . . . . . . . . . . . . . 66
6.4 Einsatzhülse Oberfläche (nur CTM9100-150) . . . . . . . . . . . . . . . 67
6.5 Einsatzhülse Infrarot (nur CTM9100-150) . . . . . . . . . . . . . . . . . 67
6.6 Prüfen von Temperaturfühlern . . . . . . . . . . . . . . . . . . . . . 68
6.7 Anfahrprozedur . . . . . . . . . . . . . . . . . . . . . . . . . . 68
6.8 Einschalten des Kalibrators/Mikrokalibrierbades. . . . . . . . . . . . . . . 68
6.9 Anzeige der Referenz- und Soll-Temperatur . . . . . . . . . . . . . . . . 68
6.10 Ausregelung der Referenztemperatur . . . . . . . . . . . . . . . . . 68
7. Bedienung des Kalibrators/Mikrokalibrierbades 69
7.1 Auswahl der Betriebsarten bei CTM9100-150 . . . . . . . . . . . . . . . 69
7.2 Arbeitsweise im Kalibriermodus innerhalb der einzelnen Betriebsarten . . . . . . . 69
7.3 Kalibrierung (Kalibriermodus) . . . . . . . . . . . . . . . . . . . . . 70
7.4 Einstellen einer temporären Soll-Temperatur (Sollwertmodus) . . . . . . . . . . 70
11263911.05 03/2019 EN/DE/IT
DE
51WIKA Betriebsanleitung, Typen CTD9100, CTB9100, CTM9100
Page 52

Inhalt
7.5 Programmierung (Hauptmenü). . . . . . . . . . . . . . . . . . . . . 71
7.5.1 Menüstruktur, Parameterebenen . . . . . . . . . . . . . . . . . . . . . . . . . . . . . 72
7.5.2 Automatische Regelung ausschalten . . . . . . . . . . . . . . . . . . . . . . . . . . . 73
7.5.3 Automatische Regelung einschalten . . . . . . . . . . . . . . . . . . . . . . . . . . . 73
7.5.4 Handregelung einschalten . . . . . . . . . . . . . . . . . . . . . . . . . . . . . . . . . 74
7.5.5 Handregelung ausschalten . . . . . . . . . . . . . . . . . . . . . . . . . . . . . . . . 74
7.5.6 Einstellen und Speichern von festen Soll-Temperaturen. . . . . . . . . . . . . . . . . 75
7.5.7 Abruf der gespeicherte Soll-Temperaturen . . . . . . . . . . . . . . . . . . . . . . . . 76
DE
8. Abkühlen des Metallblockes bzw. Mikrokalibrierbades 80
9. Störungen 81
10. Wartung, Reinigung und Rekalibrierung 82
11. Demontage, Rücksendung und Entsorgung 83
12. Technische Daten 84
13. Zubehör 89
14. Aufheiz- und Abkühlzeiten 90
7.5.8 Einstellen einer Gradientenregelung und eines Temperaturprofils . . . . . . . . . . . 76
10.1 Wartung . . . . . . . . . . . . . . . . . . . . . . . . . . . 82
10.2 Reinigung . . . . . . . . . . . . . . . . . . . . . . . . . . . 82
10.2.1 Reinigung von Kalibratoren mit Einsatzhülse. . . . . . . . . . . . . . . . . . . . . . . 82
10.2.2 Lüftergitterreinigung . . . . . . . . . . . . . . . . . . . . . . . . . . . . . . . . . . . . 82
10.2.3 Reinigung des Mikrokalibrierbades . . . . . . . . . . . . . . . . . . . . . . . . . . . . 82
10.2.4 Außenreinigung. . . . . . . . . . . . . . . . . . . . . . . . . . . . . . . . . . . . . . . 82
10.3 Rekalibrierung . . . . . . . . . . . . . . . . . . . . . . . . . 82
11.1 Demontage . . . . . . . . . . . . . . . . . . . . . . . . . . 83
11.2 Rücksendung. . . . . . . . . . . . . . . . . . . . . . . . . . 83
11.3 Entsorgung . . . . . . . . . . . . . . . . . . . . . . . . . . 83
12.1 Temperatur-Bockkalibrator Serie CTD9100 . . . . . . . . . . . . . . . 84
12.2 Mikrokalibrierbad Serie CTB9100 . . . . . . . . . . . . . . . . . . . 86
12.3 Multifunktionskalibrator Typ CTM9100-150. . . . . . . . . . . . . . . . 88
13.1 Serie CTD9100 . . . . . . . . . . . . . . . . . . . . . . . . . 89
13.2 Serie CTB9100 . . . . . . . . . . . . . . . . . . . . . . . . . 89
13.3 Typ CTM9100-150 . . . . . . . . . . . . . . . . . . . . . . . . 89
14.1 Temperatur-Blockkalibrator Typ CTD9100-COOL . . . . . . . . . . . . . 90
14.2 Temperatur-Blockkalibrator Typ CTD9100-165 . . . . . . . . . . . . . . 90
14.3 Temperatur-Blockkalibrator Typ CTD9100-165-X. . . . . . . . . . . . . . 91
14.4 Temperatur-Blockkalibrator Typ CTD9100-450 . . . . . . . . . . . . . . 91
14.5 Temperatur-Blockkalibrator Typ CTD9100-650 . . . . . . . . . . . . . . 92
14.6 Mikrokalibrierbad Typ CTB9100-165 . . . . . . . . . . . . . . . . . . 93
14.7 Mikrokalibrierbad Typ CTB9100-225 . . . . . . . . . . . . . . . . . . 95
14.8 Typ CTM9100-150 als Mikrokalibrierbad . . . . . . . . . . . . . . . . 96
14.9 Typ CTM9100-150 als Temperatur-Blockkalibrator . . . . . . . . . . . . . 97
14.10 Typ CTM9100-150 als Infrarot-Schwarzstrahler . . . . . . . . . . . . . . 97
14.11 Typ CTM9100-150 als Oberflächen-Temperaturkalibrator . . . . . . . . . . . 98
Konformitätserklärungen finden Sie online unter www.wika.de.
52 WIKA Betriebsanleitung, Typen CTD9100, CTB9100, CTM9100
11263911.05 03/2019 EN/DE/IT
Page 53
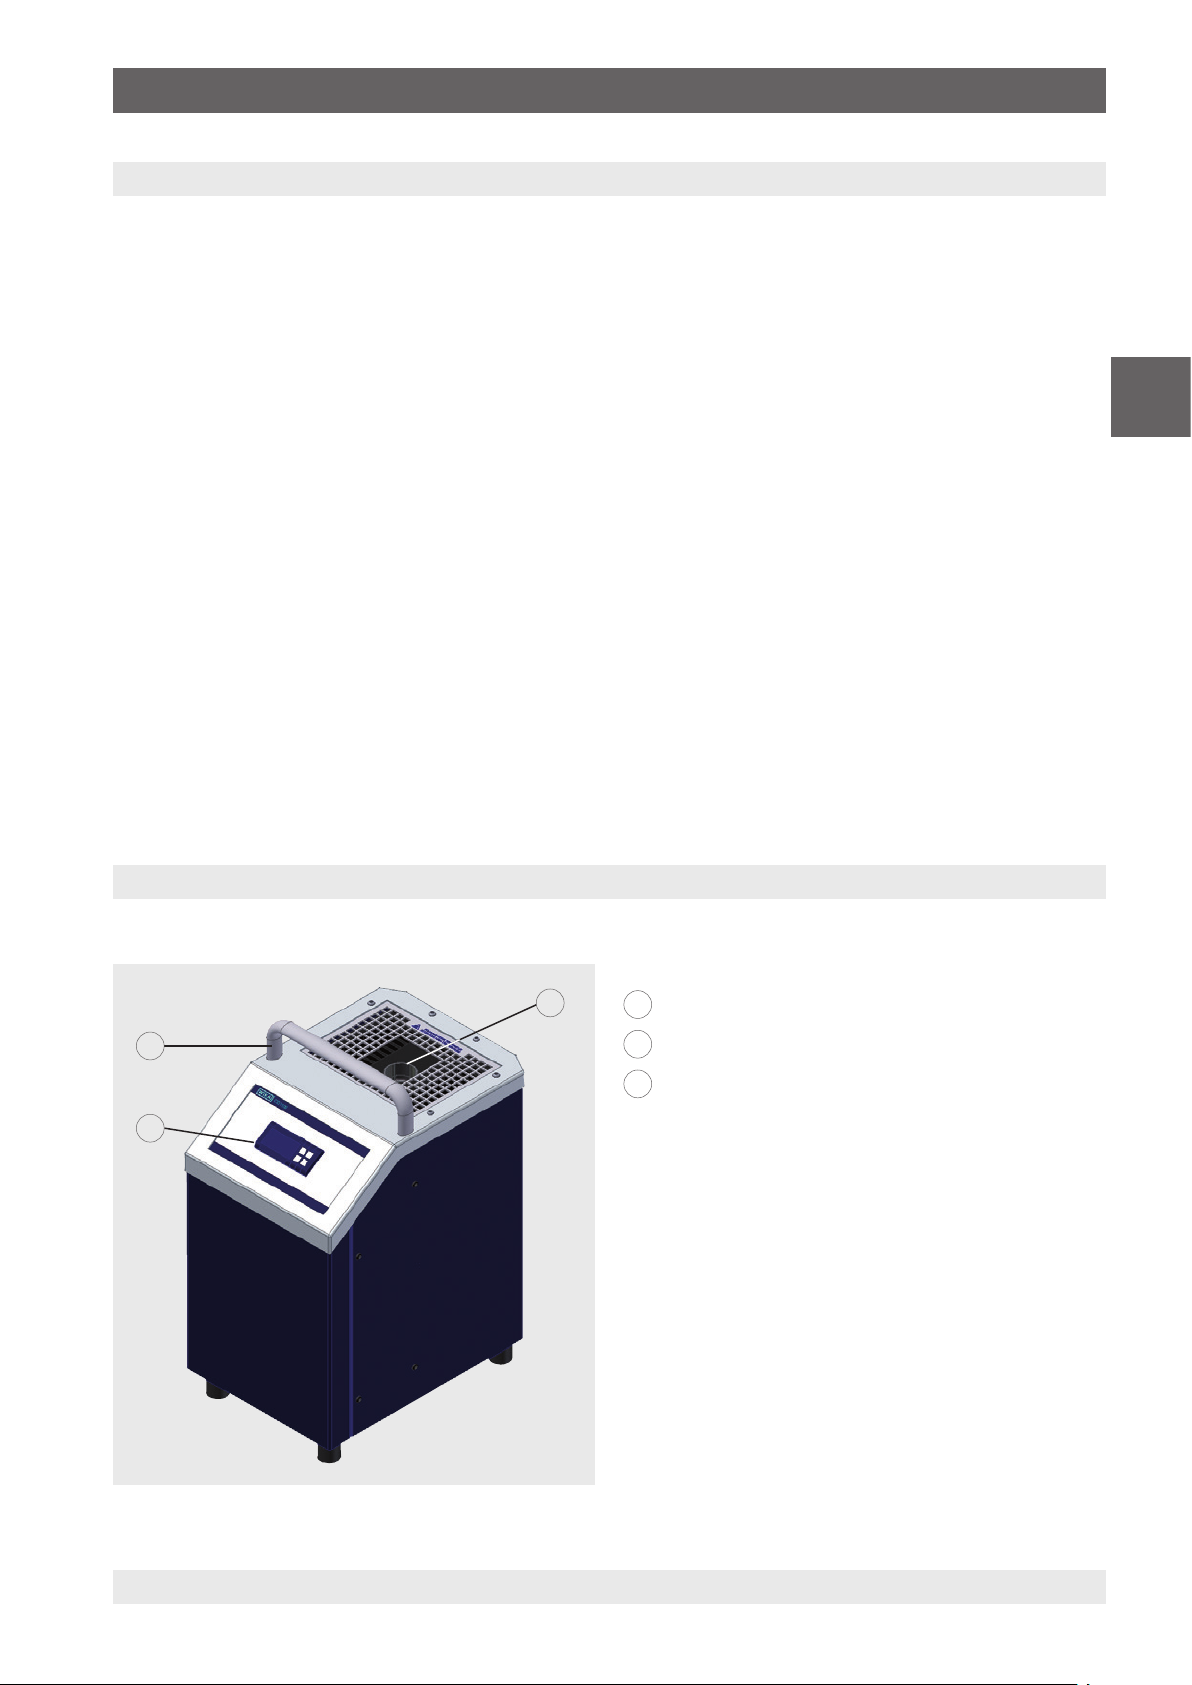
1. Allgemeines / 2. Kurzübersicht
1. Allgemeines
■
Der in der Betriebsanleitung beschriebene Kalibrator bzw.
das Mikrokalibrierbad wird nach dem aktuellen Stand der
Technik konstruiert und gefertigt.
Alle Komponenten unterliegen während der Fertigung strengen Qualitäts- und Umweltkriterien. Unsere
Managementsysteme sind nach ISO 9001 und ISO 14001
zertifiziert.
■
Diese Betriebsanleitung gibt wichtige Hinweise zum
Umgang mit dem Gerät. Voraussetzung für sicheres Arbeiten ist die Einhaltung aller angegebenen
Sicherheitshinweise und Handlungsanweisungen.
■
Die für den Einsatzbereich des Gerätes geltenden
örtlichen Unfallverhütungsvorschriften und allgemeinen
Sicherheitsbestimmungen einhalten.
■
Die Betriebsanleitung ist Produktbestandteil und muss
in unmittelbarer Nähe des Gerätes für das Fachpersonal
jederzeit zugänglich aufbewahrt werden. Betriebsanleitung an nachfolgende Benutzer oder Besitzer des Gerätes
weitergeben.
■
Das Fachpersonal muss die Betriebsanleitung vor Beginn
aller Arbeiten sorgfältig durchgelesen und verstanden
haben.
■
Es gelten die allgemeinen Geschäftsbedingungen in den
Verkaufsunterlagen.
■
Technische Änderungen vorbehalten.
■
Werkskalibrierungen / DKD/DAkkS-Kalibrierungen erfolgen nach internationalen Normen.
■
Weitere Informationen:
- Internet-Adresse: www.wika.de / www.wika.com
- zugehöriges Datenblatt: CT 41.28
CT 41.40
CT 46.30
- Anwendungsberater: Tel.: +49 9372 132-0
Fax: +49 9372 132-406
info@wika.de
DE
2. Kurzübersicht
2.1 Überblick
3
2
1
1
Temperaturblock
2
Regler
3
Tragegriff
11263911.05 03/2019 EN/DE/IT
53WIKA Betriebsanleitung, Typen CTD9100, CTB9100, CTM9100
Page 54
2. Kurzübersicht / 3. Sicherheit
2.2 Beschreibung
Der Kalibrator bzw. das Mikrokalibrierbad ist eine tragbare Einheit sowohl für Servicezwecke als auch für Industrie- und Laboraufgaben. Die Temperaturkalibratoren bzw.
die Mikrokalibrierbäder von WIKA sind zur Kalibrierung
von Thermometern, Temperaturschaltern/Thermostaten,
Widerstandsthermometern und Thermoelementen vorgesehen. Die Betriebssicherheit der gelieferten Instrumente ist
nur bei bestimmungsgemäßer Verwendung (Überprüfung
von Temperatursensoren) gewährleistet. Die angegebenen
DE
Grenzwerte dürfen keinesfalls überschritten werden (siehe
Kapitel 12 „Technische Daten“).
Es ist je nach Anwendungsfall ein entsprechendes Instrument auszuwählen, dieses korrekt anzuschließen, Tests
durchzuführen sowie alle Komponenten instandzuhalten.
Das Instrument wird in verschiedenen Ausführungen
hergestellt. Welche Ausführung im Einzelfall vorliegt dem
Typenschild am Kalibrator/Mikrokalibrierbad entnehmen.
2.3 Lieferumfang
Die Kalibratoren/Mikrokalibrierbäder werden in einer speziellen Sicherheitsverpackung ausgeliefert. Die Verpackung ist
aufzuheben, um den Kalibrator bzw. das Mikrokalibrierbad für
die Rekalibrierung oder bei Reparatur sicher an den Hersteller zurück zu schicken.
Lieferumfang Mikrokalibrierbad Typ CTB9100
■
Mikrokalibrierbad
■
Transportdeckel
■
Sensorkorb
■
Magnetrührer
■
Magnetheber
■
Netzanschlusskabel
■
Kalibrierzertifikat
■
Betriebsanleitung
Lieferumfang Multifunktionskalibrator Typ CTM9100
■
Multifunktionskalibrator
■
Hülsenwechselwerkzeug (Standard und Oberfläche)
■
Gebohrte Standardhülse
■
Transportdeckel
■
Sensorkorb
■
Magnetrührer
■
Magnetheber
■
Infrarothülse
■
Oberflächenhülse
■
Externer Referenzfühler
■
Netzanschlusskabel
■
Kalibrierzertifikat
■
Betriebsanleitung
Lieferumfang mit dem Lieferschein abgleichen.
Lieferumfang Temperatur-Blockkalibrator Typ CTD9100
■
Kalibrator
■
Hülsenwechselwerkzeug
■
Gebohrte Standardhülse
■
Netzanschlusskabel
■
Kalibrierzertifikat
■
Betriebsanleitung
3. Sicherheit
Symbolerklärung
GEFAHR!
… weist auf eine unmittelbar gefährliche Situation hin, die zum Tod oder zu schweren Verletzungen führt, wenn sie nicht gemieden wird.
WARNUNG!
… weist auf eine möglicherweise gefährliche
Situation hin, die zum Tod oder zu schweren
Verletzungen führen kann, wenn sie nicht gemieden wird.
VORSICHT!
… weist auf eine möglicherweise gefährliche
Situation hin, die zu geringfügigen oder leichten
Verletzungen bzw. Sach- und Umweltschäden
führen kann, wenn sie nicht gemieden wird.
GEFAHR!
… kennzeichnet Gefährdungen durch elektrischen Strom. Bei Nichtbeachtung der
Sicherheitshinweise besteht die Gefahr schwerer
oder tödlicher Verletzungen.
WARNUNG!
… weist auf eine möglicherweise gefährliche
Situation hin, die durch heiße Oberflächen oder
Flüssigkeiten zu Verbrennungen führen kann,
wenn sie nicht gemieden wird.
Information
… hebt nützliche Tipps und Empfehlungen sowie
Informationen für einen effizienten und störungsfreien Betrieb hervor.
11263911.05 03/2019 EN/DE/IT
54 WIKA Betriebsanleitung, Typen CTD9100, CTB9100, CTM9100
Page 55
3. Sicherheit
3.1 Bestimmungsgemäße Verwendung
Der Kalibrator bzw. das Mikrokalibrierbad ist eine tragbare Einheit sowohl für Servicezwecke als auch für Industrie- und Laboraufgaben. Die Temperaturkalibratoren bzw.
die Mikrokalibrierbäder von WIKA sind zur Kalibrierung
von Thermometern, Temperaturschaltern/Thermostaten,
Widerstandsthermometern und Thermoelementen vorgesehen.
Diese Geräte sind nicht für den Einsatz in
explosionsgefährdeten Bereichen zugelassen!
Das Gerät ist ausschließlich für den hier beschriebenen
bestimmungsgemäßen Verwendungszweck konzipiert
und konstruiert und darf nur dementsprechend verwendet
werden.
Die technischen Spezifikationen in dieser Betriebsanleitung
sind einzuhalten. Eine unsachgemäße Handhabung oder ein
Betreiben des Gerätes außerhalb der technischen Spezifikationen macht die sofortige Stilllegung und Überprüfung durch
einen autorisierten WIKA-Servicemitarbeiter erforderlich.
Elektronische Präzisionsmessgeräte mit erforderlicher
Sorgfalt behandeln (vor Nässe, Stößen, starken Magnetfeldern, statischer Elektrizität und extremen Temperaturen
schützen, keine Gegenstände in das Gerät bzw. Öffnungen
einführen). Stecker und Buchsen vor Verschmutzung schützen.
3.3 Besondere Gefahren
GEFAHR!
Lebensgefahr durch elektrischen Strom
Bei Berührung mit spannungsführenden Teilen
besteht unmittelbare Lebensgefahr.
▶
Einbau und Montage des Gerätes dürfen nur
durch Fachpersonal erfolgen.
▶
Vor dem Austauschen der Schmelzsicherung,
vor der Reinigung, vor der Wartung/Instandhaltung und bei Gefahr ist der Kalibrator
bzw. das Mikrokalibrierbad durch Ziehen des
Netzkabels aus der Netzsteckdose von der
Netzspannung zu trennen.
▶
Die Netzsteckdose muss jederzeit frei
zugänglich sein!
Temperatursicherung
Zur Sicherheit ist der Kalibrator bzw. das
Mikrokalibrierbad mit einer unabhängig arbeitenden Temperatursicherung ausgestattet, die
bei einer Übertemperatur im Gehäuseinneren
die Stromzufuhr für die Heizung abschaltet.
Nach Abkühlen des Metallblocks bzw. des
Flüssigkeitsbades ist der Kalibrator bzw. das
Mikrokalibrierbad zur Überprüfung an WIKA
einzusenden.
DE
Ansprüche jeglicher Art aufgrund von nicht
bestimmungsgemäßer Verwendung sind ausgeschlossen.
3.2 Fehlgebrauch
WARNUNG!
Verletzungen durch Fehlgebrauch
Fehlgebrauch des Gerätes kann zu gefährlichen
Situationen und Verletzungen führen.
▶
Eigenmächtige Umbauten am Gerät unterlassen.
▶
Gerät nicht in explosionsgefährdeten Bereichen einsetzen.
▶
Ausschließlich das mitgelieferte Netzkabel
verwenden.
Jede über die bestimmungsgemäße Verwendung hinausgehende oder andersartige Benutzung gilt als Fehlgebrauch.
Der Kalibrator bzw. das Mikrokalibrierbad wurde
als Mess- und Regelgerät konzipiert.
Falls eine Betriebsstörung des Kalibrators/
Mikrokalibrierbades Personen- oder Sachschäden verursachen kann, muss die Anlage mit
zusätzlichen elektromechanischen Schutzeinrichtungen abgesichert werden.
3.4 Sicherheitshinweise bei Verwendung von
Kalibrierflüssigkeiten
Kalibrierflüssigkeit Wasser
Nur destilliertes Wasser verwenden, da sonst der
Kalibratortank stark verkalkt und verschmutzt.
Verschüttete Flüssigkeiten unverzüglich aufnehmen und sachgerecht entsorgen.
11263911.05 03/2019 EN/DE/IT
55WIKA Betriebsanleitung, Typen CTD9100, CTB9100, CTM9100
Page 56
3. Sicherheit
Kalibrierflüssigkeit Silikonöl
WARNUNG!
Gefahrenstoffe Silikonöle
Unsachgemäßer Umgang kann zu Vergiftungen
oder Personenschäden führen.
▶
Notwendige Schutzausrüstung tragen (siehe
Kapitel 3.6 „Persönliche Schutzausrüstung“).
▶
Angaben im Sicherheitsdatenblatt für den
DE
entsprechenden Messstoff beachten.
▶
Bevor mit Silikonöl gearbeitet wird, das
Sicherheitsdatenblatt durchlesen. Das aktuelle Sicherheitsdatenblatt befindet sich unter
www.wika.de auf der jeweiligen Produktseite.
▶
Nur das im Lieferumfang enthaltene Silikonöl
oder in dieser Betriebsanleitung beschriebene Silikonöl verwenden.
▶
Beim Arbeiten mit Silikonöl ist auf eine gute
Raumbelüftung zu achten, da Schadstoffe
austreten können.
▶
Da Silikonöl hygroskopisch ist, immer
nach Gebrauch das Kalibrierbad mit dem
Transportdeckel verschlissen.
▶
Vor einem Transport mit Silikonöl den
Kalibrator bzw. Mikrokalibrierbad abkühlen
lassen. Der Transportdeckel ist mit einem
Sicherheitsventil ausgestattet. Wird das
Mikrokalibrierbad im warmen Zustand
verschlossen, können sich unzulässige
Drücke aufbauen. Um Überdruck zu vermeiden, der zur Zerstörung des Flüssigkeitsbad
führen kann, löst das Sicherheitsventil bei
einem Druck von ca. 2,5 bar [36 psi] aus.
Hierbei können heiße Dämpfe austreten.
3.5 Personalqualifikation
WARNUNG!
Verletzungsgefahr bei unzureichender Qualifikation!
Unsachgemäßer Umgang kann zu erheblichen
Personen- und Sachschäden führen.
Die in dieser Betriebsanleitung beschriebenen
Tätigkeiten nur durch Fachpersonal nachfolgend
beschriebener Qualifikation durchführen lassen.
Fachpersonal
Das vom Betreiber autorisierte Fachpersonal ist aufgrund
seiner fachlichen Ausbildung, seiner Kenntnisse der Messund Regelungstechnik und seiner Erfahrungen sowie
Kenntnis der landesspezifischen Vorschriften, geltenden
Normen und Richtlinien in der Lage, die beschriebenen
Arbeiten auszuführen und mögliche Gefahren selbstständig
zu erkennen.
Spezielle Einsatzbedingungen verlangen weiteres entsprechendes Wissen, z. B. über aggressive Medien.
3.6 Persönliche Schutzausrüstung
Die persönliche Schutzausrüstung dient dazu, das Fachpersonal gegen Gefahren zu schützen, die dessen Sicherheit
oder Gesundheit bei der Arbeit beeinträchtigen könnten.
Beim Ausführen der verschiedenen Arbeiten an und mit dem
Gerät muss das Fachpersonal persönliche Schutzausrüstung
tragen.
Im Arbeitsbereich angebrachte Hinweise zur persönlichen Schutzausrüstung befolgen!
WARNUNG!
Verbrennungsgefahr!
Durch Berührungen des heißen Metallblockes
bzw. Mikrokalibrierbades, der Badflüssigkeiten oder am Prüfling können diese zu akuten
Verbrennungen führen.
▶
Vor dem Transport oder Berühren des Metallblockes/Flüssigkeitsbades darauf achten,
dass dieser genügend abgekühlt ist.
Verschüttete Flüssigkeiten unverzüglich aufnehmen und sachgerecht entsorgen.
Schutzbrille tragen!
Silikonöl nicht mit den Augen in Berührung
bringen.
Schutzhandschuhe tragen!
Schutz der Hände vor Berührung mit heißen
Oberflächen und aggressiven Medien.
Die erforderliche persönliche Schutzausrüstung muss vom
Betreiber zur Verfügung gestellt werden.
Schutzbrille tragen!
Schutz der Augen vor umherfliegenden Teilen
und Flüssigkeitsspritzern.
Schutzhandschuhe tragen!
Schutz der Hände vor Berührung mit heißen
Oberflächen und aggressiven Medien.
11263911.05 03/2019 EN/DE/IT
56 WIKA Betriebsanleitung, Typen CTD9100, CTB9100, CTM9100
Page 57
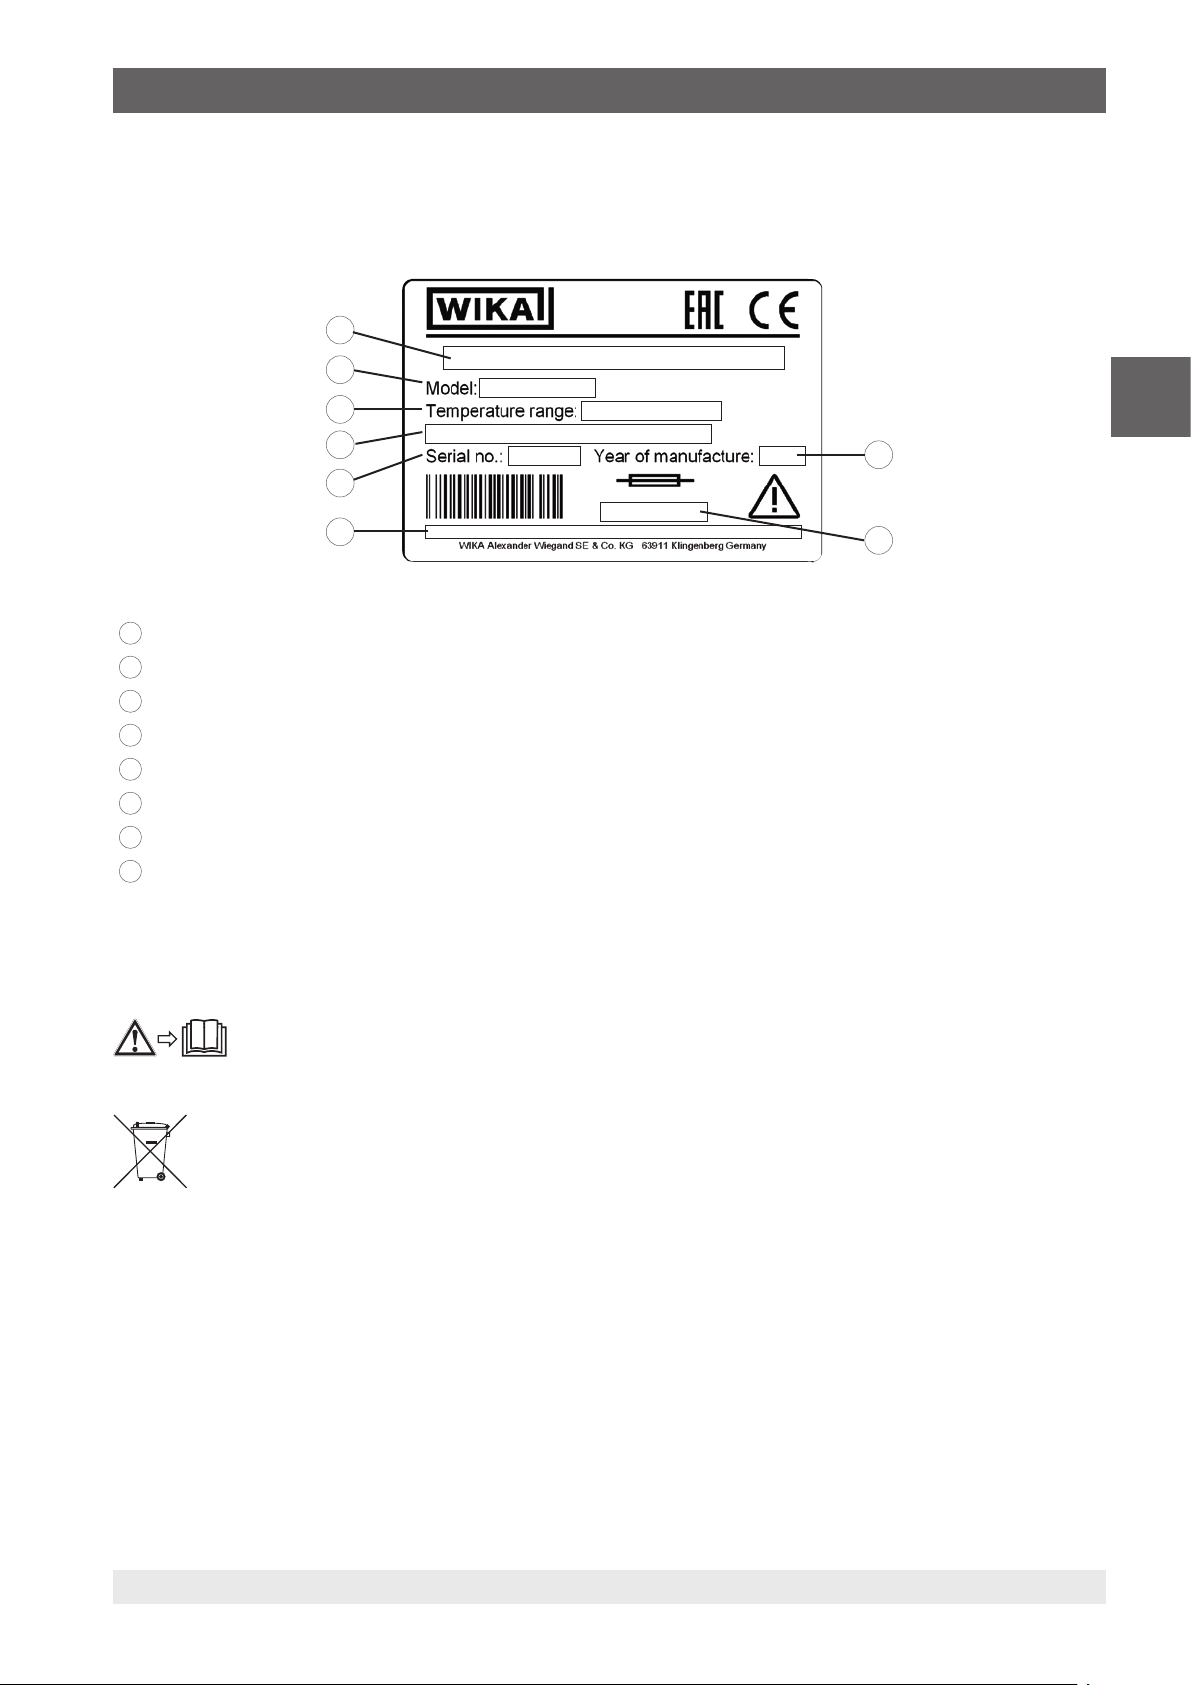
3. Sicherheit
3.7 Beschilderung, Sicherheitskennzeichnungen
Typenschild (Beispiel)
Das Typenschild ist auf der Rückseite des Gerätes befestigt.
8
7
6
DE
1
Herstellungsjahr
2
Sicherung
3
Hinweis zum Sicherheitsdatenblatt
4
Serien-Nr.
5
Hilfsenergie
6
Temperaturbereich
7
Typenbezeichnung
8
Gerätebezeichnung
Symbolerklärung
Vor Montage und Inbetriebnahme des
Gerätes unbedingt die Betriebsanleitung
lesen!
5
4
3
1
2
Nicht mit dem Hausmüll entsorgen. Für eine
geordnete Entsorgung gemäß nationaler Vorgaben sorgen.
11263911.05 03/2019 EN/DE/IT
57WIKA Betriebsanleitung, Typen CTD9100, CTB9100, CTM9100
Page 58

4. Aufbau und Funktion
4. Aufbau und Funktion
4.1 Übersicht der unterschiedlichen Gerätetypen
Temperaturkalibratoren
■
CTD9100-COOL (kühlen und heizen)
■
CTD9100-165 (kühlen und heizen)
■
CTD9100-450 (heizen)
■
CTD9100-650 (heizen)
DE
Mikrokalibrierbäder
■
CTB9100-165 (kühlen und heizen)
■
CTB9100-225 (heizen)
Multifunktionskalibrator
■
CTM9100-150 (kühlen und heizen)
Der Kalibrator bzw. das Mikrokalibrierbad besteht aus einem
robusten, grau-blau lackiertem Stahlgehäuse und ist oben
mit einem Tragegriff versehen.
Das hintere Gehäuseteil enthält einen Metallblock bzw. das
Flüssigkeitsbad mit einer von oben zugänglichen Bohrung für
die Prüflingsaufnahme.
Im Metallblock/Flüssigkeitsbad sind die Heiz- bzw. Kühlelemente und der Temperaturfühler zur Bestimmung der
Referenztemperatur eingebaut.
Der Metallblock bzw. das Flüssigkeitsbad ist wärmeisoliert.
Das vordere Gehäuseteil enthält die komplette Elektronikeinheit zur Regelung der Referenztemperatur.
Zur Ansteuerung der Heiz- bzw. Kühlelemente werden
Halbleiter-Relais (SSR) verwendet.
Auf der Frontplatte befindet sich der Regler, welcher mit einer
7-Segment-LED (2-reihig, 4-stellig) für die Referenz- und
Soll-Temperatur ausgestattet ist.
Das Mikrokalibrierbad besitzt zusätzlich ein Drehrad zur
Regelung der Rührgeschwindigkeit.
Temperaturkalibrator Typ CTD9100-165 Temperaturkalibrator Typ CTD9100-650
Multifunktionskalibrator Typ CTM9100-150Mikrokalibrierbad Typ CTB9100-165
58 WIKA Betriebsanleitung, Typen CTD9100, CTB9100, CTM9100
11263911.05 03/2019 EN/DE/IT
Page 59

4. Aufbau und Funktion
4.2 Isometrische Ansichten Temperatur-Blockkalibrator Serie CTD9100
1
Vorder- und Oberseite Typ CTD9100
An der Oberseite des Temperatur-Blockkalibrator befindet
3
2
sich die Blocköffnung zum Einschieben der Einsatzhülsen.
■
CTD9100-COOL: Ø 28 x 150 mm [Ø 1,10 x 5,91 in]
■
CTD9100-165: Ø 28 x 150 mm [Ø 1,10 x 5,91 in]
■
CTD9100-165-X: Ø 60 x 150 mm [Ø 2,36 x 5,91 in]
■
CTD9100-450: Ø 60 x 150 mm [Ø 2,36 x 5,91 in]
■
CTD9100-650: Ø 28 x 150 mm [Ø 1,10 x 5,91 in]
DE
Der Regler mit Anzeige und Bedienung ist auf der Vorderseite des Kalibrators zu finden.
Geräterückseite
Auf der Geräterückseite befindet sich das Typenschild mit
den wichtigsten Informationen über das jeweilige Modell.
■
CTD9100-COOL: -55 ... +200 °C [-67 ... +392 °F]
■
CTD9100-165: -35 ... +165 °C [-31 ... +329 °F]
■
CTD9100-450: 40 ... 450 °C [104 ... 842 °F]
■
CTD9100-650: 40 ... 650 °C [104 ... 1.202 °F]
1
Die richtige Netzspannung und Frequenz ist ebenfalls
angegeben.
8
11263911.05 03/2019 EN/DE/IT
■
AC 100 ... 240 V, 50 ... 60 Hz
■
AC 115 V, 50 ... 60 Hz
■
AC 230 V, 50 ... 60 Hz
4
5
Des weiteren ist die individuelle Seriennummer, z. B.
S/N 550 33 44, sowie die Netzspannung und der Wert der
Schmelzsicherung angegeben.
Sie finden hier auch den Anschluss der RS-485-Schnittstelle.
Geräteunterseite
Auf der Geräteunterseite sind die Netzanschlussbuchse und
der Netzschalter mit Sicherungshalter untergebracht.
Sie befinden sich vorn in der Mitte. Ferner sind, je nach
Modell, ein oder zwei Lufteinlässe auf der Geräteunterseite
angebracht.
Die Lufteinlässe dürfen in keiner Weise versperrt werden.
1
Temperaturblock
2
Regler
3
Tragegriff
4
Typenschild
5
RS-485 Schnittstelle
6
6
7
Lüfter 1
7
Lüfter 2
8
Netzanschlussbuchse mit Hauptschalter
59WIKA Betriebsanleitung, Typen CTD9100, CTB9100, CTM9100
Page 60

4. Aufbau und Funktion
4.3 Isometrische Ansichten Mikrokalibrierbad Serie CTB9100
DE
1
3
2
9
An der Oberseite des Mikrokalibrierbades befindet sich die
Blocköffnung zum Befüllen Ø 60 x 150 mm [Ø 2,36 x 5,91 in].
Der Regler mit Anzeige und Bedienung ist auf der Vorderseite des Kalibrators zu finden.
Geräterückseite
Auf der Geräterückseite befindet sich das Typenschild mit
den wichtigsten Informationen über das jeweilige Modell.
Des weiteren ist die individuelle Seriennummer, z. B.
S/N 550 33 44, sowie die Netzspannung und der Wert der
Schmelzsicherung angegeben.
Sie finden hier auch den Anschluss der RS-485-Schnittstelle.
Geräteunterseite
Auf der Geräteunterseite sind die Netzanschlussbuchse und
der Netzschalter mit Sicherungshalter untergebracht.
Vorder- und Oberseite Typ CTB9100
1
Sie befinden sich vorn in der Mitte. Ferner sind, je nach
Modell, ein oder zwei Lufteinlässe auf der Geräteunterseite
angebracht.
Die Lufteinlässe dürfen in keiner Weise versperrt werden.
4
5
8
1
Temperaturblock
2
Regler
3
Tragegriff
4
Typenschild
5
RS-485 Schnittstelle
6
Lüfter 1
7
Lüfter 2
8
Netzanschlussbuchse mit Hauptschalter
9
Regler für das Rührwerk
6
7
60 WIKA Betriebsanleitung, Typen CTD9100, CTB9100, CTM9100
11263911.05 03/2019 EN/DE/IT
Page 61

4. Aufbau und Funktion
4.4 Isometrische Ansichten Multifunktionskalibrator Typ CTM9100-150
Vorder- und Oberseite Typ CTM9100-150
11
10
1
3
2
9
An der Oberseite des Multifunktionskalibrator befindet
sich die Blocköffnung zum Einschieben der verschiedenen Einsatzhülsen bzw. zum Befüllen Ø 60 x 150 mm
[Ø 2,36 x 5,91 in].
Der Regler mit Anzeige und Bedienelementen ist auf der
Vorderseite zu finden. Zudem sind die Bedienelemente für
die externe Referenz auf der Vorderseite platziert.
Geräterückseite
Auf der Geräterückseite befindet sich das Typenschild mit
den wichtigsten Informationen über das jeweilige Modell.
Des weiteren ist die individuelle Seriennummer, z. B.
S/N 550 33 44, sowie die Netzspannung und der Wert der
Schmelzsicherung angegeben.
Sie finden hier auch den Anschluss der RS-485-Schnittstelle.
DE
1
Geräteunterseite
Auf der Geräteunterseite sind die Netzanschlussbuchse und
der Netzschalter mit Sicherungshalter untergebracht.
Sie befinden sich vorn in der Mitte. Ferner sind zwei
Lufteinlässe auf der Geräteunterseite angebracht.
Die Lufteinlässe dürfen in keiner Weise versperrt werden.
4
5
8
1
Temperaturblock
2
Regler
3
Tragegriff
4
Typenschild
5
RS-485 Schnittstelle
6
Lüfter 1
7
Lüfter 2
8
Netzanschlussbuchse mit Hauptschalter
9
Regler für das Rührwerk
10
Schalter für ext. Referenz
11
Buchse für ext. Referenz
11263911.05 03/2019 EN/DE/IT
6
7
61WIKA Betriebsanleitung, Typen CTD9100, CTB9100, CTM9100
Page 62

4. Aufbau und Funktion
4.5 Beschreibung der Bedienelemente
Reglerfront
7 8 9
6
DE
5
Übersicht über die Bedienelemente der Reglerfront
Taste [▲]
1
■
Erhöhung einzustellender Werte
■
Auswahl einzelner Menüpunkte
■
Rücksprung um eine Menüebene
Taste [▼]
2
■
Reduzierung einzustellender Werte
■
Auswahl einzelner Menüpunkte
■
Rücksprung um eine Menüebene
Taste [P]
3
■
Zugriff auf die Vorgabe der Soll-Temperaturen
■
Zugriff auf Menüpunkte und Parameter
■
Eingabebestätigung
LED SET
4
Signalisiert blinkend den Zugriff auf die einzelnen
Menüpunkte und Parameter
Anzeige SV
5
■
Anzeige der Soll-Temperaturen
■
Anzeige bestimmter Parameter in den der einzelnen
Modi und der Menüpunkten
Anzeige PV
6
■
Anzeige der aktuellen Referenztemperatur
■
Anzeige der einzelnen Modi, der Menüpunkte und
der Parameter
1
2
34
LED OUT 2
7
a) Heizinstrument
Signalisiert den Zustand des Ausgangs für die
Lüftersteuerung
■
Leuchtet die LED OUT 2, läuft der Lüfter mit hoher
Drehzahl
■
Leuchtet die LED OUT 2 nicht, läuft der Lüfter mit
verringerter Drehzahl
b) Heiz- und Kühlinstrument
Signalisiert den Zustand des Ausgangs für
Temperaturansteuerung
■
Leuchtet die LED OUT 1, kühlt der Kalibrator bzw.
das Mikrokalibrierbad
■
Leuchtet die LED OUT 1 nicht, kühlt der Kalibrator
bzw. das Mikrokalibrierbad nicht
LED OUT 1
8
Signalisiert den Zustand des Ausgangs für die
Temperaturansteuerung
■
Leuchtet die LED OUT 1, heizt der Kalibrator bzw.
das Mikrokalibrierbad
■
Leuchtet die LED OUT 1 nicht, heizt der Kalibrator
bzw. das Mikrokalibrierbad nicht
Taste [U]
9
Abruf der gespeicherten Soll-Temperaturen
Weitere Definitionen
[XXX] Taste XXX drücken
XXX Menü XXX wird angezeigt
62 WIKA Betriebsanleitung, Typen CTD9100, CTB9100, CTM9100
11263911.05 03/2019 EN/DE/IT
Page 63

4. Aufbau und Funktion
4.6 Datenschnittstelle
Die Geräte sind mit einer seriellen Kommunikationsschnittstelle RS-485 ausgestattet. Mit Hilfe dieser Schnittstelle
können Sie einen PC, Pegelwandler oder ein Netzwerk
anschließen.
Das verwendete Softwareprotokoll ist ein MODBUS-RTU
Protokoll, das in zahlreichen, auf dem Markt erhältlichen
Überwachungsprogrammen verwendet wird.
Die Übertragungsgeschwindigkeit (Baud-Rate) ist werkseitig auf 9.600 Baud eingestellt. Auf Anfrage sind andere
Übertragungsgeschwindigkeiten möglich.
Die 5-polige Einbaubuchse ist mit zwei Anschlüssen, A
und B, versehen, die Sie an die entsprechenden Anschlüssen des PC, Pegelwandlers oder Netzwerks anschließen
müssen.
Draufsicht 5-pol.-Einbaubuchse
4.7 Schnittstellenprotokoll
Das Schnittstellenprotokoll wird auf Anfrage als spezielles
Zusatzdokument geliefert.
4.8 Schutzleiterüberwachung
Der Kalibrator ist zur Kontrolle der Basisisolation
der Heizung mit einer Schutzleiterüberwachung
ausgestattet. Die Überwachungseinheit arbeitet
unabhängig von der übrigen Steuerung und
schaltet die Stromversorgung der Heizung ab,
sobald der Kalibrator keine Verbindung mehr
zum Schutzleitersystem der Isolation hat.
Ist die Verbindung zum Schutzleitersystem
wieder hergestellt, schaltet die
Überwachungseinheit den Heizkreis automatisch wieder an die Stromversorgung an.
DE
Zum Anschluss an einen PC müssen die RS-485-Signale
extern in RS-232- bzw. USB-Signale gewandelt werden.
Passende Konverter incl. Treiber sind als Option vorhanden. Der PC erfasst alle Betriebsdaten und ermöglicht
eine Programmierung aller Konfigurationsparameter des
Kalibrators.
Die Mindestanforderung für Betrieb mit USB-Wandler sind:
■
IBM kompatibler PC
■
Installiertes Betriebssystem Microsoft® Windows® 98 SE,
ME, 2000, XP (Home oder Prof.) oder 7
■
Eine USB-Schnittstelle (USB 1.1 oder USB 2.0)
Ein Netzwerkaufbau ermöglicht den Anschluss von bis zu 32
Kalibratoren/Mikrobäder am gleichen Netz.
Zum Aufbau eines Netzwerks müssen werkseitig einige
Einstellungen vorgenommen werden. Hierfür den Lieferanten
oder direkt WIKA kontaktieren.
Bei Zugriff auf die Programmierung über die
Tastatur, während eine Kommunikation über
die serielle Schnittstelle läuft, erscheint auf der
Anzeige die Meldung buSy und weist damit auf
den Zustand „belegt“ hin.
11263911.05 03/2019 EN/DE/IT
63WIKA Betriebsanleitung, Typen CTD9100, CTB9100, CTM9100
Page 64
5. Transport, Verpackung und Lagerung / 6. Inbetriebnahme, Betrieb
5. Transport, Verpackung und Lagerung
5.1 Transport
Kalibrator bzw. Mikrokalibrierbad auf eventuell vorhandene
Transportschäden untersuchen.
Offensichtliche Schäden unverzüglich mitteilen.
VORSICHT!
Beschädigungen durch unsachgemäßen
DE
Wird das Gerät von einer kalten in eine warme Umgebung
transportiert, so kann durch Kondensatbildung eine Störung
der Gerätefunktion eintreten. Vor einer erneuten Inbetriebnahme die Angleichung der Gerätetemperatur an die
Raumtemperatur abwarten.
Transport
Bei unsachgemäßem Transport können
Sachschäden in erheblicher Höhe entstehen.
▶
Beim Abladen der Packstücke, bei Anlieferung sowie innerbetrieblichem Transport
vorsichtig vorgehen und die Symbole auf der
Verpackung beachten.
▶
Bei innerbetrieblichem Transport die Hinweise
unter Kapitel 5.2 „Verpackung und Lagerung“
beachten.
5.2 Verpackung und Lagerung
Verpackung erst unmittelbar vor der Montage entfernen.
Die Verpackung aufbewahren, denn diese bietet bei einem
Transport einen optimalen Schutz (z. B. wechselnder Einbauort, Reparatursendung).
Zulässige Bedingungen am Lagerort:
■
Lagertemperatur: -10 ... +60 °C [14 ... 140 °F]
■
Feuchtigkeit: 30 ... 95 % relative Feuchte (keine Betauung)
Folgende Einflüsse vermeiden:
■
Direktes Sonnenlicht oder Nähe zu heißen Gegenständen
■
Mechanische Vibration, mechanischer Schock (hartes
Aufstellen)
■
Ruß, Dampf, Staub und korrosive Gase
■
Explosionsgefährdete Umgebung, entzündliche
Atmosphären
Kalibrator bzw. Mikrokalibrierbad in der Originalverpackung
an einem Ort lagern, der die oben gelisteten Bedingungen
erfüllt.
6. Inbetriebnahme, Betrieb
Personal: Fachpersonal
Schutzausrüstung: Schutzhandschuhe und Schutzbrille
Nur Originalteile verwenden (siehe Kapitel 13 „Zubehör“).
WARNUNG!
Körperverletzungen, Sach- und Umweltschäden durch gefährliche Messstoffe
Bei Kontakt mit gefährlichen Messstoffen (z. B.
brennbaren oder giftigen Stoffen) sowie gesundheitsgefährdenden Messstoffen (z. B. ätzend,
giftig, krebserregend, radioaktiv) besteht die
Gefahr von Körperverletzungen, Sach- und
Umweltschäden.
Am Gerät können im Fehlerfall aggressive
Messstoffe und/oder mit hoher Temperatur
anliegen.
▶
Bei diesen Messstoffen müssen über die
gesamten allgemeinen Regeln hinaus die
einschlägigen Vorschriften beachtet werden.
▶
Notwendige Schutzausrüstung tragen (siehe
Kapitel 3.6 „Persönliche Schutzausrüstung“).
6.1 Betriebslage
Die Betriebslage des Kalibrators bzw. des
Mikrokalibrierbades ist die senkrechte Aufstellung, da hierbei
eine optimale Temperaturverteilung im Metallblock bzw.
Flüssigkeitsbad gewährleistet ist.
Spannungsversorgung
GEFAHR!
Lebensgefahr durch elektrischen Strom
Bei Berührung mit spannungsführenden Teilen
besteht unmittelbare Lebensgefahr.
▶
Ausschließlich das mitgelieferte Netzkabel
verwenden.
Die Spannungsversorgung des Gerätes erfolgt über das
Netzkabel. Dieses ist im Lieferumfang enthalten.
64 WIKA Betriebsanleitung, Typen CTD9100, CTB9100, CTM9100
11263911.05 03/2019 EN/DE/IT
Page 65
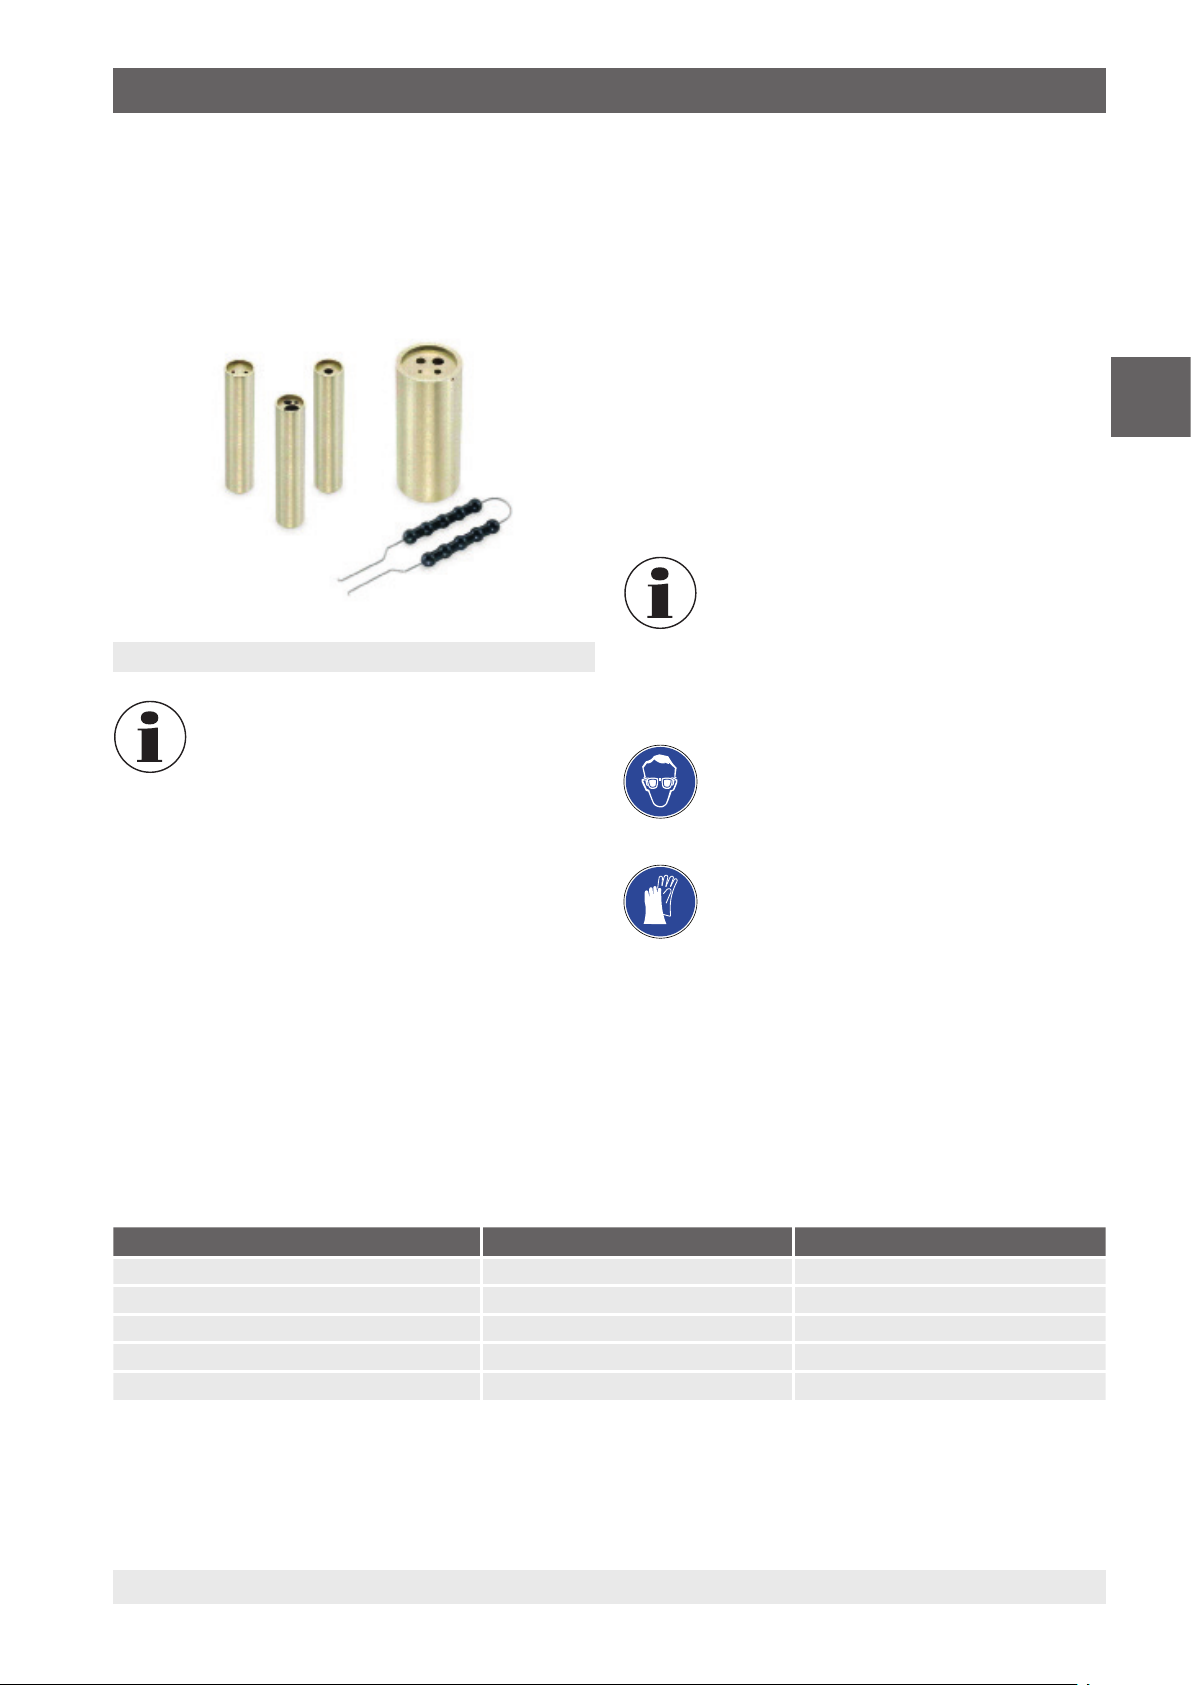
6. Inbetriebnahme, Betrieb
6.2 Einsatzhülsen bei Metallblock
Um die größtmögliche Genauigkeit zu erreichen, ist die
Verwendung von exakt passenden Einsatzhülsen notwendig.
Hierzu den Durchmesser des Prüflings genau bestimmen.
Die Bohrung der Einsatzhülse ergibt sich durch Addition von
+0,5 mm [+0,02 in].
Einsatzhülsen
Die Einsatzhülsen nach dem Gebrauch mit Hilfe
des Hülsenwerkzeuges entfernen und danach
Hülse und Block reinigen. Dies verhindert das
Festklemmen der Hülsen im Heizblock.
Empfohlene Kalibrierflüssigkeiten für die verschiedenen
Temperaturbereiche:
Wasser als Kalibrierflüssigkeit
■
Nur destilliertes oder demineralisiertes Wasser verwenden, da sonst der Kalibratortank stark verkalkt und
verschmutzt.
Silikonöl als Kalibrierflüssigkeit
■
Nur das hier empfohlene Silikonöl verwenden.
■
Beim Arbeiten mit Silikonöl ist auf eine gute
Raumbelüftung zu achten, da Schadstoffe austreten
können.
■
Da Silikonöl hygroskopisch ist, immer nach Gebrauch das
Kalibrierbad mit dem Transportdeckel verschlissen.
Nur saubere Kalibrierflüssigkeiten verwenden.
Bei der Überprüfung von Temperatursensoren
und anderen Temperaturmessmitteln kann
es zur Verunreinigung der Kalibrierflüssigkeit
kommen. Diese Verunreinigungen können
durch die Drehbewegung des Magnetrührers zu
Schmiergeleffekten am Tankboden führen.
Schutzbrille tragen!
Silikonöl nicht mit den Augen in Berührung
bringen.
DE
6.3 Vorbereiten des Mikrokalibrierbades
Um die größtmögliche Genauigkeit eines Mikrokalibrierbades
zu erreichen, mit einer geeigneten Kalibrierflüssigkeit
befüllen.
6.3.1 Eigenschaften der Kalibrierflüssigkeiten
Unterschiedliche Kalibrierflüssigkeiten liefern durch
ihre spezifischen Eigenschaften abweichende
Kalibrierergebnisse.
Ein Abgleich auf die jeweils verwendete Kalibrierflüssigkeit
■
Den Tank reinigen
■
Vor der Kalibrierung die Sensoren reinigen
■
Verschlissene Magnetrührer wechseln
■
Verschmutzte, eingetrübte Kalibrierflüssigkeiten auswechseln
Schutzhandschuhe tragen!
Schutz der Hände vor Berührung mit heißen
Oberflächen und aggressiven Medien.
sollte ggf. werkseitig durch den Hersteller durchgeführt
werden.
Medium Kalibrierbereich Flammpunkt
Destilliertes Wasser 5 ... 90 °C [51 ... 194 °F] keiner
Dow Corning 200 Fluid mit 5 CS -40 ... +123 °C [-40 ... +253 °F] 133 °C [271 °F]
Dow Corning 200 Fluid mit 10 CS -35 ... +155 °C [-31 ... +311 °F] 163 °C [325 °F]
Dow Corning 200 Fluid mit 20 CS 7 ... 220 °C [45 ... 428 °F] 232 °C [450 °F]
Dow Corning 200 Fluid mit 50 CS 25 ... 270 °C [77 ... 518 °F] 280 °C [536 °F]
11263911.05 03/2019 EN/DE/IT
65WIKA Betriebsanleitung, Typen CTD9100, CTB9100, CTM9100
Page 66
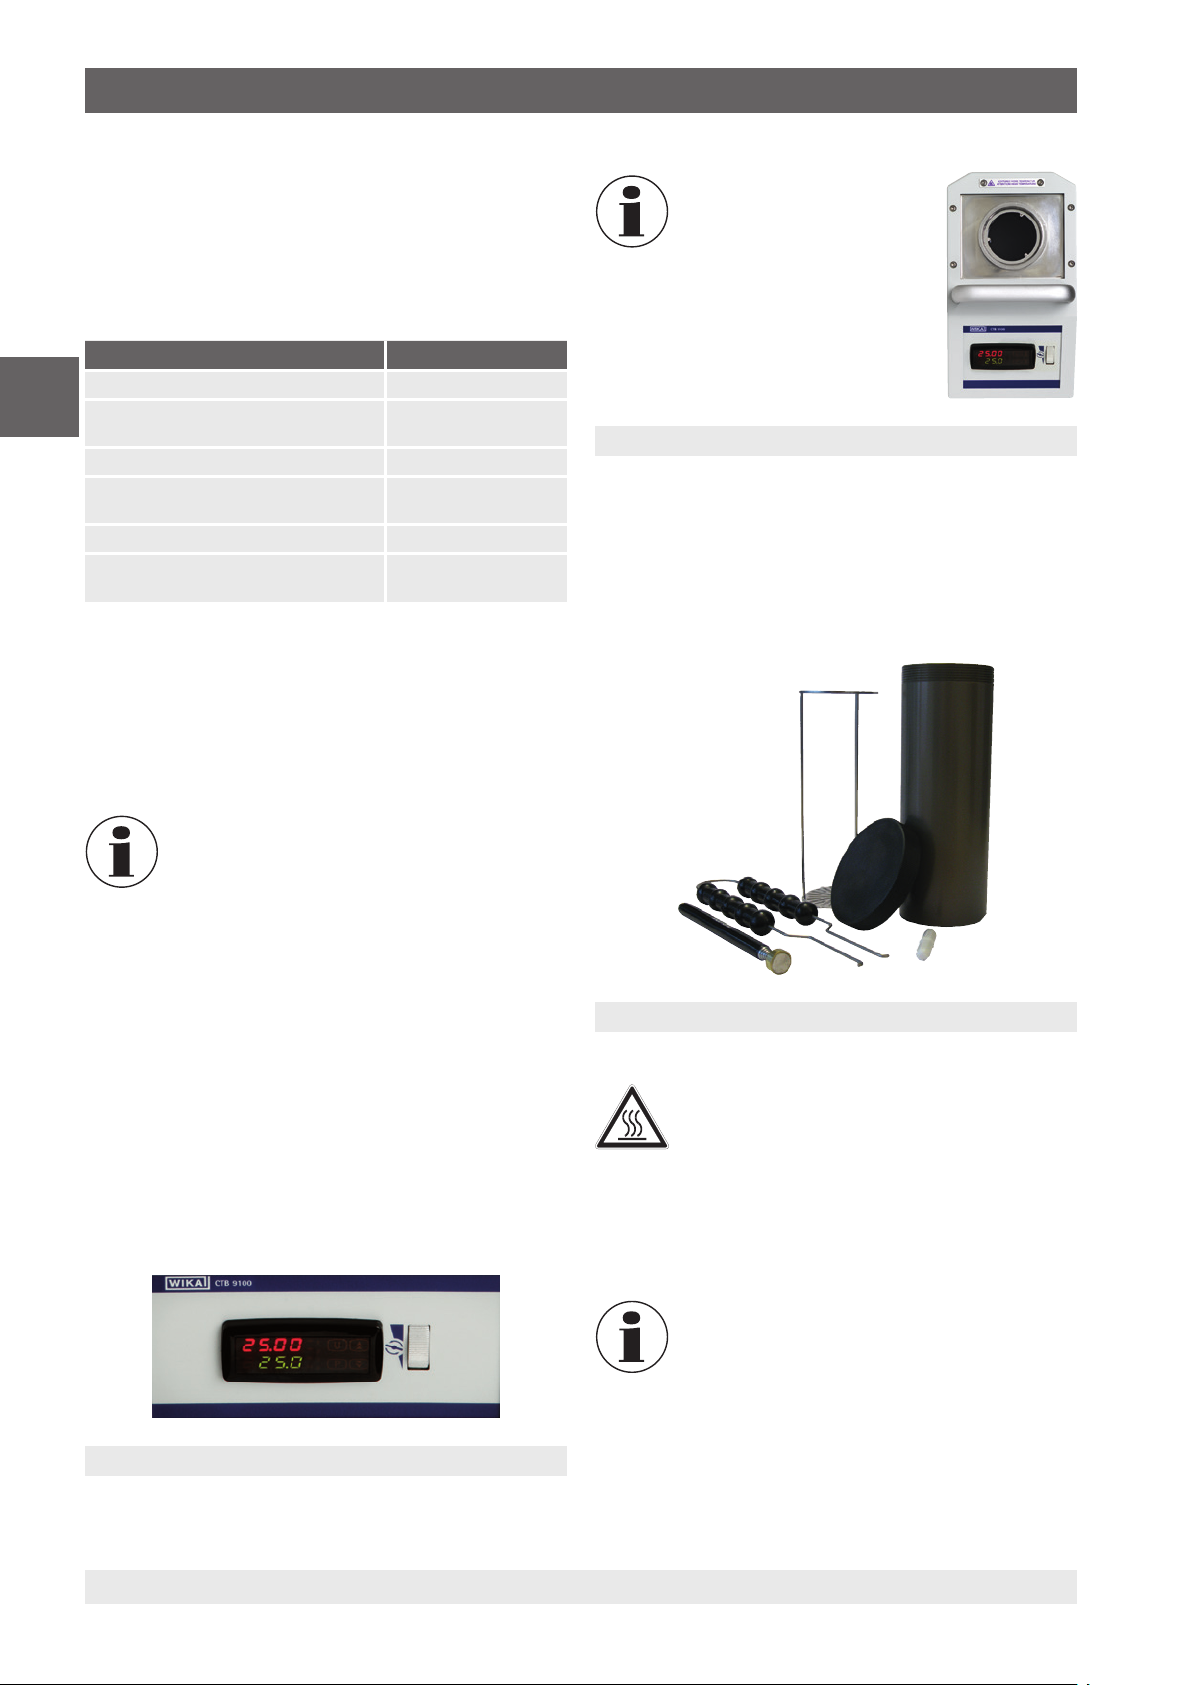
6. Inbetriebnahme, Betrieb
6.3.2 Befüllen des Mikrokalibrierbades
1. Zunächst den Transportdeckel entfernen.
2. Die Prüflinge in den Sensorkorb stecken.
3. Die Kalibrierflüssigkeit in den Tank füllen.
Folgende maximale Füllhöhen werden je nach Typ
empfohlen:
Kalibratortyp max. Füllhöhe
CTB9100-165 / CTM9100-150 130 mm [5,12 in]
DE
CTB9100-165 / CTM9100-150
mit herausnehmbaren Einsatz
CTB9100-225 123 mm [4,84 in]
CTB9100-225
mit herausnehmbaren Einsatz
CTB9100-225-X 115 mm [4,53 in]
CTB9100-225-X
mit herausnehmbaren Einsatz
Folgende Punkte sind bei der maximalen Füllhöhe zu
beachten:
110 mm [4,33 in]
105 mm [4,13 in]
95 mm [3,74 in]
Der Magnetrührer ist ein
Verschleißteil.
Flüssigkeitsbad
6.3.4 Bechereinsatz
Bechereinsatz bestehend aus:
■
Becher mit auslaufsicherem Deckel
■
Sensorkorb
■
Magnetrührer und -heber
■
Wechselwerkzeug
■
Messung ab Sensorkorb aufsitzend
■
Kein beladener Tank
■
Standard-WIKA-Füllmedium
■
Füllung ab Werk mit optimaler Höhe
Der Transportdeckel ist mit einem Sicherheitsventil ausgestattet. Wird das Mikrokalibrierbad
im warmen Zustand verschlossen, können
sich unzulässige Drücke aufbauen. Um
Überdruck zu vermeiden, der zur Zerstörung
des Flüssigkeitsbad führen kann, löst das
Sicherheitsventil bei einem Druck von ca. 2,5 bar
[36 psi] aus. Hierbei können heiße Dämpfe
austreten.
6.3.3 Bedienung des Magnetrührers
Die größtmögliche Homogenität wird durch das Umrühren
der Kalibrierflüssigkeit mit Hilfe des Magnetrührers erzielt.
Die Rührgeschwindigkeit auf das jeweils mögliche Maximum
einstellen. Drehen des Einstellrades nach oben erhöht
die Geschwindigkeit, drehen nach unten verlangsamt die
Rührbewegung.
Bechereinsatz
WARNUNG!
Verbrennungsgefahr!
Heiße Flüssigkeiten können zu akuten Verbrennungen führen.
▶
▶
Den Bechereinsatz nur entfernen, wenn der
Kalibrator Raumtemperatur erreicht hat.
Die Füllhöhe dem Medium und der Temperatur entsprechend anpassen.
Wird der Bechereinsatz mit einem neuen
Mikrokalibrierbad Typ CTB9100 oder einem
neuen Multifunktionskalibrator Typ CTM9100
bestellt, so wird das Gerät auf den
Bechereinsatz abgeglichen.
Sollte der Bechereinsatz nachbestellt werden, so
Reglerfront mit Rührgeschwindigkeitsrad
ist eine neue Justage des beim Kunden vorhandenen Gerät erforderlich.
66 WIKA Betriebsanleitung, Typen CTD9100, CTB9100, CTM9100
11263911.05 03/2019 EN/DE/IT
Page 67
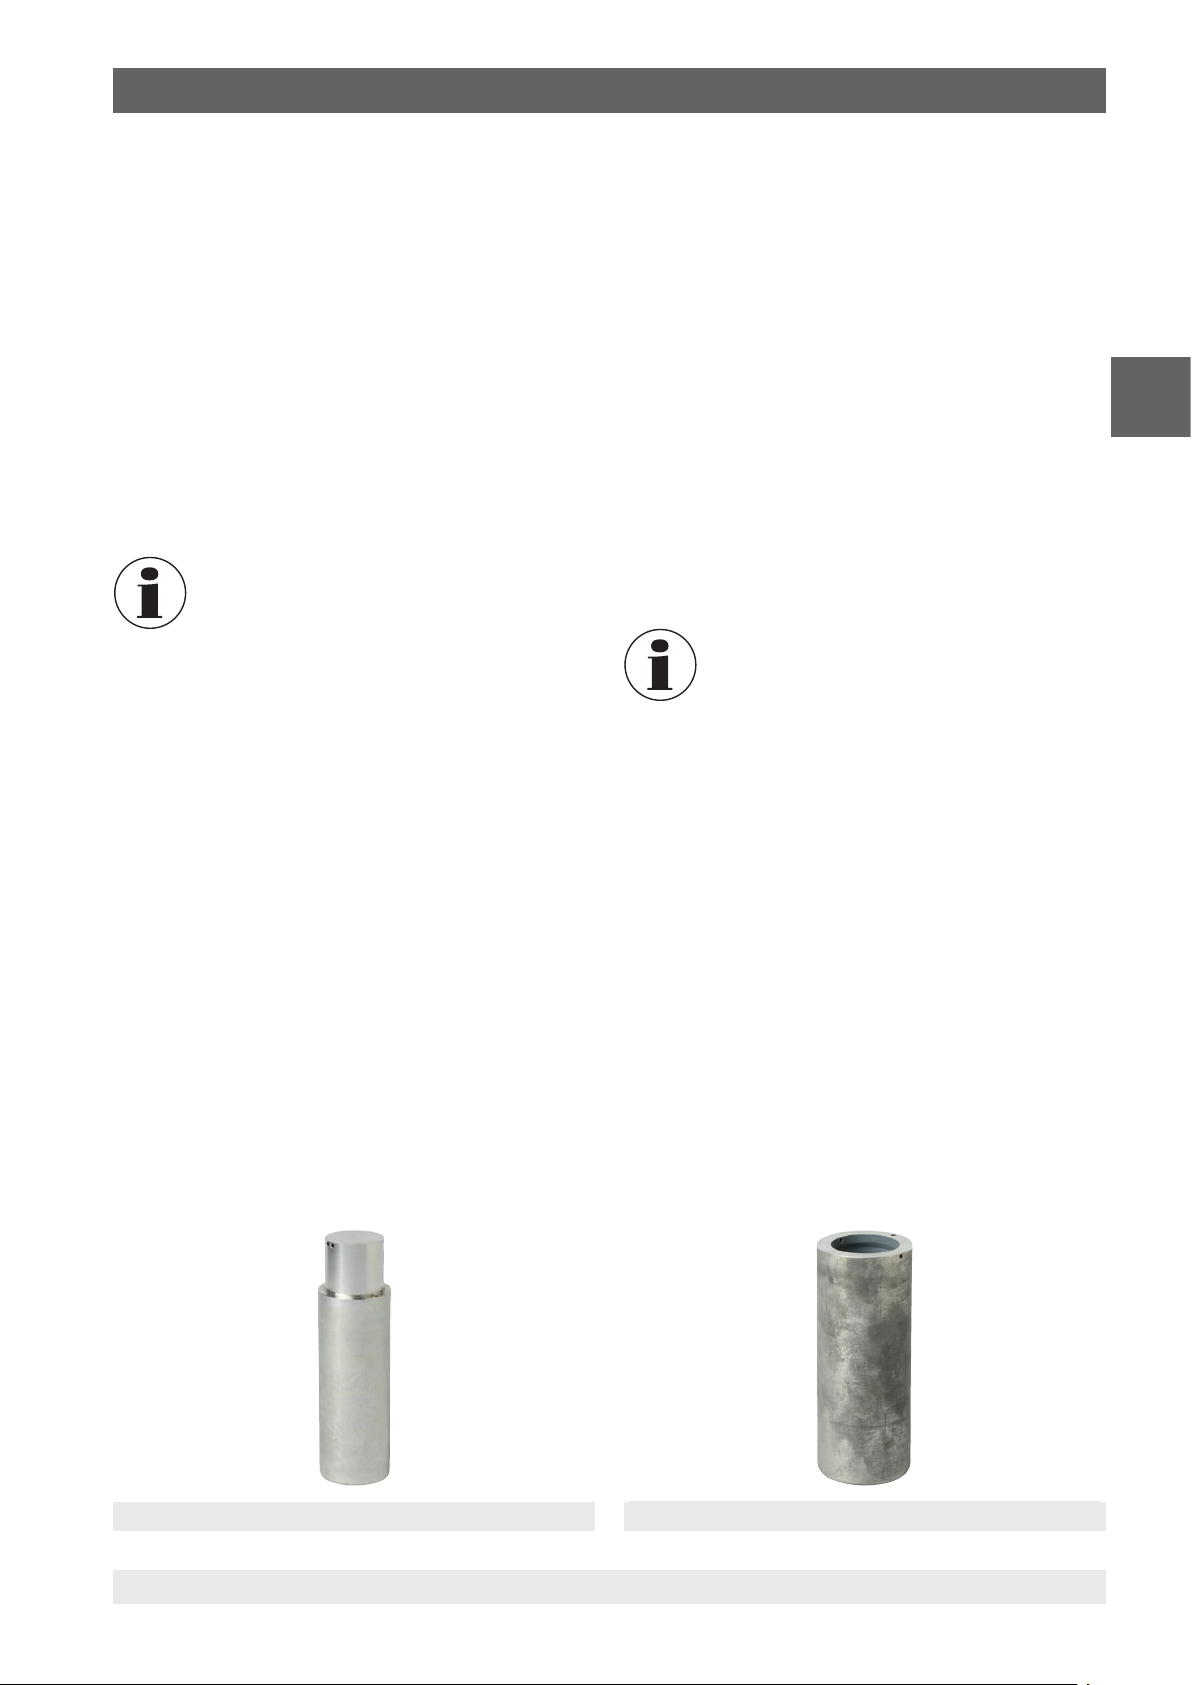
6. Inbetriebnahme, Betrieb
6.4 Einsatzhülse Oberfläche (nur CTM9100-150)
Die Funktionsweise des Kalibrators mit dem
Oberflächeneinsatz ist auf eine einfache und möglichst
genaue Kalibrierung von Oberflächenfühlern abgestimmt.
Die von unten hohle und längere Einsatzhülse wird mit Hilfe
des speziellen Wechselwerkzeuges in den Block eingesetzt.
Die Hülse besitzt zusätzlich drei Bohrungen (1 x 3 mm,
1 x 3,1 mm und 1 x 4 mm [1 x 0,12 in, 1 x 0,12 in und
1 x 0,16 in]) direkt unter der Oberfläche, sodass die korrekte
Oberflächentemperatur jederzeit kontrolliert werden kann.
Die Einsatzhülsen nach dem Gebrauch mit Hilfe des speziellen Hülsenwerkzeuges entfernen, Hülse und Block reinigen.
Dies verhindert das Festklemmen der Hülsen im Heizblock.
Die Kalibrierung von Oberflächen-Temperaturfühlern ist sehr schwierig und nicht unumstritten. Der auf der Oberfläche aufgesetzte
Temperaturfühler leitet Wärme von der Oberfläche ab und erzeugt damit einen kalten Fleck auf
der zu messenden Oberfläche. Beim Multifunktionskalibrator wird die Kalibriertemperatur in
einer speziell konstruierten Oberflächenhülse
erzeugt und direkt unter der Oberfläche mit
einem externen Referenzthermometer gemessen. Das Referenzthermometer ermittelt durch
Integration der Temperatur über die sensitive
Länge des Referenzthermometers auch die
Temperatur des kalten Fleckes und bietet somit
eine wahre Temperaturkalibrierung von Oberflächen-Temperaturfühlern an.
6.5 Einsatzhülse Infrarot (nur CTM9100-150)
Die Funktionsweise des Kalibrators mit der Infraroteinsatzhülse ist auf eine schnelle und einfache Kalibrierung von
berührungslos messenden Thermometern abgestimmt.
Die hohle und besonders konstruierte Einsatzhülse wird
mit Hilfe des Wechselwerkzeuges in den Block eingesetzt.
Diese Hülse besitzt zusätzlich zwei Bohrungen im Rand mit
1 x 3,5 mm und 1 x 4,5 mm [1 x 0,14 in und 1 x 0,18 in], zur
genauen Überwachung der Temperatur.
Die Hülse ist besonders in Ihrer Konstruktion und Oberflächenbeschaffenheit, sodass ein Emissionsgrad von 1
erreicht wird.
Die Einsatzhülsen nach dem Gebrauch mit Hilfe des speziellen Hülsenwerkzeuges entfernen, Hülse und Block reinigen.
Dies verhindert das Festklemmen der Hülsen im Heizblock.
Bei Temperaturen < 0 °C [< 32 °F] und hoher
Luftfeuchtigkeit kommt es zur Eis- bzw. Taubildung in der Einsatzhülse. Dadurch kann die
Kalibrierung verfälscht werden. Durch Abdecken
der Messöffnung wird die Eis- bzw. Taubildung
stark reduziert.
■
Messöffnung möglichst lange verschlossen
halten
■
Messöffnung kurzzeitig für die Messung
öffnen
■
Vorhandenes Eis bzw. Tau durch Beheizen
entfernen
DE
Die Hülse ist so konstruiert, dass die
mitgelieferte externe Referenz das bestmögliche Ergebnis liefert, da die Tiefe der Bohrung
an die sensitive Länge angepasst ist. Falls eine
eigene externe Referenz zur Vergleichskalibrierung herangezogen wird, sicherstellen, dass die
sensitive Länge bekannt ist und in der Mitte der
Kalibrieroberfläche liegt.
Einsatzhülse Oberfläche
11263911.05 03/2019 EN/DE/IT
Einsatzhülse für Infrarotmessungen
67WIKA Betriebsanleitung, Typen CTD9100, CTB9100, CTM9100
Page 68
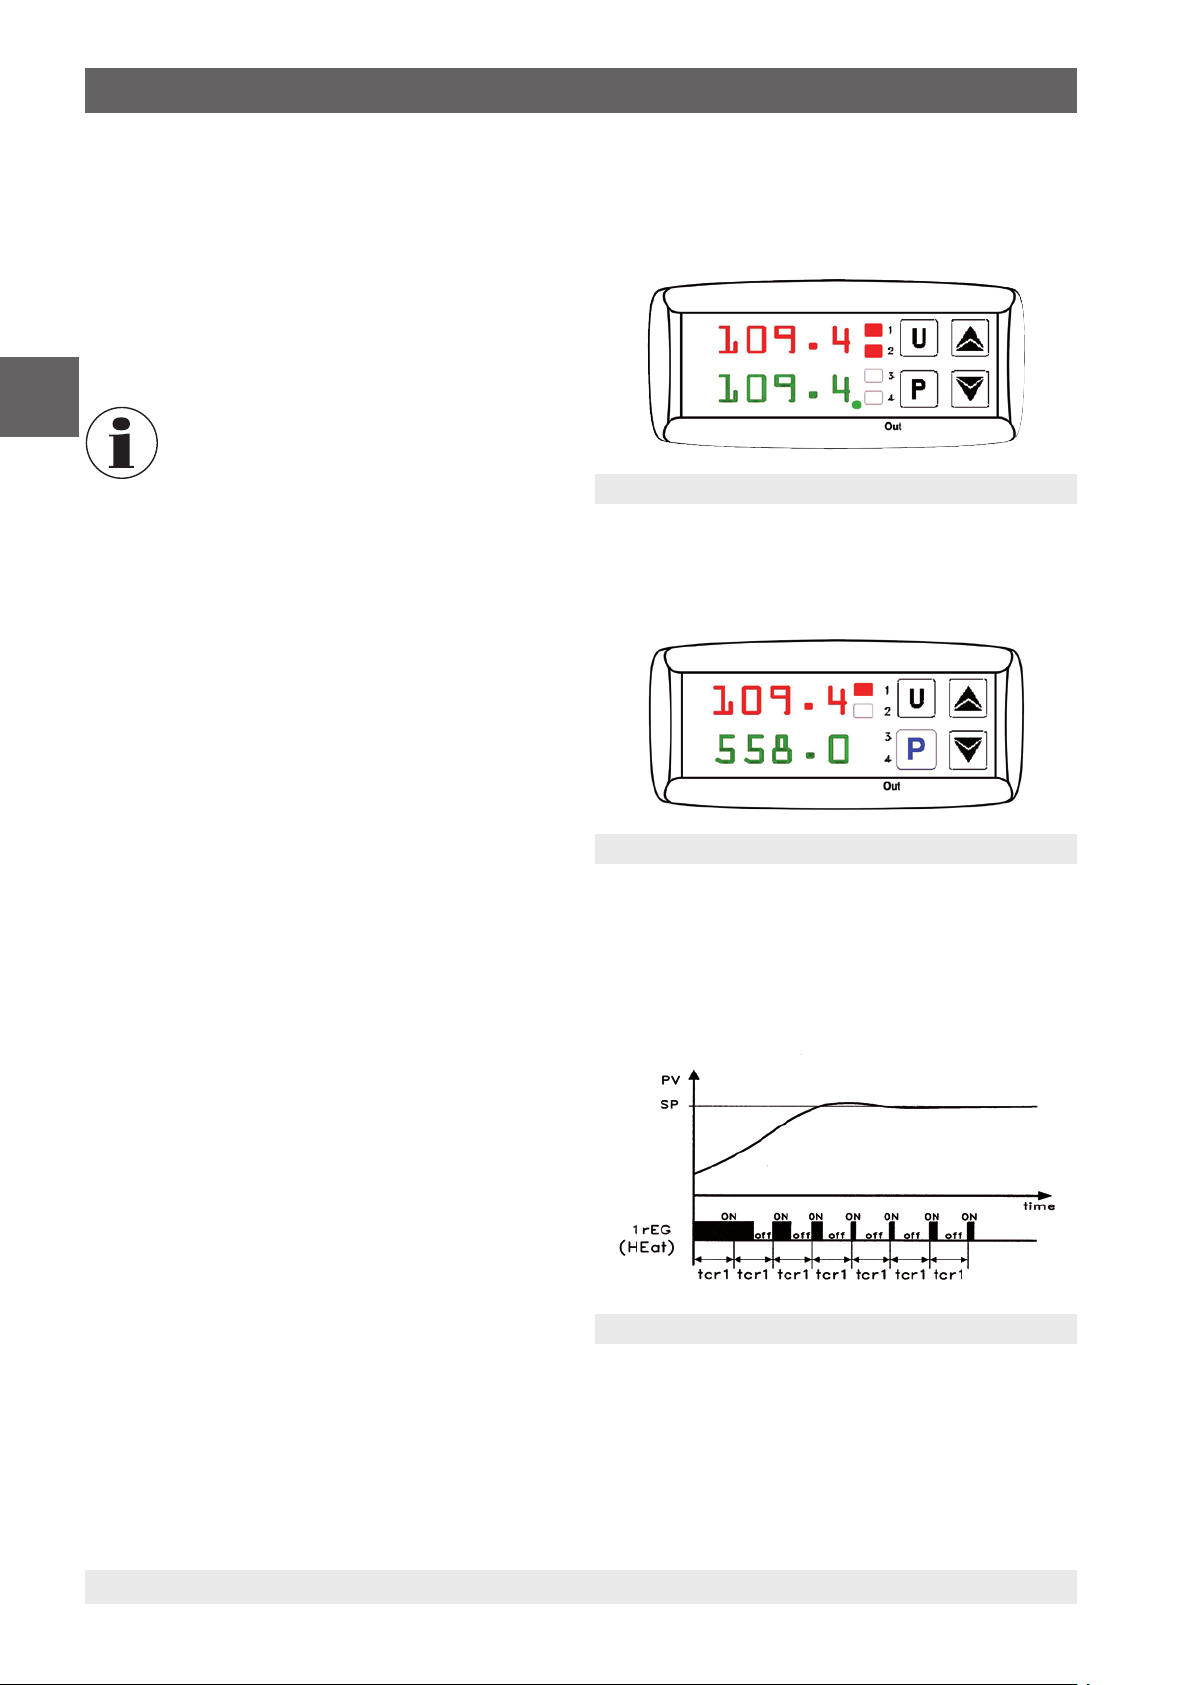
6. Inbetriebnahme, Betrieb
6.6 Prüfen von Temperaturfühlern
Zur Prüfung von Temperaturfühlern ein separates Temperatur-Messinstrument an den Prüfling anschließen. Durch
den Vergleich der am externen Messinstrument angezeigten
Temperatur mit der Referenztemperatur kann eine Aussage
über den Zustand des Prüflings gemacht werden. Hierbei
darauf achten, dass der Prüfling kurze Zeit benötigt, bis er
die Temperatur des Metallblockes bzw. Flüssigkeitsbades
angenommen hat.
DE
6.7 Anfahrprozedur
Bei längerem Nichtgebrauch des Kalibrators ist es möglich,
dass aufgrund des verwendeten Materials (Magnesiumoxid)
Feuchtigkeit in die Heizelemente eindringt. Nach Transport oder Lagerung des Kalibrators in feuchter Umgebung
müssen die Heizelemente daher beim Anheizen langsam
hochgeheizt werden.
Während des Austrocknungsvorganges ist davon auszugehen, dass der Kalibrator noch nicht die für die Schutzklasse I
erforderliche Isolationsspannung erreicht hat. Der Anfahrsollwert beträgt T
T
= 15 min.
n
6.8 Einschalten des Kalibrators/Mikrokalibrierbades
1. Netzanschluss über den mitgelieferten Netzstecker
herstellen.
2. Den Netzschalter betätigen.
Der Regler wird initialisiert.
In der oberen Anzeige PV erscheint tESt.
In der unteren Anzeige SV erscheint die Versionsnummer,
z. B. rL 2.2.
Es besteht keine Kalibriermöglichkeit für geerdete Thermoelemente, da der Heizblock geerdet ist
und Messungen deshalb zu falschen Ergebnissen führen.
= 120 °C [248 °F] bei einer Haltezeit von
anf
Ist die eingestellte Soll-Temperatur erreicht, wird durch kurze
Einschaltimpulse die vom Metallblock bzw. Flüssigkeitsbad
abgestrahlte Wärmeenergie nachgeliefert, sodass die
Temperatur im Inneren konstant gehalten wird.
Anzeige der Referenz- und Soll-Temperatur
6.10 Ausregelung der Referenztemperatur
Die rote LED OUT 1 zeigt an, dass die Heizung eingeschaltet ist.
Anzeige mit LED OUT 1
Während der Aufheizphase zeigt ein Dauerlicht die Zufuhr
von Heizenergie an. Ein Blinken der LED deutet an, dass
die Referenztemperatur, (eingestellte Soll-Temperatur) bald
erreicht ist und deshalb die Heizenergie nur noch in kurzen
Intervallen zugeführt wird.
Nach ca. 5 Sek. ist die Initialisierung abgeschlossen und es
wird automatisch der Kalibriermodus angezeigt.
Die eingebauten Heiz- bzw. Kühlelemente temperieren den
Metallblock automatisch von Raumtemperatur auf die am
Regler eingestellte Soll-Temperatur.
6.9 Anzeige der Referenz- und Soll-Temperatur
Obere Anzeige PV:
Die rote, 4-stellige 7-Segmentanzeige zeigt die aktuelle
Temperatur des Metallblocks bzw. Flüssigkeitsbades an.
Untere Anzeige SV:
In der grünen, 4-stelligen 7-Segmentanzeige erscheint
die aktuelle Soll-Temperatur des Metallblockes bzw.
Flüssigkeitsbades.
68 WIKA Betriebsanleitung, Typen CTD9100, CTB9100, CTM9100
Regelung erfolgt mittels PID-Algorithmus
Zur Gewährleistung einer guten Temperaturstabilität ist die
Zykluszeit des Reglers niedrig eingestellt und der Regelausgang wird häufig angesprochen.
11263911.05 03/2019 EN/DE/IT
Page 69

7. Bedienung des Kalibrators/Mikrokalibrierbades
7. Bedienung des Kalibrators/Mikrokalibrierbades
Zur Bedienung stehen drei Modi zur Verfügung
Kalibriermodus
In diesem normalen Betriebszustand die Kalibrierung der
Prüflinge vornehmen.
Sollwertmodus
In diesem Modus die Soll-Temperaturen eingeben.
Hauptmenü
In diesem Modus sämtliche Einstellungen vornehmen,
wie Vorgabe der Soll-Temperaturen oder Einstellung der
Regelparameter.
7.1 Auswahl der Betriebsarten bei CTM9100-150
Um den Multifunktionskalibrator in der gewünschten
Betriebsart zu betreiben, zuerst die korrekte Linearisierung dem Regler vorgeben. Dazu im Hauptmenü (über die
[P]-Taste) mit Hilfe der Pfeiltasten die gewünschte Funktion
auswählen.
LI Funktion als Mikrokalibrierbad
DB Funktion als Trockenblock
Ir Funktion als Infrarot-Schwarzstrahler
SU Funktion als Oberflächen-Temperaturkalibator
Die Flüssigkeit wird mit Hilfe eines Magnetrührers umgewälzt
und sorgt damit für eine sehr gute Temperaturverteilung im
Bad.
Die verwendeten Flüssigkeiten entsprechend der gewünschten Kalibriertemperatur auswählen.
Betriebsart Trockenblock
1. Evtl. Reinigung des Tankes
2. Einsetzen der Einsatzhülse (Aluminium)
3. Die Geschwindigkeit des Magnetrührers auf „0“ stellen.
4. Um die korrekte Linearisierung des Reglers zu gewährleisten, DB im Regler einstellen. Hierzu ca. 5 Sek. lang die
[P]-Taste drücken und in dem Hauptmenü die passende
Einstellung mit [P] bestätigen.
5. Der Schalter links neben dem Regler auf externe Referenz
einstellen. Die mitgelieferte externe Referenz in die dafür
vorgesehene Buchse einstecken und in eine passende
Bohrung der Einsatzhülse eintauchen.
Die Einsatzhülse hat mehrere Bohrungen zur Aufnahme
der zu kalibrierenden Temperaturfühler und der externen
Referenz zur Vergleichskalibrierung. Der Block wird bis zur
gewünschten Kalibriertemperatur aufgeheizt oder gekühlt.
Wenn die stabile Temperatur erreicht ist, werden die zu kalibrierenden Temperaturfühler mit dem Referenzthermometer
verglichen.
DE
Die Bestätigung der gewünschten Funktion erfolgt über die
[P]-Taste.
Auf dem Hauptbildschirm wird in der PV Zeile dann alle
5 Sek. die ausgewählte Linearsierung (LI, DB, Ir oder SU)
angezeigt.
7.2 Arbeitsweise im Kalibriermodus innerhalb der
einzelnen Betriebsarten
Betriebsart Mikrokalibrierbad (mit oder ohne
Bechereinsatz möglich)
1. Den Magentrührer und den Sensorkorb einsetzen.
2. Das Mikrokalibrierbad befüllen (siehe Kapitel
6.3.2 „Befüllen des Mikrokalibrierbades“).
3. Die Geschwindigkeit des Magnetrührers einstellen, um die
bestmögliche Homogenität zu erreichen.
4. Um die korrekte Linearisierung des Reglers zu gewähr-
leisten, LI im Regler einstellen. Hierzu ca. 5 Sek. lang die
[P]-Taste drücken und in dem Hauptmenü die passende
Einstellung mit [P] bestätigen.
5. Der Schalter links neben dem Regler auf interne Referenz
einstellen.
Abgewinkelte Fühler, Fühler mit größeren Durchmessern
oder als Sonderbauformen können in einem Block nicht
kalibriert werden. Dafür haben Multifunktionskalibratoren ein
umgewälztes Flüssigkeitsbad.
11263911.05 03/2019 EN/DE/IT
Betriebsart Infrarot
1. Evtl. Reinigung des Tankes
2. Einsetzen der Einsatzhülse (hohl, keramikbeschichtet)
3. Die Geschwindigkeit des Magnetrührers auf „0“ stellen.
4. Um die korrekte Linearisierung des Reglers zu gewährleisten, Ir im Regler einstellen. Hierzu ca. 5 Sek. lang die
[P]-Taste drücken und in dem Hauptmenü die passende
Einstellung mit [P] bestätigen.
5. Der Schalter links neben dem Regler auf externe Referenz
einstellen. Die mitgelieferte externe Referenz in die dafür
vorgesehene Buchse einstecken und in eine passende
Bohrung am äußeren Rand der Einsatzhülse einbringen.
Der Messfleck des zu kalibrierenden Pyrometers darf in
keinem Fall größer sein, als der Durchmesser der Infrarothülse.
Betriebsart Oberfläche
1. Evtl. Reinigung des Tankes
2. Einsetzen der Einsatzhülse (hohl, oben mit Kragen
abgesetzt)
3. Die Geschwindigkeit des Magnetrührers auf „0“ stellen.
4. Um die korrekte Linearisierung des Reglers zu gewährleisten, SU im Regler eingestellt werden. Hierzu ca. 5 Sek.
lang die P-Taste drücken und in dem Hauptmenü die
passende Einstellung mit [P] bestätigen.
69WIKA Betriebsanleitung, Typen CTD9100, CTB9100, CTM9100
Page 70
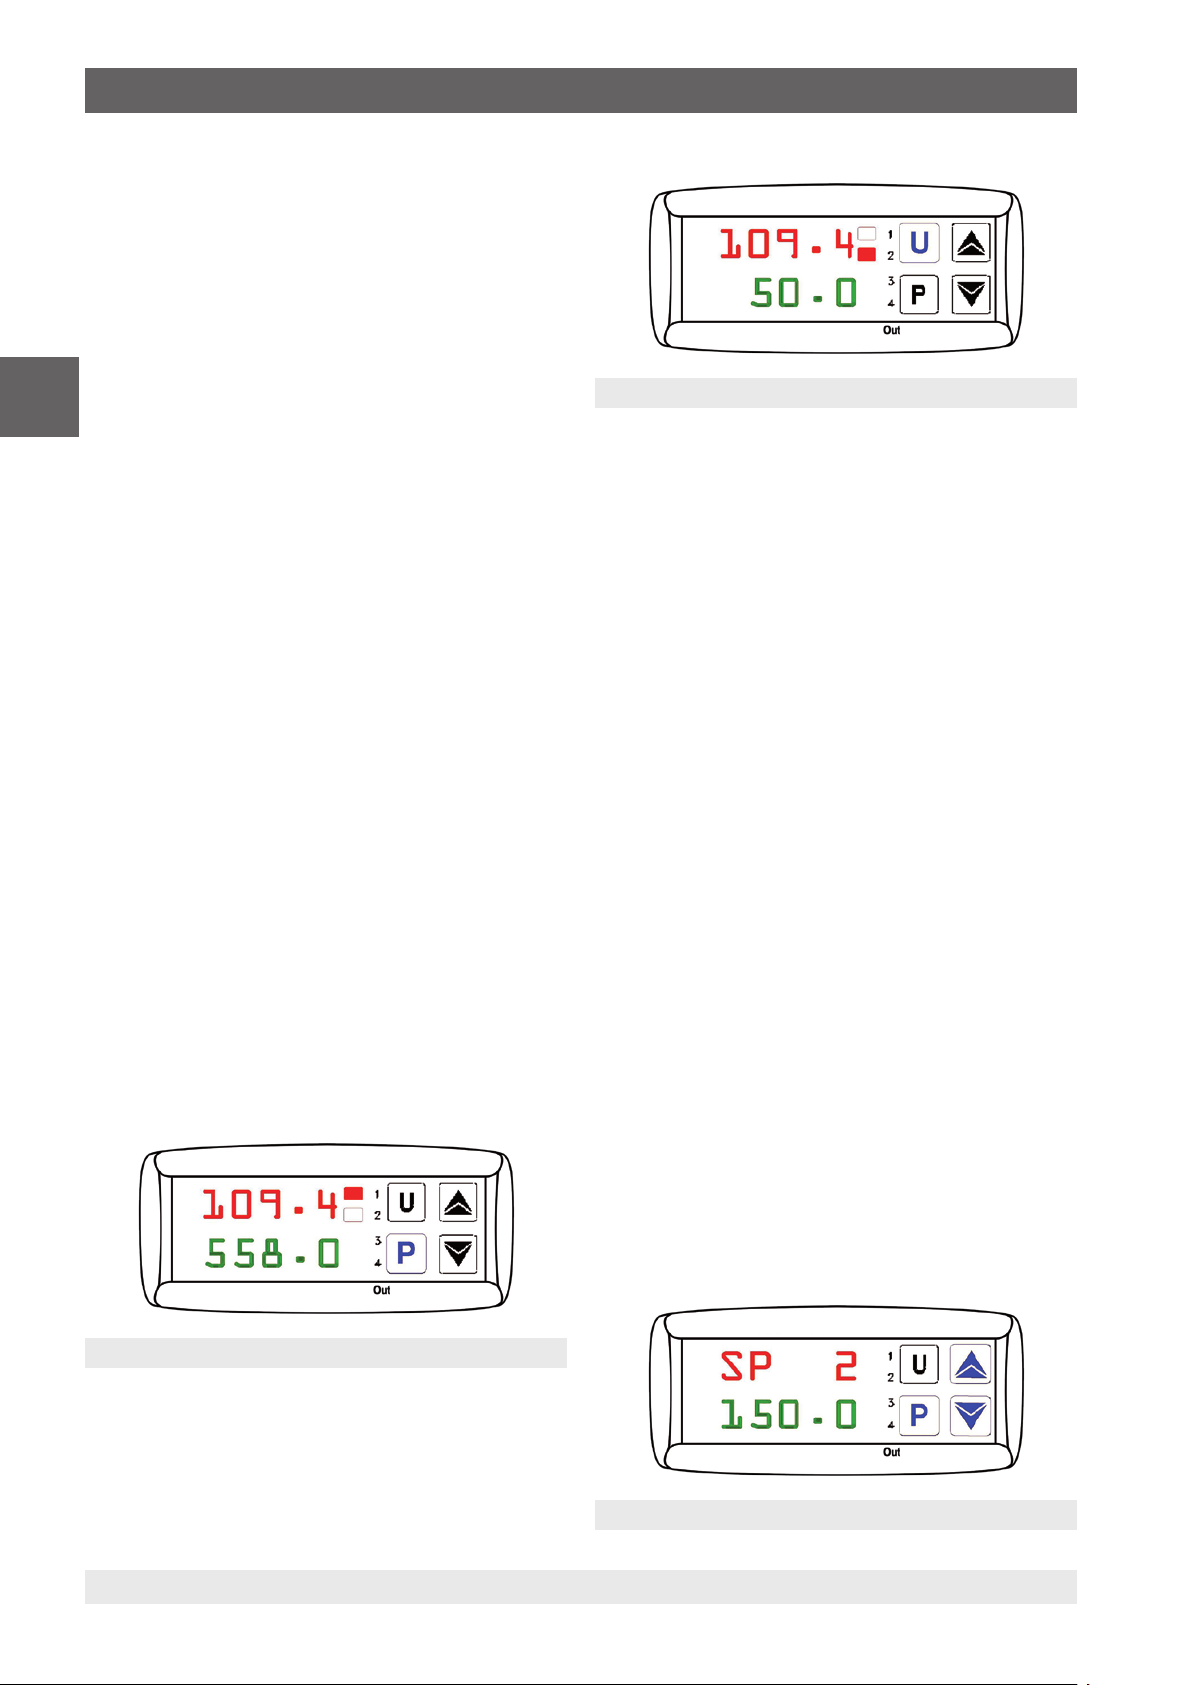
7. Bedienung des Kalibrators/Mikrokalibrierbades
5. Den Schalter links neben dem Regler auf externe
Referenz einstellen. Die mitgelieferte externe Referenz
in die dafür vorgesehene Buchse einstecken und in eine
passende Bohrung direkt unterhalb der Oberfläche der
Einsatzhülse einbringen.
Die Kalibrierung von Oberflächen-Temperaturfühlern ist
sehr schwierig und nicht unumstritten. Der auf der Oberfläche aufgesetzte Temperaturfühler leitet Wärme von der
Oberfläche ab und erzeugt damit einen kalten Fleck auf der
DE
zu messenden Oberfläche. In dem entwickelten Multifunktionskalibrator wird die Kalibriertemperatur in einer speziell
konstruierten Oberflächenhülse erzeugt und direkt unter der
Oberfläche mit einem Referenzthermometer gemessen. Das
Referenzthermometer ermittelt damit auch die Temperatur
des kalten Fleckes (durch Integration der Temperatur über
die sensitive Länge des Referenzthermometers) und bietet
somit eine wahre Temperaturkalibrierung von OberflächenTemperaturfühlern an.
Die Hülse ist so konstruiert, dass die mitgelieferte externe
Referenz das bestmögliche Ergebnis liefert, da die Tiefe der
Bohrung an die sensitive Länge angepasst ist. Falls eine
eigene externe Referenz zur Vergleichskalibrierung herangezogen wird, sicherstellen, dass die sensitive Länge bekannt
ist und in der Mitte der Kalibrieroberfläche liegt.
7.3 Kalibrierung (Kalibriermodus)
Sobald der Kalibrator bzw. das Mikrokalibrierbad eingeschaltet ist, befindet er sich nach der Initialisierung im
Kalibriermodus.
Auf der oberen Anzeige PV wird die aktuelle
Referenztemperatur angezeigt.
Auf der unteren Anzeige SV steht die Soll-Temperatur.
Die LED OUT 1 signalisiert den Zustand des Ausgangs für
die Heizungsansteuerung:
■
Leuchtet die LED OUT 1, wird die Temperatur erhöht.
■
Leuchtet die LED OUT 1 nicht, ist die Heizung ausgeschaltet.
Anzeige im Kalibriermodus LÜFTER oder KÜHLEN
a) Heizinstrument
Die LED OUT 2 signalisiert den Zustand des Ausgangs für
die Lüftersteuerung:
■
Leuchtet die LED OUT 2, läuft der Lüfter mit hoher
Drehzahl.
■
Leuchtet die LED OUT 2 nicht, läuft der Lüfter mit verringerter Drehzahl.
b) Heiz- und Kühlinstrument
Die LED OUT 2 signalisiert den Zustand des Ausgangs für
die Kühlungsansteuerung:
■
Leuchtet die LED OUT 2, wird die Temperatur verringert.
■
Leuchtet die LED OUT 2 nicht, ist die Kühlung ausgeschaltet.
Zwei Möglichkeiten zur Einstellung der Soll-Temperatur
Entweder eine temporäre Soll-Temperatur einstellen
(siehe Kapitel 7.3 „Kalibrierung (Kalibriermodus)“) oder
im Hauptmenü feste Soll-Temperaturen speichern (siehe
Kapitel. 7.4 „Einstellen einer temporären Soll-Temperatur
(Sollwertmodus)“).
7.4 Einstellen einer temporären Soll-Temperatur
(Sollwertmodus)
In diesem Betriebszustand eine gespeicherte Soll-Temperatur temporär verändern.
1. Kurz die Taste [P] drücken.
Auf der oberen Anzeige PV wird der zur Zeit aktive
Sollwertspeicher z. B. SP2 (Setpoint 2) angezeigt.
Auf der unteren Anzeige SV steht die dazugehörige SollTemperatur.
2. Durch Drücken der Taste [▲] die Soll-Temperatur
erhöhen.
Durch Drücken der Taste [▼] die Soll-Temperatur reduzie-
ren.
3. Durch erneutes Drücken der Taste [P] den neu eingestell-
ten Sollwert bestätigen.
Anzeige im Kalibriermodus HEIZEN
Die LED OUT 2 signalisiert den Zustand des Ausgangs für
die Lüfter-/Kühlungsansteuerung.
Temporäre Soll-Temperatureinstellung
70 WIKA Betriebsanleitung, Typen CTD9100, CTB9100, CTM9100
11263911.05 03/2019 EN/DE/IT
Page 71
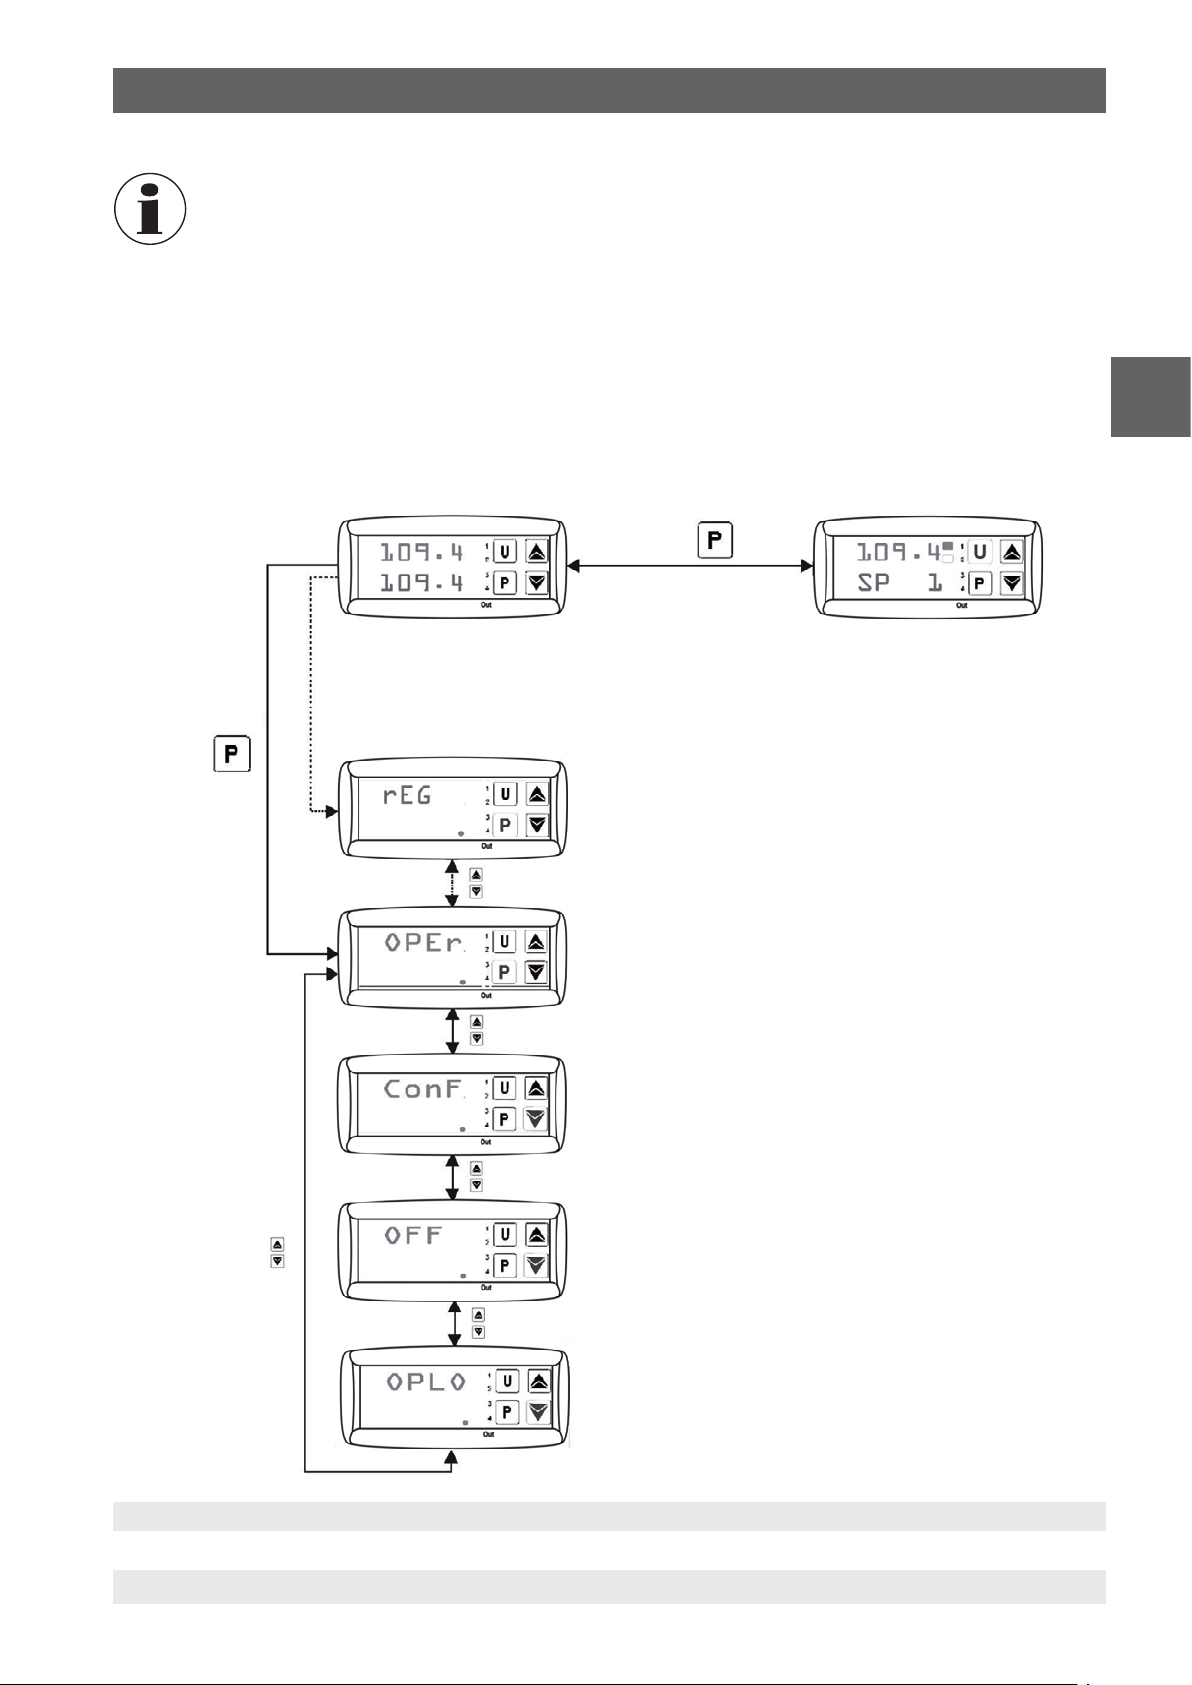
7. Bedienung des Kalibrators/Mikrokalibrierbades
Bei Betätigung der Taste [▲] bzw. [▼] steigt oder
sinkt der Wert um 0,01 °C [0,01 °F]. Werden die
Tasten hingegen mindestens 1 Sek. gedrückt
gehalten, steigt bzw. sinkt der Wert schnell
und nach 2 Sek. noch schneller, wodurch der
gewünschte Wert sehr schnell erreicht wird.
Wenn im Sollwertmodus ca. 15 Sek. lang keine
Taste mehr gedrückt wird, erfolgt ein automatischer Rücksprung in den Kalibriermodus.
Kalibriermodus
ca. 5 Sek.
Hauptmenü
7.5 Programmierung (Hauptmenü)
In dieser Menüstruktur sämtliche Erstellungen vornehmen.
1. Die Taste [P] ca. 5 Sek. lang drücken. Es öffnet sich das
Hauptmenü.
2. Mit den Tasten [▲] und [▼] das gewünschte Hauptmenü
auswählen (siehe Übersicht).
3. Drücken der Taste [P] bestätigt den ausgewählten
Menüpunkt.
DE
Sollwertmodus
Menüstruktur (Hauptmenü)
11263911.05 03/2019 EN/DE/IT
71WIKA Betriebsanleitung, Typen CTD9100, CTB9100, CTM9100
Page 72
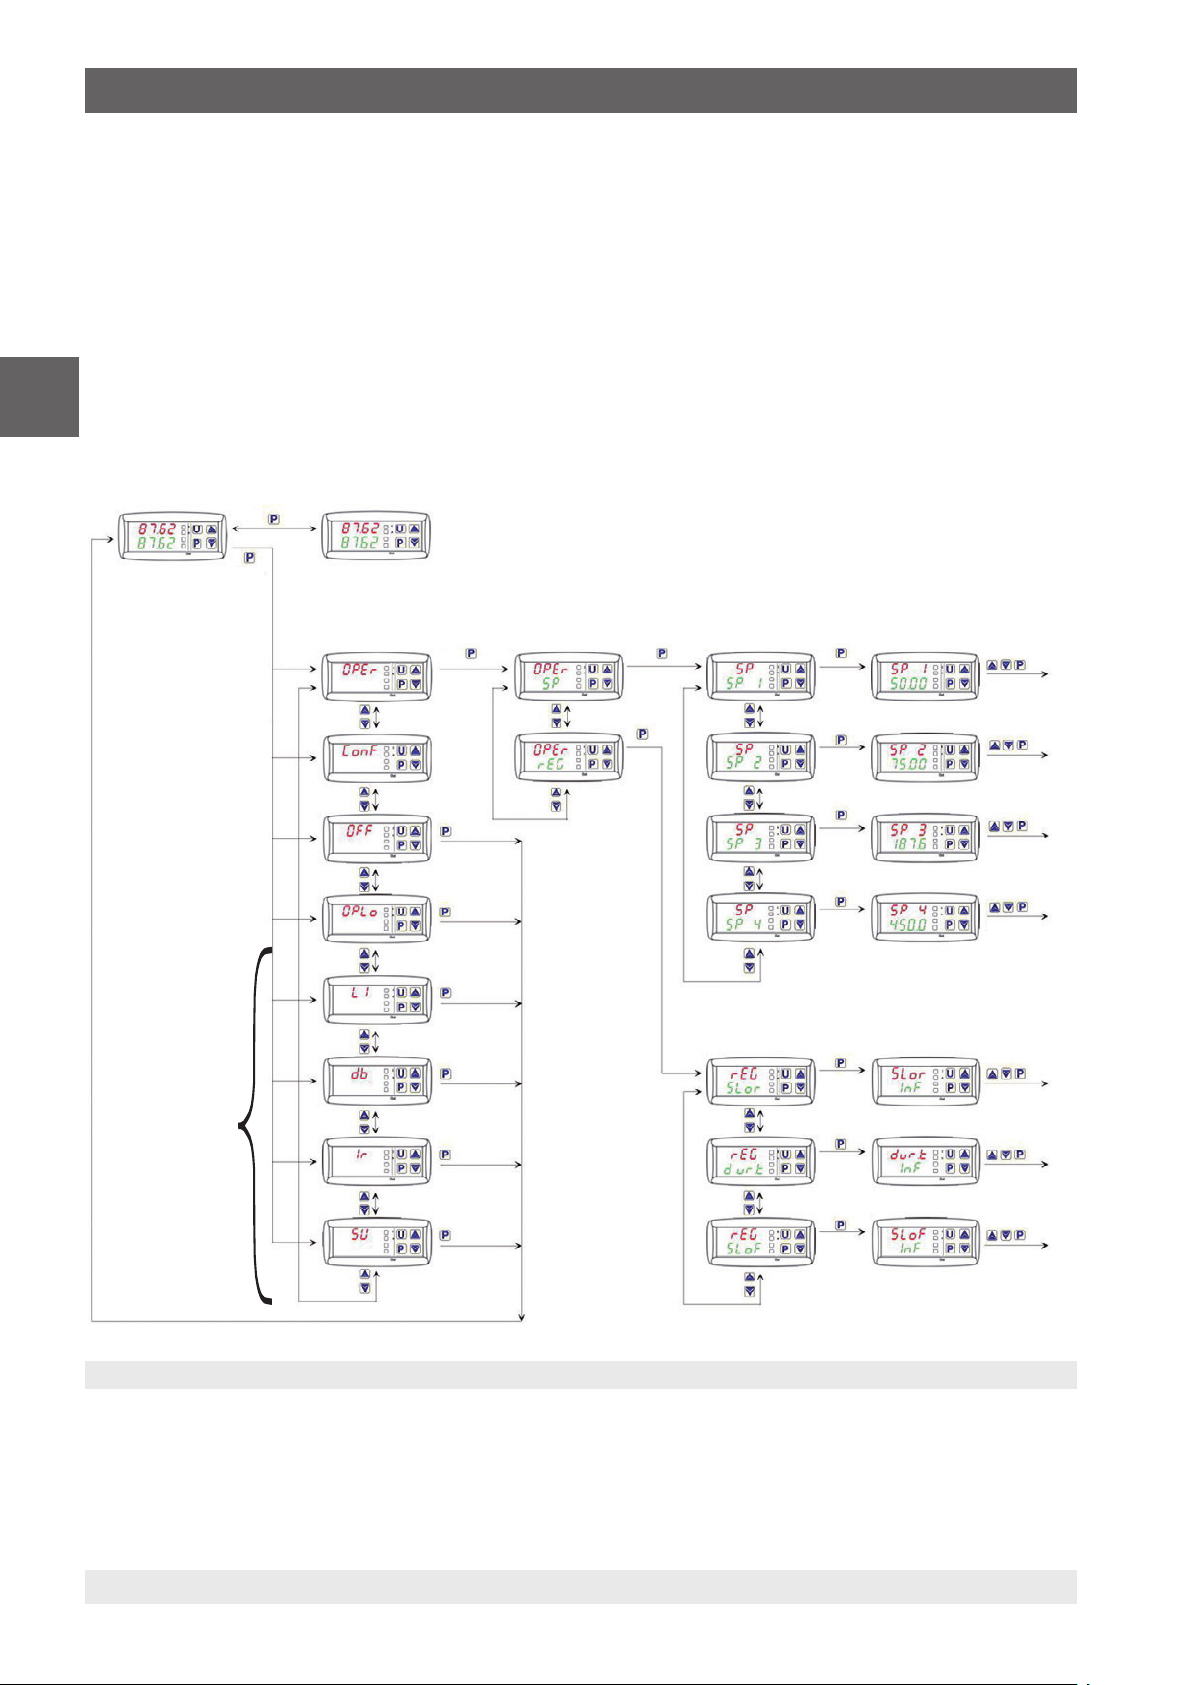
7. Bedienung des Kalibrators/Mikrokalibrierbades
7.5.1 Menüstruktur, Parameterebenen
Wie aus der Menüstruktur ersichtlich, ist über OPEr die
Gruppen- und Parameterebene erreichbar, in der dann
Einstellungen vorgenommen werden können.
DE
Kalibriermodus
ca. 5 Sek.
Sollwertmodus
Hauptmenü
Rücksprung in eine andere Ebene
Wenn im Hauptmenü, auf der Gruppen- oder Parameterebene ca. 15 Sek. keine Taste gedrückt wird, erfolgt
ein automatischer Rücksprung um eine Ebene bis in den
Kalibriermodus.
Einen Rücksprung vornehmen, durch Drücken der Taste [▲]
oder [▼].
Gruppenebene Parameterebene
Parametereingabe
Sollwert 1
Betriebsarten bei
CTM9100-150
Sollwert 2
Regelung
aus
Handsteuerung
Mikrokalibrierbad
Blockkalibrator
Infrarot Verweilzeit
Oberfläche Rampe
Parameterebene
Parametereingabe
Sollwert 3
Sollwert 4
Rampe
steigend
fallend
Menüstruktur
72 WIKA Betriebsanleitung, Typen CTD9100, CTB9100, CTM9100
11263911.05 03/2019 EN/DE/IT
Page 73

7. Bedienung des Kalibrators/Mikrokalibrierbades
7.5.2 Automatische Regelung ausschalten
Für bestimmte Aufgaben ist es vorteilhaft, die Regelung
auszuschalten, um z. B. Einstellungen am Kalibrator oder
Mikrokalibrierbad vorzunehmen.
Im Kalibriermodus für ca. 5 Sek. die Taste [P] drücken,
dadurch wird das Hauptmenü geöffnet.
Auf der oberen Anzeige PV erscheint OPEr.
Auf der unteren Anzeige SV erscheint die blinkende
LED SET.
Anzeige im Hauptmenü
Die Taste [▲] oder [▼] drücken bis OFF erscheint.
7.5.3 Automatische Regelung einschalten
Die Regelung ist ausgeschaltet, wenn folgende Anzeige
angezeigt werden:
Auf der oberen Anzeige PV erscheint die aktuelle
Referenztemperatur alternierend mit OFF.
Auf der unteren Anzeige SV erscheint die aktuell eingestellte
Soll-Temperatur.
DE
Anzeige bei Einstellung Regelung OFF
Die Regelung wieder einschalten durch ca. 5 Sek. langes
Drücken der Taste [P], dadurch wird das Hauptmenü geöff-
net.
Auf der oberen Anzeige PV erscheint ’rEG.
Auf der unteren Anzeige SV erscheint die blinkende
LED SET.
Menü Regelung OFF
Mit der Taste [P] bestätigen.
Auf der oberen Anzeige PV erscheint die aktuelle
Referenztemperatur alternierend mit OFF.
Auf der unteren Anzeige SV erscheint die aktuell eingestellte
Soll-Temperatur.
Anzeige bei Einstellung Regelung OFF
Die Regelung ist jetzt ausgeschaltet und die
Referenztemperatur wird kontinuierlich abfallen,
ohne dass nachgeregelt wird.
Anzeige 'rEG
Das Einschalten der Regelung durch Drücken der Taste [P]
bestätigen.
Die Regelung ist jetzt wieder aktiv. Der Kalibrator
bzw. das Mikrokalibrierbad befindet sich im
Kalibriermodus und die eingestellte Soll-Temperatur wird angefahren.
11263911.05 03/2019 EN/DE/IT
73WIKA Betriebsanleitung, Typen CTD9100, CTB9100, CTM9100
Page 74

7. Bedienung des Kalibrators/Mikrokalibrierbades
7.5.4 Handregelung einschalten
Die automatische Regelung des Kalibrators bzw.
Mikrokalibrierbad ausschalten und mit einer manuellen
Regelung die gewünschte Temperatur anfahren.
Für ca. 5 Sek. die Taste [P] drücken, dadurch wird das
Hauptmenü geöffnet.
Auf der oberen Anzeige PV erscheint OPEr.
Auf der unteren Anzeige SV erscheint die blinkende
LED SET.
DE
Anzeige im Hauptmenü
Die Taste [▲] oder [▼] drücken bis OPLO erscheint.
Auf der oberen Anzeige PV erscheint OPLO.
Auf der unteren Anzeige SV erscheint die blinkende
LED SET.
Die Taste [▲] drücken, die Ausgangsleistung wird erhöht.
Die Taste [▼] drücken, die Ausgangsleistung wird reduziert.
Bei Betätigung der Taste [▲] bzw. [▼] steigt oder
sinkt der Wert um 0,1 %. Werden die Tasten
hingegen mindestens 1 Sek. gedrückt gehalten, steigt bzw. sinkt der Wert schnell und nach
2 Sek. noch schneller, wodurch der gewünschte
Wert sehr schnell erreicht wird.
7.5.5 Handregelung ausschalten
Die Handregelung ist eingeschaltet, wenn folgende Anzeige
erscheint:
Auf der oberen Anzeige PV erscheint die aktuelle
Referenztemperatur.
Auf der unteren Anzeige SV erscheint ein H und die aktuell
eingestellte Ausgangsleistung in %.
Menü Handregelung OPLO
Durch Drücken der Taste [P] bestätigen.
Auf der oberen Anzeige PV erscheint die aktuelle
Referenztemperatur.
Auf der unteren Anzeige SV erscheint ein H und die aktuell
eingestellte Ausgangsleistung in %.
Anzeige bei Einstellung Handregelung OPLO
Anzeige bei Einstellung Handregelung OPLO
Die Handregelung wieder ausschalten durch ca. 5 Sek.
langes Drücken der Taste [P], dadurch wird das Hauptmenü
geöffnet.
Auf der oberen Anzeige PV erscheint ’rEG.
Auf der unteren Anzeige SV erscheint die blinkende
LED SET.
Anzeige im Hauptmenü
Das Einschalten der automatischen Regelung durch Drücken
der Taste [P] bestätigen.
74 WIKA Betriebsanleitung, Typen CTD9100, CTB9100, CTM9100
11263911.05 03/2019 EN/DE/IT
Page 75

7. Bedienung des Kalibrators/Mikrokalibrierbades
7.5.6 Einstellen und Speichern von festen Soll-Temperaturen
Um Soll-Temperaturen im Kalibrator bzw. Mikrokalibrierbad
zu speichern, muss der entsprechende Sollwertspeicher
geöffnet werden.
Im Kalibriermodus die Taste [P] für ca. 5 Sek. drücken,
dadurch wird das Hauptmenü geöffnet.
Auf der oberen Anzeige PV erscheint OPEr.
Auf der unteren Anzeige SV blinkt LED SET.
Operator-Menü OPEr
Erneut die Taste [P] drücken, dadurch wird die Gruppene-
bene geöffnet.
Auf der oberen Anzeige PV erscheint OPEr.
Auf der unteren Anzeige SV erscheint ’SP und zusätzlich
blinkt LED SET.
Mit der Taste [▲] oder [▼] einen der vier Sollwertspeicher
SP1, SP2, SP3 oder SP4 auswählen.
Durch Drücken der Taste [P] wird nun der entsprechende
Sollwertspeicher geöffnet.
Auf der oberen Anzeige PV erscheint blinkend der angewählte Sollwertspeicher z. B. SP3.
Auf der unteren Anzeige SV erscheint die dazugehörige
aktuell eingestellte Soll-Temperatur.
DE
Eingabe in den Sollwertspeicher SP3
Die Taste [▲] rücken, die Soll-Temperatur wird erhöht.
Die Taste [▼] drücken, die Soll-Temperatur wird reduziert.
Bei Betätigung der Taste [▲] bzw. [▼] steigt oder
sinkt der Wert um 0,01 °C [0,01 °F]. Werden die
Tasten hingegen mindestens 1 Sek. gedrückt
gehalten, steigt bzw. sinkt der Wert schnell
und nach 2 Sek. noch schneller, wodurch der
gewünschte Wert sehr schnell erreicht wird.
Gruppe ’SP
Erneut die Taste [P] drücken, dadurch wird die Parametere-
bene geöffnet.
Auf der oberen Anzeige PV erscheint ’SP.
Auf der unteren Anzeige SV erscheint blinkend der
Sollwertspeicher SP1 und zusätzlich die LED SET.
Parameter für Sollwertspeicher SP1
Durch Drücken der Taste [P] die neu eingestellte Soll-Temperatur bestätigen.
Der Sollwertspeicher wird verlassen und die Anzeige kehrt in
die Parameterebene zurück.
Zum Kalibriermodus zurückkehren, durch längeres
Drücken der Taste [▲] oder [▼].
Wenn ca. 15 Sek. keine Taste gedrückt wird,
erfolgt ein automatischer Rücksprung um eine
Ebene bis in den Kalibriermodus.
11263911.05 03/2019 EN/DE/IT
75WIKA Betriebsanleitung, Typen CTD9100, CTB9100, CTM9100
Page 76

7. Bedienung des Kalibrators/Mikrokalibrierbades
7.5.7 Abruf der gespeicherte Soll-Temperaturen
Die gespeicherten Soll-Temperaturen können im
Kalibriermodus abgerufen werden.
Für ca. 2 Sek. die Taste [U] drücken. Der aktuelle
Sollwertspeicher wird geöffnet.
Auf der oberen Anzeige PV erscheint die z. Zt. aktuelle
Referenztemperatur.
Auf der unteren Anzeige SV erscheint für 2 Sek. der
Sollwertspeicher SP1, SP2, SP3 oder SP4 und anschließend die dazugehörige aktuell eingestellte Soll-Temperatur.
DE
Es erscheint erst der Sollwertspeicher SP1, SP2, SP3 oder
SP4.
Danach erscheint die gespeicherte Soll-Temperatur.
Es wird ein einfaches Temperaturprofil erzeugt.
Nach Einschaltung des Kalibrators bzw. Mikrokalibrierbad
wird automatisch das Temperaturprofil durchlaufen.
Gradientenregelung und Temperaturprofil
Aufheizgradient SLor
Der Aufheizgradient SLor ist aktiv, wenn die
Referenztemperatur niedriger ist als die Soll-Temperatur.
Jeder Kalibratortyp hat eine maximale Heizleistung und
damit sind nur Einstellungen < als diese Heizleistung sinnvoll
und verlängern die Zeit zum Erreichen der Soll-Temperatur.
Anzeigen beim Abrufen der Soll-Temperaturen
Um einen anderen gespeicherten Sollwert zu erhalten,
erneut auf die Taste [U] rücken.
Der gewählte Temperaturwert wird direkt übernommen und
angefahren.
7.5.8 Einstellen einer Gradientenregelung und eines
Temperaturprofils
Mit Hilfe der Gradientenregelung wird die Zeit bestimmt,
in der die Soll-Temperatur erreicht wird. Diese Zeit kann
kürzer oder länger sein, als die, die der Kalibrator bzw. das
Mikrokalibrierbad normalerweise benötigen würde.
Bei Änderung der Soll-Temperatur oder Einschalten
des Kalibrators bzw. Mikrokalibrierbades wird automatisch bestimmt, welcher der Gradienten benutzt wird
(Aufheizgradient SLor oder Abkühlgradient SLoF).
Im Kalibrator bzw. im Mikrokalibrierbad kann die Verweilzeit dur.t so programmiert werden, dass die erreichte
Soll-Temperatur im Sollwertspeicher SP1 automatisch
nach vorgegebener Zeit auf die Soll-Temperatur im
Sollwertspeicher SP2 umschaltet.
Kalibratortyp
Einstellung für SLor
(Heizen/Kühlen)
CTD9100-165 < 7 °C/min [< 13 °F/min]
CTB9100-165 / CTM9100-150
mit Silikonöl 10 CS
CTB9100-165 / CTM9100-150
mit destilliertem Wasser
CTM9100-150 als Kalibrator < 3 °C/min [< 5 °F/min]
CTM9100-150 als Infrarotkalibrator < 3 °C/min [< 5 °F/min]
CTM9100-150
als Oberflächenkalibrator
Kalibratortyp
< 3 °C/min [< 5 °F/min]
< 5 °C/min [< 9 °F/min]
< 3 °C/min [< 5 °F/min]
Einstellung für SLor
(Heizen)
CTD9100-450 / CTD9100-650 < 35 °C/min [< 63 °F/min]
CTB9100-225 mit Silikonöl 20 CS < 22 °C/min [< 40 °F/min]
CTB9100-225
mit destilliertem Wasser
< 12 °C/min [< 22 °F/min]
11263911.05 03/2019 EN/DE/IT
76 WIKA Betriebsanleitung, Typen CTD9100, CTB9100, CTM9100
Page 77

7. Bedienung des Kalibrators/Mikrokalibrierbades
Abkühlgradient SLoF
Der Abkühlgradient SLoF ist aktiv, wenn die
Referenztemperatur höher ist als die Soll-Temperatur.
Nur Einstellungen die unterhalb der Kühlleistung des
Kalibrators liegen haben Auswirkungen auf den Abkühlgradienten.
Kalibratortyp
Einstellung für SLoF
(Heizen/Kühlen)
CTD9100-165 < 5 °C/min [< 9 °F/min]
CTB9100-165 / CTM9100-150
mit Silikonöl 10 CS
CTB9100-165 / CTM9100-150
mit destilliertem Wasser
CTM9100-150 als Kalibrator < 4 °C/min [< 7 °F/min]
CTM9100-150 als Infrarotkalibrator < 4 °C/min [< 7 °F/min]
CTM9100-150
als Oberflächenkalibrator
Kalibratortyp
< 6 °C/min [< 11 °F/min]
< 4 °C/min [< 7 °F/min]
< 4 °C/min [< 7 °F/min]
Einstellung für SLoF
(Heizen)
CTD9100-450 / CTD9100-650
bis 300 °C [572 °F]
300 °C bis 100 °C [572 °F bis 212 °F]
CTB9100-225 mit Silikonöl 20 CS
200 °C bis 50 °C [392 °F bis 122 °F]
50 °C bis 30 °C [122 °F bis 86 °F]
CTB9100-225 mit destilliertem Wasser
90 °C bis 50 °C [194 °F bis 122 °F]
50 °C bis 30 °C [122 °F bis 86 °F]
< 10 °C/min [< 18 °F/min]
< 5 °C/min [< 9 °F/min]
< 4 °C/min [< 7 °F/min]
< 0,5 °C/min [< 1 °F/min]
< 2 °C/min[< 4 °F/min]
< 0,5 °C/min [< 1 °F/min]
Die Aufheiz- und Abkühlgradienten und die Verweilzeit
werden über die Parameterebene ’rEG eingestellt. Dies wird
erreicht durch 5 Sek. langes Drücken der Taste [P], dadurch
wird das Hauptmenü geöffnet.
Auf der oberen Anzeige PV erscheint OPEr.
Auf der unteren Anzeige SV blinkt LED SET.
DE
Operator-Menü OPEr
Erneut die Taste [P] drücken, dadurch wird die Gruppene-
bene geöffnet.
Auf der oberen Anzeige PV erscheint OPEr.
Auf der unteren Anzeige SV erscheint ’SP und zusätzlich
blinkt LED SET.
Gruppe ’SP
Die Verweilzeit dur.t ist aktiv, wenn die Soll-Temperatur SP1
erreicht wurde. Anschließend schaltet der Kalibrator bzw. das
Mikrokalibrierbad automatisch auf die Soll-Temperatur SP2
um.
Falls für diese drei Parameter Einstellungen
vorgenommen werden, benutzt der Kalibrator
bzw. das Mikrokalibrierbad die neuen Werte erst,
wenn entweder die Soll-Temperatur geändert
oder der Kalibrator bzw. das Mikrokalibrierbad
aus- und wieder eingeschaltet wird.
Eine weitere Vorgehensweise wäre die
automatische Regelung vor der Parameteränderung auszuschalten (siehe Kapitel
7.5.2 „Automatische Regelung ausschalten“),
und danach wieder einzuschalten (siehe Kapitel
7.5.3 „Automatische Regelung einschalten“).
11263911.05 03/2019 EN/DE/IT
Mit der Taste [▼] die Gruppe ’rEG auswählen.
Auf der oberen Anzeige PV erscheint OPEr.
Auf der unteren Anzeige SV erscheint ’rEG und zusätzlich
blinkt LED SET.
Gruppe ’rEG
77WIKA Betriebsanleitung, Typen CTD9100, CTB9100, CTM9100
Page 78

7. Bedienung des Kalibrators/Mikrokalibrierbades
Wieder die Taste [P] drücken, dadurch wird die Parametere-
bene geöffnet.
Auf der oberen Anzeige PV erscheint ’rEG.
Auf der unteren Anzeige SV blinkt SLor.
DE
Parameter für Aufheizgradient SLor
7.5.8.1 Aufheizgradient einstellen
Der Aufheizgradient SLor ist aktiv, wenn die
Referenztemperatur niedriger ist als die Soll-Temperatur.
Der Einstellbereich reicht von 99,99 °C/min bis 0,00 °C/min
[99,99 °F/min bis 0,00 °F/min].
Die Funktion ist deaktiviert, wenn SLor = InF (in
no Function) eingestellt ist.
Sie befinden sich in der Parameterebene (wie in Kapitel
7.5.1 „Menüstruktur, Parameterebenen“ beschrieben).
Auf der oberen Anzeige PV steht ’rEG.
Auf der unteren Anzeige SV blinkt SLor.
Die Taste [▲] rücken, der Aufheizgradient SLor wird erhöht.
Die Taste [▼] rücken, der Aufheizgradient SLor wird
reduziert.
Bei Betätigung der Taste [▲] bzw. [▼] steigt oder
sinkt der Wert um 0,1. Werden die Tasten hingegen mindestens 1 Sek. gedrückt gehalten, steigt
bzw. sinkt der Wert schnell und nach 2 Sek. noch
schneller, wodurch der gewünschte Wert sehr
schnell erreicht wird.
Durch Drücken der Taste [P] den neu eingestellten Aufheizgradienten SLor bestätigen.
Die Anzeige kehrt in die Parameterebene zurück und es
können die anderen Parameter eingestellt werden.
Wenn ca. 15 Sek. keine Taste gedrückt wurde,
erfolgt ein automatischer Rücksprung um eine
Ebene bis in den Kalibriermodus.
Nachdem die Einstellung vorgenommen wurde,
benutzt der Kalibrator bzw. das Mikrokalibrierbad
den neuen Wert erst, wenn entweder die SollTemperatur geändert wird oder der Kalibrator
bzw. das Mikrokalibrierbad aus- und wieder
eingeschaltet wird.
7.5.8.2 Abkühlgradient einstellen
Der Abkühlgradient SLoF ist aktiv, wenn die
Referenztemperatur höher ist als die Soll-Temperatur. Der
Einstellbereich reicht von 99,99 °C/min bis 0,00 °C/min
[99,99 °F/min bis 0,00 °F/min].
Die Funktion ist deaktiviert, wenn SLoF = InF (in
no Function) eingestellt ist.
Parameter für Aufheizgradient SLor
Die Taste [P] drücken.
Auf der oberen Anzeige PV erscheint blinkend SLor.
Auf der unteren Anzeige SV erscheint der dazugehörige
aktuell eingestellte Aufheizgradient.
Eingabe des Aufheizgradienten
78 WIKA Betriebsanleitung, Typen CTD9100, CTB9100, CTM9100
Sie befinden sich in der Parameterebene (wie in Kapitel
7.5.1 „Menüstruktur, Parameterebenen“ beschrieben).
Auf der oberen Anzeige PV steht ’rEG.
Auf der unteren Anzeige SV blinkt SLor.
Parameter für Aufheizgradient SLor
11263911.05 03/2019 EN/DE/IT
Page 79

7. Bedienung des Kalibrators/Mikrokalibrierbades
Mit der Taste [▲] oder [▼] den Parameter SLoF auswählen.
Auf der oberen Anzeige PV erscheint ’rEG.
Auf der unteren Anzeige SV blinkt SLoF.
Eingabe des Abkühlgradienten
Die Taste [P] drücken.
Auf der oberen Anzeige PV erscheint blinkend SLoF.
Auf der unteren Anzeige SV erscheint der dazugehörige
aktuell eingestellte Abkühlgradient.
Nachdem die Einstellung vorgenommen wurde,
benutzt der Kalibrator bzw. das Mikrokalibrierbad
den neuen Wert erst, wenn entweder die SollTemperatur geändert wird oder der Kalibrator
bzw. das Mikrokalibrierbad aus- und wieder
eingeschaltet wird.
7.5.8.3 Verweilzeit einstellen
Die Verweilzeit dur.t ist aktiv, wenn die Soll-Temperatur SP1
erreicht wurde. Anschließend schaltet der Kalibrator bzw. das
Mikrokalibrierbad automatisch auf die Soll-Temperatur SP2,
um.
Der Einstellbereich reicht von 99:59 [hh:min] bis
00:00 [hh:min].
Die Funktion ist deaktiviert, wenn dur.t = InF (in
no Function) eingestellt ist.
Sie befinden sich in der Parameterebene (wie in Kapitel
7.5.1 „Menüstruktur, Parameterebenen“ beschrieben)
Auf der oberen Anzeige PV steht ’rEG.
Auf der unteren Anzeige SV blinkt SLor.
DE
Anzeige zur Abkühlgradienteingabe
Die Taste [▲] rücken, der Abkühlgradient SLoF wird erhöht.
Die Taste [▼] drücken, der Abkühlgradient SLoF wird
reduziert.
Bei Betätigung der Taste [▲] bzw. [▼] steigt oder
sinkt der Wert um 0,1. Werden die Tasten hingegen mindestens 1 Sek. gedrückt gehalten, steigt
bzw. sinkt der Wert schnell und nach 2 Sek. noch
schneller, wodurch der gewünschte Wert sehr
schnell erreicht wird.
Durch Drücken der Taste [P] den neu eingestellten Abkühlradienten SLoF bestätigen.
Die Anzeige kehrt in die Parameterebene zurück
und es können die anderen Parameter eingestellt werden.
Wenn ca. 15 Sek. keine Taste gedrückt wurde,
erfolgt ein automatischer Rücksprung um eine
Ebene bis in den Kalibriermodus.
Parameter für Aufheizgradient SLor
Mit der Taste [▲] oder [▼] den Parameter dur.t auswählen.
Auf der oberen Anzeige PV erscheint ’rEG.
Auf der unteren Anzeige SV blinkt dur.t.
Parameter für Verweilzeit dur.t
11263911.05 03/2019 EN/DE/IT
79WIKA Betriebsanleitung, Typen CTD9100, CTB9100, CTM9100
Page 80
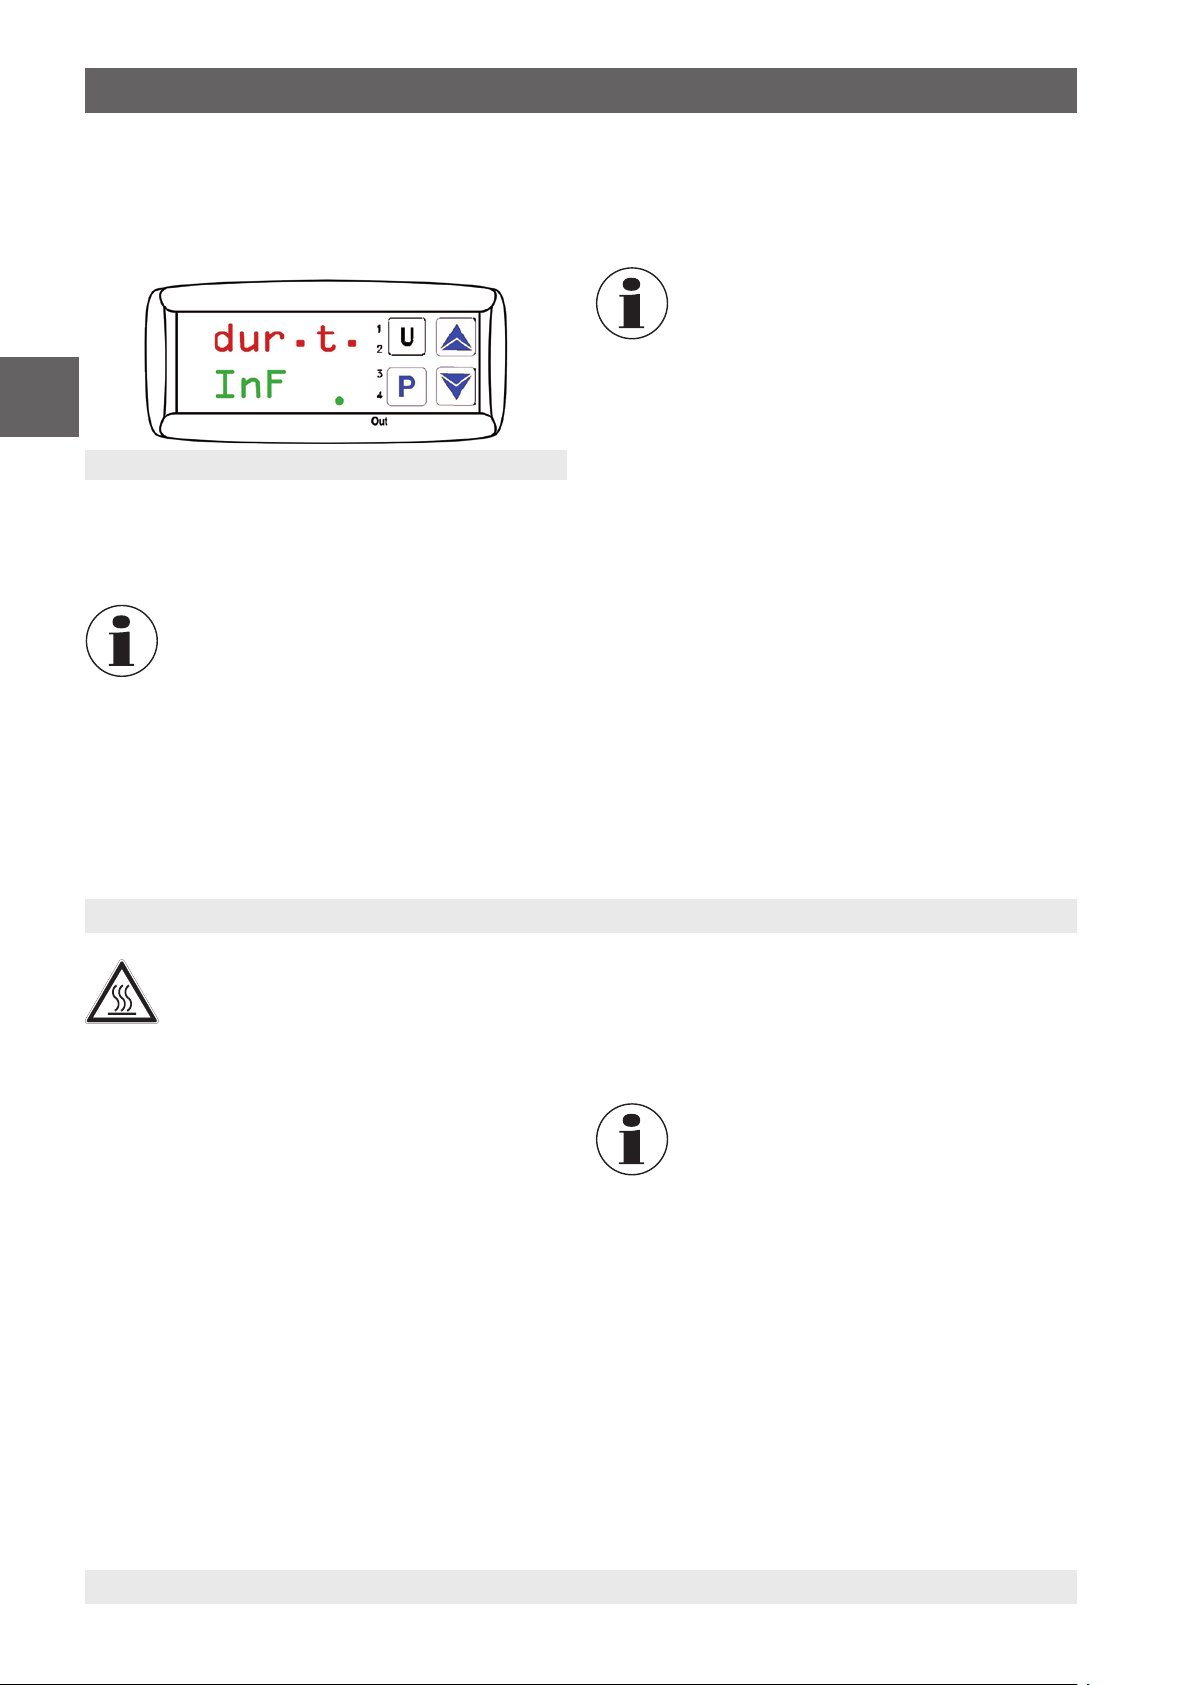
7. Bedienung ... / 8. Abkühlen des Metallblockes bzw. Mikrokalibrierbades
Die Taste [P] drücken.
Auf der oberen Anzeige PV erscheint blinkend dur.t.
Auf der unteren Anzeige SV erscheint die dazugehörige
aktuell eingestellte Verweilzeit.
DE
Eingabe der Verweilzeit
Die Taste [▲] rücken, die Verweilzeit dur.t wird erhöht.
Die Taste [▼] drücken, die Verweilzeit dur.t wird reduziert.
Bei Betätigung der Taste [▲] bzw. [▼] steigt oder
sinkt der Wert um 0,1. Werden die Tasten hingegen mindestens 1 Sek. gedrückt gehalten, steigt
bzw. sinkt der Wert schnell und nach 2 Sek. noch
schneller, wodurch der gewünschte Wert sehr
schnell erreicht wird.
Durch Drücken der Taste [P] die neu eingestellte Verweilzeit
dur.t bestätigen.
Die Anzeige kehrt in die Parameterebene zurück.
Wenn ca. 15 Sek. keine Taste gedrückt wird,
erfolgt ein automatischer Rücksprung um eine
Ebene bis in den Kalibriermodus.
Nachdem die Einstellung vorgenommen wurde,
benutzt der Kalibrator bzw. das Mikrokalibrierbad
den neuen Wert erst, wenn entweder die SollTemperatur geändert wird oder der Kalibrator
bzw. das Mikrokalibrierbad aus- und wieder
eingeschaltet wird.
8. Abkühlen des Metallblockes bzw. Mikrokalibrierbades
WARNUNG!
Verbrennungsgefahr
Durch Berührungen des heißen Metallblockes
bzw. Mikrokalibrierbades, der Badflüssigkeiten oder am Prüfling können diese zu akuten
Verbrennungen führen.
▶
Vor dem Transport oder Berühren der
Kalibriergeräte darauf achten, dass diese
genügend abgekühlt sind.
▶
Um die Kalibriergeräte möglichst schnell von
einer höheren auf eine niedrigere Temperatur zu bringen, die Soll-Temperatur auf eine
niedrigere Temperatur z. B. Raumtemperatur
stellen.
Bei den Heizinstrumenten schaltet der eingebaute Ventilator
automatisch langsam auf eine höhere Drehzahl, dadurch
wird mehr Kühlluft gefördert.
Die LED OUT 2 signalisiert den Zustand des Ausgangs für
die Lüftersteuerung. Leuchtet die LED OUT 2, läuft der Lüfter
mit hoher Drehzahl, leuchtet die LED OUT 2 nicht, läuft der
Lüfter mit verringerter Drehzahl.
Bei den Heiz- bzw. Kühlinstrumenten schaltet der Regler
die aktive Kühlung ein. Die LED OUT 2 signalisiert den
Zustand des Ausgangs für die aktive Kühlung. Leuchtet
die LED OUT 2, läuft die aktive Kühlung, leuchtet die
LED OUT 2 nicht, ist die Kühlung nicht aktiv.
Nach dem Ausschalten oder nach Entfernen
des Netzanschlusses wird durch den eingebauten Ventilator keine Kühlluft gefördert. Eine
ausreichende thermische Entkopplung zwischen
Metallblock bzw. Flüssigkeitsbad und Gehäuse
wird trotzdem gewährleistet.
11263911.05 03/2019 EN/DE/IT
80 WIKA Betriebsanleitung, Typen CTD9100, CTB9100, CTM9100
Page 81
9. Störungen
9. Störungen
Personal: Fachpersonal
Schutzausrüstung: Schutzhandschuhe und Schutzbrille
VORSICHT!
Körperverletzungen, Sach- und Umweltschä-
den
WARNUNG!
Körperverletzungen, Sach- und Umweltschäden durch gefährliche Messstoffe
Bei Kontakt mit gefährlichen Messstoffen (z. B.
Sauerstoff, Acetylen, brennbaren oder giftigen
Stoffen), gesundheitsgefährdenden Messstoffen
Können Störungen mit Hilfe der aufgeführten
Maßnahmen nicht beseitigt werden, Gerät unver-
züglich außer Betrieb setzen.
▶
Kontakt mit dem Hersteller aufnehmen.
▶
Bei notwendiger Rücksendung die Hinweise
unter Kapitel 11.2 „Rücksendung“ beachten.
(z. B. ätzend, giftig, krebserregend, radioaktiv)
besteht die Gefahr von Körperverletzungen,
Sach- und Umweltschäden.
Am Gerät können im Fehlerfall aggressive
Kontaktdaten siehe Kapitel 1 „Allgemeines“ oder
Rückseite der Betriebsanleitung.
Messstoffe und/oder mit extremer Temperatur
anliegen.
▶
Bei diesen Messstoffen müssen über die
gesamten allgemeinen Regeln hinaus die
einschlägigen Vorschriften beachtet werden.
▶
Notwendige Schutzausrüstung tragen (siehe
Kapitel 3.6 „Persönliche Schutzausrüstung“).
Fehler Ursachen Maßnahmen
- - - - Unterbrechung des internen Referenzfühlers oder
der interne Referenzfühler ist defekt.
Zur Reparatur einschicken.
DE
uuuu Gemessene Temperatur unter dem Grenzwert des
internen Referenzfühlers
(Underrange -200 °C (-328 °F])
oooo Gemessene Temperatur über dem Grenzwert des
internen Referenzfühlers
(Overrange +850 °C [+1.562 °F])
ErEP Mögliche Störung im EEPROM Speicher des
Reglers.
Lüfter läuft nicht Der Lüfter ist defekt oder blockiert.
Der Temperaturschalter hat ggf. ausgelöst und die
Stromzufuhr für die Heizpatrone abgeschaltet.
Endtemperatur wird nicht
erreicht
Keine Anzeige Der Regler ist defekt.
Keine Funktion Die Spannungsversorgung ist nicht richtig herge-
Halbleiterrelais defekt oder Heiz-Kühlelement hat
Kurzschluss bzw. ist gealtert.
stellt oder Sicherung ist defekt.
Die Taste [P] drücken.
Zur Reparatur einschicken.
Die Spannungsversorgung und Sicherung prüfen.
11263911.05 03/2019 EN/DE/IT
81WIKA Betriebsanleitung, Typen CTD9100, CTB9100, CTM9100
Page 82
10. Wartung, Reinigung und Rekalibrierung
10. Wartung, Reinigung und Rekalibrierung
Personal: Fachpersonal
Schutzausrüstung: Schutzhandschuhe und Schutzbrille
Kontaktdaten siehe Kapitel 1 „Allgemeines“ oder
Rückseite der Betriebsanleitung.
10.1 Wartung
DE
Die hier beschriebenen Geräte sind wartungsfrei.
Reparaturen sind ausschließlich vom Hersteller durchzuführen.
Ausgenommen ist der Austausch der Schmelzsicherung.
Vor dem Austausch der Schmelzsicherung den
Kalibrator bzw. das Mikrokalibrierbad durch
Ziehen des Netzkabels aus der Netzsteckdose
von der Netzspannung trennen.
Nur Originalteile verwenden (siehe Kapitel 13 „Zubehör“).
10.2 Reinigung
VORSICHT!
Körperverletzungen, Sach- und Umweltschäden
Eine unsachgemäße Reinigung führt zu Körperverletzungen, Sach- und Umweltschäden.
Messstoffreste im Gerät können zur Gefährdung
von Personen, Umwelt und Einrichtung führen.
▶
Notwendige Schutzausrüstung tragen.
▶
Reinigungsvorgang wie folgt beschrieben
durchführen.
1. Den Kalibrator bzw. das Mikrokalibrierbad abkühlen,
wie in Kapitel 8 „Abkühlen des Metallblockes bzw.
Mikrokalibrierbades“ beschrieben.
2. Vor der Reinigung den Kalibrator bzw. das
Mikrokalibrierbad ausschalten und durch Ziehen des
Netzkabels aus der Netzsteckdose von der Netzspannung
trennen.
3. Das Gerät mit einem feuchten Tuch reinigen.
Elektrische Anschlüsse nicht mit Feuchtigkeit in Berührung bringen.
VORSICHT!
Beschädigung des Gerätes
Eine unsachgemäße Reinigung führt zur
Beschädigung des Gerätes!
▶
Keine aggressiven Reinigungsmittel verwenden.
▶
Keine harten und spitzen Gegenstände zur
Reinigung verwenden.
4. Gerät säubern, um Personen und Umwelt vor Gefährdung
durch anhaftende Messstoffreste zu schützen.
10.2.1 Reinigung von Kalibratoren mit Einsatzhülse
Bei Kalibratoren mit Einsatzhülsen entsteht während des
Betriebes eine geringe Menge Metallstaub, der Block und
Hülse verklemmen kann. Um dies zu verhindern, in regelmäßigen Abständen und vor einer längeren Außerbetriebnahme
des Kalibrators die Einsatzhülsen aus dem Heizblock entfernen. Die Heizblockbohrung aussaugen und die Bohrung und
Hülse mit einem trockenen Tuch reinigen.
10.2.2 Lüftergitterreinigung
Jeder Kalibrator besitzt am Boden ein engmaschiges Luftgitter, durch das Kühlluft in den Kalibrator gefördert wird. Das
Gitter je nach Luftverunreinigung in regelmäßigen Abständen
durch Absaugen oder Abbürsten reinigen.
10.2.3 Reinigung des Mikrokalibrierbades
Das Silikonöl möglichst vollständig aus dem Tank entfernen.
Danach den Sensorkorb aus dem Tank nehmen und den
Korb, Magnetrührer und Tank mit Wasser, dem reichlich
Spülmittel zugesetzt wird, reinigen. Alles gut trocknen lassen.
Wenn destilliertes Wasser benutzt wird, die
Kalibrierflüssigkeit entfernen und den Sensorkorb, den
Magnetrührer und den Tank gut trocknen lassen.
10.2.4 Außenreinigung
Gerät von außen mit einem feuchten Tuch und etwas Wasser
oder mit einem lösungsmittelfreien, leichten Reinigungsmittel
reinigen.
10.3 Rekalibrierung
DKD/DAkkS-Schein - amtliche Bescheinigungen:
Der Kalibrator bzw. das Mikrokalibrierbad ist vor der Auslieferung mit Messmitteln, die rückführbar sind auf national
anerkannte Standards, abgeglichen und geprüft.
Auf der Grundlage der DIN ISO 10012 ist der Kalibrator bzw.
das Mikrokalibrierbad je nach Anwendungsfall in angemessenen, periodischen Intervallen zu überprüfen.
Es wird empfohlen, das Gerät in regelmäßigen
Zeitabständen von ca. 12 Monaten oder etwa 500
Betriebsstunden durch den Hersteller rekalibrieren zu lassen.
Die Grundeinstellungen werden wenn notwendig korrigiert.
Die Grundlage der Rekalibrierung ist die Richtlinie des
Deutschen Kalibrierdienstes DKD R5-4. Die hier beschriebenen Maßnahmen werden bei der Rekalibrierung angewendet
und berücksichtigt.
82 WIKA Betriebsanleitung, Typen CTD9100, CTB9100, CTM9100
11263911.05 03/2019 EN/DE/IT
Page 83
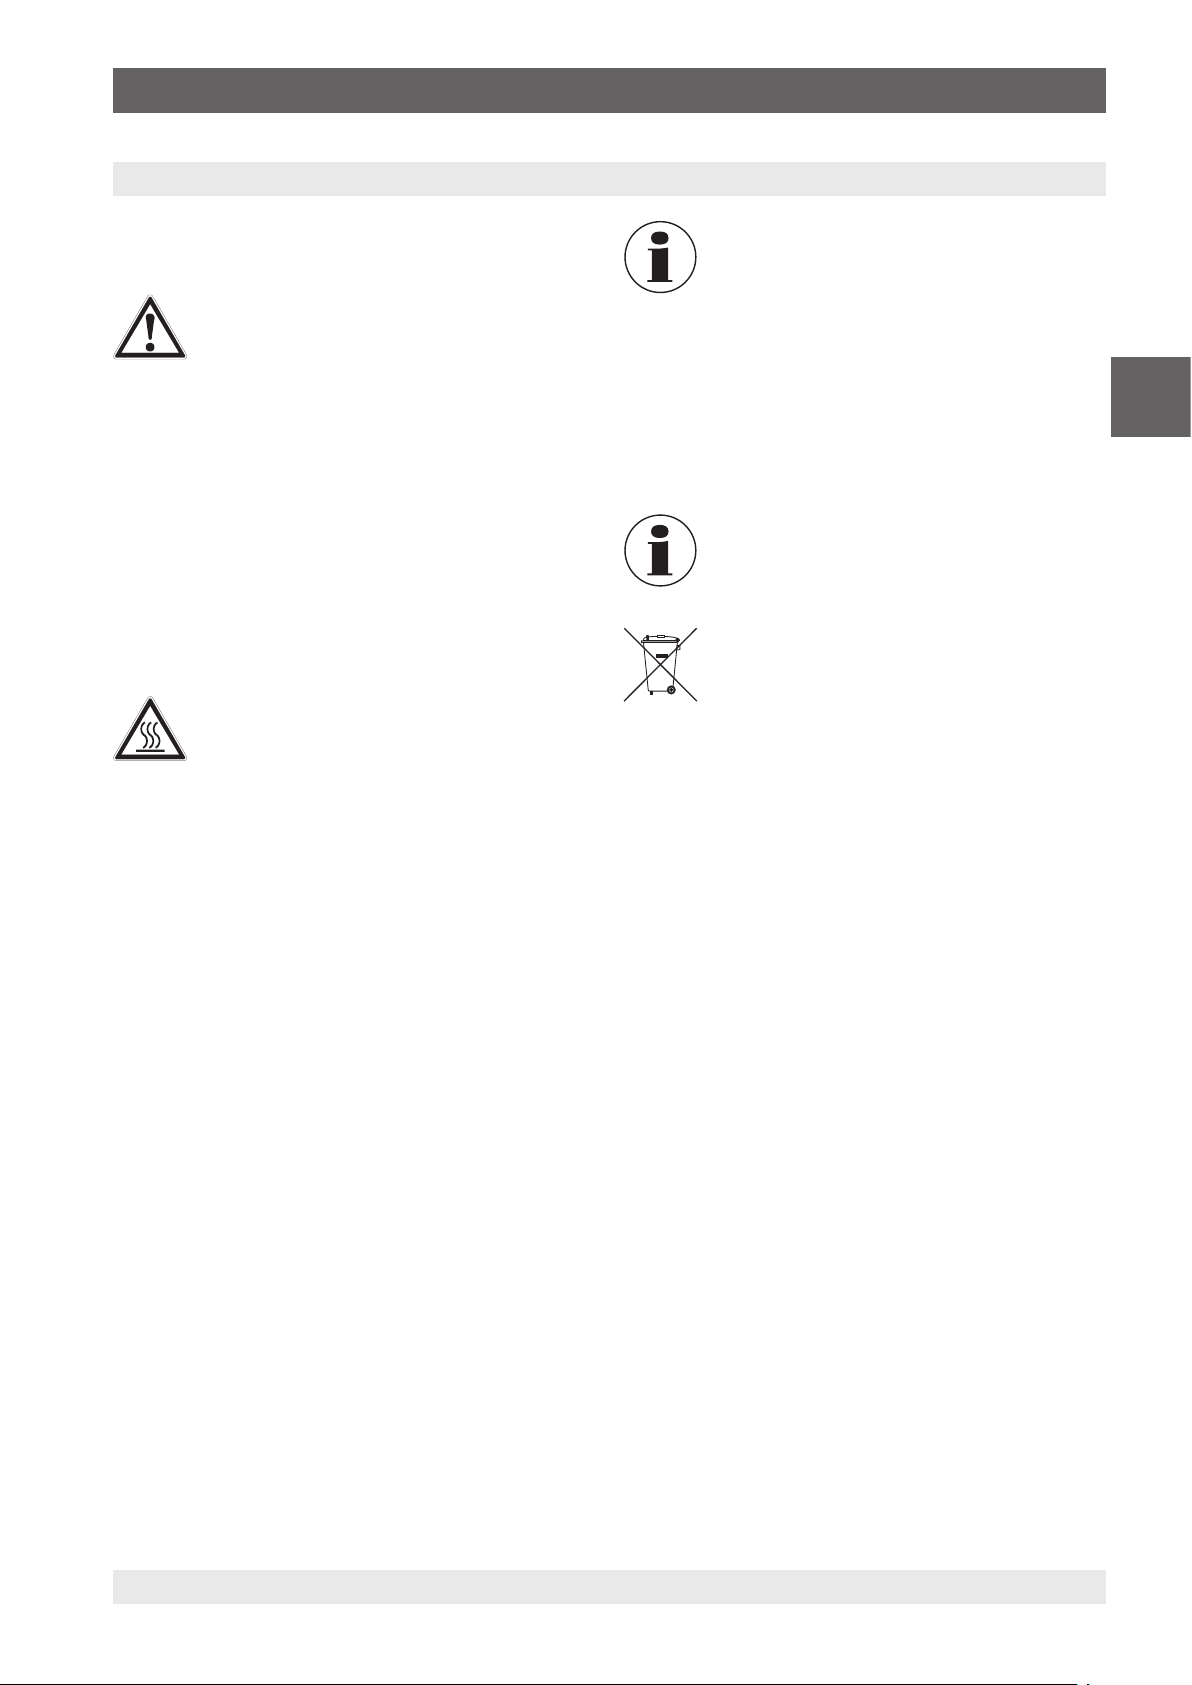
11. Demontage, Rücksendung und Entsorgung
11. Demontage, Rücksendung und Entsorgung
Personal: Fachpersonal
Schutzausrüstung: Schutzhandschuhe und Schutzbrille
WARNUNG!
Körperverletzungen, Sach- und Umweltschäden durch Messstoffreste
Messstoffreste am oder im Gerät können zur
Gefährdung von Personen,
Umwelt und Einrichtung führen.
▶
Notwendige Schutzausrüstung tragen (siehe
Kapitel 3.6 „Persönliche Schutzausrüstung“).
▶
Angaben im Sicherheitsdatenblatt für den
entsprechenden Messstoff beachten.
▶
Gerät säubern, um Personen und Umwelt vor
Gefährdung durch anhaftende Messstoffreste
zu schützen.
11.1 Demontage
WARNUNG!
Verbrennungsgefahr
Bei der Demontage besteht Gefahr durch austretende, gefährlich heiße Messstoffe.
▶
Vor der Demontage das Gerät ausreichend
abkühlen lassen!
Hinweise zur Rücksendung befinden sich
in der Rubrik „Service“ auf unserer lokalen
Internetseite.
11.3 Entsorgung
Durch falsche Entsorgung können Gefahren für die Umwelt
entstehen.
Gerätekomponenten und Verpackungsmaterialien entsprechend den landesspezifischen Abfallbehandlungs- und
Entsorgungsvorschriften umweltgerecht entsorgen.
Entsorgen Sie das Silikonöl wie im Sicherheitsdatenblatt beschrieben.
Nicht mit dem Hausmüll entsorgen. Für eine
geordnete Entsorgung gemäß nationaler Vorgaben sorgen.
DE
1. Das Kalibariergerät abkühlen, wie in Kapitel 8 „Abkühlen
des Metallblockes bzw. Mikrokalibrierbades“ beschrieben.
2. Das Kalibriergerät ausschalten und Netzstecker aus der
Netzsteckdose ziehen.
3. Falls vorhanden, die Kalibrierflüssigkeit aus dem
Mikrokalibrierbad (siehe Kapitel 10.2.3 „Reinigung des
Mikrokalibrierbades“) entfernen.
11.2 Rücksendung
Beim Versand des Gerätes unbedingt beachten:
Alle an WIKA gelieferten Geräte müssen frei von
Gefahrstoffen (Säuren, Laugen, Lösungen, etc.) sein und
sind daher vor der Rücksendung zu reinigen, siehe Kapitel
10.2 „Reinigung“.
Zur Rücksendung des Gerätes die Originalverpackung oder
eine geeignete Transportverpackung verwenden.
Um Schäden zu vermeiden:
1. Das Gerät mit dem Dämmmaterial in der Verpackung
platzieren. Zu allen Seiten der Transportverpackung
gleichmäßig dämmen.
2. Wenn möglich einen Beutel mit Trocknungsmittel der
Verpackung beifügen.
3. Sendung als Transport eines hochempfindlichen Messgerätes kennzeichnen.
11263911.05 03/2019 EN/DE/IT
83WIKA Betriebsanleitung, Typen CTD9100, CTB9100, CTM9100
Page 84

12. Technische Daten
12. Technische Daten
12.1 Temperatur-Bockkalibrator Serie CTD9100
CTD9100-COOL CTD9100-165
Anzeige
Temperaturbereich -55 ... +200 °C [-67 ... +392 °F] -35 ... +165 °C [-31 ... +329 °F]
Genauigkeit
DE
Stabilität
Auösung 0,01 bis 100 °C, dann 0,1 [0,01 bis 212 °F, dann 0,1]
Temperaturverteilung
Axiale Homogenität
Radiale Homogenität
Temperierung
Aufheizzeit ca. 10 min von 20 °C auf 200 °C
Abkühlzeit ca. 10 min von +20 °C auf -20 °C
Stabilisierungszeit
Einsatzhülse
Eintauchtiefe 150 mm [5,91 in]
Hülsenabmessung Ø 28 x 150 mm [Ø 1,1 x 5,91 in] Ø 28 x 150 mm oder Ø 60 x 150 mm
Hülsenmaterial Aluminium
Spannungsversorgung
Hilfsenergie AC 100 ... 240 V, 50/60 Hz
Leistungsaufnahme 555 VA 375 VA
Sicherung 6,3 A träge
Netzkabel AC 230 V; für Europa
Kommunikation
Schnittstelle RS-485
Gehäuse
Abmessungen (B x T x H) 215 x 305 x 425 mm [8,46 x 12,00 x 16,73 in]
Gewicht 11 kg [24,3 lbs]
1) Ist definiert als Messabweichung zwischen dem Messwert und dem Referenzwert.
2) Maximaler Temperaturunterschied an einer stabilen Temperatur über 30 Minuten.
3) Maximaler Temperaturunterschied bei 40 mm [1,57 in] oberhalb des Bodens.
4) Maximaler Temperaturunterschied zwischen den Bohrungen (alle Thermometer gleich tief eingetaucht).
5) Zeit, um einen stabilen Wert zu erreichen.
1)
2)
3)
4)
5)
0,15 ... 0,3 K 0,15 ... 0,25 K
±0,05 K
abhängig von Temperatur, Temperaturfühlern und deren Anzahl
abhängig von Temperatur, Temperaturfühlern und deren Anzahl
[von 68 °F auf 392 °F]
[von 68 °F auf -4 °F]
abhängig von Temperatur und Temperaturfühler
ca. 25 min von 20 °C auf 165 °C (X ca. 35 min)
[von 68 °F auf 329 °F]
ca. 15 min von +20 °C auf -20 °C (X ca. 35 min)
[von 68 °F auf -4 °F]
[Ø 1,1 x 5,91 in oder Ø 2,36 x 5,91 in]
Die Messunsicherheit ist definiert als die gesamte Messunsicherheit (k = 2), welche folgende Anteile beinhaltet: Genauigkeit,
Messunsicherheit der Referenz, Stabilität und Homogenität.
84 WIKA Betriebsanleitung, Typen CTD9100, CTB9100, CTM9100
11263911.05 03/2019 EN/DE/IT
Page 85
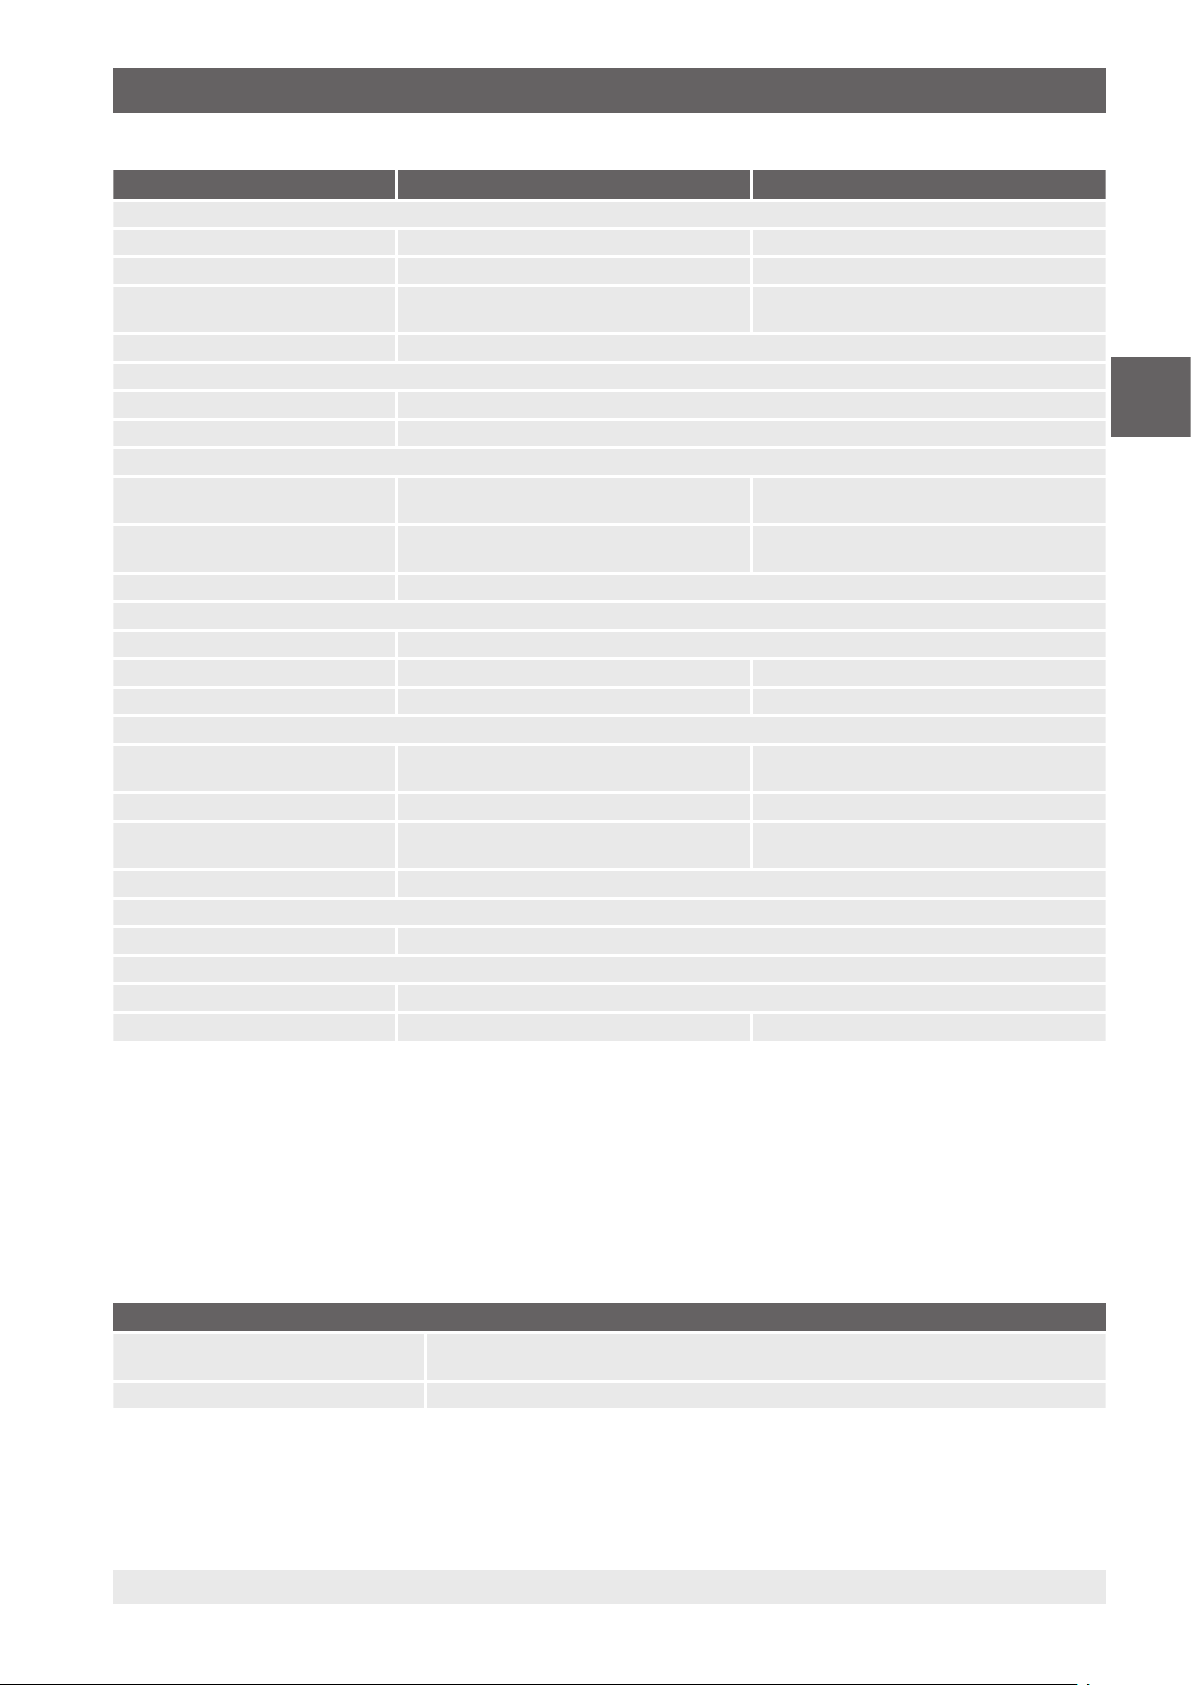
12. Technische Daten
CTD9100-450 CTD9100-650
Anzeige
Temperaturbereich 40 ... 450 °C [104 ... 842 °F] 40 ... 650 °C [104 ... 1.202 °F]
Genauigkeit
Stabilität
1)
2)
Auösung 0,01 bis 100 °C, dann 0,1 [0,01 bis 212 °F, dann 0,1]
Temperaturverteilung
Axiale Homogenität
Radiale Homogenität
3)
4)
Temperierung
Aufheizzeit ca. 14 min von 20 °C auf 450 °C
Abkühlzeit ca. 60 min von 450 °C auf 100 °C
Stabilisierungszeit
5)
Einsatzhülse
Eintauchtiefe 150 mm [5,91 in]
Hülsenabmessung Ø 60 x 150 mm [Ø 2,36 x 5,91 in] Ø 28 x 150 mm [Ø 1,1 x 5,91 in]
Hülsenmaterial Aluminium Messing
Spannungsversorgung
Hilfsenergie AC 230 V, 50/60 Hz AC 230 V, 50/60 Hz
Leistungsaufnahme 2.000 VA 1.000 VA
Sicherung 10 A träge 10 A träge (bei AC 110 V)
Netzkabel AC 230 V; für Europa
Kommunikation
Schnittstelle RS-485
Gehäuse
Abmessungen (B x T x H) 150 x 270 x 400 mm [5,91 x 10,63 x 15,75 in]
Gewicht 7,5 kg [16,5 lbs] 8 kg [17,6 lbs]
1) Ist definiert als Messabweichung zwischen dem Messwert und dem Referenzwert.
2) Maximaler Temperaturunterschied an einer stabilen Temperatur über 30 Minuten.
3) Maximaler Temperaturunterschied bei 40 mm [1,57 in] oberhalb des Bodens.
4) Maximaler Temperaturunterschied zwischen den Bohrungen (alle Thermometer gleich tief eingetaucht).
5) Zeit, um einen stabilen Wert zu erreichen.
6) Geräteausführung mit Weitbereichsnetzteil verfügbar.
7) Die Hilfsenergie AC 115 V muss bei der Bestellung mit angegeben werden, da sonst AC 230 V angenommen wird.
0,3 ... 0,5 K 0,3 ... 0,8 K
±0,05 K bis 100 °C [212 °F]
±0,1 K bis 450 °C [842 °F]
±0,05 K bis 100 °C [212 °F]
±0,1 K bis 600 °C [1.112 °F]
abhängig von Temperatur, Temperaturfühlern und deren Anzahl
abhängig von Temperatur, Temperaturfühlern und deren Anzahl
ca. 20 min von 20 °C auf 600 °C
[von 68 °F auf 842 °F]
[von 68 °F auf 1.112 °F]
ca. 60 min von 600 °C auf 100 °C
[von 842 °F auf 212 °F]
[von 1.112 °F auf 212 °F]
abhängig von Temperatur und Temperaturfühler
(AC 100 ... 240 V, 50/60 Hz)
6,3 A träge (bei AC 230 V)
6)
DE
7)
Die Messunsicherheit ist definiert als die gesamte Messunsicherheit (k = 2), welche folgende Anteile beinhaltet: Genauigkeit,
Messunsicherheit der Referenz, Stabilität und Homogenität.
Zertifikate/Zeugnisse
Zertifikat
Kalibrierung Standard: Kalibrierzertifikat 3.1 nach DIN EN 10204
Option: DKD/DAkkS-Kalibrierzertifikat
Empfohlenes Rekalibrierungsintervall 1 Jahr (abhängig von den Nutzungsbedingungen)
Zulassungen und Zertifikate siehe Internetseite
Weitere technische Daten siehe WIKA-Datenblatt CT 41.28 und Bestellunterlagen.
11263911.05 03/2019 EN/DE/IT
85WIKA Betriebsanleitung, Typen CTD9100, CTB9100, CTM9100
Page 86

12. Technische Daten
12.2 Mikrokalibrierbad Serie CTB9100
Typ CTB9100-165 Typ CTB9100-225
Anzeige
Temperaturbereich -35 ... +165 °C [-31 ... +329 °F] 40 ... 225 °C [104 ... 437 °F]
Genauigkeit
Stabilität
1)
2)
Auösung 0,1 °C
DE
Temperaturverteilung
Axiale Homogenität
Radiale Homogenität
3)
4)
Temperierung
Aufheizzeit ca. 45 min von 20 °C auf 160 °C
Abkühlzeit ca. 30 min von +20 °C auf -20 °C
Stabilisierungszeit
5)
Tank
Einbautiefe 150 mm [5,91 in]
Volumen ca. 0,6 Liter
Tankabmessung Ø 60 x 165 mm [2,36 x 5,91 in]
Spannungsversorgung
Hilfsenergie AC 100 ... 240 V, 50/60 Hz AC 230 V, 50/60 Hz
Leistungsaufnahme 375 VA 1.000 VA
Sicherung 6,3 A träge 10 A träge (bei AC 110 V)
Netzkabel AC 230 V; für Europa
Kommunikation
Schnittstelle RS-485
Gehäuse
Abmessungen (B x T x H) 215 x 305 x 425 mm [8,46 x 12,00 x 16,73 in] 150 x 270 x 400 mm [5,91 x 10,63 x 15,75 in]
Gewicht 12 kg [26,5 lbs] 7,9 kg [17,5 lbs]
1) Ist definiert als Messabweichung zwischen dem Messwert und dem Referenzwert.
2) Maximaler Temperaturunterschied an einer stabilen Temperatur über 30 Minuten.
3) Maximaler Temperaturunterschied bei 40 mm [1,57 in] oberhalb des Bodens.
4) Maximaler Temperaturunterschied zwischen den Bohrungen (alle Thermometer gleich tief eingetaucht).
5) Zeit, um einen stabilen Wert zu erreichen.
6) Die Hilfsenergie AC 115 V muss bei der Bestellung mit angegeben werden, da sonst AC 230 V angenommen wird.
±0,2 K ±0,3 K
±0,05 K
abhängig von Temperatur, Temperaturfühlern und deren Anzahl
abhängig von Temperatur, Temperaturfühlern und deren Anzahl
[von 68 °F auf 320 °F]
[von +68 °F auf -4 °F]
abhängig von Temperatur und Temperaturfühler
optional 40 ... 255 °C [104 ... 491 °F]
ca. 10 min von 20 °C auf 225 °C
[von 68 °F auf 437 °F]
ca. 30 min von 225 °C auf 50 °C
[von 437 °F auf 122 °F]
(AC 115 V, 50/60 Hz)
6)
6,3 A träge (bei AC 230 V)
Die Messunsicherheit ist definiert als die gesamte Messunsicherheit (k = 2), welche folgende Anteile beinhaltet: Genauigkeit,
Messunsicherheit der Referenz, Stabilität und Homogenität.
86 WIKA Betriebsanleitung, Typen CTD9100, CTB9100, CTM9100
11263911.05 03/2019 EN/DE/IT
Page 87

12. Technische Daten
Zertifikate/Zeugnisse
Zertifikat
Kalibrierung Standard: Kalibrierzertifikat 3.1 nach DIN EN 10204
Option: DKD/DAkkS-Kalibrierzertifikat
Empfohlenes Rekalibrierungsintervall 1 Jahr (abhängig von den Nutzungsbedingungen)
Zulassungen und Zertifikate siehe Internetseite
Weitere technische Daten siehe WIKA-Datenblatt CT 46.30 und Bestellunterlagen.
Badflüssigkeiten
Zubehör Typ CTB9100-165 Typ CTB9100-225
Silikonöl DC 200.05:
-40 ... +130 °C [-40 ... +266 °F]
FP 8) = 133 °C [271,4 °F]
Silikonöl DC 200.10:
-35 ... +160 °C [-31 ... +320 °F]
8)
= 163 °C [325,4 °F]
FP
Silikonöl DC 200.20:
10 ... 220 °C [50 ... 428 °F]
8)
= 230 °C [446 °F]
FP
Silikonöl DC 200.50:
25 ... 250 °C [77 ... 482 °F]
8)
= 280 °C [536 °F]
FP
8) FP = Flammpunkt bei offenem Tiegel
von -35 ... +130 °C [-31 ... +266 °F]
sehr gut einsetzbar]
von -35 ... +160 °C [-31 ... +320 °F]
gut einsetzbar
nicht empfohlen von 40 ... 225 °C [104 ... 437 °F]
nicht empfohlen von 80 ... 255 °C [176 ... 491 °F]
nicht empfohlen
nicht empfohlen
gut einsetzbar
gut einsetzbar
DE
11263911.05 03/2019 EN/DE/IT
87WIKA Betriebsanleitung, Typen CTD9100, CTB9100, CTM9100
Page 88

12. Technische Daten
12.3 Multifunktionskalibrator Typ CTM9100-150
Technische Daten Typ CTM9100-150
Anzeige
Temperaturbereich -20 ... +150 °C [-4 ... 302 °F]
-35 ... +165 °C [-31 ... 329 °F] Verwendung als Mikrokalibrierbad
Genauigkeit
DE
Stabilität
Auösung 0,01 bis 100 °C, dann 0,1 [0,01 bis 212 °F, dann 0,1]
Temperierung
Aufheizzeit je nach Verwendung und Einsatzbereich
Abkühlzeit je nach Verwendung und Einsatzbereich
Stabilisierungszeit
Einsatzhülse
Eintauchtiefe 150 mm [5,91 in]
Hülsenabmessung Ø 60 x 170 mm [Ø 2,36 x 6,69 in]
Hülsenmaterial Aluminium
Spannungsversorgung
Hilfsenergie AC 100 ... 240 V, 50/60 Hz
Leistungsaufnahme 400 VA
Sicherung 6,3 A träge
Netzkabel AC 230 V; für Europa
Kommunikation
Schnittstelle RS-485
Gehäuse
Abmessungen (B x T x H) 215 x 305 x 425 mm [8,46 x 12,0 x 16,73 in]
Gewicht 12 kg [26,5 lbs]
1) Ist definiert als Messabweichung zwischen dem Messwert und dem Referenzwert.
2) Maximaler Temperaturunterschied an einer stabilen Temperatur über 30 Minuten.
3) Zeit, um einen stabilen Wert zu erreichen.
1)
2)
3)
±0,2 K
±0,3 K
±1 K
±1 K
±0,05 K
±0,05 K
±0,2 K
±0,2 K
je nach Verwendung und Einsatzbereich
Verwendung als Mikrokalibrierbad
Verwendung als Blockkalibrator
Verwendung als Infrarot-Schwarzstrahler
Verwendung als Oberflächen-Temperaturkalibrator
Verwendung als Mikrokalibrierbad
Verwendung als Blockkalibrator
Verwendung als Infrarot-Schwarzstrahler
Verwendung als Oberflächen-Temperaturkalibrator
Die Messunsicherheit ist definiert als die gesamte Messunsicherheit (k = 2), welche folgende Anteile beinhaltet: Genauigkeit,
Messunsicherheit der Referenz, Stabilität und Homogenität.
Zertifikate/Zeugnisse
Zertifikat
Kalibrierung Standard: Kalibrierzertifikat 3.1 nach DIN EN 10204
Option: DKD/DAkkS-Kalibrierzertifikat
Empfohlenes Rekalibrierungsintervall 1 Jahr (abhängig von den Nutzungsbedingungen)
Zulassungen und Zertifikate siehe Internetseite
Weitere technische Daten siehe WIKA-Datenblatt CT 41.40 und Bestellunterlagen.
88 WIKA Betriebsanleitung, Typen CTD9100, CTB9100, CTM9100
11263911.05 03/2019 EN/DE/IT
Page 89

13. Zubehör
13. Zubehör
13.1 Serie CTD9100
Einsatzhülsen und Zubehör
■
Gebohrte Standardeinsatzhülse je nach
Geräteausführung
■
Einsatzhülsen, ungebohrt und gebohrt nach Angaben
■
Wechselwerkzeug
Netzanschluss
■
Netzanschlusskabel 1,5 m [5 ft] mit Schukostecker
■
Netzanschlusskabel für die Schweiz
■
Netzanschlusskabel für USA/Kanada
■
Netzanschlusskabel für UK
Software und Zubehör
■
Softwarepaket zur Bedienung des Kalibrators
■
Schnittstellenkabel mit integriertem Konverter von RS-485
auf USB 2.0
Zertifikate
■
Kalibrierzertifikat 3.1 nach DIN EN 10204
■
DKD/DAkkS-Kalibrierzertifikat
Sonstiges
■
Transportkoffer
13.2 Serie CTB9100
Badzubehör
■
Schraubdeckel
■
Silikonöle in 1 Liter Plastikflasche
■
Magnetrührer und Schraubdeckel Plastik oder Metall
■
Bechereinsatz bestehend aus: Becher mit auslaufsicheren Deckel, Sensorkorb, Magnetrührer- und heber,
Wechselwerkzeug (bei Nachbestellung erneute Justage
nötig)
13.3 Typ CTM9100-150
Einsatzhülsen und Zubehör
■
Einsatzhülse mit sieben Bohrungen:
Ø 1 x 2 mm, 3 x 3,5 mm, 2 x 4,5 mm, 1 x 6 mm
[Ø 1 x 0,08 in, 3 x 0,14 in, 2 x 0,18 in, 1 x 0,24 in]
■
Oberflächeneinsatz
■
Infraroteinsatz
■
Wechselwerkzeuge
Netzanschluss
■
Netzanschlusskabel 1,5 m [5 ft] mit Schukostecker
■
Netzanschlusskabel für die Schweiz
■
Netzanschlusskabel für USA/Kanada
■
Netzanschlusskabel für UK
Software und Zubehör
■
Softwarepaket zur Bedienung des Kalibrators
■
Schnittstellenkabel mit integriertem Konverter von RS-485
auf USB 2.0
Zertifikate
■
Kalibrierzertifikat 3.1 nach DIN EN 10204
■
DKD/DAkkS-Kalibrierzertifikat
Sonstiges
■
Transportkoffer
■
Externe Referenz
■
Kalibrierflüssigkeit und Entleerungspumpe
DE
Netzanschluss
■
Netzanschlusskabel 1,5 m [5 ft] mit Schukostecker
■
Netzanschlusskabel für die Schweiz
■
Netzanschlusskabel für USA/Kanada
■
Netzanschlusskabel für UK
Software und Zubehör
■
Softwarepaket zur Bedienung des Kalibrators
■
Schnittstellenkabel mit integriertem Konverter von RS-485
auf USB 2.0
Zertifikate
■
Kalibrierzertifikat 3.1 nach DIN EN 10204
■
DKD/DAkkS-Kalibrierzertifikat
Sonstiges
■
Transportkoffer
■
Entleerungspumpe
11263911.05 03/2019 EN/DE/IT
89WIKA Betriebsanleitung, Typen CTD9100, CTB9100, CTM9100
Page 90

14. Aufheiz- und Abkühlzeiten
14. Aufheiz- und Abkühlzeiten
14.1 Temperatur-Blockkalibrator Typ CTD9100-COOL
Messbedingungen
■
Alle Zeiten beziehen sich auf einen Pt100-Referenzsensor
Ø 6 mm [0,24 in].
■
Der Referenzsensor sitzt bei voller Tiefe mittig in der
Einsatzhülse.
■
Alle Zeiten sind Durchgangszeiten und berücksichtigen
nicht die jeweils benötigte Einschwingzeit.
■
Die Messungen wurden bei einer Raumtemperatur von
ca. 23 °C [73 °F] durchgeführt.
DE
Einsatzhülse
Aufheizen Zeit Abkühlen Zeit
-55 °C auf -45 °C -67 °F auf -49 °F 0:36 min 200 °C auf 175 °C 392 °F auf 347 °F 2:02 min
-45 °C auf -35 °C -49 °F auf -31 °F 0:25 min 175 °C auf 150 °C 347 °F auf 302 °F 1:41 min
-35 °C auf -25 °C -31 °F auf -13 °F 0:20 min 150 °C auf 125 °C 302 °F auf 257 °F 1:46 min
-25 °C auf -15 °C -13 °F auf +5 °F 0:20 min 125 °C auf 100 °C 257 °F auf 212 °F 2:07 min
-15 °C auf 0 °C 5 °F auf 32 °F 0:26 min 100 °C auf 75 °C 212 °F auf 167 °F 2:22 min
0 °C auf 25 °C 32 °F auf 77 °F 0:40 min 75 °C auf 50 °C 167 °F auf 122 °F 2:47 min
25 °C auf 50 °C 77 °F auf 122 °F 0:41 min 50 °C auf 25 °C 122 °F auf 77 °F 3:28 min
50 °C auf 75 °C 122 °F auf 167 °F 0:45 min 25 °C auf 0 °C 77 °F auf 32 °F 4:38 min
75 °C auf 100 °C 167 °F auf 212 °F 0:41 min 0 °C auf -15 °C 32 °F auf 5 °F 3:43 min
100 °C auf 125 °C 212 °F auf 257 °F 0:45 min -15 °C auf -25 °C +5 °F auf -13 °F 3:07 min
125 °C auf 150 °C 257 °F auf 302 °F 0:46 min -25 °C auf -35 °C -13 °F auf -31 °F 4:13 min
150 °C auf 175 °C 302 °F auf 347 °F 0:56 min -35 °C auf -45 °C -31 °F auf -49 °F 6:10 min
175 °C auf 200 °C 347 °F auf 392 °F 2:01 min -45 °C auf -55 °C -49 °F auf -67 °F 12:14 min
14.2 Temperatur-Blockkalibrator Typ CTD9100-165
Messbedingungen
■
Alle Zeiten beziehen sich auf einen Pt100-Referenzsensor
Ø 6 mm [0,24 in].
■
Der Referenzsensor sitzt, bei voller Tiefe, mittig in der
Einsatzhülse.
■
Alle Zeiten sind Durchgangszeiten und berücksichtigen
nicht die jeweils benötigte Einschwingzeit.
■
Die Messungen wurden bei einer Raumtemperatur von
ca. 23 °C [73 °F] durchgeführt.
Einsatzhülse
Aufheizen Zeit Abkühlen Zeit
-30 °C auf -25 °C -22 °F auf -13 °F 0:32 min 165 °C auf 150 °C 329 °F auf 302 °F 1:13 min
-25 °C auf -15 °C -13 °F auf +5 °F 0:56 min 150 °C auf 125 °C 302 °F auf 257 °F 1:54 min
-15 °C auf 0 °C 5 °F auf 32 °F 1:19 min 125 °C auf 100 °C 257 °F auf 212 °F 2:11 min
0 °C auf 25 °C 32 °F auf 77 °F 2:15 min 100 °C auf 75 °C 212 °F auf 167 °F 2:38 min
25 °C auf 50 °C 77 °F auf 122 °F 2:42 min 75 °C auf 50 °C 167 °F auf 122 °F 3:13 min
50 °C auf 75 °C 122 °F auf 167 °F 3:09 min 50 °C auf 25 °C 122 °F auf 77 °F 4:16 min
75 °C auf 100 °C 167 °F auf 212 °F 4:17 min 25 °C auf 0 °C 77 °F auf 32 °F 6:26 min
100 °C auf 125 °C 212 °F auf 257 °F 4:30 min 0 °C auf -15 °C 32 °F auf 5 °F 6:08 min
125 °C auf 150 °C 257 °F auf 302 °F 5:46 min -15 °C auf -25 °C +5 °F auf -13 °F 7:03 min
150 °C auf 165 °C 302 °F auf 329 °F 5:31 min -25 °C auf -30 °C -13 °F auf -22 °F 6:21 min
11263911.05 03/2019 EN/DE/IT
90 WIKA Betriebsanleitung, Typen CTD9100, CTB9100, CTM9100
Page 91

14. Aufheiz- und Abkühlzeiten
14.3 Temperatur-Blockkalibrator Typ CTD9100-165-X
Messbedingungen
■
Alle Zeiten beziehen sich auf einen Pt100-Referenzsensor
Ø 6 mm [0,24 in].
■
Der Referenzsensor sitzt bei voller Tiefe mittig in der
Einsatzhülse.
■
Alle Zeiten sind Durchgangszeiten und berücksichtigen
nicht die jeweils benötigte Einschwingzeit.
■
Die Messungen wurden bei einer Raumtemperatur von
ca. 23 °C [73 °F] durchgeführt.
Einsatzhülse
Aufheizen Zeit Abkühlen Zeit
-35 °C auf -30 °C -31 °F auf -22 °F 1:05 min 165 °C auf 150 °C 329 °F auf 302 °F 2:00 min
-30 °C auf -25 °C -22 °F auf -13 °F 0.45 min 150 °C auf 125 °C 302 °F auf 257 °F 3:21 min
-25 °C auf -20 °C -13 °F auf -4 °F 0:26 min 125 °C auf 100 °C 257 °F auf 212 °F 3:57 min
-20 °C auf -15 °C -4 °F auf +5 °F 0:40 min 100 °C auf 75 °C 212 °F auf 167 °F 4:47 min
-15 °C auf -10 °C 5 °F auf 14 °F 0:40 min 75 °C auf 50 °C 167 °F auf 122 °F 5:51 min
-10 °C auf 0 °C 14 °F auf 32 °F 1:21 min 50 °C auf 25 °C 122 °F auf 77 °F 7:58 min
0 °C auf 25 °C 32 °F auf 77 °F 3:26 min 25 °C auf 0 °C 77 °F auf 32 °F 12:24 min
25 °C auf 50 °C 77 °F auf 122 °F 3:51 min 0 °C auf -10 °C 32 °F auf 14 °F 6:43 min
50 °C auf 75 °C 122 °F auf 167 °F 4:06 min -10 °C auf -15 °C 14 °F auf 5 °F 4:26 min
75 °C auf 100 °C 167 °F auf 212 °F 4:57 min -15 °C auf -20 °C +5 °F auf -4 °F 5:27 min
100 °C auf 125 °C 212 °F auf 257 °F 6:17 min -20 °C auf -25 °C -4 °F auf -13 °F 7:17 min
125 °C auf 150 °C 257 °F auf 302 °F 9:18 min -25 °C auf -20 °C -13 °F auf -22 °F 11:09 min
150 °C auf 165 °C 302 °F auf 329 °F 8:59 min -30 °C auf -35 °C -22 °F auf -31 °F 24:18 min
14.4 Temperatur-Blockkalibrator Typ CTD9100-450
Messbedingungen
■
Alle Zeiten beziehen sich auf einen Pt100-Referenzsensor
Ø 6 mm [0,24 in].
■
Der Referenzsensor sitzt bei voller Tiefe mittig in der
Einsatzhülse.
■
Alle Zeiten sind Durchgangszeiten und berücksichtigen
nicht die jeweils benötigte Einschwingzeit.
■
Die Messungen wurden bei einer Raumtemperatur von
ca. 23 °C [73 °F] durchgeführt.
DE
Einsatzhülse
Aufheizen Zeit Abkühlen Zeit
25 °C auf 40 °C 77 °F auf 104 °F 1:00 min 450 °C auf 400 °C 842 °F auf 752 °F 5:36 min
40 °C auf 50 °C 104 °F auf 122 °F 0:31 min 400 °C auf 350 °C 752 °F auf 662 °F 5:10 min
50 °C auf 100 °C 122 °F auf 212 °F 1:38 min 350 °C auf 300 °C 662 °F auf 572 °F 6:06 min
100 °C auf 150 °C 212 °F auf 302 °F 1:23 min 300 °C auf 250 °C 572 °F auf 482 °F 7:28 min
150 °C auf 200 °C 302 °F auf 392 °F 1:16 min 250 °C auf 200 °C 482 °F auf 392 °F 9:14 min
200 °C auf 250 °C 392 °F auf 482 °F 1:18 min 200 °C auf 150 °C 392 °F auf 302 °F 12:07 min
250 °C auf 300 °C 482 °F auf 572 °F 1:23 min 150 °C auf 100 °C 302 °F auf 212 °F 18:00 min
300 °C auf 350 °C 572 °F auf 662 °F 1:33 min 100 °C auf 50 °C 212 °F auf 122 °F 37:01 min
350 °C auf 400 °C 662 °F auf 752 °F 1:53 min 50 °C auf 40 °C 122 °F auf 104 °F 15:45 min
400 °C auf 450 °C 752 °F auf 842 °F 2:33 min 40 °C auf 25 °C 104 °F auf 77 °F 50:53 min
11263911.05 03/2019 EN/DE/IT
91WIKA Betriebsanleitung, Typen CTD9100, CTB9100, CTM9100
Page 92

14. Aufheiz- und Abkühlzeiten
14.5 Temperatur-Blockkalibrator Typ CTD9100-650
Messbedingungen
■
Alle Zeiten beziehen sich auf einen Pt100-Referenzsensor
Ø 6 mm [0,24 in].
■
Der Referenzsensor sitzt bei voller Tiefe mittig in der
Einsatzhülse.
Einsatzhülse
DE
Aufheizen Zeit Abkühlen Zeit
25 °C auf 40 °C 77 °F auf 104 °F 0:54 min 650 °C auf 600 °C 1.202 °C auf 1.112 °C 2:25 min
40 °C auf 50 °C 104 °F auf 122 °F 0:22 min 600 °C auf 550 °C 1.112 °C auf 1.022 °C 2:33 min
50 °C auf 100 °C 122 °F auf 212 °F 1:18 min 550 °C auf 500 °C 1.022 °C auf 932 °C 2:55 min
100 °C auf 150 °C 212 °F auf 302 °F 1:06 min 500 °C auf 450 °C 932 °C auf 842 °C 3:27 min
150 °C auf 200 °C 302 °F auf 392 °F 1:03 min 450 °C auf 400 °C 842 °F auf 752 °F 4:01 min
200 °C auf 250 °C 392 °F auf 482 °F 1:05 min 400 °C auf 350 °C 752 °F auf 662 °F 4:39 min
250 °C auf 300 °C 482 °F auf 572 °F 1:06 min 350 °C auf 300 °C 662 °F auf 572 °F 5:36 min
300 °C auf 350 °C 572 °F auf 662 °F 1:09 min 300 °C auf 250 °C 572 °F auf 482 °F 6:46 min
350 °C auf 400 °C 662 °F auf 752 °F 1:21 min 250 °C auf 200 °C 482 °F auf 392 °F 8:32 min
400 °C auf 450 °C 752 °F auf 842 °F 1:30 min 200 °C auf 150 °C 392 °F auf 302 °F 11:22 min
450 °C auf 500 °C 842 °C auf 932 °C 1:32 min 150 °C auf 100 °C 302 °F auf 212 °F 17:01 min
500 °C auf 550 °C 932 °C auf 1.022 °C 1:38 min 100 °C auf 50 °C 212 °F auf 122 °F 52:37 min
550 °C auf 600 °C 1.022 °C auf 1.112 °C 1:55 min 50 °C auf 40 °C 122 °F auf 104 °F 15:23 min
600 °C auf 650 °C 1.112 °C auf 1.202 °C 2:33 min 40 °C auf 25 °C 104 °F auf 77 °F 1:01:58 min
■
Alle Zeiten sind Durchgangszeiten und berücksichtigen
nicht die jeweils benötigte Einschwingzeit.
■
Die Messungen wurden bei einer Raumtemperatur von
ca. 23 °C [73 °F] durchgeführt.
92 WIKA Betriebsanleitung, Typen CTD9100, CTB9100, CTM9100
11263911.05 03/2019 EN/DE/IT
Page 93

14. Aufheiz- und Abkühlzeiten
14.6 Mikrokalibrierbad Typ CTB9100-165
Messbedingungen
■
Alle Zeiten beziehen sich auf einen Pt100-Referenzsensor
Ø 6 mm [0,24 in].
■
Der Referenzsensor sitzt mittig im Tank, 5 mm [0,2 in] über
dem Siebeinsatz.
■
Alle Zeiten sind Durchgangszeiten und berücksichtigen
nicht die jeweils benötigte Einschwingzeit.
■
Die Messungen wurden bei einer Raumtemperatur von
ca. 23 °C [73 °F] durchgeführt mit Bad ohne Deckel.
Destilliertes Wasser
Aufheizen Zeit Abkühlen Zeit
2 °C auf 25 °C 36 °F auf 77 °F 5:31 min 90 °C auf 75 °C 194 °F auf 167 °F 3:09 min
25 °C auf 50 °C 77 °F auf 122 °F 6:49 min 75 °C auf 50 °C 167 °F auf 122 °F 7:06 min
50 °C auf 75 °C 122 °F auf 167 °F 8:07 min 50 °C auf 25 °C 122 °F auf 77 °F 10:18 min
75 °C auf 90 °C 167 °F auf 194 °F 6:19 min 25 °C auf 2 °C 77 °F auf 36 °F 14:52 min
Silikonöl 5 CS
Aufheizen Zeit Abkühlen Zeit
-30 °C auf -25 °C -22 °F auf -13 °F 0:56 min 120 °C auf 100 °C 248 °F auf 212 °F 32:24 min
-25 °C auf -15 °C -13 °F auf +5 °F 1:06 min 100 °C auf 75 °C 212 °F auf 167 °F 3:40 min
-15 °C auf 0 °C 5 °F auf 32 °F 1:18 min 75 °C auf 50 °C 167 °F auf 122 °F 4:48 min
0 °C auf 25 °C 32 °F auf 77 °F 2:46 min 50 °C auf 25 °C 122 °F auf 77 °F 6:41 min
25 °C auf 50 °C 77 °F auf 122 °F 2:37 min 25 °C auf 0 °C 77 °F auf 32 °F 8:50 min
50 °C auf 75 °C 122 °F auf 167 °F 3:10 min 0 °C auf -15 °C 32 °F auf 5 °F 10:36 min
75 °C auf 100 °C 167 °F auf 212 °F 4:23 min -15 °C auf -25 °C +5 °F auf -13 °F 15:01 min
100 °C auf 120 °C 212 °F auf 248 °F 5:05 min -25 °C auf -30 °C -13 °F auf -22 °F 23:19 min
DE
Silikonöl 10 CS
Aufheizen Zeit Abkühlen Zeit
-30 °C auf -25 °C -22 °F auf -13 °F 1:17 min 165 °C auf 150 °C 329 °F auf 302 °F 1:54 min
-25 °C auf -15 °C -13 °F auf +5 °F 1:17 min 150 °C auf 125 °C 302 °F auf 257 °F 2:37 min
-15 °C auf 0 °C 5 °F auf 32 °F 1:20 min 125 °C auf 100 °C 257 °F auf 212 °F 3:11 min
0 °C auf 25 °C 32 °F auf 77 °F 1:56 min 100 °C auf 75 °C 212 °F auf 167 °F 3:59 min
25 °C auf 50 °C 77 °F auf 122 °F 2:30 min 75 °C auf 50 °C 167 °F auf 122 °F 5:02 min
50 °C auf 75 °C 122 °F auf 167 °F 3:13 min 50 °C auf 25 °C 122 °F auf 77 °F 6:57 min
75 °C auf 100 °C 167 °F auf 212 °F 4:24 min 25 °C auf 0 °C 77 °F auf 32 °F 8:26 min
100 °C auf 125 °C 212 °F auf 257 °F 6:47 min 0 °C auf -15 °C 32 °F auf 5 °F 9:58 min
125 °C auf 150 °C 257 °F auf 302 °F 12:51 min -15 °C auf -25 °C +5 °F auf -13 °F 15:33 min
150 °C auf 165 °C 302 °F auf 329 °F 18:21 min -25 °C auf -30 °C -13 °F auf -30 °F 29:45 min
11263911.05 03/2019 EN/DE/IT
93WIKA Betriebsanleitung, Typen CTD9100, CTB9100, CTM9100
Page 94

14. Aufheiz- und Abkühlzeiten
Silikonöl 20 CS
Aufheizen Zeit Abkühlen Zeit
-30 °C auf -25 °C -22 °F auf -13 °F 1:14 min 165 °C auf 150 °C 329 °F auf 302 °F 1:37 min
-25 °C auf -15 °C -13 °F auf +5 °F 1:11 min 150 °C auf 125 °C 302 °F auf 257 °F 2:38 min
-15 °C auf 0 °C 5 °F auf 32 °F 1:31 min 125 °C auf 100 °C 257 °F auf 212 °F 3:16 min
0 °C auf 25 °C 32 °F auf 77 °F 2:39 min 100 °C auf 75 °C 212 °F auf 167 °F 3:47 min
25 °C auf 50 °C 77 °F auf 122 °F 2:59 min 75 °C auf 50 °C 167 °F auf 122 °F 4:33 min
50 °C auf 75 °C 122 °F auf 167 °F 4:17 min 50 °C auf 25 °C 122 °F auf 77 °F 5:57 min
DE
75 °C auf 100 °C 167 °F auf 212 °F 5:18 min 25 °C auf 0 °C 77 °F auf 32 °F 7:49 min
100 °C auf 125 °C 212 °F auf 257 °F 7:09 min 0 °C auf -15 °C 32 °F auf 5 °F 10:17 min
125 °C auf 150 °C 257 °F auf 302 °F 12:06 min -15 °C auf -25 °C +5 °F auf -13 °F 15:19 min
150 °C auf 165 °C 302 °F auf 329 °F 21:04 min -25 °C auf -30 °C -13 °F auf -22 °F 20:52 min
Silikonöl 50 CS
Aufheizen Zeit Abkühlen Zeit
-30 °C auf -25 °C -22 °F auf -13 °F 1:53 min 165 °C auf 150 °C 329 °F auf 302 °F 1:59 min
-25 °C auf -15 °C -13 °F auf +5 °F 1:22 min 150 °C auf 125 °C 302 °F auf 257 °F 2:31 min
-15 °C auf 0 °C 5 °F auf 32 °F 1:38 min 125 °C auf 100 °C 257 °F auf 212 °F 2:58 min
0 °C auf 25 °C 32 °F auf 77 °F 2:46 min 100 °C auf 75 °C 212 °F auf 167 °F 3:17 min
25 °C auf 50 °C 77 °F auf 122 °F 3:15 min 75 °C auf 50 °C 167 °F auf 122 °F 4:13 min
50 °C auf 75 °C 122 °F auf 167 °F 3:52 min 50 °C auf 25 °C 122 °F auf 77 °F 6:40 min
75 °C auf 100 °C 167 °F auf 212 °F 5:08 min 25 °C auf 0 °C 77 °F auf 32 °F 9:17 min
100 °C auf 125 °C 212 °F auf 257 °F 6:56 min 0 °C auf -15 °C 32 °F auf 5 °F 11:46 min
125 °C auf 150 °C 257 °F auf 302 °F 11:38 min -15 °C auf -25 °C +5 °F auf -13 °F 16:55 min
150 °C auf 165 °C 302 °F auf 329 °F 17:04 min -25 °C auf -30 °C -13 °F auf -22 °F 23:38 min
94 WIKA Betriebsanleitung, Typen CTD9100, CTB9100, CTM9100
11263911.05 03/2019 EN/DE/IT
Page 95

14. Aufheiz- und Abkühlzeiten
14.7 Mikrokalibrierbad Typ CTB9100-225
Messbedingungen
■
Alle Zeiten beziehen sich auf einen Pt100-Referenzsensor
Ø 6 mm [0,24 in].
■
Der Referenzsensor sitzt mittig im Tank, 5 mm [0,2 in] über
dem Siebeinsatz.
■
Alle Zeiten sind Durchgangszeiten und berücksichtigen
nicht die jeweils benötigte Einschwingzeit.
■
Die Messungen wurden bei einer Raumtemperatur von
ca. 23 °C [73 °F] durchgeführt mit Bad ohne Deckel.
Destilliertes Wasser
Aufheizen Zeit Abkühlen Zeit
25 °C auf 40 °C 77 °F auf 104 °F 0:55 min 90 °C auf 75 °C 194 °F auf 167 °F 5:53 min
40 °C auf 50 °C 104 °F auf 122 °F 0:37 min 75 °C auf 50 °C 167 °F auf 122 °F 15:17 min
50 °C auf 75 °C 122 °F auf 167 °F 1:27 min 50 °C auf 40 °C 122 °F auf 104 °F 10:50 min
75 °C auf 90 °C 167 °F auf 194 °F 1:30 min 40 °C auf 25 °C 104 °F auf 77 °F 45:26 min
Silikonöl 5 CS
Aufheizen Zeit Abkühlen Zeit
25 °C auf 40 °C 77 °F auf 104 °F 0:51 min 120 °C auf 100 °C 248 °F auf 212 °F 3:27 min
40 °C auf 50 °C 104 °F auf 122 °F 0:16 min 100 °C auf 75 °C 212 °F auf 167 °F 5:55 min
50 °C auf 75 °C 122 °F auf 167 °F 0:54 min 75 °C auf 50 °C 167 °F auf 122 °F 10:00 min
75 °C auf 100 °C 167 °F auf 212 °F 1:13 min 50 °C auf 40 °C 122 °F auf 104 °F 7:02 min
100 °C auf 120 °C 212 °F auf 248 °F 1:35 min 40 °C auf 25 °C 104 °F auf 77 °F 34:28 min
Silikonöl 10 CS
Aufheizen Zeit Abkühlen Zeit
25 °C auf 40 °C 77 °F auf 104 °F 0:52 min 165 °C auf 150 °C 329 °F auf 302 °F 1:40 min
40 °C auf 50 °C 104 °F auf 122 °F 0:22 min 150 °C auf 125 °C 302 °F auf 257 °F 3:17 min
50 °C auf 75 °C 122 °F auf 167 °F 0:52 min 125 °C auf 100 °C 257 °F auf 212 °F 4:14 min
75 °C auf 100 °C 167 °F auf 212 °F 0:53 min 100 °C auf 75 °C 212 °F auf 167 °F 5:59 min
100 °C auf 125 °C 212 °F auf 257 °F 0:59 min 75 °C auf 50 °C 167 °F auf 122 °F 9:59 min
125 °C auf 150 °C 257 °F auf 302 °F 1:12 min 50 °C auf 40 °C 122 °F auf 104 °F 7:00 min
150 °C auf 165 °C 302 °F auf 329 °F 1:03 min 40 °C auf 25 °C 104 °F auf 77 °F 31:40 min
DE
Silikonöl 20 CS
Aufheizen Zeit Abkühlen Zeit
25 °C auf 40 °C 77 °F auf 104 °F 1:20 min 225 °C auf 200 °C 437 °F auf 392 °F 2:08 min
40 °C auf 50 °C 104 °F auf 122 °F 0:22 min 200 °C auf 165 °C 392 °F auf 329 °F 3:21 min
50 °C auf 75 °C 122 °F auf 167 °F 0:50 min 165 °C auf 150 °C 329 °F auf 302 °F 1:46 min
75 °C auf 100 °C 167 °F auf 212 °F 0:48 min 150 °C auf 125 °C 302 °F auf 257 °F 3:23 min
100 °C auf 125 °C 212 °F auf 257 °F 0:52 min 125 °C auf 100 °C 257 °F auf 212 °F 4:30 min
125 °C auf 150 °C 257 °F auf 302 °F 0:58 min 100 °C auf 75 °C 212 °F auf 167 °F 6:19 min
150 °C auf 165 °C 302 °F auf 329 °F 0:37 min 75 °C auf 50 °C 167 °F auf 122 °F 10:30 min
165 °C auf 200 °C 329 °F auf 392 °F 1:39 min 50 °C auf 40 °C 122 °F auf 104 °F 7:35 min
200 °C auf 225 °C 392 °F auf 437 °F 2:50 min 40 °C auf 25 °C 104 °F auf 77 °F 40:02 min
11263911.05 03/2019 EN/DE/IT
95WIKA Betriebsanleitung, Typen CTD9100, CTB9100, CTM9100
Page 96

14. Aufheiz- und Abkühlzeiten
Silikonöl 50 CS
Aufheizen Zeit Abkühlen Zeit
25 °C auf 40 °C 77 °F auf 104 °F 1:18 min 225 °C auf 200 °C 437 °F auf 392 °F 2:37 min
40 °C auf 50 °C 104 °F auf 122 °F 0:21 min 200 °C auf 165 °C 392 °F auf 329 °F 3:25 min
50 °C auf 75 °C 122 °F auf 167 °F 0:48 min 165 °C auf 150 °C 329 °F auf 302 °F 1:47 min
75 °C auf 100 °C 167 °F auf 212 °F 0:46 min 150 °C auf 125 °C 302 °F auf 257 °F 3:31 min
100 °C auf 125 °C 212 °F auf 257 °F 0:47 min 125 °C auf 100 °C 257 °F auf 212 °F 4:21 min
125 °C auf 150 °C 257 °F auf 302 °F 0:57 min 100 °C auf 75 °C 212 °F auf 167 °F 6:04 min
DE
150 °C auf 165 °C 302 °F auf 329 °F 0:40 min 75 °C auf 50 °C 167 °F auf 122 °F 10:17 min
165 °C auf 200 °C 329 °F auf 392 °F 1:57 min 50 °C auf 40 °C 122 °F auf 104 °F 7:09 min
200 °C auf 225 °C 392 °F auf 437 °F 4:11 min 40 °C auf 25 °C 104 °F auf 77 °F 35:40 min
14.8 Typ CTM9100-150 als Mikrokalibrierbad
Messbedingungen
■
Alle Zeiten beziehen sich auf einen Pt100-Referenzsensor
Ø 6 mm [0,24 in].
■
Der Referenzsensor sitzt mittig im Tank, 25 mm [0,98 in]
über dem Siebeinsatz.
■
Alle Zeiten sind Durchgangszeiten und berücksichtigen
nicht die jeweils benötigte Einschwingzeit.
■
Die Messungen wurden bei einer Raumtemperatur von
ca. 23 °C [73 °F] durchgeführt mit Bad ohne Deckel.
■
Geregelt wird nach internem Referenzsensor.
Silikonöl 10 CS
Aufheizen Zeit Abkühlen Zeit
-20 °C auf -15 °C -4 °F auf +5 °F 0:25 min 150 °C auf 125 °C 302 °F auf 257 °F 2:01 min
-15 °C auf -10 °C 5 °F auf 14 °F 0:25 min 125 °C auf 100 °C 257 °F auf 212 °F 3:27 min
-10 °C auf 0 °C 14 °F auf 32 °F 0:41 min 100 °C auf 75 °C 212 °F auf 167 °F 3:36 min
0 °C auf 25 °C 32 °F auf 77 °F 2:36 min 75 °C auf 50 °C 167 °F auf 122 °F 4:37 min
25 °C auf 50 °C 77 °F auf 122 °F 2:51 min 50 °C auf 25 °C 122 °F auf 77 °F 6:18 min
50 °C auf 75 °C 122 °F auf 167 °F 3:21 min 25 °C auf 0 °C 77 °F auf 32 °F 9:55 min
75 °C auf 100 °C 167 °F auf 212 °F 3:57 min 0 °C auf -10 °C 32 °F auf 14 °F 6:27 min
100 °C auf 125 °C 212 °F auf 257 °F 5:22 min -10 °C auf -15 °C 14 °F auf 5 °F 4:12 min
125 °C auf 150 °C 257 °F auf 302 °F 9:10 min -15 °C auf -20 °C +5 °F auf -4 °F 5:23 min
96 WIKA Betriebsanleitung, Typen CTD9100, CTB9100, CTM9100
11263911.05 03/2019 EN/DE/IT
Page 97
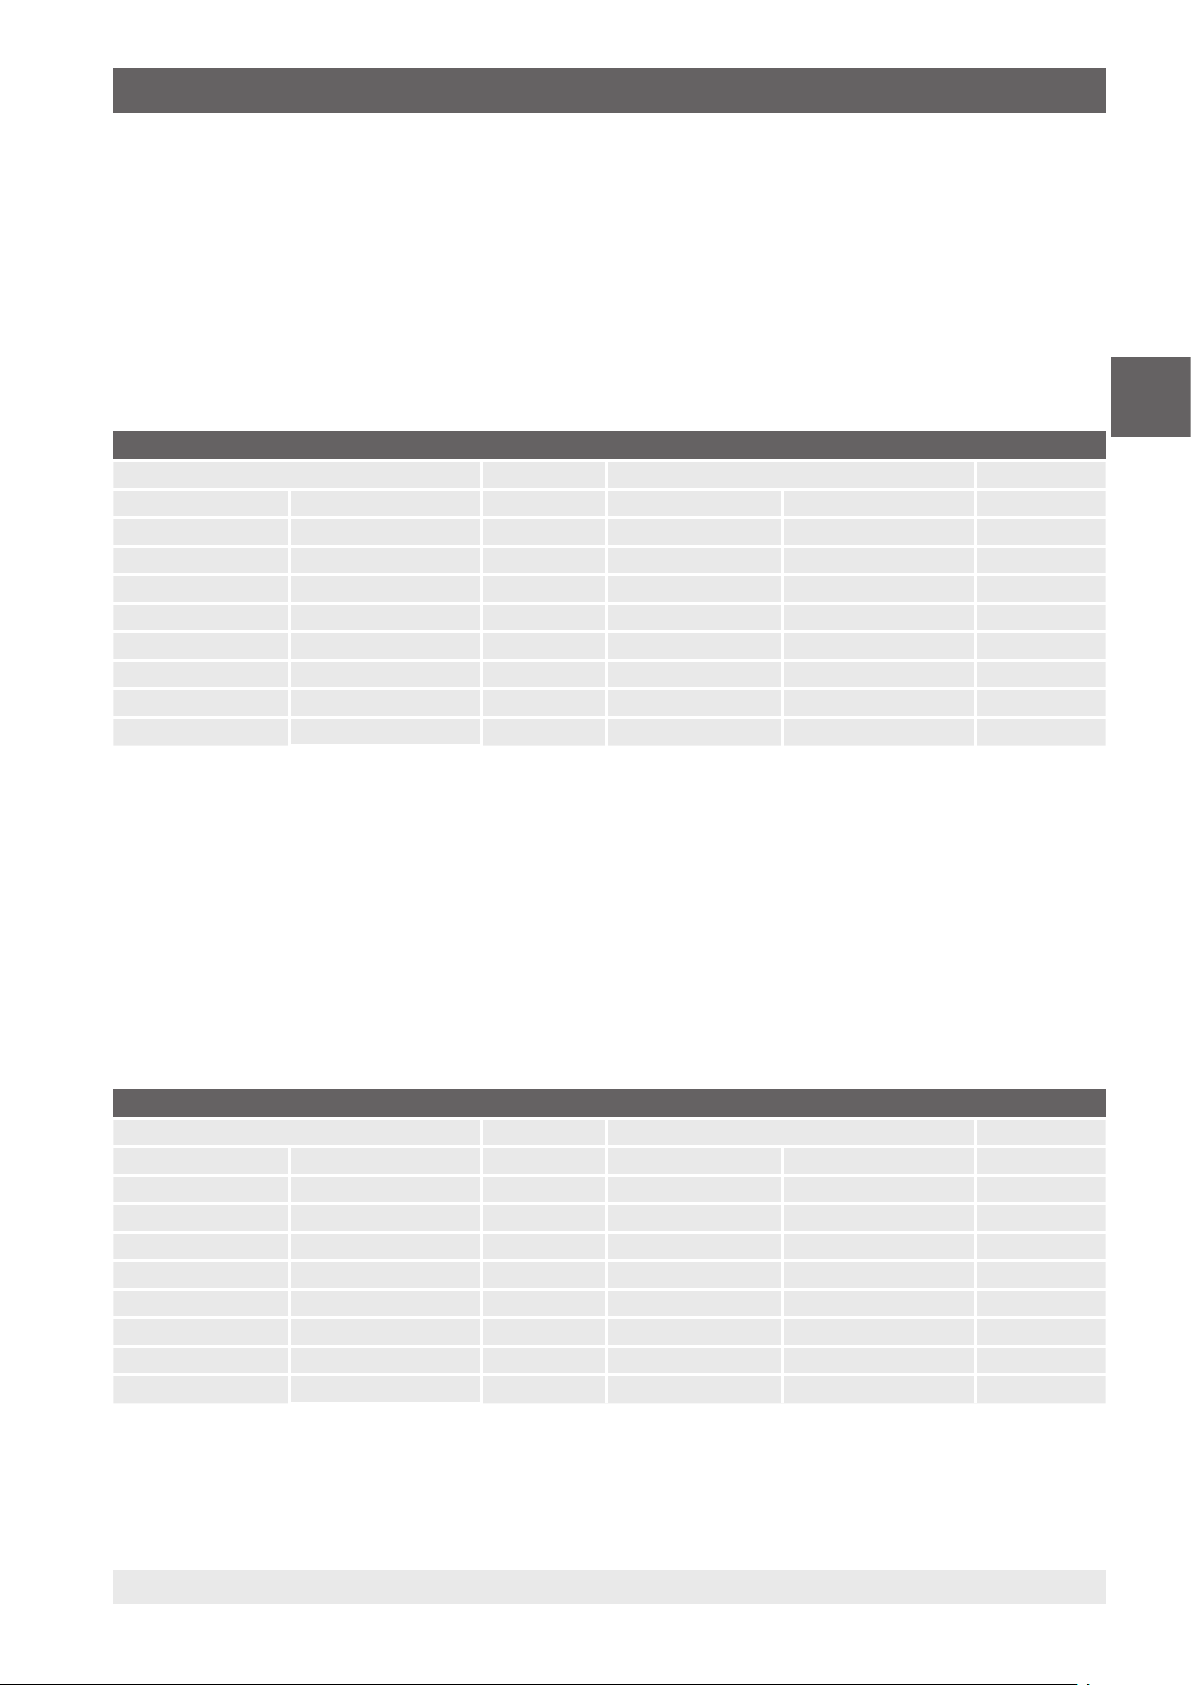
14. Aufheiz- und Abkühlzeiten
14.9 Typ CTM9100-150 als Temperatur-Blockkalibrator
Messbedingungen
■
Alle Zeiten beziehen sich auf einen Pt100-Referenzsensor
Ø 6 mm [0,24 in].
■
Der Referenzsensor sitzt 10 mm [0,39 in] außerhalb der
Mitte, bei 155 mm [5,91 in] Tiefe.
■
Alle Zeiten sind Durchgangszeiten und berücksichtigen
nicht die jeweils benötigte Einschwingzeit.
Einsatzhülse
Aufheizen Zeit Abkühlen Zeit
-20 °C auf -15 °C -4 °F auf +5 °F 0:42 min 150 °C auf 125 °C 302 °F auf 257 °F 3:37 min
-15 °C auf -10 °C 5 °F auf 14 °F 0:44 min 125 °C auf 100 °C 257 °F auf 212 °F 4:12 min
-10 °C auf 0 °C 14 °F auf 32 °F 1:30 min 100 °C auf 75 °C 212 °F auf 167 °F 5:02 min
0 °C auf 25 °C 32 °F auf 77 °F 3:47 min 75 °C auf 50 °C 167 °F auf 122 °F 6:18 min
25 °C auf 50 °C 77 °F auf 122 °F 4:17 min 50 °C auf 25 °C 122 °F auf 77 °F 8:23 min
50 °C auf 75 °C 122 °F auf 167 °F 4:42 min 25 °C auf 0 °C 77 °F auf 32 °F 12:45 min
75 °C auf 100 °C 167 °F auf 212 °F 5:47 min 0 °C auf -10 °C 32 °F auf 14 °F 7:54 min
100 °C auf 125 °C 212 °F auf 257 °F 7:39 min -10 °C auf -15 °C 14 °F auf 5 °F 5:12 min
125 °C auf 150 °C 257 °F auf 302 °F 12:05 min -15 °C auf -20 °C +5 °F auf -4 °F 6:38 min
■
Die Messungen wurden bei einer Raumtemperatur von
ca. 23 °C [73 °F] durchgeführt.
■
Geregelt wird nach externem Referenzsensor (3 x 300 mm
[0,12 x 11,81 in]).
■
Ohne Deckel, ohne Abdeckung.
DE
14.10 Typ CTM9100-150 als Infrarot-Schwarzstrahler
Messbedingungen
■
Alle Zeiten beziehen sich auf einen Pt100-Referenzsensor
Ø 3 mm [0,12 in], L = 300 mm [11,81 in].
■
Der Referenzsensor ist bei 111 mm [4,37 in] Tiefe eingetaucht.
■
Alle Zeiten sind Durchgangszeiten und berücksichtigen
■
Die Messungen wurden bei einer Raumtemperatur von
ca. 23 °C [73 °F] durchgeführt.
■
Geregelt wird nach externem Referenzsensor (3 x 300 mm
[0,12 x 11,81 in]).
■
Ohne Deckel, ohne Abdeckung.
nicht die jeweils benötigte Einschwingzeit.
Infraroteinsatz
Aufheizen Zeit Abkühlen Zeit
-20 °C auf -15 °C -4 °F auf +5 °F 0:30 min 150 °C auf 125 °C 302 °F auf 257 °F 2:26 min
-15 °C auf -10 °C 5 °F auf 14 °F 0:30 min 125 °C auf 100 °C 257 °F auf 212 °F 2:52 min
-10 °C auf 0 °C 14 °F auf 32 °F 1:00 min 100 °C auf 75 °C 212 °F auf 167 °F 3:36 min
0 °C auf 25 °C 32 °F auf 77 °F 2:42 min 75 °C auf 50 °C 167 °F auf 122 °F 4:27 min
25 °C auf 50 °C 77 °F auf 122 °F 3:06 min 50 °C auf 25 °C 122 °F auf 77 °F 6:03 min
50 °C auf 75 °C 122 °F auf 167 °F 3:26 min 25 °C auf 0 °C 77 °F auf 32 °F 8:59 min
75 °C auf 100 °C 167 °F auf 212 °F 4:12 min 0 °C auf -10 °C 32 °F auf 14 °F 5:33 min
100 °C auf 125 °C 212 °F auf 257 °F 5:38 min -10 °C auf -15 °C 14 °F auf 5 °F 3:31 min
125 °C auf 150 °C 257 °F auf 302 °F 9:49 min -15 °C auf -20 °C +5 °F auf -4 °F 4:32 min
11263911.05 03/2019 EN/DE/IT
97WIKA Betriebsanleitung, Typen CTD9100, CTB9100, CTM9100
Page 98

14. Aufheiz- und Abkühlzeiten
14.11 Typ CTM9100-150 als Oberflächen-Temperaturkalibrator
Messbedingungen
■
Alle Zeiten beziehen sich auf einen Pt100-Referenzsensor
Ø 3 mm [0,12 in], L = 150 mm [5,91 in].
■
Der Referenzsensor ist bei 51 mm [2,01 in] Tiefe eingetaucht und sitzt unterhalb der Stirnfläche.
■
Alle Zeiten sind Durchgangszeiten und berücksichtigen
■
Die Messungen wurden bei einer Raumtemperatur von
ca. 23 °C [73 °F] durchgeführt.
■
Geregelt wird nach externem Referenzsensor (3 x 300 mm
[0,12 x 11,81 in]).
■
Ohne Deckel, ohne Abdeckung.
nicht die jeweils benötigte Einschwingzeit.
DE
Oberflächeneinsatz
Aufheizen Zeit Abkühlen Zeit
-20 °C auf -15 °C -4 °F auf +5 °F 0:46 min 150 °C auf 125 °C 302 °F auf 257 °F 3:11 min
-15 °C auf -10 °C 5 °F auf 14 °F 0:45 min 125 °C auf 100 °C 257 °F auf 212 °F 3:17 min
-10 °C auf 0 °C 14 °F auf 32 °F 1:15 min 100 °C auf 75 °C 212 °F auf 167 °F 3:51 min
0 °C auf 25 °C 32 °F auf 77 °F 2:57 min 75 °C auf 50 °C 167 °F auf 122 °F 5:02 min
25 °C auf 50 °C 77 °F auf 122 °F 3:16 min 50 °C auf 25 °C 122 °F auf 77 °F 6:58 min
50 °C auf 75 °C 122 °F auf 167 °F 3:37 min 25 °C auf 0 °C 77 °F auf 32 °F 11:55 min
75 °C auf 100 °C 167 °F auf 212 °F 4:46 min 0 °C auf -10 °C 32 °F auf 14 °F 9:19 min
100 °C auf 125 °C 212 °F auf 257 °F 6:18 min -10 °C auf -15 °C 14 °F auf 5 °F 7:44 min
125 °C auf 150 °C 257 °F auf 302 °F 10:45 min -15 °C auf -20 °C +5 °F auf -4 °F 12:35 min
98 WIKA Betriebsanleitung, Typen CTD9100, CTB9100, CTM9100
11263911.05 03/2019 EN/DE/IT
Page 99

Contenuti
Contenuti
1. Informazioni generali 101
2. Breve panoramica 101
2.1 Panoramica . . . . . . . . . . . . . . . . . . . . . . . . . . . 101
3. Sicurezza 102
3.1 Legenda dei simboli . . . . . . . . . . . . . . . . . . . . . . . . 102
3.2 Descrizione . . . . . . . . . . . . . . . . . . . . . . . . . . . 102
3.3 Scopo di fornitura . . . . . . . . . . . . . . . . . . . . . . . . . 102
3.4 Destinazione d'uso. . . . . . . . . . . . . . . . . . . . . . . . . 103
3.5 Uso improprio . . . . . . . . . . . . . . . . . . . . . . . . . . 103
3.6 Istruzioni di sicurezza per l'utilizzo dei liquidi per la taratura . . . . . . . . . . . 103
3.7 Qualicazione del personale . . . . . . . . . . . . . . . . . . . . . 104
3.8 Dispositivi di protezione personale . . . . . . . . . . . . . . . . . . . 104
3.9 Etichettatura/Simboli di sicurezza. . . . . . . . . . . . . . . . . . . . 105
4. Esecuzione e funzioni 106
4.1 Panoramica dei diversi modelli dello strumento . . . . . . . . . . . . . . . 106
4.2 Viste isometriche dei calibratori di temperatura a secco della serie CTD9100 . . . . . 107
4.3 Viste isometriche dei microbagni di calibrazione della serie CTB9100 . . . . . . . 108
4.4 Viste isometriche del calibratore multifunzione, modello CTM9100-150 . . . . . . . 109
4.5 Descrizione dei comandi. . . . . . . . . . . . . . . . . . . . . . . 110
4.6 Interfaccia dati . . . . . . . . . . . . . . . . . . . . . . . . . . 111
4.7 Protocollo di interfaccia . . . . . . . . . . . . . . . . . . . . . . . .
4.8 Monitoraggio della messa a terra . . . . . . . . . . . . . . . . . . . . .
5. Trasporto, imballo e stoccaggio 112
5.1 Trasporto . . . . . . . . . . . . . . . . . . . . . . . . . . . . 112
5.2 Imballaggio e stoccaggio. . . . . . . . . . . . . . . . . . . . . . . 112
6. Messa in servizio, funzionamento 112
6.1 Posizione di funzionamento. . . . . . . . . . . . . . . . . . . . . . 112
6.2 Inserti con blocco in metallo . . . . . . . . . . . . . . . . . . . . . 113
6.3 Preparazione del microbagno di calibrazione . . . . . . . . . . . . . . . . 113
6.3.1 Proprietà del liquido di calibrazione . . . . . . . . . . . . . . . . . . . . . . . . . . . .113
6.3.2 Riempimento del microbagno di taratura . . . . . . . . . . . . . . . . . . . . . . . . .114
6.3.3 Funzionamento dell'agitatore magnetico . . . . . . . . . . . . . . . . . . . . . . . . .114
6.3.4 Inserto per liquidi . . . . . . . . . . . . . . . . . . . . . . . . . . . . . . . . . . . . . .114
6.4 Inserto per misure superciali (solo CTM9100-150) . . . . . . . . . . . . . 115
6.5 Inserto a infrarossi (solo CTM9100-150) . . . . . . . . . . . . . . . . . 115
6.6 Prova di sonde di temperatura . . . . . . . . . . . . . . . . . . . . . 115
6.7 Procedura di avvio . . . . . . . . . . . . . . . . . . . . . . . . . 116
6.8 Accensione del calibratore/microbagno di calibrazione . . . . . . . . . . . . 116
6.9 Visualizzazione della temperatura di riferimento e di quella impostata . . . . . . . 116
6.10 Controllo della temperatura di riferimento . . . . . . . . . . . . . . . . 116
7. Comandi del calibratore/microbagno di calibrazione 117
7.1 Selezione dei modi operativi del CTM9100-150 . . . . . . . . . . . . . . . 117
7.2 Metodo di funzionamento in modi di calibrazione all'interno di modi operativi singoli . . 117
7.3 Calibrazione (modo di calibrazione) . . . . . . . . . . . . . . . . . . . 118
7.4 Impostazione di una temperatura temporanea (modalità valore impostato). . . . . . 118
11263911.05 03/2019 EN/DE/IT
IT
WIKA manuale d'uso, modelli CTD9100, CTB9100, CTM9100 99
Page 100

Contenuti
7.5 Programmazione (menu principale) . . . . . . . . . . . . . . . . . . . 119
7.5.1 Struttura di menu, livelli di parametro . . . . . . . . . . . . . . . . . . . . . . . . . . .120
7.5.2 Disinserimento del controllo automatico . . . . . . . . . . . . . . . . . . . . . . . . .121
7.5.3 Inserimento del controllo automatico . . . . . . . . . . . . . . . . . . . . . . . . . . .121
7.5.4 Inserimento del controllo manuale . . . . . . . . . . . . . . . . . . . . . . . . . . . .122
7.5.5 Disinserimento del controllo manuale. . . . . . . . . . . . . . . . . . . . . . . . . . .122
7.5.6 Impostazione e memorizzazione di temperature sse. . . . . . . . . . . . . . . . . .123
7.5.7 Richiamo delle temperature impostate memorizzate . . . . . . . . . . . . . . . . . .124
7.5.8 Impostazione del controllo della rampa e di un prolo di temperatura . . . . . . . . .124
8. Raffreddamento dei blocchi in metallo o dei microbagni di calibrazione 128
9. Malfunzionamenti e guasti 129
10. Manutenzione, pulizia e ricertificazione 130
IT
10.1 Manutenzione . . . . . . . . . . . . . . . . . . . . . . . . . 130
10.2 Pulizia . . . . . . . . . . . . . . . . . . . . . . . . . . . . 130
10.2.1 Pulizia dei calibratori con inserti . . . . . . . . . . . . . . . . . . . . . . . . . . . . . .130
10.2.2 Pulizia delle griglie delle ventole. . . . . . . . . . . . . . . . . . . . . . . . . . . . . .130
10.2.3 Pulizia del microbagno di calibrazione . . . . . . . . . . . . . . . . . . . . . . . . . .130
10.2.4 Pulizia esterna . . . . . . . . . . . . . . . . . . . . . . . . . . . . . . . . . . . . . . .130
10.3 Ricerticazione . . . . . . . . . . . . . . . . . . . . . . . . . 130
11. Smontaggio, resi e smaltimento 131
11.1 Smontaggio . . . . . . . . . . . . . . . . . . . . . . . . . . 131
11.2 Resi . . . . . . . . . . . . . . . . . . . . . . . . . . . . . 131
11.3 Smaltimento . . . . . . . . . . . . . . . . . . . . . . . . . . 131
12. Specifiche tecniche 132
12.1 Calibratore di temperatura a secco, serie CTD9100 . . . . . . . . . . . . . 132
12.2 Microbagno di calibrazione, serie CTB9100 . . . . . . . . . . . . . . . 134
12.3 Calibratore multifunzione, modello CTM9100-150 . . . . . . . . . . . . . 136
13. Accessori 137
13.1 Serie CTD9100 . . . . . . . . . . . . . . . . . . . . . . . . . 137
13.2 Serie CTB9100 . . . . . . . . . . . . . . . . . . . . . . . . . 137
13.3 Modello CTM9100-150 . . . . . . . . . . . . . . . . . . . . . . 137
14. Tempi di riscaldamento e raffreddamento 138
14.1 Calibratore di temperatura a secco, modello CTD9100-COOL . . . . . . . . . 138
14.2 Calibratore di temperatura a secco, modello CTD9100-165 . . . . . . . . . . 138
14.3 Calibratore di temperatura a secco, modello CTD9100-165-X . . . . . . . . . 139
14.4 Calibratore di temperatura a secco, modello CTD9100-450 . . . . . . . . . . 139
14.5 Calibratore di temperatura a secco, modello CTD9100-650 . . . . . . . . . . 140
14.6 Microbagno di calibrazione modello CTB9100-165 . . . . . . . . . . . . . 141
14.7 Microbagno di calibrazione modello CTB9100-225 . . . . . . . . . . . . . 143
14.8 Modello CTM9100-150 come microbagno di calibrazione. . . . . . . . . . . 144
14.9 Modello CTM9100-150 come calibratore di temperatura a secco . . . . . . . . 145
14.10 Modello CTM9100-150 come un corpo nero a infrarossi . . . . . . . . . . . 145
14.11 Modello CTM9100-150 come calibratore per temperature superciali. . . . . . . 146
La dichiarazione di conformità è disponibile online sul sito www.wika.it.
100 WIKA manuale d'uso, modelli CTD9100, CTB9100, CTM9100
11263911.05 03/2019 EN/DE/IT
 Loading...