

Page 1

USER INSTRUCTIONS
SCOLA™ FM SYSTEM
SCOLA TEACH44/
SCOLA TEACH33
TRANSMITTER
Page 2

CONTENTS
INTRODUCTION ..................................................
THESCOLA™FMSYSTEM ..........................................
DESCRIPTION ..................................................
PREPARINGTHESCOLATEACH ..................................
Insertingthebattery ...........................................
Charging ......................................................
Connectingthemicrophone .....................................
Positioning.....................................................
OPERATINGTHESCOLAFMSYSTEM..............................
On off ........................................................
Channelselection ..............................................
SynchronisingSCOLAFLEXorSCOLABUDDY ....................
Microphoneonoff .............................................
Keypadlock....................................................
Connectingaudioequipment ...................................
Batteryandcharging ..........................................
TeamTeachingfunction ........................................
TablewithSCOLATEACHkeyfunctions ..........................
2
Page 3

GOODADVICE..................................................
CAREANDMAINTENANCE.......................................
WARNINGS ....................................................
INCASEOFMALFUNCTION ......................................
TERMSANDDEFINITIONSEXPLAINED ............................
WARRANTY....................................................
REGULATORYINFORMATION....................................
SYMBOLS .....................................................
SETTINGS ......................................................
3
Page 4
INTRODUCTION
SCOLA provides hearing aid users with additional opportunities
in difficult listening situations.
The SCOLA FM system has been developed specifically for children and educational environments. These instructions therefore
primarily address parents and teachers.
The symbol refers to the section ‘Terms and definitions
explained’, where you will find detailed explanations of functions
and technical terms.
WARNING
This booklet contains important information and instructions. Read
this booklet carefully before you start using the device.
4
Page 5

NOTE
Your SCOLA TEACH device and accessories may not look exactly as il-
lustrated in this booklet. We f urthermore re serve the right to make any
changes considered necessary.
5
Page 6

THE SCOLA™ FM SYSTEM
The SCOLA™ FM system consists of a SCOLA TEACH transmitter and one or two SCOLA receivers. The SCOLA TEACH transmitter’s primary function is to transmit sound signals from the microphone or audio equipment to the SCOLA receiver(s). The operating range is up to 20-30 metres, depending on the surround-
ings. The transmission power is very low and limited by national
regulations. It has no physiological side effects.
SCOLA TEACH is available in two versions:
SCOLA TEACH44 with the Team Teaching function, and
SCOLA TEACH33 without the Team Teaching function. The
Team Teaching version can easily be recognised by its
on the keypad.
The SCOLA TEACH transmitter and SCOLA receiver(s) must be on
the same channel in order to work together.
6
key
Page 7

SCOLA TE ACH with standa rd accessories
7
SCOLA TEACH
(The ver sion shown is the Team
Teaching version)
Lapel microphone (omnidirectional) including neck cord
and clips
Page 8
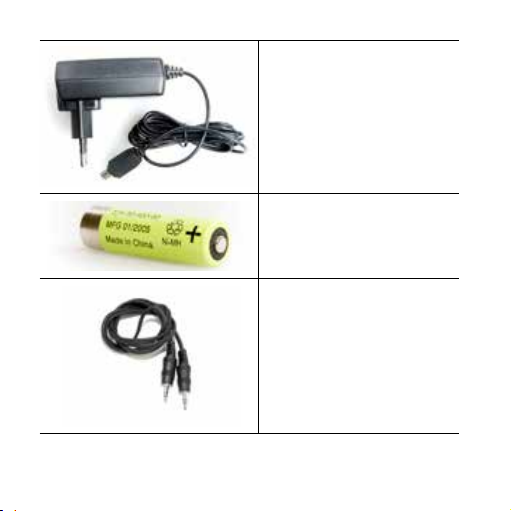
Charger
Rechargeable battery
Audio lead
8
Page 9
User instrUctions
SCOLA™ FM SySteM
scoLAteAch44/
scoLAteAch33
trAnsmitter
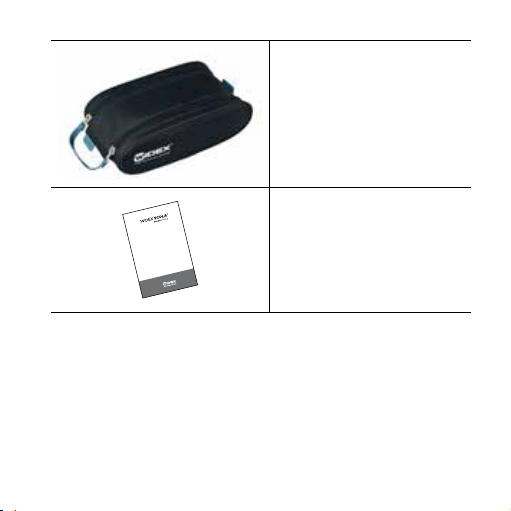
Storage case
User instructions
9
Page 10
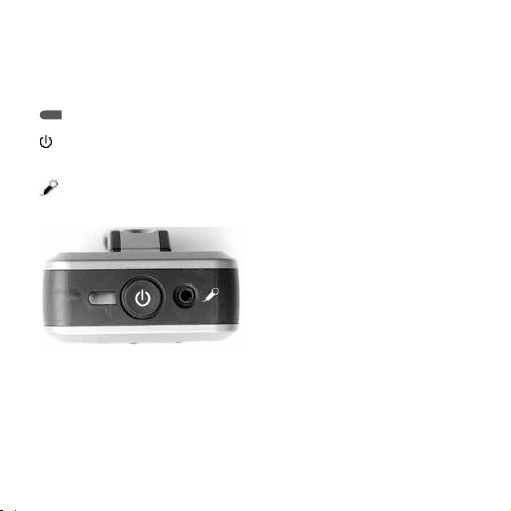
DESCRIPTION
The top of SCOLA TEACH has the following functions:
Light-emitting diode indicator (LED)
On/off button (which also serves to turn the microphone on
or off)
Microphone jack (2.5 mm jack)
10
Page 11

The front of SCOLA TEACH has the following functions:
Display with:
Status bar
Battery indicator
Channel Tracer
Team Teaching
Keypad lock
Microphone
Channel information
H02
15
NOTE
The corresponding channel number for MicroLink FM equipment is shown at the bottom of the display
11
Page 12

Multifunctional keypad (this illustration shows the Team Teaching
version)
Team Teaching key
© C key, which serves as
an undo key, amongst
The bottom of SCOLA TEACH has the following functions:
other things
Arrow keys
OK key
Jack (3.5 mm) for connec-
tion of an external sound
source or headset
Jack for connection of
charger (mini USB jack)
12
Page 13
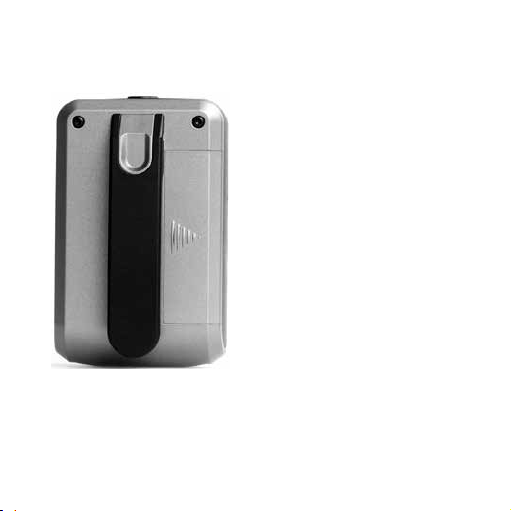
The back of SCOLA TEACH has the following functions:
Belt clips for fastening the SCOLA TEACH
Battery cover
NOTE
The approval label with serial
number is located below the battery.
We recommend that you make a
note of the serial number at the back
of this booklet.
13
Page 14
PREPARING THE SCOLA TEACH
14
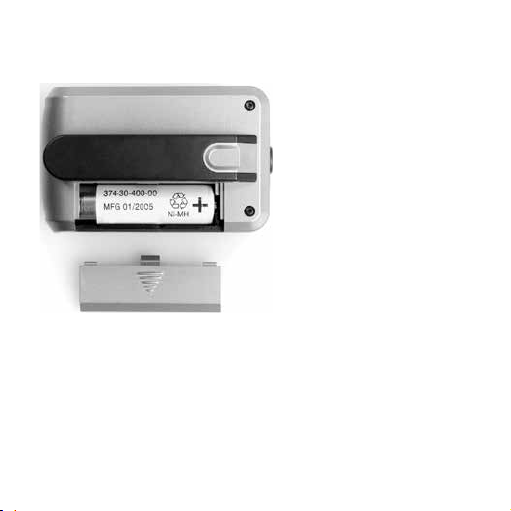
Inserting the battery
Remove the battery cover
and insert the battery
provided .
Be sure to insert the battery correctly, with the
positive pole oriented as
illustrated.
Page 15
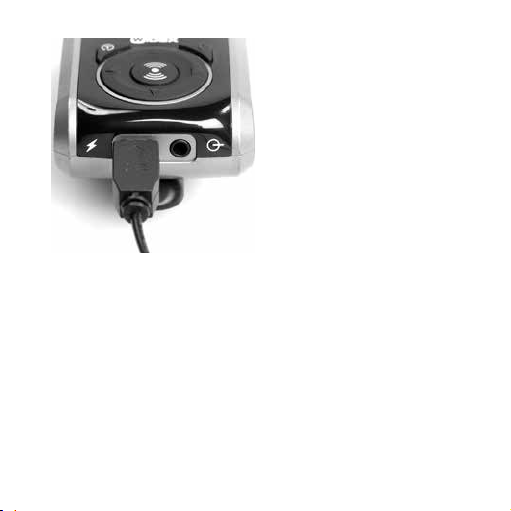
Charging
The battery included is not
charged. Before the battery
is used for the first time, it
must be charged for at least
14 hours.
With the charger plug-ged
into the socket, connect the
charger to the SCOLA TEACH
as illustrated.
15
Page 16
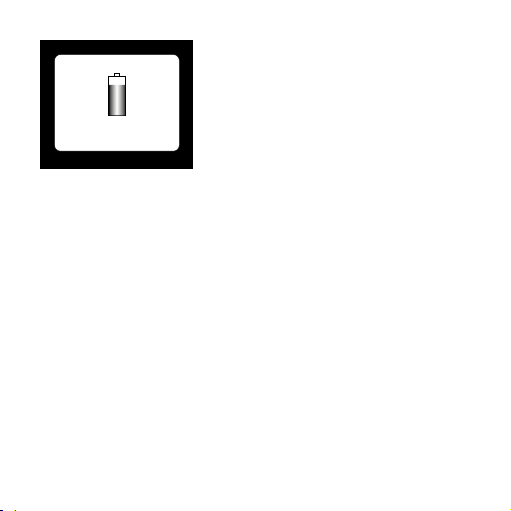
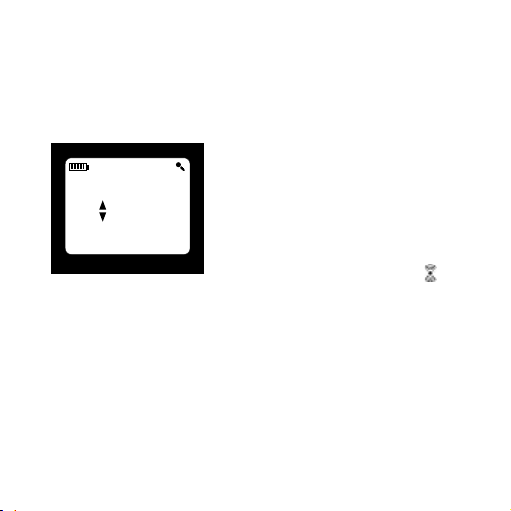
During charging the battery sym-
bol will be shown in the display and the
LED will be red.
Battery charging!
NOTE
The transmitting function is off during charging.
16
Page 17

Connecting the microphone
Plug the microphone lead into the microphone jack.
The microphone lead serves as an antenna . For optimum
operating range , make sure that the lead hangs as freely as
possible.
The standard version of the microphone is omnidirectional, which
means that it picks up sound equally from all directions.
Positioning
SCOLA TEACH can be placed in a pocket or clipped onto a belt.
The microphone can be clipped onto clothes or hung around
the neck on the neck cord. The standard microphone can also
be replaced by one of the other microphones available as
optional accessories.
17
Page 18

OPERATING THE SCOLA FM SYSTEM
On/of f
Press and hold down the on/off key on SCOLA TEACH for one second until the LED is green.
The user’s name or ”WIDEX SCOLA” will appear on the display for
approx. two seconds. SCOLA TEACH is turned off by holding the
on/off key down for one second.
18
Page 19
Channel selection
When SCOLA TEACH is turned on, the starting channel will usually be the channel last used, unless programmed differently. To
select another channel :
Hold down the or key.
will appear in front of the channel
15
H02
number.
Press or until the required channel number appears, and press
Press C if you wish to exit without
changes.
19
.
Page 20

NOTE
Note that interference may occur if other transmitters are using the
same channel as you.
Synchronising SCOLA FLEX or SCOLA BUDDY
If the receiving channel differs from the transmitting channel of
SCOLA TEACH, the former can be synchronised to the latter.
Press
briefly. If there are one or more SCOLA receivers within
a range of approx. 80 cm, the receiving channel will be synchronised to the transmitting channel (standard synchronisation ).
When the SCOLA receiver picks up the synchronisation signal,
the user will hear a beep, confirming the connection, even if the
receiving channel has not been changed.
The option of extended synchronisation (teacher’s synchronisation ) is also available.
20
Page 21

Microphone on/off
The microphone can be turned on and off by pressing the on/off
key briefly.
A green light will flash in the LED and the following symbol will
blink in the status bar:
Keypad lock
The keypad can be locked and unlocked by holding down the
right and left arrow keys simultaneously. Any attempt to activate
a locked key will result in the following message:
The hearing care professional
can program the keypad to lock
automatically if 1½ minutes have
elapsed without any key press.
+
Key lock is ac tive.
Hold down to u nlock.
21
Page 22

Connecting audio equipment
SCOLA TEACH can be connected to audio equipment (radio, TV,
DVD, PC, etc.) with the audio lead provided. Connect the lead
from the audio input jack of SCOLA TEACH to the headphone
jack of the audio equipment. The sound signal volume is usually
adjusted using the volume control of the audio equipment. The
microphone should also be connected, as its lead serves as an
antenna.
When the microphone is turned on, it is possible to speak over the
sound from the audio equipment. When the microphone is turned
off, only the sound from the audio equipment will be heard.
If the jack does not fit your audio equipment, a lead with phono
plugs and/or a SCART plug can be acquired as an extra accessory.
22
Page 23

Battery and charging
One AA battery is required for SCOLA TEACH. A rechargeable nickel-metal -hydride (NiMH) battery is included as a standard accessory. Ordinary non-rechargeable batteries can also be
used, in which case we recommend the alkaline type. After its
first charge, the battery charge time is ten hours, providing power
for approximately ten hours of use. Battery status is indicated
by the battery symbol in the display.
We recommend that you always have a spare battery with you in
case the rechargeable battery becomes drained.
23
Page 24

T
Team teaching
TT Ch:
13
55
H02 H06
Team Teaching function
The Team Teaching function is
available only in the SCOLA TEACH
version provided with a
key. The
Team Teaching function is activated
by holding down the
key. The
symbol appears in the display status
bar, and the transmitting channel and
Team Teaching channel (TT Ch) are
displayed.
T
Team teaching
TT Ch:
13
30!
H01 H
SCOLA TEACH automatically calculates
the risk of interference between the
transmitting and receiving channel. If
there is a risk of interference, the Team
Teaching channel will be grey, followed
by an exclamation mark.
The Team Teaching function is deactivated by holding down C or
24
.
Page 25

Team Teaching channel selection:
The TT channel is changed in the same way as the transmitting
channel.
Press and hold down the or key. Then press again to go to
another TT channel.
Pressing will allow you to change the transmitting channel and
still maintain the TT channel.
Try to find channels that are not grey.
To exit with changes, press
.
To exit without changes, press C.
25
Page 26

Table with SCOLA TEACH key functions
Hold down ( 1 second) Press
On/off key On/off Microphone on/off.
or Enable channel change
Enable TT channel
change with the TT function active*)
or Switch between transmit-
+
simultaneously
+
simultaneously
26
Channel change
ting and TT channel with
the TT function active*)
Lock / unlock keypad
Rotate display
Page 27

”OK”
Teacher’s synchronisation
Exit with changes after
channel change
Channel synchronisation
key *)
Activate/deactivate TT
function*)
C Deactivate TT function*) Exit without changes
*) Applies only to the SCOLA TEACH version with Team Teaching functio n.
27
Page 28

GOOD ADVICE
SCOLA TEACH is primarily intended for educational environments, but can also be used in other situations where noise, poor
acoustics or the like make listening difficult.
To benefit fully from the SCOLA FM system, it is important to:
• practise using the FM system and test the different settings in
familiar surroundings
• inform other people that you use an FM system with your
hearing aid, so that they can understand why they should talk
into the microphone, and how the system works
• select the right settings for SCOLA TEACH and the SCOLA
receiver(s)
28
Page 29

Listening situation Use of SCOL A TEACH and micro phone
positioning
In kindergartens /
classrooms
Lectures Check that there is no interference on the chan-
Ask the teacher to use SCOLA TEACH and position the microphone as described.
Microphone types other than omnidirectional are
available a s optional accessories to optimise the
speech signal.
For group work, or if several teachers are present, we recommend the use of the Team Teaching func tion. This requires that SCOLA TEACH is
provided with this func tion, and that an extra FM
microphone is available.
nel selected for the system. Find and select a
noise-free channel for the transmitter and
receiver.
Explain to the lecturer how SCOLA TEACH works.
Ask the lecturer to keep the microphone as close
as possible to his or her mouth.
29
Page 30

Listening situation Use of SCOL A TEACH and micro phone
positioning
At home Using the FM system at home is almost the same
In the car The SCOLA FM system is particularly effective in
as in the classroom. SCOLA TE ACH can be connected to the TV, PC, etc. via the audio lead.
With a Team Teaching version transmitter and an
extra FM microphone, e.g. a SCOLA TALK, both
parents can communicate with their child via FM.
a ca r.
The microphone should be placed as closely as
possible to the person speaking.
It is possible to listen to music from an MP3
player or the like by connecting the audio lead
from the SCOLA TEACH to the headphone jack of
the MP3 player. Leaving the microphone on
allows the child to hear music as well as any
speech into the microphone.
30
Page 31

CARE AND MAINTENANCE
In general, the SCOLA™ FM system should be cared for in the
same way as the hearing aid. It is a good idea to clean and remove
dirt and debris from the FM system on a daily basis. There are also
some special precautions which should be taken.
• Remove any dirt from SCOLA TEACH with a dry, soft cloth.
• Do not disassemble any of the SCOLA products or hearing aid,
as this will void the guarantee.
• Do not use water, alcohol or the like to clean the FM system.
• Make sure that the microphone, audio and charger cords do
not become tangled up.
• Do not expose the SCOLA FM system to cosmetics, hair spray,
water, cleaning solutions or other chemicals.
31
Page 32

WARNINGS
WARNING
• Make sure that the batteries for the hearing aid and for the SCOLA
TEACH are kept out of reach of children, who might place them in
their mouths.
• Discard used batteries carefully.
• Do not change batteries in front of children, and do not let them see
where you keep your supply.
32
Page 33

IN CASE OF MALFUNCTION
With proper use and maintenance, your SCOLA™ FM system will
give you years of reliable service. The following pages contain
some brief advice to follow if you experience problems with your
SCOLA FM system. Before contacting the hearing care professional where you acquired your SCOLA FM system, please follow
the advice below:
If there is no sound from the SCOLA FM system or the audio
equipment, or the sound is distorted, it could be because:
• The hearing aid, SCOLA TEACH or the SCOLA receiver(s) are
not set correctly.
Check to ensure that all the settings are correct for the desired
use, and that both the transmitter and receiver are turned on.
• SCOLA TEACH and the SCOLA receiver(s) are not set to the
same channel.
Check that the channel number in the display of the SCOLA
TEACH is the same as the receiving channel of the SCOLA
receiver by performing a channel synchronisation.
33
Page 34

If there is noise in the hearing aid, it could be because:
• You are at or beyond the limit of the operating range of SCOLA
TEACH.
Reduce the distance between the SCOLA TEACH and SCOLA
receiver.
• Noise and whistling are interfering with reception, possibly
because two or more FM transmitters are transmitting on the
same channel as your receiving channel.
To avoid this type of interference, make sure that only one FM
transmitter is transmitting on the receiving channel.
Try turning off your SCOLA TEACH. If you hear another FM
signal, this is what is causing the noise. There are several ways
of avoiding interference:
• Turn on one FM transmitter only.
• Find another available channel and select this channel on
both SCOLA TEACH and the SCOLA receiver.
• Increase the distance between the interfering FM transmitter
until the interference stops.
34
Page 35

If there is no sound from the audio equipment, but the sound
from the SCOLA TEACH microphone signal is okay, it could be
because:
• The audio lead is not correctly plugged into the audio jack on
the SCOLA TEACH or audio equipment.
Check that it is correctly plugged in.
• The signal from the audio equipment is too weak.
Turn up the volume of the sound signal on the audio equipment’s volume control, if possible.
If the battery is quickly drained of power even after a full charge
cycle, but the display indicates that the battery is charged, it
could be because:
• The battery is defective.
Contact the hearing care professional where the SCOLA FM
system was acquired, to have the battery changed. You can
use standard alkaline (non-rechargeable) batteries until this
is done.
35
Page 36

If the battery does not charge and the display does not indicate
that the battery is charging, it could be because:
• There is no power in the socket.
Check that the socket functions.
• The charger lead or jack is defective.
Consult the hearing care professional where the SCOLA FM
system was acquired.
• The connecting terminals on the battery are dirty or defective.
Consult the hearing care professional where the SCOLA FM
system was acquired.
WARNING
Low battery can cause the sound transmission to suddenly stop.
36
Page 37

TERMS AND DEFINITIONS EXPLAINED
Antenna
The receiver and transmitter are both provided with an antenna.
The microphone lead of SCOLA TEACH also serves as an antenna,
and should therefore always be connected, even when only the
audio input function is being used. Turn off the microphone if the
microphone signal causes disturbance.
Approval and CE marking
SCOLA TEACH and the SCOLA receiver have been tested at an EU/
FCC accredited test laboratory. The CE/FCC marking and declaration of conformity document that the products conform to the
directives and technical requirements laid down in North America
and the EU, as well as in associated countries.
The transmitter and receiver are provided with serial numbers.
37
Page 38

Battery - SCOLA TEACH
One AA battery is required for SCOLA TEACH. The rechargeable
battery included is a nickel-metal-hydride (NiMH) type battery.
It is environmentally friendly and does not contain heavy metals.
The contact surface at the negative pole ensures that only this
type of battery can be charged in SCOLA TEACH.
The lifetime of the battery depends on the number of times it is
charged. If the battery is charged daily, we recommend changing
the battery once a year to ensure optimum operating time.
Other battery types can also be used, but cannot be recharged.
38
Page 39

WARNING
If you use other types of rechargeable batteries in SCOLA TEACH than
the original, it must be charged in a separate charger.
If you use a NON-rechargeable battery, then use only high quality batteries, e.g. alkaline batteries.
Always remove ex hausted alkalin e batteries from th e battery compar tment to limit the risk of leakage.
If you try to charge alkaline batteries or other NON-rechargeable batteries or ot her rechargeable batterie s than the type included with SCOLA TEAC H, all that will happ en is that the display w ill show: “WARNING ,
the battery is not rechargeable”.
Rechargeable batteries cannot be overcharged in SCOL A TEACH.
39
Page 40

ALWAYS remember to remove the battery – irrespective of type –
if the transmitter will not be used again soon.
If you have any questions about the type, acquisition, use or disposal of batteries, please consult the hearing care professional
where you acquired your SCOLA™ FM system.
CAUTION
Batteri es that are no longe r usable shoul d be disposed of in acco rdance
with applicable environmental requirements.
Battery charging
Fully charging a drained battery takes ten hours. Before the battery is used for the first time, we recommend that it is charged
for 14 hours. Even when the battery is fully charged, the battery
symbol will continue to indicate that the battery is charging for
as long as the charger is connected. The battery cannot be overcharged.
40
Page 41

WARNING
Charger and mini USB connector:
This device can be charged by an external charger or USB device.
Only connect a charger that is compatible with the SCOLA TEACH.
The charger plug and input rating must be compatible with the AC wall
outlet in your region.
When the SCOLA TEACH is connected to external mains-operated
equipment like a charger or PC or similar, this equipment must comply
with IEC 60065, IEC 60950, IEC 60601-1 or equivalent UL safety standards.
Widex strongly recommends that you always use a charger that is supplied by your Widex distributor to ensure safe and efficient use of your
SCOLA TEACH.
41
Page 42

Battery status
The battery power level is shown in the display. Five bars indicate
that the battery is fully charged, three bars that it is half charged,
and no bars that it is almost drained (less than ½ hour of operation remaining). When the battery is almost drained, the battery symbol flashes in the display and the LED flashes red. After
a while, the transmitter will turn off. If the receiver is connected,
this can be clearly heard in the hearing aid.
For optimum battery lifetime, we recommend not recharging the
battery until the battery indication is below two bars.
42
Page 43

Channels and frequencies
SCOLA TEACH can be set to transmit on different channels. Each
channel corresponds to a specific frequency. Only channels/frequencies that are permitted in the country where the transmitter is employed may be used. SCOLA TEACH is pre-programmed
with the channels permitted in the country where it is acquired.
The channel numbers are divided into three frequency bands
indicated by “H”, “J” or “N” in the lower left-hand corner of the
display. The corresponding channel number for MicroLink equipment is displayed after these three letters. This is an advantage if
several FM systems are used simultaneously.
SCOLA TEACH can transmit sound signals on most permitted frequencies in the frequency ranges 169 MHz–176 MHz (H band), 180
MHz-187 MHz (J band) and 216 MHz-217 MHz (N band).
43
Page 44

NOTE
• Do not use two transmitters (e.g. SCOLA TEACH) on the same channel/
frequency in the same area.
• Note that there is a risk of interference from other radio communica-
tions, especially when using the system abroad.
• Please note that when travelling abroad it may not be permitted to use
the same channels as in your own country.
Channel synchronisation
The SCOLA TEACH transmitting channel can be synchronised
with the SCOLA receiver’s receiving channel in two ways.
Standard synchronisation
Press
once. This will change the receiving channel to the same
one as the transmitting channel. For this type of synchronisation, the distance between the SCOLA TEACH and SCOLA FLEX or
SCOLA BUDDY should be approximately 10-80 cm. The FM user
will hear a beep tone when synchronisation is complete.
44
Page 45

Teacher’s settings and Teacher’s synchronisation
The SCOLA TEACH transmitter can wirelessly synchronise SCOLA
FLEX with what we call the Teacher’s settings.
These Teacher’s settings are temporary, and can only be reset by
switching the hearing aid off and on.
The purpose of this is to prevent small children from operating the
mode switch and scan button on the SCOLA FLEX receiver during
classes. These settings can be activated without any risk of altering the settings entered by the hearing healthcare professional.
45
Page 46

To set up the Teacher’s settings:
Access“Teacher’smenu”bypressingtheCkeyandthe key
simultaneously
Press
toselect“SyncSettings”
Withthearrowkeysselectswitchandscanbuttonsettingsand
press
Leave “Teacher’s menu” by pressing C.
To perform a Teacher’s synchronisation:
From the standard “user mode”, hold down
for about 1 sec.
This will synchronise the receiving channel with the transmitting
channel, mode switch and scan button settings.
When a Teacher’s synchronisation is performed within the reply
range of 10 to 30 cm, the settings of the SCOLA FLEX will be
shown in the SCOLA TEACH display.
46
Page 47

If a Teacher’s synchronisation is performed at a distance of
approximately 30 cm-80 cm, the teacher’s synchronisation will
still take place, and a beep-tone will be heard in the hearing aid.
However, the SCOLA TEACH display will indicate that the receiver
is outside its reply range, and it will not show the detailed settings.
NOTE
The optimal operating range is achieved by holding the SCOLA TEACH
vertically – NOT horizontally, as you might with an ordinary remote control.
FM system
An FM system is a radio communication system in which a transmitter sends signals to a receiver via carrier waves. ”FM” stands
for “frequency modulation” and is a technical term for the way in
which the radio signal is produced. FM transmission ensures high
quality reception without any noise, hum or distortion.
If you have two hearing aids, they should both have a receiver.
47
Page 48

NOTE
Do not use SCOLA on aircraft or in hospitals without permission.
Interference
Interference occurs when signals from two transmitters on the
same frequency are mixed in the same receiver. When the signals are equally strong, the interference will be most noticeable.
The further away one transmitter is from the receiver compared
to the other transmitter, the weaker the disturbing noise will be.
Interference can be avoided by selecting another transmitting
and receiving channel. Any potential risk of interference may be
detected if the Channel Tracer function is active. Channel Tracer is
a function in the Teacher’s menu. Consult your hearing care professional for further information.
48
Page 49

Microphones for SCOLA TEACH
Omnidirectional lapel microphone: Standard microphone
included with SCOLA TEACH. The microphone is equally sensitive
to sound from all directions.
The following microphones are available as optional accessories:
Directional lapel microphone: Designed for noisy environments;
more sensitive to sounds from one direction.
Headset microphone: Designed for especially noisy environments. It should be placed 2-3 cm from the mouth of the speaker.
The advantage of this microphone type is that its signal remains
unchanged even if the person speaking turns his or her head.
All microphones for SCOLA TEACH are provided with a 2.5 mm
jack.
49
Page 50

Operating range
The operating range of the FM system is highly dependent on
the surroundings, including construction materials. The optimum
operating range of 20-30 metres can be obtained in the open and
with the microphone lead hanging freely. Inside buildings with
steel and concrete walls and floors, the operating range may be
reduced to ten metres. The position of the SCOLA receiver will
also affect the range.
CAUTION
Note that what is being transmitted from SCOLA TEACH may possibly
be picked up by another FM system.
50
Page 51

Phono / SCART plugs
If the 3.5 mm jack of the audio lead does not fit the audio equipment, an additional lead should be acquired. Phono plugs are
widely used with CD players, stereo systems, etc., and a SCART
plug can be used with television sets or video equipment provided with a SCART connection. Connect the leads and plugs in
the following way:
Audio lead <-> lead with phono/SCART plugs <-> SCART connection.
WARNING
Audio connector (3.5 mm jack):
The safety of the use of SCOLA TEACH is determined by any external
equipment that is connected to the SCOLA TEACH via the audio connector. When SCOLA TEACH is connected to external mains-operated
equipment via the audio connector, this equipment must comply with
IEC60065, IEC60950, IEC 60601-1 or equivalent safety standards.
51
Page 52

Team Teaching function (SCOLA TEACH with Team Teaching
only)
When the Team Teaching function is active, the signal from the
team microphone (an extra FM microphone such as SCOLA TALK)
will be relayed to one or more SCOLA receivers along with the
microphone signal from SCOLA TEACH. This allows two persons,
e.g. two parents or teachers, to be in contact with one or several
FM users at the same time.
With the team microphone’s audio input connected to a TV or
audio equipment, the sound signal is sent wirelessly to the student, who can simultaneously hear what the teacher is saying.
52
Page 53

Additional technical information:
SCOLA TEACH has a built-in FM receiver which enables Team
Teaching. The channel used for the receiver and the team microphone must be the same. This channel can be selected in the
Team Teaching menu.
Reception on the Team Teaching ch annel is only possi ble if the frequency distance between the SCOLA TEACH transmitting channel
and the Team Teaching receiving channel is sufficiently large. This
distance is calculated by a program integrated in SCOLA TEACH.
If the frequency distance is too small, the Team Teaching channel
number will have a grey appearance with an exclamation mark,
indicating that there is a risk of interference .
If the channel for the team microphone cannot be changed,
another transmitting channel can be selected until the warning
disappears.
53
Page 54

WARRANTY
A warranty of two years is provided. The warranty covers
any defects in manufacture or materials. Defects arising from
improper handling or repairs carried out by an unauthorised
party are not covered by this warranty.
54
Page 55

Directive 1999/5/EC
Hereby, Widex A/S declares that this SCOLA TEACH44 and
SCOLA TEACH33 are in compliance with the essential requirements and other relevant provisions of Directive 1999/5/EC.
A copy of the Declaration of Conformity according to 1999/5/EC
can be found at:
http://www.widex.com/doc
55
Page 56

REGULATORY INFORMATION
FCC ID: BRG-871T
IC: 5676A-871T
Federal Communications Commission Statement
This device complies with part 15 of the FCC Rules. Operation is subject
to the following two conditions:
(1) This device may not cause harmful interference, and
(2) this device must accept any interference received, including
interference that may cause undesired operation.
NOTE:
This equipment has been tested and found to comply with the limits
for a Class B digital device, pursuant to part 15 of the FCC Rules. These
limits are designed to provide reasonable protection against harmful
interference in a residential installation. This equipment generates, uses
and can radiate radio frequency energy and, if not installed and used
in accordance with the instructions, may cause harmful interference to
56
Page 57

radio communications. However, there is no guarantee that interference
will not occur in a particular installation. If this equipment does cause
harmful interference to radio or television reception, which can be
determined by turning the equipment off and on, the user is encouraged
to try to correct the interference by one or more of the following
measures:
— Reorient or relocate the receiving antenna.
— Increase the separation between the equipment and receiver.
— Connect the equipment into an outlet on a circuit different from that
to which the receiver is connected.
— Consult the dealer or an experienced radio/TV technician for help.
NOTE:
This equipment complies with FCC radiation exposure limits set forth for
an uncontrolled environment. This transmitter must not be co-located or
operating in conjunction with any other antenna or transmitter.
Changes or modifications to the equipment not expressly approved by
Widex could void the user’s authority to operate the equipment.
57
Page 58

Industry Canada Statement / Déclaration d’industrie Canada
Under Industry Canada regulations, this radio transmitter may only
operate using an antenna of a type and maximum (or lesser) gain
approved for the transmitter by Industry Canada.
To reduce potential radio interference to other users, the antenna
type and its gain should be so chosen that the equivalent isotropically
radiated power (e.i.r.p.) is not more than that necessary for successful
communication.
This device complies with Industry Canada licence-exempt RSS
standard(s). Operation is subject to the following two conditions:
(1) this device may not cause interference, and
(2) this device must accept any interference, including interference that
may cause undesired operation of the device.
58
Page 59

Conformément à la réglementation d’Industrie Canada, le présent
émetteur radio peut fonctionner avec une antenne d’un type et d’un
gain maximal (ou inférieur) approuvé pour l’émetteur par Industrie
Canada.
Dans le but de réduire les risques de brouillage radioélectrique à
l’intention des autres utilisateurs, il faut choisir le type d’antenne et
son gain de sorte que la puissance isotrope rayonnée équivalente
(p.i.r.e.) ne dépasse pas l’intensité nécessaire à l’établissement d’une
communication satisfaisante.
Le présent appareil est conforme aux CNR d’Industrie Canada
applicables aux appareils radio exempts de licence. L’exploitation est
autorisée aux deux conditions suivantes :
(1) l’appareil ne doit pas produire de brouillage, et
(2) l’utilisateur de l’appareil doit accepter tout brouillage radioélectrique
subi, même si le brouillage est susceptible d’en compromettre le
fonctionnement.
59
Page 60

Electrical and electronic equipment (EEE) contains
materials, components and substances that can be
hazardous and present a risk to human health and
the environment when waste electrical and electronic equipment (WEEE) is not handled correctly.
Do not dispose of hearing aids, hearing aid accessories and batteries with ordinary household waste.
Hearing aids, batteries and hearing aid accessories should be
disposed of at sites intended for waste electrical and electronic
equipment, or given to your hearing care professional for safe
disposal. Proper disposal helps to protect human health and the
environment.
60
Page 61

SYMBOLS
Symbols commonly used by Widex A/S in medical device labelling
(labels/IFU/etc.)
Symbol Title/Description
Manufacturer
The product is produced by the manufacturer whose name
and address are stated next to the symbol. If appropriate,
the date of manufacture may also be stated.
Date of manufacture
The date when the product was manufactured.
Use-by date
The date after which the product is not to be used.
Batch code
The product’s batch code (lot or batch identification).
61
Page 62

Symbol Title/Description
Catalogue number
The product’s catalogue (item) number.
Serial number
The product’s serial number.*
Keep away from sunlight
The product must be protected from light sources and/or
The product must be kept away from heat
Keep dry
The product must be protected from moisture and/or The
product must be kept away from rain
Lower limit of temperature
The lowes t temperature to which the produc t can be safely
exposed.
62
Page 63

Symbol Title/Description
Upper limit of temperature
The highest temperature to which the product can be
safely exposed.
Temperature limits
The highest and lowest tempe ratures to which the product
can be safely exposed.
Consult instructions for use
The user instructions contain important cautionary information (warnings/precautions) and must be read before
using the product.
Caution/Warning
Text marked with a caution/warning symbol must be read
before using the product.
63
Page 64

Symbol Title/Description
WEEE mark
“Not for general waste”
When the product is to be discarded, it must be sent to a
designated collection point for recycling and recovery.
CE mark
The product is in conformity with the requirements set out
in European CE marking directives.
Alert
The product is identified by R&TTE Directive 1999/5/EC as
an equipment Class 2 product with some restrictions on
use in some CE member states.
C-Tick mark
The product complies with EMC and radio spectrum
regulatory requirements for products supplied to the
Australian or New Zealand market.
64
Page 65

Symbol Title/Description
Interference
Electromagnetic interference may occur in the vicinity of
the product.
*The six- or seven-digit number on the product is the serial number. Serial numbers may not always be preceded by
65
Page 66

SETTINGS
Serial number: ______________________________
Gain adjustment: ____________________________
66
Page 67

67
Page 68

WIDEX A /S Nymoellevej 6, DK-3540 Lynge, Denmark
www.widex.com
Manual no.:
9 514 0197 001 #05
Issue:
2015-10
É[5qr0q9|j;;a;l]
 Loading...