

Page 1

RC3-1
User’s instructions
RC3-1 remote control
Page 2
e remote control and any other parts shown in
these user’s instructions may not look the same as
the one(s) you have. We furthermore reserve the
right to make any changes considered necessary.
Hearing aids and their accessories should
not be disposed of with normal household waste. Please consult your national
Widex distributor for advice on how to
dispose of your hearing aid.
2
Page 3

Contents
Your new RC3-1 remote control . . . . . . . . . . . . . . . . . . . . . . 4
RC3-1 . . . . . . . . . . . . . . . . . . . . . . . . . . . . . . . . . . . . . . . . . . 6
The battery . . . . . . . . . . . . . . . . . . . . . . . . . . . . . . . . . . . . . . . 8
Battery type . . . . . . . . . . . . . . . . . . . . . . . . . . . . . . . . . . . . 8
Inserting the batteries . . . . . . . . . . . . . . . . . . . . . . . . . . . . 9
Changing the batteries . . . . . . . . . . . . . . . . . . . . . . . . . . . 9
Turning the remote control on and off. . . . . . . . . . . . . . . . . 10
Initial setting . . . . . . . . . . . . . . . . . . . . . . . . . . . . . . . . . . 10
The volume . . . . . . . . . . . . . . . . . . . . . . . . . . . . . . . . . . . . . 11
Mute . . . . . . . . . . . . . . . . . . . . . . . . . . . . . . . . . . . . . . . . 14
Listening programs. . . . . . . . . . . . . . . . . . . . . . . . . . . . . . . . 16
Short-term logging. . . . . . . . . . . . . . . . . . . . . . . . . . . . . . . . 20
Caring for your remote control. . . . . . . . . . . . . . . . . . . . . . . 21
Good advice . . . . . . . . . . . . . . . . . . . . . . . . . . . . . . . . . . . . . 23
In case of malfunction . . . . . . . . . . . . . . . . . . . . . . . . . . . . . 24
Accessories . . . . . . . . . . . . . . . . . . . . . . . . . . . . . . . . . . . . . . 25
Regulatory conformity . . . . . . . . . . . . . . . . . . . . . . . . . . . . . 28
3
Page 4

Your new RC3-1 remote control
We hope you will be pleased with the remote control for your Widex hearing aid. We have included
these user’s instructions to explain how your remote
control should be operated. We recommend that
you read the entire booklet to get full satisfaction
from your new RC3-1 remote control.
4
Page 5

Your RC3-1 remote control is an accessory for your
hearing aid. You can easily operate your hearing aid
without the remote control; it is just an alternative
way of operating your hearing aid. e advantages of
a Widex RC3-1 remote control are:
• Unlike the buttons on your hearing aid when it
is placed in/on the ear, you can easily see the keys
on the remote control.
• e larger keys on the remote control are easier to
manipulate than the small buttons on the hearing
aid.
• e remote control enables you to operate your
hearing aid discreetly, e.g. from your pocket or
handbag.
• You can adjust the volume and choose programs
for a CIC hearing aid.
5
Page 6
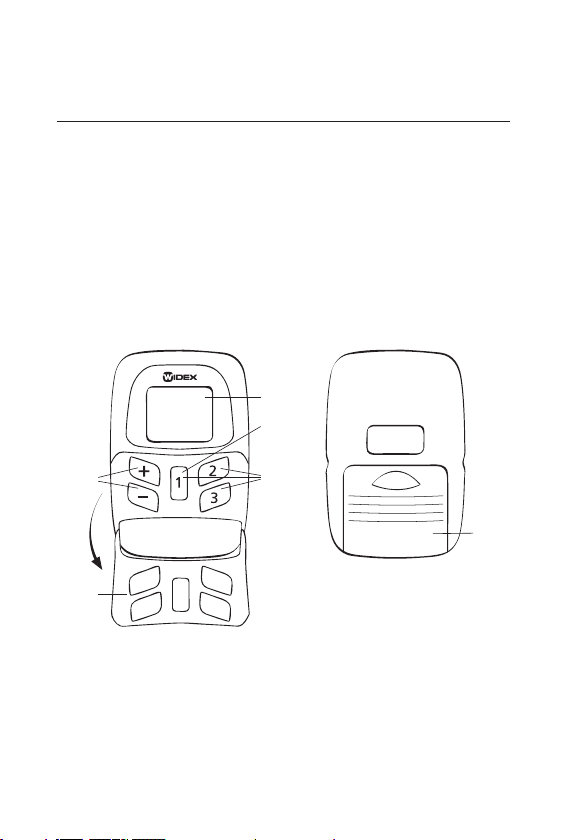
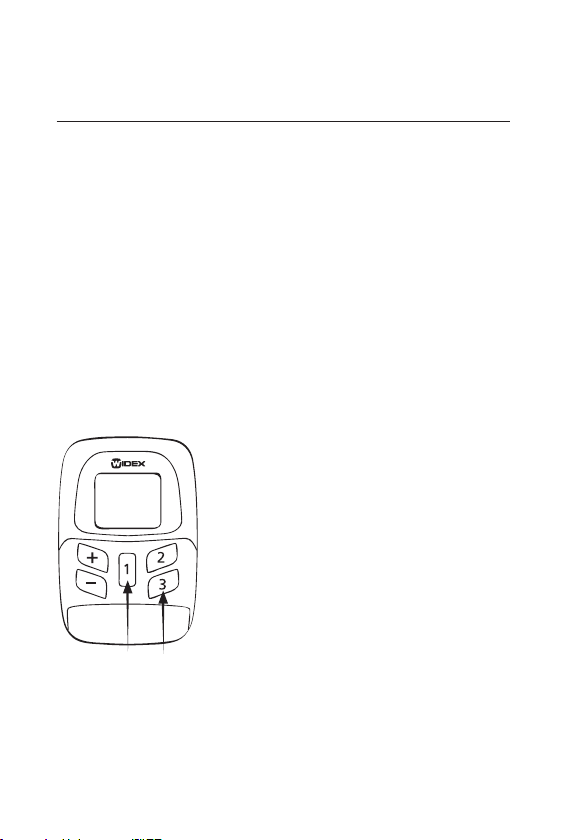
RC3-1
Your RC3-1 remote control is a small computer that
contains data for the diff erent hearing aid settings.
It also contains a radio transmitter, which sends
messages to the hearing aid. e remote control and
hearing aid do not need to be in view of each other.
e operating range is approximately 1 metre.
4.
3.
1.
5.
2.
6.
6
Page 7

1. Volume control. e [+] and [–] keys are used for
volume adjustment.
2. Program selection. e [
1], [2] and [3] keys are
used for program selection. Your RC3-1 can op-
erate a maximum of three programs.
3. On/off function. e [
the remote control. e [
1] key is used to turn on
1] key also sets the re-
mote control to the initial setting: P1 V9.
4. Display. is shows the currently selected pro-
gram (P), volume (V ) and the remote control’s
battery level.
5. Transparent key guard with holes for the keys.
With the cover closed, the risk of accidental key-
presses is reduced. e key guard can be fl ipped
open to make the remote control a little longer
and easier to hold. e keys are then higher and
easier to feel.
6. Battery cover.
7
Page 8

The battery
Battery type
e recommended battery type for your RC3-1 remote control is:
Lithium CR 2032
Your RC3-1 uses two CR2032 batteries.
To obtain replacement batteries, please consult your
hearing care professional. Please note the expiry
date and the recommendations regarding disposal
of used batteries on the battery pack. e battery
life will depend on how much you use your remote
control.
8
Page 9
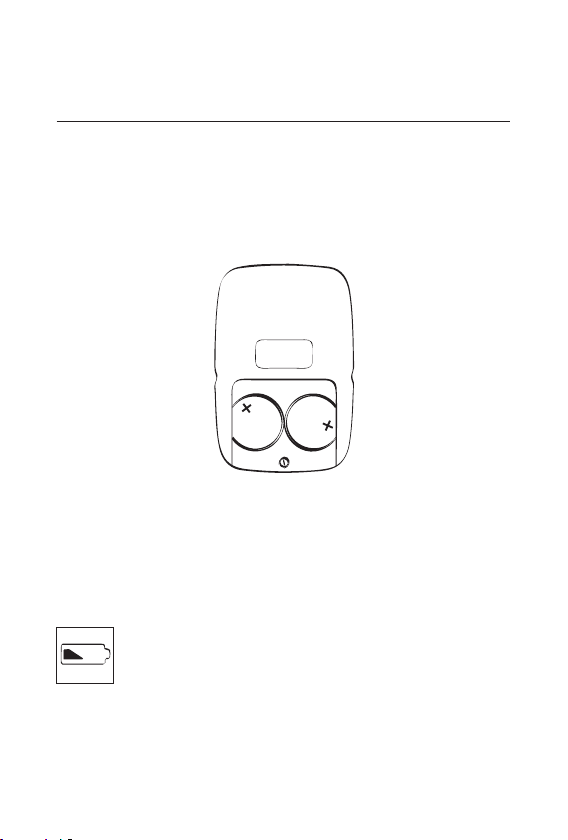
Inserting the batteries
e plus (+) sign on the batteries for your RC3-1
must face upwards when placed in the battery compartment.
Changing the batteries
Always change both batteries at the same time. e
display shows the battery level of the remote control.
When the battery is nearly exhausted, this
symbol will be continuously displayed. If
the symbol is only briefl y displayed, you
need not change the batteries.
9
Page 10
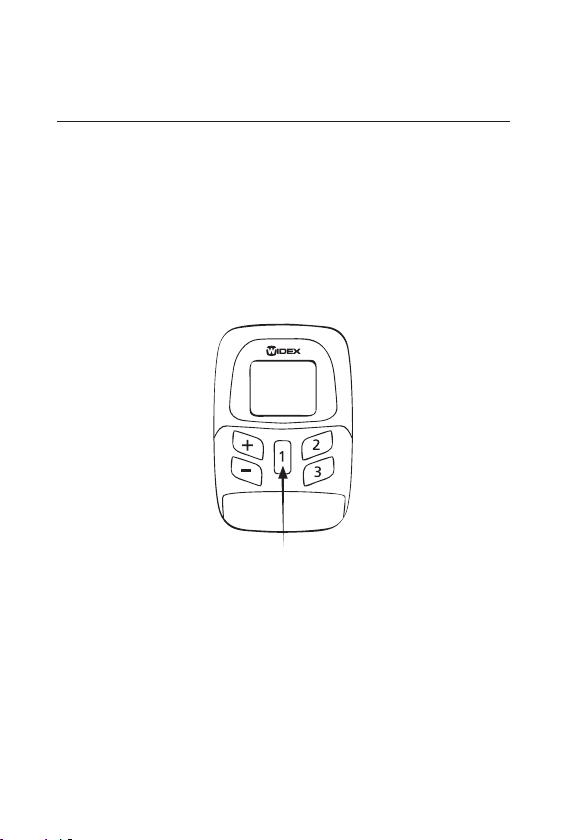
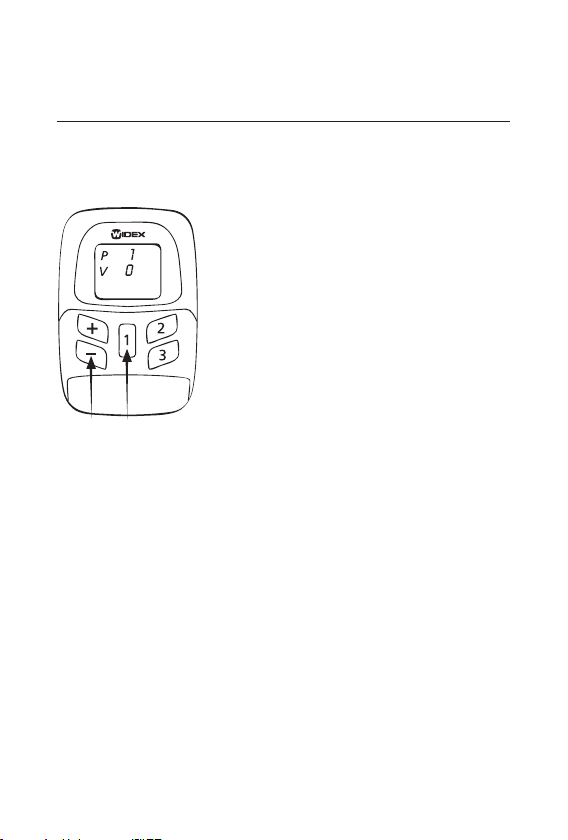
Turning the remote control on and off
e RC3-1 remote control is turned on when the
[
1] key is pressed for approximately ½ second. As
standard, it will automatically turn off after 15 seconds. Your hearing care professional can help you
select another time-out setting, if required.
Initial setting
When your RC3-1 is turned on, you can set the instrument to the initial setting, P1 V9, by pressing
the [
1] key for approximately 2 seconds.
10
Page 11
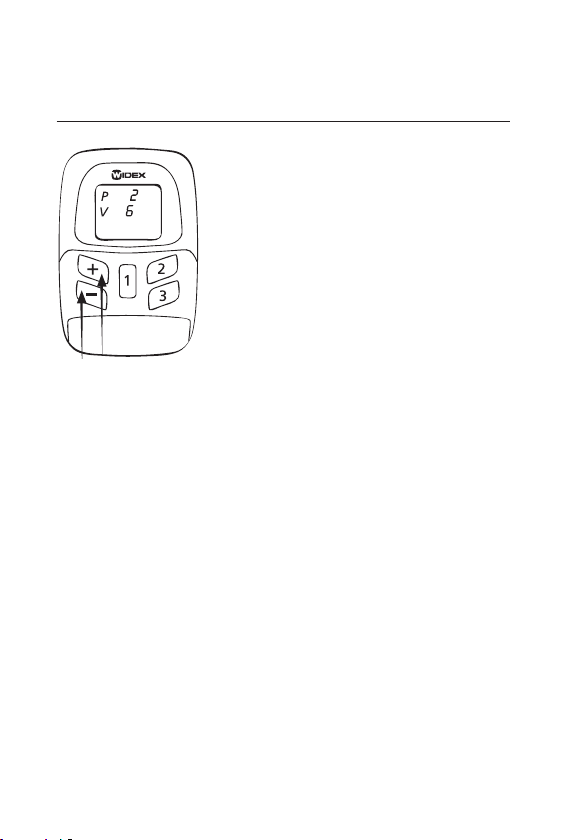
The volume
e [+] [–] keys allow you to adjust the volume in 13 steps. e
minimum level is 0, at which level the hearing aid is completely
silent, and the maximum level
is 13. e initial volume setting
used as standard is 9, and this
is always the volume setting to
which the remote control reverts.
If, for example, you have selected listening program
2 and volume level 6, and then change to another
listening program, the volume level will automatically change to 9.
You can adjust the volume one step at a time by single key presses, or you can hold the [
down until the required volume has been reached.
+] or [–] key
11
Page 12

Adjusting the volume if you only have one hearing
aid
e starting point is a turned off
remote control starting up in pro-
gram 1 at volume level 9. Press the
[
1] key for approximately ½ sec-
ond. e initial setting, P1 V9,
should now be displayed. Use the
[
+] [–] keys to adjust the volume
as required. e remote control
automatically turns off after ap-
proximately 15 seconds.
12
Page 13

Adjusting the volume if you have two hearing aids
e starting point is a turned off
remote control starting up in pro-
gram 1 at volume level 9. Press
the [
1] key for approximately ½
second. e initial setting, P1
V9, should now be displayed.
Use the [
+] [–] keys to adjust the
volume as required. Your choice
will then apply to both of your
hearing aids. e remote control
automatically turns off after ap-
proximately 15 seconds.
13
Page 14

Mute
You can also use your RC3-1 to mute your hearing
aid completely.
Using the mute function if you only have one
hearing aid
e starting point is a turned off
remote control starting up in pro-
gram 1 at volume level 9. Press the
[
1] key for approximately ½ sec-
ond. en press and hold down
the [
1] key while pressing the [–]
key. e number 0 is displayed
next to V. To turn up the volume
again, press the [
+] key. is will
reset the volume to the initial
setting (9).
14
Page 15
Using the mute function if you have two hearing
aids
e starting point is a turned off
remote control starting up in pro-
gram 1 at volume level 9. Press the
[
1] key for approximately ½ sec-
ond. e initial setting, P1 V9,
should now be displayed. en
press and hold down the [
while pressing the [
1] key
–] key. e
number 0 is displayed next to V.
is value applies to both hear-
ing aids.
15
Page 16
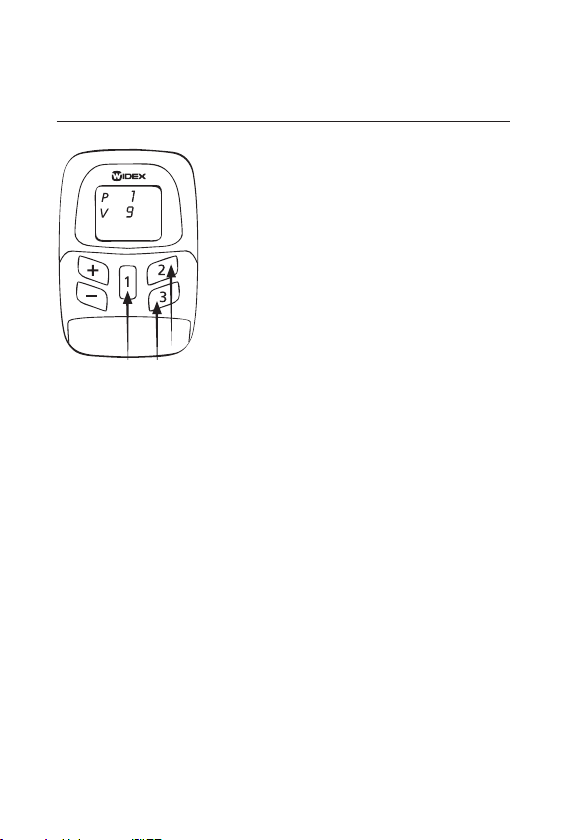
Listening programs
With your RC3-1 remote con-
trol, you can choose between
up to three listening programs.
Together with your hearing care
professional you should have es-
tablished which programs are of
use to you. If your needs change
over time, the combination of lis-
tening programs can be changed.
You can switch between the listening programs by
using the [
next to P (program) in the display tells you which
program you have chosen. You will also hear beeps
indicating choice of program.
e beeps indicate:
Program 1: One brief beep
Program 2: Two brief beeps
Program 3: ree brief beeps
e number of beeps depends on how many programs
you - together with your hearing care professional have chosen to have in your hearing aid. In these instructions, you and your hearing care professional can
make a note of the programs you have chosen.
1], [2] and [3] keys. e number shown
16
Page 17

Program Program name in
the hearing aid
1
2
3
Comments
17
Page 18
Selecting a listening program if you only have one
hearing aid
e starting point is a turned off
remote control starting up in pro-
gram 1 at volume level 9. Press
the [
1] key for approximately ½
second. Select the listening pro-
gram you wish to apply using the
[
1], [2] and [3] keys. e remote
control automatically turns off
after approximately 15 seconds.
Selecting a listening program if
you have two hearing aids
e starting point is a turned off
remote control starting up in pro-
gram 1 at volume level 9. Press
the [
1] key for approximately ½
second. Select the listening pro-
gram you wish to apply using the
[
1], [2] and [3] keys. Your choice
will then apply to both hearing
aids. e remote control automatically turns off after approximately 15 seconds.
18
Page 19

Important: Please note that if you alternate between
using your remote control and the controls on your
hearing aid to adjust the volume and select listening
programs, the remote control will cancel any adjustments that have been made manually on your hearing aid.
An example: You adjust the volume or select a listening program on the remote control. en the remote
control turns off . If you now change the volume setting and listening program by means of the controls
on your hearing aid and turn your remote control
back on, the hearing aid will be reset to the settings
chosen before the remote control turned off and you
changed the settings manually on your hearing aid.
19
Page 20
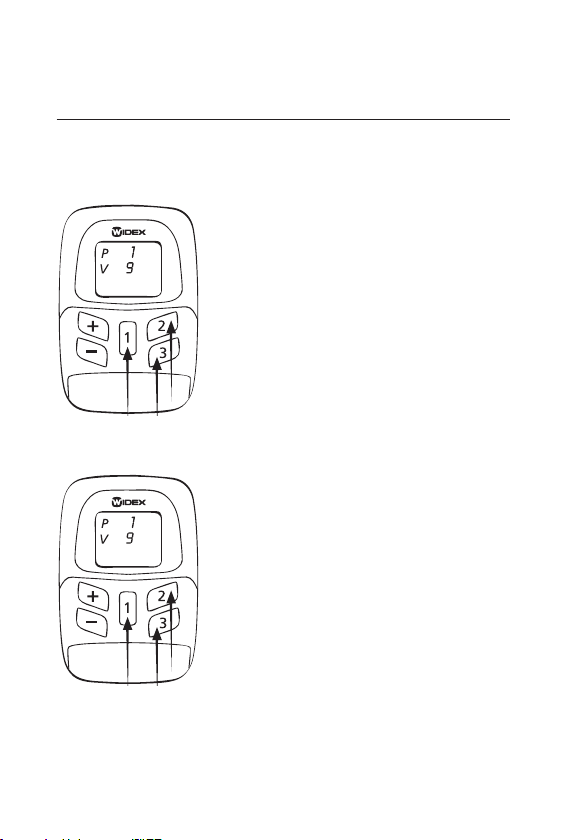
Short-term logging
If switched on by your hearing care professional, the
short-term logging function in your RC3-1 remote
control allows you to record a specifi c, problematic
listening situation. e hearing care professional can
then analyse the recorded situation using special
software. e remote control is used to start the recording. e recording is made through the hearing
aid and lasts one minute.
To start recording:
Press and hold down the centre
key [1] of the activated or de-
activated remote control while
pressing the lower right key [3].
Your hearing aid will start re-
cording the acoustic situation
you are in. e remaining time of
the short-term logging is shown
in the remote control display. When you use the
short-term logging function again, your previous
recording will be replaced by the new recording.
20
Page 21
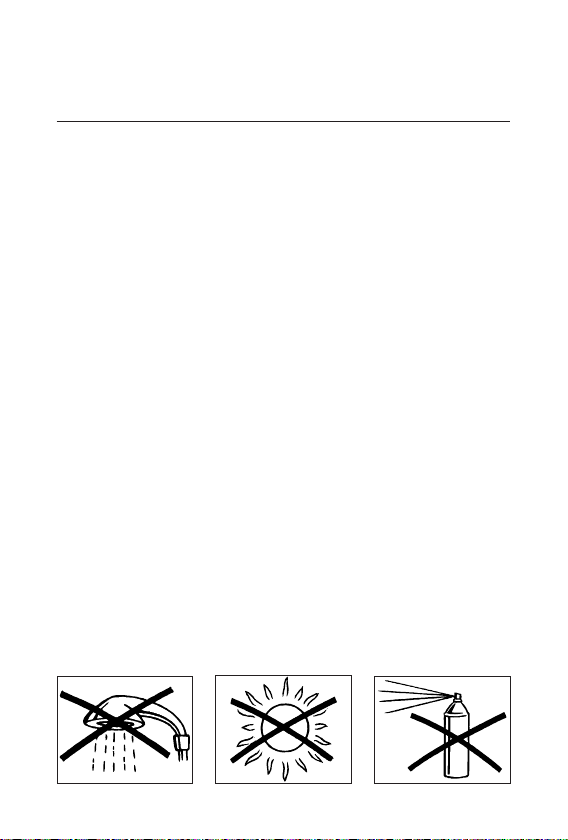
Caring for your remote control
With proper care, your RC3-1 remote control will
give you a long life of reliable service. Here are some
things you can do to prolong the life of your remote
control:
• Treat your remote control as the valuable object
it is: with care. When it is not in use, keep it in a
cool, dry location where it cannot be reached by
children or pets.
• Do not expose it to extreme temperatures or high
humidity.
• Never try to open or repair your remote control
yourself.
• Clean the remote control with a soft cloth. Never
wash your remote control with water, cleaning
solutions or other liquids.
21
Page 22

• Do not carry your remote control with you dur-
ing x-ray, MR scans, CT scans, short-wave diathermy, or similar radiation treatments and never
place your remote control in a microwave oven.
ese are some of the types of radiation that can
damage your remote control. Radiation from, for
example, room surveillance equipment, burglar
alarms and cellular telephones is weaker and will
not damage your remote control.
• e RC3-1 remote control is not certifi ed for use
in mines or other areas with explosive gases.
22
Page 23

Good advice
• Please be sure to keep your remote control and its
parts and accessories out of the reach of children,
who might place them in their mouths. Also keep
batteries out of children’s reach and discard used
batteries carefully. Do not change batteries in
front of children and do not let them see where
you keep your supply.
• Never put a battery in your mouth for any reason
as you may risk swallowing it. In case of ingestion, contact your physician immediately.
23
Page 24

In case of malfunction
e following pages include some quick advice to
follow if you experience problems. Before contacting your hearing care professional, please follow the
advice below:
If your RC3-1 does not work, it could be because:
• Nothing happens when you press the keys. Flip
open the key guard to facilitate access to the
keys.
• e batteries have not been inserted correctly.
Remove both batteries and reinsert them.
• e batteries are exhausted. Change the batter-
ies.
• e battery in your hearing aid is exhausted.
Change the battery.
• e connection between your hearing aid(s) and
remote control is unstable. Turn your hearing
aid(s) off and on.
24
Page 25

Accessories
e following accessories are available for your
RC3-1:
• Clip version of the battery cover
• Case for the remote control
• Carrying strap for the clip version of the battery
cover
Clip version Case
Carrying strap
25
Page 26

e clip version has a built-in clip for fastening the
RC3 to your belt or waistband, and an eye in which
you can fasten the carrying strap if you want to carry
the RC3 around your neck.
Changing the battery cover
If you want to replace the stan-
dard battery cover with the clip
version, you must also replace the
small screw below the battery
cover. Once the screw has been
removed, you can mount the clip
version battery cover using the
long screw (see illustration) sup-
plied with this cover.
Mount the battery cover by positioning it as illustrated. Now it is easy to push the cover into place.
26
Page 27

27
Page 28

Regulatory conformity
Declaration of conformity
We Widex A/S
Ny Vestergaardsvej 25
3500 Vaerloese
Denmark
declare under our sole responsibility that the
Class 2 products:
Series: RC3
Starting with serial no. 10000
Models: RC3-1 Remote control
RC3-2 Remote control
are in conformity with the relevant requirements of:
R&TTE Directive 1999/5/EC of 9 March 1999
and the following standards:
EN 300 330-2 V1.1.1
EN 301 489-1 V1.4.1 and EN 301 489-3 V1.4.1
EN 60601-1-2:2001
IEC 60601-1-2:2001
Vaerloese, 02 December 2008
Place and date of issue Jan Tøpholm
President
28
Page 29

Within the EU, the product is intended for use in
the following member states:
AT BE BG CY CZ
DE DK EE ES FI
FR GB GR HU IE
IT LT LU LV MT
NL PL PT RO SI
SE SK
29
Page 30

30
Page 31

31
Page 32
WIDEX A/S
Denmark
đ
Nymoellevej 6, DK-
3540 Lynge
đ
www.widex.com
¡9 514 0065 001«¤ ¡#03|¤
Printed by HTO / 2009-01
9 514 0065 001 #03
 Loading...