

Page 1

USER INSTRUCTIONS
The MeNU™ SerieS
ME-X model
In-the-ear
Page 2

YOUR WIDEX HEARING AID
(To be filled out by the hearing care professional)
MENU
MENU
MENU
Date: ______________________________________
Battery size: 312
Vent
Novent
2 3
Page 3
Programs:
6 Master
Music
TV
T
MT
Standard
Acclimatisation
AudibilityExtender
Zen
Page 4

CONTENTS
DESCRIPTIONOFTHEHEARINGAID................................
Rightleftidentification............................................
Acousticindicators ...............................................
Thebattery ......................................................
Insertingthebattery ...........................................
Lowbatteryindication..........................................
Turningthehearingaidonandoff.................................
Positioningthehearingaid .......................................
Removingthehearingaid ........................................
Volumeadjustment ..............................................
Listeningprograms...............................................
Switchingbetweenthelisteningprograms .......................
CLEANING .....................................................
Thehearingaid ..................................................
Thesoundoutlet .................................................
Thevent .........................................................
NANOCAREWAXGUARD........................................
ChangingtheNanoCarewaxguard................................
4
Page 5

ACCESSORIES ..................................................
INCASEOFMALFUNCTION ......................................
CARINGFORYOURHEARINGAID ................................
WARNINGS....................................................
ADVICE ........................................................
SYMBOLS ......................................................
Page 6
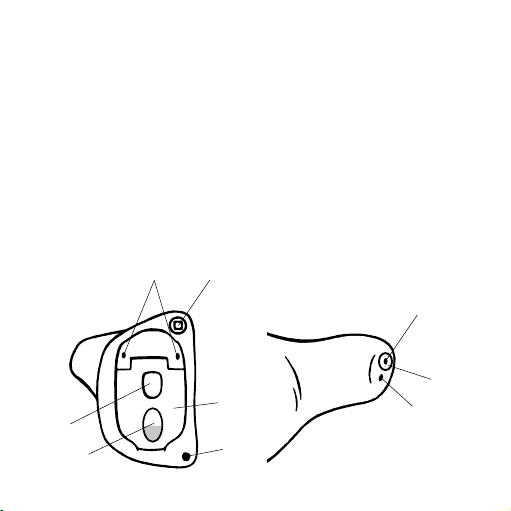
DESCRIPTION OF THE HEARING AID
1. Microphone openings
2. Volume control
3. Program button
4. On/off function
5. Nail grip
6. Sound outlet
7. NanoCare wax guard
8. Vent (Not in all versions).
1.
2.
6.
4.
3.
5.
8.
6 7
7.
8.
Page 7
Your hearing aid may be provided with a listening program called
Zen. It makes musical tones (and sometimes a rushing noise)
in the background. These sounds are shaped according to your
hearing loss.
If you need help to identify the serial number (usually six or seven digits)
on the product, please contact your hearing care professional.
WARNING
This booklet contains important information and instructions. Please
read this booklet carefully before you start using the hearing aid.
NOTE
Your hearing aid and accessories may not look exactly as illustrated in
this boo klet. We also res erve the right to ma ke any changes con sidered
necessary.
Page 8

Intended use
The hearing aids are intended as air conduction amplification
devices to be used in everyday listening environments. The hearing aids may be provided with the Zen program intended to provide a relaxing sound background (i.e. music/noise source) for
adults who desire to listen to such a background in quiet.
Indications for use
The devices are indicated for individuals with a range of hearing
loss severity from minimal (10 dB HL) to severe (80 dB HL) and all
hearing loss configurations.
They are to be programmed by licensed hearing care professionals (audiologists, hearing aid specialists, otolaryngologists) who
are trained in hearing (re)habilitation.
8 9
Page 9
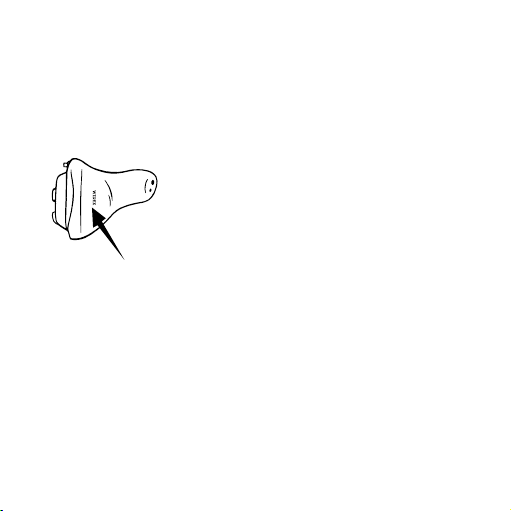
Right/left identification
If you are wearing hearing aids in both ears, it is easy to tell them
apart as the right-ear hearing aid has a red Widex logo, and the
left-ear hearing aid a blue logo.
The arrow shows the position of the logo.
Page 10

Acoustic indicators
The hearing aid may be set to produce a signal to indicate the
use of certain functions. The signal may be tones (SmartTone) or
a spoken message (SmartSpeak)*. The signal can also be deactivated.
Functions
Adjusting volume Tone Off
Confirming program button use
Changing program Tones Mess age/off
Starting up the hearing aid Tone Mess age/off
Warning about low battery 4 tones Mess age/off
Service reminder Off Message
* SmartSpeak not available as a standard feature
Default
settings
Clicking
sound
10
Other
settings
Off
Page 11
The battery
We recommend zinc-air batteries. Use a size 312 battery for the
hearing aid.
To obtain replacement batteries, please consult your hearing care
professional. It is important to take note of the expiry date and
the recommendations on the battery pack regarding disposal of
used batteries. Otherwise there is a risk that the battery life may
be reduced.
Inserting the battery
Before inserting a new battery into the hearing
aid, remember to remove the adhesive tab. Once
the tab has been removed, the battery will start
functioning after a few seconds.
Page 12

CAUTION
Do not use b atteries if there is a s ticky residue f rom the tab or other un wanted substance, as this can cause the hearing aid to malfunction.
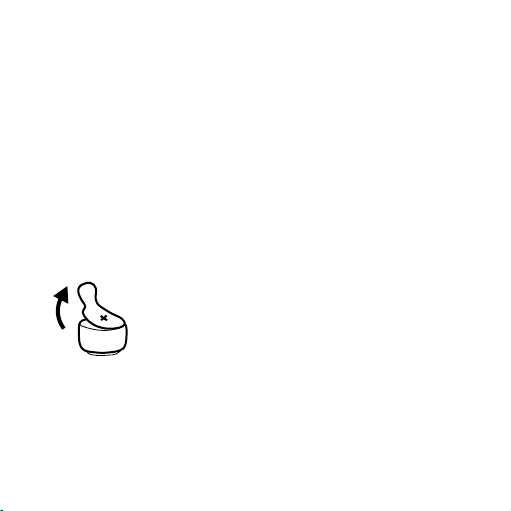
Use the nail grip to push the battery compartment cover downwards and open the
cover. Do not press the battery compartment
cover beyond the open position.
12
Page 13
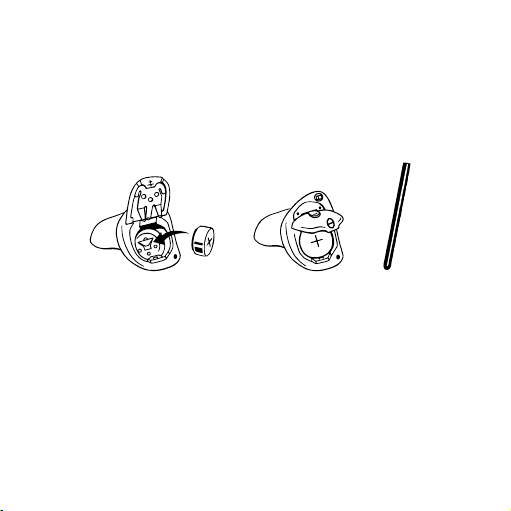
Place the battery so that the plus (+) sign of the battery faces
upwards.
You can use the battery magnet provided to steer the battery into
place.
If the battery compartment cover does not close easily, the battery is incorrectly inserted.
When changing battery, it is a good idea to hold the hearing aid
over a table.
Page 14

Low battery indication
An acoustic indicator will sound when the battery is nearly
exhausted, unless this function has been disabled (see page
10). We recommend that you always have a spare battery
with you.
WARNING
Never leave an exhausted batter y in the hearing aid. Exhaus ted batter-
ies may leak, damaging the hearing aid.
WARNING
Your hearing aid may stop functioning, for instance if the battery is exhausted. You should be aware of this possibility, in particular when you
are in traffic or are otherwise dependent on warning signals.
14 15
Page 15
Turning the hearing aid on and off
The batter y compartment cover of your hearing aid also functions
as the on/off switch.
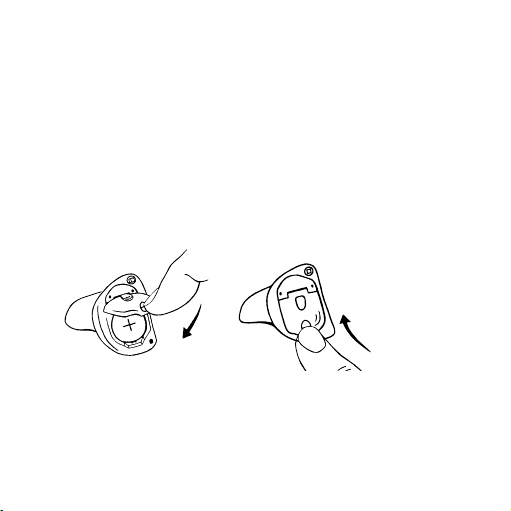
Close the battery compartment cover and push it upwards to turn
the hearing aid on. An acoustic indicator will indicate that the
hearing aid has been switched on unless this function has been
disabled.
Page 16
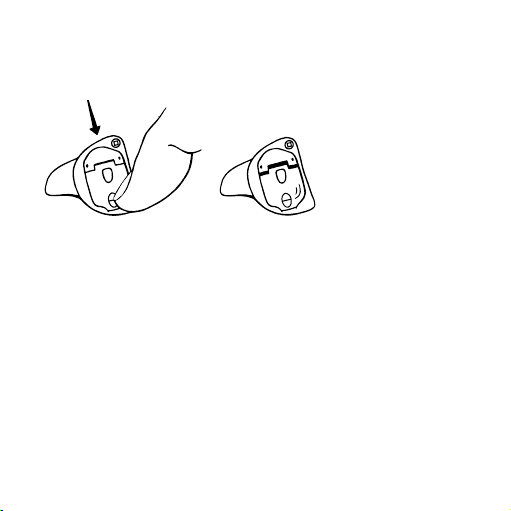
Push the battery compartment cover downwards to turn the
hearing aid off.
Please remember to turn off the hearing aid when it is not in use.
Remove the battery if the hearing aid will not be used for several days.
16
Page 17
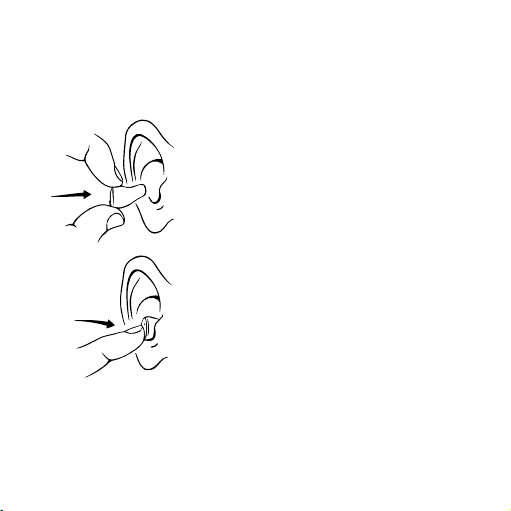
Positioning the hearing aid
Close the battery compartment cover completely.
Hold your hearing aid with your thumb and
fore finger. Slowly guide the hearing aid
into your ear canal until you feel resistance.
Let go of the hearing aid and use the tip of
your forefinger to gently push it into your
ear until it rests comfortably in your ear
canal.
Page 18

To help position the hearing aid properly
you could pull the outer ear backwards and
upwards with the opposite hand.
If your hearing aid does not fit or sit properly, causing discomfort, irritation, redness or the like, contact your hearing care professional.
18
Page 19
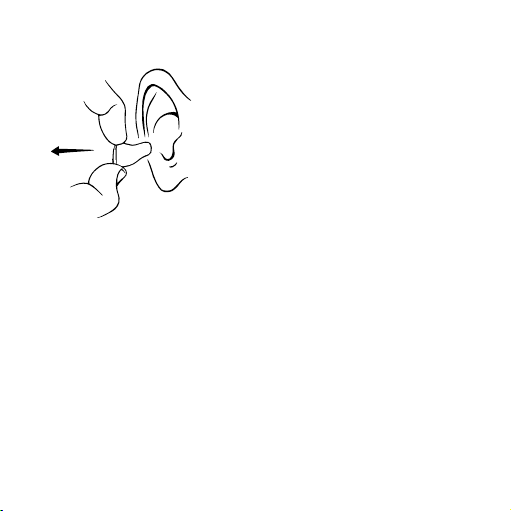
Removing the hearing aid
Hold the hearing aid with your thumb
and forefinger and pull gently.
If it is difficult, you can try to move the
hearing aid carefully from side to side. It
may also help to pull the outer ear backwards and upwards with the opposite
hand.
Page 20
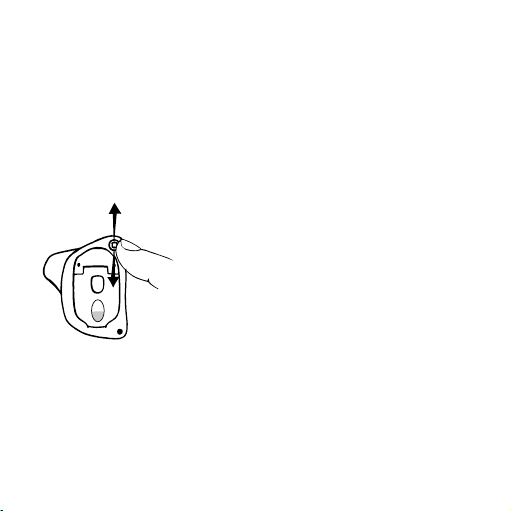
Volume adjustment
The hearing aid volume is adjusted automatically in accordance
with your sound environment.
Your hearing aid may furthermore be provided with a volume
control, shaped like a small lever.
Push the lever upward to gradually raise
the volume.
Push the lever downwards to gradually
lower the volume.
Each time you operate the volume control, you will hear a beeptone unless this function has been disabled. When the maximum
or minimum adjustment level is reached , a steady tone will sound.
20 21
Page 21

WARNING
If the volume in the hearing aid is generally too loud or too weak, or
the reproduced sounds are distorted, or if you would like any further
information, consult your hearing care professional.
Page 22

To turn off the sound completely
• Keep pressing the volume control lever downwards after the
steady tone has sounded
To turn the sound on again
• Press the lever upwards or
• Change listening program
Any adjustm ent of the volume setting will be cancelled when your
hearing aid is turned off, or when you change program.
If you wish to have the volume control disabled, please consult
your hearing care professional.
22
Page 23

Listening programs
By default, your hearing aid contains a Master program, with the
option of an extra program. A number of supplementary programs can also be made available. If this solution is chosen, you
can have up to five programs.
Master All the automatic func tions work to ensure comfort in
Music For listening to music
TV For listening to the TV
T In this program you listen via the telecoil (T) and not
M+T In this program you listen via the hearing aid micro-
all listening situations
via the hearing aid microphones (M). The telecoil is
used where a loop sys tem is installed. If you activate
the telecoil program, you listen to a specific sound
source and shut out surrounding sounds.
phones (M) and the telecoil (T).
Page 24

Standard All the automatic func tions work to ensure audibility
Acclimatisation This program has the same features as the Master
and speech understanding in all lis tening situations
program but provides slightly less amplification
Audibility
Extender*
Zen* Generates different kinds of tones.
* Available separately
Makes high-frequency sounds audible
If your needs change over time, the combination of listening programs can be altered.
24
Page 25

Zen program
Your hearing aid may be provided with a unique optional listening program called Zen. It makes musical tones (and sometimes
a rushing noise) in the background. These sounds are shaped
according to your hearing loss. The Zen program may be used
alone (without amplification) in quiet when you are not required
to hear surrounding sounds. Or, it may be used with the Master program so both the surrounding sounds and the generated
sounds (fractal tones and noise) are heard together.
CAUTION
Use of the dif ferent Zen progr ams may interfere wi th hearing surro unding sounds including speech. The programs should not be used when
hearing such sounds is important. Switch the hearing aid to a non-Zen
program in those situations.
Page 26

CAUTION
If you perceive a decrease in loudness, tolerance of sounds, speech not
as clear, or worsening tinnitus, contact your hearing care professional.
Benefits
The Zen program may provide a relaxing listening background for
some people. When the Zen program is used in a tinnitus management program, its wearer may experience some relief from
tinnitus.
Indications for use
The Zen program is intended to provide a relaxing sound background (i.e., music/noise source) for adults who desire to listen
to such a background in quiet. It may be used as a sound therapy
tool in a tinnitus treatment program that is prescribed by a hearing care professional (audiologists, hearing aid specialists, otolaryngologists) who is trained in tinnitus management.
26
Page 27

Directions for use
Because of the unique ways in which Zen is programmed in your
hearing aid, please follow the recommendations of your hearing
care professionals as to how to use the program, when to use the
program and/or how long to use the program.
Page 28

Switching between the listening
programs
To change programs, press the program
button briefly. Each time you switch to
another program, an acoustic indicator will
sound unless this function has been disabled.
Program 1: One short beep or message
Program 2: Two short beeps or message
Program 3: Three short beeps or message
Program 4: One long and one short beep or message
Program 5: One long and two short beeps or message
If you wish to have the program button disabled, please consult
your hearing care professional.
28
Page 29

CLEANING
The following cleaning accessories are available for the hearing
aid.
1. Cloth
2. Brush
3. Wax removing tool
3.
2.1.
Contact your hearing care professional if you need additional
supplies of cleaning accessories.
Page 30

The hearing aid
It is very important for the hearing aid’s performance that it is
kept free from earwax and dirt.
Clean your hearing aid daily with the soft
cloth to keep it dry and clean of earwax
or dirt.
WARNING
Never clean the hearing aid with water or cleaning solutions, as this
may cause it to malfunction.
30
Page 31

When the hearing aid is not in use, keep it
in a warm, dry place with the battery compartment cover open, to ventilate the hearing aid and allow it to dry.
Page 32

We recommend that every time you take the hearing aid out of
2.
your ear, you inspect the sound outlet and the vent openings to
ensure that no earwax or dirt has gathered there. Below is an
example of how the sound outlet and vent openings may be positioned. The positions can be slightly different on your hearing aid.
1. Sound outlet
2. Vent opening
1.
32 33
Page 33

The sound outlet
It is important that the sound outlet is not blocked by earwax. If it
is blocked, do as follows:
Remove any visible earwax from
around the sound outlet with
the small brush or cloth. Do not
attempt to clean the wax guard.
If the sound outlet is still blocked, you should change the wax
guard (see pages 37-41).
Page 34

WARNING
If you cannot clean the sound outlet completely, you
should contact your hearing care professional. Do not insert anything into the sound outlet, as this could damage
the hearing aid.
34
Page 35

The vent
If earwax has accumulated in and/or around the vent opening,
do as follows:
Clean any ear wax from the vent by
passing the wax removing tool all
the way through the vent.
Page 36

WARNING
It is important for the performance of the hearing aid that
the vent is never blocked by earwax. Make it a habit to
clean the vent every day! In rare cases so much earwax can
accumulate in the vent that the hearing aid sound is affected. In that case you should see your hearing care professional.
36
Page 37

NANOCARE WAX GUARD
The NanoCare wax guard helps to protect the hearing aid against
earwax. Always use NanoCare wax guards with your hearing aid.
Otherwise the warranty for your hearing aid will be void.
The NanoCare wax guard consists of the following parts:
1. Holder
2. Removal hook
3. Wax guard
Page 38

CAUTION
The wax guard is disposable and for one-time use only. Do not attempt
to clean or reuse a wax guard. This could damage your hearing aid and/
or cause the wax guard to become dislodged in your ear.
38
Page 39

Changing the NanoCare wax guard
Insert the removal hook into the used wax guard placed in the
sound outlet. Pull the wax guard straight out.
1. Vent opening
2. Sound outlet
3. Used wax guard
Page 40

Turn the holder around so that the new wax
guard is in position to be inserted.
Insert the holder into the opening of the
sound outlet and gently press the wax
guard into the opening.
Then pull the holder straight out. The
new wax guard will automatically
detach from the holder. Press the hearing aid gently against a flat surface to
ensure that the wax guard remains in
place.
40
Page 41

Discard the holder with the used wax
guard.
The frequency with which the NanoCare wax guard should be
changed varies from one individual to another.
If you have any questions regarding your NanoCare wax guard,
please contact your hearing care professional.
Page 42

WARNING
If the wax guard fits loosely, discard it and insert another. If the wax
guard becomes dislodged from the hearing aid while in the ear canal,
please co ntact your physic ian. Do not try to rem ove the wax guard from
your ear canal yourself.
42
Page 43

ACCESSORIES
Remote control
A remote control gives you a number of
additional options.
T-DEX
A device for connecting hearing aids to mobile phones using telecoil.
For help in determining whether you could benefit from a remote
control or other acce ssories, plea se consult your hearing ca re professional.
Page 44

IN CASE OF MALFUNCTION
The following pages contain some quick advice on what to do if
your hearing aid stops working or performs unsatisfactorily. If
the problems persist, contact your hearing care professional for
assistance.
44 45
Page 45

Problem Possible cause Solution
The hearing aid is
completely silent
The hearing aid is not
turned on
The battery does not
work
The sound outlet is
blocked
The microphone opening
is blocked
Make sure the battery is
placed correctly and the
battery compartment
cover is closed correctly.
See page 15
Insert a new batter y in
the hearing aid
See page 33
If you suspect that
earwax or dirt has
migrated into the
microphone inside the
hearing aid, contact
your hearing care
professional. Do not
insert anything into the
microphone opening
Page 46

Problem Possible cause Solution
The hearing aid
volume is not
powerful enough
The hearing aid
whistles
continuously
The battery is nearly
exhausted
The sound outlet is
blocked
Your ear is blocked by
earwax
Your hearing may have
changed
Your ear is blocked by
earwax
The hearing aid is not
correctly placed in your
ear canal
The hearing aid fits
loosely in your ear canal
46 47
Insert a new battery in
the hearing aid
See page 33
Contact your ENT
doctor/physician
Contact your hearing
care professional
Contact your ENT
doctor/physician
Take the hearing aid out
and reinsert it
Contact your hearing
care professional
Page 47

Problem Possible cause Solution
If the hearing aid
is uncom fortable
to wear
The hearing aid is not
correctly placed in your
ear canal.
The hearing aid does not
fit your ear properly
Your outer ear or ear
canal is sore
Consult your hearing
care professional on how
to place the hearing aid
correctly in your ear
canal
Contact your hearing
care professional
Contact your hearing
care professional
Page 48

CARING FOR YOUR HEARING AID
The hearing aid is a valuable object and should be treated with
care. Here are some things you can do to prolong the life of your
hearing aid:
48
Page 49

CAUTION
• Turn off your hearing aid when it is not in use. Remove the battery if
the hearing aid will not be used for several days.
• When the hearing aid is not in use, keep it in its case in a dry location
out of reach of children and pets.
• Do not expose the hearing aid to extreme temperatures or high
humidity. Make sure to dry the hearing aid thoroughly after heavy
perspiration such as that which may occur during intense physical
activity, e.g. playing sports.
• Avoid dropping your hearing aid – perform cleaning and battery
changes while holding the hearing aid above a soft surface.
• Do not wear your hearing aid while in the shower or swimming, or
when using a hair dryer, perfume, hair and body sprays or gels such
as suntanning lotions or creams.
Page 50

WARNINGS
WARNING
Hearin g aids and bat teries can be da ngerous if sw al lowed or used im properly. Swallowing or improper use can result in severe injury or
even fatalities. In case of ingestion, contact a physician immediately.
• Keep hearing aids and their parts, accessories and batteries out of
reach of children and anyone else who might swallow such items or
otherwise cause injury to themselves. Do not change batteries in
front of them and do not let them see where you keep your battery
supply. Discard used batteries carefully.
• Batteries are very small and can easily be mistaken for pills or the
like. Never put a battery or hearing aid in your mouth for any reason
as you may risk swallowing it.
• Clean and inspect your hearing aid after use to check that it is intact.
If the hearing aid breaks while in the ear canal, contact your hearing
care professional immediately. Do not try to remove the parts yourself.
50
Page 51

WARNING
• Risk of explosion if battery is replaced by an incorrect type or
recharged. Dispose of used batteries according to the instructions.
• Never allow others to wear your hearing aid, as this could cause per-
manent damage to their hear ing.
• When selecting a listening program, please remember that there are
situations in which it is particularly important to be able to hear the
surrounding sounds (e.g. traffic, warning signals).
• The hearing aid is made of modern non-allergenic materials. None-
theless, in rare cases skin irritation may occur. If you notice skin irritation in or around your ear or ear canal, contact your hearing care
professional.
Page 52

WARNING
• Please note that when using any type of hearing aid, you must allow
regular ventilation of the ear. If the ear is not adequately ventilated,
there may be a slightly increased risk of infection or disease in the
ear canal. We therefore recommend that you remove the hearing aid
from your ear when you go to bed, to allow the ear canal to be ventilated. If possible, you should also remove your hearing aid during
the day if there are any periods when you do not need them. Make
sure that you clean and inspect your hearing aid as required. If an ear
infection or disease occurs, you should seek medical attention and
contact your hearing care professional for advice on how to disinfect
the hearing aid. Do not under any circumstances use alcohol, chlorine
or similar substances for this purpose.
• Regular use of a de-humidifier is recommended to help avoid malfunction of the hearing aid.
• Do not use Widex hearing aids in mines or other areas with explosive gases.
52
Page 53

WARNING
• Do not wear your hearing aid during radiation, X-rays, MRIs, CT or
other medical treatments and scans. The emissions from these pro-
cedures as well as from other types of radiation, such as that in a
microwave oven, can damage your hearing aid and the hearing aid
can becom e very hot. Radiation from , for example, room surveillance
equipment, burglar alarms and mobile phones is weaker and will not
damage the hearing aid, but may create audible interference.
Page 54

CAUTION
• Your hearing aid has been tested for interference according to international s tandards. Neverthele ss, it is possible that unforeseen interference may o ccur in the hearing a id due to electrom agnetic radiatio n
from other p roducts such a s alarm systems , room surveillan ce equipment and mobile phones.
• Although your hearing aid has been designed to comply with the
most stringent international electromagnetic compatibility standards, the possibility cannot be excluded that it may cause interference with other equipment, such as medical devices.
• Never try to open or repair the hearing aid yourself.
54
Page 55

ADVICE
NOTE
• The hearing aid will not restore normal hearing and will not prevent
or improve a he aring loss res ulting from organi c conditions. Howeve r,
the hearing aid can help you to make the best possible use of your
remaining hearing ability. You should also bear in mind that it can
take time to get used to a new hearing aid and new sounds.
• In most cases, using the hearing aid infrequently will not permit you
to gain full benefit from it.
• The use of a hearing aid is only part of hearing habilitation and may
need to be supplemented by auditory training and instruction in
lipreading.
• The use of hearing aids increases the risk of accumulation of earwax.
Contact your physician/ENT doctor if you suspect that a plug of earwax has accumulated in your ear. Earwax may not only reduce your
own hearing but also the effect of the hearing aid considerably. It
is a good idea to ask your physician to clean your ears a couple of
times a year.
Page 56

Electrical and electronic equipment (EEE) contains
materials, components and substances that can be
hazardous and present a risk to human health and
the environment when waste electrical and electronic equipment (WEEE) is not handled correctly.
Do not dispose of hearing aids, hearing aid accessories and batteries with ordinary household waste.
Hearing aids, batteries and hearing aid accessories should be
disposed of at sites intended for waste electrical and electronic
equipment, or given to your hearing care professional for safe
disposal. Proper disposal helps to protect human health and the
environment.
56
Page 57

SYMBOLS
Symbols commonly used by Widex A/S in medical device labelling
(labels/IFU/etc.)
Symbol Title/Description
Manufacturer
The product is produced by the manufacturer whose name
and address are stated next to the symbol. If appropriate,
the date of manufacture may also be stated.
Date of manufacture
The date when the product was manufactured.
Use-by date
The date after which the product is not to be used.
Batch code
The product’s batch code (lot or batch identification).
Page 58

Symbol Title/Description
Catalogue number
The product’s catalogue (item) number.
Serial number
The product’s serial number.*
Keep away from sunlight
The product must be protected from light sources and/or
The product must be kept away from heat
Keep dry
The product must be protected from moisture and/or The
product must be kept away from rain
Lower limit of temperature
The lowes t temperature to which t he product can be s afely
exposed.
58
Page 59

Symbol Title/Description
Upper limit of temperature
The highest temperature to which the product can be
safely exposed.
Temperature limits
The highest and lowest temp eratures to which the p roduct
can be safely exposed.
Consult instructions for use
The user instructions contain important cautionary information (warnings/precautions) and must be read before
using the product.
Caution/Warning
Text marked with a caution/warning symbol must be read
before using the product.
Page 60

Symbol Title/Description
WEEE mark
“Not for general waste”
When the product is to be discarded, it must be sent to a
designated collection point for recycling and recovery.
CE mark
The product is in conformity with the requirements set out
in European CE marking directives.
Alert
The product is identified by R&TTE Directive 1999/5/EC as
an equipment Class 2 product with some restrictions on
use in some CE member states.
C-Tick mark
The product complies with EMC and radio spectrum
regulatory requirements for products supplied to the
Australian or New Zealand market.
60
Page 61

Symbol Title/Description
Interference
Electromagnetic interference may occur in the vicinity of
the product.
*The six- or seven-digit number on the product is the serial number. Serial numbers may not always be preceded by
Page 62

62
Page 63

Page 64

WIDE X A/S Nymoellevej 6, DK-3540 Lynge, Denmark
www.widex.com
Manual no.:
9 514 0209 001 #05
Issue:
2015-02
WIDEX , MENU, DE X and NANOC ARE are trade marks of Wid ex A/S
É[5qr0w0|l;;a;l]
 Loading...