White 834DW User Manual

Specifications and Main Features

  • Maximum number of threads: 4, 3, or 2 threads
  • Maximum number of needles: 2 Needles (1 needle)
  • Needles: Standard SCHMETZ 130/705H NO: 80 ~ 90
  • Inter-Needle Spacing: 2mm
  • Overlock Edge Width: Standard 5.5 mm (Range 5.2 ~ 7 mm)
  • Stitch Length: Length of 1: 5 mm
  • Ratio of differential feeds: Normal 1: (0.7 ~ 2)
  • Sewing Speed: 1500 RPM
  • Specifications of the Sewing Machine:
  • Width: 300mm
  • Depth: 230mm (Maximum 340mm)
  • Height: 290mm (Maximum 350mm)
  • Weight: 8.7 kg

Frequently Asked Questions

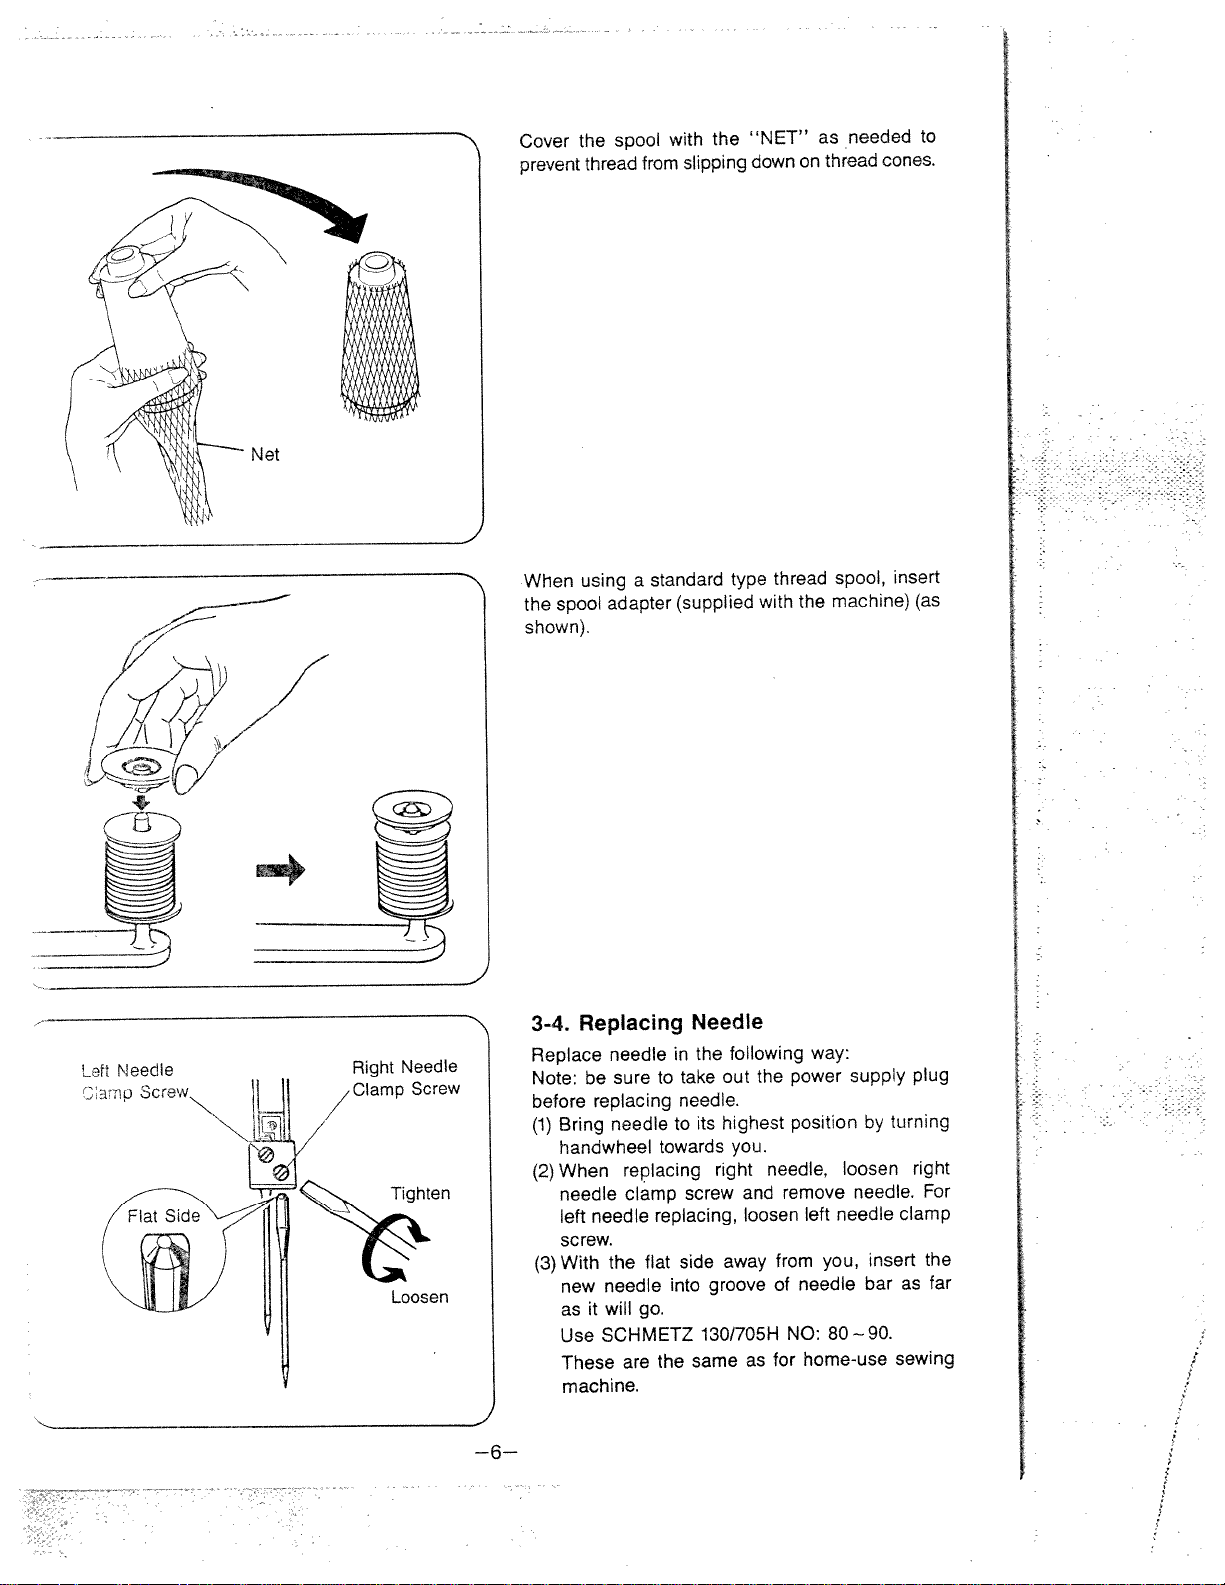
Q: What are the steps to removing and installing a needle in the sewing machine?

A: For needle removal, ensure that the electric supply to the sewing machine has been cut off. Effect the highest level of the needle using the hand wheel, and start untightening the screw of the needle clamp. Remove the old needle and fit in a new one while ensuring the flat end points toward you and tighten the screw once again.

Q: Who are the people who recommend this machine, and for which materials can this machine be used?

A: It is mainly designed for hercules polyester (spun, filament) products, and for thicker substances #60/2 to #50/2 twisted threads are advised.

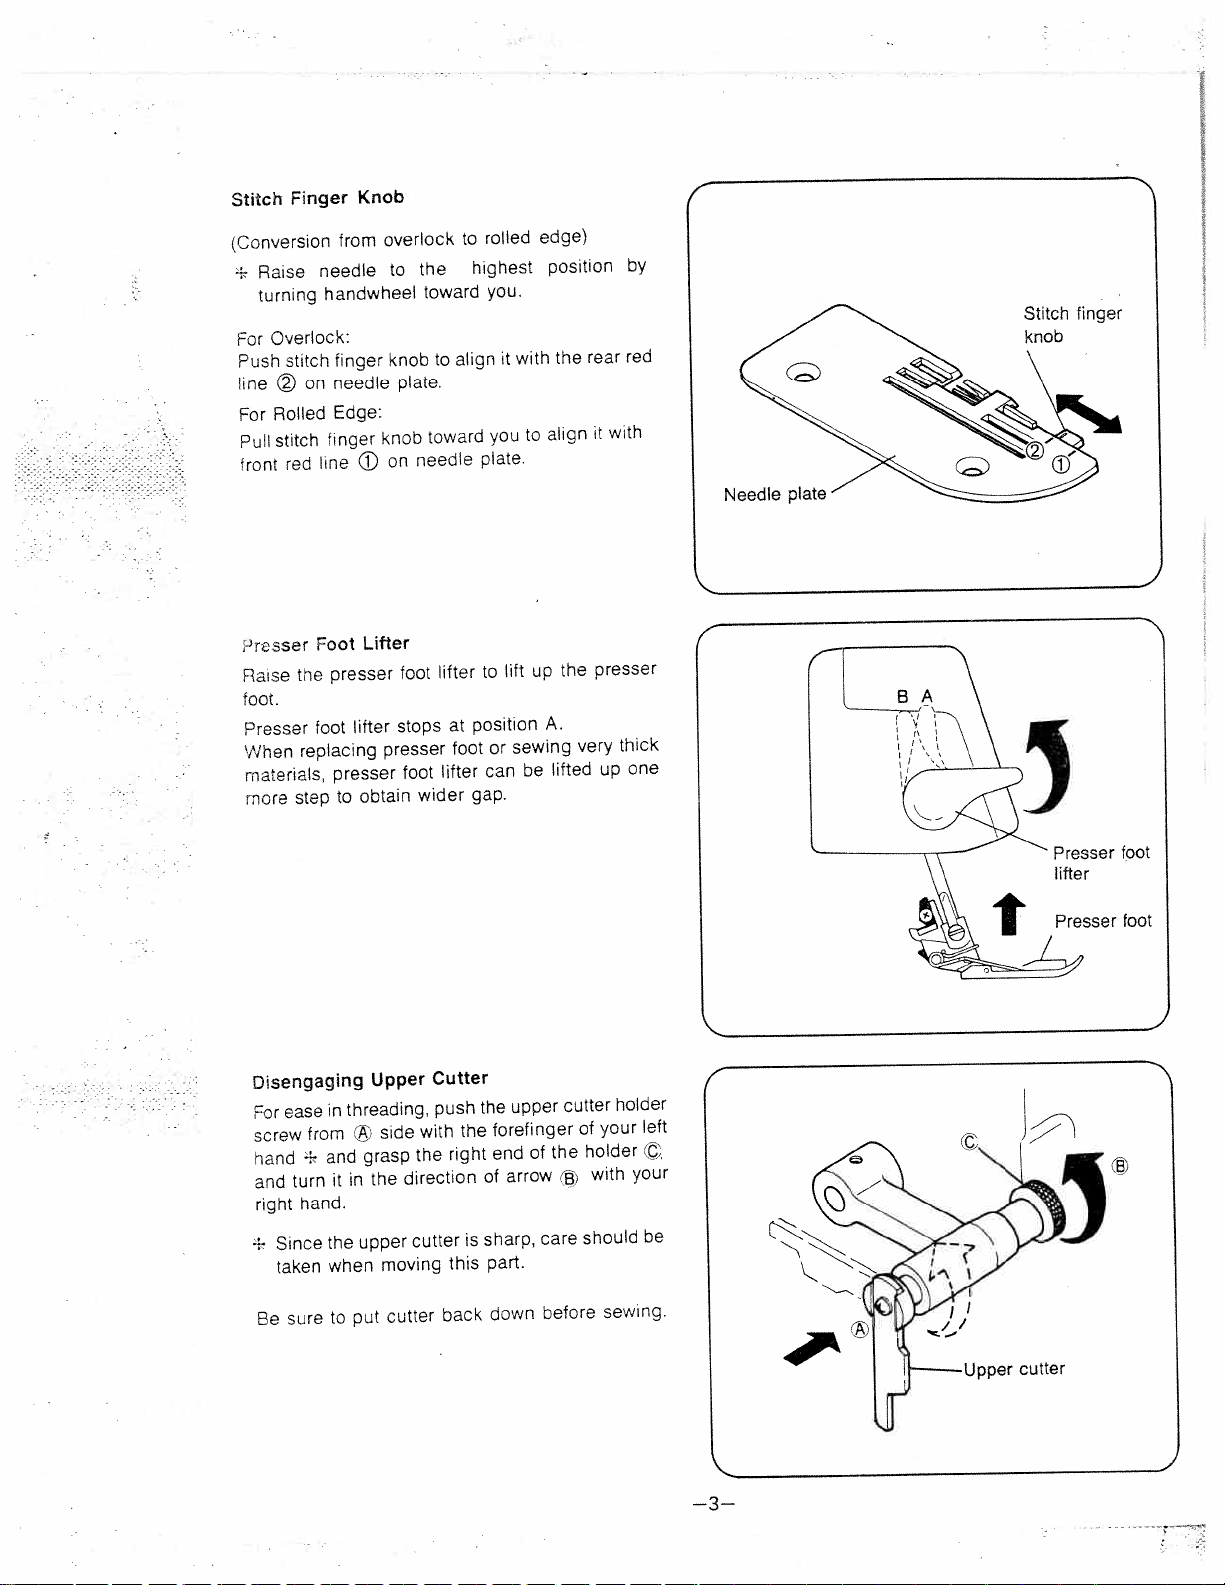
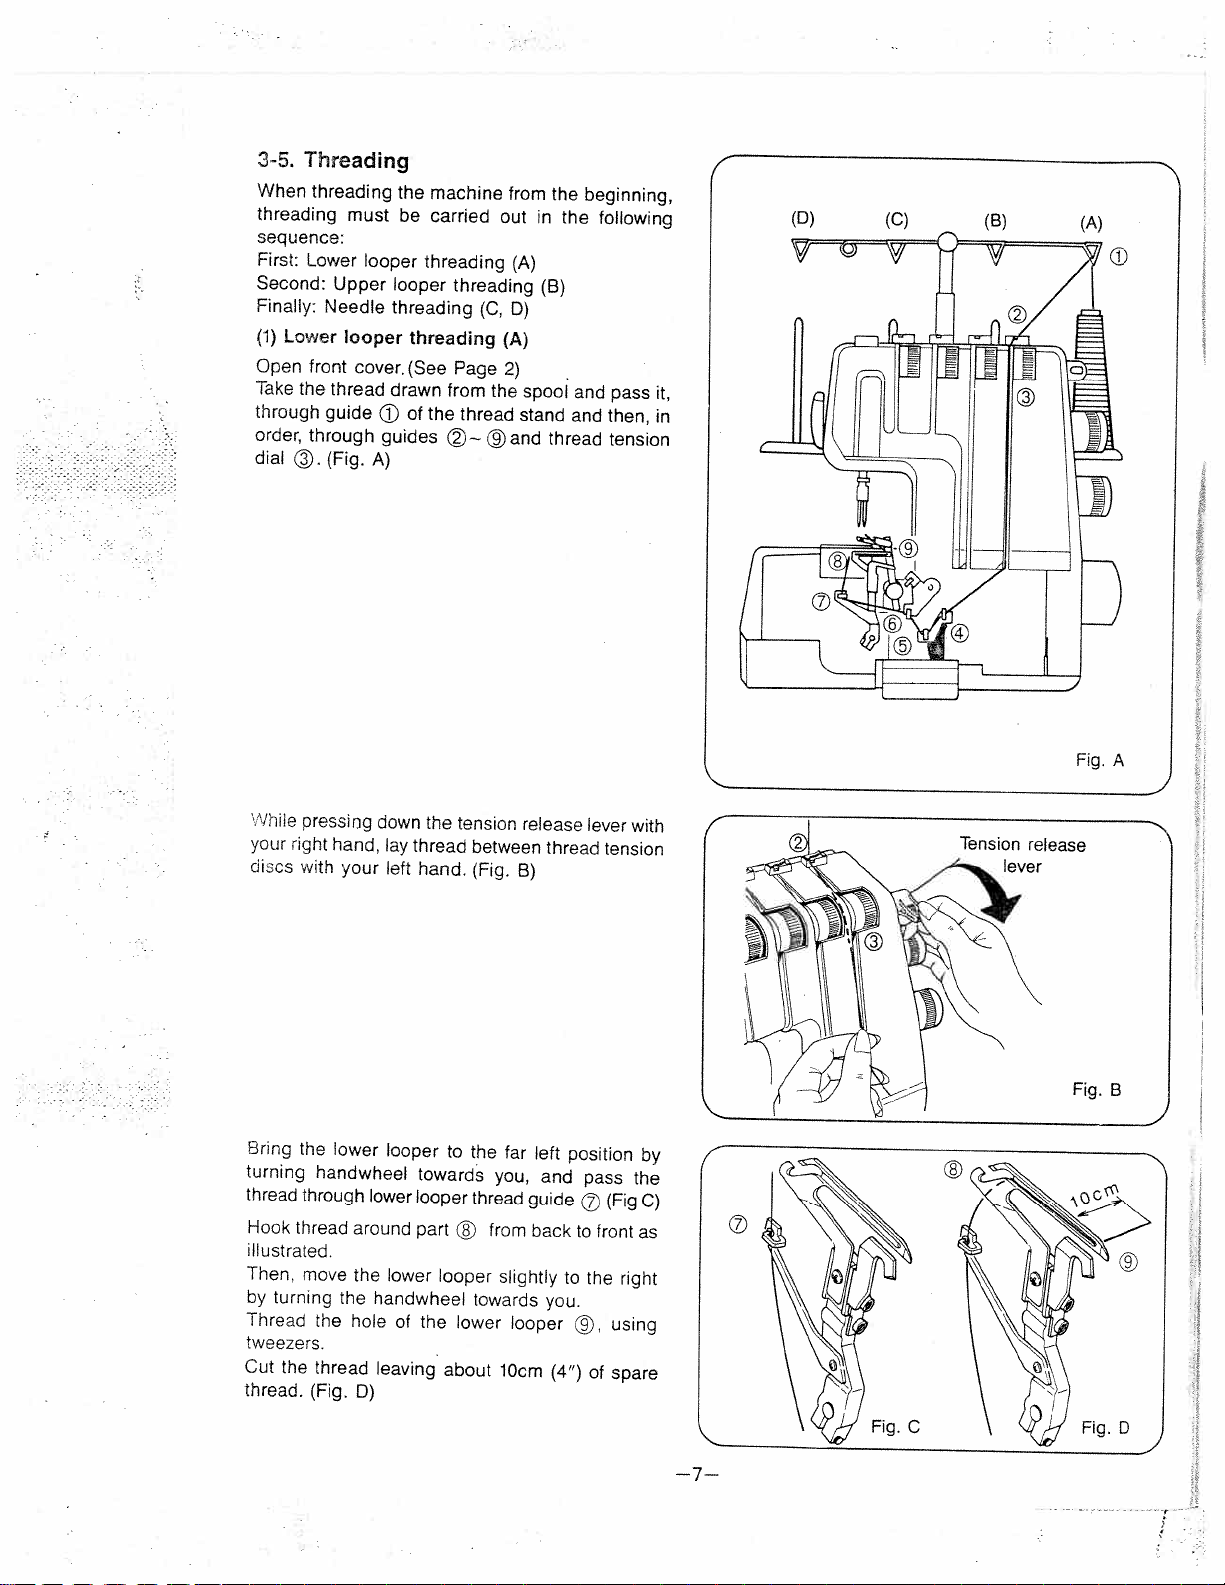
Q: How do I regulate the cutting width?

A: You can see the dial that changes the cutting width from around 5.2 mm (0.2”) to about 7mm (0.28”) based on the material that is used on the sewing machine upon opening the front cover.

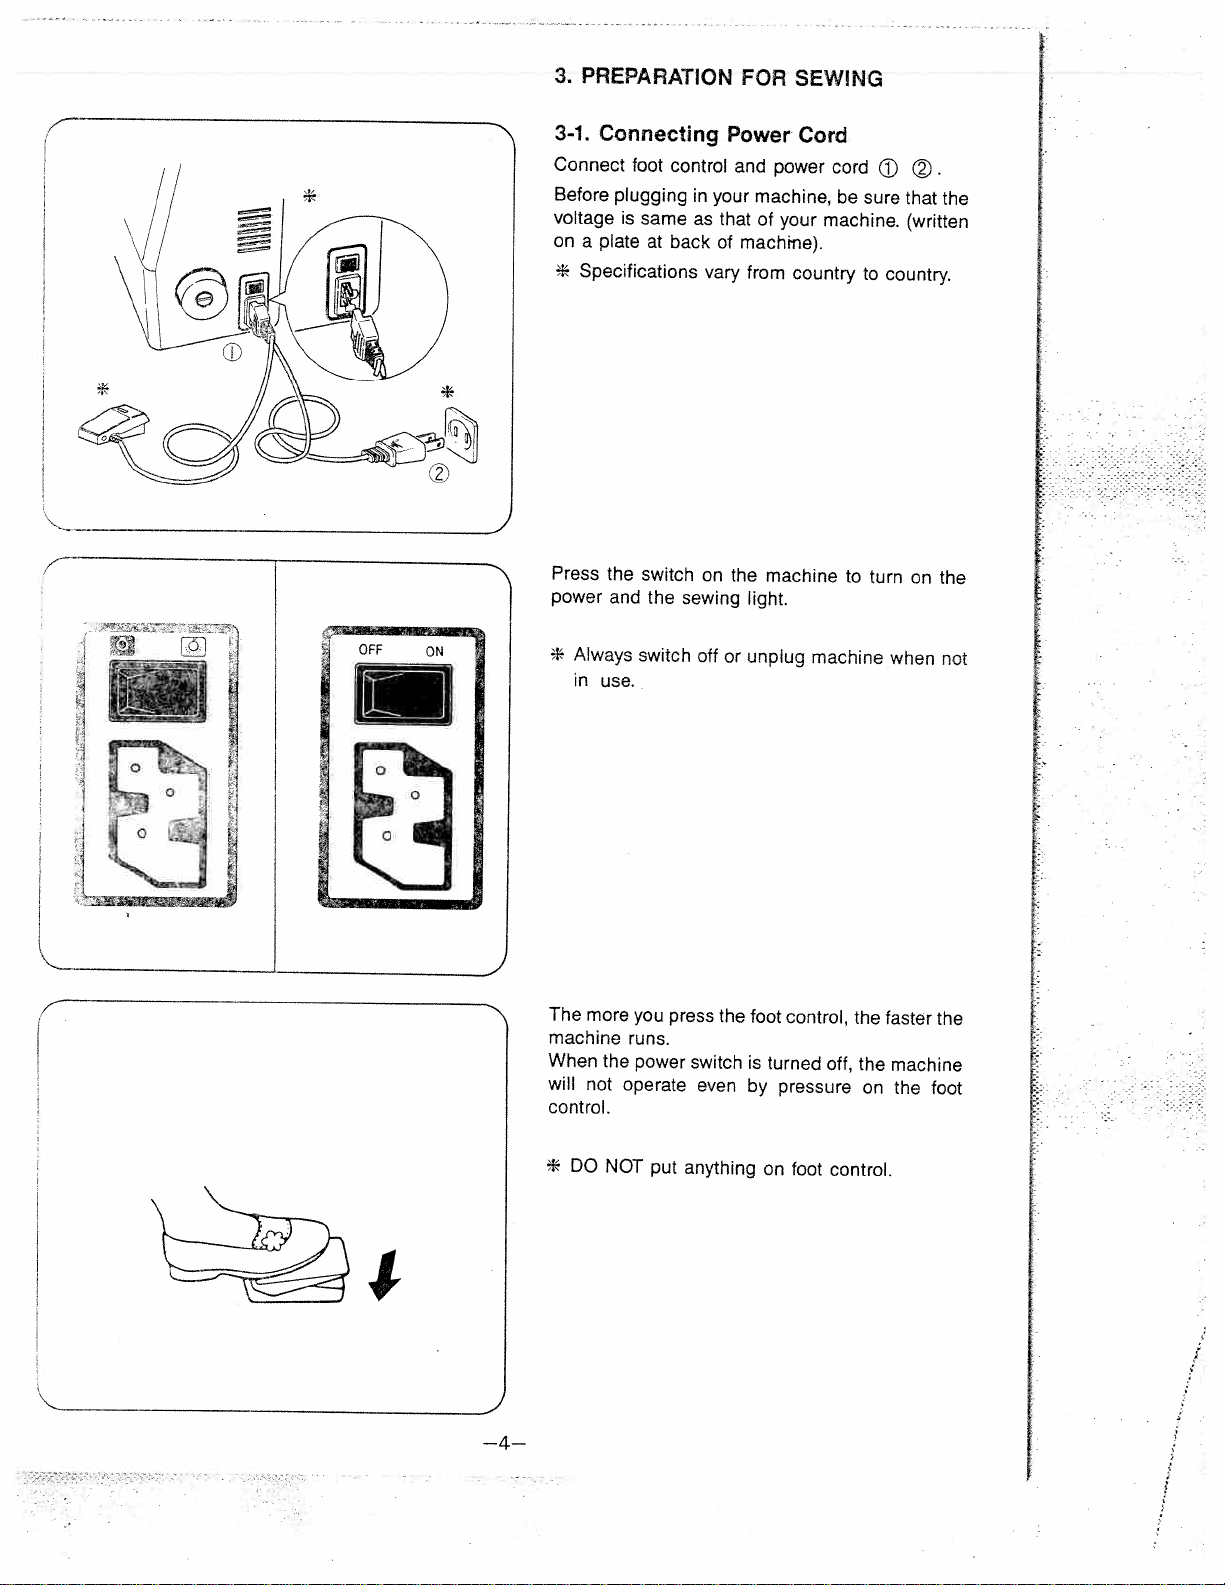
Q: What should I do if the machine does not sew?

A: Examine whether the sewing machine has been plugged in properly or if the foot pressing down is properly fastened. In addition, check that the needle is not bent and is inserted correctly in its designated place.

Q: Is this machine able to sew through fabric of different thickness?

A: The machine is equipped with an adjustable presser foot pressure mechanism which allows it to sew through fabric of different thickness.

User Manual

-I
v
0
IC
z
o
w
0
0
U)
C
m
w
CD
C,,
m
w
D
r
0
(I%
0
CD
_______________________________
reduce
To
has
a other). one
way.
reverse
qualified
not
change
POLARIZED
the
polarized
if
plug
the
plug.
This
the
electrician
the
Record
Model
and
Serial
The
Model
The Serial
Model Retain
No.
No.
these
risk
of
plug
will
If
does it
plug
to
plug
OVERLOOK in
space
No.
No.
provided
of
is
is
No.
834DW
numbers
this
located
located
PLUG
electric
(one
in
fit
not
still
install
any
in
SEWING
appliance.
Rear
for
CAUTION
shock,
blade
polarized
a
fit
does
the
way.
MACHINE
below
Rear
future
the
of
of
reference.
is
fully
not proper
Serial
arm.
arm.
this
wider
in
fit,
No.
appliance
than
outlet
outlet,
the
contact
outlet.
the
only
a
Do
iITANT
SAFETY
INSTRUcTIONS
When
followed,
using
including
Read
INE——To
appliance
An
appliance
from
electrical
an
the
instructions
II
should
electric
the
appliance,
following:
never
be
outlet
reduce
WARNING——To
injury
be
children.
this
been
nearest
the
cloth.
insert
where
turn
by
or
as
used
only
for
appliance
dropped authorized
adjustment. appliance machine
object
any
aerosol
controlstothe
all
pulling
a
by
on
scctrc
Do
1. used
is
Use
2.
attachments
Never
3.
properly, appliance eiectricai
Never
4.
ings
dust,
Never
5. Do
6.
Do
7.
being
To
8.
outlet.
Do
9.
shcck,
allow
not
or
by
appliance
this
recommended
operate
it
if
the
to
mechanical
or
operate
sewing
the
of
loose
and
or
drop
outdoors.
use
not not
;?erate
administered.
disconnect,
unplug
not
to
near
has
unattended
left
immediately
reduce
to
Close
toy.
intended
its
manufacturer
the
if
has
it
or
dealer
any
with
and
foot
into
(spray)
To
cord.
basic
safety
before
the
when
after
the
persons:
attention
use
a
damaged
damaged,
or
openings
air
controller
opening.
any
products
(“0”)
off
unplug,
risk
using
risk
described
as
as
or
service
free
are
grasp
precautions
electric
of
plugged
and
of
necessary
is
contained
or
cord dropped
center
blocked,
from
being
position,
the
using
in.
before
burns,
when
in
this
in
plug,
into
for
Keep
accumulation
the
used
then
plug,
not
should
always
(this
shock:
cleaning.
this
manual.
manual.
this
it
is
if
water.
ventilation
where
remove
the
unplug
fire,
not
Return
cord.
Always
examination,
or
be
this
appliance
only
Use
working
the
repair;
open
lint,
of
oxygen
from
plug
is
DANGER
not
not
not
unplug reach
place
place
1.
2.
3.
Always
Do Do
Do
in
before
for
or
or
an
store
drop
relamping.
appliance
appliance
water
into
Replace
has
that
whereitcan
other
or
bulb
fallen
liquid.
with
into
water.
fall
orbepulled
same
type
Unplug
watts.
15
rated
immediately.
intoatub
or
sink.
WARNING
needle.
the
use
bent
use
or
pull
sewing
the
as
unplug
or
manual.
operate
blocked.
away
Keep
1. machine
Always
2.
Do
3.
Do
4.
break.
Switch
5. area,
Always
6. lubricating, instruction
Never
7. may
fingers
not not
such
be
from
proper
needles.
push
machine
threading
sewing
when
on
a
all
needle
fabric
needle,
machine
making
soft
moving
plate.
while
off
any
surface
parts.
The
stitching.
when
(“0”)
changing
from
other
such
Special
wrong
the
user
as
careisrequired
plate
deflect
may
It
making
needle,
electrical
servicing
or
bed
a
can
cause
the
any
adjustments
or
changing
outlet
adjustments
couch
the
needle
when
where
around
needle
causing
in
presser
removing
mentioned
air
the
sewing
the
break.
to
needle
the
foot,
covers,
openings
it
in
to
etc.
the
SAVE
THESE
INSTRUCTIONS
-
NAMES
1
OPERATION
2. PREPARATION
3. 3-rni. 3-2. 3-3. 3-4. 3-5. FOUR
4. 4—1 4-2. 4-3. 4-4. 4-5. 4-5.
ADJUSTiNG
5.
STITCH
5.
7.
DIFFERENTiAL
3.
CORDED SEWING
1.
10.
THREE
TWO
11. I
1-1-Conversion
11-2.
11-3.
12.
ROLLED 12-1. 12-2.
D
REPLACING CHANGING
15.
16.
LUBRICATION
17.
ACCESSORIES TABLE
18.
19.
PROBLEM SPECIFICATIONS
20.
21.
OPTIONAL
Connecting
Setting
Changing Replacing Threading
THRE.D
.
Sefore Setting Beginning Adjustment Threscl Thread
THREAD
Stitch Thread
Three-thread Two-thread
TUCKS
OF
LENGTH
OVERLOCK
FOR
THREAD
EDGE
OF
SEWING
SOLViNG
PARTS
AND
FOR
Power
Telescopic
Threads
Needle
OVERLOCK
Sewing
Fabric
the
and
of Tnsion Tension
BALANCE
FEED
CURVED
OVERLOCK
OVERLOCK
Selection
Tension
LOWER
LIGHT
ACCESSORY
FUNCTION
SEWING
Cord Thread
Ending
the
Presser Chart Adjustment
OF
ADJUSTMENT
SEAMS
2-thread
to
Table
Adjustment
Rolled
Rolled
Edge
CUTTER
BULB
MATERIALS,
CONTENTS
OF
STITCH
of
Sewing
STITCH
STITCH
STITCH
overlock
Edge
PRESSER
PARTS
Stand
Foot
NEEDLES
USING
Pressure
WIDTH
USING
USING
FEET
2
AND
1
AND
NEEDLES
CUTTING
NEEDLE
1 NEEDLE
THREADS
WIDTH
1 2 4 4 5 5
6 7
10 10 10 10 1 1 12 13 15 15 16
17
18
19 20 20
21 22 23 23 24 25 26
26 26 28 29 30 31 32
PARTS
NAMES
1.
n
1456
y
OF
I.
Presser
1,
Spool
2. Ribbon
3.
4.
Pressure Telescopic
5.
1
foot
pin
cord
12
lift
quides
regulator
thread
screw
stand
L
Y
/iI;
13
14
LL
15
16
\Y
17
/
18
22
19
20
21
9Dfferentialfeeddial
11.
2.
13.
14.
15,
16.
17.
18.
19.
20.
21.
22.
Thread Triread Cutting
Presser Front
Upper
Cutter
Accessory Front Handwheel Stitch
Stitch
take cutter
width
foot
cover
cutter cover
panel
finger
finger
up
adjusting
cover
(Right
knob
lever
side
cover
dial
of
machine)
Needle
plate
OPERATION
2. PARTS
Handwheel
AND
FUNCTION
OF
Re
movi
Always
turn
handwheel
toward
you.
I
the
new
of
machine.
foot.
to
A
the
holder
Foot
their toward and
foot
ankle.
catches
foot
with
highest
you.
will
the Lower
the
come
pin
presser
position
right
presser
by
off.
under
foot
foot.
off
presser
needles
handwheel
red
groove
that
so
Presser
button
the
Changing
±
Switch
Attaching
n
ç
1.
2. turning
3.
4. the
Raise Raise
Push Position
lifter
I
)
—2—
Opening
To
open
right
and
Closing
part
Push
+
Always
Front
front
pull
Front
B close
cover,
it
Cover
and
Cover
push
down
close
front
partBof
toward
it.
cover
you.
when
cutter
sewing.
cover
to
Finger
Stitch
(Conversion
Raise
÷
turning
Overlock:
For Push
stitch
more
on
©
Rolled
stitch
red
tne
replacing
step
line For
Pull front
resser Raise
foot.
Presser When materials,
Knob
from
needle
handwheel
finger
needle Edge:
finger
line
Lifter
Foot
presser
lifter
foot
presser
obtain
to
overlock
the
to
toward
knob
plate.
toward
knob
needle
on
foot
stops
presser
foot
wider
to
lifter
at
lifter
to
highest
align
position
foot
gap.
rolled
you.
it
you
plate.
to
or
can
with
to
lift
up
sewing
be
edge)
position
the
align
the
A.
very
lifted
rear
with
t
presser
up
by
red
thick
one
Disengaging
in
ease
For
from
screw
and
±
hand
turn
and
hand.
right
Since taken
sure
the when
to
+
Be
Upper
threading,
grasp
the
in
it
upper
put
with
side
the
direction
cutter
moving
cutter
Cutter
push
the
right
this
back
the
forefinger end
of
sharp,
is
part.
down
upper
of
arrow
cutter
the
B
care
before
your
of
holder
with
should
sewing.
holder
left
.
your
be
Presser
lifter
Presser
foot
toot
I
-Upper
cutter
—3—
)
1/
3.
PREPARATION
3-1.
Connecting
Connect
Before voltage on
*
Press power
foot
plugging
is
same
plate
the
and
at
switch
the
a
Specifications
control
in as
back
vary
on
sewing
FOR
Power
and
your
that of
machrne).
from
the
light.
SEW!NG
Cord
power
machine,
your
of
country
machine
cord
®
be
sure
machine.
to
to
turn
that
(written
country.
on
the
the
ij
OFF
ON
*
Always in
The
more machine When will
not
control.
*
DO
use.
the
NOT
switch
you
runs.
power
operate
put
off
press
switch
even
anything
or
the
unplug
foot
is
turned
by
pressure
on
machine
control,
off,
foot
control.
the
the
on
when
faster
machine
the
not
the
foot
$
—4—
3-2.
Setting
Extend then
turn
position.
3-3.
Changing
The
machine
ing
isaneasy
(1)
Cut (behind
new of
the
Telescopic
the
telescopic thread
it
until
the
supplied
is
way
thread
the
the
telescopic thread
threadonthe
original
thread.
shaft
Threads
change
to in
use
spindle
Thread Stand
stand clicks
with
thread
them:
near
stand).
and
to
into
but the
the
tie
its
full
its
cone
Place
ittothe
height,
locked
follow
spool
the
end
Cut
thread
Tie
I
threads
(2)
Raise foot.
Press
(3)
thread out
the
comes
(4)
When the
thread needletoavoid is
pulled
the
presser
down
knot
looper
to
about
changing
knot
and
foot
liftertolift
the
tension
can
before bending
caughtinthe needle’s
pass
thread
10
cm
the
release
through
until
past
needle it
reaches the
the
needle
presser
up
the
leversothat smoothly, draw
the
thread
presser
thread,
the
foot.
cut
eyeofthe
as
the
eye.
the
knot
off
knot
3
—5—-
I
Cover prevent
When
spool
the shown).
the
thread
using
spool
from
a
adapter
with
slipping
standard
(supplied
the
“NET”
down
type
thread
with
as
on
the
needed
thread
spool,
machine)
to
cones.
insert
(as
Left
Needle
Right Clamp
Needle
Screw
Tighten
Loosen
I
—6—
3-4.
Replace
Note: before (1)
Bring handwheel
When
(2)
needle left
screw.
With
(3)
new as
Use These
machine.
Replacing
needle
sure
be
replacing
needle
replacing
clamp
needle
flat
the needle will
it
go.
SCHMETZ
are
Needle
the
in
take
to
needle.
its
to
towards
right
screw
replacing,
side
groove
into
130/705H
same
the
following
the
out
highest
you.
needle, and loosen
away
of
for
as
way:
power
position
remove
left
from
needle
NO:
home-use
supply
by
loosen
needle.
needle
you,
bar
80—90.
turning
insert
sewing
plug
right
For
clamp
the
far
as
35.
Threading
When threading sequence: First:
Lower Second: Finally:
(1)
Lower
Open Take
the through order,
dial
©.
threading
must
Upper
Needle
looper
front
cover.
thread
guide
through
(Fig.
looper
looper
threading
drawn
cj
guides
A)
the
machine
be
carried
threading
threading
(See
of
the
threading
(C,
Page
from
the
thread
©and
©--
from
out
(A)
D)
(A)
2)
in
(8)
spool
stand
the
the
and
and
thread
beginning,
following
pass
then,
tension
(D)
it, in
(C)
(B)
(A)
,Vhiie
pressing
your
right
discs
with
Bring
the
turning thread
through
Hook
thread
illustrated.
Then,
move
by
turning Thread tweezers.
Cut
the
thread.
hand,
your
lower
handwheel
lower
around
the
the
the
hole
thread
(Fig.
D)
down
the
lay
thread
left
hand.
looper
towards
looper part
lower
handwheel
of
the
leaving
tension
to
the
®
looper
lower
about
between (Fig.
B)
far
you,
thread
from
slightly
towards
looper
10cm
release
thread
left
and
guide
back
you.
(4”)
lever
position
pass
0
front
to
to
the
©,
of
with
tension
by
the
(Fig
C)
as
right
using
spare
Fig.
A
—7—
(D)
(C)
(B)
(A)
Upper
(2)
Bring
turning Draw
of
c
guides
looper
upper
the
handwheel
thread
thread
the
©
from
stand
©.(Fig.
threading
looper
toward
spool
and
A)
to
and
its
you.
pass
then,
(8)
lowest
it,
in
position
through
orde
by
guide
through
Fig.
Fig.
A
While
pressing
your
right
discs
with
B
Thread Cut
thread.(Fig.
Close
the
the
the
hand,
your
hole
thread
front
C)
down
lay
thread
left
upper
of leaving
cover.
the
hand.
tension
between (Fig.
looper
about
release
B)
0
10cm
thread
using
(4”)
lever
with
tension
tweezers.
of
spare
—8—
Needle
(3)
For
easeinthreading,
to
the
1.
Raise
the
Draw
2.
thread guide®. Lay
thread
3.
pressing
while Pass
thread
4.
needle thread. Pass
thread needle thread.
Threading
non-operating
needlestotheir
from
between
down
through
through
(Fig
(C) (D).
turn
position.
spool
thread the
guides
guides
A)
the
highest
and
tension
tension
©,
moveable
(See
Page
position.
it
pass
discs
release
®,
©
©,
©
cutter
3).
through
©
lever.
for
right
for
left
(D)
(C)
(B)
(A)
Fig.
A
Then
5.
Preparation Check
Confirm lower slowly
thread Cut
the
spare
tweezers
Use
thatnothread
cutter
towards
thread
thread.
that
thereisany
the
the
the
handwheel
thread
needle
incorrectly.
Turn
handtocheck stitch finger
If of threaded
each
needle’s
leaving
for
easy
for
Sewing
the
upper
correctly
you.Ifitisnot
fabric
or
waste
towards
that
the
needle
of
the
doesn’t
wind
plate,
eye
about
10cm
threading
and
Checking
slips
off
guides,orbreaks.
cutter
moves
by
turning
correct,
thread
you
thread
winds
plate.
around
checkifany
0.
(4”)
of
to
needle’s
the handwheel
between
with
the
stitch finger
threads
against
check
cutters.
your
around
eye.
right
-I
7-
the
if
the
are
—9—
when
finger,
form
the
will
be
presser
foot.
and
presser
STITCH
threads
the
gently
presser
the
by
you
the
on
material
through.
fed
foot
Raise
Place
push
foot
draw
hand
stitch
just
lifter.
presser
to
it
before
the the
OVERLOCK
completed,
the
under
handw
make
to
Fabric
the
sew,
to
foot
raise
to
thick
very
the
up
presser
the
and
stitch
and
heel
stitch
place
and
material;
presser
lower
and
behind
towards
it
the
foot
Before
threading
wound
four
turn
and
three
or
Setting
beginning of is
setting
lifter
of
the
THREAD
NEEDLES
2
Sewing
is
around
threads
the
times
presser
the
need
no
the
lift
to
under
cutter
FOUR
4. USING
4-1.
After
not
are
the
out foot,
two finger.
7
4-2.
When
ahead There
For foot material front
sewing.
I
—10--
4-3.
Beginning
(1)
Place
and
Beginning
material
the
sewing
begin
to
and
sew
under
slowly.
Ending
toe
the
Sewing
of
presser
the
of
foot
EndIng
(2)
oft
Sew
thread
sewing.
me
oraw
‘eft
the
chain-Stith
oo
*
bead
the
Cut
presser
ctI
(2”)
th
a*
not
of
terial
shed
me
pufl
nd
hfltit
toot
ifl$tit
sewing
mtying
machine
This
it
break.
illustrated,
s
from
forming
and
fabric
is
out
to
gently
is
called
roughly
with
end
the
chain
a
prepare
backwards
operating
chain-stitch
the
as
leaving
of
cutter
fabric.
thread
prevent
to
for
needle
about
the
and
sewing.
the
next
and
make
will
behind
cm
5
4
to
pistment PreSsure
presset
me
thr
very
thAcker
medium
y
ery
of
pressure
toot
(standard)
necessary
thick
thinner
sew
materials
pressure adjustment
Presser
the
is
when
only
materials.
materials
with
the
of
screw.
Foot
pre-adjusted
thickness.
work
you
with
pressure.
more
presser
foot
4
for
on
less
by
—11—
Thread
3.
PTT;:NN STITCHES
Tension
THREAD TENSiON
Chart
Left
Needle
Right
‘j3l
Needle
Upper Looper
‘f3l
L
Lower Loope
I
3
..
STITCH
LENGTH
CUTTING
WIDTH
STITCH
FINGER
OVERLOOK
ROLLED
NARROW
,e
.fferent
EDGE
EDGE
tension
for
accordingtothe
‘Dove.
figures
the
3ince nread
tension,itmay
.ension slightly.
rhread
.mnd
The
tensions
the
thread.
differential
each
will
feed
4
:
thread
of
the
pattern
in
the
chart
necessary
be
differ
accordingtothe
ratio
is
tension
stitches
are
for
normally
dials
as
average
adjust
to
‘N”.
4
4
4
kind
(See
should
in
the
strength
the
of
P16)
chart
thread
fabric
be
4
4
2.5-5
mm
5-6
mm
POSITION
PULL
4
4
8
4
1-1.5
1-1.5
mm
mm
5-6
5-6
mm
mm
LEVER
TOWARD
YOU
PULL LEVER TOWARD YOU
of
NORMAL
—12--
4-6.
the
Set
tighten
To
number.
loosen
To
number.
Left
®
Right
©
Upper
©
Lower
©
Thread
balance
the
the
needle
needle
tension,
tension,
looper
looper
Tension
the
of
thread
thread
thread
thread
Adjustment
tension
tension
turn
tension
turn
tension
tension
tension
tension
as
weak
dial
dial
possible.
as
to
to
a
a
N
higher
lower
J
Correct
(1)
Lower well
threads
fabric.) Needle
(2)
Tighten
©)or (Dial
tension.
looper
balanced
should
thread
Unbalanced
and
round
thread
the
loosen
©).
thread
over
the
with
make
should
upper
tension
thread
and
same
crosses
not
the
tension
upper
tension.
be
looper
back:
of
thread
at
slacken,
the
of
the
thread
upper
the
should
(Both
edge
or
looper
lower
be
looper
the
of
pulled.
wraps
(Dial
looper
7-
thread
needle
Right
thread
looper
thread
needle
Right
.Upper
Side
Left thread
N
—13—
-
o-
BC
0)
z0.
hi
0-CD
CD
C,)
P
0
0)
0-
DCD
CD—
(D
CD
:,-
0
0)
CD
C’
0
0
c.
CD
0-
0
0
z
oc
00
0)
CD
CD
C,
z
CD
0
0)
0)
C
0
ö-z
C,
z
C
(51
CD
0.
CD
CD
::j-
CD
0
CD
(0
CD
CD
(1)CD
0
CD
0
0
0
C,)
0
0
CD
CD
0
0
0
0
5.
ADJUSTING
WIDTH
Adjust (0.28”) The
Open
(1)Ifthe cutting
width, cutting arrow.
AND
the
cutting
accordingtothe
standard
the
front
leaving
width
(Toabigger number)
BALANCE
CUTTING
width
from
kind
cutting
width
width
covertoadjust
narrower
is
loops
off
the
adjusting
dialtothe
OF
STITCH
WIDTH
5.2(0.2”)to7.0mm material.
of
is
5.5mm
the
fabric
cutting
than
edge,
direction
(0.21”).
width.
stitch
the
turn
4
the
of
(2)Ifthe cutting
causingapucker
the
cutting
of
the
6.
STITCH
The
machineispre-set
regular
stuch length
5mm
+
seaming
by
For
normal
2.5mmto5mm.Astitch length is
used
width
width
arrow.
LENGTH
from
one-touch
overlock
only
(To
and
for
is
wider within adjusting a
smaller
toa2.5mm
overlock.
1mm
of
the
rolled
than
the
stitch
the
overlock
dial
to
the
number)
ADJUSTMENT
stitch length
You
may
(Narrow
stitch length
set
edge.
the
rolled
stitch
less
length than
width,
seam,turn
direction
adjust
edge)
dial.
from
2.5mm
for
the
4
to
/
Stitch
length
dial
I
—15—
Indicator
DFFERENTAL
7.
FEED
icr
Differential
,,
on
fabrics, front to
This stretchable
+
scrap
a
feed
“N”
p
Differential
1i
to
cnart
the
.
below
and
—anrin
test
stitch
performance
Differential
ratio
is
set
feed
,,
N
feed
since
and
one
different
at
function
indicates
material
of
Differential
feed
ratio
two
behind
produces
and
prevents
independent
the
ratio.
a
lightweight
the
normal
you
are
stretching
needles,
neat
finish
fabrics.
position.
going
Result adjustment
feed
can
to
or dogs,
be
of
overlock
use.
of
puckering
one
adjusted
for
in
—---H--
obaole
dte
-__
I
i
rri
ma
riols
id’tclt
Knit ersPy
Medium
‘oven aorics
N
N
07N
2
—16—
CORDED
8.
OVERLOCK
Corded
stabIlZe such
Thread
overlock
stitches
knitted
as
nrrow
can
when
fabrics.
cord
or
be
ribbon
used
joining
strengthen
to
elastic
illustrated.
as
and
materials
I
There
place
(1)
into rough
Sew
cz
re
edge
the
the
then
over
of
two
Narrow
hole
the
a
the
ways
the
in
with
sew
cord. narrow
overlocked
of
cord
corded
or
foot
the
cord,
overlock.
ribbon
back
and
needle
right
positioning
stitch.
(about
under
3mm)
the
stitching
the
it
on
J
—17—
SEWING
9.
FOR
CURVED
SEAMS
a
For
inside
For trimming
presser
the
left
your
pressure hand
For
outside
directions
neat
to
and
curves,
line
foot, hand, in
hold
of
clean
of
applying
opposite
the
against
it
curves,
the
guide
the
at
above.
fabric
the
apply
finish
the
pressure
same
the
curved
of fabric
under
time,
direction
cutter
pressure
gently
the
to
with
as
in
seams:
right
the
apply
shown.
the
with
front
fabric
a
your
opposite
the
of with little
right
—18—
THREE
10.
STITCH
Though
stitch
To
simply
(1)
Three-thread wde
can Use
is The
this
overlock
three-thread
sew
remove
removing
By
as
achieved.
be
the
about
differential
a
machine
4-thread
left
thread
6mm
THREAD
USING
is
2
using
stitch
needle.
1
right
the
overlock
wide. feed
stitch
overlock
tension.
ratio
OVERLOCK
NEEDLE
I
mainly
made
needles.
needle.
using
stitch
(DiE
using
I
.
illy
using
overlock
is
norm
1
needle
“N”.
for 4
2
This
thread
needle
1
for
needles
stitch
(See
as
R16)
ii
,jjj1,
V
iI
1
llJi,
I
/t
N
needle
(2) The
naht
arnm
The
removing
By
right
needle
thread
wice.
differential
sews
tension
feed
the
with
(Dial
ratio
left
needle.
narrow
a
©).
normally
is
The
width. stitch
“N”.
Use
is
(See
the
about
P.16).
—1
9—
1/
Riaht
needle
..—1
.
-7
2-Thread
overlcc
convertor
2-THREAD
11. USING
1.
Use
needle) Remove
2.
Attach looper.
*
Store case.
needle
1
2-thread
the
NEEDLE
I
and
upper
removed
lower
OVERLOCK
looper
looper
overlock
needle
(left
thread.
convertor
thread
STITCH
needle
thread.
in
the
or
right
upper
to
convertor
Convertor
case
ii
lowest
you.
on
convertor
eye
the
Overlock
position
upper
the
insert
and
(
of
by
2-Thread
cover.
looper
overlock
convertor
of
To
toward
its
to
convertor
of
;
into
Conversion
11-1.
front
Open
(1)
upper
Bring
turning
Put
looper.
J
Push
(2)
the
upper
handwheel
2-thread
the
EJ
tip
looper.
projection
)
11-2.
\\
\
PAfl\ STITCHEa
________
2-Thread
2
-T Over1ock (Wide)
2-Thread
Narrow
2-Thread
Roled
The
the
chart
Since
aDJUSt
Thread The
differential
Stitch
Overlock
(Narrow)
h
r
e
a
tenson
aoove.
the
figures
the
thread
tensions
SelecUon
THREAD TENSION
1
d
edge
edge
for
each
will
feed
MATERIAL
(see
Light Medium Heavy
Light
Medium Heavy Light
Medium Heavy Light
Medium
Heavy
of
in
the
tension
differ
ratio
P24)
the
chart
slightly.
according
is
normally
Tabie
thread
are
Left Needle
I3l
1 1
2
tension
for
to
“N’,
dials
average
the
(See
Right
Needle
Il3I
1-2 1-2
2-3
4
4
2
2
should
strength
kind
P16)
of
I
I
fabric
Upper
Looper
[{[
be
of
and
4lI
different
thread
the
Lower Looper
3’
J
4
6
5-6
4
4
5
5
according
tension,
thread.
1
fTh
>1J
>1
2.5
1
I
>1111
1
Stitch Length
Dial
2.5
2
—3
.
—1.5
1.5
to
it
may
Cutting Width
j
Ajusting Dial
EI1
3
5.5
5.5
,j
J__L_l
5.5
the
pattern
be
necessary
5.5
towards
you Pull
lever
towards
you
stitches
Stitch Finger
Normal position
Normal position
Pull lever
as
to
in
—21—
\
-n
U)
CD
z
—I
-
-
)
C)
0
CD
CD
cn
0
CD
:3
c
0
\
5
o
0
o
(D
CD—
D
-
0(0
-‘
0
T
o
COO
DD
£
C)
CD
CD
CD
0(0
-
o_-
D(D
CD
Dj
D
::r
0
D-
CD
icD
DO-
-‘
CD
CD
0-
Ch
3
t
0-
0
DD
——
O
Pi-
-
CD
0.
i
D
-_CI)
D
0
g
(0D
-
-‘
CD
0
0
-
.
0)FJ
O-_.
0
4__;__
CD
(j)
0(0:3D—
.-
---
t’J
12.
12-1.
ROLLED
3-Thread
EDGE
Rolled
Edge
Narrow
The
fabricisoverlocked
\.joper
Rolled
overlocking,
(1)
(2)
edgeisachieved
deal
for
Remove needle) Pull
stitch
with
front
use
edge
thread.
the
with
the
finger
red
left
2
types
thin
needle.
line
materials.
knob
on
with
by
rolling
as
illustrated
(Sew
toward
needle
upper
only
you
plate.
the
and
with
to
lower
fabric above
the
align
and
are
right
it
Roiled
Edge
©
I
The
fabric
is
roiled
by
adjusting
the
thread
upper
looper
tension
thread.
and
is
overlocked
with
/
(3)At
the
beginning
-
end
of
the
thread
of
sewing,
chain.
gently
pull
the
—23—
isDARD
CHART
FOR
ROLLED
EDGE
(3-Thread
Rolled
Edge)
CUflING
WIDTH
ROLLED NARROW EDGE
5-6
mm
EDGE
5-6
mm
.2.
Thnvert
*
n
2-Uiread
to
ngh
needS
Rofled
2-threac
overiock
only
Edge
and
pull
(See
stitch
P.20)
finger
toward
STITCH
DIFFERENTIAL
THREAD TENSION
+
-J
Adjust the
fabric
LENGTH
RIGHT NEEDLE
UPPER
THREAD
LOWER
THREAD
as
needed
FEED
and
RATIO
©
THREAD
OOER
LOOPER
according
the
threads.
1-1.5
mm
N
3-5
3-5
7-9
to
(See.
the
kind
P.29)
1-1
5
3-5
3-5
3-5
mm
N
of
you
3TANDARD
rNG
Ci
STITCH
DIFFERENTIAL
CHART
NIDTrI
LENGTH
RIGHT
LOWER THREAD
FEED
FOR
RATIO
LOOPER
ROLLED
ROLLED EDGE
5.5mm
1-1.5
©
.
EDGE
mm
N
2
-
(2-Thread
NARROW EDGE
55mm
1.1.5
r
Rolled
mm
N
4
Edge)
—24—
PN
13.
tucks
Pin
the
Use
tucking
Pin
clothing
TUCKS
are
cutter
is
and
overlocked
guide
as
a
suited
lady’s
a
on
but
the
to
blouse.
the
do not design
edge.
cut
of
your
child’s
a
fabric.
(1)
*
(2)
*
(3)
+
Remove desired
needle.)
Raise
tensionisset
The
P12)
(See
and
Mark
differential
The
Place
Ide
edge
and
plate
Make
P.11)
(See
left
the
pintuck
presser
the
press
fabric
the
line with
in start
chain-stitch
width.
pin
feed
under
sew.
to
or
foot
for
at
right
(Sew
lifter.
normal
tucks
ratio
the
the
the
needle
only
in
advance.
normally
is
presser
side
end
with
over
of
of
the
lock.
the
the
for
one
“N”.
foot
needle
sewing.
your
J
with
(4)
tuck
The Dewing
is
5
finished
ironed
your
when
side
one
to
—25—
REPLACING
14.
LOWER
CUTTER
.ower
cutter holder
Align
cutter
Replacing
Unplug
(1)
Open
(See
(2)
Loosen lower
(3)
Set Align needle screw(j.
15.
When itisswitched
Howtoremove
(1)
Take
(2)
Remove
(3)
Remove
(4)
Change
(5)
Replace
Lower
the
front
page
lower
cutter.
the
new
the
plate,
CHANGING
light
the
out
the the the
the
the
Cutter
machine
cover
and
3) cutter clamp
lower
cutter.
topoflower
and
tighten
LIGHT BULB
does
not
on:
the
lamp
power
supply
presser
lamp
light
lamp
foot
cover.
bulb.
cover.
disengage
screwJand
cutter
lower
come
cover.
plug.
lifter
with
on
by
upper
the
cutter
even
pulling
cutter.
remove
top clamp
though
it
out.
of
How
to
use
(1)
Take
out
(2)
Place
the
in
accessory
the directionofarrow of
arrow
Replace
(3)
of (2).
16.
LUBRICATION
Although
machine a
special
drops
durability.
Lubrication since oil
of
oil
the
bulb
catcher
the
power
supply
bulb
catcher
and
©,
the
new bulb
the
important
impregnated sintered
on
moving
box
around
,
remove
is
not
metal
(plastic
turn
the
in
required
parts
(plastic
plug.
the
itinthe
bulb.
the
are
metal,
parts
sheath).
sheath)
bulbinthe
direction
reverse
often
all
one
will
increase
found
steps
for
made
or
this
of
two
—26—
CLEANING
First
disconnect
removing
Open
1. Using
2. and
front
lint
plug
the
that
STORAGE
removing Using
machine
your
away
Store
the
the
V’lhen
1. disconnect
2.
3.
SERVICING
questions
Any
to
are
machine
be
was
machine
from
cover
brush
has
machine
from
it
from
plug
vinyl
when
from
regarding
addressed
purchased.
from
the
electric
side
and
provided,
accumulated.
not
is
the
electric
the
provided
cover
you
bright
and
service
the
to
power
outlet.
cover.
(See
remove
power
finish
all
in
use,
outlet.
please
your
damp
andoroperation
store
supply
Page
the
supply
sewing.
places.
where
by
3)
dust
please
by
cover
the
—27—
17.
ACCES$OR1S
Screw
drivers
(large)
(small)
Lower
cutter
Tieezers
lcaning
brush
Net
(anti-spill
(In
the
Accessory
n
the
Accessory
cover.)
cover.)
Vinyl
Spool
cover
Adapter
sleeves)
Needles
H
S’’
2-thread
M
EZ
H
overlock
convertor
(In
...
the
.....
...
Accessory
80
cover.)
0
—28—
plastic
Convertor
sheath
Ii
case
(In
the
Accessory
cover.)
18.
TABLE
OF
SEWING
MATERIALS,
NEEDLES
AND
THREADS
Needle
(For
home-use
machine)
Thread
SCHMETZ
130/705H
sewing
material
Thin (crepe,
georgette)
80
Poluester(spun,
Twisted
#60/2
#80/2
twisted
Twisted
(#80/3
—#100/3
twisted
filament)
thread
thread
thread
thread)
Mediumtothick
material
(Broadcloth,
etc.)
80—90
#60/2
Twisted
gabardine,
thread
Thick (thick
#50/2
60/2
material denim)
90
Twisted
twisted
thread
thread
(8etween edce)
ball
Use
Thread
(Needle thread)
Overedging
left
Stitch
length
needles
point
tension
width
needle
and
for
Loose
Man-Made
52—55mm
2—2.5mm
fibersorstretch
(Set
the
balance
fabrics.
Medium
of
5.2—5.5mm
looper
2.5—3mm
tensions
Tight
weak)
55—6mrn
2.5—3mm
—29—
19.
PROBLEM
Under
normal necessary Toliowing
for
cases
SOLVING
conditions, this
machine.
are
not
if
you
failure
carefully
of
machine.
follow
Check
instruction
your
for
operating,
machine
before
no
you
difficult
call
for
or
special
service.
adjustment
is
SQiLEM
Machine
sew
not
Machine
not
feed
Drccerlv
Needle
S-caking
Threads
does
does
Breaks
Not
Pressure
insufficient Differential
I
Bent Needle Pulling
improper
Thread Incorrect
plugged
on
blunt
or
inserted
fabric
threading
tension(s)
CAUSE
in
presser
feed
needle
while
setting
properly
foot
not
set
incorrectly
sewing
too
tight
of
needle
correctly
Plug
and
Increase pressure right
Adlust
Insert
Reset
Do
Re-thread
Reset
Reset
Reset needle
CORREc11ON
cord
machine
pressure regulator
differential
new needle
not
pull
machine
thread
needle
needle/change
into
properly
needle
fabric
tension(s)
electrical
by
screw
feed
outlet
turning
to
to
new
REFERENCE
11
16
6
6
-
7—9
12
6
3kipping
Stitches
irreaular Stitcnes
Puckering
I
a
tight
Bent
or Needle Improper
Tension
Bad
needle
Needle
Improper Need
differential
blunt
inserted
threading
not
adjusted
thread
threading
needle
incorrectly
tensions
feed
properly
are
too
—30—
Insert
Reset
Re-thread
Check
Change
Loosen
Re-thread
Set
new
needle
needle
machine
thread
needle
needle
machine
differential
tensions
thread
feed
tensions
0.7
6
6
7—9
13.14 6
13.14
7—9
-
N
16
SPECIF!CA11ONS
20.
Number
Number
Needles
of
of
threads
needles
Standard
3.
4.
Needles
2
SCHMETZ
2
or
130/705H
threads
needle)
(1
NO:
2
80—90
r
between
Width
Overlock
length
Stitch
.
Differential
Maximum
Machine
two
width
.
feed
sewing
dimensions
ratio
speed
needles
.
Standard
Width
Depth Height
300mm
230mm
290mm
mm
5.5
Normal
(Max.
(Max.
2mm
(Range
1
5mm
Raige
,
RPM
1500
340mm)
350mm-..555mm)
5.27
mm)
Weight
—31--
8.7
kg
L
C)
C,
C)
m
C),
C)
rn
0
m
m
m
-n
N)
Loading...