

Page 1
INSTRUCTION
0
0
WHITE
Call
Toll
800-331-3164
www.whitesewng.
BOOK
Free
corn
750
=
Page 2

‘When
‘Read
using
instructions
all
an
‘IMPORTANT
electrical
before
appliance,
using
this
basic
sewing
safety
SAFETY
precautions
machine.’
should
INSTRUCTIONS”
always
followed,
be
including
the
following.’
“
DANG
sewing
‘This
1.
electric
the
‘Always
2.
“
VVA
not
‘Do
1.
this
‘Use
2.
the
by
‘Never
3.
or
damaged,
examination,
‘Never
4.
foot
and
“Never
5.
not
‘Do
6.
not
‘Do
7.
disconnect,
“To
8.
not
‘Do
9.
‘Keep
10.
“Never
11.
‘Do
not
12.
ER
machine
outlet
unplug
I
sewing
control
or
outdoors.’
use
operate
unplug
with
bent
use
N
to
or
repair,
insert
away
RN
allow
manufacturer
operate
operate
drop
fingers
sew
—
should
immediately
before
G
used
be
machine
as
sewing
this
dropped
electrical
sewing
the
from
free
any
where
switch
turn
pulling
by
from
damaged
a
needles.’
reduce
To
never
replacing
To
—
a
as
only
contained
machine
into
machine
the
object
aerosol
to
cord.
on
moving
all
needle
the
be
using
after
bulb.
light
reduce
toy.
for
water.
or
accumulation
(spray)
the
the
Close
intended
its
this
in
it
if
Return
mechanical
with
any
into
off
(‘0”)
unplug,
To
parts.
plate
of
risk
unattended
left
and
Replace
risk
attention
manual.’
has
a
the
any
opening.’
products
position,
Special
as
electric
cleaning.’
before
bulb
burns,
of
necessary
is
described
as
use
damaged
sewing
adjustment.’
openings
air
dust,
lint,
of
are
being
then
the
grasp
care
can
cause
this
shock:’
when
with
fire,
cord
machine
blocked.
and
used
remove
plug,
required
is
plugged
same
electric
when
in
plug,
or
to
loose
or
plug
not
needle
type
this
the
Keep
cloth.’
where
the
around
to
in.
shock,
this
manual.
it
if
nearest
from
cord.’
break.’
Always
15
rated
injury
or
sewing
not
is
ventilation
oxygen
outlet.’
sewing
the
unplug
watts.’
persons:’
to
machine
only
Use
working
authorized
openings
being
is
machine
sewing
this
is
used
attachments
properly,
dealer
of
the
administered.’
needle.’
machine
or
by
recommended
has
it
if
service
or
sewing
near
been
from
children.’
dropped
centre
machine
for
Page 3
13.
14.
15.
not
“Do
“Switch
changing
“Always
other
pull
the
unplug
user
push
or
sewing
needle,
servicing
ION
fabric
machine
threading
sewing
while
off
bobbin,
machine
adjustments
Moving
—
Close
stitching.
when
(“0”)
or
from
mentioned
parts
cover
It
making
changing
electrical
the
—
before
may
To
in
reduce
deflect
any
presser
outlet
instruction
the
operating
needle
the
adjustments
foot,
when
injury,
of
risk
machine.”
causing
in
etc.”
removing
manual.’
switch
the
to
it
needle
covers,
before
off
breaks
area,
lubricating,
servicing.
such
threading
as
when
or
needle,
making
any
“SAVE
“This
THESE
for
product
is
INSTRUCTIONS”
equivalent.”
or
household
2
use,
Page 4

TABLE
Removing
Replacing
Machine
OF
Front
the
identification
Settingupyour
control,
Foot
Accessories
Presser
Winding
Inserting
Threading
Using
Picking
Changing
Machine
Straight
Securing
Inserting
Adjusting
Changing
Zigzag
Satin
Blind
Shell
3-step
foot
bobbin
the
top
automatic
up
bobbin
presser
setting
stitch.
seams—
zippes
thread
the
stitch
stitch
stitch
stitch
zigzag
Double-action
Bridging
stitch
CONTENTS
Cover
covers
on
machine
Powerllight
lift
safety
-.
bobbin
thread
needle
chart
needle,
stitch
thread
feet
and
tension
threader
piping
thread
the
..
machine
switch
-
and
fabric
chart-
4-5
6-7
8-10
11
12
13
14
15
16
17
18
19
20-2
22-23
24
24
25
26
27
27
28
29
30
31
31
Adjusting
Triple
Ric-rac
Stretch
Overlock
Honeycomb
Elastic
Double
Feather
Buttonholes
Procedure
Corded
Caring
1
Cleaning
Changing
For
straight
overiock
for
further
stretch
stitch
stitch
overlock
stitch
stitch
overtock
stitch
buttonhole
your
machine
the
feed
light
bulb
information
stitch
stitch
stitch
stitch
dogs
-
balance
and
visit
our
hook
-
area,
website
32
32
33
33
33
34
34
35
35
36
37
38
39
at
www.whitesewing.com
3
Page 5
0
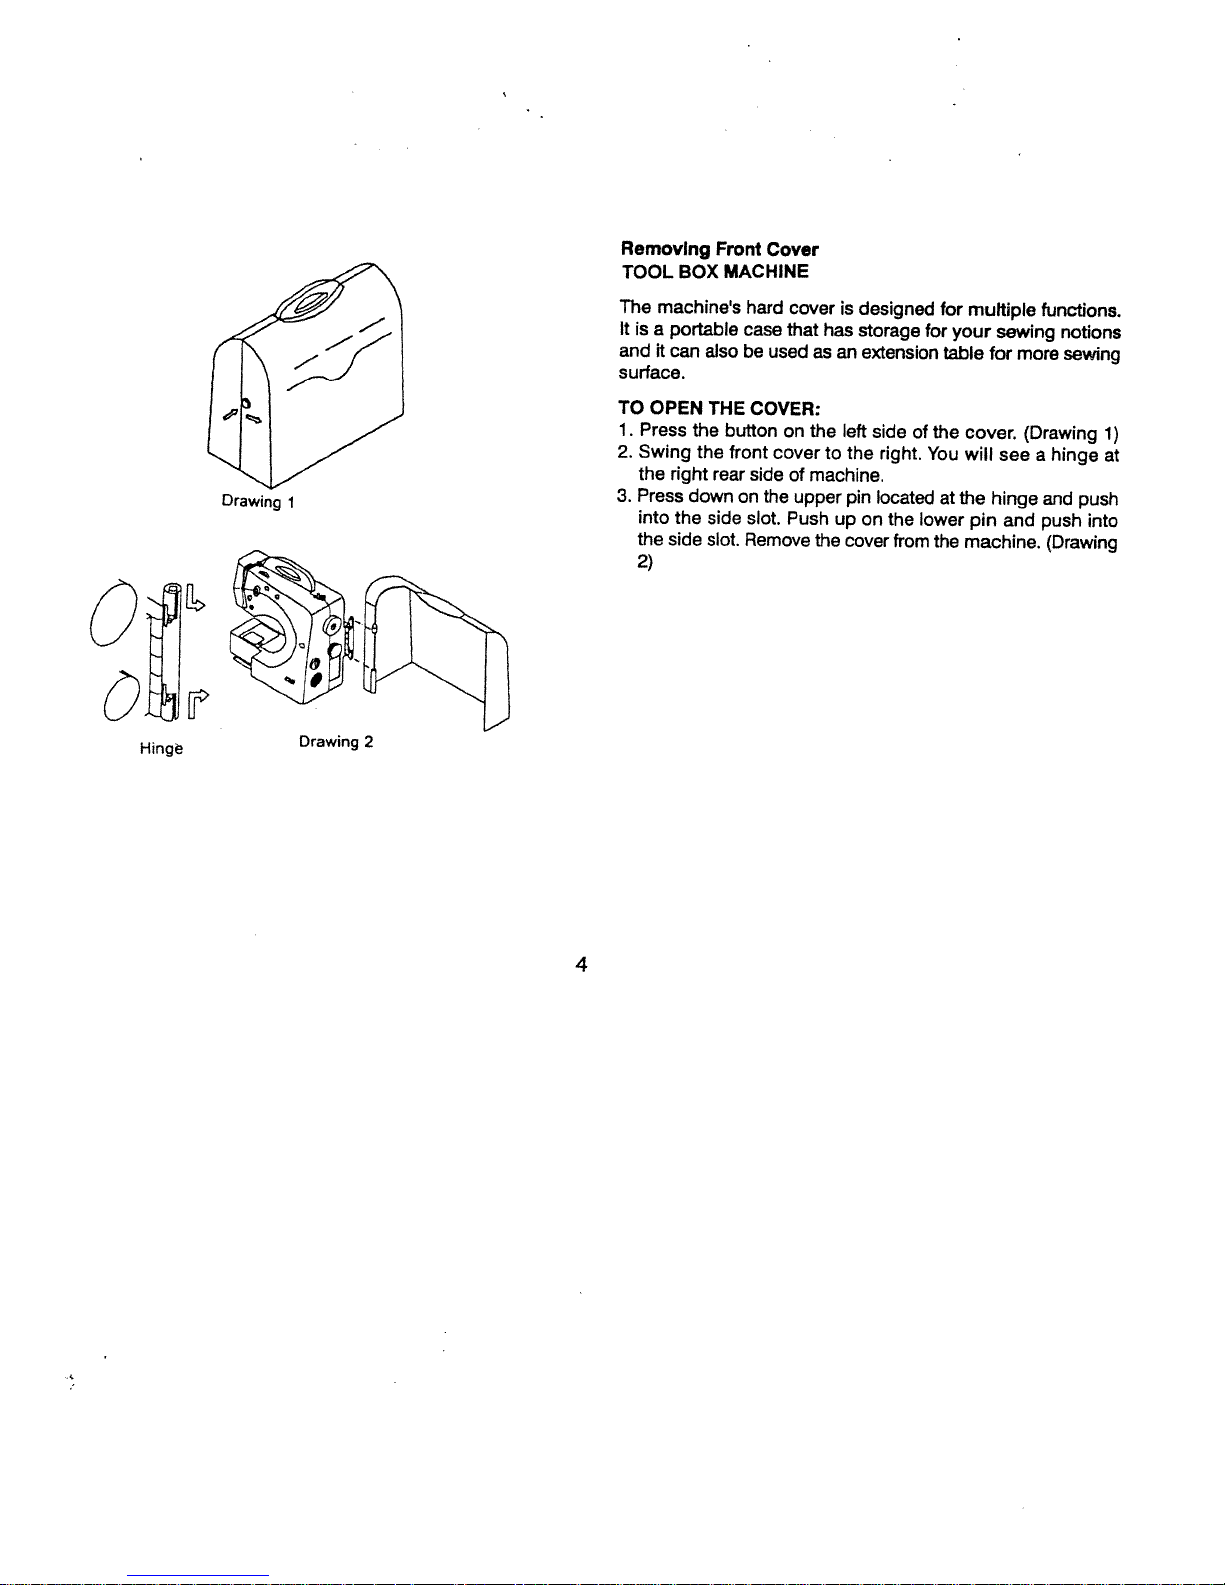
Removing
TOOL
BOX
machine’s
The
It
portable
is
a
and
it
can
surface.
TO
OPEN
1.
Press
Swing
2.
the
right
Press
3.
into
the
side
the
2)
Front
MACHINE
aiso
THE
button
the
the
rear
down
side
slot.
hard
case
be
COVER:
front
side
on
the
slot.
Remove
Cover
cover
that
used
on
cover
of
upper
Push
is
designed
has
storage
as
an
extension
left
the
to
the
machine.
pin
up
on
cover
the
side
right.
located
the
from
for
the
of
You
lower
the
for
multiple
your
table
cover.
will
at
the
pin
machine.
functions.
sewing
for
more
(Drawing
seeahinge
hinge
and
push
and
(Drawing
notions
sewing
1)
at
push
into
Hinge
Drawing
2
4
Page 6
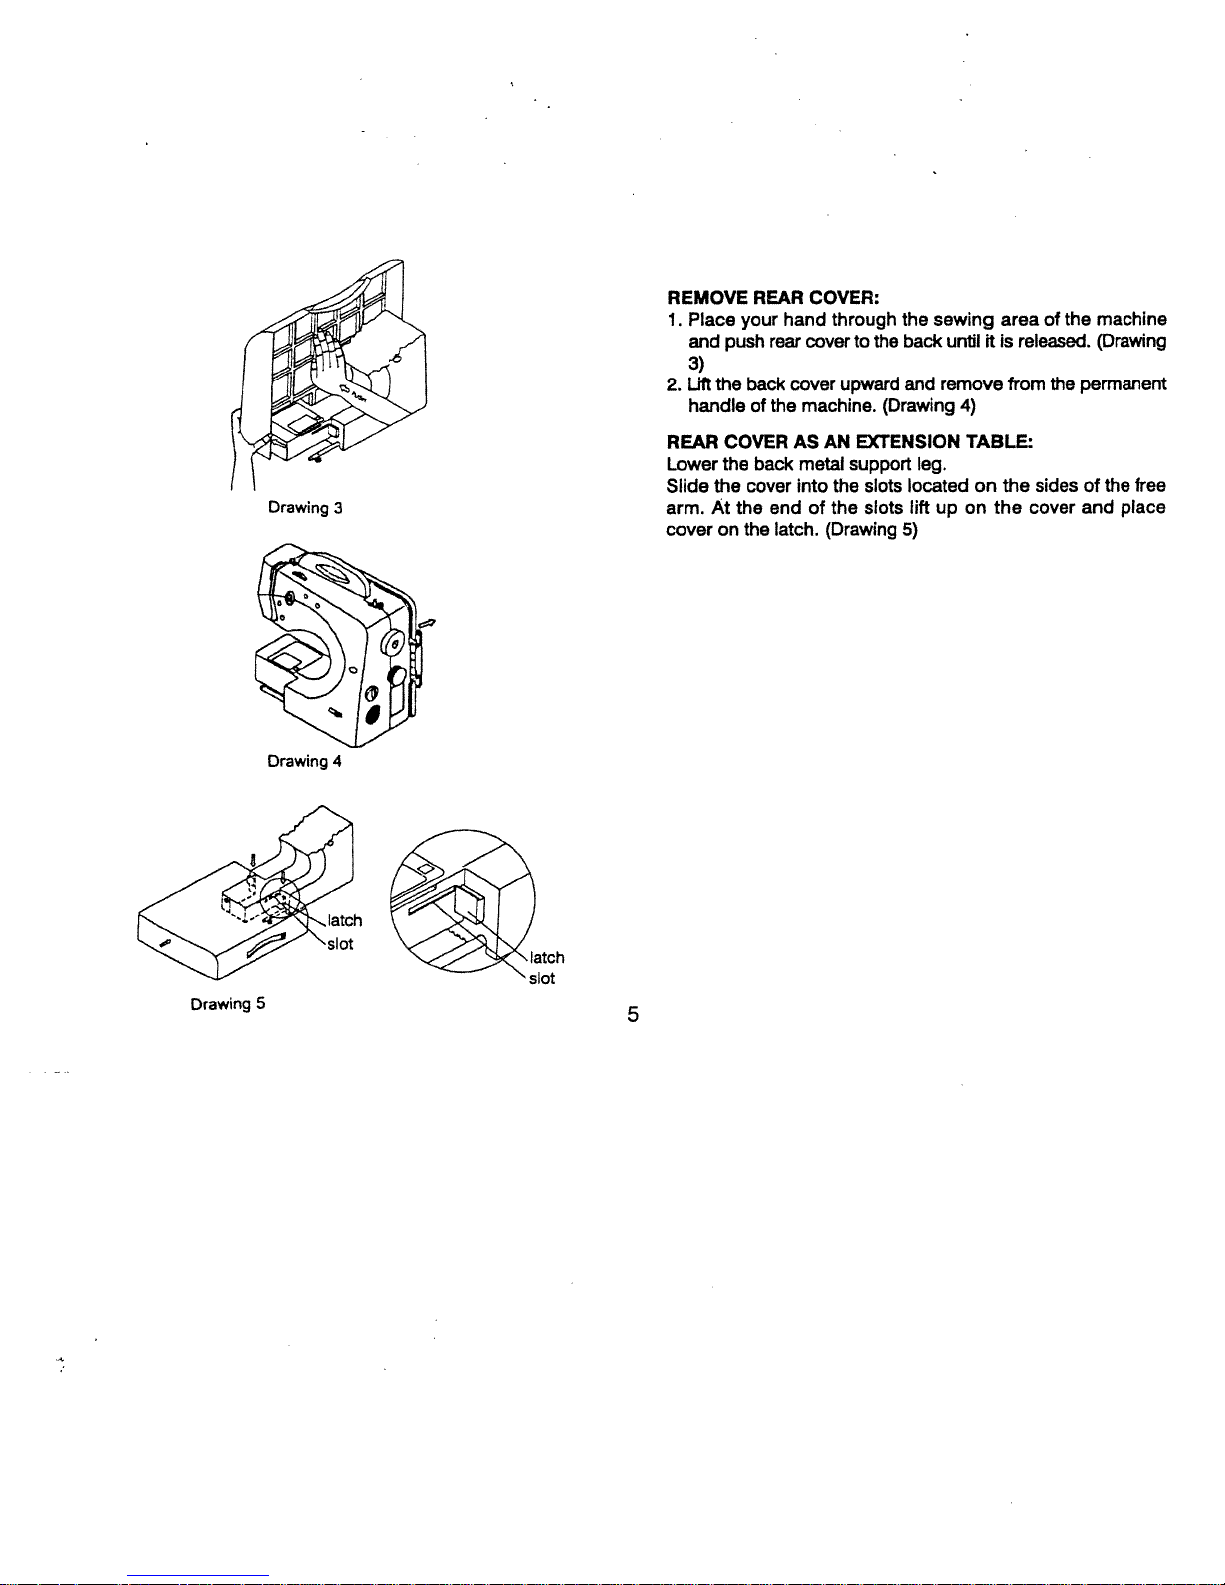
REMOVE
1.
Place
push
and
3)
Uft
the
2.
handleofthe
REAR
your
hand
rear
back cover
machine.
COVER:
through
covertothe
upward
the
sewing
back
and
remove
(Drawing
untilitis
4)
area
released.
from
of
the machine
(Drawing
permanent
the
Drawing
Drawing
Drawing
5
leg.
located
lift
up on
TABLE:
on
the
the
sidesofthe
cover
and place
free
COVERASAN
REAR
the
Lower
Slide
3
arm.
coveronthe
4
the
At
cover
the
back
end
latch.
metal
into
of
(Drawing
EXTtNSION
support
slots
the
the
slots
5)
5
Page 7
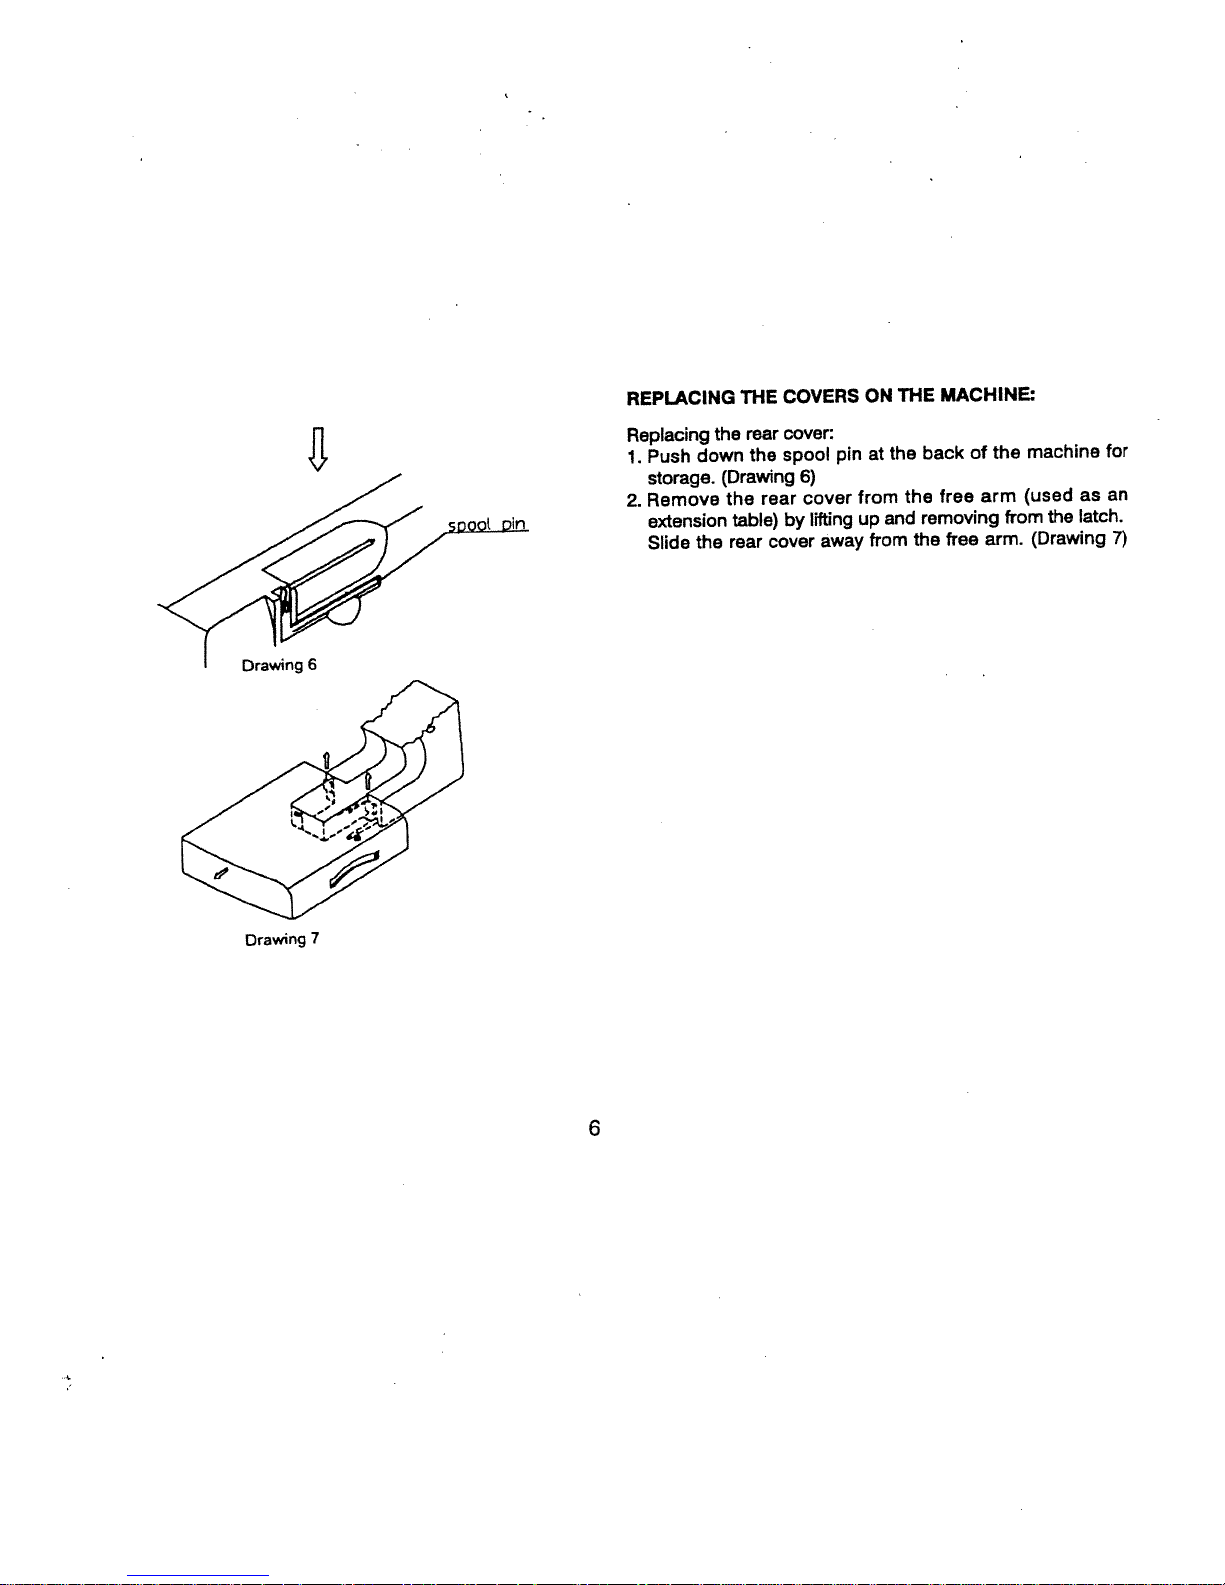
REPLACING
Replacing
Push
1.
the
down
storage.
Remove
2.
extension
the
Slide
THE
rear
the
(Drawing
rear
the
table)
cover
rear
COVERS
cover:
pin
spool
6)
cover
lifting
by
away
ON
at
from
up
from
THE
the
the
and
MACHINE
back
free
removing
the
free
of
the
arm
arm.
machine
(used
from
(Drawing
the
as
latch.
for
an
7)
Drawing
7
6
Page 8

Place
3.
snap
8)
Align
4.
into
(Drawing
5.
Swing
the
the
the
the
cover
front
cover
the
rear
91)
front
cover
into
placeonthe
cover
then
release
covertothe
over
at
the
the
handleofthe
backofmachine.
hinges.
the bottom
front
and
Release
hinge
close.(Drawing
machine
(Drawing
the
top
into
the
and
hinge
cover.
9)
Drawing
9
Drawing
9-1
7
Page 9

14
15
29
28
MACHINE
Bobbin
1.
Thread
2.
30
2
31
21
0
5
6
7
32
26
4
5
_—
8
3.
4.
5.
6.
7.
8.
9.
10.
11.
12.
13.
14.
15.
16.
17.
18.
19.
20.
21.
22.
23.
24.
25.
26.
27.
28.
29.
30.
31.
32.
First
Face
Thread
Needle
Bobbin
Accessory
Bobbin
Bobbin
Spool
Hand
Stitch
Power/light
Plug
Presser
Thread
Automatic
Foot
Presser
Feed
Thread
Needle
Needle
Presser
Foot
Extension
Start/
Slow
Single
Needle
Speed
IDENTIFICATION
guide
storage
winder
foot
cutter
needle
foot
guide
clamp
foot
table
button
stop
up/bown
control
tension
plate
shaft
stop
switch
lever
lever
screw
screw
button
baste
/
threader
button
winder
guide
thread
cover
guide
plate
cover
winder
pin
wheel
selector
socket
release
dogs
control
stop
sew)
stitch
disc
button
Page 10
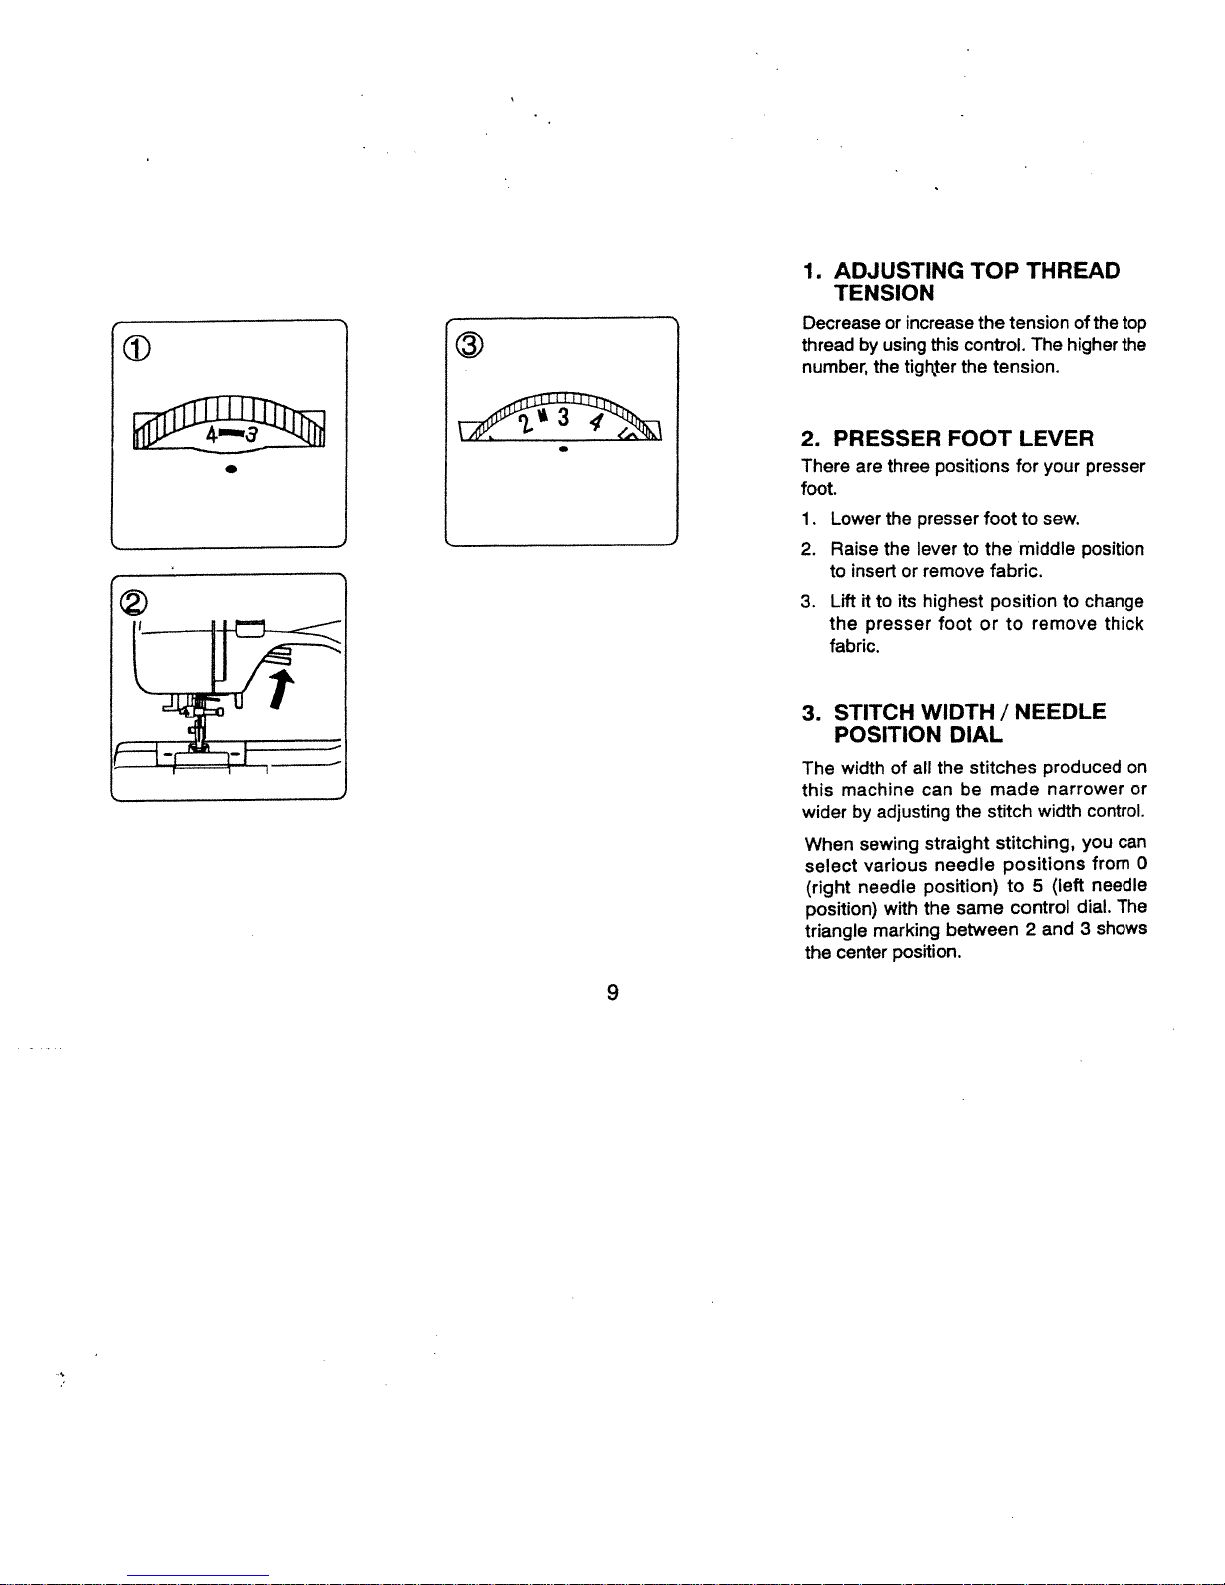
ADJUSTING
1.
TENSION
Decrease
by
thread
number,
the
or
increase
using
tighter
this
TOP
the
control.
tension.
the
THREAD
tension
higher
The
of
the
top
the
PRESSER
2.
There
are
foot.
1.
Lower
Raise
2.
insert
to
Lift
3.
the
fabric.
STITCH
3.
POSITION
width
The
machine
this
wider
by
When
select
(right
position)
triangle
center
the
three
the
the
it
to
presser
of
adjusting
sewing
various
needle
with
marking
position.
positions
presser
lever
remove
or
its
highest
foot
WIDTH
all
the
can be
straight
needle
position)
the
FOOT
DIAL
the
same
between
LEVER
for
foot
to
middle
the
to
fabric.
position
ortoremove
NEEDLE
/
stitches
made
stitch
stitching,
positions
to
5
control
2
your
sew.
position
to
change
produced
narrower
width
you
(left
dial.
3
and
presser
thick
on
control.
can
from
needle
The
shows
or
0
9
Page 11

STITCH
4.
INDICATOR
select
To
1.
fabric
of
turn
Then
2.
is
stitch
SELECTOR
stitch,
a
its
highest
at
selector
the
indicated
on
be
sure
position.
until
the
AND
needle
the
indicator
out
is
required
panel.
10
STITCH
5.
(STRETCH)
Stitch
according
Super
selected
where
6.
with
length
to
(stretch)
by
fine
REVERSE
is
recommended
It
several
reinforcement.
lever
this
down
continue
will
LENGTH
STITCH
can
thickness
stitch
the
turning
adjustment
STITCH
to
stitches
As
long
while
feed
to
be
and
same
can
begin,
as
sewing,
fabric
the
SUPER
/
DIAL
selected
type
patterns
dial
be
LEVER
or
reverse
in
are
you
the
easily
of
fabric.
can
mark
to
S
made.
seams
end
pressing
machine
backwards.
be
for
Page 12
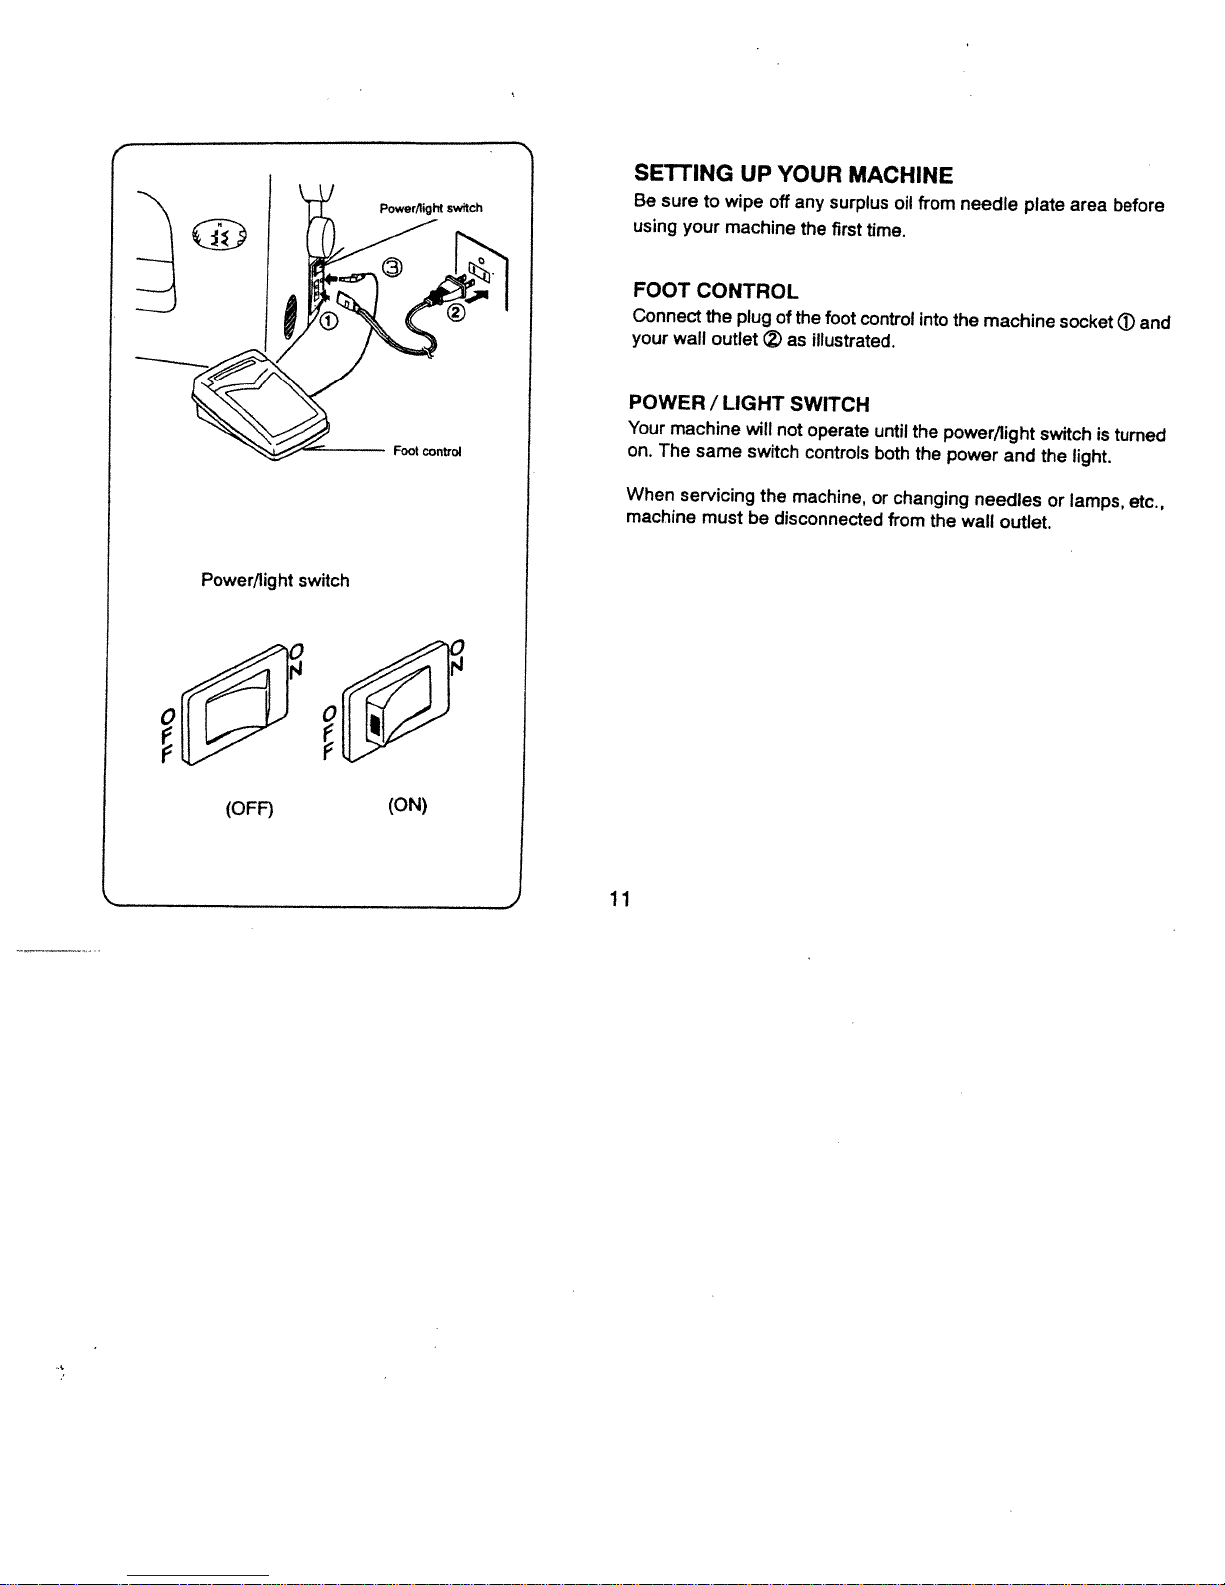
SETflNG
sure
Be
using
your
wipe
to
machine
UP
YOUR
off
any
the
MACHINE
surplus
first
oil
time.
from
needle
plate
area
before
Power/light
0
rrv
(OFF)
switch
(ON)
FOOT
Connect
your
wall
POWER
Your
machine
on.
The
When
servicing
machine
CONTROL
the
plug
outlet
LIGHT
I
wilt
same
switch
the
must
be
of
the
foot
control
illustrated.
as
SWITCH
not
operate
controls
machine,
disconnected
until
both
or
changing
from
into
the
the
power/light
the
power
the
machine
needles
wall
and
outlet.
socket
switch
the
light.
or
lamps,
is
and
CD
turned
etc.,
11
Page 13

0
®
0
ACCESSORIES
Open
the
accesso
accessories
1.
Straight
2.
Oil
3.
Buttonhole
4.
Zipper
5.
Bobbins
6.
Needles
7.
Spool
8.
Spool
9.
Buttonhole
10.
Screwdriver
11.
Screwdriver
foot
pin
pin
inside.
stitch
cap
cap
opener
foot
foot
(small)
(large)
(large)
(small)
box
They
with
and
are
brush
you
listed
will
below.
find
a
variety
of
®—9
12
Page 14

PRESSER
Your
White
presser
the
FOOT
750
foot
features
isinthe
lift
LIFT
an
up
SAFETY
electronic
position,
presser
machine
the
foot
safety.
will
not
When
sew.
STAR1fSTOP
also
can
You
button
Stop
position.
up
SEW
the
The
I
slow
needle
®SLOW
Press
stop.
@)SINGLE
the
Touch
will
needle
needle
normal
for
without
UP
(4)NEED
The
up
completely
and
®VARIABLE
can
left
infinitely
speed
sew
to
You
sliding
the
BUTTON
without
sew
located
STOP
Sew
will
STITCH
stitch
single
the
in
stop
DOWN
OR
stop
up?
sewing.
formed
tangling.
SPEED
adjust
control
slower,
above
/
Stop
stop
up
down
and
on
and
When
the
the
control
foot
the
needle.The
the
BUTTON
button
position.
up
in
the
button
fabric
to
has
the
and
button
position.
CONTROL
speed
the
right
side
right
to
the
sew
to
sew
two
needle
of
of
to
touching
by
needle
slower
one
settings.
is
thread
your
machine.
the
faster.
sew
stitch
up
will
White
will
oc
Use
pull
the
stop
release
a
at
needle
the
750
Start
in
time.The
stitch
easily
out
with
Slide
the
it
stop
the
it
REVERSE
®
I
to
is
to
Push
the
lever
machine
STITCHLEVER
down
automatically
in
to
sew
reverse.When
returns
to
normal
the
lever
sewing.
released
is
13
Page 15

WINDING
1.
Pivot
spool
2.
Pass
spool
ensure
3.
Pass
thread
4.
Pull
end
5.
Make
bobbin
bobbin.
onto
end
Start
6.
machine.
be
trimmed
completely
BOBBIN
a
spool
of
thread
smooth
of
sure
onto
Push
of
pin
of
from
thread
the
shaft
bobbin
thread.
with
filled.
into
highest
thread
on
flow
spool
through
bobbin
with
The
scissors.
a
Push
the
of
thread.
winder
winder
thread
shaft
horizontal
the
on
pin.
Secure
through
hole
end
shaft
that
Bobbin
to
14
shaft
of
left
spool
thread
in
bobbin
thread
to
is
to
spool
pin.
it
with
guides
as
isinleft
coming
right
held
will
cease
remo’e
pin
Secure
the
shown.
position.
until
will
bobbin.
position.
to
spool
as
shown.
from
it
clicks.
snap
turning
place
cap
Place
top
or
when
a
to
of
Hold
may
Page 16

INSERTING
Raise
the
presser
Raise
1.
2.
3.
4.
5.
the
handwheel
Remove
left
lower
latch
the
fig.
(See
Insert
the
clockwise
Pull
thread
about
Replace
inches
6
the
corner
to
2)
the
THE
needle
towards
bobbin
the
bobbin
with
through
bobbin
BOBBIN
foot.
to
its
highest
you.
cover
plate
of
the
bobbin
right
that
holds
making
the
(15cm)
thread
the
cover
slot
of
sure
off
the
A’
thread.
plate
L’F
positionbyrotating
by
cover
the
the
top
and
onto
pressing
plate
bobbin
bobbin
of
then
the
while
cover
rotates
bobbin
to
the
needle
down
to
left.
the
the
on
pressing
in
place.
counter
the
left.
Leave
plate.
15
iiL
Page 17

THREADING
Raise
Raise
wheel
Thread
the
the
towards
the
1.
2.
3.
I’
THE
presser
needle
machine
you.
TOP
foot
to
its
in
lever.
highest
the
THREAD
position
illustrated.
as
order
by
rotating
©
the
hand
16
Page 18

USING
the
Raise
wheel
hand
Pull
1.
thread
push
through
Guide
2.
upward.
it
Release
3.
threaded
Pull
NOTE:
AUTOMATIC
its
to
needle
towards
down
guide
lever
the
thread
the
automatically.
of
ioop
For
recommended
straight
at
position)
threader.
lever
as
until
needle
into
lever
thread
smooth
you.
and
illustrated.
the
when
NEEDLE
highest
hdok
hooked
eye.
hooked
and
back
to
threading
to
stitching
Continue
end
needle
set
using
position
thread
passes
end
and
machine,
of
machine
the
(middle
needle
THREADER
rotating
by
to
to
pull
be
will
is
it
the
17
Page 19

PICKING
1.
Raise the
Holding
hand,
revolution
comestoits
UP
needle
turn
BOBBIN
presser
hand
with
your
highest
foot
thread
wheel
right
position.
THREAD
lever.
loosely
towards
hand
with
until
the
your
you
left
one
needle
Lightly
2.
This
through
Pull
3.
together
under
about6inch
pull
will
pullaloop
the needle
both
the
up
top
and
towards
presser
thread
on
the
of
plate
bobbin
back
foot,
tail
needle
bobbin
slot.
of
machine
(15cm).
thread.
thread
threads
leaving
Page 20

CHANGING
Make
Raise
remove
Place
presser
holder.
foot
Lower
snaps
sure
presser
the
foot.
presser
foot
the
onto
presser
1.
2.
3.
4.
PRESSER
needle
the
foot
foot
below
pin
is
foot.
the
is
lever.
aligned
foot
so
FEET
in
the
Press
presser
with
that
highest
foot
foot
the
presser
the
position.
release
holder
in
slit
the
foot
so
lever
the
that
presser
holder
to
19
Page 21

MACHINE
SE1TING
CHART
STITCH
1.
LENGTh
2.
STITCH
3.
INDICATOR
DIAL
WIDTH
DIAL
PRESSER
4.
Straight
foot
Buttonhole
stitch
FOOT
Zigzag
foot
foot
Zipper
foot
20
Page 22

,_
STRAIGHT
ZIGZAG
BLIND
STITCH
WvWWNyj
mvvr
1
1.
INDICATOR
2.
STITCH
3.
STITCH
LENGTh
CONTROL
-
—
A
B
1
0.5
TROL
4
M
L.R
4
4.
PRESSER
FOOT
A,
B
B
SHELL
3—STEP
ZIGZAG
DOUBLE
ACTION
BRIDGING
TRIPLE
STRAIGHT
RIC-RAC
STRETCH
OVERLOCK//ih//i////////I
OVERLOCK
FEATHER
ELASTIC
DOUBLE
OVERLOCK
OVERLOCK________
FEATHER
BUTTONHOLE
INSERTING
-
ZIPPERS
JAAA.AJL
*
,
IRS
.
JVVVVV
W4AMMMI
F
$R5
1[>2Qc3lUc>4Q
21
D
1-4
1-5
B
E
G
H
‘“
A
.•
M
L,R
B
C
D
S
1-5
E
A,B
B
B
B
B
F
G
H
1
-
,
1
3-5
4
M
B
B
D
C
i
Page 23

STRAIGHT
Selector
Stitch
Width
Stitch
Length
Stitch
Straight
following
stitch
the
STITCHES
A
3
1-4
frequently
most
is
below.
steps
A
used
for
every
SETTINGS
1.
Stitch
Stitch
Stitch
Thread
aspect
Raise
highest
hand
Take-up
Tension
Stitch
©
position
Stitch
Stitch
Hand
®
Stitch
©
Power/light
Reverse
Presser
sewing.
of
indicator
length
width-
tension
take-up
the
position
wheel
width/needle
indicator
selector
wheel
length
—
2
—
(2-3)
—
toward
lever
dial
dial
switch
stitch
foot
A
3
-
3
by
dial
lever
Learn
lever
turning
you.
lever
to
the
its
the
correct
2.
3.
4.
method
Pull
presser
the
of
Place
presser
presser
Turn
you
fabric.
of
both
foot
machine.
the
foot
the
the
until
your
threads
fabric
foot
hand
machine
toward
and
lever.
wheel
needle
under
the
under
lower
enters
the
back
the
the
toward
the
22
Page 24

r__T
Needle
stitching
Straight
®
with
Straight
®
position
set
Straight
position
at
R.
position
needle
at
M.
stitch
stitch
with
stitch
with
for
at
left
position
at
needle
at
needle
straight
needle
control
middle
position
right
position
position
at
L.
needle
control
needle
control
6.
5.
d.
a.
b.
c.
a.
b.
pushing
c.
Use
above
cut
Pull
and
pizesser
inches
Start
the
foot
Guide
with
When
of
the
machine
foot
control.
Turn
raise
Raise
the
off
both
to
to
your
you
the
the
the
the
excess
the
(10
sew
control.
the
fabric
hand.
reach
fabric,
by
releasing
hand
needle.
presser
the
lever
thread
presser
threads
back
foot,
cm)
stepping
the
stop
wheel
foot
up.
cutter
foot
threads.
under
of
leaving
thread
on
gently
end
the
the
to
by
to
the
4
tail.
23
Page 25

SECURING
go
your
reverse.
in
forward.
the
well.
as
the
Secure
stitches
to
Reverse
seams
Lower
SEAMS
seams
ThAs
machine
reverse
by
Then
is
lever
taking
allow
called
at
for
the
the
back
back
the
end
few
first
machine
tacking.
your
of
tacking.
24
INSERTING
To
of
the
the
To
of
zipper
needle
left
sew
foot
foot
side
down
foot
to
passes
down
sew
PIPING
soft
pipe
To
bias
main
Attach
so
on
that
the
strip
piece
of
right
needle
right
ZIPPERS
right
the
presser
to
through
foot.
the
of
left
the
holder.
furnishings,
and
fabric
fabric.
of
zipper
of
side
passes
the
of
side
side,
side,
through
foot
cover
pin
foot.
attach
holder
the
attach
or
foot
left
so
opening
right
cord
tack
foot
to
opening
the
side
side
with
it
to
holder
that
on
a
the
Page 26

Top
Top
Well
side
balanced
Under
side
ADJUSTING
The
good
looking
by
the
balanced
is
well
balanced
layers
of
fabric
STRAIGHT
appearance
tension
you
when
are
of
both
these
sewing.
STITCH
of
your
top
and
two
threads
THREAD
stitching
bobbin
is
threads.
iock
largely
in
the
TENSION
determined
The
tension
middle
of
Bobbin
Top
Top
thread
stitch
stitch
too
too
tight
loose
Threads
side.
Threads
under
side.
lock
lock
on
on
the
the
top
Increase
25
Decrease
tension
tension
Page 27

NEEDLE,
fabric
Your
following
Always
use
thread
The
fiber:
synthetic,
are
LIght.
Weight
MediumWeight
Weight
Heavy
Knits
the
fabrics
listed
cotton,
table
refer
same
supply.
FABRICS
THREAD
determine
will
isapractical
it
to
size
below
linen,
blends.
rayon,
examples
as
Batiste
Chiffon
Crepe
Corduroy
Flannel
Gabardine
Gingham
Linen
Muslin
Crepe
Wool
Bonded
Canvas
Coating
Denim
Duck
Sailcloth
Bonded
Double
Jersey
Tricot
before
and
can
silk,
Wovens
Knits
Knit
be
wool
of
type
of
They
weight.
AND
choice
the
guide
new
a
thread
of
THREAD
any
Cotton-wrapped
Polyester
100%
*
Mercerized
Cotton-wrapped
Polyester
100%
*
Mercerized
Nylon
Cotton-wrapped
Polyester
100%
‘Mercerized
*HeavyDut.f
Cotton-wrapped
Polyester
Polyester
N1on
FABRIC
a
of
needle
to
sewing
in
Polyester
Size
Polyester
Size
Polyester
Size
the
CHART
needle
and
project.
bobbin
60
50
40
thread.
and
thread
And
as
NEEDLES
The
selection.
sure
be
top
in
the
SIZE
12/80
14/90
18/100
F
t
12/80+14/90
the
the
you.
the
it
needle
needle
turning
by
needle
toward
the
you.
needle
bar
to
the
clamp
by
its
hand
pulling
highest
screw
wheel
by
it
Changing
Raise
1.
position
2.
3.
toward
Loosen
turning
Remove
to
downward.
4.
5.
6.
Insert
clamp
Push
Tighten
with
the
the
with
the
new
the
needle
the
screw
needle
flat
needle
driver.
up
side
as
clamp
into
away
far
the
from
it
as
screw
needle
you.
can
firmly
go.
Do
not
use
on
stretch
fabrics.
26
Page 28

ZIGZAG
Stitch
STITCHING
Indicator
Selector
B
Stitch
Stitch
Mdth
Stitch Length
B
1-5
1-4
SATIN
This
appliqué,
tension
Use
materials
STITCH
is
a
for
a
backing stabilizer
closely
bar-tacking,
avoid
satin
spaced
stitching.
puckering.
attractive
etc.
Slightly
interfacing for
stitch
loosen
top
the
used
thread
sheer
for
Sthch
-1
0.5
I
length
1
Thread
2
tension
dial
Under
side
The
top
on
the
the
on
sewing
thread
the
topofthe
thread
under
thread,
speed,
must
side
but
never
fabric.
may
appear
depending
fabric
bobbin
the
appear
and
on
27
Page 29

Under
Medium
heavyweight
to
side
fabric
BLINDSTITCH
Stitch
Selector
Stitch
Stitch
Length
First
1.
on
fine
heavyweight
Then
pin
Width
finish
in
fabrics
turn
place.
C,F
1-5
1-4
the
the
raw
and
ones.
hem
c
edge.
F
Do
overcasting
required
up
the
this
turningitunder
by
it
medium
on
depth,
press
to
and
28
2.
C
F
3.
4.
fold
Now
—
Regular
—
Elastic
Place
the
foot
fabric
the
that
pierces
needle
stitch
Use
fine
to
position
When
stitching
the
on
fabric.
fabricasillustrated.
the
blind
blind
fabric
the
with
the
positioned
needle
the
the
fold
swingstothe
width
tune
needle.
of
completed,
almost
is
side
right
stitch
under
fold
when
control
exact
stitch
for
of
so
just
the
left.
the
invisible
of
the
for
woven
soft,
fabrics
stretchable
fabrics
Page 30

Th
SHELL
Stitch
Stitch
Stitch
Shell
one
:
and
STITCH
Selector
Width
Length
stitch
operation.
other
fine
0
1-5
1-4
is
for
It
garments.
seaming
also
produces
and
overcasting
a
delicate
sheer,
shell
soft
hem
fabrics
on
in
lingerie
29
SEAM
Place
presser
raw
edge.
SHELL
Turn
so
that
pulling
close
AND
the
foot
under
the
the
to
the
OVERCAST
right
so
TUCKS
the
zigzag
fabric
stitching
sides
that
raw
in
the
edge
part
to
of
the
zig-zag
of
form
line.
and
the
IN
fabric
press.
stitch
a
shell
ONE
together
part
sews
of
the
Place
hem.
stitch
just
Trim
and
the
position
fabric
over
away
sews
the
under
just
right
folded
excess
over
side
the
the
up
edge,
fabric
Page 31

3-STEP
Selector
Stitch
Width
Stitch
Length
Stitch
is
This
stitches
short
For
this
of
fabrics.
also
It
is
and
work
stitch
0
At
ZIGZAG
strong
a
reason
ideal
attaching
length
E
1-5
1-4
stitch
where
is
it
mending
for
the
because
the
highly
elastic.
fiat
3-step
its
as
normal
zigzag
recommended
patching,
tears,
Zigzag
name
makes
implies,
makes
for
sewing
an
makes
it
one.
only
overcasting
towelling,
excellent
three
types
all
patch
bartack.
vuuVMflMMMt.
IIIItIIIII!
JWW’J
:
30
Page 32

DOUBLE-ACTION
STITCH
G
‘-I-
I
I
Selector
Stitch
Width
Stitch
Length
Stitch
Double-action
on
almost
sewing
with
BRIDGING
Selector
Stitch
Width
Stitch
Length
Stitch
This
blouses
together,
Fold
Baste
space
catching
and
popular
is
a
an
leavealittle
under
folded
between.
the
stadilizer
G
1-5
1-4
stitch
type
any
contrasting
STITCH
H
1-5
1-4
dresses).
seam
the
edges
Stitch
fabric
then
is
ideal
fabric
of
thread.
decorative
To
space
allowances
stabilizer
to
over
both
on
fold
press.
for
A
1.
stitch
attach
in
the
producing
bolder
H
(usedinsleeves
two
separate
between.
on
the
with
about
inch
1/8
with
sides
flat
effect
To
cut
(0.3
needle.
overlapped
will
result
pieces
prepare
edges,
inch
1/8
allowance,
cm)
Remove
or
the
and
(0.3
seams
from
fronts
fabric
of
fabric:
press.
cm)
bastings
of
just
31
Page 33

Th
TRIPLE
Selector
Stitch
Width
Stitch
Length
Stitch
straight
Triple
ordinary
times
three
forwards.
particularly
is
It
seams
fabrics,
stretch
lot
a
take
this
Use
lapels,
professionai
STRAIGHT
A
3
-S+
stitch
straight
forwards,
—
suitable
sportswear
of
and
strain.
of
also
stitch
collars
finish
stitch
for
to
and
to
STITCH
far
is
because
backwards
for
stretch
in
curved
top-stitch
cuffs
garments.
your
I’’
.,,
‘H
A
‘H
stronger
locks
it
reinforcing
and
which
seams
around
give
to
J
than
and
the
non-
for
woven
use
HONEYCOMB
ELASTIC
ZDOUBLE
FEATHER
®
on
fabrics.
Ric-rac
OVERLOCK
OVERLOCK
or
knit,
Stitch
stretch
fabrics,
(I)TRIPLE
cRIC-RAC
STRETCH
®OVERLOCK
STRETCH
can
stitches
also
Stretch
but
STRAIGHT
OVERLOCK
STITCHES
mainly
are
sewn
on
be
i1
[_
(stretch)
match
to
stitches
STITCH
upon
If
ADJUSTiNG
length
Stitch
materials.
adjust
a
to
reverse
+
to
position;
STRETCH
super
/
Depending
dial
this
motion
if
stitches.
the
32
stitch
type
the
forward
stitches
the
overlap,
BALANCE
dial
should
fabric
of
stitches
are
the
turn
too
be
used,
of
dial
atSmark
you
stretch
open,
to
may
sewing
turn
position.
—
the
for
most
need
with
dial
Page 34

RIC-RAC
Stitch
Selector
Stitch
Stitch
Length
Ric-rac
edge
and
in
one
operation.
bands,
STITCH
Width
is
a
quick
providing
armholes,
B
1-5
-S+
method
is
It
sleeves
a
decorative
ideal
of
finishing
for
edging
and
top-stitch
hems.
raw
a
neck-
33
OVERLOCK
Stitch
Selector
Stitch
Width
Stitch
Length
Stretch
one
to
produce
overlock
particularly
T-shirts,
towelling,
babywear
jersey
STRETCH
Stitch
Selector
Stitch
Width
Stitch
Length
This
is
the
garment
forms
industry
and
operation.
It’s
very
effective
worn
edges
STITCH
D
1-5
-S+
seams
narrow,
a
suited
to
swimwear,
in
and
OVERLOCK
C
1-5
-S+
same
type
in
making
finishes
for
use
of
older
garments.
stretch
cotton
stitch
the
in
and
overcasts
supple
sportswear,
nylon,
jersey.
STITCH
used
sportswear
seam
repairing
seam,
stretch
by
in
one
raw
C
the
—
in
it
or
Page 35

FEATHER
Stitch
Selector
Stitch
Width
Stitch
Length
The
pleasing
enables
attaching
lingerie
or
Itisalso
faggoting.
STITCH
ittobe
lace
girdles.
ideal
E
1-5
-S+
appearance
used
or
inset
for
panels
quilting
for
top
application
of
this
stitching,
when
stitch
or
making
and
34
ELASTIC
Stitch
Selector
Width
Stitch
Stitch
Length
Use
this
overlock
fabrics
required.
OVERLOCK
F
1-5
-S+
stitchinpreference
for
stitch
where
overcasting
strength
STITCH
stretch
flexibility
and
to
F
regular
or
knit
are
Page 36

DOUBLE
Stitch
Selector
Stitch
Width
Stitch
Length
Double
attaching
Itisideal
seaming
fabric
and
medium
couching
work.
OVERLOCK
G
1-5
-S÷
overlock
flat
elastic
for
overcasting
overcasting
and
non-stretch
to
heavy-weight
over
narrow
has
STITCH
number
a
when
fabrics
cotton.
ribbon or
of
uses.
making
single
a
in
one
step
suchaslinen,
It
may
yarn
G
repairing
or
layer
or
It
on
also
for
perfect
is
of
fabric
slightly
be
drawn
lingerie.
stretch
tweed
used
thread
for
or
and
for
35
FEATHER
Selector
Stitch
Stitch
Width
Stitch
Length
beautiful
This
decorative
fabric,
embellishment.
and
STITCH
H
1-5
-S+
stitchisused
crazy
H
patch
for
quilting
joining
Page 37

Less
BUTTONHOLES
Change
Slide
button
ening
size
Carefully
fabric
foot
the
the
of
ADJUSTING
You
buttonhole
Narrow
dial.
density
the
buttonhole
the
between
screw
buttonhole.
of
mark
with
forward
buttonhole.
also
can
buttonholes
presser
(A).
buttonhole
the
change
zone
foot
guide
support
Remove
buttonhole
the
so
that
STITCH
marked
may
buttonhole
to
forward.
and
(B)
the
marked
needle
the
LENGTH
stitch
on
be
support
button.
length
pierces
density
stitch
sewn
foot.
Loosen
(C).
Then
your
on
the
under
the
(DENSITY)
your
to
dial.
length
adjusting
by
(A).
screw
Fix
the
can
you
garment.
buttonhole
fabric
AND
preference,
the
button
obtain
the
at
Place
tight
exact
Place
foot.
beginning
WIDTH
within
stitch
the
the
Slide
the
width
More
density
36
Page 38

D
®
()
jJ
24
0
3
I
24
PROCEDURE
1.
Stitch
forwardtothe
1
1
J
buttonhole
at
needle.
2.
Bartack
sewing
raise
position.
the
mark.
left
stitch
4
or5stitches.
at
the
needle
left
to
Stop
and
stitch
its
end
sewing
raise
Stop
and
highest
of
I
Stitch
3.
buttonhole
buttonhole.
backword
marktocomplete
start
to
the
of
illi
4.
Bartack
t
sewingatthe
raise
4
or5stitches.
needle.
right
stitch
Stop
and
C
El
37
Page 39

CORDED
fiNer
Hook
pull
and
buttonhole
Sew
completed,
When
forward
BUTTONHOLES
(crochet
cord
of
ends
both
that
so
release
off
snip
and
the
extra
thread
cord
zigzag
the
length.
buttonhole
or
forward
stitches
from
cord
under
cover
foot,
the
the
twist)
foot.
cord.
pull
to
ends
the
of
spur
cord
38
Page 40

CARING
ensure
To
Always
Cleaning
Raise
1.
position.
Remove
2.
Remove
3.
Clean
4,
lint
brush.
NOTE:
Replace
5.
positioned
(3)
needle
the
FOR
YOUR
the
disconnect
the
the
the
the
the
Putadropofsewing
the
arrows
the
best
teed
needle
needle
bobbin
feed
hook
bobbin
plate.
possible
the
dogs
to
dogs
race
A.
against
MACHINE
operation
machine
and
highest
its
plate
(1>.
case
(2).
hook
and
as
case
with
spring
the
from
hook
area
machine
indicated
the
(4).
of
your
power
area
with
the
oil
the
by
projection
Replace
machine,
supply
on
removing
by
39
is
it
necessary
the
to
keep
the
plug
from
the
Changing
1.
Remove
slightly
2.
Insert
counterclockwise.
Disconnect
before
more
chanino
than
and
15
essential
socket-outlet.
light
bulb
the
face
turn
new
bulb,
the
machine
a
watts.
parts
cover.
clockwise.
push
Replace
from
bulb.
Do
clean
Push
the
not
up
up
face
øower
use
at
and
a
all
the
cover.
supply
bulb
times.
bulb
turn
of
 Loading...