

Page 1
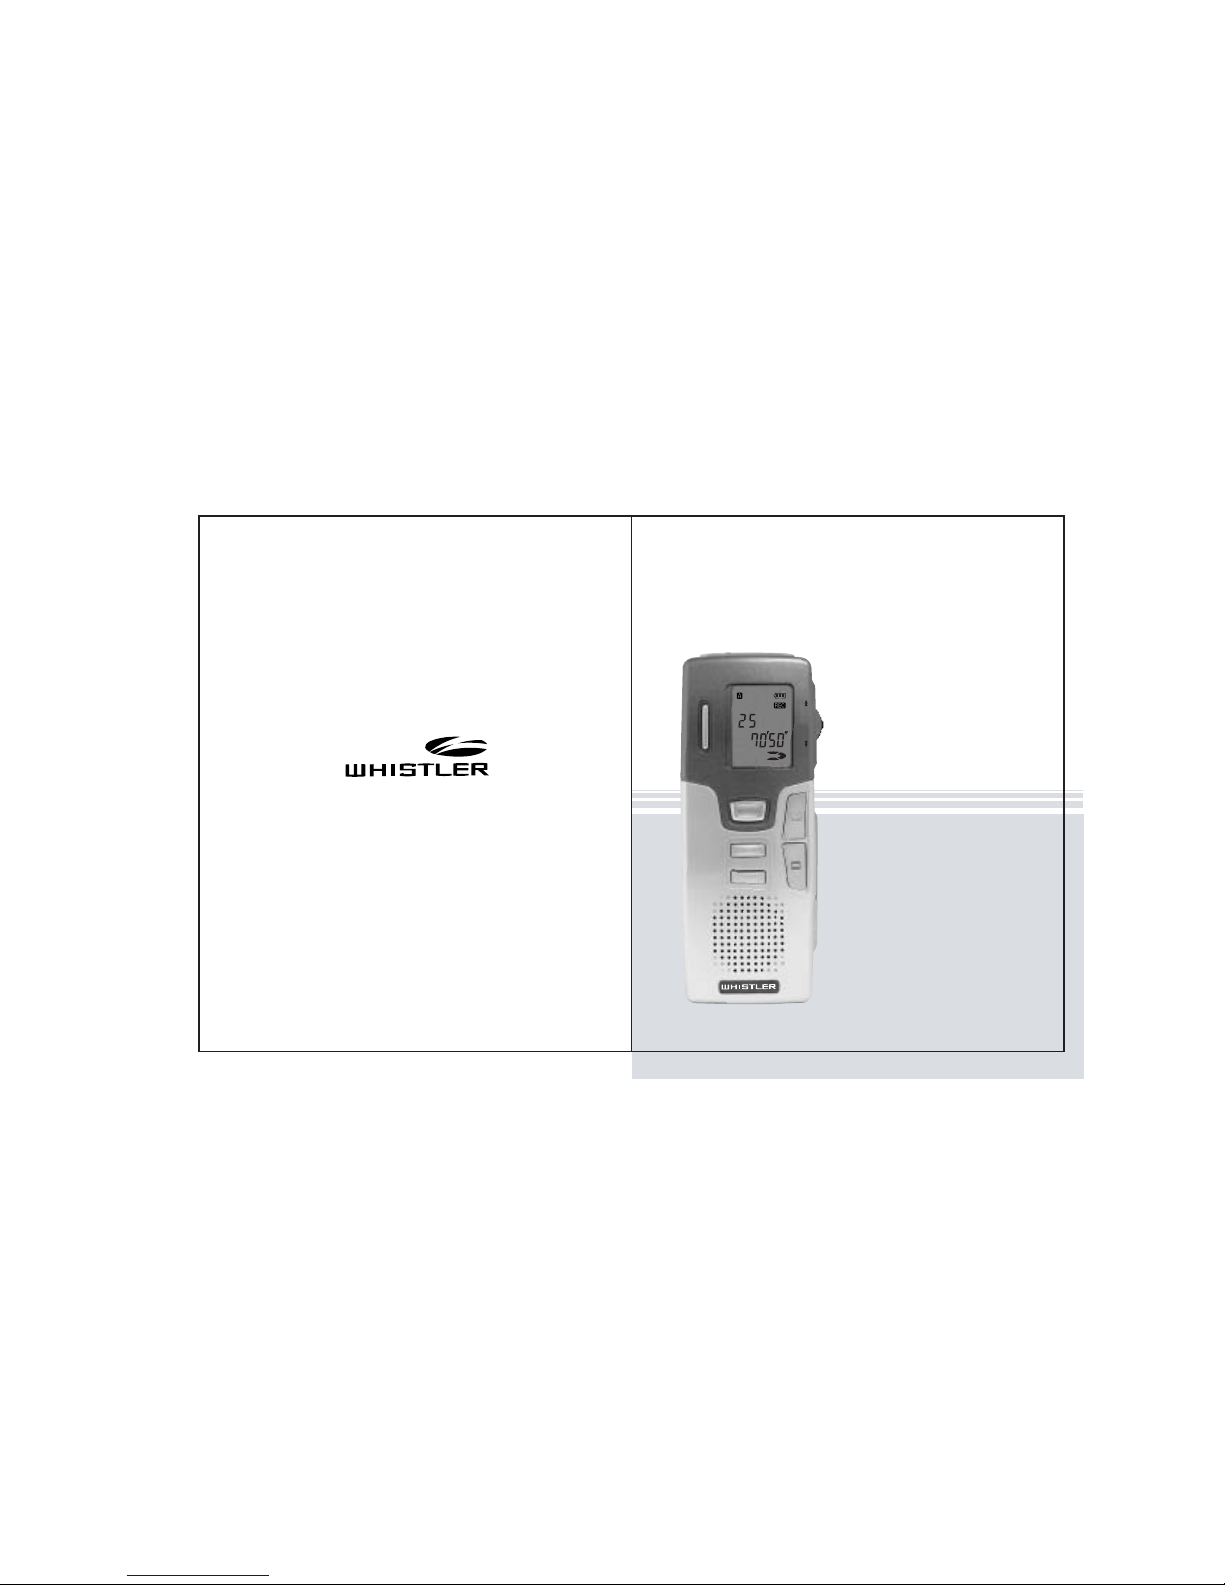
USER’S MANUAL
WVR-175/WVR-185
Digital Recorder
LIGHT
REC/STOP
FUNC/
DISPLAY
MENU
PLAY/STOP
HQ
Page 2
VOICE RECORDER
VOICE RECO RDER
INDEX
¡Æ Features
----------------------------------
¡Æ Names of Parts
------------------------------
¡Æ LCD Descriptions
-----------------------------
¡Æ Before Using
-----------------------------
-Inserting Battery ----------------------------
-Setting Date/Time
----------------------------
¡Æ Using Voice Recorder
------------------------
-Recording ------
--------------------------
-Playback
-------------------------------
-Deleting Recorded Sound
----------------------
-Hearing Aid Function
-------------------------
-Setting Menu
----
-------------------------
-
-Recording Functions ------------------------
-Playback Functions -------
-----------------
-Editing
------
-----------------------------
¡Æ Connecting to External Device
--------------------
¡Æ Cautions
-----------------------------------
¡Æ Troubleshooting
----------------------------
¡Æ Specifications
2
3
4
5
5
6
8
8
9
10
12
13
14
15
19
22
25
27
Page 3
2
VOICE RECORDER
VOICE RECORDER
Features
¡Æ RECORDING MAX. 300 MESSAGES
¡Æ PORTABLE USB DEVICE
¡Æ COMPACT SIZE
Handy to carry due to compact size and light-weight.
¡Æ FLASH MEMORY
Recorded sound is preserved even if the power is off.
¡Æ AUTOMATIC POWER OFF
Automated power break reduces battery consumption.
¡Æ TIME STAMP & REMAINING RECORDING TIME DISPLAY
Recording time & remaining time is displayed on the LCD.
¡Æ RECORDING MODE
You can choose one recording mode among HQ ,SP and LP.
¡Æ LONG TIME RECORDING
Maximum 33.6 hours recording is supported with LP mode.
¡Æ VOS(Voice Operated Recording System)
Recording id proceeded only when voice is emitted to reduce the memory usage.
¡Æ PLAY BACK SPEED CONTROL
You can control playback speed in 3 levels; fast, normal and slow.
¡Æ REPEAT PLAY
You can repeat selected file(s) continuously.
¡Æ SCAN PLAY
The first 5 seconds of each files are played back one by one.
¡Æ EXTERNAL IN/OUT CONNECTION
Mutual connection with another appliances is available.
¡Æ EL BACK LIGHTING
You can check LCD displays in dark place.
¡Æ CONVENIENT EDIT FUNCTION
You don't need to waste much time to edit messages. .
¡Æ TEL FUNCTION
Recording is started automatically when you start a conversation on the phone.
¡Æ HEARING AID FUNCTION
You can record each 100 mesages in A, B and C folder.
D folder can be used for a USB storage drive.
You can amplify low sound to aid hearing.
VOICE RECORDER
3
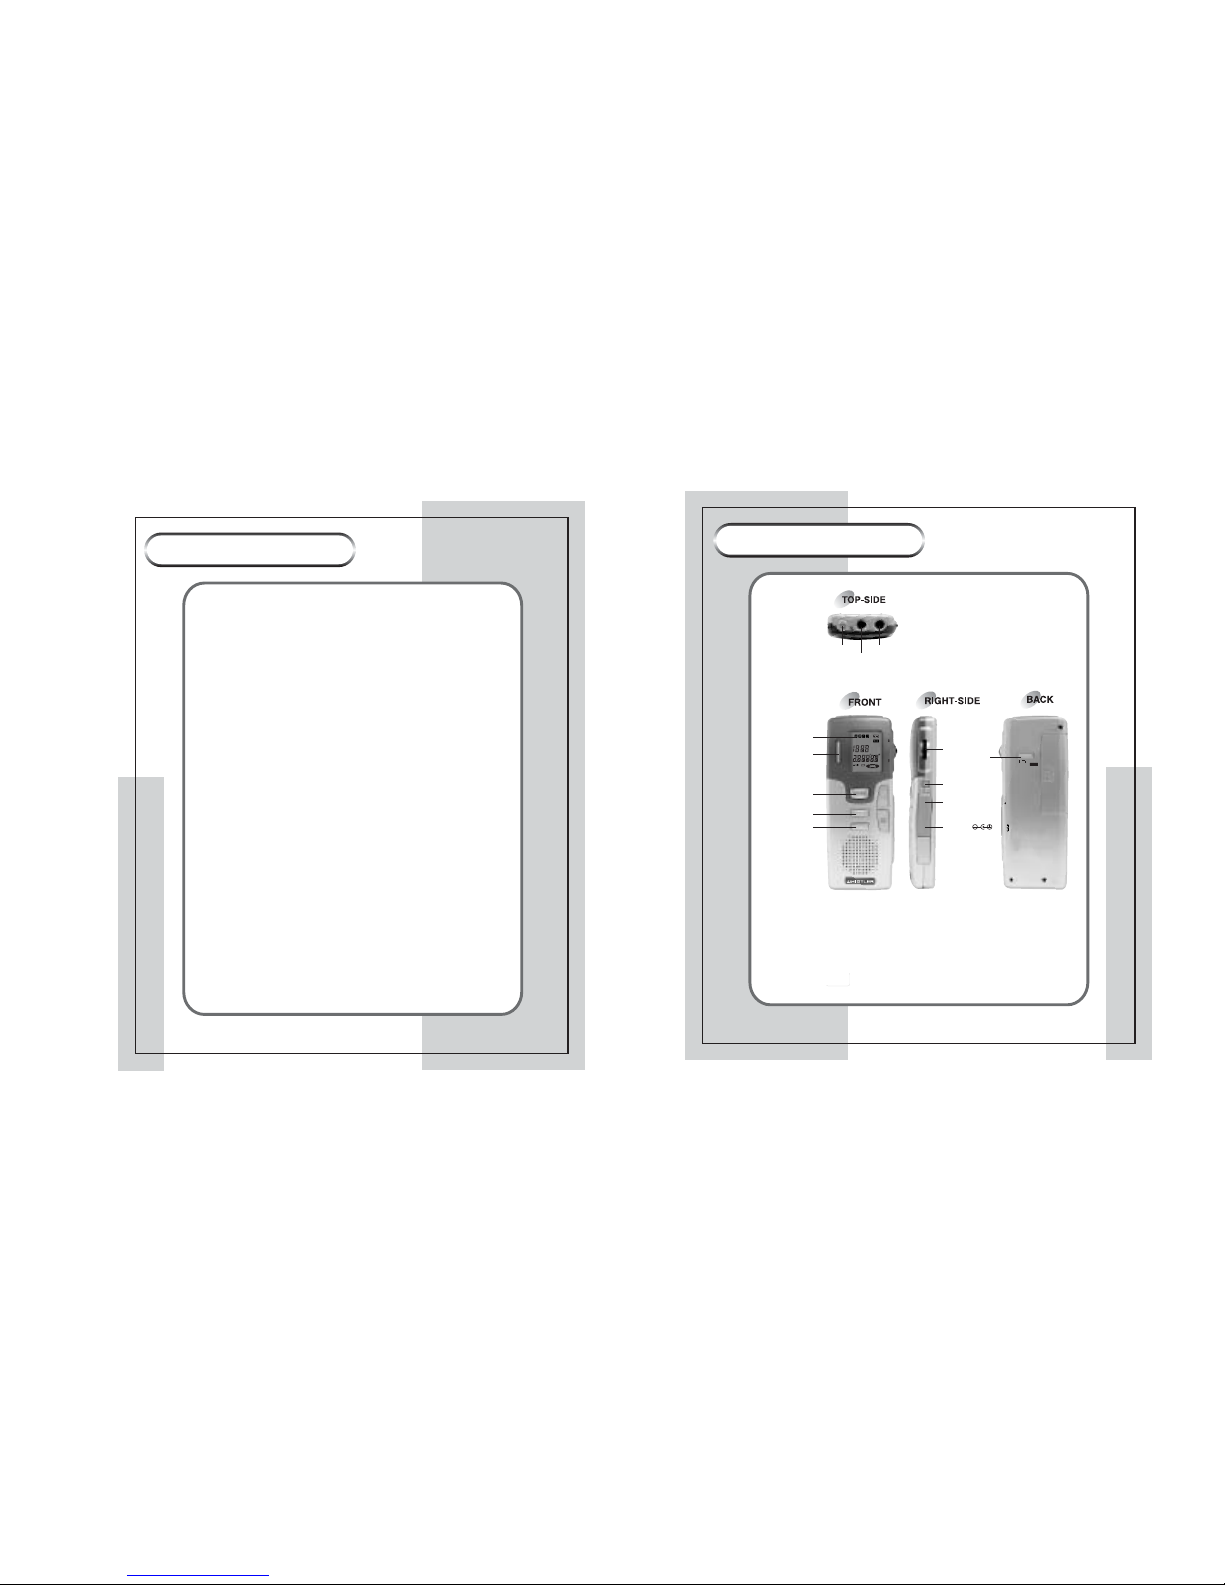
Name of Parts
VOICE RECORDER
External Microphone
HQ
MD
SP
LP
VOS
LOCK
REMAIN
REC
DATE
1
A-B
LIGHT
REC/STOP
FUNC/
DISPLAY
MENU
PLAY/STOP
OFF ON
ERASE
HOLD
USBDC3.0V
DC3.0V
Earphone terminal
PLAY/STOP
HOLD
ERASE
USB
EL
LIGHT
LCD
REC/STOP
FUNC/DISPLAY
MENU
Built-in Microphone
Page 4
VOICE RECORDER
5
VOICE RECORDER
1. Push the battery cover and slide it in the arrow direction.
2. Insert two AAA alkaline batteries. Make sure that the polarities (+,-) are correct.
3. Close the battery cover.
¡Æ Inserting Battery
(Battery Type : AAA or LR03 or UM-4 or equivalent)
............................................
............................................
Much consumed
Little consumed
Time to replace
Full
¡Æ
Battery Lifetime ("AAA" Alkaline)
Recording Playback
"AAA"
Alkaline
- The power is turned off automatically for efficient use of the battery if you
do not use the product for more than 1 minute.
- When you do not use the product, set the HOLD switch to ON to prevent
unwated consumption of the battery due to misuse of the buttons.
- Battery lifetime is subject to battery type and the volume you use.
19 hours
11 hours
Before Using
¢ NoteNote
¡ Make sure to insert the batteries in stop mode.
Caution
AAA
4
VOICE RECORDER
VOICE RECORDER
LCD Descriptions
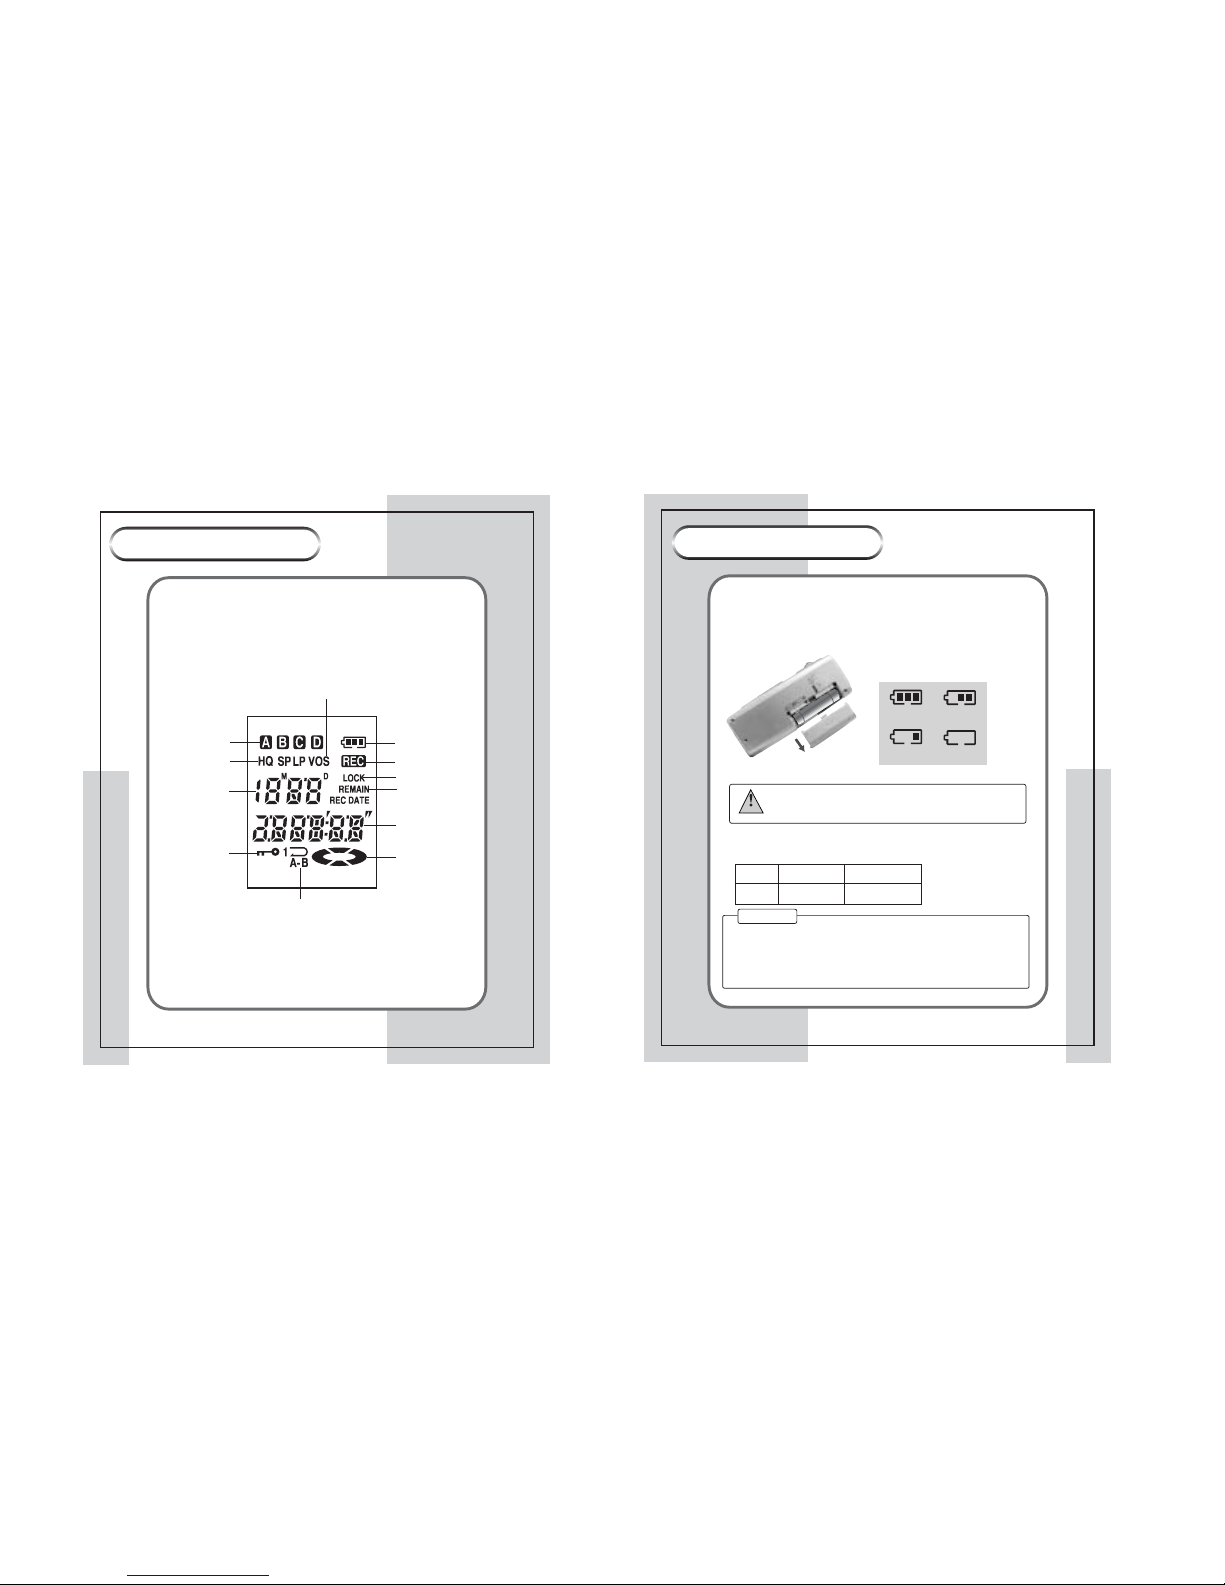
FILE NUMBER/
MONTH&DATA
FOLDER
RECORDING MODE
BATTERY ICON
RECORDING ICON
REPEAT
HOLD
VOS FUNCTION
ERASING LOCK
REMAINING
RECORDING
TIME DISPLAY
TIME DISPLAY (REC,
PLAYBACK,
REMAINING
RECORDING TIME)
DYNAMIC
OPERATION ICON
Battery
Page 5
6
VOICE RECORDER
VOICE RECORDER
7
VOICE RECORDER
VOICE RECORDER
¡Æ Power On/Off
1.Set the HOLD button to OFF(HOLD OFF)
2.Press the PLAY/STOP or FUNC/DISP or REC/STOP button shortly once to
turn the power on.
3.Press the PLAY/STOP or FUNC/DISP or REC/STOP button shortly once to
turn the power off.
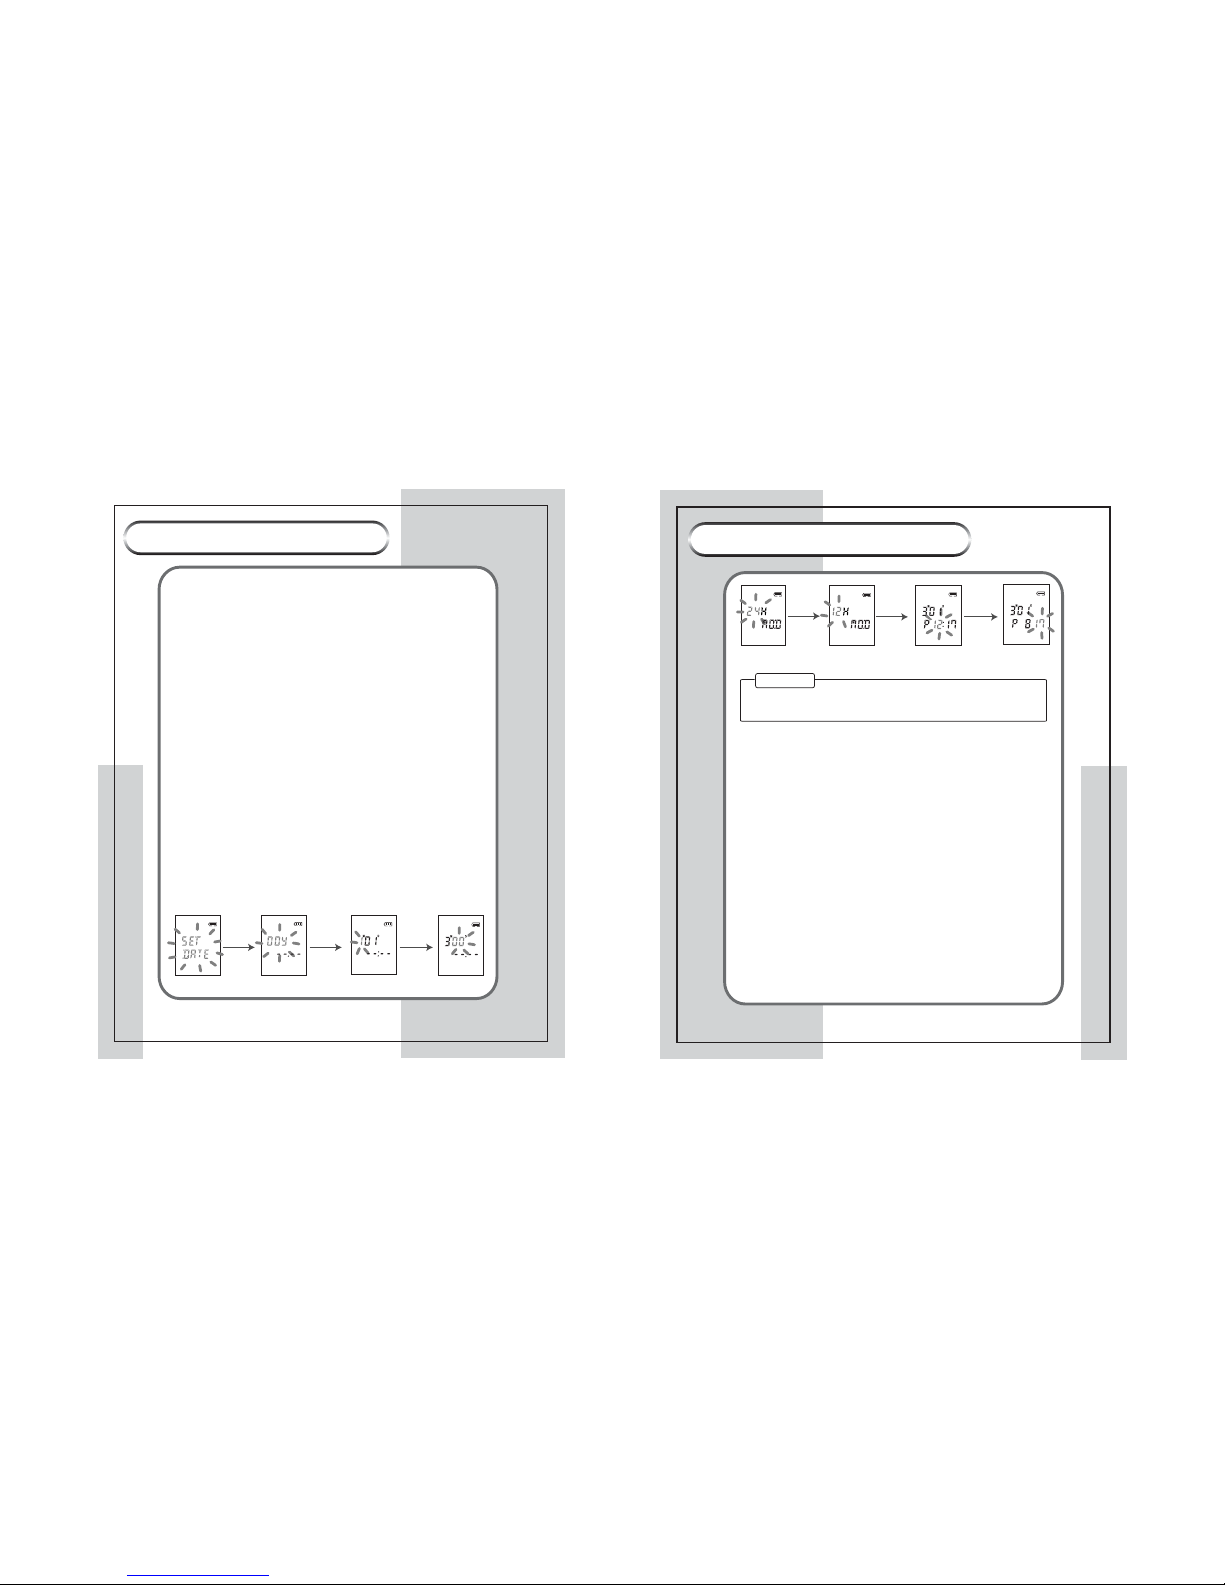
¡Æ Setting Date/ Time
1.Set the year : Select a year you want using the jog key when the "00Y"
message blinks on the LCD and press the MENU button shortly once.
The year you selected is set and the mode changes to the mode you can set
a month.
2.Set the month : Select a month you want using the jog key when the "1M"
message blinks on the LCD and press the MENU button shortly once.
The month you selected is set and the mode changes to the mode you can
set a day.
3.Set the day : Select a month you want using the jog key when the "1D"
message blinks on the LCD and press the MENU button shortly once.
The day you selected is set and the mode changes to the time mode you can
set a time.
4. Set the 12H/24H mode: Select the 12H/24H mode using the jog key when the
"12" message blinks on the LCD and press the MENU button shortly once.
The 12H/24H mode is set and the mode changes to
the mode you can set the time. by the jog key, press the MENU button.
5. Set the time : Select the time using the jog key and press the MENU
button shortly once. The time you selected is set and the mode changes to
the mode you can set a minute.
6.Set the minute: Select the minute you want using the jog key when the
"00" message blinks on the LCD and press the MENU button shortly
once to set the minute you selected. The time setting is completed and the
product changes to the standby mode.
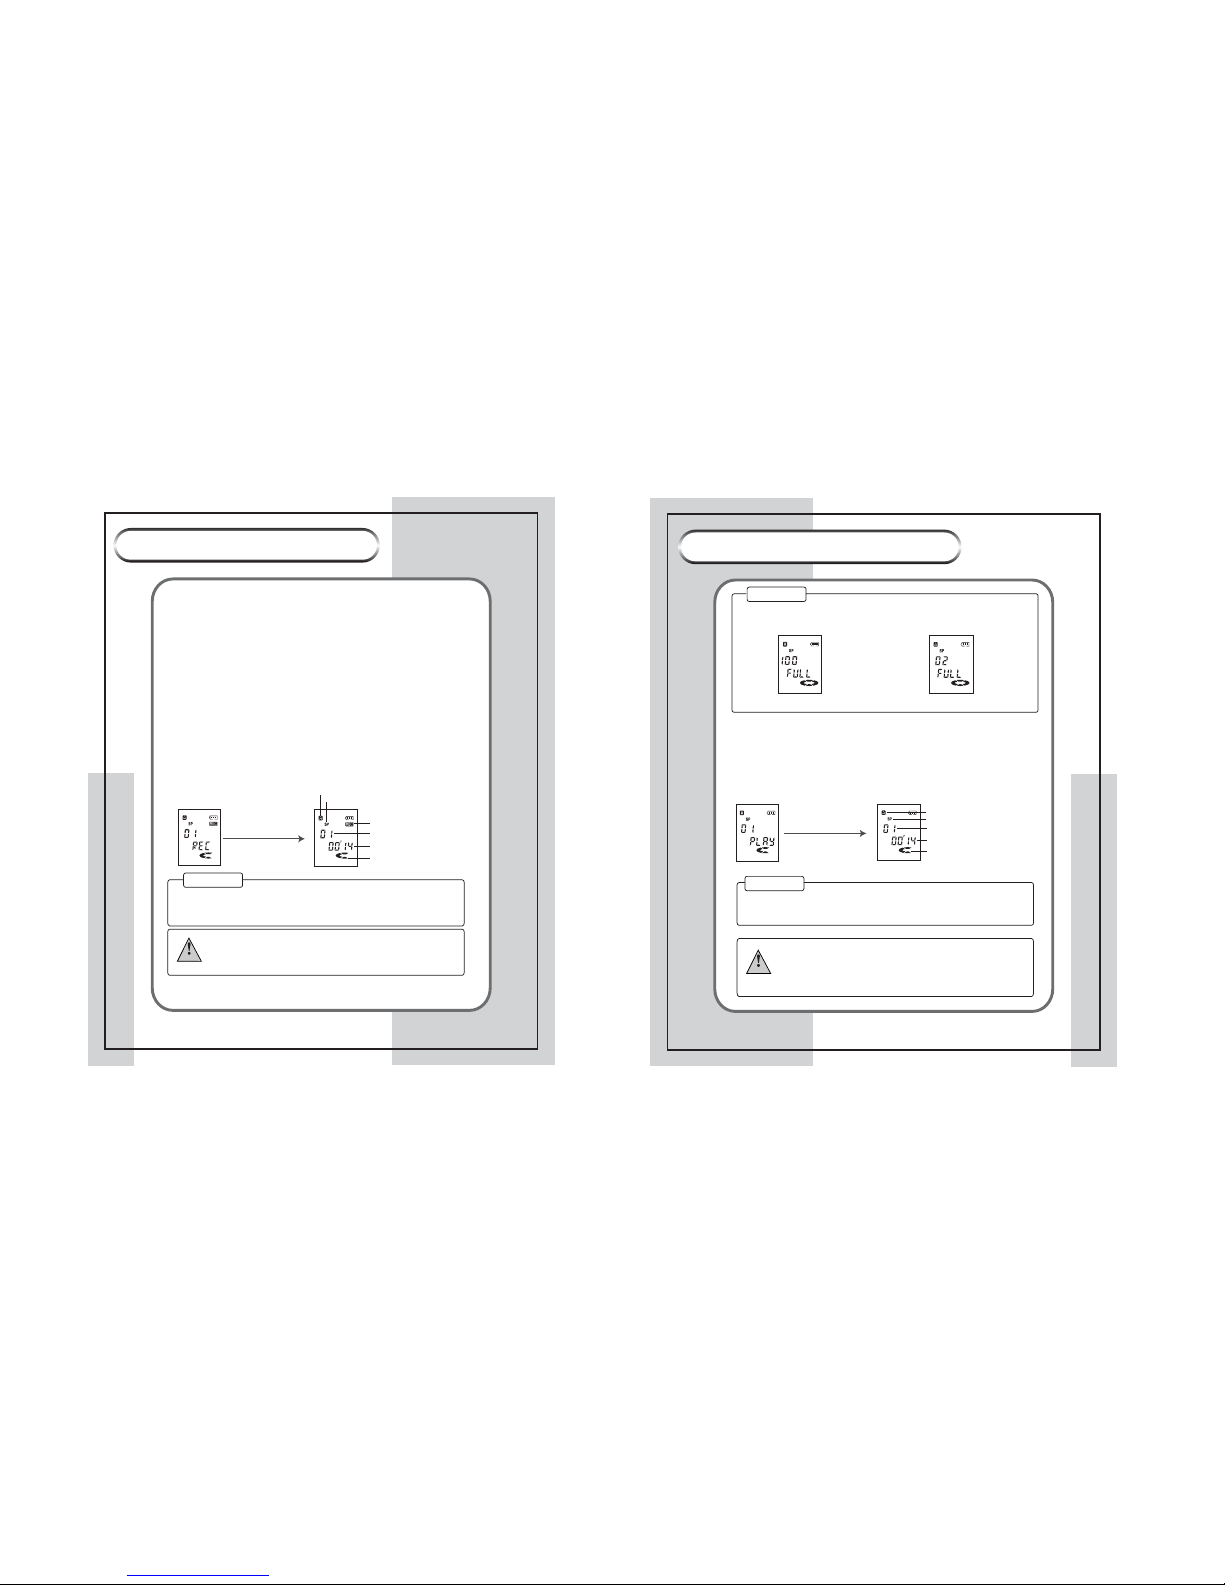
e.g) To set 8 : 17 PM on March 1, 2005, operate as follows.
Before Using
Before Using
Year
Month(March)
Date(1)
24H mode
Hour(pm 8)
Minute(17)
12H mode
¢ NoteNote
- To change the clock, press MENU button more than 1 second in
Clock or Stop mode.
Page 6
8
VOICE RECORDER
VOICE RECORDER
9
VOICE RECORDER
VOICE RECORDER
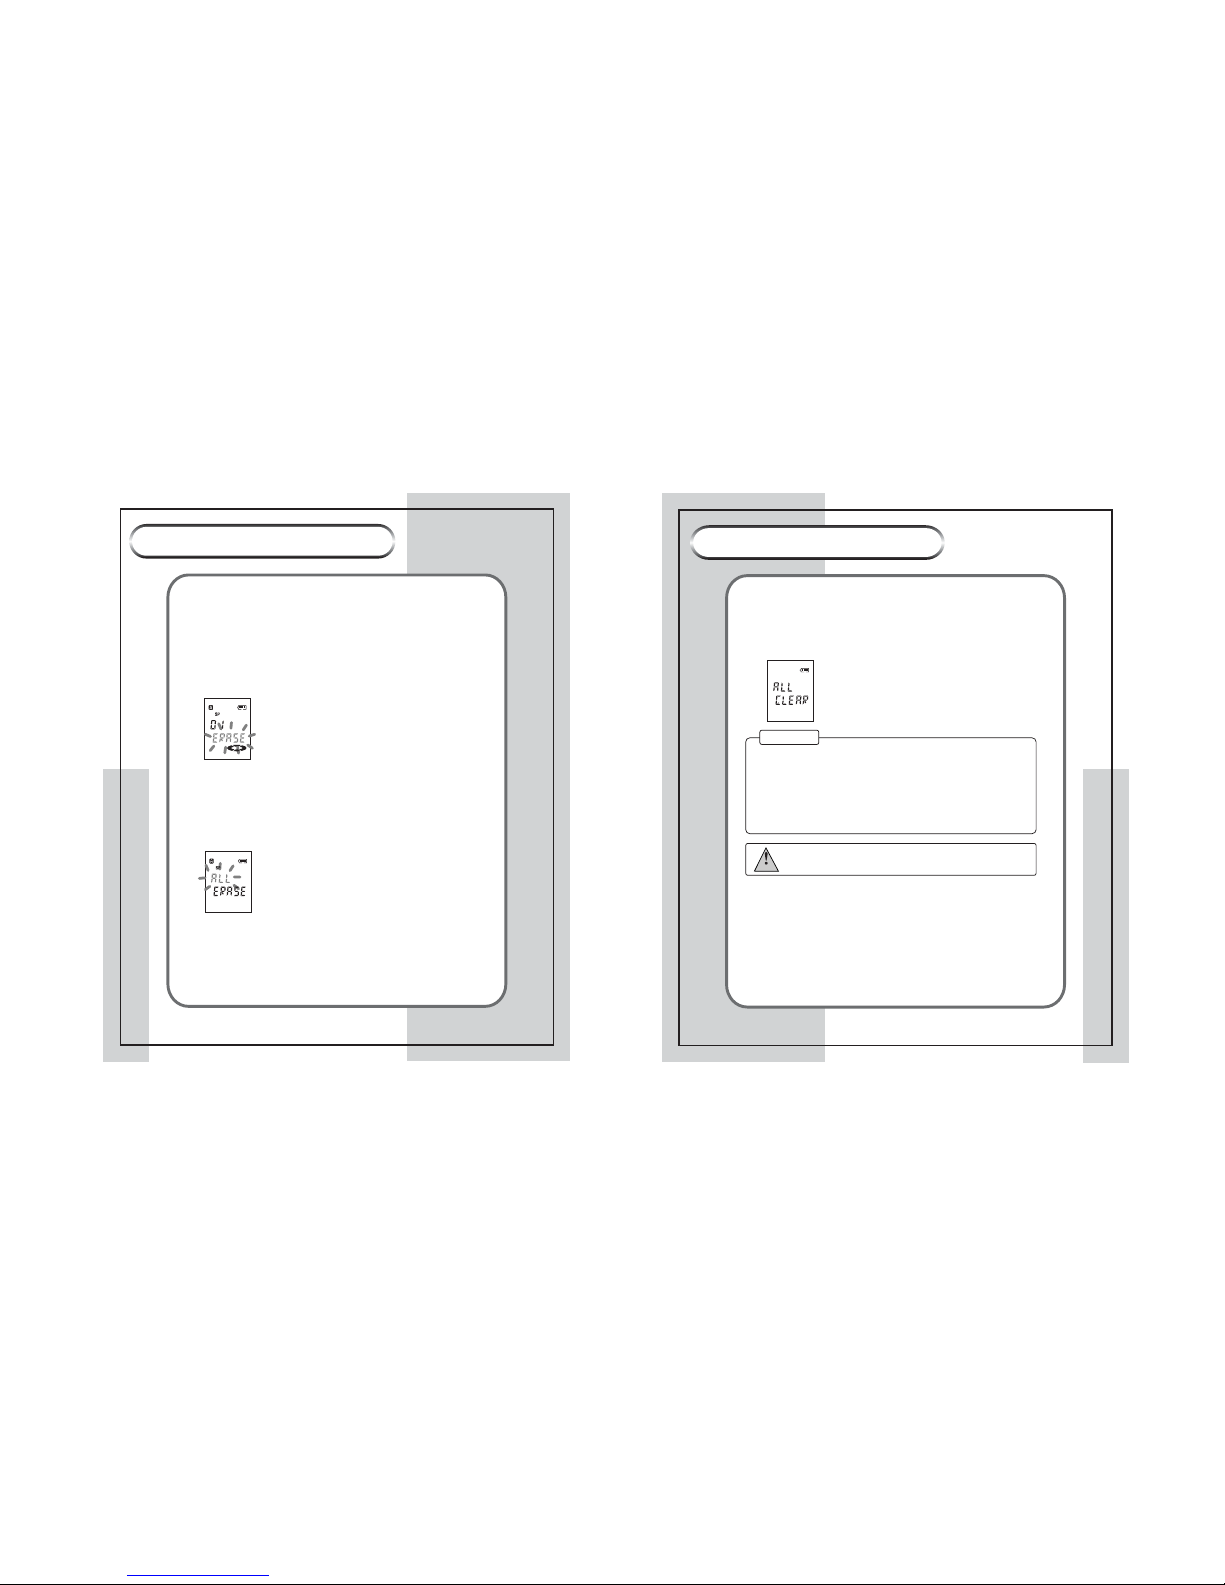
- If the number of the files is more than 100 for a folder, FULL is displayed and
recording is disabled.
- When the recording time is over, FULL is displayed and recording is disabled.
<The recording time is over><The number of files is more than 100>
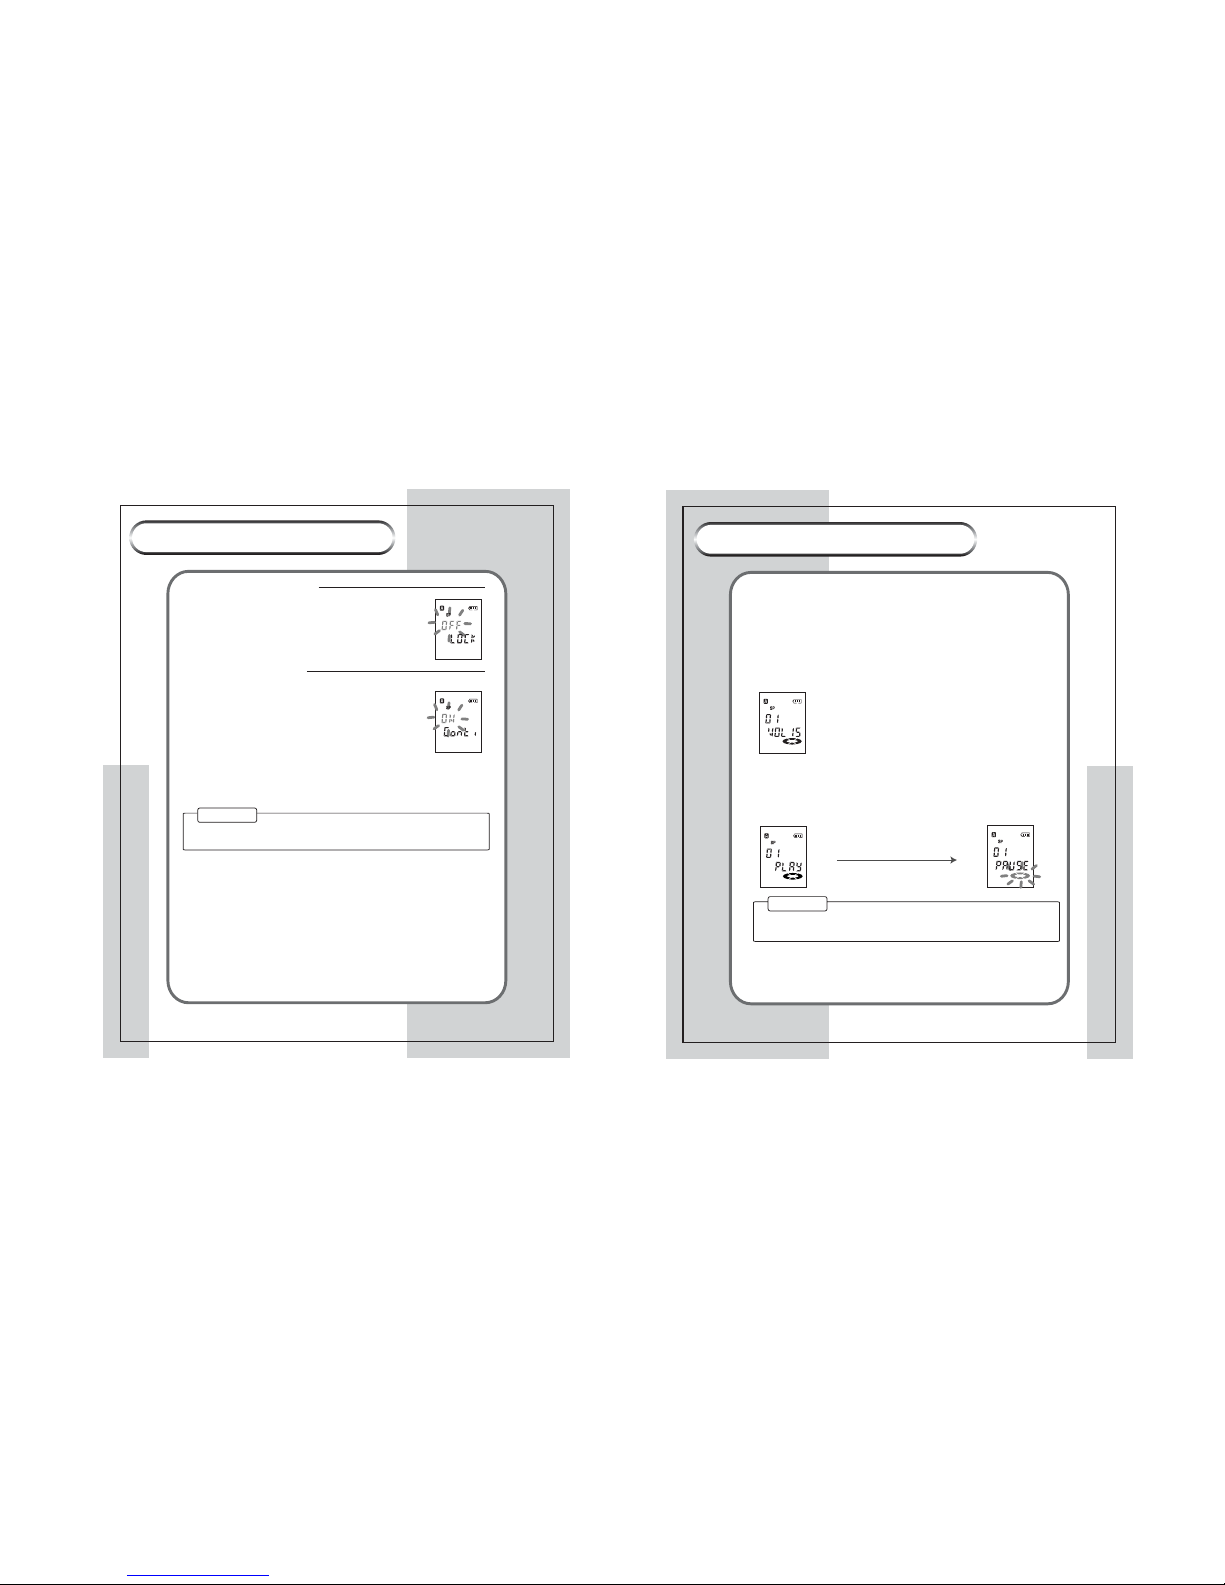
¡Æ Playback
You can hear the recorded sound using the built-in speaker of earphone.
1.Select the file you wish to playback.
2. Control the volume using the Volume button.
3. Press the PLAY/STOP button shortly once to playback the selected file.
4. Press the PLAY/STOP button shortly again to stop playback.
Current playing folder (A folder)
Current playing mode (SP mode)
Current playing message file (File Number 1)
Proceeded playing time (14 seconds)
Dynamic operation icon
Using Voice Recorder
Using Voice Recorder
¡Æ Button Functions
¢` PLAY/STOP : Playback and Stop
¢` FUNC/DISP : Selects functions and stops playback/recording temporarily
¢` REC/STOP : Recording and Sop
¢` MENU/REPEAT :Selects MENU,SEARCH,REPEAT,FF and REW
¢` VOLUME +,- : Volume control
¢` ERASE : Deleting recorded files
¢` HOLD : Button hold on/off to prevent unwated operations
¡Æ Recording
Records voice or sound.
1. Turn the power on.
2. Place the MIC toward sound source.
3. Press the REC/STOP button shortly once to start recording.
4. Press the REC/STOP button again shortly to stop recording.
Dynamic operating display
Current recording folder (A folder)
Current recording mode (SP mode)
Current operating position (Recording)
Current recording message file
(File Number 1)
Proceeded recording time
(14 seconds)
- If the recording source is shorter than 2 seconds, it is not recorded.
- Volume control is disabled during recording.
¡
Try a test recording first to prevent recording failure.
Caution
¡
Do not listen to recorded files with a load volume.
Otherwise it may damage your hearing.
¡
Start from a l ow volume, and then set the volume to an
appropriate level.
Warning
- During playing back messages, MENU won't be operated.
¢ NoteNote
¢ Note
Note
¢ NoteNote
Page 7
VOICE RECORDER
VOICE RECORDER
11
10
VOICE RECORDER
VOICE RECORDER
¡Æ Deleting Recorded Sound
Deletes the sound recorded in the product.
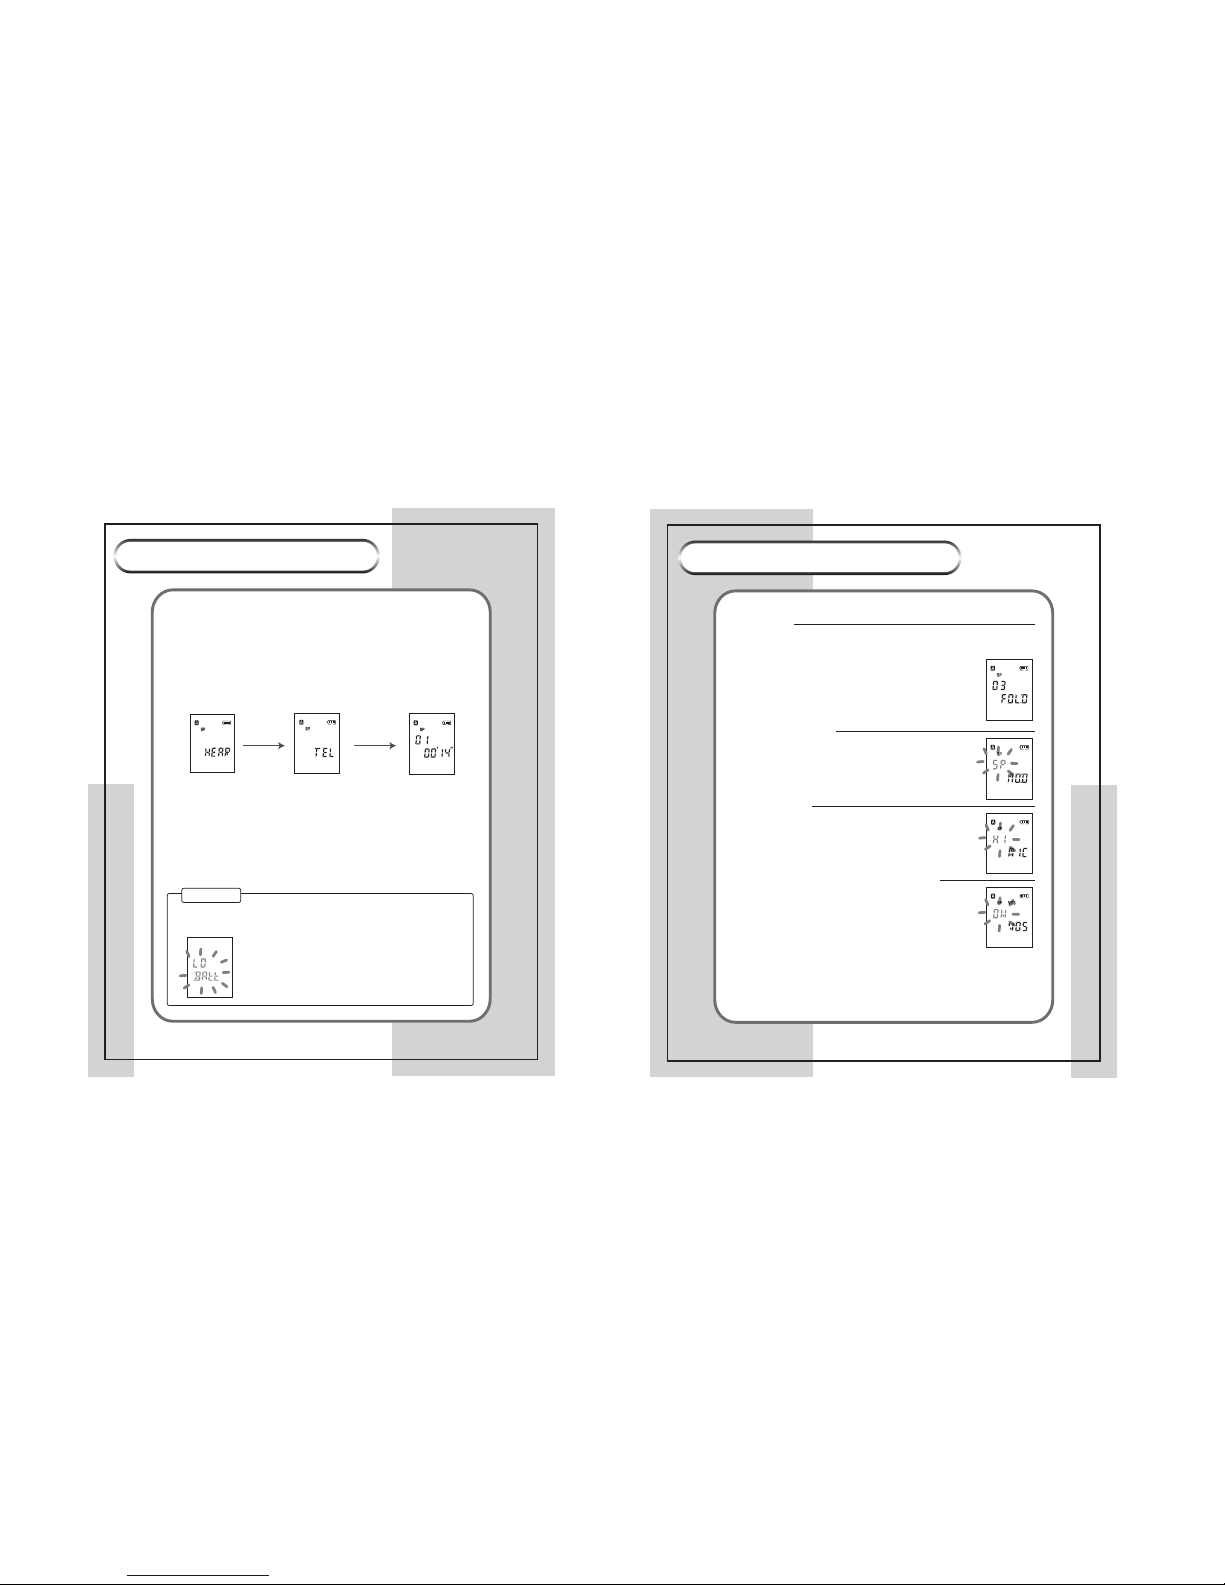
<Deleting one file>
Deletes one file in the recorded files. The file numbers are decreased by one after
deleting file.
1. Select the file to delete in stop mode.
2. Press the ERASE button more than 3 seconds. The ERASE message blinks
and the first 5 seconds of the recorded file are played back.
3. Press the ERASE button shortly again to delete file.
<Deleting all files in a folder>
Deletes all the recorded files saved in a folder.
1. Select the folder to delete.(See page 00)
2. Press the ERASE and REC/STOP buttons at the same time in
stop mode for more than 3 seconds. The ALL ERASE message blinks on the
LCD.
3. Press the ERASE button again shortly to delete all files in the folder.
The deleted recording file cannot be recovered. Please make sure
to decided carefully and check the file(s) you select to delete.
Warning
Using Voice Recorder
Using Voice Recorder
<Formatting>
Deletes all recorded files in the product
1. Press the ERASE and REC/STOP buttons at the same time in stop
mode for more than 7 seconds. The All CLEAR message blinks on the LCD.
2. Press the ERASE button shortly again to delete all recorded files saved in
the product.
- If you press other button except the ERASE button, file deletion is
cancelled.
- If you do not press any button for 10 seconds the ERASE function is
released automatically.
- File Erase Prevented file is not deleted when you delete one file or
in one folder.
- All recorded files even including "File Erase Prevented" files is
erased after fomatting.
¢ NoteNote
Page 8
12
VOICE RECORDER
VOICE RECORDER
13
VOICE RECORDER
VOICE RECORDER
¡Æ Hearing Aid Function
You can amplify low sound to aid hearing.
<
Switching to Hearing Aid Function>
1. Connect an earphone to the earphone terminal.
2. Press the FUNC/DISP button shortly once to start hearing.
3. Press the FUNC/DISP button twice to stop hearing. Or press the
PLAY/STOP button shortly once.
3. Volume Control
Press the VOLUME button to control the volume.
4. Recording in Hearing Aid Function
1. Press the REC/STOP button shortly once in the Hearing Aid Mode to
start recording.
2. Press REC/STOP button once again to stop recording.
3. Press FUNC/DISP button once to pause recording.
- Operating order of the FUNC/DISP button : VOICE¡ HEAR¡ TEL¡ VOICE
- Please replace the batteries when the LO Batt message blinks on the LCD.
¢ Note
Using Voice Recorder
Using Voice Recorder
¡Æ¡Æ Setting Menu
¢` Select Folder
You can save a file in one of A, B, C folder.
1. Press the MENU button shortly once.
2. Select a folder using the jog key. The folder changes in
order of A->B->C by each press.
¢` Setting Recording Mode
Setting Recording Mode
You can record in appropriate mode you want according to
your situation.
1. Press the MENU button shortly twice.
2. Select one option of HQ, SP and LP using the jog key.
¢` Setting Mic Sense
Setting Mic Sense
You can record in appropriate mode of HI, NOR or LO
mode according to your situation.
1. Press the MENU button shortly three times.
2. Select one option using the jog key.
HI:Quiet place/ NOR: Normal/ LO: Noisy place
¢` Setting VOS(Voice Operated Recording System )
Setting VOS(Voice Operated Recording System )
Recording is proceeded only when sound is emitted.
It reduces memory usage.
1. Press the MENU button shortly four time.
2. Select ON or OFF using the jog key.
Page 9
14
VOICE RECORDER
VOICE RECORDER
15
VOICE RECORDER
VOICE RECORDER
Using Voice Recorder
Using Voice Recorder
¢` File Erase Prevention FunctionFile Erase Prevention Function
This function prevents files from being erased due to
unwanted operations.
1. Press the MENU button shortly five times.
2. Select ON or OFF using the jog key.
¢` Repeating Folder Playback Repeating Folder Playback
Playback all the files in a folder repeatedly.
1. Press the MENU button shortly six times.
2. Select ON or OFF using the jog key.
¡Æ Recording Functions
<Recording Pause>
Stops the recording temporarily.
1. Press the FUNC/DISP button shortly once to pause a recording.
2. Press the FUNC/CISP button shortly once to start recording again.
<Checking Current Time and Remaining Time><Checking Current Time and Remaining Time>
Displays the accurate avilable recording time remained.
1. Press the FUNC/DISP button for more than 1 second.
2. RECORDING STATUS -> CURRENT TIME->REC DATE->REMAINING
TIME displays in order.
<Recording Monitoring><Recording Monitoring>
Records the sound with hearing the recording sound using an earphone.
Connect an earphone to the earphone terminal of the product.
<Index Added Recording><Index Added Recording>
Adds the indexing number(file number) of the file being recorded.
Slide up the jog key during recording, the file number of the file being
recorded is increased and saved automatically.
¡ When you slide up the jog key and record for 30 minutes after
recording for 30 minutes starting from the number 1 file, the sound is recorded
in the number 1 file for 30 minutes and in the number 2 file for 30 minutes.
< Volume Control>
Controls the volume using the VOLUME.
The range is between 0 and 20.
<Pause>
Stops the playback temporaily.
1. Press the FUNC/DISP button shortly once during playback.
2. Press the FUNC/DISP button or the PLAY/STOP button
shortly again to continue playback.
¡Æ Playback Functions
¢ Note
When 30 minutes are passed after you paused, the power is turned off
automatically.
- When 30 minutes are passed after you paused, the power is turned off
automatically.
¢ Note
Page 10
16
VOICE RECORDER
VOICE RECORDER
17
VOICE RECORDER
VOICE RECORDER
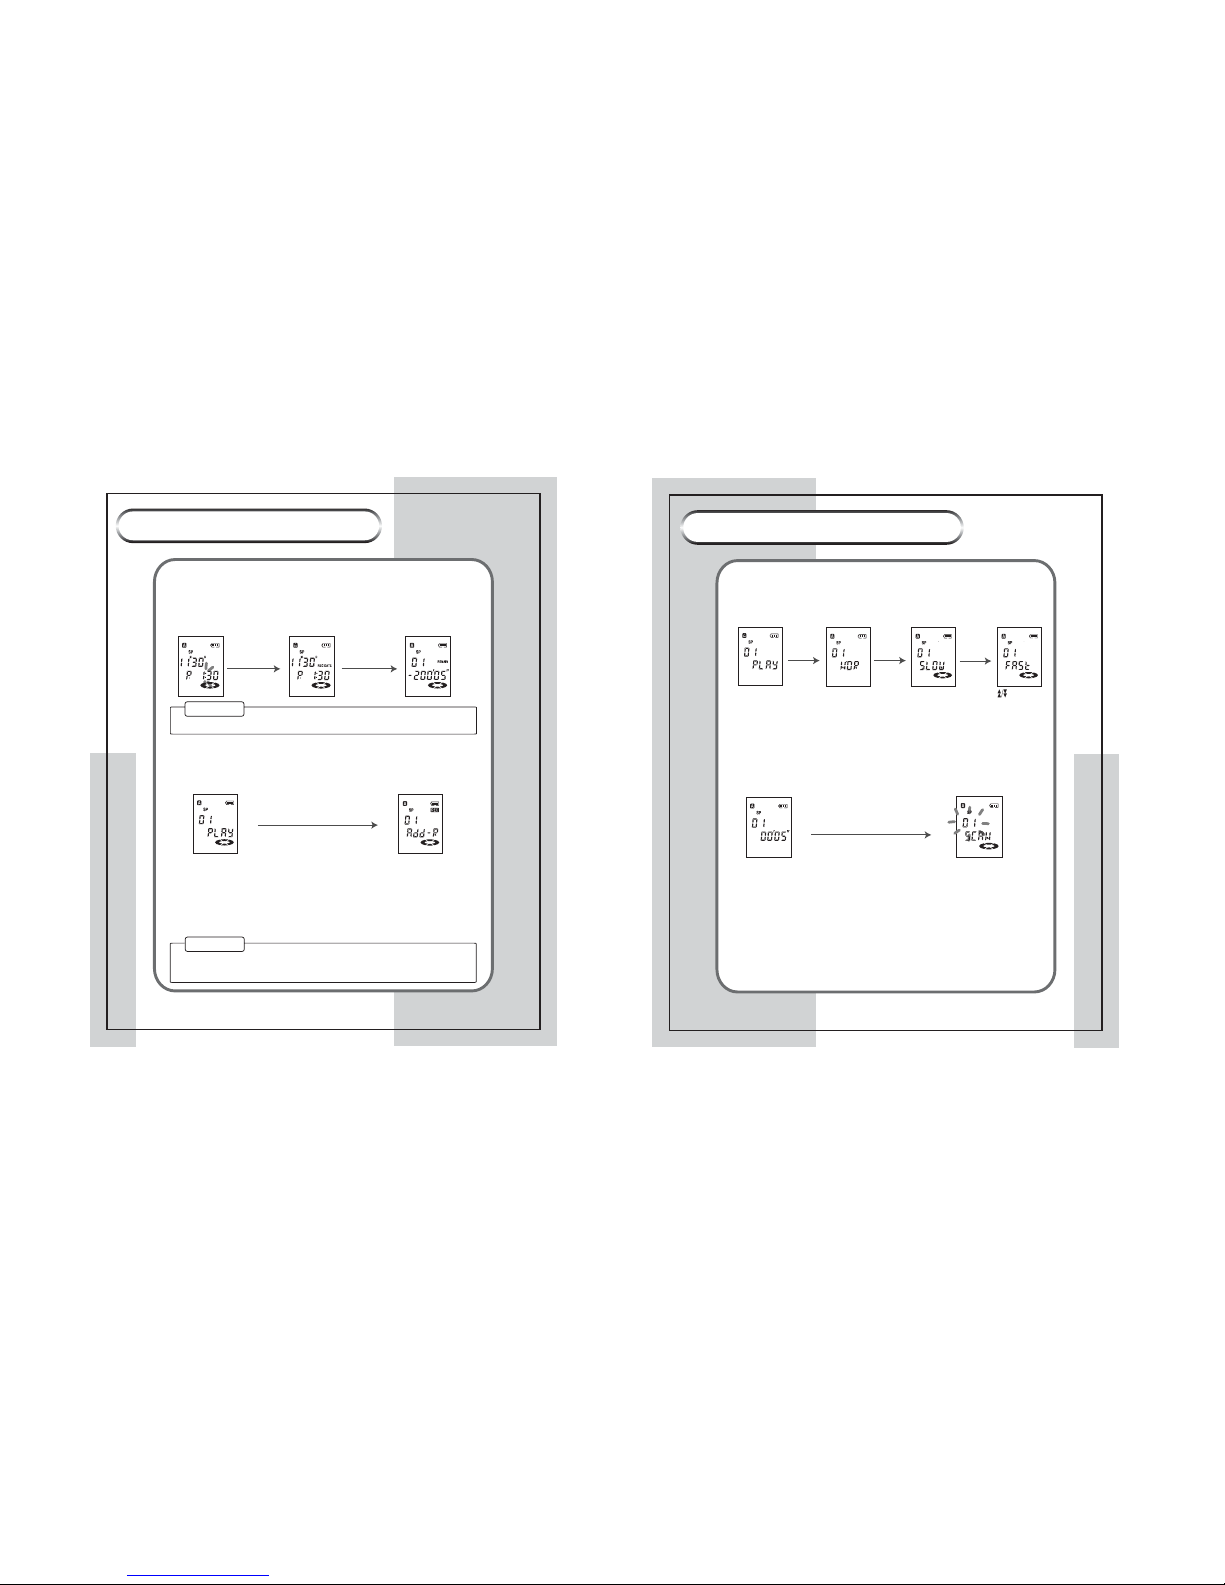
<Scan and Playback>
The first 5 seconds of each files are played back one by one.
1. Press the PLAY/STOP button longer more than 1 second in stop mode
or playback.
2. The SCAN message is displayed on the LCD and the first 5 seconds of the
recorded files are played back in the order.
3. Press the PLAY/STOP button shortly once to stop scan and play.
<REW & FF>
<REW & FF>
You can move to, search, or select a file using the jog key.
- Moving to the previous or next file: Slide up or down the jog key shortly
during playback.
- Scanning file: Slide up or down and hold the jog key during playback.
During the first 10 seconds: The playback time is increased or decreased by
second. After 10 seconds: The playback time is increased or decreased by
10 seconds.
- Selecting the previous or next file: Slide up or down the jog key in stop mode.
¡ When you want to add an additional recording to the number 2 file
1. Press the PLAY/STOP button to playback the file #2.
2. Press the REC/STOP button longer more than 1 second during playback.
3. The Add-R message is displayed an the sound is recorded and added to the
end of the number 2 file.
<Resume>
Playbacks from the position you stopped when you stopped playback.
<Additional Recording>
Records additional sound at the end of the file being played back.
1. Press the REC/STOP button longer once during playback.
2. The Add-R message is displayed and the additional recording starts.
3. To stop additional recording, press the REC/STOP button shortly once.
<PLAY SPEED CONTROL>
You can control playback speed in 3 levels: Fast(30% fater than the normal
speed), Normal(steady speed) or Slow(30% slower than the normal speed).
1. Press the PLAY/STOP button longer duing playback.
2. Select Fast, Normal, or Slow using the jog key .
Select "SLOW","FAST" with jog key.
(Press Play button for
more than 3 seconds)
Using Voice Recorder
Using Voice Recorder
¢ NoteNote
If you press other button than the PLAY/STOP button after stopping
playback, the file is played back from the first position.
<Checking Current Time and Remaining Playback Time>>
Shows current time and remaining playback time.
1. Press the FUNC/DISP button longer once duing playback.
2. PLAYBACK STATUS-> CURRENT TIME -> REC DATE->REMAIN TIME
displays in order.
FUNC/DISP FUNC/DISP
¢ Note
If there is no message, REC DATE is not displayed.
Page 11
18
VOICE RECORDER
VOICE RECORDER
19
VOICE RECORDER
VOICE RECORDER
Using Voice Recorder
Using Voice Recorder
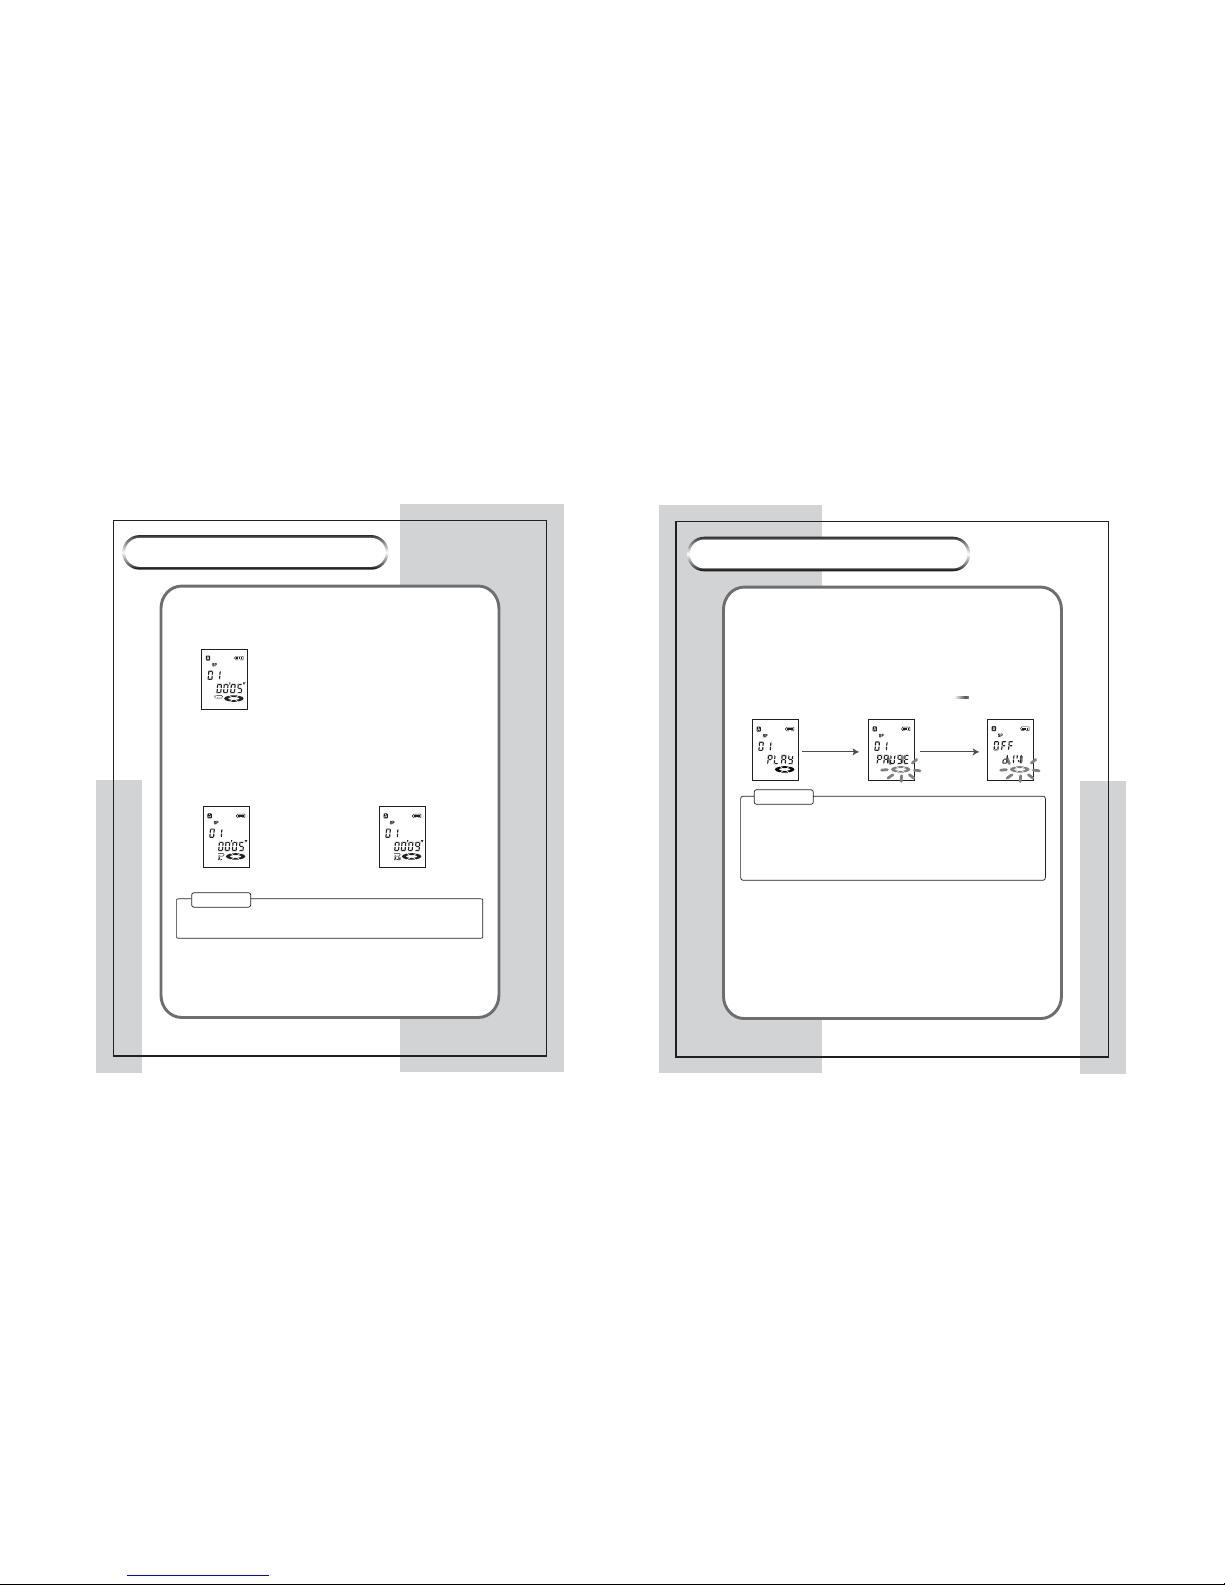
<Repeating A-B Section>
Repeats playback for a specified section
1. Press the MENU button shortly once on the first position of the section
you wish to repeat during playback, the position A is set.
2. Press the MENU button shortly once on the end position of the section you
wish to repeat during playback. The position B is set and the A-B section is
played back repeatedly.
3. Press the PLAY/STOP button to release section.
(selecting point A) (selecting point B)
¢ NoteNote
After selecting the position A, if you do not select the position B, the end
position of the file is to the position B.
<One File Repeat>
Repeats the selected file continuously.
1. Press the MENU button longer during playback to repeat playback.
2. Press the MENU button longer once again to release repeating file.
¡Æ Editing
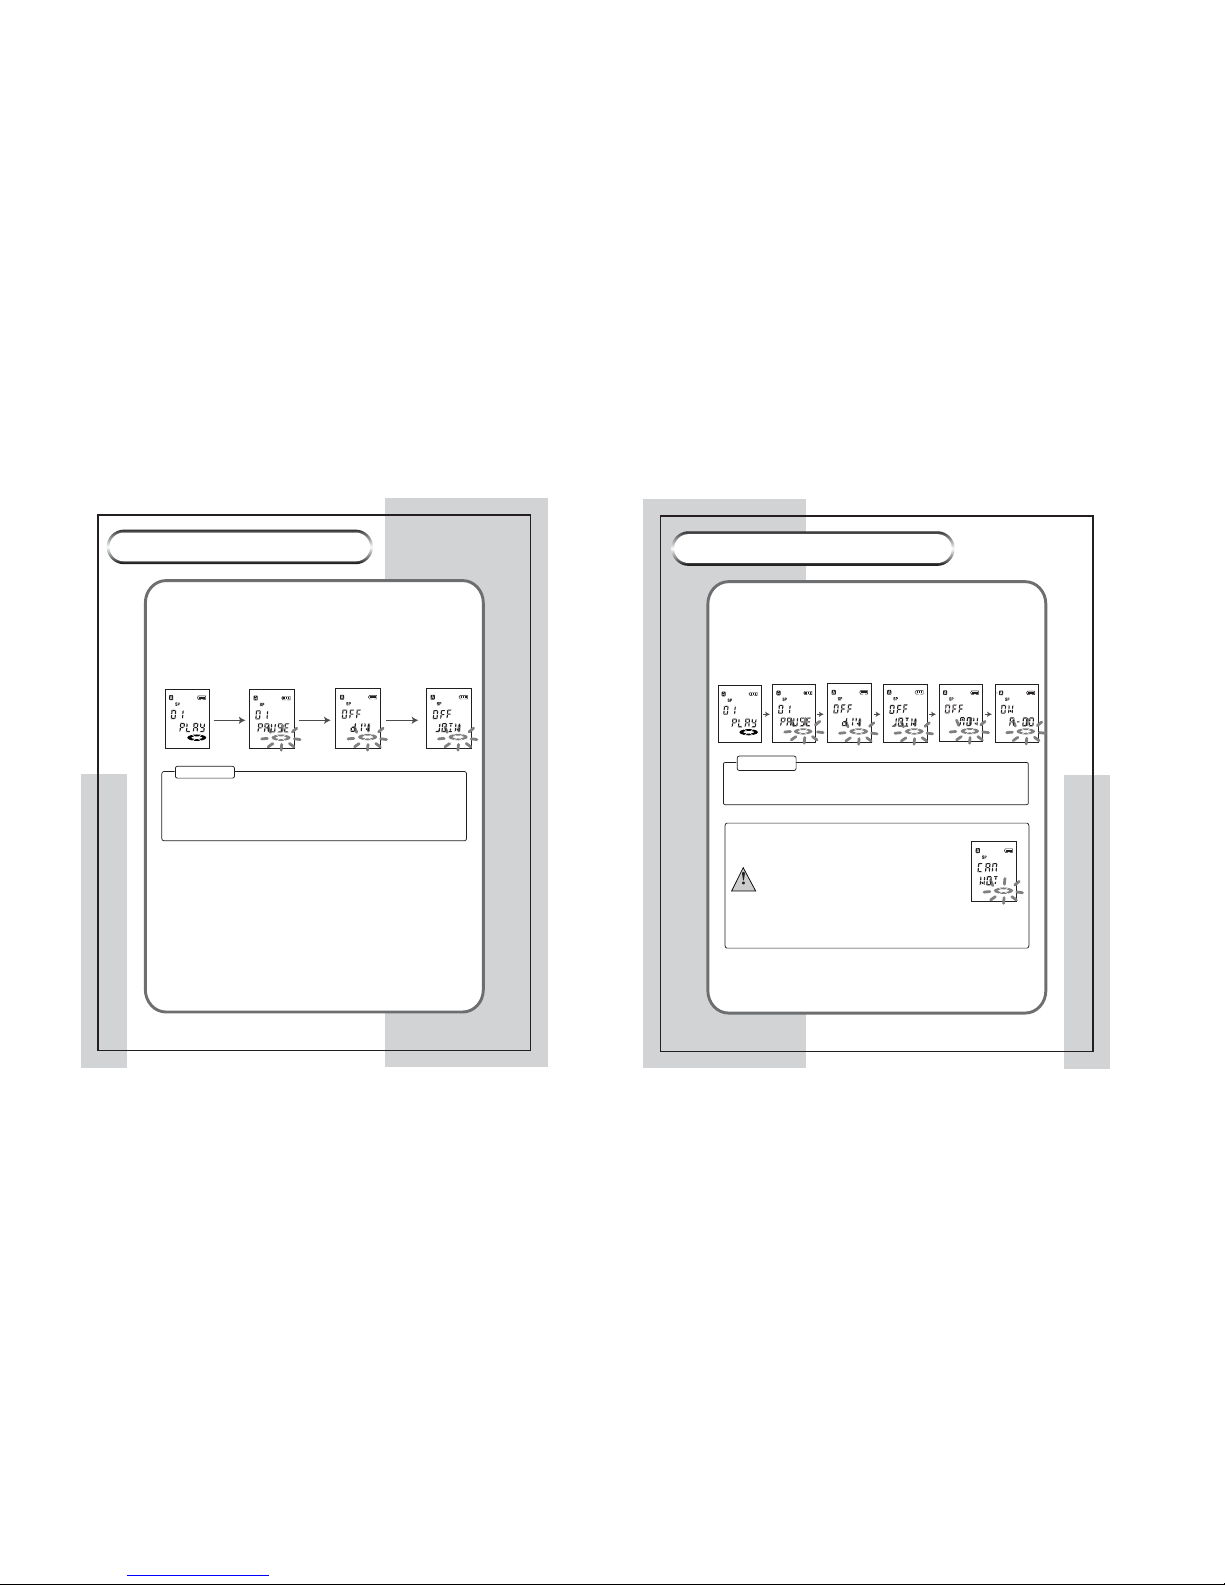
<File Dividing>
You can divide a file into two files.
1. Playback a file that you want to divide.
2. Press the FUNC/DISP button at the part which you want to divide.
3. Press the MENU button longer once to start dividing.
4. Press the MENU button shortly once an the OFF DIV message is
displayed on the LCD.
5. Select ON using the jog key and press the MENU( ) button shortly
once. Then the file is divided.
¢ Note
- The file number is increased after dividing.
- The longer you have recorded previously, the longer the dividing time is
taken to divide.
- If the memory or file number is full, files are not divided.
- The file less than 5 seconds recording cannot be divided.
- The recording date of the two divided is the same.
Page 12
20
VOICE RECORDER
VOICE RECORDER
21
VOICE RECORDER
VOICE RECORDER
<File Combining>
You can combine two files to one file.
1. Playback the fore file of the 2 files.( Playack #3 file when you want to combine
#2 and #3 file.)
2. Press the FUNC/DISP button at any point of the file.
3. Press the MENU button longer once to start combining.
4. Press the MENU button shortly twice then OF JOIN message is displayed.
5. Select ON using the jog key and press the MENU button shortly
once to combine two files.
¢ Note
- The longer you have recorded previously, the longer the combining time
is taken to combine.
- If memory or file number is full, files are not combined.
- Files with differenct recording mode cannot be combined each other.
- The last message file cannot be combined.
Using Voice Recorder
¢ Note
3. File Moving
You can move a message file from one folder to the other.
1. Playback the file you want to move.
2. Press the FUNC/DISP button at any point of the file.
3. Press the MENU button longer once to move the file.
4. Press the MENU button shortly three times then the OFF MOV message
is displayed.
5. Select a folder bewteen A, B and C with the jog key and press the MENU
button shortly once to move the file.
- After completing file moving, the file is deleted at the original folder or file
location.
Operating Recorder
¡ All editing operation operates in pause mode
only.
¡ If the memory capacity is not enough, editin is
impossible and the CANNOT message is
displayed.
Warning
¡ Please do not remove batteries during editing.
The file may not playback properly.
¡ When the LO Batt is displayed on the LCD, please replace
the batteries before editing.
Page 13
22
VOICE RECORDER
VOICE RECORDER
23
VOICE RECORDER
VOICE RECORDER
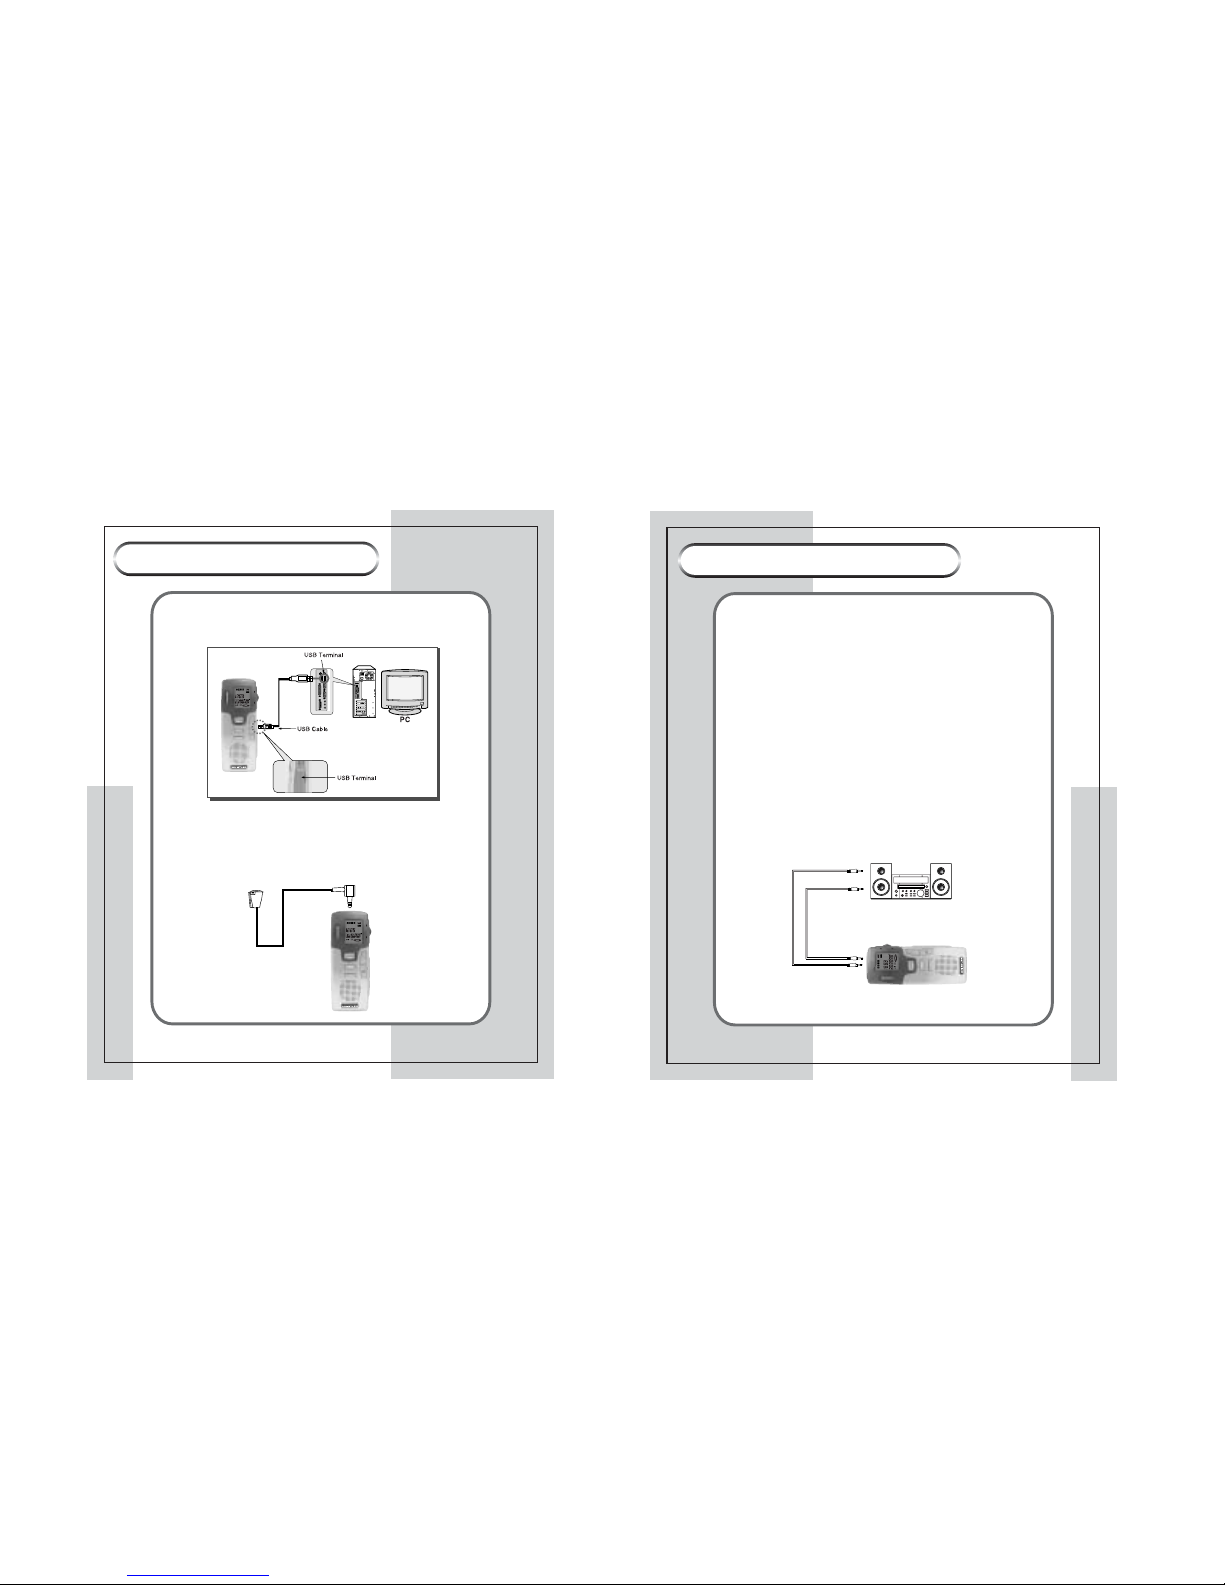
You can connect to the recorder to you PC with a USB cable and transmit data
between them. For more information on how to gransmit data, refer to the user's
manual of Power Voice ¥–.
You can also record by connecting an external microphone to the microphone
terminal of you recorder.
If you fix an external microphone onto your collar, you can act freely and you
can recored more clear sound when you come near to the source of sound.
External Microphone
External MIC Jack
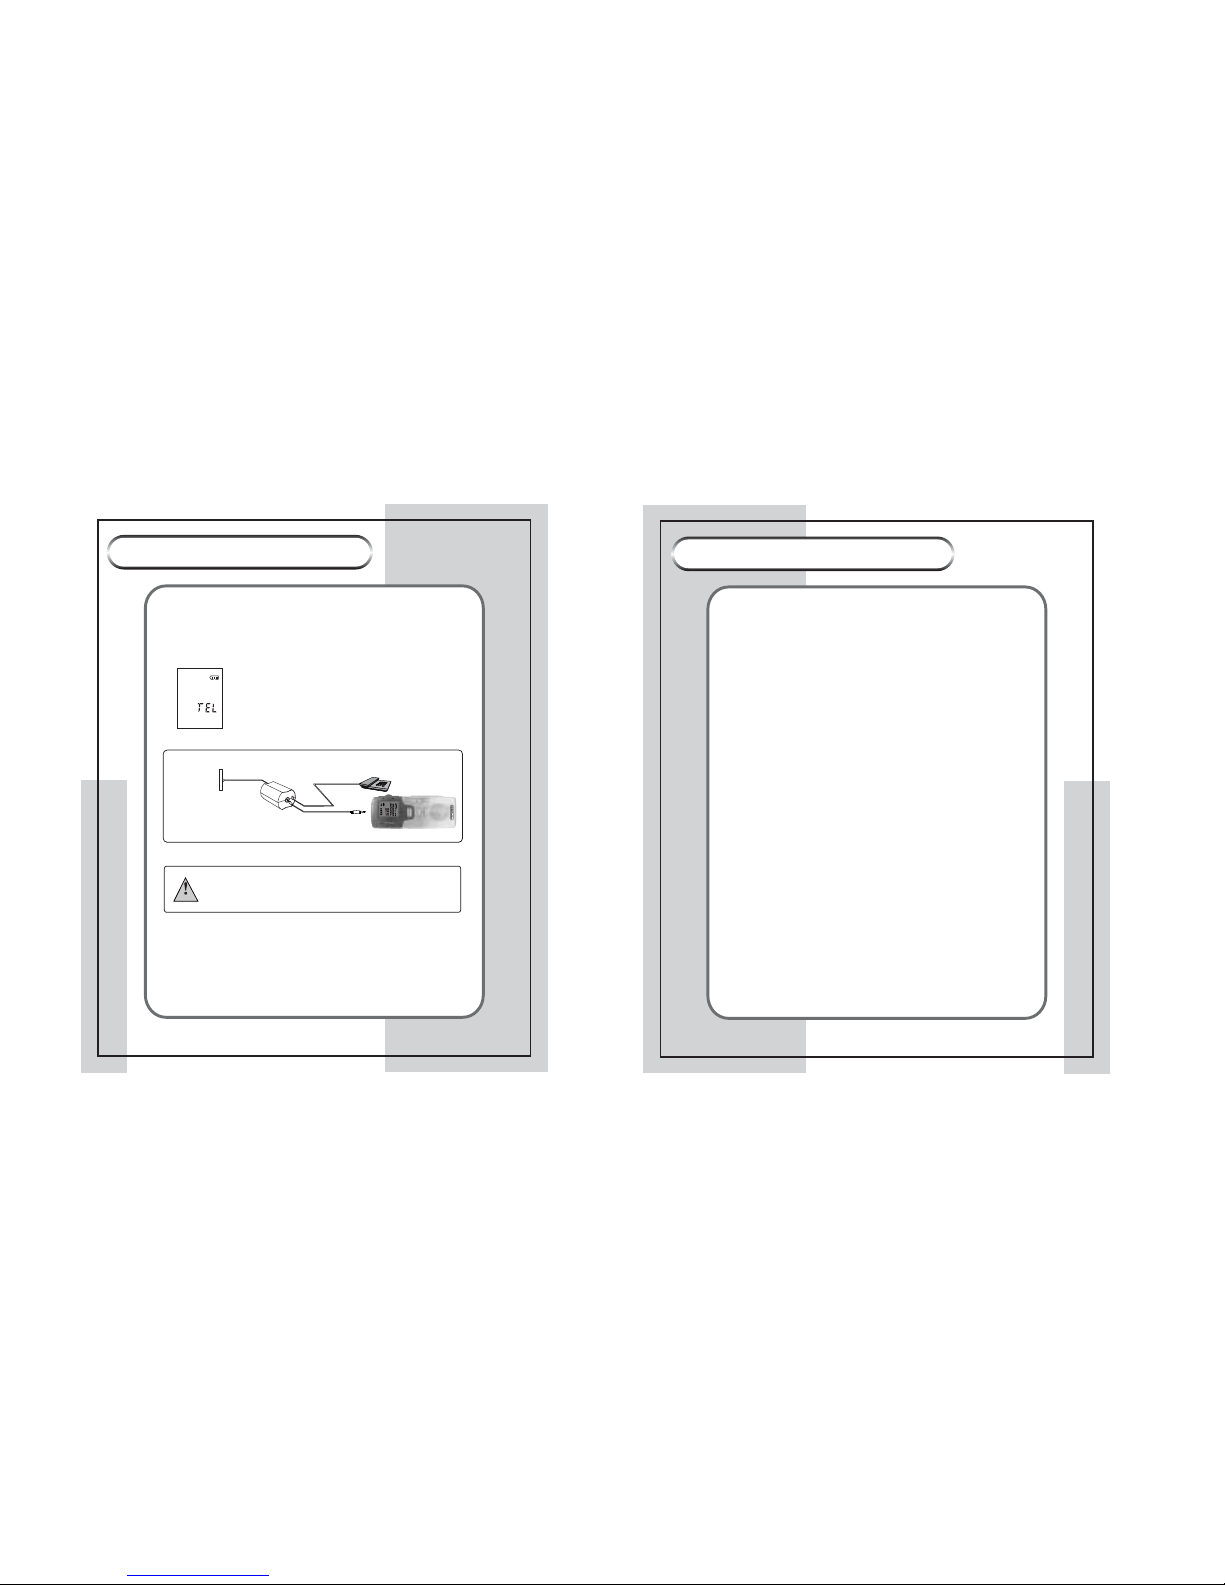
¡Æ When recording the sound recorded in you recorde onto an
external device
Connect to MIC IN or External INPUT Jack
External
Audio Cable(1)
External
Audio Cable(2)
Earphone Jack
EAR Jack
MIC Jack
Audio
Connecting to External Device
Connecting to External Device
¡Æ Recording with external microphone
¡Æ USB Interface
HQ
MD
SP
LP
VOS
LOCK
REMAIN
REC
DATE
1
A-B
LIGHT
REC/STOP
FUNC/
DISPLAY
MENU
PLAY/STOP
HQ
MD
SP
LP
VOS
LOCK
REMAIN
REC
DATE
1
A-B
LIGHT
REC/STOP
FUNC/
DISPLAY
MENU
PLAY/STOP
HQ
MD
SP
LP
VOS
LOCK
REMAIN
REC
DATE
1
A-B
LIGHT
REC/STOP
FUNC/
DISPLAY
MENU
PLAY/STOP
¡Æ When recording the sound of an external device to your
recorder
You can record the sound of an external sound device to your recorder.
1. Connect the output terminal(earphone terminal) of an external device and
the microphone terminal of the recorder with and audio.
2. Control the volume of the external device properly. If the volume of the
device is loud, the sound my be distored when you playback the recorded
sound.
3. Press the playback button of the external device and the press the RECORD
button of your voice recorder.
You can transmit the sound recorded in you recorder onto an external device.
Connect the earphone terminal of you voice recorder and the input terminal
(microphone terminal) of an external device with an audio cable. Then, press
the PLAYBACK button of your voice recorder and press the RECORD button
of the external device.
Page 14
24
VOICE RECORDER
VOICE RECORDER
25
VOICE RECORDER
VOICE RECORDER
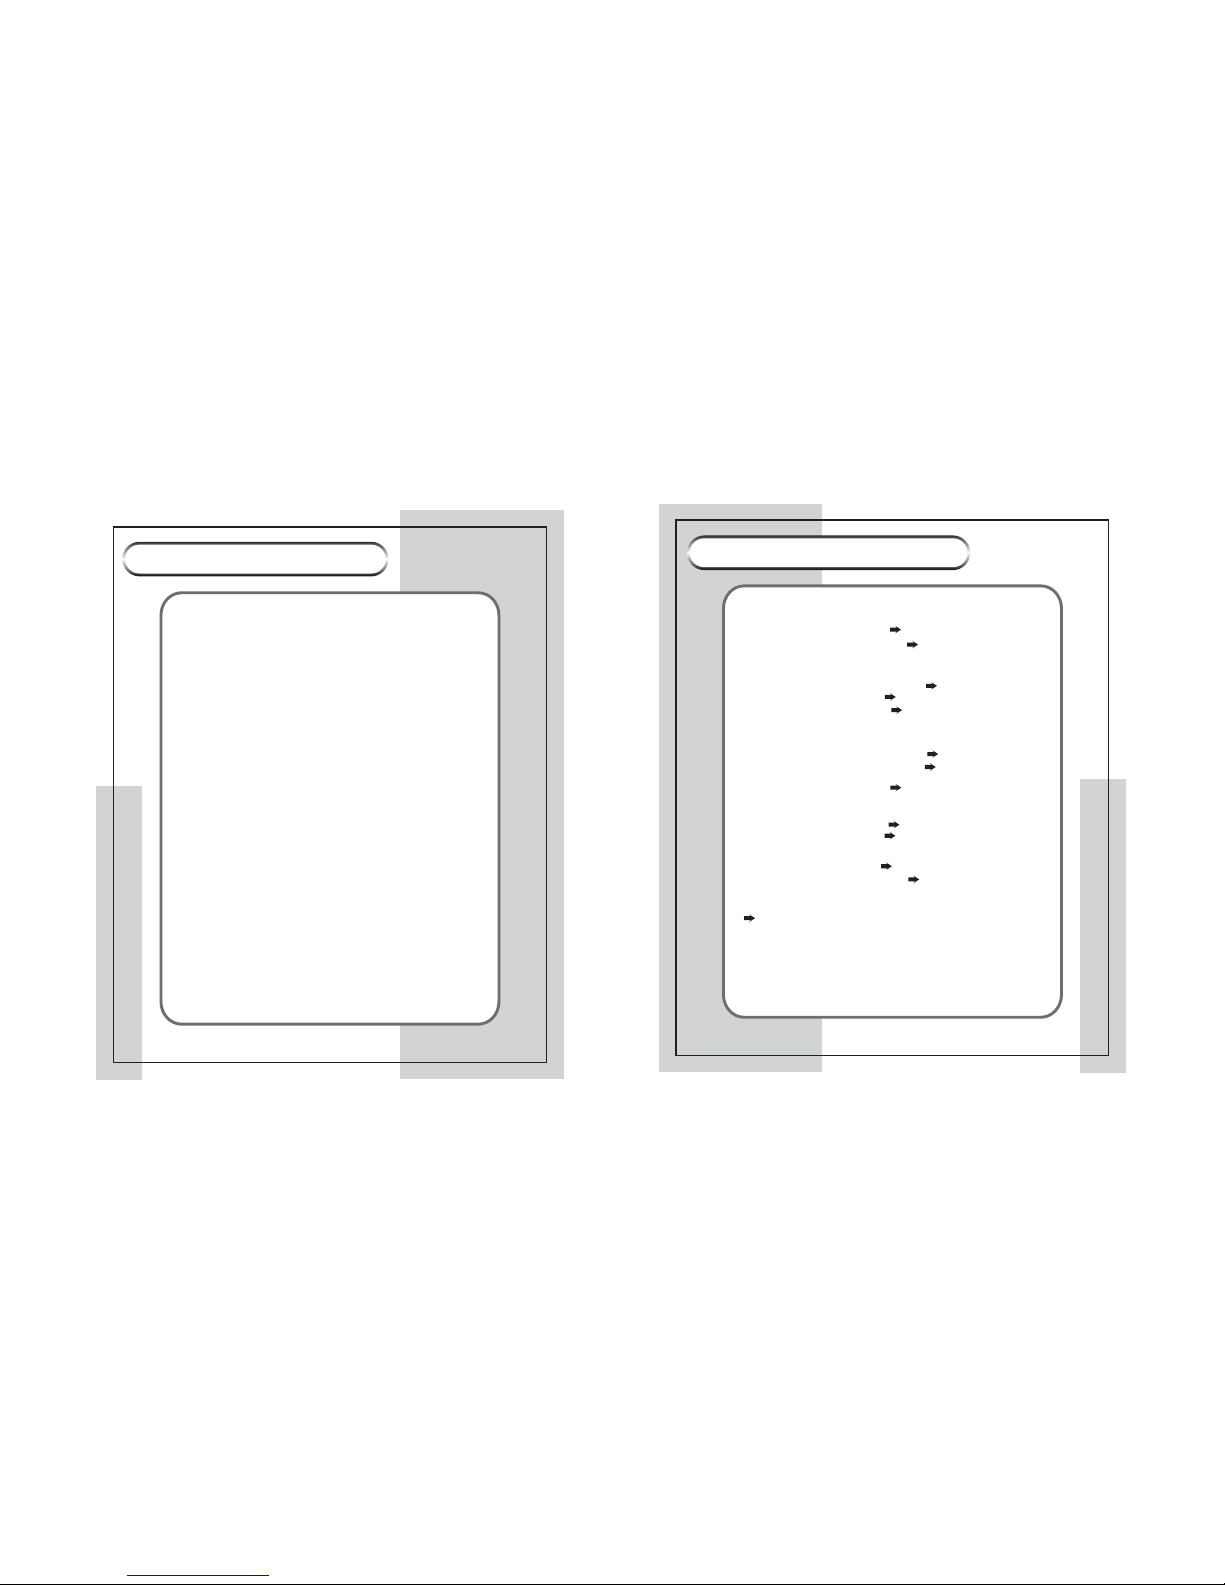
¡Æ Automatic Telephone Recording
1. Connect an adaptor for telephone recording and the cable as shown in the
following picture.
2. Press the FUNC/DISP button twice in stop mode to set TEL mode.
3. Start a telephone conversation, then recording starts automatically.
4. Press the FUNC/DISP button once again to stop recording.
JACK on the wall
Telephone
Telephone Line Adapter
MIC Jack
The telephones which does not meet the standard of modular jack
of the digital telephone avaialbe in the digital communication are
not supported.
¡Æ Cautions for Use of the Product
¢` Do not drop down any materials on the product or impact against the
product.
¢` Do not drop down any materials on the product or impact against the
product.
¢` Do not install the product in a place exposed to these conditions:
- High temperature (above 40¡)
- Poorly ventilated or closed (car inside, especially summer)
- Much moisture (humidity, above 75%)
- Dusty place
¢` Do not impact against the LCD of the product.
¢` Make sure not to place cash cards or pass cards, susceptible to
magnetic influences, near to the speaker of the product.
¢` Do not clean using chemicals such as alcohol, benzene, or sinner, etc.
¢` Does not have any responsibility for property loss due to your use of
the product even if you use the product correctly.
¢` Does not have any responsibility for memory data corruptions and
resulted property loss due to product malfunction or fault, repair,
and/or other reasons.
¡Æ
Cautions for Use of the Battery
Cautions
Line-in
Output
Audio Cable
Connecting to External Device
Caution
¡ Recording will continue till 20 seconds after hanging up the phone.
HQ
MD
SP
LP
VOS
LOCK
REMAIN
REC
DATE
1
A-B
LIGHT
REC/STOP
FUNC/
DISPLAY
MENU
PLAY/STOP
¢` Make sure to use the specified standard bettery. (AAA Alkaline bettery)
¢` Do not impose heat on it. Do not disassemble or short-circuit.
Otherwise, it may cause damages or malfunctions to the product.
¢` Do not place the metals such as coins and keys with the battery.
Otherwise, it may cause a fire due to frictional heat.
¢` Make sure that the polarities are correct when inserting a battery.
¢` Place the battery in a location that your children or infants cannot
access to.
¢` Make sure to remove the battery when you do not use the product
for a long time.
¢` Do not mix a new battery with the old one.
¢` When your skin or clothes is stained with electrolyte:
Wash them with clean water immediately. When your skin has been
hurt, make sure to consult your doctor.
¢` When electrolyte enters your eye:
Do not rub your eye. Wash it with clean water immediately and make
sure to consult your doctor.
Page 15
26
VOICE RECORDER
VOICE RECORDER
¡Æ
Cautions for Safety
Cautions
VOICE RECORDER
27
VOICE RECORDER
¢` If the product smokes or any modification occurs due to heating, remove
the battery immediately.
¢` Do not use the product in an airplane or a place where electronic device
should not be used.
¢` Do not use the product during driving or walking. Otherwise it may cause
a traffic accident.
¢` Do not listen to with a loud volume. Otherwise it may damage your
hearing. Control the volume again.
¢` Do not disassemble the product arbitrarily.
Troubleshooting
- Check whether the polarities are correct. Make sure that the polarities are
correct.
Cannot record.
- Check whether the HOLD switch is set to ON. Set the HOLD switch to OFF.
- Check whether the momory is
full.
- Check whether the battery runs out. Replace the battery with a new one.
Cannot playback.
- Check whether the HOLD switch is set to ON. Set the HOLD switch to OFF.
- Check whether your recorder has the sound Verify the number of the
sound recorded.
- Check whether the battery runs out. Replace the battery with a new one.
Cannot hear sound from the speaker.
- Check the volume is set to 0(zero). Control the volume.
- Check the earphone is connected. Disconnect the earphone.
Cannot hear sound through the earphone.
"ERROR" is displayed on the LCD and all buttons does not operate.
- Check the volume is set to 0(zero). Control the volume.
- Check whether the earphone is connected
firmly and correctly.
and correctly.
Format your recorder.
When you encounter any problem, check the following items.
Nothing is displayed on the LCD.
- Check whether the battery runs out. Replace the battery with a new one.
Connect the earphone firmly
Delete unnecessary recorded files.
recorded.
Page 16
VOICE RECORDER
VOICE RECORDER
VOICE RECORDER
VOICE RECORDER
Specifications
¢` The specifications and appearance of the product may change without prior
notice in order to imporve the quality.
ITEM SPECIFICATION
930 min.
2029 min.
464 min.
620 min.
310 min.
1012 min.
Model
Max. Recording Time (SP)
Max. Recording Time (HQ)
Max. Recording Time (LP)
Storage Media
Weight
Power
Imbedded Flash Memory
2.50 oz(Including battery)
Dimensions
Speaker
Frequency
Memory
500 ~ 3400 Hz
32 MB
64 MB
Actual Max. Output
Earphone
3 Folders(A, B, C) x100 Files
1(D) Folder
Voice
Data
Number of Files & Folders
PC Interface USB 1.1
USB Cable
Microphone
3.5 Mono
3.5 Mono Jack
4.2" x 1.6" x 0.7 (W x H x D)
DC 3V, AAA Alkaline bettery x 2
180 mW
WVR-185
WVR-175
User Manual, Earphone, USB Cable, Installation CD
Recording: 19 Hours, Playback: 11 Hours
0¡ ~ 40¡
Accessories
Battery Lifetime
Operating Temperature
Dynamic 20mm, 8 Ohm
Jack
Note
This device complies with Part 15 of the FCC Rules. Operation is subject to the
following two conditions: (1) this device may not cause harmful interference, and (2)
this device must accept any interference received, including interference that may
cause undesired operation.
Note : This equipment has been tested and found to comply with
the limits for a Class B digital device, pursuant to part 15 of the FCC
Rules. These limits are designed to provide reasonable protection
against harmful interference in a residential installation. This
equipment generates, uses and can radiate radio frequency energy
and, if not installed and used in accordance with the instructions,
may cause harmful interference to radio communications. However,
there is no guarantee that interference will not occur in a particular
installation. If this equipment does cause harmful interference to
radio or television reception, which can be determined by turning
the equipment off and on, the user is encouraged to try to correct
the interference by one or more of the following measures :
- Reorient or relocate the receiving antenna.
- Increase the separation between the equipment and receiver.
- Connect the equipment into an outlet on a circuit different from
that to which the receiver is connected.
- Consult the dealer or an experienced radio/TV technician for help.
NOTE:THE MANUFACTURER IS NOT RESPONSIBLE FOR ANY RADIO OR TV
INTERFERENCE CAUSED BY UNAUTHORIZED MODIFICATIONS TO THIS
EQUIPMENT. SUCH MODIFICATIONS COULD VOID THE USER'S AUTHORITY TO
OPERATE THE EQUIPMENT .
 Loading...