

BUILT-IN MICROWAVE WITH TRIM KIT
INSTALLATION INSTRUCTIONS
INSTRUCTIONS D’INSTALLATION DU FOUR À
MICRO-ONDES ENCASTRÉS AVEC GARNITURE
Built-In Microwave with Trim Kit Models / Modèles de four à micro-ondes avec garniture
Standard Models / Modèles standard: YWMT55511K, YKMBT5511K
Slim Models / Modèles minces: YWMT50011K, YKMBT5011K
Table of Contents / Table des matières
MICROWAVE OVEN SAFETY ........................................................1
INSTALLATION REQUIREMENTS .................................................2
Tools and Parts .............................................................................2
Location Requirements ................................................................3
Not installed over a built-in oven .................................................3
Installed over a built-in oven ........................................................3
Product Dimensions .....................................................................4
Required Cutout Dimensions .......................................................5
Electrical Requirements ...............................................................6
INSTALLATION INSTRUCTIONS ...................................................7
Unpacking Instructions ................................................................7
Prepare Microwave Oven .............................................................7
Install the Rails .............................................................................8
Install the Microwave Oven ..........................................................9
Secure the Trim Kit Frame ...............................................................9
SÉCURITÉ DU FOUR À MICRO-ONDES ...................................10
EXIGENCES D’INSTALLATION ...................................................11
Outils et pièces ...........................................................................11
Exigences d’emplacement ......................................................12
Non installé au-dessus un four encastré ...................................12
Installé au-dessus un four encastré ...........................................12
Dimensions du produit ...............................................................13
Dimensions requises des ouvertures à découper .....................14
Spécicationsélectriques ..........................................................15
INSTRUCTIONS D’INSTALLATION ............................................. 16
Instructions de déballage ...........................................................16
Préparation du four à micro-ondes ............................................16
Installation des glissières ...........................................................17
Installation du four à micro-ondes .............................................18
Fixer le cadre de garniture .........................................................18
UL listed for use over electric built-in oven, 30" (76.2 cm) wide.
This appliance is a built-in microwave with trim kit, do not use as countertop microwave oven.
Homologué UL pour une utilisation au-dessus d’un four électrique encastré de 30po (76,2cm) de large.
Cet appareil est un four à micro-ondes encastré avec garniture; ne pas utiliser comme four à micro-ondes de comptoir.
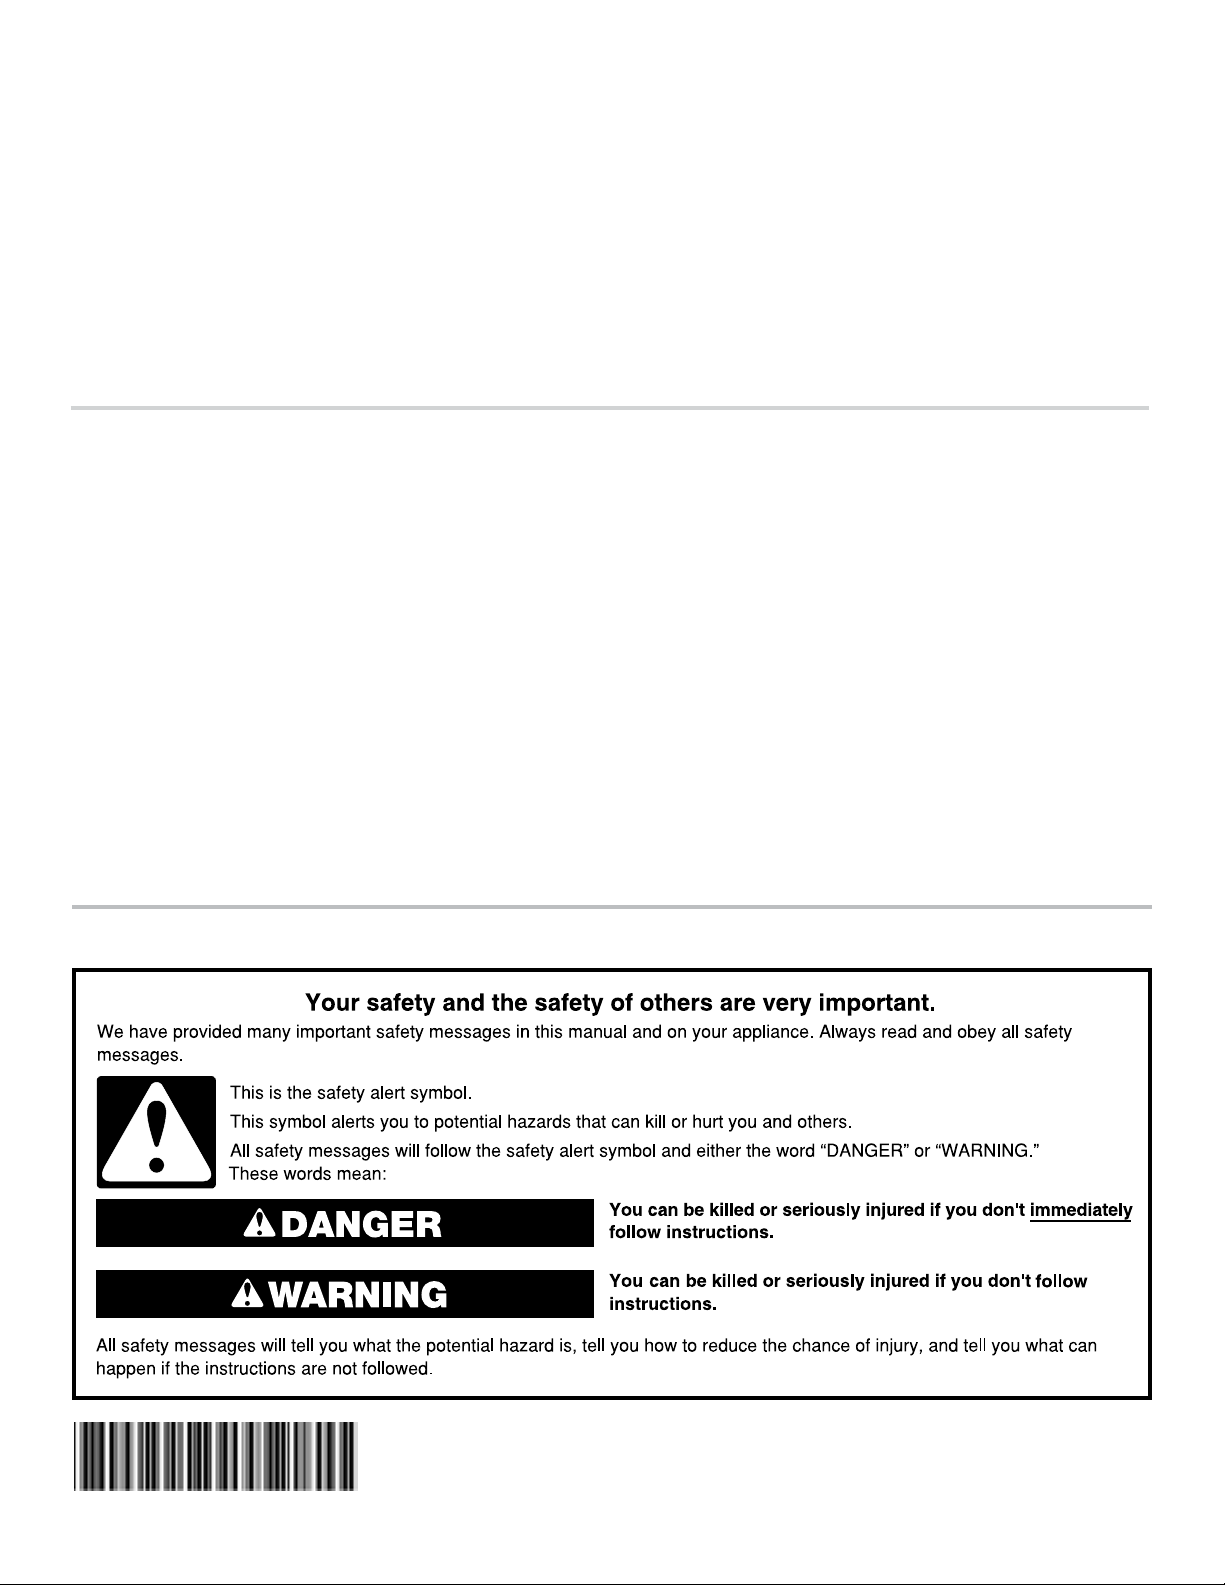
MICROWAVE OVEN SAFETY
W11412754B
INSTALLATION REQUIREMENTS
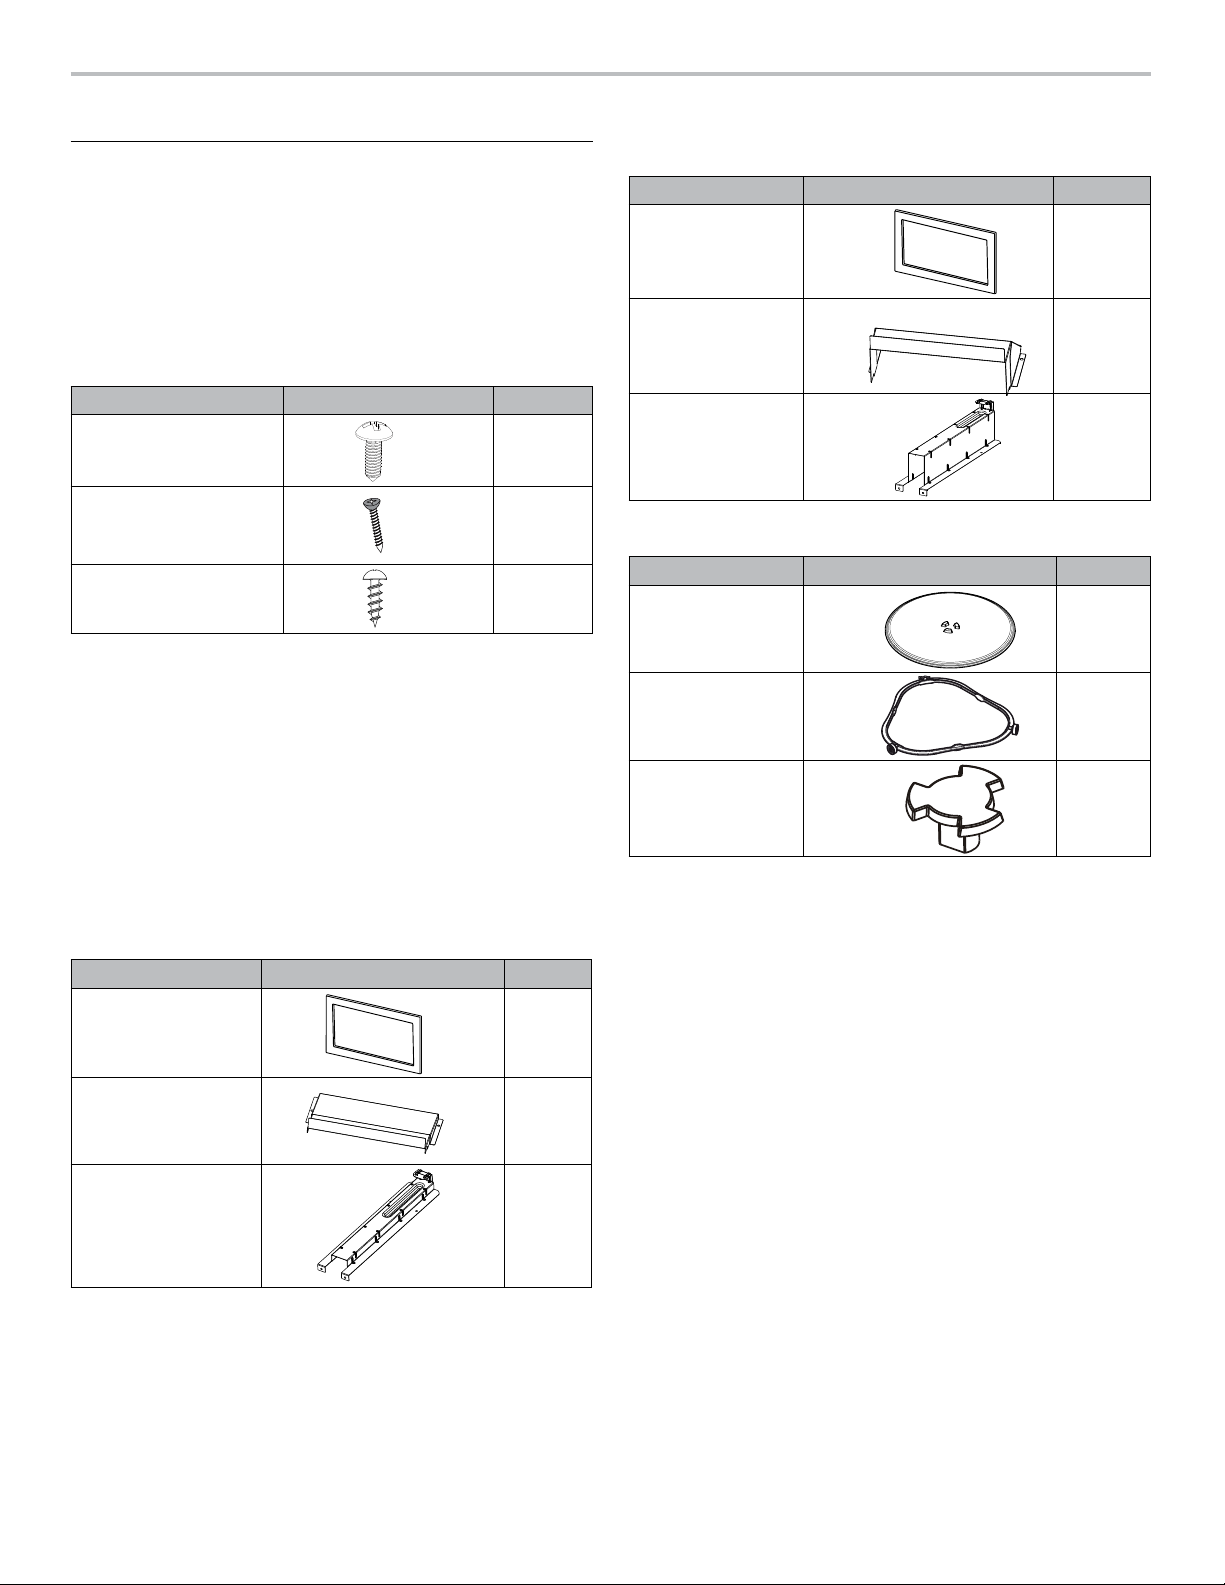
Tools and Parts
Tools Needed
Gather the required tools and parts before starting installation.
Read and follow the instructions provided with any tools listed
here.
■ Measuring tape
■ Pencil
■ Phillips screwdriver
Screw Pack Supplied (not shown to scale)
SCREW SCREW ART QTY
#7-18x7/16"
round- head sheet metal
screws
#7-16x15/16"
at head wood screws
#7-16x7/16"
round-head wood screws
NOTE: There are some extra screws in the screw pack. They are
spares for your use during installation if needed. See below:
■ #7-18x7/16" round-head sheet metal screw: 4 extra
■ #7-16x15/16" at head wood screw: 2 extra
■ #7-16x7/16" round-head wood screw: 4 extra
Parts supplied (not shown to scale)
This installation instruction is for various models. Some parts
supplied may have different appearance, depending on your
model.
NOTE: Trim kit frame (1), Cooling Ducts (2) and Rail (2) parts will
need to be purchased to convert from Standard to Slim or from a
Slim to a Standard installation.
Parts supplied for model: YWMT50011K and YKMBT5011K
PART PART ART QTY
Trim kit frame (slim)
■ 7/64" (2.8 mm) drill bit
■ Drill
14
6
10
1
Parts supplied for model: YWMT55511K and YKMBT5511K
PART PART ART QTY
Trim kit frame
(standard)
Cooling duct
(standard)
Rail (standard)
1
2
2
Parts supplied for all models
PART PART ART QTY
Turntable
Turntable ring
Turntable driver
1
1
1
NOTE: The turntable driver is located inside the microwave oven
cavity. Remove the tape before use.
Cooling duct (slim)
Rail (slim)
2
2
2
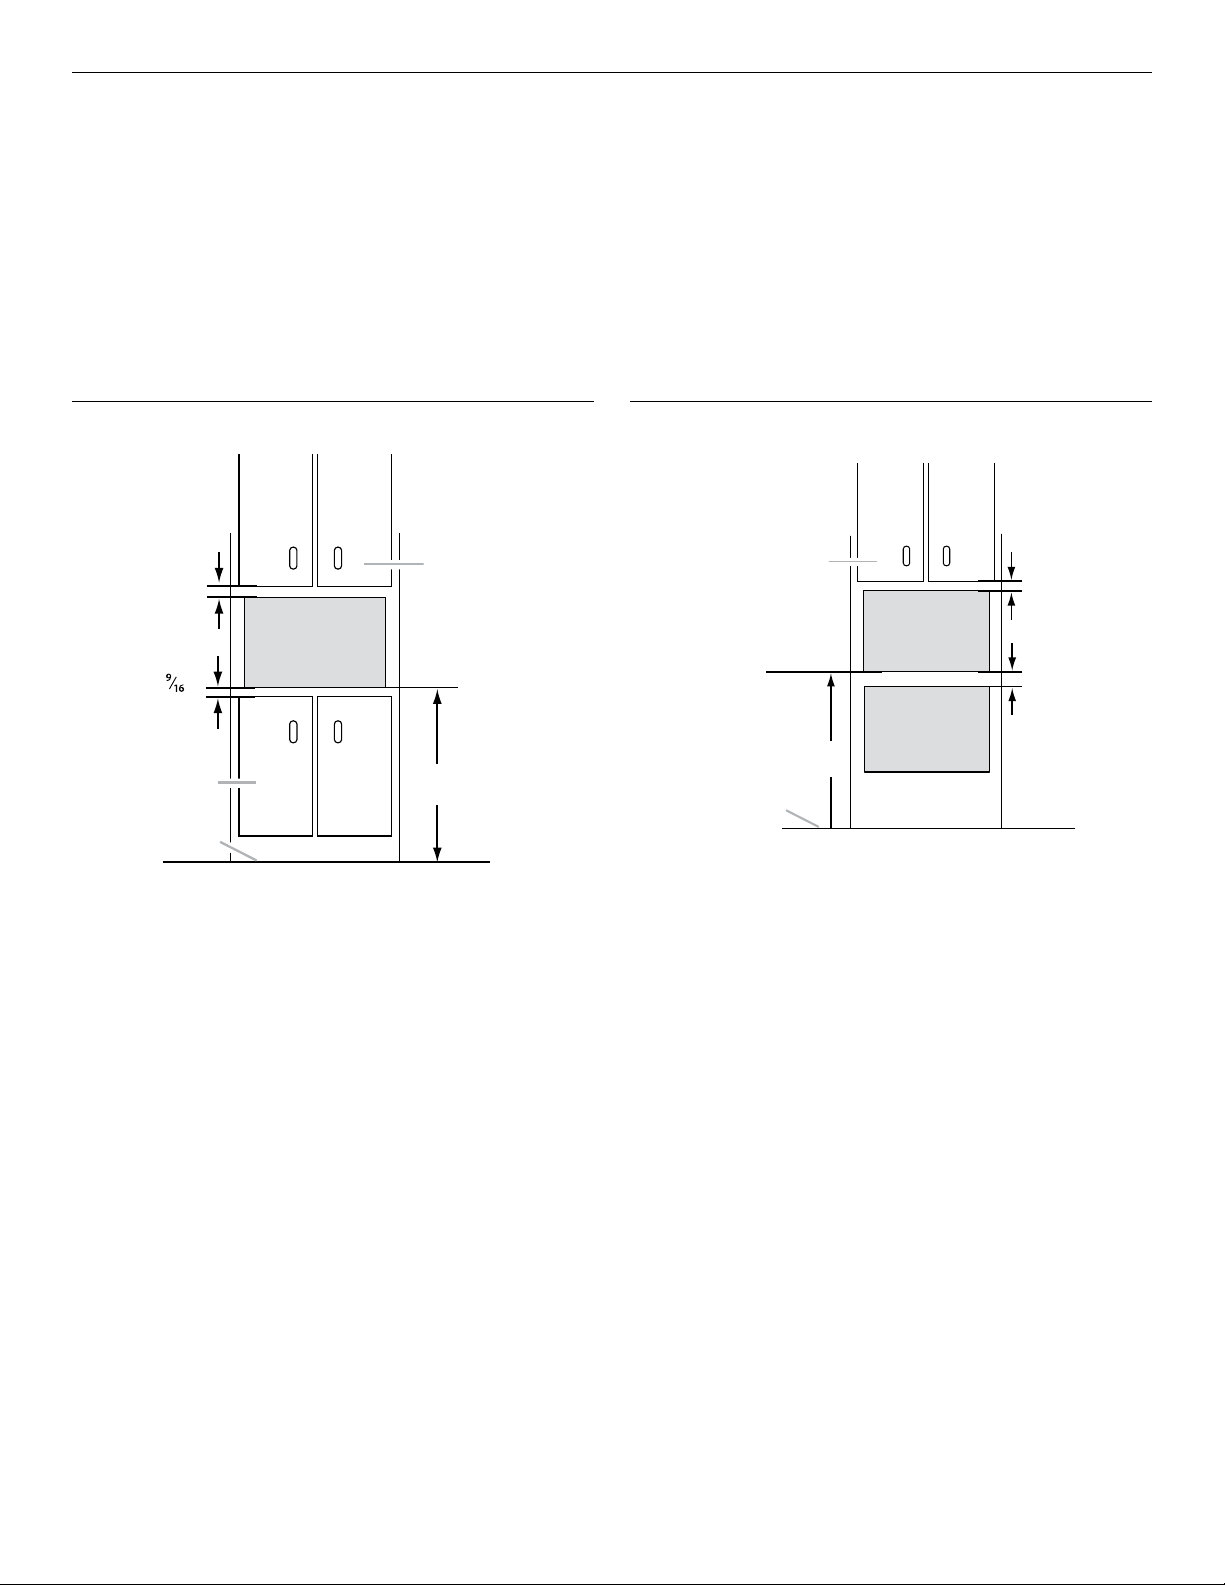
Location Requirements
This is a built-in appliance. Do not use as countertop microwave oven.
This microwave oven must be installed into a wood cabinetry. The location must provide:
■ Cutout opening that is plumb and square.
■ Cutout oor that is solid, level and ush with bottom of cabinet cutout.
■ Support for weight of at least 150 lbs (68 kg), which includes microwave oven and items placed inside.
■ There must be minimum of 36" (91.4 cm) from the oor to cut-out oor. See pictorial below.
■ Grounded electrical outlet. See “Electrical Requirements” section.
■ Minimum installation clearances for installation location. See “Required Cutout Dimensions” section.
■ Complete enclosure around the recessed portion of the microwave oven.
■ Mounting distance between a xed wall on the hinged-side of the door and the microwave oven is 0.5" (1.3 cm).
Not installed over a built-in oven
2"
(5.1 cm)
B
1
"
(4.0 cm)
C
D
A. Upper cabinet
B. Microwave oven cutout
1. Minimum distance of 36" (91.4 cm) from the oor to the
cutout oor.
2. The microwave oven may also be installed in a cabinet by
itself (without a built-in oven below). Allow a clearance of at
9
/16" (4.0 cm) below the cabinet.
least 1
3. Make sure the surrounding cabinetry has clearance to open
and close freely. Allow a clearance of at least 2" (5.1 cm)
above the cutout opening.
C. Lower cabinets
D. Floor
A
min.
36"
(91.4 cm)
Installed over a built-in oven
A
B
F
min.
36"
(91.4 cm)
D
A. Upper cabinet
B. Microwave oven cutout
D. Floor
F. Lower oven cutout
1. Minimum distance of 36" (91.4 cm) from the oor to the
cutout oor.
2. The microwave oven may be installed over a built-in oven. If
installing over a built-in oven, make sure there is a minimum
of 3" (7.6 cm) between the top of the lower oven cutout and
the microwave oven cutout oor.
3. Make sure the surrounding cabinetry has clearance to open
and close freely. Allow a clearance of at least 2" (5.1 cm)
above the cutout opening.
2"
(5.1 cm)
3"
(7.6 cm)
3
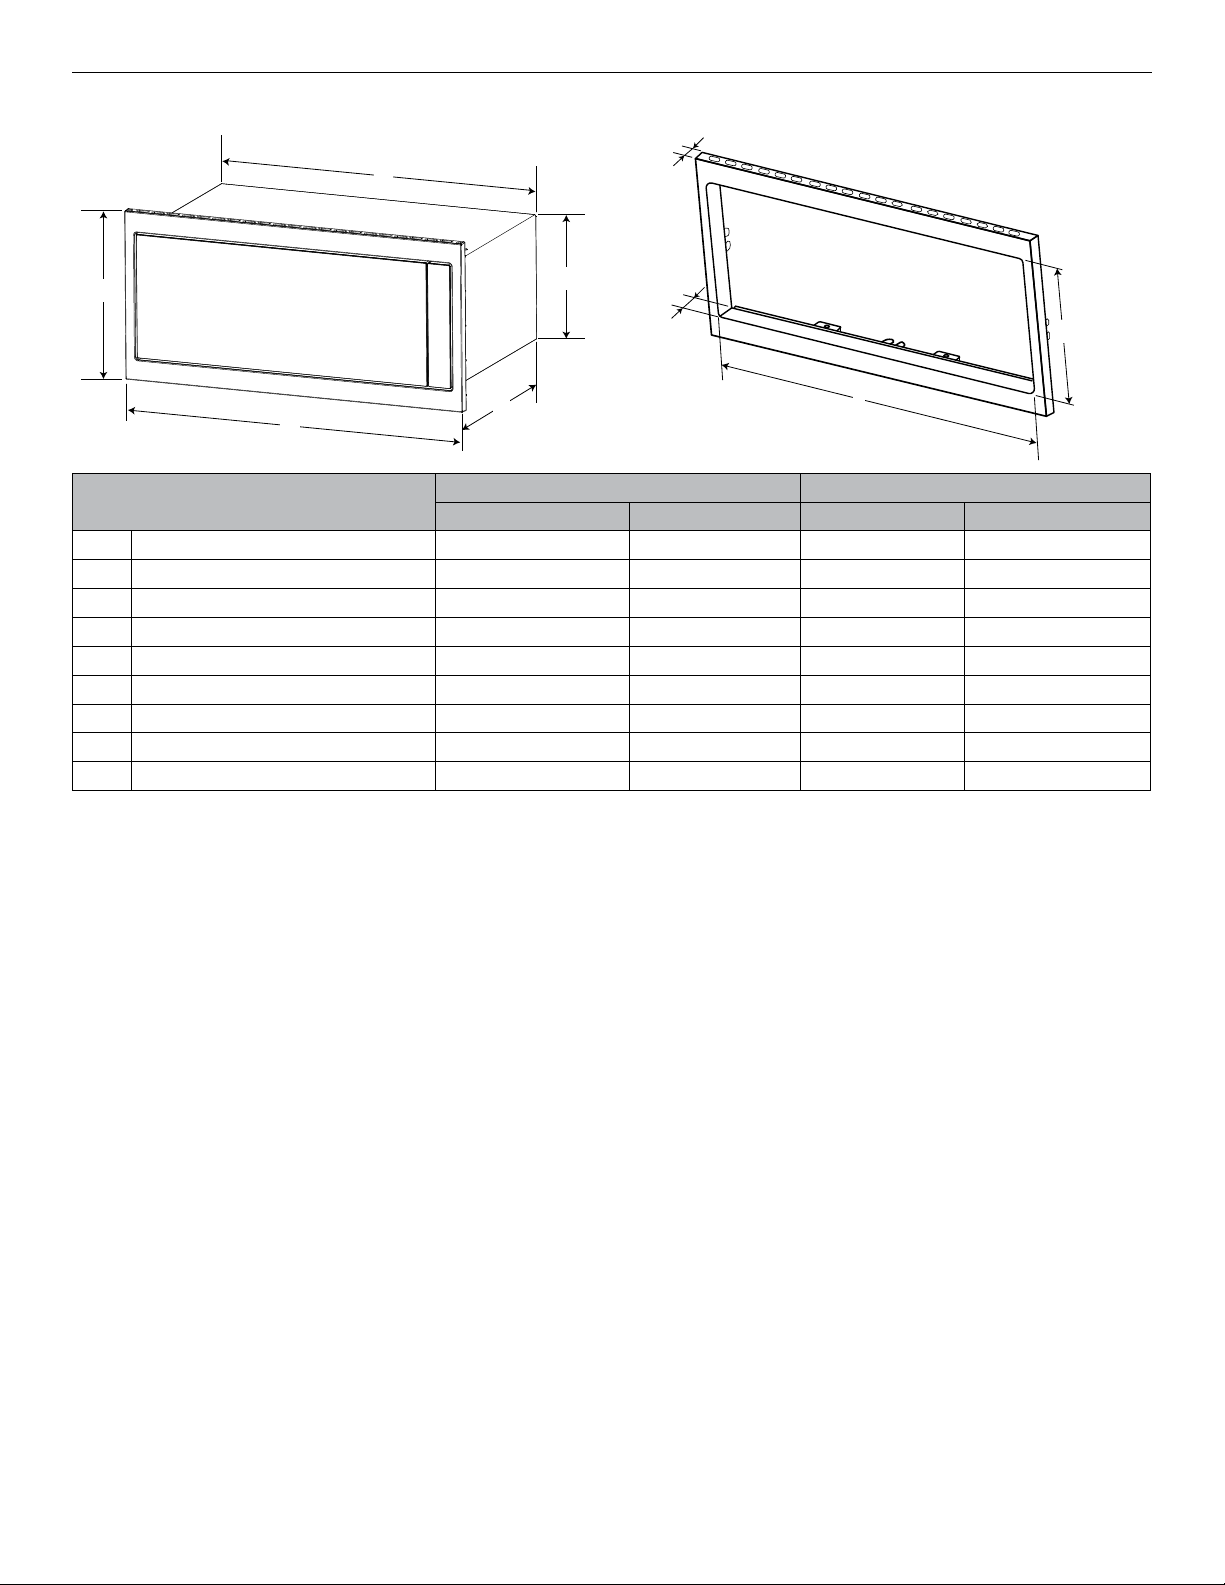
Product Dimensions
F
E
B
D
G
J
C
H
A
Unit Measurement Slim models Standard models
in cm in cm
A Width of unit with trim kit frame 29¾ 75.6 29¾ 75.6
1
B Height of unit with trim kit frame 14 35.6 19
/
8
C Depth of unit 18 45.7 18 45.7
D Height of unit without trim kit frame 10
E Width of unit without trim kit frame 27
/
16
13
/
16
26.2 105/
70.7 2713/
16
16
5
F Trim kit frame thickness (visible) 7/8 2.2 7/8 2.2
G Total thickness of frame 2
/
16
5.8 25/
16
5
H Trim kit frame inner opening width 28 71.1 28 71.1
9
J Trim kit frame inner opening height 10
/
16
26.9 109/
16
48.6
26.2
70.7
5.8
26.9
4
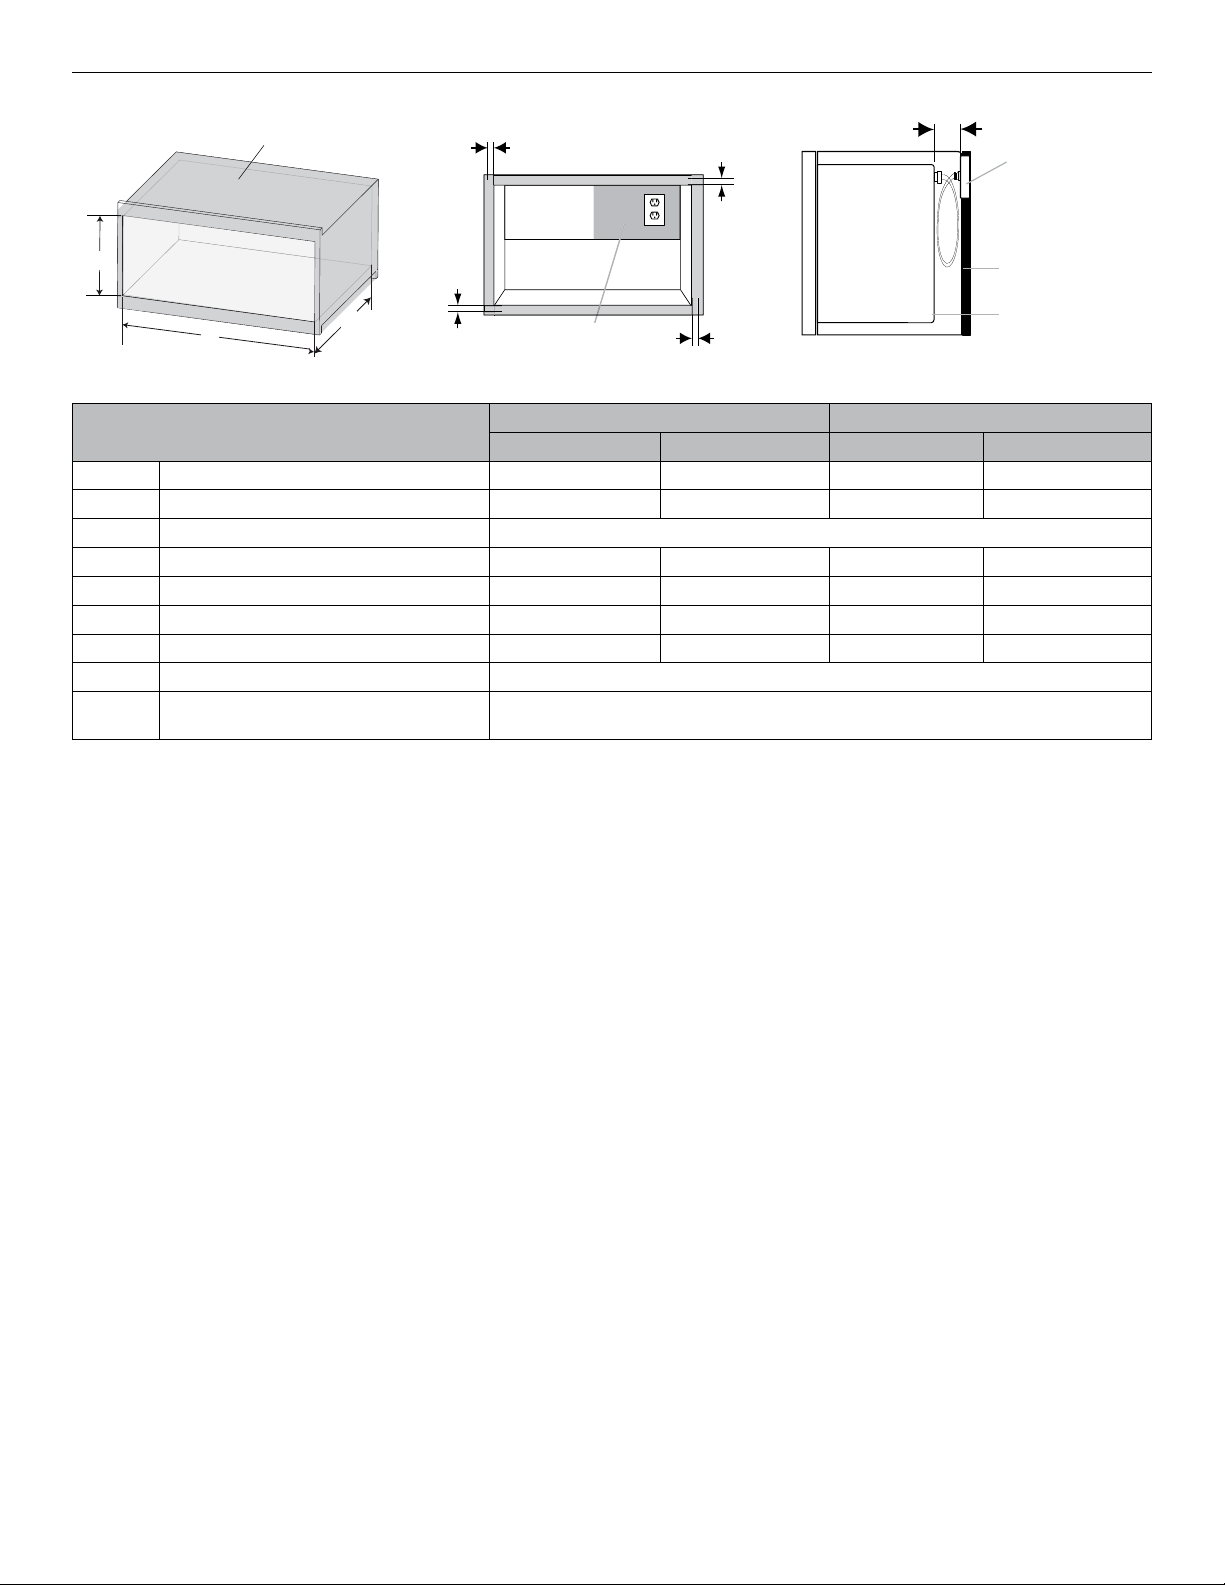
Required Cutout Dimensions
J
Back of the
microwave oven
Back of the
Cabinet
Receptacle
e
Wooden Cabinet
B
F
E
H
A
C
D
Recommended
Receptacle
Location
G
Cabinet Cutout Measurement Slim models Standard models
in cm in cm
1
A Width of cabinet opening 28
/
2
B Height of cabinet opening 12 30.5 17
3
C Depth of cabinet opening Minimum 21
/4" (55.2 cm) with ush receptacle
72.4 281/
2
1
/
8
72.4
43.5
D Trim kit frame overhang-lower frame 1 2.54 1 2.54
E Trim kit frame overhang-upper frame 1 2.54 1 2.54
F Trim kit frame overhang-left frame 5/8 1.6 5/8 1.6
G Trim kit frame overhang-right frame 5/8 1.6 5/8 1.6
H Recommended region for receptacle Upper right quadrant
J Receptacle surface to the back of the
4" (10.2 cm) < J < 40" (102 cm)
microwave oven
NOTES:
■ Flush receptacle is recommended. For non-ush receptacle, make sure you have at least 4" (10.2 cm) clearance between the back
of microwave oven and the receptacle.
■ If the receptacle is placed outside of the recommended region, make sure from the back of the microwave oven to the receptacle
must be within 40" (102 cm). Otherwise, the power cord is not long enough to plug in.
■ Tolerance for width and height of cabinet opening is 1/16"(2mm).
5
Electrical Requirements
WARNING
Electrical Shock Hazard
Plug into a grounded 3 prong outlet.
Do not remove ground prong.
Do not use an adapter.
Do not use an extension cord.
Failure to follow these instructions can result in death,
fire, or electrical shock.
Observe all governing codes and ordinances.
Required:
■ A 120 V, 60 Hz, AC only, 15 or 20 A electrical supply with a
fuse or circuit breaker
Recommended:
■ A time-delay fuse or time-delay circuit breaker
■ A separate circuit serving only this microwave oven
GROUNDING INSTRUCTIONS
For all cord connected appliances:
The microwave oven must be grounded. In the event of
an electrical short circuit, grounding reduces the risk of
electric shock by providing an escape wire for the electric
current. The microwave oven is equipped with a cord
having a grounding wire with a grounding plug. The plug
must be plugged into an outlet that is properly installed
and grounded.
WARNING: Improper use of the grounding plug can
result in a risk of electric shock. Consult a qualified
electrician or serviceman if the grounding instructions are
not completely understood, or if doubt exists as to whether
the microwave oven is properly grounded.
Do not use an extension cord. If the power supply cord is
too short, have a qualified electrician or serviceman install
an outlet near the microwave oven.
SAVE THESE INSTRUCTIONS
This device complies with Part 18 of the FCC Rules.
This device complies with Industry Canada ICES-001.
6

INSTALLATION INSTRUCTIONS
Unpacking Instructions
WARNING
Excessive Weight Hazard
Use two or more people to move and install
microwave oven.
Failure to do so can result in back or other injury.
1. Unpack the microwave oven and check if all parts are
supplied and screw pack is included. See “Screw Pack
Supplied” and “Parts Supplied” sections. They are needed
for installation.
2. Dispose of/recycle all packing materials.
D
A
E
B
C
B
A. Carton box (1)
B. Angle bar (2)
C. Top cushion (1)
D. Small cushion (1)
E. Inner cushion
(Standard models only)
F. Inner cushion bar
(Standard models only)
G. Bottom cushion
F
G
3. Attached the trim kit frame to the microwave oven in the
following steps:
■ Remove the protective lm on door before installation.
■ Insert the four trim kit frame locating holes to the four
microwave oven locating pins. Install the trim kit frame in
the proper orientation. “TOP” side is marked.
B
A
C
A. Trim Kit Frame
B. Locating pin (4)
C. Locating slot (4)
■ Secure the trim kit frame to the microwave oven using
four #7-18x7/16" round-head sheet metal screws
A
B
C
Prepare Microwave Oven
1. Remove any loose items inside microwave oven.
2. Place the microwave oven on a sturdy counter top or table
with the door slightly beyond the surface edge as shown.
< 3.5" (9 cm)
B
A. Edge of table
B. Edge of microwave-lower front door
A
A. Trim Kit Frame
B. #7-18x7/16" round head sheet metal screw (4)
C. Screw holes (4)
4. Secure the two cooling ducts to the top of the microwave
oven using six #7-18x7/16" round-head sheet metal screws.
B
C
Standard
Slim
A. Cooling Duct (2)
B. #7-18x7/16" round head sheet metal screws (6)
C. Screw holes (6)
A
NOTE: The cooling duct may have slightly different appearance,
depending on your model.
7

Install the Rails
1. Using measuring tape and pencil, mark the centerline of the
opening on the cabinet lower front wall.
2. Place the two rails inside the cabinet as shown below such
that distance between the nearest edges are 20
A
3
/4" (52.7cm).
5. Put the two rails inside the cabinet, and align the screw holes
on rails and pilot holes on cabinet.
C
3
20
/
"
(52.7 cm)
4
B
A. Cabinet
B. Rails
C. Side wall
3. Use a pencil to draw screw marks across six rails screw
holes C, D, E, F, G, H in the cabinet. Conrm that the
distance from hole D to centerline is 10
distance from hole F to centerline should be 10
(27.6cm) as shown. Then take out of the two rails.
E
27
10
/
"
(27.6 cm)
32
C
D
A. Cabinet
B. Rails
C. Hole C on left rail
D. Hole D on left rail
B
27
10
/
"
(27.6 cm)
32
E. Hole E on left rail
F. Hole F on right rail
G. Hole G on right rail
H. Hole H on right rail
27
/32" (27.6 cm). Also,
27
/32"
A
H
F
G
A
B
C
D
A. Cabinet
B. Rails
C. Holes on rails
D. Pilot holes on cabinet
6. Attach the two rails using the six #7-16x7/16" round-head
wood screws.
C
C
A
B
C
A. Cabinet
B. Rail (2)
C. #7-16x7/16"
C
round head wood screw (6)
B
C
4. Using a 7/64" (2.8 mm) drill bit, drill four pilot holes C, D, F, G
on the cabinet lower front wall and two screw pilot holes E
and H inside the bottom of cabinet.
A
C
D
A. Cabinet
B. Centerline
C. Pilot hole C
D. Pilot hole D
E
B
H
F
G
E. Pilot hold E
F. Pilot hole F
G. Pilot hole G
H. Pilot hole H
8

Install the Microwave Oven
1. Position microwave oven near cutout opening.
WARNING
Electrical Shock Hazard
Plug into a grounded 3 prong outlet.
Do not remove ground prong.
Do not use an adapter.
Do not use an extension cord.
Failure to follow these instructions can result in death,
fire, or electrical shock.
2. Plug in microwave oven.
Secure the Trim Kit Frame
1. Holding the trim kit frame in place, use 7/64" drill to drill four
pilot holes into the front face of the cutout/cabinet through
the mounting hole guides in the upper and lower corners of
the trim kit frame.
NOTE: The holes will be drilled downward from the top, and
upward from the bottom at an angle of about 45°.
A. Trim kit frame
B. Mounting hole guide
C. #7-16x15/16" (17.8-40.6x2.4 cm)
wood screw (4)
D. Cutout ceiling
2. Secure trim kit frame to cutout/cabinet by installing four
#7-16x15/16" at head wood screws into the pilot holes
drilled.
NOTE: To avoid damage to the trim kit frame, do not overtighten
screws.
Installation is now complete. Replace any loose items that have
been removed from microwave oven cavity.
Save these Installation Instructions for future reference.
at head
3. Slide the microwave oven back and into place.
4. Adjust the microwave oven gently to the cutout/cabinet
center.
9

SÉCURITÉ DU FOUR À MICRO-ONDES
Votre sécurité et celle des autres est très importante.
Nous donnons de nombreux messages de sécurité importants dans ce manuel et sur votre appareil ménager. Assurez-vous de
toujours lire tous les messages de sécurité et de vous y conformer.
Voici le symbole d’alerte de sécurité.
Ce symbole d’alerte de sécurité vous signale les dangers potentiels de décès et de blessures graves à vous
et à d’autres.
Tous les messages de sécurité suivront le symbole d’alerte de sécurité et le mot “DANGER” ou
“AVERTISSEMENT”. Ces mots signifient :
Risque possible de décès ou de blessure grave si vous ne
DANGER
AVERTISSEMENT
Tous les messages de sécurité vous diront quel est le danger potentiel et vous disent comment réduire le risque de blessure et
ce qui peut se produire en cas de non-respect des instructions.
suivez pas immédiatement les instructions.
Risque possible de décès ou de blessure grave si vous
ne suivez pas les instructions.
10

EXIGENCES D’INSTALLATION
Outils et pièces
Outils nécessaires
Rassembler les outils et pièces nécessaires avant d’entreprendre
l’installation. Lire et observer les instructions fournies avec
chacun des outils de la liste ci-dessous.
■ Ruban à mesurer
■ Crayon
■ Tournevis à tête cruciforme
Pièces fournies (non illustrées à l’échelle)
VIS ILLUSTRATION QTÉ
Vis à métaux à tête ronde
n° 7-18x7⁄16po
Vis à bois à tête plate
o
n
7-16x15/16po
Vis à bois à tête ronde
o
n
7-16x7/16po
REMARQUE: Il y a des vis supplémentaires dans le paquet de
vis. Ils sont des pièces de rechange pour votre utilisation lors de
l’installation si nécessaire. Voir ci-dessous:
■ Vis à tôle à tête ronde n°7-18x7⁄16po:4 supplémentaires
■ Vis à bois à tête plate n
■ Vis à bois à tête ronde n
o
7-16x15/16po: 2 supplémentaires
o
Pièces fournies (non illustrées à l’échelle)
Cette instruction d’installation concerne différents modèles.
Certaines pièces fournies peuvent avoir un apparence différente,
selon le modèle.
REMARQUE: Le cadre de garniture (1), les conduits de
refroidissement (2) et les glissières (2) devront être achetés pour
conversion du modèle standard au modèle mince ou du modèle
mince au modèle standard.
Pièces fournies pour les modèles: YWMT50011K et YKMBT5011K
PIÈCE ILLUSTRATION QTÉ
Cadre de garniture
(mince)
■ Mèche de 7/64 po
(2,8mm)
■ Perceuse
14
6
10
7-16x7/16po: 4 supplémentaires
1
Pièces fournies pour les modèles: YWMT55511K et YKMBT5511K
PIÈCE ILLUSTRATION QTÉ
Cadre de garniture
(standard)
Conduit de
refroidissement
(standard)
Rail (standard)
1
2
2
Pièces fournies pour tous les modèles
PIÈCE ILLUSTRATION QTÉ
Plateau rotatif
Anneau de plateau
rotatif
Entraîneur de plateau
rotatif
1
1
1
REMARQUE: L’entraîneur de plateau rotatif est situé à l’intérieur
de la cavité du four à micro-ondes. Retirer le ruban avant
d’utiliser le four.
Conduit de
refroidissement (mince)
Glissière (mince)
2
2
11

Exigences d’emplacement
Il s’agit d’un appareil encastré. Ne pas utiliser ce four à micro-ondes sur le comptoir.
Ce four à micro-ondes doit être installé dans une armoire en bois. L’emplacement doit comporter les caractéristiques suivantes:
■ Ouverture découpée qui est d’aplomb et d’équerre.
■ Plancher au niveau de l’encastrement robuste, d’aplomb et en afeurement avec le bas de l’ouverture découpée de l’armoire.
■ Capable de soutenir une charge d’au moins 150lb (68kg), ce qui comprend le four à micro-ondes ainsi que les éléments placés à
l’intérieur.
■ Il doit y avoir un minimum de 36po (91,4cm) entre le plancher et le plancher de l’ouverture d’encastrement. Voir l’illustration
ci-dessous.
■ Prise de courant reliée à la terre. Voir la section « Spécications électriques ».
■ Distances de dégagement minimales pour l’emplacement d’installation. Voir la section « Dimensions de l’ouverture découpée
requises ».
■ Enceinte complète autour de la partie encastrée du four à micro-ondes.
■ La distance de montage entre un mur xe sur le côté charnière de la porte et le four à micro-ondes est de 0,5po (1,3cm)
Non installé au-dessus un four encastré
2 po
(5,1 cm)
B
1
po
(4,0 cm)
C
D
A. Armoire supérieure
B. Ouverture d’encastrement
du four à micro-ondes
1. Une distance minimale de 36 (91,4cm) est recommandée
entre le plancher et le plancher de l’ouverture
d’encastrement.
2. Le four à micro-ondes peut aussi être installé seul dans une
armoire (sans four encastré en dessous). Laisser un espace
libre d’au moins 1
9
/16po (4,0cm) au-dessous de l’armoire.
3. S’assurer que les armoires environnantes peuvent s’ouvrir et
se fermer librement. Laisser un espace libre d’au moins 2po
(5,1cm) au-dessus de l’ouverture d’encastrement.
C. Armoires inférieures
D. Plancher
A
min.
36 po
(91,4 cm)
Installé au-dessus un four encastré
A
B
F
min.
36 po
(91,4 cm)
D
A. Armoire supérieure
B. Ouverture d’encastrement
du four à micro-ondes
D. Plancher
F. Ouverture d’encastrement
inférieure
1. Une distance minimale de 36 (91,4cm) est recommandée
entre le plancher et le plancher de l’ouverture
d’encastrement.
2. Le four à micro-ondes peut être installé par-dessus un four
encastré. Si l’on installe le four à micro-ondes par-dessus
un four encastré, s’assurer qu’il existe un dégagement
minimal de 3po (7,6cm) entre le sommet de l’ouverture
d’encastrement du four inférieur et le plancher de l’ouverture
d’encastrement du four à micro-ondes.
3. S’assurer que les armoires environnantes peuvent s’ouvrir et
se fermer librement. Laisser un espace libre d’au moins 2po
(5,1cm) au-dessus de l’ouverture d’encastrement.
2 po
(5,1 cm)
3 po
(7,6 cm)
12

Dimensions du produit
F
E
B
D
G
J
C
H
A
Unité de mesure Modèles minces Modèles standards
po cm po cm
A Largeur de l’appareil avec cadre de
garniture
B Hauteur de l’appareil avec cadre de
garniture
C Profondeur de l’appareil 18 45,7 18 45,7
D Hauteur de l’appareil sans cadre de
garniture
E Largeur de l’appareil sans cadre de
garniture
F Épaisseur du cadre du de garniture
(visible)
G Épaisseur totale du cadre 2
H Largeur d’ouverture intérieure du
cadre de garniture
J Hauteur d’ouverture intérieure du
cadre de garniture
29¾ 75,6 29¾ 75,6
14 35,6 19
5
10
27
/
16
13
/
16
26,2 105/
70,7 2713/
/
8
16
16
48,6
26,2
70,7
1
7/8 2,2 7/8 2,2
5
/
16
5,8 25/
16
5,8
28 71,1 28 71,1
9
10
/
16
26,9 109/
16
26,9
13

Armoire de bois
F
J
E
Prise de courant
e
H
B
D
A
C
Emplacement recommandé
pour la prise de courant
G
de l’armoire
micro-ondes
Dimensions requises des ouvertures à découper
Mesure de l’ouverture à découper dans l’armoire Modèles minces Modèles standards
po cm po cm
1
A Largeur de l’ouverture de l’armoire 28
/
2
B Hauteur de l’ouverture de l’armoire 12 30,5 17
C Profondeur de l’ouverture de l’armoire Minimum de 21
D Cadre inférieur de surplomb de
1 2,54 1 2,54
l’ensemble du cadre de garniture
E Cadre supérieur de surplomb de
1 2,54 1 2,54
l’ensemble du cadre de garniture
F Cadre gauche de surplomb de
5/8 1,6 5/8 1,6
l’ensemble du cadre de garniture
G Cadre droit de surplomb de l’ensemble
5/8 1,6 5/8 1,6
du cadre de garniture
H Zone recommandée pour la prise Quadrant supérieur droit
J Dégagement entre la prise et l’arrière du
4po (10,2cm) < J < 40po (102cm)
four à micro-ondes.
72,4 281/
3
/4po (55,2cm) avec prise en afeurement
2
1
/
8
Paroi arrire
Arrire du four
72,4
43,5
REMARQUES:
■ Une prise afeurante est recommandée. Pour une prise non afeurante, s’assurer d’avoir un espace d’au moins 4po (10,2cm)
entre l’arrière du four à micro-ondes et la prise.
■ Si la prise est placée à l’extérieur de la zone recommandée, s’assurer que la distance de l’arrière du four à micro-ondes jusqu’à la
prise est d’au moins 40po (102cm). Sinon, il ne sera pas possible de brancher le cordon d’alimentation.
■ La tolérance pour la largeur et la hauteur de l’ouverture de l’armoire est de 1/16po (2mm).
14

Spécicationsélectriques
AVERTISSEMENT
Risque de choc électrique
Brancher sur une prise à 3 alvéoles reliée à la terre.
Ne pas enlever la broche de liaison à la terre.
Ne pas utiliser un adaptateur.
Ne pas utiliser un câble de rallonge.
Le non-respect de ces instructions peut causer
un décès, un incendie ou un choc électrique.
observer les dispositions de tous les codes et règlements en
vigueur.
Exigences:
■ Alimentation de 120 V CA à 60Hz et protégée par un fusible
ou un disjoncteur temporisé de 15 ou 20 A seulement.
Recommandation:
■ Fusible ou disjoncteur temporisé
■ Circuit distinct exclusif au four à micro-ondes
INSTRUCTIONS DE LIAISON
À LA TERRE
Pour tout appareil ménager connecté par un cordon
de courant électrique :
Il faut que le four à micro-ondes soit relié à la terre. En
cas de court-circuit électrique, la liaison à la terre réduit le
risque de choc électrique car le courant électrique
dispose d’un itinéraire direct d’acheminement à la terre.
Le four à micro-ondes est doté d’un cordon de courant
électrique qui comporte un fil de liaison à la terre, avec
broche de liaison à la terre. On doit brancher la fiche sur
une prise de courant convenablement installée et reliée à
la terre.
AVERTISSEMENT :
dispositif de liaison à la terre peut susciter un risque de choc
électrique. L’utilisateur qui ne comprend pas bien les
instructions de liaison à la terre, ou qui n’est pas certain que
le four à micro-ondes soit convenablement relié à la terre,
devrait consulter un électricien ou un technicien qualifié.
Ne pas utiliser un câble de rallonge. Si le cordon de
courant électrique est trop court, demander à un électricien
ou un technicien qualifié d’installer une prise de courant à
proximité du four à micro-ondes.
L’utilisation incorrecte du
CONSERVEZ CES
INSTRUCTIONS
Ce dispositif est conforme à la section 18 des règlements FCC.
Ce dispositif est conforme à la norme ICES-001 d’Industrie Canada.
15

INSTRUCTIONS D’INSTALLATION
AVERTISSEMENT
Instructions de déballage
Risque du poids excessif
Utiliser deux ou plus de personnes pour déplacer et
installer le four à micro-ondes.
Le non-respect de cette instruction peut causer
une blessure au dos ou d'autre blessure.
1. Déballer le four à micro-ondes et vérier si toutes les pièces
sont fournies et si le paquet de vis est inclus. Voir les
sections « Paquet de vis fourni » et « Pièces fournies ».
Ils sont nécessaires pour l’installation.
2. Éliminer/recycler tous les matériaux d’emballage.
D
A
E
B
C
B
A. Boîte en carton (1)
B. Barre d’angle (2)
C. Coussin supérieur (1)
D. Petit coussin (1)
E. Coussin interne (modèles
standard seulement)
F. Barre de coussin interne
(modèles standard
seulement)
G. Coussin inférieur
F
G
3. Fixer le cadre de garniture au four à micro-ondes en
procédant comme suit:
■ Retirer le lm protecteur sur la porte avant d’installer le
four à micro-ondes.
■ Insérer les quatre goupilles de positionnement du four à
micro-ondes dans les quatre trous de positionnement du
cadre de garniture. Installer le cadre de garniture dans le
bon sens. Le côté portant la mention « TOP » (haut).
B
A
C
A. Cadre de garniture
B. Goupille de positionnement (4)
C. Fente de positionnement (4)
■ Fixer le cadre de garniture au four à micro-ondes à l’aide
de quatre vis à tôle à tête ronde nº7-18x7/16po
A
B
C
Préparation du four à micro-ondes
1. Retirer les articles à l’intérieur du four à micro-ondes – le cas
échéant.
2. Placer le four à micro-ondes sur un comptoir ou une table
solide avec la porte légèrement au-delà du bord de la
surface, comme illustré .
< 3,5 po (9 cm)
B
A. Bord de table
B. Bord de la porte avant inférieure du four à micro-ondes
A
A. Cadre de garniture
B. Vis à tôle à tête ronde n°7-18x7⁄16po (4)
C. Trous de vis (4)
4. Fixer les deux conduits de refroidissement en haut du four à
micro-ondes à l’aide de six vis à tôle à tête ronde
nº7-18x7/16po.
B
C
Standard
Mince
A. Conduit de refroidissement (2)
B. Vis à tôle à tête ronde n°7-18x7⁄16po (6)
C. Trous de vis (6)
A
REMARQUE: Le conduit de refroidissement peut avoir une
apparence légèrement différente, selon votre modèle.
16

Installation des glissières
1. À l’aide d’un ruban à mesurer et d’un crayon, marquez la ligne
médiane de l’ouverture sur la paroi avant inférieure de l’armoire.
2. Placer les deux glissières à l’intérieur de l’armoire, comme
indiqué ci-dessous de sorte que la distance entre les bords
les plus proches est de 20
3
/4po (52,7cm).
A
5. Placer les deux glissières à l’intérieur de l’armoire et aligner
les trous de vis sur les glissières avec les avant-trous sur
l’armoire.
C
3
20
/
po
4
(52,7 cm)
B
A. Armoire
B. Glissières
C. Paroi latérale
3. Utiliser un crayon pour tracer des marques de vis des six
trous de vis C, D, E, F, G, H dans l’armoire. Vérier que la
distance entre le trou D et la ligne centrale est de
27
/32po (27,6cm). De plus, la distance entre le trou F et la
10
ligne centrale doit être de 10
indiqué. Sortir ensuite les deux glissières.
27
10
/
po
32
(27,6 cm)
C
D
A. Armoire
B. Glissières
C. Trou C sur la glissière gauche
D. Trou D sur la glissière gauche
27
/32po (27,6cm) comme
A
E
10
H
B
27
/
po
32
(27,6 cm)
F
G
E. Trou E sur la glissière gauche
F. Trou F sur la glissière droite
G. Trou G sur la glissière droite
H. Trou H sur la glissière droite
A
B
C
D
A. Armoire
B. Glissières
C. Trous sur les glissières
D. Avant-trous dans les armoires
6. Fixer les deux glissières à l’aide des six vis à bois à tête
ronde nº7-16x7/16po.
C
B
C
A. Armoire
B. Glissière (2)
C. Vis à bois à tête ronde n
C
o
7-16x7/16po (6)
C
A
B
C
4. À l’aide d’une mèche de 7/64po (2,8mm), percer quatre
avant-trous C, D, F, G sur la paroi avant inférieure de
l’armoire et deux avant-trous de vis E et H à l’intérieur du bas
de l’armoire.
A
C
D
A. Armoire
B. Ligne centrale
C. Avant-trou C
D. Avant-trou D
E
B
H
F
G
E. Avant-trou E
F. Avant-trou F
G. Avant-trou G
H. Avant-trou H
17

Installation du four à micro-ondes
1. Placer le four à micro-ondes à proximité de l’ouverture
d’encastrement.
AVERTISSEMENT
Risque de choc électrique
Brancher sur une prise à 3 alvéoles reliée à la terre.
Ne pas enlever la broche de liaison à la terre.
Ne pas utiliser un adaptateur.
Ne pas utiliser un câble de rallonge.
Le non-respect de ces instructions peut causer
un décès, un incendie ou un choc électrique.
2. Brancher le four à micro-ondes.
Fixer le cadre de garniture
1. Tout en maintenant le cadre de trousse de garniture en
place, utiliser une mèche de 7/64 po pour percer quatre
avant-trous dans l’avant de l’ouverture d’encastrement à
travers les rails de guidage des trous de montage, dans les
angles supérieurs et inférieurs du cadre de garniture.
REMARQUE: Les trous sont percés de haut en bas, et de bas
en haut à un degré d’environ 45°.
A. Cadre de garniture
B. Rail de guidage du trou de montage
C. Vis à bois à tête plate nº 7-16x15/16po (17,8-40,6x2,4 cm)
D. Plafond de l’ouverture d’encastrement
2. Fixer le cadre de garniture à l’ouverture d’encastrement
de l’armoire au moyen de quatre vis à bois à tête plate
n°7-16x15/16po vissées dans les avant-trous percés.
REMARQUE: Pour éviter d’endommager le cadre de garniture,
ne pas serrer excessivement les vis.
L’installation est maintenant terminée. Réinstaller tous les articles
qui auraient été retirés de la cavité du four à micro-ondes.
Conserver ces Instructions d’installation pour une éventuelle
réutilisation ultérieure.
(4)
3. Réinsérer le four à micro-ondes dans la cavité pour le
remettre en place.
4. Ajuster doucement le four à micro-ondes au centre de
l’ouverture d’encastrement de l’armoire.
18

NOTES
19

W11412754B
©2020 All rights reserved.
Tous droits réservés.
04/20
 Loading...