


CHEST FREEZER OWNER'S MANUAL
MANUEL D’UTILISATION DU CONGÉLATEUR
HORIZONTAL
Table of Contents/Table des matières
FREEZER SAFETY .......................................................... 2
Freezer Safety .............................................................. 2
MAINTENANCE AND CARE ..............................................4
Defrosting and Cleaning Your Freezer ................................ 4
Changing the Light Bulbs (on some models) ........................4
Power Interruptions ........................................................ 4
Moving Care .................................................................4
INSTALLING YOUR FREEZER ........................................... 5
Unpacking....................................................................5
Location Requirements ................................................... 5
Electrical Requirements .................................................. 5
Switching on the Appliance ..............................................5
OPERATING YOUR FREEZER ...........................................6
Using the Control ...........................................................6
Temperature Adjustment ...............................................6
Key Eject Lock (on some models)...................................... 6
Sliding Basket (on some models) ...................................... 7
SÉCURITÉ DU CONGÉLATEUR .........................................9
Sécurité du congélateur .................................................. 9
ENTRETIEN ET SOINS ................................................... 11
Dégivrage et nettoyage du congélateur............................. 11
Remplacer l’ampoule (sur certains modèles)...................... 11
Pannes de courant ....................................................... 12
Précautions à prendre avant un déménagement................. 12
INSTALLATION DE VOTRE CONGÉLATEUR...................... 12
Déballage .................................................................. 12
Exigences d’emplacement ............................................. 13
Spécifications électriques .............................................. 13
Mettre en marche l’appareil............................................ 13
UTILISATION DE VOTRE CONGÉLATEUR......................... 14
Utilisation de la commande ............................................ 14
Réglage de la température........................................... 14
Serrure à éjection de clé (sur certains modèles).................. 14
Panier coulissant (sur certains modèles) ........................... 15
W11531549A
FREEZER SAFETY
Your safety and the safety of others are very important.
We have provided many important safety messages in this manual and on your appliance. Always read and obey all safety
messages.
This is the safety alert symbol.
This symbol alerts you to potential hazards that can kill or hurt you and others.
All safety messages will follow the safety alert symbol and either the word “DANGER” or “WARNING.” These
words mean:
You can be killed or seriously injured if you don't
DANGER
immediately follow instructions.
WARNING
All safety messages will tell you what the potential hazard is, tell you how to reduce the chance of injury, and tell you what can
happen if the instructions are not followed.
You can be killed or seriously injured if you don’t follow
instructions.
IMPORTANT SAFETY INSTRUCTIONS
WARNING: To reduce the risk of fire, electric shock, or injury to persons when using your appliance, follow basic precautions,
including the following:
� Children should be supervised to ensure that they do not
play with the appliance.
� This appliance is not intended for use by persons (including
children) with reduced physical, sensory, or mental
capabilities, or lack of experience and knowledge, unless
they have been given supervision or instruction concerning
use of the appliance by a person responsible for their
safety.
� Do not use an extension cord.
� If power supply cord is damaged, it must be replaced by the
manufacturer, its service agent, or a similarly qualified
person in order to avoid a hazard.
� This appliance is intended to be used in household and
similar applications such as: staff kitchen areas in shops,
offices, and other working environments; farm houses and
by clients in hotels, motels, and other residential-type
environments; bed and breakfast-type environments; and
catering and similar non-retail applications.
� Do not store explosive substances such as aerosol cans
with a flammable propellant in this appliance.
� Do not use replacement parts that have not been
recommended by the manufacturer (e.g., parts made at
home using a 3D printer).
� Keep ventilation openings, in the appliance enclosures or in
the built-in structure, clear of obstacles.
� Do not use mechanical devices or other means to
accelerate the defrosting process, other than those
recommended by the manufacturer.
� Do not damage the refrigerant circuit.
� Do not use electrical appliances inside the food storage
compartments of the appliance, unless they are of the type
recommended by the manufacturer.
SAVE THESE INSTRUCTIONS
2
Proper Disposal of Your Old Freezer
WARNING: Risk of child entrapment. Before you throw away
your old refrigerator or freezer:
� Take off the doors.
� Leave the shelves in place so that children may not easily climb
inside.
WARNING
Suffocation Hazard
Remove doors or lid from your old appliance.
Failure to do so can result in death or brain damage.
IMPORTANT: Child entrapment and suffocation are not problems
of the past. Junked or abandoned freezers or refrigerators, are still
dangerous, even if they will sit for “just a few days.” If you are
getting rid of your old refrigerator or freezer, please follow these
instructions to help prevent accidents.
Important information to know about disposal of refrigerants:
Dispose of freezer in accordance with federal and local regulations.
Refrigerants must be evacuated by a licensed, EPA-certified
refrigerant technician in accordance with established procedures.
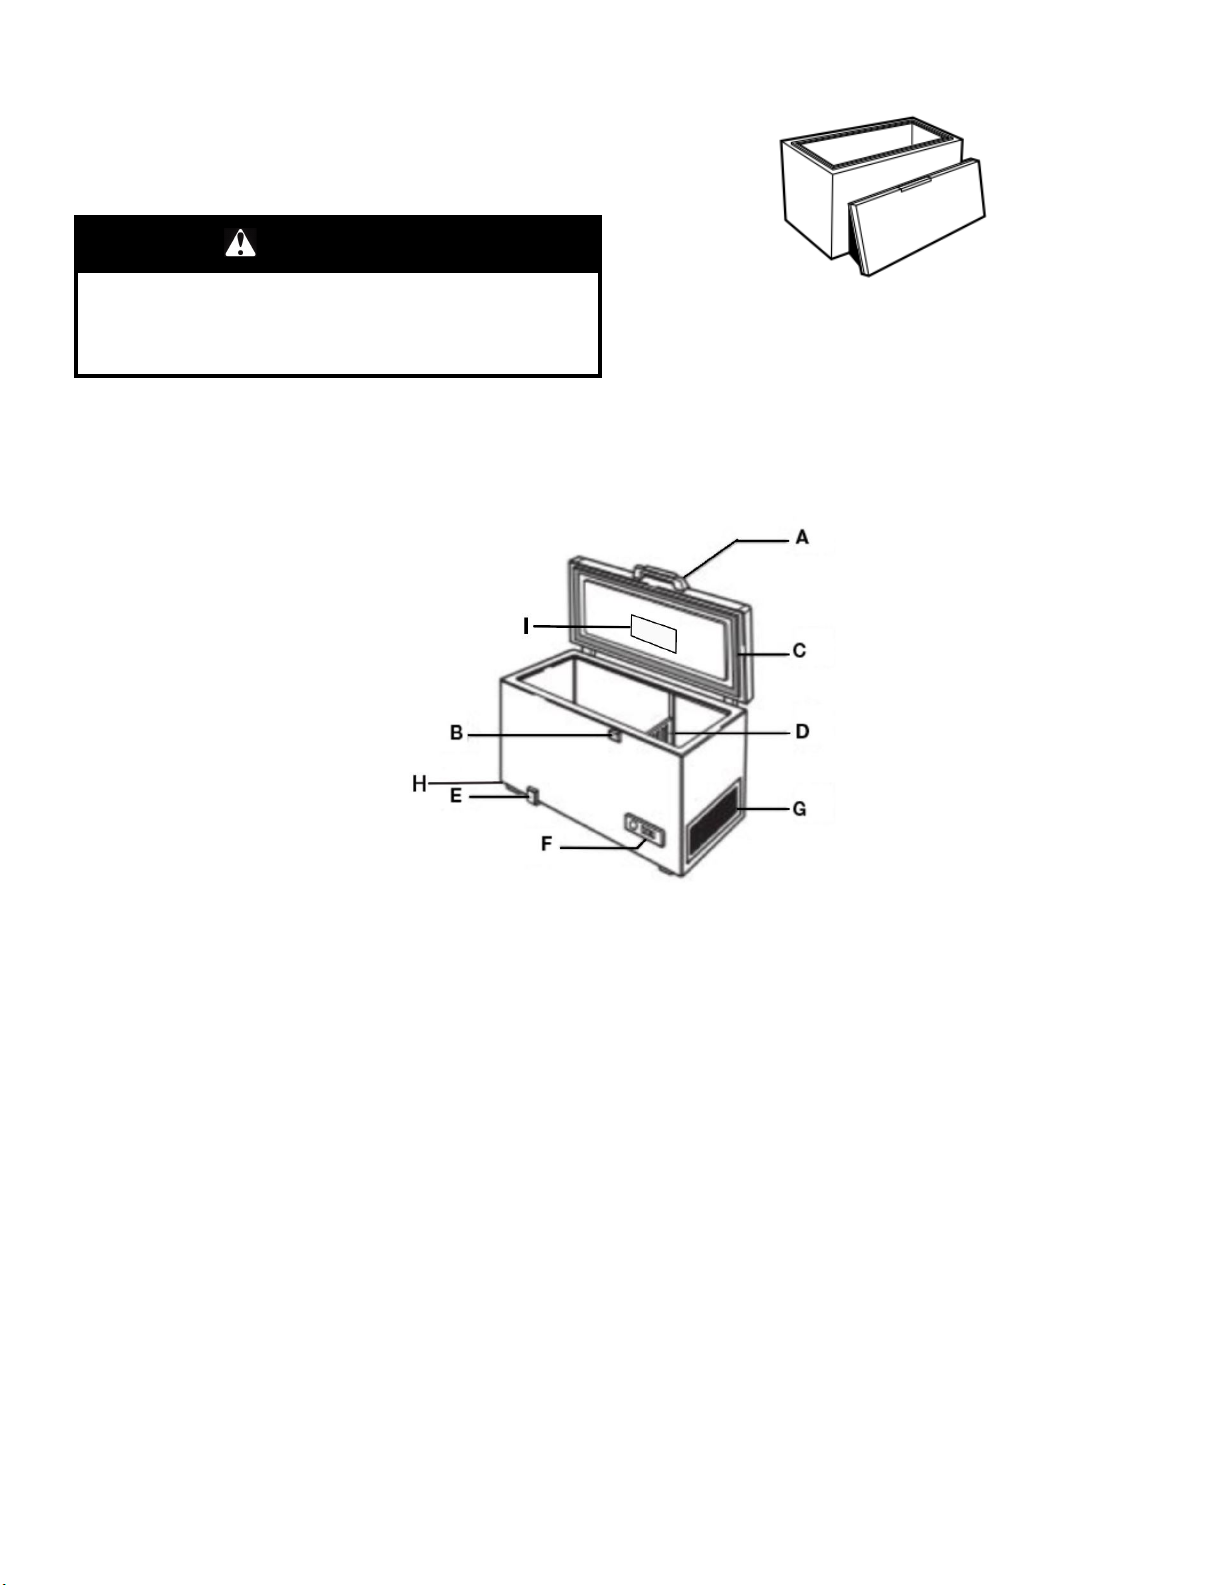
A. Handle F. Control panel
B. Safety Lock (if provided) G. Side motor cooling grille
C. Gasket H. Caster Wheels
D. Separator (if provided) I. Interior Light
E. Defrost water drain plug
3
MAINTENANCE AND CARE
Defrosting and Cleaning Your Freezer
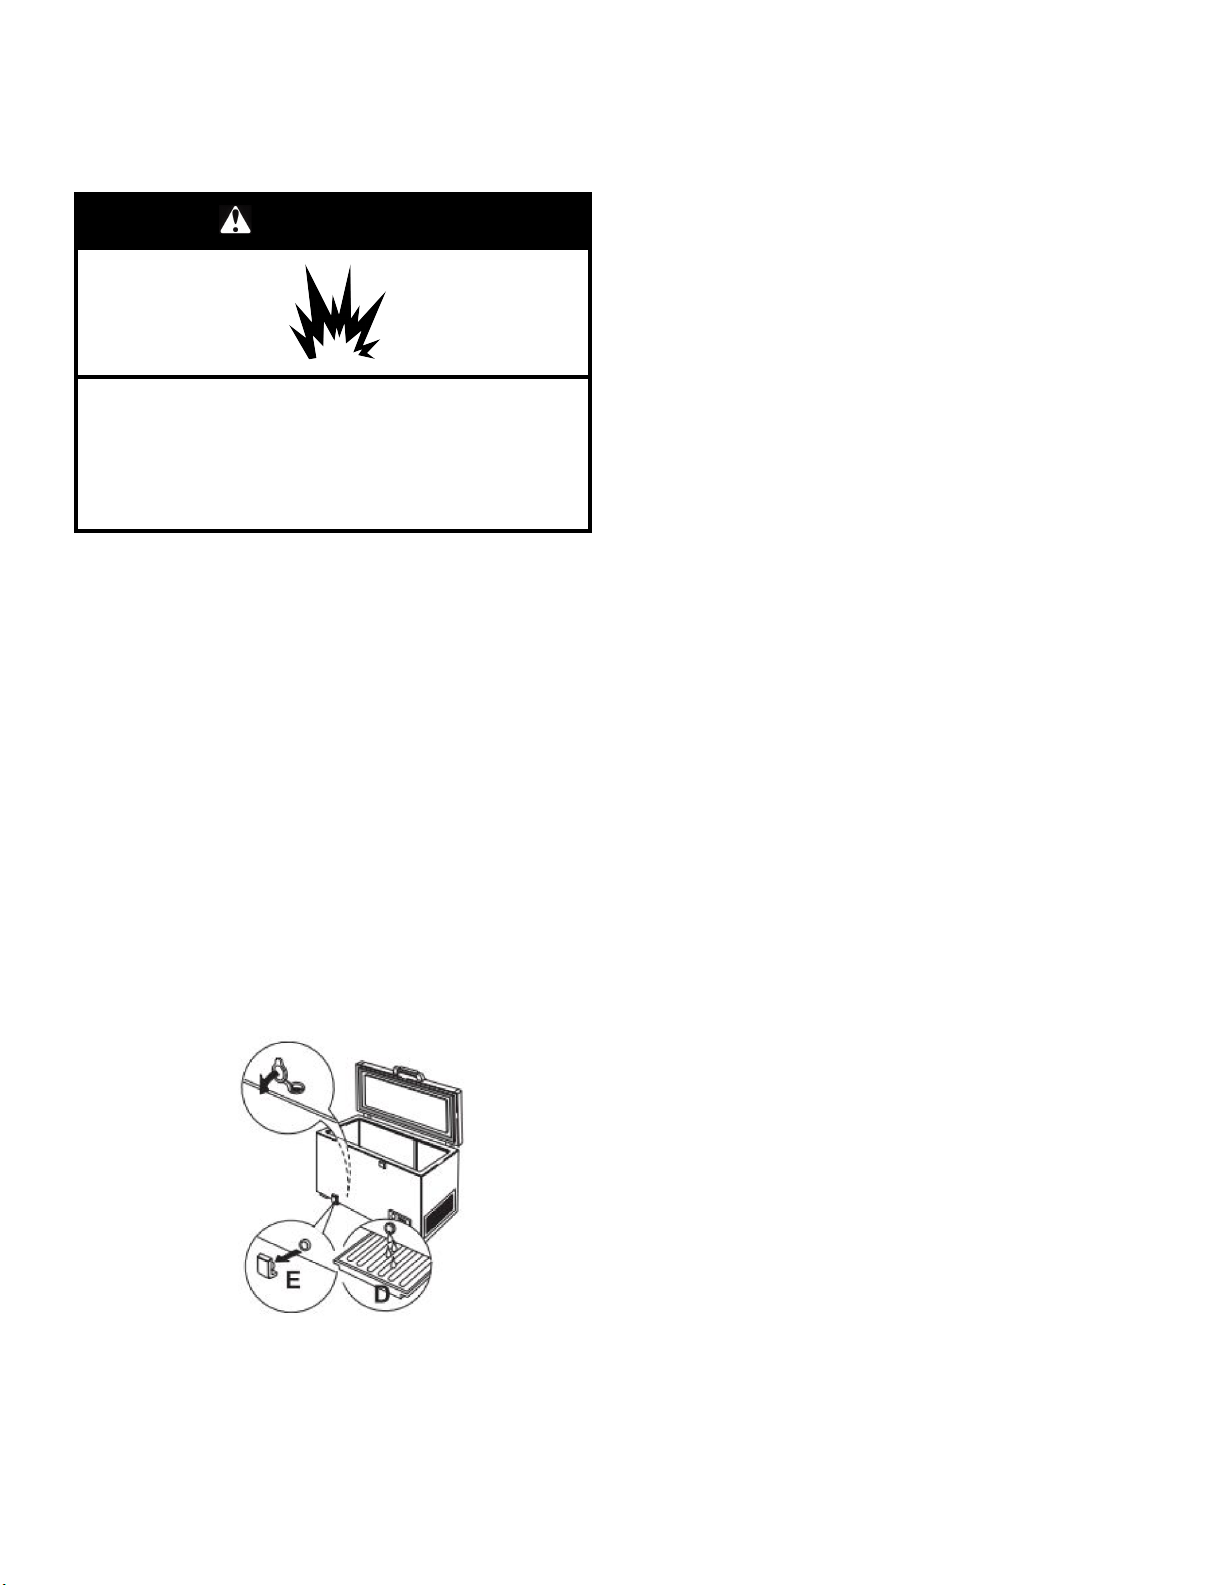
WARNING
Explosion Hazard
Keep flammable materials and vapors, such as gasoline,
away from appliance.
Use nonflammable cleaner.
Failure to do so can result in death, explosion, or fire.
Defrost and clean your freezer when frost has built up to about
1/4" (0.6 cm) thickness, and thoroughly defrost and clean your
freezer at least once a year. In high-humidity areas, a freezer may
need more frequent defrosting and cleaning.
Do not use abrasive cleaners on your freezer. Do not use cleaning
waxes, concentrated detergents, bleaches, or cleaners containing
petroleum on plastic parts. Damage can occur.
NOTE: The drain cap must be removed before defrosting the
freezer and replaced securely afterward.
1. Unplug freezer or disconnect power.
2. Remove all frozen food. Wrap frozen food in several layers of
newspaper and cover with a blanket. Food will stay frozen for
several hours. You may also store frozen food in a cooler,
additional refrigerator-freezer, or in a cool area.
3. Remove the drain cover (E) by pulling it straight out. Then
insert the hose adapter (provided) into the drain outlet.
Remove the plastic cap from inside the bottom of the freezer.
Place the Separator pan (D), or a drain pan, under the drain,
or attach a hose to the threaded end of the hose adapter and
direct the water into a separate drain.
NOTE: Check the drain pan frequently to avoid water
overflow. Have a second pan handy for easier emptying.
6. Wipe water from walls with a towel or sponge.
7. Wash the inside walls with a solution of mild detergent in warm
water or 2 tbs (26 g) baking soda to 1 qt. (0.95 L) warm water.
Do not use abrasive or harsh cleaners.
8. Rinse well and wipe dry with a clean, soft cloth.
9. Use a clean sponge or soft cloth and mild detergent in warm
water to clean outside of freezer, door liner, and gasket.
10. Rinse well and wipe dry with a clean, soft cloth.
11. Wax painted metal surfaces on the outside of freezer to avoid
rust.
NOTE: Do not use wax on plastic parts. Wax may damage
them.
12. Remove the hose adapter and replace the drain cover and the
plastic cap in the bottom of the freezer.
13. Replace all frozen food.
14. If your freezer is equipped with a temperature alarm, turn off
alarm for 24 hours after defrosting.
15. Plug in freezer or reconnect power. See “Using the Control.”
Changing the Light Bulbs (on some models)
To Replace Interior Light:
1. Unplug freezer or disconnect power.
2. Pinch top and bottom of light cover with both hands.
3. Replace bulb with a 15 W maximum appliance bulb.
NOTE: Not all appliance bulbs will fit your freezer. Be sure
to replace the bulb with one of the same size, shape, and
wattage.
4. Align bottom of cover and snap top of cover in place.
5. Plug in freezer or reconnect power.
Power Interruptions
If the power will be out for 24 hours or less, keep the door closed
to help food stay cold and frozen.
If the power will be out for more than 24 hours, do one of the
following:
� Remove all frozen food and store it in a frozen food locker.
� If a food locker is not available, consume or can perishable
food at once.
REMEMBER: A full freezer stays cold longer than a partially
filled one. A freezer full of meat stays cold longer than a
freezer full of baked goods. If you see that food contains ice
crystals, it may be refrozen, although the quality and flavor
may be affected. If the condition of the food is poor, dispose of
it.
4. Place pans of hot water in freezer with lid open to speed
melting. Directing air from an electric fan into freezer will also
help. Do not place fan or any electrical device in freezer.
5. Use a plastic scraper to remove frost.
NOTE: Do not use an ice pick, knife, or other sharp-pointed
tool to defrost freezer. Damage can occur.
4
Moving Care
When you are moving your freezer to a new home, follow these
steps to prepare it for the move.
1. Remove all frozen food.
2. Unplug the freezer.
3. Take out all removable parts, wrap them well, and tape them
together so they don’t shift and rattle during the move.
4. Clean the freezer thoroughly.
5. Tape the freezer shut and tape the electrical cord to the
cabinet.
When you get to your new home, refer to the “Installing Your
Freezer” and “Operating Your Freezer” sections for information on
installation and setting the controls.
INSTALLING YOUR FREEZER
Unpacking
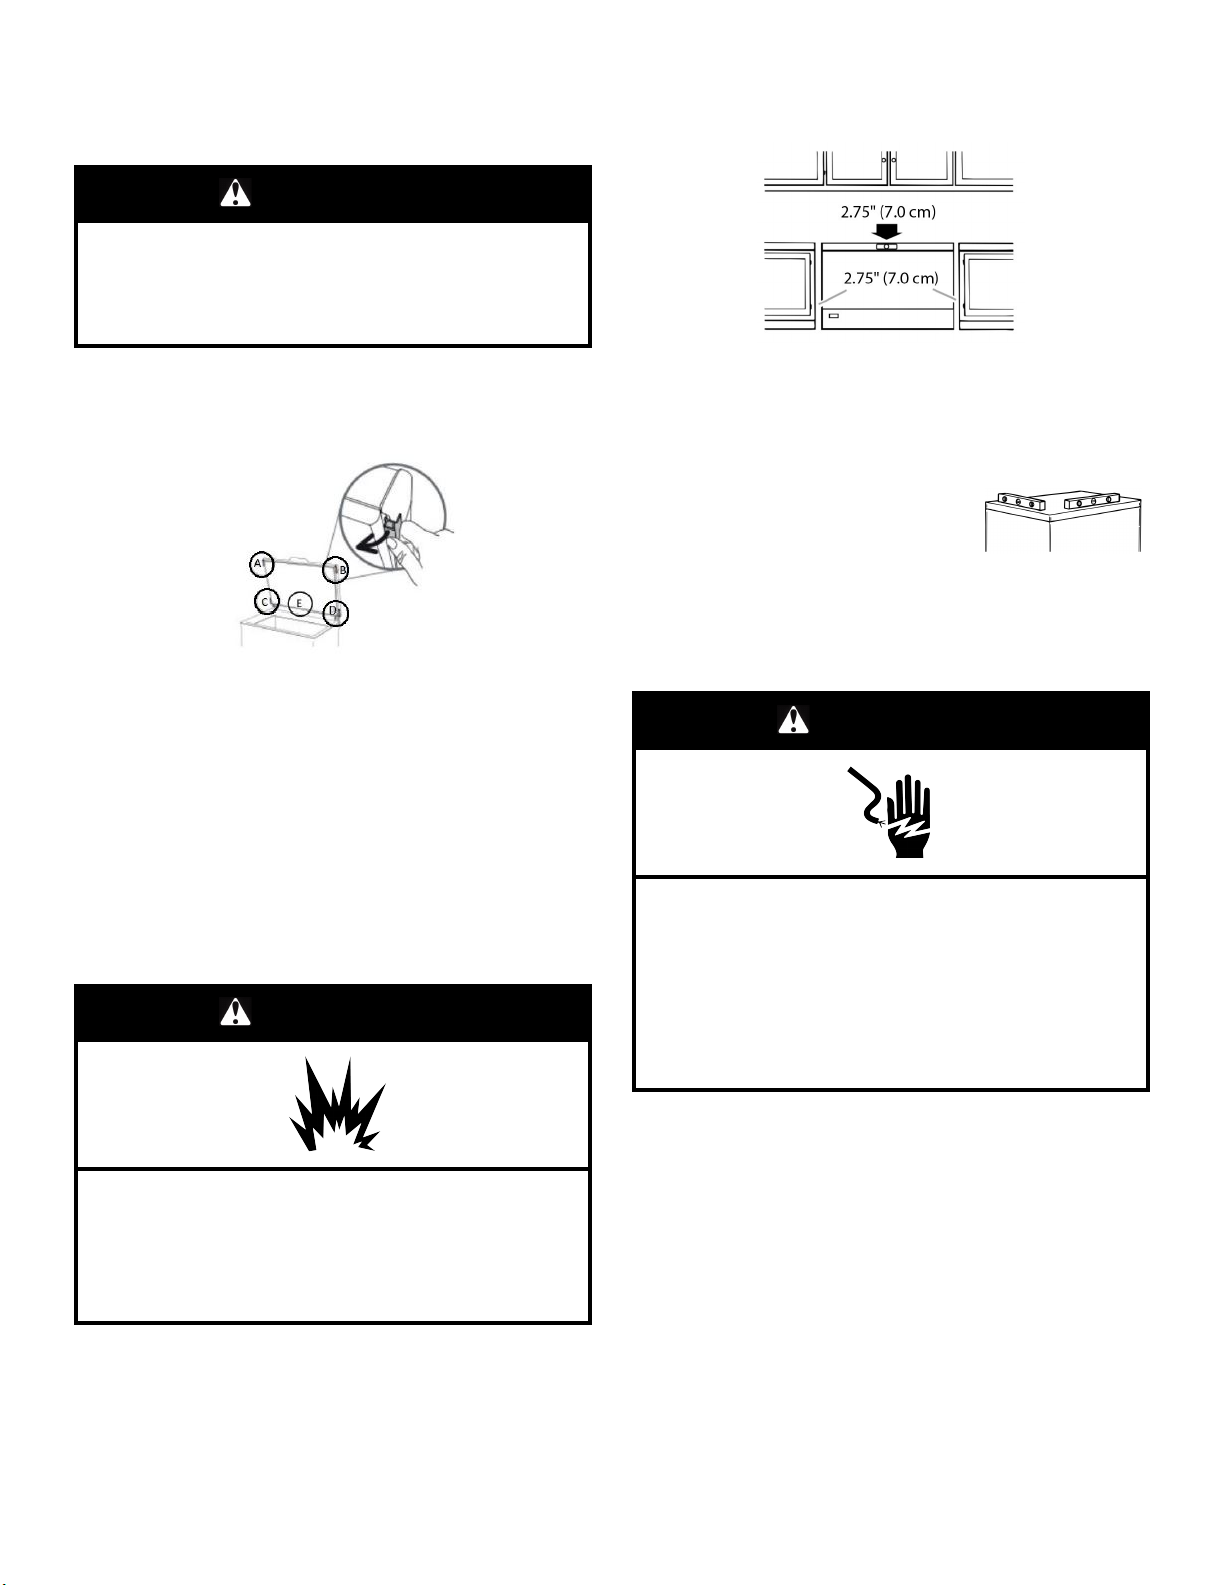
WARNING
Excessive Weight Hazard
Use two or more people to move and install or uninstall
appliance.
Failure to do so can result in back or other injury.
� Allow at least a 2.75" (7.0 cm) clearance on both sides of the
freezer and 2.75" (7.0 cm) between the back of the freezer and
the wall. Leave room above the freezer to open the lid.
Remove Packaging Materials
� Unpack the appliance.
� Remove the 5 spacers inserted between the door and the
appliance.
� Make sure the defrost drain plug (if provided) is correctly
positioned.
When Moving Your Freezer:
Your freezer is heavy. When moving the freezer for cleaning or
service, be sure to cover the floor with cardboard or hardboard to
avoid floor damage. Always pull the freezer straight out when
moving it. Do not wiggle or “walk” the freezer when trying to move
it, as floor damage could occur.
Clean Before Using
After you remove all of the packaging materials, clean the inside
of your freezer before using it. See the “Maintenance and Care”
section.
Location Requirements
WARNING
Temperature
Your freezer operates most efficiently when located in an area
where the temperature is normally between 32°F (0°C) and 110°F
(43°C). Place your freezer in a location where the temperature will
fall between the low and high recommended temperatures.
Upon Moving to Final Location
Level the freezer from side to side and front
to back so that the lid will seal properly. Use
shims to level the freezer if necessary.
NOTE: It should not be necessary to remove the lid during
installation. If, for any reason, the hinges need adjustment,
contact a designated service company.
Electrical Requirements
WARNING
Electrical Shock Hazard
Plug into a grounded 3 prong outlet.
Do not remove ground prong.
Do not use an adapter.
Do not use an extension cord.
Failure to follow these instructions can result in death,
fire, or electrical shock.
Explosion Hazard
Keep flammable materials and vapors, such as gasoline,
away from appliance.
Use nonflammable cleaner.
Failure to do so can result in death, explosion, or fire.
Ventilation and Clearance
� Keep flammable materials and vapors, such as gasoline, away
from freezer.
� Do not cover the freezer with items such as blankets, sheets,
and tablecloths. This reduces air circulation.
Before you move your freezer into its final location, it is important
to make sure you have the proper electrical connection.
Recommended Grounding Method
A 115 V, 60 Hz, AC-only, 15 A or 20 A fused, grounded electrical
supply is required. It is recommended that a separate circuit
serving only your freezer be provided. Use an outlet that cannot
be turned off by a switch. Do not use an extension cord.
NOTE: Before performing any type of installation, cleaning, or
removing a light bulb, turn the temperature control to 0 (align circle
on knob with desired number), as shown, to turn off cooling, and
then disconnect the freezer from the electrical source.
Switching on the Appliance
� The appliance is factory set for optimum operation at a
temperature of 0°F (-18°C).
� Plug in the appliance.
� The green LED lights up.
5
 Loading...