

Whirlpool WWI206 Service Manual
Whirlpool Customer Service
Service Manual
Model: WWI206
Contents
1、Precautions ------------------------------2
2、Specifications ---------------------------3
3、Installation -------------------------------4
4、Washing program ---------------------6
5、Wiring Diagrams ------------------------7
6、Trouble shooting ------------------------8
7、Exploded Views -------------------------15
8、Parts list ----------------------------------17
Fully Automatically Washing Machine
This
documentation is onl
y
intended for qualified technicians who are aware of the respective
safety regulations.

2
1.Precautions
When performing trouble-shorting and part replacement during service operation, be sure to
note the following precautions for safety reasons.
1-1.Safety Precautions
1-1-1.Do not use Non-genuine parts
The components of this washing machine have safety-features such as non-combustibility and voltage
withstanding. Therefore, always use the same parts when replacing parts. In particular, be sure to use
only designated parts in case of major safety parts identified by the marking.
1-1-2.Be sure that the washer is grounded
Connect the grounding wire to the shell plate, and lay it into earth of over 25cm in depth or ground it
to the power receptacle equipped with ground terminal.
* Never ground it to the telephone line , lightning rod or gas pipe.
1-1-3. Servicing precautions
After servicing , check to see that the screws, parts, and wiring are installed in their original
Positions, and check the installation between the external metals and the stock plug. In addition, place
The washing machine in a level position to prevent vibration and noise during operation.
1-1-4.Precautions in operation
* During spinning , don’t put your hand in the spin basket. Because the spin basket is roating at high
speed, roating parts may injure your hand.
* Put your laundry into the washer evenly. Because uneven laundry may cause noise or vibration.
* Before washing, check all pockets. If nails or pins remain in pockets, they may damage the washer or
clothes.
* Don’t press the control panel with a sharp object.
* Don’t use excessively hot water.

3
2.Specifications
Model: WWI206
2-1 Detention
Height
54.9
cm
Width 53.7 cm
Depth 88 cm
2-2 Weight
Net weight 35 Kg
2-3 Standard specification
Voltage
220 10%/60
V/Hz
Load after connection about 0.33 kW
Safety fuse 5 A
2-4 Specification of tub and basket
Rinse 170 rounds/m
Spine 850 rounds/m
Cloths load (maximum) 4.2 dried (maximum) Kg
2-5 Electrical and Motor Accessories
Motor 0.33 KW
Capacitor 12 Microfarad
Working voltage 220 V/AC
Force 58.8 Newton
2-6 water level switch
Low water level 26+2 Liter
Middle water level 32+2 Liter
High water level 46+2 Liter
批注:
3-1.Installation
* Open the box and take out the silent base.
* Insert the silent base with smooth face downward and slot it under the back portion of machine.
* Keep silent base intact while machine is operation and after use.
* Find a screw from document pa ck and screw the silent base into the screw hole on the bas e of the
machine.
3-2.Position the machine properly
(1) Position the washing machine at solid, the level ground, and the gradient should not exceed 2゜;
(2) Please don’t put the machine on the shelf;
(3) The distance between the machine and walls should be about 2 cms;
(4) When the ground is not smooth, adjust the right front foot spanner of machine;
(5) After adjusting, please push the foot spanner back.
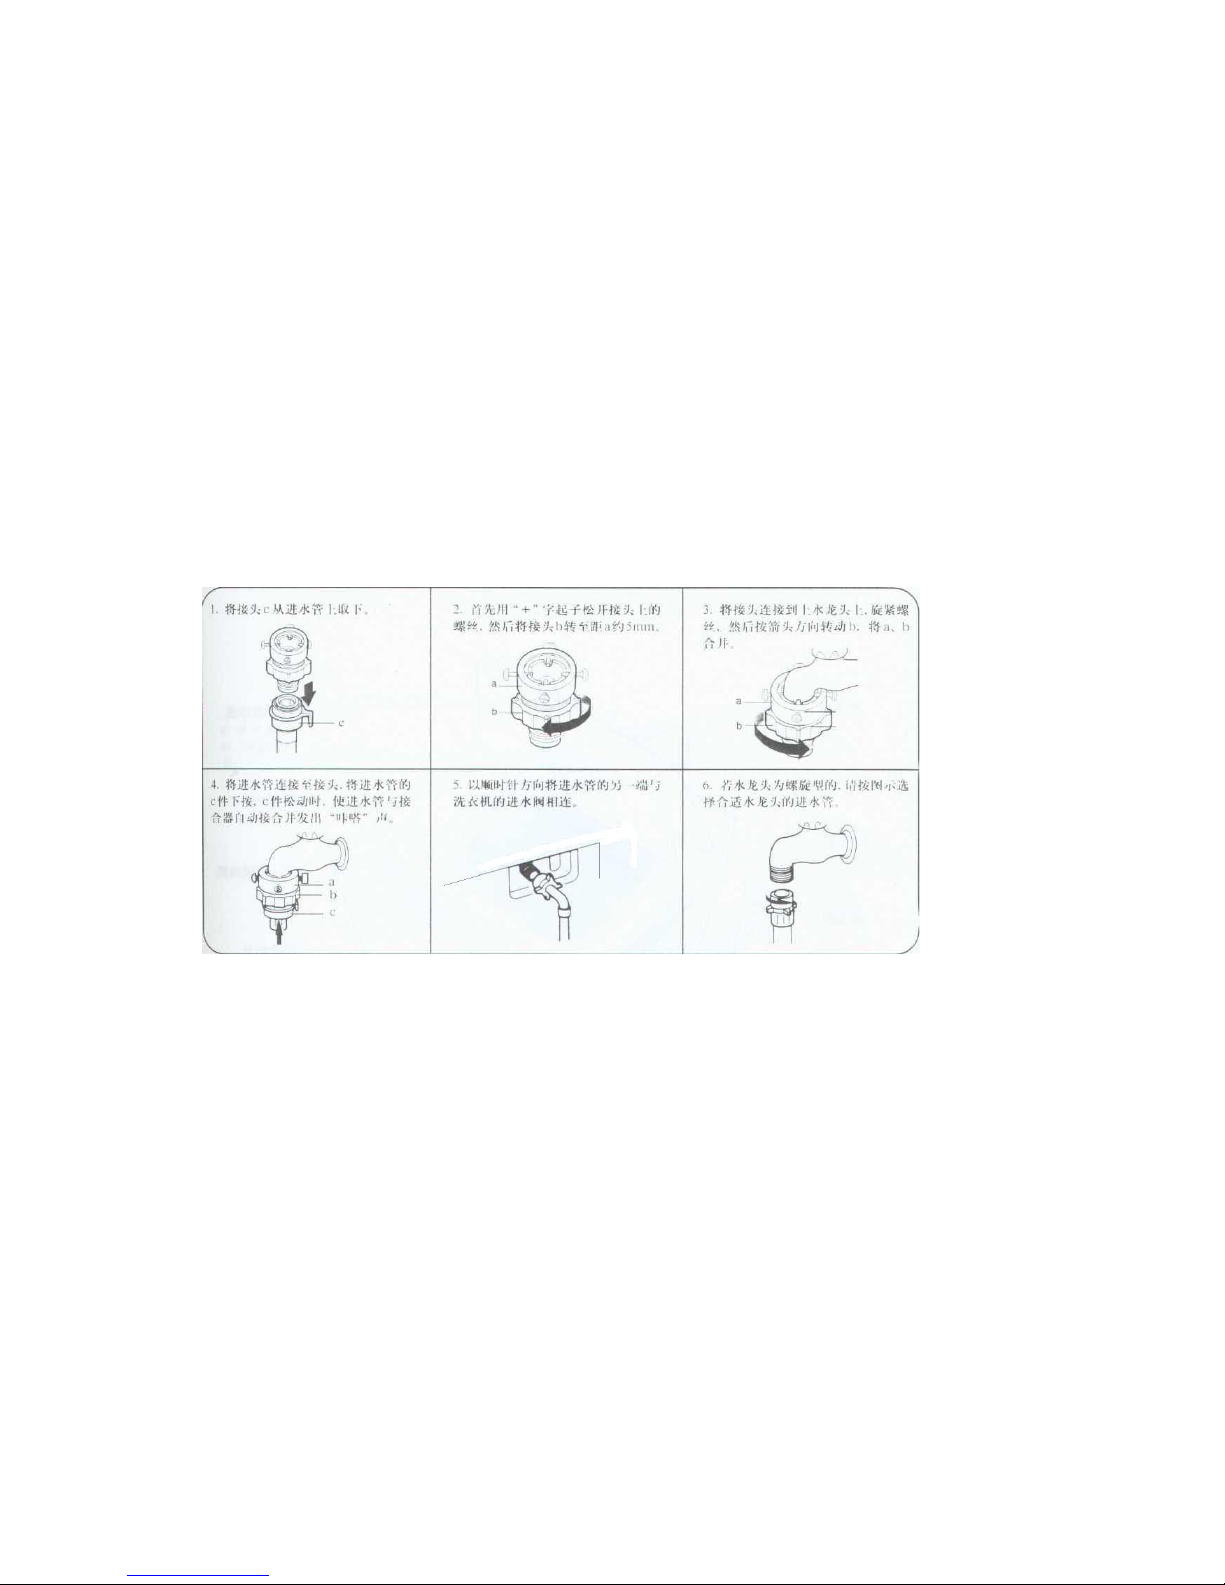
3.3 Water connecting
(1) Open the box and take out the inlet hose;
(2) The following picture shows the method how to connect the inlet hose;
(3) After being lengthened, the whole length of the inlet hose can't exceed 5 meters.
3-4.Connecting the drain hose
(1) Open the box and take out the drain hose;
(2) The highest point of the drain hose can't exceed 8 cms, otherwise it should cause drain breakdown;
(3)Don’t seal up the drain hose to the sewer completely or directly put it into the water, otherwise it
siphon may occured;
(4) After being lengthened, the whole length of the drain hose can't exceed 3 meters.
4
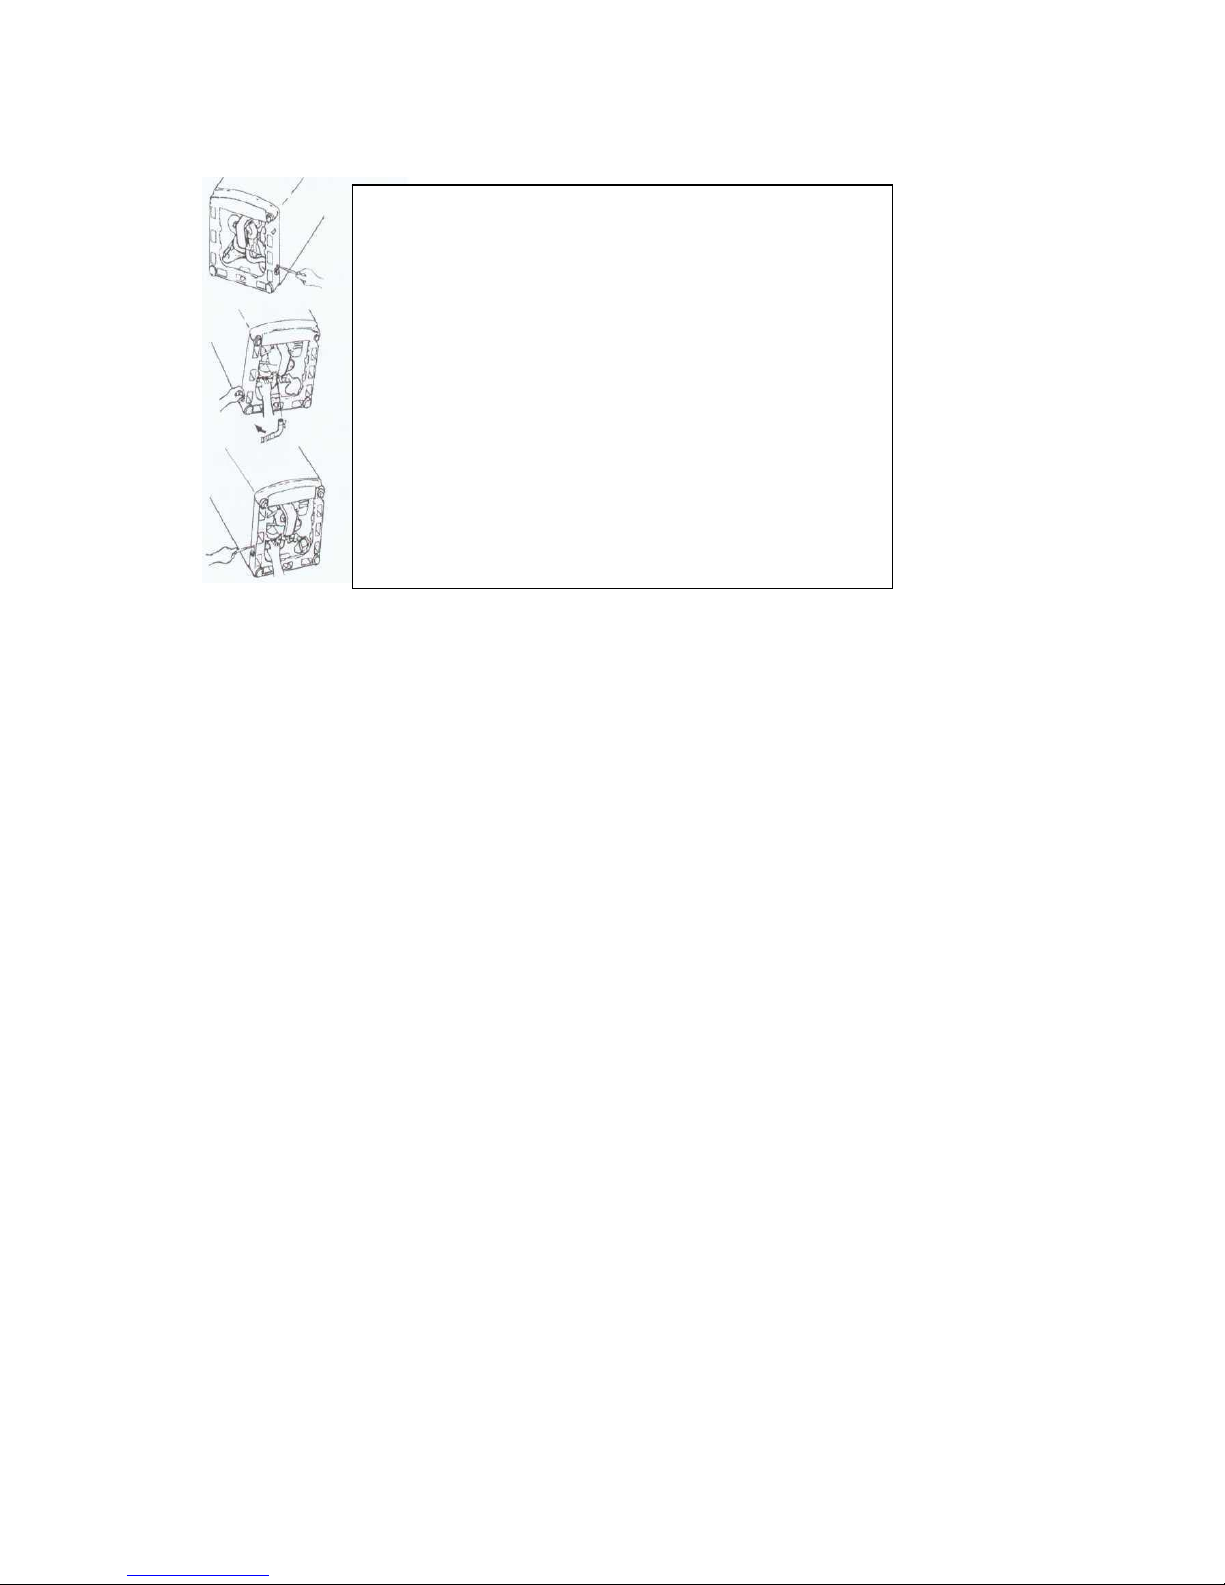
3.5 Adjusting the direction of drain hose
(1) The method how to adjust the direction of drain hose is showed in the following pictures;
(2) While adjusting the direction of drain hose, revolve the drain hose connected with the drain valve in
order to form the natural angle and avoid inclining the tub ring.
Adjust the direction of drain hose.
z Release the screw on the water outlet and push it in wards.
z When placing the machine lopsided, do not hurt the power cord and
clips.
z Pull out the drain hose through the outlet at the bottom of machine.
z Release the inside spring, push aside and tighten it.
z Dismount the hole cover and install it on to the opposite hole.
z Turn the drain hose outlet to the selected direction.
z Fix the drain hose with screw.
z Tighten the drain hose with the clip provided.
5
6
4.Washing Procedure
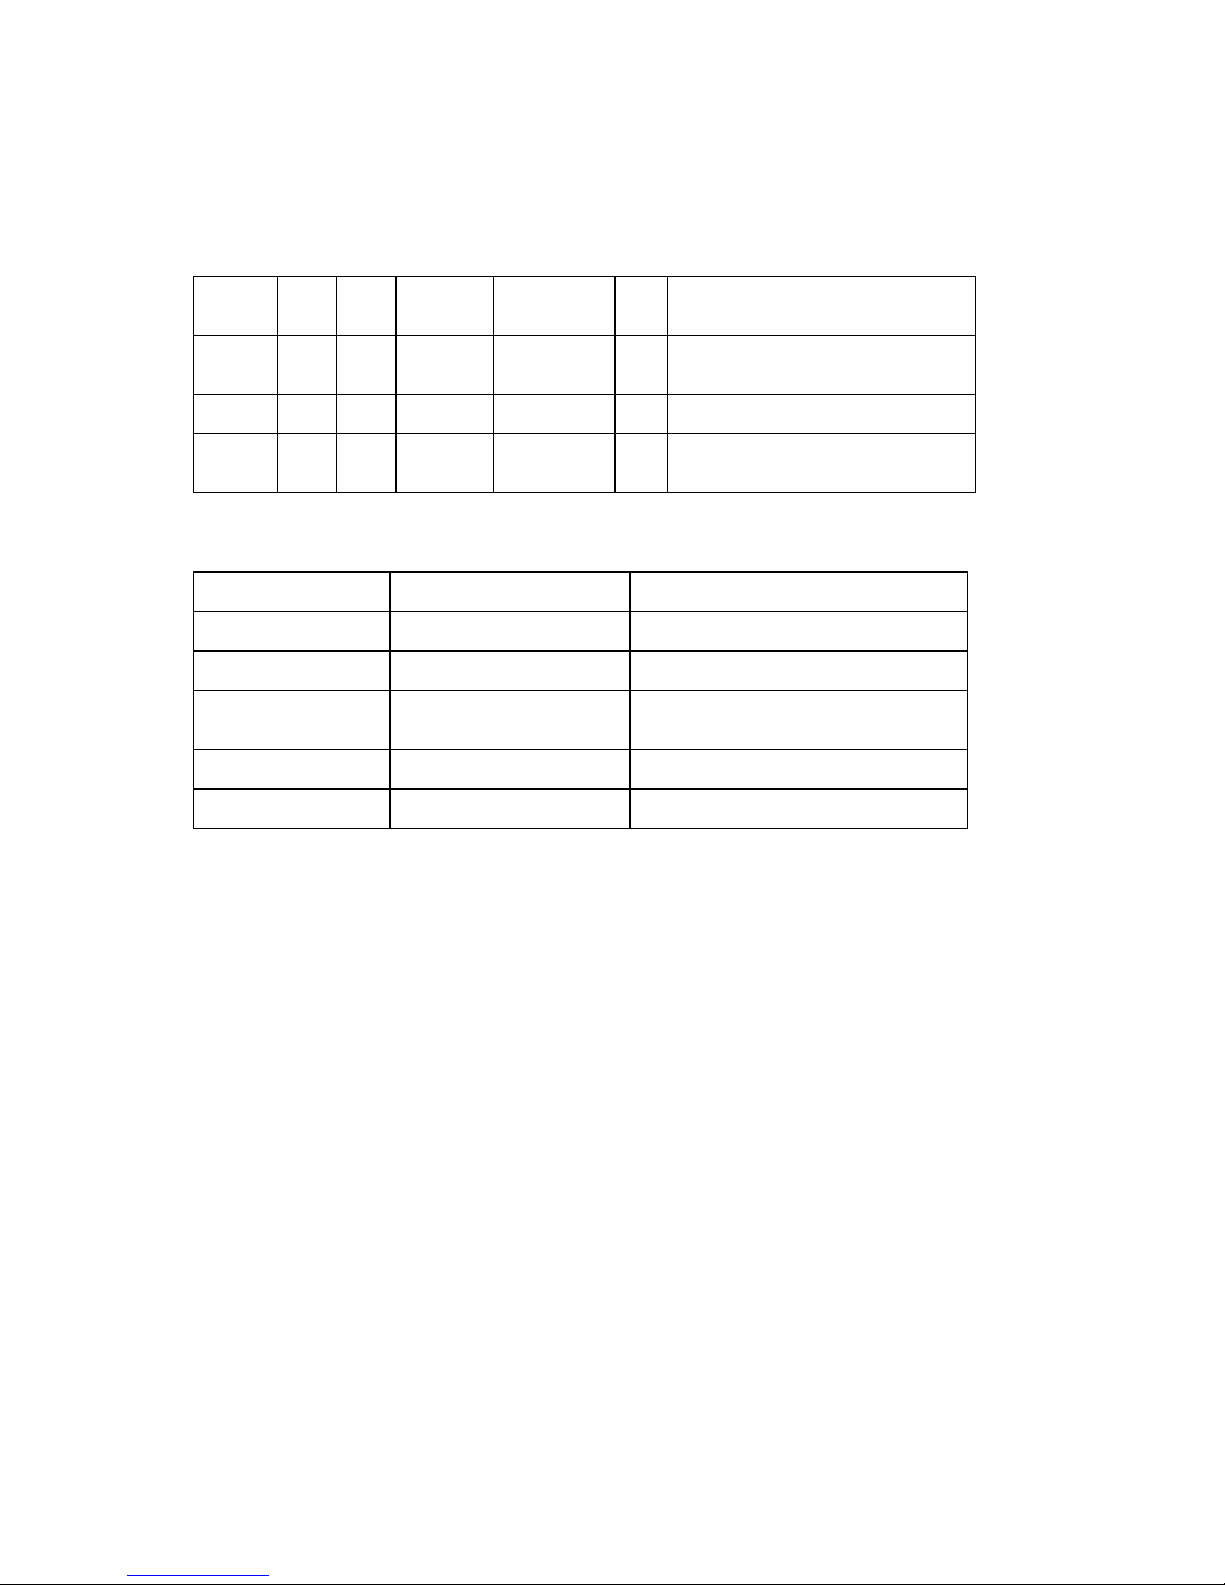
4-1.Automatic Program
Program Soak
(min)
Wash
(min)
First
rinse
(min)
Second rinse
(min)
Spin Remark
Heavy 30 12
2
2
3
Achieve ideal washing effect for thicker
and heavily soiled laundry items with
grease, such as Jean and working clothes.
Standard 30 12
2
2
3
Clean normal laundry items.
Delicate 30 12
2
2
3 For delicate fabrics, such as woolen and
silk
4-2Programs Selection
Program selection
Operation
Set standard (user can set by oneself if needs)
Soak--Wash--Rinse--Spin Soak to clean stubborn stain
Soak 30 min ,rinse twice
Wash only
Detergent can be used repeatedly
Spin only
For draining water only
If 3 times automatic unbalance adjustment
doesn’t correct the unbalance, it will be beep’
to call for manual adjustment.
Wash--rinse
To prevent clothes from crease
Rinse twice , 8 min in total.
Rinse--Spin
Wash and spin only
Rinse once ,3 Min in total.
 Loading...