

Page 1
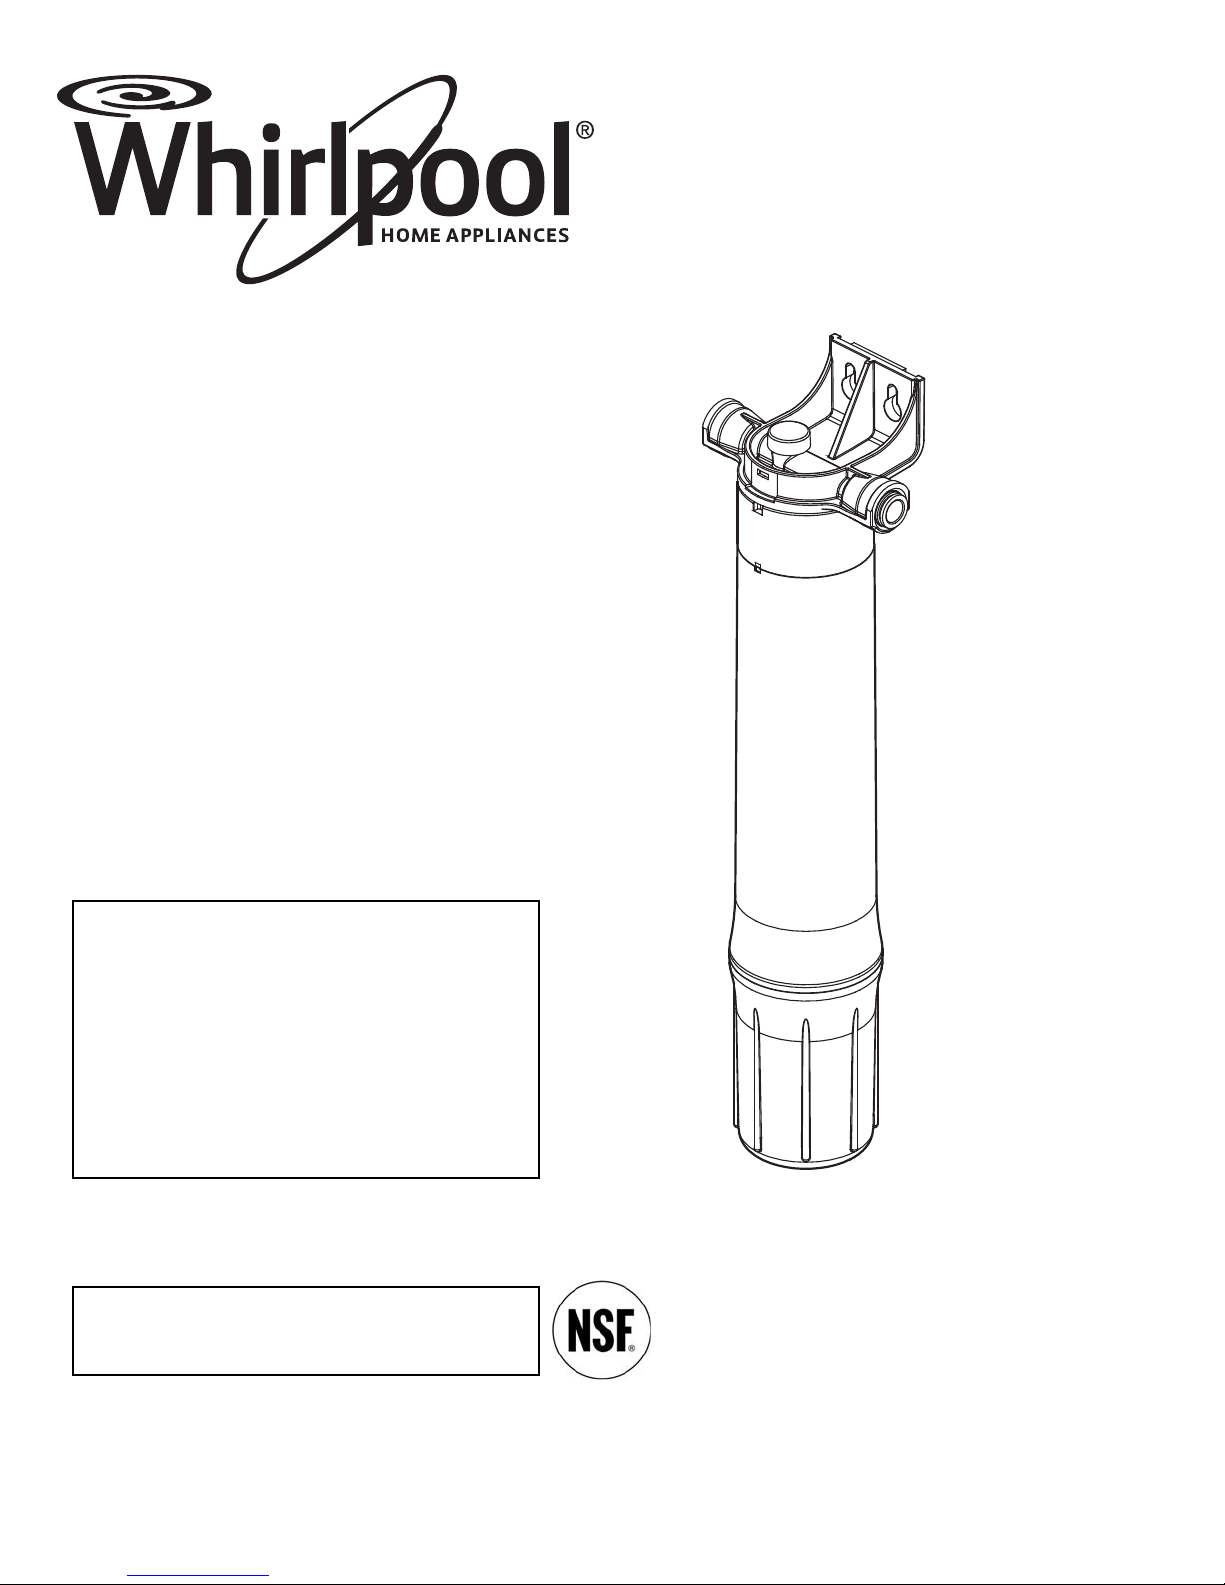
Model WHEUFF
How to install, operate and
maintain your Undersink Full
Flow Water Filtration System
Do not return unit to store
If you have any questions or concerns when
installing, operating or maintaining your water
filtration system, call our toll free number:
1-866-986-3223
Monday- Friday, 8 AM - 7 PM EST or visit
whirlpoolwatertreatment.com
When you call, please be prepared to provide
the model number and date code of
your product, found on the filter head.
System tested and certified by NSF International
against NSF/ANSI Standards 42 & 53.
See performance data sheet for details.
Manufactured and warranted by
Ecodyne Water Systems
1890 Woodlane Drive
Woodbury, MN 55125
Installation and Operation Manual
201-8401024 (Rev. 01 2/20/13)
Page 2

TABLE OF CONTENTS
Page
Before You Start . . . . . . . . . . . . . . . . . . . . . . . . . . . . . . . . . . . . . . . . . . . . . . . . . . . . . . . . . . . . . . . . . . . . . . . . . . . . 3
Specifications & Dimensions . . . . . . . . . . . . . . . . . . . . . . . . . . . . . . . . . . . . . . . . . . . . . . . . . . . . . . . . . . . . . . . . . . . 3
Parts & Tools . . . . . . . . . . . . . . . . . . . . . . . . . . . . . . . . . . . . . . . . . . . . . . . . . . . . . . . . . . . . . . . . . . . . . . . . . . . . . . . 4
Typical Undersink Installation . . . . . . . . . . . . . . . . . . . . . . . . . . . . . . . . . . . . . . . . . . . . . . . . . . . . . . . . . . . . . . . . . . 4
Installation Instructions . . . . . . . . . . . . . . . . . . . . . . . . . . . . . . . . . . . . . . . . . . . . . . . . . . . . . . . . . . . . . . . . . . . . . . 5-6
Step A - Install Water Supply Fittings . . . . . . . . . . . . . . . . . . . . . . . . . . . . . . . . . . . . . . . . . . . . . . . . . . . . . . . . . 5
Step B - Make Tubing Connections . . . . . . . . . . . . . . . . . . . . . . . . . . . . . . . . . . . . . . . . . . . . . . . . . . . . . . . . . 5-6
Step C - Install the Filter Cartridge . . . . . . . . . . . . . . . . . . . . . . . . . . . . . . . . . . . . . . . . . . . . . . . . . . . . . . . . . . . 6
Step D - Turn On Water, Check for Leaks and Rinse Carbon Fines . . . . . . . . . . . . . . . . . . . . . . . . . . . . . . . . . 6
Filter Cartridges . . . . . . . . . . . . . . . . . . . . . . . . . . . . . . . . . . . . . . . . . . . . . . . . . . . . . . . . . . . . . . . . . . . . . . . . . . . . . 7
Filter Cartridge Life . . . . . . . . . . . . . . . . . . . . . . . . . . . . . . . . . . . . . . . . . . . . . . . . . . . . . . . . . . . . . . . . . . . . . . . 7
Filter Cartridge Replacement . . . . . . . . . . . . . . . . . . . . . . . . . . . . . . . . . . . . . . . . . . . . . . . . . . . . . . . . . . . . . . . 7
Troubleshooting the System . . . . . . . . . . . . . . . . . . . . . . . . . . . . . . . . . . . . . . . . . . . . . . . . . . . . . . . . . . . . . . . . . . . 8
Exploded View & Parts List . . . . . . . . . . . . . . . . . . . . . . . . . . . . . . . . . . . . . . . . . . . . . . . . . . . . . . . . . . . . . . . . . . . . 8
WARRANTY
ONE YEAR LIMITED WARRANTY ON UNDERSINK FULL FLOW WATER FILTRATION SYSTEM
(except filter cartridges)
Warrantor: Ecodyne Water Systems, 1890 Woodlane Drive, Woodbury, MN 55125
Warrantor guarantees, to the original owner, that the Undersink Full Flow Water Filtration System, when installed and maintained in accordance with the instructions, will be free from defects in materials and workmanship for a period of one (1)
year from the date of purchase. If, within the first year, a part proves, after inspection, to be defective, Warrantor will, at its
sole option, either replace or repair the part without charge except normal shipping and installation charges. Labor to
maintain the equipment is not part of the warranty. Filters, which are expendable, are not covered by the warranty.
TO OBTAIN WARRANTY PARTS, SIMPLY CALL 1-866-986-3223, Monday - Friday, 8 am - 7 pm EST, for assistance. This
warranty applies only while this product is in use in the United States or Canada.
General Provisions
The above warranties are effective provided the Undersink Full Flow Water Filtration System is operated at water pressures not exceeding 100 psi, and at water temperatures not exceeding 100°F; provided further that the Undersink Full Flow
Water Filtration System is not subject to abuse, misuse, alteration, neglect, freezing, accident or negligence; and provided
further that the Undersink Full Flow Water Filtration System is not damaged as the result of any unusual force of nature
such as, but not limited to, flood, hurricane, tornado or earthquake.
Warrantor is excused if failure to perform its warranty obligations is the result of strikes, government regulation, materials
shortages, or other circumstances beyond its control.
*THERE ARE NO WARRANTIES ON THE UNDERSINK FULL FLOW WATER FILTRATION SYSTEM BEYOND THOSE
SPECIFICALLY DESCRIBED ABOVE. ALL IMPLIED WARRANTIES, INCLUDING ANY IMPLIED WARRANTY OF MERCHANTABILITY OR OF FITNESS FOR A PARTICULAR PURPOSE, ARE DISCLAIMED TO THE EXTENT THEY MIGHT
EXTEND BEYOND THE ABOVE PERIODS. THE SOLE OBLIGATION OF WARRANTOR UNDER THESE WARRANTIES IS TO REPLACE OR REPAIR THE COMPONENT OR PART WHICH PROVES TO BE DEFECTIVE WITHIN
THE SPECIFIED TIME PERIOD, AND WARRANTOR IS NOT LIABLE FOR CONSEQUENTIAL OR INCIDENTAL DAMAGES. NO WARRANTOR DEALER, AGENT, REPRESENTATIVE, OR OTHER PERSON IS AUTHORIZED TO EXTEND
OR EXPAND THE WARRANTIES EXPRESSLY DESCRIBED ABOVE.
Some states do not allow limitations on how long an implied warranty lasts or exclusions or limitations of incidental or consequential damage, so the limitations and exclusions in this warranty may not apply to you. This warranty gives you specific legal rights, and you may have other rights which vary from state to state. This warranty applies to consumer-owned
installations only.
Manufactured under license by Ecodyne Water Systems, Woodbury, Minnesota.
® /TM © 2013 Whirlpool. All rights reserved.
2
Page 3
14-1/2"
4" 3"
2"
Before You Start
q Read all steps and guides carefully before installing and using your undersink full flow water filtration
system. Follow all steps exactly to correctly install. Reading this manual will also help you to get all
the benefits from the filtration system.
q Do not use with water that is microbiologically unsafe or of unknown quality without adequate disinfec-
tion before or after the system. This system is certified for cyst reduction and may be used on disinfected waters that may contain filterable cysts.
q All plumbing should be done in accordance with local codes and requirements. In Massachusetts,
plumbing code 248 CMR 3.00 and 10.00 shall be adhered to. Consult with your licensed plumber.
q The undersink full flow water filtration system works on water pressures of 30 psi (minimum) to 100 psi
(maximum). If your house water pressure is over the maximum, install a pressure reducing valve in
the water supply pipe to the filtration system.
q Do not install the filtration system outside, or in extreme hot or cold temperatures. Temperature of the
water supply to the filtration system must be between 40°F and 100°F. Do not install on hot water.
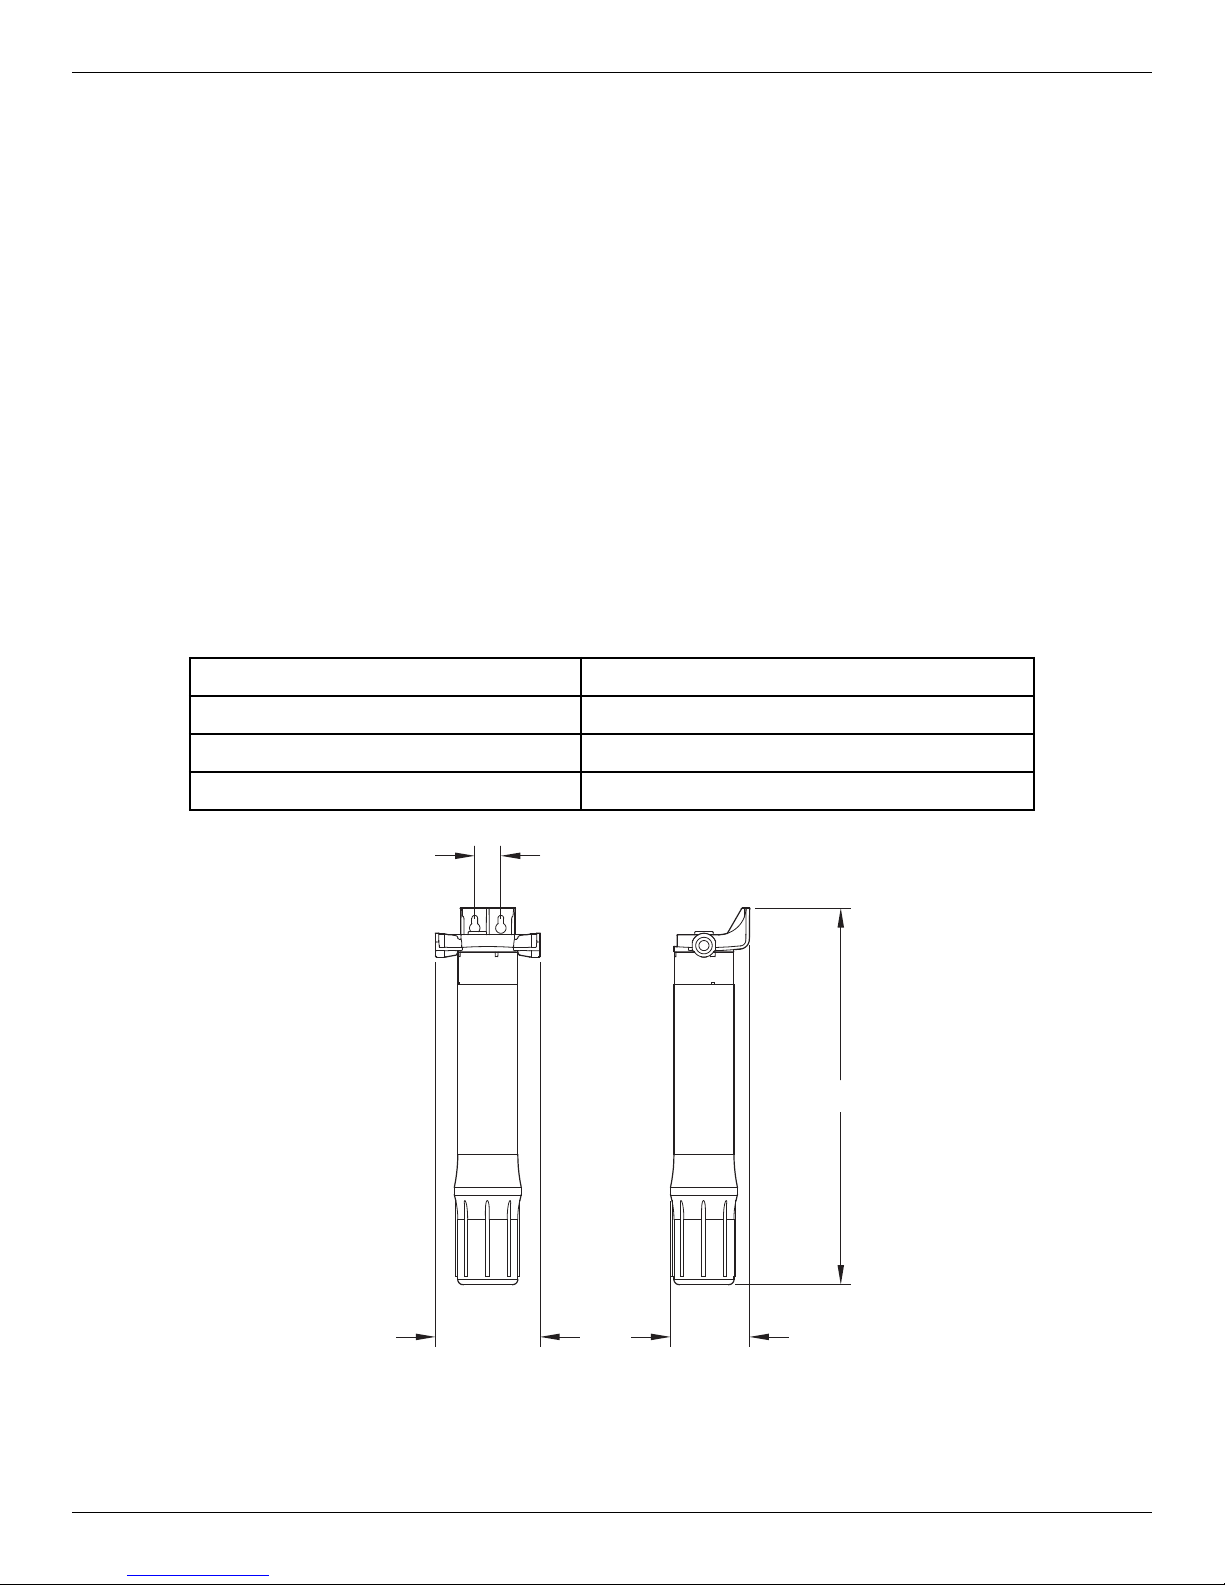
Specifications & Dimensions
Supply Water Pressure Min. - Max. 30 - 100 psi (207 - 689 kPa)
Supply Water Temperature Min. - Max. 40 - 100 °F (4 - 38 °C)
Rated Service Flow 2.0 gallons per minute (7.57 liters per minute)
Inlet - Outlet 3/8" quick connect fittings and tubing included
1”
14-1/2”
Questions? Call Toll Free 1-866-986-3223 Monday- Friday, 8 AM - 7 PM EST
or visit whirlpoolwatertreatment.com
When you call, please be prepared to provide the model number and date code, found on the filter head.
4”
3”
3
FIG. 1
Page 4
2"
Parts & Tools
Included:
= Filter head, bracket & mounting screws
= Filter cartridge
= Tubing
= Faucet adaptor
Not Included:
= Slotted and Phillips screwdrivers
= Pliers and adjustable jaw wrench
= Tubing cutter
= Electric drill
= Teflon tape
T
ypical Undersink Installation
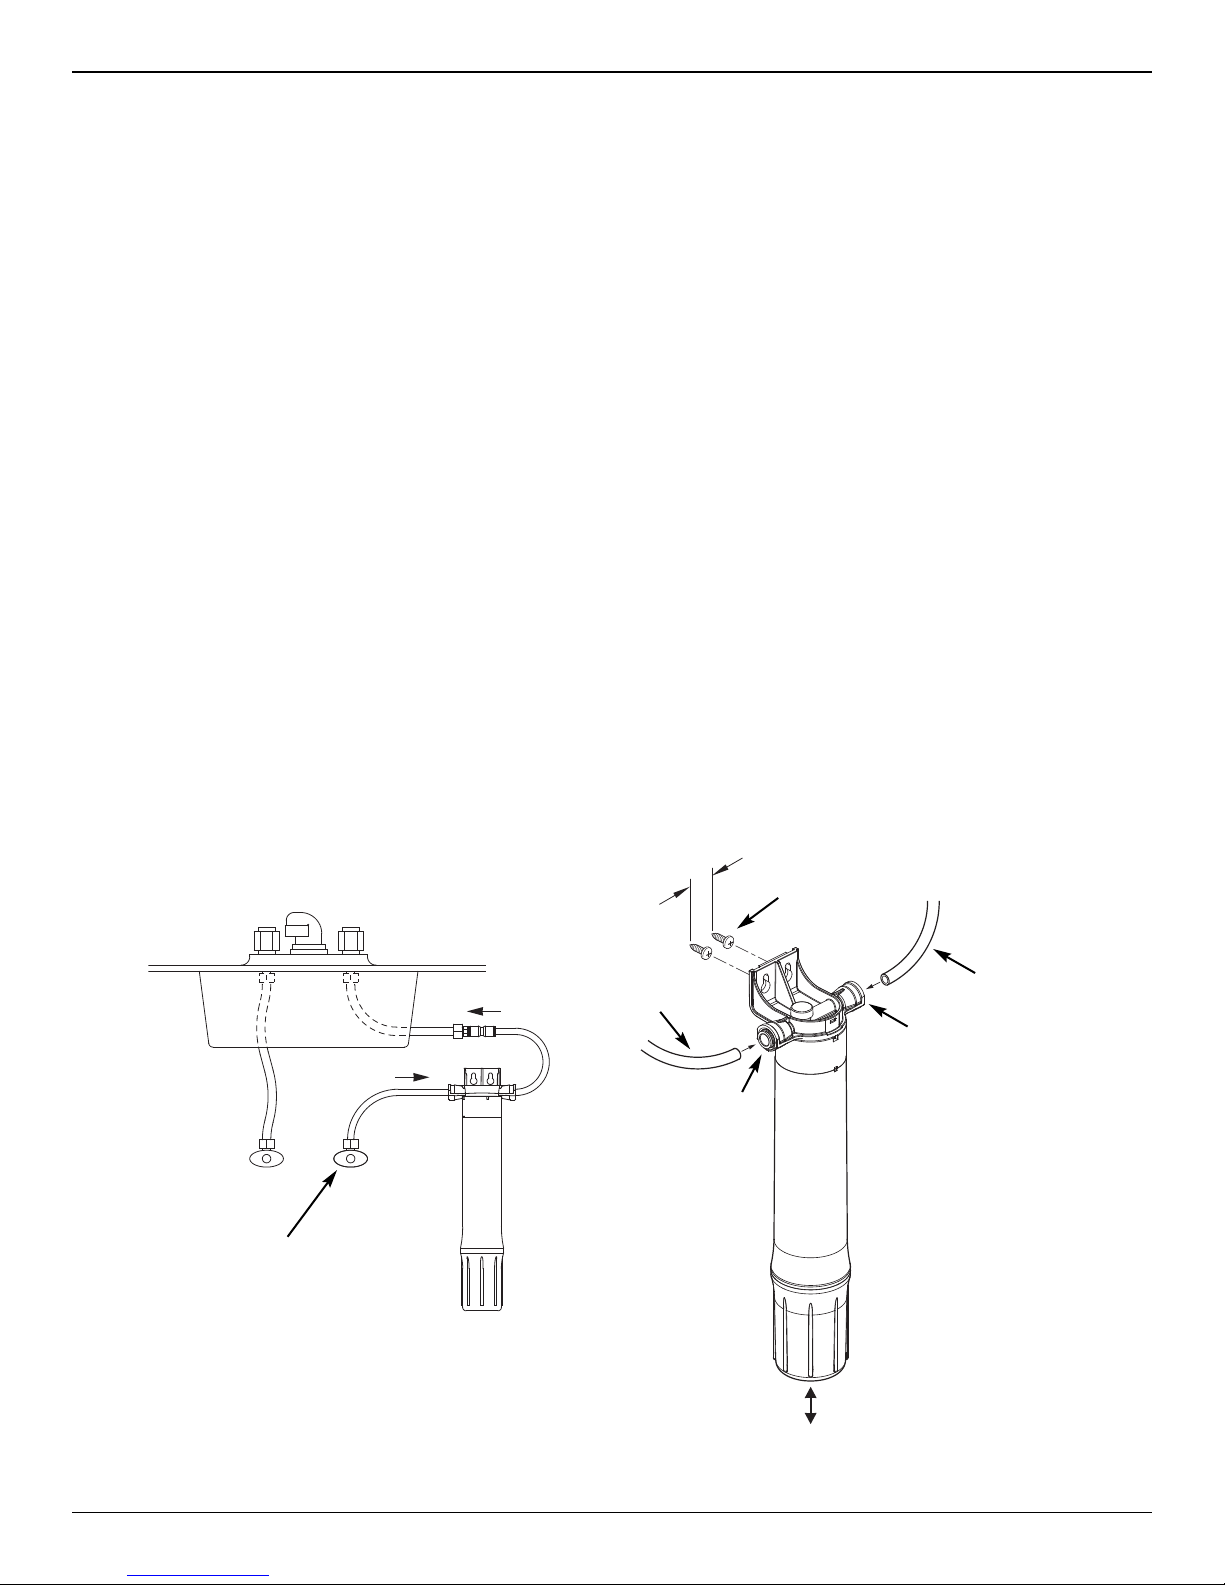
Locate the water filter housing on the cold water supply pipe, under the kitchen and/or bathroom sink, to
the cold water. Refer to the following drawing.
filter
1”
filtered water
HOT COLD
shutoff valve
faucet
SINK
INLET
water supply
OUTLET
3/8” tubing
from cold
INLET
yellow collar on
push-in fitting
mounting
screws (2)
3/8” tubing
to faucet
OUTLET
blue collar on
push-in fitting
NOTE: Be
the system for removing the filter cartridge to change it.
sure to allow a minimum space of 1-1/2” under
4
FIG. 2
Page 5
Installation Instructions
Step A - Install Water Supply Fittings
Check and comply
with local plumbing codes as you plan, then install the fittings to connect the
undersink filter into the sink’s cold water supply line. Fittings (9/16-24 thread) and 3/8” O.D. tubing are
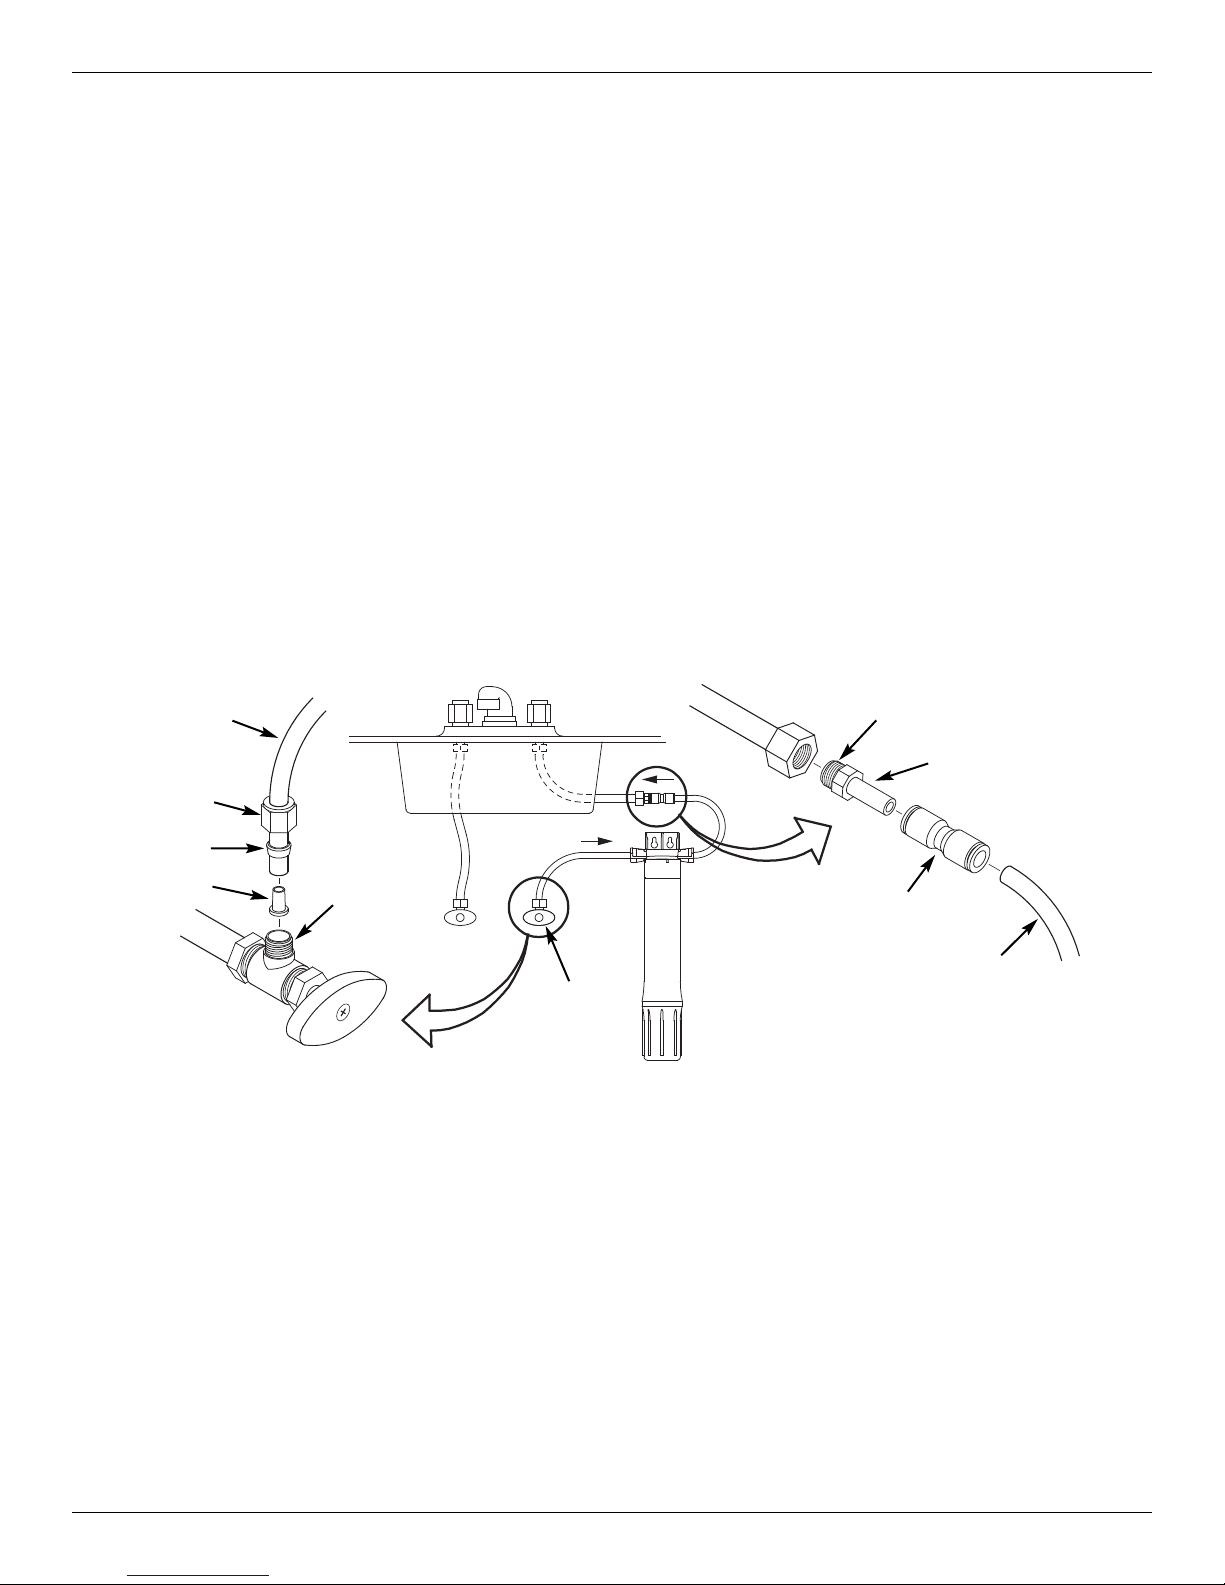
included to provide connections to and from the undersink filter’s inlet and outlet. A typical connection
using the included water supply fittings is shown in Figure 3.
1. Close the sink’s water shut off valve(s), or another shut off valve upstream from where you will
install the filter, and open faucets to relieve pressure from the sink’s cold water supply line.
2. Locate the line connecting the cold water shutoff to the sink faucet. Typically this line will be a flexible
hose. Disconnect the nut that connects this line to the cold water shutoff. Use a bucket to catch water
that drains from this line.
3. Locate one piece of the supplied 3/8” tubing, plus the supplied compression nut, ferrule and tubing
insert (See Fig. 3). Assemble the parts onto the tube, as shown in Figure 3, and thread the compression nut onto the cold water shutoff. Tighten to provide a leak-tight connection.
4. Locate the water supply adaptor (supplied) and, using thread sealing tape, install it into the nut on the
supply line which you disconnected in Step 2. Refer to Figure 3.
5. Press the stem of the water supply adaptor into one end of the supplied union connector (See Figure
3). Be sure to push the stem all the way in.
3/8" tubing to
water filter
INLET
compression
nut
filtered water faucet
SINK
flexible connection
to faucet
use thread sealing
tape on threads
water supply
adaptor
ferrule
insert
cold water shutoff
use thread
sealing tape
on threads
INLET
cold water
shutoff
filter system assembly
OUTLET
union
connector
3/8" tubing from
water filter
OUTLET
Step B - Make Tubing Connections
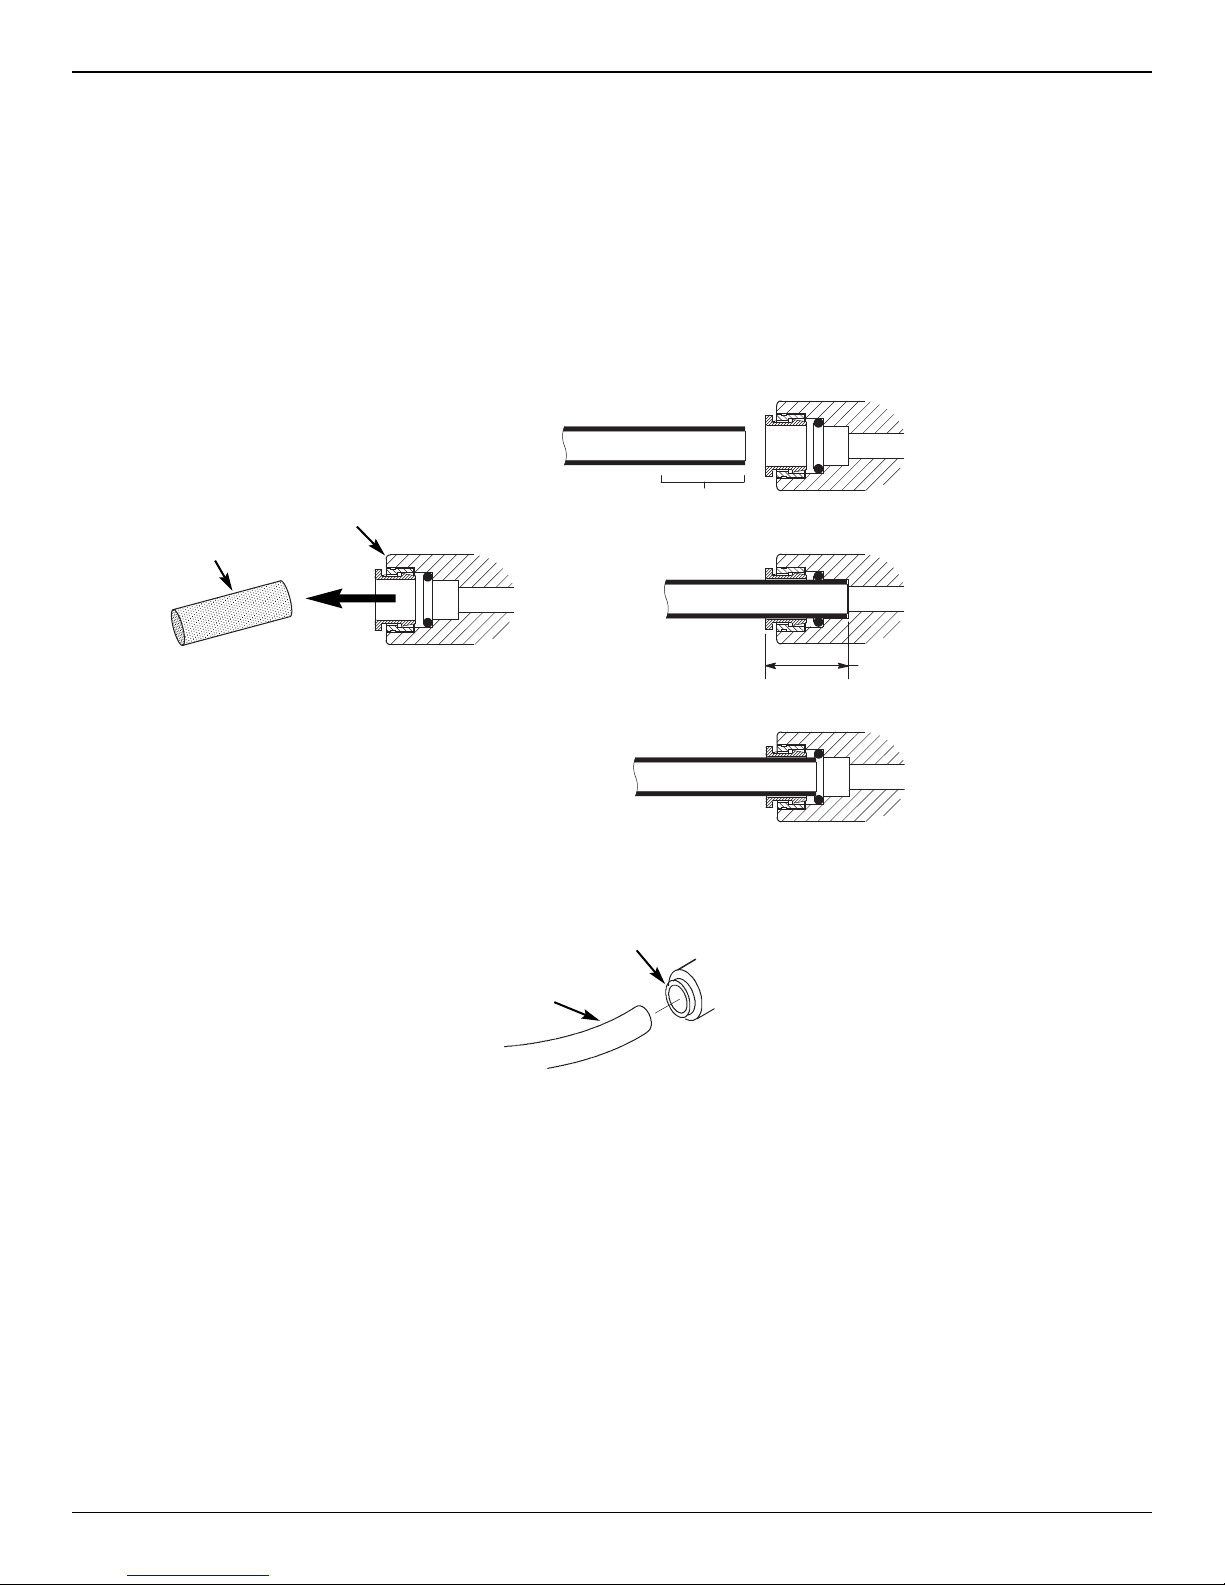
NOTE: Remove protective foam plugs before connecting tubes (See Fig. 4). Discard foam plugs.
Locate the piece of supplied 3/8" tubing not used previously. Route it between the union connector
1.
and the filter system outlet (See Figures 2 & 3). Allowing some slack, measure and cut to length. Cut
the ends of the tubing square.
2. Insert tubing all the way into the union connector and filter system outlet. Pull on the tubing to be
sure that it's held firmly in the fittings.
3. Repeat steps 1 and 2 to connect the tube installed on the cold water shutoff to the filter system inlet.
Tubing Connection (all push-in fitting locations):
This system includes push-in fittings for quick tubing connections. When working with the fittings, do the
following.
continued on the next page
FIG. 3
5
Page 6
Installation Instructions
continued from the previous page
Connect Tubing:
1. Use a tube cutter to cut the end of tubing square.
2. Inspect the end (about 1") of the tubing to be sure there are no nicks, scratches or other rough spots.
If needed cut the tubing again.
3. Push tubing through the collet and all the way into fitting. Full engagement is 3/4" length of tube into
the fitting.
Tubing correctly cut and connected
push in fitting
foam plug
Remove and discard foam plugs
To Disconnect Tubing:
1.
Push the collet inward and hold with a finger while pulling the tubing out.
collet (depress to remove tubing)
tubing
end of tubing round and smooth,
with no cuts, nicks or flat spots
Incorrect partial engagement
correct full 3/4" engagement
FIG. 4
. 5
FIG
Step C - Install the Filter Cartridge
1.
Remove the small plastic shipping cap from the open end of the filter cartridge.
2. Install the cartridge onto the water filter head assembly, as shown in Figure 6. Turn cartridge to the
right to tighten.
Step D - Turn On Water, Check for Leaks and Rinse Carbon Fines
Open the shutoff valve(s) that you closed at the beginning of this installation.
1.
2. Open the filtered water faucet to purge air from the system. When the water runs smooth, with no
bubbles or spurting, close faucet and check installation for leaks.
3. Open the filtered water faucet and let water run for 10 minutes to rinse out carbon fines.
6
Page 7
Filter Cartridge Life
Filter Cartridges
Taste and Odor Cartridges: A
filtered water faucet and allow fine, carbon particles to purge from the cartridge. Flush for 10 minutes. It
is recommended to replace filter cartridge every six months of use. There are several variables that
determine how long a cartridge will last. These include:
1. How much water you use, and
2. How much sediment, taste and/or odor, or other unwanted substance, is in the water.
Use the following information as a guide. However, no matter which type of cartridge you are using, you
will know it is time to replace them when you first notice the return of the unwanted sediment, taste
and/or odor in your water, or when the flow diminishes or stops.
Whirlpool®Undersink Full Flow Water Filtration System model WHEUFF with replacement element
WHEURF conforms to NSF/ANSI 42 and 53 for the specific performance claims as verified and substantiated by test data. The rated capacity for this system is 2000 gallons (7570 liters) at a rated service flow
of 2.0 gallons per minute (7.57 liters per minute).
taste and odor cartridge contains activated carbon. When new, open the
Register for reminders to change filters
at whirlpoolwatertreatment.com
Filter Cartridge Replacement
NOTE: There
is no need to shut off the water supply when replacing the filter cartridge.
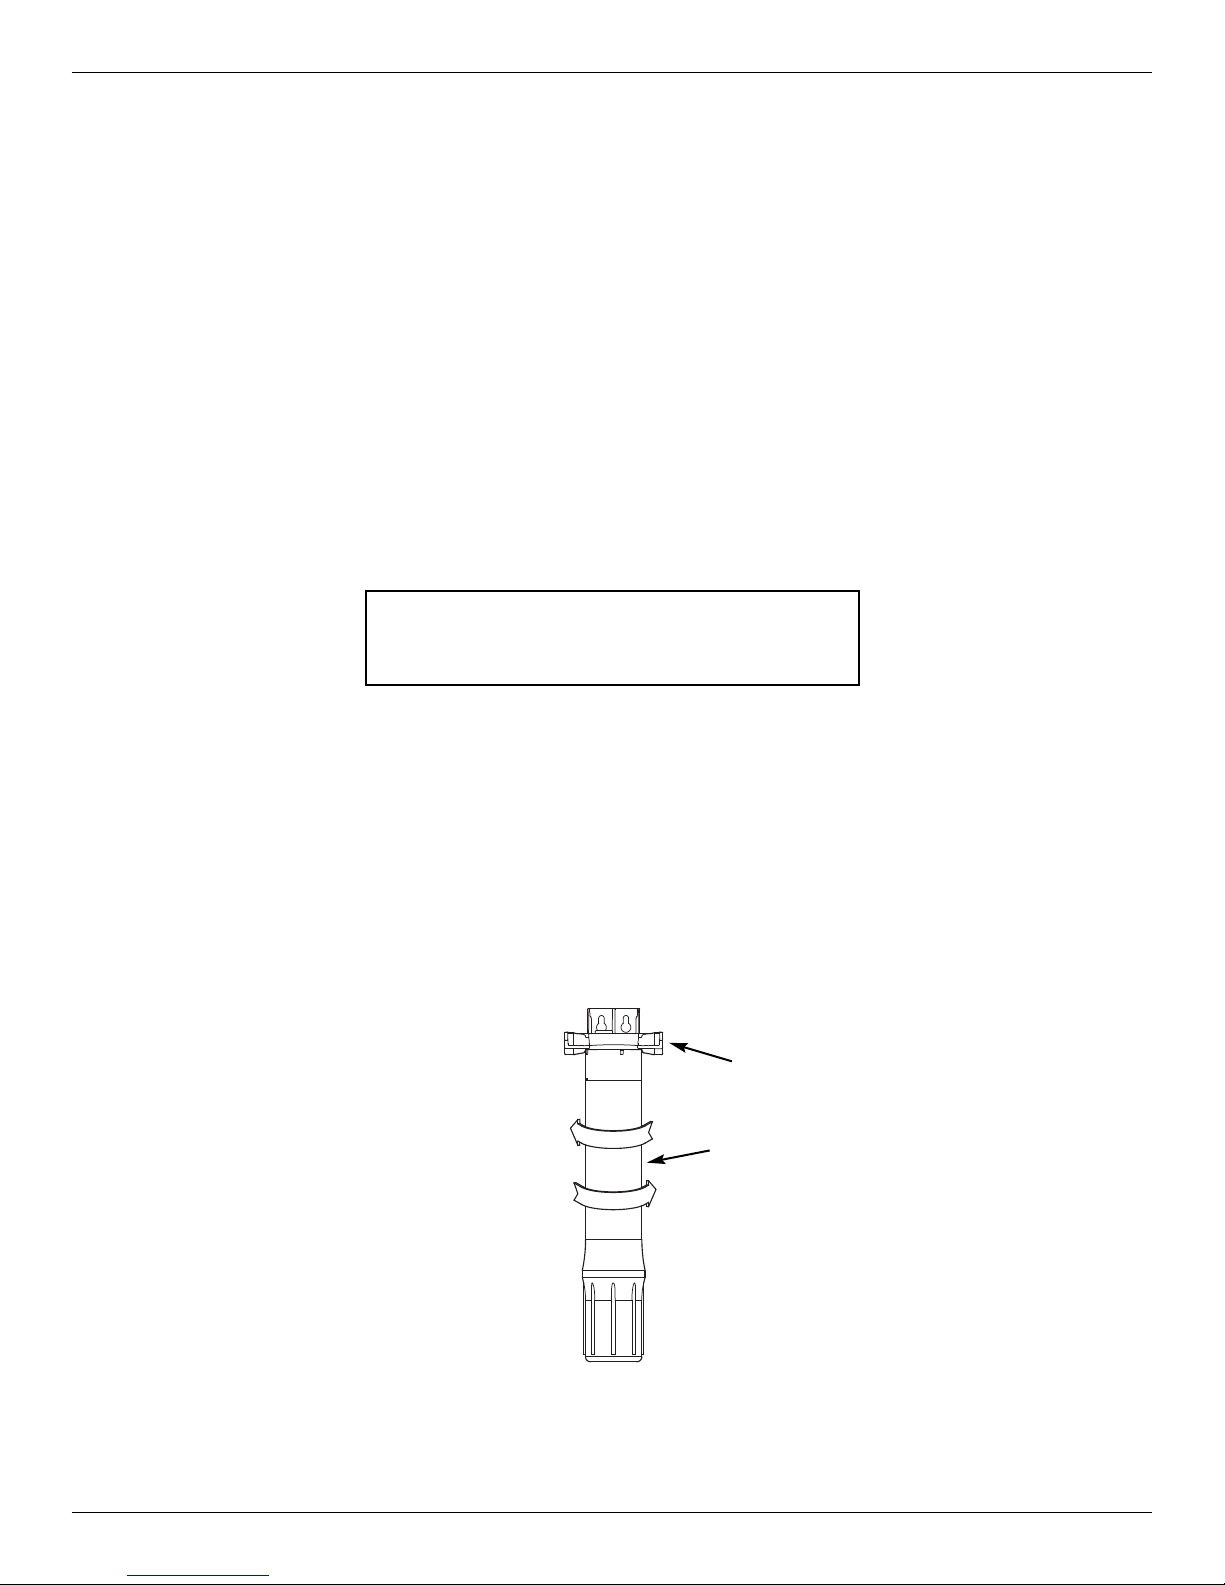
1. Turn filter cartridge to the left to remove cartridge from the filter head.
2. Dispose of the cartridge in a proper manner.
3. Install new cartridge. Turn cartridge to the right to re-attach to the filter head.
Taste and Odor Cartridges: Taste and odor cartridges contain activated carbon, a black powder.
When new, open the filtered water faucet and allow fine, carbon particles to purge from the cartridge.
Flush for 10 minutes.
head
Turn filter cartridge to the left
to remove from head
Turn filter cartridge to the right
to attach to head
filter cartridge
FIG. 6
Questions? Call Toll Free 1-866-986-3223 Monday- Friday, 8 AM - 7 PM EST
or visit whirlpoolwatertreatment.com
When you call, please be prepared to provide the model number and date code, found on the filter head.
7
Page 8
Troubleshooting the System
Problem: Taste and/or Odor.
Cause: Filter cartridge exhausted. Correction: Replace filter cartridge.
Cause: System contaminated. Correction: Sanitize system. Call 1-866-986-3223 for instructions.
Problem: Water leaks at push connect fittings.
Cause: Tubing not pushed in all the way. Correction: Push tubing in all the way into fittings.
Cause: Tubing not cut square. Correction: Cut tubing square.
Cause: Tubing nicked. Correction: Remove nicked portion, reinsert tubing into fitting.
Cause: Outer tubing surface not smooth. Correction: Remove rough portion, reinsert tubing into fitting.
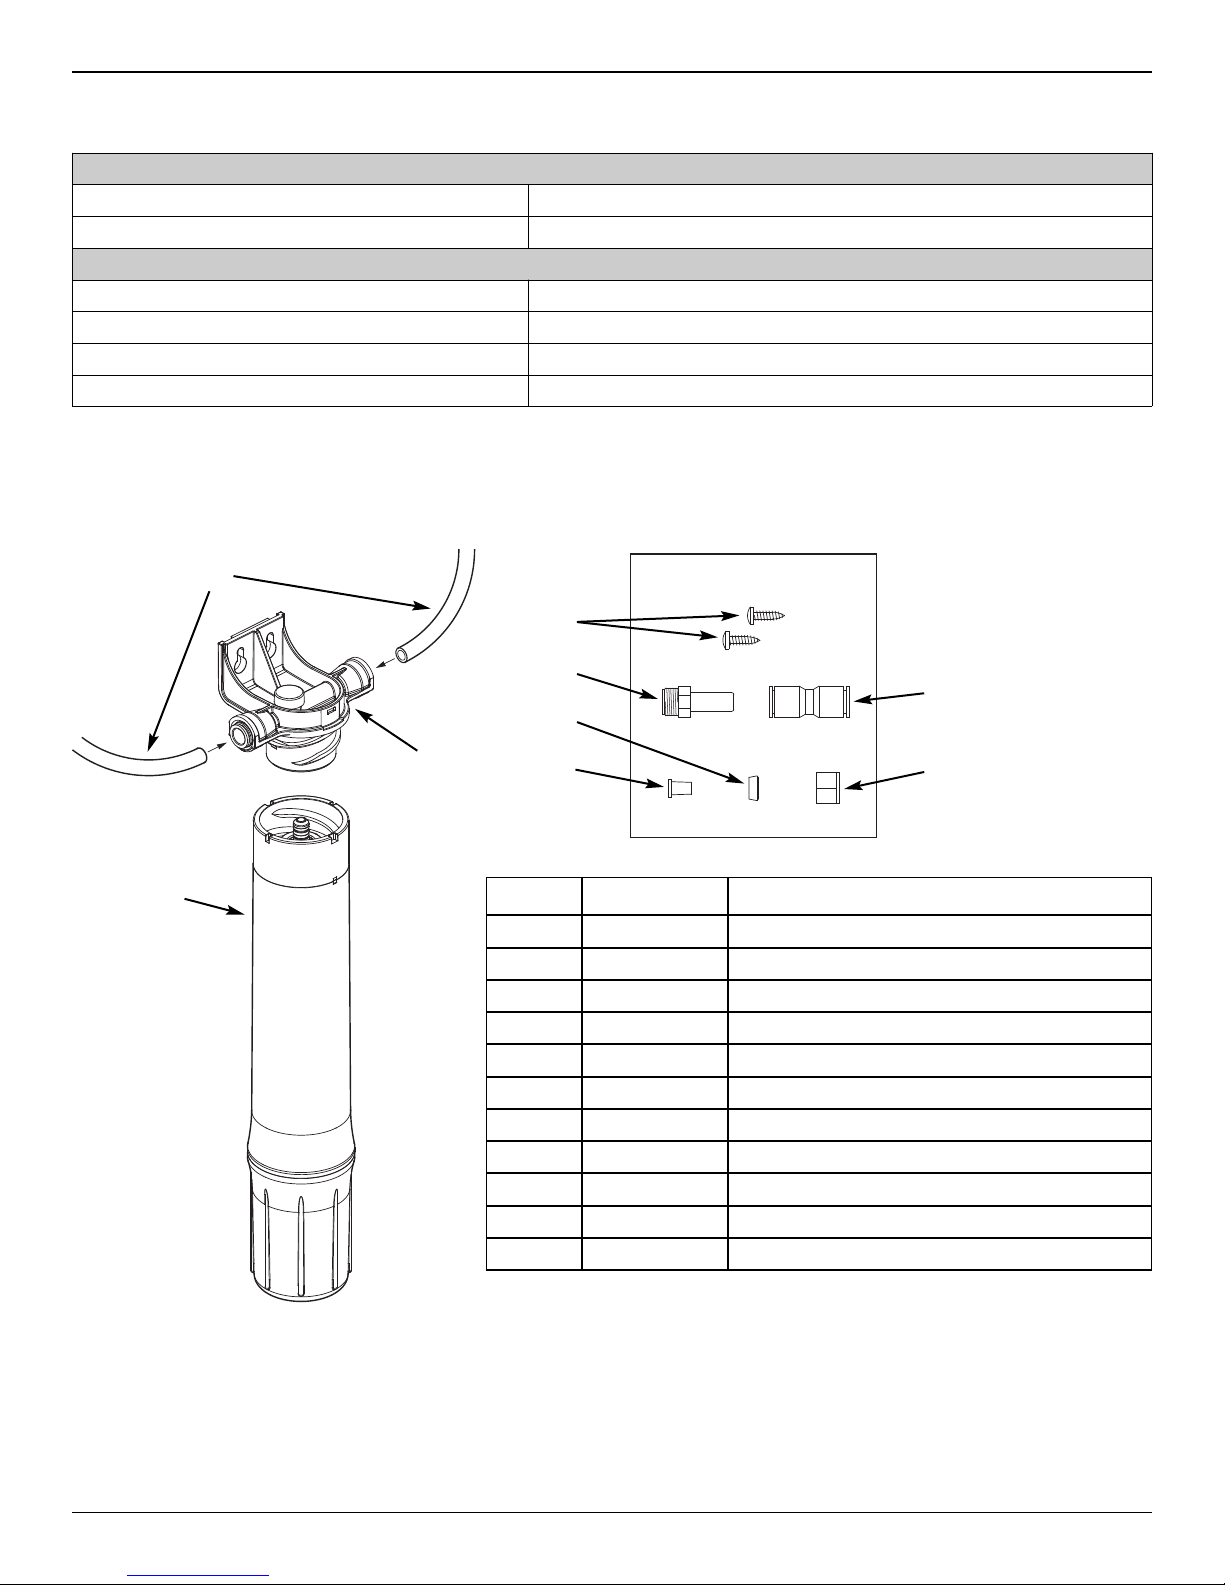
Parts List
9
2
3
6
1
8
7
Key No. Part No. Description
1 1042-45-HA Head Assembly with Quick Connect Fittings
– 1042-45-AC Parts Bag (includes Key Nos. 2-7)
2
3
4
5
6
7
8 WHEURF
9 7208251 Tubing, 3/8” OD x 30” long, Black
¢
á
á
á
á
á
á
201-8401024 Owner’s Manual
Parts Bag
4
5
Mounting Screws (2)
Water Supply Adaptor
Union Connector, 3/8” to 3/8”
Compression Nut, 3/8”
Ferrule, Plastic, 3/8”
Tubing Insert, 3/8”
Repl. Filter Cartridge, Taste & Odor Ù
Manufactured and warranted by
Ecodyne Water Systems
1890 Woodlane Drive
Woodbury, MN 55125
Ù Please purchase replacement cartridges from the retailer where you
bought your water filtration system.
¢ Not illustrated.
To order repair parts call toll free 1-866-986-3223,
Monday - Friday, 8 am - 7 pm EST.
8
 Loading...