

Pedestal Installation Instructions
For use with Model WFP24GW
Instructions d’installation du piédestal
Pour utilisation avec le modèle WFP24GW
Table of Contents
PEDESTAL SAFETY ................................................................. 1
INSTALLATION REQUIREMENTS .......................................... 2
Tools and Parts ..................................................................... 2
Location Requirements.......................................................... 2
Before Installing Your Pedestal ............................................. 2
INSTALLATION INSTRUCTIONS ............................................ 3
Install Pedestal ....................................................................... 3
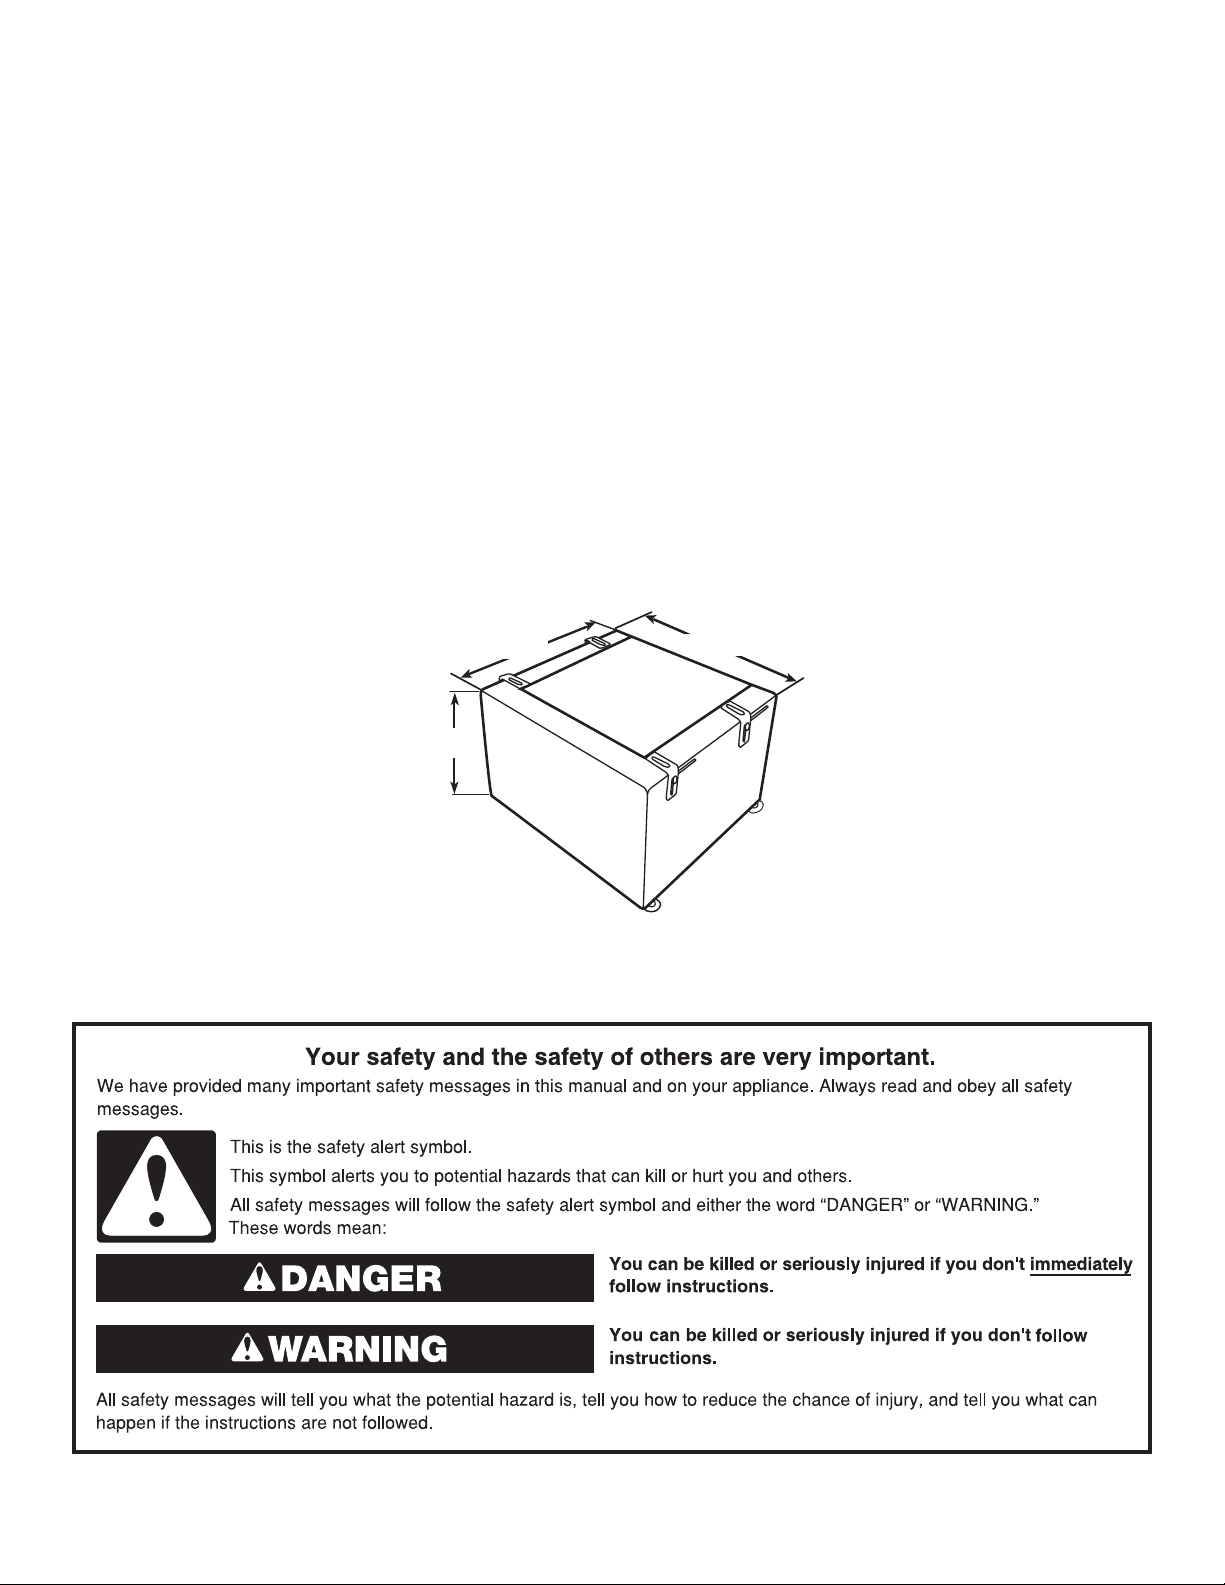
211/8"
(537 mm)
12"
(305 mm)
Table des matières
SÉCURITÉ DU PIÉDESTAL ...................................................... 5
EXIGENCES D’INSTALLATION ................................................ 5
Outillage et pièces ................................................................... 5
Exigences d’emplacement ......................................................6
Avant l’installation du piédestal .............................................. 6
INSTRUCTIONS D’INSTALLATION .........................................7
Installation du piédestal ........................................................... 7
233/8"
(594 mm)
Pedestal Safety
W10917271A
W10917573A - SP
Installation Requirements
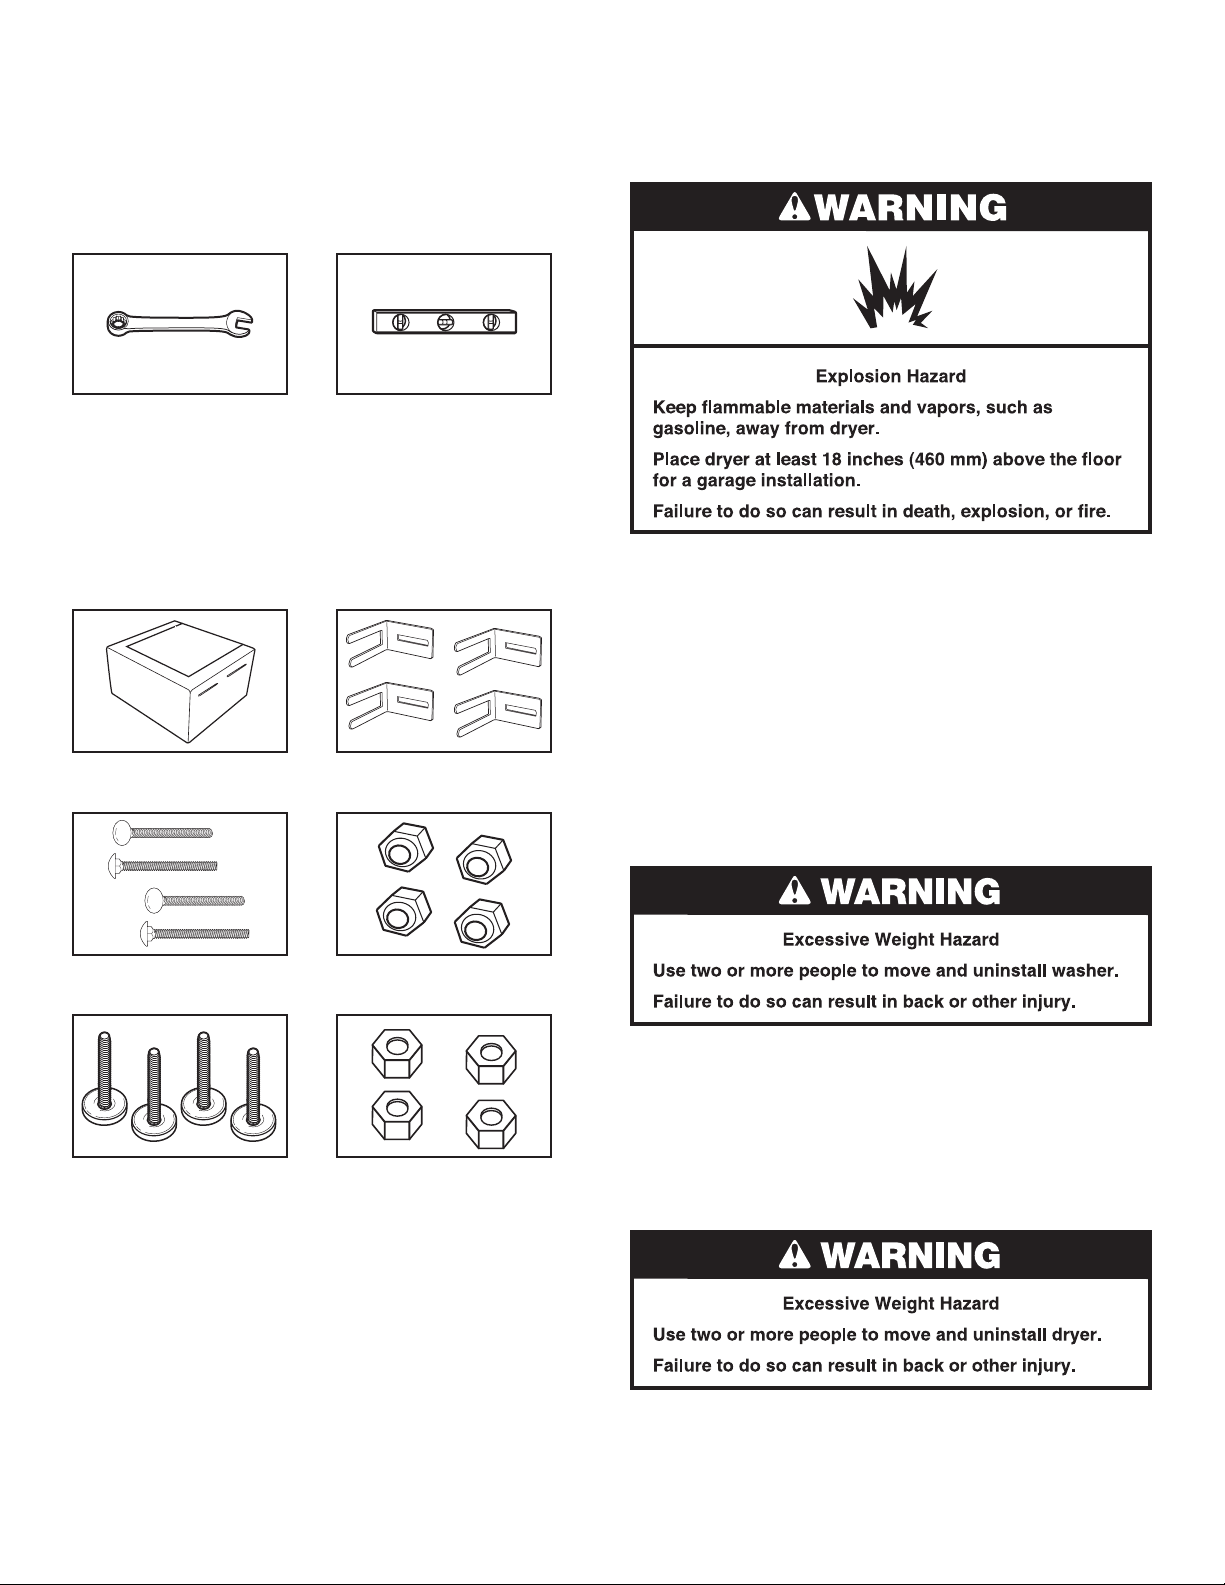
Tools and Parts
Check that you have the tools and parts necessary
for correct installation.
Tools required:
7/16" (11 mm) open end
wrench (for bracket selflocking nut) and 9/16"
(14 mm) open end wrench
(for foot locknut)
Parts supplied:
Remove parts from package. Check that all parts
were included.
Metal pedestal
Level
Mounting brackets (4)
Location Requirements
If the dryer and pedestal assembly is located in a garage, 6"
(152 mm) must be added under the pedestal so that the dryer
is 18" (460 mm) above the garage oor. A separate riser, able
to support at least 275 lbs. (125 kg), may be required. The entire
pedestal must sit completely on the riser.
Before Installing Your Pedestal
IMPORTANT: If your washer and dryer are already installed,
they must be uninstalled.
If you need to uninstall your washer or dryer, see the Installation
Instructions that came with your model for tools required.
Uninstalling Your Washer
Carriage bolts (4)
Feet with rubber caps (4)
2
Self-locking nuts (4)
Locknuts (4)
1. Unplug the power supply cord.
2. Turn off the cold water faucet.
3. Slowly loosen the ll hose at the faucet to relieve the water
pressure. Use a sponge or towel to absorb the released water.
4. Pull the washer away from the wall so the pedestal can be
placed in its nal location.
Uninstalling Your Electric Dryer
1. Unplug dryer or disconnect power.
2. Pull the dryer away from the wall so the pedestal can be
placed in its nal location.
Installation Instructions
Install Pedestal
Follow these instructions to install the pedestal on the washer
or dryer.
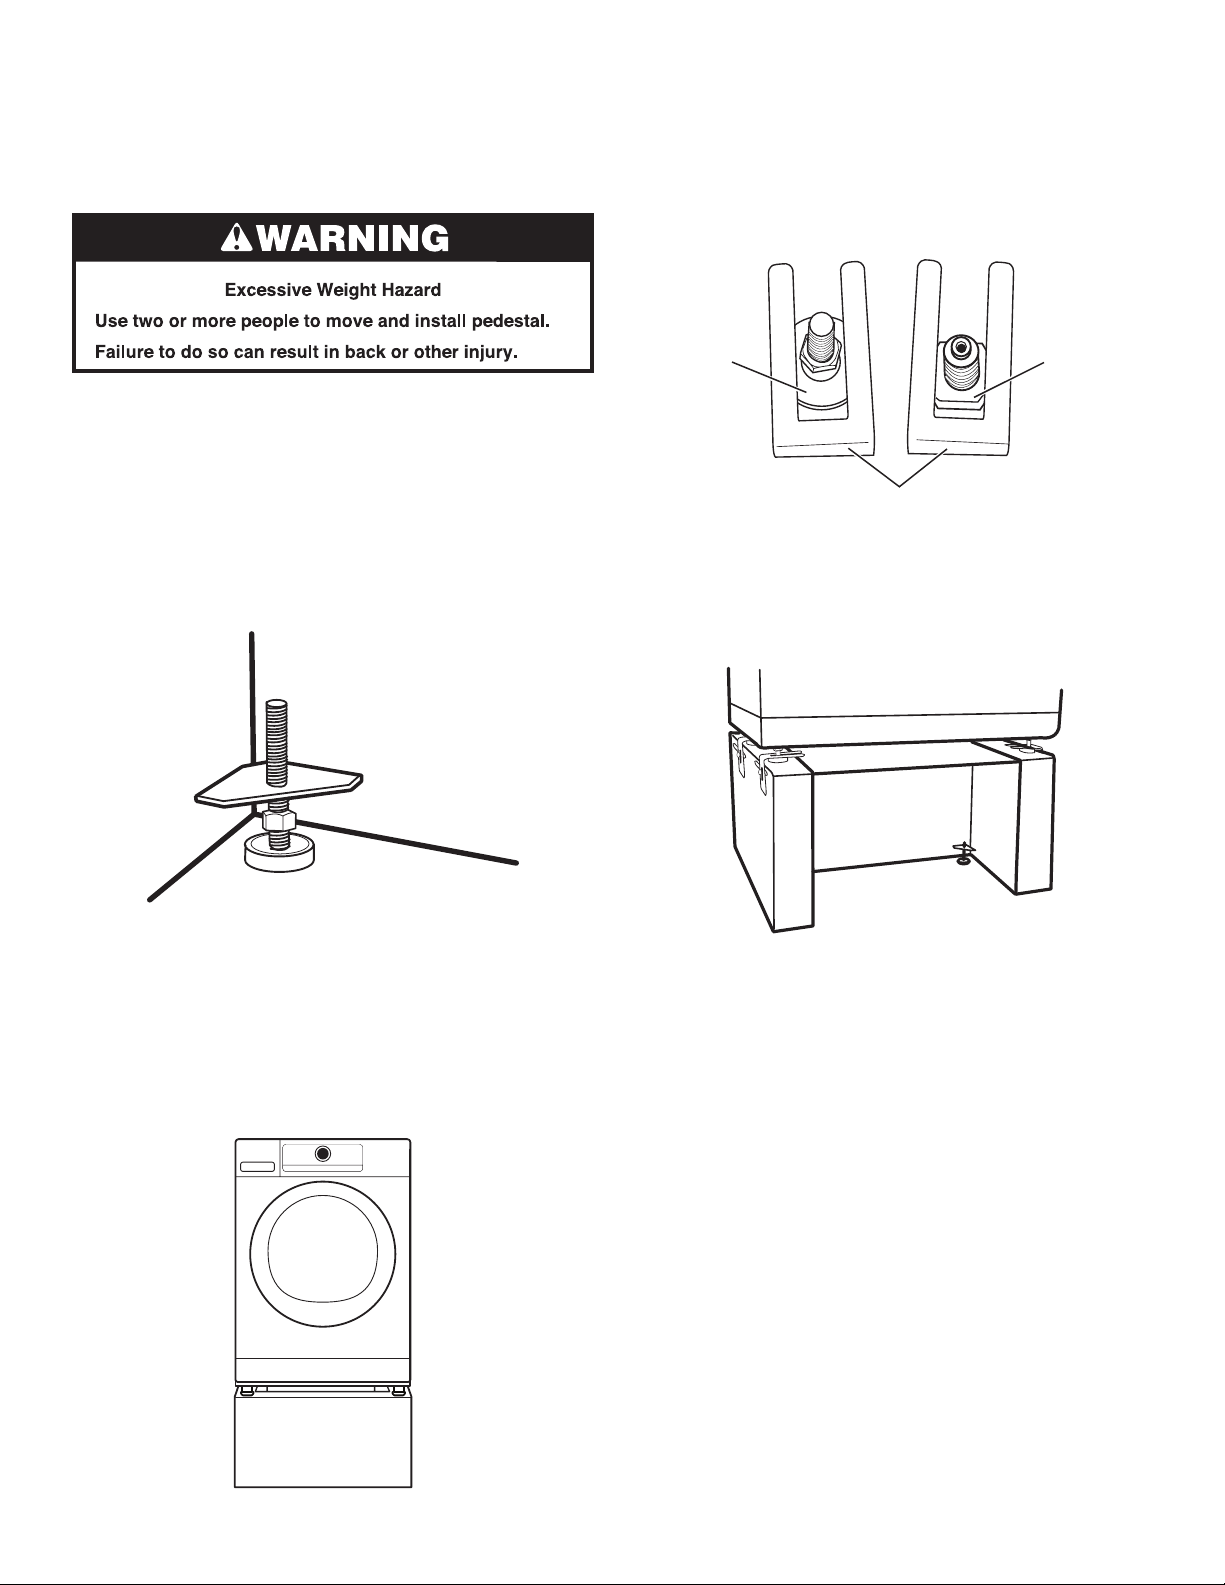
1. To install the washer or dryer onto the pedestal, rst thread
a locknut onto each foot. Screw each locknut down to the
rubber base of the foot.
2. When all 4 locknuts are in place on the feet, screw a foot
into each corner brace of the pedestal. Adjust the feet so
that the rubber pads extend just below the bottom of the
pedestal and keep the pedestal at least ¹⁄
the oor.
NOTE: For more stability, do not raise the bottom of the
pedestal any higher than necessary to clear the oor on all
four sides.
8" (3.175 mm) off
7. To install the brackets, slide the open-ended portion of the
bracket over one of the feet of the washer or dryer. Center
the two prongs of the bracket on top of the foot. Repeat this
step with the other three brackets and feet. Use one bracket
on each of the four feet to properly secure the washer or
dryer to the pedestal.
Washer foot Dryer foot
Pedestal bracket
8. Slide the brackets directly against the side of the pedestal.
9. Insert the carriage bolt through the slot in the mounting
bracket and the pedestal. Repeat this step for the other
brackets. Attach the self-locking nut on all carriage bolts.
7
Use a
⁄16" (11 mm) open end wrench to completely
tighten the self-locking nuts.
3. Set the pedestal in its nal location.
4. Place a level on the pedestal to ensure that it is level from
front to back and side to side. If necessary, adjust the feet
up or down to level the pedestal.
5. Once it is level, use a
9
⁄16" (14 mm) open end wrench
to thread each locknut to the bottom of each corner brace.
Tighten until locked into place.
6. Place the washer or dryer on the pedestal as shown.
The front and side edges should line up.
10. With the washer or dryer locked securely into place
on the pedestal, slide the washer or dryer and pedestal
to their nal location.
11. Place a level on top of the washer or dryer and ensure
that it is level from front to back and side to side. If it is
necessary to adjust the washer or dryer feet to level it
on the pedestal, the brackets may need to be temporarily
loosened.
To adjust the washer or dryer feet:
n Reach inside the pedestal and use a
7
⁄16" (11 mm)
open end wrench to loosen the locknut.
n Adjust the washer or dryer feet up or down. Be sure
to completely tighten the brackets and locknuts again
after the washer or dryer is level.
12. Follow the Installation Instructions that came with your
model to nish installing or reinstalling your washer or dryer.
3
 Loading...