

Whirlpool WEE510SAGB0, WEE510SAGS0, WEE510SAGS1, WEE510SAGW0, WEC310SAGS0 Installation Guide
...Page 1

IMPORTANT:
Sa
INSTALLATION INSTRUCTIONS
FRONT CONTROL ELECTRIC RANGES
Table of Contents
RANGE SAFETY .............................................................................2
INSTALLATION REQUIREMENTS .................................................3
Tools and Parts .............................................................................3
Location Requirements ................................................................3
Electrical Requirements - U.S.A. Only .........................................5
INSTALLATION INSTRUCTIONS ...................................................6
Unpack Range..............................................................................6
Install Anti-Tip Bracket .................................................................6
Adjust Leveling Legs ....................................................................7
Level Range ..................................................................................8
Electrical Connection - U.S.A. Only .............................................8
Verify Anti-Tip Bracket Is Installed and Engaged ......................14
Remove/Reinstall Toe Panel ......................................................14
Oven Door ..................................................................................14
Complete Installation .................................................................15
ve for local electrical inspector's use.
W11097823B
Page 2
RANGE SAFETY
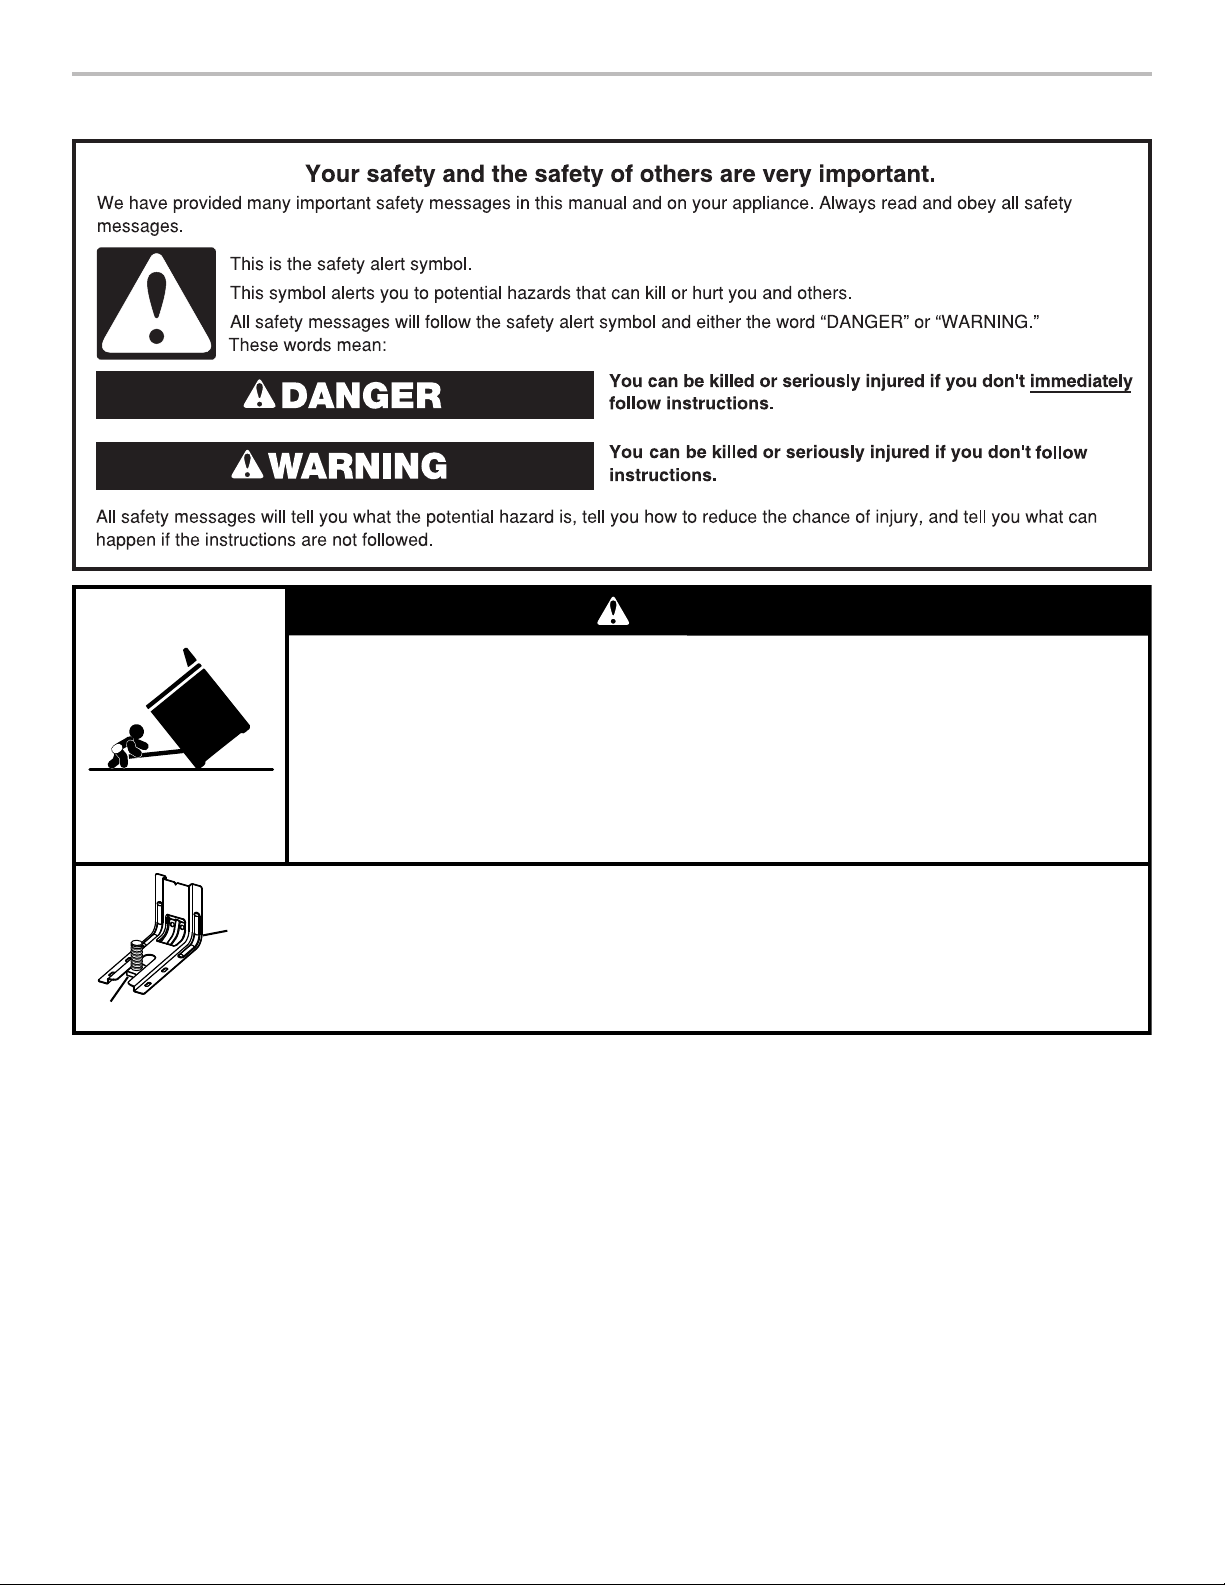
WARNING
Tip Over Hazard
A child or adult can tip the range and be killed.
Install anti-tip bracket to floor or wall per installation instructions.
Slide range back so rear range foot is engaged in the slot of the anti-tip bracket.
Re-engage anti-tip bracket if range is moved.
Do not operate range without anti-tip bracket installed and engaged.
Failure to follow these instructions can result in death or serious burns to children and adults.
Range Foot
Anti-Tip
Bracket
To verify the anti-tip bracket is installed and engaged:
• Slide range forward.
• Look for the anti-tip bracket securely attached to floor or wall.
• Slide range back so rear range foot is under anti-tip bracket.
• See installation instructions for details.
2
Page 3

INSTALLATION REQUIREMENTS
Tools and Parts
Gather the required tools and parts before starting installation.
Read and follow the instructions provided with any tools
listed here.
Tools Needed
■ Tape measure
■ Flat-blade screwdriver
■ Phillips screwdriver
■ Level
■ Hand or electric drill
■ Wrench or pliers
■ Marker or pencil
Parts Supplied
Check that all parts are included.
■ 10-32 hex nuts (attached to terminal block) (3)
■ Direct wire lugs (3)
■ #10 x 1
■ Anti-tip bracket (inside oven cavity)
5
/8" (4.1 cm) screws (for mounting anti-tip bracket) (2)
Anti-tip bracket must be securely mounted to the back wall
or floor. Thickness of flooring may require longer screws to
anchor bracket to subfloor. Longer screws are available from
your local hardware store.
Parts Needed
If using a power supply cord kit:
■ A UL Listed power supply cord kit marked for use with
ranges. The cord should be rated at 250 volts minimum, 40
amps or 50 amps, that is marked for use with nominal 13/8"
(3.5 cm) diameter connection opening and must end in ring
terminals or open-end spade terminals with upturned ends.
■ A UL Listed strain relief.
Check local codes. Check existing electrical supply. See the
appropriate “Electrical Requirements” section.
It is recommended that all electrical connections be made by a
licensed, qualified electrical installer.
■ Masking tape
■ 1/4" (6.4 mm) drive ratchet
■ 1/4" (6.4 mm) nut driver
■ 3/8" (9.5 mm) and
5/16" (8 mm) nut driver
■ 1/8" (3.2 mm) drill bit (for
wood floors)
■ Tin snips or large wire
cutters (for cutting ground
strap, if necessary)
Location Requirements
IMPORTANT: Observe all governing codes and ordinances.
■ It is the installer’s responsibility to comply with installation
clearances specified on the model/serial/rating plate. The
model/serial/rating plate is located behind the oven door on
the top right-hand side of the oven frame.
■ The range should be located for convenient use in the
kitchen.
■ Recessed installations must provide complete enclosure of
the sides and rear of the range.
■ To eliminate the risk of burns or fire by reaching over the
heated surface units, cabinet storage space located above
the surface units should be avoided. If cabinet storage
is to be provided, the risk can be reduced by installing a
range hood or microwave hood combination that projects
horizontally a minimum of 5" (12.7 cm) beyond the bottom of
the cabinets.
■ All openings in the wall or floor where range is to be installed
must be sealed.
■ Cabinet opening dimensions that are shown must be used.
Given dimensions are minimum clearances.
■ The anti-tip bracket must be installed. To install the anti-tip
bracket shipped with the range, see “Install Anti-Tip Bracket”
section.
■ Grounded electrical supply is required. See the appropriate
“Electrical Requirements” section.
■ Contact a qualified floor covering installer to check that the
floor covering can withstand at least 200°F (93°C).
■ Use an insulated pad or 1/4" (6.4 mm) plywood under range
if installing range over carpeting.
IMPORTANT: To avoid damage to your cabinets, check with
your builder or cabinet supplier to make sure that the materials
used will not discolor, delaminate, or sustain other damage. This
oven has been designed in accordance with the requirements
of UL and CSA International and complies with the maximum
allowable wood cabinet temperatures of 194°F (90°C).
3
Page 4
Mobile Home — Additional Installation Requirements
The installation of this range must conform to the Manufactured
Home Construction and Safety Standard, Title 24 CFR,
Part 3280 (formerly the Federal Standard for Mobile Home
Construction and Safety, Title 24, HUD Part 280). When such
standard is not applicable, use the Standard for Manufactured
Home Installations, ANSI A225.1/NFPA 501A or with local codes.
In Canada, the installation of this range must conform with
the current standards CAN/CSA-A240-latest edition, or with
local codes.
Mobile Home Installations Require:
■ When this range is installed in a mobile home, it must be
secured to the floor during transit. Any method of securing
the range is adequate as long as it conforms to the
standards listed above.
■ Four-wire power supply cord or cable must be used in a
mobile home installation. The appliance wiring will need
to be revised. See “Electrical Connection — U.S.A. Only”
section.
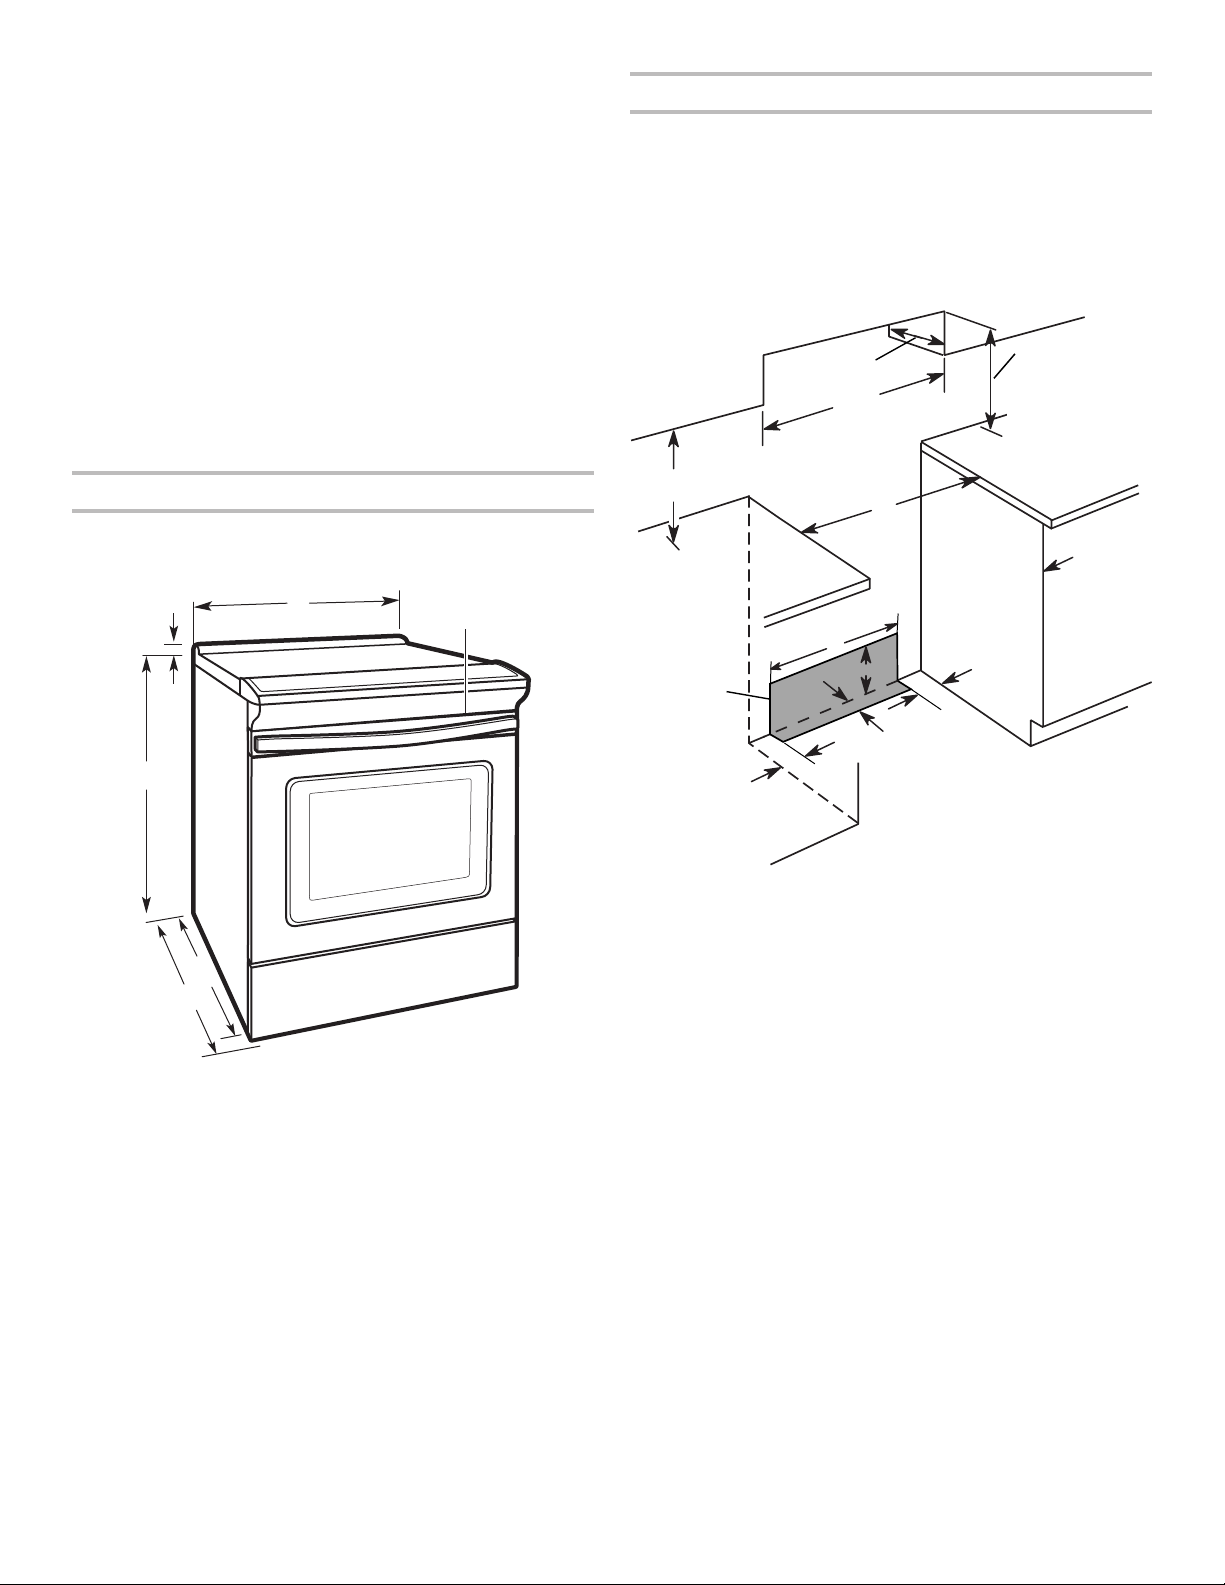
Product Dimensions
These instructions cover several models. Your model may
appear different from the models depicted. Dimensions given are
maximum dimensions across all models.
Cabinet Dimensions
Cabinet opening dimensions shown are for 25" (64.0 cm)
countertop depth, 24" (61.0 cm) base cabinet depth and
36" (91.4 cm) countertop height.
IMPORTANT: If installing a range hood or microwave hood
combination above the range, follow the range hood or
microwave hood combination installation instructions for
dimensional clearances above the cooktop surface.
Range may be installed next to combustible walls with
zero clearance.
D
B
C
A
E
K
A
B
C
D
E
F
A. 13/16" (3.0 cm) height from cooktop
to top of vent
B. 297/8" (75.9 cm)
C. Model/serial/rating plate (located
behind the oven door on the top
right-hand side of the oven frame)
D. 34" (86.4 cm) height to top of
cooktop edge with leveling legs
screwed all the way in*
E. 2825/64" (72.1 cm) max. depth
from front of console to
back of range
F. 291/64" (73.7 cm) max. depth
from handle to back of
range
IMPORTANT: Range must be level after installation. Follow the
instructions in the “Level Range” section. Using the cooktop as
a reference for leveling the range is not recommended.
* Range can be raised approximately 1" (2.5 cm) by adjusting
the leveling legs.
G
H
I
F
J
I
A. 18" (45.7 cm) upper side cabinet to countertop
B. 13" (33 cm) max. upper cabinet depth
C. 30" (76.2 cm) min. opening width
D. For minimum clearance to top of cooktop, see NOTE*.
E. 30" (76.2 cm) min. opening width
F. The shaded area is recommended for installation of grounded
outlet.
G. 13¹⁄8" (33.3 cm)
H. 511/16" (14.5 cm)
I. 4¹³⁄16" (12.2 cm)
J. 3¹¹⁄16" (9.4 cm)
K. Cabinet door or hinges should not extend into the cutout.
* NOTE: 24" (61.0 cm) minimum when bottom of wood or
metal cabinet is shielded by not less than 1/4" (6.4 mm) flame
retardant millboard covered with not less than No. 28 MSG
sheet steel, 0.015" (0.4 mm) stainless steel, 0.024" (0.6 mm)
aluminum or 0.020" (0.5 mm) copper.
30" (76.2 cm) minimum clearance between the top of the
cooking platform and the bottom of an uncovered wood or
metal cabinet.
4
Page 5
Electrical Requirements — U.S.A. Only
If codes permit and a separate ground wire is used, it is
recommended that a qualified electrical installer determine
that the ground path and wire gauge are in accordance with
local codes.
Do not use an extension cord.
Be sure that the electrical connection and wire size are adequate
and in conformance with the National Electrical Code, ANSI/
NFPA 70-latest edition and all local codes and ordinances.
A copy of the above code standards can be obtained from:
National Fire Protection Association
1 Batterymarch Park
Quincy, MA 02169-7471
WARNING: Improper connection of the equipment-grounding
conductor can result in a risk of electric shock. Check with a
qualified electrician or service technician if you are in doubt as to
whether the appliance is properly grounded. Do not modify the
power supply cord plug. If it will not fit the outlet, have a proper
outlet installed by a qualified electrician.
Electrical Connection
To properly install your range, you must determine the type
of electrical connection you will be using and follow the
instructions provided for it here.
■ Range must be connected to the proper electrical voltage
and frequency as specified on the model/serial/rating plate.
The model/serial/rating plate is located behind the oven door
on the top right-hand side of the oven frame.
■ This range is manufactured with the neutral terminal
connected to the cabinet. Use a 3-wire, UL Listed, 40- or
50-amp power supply cord (pigtail). See the following Range
Rating chart. If local codes do not permit ground through the
neutral, use a 4-wire power supply cord rated at 250-volts,
40- or 50-amps and investigated for use with ranges.
Range Rating* Specified Rating of
Power Supply Cord Kit
and Circuit Protection
120/240 Volts 120/208 Volts Amps
8.8 - 16.5 KW 7.8 - 12.5 KW 40 or 50**
16.6 - 22.5 KW 12.6 - 18.5 KW 50
* The NEC calculated load is less than the total connected load
listed on the model/serial/rating plate.
** If connecting to a 50-amp circuit, use a 50-amp rated cord
with kit. For 50-amp rated cord kits, use kits that specify use
with a nominal 1³⁄8" (3.5 cm) diameter connection opening.
■ A circuit breaker is recommended.
■ The range can be connected directly to the circuit breaker
box (or fused disconnect) through flexible or nonmetallic
sheathed, copper or aluminum cable. See the “Electrical
Connection — U.S.A. Only” section.
■ Allow at least 6 ft (1.8 m) of slack in the line so that the range
can be moved if servicing is ever necessary.
■ A UL Listed conduit connector must be provided at each
end of the power supply cable (at the range and at the
junction box).
■ Wire sizes and connections must conform with the rating of
the range.
■ The tech sheet and wiring diagram are located on the back
of the range in a plastic bag.
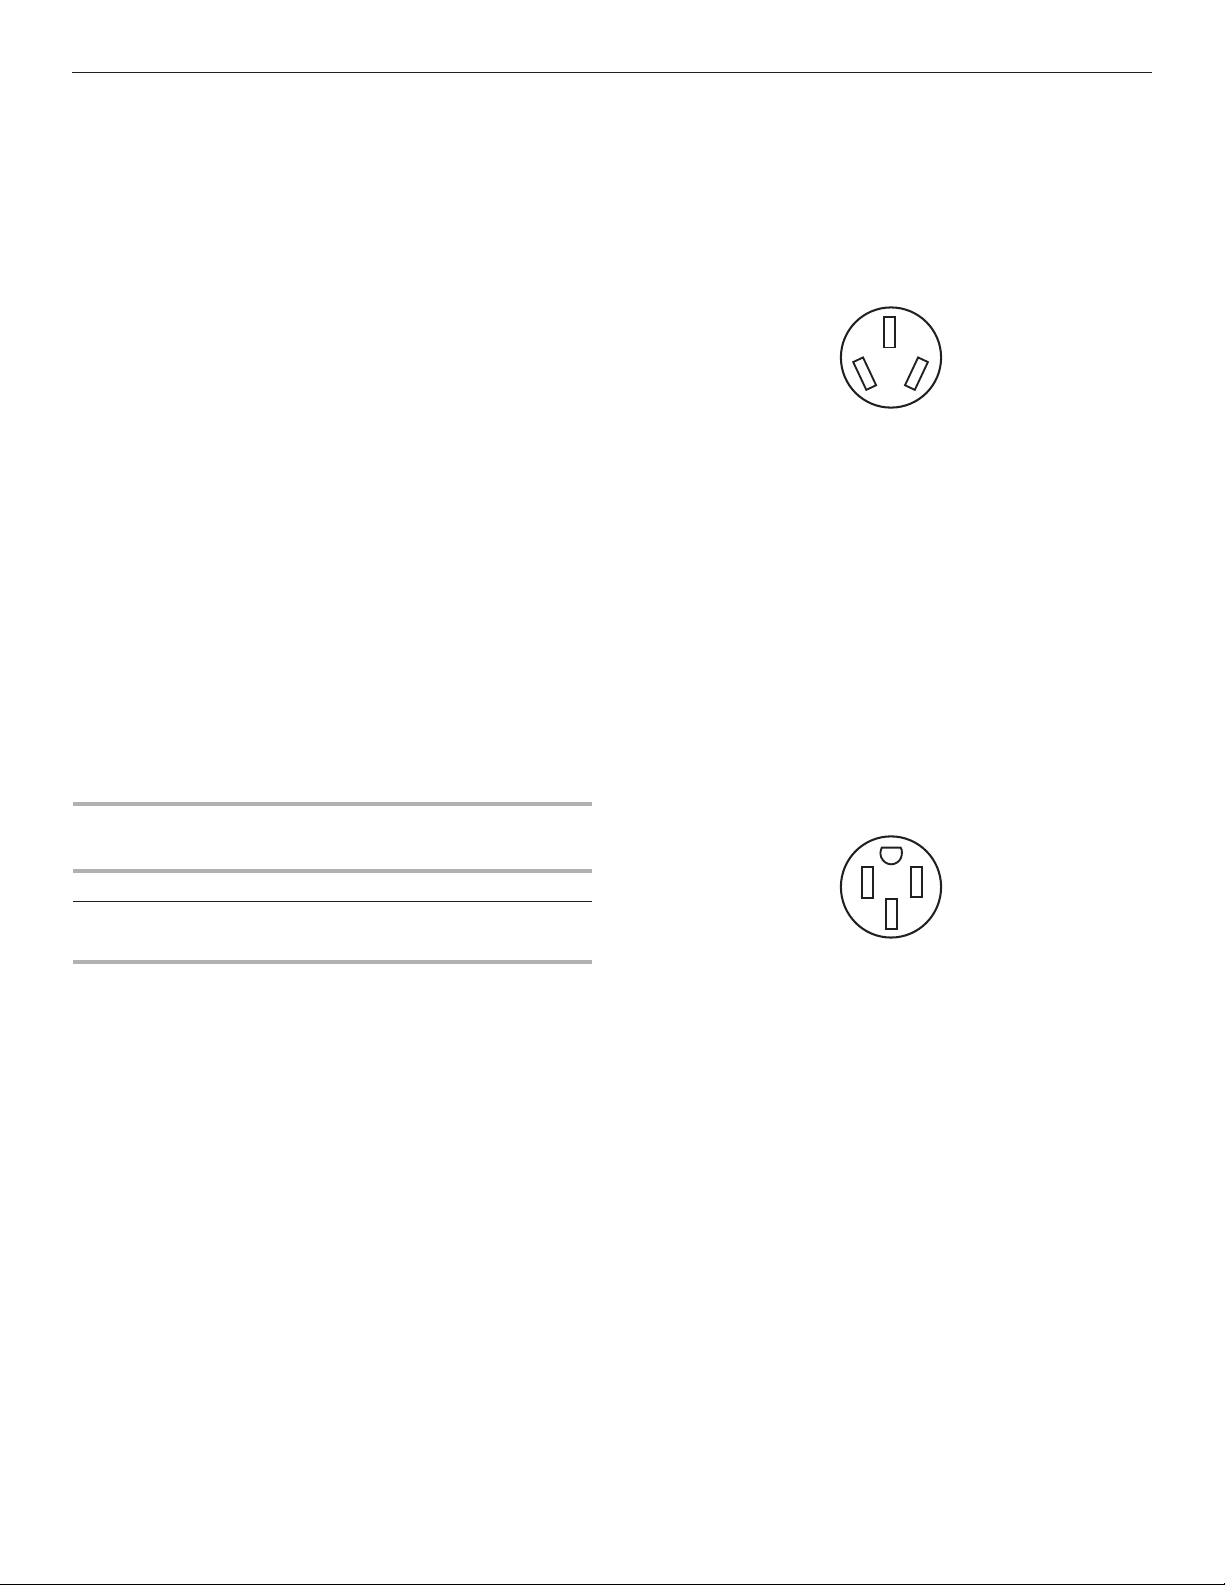
If Connecting to a 3-Wire System:
Local codes may permit the use of a UL Listed, 3-wire, 250volt, 40- or 50-amp range power supply cord (pigtail). This
cord contains three copper conductors with ring terminals or
open-end spade terminals with upturned ends, terminating in a
NEMA Type 10-50P plug on the supply end. Connectors on the
appliance end must be provided at the point the power supply
cord enters the appliance. This uses a 3-wire receptacle of
NEMA Type 10-50R.
3-wire receptacle (10-50R)
If Connecting to a 4-Wire System:
This range is manufactured with the ground connected to the
neutral by a link. The ground must be revised so the green
ground wire of the 4-wire power supply cord is connected to the
cabinet. See the “Electrical Connection — U.S.A. Only” section.
Grounding through the neutral conductor is prohibited for new
branch-circuit installations (1996 NEC); mobile homes; and
recreational vehicles, or an area where local codes prohibit
grounding through the neutral conductor.
When a 4-wire receptacle of NEMA Type 14-50R is used, a
matching UL Listed, 4-wire, 250-volt, 40- or 50-amp, range
power supply cord (pigtail) must be used. This cord contains
4 copper conductors with ring terminals or open-end spade
terminals with upturned ends, terminating in a NEMA Type
14-50P plug on the supply end.
The fourth (grounding) conductor must be identified by a green
or green/yellow cover and the neutral conductor by a white
cover. Cord should be Type SRD or SRDT with a UL Listed strain
relief and be at least 4 ft (1.22 m) long.
4-wire receptacle (14-50R)
The minimum conductor sized for the copper 4-wire power
cord are:
40-amp circuit
2 No.-8 conductors
1 No.-10 white neutral
1 No.-10 green grounding
5
Page 6
INSTALLATION INSTRUCTIONS
WARNING
Unpack Range
WARNING
Excessive Weight Hazard
Use two or more people to move and install range.
Failure to do so can result in back or other injury.
1. Remove shipping materials, tape, and film from the range.
Keep cardboard bottom under range. Do not dispose of
anything until the installation is complete.
2. Remove oven racks and parts package from oven and
shipping materials.
3. To remove cardboard bottom, first take four cardboard
corners from the carton. Stack one cardboard corner on top
of another. Repeat with the other two corners. Place them
lengthwise on the floor behind the range to support the
range when it is laid on its back.
4. Using two or more people, firmly grasp the range and gently
lay it on its back on the cardboard corners.
5. Remove cardboard bottom.
The leveling legs can be adjusted while the range is on its back.
See the “Adjust Leveling Legs” section.
NOTE: To place range back up into a standing position, put a
sheet of cardboard or hardboard on the floor in front of range to
protect the flooring. Using two or more people, stand range back
up onto the cardboard or hardboard.
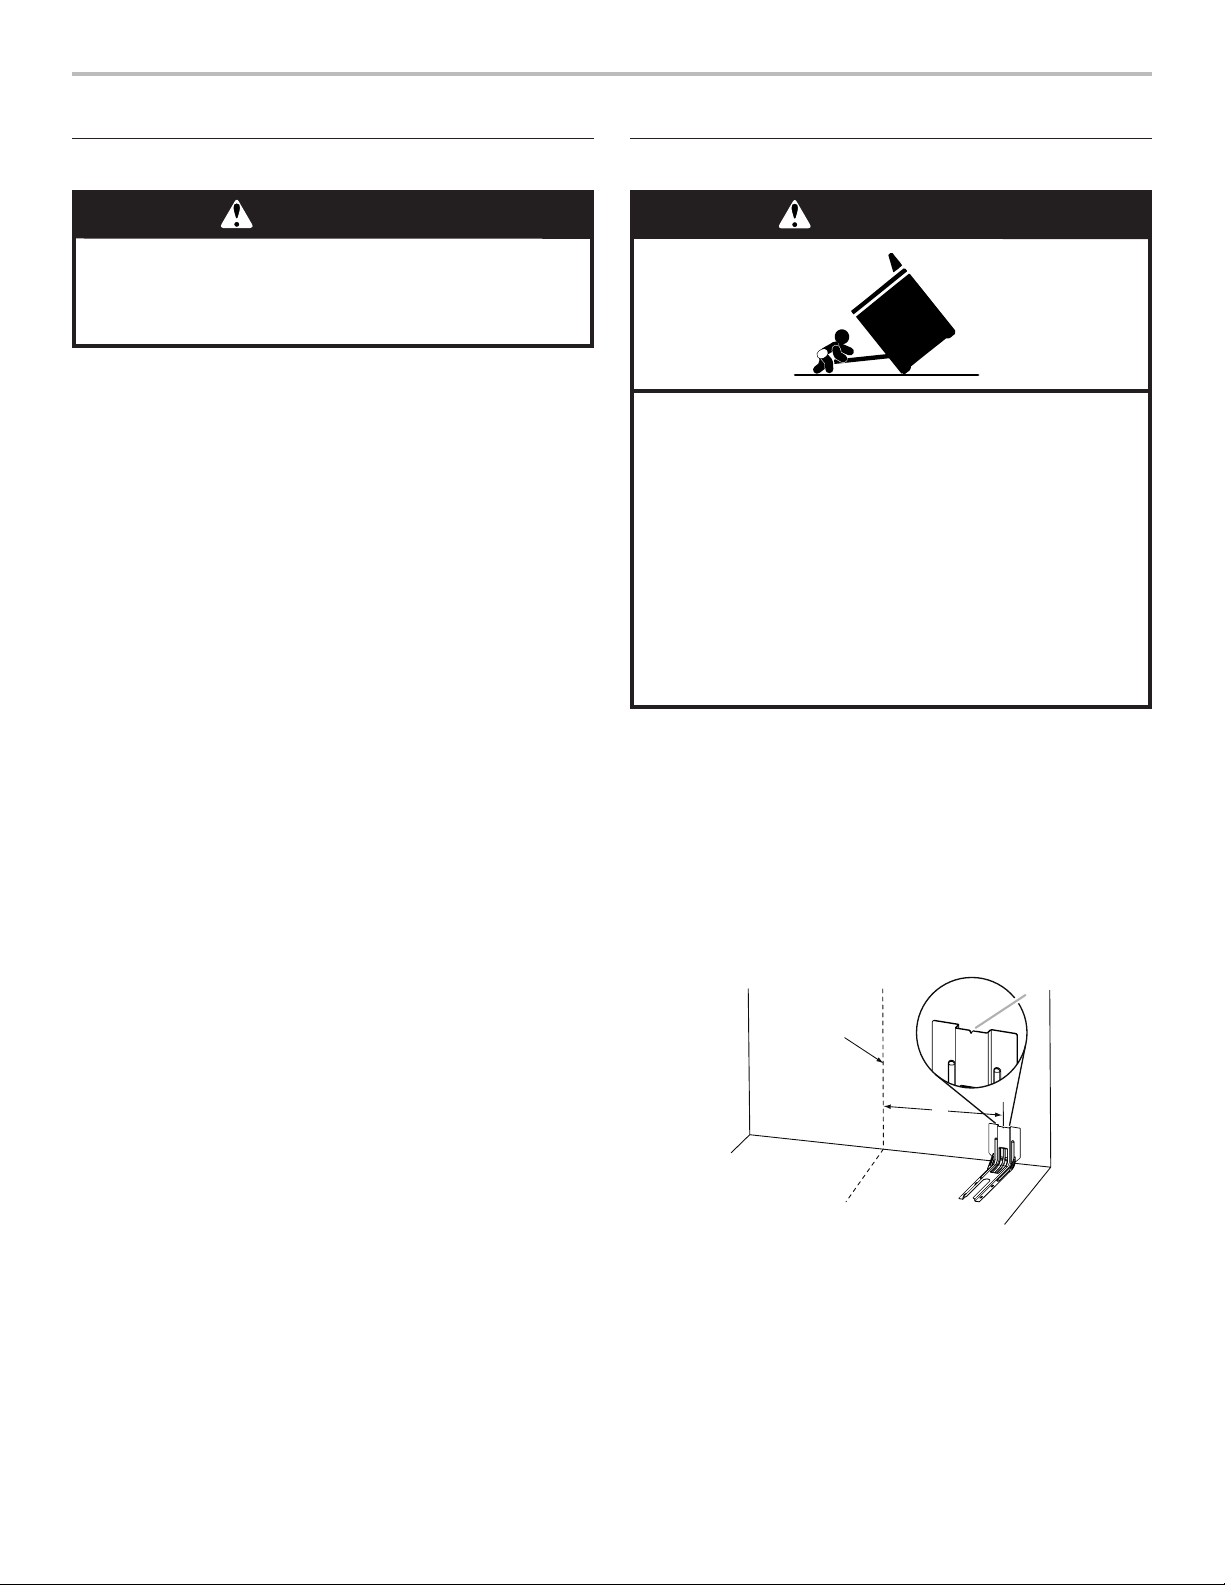
Install Anti-Tip Bracket
Tip Over Hazard
A child or adult can tip the range and be killed.
Install anti-tip bracket to floor or wall per installation
instructions.
Slide range back so rear range foot is engaged in the
slot of the anti-tip bracket.
Re-engage anti-tip bracket if range is moved.
Do not operate range without anti-tip bracket installed
and engaged.
Failure to follow these instructions can result in death
or serious burns to children and adults.
1. Remove the anti-tip bracket from the inside of the oven.
2. Determine which mounting method to use: floor or wall.
If you have a stone or masonry floor, you can use the wall
mounting method. If you are installing the range in a mobile
home, you must secure the range to the floor.
This anti-tip bracket and screws can be used with wood or
metal studs.
3. Determine and mark centerline of the cutout space. The
mounting bracket can be installed on either the left-hand
or right-hand side of the cutout. Position mounting bracket
against the wall in the cutout so that the V-notch of the
bracket is 12½" (31.8 cm) from centerline as shown.
B
Centerline
A. 12½" (31.8 cm)
B. Bracket V-notch
6
A
Page 7
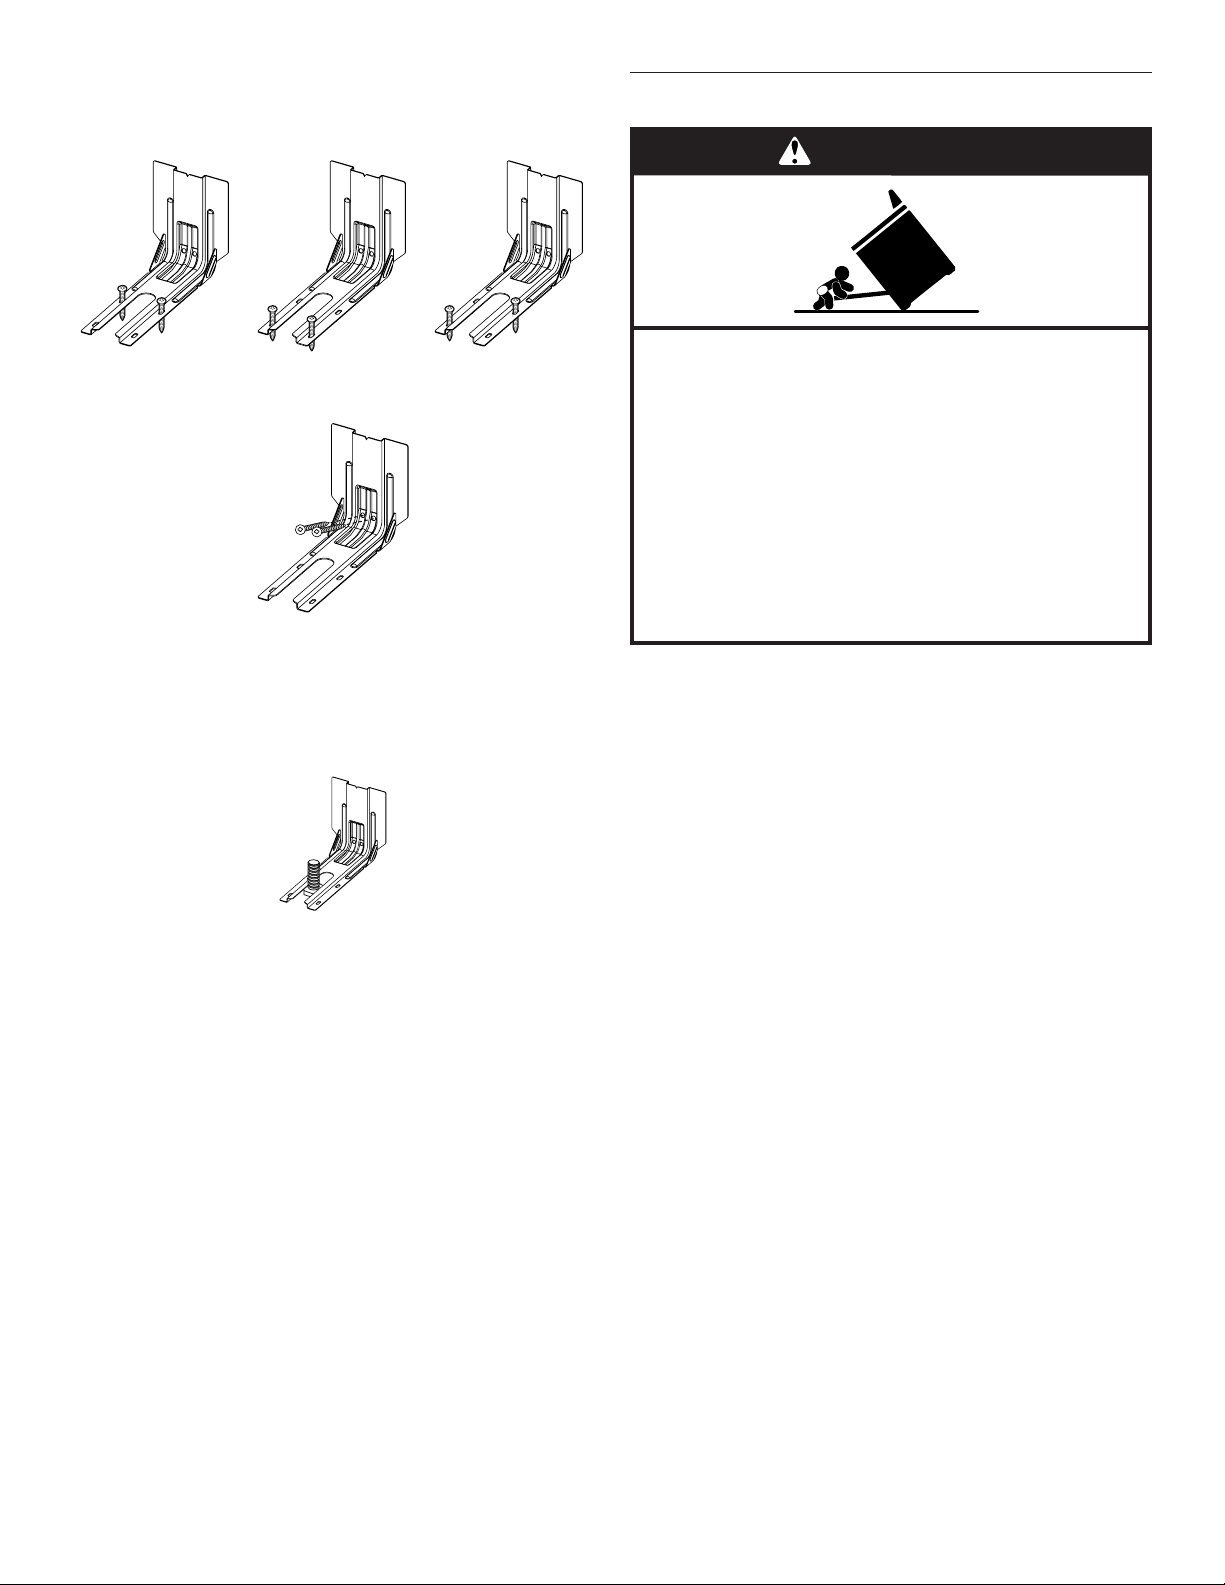
4. Drill two 1/8" (3 mm) holes that correspond to the bracket
holes of the determined mounting method. See the
following illustrations.
Floor Mounting
Rear position Front position Diagonal (2 options)
Wall Mounting
5. Using the two #10 x 15⁄8" (4.1 cm) Phillips-head screws
provided, mount anti-tip bracket to the wall or floor.
6. Move range close enough to opening to allow for final
electrical connections. Remove shipping base, cardboard or
hardboard from under range.
7. Move range into its final location, making sure rear leveling
leg slides into anti-tip bracket.
8. Move range forward onto shipping base, cardboard or
hardboard to continue installing the range, using the
following installation instructions.
Adjust Leveling Legs
WARNING
Tip Over Hazard
A child or adult can tip the range and be killed.
Install anti-tip bracket to floor or wall per installation
instructions.
Slide range back so rear range foot is engaged in the
slot of the anti-tip bracket.
Re-engage anti-tip bracket if range is moved.
Do not operate range without anti-tip bracket installed
and engaged.
Failure to follow these instructions can result in death
or serious burns to children and adults.
1. If range height adjustment is necessary, use a wrench or
pliers to loosen the four leveling legs.
This may be done with the range on its back or with the
range supported on two legs after the range has been placed
back to a standing position.
NOTE: To place range back up into a standing position, put a
sheet of cardboard or hardboard in front of range. Using two
or more people, stand range back up onto the cardboard
or hardboard.
2. Measure the distance from the top of the counter to the floor.
3. Measure the distance from the top of the cooktop to the
bottom of the leveling legs. This distance should be the
same. If it is not, adjust the leveling legs to the correct
height. The leveling legs can be loosened to add up to a
maximum of 1" (2.5 cm). A minimum of 3/16" (5 mm) is
needed to engage the anti-tip bracket.
NOTE: If height adjustment is made when range is standing,
tilt the range back to adjust the front legs, and then tilt
forward to adjust the rear legs.
4. When the range is at the correct height, check that there is
adequate clearance under the range for the anti-tip bracket.
Before sliding range into its final location, check that the
antitip bracket will slide under the range and onto the rear
leveling leg prior to anti-tip bracket installation.
NOTE: If a Trim Kit will be used, the top of the cooktop
should be higher than the counter. See the Installation
Instructions included with the Trim Kit for the correct height.
7
Page 8
Level Range
A
B
C
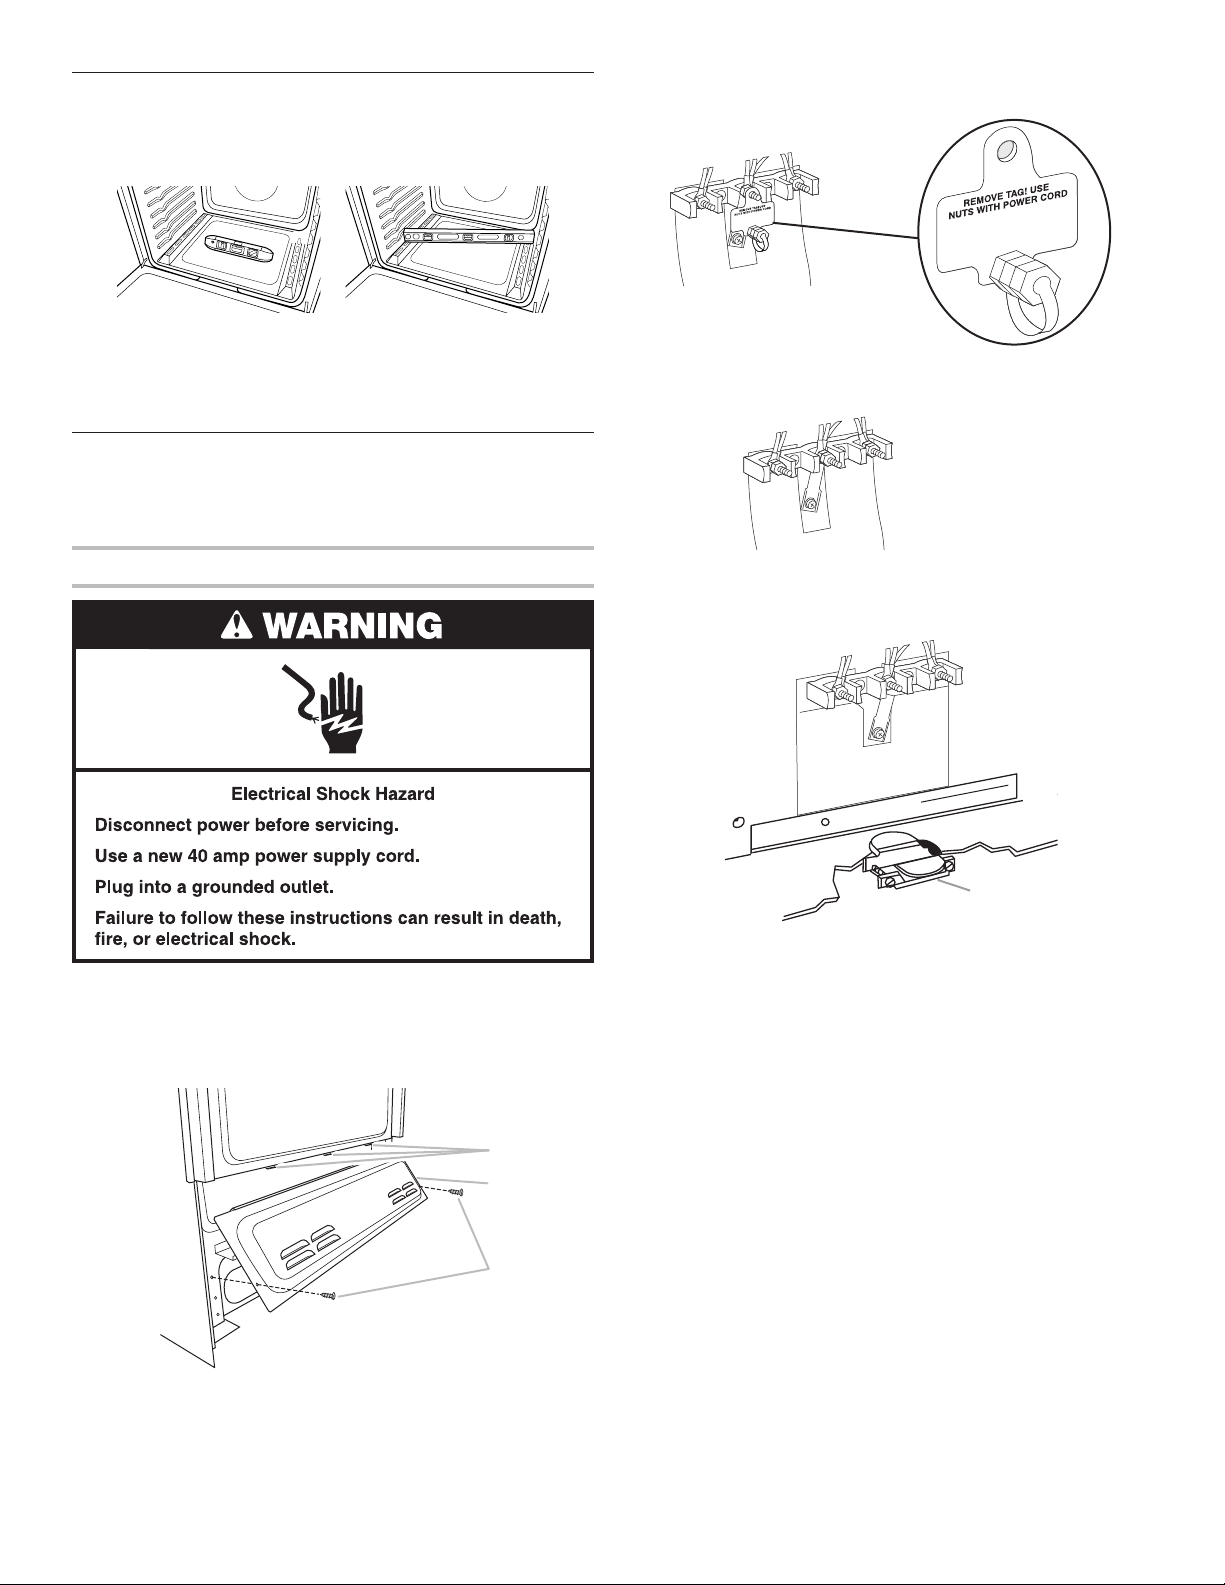
1. Place level on the oven bottom, as indicated in one of the
two figures below, depending on the size of the level. Check
with the level side-to-side and front to back.
2. If range is not level, use a wrench or pliers to adjust leveling
legs up or down until the range is level.
NOTE: Range must be level for satisfactory baking
performance and best cleaning results using AquaLift®
Self-Clean Technology.
Electrical Connection — U.S.A. Only
If your home has a 3- or 4-wire receptacle, continue with “Install
Using a Power Supply Cord.” If your home has a 3- or 4-wire
direct connection, go to “Install Using Direct Wire.”
Install Using a Power Supply Cord
3. Depending on your model, remove plastic tag holding three
10-32 hex nuts from the middle post of the terminal block.
OR
Remove the top 10-32 hex nut from each of the three terminal
blocks and set aside.
4. Assemble a UL Listed strain relief in the opening.
Power Supply Cord Strain Relief
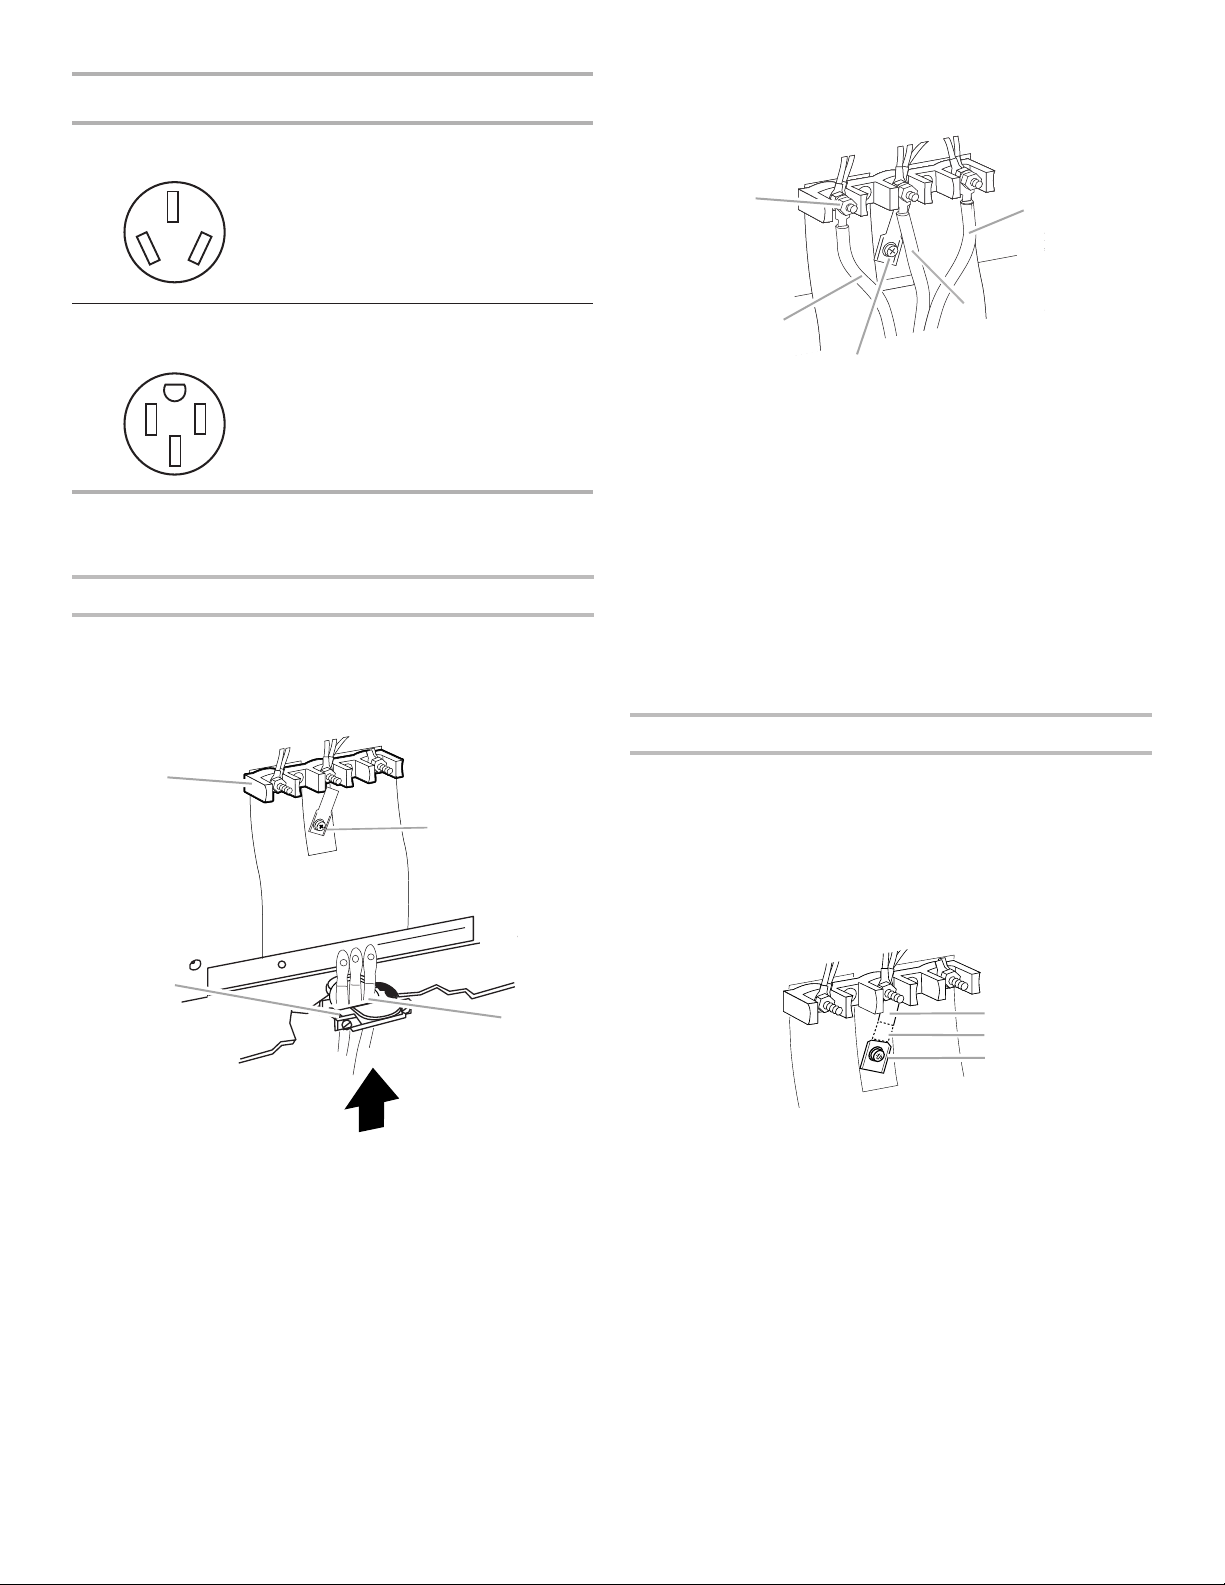
1. Disconnect power.
2. Remove the lower access cover screws located on the back
of the range. Pull the bottom of the cover toward you and out
to remove cover from range.
A. Mounting tabs (3)
B. Lower access cover
C. Screws (2)
A
A. UL Listed strain relief
5. Complete installation following instructions for your type of
electrical connection:
4-wire (recommended)
3-wire (if 4-wire is not available)
Electrical Connection Options
8
Page 9
If your home has: And you will be
A
D
A
C
E
A
B
C
connecting to:
3-wire receptacle
(NEMA type 10-50R)
A UL Listed,
250-volt
minimum,
40- or 50-amp,
range power
supply cord
Go to Section:
3-Wire Connection:
Power Supply Cord
2. Use 3⁄8" (9.5 mm) nut driver to connect the neutral (white)
wire to the center terminal block post with one of the 10-32
hex nuts.
4-wire receptacle
(NEMA type 14-50R)
A UL Listed,
250-volt
4-Wire Connection:
Power Supply Cord
minimum,
40- or 50-amp,
range power
supply cord
3-Wire Connection: Power Supply Cord
Use this method only if local codes permit connecting chassis
ground conductor to neutral wire of power supply cord.
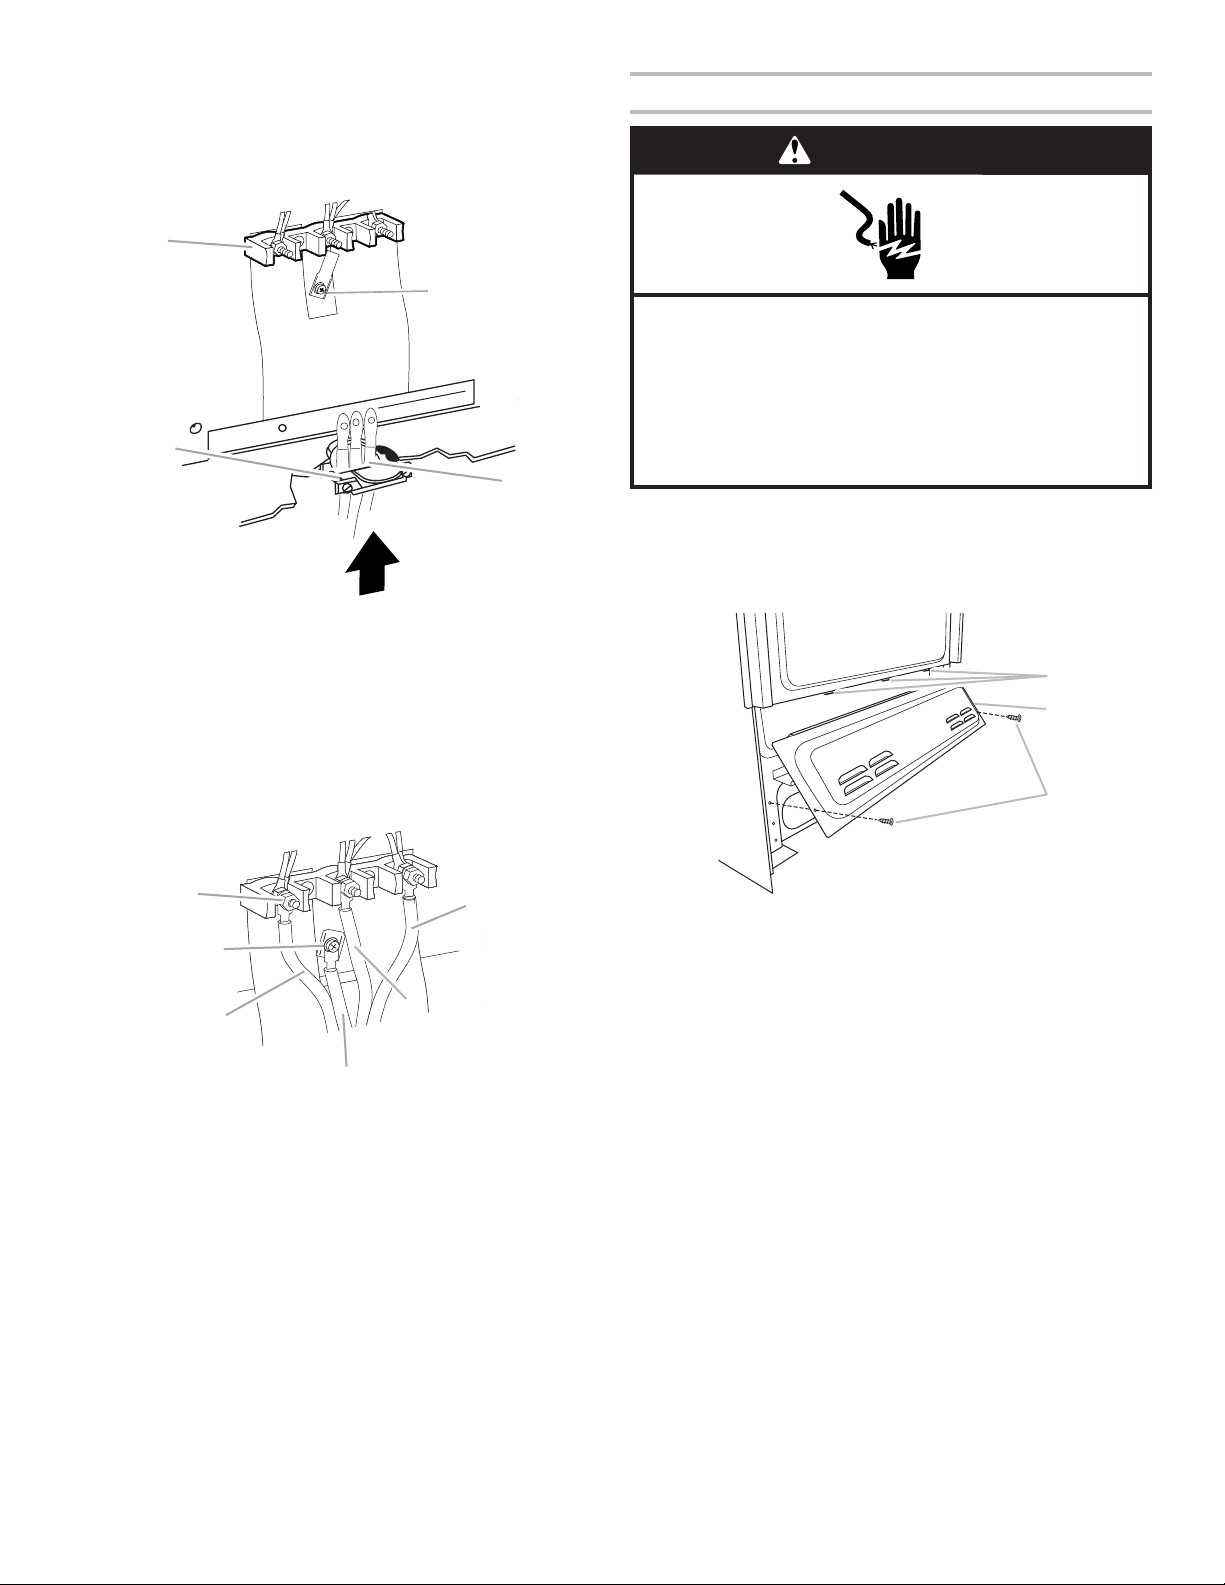
1. Feed the power supply cord through the strain relief on the
cord/conduit plate on bottom of range. Allow enough slack
to easily attach the wiring to the terminal block.
B
B
A. 10–32 hex nut
B. Line 2 (red) wire
C. Ground-link screw
D. Neutral (white) wire
E. Line 1 (black) wire
D
3. Connect line two (red) and line one (black) wires to the outer
terminal block posts with 10-32 hex nuts.
4. Firmly tighten hex nuts.
NOTE: For power supply cord replacement, use only a
power cord rated at 250 volts minimum, 40- or 50-amps
that is marked for use with nominal 1³⁄8" (3.5 cm) diameter
connection opening, with ring terminals and marked for use
with ranges.
5. Tighten strain relief screws.
IMPORTANT: Verify the tightness of the hex nuts.
6. Replace lower access cover.
4-Wire Connection: Power Supply Cord
Use this method for:
■ New branch-circuit installations (1996 NEC)
■ Mobile homes
■ Recreational vehicles
■ In an area where local codes prohibit grounding through
the neutral
1. Cut out and remove part of metal ground strap, as shown.
C
A. Metal ground strap
A. Terminal block
B. Ground-link screw
C. UL Listed strain relief
D. Power supply cord wires: large opening
B. Discard
C. Ground-link screw
9
Page 10
A
F
D
A
B
C
A
D
2. Use a Phillips screwdriver to remove the ground-link screw
from the back of the range. Save the ground-link screw and
the end of the ground link under the screw.
3. Feed the power supply cord through the strain relief on the
cord/conduit plate on bottom of range. Allow enough slack
to easily attach the wiring to the terminal block.
B
C
A. Terminal block
B. Ground-link screw
C. UL listed strain relief
D. Power supply cord wires
4. Use a Phillips screwdriver to connect the green ground wire
from the power supply cord to the range with the groundlink screw and ground-link section. The ground wire must be
attached over the ground-link section.
5. Use 3/8" (9.5 mm) nut driver to connect the neutral (white)
wire to the center terminal block post with one of the 10-32
hex nuts.
Install Using Direct Wire
WARNING
Electrical Shock Hazard
Disconnect power before servicing.
Use 8 gauge copper or 6 gauge aluminum wire.
Electrically ground range.
Failure to follow these instructions can result in death,
fire, or electrical shock.
Direct Wire Strain Relief
1. Disconnect power.
2. Remove the lower access cover screws located on the back
of the range. Pull the bottom of the cover toward you and out
to remove cover from range.
A. Mounting tabs (3)
B
C
A. 10–32 hex nut
B. Ground-link screw
C. Line 2 (red) wire
E
D. Green ground wire
E. Neutral (white) wire
F. Line 1 (black) wire
B. Lower access cover
C. Screws (2)
6. Connect line two (red) and line one (black) wires to the outer
terminal block posts with 10-32 hex nuts.
7. Firmly tighten hex nuts.
NOTE: For power supply cord replacement, use only a
power cord rated at 250 volts minimum, 40- or 50-amps
that is marked for use with nominal 1³⁄8" (3.5 cm) diameter
connection opening, with ring terminals and marked for use
with ranges.
8. Tighten strain relief screws.
IMPORTANT: Verify the tightness of the hex nuts.
9. Replace lower access cover.
10
Page 11
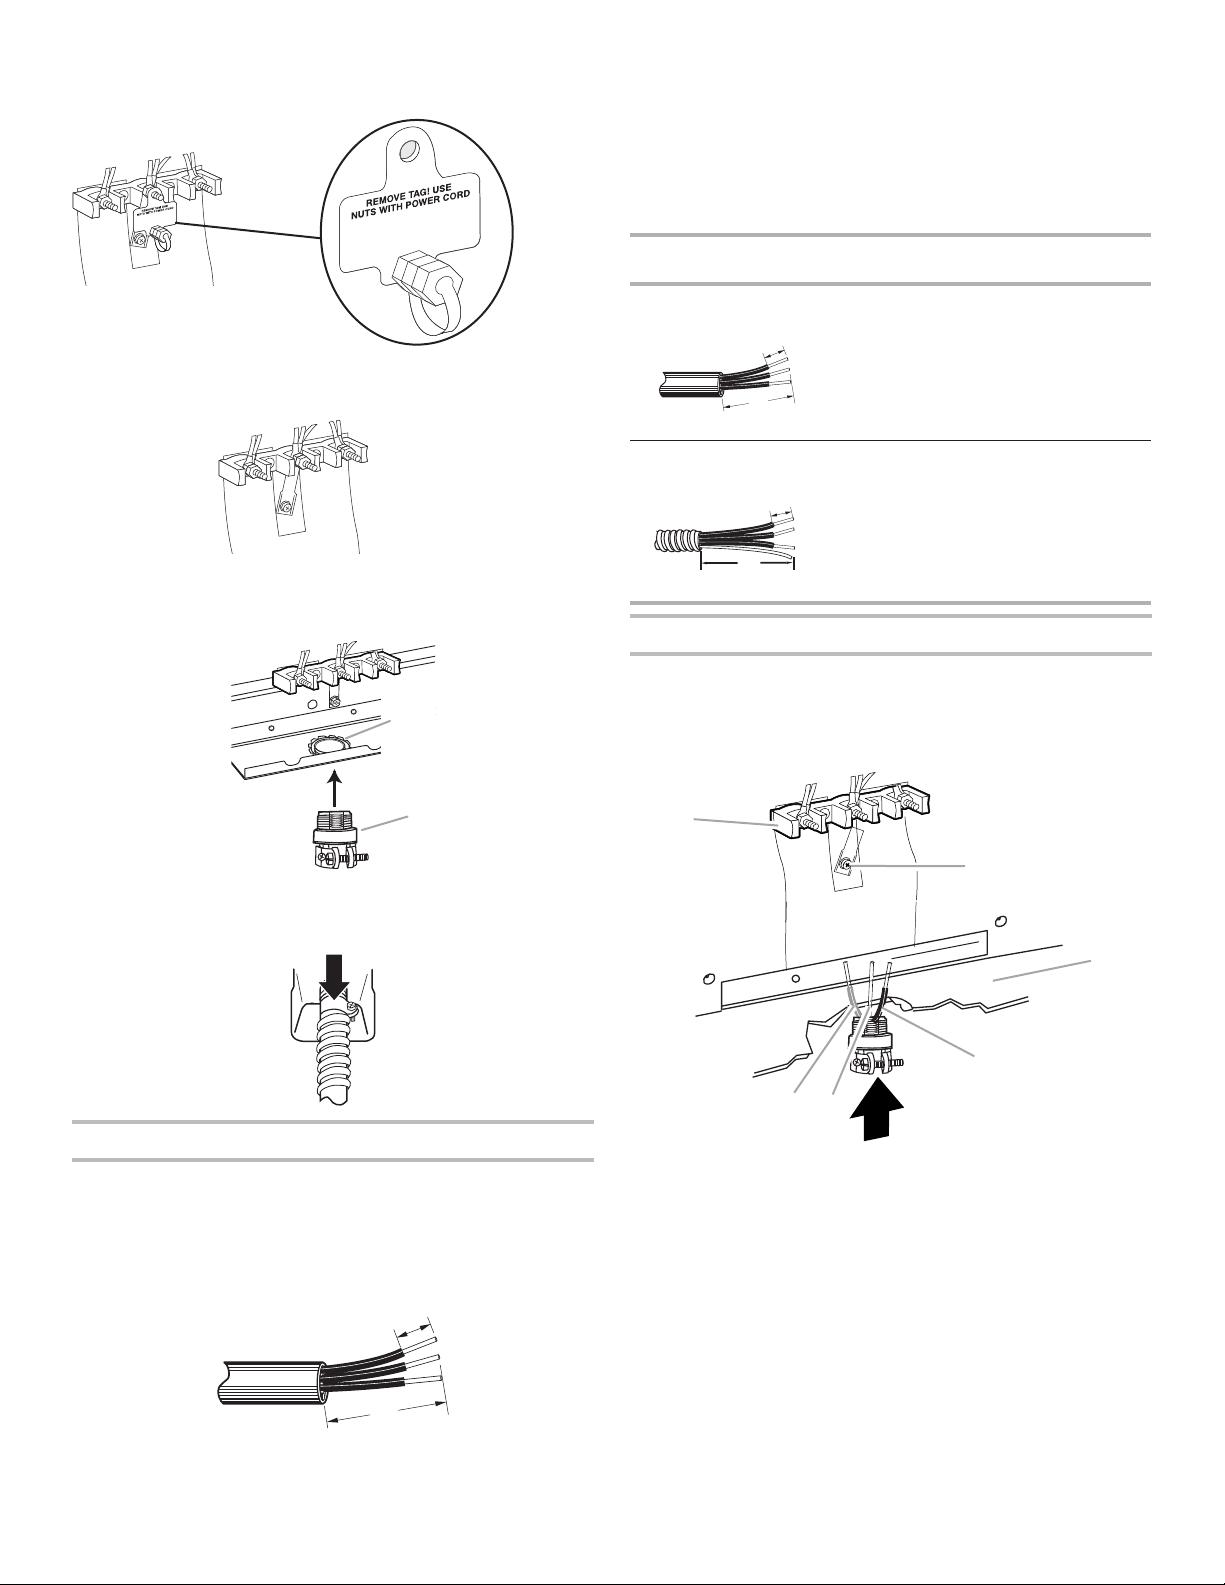
3. Depending on your model, remove plastic tag holding three
(7.6 cm)
"
(12.7 cm)
"
(7.6 cm)
"
A
C
10-32 hex nuts from the middle post of the terminal block.
2. Allow enough slack in the wire to easily attach the wiring
terminal block.
3. Complete installation following instructions for your type of
electrical connection:
4-wire (recommended)
3-wire (if 4-wire is not available)
Electrical Connection Options
OR
Remove the top 10-32 hex nut from each of the three terminal
blocks and set aside.
4. Assemble a UL Listed conduit connector in the opening.
A
B
If your home has: And you will be
Go to Section:
connecting to:
3-wire direct A circuit breaker
³⁄₈
(1.0 cm)
3"
box or fused
disconnect
4-wire direct A circuit breaker
³⁄₈
(1.0 cm)
5"
box or fused
disconnect
3-Wire Connection:
Direct Wire
4-Wire Connection:
Direct Wire
3-Wire Connection: Direct Wire
Use this method only if local codes permit connecting ground
conductor to neutral supply wire.
1. Pull the wires through the conduit on cord/conduit plate on
bottom of range. Allow enough slack to easily attach the
wiring to the terminal block.
A. Removable retaining nut
B. Conduit
5. Tighten strain relief screw against the flexible conduit.
F
B
D
E
Direct Wire Installation: Copper or Aluminum Wire
This range may be connected directly to the fuse disconnect or
circuit breaker box. Depending on your electrical supply, make
the required 3-wire or 4-wire connection.
A. Terminal block
B. Ground-link screw
C. Cord/conduit plate
1. Strip outer covering back 3" (7.6 cm) to expose wires. Strip
the insulation back 3/8" (9.5 mm) from the end of each wire.
³⁄₈
(1.0 cm)
3"
D. Line 2 (red) wire
E. Bare (green) ground wire
F. Line 1 (black) wire
11
Page 12
B
E
A
B
A
C
A
B
C
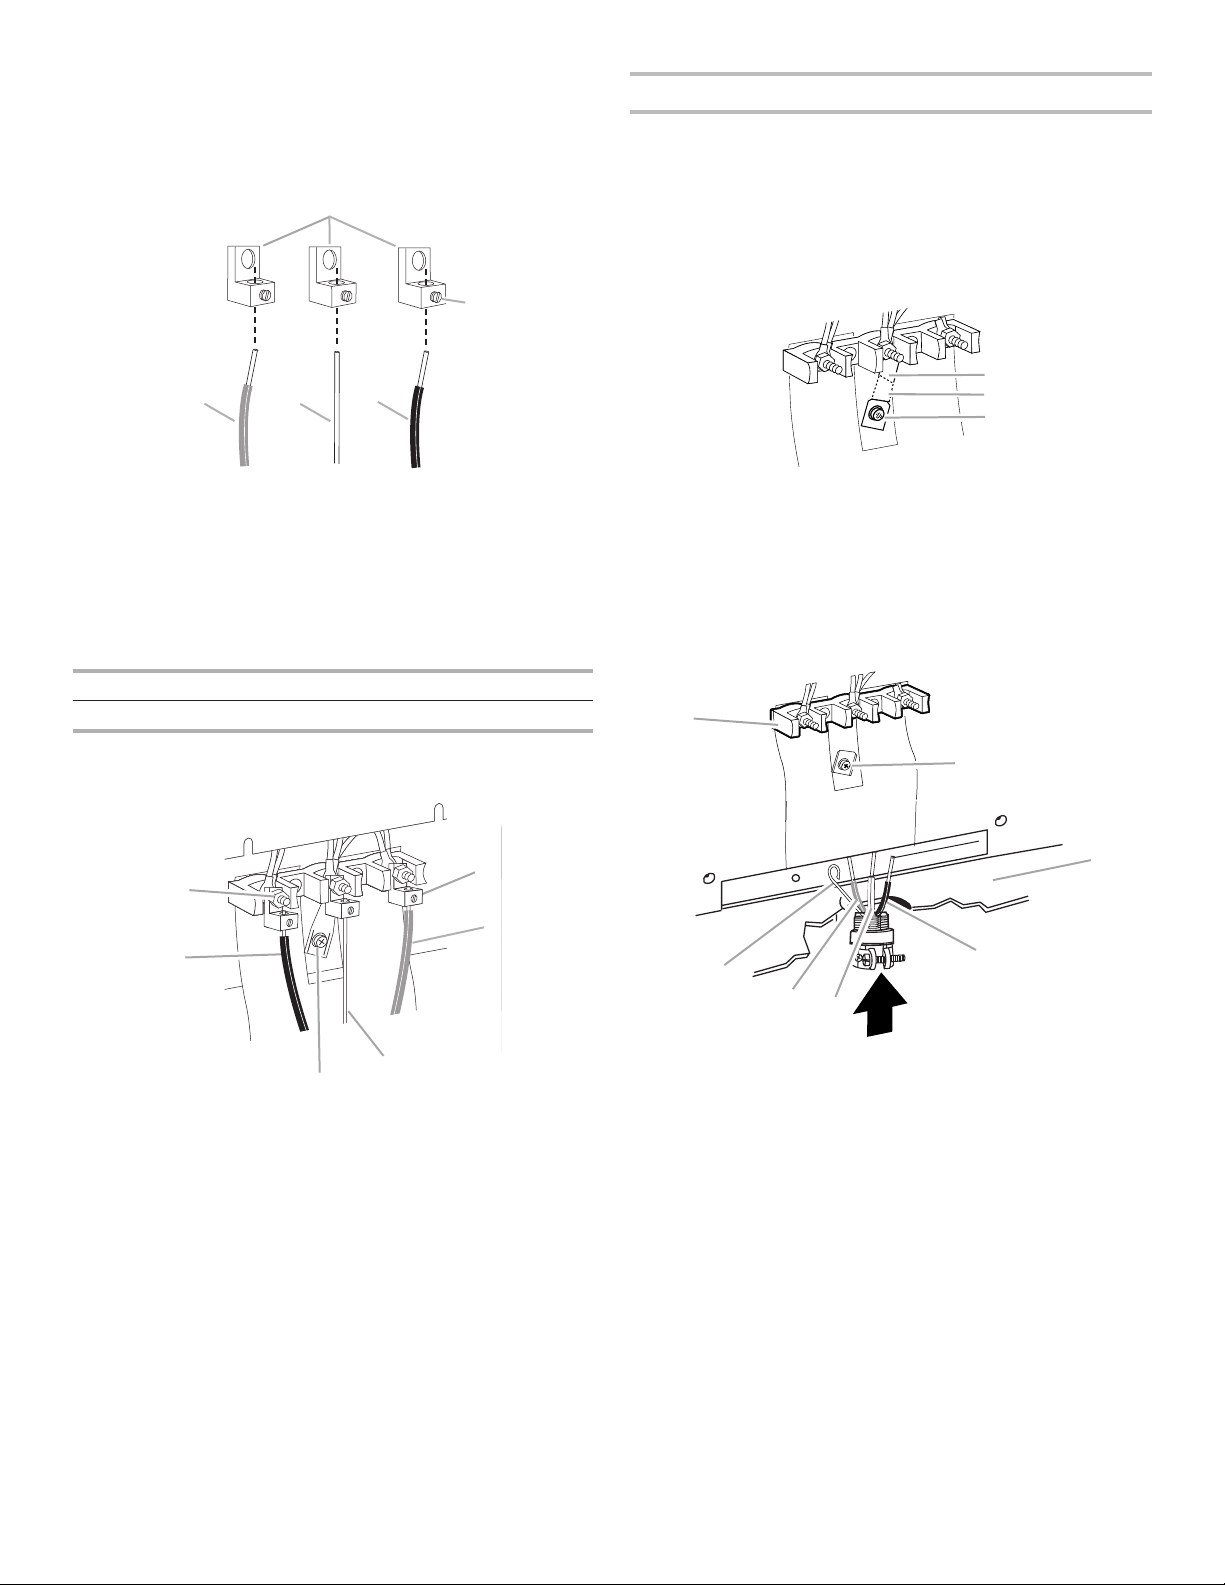
2. Attach terminal lugs to line two (red), bare (green) ground,
and line one (black) wires. Loosen (do not remove) the
setscrew on the front of the terminal lug and insert exposed
wire end through bottom of terminal lugs. Securely tighten
setscrew to torque as shown in the following Bare Wire
Torque Specifications chart.
DE
4-Wire Connection: Direct Wire
Use this method for:
■ New branch-circuit installations (1996 NEC)
■ Mobile homes
■ Recreational vehicles
■ In an area where local codes prohibit grounding through
the neutral
1. Cut out and remove part of metal ground strap, as shown.
C
A. Terminal lug
B. Setscrew
C. Line 2 (red) wire
D. Bare (green) ground wire
E. Line 1 (black) wire
Bare Wire Torque Specifications
Attaching terminal lugs to the terminal block - 20 lbs-in. (2.3 N-m)
Wire Awg Torque
2. Use a Phillips screwdriver to remove the ground-link screw
from the back of the range. Save the ground-link screw and
the end of the ground link under the screw.
3. Pull the wires through the strain relief on bottom of range.
Allow enough slack to easily attach wiring to the
terminal block.
A. Metal ground strap
B. Discard
C. Ground-link screw
8 gauge copper 25 lbs-in. (2.8 N-m)
6 gauge aluminum 35 lbs-in. (4.0 N-m)
3. Use 3/8" (9.5 mm) nut driver to connect the bare (green)
ground wire to the center terminal block post with one of
B
the 10-32 hex nuts.
F
A
G
A. 10–32 hex nut
B. Line 2 (red) wire
C. Ground-link screw
D
D. Bare (green) ground wire
E. Line 1 (black) wire
F. Terminal lug
D
E
F
A. Terminal block
B. Ground-link screw
C. Cord/conduit plate
D. Bare (green) ground wire
E. Line 2 (red) wire
F. Neutral (white) wire
G. Line 1 (black) wire
4. Connect line two (red) and line one (black) wires to the outer
terminal block posts with 10-32 hex nuts.
5. Firmly tighten hex nuts.
IMPORTANT: Verify the tightness of the hex nuts.
6. Replace lower access cover.
12
Page 13
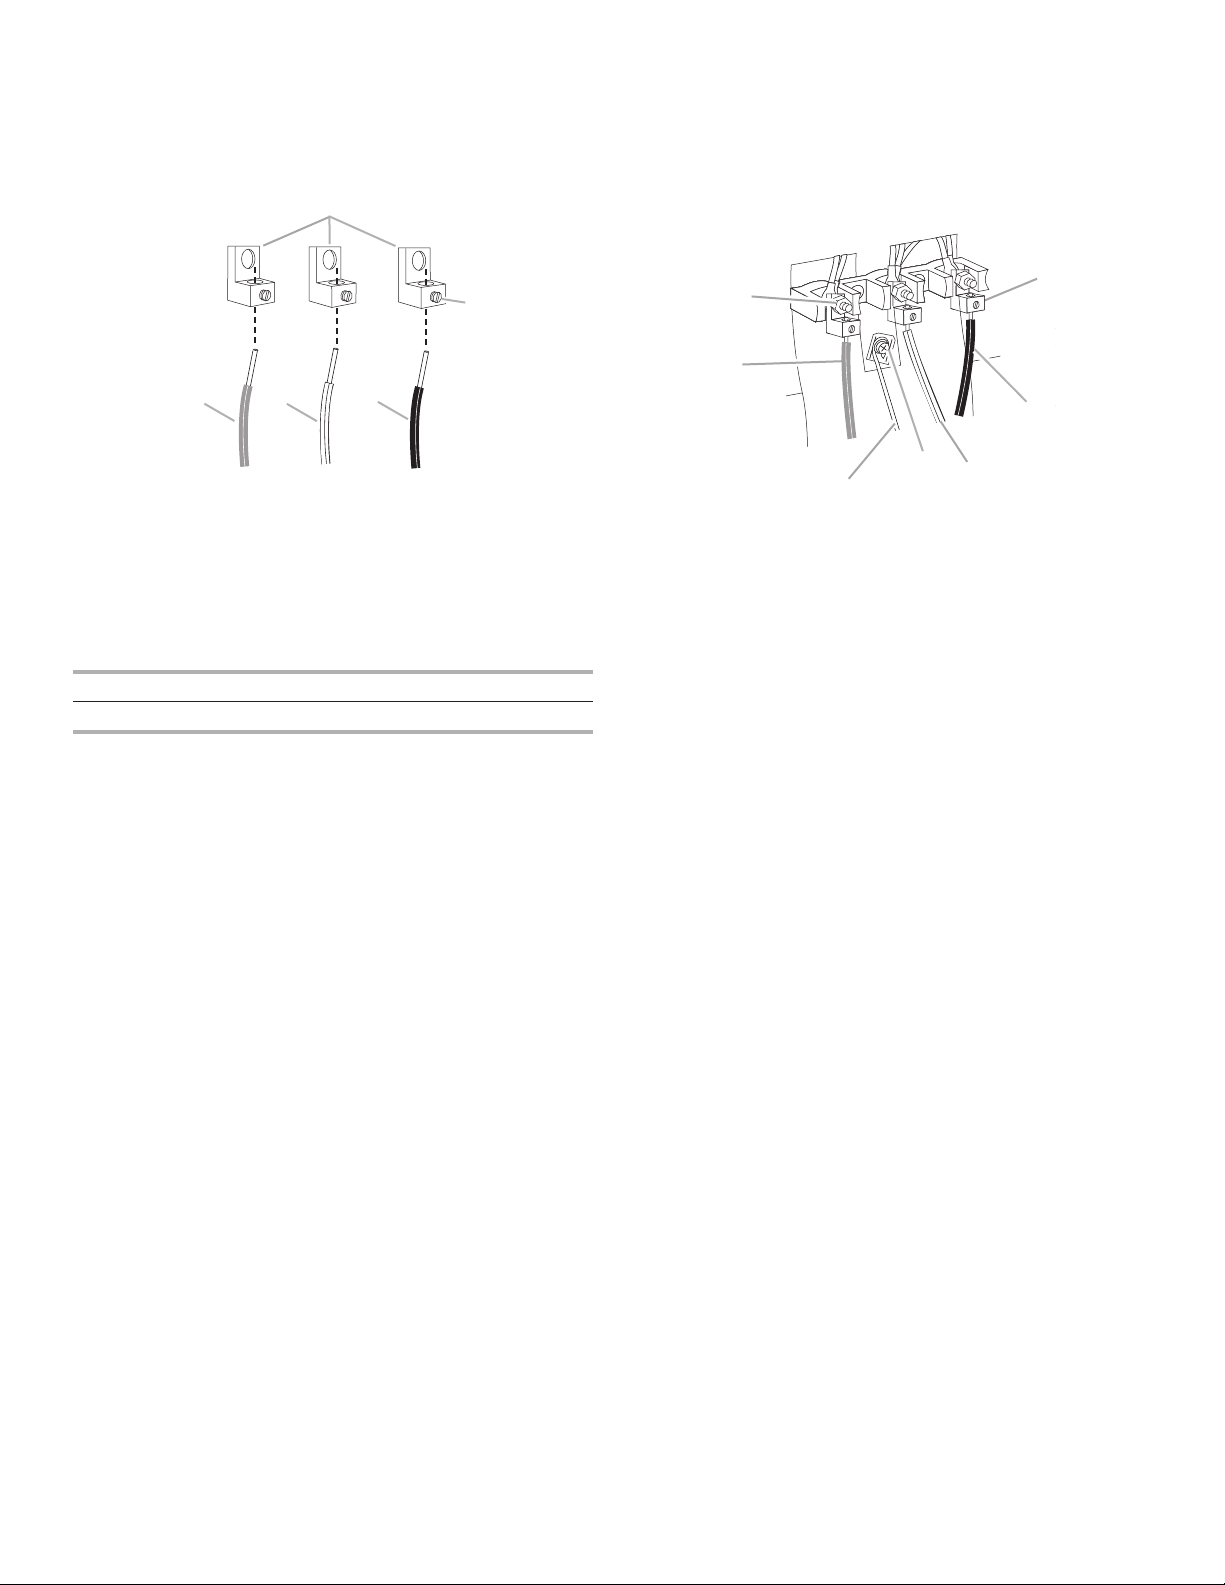
4. Attach terminal lugs to line one (black), neutral (white), and
A
B
C
B
G
C
line two (red) wires. Loosen (do not remove) the setscrew
on the front of the terminal lug and insert exposed wire end
through bottom of terminal lugs. Securely tighten setscrew
to torque as shown in the following Bare Wire Torque
Specifications chart.
5. Use a hex or Phillips screwdriver to connect the bare (green)
ground wire to the range with the ground-link screw and
ground-link section. The ground wire must be attached
over the ground-link section and must not contact any
other terminal.
6. Use 3/8" (9.5 mm) nut driver to connect the neutral (white)
wire to the center terminal block post with one of the 10-32
hex nuts.
A
DE
A. Terminal lug
B. Setscrew
C. Line 2 (red) wire
D. Neutral (white) wire
E. Line 1 (black) wire
Bare Wire Torque Specifications
Attaching terminal lugs to the terminal block - 20 lbs-in. (2.3 N-m)
Wire Awg Torque
8 gauge copper 25 lbs-in. (2.8 N-m)
6 gauge aluminum 35 lbs-in. (4.0 N-m)
F
D
E
A. 10–32 hex nut
B. Line 2 (red) wire
C. Bare (green) ground wire
D. Ground-link screw
E. Neutral (white) wire
F. Line 1 (black) wire
G. Terminal lug
7. Connect line two (red) and line one (black) wires to the outer
terminal block posts with 10-32 hex nuts.
8. Firmly tighten hex nuts.
IMPORTANT: Verify the tightness of the hex nuts.
9. Replace lower access cover.
13
Page 14
Verify Anti-Tip Bracket Is Installed and
Engaged
1. Slide range into final location, making sure rear leveling leg
slides into anti-tip bracket.
2. Remove the toe panel.
3. Use a flashlight to look underneath the bottom of the range.
4. Visually check that the rear range foot is inserted into the slot
of the anti-tip bracket.
5. Replace the toe panel.
IMPORTANT: If the range is moved to adjust the leveling legs,
verify that the anti-tip bracket is engaged by repeating steps
1 to 5.
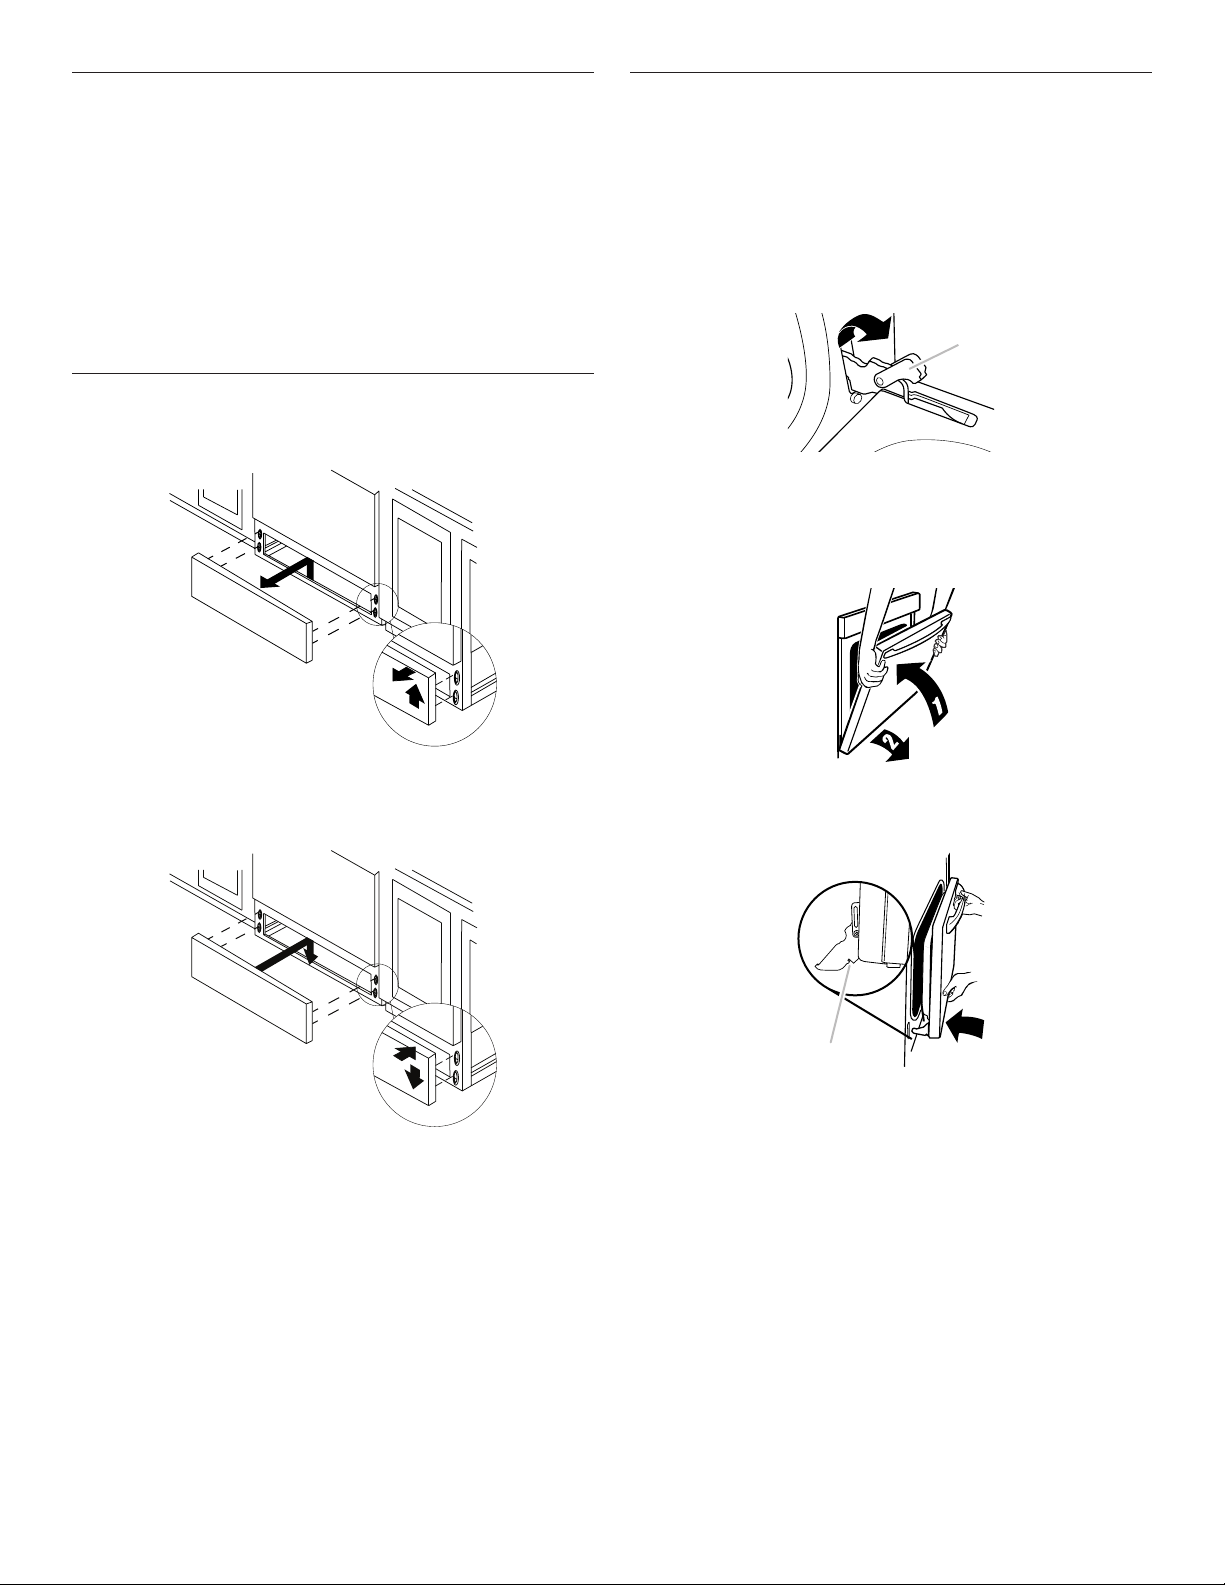
Remove/Reinstall Toe Panel
To Remove:
Pull upward and out to disengage the studs.
1
2
Oven Door
For normal range use, it is not suggested to remove the oven
door. However, if removal is necessary, make sure the oven is
off and cool. Then, follow these instructions. The oven door
is heavy.
To Remove:
1. Open oven door all the way.
2. Pinch the hinge latch between two fingers and pull forward.
Repeat on other side of oven door.
A
A. Hinge latch
3. Close the oven door as far as it will shut.
4. Lift the oven door while holding both sides.
Continue to push the oven door closed and pull it away from
the oven doorframe.
To Reinstall:
Reinstall the access panel by aligning the studs with the keyhole
slots on the range. Press the toe panel forward into the slots and
push downward to enage the studs.
1
2
To Replace:
1. Insert both hanger arms into the door. Be sure that the hinge
notches are engaged in the oven doorframe.
A
A. Hinge notch
2. Open the oven door.
The door should be able to open all the way.
3. Move the hinge levers back to the locked position. Check
that the door is free to open and close and is level while
closed. If it is not, repeat the removal and installation
procedures.
14
Page 15

Complete Installation
1. Check that all parts are now installed. If there is an extra
part, go back through the steps to see which step
was skipped.
2. Check that you have all of your tools.
3. Check that you have all of the range accessories, especially
oven racks. These accessories may be in the range
packaging.
4. Dispose of/recycle all packaging materials.
5. Check that the range is level. See the “Level Range” section.
6. Use a mild solution of liquid household cleaner and warm
water to remove waxy residue caused by shipping material.
Dry thoroughly with a soft cloth. For more information, see
the “Range Care” section of the User Guide.
7. Read the User Guide.
8. Plug power cord into a grounded outlet. Turn power on.
9. Turn on surface elements and oven. See the User Guide for
specific instructions on range operation.
NOTE: Odors and smoke are normal when the oven is used
the first few times.
If Range Does Not Operate, Check the Following:
■ Household fuse is intact and tight; or circuit breaker has
not tripped.
■ Range is plugged into a grounded outlet.
■ Electrical supply is connected.
IMPORTANT: If the range control displays an “F9” or
“F9, E0” error code, the electrical outlet in the home may
be miswired. Disconnect power and contact a qualified
electrician to verify the electrical supply.
10. When the range has been on for 5 minutes, check for heat.
If the range is cold, turn off the range and contact a
qualified electrician.
If You Need Assistance or Service:
Please reference the “Warranty” section of the User Guide to
contact service.
15
Page 16

W11097823B
©2017 All rights reserved.
04/17
 Loading...