

Dryer Quick Start Guide
OPERATING INSTRUCTIONS
WARNING
Fire Hazard
No washer can completely remove oil.
Do not dry anything that has ever had any type of oil
on it (including cooking oils).
Items containing foam, rubber, or plastic must be
dried on a clothesline or by using an Air Cycle.
Failure to follow these instructions can result in
death or fire.
WARNING
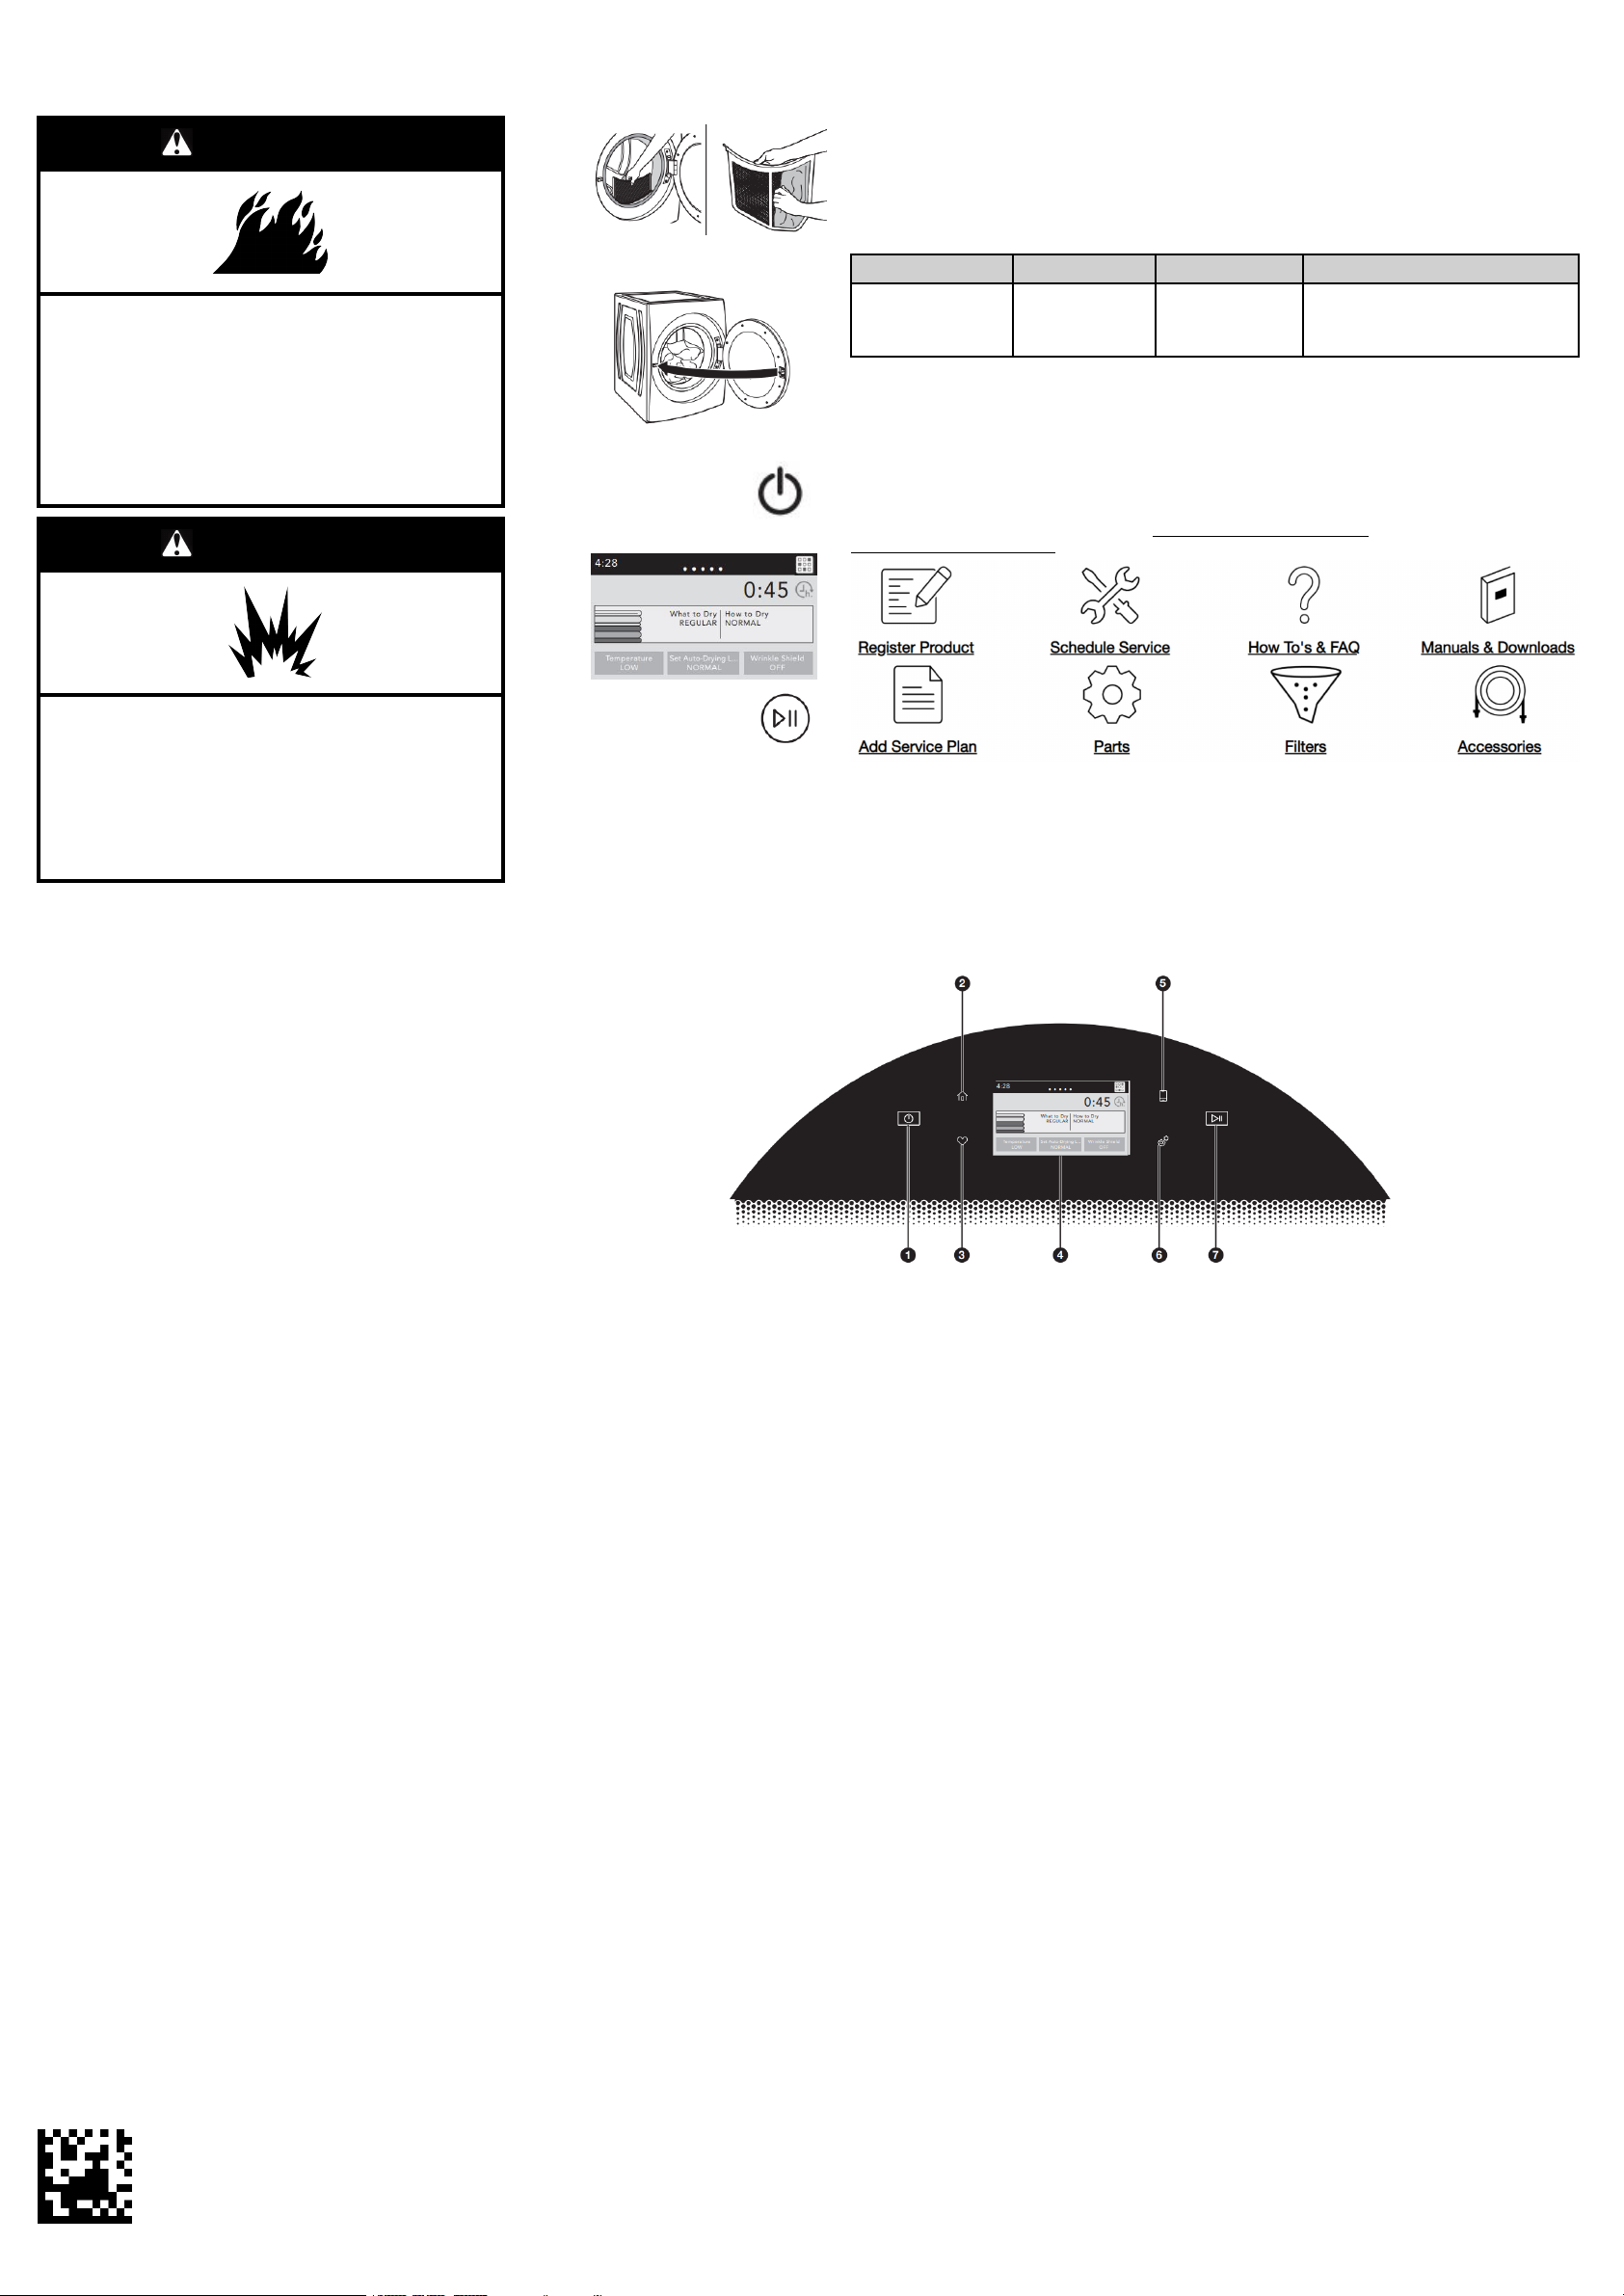
Step 1. Clean Lint Screen
Step 2. Load Clothes; then Close
Door
Step 3. Power On/Cancel
Step 4. Select Cycle and Settings
Cycle Guide — Normal Cycle
This dryer has a unique user interface to help you select the best cycle you need for your load. The "What to Dry"
"How to Dry" layout guides you to the optimal cycle in two easy steps: First determine what items are in the load
that you are trying to dry. Use that to guide your "What to Dry" selection. Then determine how you want the dryer to
dry them and select the appropriate "How to Dry" selection. Modifiers are preset for the items being dried, but can
be changed if desired.
To get the most energy savings and enhanced fabric care from your dryer, use the Automatic cycles. These cycles
measure the drying air temperature and moisture levels to turn the dryer off once the load reaches the selected
dryness level. Dryer performance and results may vary with service voltage less than 240.
Items to Dry: “What to Dry”: “How to Dry”: Description:
T-shirts, Lingerie,
Blankets, White
Napkins, Athletic, Dish
cloths
NOTE: Government energy certifications for this model were based on the Regular + Normal Cycle, Highest
temperature setting, Normal Dryness Level, EcoBoost
Government Energy Certification Settings except the default Temperature Setting of Medium was adjusted to the
Highest temperature setting.
Regular, Delicate,
Bulky Items,
Whites, Colors,
Towels
Normal
Automatic Sensor Cycle stops when
dryness level is reached.
™ On. The as-shipped defaults were the same as the
Online Ordering Information
For detailed installation instruction and maintenance information, winter storage, and transportation tips, please
see the Owner’s Manual included with your machine.
For information on any of the following items, a full cycle guide, detailed product dimensions, or for complete
instructions for use and installation, please visit https://www.whirlpool.com/owners, or in Canada
https://www.whirlpool.ca/owners. This may save you the cost of a service call.
Explosion Hazard
Keep flammable materials and vapors, such as
gasoline, away from dryer.
Do not dry anything that has ever had anything
flammable on it (even after washing).
Failure to follow these instructions can result in
death, explosion, or fire.
WARNING: To reduce the risk of fire, electric shock, or injury to persons,
read the IMPORTANT SAFETY INSTRUCTIONS, located in your
appliance's Owner's Manual, before operating this appliance.
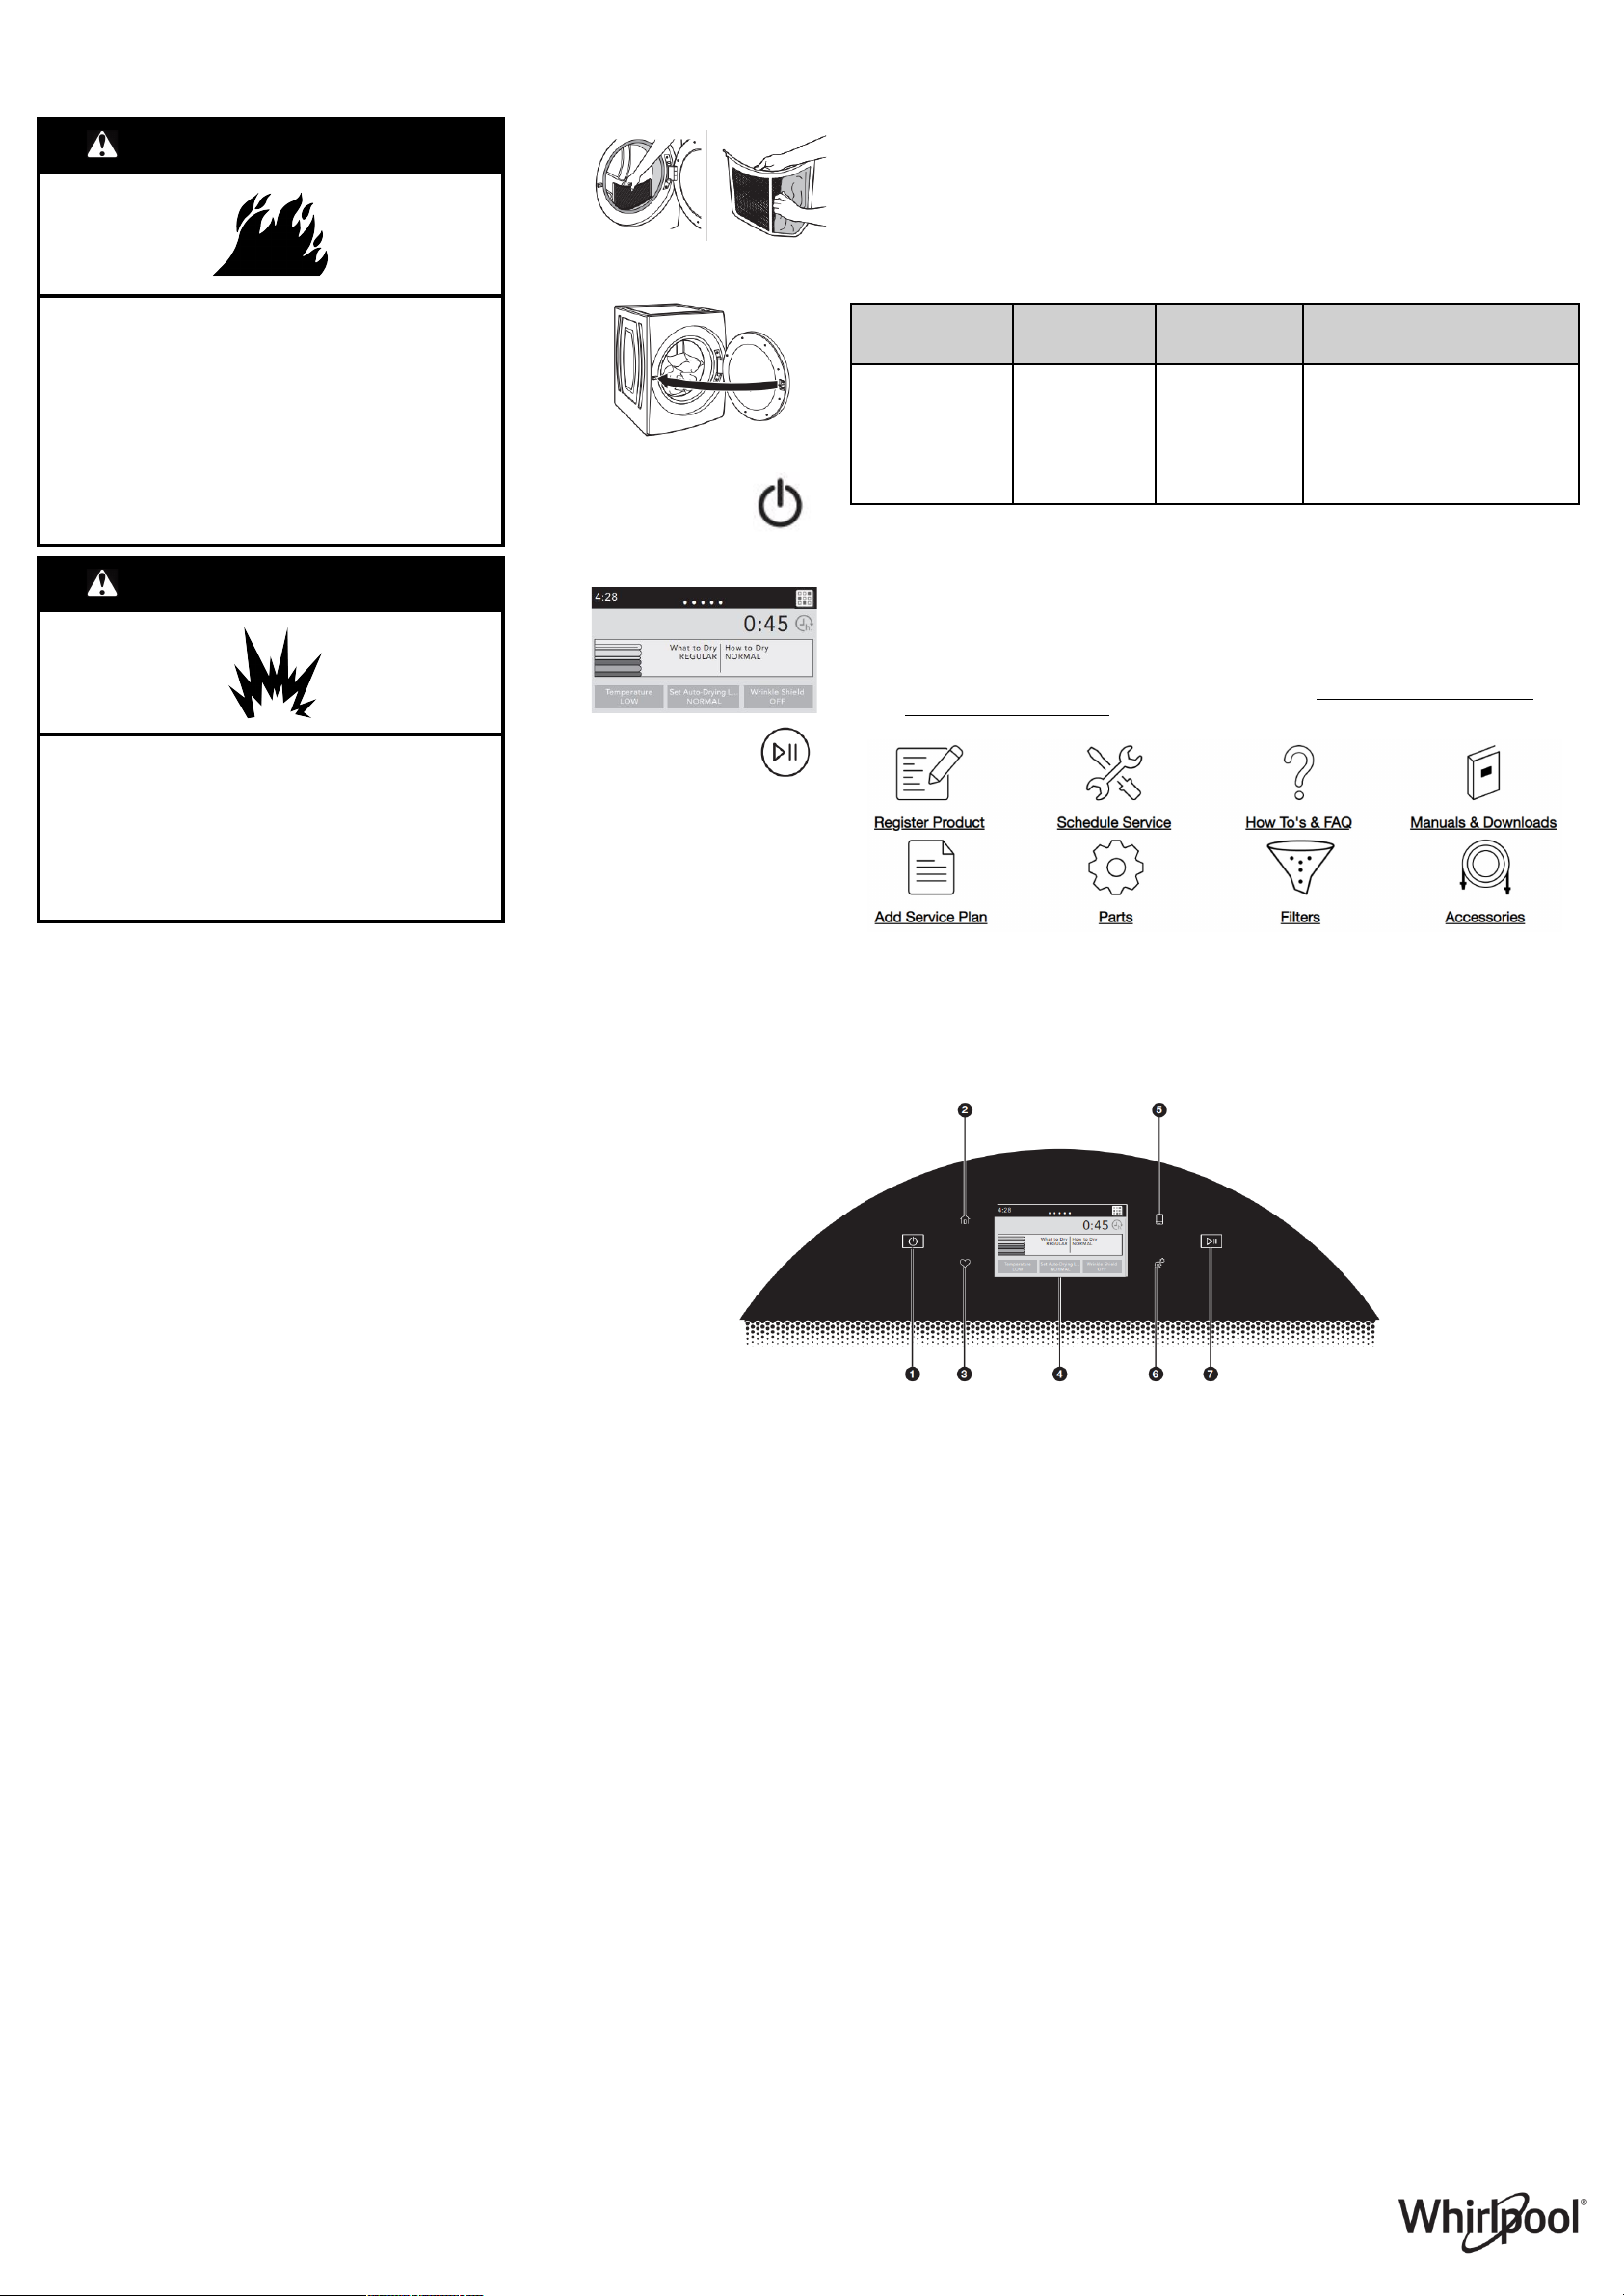
Button Descriptions
1. POWER/CANCEL
Touch to turn the dryer on and off. Touch to stop/cancel a cycle at any time.
2. HOME
Touch this button and the LCD screen will show the home screen, where you
can select your cycle, settings, and options.
3. FAVORITES
Stores and accesses your favorite cycles, and also accesses a history of
recently run cycles.
4. LCD DISPLAY
Use this screen to select cycle, settings, options, etc. Swiping the screen gives
access to five frequently run cycles.
MODIFIERS
First select a cycle from the “What to Dry” (Automatic Cycles) and then select
the “How to Dry” to get the best combination cycle available for the type of
items you are going to dry. See the online “Cycle Guide” for more information.
Step 5. Press Start/Pause
However, if you need to contact us, use the information listed below for the appropriate region.
United States:
1–800–253–1301
Whirlpool Brand Home Appliances
Customer eXperience Center
553 Benson Road
Benton Harbor, MI 49022–2692
Canada:
1–800–807–6777
Whirlpool Brand Home Appliances
Customer eXperience Centre
200–6750 Century Ave.
Mississauga, Ontario L5N 0B7
NOTE: The control panel features a sensitive surface that responds to a light touch of your finger. To ensure your selections are registered, touch the control
panel with your finger tip, not your fingernail. When selecting a setting or option, simply touch its name.
Automatic Cycles
You can select a different dryness level, depending on your load. Touch Set AutoDrying Level; then touch the screen to choose between More, Normal, or Less to
adjust the dryness level at which the dryer will shut off. Dryness level can be changed
in the first 5–8 minutes of the cycle.
Automatic cycles give the best drying in the shortest time. Drying time varies based on
fabric type, load size, and dryness setting.
NOTE: Automatic Cycles will give you up to 4 temperatures to adjust and it varies,
depending on the “What to Dry” or “How to Dry” selections that have been made.
Timed Dry
When you select Timed Dry, the default time appears in the display. To change the
drying times, touch Timed Dry or Quick Dry, then touch the screen to choose a new
drying time. Touch Temperature then the screen to adjust the default temperature.
Wrinkle Shield™ Option
If you will be unable to remove a load immediately, touch Wrinkle Shield
to 150 minutes of periodic tumbling to help reduce wrinkling. Touch Wrinkle Shield
option, then touch “ON” to activate this option. Wrinkle Shield™ option may be ended
at any time by touching the “X” on the touch screen to the right of the estimated time
remaining.
OPTIONS
From the home screen, touch the Options icon (at upper right of screen) and the
Options screen will show Static Reduce, Damp Dry Signal, and/or EcoBoost
(depending on the cycle).
NOTE: Not all options and settings are available with all cycles.
Damp Dry Signal
Touch to select the Damp Dry Signal on or off. When selected, a series of beeps will
sound when the load is damp, but not completely dry. This will allow you to take
clothes out of the load that do not need to dry completely. The Damp Dry Signal is
selected as a default for the
bulky loads midway through the cycle. This option is not available for all cycles. See
the online “Cycle Guide” for details.
Bulky Items cycles, as a reminder to manually reposition
™ to add up
™
™
Not all features, cycles, and options are available on all models. Appearance may vary.
Static Reduce (on some models only)
Touch to add this option to selected Automatic Cycles. The dryer will
automatically tumble, pause, and introduce a small amount of moisture into
the load to help reduce static. This option adds approximately 3 minutes to
the total cycle time.
EcoBoost™ Option
Touch to activate the EcoBoost
energy savings by using a slightly lower heat level. This will increase dry
times. The EcoBoost
and defaults on.
5. REMOTE ENABLE
Press the Remote Enable button any time you want to use the WiFi app.
Pressing the button locks out the LCD screen and you will be prompted with a
message about the dryer waiting for input from the app. To exit this mode,
press the Remote Enable button again.
6. TOOLS
The Tools button gives access to many other settings, utility cycles,
preferences, and information. Touch the Tools button to access the Tools
screen. Scroll down with your finger to access all of the selections.
Control Lock
Press this icon to lock the controls. Swipe up to unlock.
Mute
Press this icon to mute or unmute sounds.
UTILITY CYCLE
Steam Refresh
Select Steam Refresh to reduce odors and light wrinkles in dry loads
consisting of wrinkle-free cotton, cotton-polyester blends, common knits, and
synthetics. If you will be unable to remove a load immediately, touch Wrinkle
Shield
™ to add up to 150 minutes of periodic tumbling. You may select the “+
Steam” setting to add a short steam cycle after 60 minutes to help smooth out
wrinkles.
™ option is only available on the Regular/Normal cycle
™ option, which allows you to increase your
Preferences
Press to access Times and Dates, Sound Volume, Display Settings, and
Regional. Follow the screen prompts.
WiFi
Touch and hold WiFi Connect for 3 seconds during the initial connection of
the dryer to your home Wi-Fi network. If the dryer is in a Smart Delay, touch
WiFi Connect to override the delay and begin a dry cycle immediately.
Info
Press to access Service & Support, Store Demo Mode, Restore Factory, WiFi
Terms and Conditions, and Software Terms and Conditions. Follow the
screen prompts.
7. START/PAUSE
Touch and hold to start, or touch to pause a cycle. When the dryer drum
begins to move, release the Start/Pause button. Continuing to hold the Start/
Pause button after the dryer has started will cause the dryer to stop.
Internet Connectivity Guide
Connectivity requires Wi-Fi and account creation. App features and
functionality subject to change. Data rates may apply. Once installed, launch
the app. You will be guided through the steps to set up a user account and to
connect your appliance. If you have any problems or questions, call
Whirlpool
®
Corporation Connected Appliances at 1–866–333–4591.
W11356338A
W11356666A-SP
Guide de démarrage rapide de la sécheuse
INSTRUCTIONS D’UTILISATION
AVERTISSEMENT
Risque d’incendie
Aucune laveuse ne peut complètement enlever
l’huile.
Ne pas faire sécher des articles qui ont été salis par
tout genre d’huile (y compris les huiles de cuisson).
Les articles contenant mousse, caoutchouc ou
plastique doivent être séchés sur une corde à linge
ou par le programme de séchage à l’air.
Le non-respect de ces instructions peut causer un
décè ou un incendie.
AVERTISSEMENT
Risque d’explosion
Garder les matières et les vapeurs inflammables,
telle que l’essence, loin de la sécheuse.
Ne pas faire sécher un article qui a déjà été touché
par un produit inflammable (même après un lavage).
Le non-respect de ces instructions peut causer un
décès, une explosion ou un incendie.
Étape 1. Nettoyer le filtre à charpie
Étape 2. Charger les vêtements;
fermer ensuite la porte
Étape 3. Allumer/Annuler
Étape 4. Sélectionner le programme
et les réglages
Étape 5. Appuyer sur Start/
Pause (mise en
marche/pause)
Guide de programmes – programme normal
Votre sécheuse possède une interface utilisateur unique pour vous aider à sélectionner le programme le mieux
adapté à votre charge. Les configurations « What to Dry » (articles à sécher) et « How to Dry » (méthode de
séchage) vous indiquent le programme idéal en deux étapes faciles: Commencer par déterminer quels sont les
articles de la charge dont le séchage est souhaité. Sélectionner ainsi les articles adéquats dans la partie « What to
Dry » (articles à sécher). Ensuite, déterminer la manière dont l’on souhaite sécher ces articles et sélectionner la
méthode appropriée dans la partie « How to Dry » (méthode de séchage). Les modificateurs sont préréglés pour
les articles à sécher, mais peuvent être modifiés au besoin.
Pour réaliser un maximum un maximum d’économie d’énergie et prendre davantage soin des tissus, utiliser les
programmes automatiques. Ces programmes mesurent la température de l’air de séchage et les niveaux
d’humidité afin d’éteindre la sécheuse une fois que la charge a atteint le niveau de séchage désiré. La performance
et les résultats de la sécheuse peuvent varier si la tension nominale est inférieure à 240 V.
Articles à sécher : « What to Dry »
T-shirts, lingerie,
couvertures, serviettes
de table blanches,
vêtements de sport,
torchons de vaisselle
REMARQUE : Les certifications de performance énergétique du gouvernement pour ce modèle sont fondées sur
les réglages activés de Regular + Normal Cycle (ordinaire + programme normal), Highest Temperature
(température la plus élevée), Normal Dryness Level (niveau de séchage normal) et EcoBoost
défaut étaient identiques aux réglages de certifications de performance énergétique du gouvernement, sauf pour le
réglage de température par défaut moyenne qui était placé au réglage de température la plus élevée.
(articles à
sécher) :
Regular (régulier),
Delicate (vêtements
délicats), Bulky
Items (articles
volumineux),
Whites (blancs),
Colors (couleurs),
Towels (serviettes)
« How to Dry »
(méthode de
séchage) :
Normal
Description :
Le programme de détection automatique
s’arrête lorsque le niveau de séchage
est atteint.
™. Les valeurs par
Information de commande en ligne
Pour obtenir des instructions détaillées pour l’installation l’entretien, l’hivernisation, ainsi que des conseils de
transport, consulter le manuel de l’utilisateur inclus avec votre machine.
Pour obtenir des informations sur l’un des points suivants guide complet des programmes, dimensions détaillées
du produit ou instructions complètes d’utilisation et d’installation, visiter le https://www.whirlpool.com/owners ou au
Canada https://www.whirlpool.ca/owners. Cette vérification peut vous faire économiser le coût d’une intervention
de dépannage.
AVERTISSEMENT: Pour réduire le risque d’incendie, de décharge
électrique ou de blessures, lire les INSTRUCTIONS IMPORTANTES DE
SÉCURITÉ du guide d’utilisation de l’appareil avant de faire fonctionner
cet appareil.
Descriptions du bouton
1. POWER/CANCEL (Mise sous tension/Annuler)
Toucher ce bouton pour mettre la sécheuse en marche et pour l’éteindre.
Toucher ce bouton pour arrêter/annuler un programme à tout moment.
2. HOME (accueil)
Toucher ce bouton pour afficher l’écran d’accueil à l’écran ACL et permettre de
sélectionner le programme, les réglages et les options.
3. FAVORITES (favorites)
Utiliser ce bouton pour sauvegarder et accéder les programmes préférés, ainsi
que l’historique des programmes utilisés récemment.
4. AFFICHEUR ACL
Utiliser cet écran pour sélectionner le programme, les réglages, les options,
etc. Faire glisser l’écran donne accès à cinq programmes récemment utilisés.
MODIFICATEURS
Sélectionner d’abord un programme, dans la partie « What to Dry » (articles à
sécher) (programmes automatiques), puis sélectionner un programme dans la
partie « How to Dry » (méthode de séchage) pour obtenir la meilleure
combinaison de programmes disponibles pour le type d’articles à sécher. Voir
le en ligne “Guide de programmes” pour plus d’informations.
Programmes automatiques
Selon la charge, un degré de séchage différent peut être sélectionné. Appuyer sur SET
AUTO-DRYING LEVEL (régler le niveau de séchage automatique), puis appuyer sur l’écran
pour sélectionner un niveau allant de Less (moins), Normal ou More (plus) pour ajuster
automatiquement le degré de séchage qui commande l’arrêt de la sécheuse. Il est possible
de modifi er le niveau de séchage durant les 5 à 8 premières minutes du programme.
Les programmes automatiques offrent un séchage idéal en un temps record. La durée de
séchage varie en fonction du type de tissu, de la taille de la charge et du réglage de niveau
de séchage.
REMARQUE : Les programmes automatiques donnent le choix entre jusqu’à 4 températures
de réglage, et cela varie en fonction des sélections effectuées à “What to Dry” (articles à
sécher) ou “How to Dry” (méthode de séchage).
Timed Dry (séchage minuté)
Lorsqu’on sélectionne Timed Dry (séchage minuté), la durée par défaut apparaît sur l’affi
chage. Pour modifi er la durée de séchage, appuyer sur TIMED DRY (séchage minuté) ou
QUICK DRY (séchage rapide), puis appuyer sur l’écran pour sélectionner une nouvelle
durée de séchage. La température par défaut peut être modifiée en appuyant sur
TEMPERATURE (température), puis appuyant sur l’écran pour ajuster la température.
l’option Wrinkle Shield™
Si l’on n’est pas en mesure de retirer la charge immédiatement, toucher sur Wrinkle Shield
(antifroissement) pour ajouter jusqu’à 150 minutes de culbutage périodique afin d’aider à
réduire le froissement. Toucher l’option Wrinkle Shield
ON » (Activé) pour activer cette option. L’option Wrinkle Shield
annulée à tout moment en appuyant sur le « X » situé à droite du temps restant estimé
affiché à l’écran tactile.
OPTIONS
À partir de l’écran d’accueil, toucher l’icône Options située dans le coin supérieur droit de
l’écran, ce qui fera apparaître l’écran des options avec Static Reduce (réduction de
l’électricité statique), Damp Dry Signal (signal de séchage humide) ou EcoBoost (puissance
éco)
™ (selon le programme).
REMARQUE : Tous les réglages et toutes les options ne sont pas disponibles avec tous les
programmes.
Damp Dry Signal (signal de séchage humide)
Appuyer pour activer ou désactiver le signal Damp Dry (séchage humide). Lorsque cette
option est sélectionnée, plusieurs signaux sonores retentissent lorsque la charge est
humide, mais pas complètement sèche. Ceci vous permettra de retirer les vêtements dans la
charge qui n’ont pas besoin d’être séchés complètement. Le signal Damp Dry (séchage
humide) est sélectionné par défaut pour le programme Bulky Items (articles volumineux)
pour rappeler à l’utilisateur de réagencer les articles volumineux à la main vers la moitié du
programme. Cette option n’est pas accessible avec certains programmes. Consulter le
« Guide de programmes » en ligne pour plus de détails.
™ (antifroissement), toucher en sur «
™ (antifroissement) peut être
REMARQUE : La surface du tableau de commande est très sensible et il suffit d’un léger toucher pour l’activer. Pour s’assurer que vos sélections ont été
sauvegardées, toucher le tableau de commande du bout du doigt et non avec l’ongle. Pour sélectionner un réglage ou une option, il suffit de toucher le nom qui
lui correspond.
™
Cependant, si vous devez nous contacter, utiliser les coordonnées suivantes selon la bonne région.
États-Unis :
1–800–253–1301
Whirlpool Brand Home Appliances
Customer eXperience Center
553 Benson Road
Benton Harbor, MI 49022–2692
Les programmes, les fonctions, et options ne sont pas tous offerts sur tous les modèles. L’apparence peut varier.
Static Reduce (réduction de l’électricité statique) (sur certains
modèles)
Toucher pour ajouter cette option pour sélectionner les programmes
automatiques. La sécheuse effectue automatiquement un culbutage, fait une
pause puis introduit une petite quantité d’humidité dans la charge pour aider
à réduire le niveau d’électricité statique. Cette option prolonge la durée totale
du programme d’environ 3 minutes.
L’option EcoBoost™
Toucher pour activer l’option EcoBoost
économies d’énergie en utilisant un niveau de chaleur légèrement plus
faible. Ceci allonge la durée de séchage. L’option EcoBoost
uniquement pour le cycle Regular/Normal cycle (ordinaire/normal).
5. REMOTE ENABLE (activation à distance)
Appuyer sur le bouton Remote (activation à distance) pour utiliser Wi-Fi
l’application, peu importe tout moment. Appuyer sur bouton verrouille l’écran
ACL et affiche un message indiquant que la sécheuse attend une commande
de l’application. Pour quitter ce mode, appuyer de nouveau sur le bouton
Remote Enable (activation à distance).
6. TOOLS (outils)
Le bouton Tools (outils) permet d’accéder plusieurs autres réglages,
programmes, préférences et renseignements. Toucher le bouton Tools
(outils) pour accéder à l’écran des Tools. De naviguer vers le bas dans le
menu pour voir toutes les sélections.
Control Lock (verrouillage des commandes)
Toucher sur cette icône pour verrouiller les commandes. Naviguer vers le
haut pour déverrouiller.
Mute (sourdine)
Toucher cette icône pour mettre le son en sourdine ou le réactiver.
PROGRAMME DE SERVICE
Steam Refresh (rafraîchissement avec vapeur)
Sélectionner Steam Refresh (rafraîchissement avec vapeur) pour réduire les
petits faux plis et la formation d’odeurs dans les charges sèches composées
d’articles en coton infroissable, en mélange de coton et polyester, de tricots
ordinaires et de vêtements synthétiques. Si l’on n’est pas en mesure de
retirer la charge immédiatement, appuyer sur Wrinkle Shield
(antifroissement) pour ajouter jusqu’à 150 minutes de culbutage périodique.
On peut sélectionner le réglage + Steam (avec vapeur) pour ajouter un
programme court avec vapeur après 60 minutes afi n d’aider à défroisser les
articles.
™, qui permet d’accroître vos
™ est disponible
™
Canada:
1–800–807–6777
Whirlpool Brand Home Appliances
Customer eXperience Centre
200–6750 Century Ave.
Mississauga, Ontario L5N 0B7
Préférences
Permet d’accéder aux réglages de l’heure, de la date, du volume du
son, de l’affichage et de la région. Suivre les instructions à l’écran.
Wi-Fi
Toucher et maintenir enfoncé WiFi Connect (connexion Wi-Fi) pendant
3 secondes lors de la connexion initiale de la sécheuse au réseau WiFi domestique. Si la sécheuse est en mode Smart Delay (mise en
marche différée), WiFi Connect (connexion Wi-Fi) pour annuler le délai
et commencer un programme de séchage immédiatement.
Info
Permet d’accéder au soutien, au mode de démonstration en boutique,
à la réinitialisation aux réglages d’usine, aux conditions de l’utilisation
du Wi-Fi et aux conditions d’utilisation du logiciel. Suivre les
instructions à l’écran.
7. START/PAUSE (mise en marche/pause)
Appuyer sans relâcher pour mettre le programme en marche ou
appuyer pour suspendre un programme. Lorsque le tambour de la
sécheuse commence à se déplacer, relâcher le bouton de MISE EN
MARCHE/ PAUSE. Si vous continuez à maintenir le bouton de mise en
marche/pause après le démarrage de la sécheuse, la sécheuse
s’arrêtera.
Guide de connexion Internet
La connexion requiert un lien Internet et la création d’un compte. Les
fonctions de l’application peuvent changer. Des frais de transfert de
données peuvent s’appliquer. Une fois installée, lancer l’application.
Suivre les étapes de configuration du compte d’utilisateur et de
connexion de l’appareil. En cas de problèmes ou pour toute question,
communiquer avec l’équipe Whirlpool
Appliances au 1 866 333-4591.
®
Corporation Connected
W11356338A
W11356666A-SP
/™ ©2020 Whirlpool. All rights reserved. Used under license in Canada.
®
Tous droits réservés. Utilisé sous licence au Canada.
 Loading...