

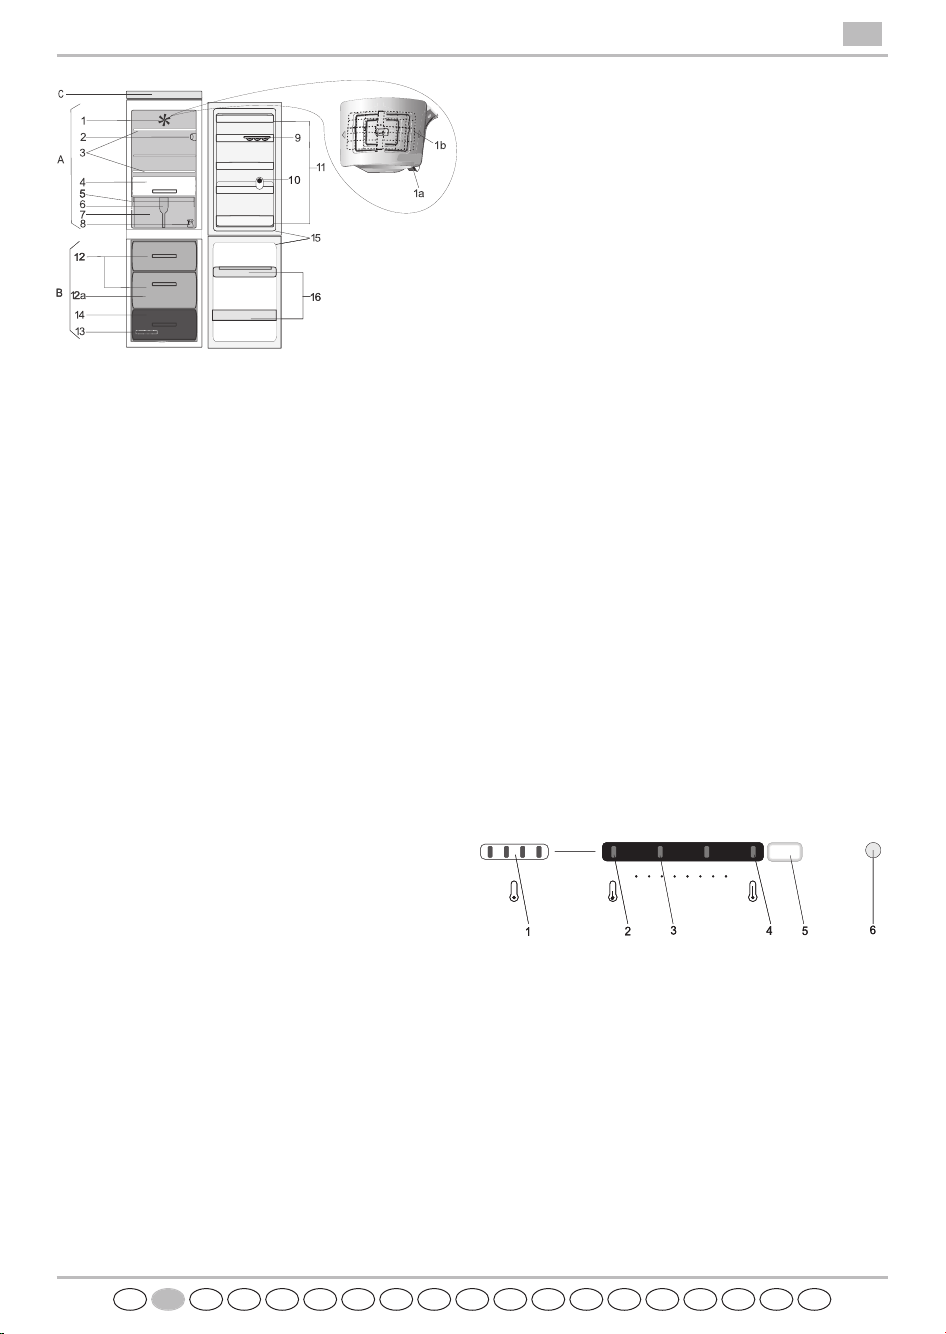
A. Refrigerator Compartment
2. Lighting
3. Shelves / Shelf area
4. Cooler compartment
5. Rating plate with commercial name
6. Crisper divider
8. Reversibility kit
9. Egg tray
10. Separator
11. Door trays
B. Freezer Compartment
12. Storage baskets for frozen food items
12a. "Eco green" basket (only in models with ECO
GREEN function)
13. Ice tray and/or cold accumulator
14. Bottom basket (freezing zone)
16. The freezer door trays for pizza or other frozen
products with a short storage time
Depending on the model the number and type of
accessories may vary. The freezer compartment can be
used without the two upper baskets to increase storage
for large products. The lower basket must not be
removed. Place the food products directly on the racks.
After inserting food, ensure that the freezer compartment
door closes properly.
C. Control panel
Anti-bacterial protection:
1. Filter in fan (depending on the model)
7. Crisper with antibacterial additives (depending
on the model)
15. Door seals
The crisper and the door seals are manufactured from
materials that inhibit bacterial growth.
Notes:
- In case of power failure the cold accumulator
helps to keep optimal storage temperature
longer.
- All shelves and door trays are removable.
- The internal temperatures of the appliance
depend on the ambient temperature, frequency of
opening the doors, as well as location of the appliance.
Temperature setting must consider these factors.
- The appliance accessories are not suitable for
washing in dishwasher.
FAN WITH A BUTTON
The fan gives more even temperature distribution inside
the refrigerator compartment, allowing better
preservation of stored food.
To switch on the fan press the button (1a). It is advisable
to activate the fan when the ambient air temperature is
over 27 ÷ 28°C or if you perceive drops of water on the
glass shelves or in the severe humidity conditions.
Note:
Do not obstruct the air intake area with food items.
The fan will run ONLY when the compressor is in
operation.
Remember to turn off the fan when there is a lower
ambient air temperature.
If the appliance has the fan it can be equipped with the
antibacterial filter.
Remove it from the box (found in the crisper drawer
(item 7) and insert into the cover of fan (item 1b).
The replacement procedure is attached with the filter.
HOW TO START THE APPLIANCE
After plugging the appliance to the mains, it starts the
operation automatically. The indicator lamps on the
control panel light up for approximately 1 second, and
after initialization process, setpoint is displayed.
Note:
- If food is placed in the refrigarator before the appliance
has cooled completely, it may deteriorate.
- If fresh food is loaded in freezer position 3 on control
panel should be chosen.
CONTROL PANEL DESCRIPTION
1. extra low temperature
2. low temperature
3. “ECO GREEN” position (depending on the model)
4. high temperature
5. temperature selection/stand-by (3 sec.) pushbutton
6. internal light switch
OPERATION DESCRIPTION
Temperature adjustment is made with pushbutton (5).
Temperature setpoint is done for both compartments at
one time – fridge and freezer.
At first plug-in of appliance factory setpoint is chosen –
medium position (ECO Green, depending on model).
PRODUCT SHEET
GB
ROBGRUSHSKCZPLIGB FINDKNSGRPENLFD
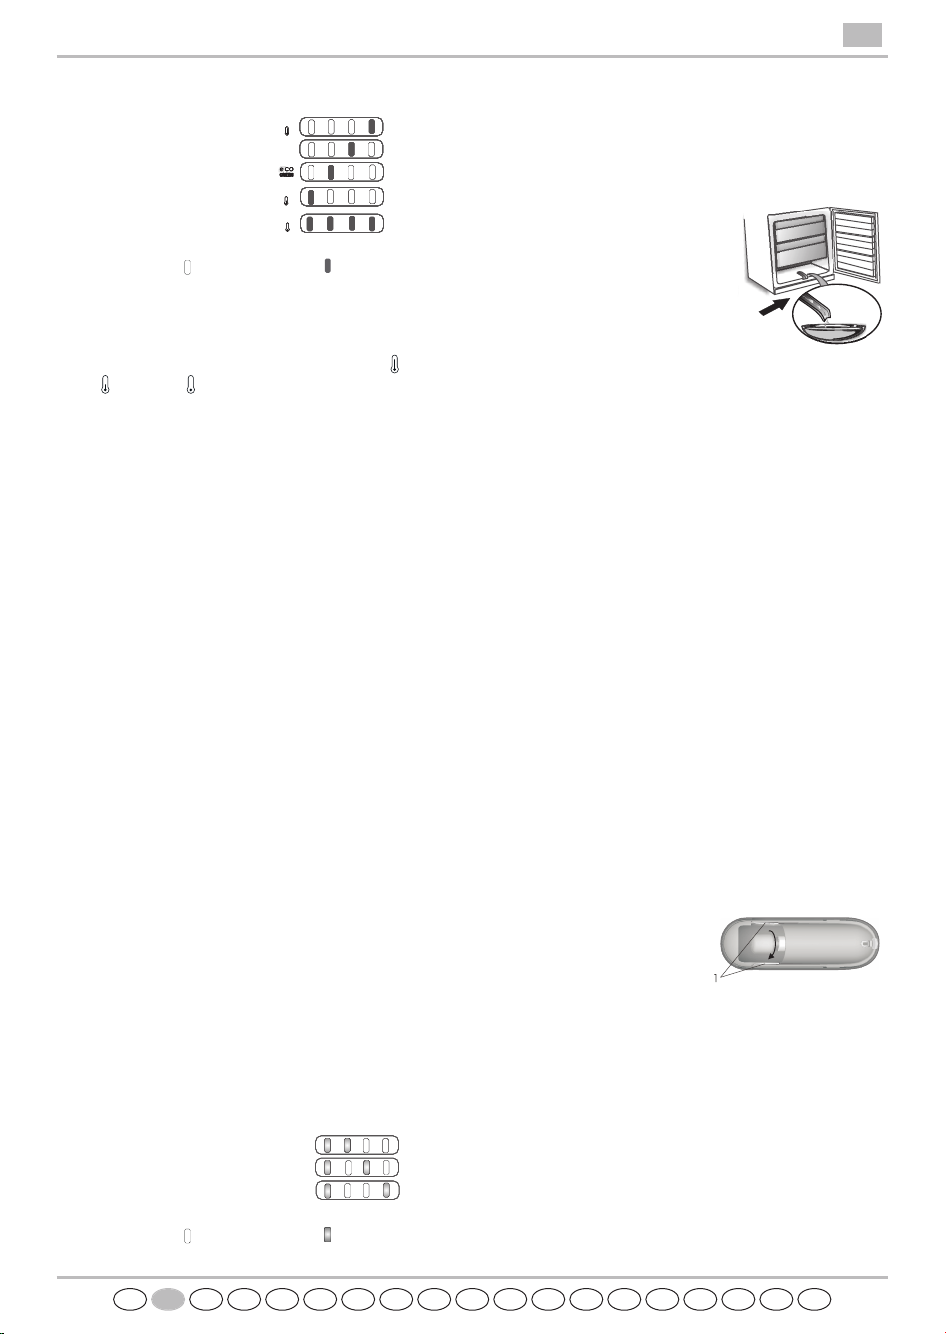
Following table shows set-points level
Description Lamp OFF Lamp ON
GUIDE TO SELECTING FUNCTIONS
Temperature selection / stand-by pushbutton is used
to set desired temperature level, from warmest through
lower to coldest . Pressing pushbutton setpoint will
change cyclically.
Stand-by / ON function
To put the appliance in Stand-by state press and hold
Temperature selection / stand-by pushbutton for 3
seconds.
NOTE: When the product is in stand-by mode the light
operates normally, all other loads are disabled and control
panel shows no indication. When the appliance has to be
left for a longer period with fridge door open to avoid
odour, power cord has to be unplugged from the power
supply.
To switch on the product when it is in Stand-by state,
press Temperature selection / stand-by pushbutton
for 3 seconds.
Appliance comes back to normal operation, control panel
displays previously chosen setpoint.
Note: in case of power failure, appliance goes back to
normal operation and previously chosen setpoint is restored.
ECO GREEN function
This function gives best food preservation performance
with the smallest energy consumption possible (around 510% less in comparison with the normal settings) if there
is lower amount of food to be preserved in the appliance.
The best food preservation conditions when ECO
function is activated are in the ECO compartments:
- 2 "eco green" shelves in the fridge (with green frames)
- 1 "eco green" basket in freezer compartment.
ABNORMAL APPLIANCE OPERATION
When the product is plugged in to the mains, during first
10 minutes of its performance, possible temperature
sensor failure will be displayed according to following
table:
Description Lamp OFF Lamp Flashing
The appliance will work preserving the food stored, but it
is necessary to contact after-sales service and provide
alarm code.
DEFROSTING THE FREEZER
COMPARTMENT
The freezer should be defrosted
once or twice a year or when
excessive frost is present (3 mm
thickness).
The formation of frost is normal.
The amount and rate at which
frost accumulates depends on
room conditions and how often
the door is open.
To defrost the unit, switch off the freezer compartment or
the whole appliance, depending on the model, and
remove all food products.
Leave the freezer door open to allow the frost to melt.
For appliances in figure only pull out the defrost water
drain and place a container under the drain.
When the operation is completed, put back the defrost
water drain.
Clean the inside of the freezer. Rinse and dry thoroughly.
Switch the freezer compartment, or the whole appliance,
back on and store the food inside.
DEFROSTING THE REFRIGERATOR
COMPARTMENT
Refrigerator compartment defrosting is completely
automatic.
Droplets of water on the rear wall inside the refrigerator
compartment indicate that the automatic defrost phase is
in progress. The defrost water is automatically run into a
drain hole and collected in a container, where it
evaporates.
REPLACING THE LIGHT BULB
Always disconnect the
refrigerator from the power
supply before replacing any
light bulb.
If the inside light is not working, it is necessary to:
1. Remove the light cover: put the fingers into the side
ventilation holes (1), stretch the cover gently and
move it upwards.
2. Check the bulb. If necessary unscrew the broken bulb
and replace it with the new one (use maximum 15W
bulb).
3. Put on the light cover.
Do not leave the bulb uncovered.
PRODUCT SHEET
GB
5019 637 01052/A
Printed in Poland 05/09
ROBGRUSHSKCZPLFINDKNSGRIPENLFGBD
Refrigerator sensor failure
Freezer sensor failure
Refrigerator & freezer sensor failure
high temperature
low temperature
extra low temperature
 Loading...