

Page 1
under license
Pralka automatyczna
Instrukcja obsługi
Washing Machine
User Manual
PL
EN
WAM 764GKBC PL
1911863055 /PL/ / 11.04.25 15:03
Page 2
Przed użyciem przeczytaj niniejszą instrukcję obsługi!
Drodzy Klienci,
Dziękujemy za wybór produktuWhirlpool.
Zarejestruj swój produkt na stronie www.register10.eu.
Mamy nadzieję, że ta pralka, wyprodukowana z zachowaniem najwyższych wymogów jakościowych i przy zastosowaniu najnowszej technologii, będzie Wam służyła jak najlepiej.
Prosimy zatem przed jej uruchomieniem uważnie przeczytać całą instrukcje obsługi.
Stosujcie się do wszystkich ostrzeżeń i informacji z tej instrukcji. W ten sposób chronisz
siebie i urządzenie przed możliwymi zagrożeniami.
Zachowaj instrukcję obsługi. Jeśli przekażesz tę pralkę komuś innemu, dołącz instrukcję.
Warunki gwarancji, sposób użytkowania i sposoby rozwiązywania problemów z produktem
można znaleźć w instrukcji obsługi.
Symbole i definicje
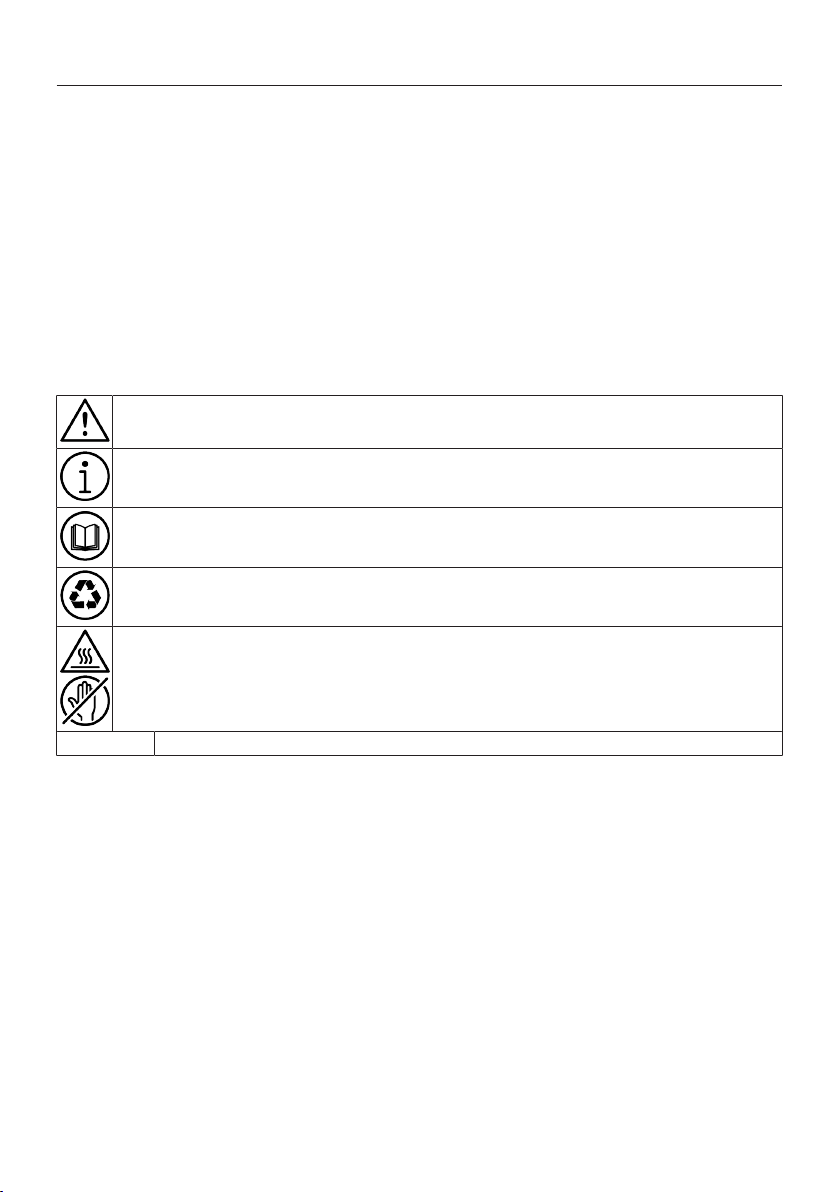
W instrukcji obsługi zastosowano następujące symbole:
Niebezpieczeństwo, które grozi śmiercią lub obrażeniami.
Ważna informacja albo przydatna rada dotycząca eksploatacji.
Przeczytaj instrukcję obsługi.
Surowce wtórne.
Ostrzeżenie przed gorącą powierzchnią.
OSTRZEŻENIE Niebezpieczeństwo, które grozi uszkodzeniem urządzenia lub jego otoczenia
PL / 2
Page 3
Spis treści
1 Instrukcje bezpieczeństwa............. 4
1.1 Dozwolony użytek ......................... 4
1.2 Instalacja........................................ 5
1.3 Ostrzeżenia elektryczne................ 7
1.4 Czyszczenie i konserwacja........... 7
2 Ważne informacje dotyczące śro-
dowiska .........................................
2.1 Zgodność z Dyrektywą WEEE....... 8
2.2 Informacje o opakowaniu ............. 8
3 Specyfikacja techniczna................. 9
4 Instalacja ....................................... 10
4.1 Rozpakowanie i transport produk-
tu.....................................................
4.2 Właściwe miejsce instalacji.......... 10
4.3 Montaż osłon panelu dolnego...... 11
4.4 Demontaż śrub zabezpieczają-
cych ................................................
4.5 Przyłączanie zasilania w wodę..... 12
4.6 Przyłączenie węża spustowego
do odpływu ....................................
4.7 Regulacja nóżek ............................ 13
4.8 Podłączenie elektryczne ............... 13
4.9 Start................................................ 13
5 Przygotowanie wstępne ................. 13
5.1 Sortowanie prania ......................... 14
5.2 Przygotowanie rzeczy do prania .. 14
5.3 Wskazówki w zakresie oszczę-
dzania energii i wody.....................
5.4 Wkładanie rzeczy do prania.......... 14
5.5 Prawidłowa ilość wsadu ............... 15
5.6 Stosowanie detergentu i środka
zmiękczającego.............................
5.7 Wskazówki dotyczące skuteczne-
go prania ........................................
5.8 Czas trwania programu................. 18
6 Obsługa urządzenia ....................... 18
6.1 Panel kontrolny.............................. 19
6.2 Symbole na wyświetlaczu............. 20
6.3 Tabela programów i zużycia......... 21
6.4 Wybór programu............................ 23
6.5 Programy ....................................... 23
6.6 Wybieranie temperatury................ 25
6.7 Wybór prędkości wirowania.......... 26
6.8 Wybieranie funkcji pomocniczych 26
10
11
12
14
15
17
6.8.1 Funkcje dodatkowe.................... 27
6.8.2 Funkcje/programy wybierane
naciśnięciem przycisków funk-
cji przez 3 sekundy.....................
6.9 Godzina zakończenia .................... 29
6.10 Uruchamianie programu................ 30
6.11 Blokada drzwiczek......................... 30
6.12 Zmiana wyborów po uruchomie-
8
niu programu..................................
6.13 Anulowanie programu ................... 32
6.14 Koniec programu ........................... 32
6.15 Funkcja HomeWhiz i funkcja zdal-
nego sterowania ............................
6.15.1 Konfiguracja funkcji HomeWhiz 33
6.15.2 Konfigurowanie pralki podłą-
czonej do innego konta..............
6.15.3 Usuwanie dopasowania konta
HomeWhiz ..................................
6.15.4 Funkcja zdalnego sterowania i
jej zastosowanie.........................
6.15.5 Rozwiązywanie problemów....... 35
6.15.6 HomeWhiz Wyświetlanie warto-
ści zużycia energii......................
7 Konserwacja i czyszczenie............. 36
7.1 Czyszczenie szuflady na deter-
gent.................................................
7.2 Czyszczenie drzwiczek i bębna .... 36
7.3 Czyszczenie korpusu i panelu ste-
rowania...........................................
7.4 Czyszczenie filtrów wlotu wody.... 37
7.5 Spuszczanie pozostałej wody i
czyszczenie filtru pompy...............
8 Rozwiązywanie problemów ............ 38
9 ZASTRZEŻENIE.............................. 42
28
31
32
34
34
35
36
36
37
37
PL
EN
PL / 3
Page 4
1 Instrukcje bezpieczeństwa
PL
Ważne, aby być czytanym i obserwowanym
Przed użyciem urządzenia należy zapoznać się z niniejszymi instrukcjami bezpieczeństwa.
Trzymaj je w pobliżu na przyszłość. Niniejsza instrukcja i samo urządzenie zawierają ważne
ostrzeżenia dotyczące bezpieczeństwa, których należy zawsze przestrzegać. Producent
nie ponosi żadnej odpowiedzialności za nieprzestrzeganie niniejszych instrukcji bezpieczeństwa, za niewłaściwe użytkowanie innego urządzenia lub nieprawidłowe ustawienie elementów sterujących. Warunki gwarancji są określone w dokumencie dostarczonym z urządzeniem.
• Trzymaj bardzo małe dzieci
(0-3 lata) z dala od urządzenia.
Trzymaj małe dzieci (3-8 lat) z
dala od urządzenia, chyba że
są pod stałym nadzorem. Dzieci w wieku 8 lat i starsze, a także osoby o ograniczonych
zdolnościach fizycznych, sensorycznych lub umysłowych
lub osoby bez wiedzy i doświadczenia mogą korzystać z
urządzenia wyłącznie pod nadzorem lub po otrzymaniu jasnych instrukcji dotyczących
bezpiecznego użytkowania i
zrozumieniu możliwych zagrożeń. Dzieci nie mogą bawić się
urządzeniem. Dzieci nie mogą
wykonywać czynności związanych z czyszczeniem i konserwacją bez nadzoru. Nie otwieraj drzwi na siłę ani nie używaj
ich jako stopnia.
1.1 Dozwolony użytek
• Urządzenie nie jest przeznaczone do obsługi za pomocą
zewnętrznego urządzenia przełączającego, takiego jak timer
lub oddzielny system zdalnego
sterowania.
• To urządzenie jest przeznaczone do użytku domowego i podobnych zastosowań wymienionych poniżej:
– Kuchnie dla personelu w
sklepach, biurach i innych
środowiskach pracy.
– Farmhouses
– Hotele, motele, pensjonaty i
inne środowiska mieszkalne
– Pomieszczenia ogólnodo-
stępne w budynkach miesz-
kalnych lub pralniach samo-
obsługowych
• Nie ładuj urządzenia powyżej
maksymalnej pojemności (kilogram suchej szmatki) wskazanej w tabeli programów.
PL / 4
EN
Page 5
• To urządzenie nie jest przeznaczone do użytku profesjonalnego. Nie używaj urządzenia
na zewnątrz.
• Nie używaj żadnych rozpuszczalników (np. terpentyny, benzenu), detergentów zawierających rozpuszczalniki, proszku
do szorowania, środków czyszczących do szkła lub ogólnego
przeznaczenia ani płynów łatwopalnych. Nie pierz w pralce
tkanin, które zostały poddane
działaniu rozpuszczalników lub
łatwopalnych cieczy.
1.2 Instalacja
• To urządzenie wymaga dwóch
lub więcej osób do obsługi i instalacji, aby zapobiec obrażeniom. Podczas rozpakowywania i montażu należy nosić rękawice ochronne, aby uniknąć
skaleczeń.
• Przed ułożeniem suszarki na
pralce skontaktuj się z naszym
serwisem posprzedażnym lub
wyspecjalizowanym sprzedawcą, aby sprawdzić, czy jest to
możliwe. Jest to możliwe tylko
wtedy, gdy suszarka jest podłączona do pralki za pomocą
odpowiedniego zestawu do
sztaplowania dostępnego w
naszym serwisie posprzedażowym lub u wyspecjalizowanego sprzedawcy.
• Nie instaluj urządzenia w miejscach, w których może być narażone na ekstremalne warunki, takie jak słaba wentylacja,
temperatury poniżej 5 °C lub
powyżej 35 °C.
• Przenoś urządzenie bez podnoszenia go za blat lub górną
pokrywę.
• Instalacja, w tym zaopatrzenie
w wodę (jeśli występuje) i połączenia elektryczne oraz naprawy, muszą być wykonane
przez wykwalifikowanego technika.
• Nie naprawiaj ani nie wymieniaj żadnej części urządzenia,
chyba że jest to wyraźnie określone w instrukcji obsługi.
• Trzymaj dzieci z dala od miejsca instalacji.
• Po rozpakowaniu urządzenia
należy upewnić się, że nie zostało ono uszkodzone podczas
transportu. W przypadku problemów skontaktuj się ze
sprzedawcą lub najbliższym
serwisem posprzedażnym.
• Po zainstalowaniu urządzenia
odpady opakowaniowe (plastik, styropian itp.) należy przechowywać w miejscu niedostępnym dla dzieci, aby uniknąć ryzyka uduszenia.
PL / 5
PL
EN
Page 6

• Przed przystąpieniem do jakiejkolwiek instalacji należy odłączyć urządzenie od zasilania,
aby uniknąć porażenia prądem.
• Podczas instalacji upewnij się,
że zasilający nie jest uszkodzony, aby zapobiec pożarowi
lub porażeniu prądem.
• Nie używaj urządzenia, dopóki
instalacja nie zostanie zakończona.
• Podczas instalacji urządzenia
upewnij się, że cztery nóżki są
stabilne i spoczywają na podłodze, regulując je zgodnie z
wymaganiami. Sprawdź, czy
urządzenie jest idealnie wypoziomowane za pomocą poziomicy.
• W przypadku montażu urządzenia na podłodze drewnianej
lub pływającej (niektóre rodzaje parkietów i laminatów) należy umieścić pod urządzeniem
arkusz sklejki o wymiarach 60
x 60 x 3 cm (minimum), aby zapewnić stabilność.
• Podłącz wąż (węże) doprowadzający wodę do źródła wody
zgodnie z przepisami lokalnego przedsiębiorstwa wodociągowego.
• W przypadku modeli tylko do
napełniania na zimno: nie podłączaj do źródła ciepłej wody.
• W przypadku modeli z gorącym napełnianiem: temperatura na wlocie ciepłej wody nie
może przekraczać 60 °C.
• Pralka wyposażona jest w
transportowe, które zapobiegają ewentualnym uszkodzeniom
wnętrza podczas transportu.
Przed użyciem maszyny konieczne jest usunięcie transportowych. Po ich wyjęciu zakryj otwory dołączonymi plastikowymi zaślepkami.
• Po zainstalowaniu odczekaj
kilka godzin przed uruchomieniem urządzenia, aby przyzwyczaiło się do warunków środowiskowych panujących w pomieszczeniu.
• Upewnij się, że otwory wentylacyjne w podstawie pralki (jeśli
są dostępne w Twoim modelu)
nie są zasłonięte dywanem lub
innym materiałem.
• Do podłączenia urządzenia do
źródła wody należy używać wyłącznie nowych węży. Nie używaj ponownie starych zestawów węży.
• Ciśnienie wody zasilającej musi mieścić się w zakresie 0,1-1
MPa.
• Nie naprawiaj ani nie wymieniaj żadnej części urządzenia,
chyba że jest to wyraźnie określone w instrukcji obsługi. Korzystaj tylko z autoryzowanego
PL
EN
PL / 6
Page 7
serwisu posprzedażnego. Samodzielna lub nieprofesjonalna naprawa może prowadzić
do niebezpiecznego incydentu
skutkującego zagrożeniem życia lub zdrowia i/lub znacznymi szkodami materialnymi.
• Części zamienne do pralek dla
gospodarstw domowych będą
dostępne przez 10 lat od wprowadzenia ostatniej sztuki na
rynek, zgodnie z rozporządzeniem w sprawie ekoprojektu
dla zrównoważonych produktów.
Nie używaj urządzenia, jeśli
przewód zasilający lub wtyczka są uszkodzone, jeśli urządzenie nie działa prawidłowo
lub jeśli zostało uszkodzone
lub upuszczone.
• Jeśli przewód zasilający jest
uszkodzony, musi zostać wymieniony na identyczny przez
producenta, jego przedstawiciela serwisowego lub podobnie wykwalifikowaną osobę,
aby uniknąć ewentualnych zagrożeń i ryzyka porażenia prądem.
PL
EN
1.3 Ostrzeżenia elektryczne
• Aby odłączyć urządzenie od
źródła zasilania:
– Odłącz go (jeśli wtyczka jest
dostępna) lub
– Użyj przełącznika wielobie-
gunowego zainstalowanego
przed gniazdem zgodnie z
lokalnymi przepisami dotyczącymi okablowania.
• Upewnij się, że urządzenie jest
uziemione zgodnie z krajowymi normami bezpieczeństwa
elektrycznego.
• Nie używaj przedłużaczy, wielu
gniazd ani adapterów. Elementy elektryczne nie mogą być
dostępne dla użytkownika po
instalacji. Nie używaj urządzenia, gdy jesteś mokry lub boso.
1.4 Czyszczenie i konserwacja
• Przed przystąpieniem do jakichkolwiek czynności konserwacyjnych należy wyłączyć i
odłączyć urządzenie od zasilania.
• Nosić rękawice ochronne i
obuwie ochronne, aby uniknąć
obrażeń podczas konserwacji.
• Z urządzeniem należy obchodzić się w obecności dwóch
lub więcej osób, aby zapobiec
naprężeniu lub obrażeniom.
• Nie używaj urządzeń do czyszczenia parą na urządzeniu, aby
zapobiec porażeniu prądem.
• Nieprofesjonalne naprawy lub
konserwacje powodują utratę
gwarancji i mogą stanowić zagrożenie dla bezpieczeństwa.
PL / 7
Page 8
2 Ważne informacje dotyczące środowiska
2.1 Zgodność z Dyrektywą WEEE
Ten produkt jest zgodny z Dyrektywą UE WEEE (2012/19/
UE). Produkt posiada symbol
klasyfikacji zużytego sprzętu
elektrycznego i elektronicznego
(WEEE).
Produkt został wyprodukowany z wysokiej
jakości części i materiałów, które mogą być
ponownie użyte i nadają się do recyklingu.
Zużytego urządzenia nie należy wyrzucać
wraz z normalnymi odpadami domowymi i
pozostałymi odpadami pod koniec żywotności produktu. Urządzenie należy oddać
do punktu zbiórki w celu recyklingu sprzętu
elektrycznego i elektronicznego. Skontaktuj
się z lokalnymi władzami, aby dowiedzieć
się, gdzie znajdują się punkty zbiórki.
2.2 Informacje o opakowaniu
Materiały opakowaniowe są wyprodukowane z materiałów nadających się do recyklingu zgodnie z krajowymi przepisami środowiskowymi. Materiałów opakowaniowych
nie należy wyrzucać wraz z normalnymi odpadami domowymi itp. Dostarcz je do
punktów zbiórki materiałów opakowaniowych wyznaczonych przez władze lokalne.
PL
EN
PL / 8
Page 9
3 Specyfikacja techniczna
Nazwa dostawcy lub marki WHIRLPOOL
Nazwa modelu
Wydajność nominalna (kg) 7
Maksymalna prędkość wirowania (cykl/min) 1400
Wbudowane No
Wysokość (cm) 84.5
Szerokość (cm) 60.0
Głębokość (cm) 49.6
Pojedynczy wlot wody / Podwójny wlot wody + / -
Informacje o modelu są przechowywane w bazie danych
o produkcie, do której można uzyskać dostęp, przechodząc na następującą witrynę internetową i wyszukując
identyfikator modelu (*) znajdujący się na etykiecie energetycznej.
https://eprel.ec.europa.eu/
Wartości zużycia energii obowiązują, gdy połączenie z siecią bezprzewodową jest
wyłączone.
Zdefiniowany okres wsparcia aktualizacji oprogramowania związanego z cyberbezpieczeństwem dla produktu jest okresem gwarancji produktu. Po tym okresie aktualizacje oprogramowania związanego z cyberbezpieczeństwem nie są gwarantowane.
WAM 764GKBC PL
7009640001
PL
EN
PL / 9
Page 10
4 Instalacja
Najpierw przeczytaj Instrukcje bezpieczeństwa
Podczas wybierania programu pralka automatycznie wykrywa ilość
prania umieszczoną wewnątrz
urządzenia.
Podczas instalacji produktu przed
pierwszym użyciem należy przeprowadzić kalibrację, aby upewnić się,
że ilość prania jest wykrywana w
najdokładniejszy sposób.
W tym celu należy wybrać program
Czyszczenie bębna* i anulować
funkcję wirowania. Uruchom program bez prania. Poczekaj na zakończenie programu, który zajmie
około 15 minut.
*Nazwa programu może się różnić
w zależności od modelu. Aby wybrać odpowiedni program, możesz
przejrzeć rozdział z opisami programów.
• W celu instalacji urządzenia należy skon-
taktować się z najbliższym autoryzowanym serwisem.
• Należy zadbać o to, aby elektryczne i hy-
drauliczne przyłączenia pralki wykonał
przedstawiciel autoryzowanego serwisu.
Producent nie ponosi odpowiedzialności
za szkody spowodowane czynnościami
wykonywanymi przez osoby nieuprawnione.
• Przygotowanie miejsca na pralkę oraz in-
stalacji elektrycznej i wodno-kanalizacyjnej w tym miejscu jest obowiązkiem
klienta.
• Upewnij się, że węże dopływu i odpływu
wody, a także elektryczny przewód zasilający nie uległy zagięciu, zakleszczeniu
lub uszkodzeniu przy ustawianiu pralki w
jej miejscu po zainstalowaniu lub czyszczeniu.
• Przed zainstalowaniem obejrzyj pralkę
aby sprawdzić, czy nie ma jakichś usterek. Nie podłączaj urządzenia, jeśli jest
uszkodzone. Uszkodzone urządzenia zagrażają Twojemu bezpieczeństwu.
4.1 Rozpakowanie i transport produktu
Rozpakowanie produktu
• Usuń karton lub opakowanie styropiano-
we.
• Aby usunąć opakowanie kartonowe lub
styropianowe znajdujące się pod produktem, ostrożnie podnieś produkt. Jeśli nie
jest to możliwe, wyjmij go, przechylając
go lekko na bok lub kładąc na boku, nie
uszkadzając produktu.
• Otwórz drzwi i wyjmij wąż dopływowy
oraz wszelkie inne akcesoria znajdujące
się wewnątrz bębna.
• Odłącz zasilający i wąż spustowy od ich
ustalonych pozycji.
• Wykręć zabezpieczające w transporcie.
(patrz "Wykręcanie zabezpieczających w
transporcie")
Transport produktu
Przeczytaj najpierw sekcję "Bezpieczeństwo transportu"!
• Upewnij się, że drzwi i szuflada na deter-
gent są zamknięte.
• Ostrożnie zamontuj zabezpieczające w
transporcie, nie uszkadzając bębna produktu. (patrz "Wykręcanie zabezpieczających w transporcie")
• Zapakuj produkt w opakowanie ochron-
ne, aby zapobiec uszkodzeniom podczas
transportu.
4.2 Właściwe miejsce instalacji
• Pralkę należy ustawić na twardej i równej
podłodze. Nie stawiać na dywanie lub wykładzinie o wysokim runie ani na innych
podobnych powierzchniach. Umieszczenie urządzenia na niewłaściwej podłodze
spowoduje problemy z hałasem i wibracjami.
• Łączna waga pralki i suszarki - przy peł-
nym załadunku - gdy ustawione są jeden
na drugim sięga ok. 180 kilogramów.
Ustawić pralkę na solidnej i płaskiej podłodze o wystarczającej nośności.
PL / 10
PL
EN
Page 11
• Nie stawiaj pralki na przewodzie zasilającym.
• Nie należy instalować urządzenia w miejscach, w których temperatura może
spaść poniżej 5ºC. Zamarznięcie może
spowodować uszkodzenie produktu.
• Należy zostawić minimalną przestrzeń 1
cm między produktem a meblami.
• Jeśli urządzenie ma być zainstalowane
na powierzchni ze stopniami nie wolno
umieszczać go blisko krawędzi.
• Nie stawiać urządzenia platformie.
• Nie umieszczać na urządzeniu źródeł ciepła, takich jak szybkowar, żelazka, piekarniki, podgrzewacz itp. i nie używać ich na
produkcie.
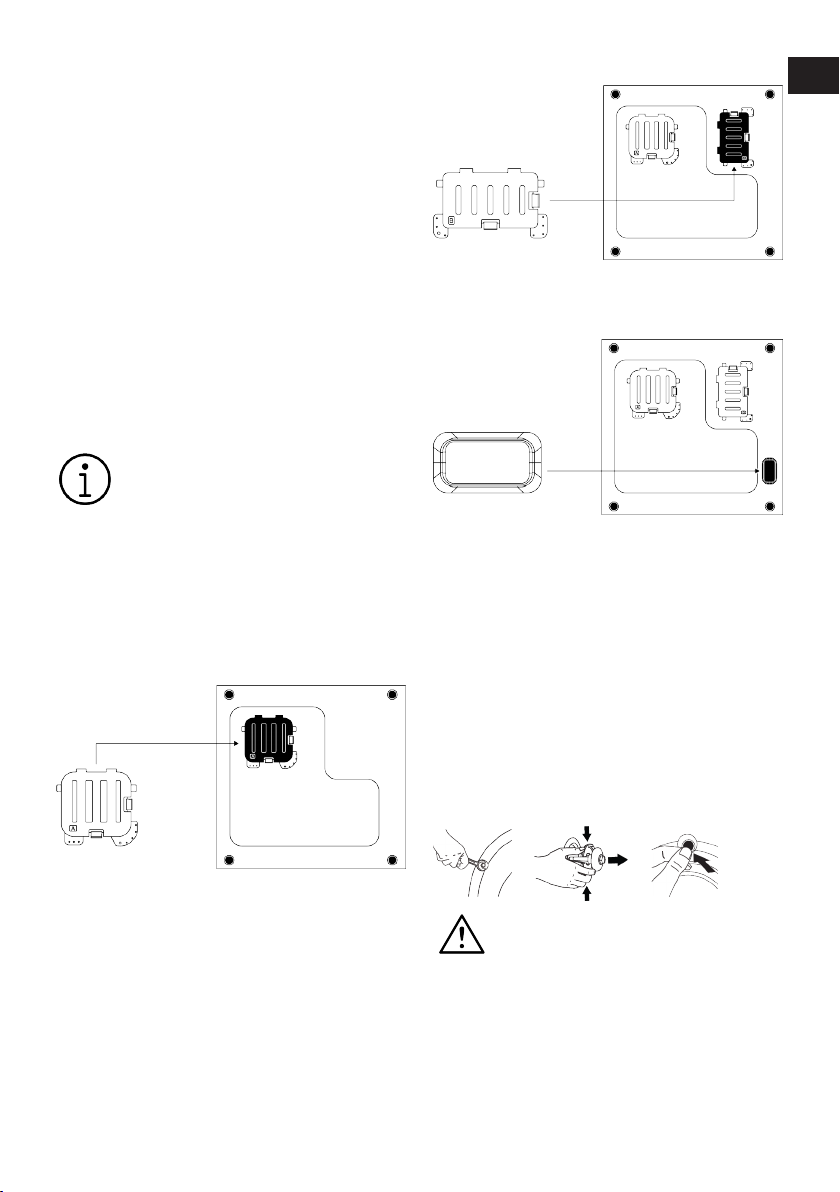
4.3 Montaż osłon panelu dolnego
W przypadku niektórych modeli
części bazowe produktów są całkowicie zamknięte. Produkty te nie
posiadają wtyczek i osłon.
Osłona B
Oprzyj zaczepy pokrywy B o dolny panel.
Dokończ montaż, obracając pokrywę.
Pokrywa
Nałóż pokrywę, naciskając ją palcem.
PL
EN
• W celu zwiększenia dobrego komfortu
akustycznego urządzenia zamontuj pokrywę A po usunięciu pianki opakowaniowej.
Osłona A
Lekko przechyl urządzenie do tyłu. Oprzyj
zaczepy pokrywy A o dolny panel. Dokończ
montaż, obracając pokrywę.
• Osłona B i nakładka są opcjonalne. Zamontuj osłonę B i nakładkę, jeśli są dostępne.
4.4 Demontaż śrub zabezpieczających
1. Odpowiednim kluczem poluzować
wszystkie śruby zabezpieczające, aż będą się swobodnie obracać.
2. Zgiąć część wewnętrzną, naciskając ją
w miejscach uchwytów, a następnie wyciągnąć.
3. Założyć plastikowe osłony dostarczone
w torebce z instrukcją obsługi w otwory
w panelu tylnym.
UWAGA
Przed uruchomieniem urządzenia
wyjąć śruby zabezpieczające na
czas transportu. W przeciwnym razie pralkosuszarka może się uszkodzić.
PL / 11
Page 12
UWAGA
Należy zachować śruby zabezpieczające w bezpiecznym miejscu po
to, aby ponownie ich użyć przy następnym transporcie pralki.
Śruby zabezpieczające na czas
transportu zakłada się w kolejności
odwrotnej do ich zdejmowania.
Nie wolno transportować pralki bez
śrub zabezpieczających umieszczonych we właściwych miejscach.
4.5 Przyłączanie zasilania w wodę
UWAGA
Modeli z pojedynczym dopływem
wody nie należy podłączać do kranu z gorącą wodą. W takim przypadku pranie ulegnie zniszczeniu
lub pralka przełączy się w tryb
ochronny i nie będzie działać.
Do nowej pralki nie zakładaj starych
ani używanych węży. Może to spowodować wyciek wody z pralki i poplamić pranie.
1. Ręcznie dokręcić wszystkie nakrętki węża. Do zakręcania nakrętek nie wolno
używać kluczy.
2. Po podłączeniu węża odkręcić do końca
kran, aby sprawdzić, czy w punktach połączeń nie ma wycieków. Jeśli wycieka
należy zakręcić kran i zdjąć nakrętkę.
Sprawdź uszczelkę i ponownie ostrożnie
dokręć nakrętkę. Aby zapobiec wyciekom wody oraz spowodowanych nimi
szkód, zakręcaj krany, kiedy nie używasz
pralki.
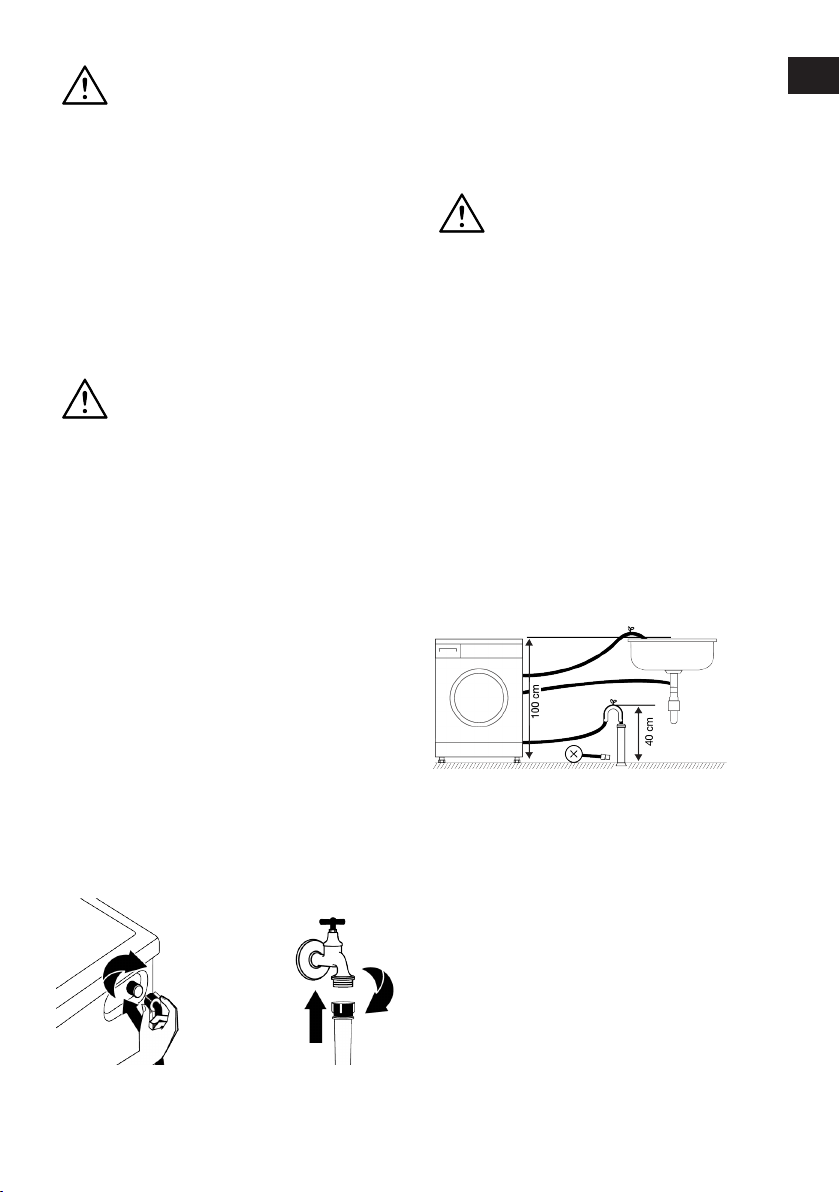
4.6 Przyłączenie węża spustowego do odpływu
1. Koniec węża spustowego przymocuj
bezpośrednio do odpływu ścieków, umywalki lub wanny.
Dom zostanie zalany, jeśli wąż spustowy zostanie przesunięty podczas spuszczania wody. Wysokie
temperatury prania powodują również ryzyko poparzenia! Aby zapobiec takim sytuacjom i zapewnić
prawidłowe pobieranie i spuszczanie wody przez pralką, należy bezpiecznie zamocować wąż spustowy.
2. Wąż ten przyłącza się na wysokości od
40 cm do 100 cm.
3. Zainstalowanie węża odprowadzające-
go wodę na poziomie gruntu lub blisko
podłogi (40 cm poniżej), a następnie
podniesienie go utrudnia odprowadzanie wody, a pranie może być bardzo mokre. Należy przestrzegać podanych na
rysunku wysokości.
4. Aby zapobiec powrotowi ścieków do
pralki i zapewnić łatwy odpływ, nie należy zanurzać końca węża w ściekach ani
nie wkładać go do odpływu ścieków głębiej niż na 15 cm. Jeśli wąż jest zbyt
długi należy go skrócić.
5. Końcówka węża nie może być zagięta
ani nadepnięta, a wąż nie może być zakleszczony między odpływem a urządzeniem. W przeciwnym razie mogą pojawić się problemy z odprowadzaniem
wody.
6. Jeśli wąż jest zbyt krótki, przedłuż go
stosując oryginalny przedłużacz. Całkowita długość węża nie może być dłuż-
PL
EN
PL / 12
Page 13
sza niż 3,2 m. Aby zapobiec wyciekom
wody, zawsze zabezpiecz połączenie
między wężem przedłużającym a wężem spustowym produktu za pomocą
odpowiedniego zacisku, aby nie wypadło i nie spowodowało wycieków.
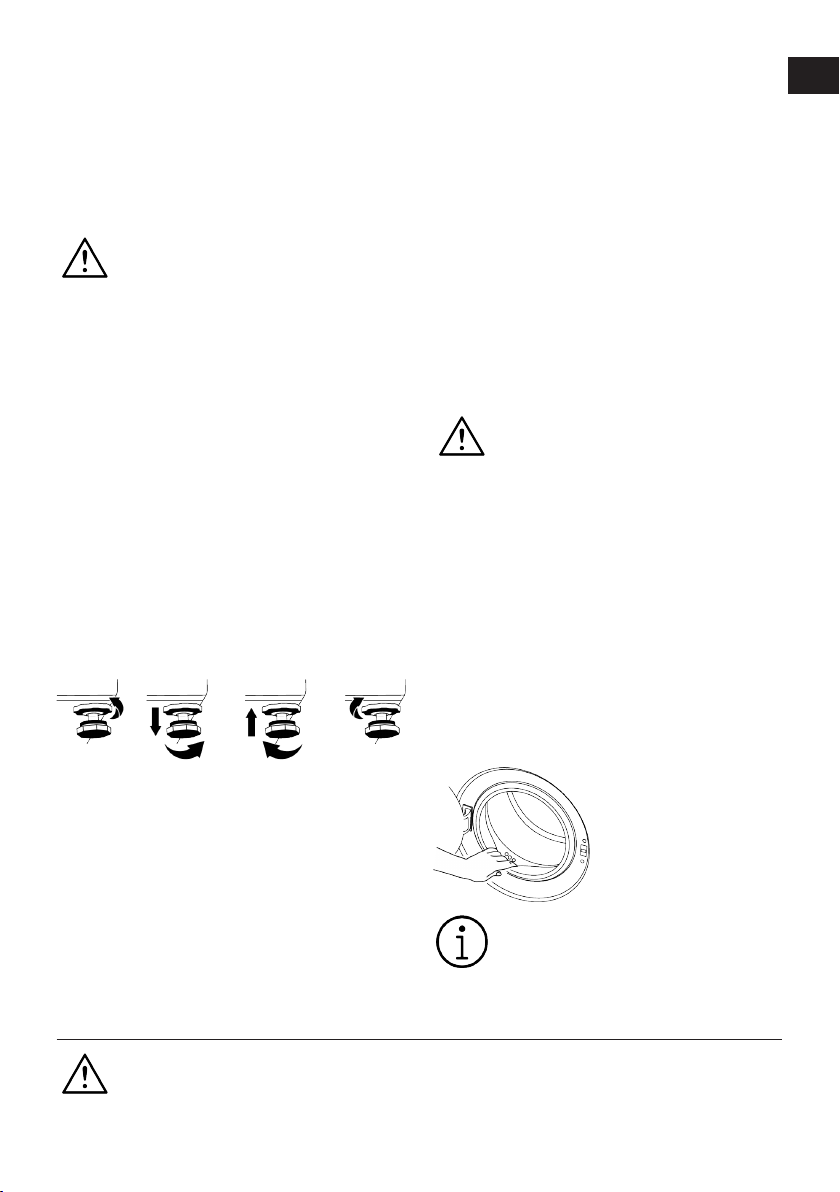
4.7 Regulacja nóżek
OSTRZEŻENIE
Aby zapewnić cichą i pozbawioną
wibracji pracę maszyny należy
ustawić ją pewnie i równo na nóżkach. Ustawić pralkę równo, regulując nóżki. W przeciwnym razie pralka może przesunąć się ze swego
miejsca i spowodować zgniecenie,
hałas i problemy mechaniczne.
Aby uniknąć uszkodzenia nakrętek
zabezpieczających, nie należy używać narzędzi do poluzowania nakrętek.
1. Ręcznie poluzuj nakrętki zabezpieczające nóżek pralki.
2. Ustawić nóżki tak, aby pralka stała poziomo i równo.
3. Ponownie dokręcić ręcznie wszystkie
nakrętki zabezpieczające.
• Infrastruktura kabli elektrycznych produktu musi być odpowiednia dla wymagań
produktu. Zaleca się stosowanie wyłącznika różnicowoprądowego.
• Wtyczka przewodu zasilającego musi być
dostępna po zainstalowaniu.
• Jeśli prąd zabezpieczenia w domu jest
mniejszy niż 16 A, zleć wykwalifikowanemu elektrykowi zainstalowanie bezpiecznika 16 A.
• Napięcie podane w "Danych technicznych" musi być równe napięciu w sieci
zasilającej mieszkanie.
• Do przyłączenia nie używaj przedłużaczy
ani rozgałęźników. Kabel łączący może
spowodować przegrzanie i spalenie.
Jeśli kabel zasilający jest uszkodzony, musi zostać wymieniony
przez autoryzowany serwis w celu
uniknięcia ewentualnych zagrożeń.
4.9 Start
Przed pierwszym użyciem urządzenia
upewnij się, że zostało przygotowane zgodnie z opisem w rozdziałach „Instrukcje dotyczące środowiska” i „Instalacja”. Aby
przygotować pralkę do prania wykonaj
pierwszą operację z programu Drum Cleaning [Czyszczenie bębna]. Jeśli ten program nie jest dostępny w Twoim urządzeniu, zastosuj metodę opisaną w rozdziale
„Czyszczenie drzwiczek i bębna”.
PL
EN
4.8 Podłączenie elektryczne
Przyłącz pralkę do uziemionego gniazdka
zabezpieczonego bezpiecznikiem 16 A. Nasza firma nie ponosi odpowiedzialności za
szkody powstałe w wyniku użytkowania
produktu bez uziemienia zgodnie z lokalnymi przepisami.
• Połączenie musi być wykonane zgodnie z
obowiązującymi przepisami krajowymi.
5 Przygotowanie wstępne
Najpierw przeczytaj Instrukcje bezpieczeństwa
Ze względu na proces kontroli jakości w trakcie produkcji we wnętrzu
pralki pozostało trochę wody. Nie
szkodzi to pralce.
PL / 13
Page 14

5.1 Sortowanie prania
• Odzież przeznaczoną do prania należy
posortować według typu tkaniny, koloru i
stopnia zabrudzenia oraz dopuszczalnej
temperatury prania.
• Zawsze przestrzegać instrukcji z metek
odzieży.
5.2 Przygotowanie rzeczy do prania
• Rzeczy do prania z elementami metalowymi, jak np. biustonosze ze stelażem
drucianym, klamry pasków i metalowe
guziki powodują uszkodzenia pralki. Usunąć metalowe części lub prać takie rzeczy w woreczkach do prania lub poszewkach na poduszkę.
• Wyjąć z kieszeni wszystkie przedmioty
takie jak monety, długopisy i spinacze
biurowe oraz wywrócić kieszenie na zewnątrz i oczyścić szczoteczką. Przedmioty takie mogą zniszczyć pralkę lub powodować nadmierny hałas.
• Małe sztuki odzieży, takie jak skarpetki
dziecięce i pończochy nylonowe włożyć
do woreczka do prania lub poszewki na
poduszkę.
• Firanki wkładać, nie gniotąc ich. Zdjąć
klamerki i haczyki z firanek. Elementy
mocujące zasłonę mogą powodować
szarpanie i jej rozdarcie.
• Zapiąć zamki błyskawiczne i wszystkie
guziki oraz zaszyć miejsca rozerwane i
naderwane.
• Produkty z metkami „do prania w pralce”
lub „do prania ręcznego” prać tylko na odpowiednim programie.
• Nie prać rzeczy kolorowych razem z białymi. Nowa odzież bawełniana w ciemnym kolorze może mocno farbować. Należy ją prać oddzielnie
• Uporczywe plamy należy w odpowiedni
sposób wywabić przed rozpoczęciem
prania.
• Spodnie i delikatne ubrania prać wywrócone na lewą stronę.
• Rzeczy do prania, które miały intensywny
kontakt z materiałami takimi jak mąka,
wapno w proszku, mleko w proszku itp.
należy wytrzepać przed włożeniem do
pralki. Kurz i proszki z rzeczy do prania
mogą się odkładać na wewnętrznych
częściach pralki i z czasem spowodować
jej uszkodzenie.
5.3 Wskazówki w zakresie oszczędzania energii i wody
Następujące informacje pomogą użytkować urządzenie w sposób przyjazny środowisku naturalnemu i energooszczędny/wodooszczędny.
• Używaj urządzenia przy maksymalnym
obciążeniu dla wybranego programu, ale
go nie przeładowuj. Patrz „Tabela programów i zużycia”.
• Przestrzegaj zaleceń dotyczących tempe-
ratury podanych na opakowaniu detergentu.
• Pierz lekko zabrudzoną bieliznę w niskich
temperaturach.
• Wybierz szybkie programy dla lekko za-
brudzonych i małych ilości prania.
• Nie stosuj prania wstępnego ani wyso-
kich temperatur do prania rzeczy niezbyt
zabrudzonych i niepoplamionych.
• Jeśli zamierzasz suszyć pranie w suszar-
ce, wybierz najwyższą prędkość wirowania zalecaną dla danego programu prania.
• Nie używaj więcej detergentu niż jest to
wskazane na jego opakowaniu.
5.4 Wkładanie rzeczy do prania
1. Otwórz drzwiczki.
2. Włożyć luźno rzeczy do prania do pralki.
3. Docisnąć drzwiczki, aż rozlegnie się od-
głos zamka, aby je zamknąć. Upewnić
się, że nic nie utknęło w drzwiczkach. W
trakcie wykonywania programu drzwiczki są zablokowane. Drzwi otworzą się po
zakończeniu programu. Wówczas można będzie otworzyć drzwiczki pralki. Jeśli drzwiczki się nie otwierają, należy zastosować rozwiązania opisane w sekcji
Rozwiązywanie problemów „Nie można
otworzyć drzwiczek”.
PL / 14
PL
EN
Page 15
5.5 Prawidłowa ilość wsadu
Maksymalny wsad zależy od rodzaju tkaniny, stopnia zabrudzenia i wybranego programu prania.
Pralka automatycznie reguluje ilość wody w
zależności od masy włożonego do niej prania.
Postępować zgodnie z informacjami zawartymi w „Tabeli programów”. Przeładowanie skutkuje
zmniejszeniem sprawności pralki.
Ponadto mogą wystąpić nadmierne
drgania i hałas.
5.6 Stosowanie detergentu i środka zmiękczającego
OSTRZEŻENIE
Jeśli używasz detergentów, zmiękczaczy, krochmalu, wybielaczy,
środków odbarwiających i zapobiegających osadzaniu się kamienia,
przeczytaj instrukcje producenta na
opakowaniu i postępuj zgodnie z
podanymi informacjami dotyczącymi dawkowania. Jeśli to możliwe,
używać miarki do dozowania.
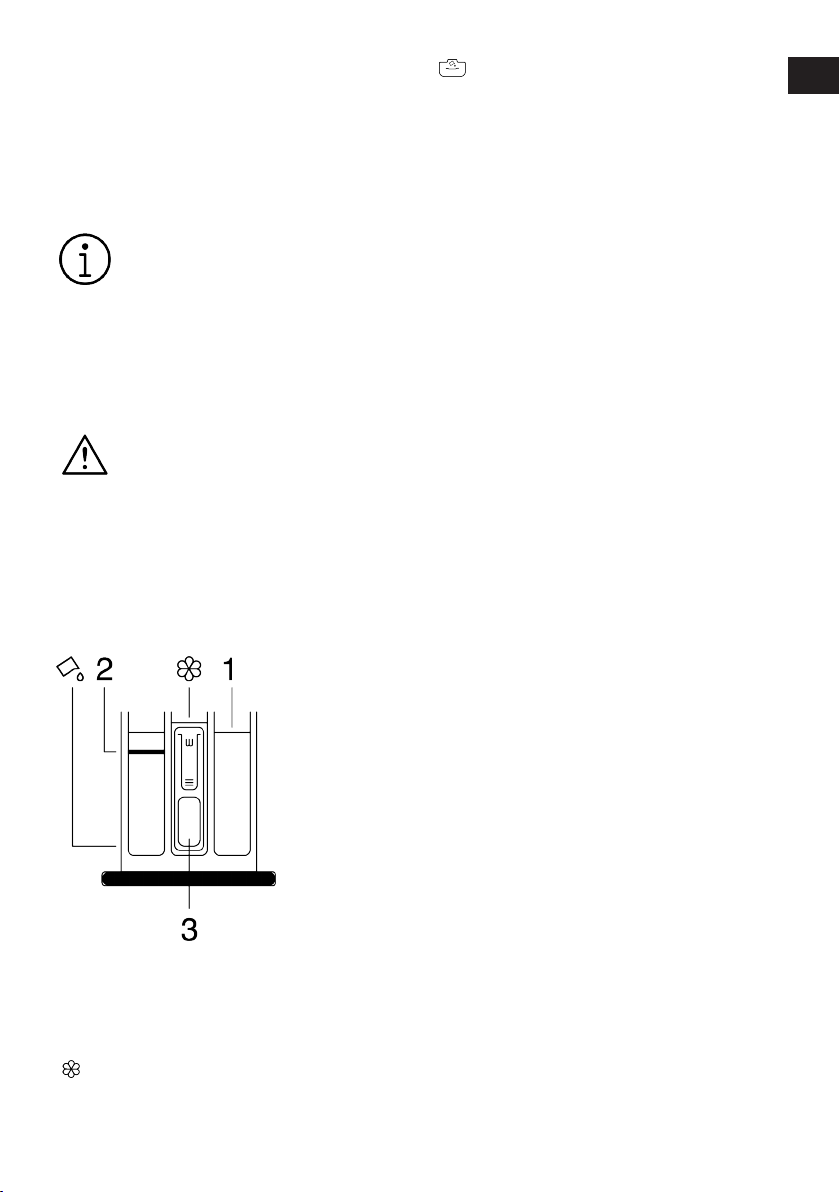
Szuflada na detergent składa się z trzech
części:
(1) do prania wstępnego,
(2) do prania głównego,
(3) na środek zmiękczający,
) w komorze na środek zmiękczający
(
znajduje się syfon.
) w głównej komorze znajduje się zbior-
(
nik do stosowania detergentu w płynie.
Detergent, środek zmiękczający i inne
środki czyszczące
• Detergent i środek zmiękczający dodawać przed uruchomieniem programu prania.
• Nigdy nie należy zostawiać szuflady na
detergent otwartej podczas trwania programu prania!
• W przypadku korzystania z programu bez
prania wstępnego nie należy dodawać
detergentu do komory prania wstępnego
(komora nr „1”).
• Jeśli używasz programu z praniem
wstępnym, uruchom urządzenie po dodaniu detergentu w proszku do przegródki
prania wstępnego i głównego (przegródki
1 i 2).
• Nie wybierać programu z praniem wstępnym, jeśli używany jest detergent w saszetce lub kuli dozującej. Detergent w saszetce lub kulę dozującą włożyć bezpośrednio do bębna pralki razem z rzeczami do prania.
• Jeśli używasz detergentu w płynie, postępuj zgodnie ze wskazówkami zawartymi
w części „Stosowanie detergentu w płynie” i nie zapomnij ustawić urządzenia na
detergent w płynie we właściwej pozycji.
Wybór typu detergentu
Rodzaj detergentu zależy od programu prania, typu tkanin oraz ich koloru.
• Do prania rzeczy białych i kolorowych należy używać różnych detergentów.
• Odzież delikatną pierz tylko w specjalnych detergentach (detergenty w płynie,
szampon do wełny itp.) przeznaczonych
wyłącznie do prania rzeczy delikatnych,
stosując jednocześnie sugerowane programy.
• Do prania odzieży o ciemnych barwach
oraz kołder zalecane jest używanie detergentu w płynie.
• Tkaniny wełniane należy prać przy użyciu
środków przeznaczonych specjalnie do
tego celu, korzystając z sugerowanego
programu.
PL
EN
PL / 15
Page 16
• Zapoznaj się z częścią zawierającą opisy
programów, aby poznać sugerowane programy do wybranych typów tkanin.
• Wszystkie rekomendacje dotyczące detergentów mają zastosowanie przy wybranym zakresie temperatur dla różnych
programów.
Należy używać wyłącznie detergentów, zmiękczaczy i dodatków odpowiednich do pralek.
Nie używać mydła w proszku.
Dostosowanie ilości detergentu
Ilość detergentu zależy od ilości prania,
stopnia zabrudzenia i twardości wody.
• Nie przekraczaj zalecanych wartości dozowania na opakowaniu detergentu, aby
wyeliminować nadmierną pianę i problemy z płukaniem, zaoszczędzić pieniądze i
chronić środowisko.
• Używaj mniejszych ilości detergentu do
lekko lub nieznacznie zabrudzonego prania.
Stosowanie środków zmiękczających
Nalać środek zmiękczający do właściwej
komory szuflady na detergent.
• Nie przekraczać maksymalnego poziomu
oznaczonego znakiem (>max<) w komorze na środek zmiękczający.
• Jeśli zmiękczacz nie jest płynny, rozcieńcz go wodą przed umieszczeniem w
przegródce na środek zmiękczający.
OSTRZEŻENIE
Nie używaj detergentów w płynie
ani innych materiałów o właściwościach czyszczących, chyba że są
one przeznaczone do stosowania w
pralkach do zmiękczania prania.
Stosowanie detergentów w płynie
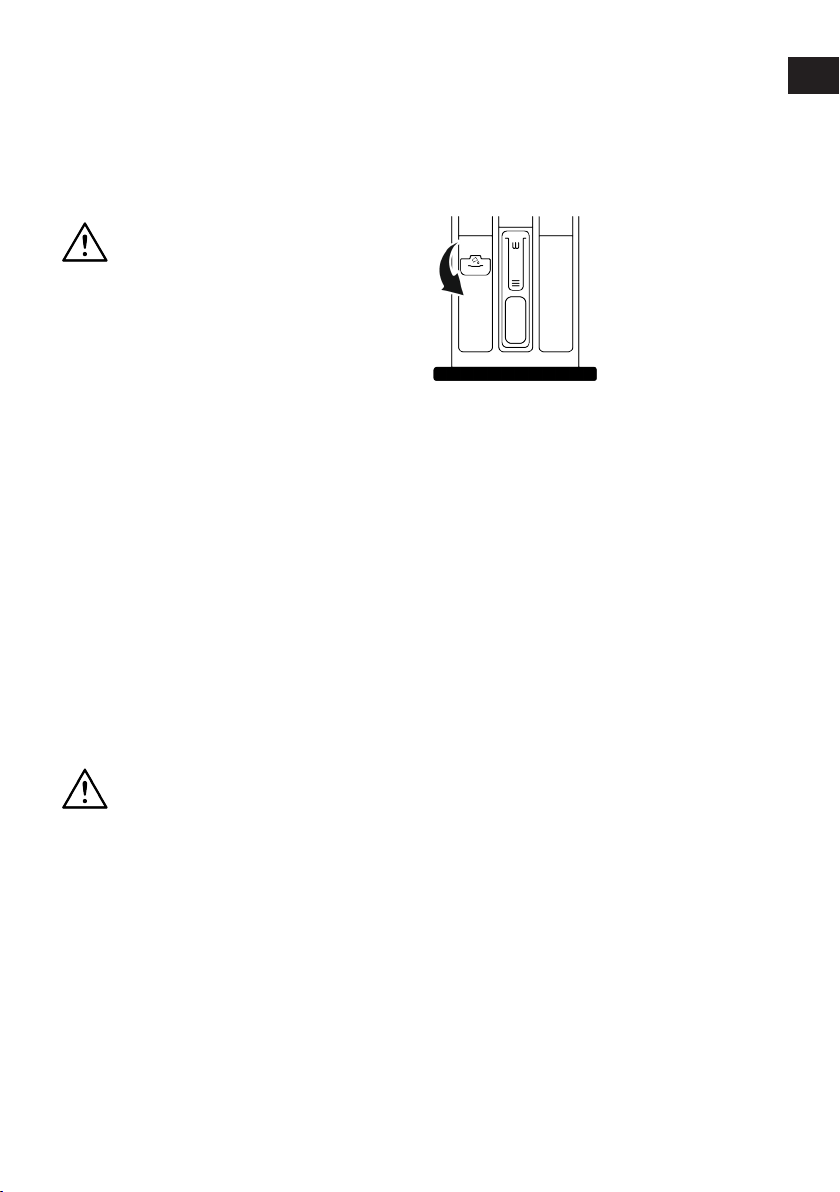
Jeśli wyrób zawiera zbiornik na detergent
w płynie:
• Naciśnij i obróć urządzenie w miejscu, w
którym jest pokazane, jeśli chcesz użyć
detergentów w płynie. Część opadająca
w dół posłuży jako bariera dla detergentu
w płynie.
• Jeśli to konieczne wyczyść za pomocą
wody wyjmując zbiornik lub nie. Nie zapomnij umieścić zbiornika po czyszczeniu w głównej komorze prania (komora nr
„2”).
• Jeśli używany jest detergent w proszku,
zbiornik powinien być podniesiony.
Detergent w żelu i tabletkach
• Jeśli używasz detergentu w płynie, a w
pralce nie ma odpowiedniej przegródki,
umieść detergent w żelu w głównej przegródce na detergent do prania przy pierwszym wlaniu wody. Jeśli pralka jest wyposażona w pojemnik na detergent w płynie, napełnić zbiornik detergentem przed
uruchomieniem programu.
• Jeśli detergent w żelu nie jest płynny lub
ma postać tabletki z kapsułką z płynem,
należy włożyć go bezpośrednio do bębna
przed praniem.
• Włożyć tabletki detergentu do komory
prania głównego (komory nr 2) lub bezpośrednio do bębna pralki przed praniem.
Krochmalenie
• Wlać krochmal w płynie, wsypać krochmal w proszku lub barwnik do komory na
środek zmiękczający.
• Nie używać środka zmiękczającego i
krochmalu jednocześnie w tym samym
cyklu prania.
• Po użyciu krochmalu wytrzeć wnętrze
pralki wilgotną i czystą ściereczką.
Używanie środka zapobiegającego osadzaniu się kamienia
• W razie potrzeby używaj wyłącznie środka zapobiegającego osadzaniu się kamienia przeznaczonego do pralek.
PL
EN
PL / 16
Page 17
Stosowanie wybielaczy i odbarwiaczy
• Wybierz program z praniem wstępnym i
dodaj wybielacz na początku prania
wstępnego. Nie dodawać detergentu do
komory prania wstępnego. Jako rozwiązanie alternatywne wybrać program z dodatkowym płukaniem i dodać wybielacz
w trakcie pobierania przez pralkę wody z
komory na detergent na pierwszym etapie płukania.
• Nie mieszaj i nie używaj razem wybielacza i detergentu.
• Wybielacz może powodować podrażnienia skóry, dlatego używaj tylko niewielkich ilości (1/2 filiżanki herbaty - około 50
• Nie wylewać wybielacza na pranie.
• Nie używaj wybielacza do kolorowych
ubrań.
• Wybierz program z praniem w niskiej
temperaturze i z odbarwiaczami na bazie
utleniacza.
• Odbarwiacz na bazie utleniacza można
stosować razem z detergentem. Jeśli
jednak nie ma takiej samej lepkości jak
detergent, najpierw umieść detergent w
komorze nr „2” w szufladzie na detergent
i poczekaj, aż pralka wypłucze detergent
podczas poboru wody. Dodaj odbarwiacz
do tej samej komory, podczas gdy pralka
nadal nabiera wodę.
ml) i dobrze wypłucz pranie.
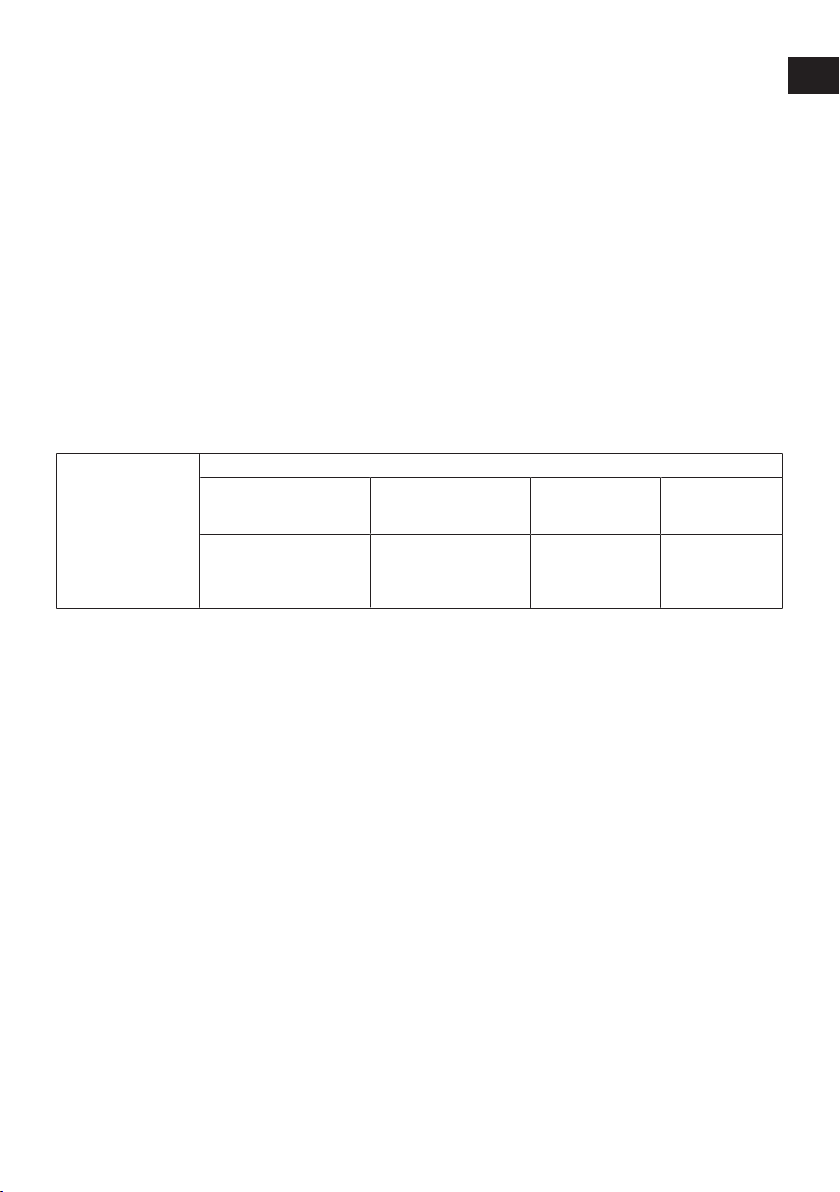
5.7 Wskazówki dotyczące skutecznego prania
Odzież
Kolory jasne i biały Kolory
(Zalecana temperatura
zależna od stopnia zabrudzenia: 40-90 °C)
(Zalecana temperatura
zależna od stopnia zabrudzenia: zimno -40 °C)
Kolory ciemne/
czarny
(Zalecana temperatura zależna od
stopnia zabrudzenia: zimno -40 °C)
PL
EN
Tkaniny delikatne/wełniane/jedwabne
(Zalecana temperatura zależna od
stopnia zabrudzenia: zimno -30 °C)
PL / 17
Page 18
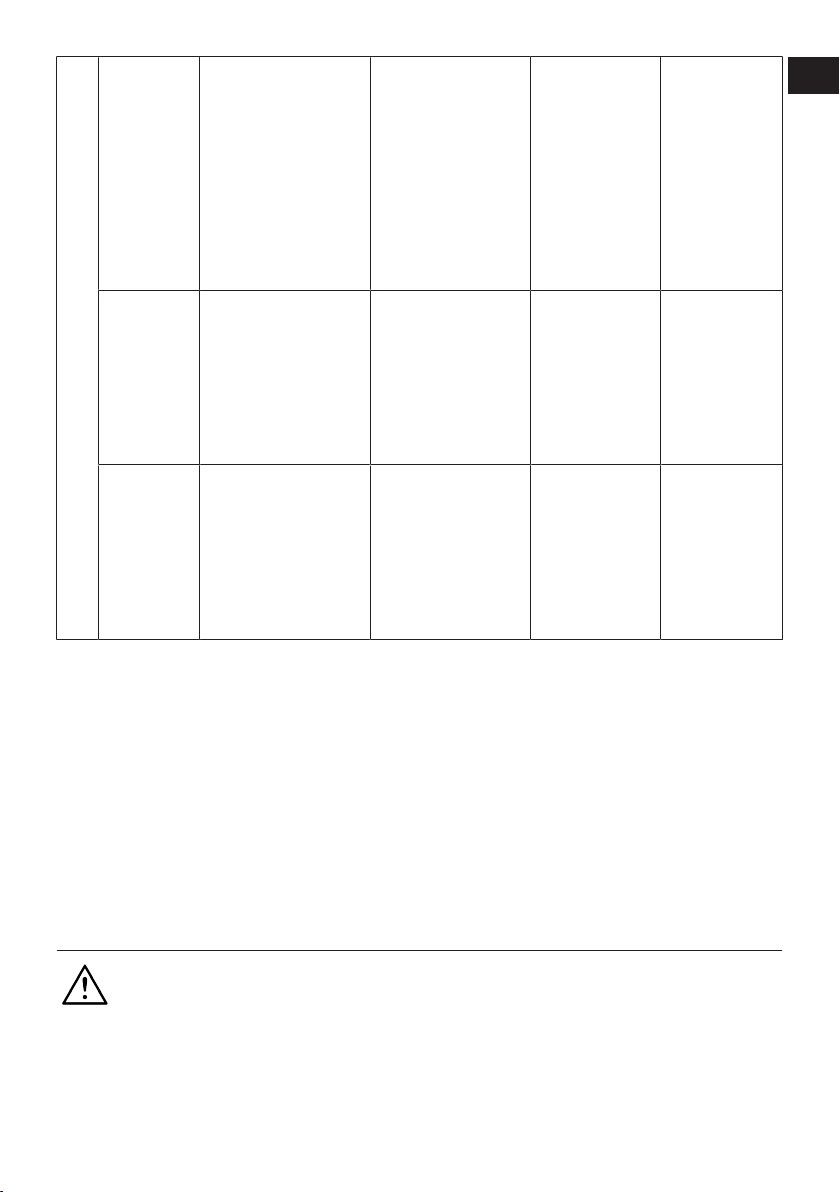
Konieczne może być
wstępne usunięcie plam
lub pranie wstępne.
Proszków i płynów prze-
Bardzo zabrudzone
(trudne do usu-
Stopień zabrudzenia
nięcia plamy z
trawy, kawy,
owoców i krwi)
Normalnie zabrudzona
(na przykład
zabrudzenia na
kołnierzykach i
mankietach)
Lekko zabrudzona
(brak widocznych plam)
znaczonych do prania białej odzieży należy używać
w dawkach zalecanych do
prania bardzo zabrudzonej odzieży. Do usuwania
plam z gliny i ziemi oraz
wrażliwych na wybielacze
zaleca się stosowanie detergentów w proszku.
Proszki i płyny przeznaczone do prania białej
odzieży można stosować
w dawkach zalecanych do
prania normalnie zabrudzonej odzieży.
Proszki i płyny przeznaczone do prania białej
odzieży można stosować
w dawkach zalecanych do
prania lekko zabrudzonej
odzieży.
Proszki i płyny przeznaczone do prania kolorowej odzieży należy stosować w dawkach zalecanych do prania bardzo
zabrudzonej odzieży. Do
usuwania plam z gliny i
ziemi oraz wrażliwych
na wybielacze zaleca się
stosowanie detergentów
w proszku. Należy użyć
detergentów, które nie
zawierają odbarwiacza.
Proszki i płyny przeznaczone do prania kolorowej odzieży można stosować w dawkach zalecanych do prania normalnie zabrudzonej
odzieży. Należy użyć detergentów, które nie zawierają odbarwiacza.
Proszki i płyny przeznaczone do prania kolorowej odzieży należy stosować w dawkach zalecanych do prania lekko
zabrudzonej odzieży.
Należy użyć detergentów, które nie zawierają
odbarwiacza.
Płynne detergenty
przeznaczone do
prania kolorowej i
czarnej/ciemnej
odzieży należy stosować w dawkach
zalecanych do prania bardzo zabrudzonej odzieży.
Płynne detergenty
przeznaczone do
prania kolorowej i
czarnej/ciemnej
odzieży należy stosować w dawkach
zalecanych do prania średnio zabrudzonej odzieży.
Płynne detergenty
przeznaczone do
prania kolorowej i
czarnej/ciemnej
odzieży należy stosować w dawkach
zalecanych do prania lekko zabrudzonej odzieży.
Do tkanin delikatnych zalecane jest
stosowanie detergentów w płynie.
Wełna i jedwab
muszą być prane
w specjalnych detergentach przeznaczonych do
prania wełny.
Do tkanin delikatnych zalecane jest
stosowanie detergentów w płynie.
Wełna i jedwab
muszą być prane
w specjalnych detergentach przeznaczonych do
prania wełny.
Do tkanin delikatnych zalecane jest
stosowanie detergentów w płynie.
Wełna i jedwab
muszą być prane
w specjalnych detergentach przeznaczonych do
prania wełny.
PL
EN
5.8 Czas trwania programu
Czas trwania programu można zobaczyć
na wyświetlaczu pralki po wybraniu programu. Czas jest automatycznie dostosowywany podczas pracy w zależności od ilości
prania umieszczonego w pralce, stopnia
spienienia, wyważenia wsadu, wahań w dostawie prądu, ciśnienia wody i ustawień
programu.
6 Obsługa urządzenia
Najpierw przeczytaj Instrukcje bezpieczeństwa
SYTUACJA SPECJALNA: Na początku programów Bawełna i Bawełna Eko wyświetlacz pokazuje czas trwania dla połowy
maksymalnego wsadu, co jest najczęściej
spotykanym wariantem. Po uruchomieniu
programu w ciągu 20- 25 minut pralka wykryje rzeczywistą objętość wsadu. Jeśli będzie ona większa niż połowa maksymalnego wsadu, program prania zostanie odpowiednio dostosowany, a czas jego trwania
automatycznie wydłużony. Możesz śledzić
tę zmianę na wyświetlaczu.
PL / 18
Page 19
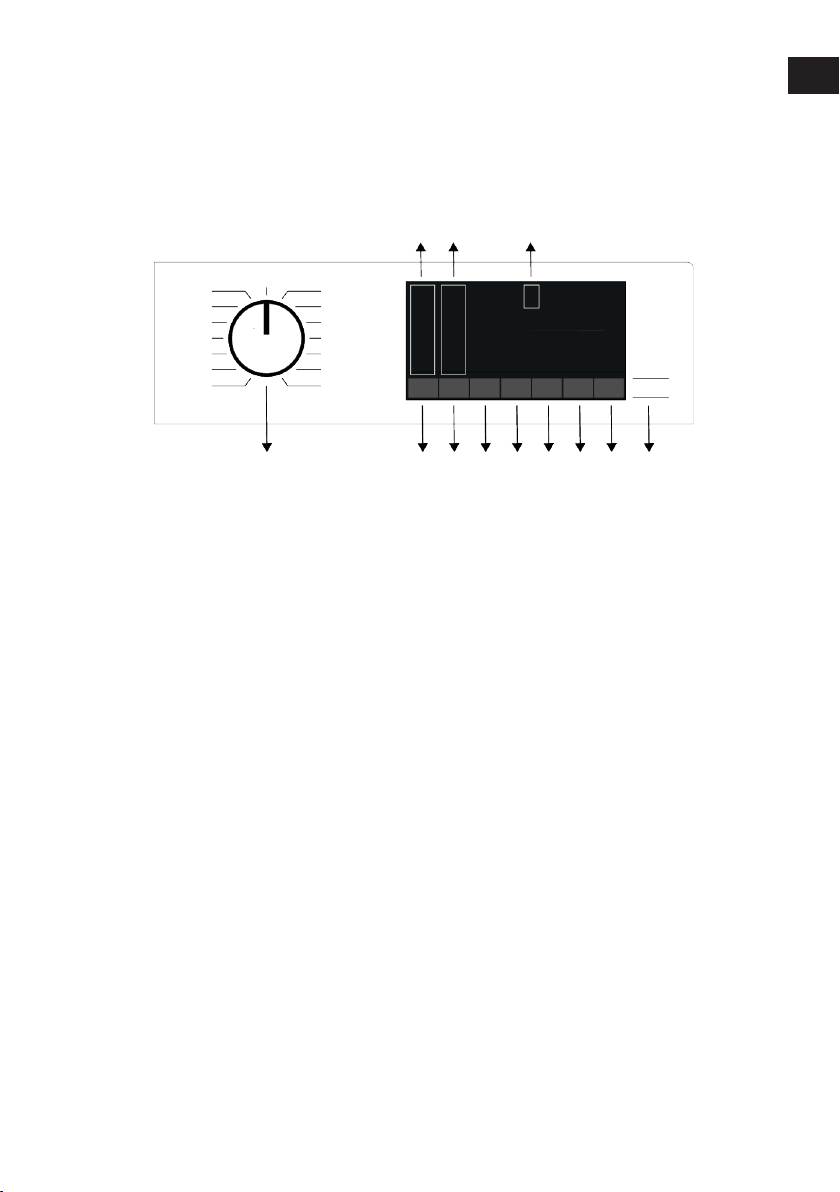
6.1 Panel kontrolny
1
2 3 4
56789101112
PL
EN
1 Przycisk wyboru programu 2 Wskaźniki świetlne temperatury
3 Wskaźniki świetlne prędkości wiro-
wania
5 Przycisk Start/Pauza 6 Przycisk zdalnego sterowania
7 Przycisk nastawiania godziny zakoń-
czenia
9 Przycisk funkcji dodatkowej 2 10 Przycisk funkcji dodatkowej 1
11 Przycisk ustawiania prędkości wiro-
wania
4 Wyświetlacz
8 Przycisk funkcji dodatkowej 3
12 Pokrętło regulacji temperatury
PL / 19
Page 20
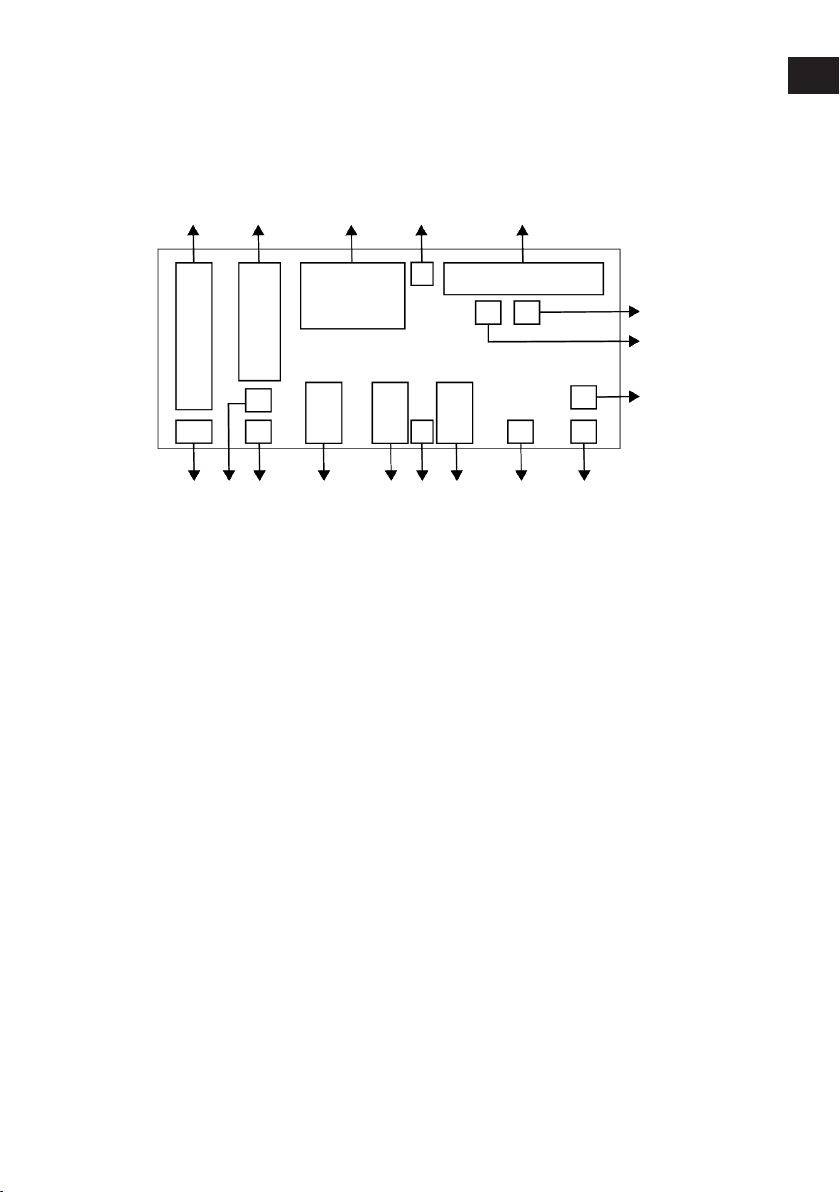
6.2 Symbole na wyświetlaczu
1 2 3 4 5
6
7
8
91011121314151617
PL
EN
1 Wskaźnik temperatury 2 Wskaźnik prędkości wirowania
3 Informacje o czasie trwania 4 Symbol włączenia blokady drzwiczek
5 Wskaźnik kolejnych kroków progra-
mu
7 Dodaj wskaźnik odzieży 8 Wskaźnik połączenia bezprzewodo-
9 Wskaźnik zdalnego sterowania 10 Symbol włączenia funkcji opóźnione-
11 Wskaźniki funkcji pomocniczej 3 12 Symbol włączonej blokady dziecięcej
13 Wskaźniki funkcji pomocniczej 2 14 Wskaźniki funkcji pomocniczej 1
15 Wskaźnik trybu Bez wirowania 16 Wskaźnik trybu Zatrzymanie płukania
17 Wskaźnik zimnej wody
6 Wskaźnik braku wody
wego
go startu
PL / 20
Page 21
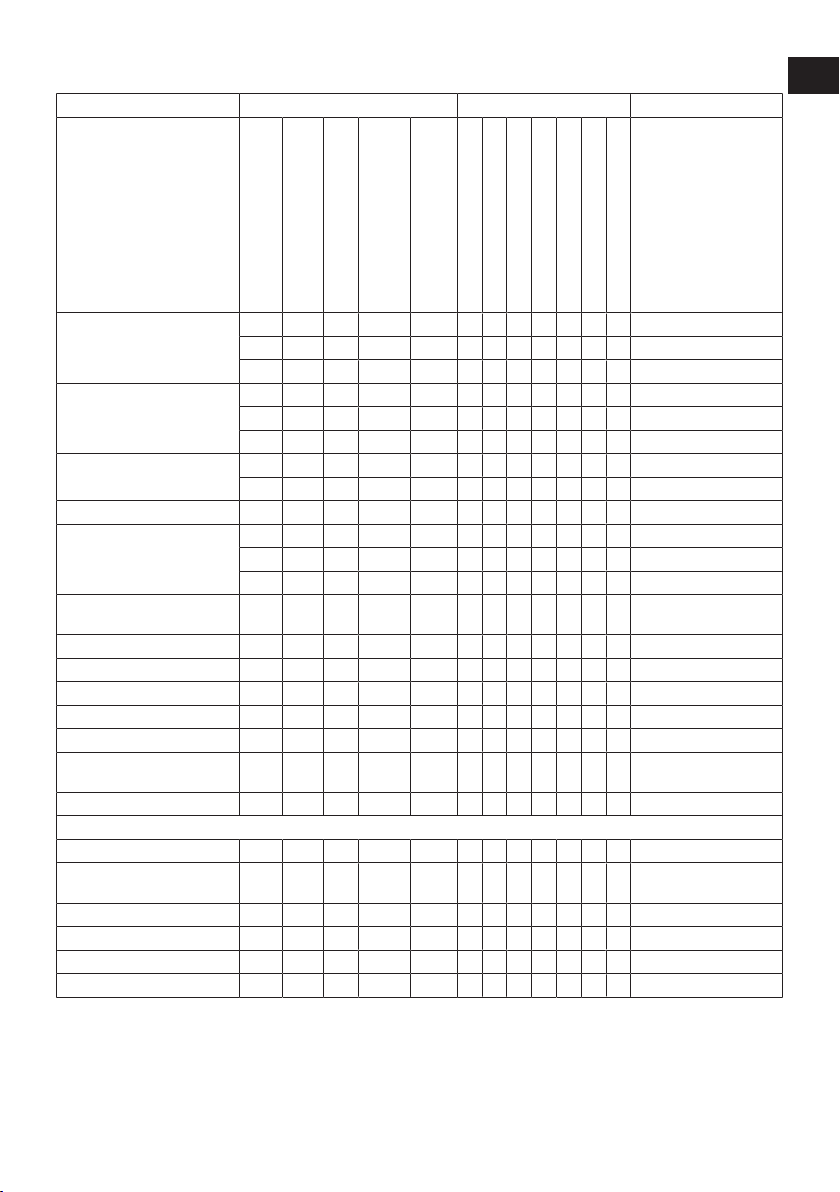
6.3 Tabela programów i zużycia
Funkcje dodatkowe
PL
EN
Program
Temperatura °C
90 7,0 94,0 2,300 1400 • • • • • • • Zimny - 90
Bawełna
Eco 40-60
Syntetyki
Mieszane 40 3,0 68,0 0,750 800 • • • • • Zimny - 40
Szybki 28’
Szybki 28’ +
Szybki/Intensywne
Puchowe 60 2,0 75,0 1,200 800 • • • Zimny - 60
Wełna / Delikatne 40 1,5 53,0 0,500 800 • Zimny - 40
Czyszczenie bębna 90 - 73,0 2,600 600 * 90
20°C 20 7,0 92,0 0,700 1400 • • • • • • • 20
Ciemne ubrania 40 3,0 75,0 0,800 1200 • • • • • * Zimny - 40
Intensywne pranie 90 7,0
Odświeżanie parą - 1,0 1,5 0,110 - * -
Koszule 60 3,0 57,0 1,200 800 • • • • * • • Zimny - 60
Pranie w niskiej temperatu-
rze
Ręcznik 60 2,0 75,0 1,200 800 • • * Zimny - 60
Zasłony 40 2,0 86,0 0,650 800 • • * Zimny - 40
Sports (Sportowe) 40 3,0 51,0 0,550 1200 • Zimny - 40
Bielizna 30 1,0 70,0 0,300 600 * Zimny - 30
60 7,0 94,0 1,700 1400 • • • • • • • Zimny - 90
40 7,0 92,0 1,050 1400 • • • • • • • Zimny - 90
40*** 7,0 53,0 0,625 1400 40-60
40*** 3,5 42,0 0,413 1400 40-60
40*** 2,0 30,0 0,222 1400 40-60
60 3,0 65,0 1,200 1200 • • • • • • • Zimny - 60
40 3,0 63,0 0,850 1200 • • • • • • • Zimny - 60
90 7,0 66,0 2,150 1400 • • • • Zimny - 90
60 7,0 66,0 1,150 1400 • • • • Zimny - 90
30 7,0 66,0 0,200 1400 • • • • Zimny - 90
30 2,0 39,0 0,150 1400 • • • • Zimny - 90
- 3,5 40,0 0,300 1400
• : Do wyboru.
* : Funkcje wybierane automatycznie, nie
można ich anulować.
Pobór wody (l)
Maksymalna ładowność (kg)
120,
2,800 1400 * * 20-90
0
Program z aplikacji
Maks. prędkość
Wartość zużycia energii (kWh)
Fresh Care
Szybki/Intensywne
Pranie wstępne
Namaczanie
Para
*** : Program Eco 40-60 to program testowy zgodnie z wyborem temperatury 40°C,
rozporządzeniem UE UE/2019/2014 i EN
Temperatura °C
Oszczędzać wodę
Dodatkowe płukanie
Zimny
60456: Norma 2016 / A11: 2020.
PL / 21
Page 22
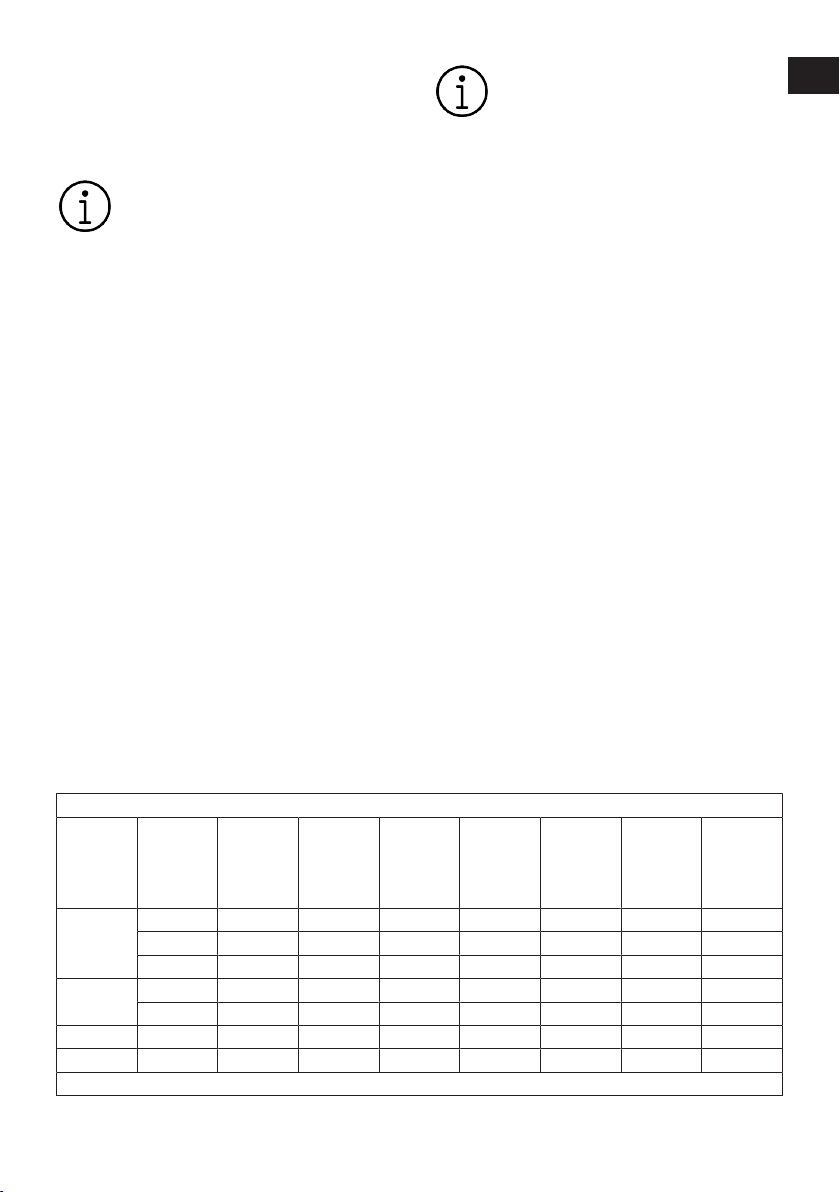
***** : Tych programów można używać z
aplikacją HomeWhiz. Pobór mocy może
wzrosnąć z powodu połączenia.
- : Maksymalne ilości prania podano w opisie programów.
Przed pierwszym użyciem zapoznaj
się z rozdziałem Instalacja.
Funkcje pomocnicze podane w tabeli mogą się różnić zależnie od
modelu pralki.
Zużycie wody i energii może różnić
się w zależności od ciśnienia, twardości i temperatury wody, temperatury otoczenia, typu i ilości rzeczy
do prania, wyboru funkcji pomocniczych, prędkości wirowania oraz
wahań napięcia w sieci elektrycznej.
Producent może zmieniać schematy wyboru funkcji pomocniczych.
Może dodawać nowe schematy lub
usuwać dotychczasowe.
„Prędkości wirowania pralki mogą
różnić się w zależności od programu, nie mogą jednak przekroczyć
maksymalnej prędkości wirowania”.
Poziom hałasu i wilgotności zmienia się w zależności od prędkości
wirowania; gdy w trybie wirowania
wybrana jest wyższa prędkość wirowania, pranie zawiera mniej wilgoci, ale pod koniec programu słychać większy hałas.
Czas trwania prania można zobaczyć na wyświetlaczu pralki po wybraniu programu. Zależnie od ilości
włożonego prania może występować różnica 1–1,5 godziny między
wartością na wyświetlaczu a rzeczywistym czasem trwania cyklu
prania. Czas trwania zostanie zaktualizowany automatycznie wkrótce
po rozpoczęciu prania.
Należy zawsze wybierać najniższą
wymaganą temperaturę. Najbardziej wydajne programy pod względem zużycia energii to na ogół te,
które działają w niższych temperaturach i dłużej.
Informacje o prędkości wirowania
podane w tabeli programów wskazują opcję prędkości wirowania wyświetlaną na panelu sterowania.
PL
EN
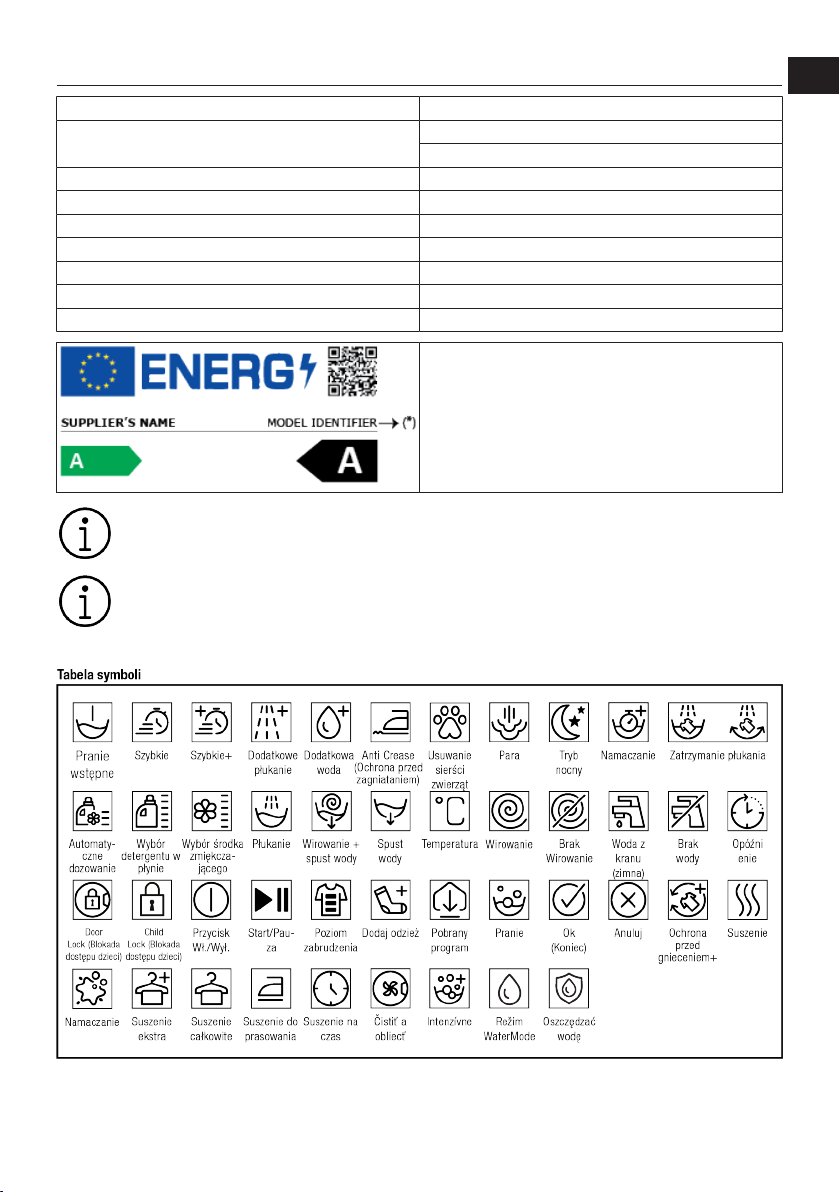
Wartości zużycia (PL)
Maksymal-
Wybór temperatury °C
Eco 40-60
Bawełna
Syntetyki 40 1200 3,0 02:10 0,850 63,0 40 40,0
Szybki 28’ 30 1400 7,0 00:28 0,200 66,0 23 62,0
Wartości zużycia podane dla programów innych niż program Eco 40-60 mają jedynie charakter orientacyjny.
na prędkość wirowania
(cykl/min)
40 1351 7,0 03:27 0,625 53,0 32 53,0
40 1351 3,5 02:41 0,413 42,0 29 53,0
40 1351 2,0 02:41 0,222 30,0 23 55,9
20 1400 7,0 03:15 0,700 92,0 20 53,9
60 1400 7,0 03:15 1,700 94,0 60 53,9
Pojemność
(kg)
Czas trwania programu (h:min)
Wartość zużycia energii (kWh/
cykl)
Pobór wody
(litr/cyk)
Temperatura prania
(°C)
Procent wilgotności
resztkowej
(%)
PL / 22
Page 23
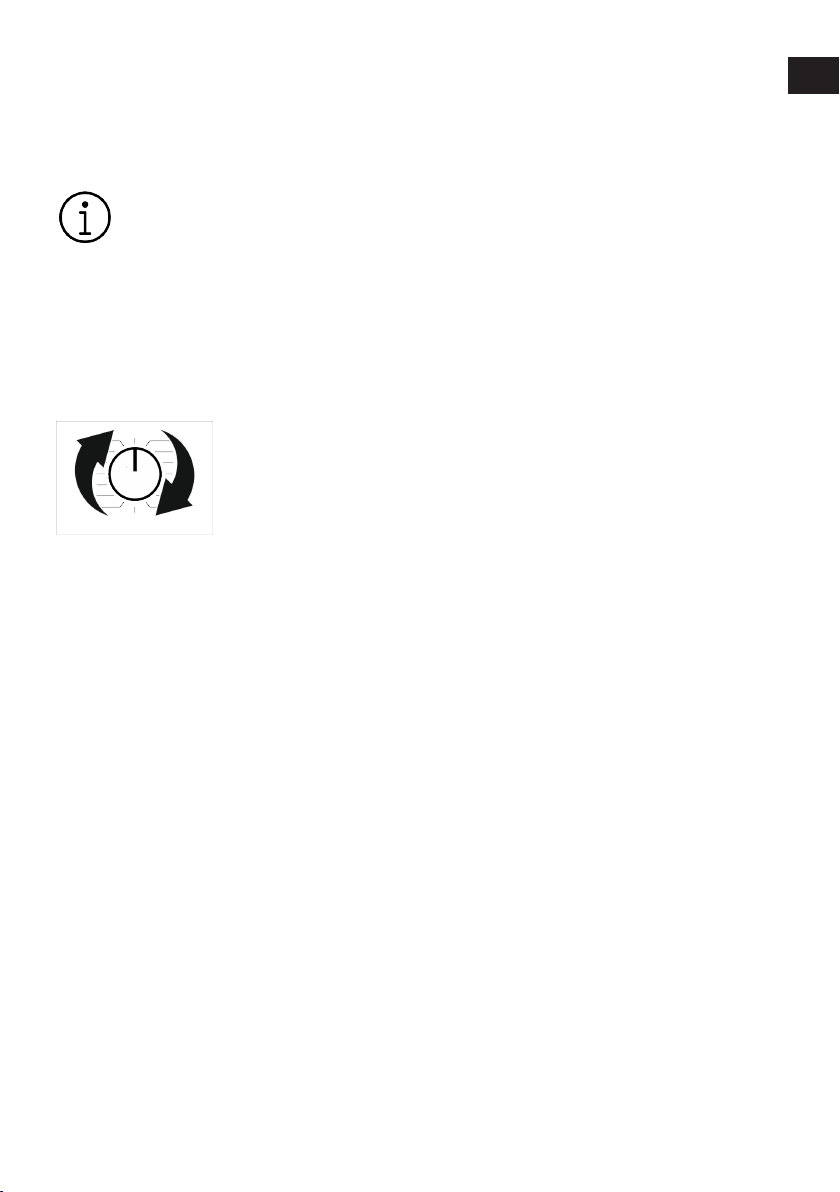
6.4 Wybór programu
1. Wybrać program odpowiedni do typu
rzeczy do prania, ich ilości oraz stopnia
zabrudzenia zgodnie z „Tabelą programów i zużycia”.
Zastosowanie odpowiedniego programu jest wyznaczone przez maksymalną prędkość wirowania danego rodzaju tkaniny.
Przy wyborze programu należy zawsze uwzględnić rodzaj tkaniny, kolor, stopień zabrudzenia oraz dopuszczalną temperaturę wody.
2. Wybierz żądany program za pomocą pokrętła wyboru programu.
6.5 Programy
• Eco 40-60
W programie Eco 40-60 można prać normalnie zabrudzone rzeczy bawełniane przeznaczone do wspólnego prania w temperaturze 40°C lub 60°C. Ten program jest standardowym programem testowym zgodnie z
prawodawstwem UE dotyczącym projektowania przyjaznego dla środowiska i etykietą energetyczną.
Chociaż ten program pierze dłużej niż inne
programy, jest bardziej wydajny pod względem zużycia energii i wody. Rzeczywista
temperatura wody może się różnić od podanej temperatury prania. Po załadowaniu
pralki mniejszą ilością prania (np. do połowy pojemności lub mniej) czas trwania etapów programu może zostać automatycznie
skrócony. W ten sposób zużycie energii i
wody byłoby znacznie mniejsze.
• Bawełna
Służy do prania trwałych tkanin bawełnianych (prześcieradeł, pościeli, ręczników,
szlafroków, bielizny itp.). Naciśnięcie przycisku funkcji szybkiego prania znacznie
skraca czas trwania programu, mimo to
skuteczność prania nie zmniejsza się dzięki
intensywnym ruchom piorącym. Jeśli nie
zostanie naciśnięty przycisk funkcji szybkiego prania, zachowana jest doskonała jakość prania i płukania mocno zabrudzonych rzeczy.
• Syntetyki
W tym programie możesz prać pranie (takie
jak koszule, bluzki, tkaniny z domieszką
syntetyczną/bawełnianą itp.). Po naciśnięciu przycisku funkcji szybkiego prania czas
trwania programu zostanie znacznie skrócony, a pranie nie jest bardzo brudne, a pranie nie jest bardzo brudne. Jeśli funkcja
szybkiego prania nie jest wybrana, mocno
zabrudzone pranie jest zapewnione przy
skutecznej wydajności prania.
Jeśli Twój produkt nie ma określonego programu zasłon, możesz skorzystać z tego
programu. Pierz zasłony w temperaturze
maksymalnie 40 °C i z prędkością wirowania do 800 obr./min.
• Wełna / Delikatne
Służy do prania rzeczy wełnianych/delikatnych. Należy dobrać odpowiednią temperaturę zgodnie ze wskazaniami znajdującymi
się na metkach odzieży. Ten program pierze bardzo delikatnie, aby nie uszkodzić
pranych rzeczy.
• Intensywne pranie
Zastosowanie pary na początku programu
ułatwi zmiękczenie brudu.
Tego programu można używać do prania
rzeczy, które nie mogą uczulać i muszą być
prane w wysokich temperaturach, w intensywnym i długim cyklu (ubranka dziecięce,
prześcieradła, pościel, bielizna i inne podobne bawełniane rzeczy). Higieniczne warunki prania są zachowywane dzięki zastosowaniu pary przed rozpoczęciem programu, długiemu czasowi nagrzewania oraz
dodatkowemu etapowi płukania.
• Puchowe
Program ten służy do prania płaszczy, kamizelek, kurtek itp. zawierających pierze
oznaczonych „do prania w pralce”. Dzięki
PL / 23
PL
EN
Page 24
specjalnym profilom wirowania woda dociera do pokładów powietrza między piórami.
Parę stosuje się po zakończeniu programu
w celu zmiękczenia dużych rzeczy, takich
jak ręczniki
• Wirowanie & Odpompowanie
Ten program służy do odprowadzenia wody
z odzieży/pralki.
• Płukanie & Wirowanie
Program pozwala dodatkowo wypłukać lub
wykrochmalić pranie.
• Odświeżanie parą
Nadaje się do niewielkiej liczby rzeczy z
tkanin bawełnianych, syntetycznych lub
mieszanych bez plam i silnych zabrudzeń.
Program ten nie służy do prania.
Podczas tego programu nie dodawaj do szuflady na detergenty środków chemicznych, takich jak detergenty, wybielacze, odplamiacze itp.
• Zasłony
Program ten służy do prania firanek i zasłon. Jako że siatkowa faktura powoduje
obfite pienienie, pierze się je przy użyciu
niewielkiej ilości detergentu dodawanego
do komory prania głównego. Dzięki specjalnym parametrom wirowania na tym programie firanki i zasłony mniej się gniotą. Aby
nie uszkodzić firanek i zasłon, nie należy
przekraczać dozwolonej masy wsadu.
Na tym programie zalecane jest dodanie do komory na detergent w
proszku specjalnych detergentów
do prania firanek.
• Koszule
Program ten służy do prania razem koszul
wykonanych z bawełny oraz z tkanin syntetycznych lub z ich domieszką. Zmniejsza
on zagniecenia. Parę stosuje się po zakończeniu programu w celu ułatwienia działania funkcji redukcji zagnieceń. Specjalny
profil obrotów i zastosowanie pary po zakończeniu programu umożliwiają redukcję
zagnieceń koszul. Po włączeniu funkcji
szybkiego prania wykonywany jest algorytm odplamiania.
• Odplamiacz należy dodać bezpośrednio
do bębna lub do komory na detergent w
proszku. Dzięki temu można uzyskać
skuteczność prania porównywalną z normalnym trybem, ale w znacznie krótszym
czasie. Pozwala to wydłużyć trwałość koszul. Nie używaj detergentu do prania
wstępnego, jeśli chcesz korzystać z funkcji opóźnienia startu. Detergent do prania
wstępnego może wylać się na ubrania
przez co powstaną plamy.
** Zaleca się uruchomienie cyklu z nie więcej niż 6 koszulami, aby zminimalizować
poziom zagnieceń. Jeśli program jest uruchomiony z więcej niż 6 koszulami, mogą
wystąpić różnice w poziomie zagnieceń i
wilgotności na ubraniach pod koniec cyklu.
• Szybki 28’
Program służy do szybkiego prania lekko
zabrudzonej i niepoplamionej odzieży bawełnianej, ale nie do ręczników lub grubej
bawełny. Po włączeniu funkcji szybkiego
prania czas trwania programu można skrócić do 14 minut. W przypadku wybrania
funkcji szybkiego prania można włożyć do
bębna maksymalnie 2 (dwa) kg odzieży.
• Ciemne ubrania
Program pozwala chronić kolory ciemnych
lub dżinsowych ubrań. Dzięki specjalnym
ruchom bębna cechuje się wysoką jakością
prania, nawet w niskich temperaturach. Do
prania rzeczy w ciemnych kolorach zalecane jest używanie detergentu w płynie lub
szamponu do wełny. Program nie jest przeznaczony do prania tkanin delikatnych zawierających wełnę lub włókna o podobnych
właściwościach.
• Czyszczenie bębna
Aby zapewnić odpowiednią czystość, regularnie (raz na 1 do 2 miesięcy) czyść bęben.
Para jest stosowana przed programem w
celu zmiękczenia osadów w bębnie. Program należy uruchamiać przy całkowicie
pustej pralce. Aby uzyskać lepsze rezultaty,
używaj proszku do usuwania kamienia
PL
EN
PL / 24
Page 25
(środki do czyszczenia bębna) przeznaczonego do pralek, gdy wybrana jest funkcja
detergentu w proszku. Po zakończeniu programu pozostaw drzwiczki do połowy
otwarte, aby wnętrze pralki wyschło.
Program ten nie służy do prania.
Jest to program do konserwacji
urządzenia.
Nie uruchamiaj go, jeśli pralka nie
jest pusta. Podczas próby uruchomienia urządzenie automatycznie
wykrywa obecność ładunku w środku i może zakończyć lub wznowić
program zgodnie z modelem urządzenia. Wznowienie programu nie
zapewnia skutecznego czyszczenia.
• Mieszane
Program służy do prania razem odzieży bawełnianej i z włókien syntetycznych bez jej
sortowania.
• Bielizna
Program służy do prania delikatnej odzieży
przeznaczonej do prania ręcznego oraz delikatnej bielizny damskiej. Niewielką ilość
ubrań należy prać w siatce do prania. Przed
włożeniem do pralki należy zapiąć haftki,
guziki, zamki itp.
• Sports (Sportowe)
Program służy do prania odzieży sportowej
i wierzchniej, która zawiera bawełnę z domieszką materiałów syntetycznych oraz
warstwę wodoodporną, np. gore-tex. Specjalne ruchy obrotowe gwarantują delikatne
pranie.
• 20°C
W tym programie możesz prać lekko zabrudzoną bawełnianą bieliznę.
• Pranie w niskiej temperaturze
Program służy do prania średnio zabrudzonej i wytrzymałej bielizny z bawełny / włókien syntetycznych. Algorytm prania opracowany specjalnie dla tego programu zapewnia skuteczne pranie bez narażania bielizny na działanie wysokich temperatur.
• Program z aplikacji
Jest to specjalny program, który umożliwia
pobieranie na żądanie różnych programów.
Na początku jest to program wyświetlany w
aplikacji HomeWhiz jako domyślny. Za pomocą aplikacji HomeWhiz można jednak
wybrać żądany program z wcześniej określonego zestawu programów, a następnie
zmienić go i użyć.
Aby użyć funkcji HomeWhiz i funkcji zdalnego sterowania, należy wybrać pobrany program. Szczegółowe informacje zawiera punkt Funkcja HomeWhiz i funkcja zdalnego
sterowania
• Ręcznik
Program służy do prania wytrzymałych materiałów z bawełny, takich jak ręczniki. Należy umieścić ręczniki w pralce i upewnić
się, że nie dotykają uszczelki drzwiczek ani
szyby.
6.6 Wybieranie temperatury
Po wybraniu nowego programu zalecana
temperatura prania zostanie wyświetlona
na wskaźniku temperatury. Może się tak
zdarzyć, że zalecana wartość temperatury
nie jest temperaturą maksymalną, którą
można wybrać w bieżącym programie.
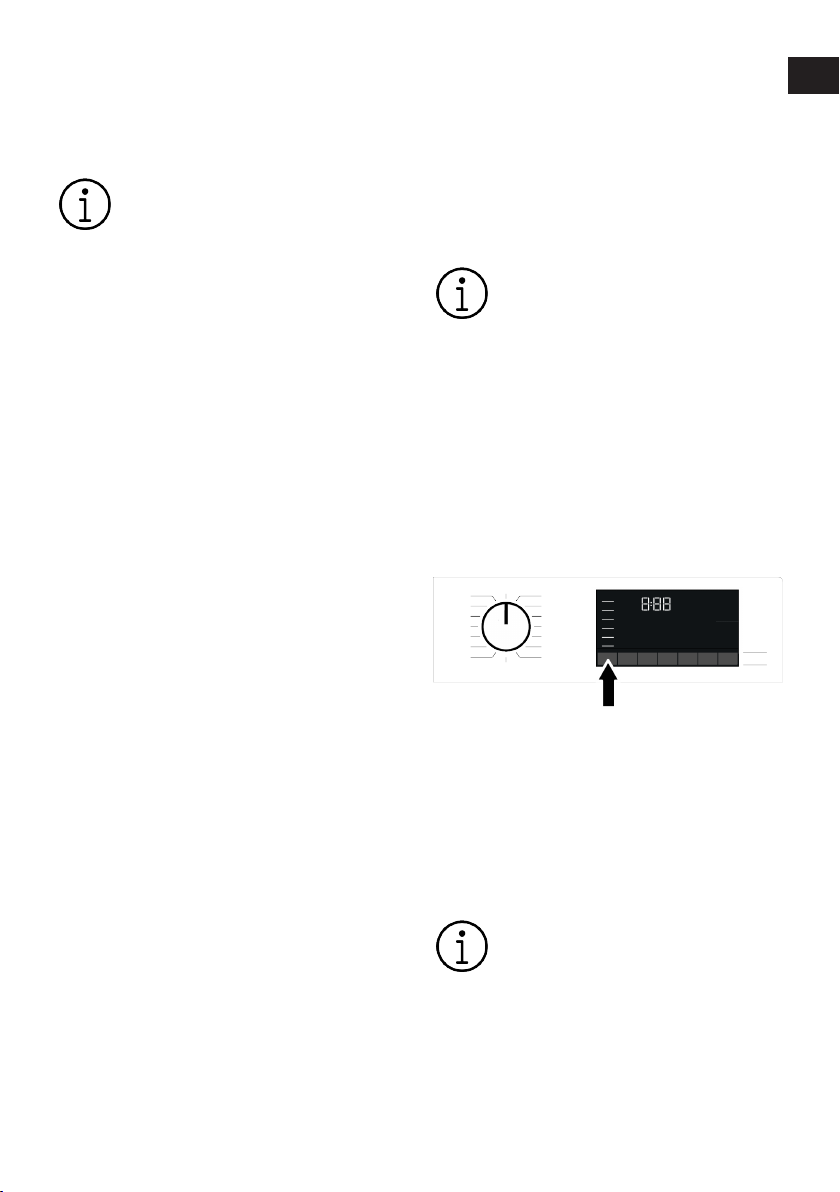
Aby zmienić temperaturę, należy nacisnąć
przycisk nastawiania temperatury. Temperatura zmniejsza się stopniowo.
Nie można dokonywać zmian w
programach, w których zmiana temperatury jest niedozwolona.
Temperaturę można zmienić także po rozpoczęciu prania. Zmianę tę można przeprowadzić, jeśli na danym etapie prania jest
dozwolona.
PL
EN
PL / 25
Page 26
Po dojściu do opcji prania na zimno
i ponownym naciśnięciu przycisku
nastawiania temperatury na wyświetlaczu pojawi się maksymalna
temperatura zalecana dla wybranego programu. Ponownie nacisnąć
przycisk nastawiania temperatury,
aby ją obniżyć.
6.7 Wybór prędkości wirowania
Po wybraniu nowego programu wskaźnik
wirowania wyświetla zalecaną prędkość wirowania w wybranym programie. Może się
tak zdarzyć, że zalecana wartość prędkości
wirowania nie jest prędkością maksymalną,
którą można wybrać dla bieżącego programu.
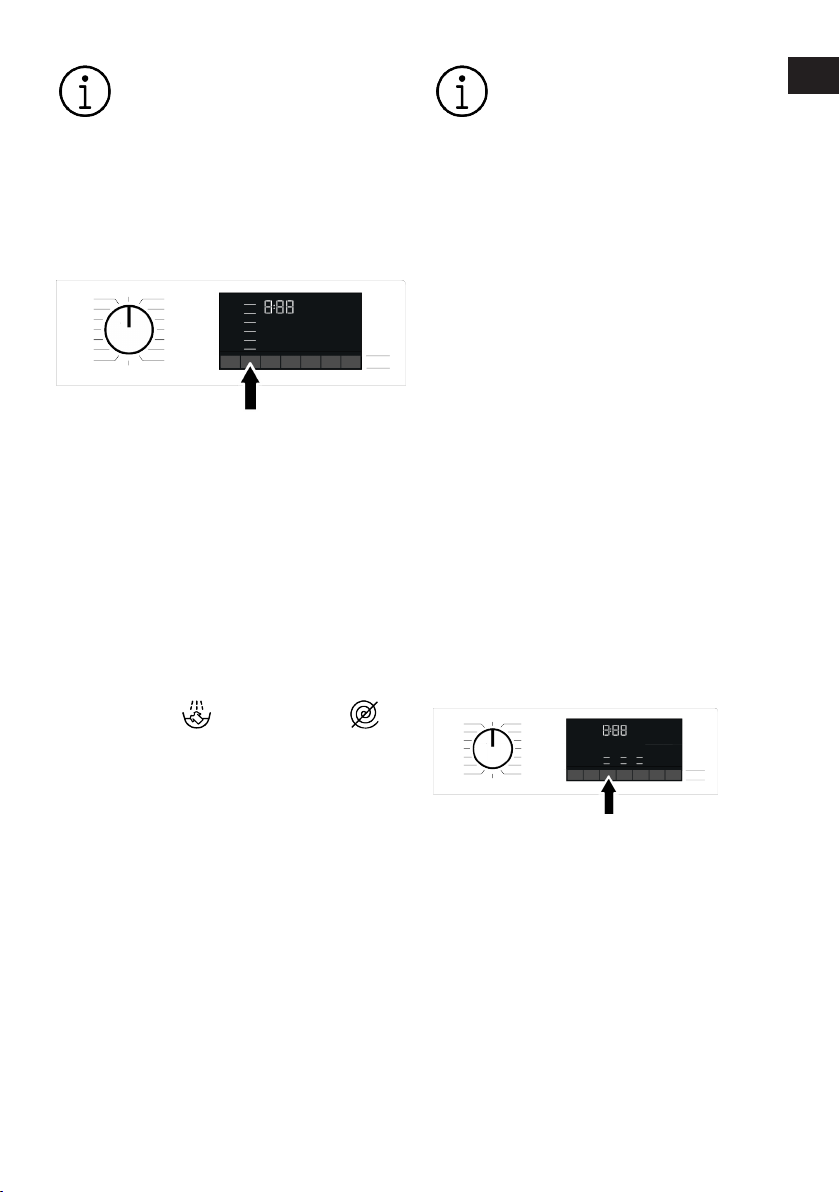
Aby zmienić prędkość wirowania ponownie
naciśnij przycisk nastawiania prędkości wirowania. Prędkość wirowania zmniejsza się
stopniowo.
Następnie, w zależności od modelu wyrobu,
na wyświetlaczu pojawią się opcje „Zatrzy-
manie płukania
Jeśli użytkownik nie zamierza wyjąć prania
z pralki zaraz po zakończeniu programu,
może użyć funkcji zatrzymania płukania,
aby zapobiec zagnieceniu odzieży, które
następuje, gdy w pralce nie ma wody.
Funkcja ta zatrzymuje pranie w wodzie z
ostatniego płukania. Aby odwirować pranie
po użyciu funkcji zatrzymania płukania:
1. Nastawić prędkość wirowania.
2. Naciśnij przycisk Start/Pauza. Program
zostanie wznowiony. Pralka spuszcza
wodę i odwirowuje pranie.
Aby bez wirowania spuścić wodę po zakończeniu programu, wybrać funkcję Bez wirowania.
i „Bez wirowania
Nie można dokonywać zmian w
programach, w których zmiana
prędkości wirowania jest niedozwolona.
Prędkość wirowania można zmienić także
po rozpoczęciu prania, jeśli jest to dozwolone na danym etapie prania. Jeśli na danym
etapie prania zmiany są niedozwolone, nie
da się ich przeprowadzić.
Namaczanie
Jeżeli użytkownik nie zamierza wyjmować
prania zaraz po zakończeniu programu,
może użyć funkcji zatrzymania prania w
wodzie z ostatniego płukania, aby zapobiec
zagnieceniu odzieży, które następuje, gdy w
pralce nie ma wody. Aby spuścić wodę bez
wirowania, po zakończeniu tego procesu
naciśnij przycisk Start/Pauza. Program uruchomi się ponownie i zakończy działanie
po odpompowaniu wody.
Aby odwirować pranie pozostawione w wodzie, należy nastawić prędkość wirowania i
nacisnąć przycisk Start/Pauza. Program
zostanie wznowiony. Woda zostaje odpompowana, pranie odwirowane, a program zakończony.
6.8 Wybieranie funkcji pomocniczych
Wybierz żądane funkcje pomocnicze przed
uruchomieniem programu. Po wybraniu
programu podświetlane są ikony symbolu
funkcji dodatkowej, która została wybrana
razem z nim.
PL
EN
PL / 26
Page 27
Naciśnięcie przycisku funkcji pomocniczej, której nie można wybrać
z bieżącym programem pralka sygnalizuje dźwiękiem ostrzegawczym.
Niektórych funkcji nie można wybierać jednocześnie. Jeśli przed
uruchomieniem pralki wybierze się
drugą funkcję pomocniczą sprzeczną z pierwszą, funkcja wybrana jako
pierwsza zostanie anulowana, zaś
wybrana jako druga będzie aktywna. Na przykład jeśli po wybraniu
funkcji Więcej wody zechce się wybrać Pranie szybkie, funkcja Więcej
wody zostanie anulowana, a funkcja Pranie szybkie będzie aktywna.
Nie można wybrać funkcji dodatkowej, która nie jest kompatybilna z
danym programem. (Patrz „Tabela
programów i zużycia”)
Niektóre programy mają funkcje pomocnicze, które trzeba stosować
równocześnie. Funkcji tych nie
można anulować. Ramka takiej
funkcji pomocniczej nie świeci się
– świeci się tylko wnętrze.
6.8.1 Funkcje dodatkowe
• Szybki/Intensywny
Dzięki tej funkcji możesz skrócić lub wydłużyć czas trwania programu. W zależności
od wybranego programu mogą występować różnice w wydłużaniu i zmniejszaniu
czasu. Jeśli dioda programu SZYBKI lub INTENSYWNY nie świeci się, pokazany jest
czas trwania programu odpowiedni dla normalnie zabrudzonego prania.
W zależności od wybranego programu
funkcja Intensywny może zostać wybrana
automatycznie. W takim przypadku, LED
prania INTENSYWNEGO na panelu będzie
się świecić. Aby uzyskać lepszą wydajność
prania podczas prania mocno zabrudzonej
bielizny, można wybrać opcję Intensywny.
Aby skrócić czas prania lekko zabrudzonej
bielizny, naciśnij przycisk Szybki/Intensywny przy programach z wybranym praniem
intensywnym. Po jednokrotnym naciśnięciu
przycisku LED zgaśnie i uzyskasz dostęp
do odpowiedniego czasu trwania programu
dla normalnie zabrudzonego prania. Gdy
naciśniesz ten sam przycisk po raz drugi,
szybko zaświeci się LED prania szybkiego,
czas trochę się skróci i pokaże minimalny
czas trwania programu, który jest odpowiedni dla mniej zabrudzonej bielizny. Po
wybraniu tej funkcji czas trwania programów można skrócić o 50%. Dzięki zoptymalizowanym etapom prania, wysokiej mobilności mechanicznej i optymalnemu zużyciu wody, osiągana jest wysoka wydajność
prania, pomimo krótszego czasu trwania.
• Para
Ta funkcja pomaga zredukować zagniecenia na praniu bawełnianym, syntetycznym i
mieszanym, skrócić czas prasowania i usunąć plamy poprzez ich zmiękczenie.
* W warunkach, w których funkcja pary jest
stosowana po zakończeniu programu, pranie może być cieplejsze po zakończeniu
prania. Oczekuje się tego w ramach pracy
programu.
Jeżeli pralko-suszarka nie jest wyposażona w kubek na detergent w
płynie albo w funkcję dozowania
detergentu w płynie, nie używać detergentu w płynie po uruchomieniu
funkcji pary. Grozi to zaplamieniem
odzieży.
• Przepływ wody
Ten przycisk funkcji dodatkowej umożliwia
wybór dodatkowych funkcji oszczędzania
wody, prania wstępnego oraz dodatkowego
płukania lub dodatkowej wody, w zależności od modelu urządzenia. Szczegółowe informacje na temat wyboru znajdziesz w
opisie konkretnej funkcji pomocniczej.
• Oszczędzać wodę
Wybierz tę funkcję, naciskając jednokrotnie
przycisk funkcji pomocniczej Trybu wody
dla wszystkich programów wskazanych jako możliwe do wyboru w tabeli „Program i
zużycie”.
PL / 27
PL
EN
Page 28
Funkcja ta jest przeznaczona do lekko zabrudzonego prania, które wymaga jedynie
niewielkiej ilości detergentu (patrz „Wskazówki dotyczące prawidłowego prania”).
Umożliwia to ekologiczne pranie dzięki
zmniejszeniu ilości zużywanej wody, bez
obniżania wydajności prania.
• Dodatkowe płukanie
Funkcji tej można używać dla wszystkich
programów wskazanych jako możliwe do
wyboru w tabeli Program i zużycie. Wybierz
tę funkcję, naciskając dwukrotnie przycisk
Trybu wody w przypadku programów, w
których można wybrać dodatkową funkcję
oszczędzania wody, lub naciskając jednokrotnie przycisk Trybu wody w przypadku
programów, w których nie można wybrać
dodatkowej funkcji oszczędzania wody.
Funkcja ta umożliwia wykonanie dodatkowego płukania oprócz tego po praniu głównym. Tym samym zmniejsza się zagrożenie
podrażnieniem wrażliwej skóry (dzieci, alergików itp.) minimalnymi pozostałościami
detergentów na wypranych rzeczach.
• Pilot
Ten przycisk funkcji dodatkowej umożliwia
połączenie produktu z urządzeniami inteligentnymi. Szczegółowe informacje zawiera
punkt HomeWhiz i funkcja zdalnego sterowania.
• Program niestandardowy
Tej funkcji pomocniczej można używać jedynie na programach Bawełna i Syntetyki,
przy użyciu aplikacji HomeWhiz. Po włączeniu tej funkcji w menu HomeWhiz „Personalizacja” możesz dodać do programu nawet
pięć dodatkowych etapów płukania. Można
wybrać niektóre funkcje pomocnicze i użyć
ich, mimo że nie są dostępne w wyrobie. W
bezpiecznym zakresie można wydłużyć lub
skrócić czas trwania programów Bawełna i
Syntetyki.
Wybranie funkcji pomocniczej Program niestandardowy skutkuje innym sposobem wykonania prania i
zużyciem energii innym niż wartość
deklarowana.
6.8.2 Funkcje/programy wybierane
naciśnięciem przycisków funkcji przez 3 sekundy
• Fresh Care
Wybór tej funkcji następuje po naciśnięciu i
przytrzymaniu przez 3 sekundy odpowiedniego przycisku funkcji dodatkowej i po zapaleniu się lampki kontrolnej programu dla
danego kroku. Po wybraniu tej funkcji bęben obraca się przez maks. 8 godzin, co zapobiega gnieceniu się prania pod koniec
programu. Program można anulować, aby
wyjąć pranie w dowolnym momencie podczas tych 8 godzin. Aby anulować funkcję,
należy nacisnąć przycisk wyboru funkcji lub
przycisk włączania/wyłączania urządzenia.
Zaświeci się wskaźnik śledzenia programu,
który pozostanie włączony aż do anulowania funkcji lub zakończenia etapu. Jeśli
funkcja nie zostanie anulowana, będzie aktywna również w kolejnych cyklach prania.
• Pranie wstępne
Aby wybrać ten program, należy nacisnąć i
przytrzymać przez 3 sekundy przycisk funkcji dodatkowej.
Pranie wstępne warto stosować tylko do
rzeczy bardzo zabrudzonych. Rezygnując z
prania wstępnego oszczędza się energię,
wodę, proszek do prania i czas.
• Namaczanie
Aby wybrać ten program, należy nacisnąć i
przytrzymać przez 3 sekundy przycisk funkcji dodatkowej.
Funkcja namaczania umożliwia lepsze
oczyszczenie plam, które dostały się do
prania, dzięki utrzymywaniu prania w wodzie z detergentem przed rozpoczęciem
prania.
• Blokada rodzicielska
Aby dzieci nie mogły zmienić ustawień pralki, należy użyć blokady rodzicielskiej. Zapobiegnie to zmianie uruchomionego programu.
PL
EN
PL / 28
Page 29
Przy włączonej funkcji blokady rodzicielskiej pralkę można włączać i
wyłączać przyciskiem Wł./Wył. Po
ponownym włączeniu pralki program zostanie wznowiony od miejsca, w którym został zatrzymany.
Przy włączonej blokadzie rodzicielskiej, jeśli naciska się przyciski, rozlega się ostrzegawczy sygnał
dźwiękowy. Aby wyłączyć ostrzegawczy sygnał dźwiękowy, należy
nacisnąć przyciski pięć razy z rzędu.
Aby załączyć blokadę dostępu dzieci:
Naciśnij i przytrzymaj przycisk funkcji pomocniczej przez 3 sekundy. Po odliczeniu
na wyświetlaczu „3- 2- 1” pojawi się na nim
symbol blokady rodzicielskiej. Gdy to
ostrzeżenie zostanie wyświetlone, można
zwolnić przycisk funkcji pomocniczej 3.
Aby wyłączyć blokadę dostępu dzieci:
Naciśnij i przytrzymaj przycisk funkcji pomocniczej przez 3 sekundy. Po odliczeniu
na wyświetlaczu „3- 2- 1” symbol blokady
rodzicielskiej zniknie.
• Połączenie bezprzewodowe
Możesz dopasować swoją maszynę i urządzenia inteligentne do połączenia bezprzewodowego. Dzięki temu można za pomocą
urządzenia inteligentnego uzyskać informacje o pralce i sterować nią.
Aby włączyć połączenie bezprzewodowe:
Naciśnij i przytrzymaj przycisk zdalnego
sterowania przez 3 sekundy. Po zakończeniu odliczania „3- 2- 1“ na wyświetlaczu pojawi się symbol „On“. Po wyświetleniu tego
powiadomienia przestań naciskać przycisk
pilota. Ikonka połączenia bezprzewodowego miga, gdy produkt łączy się z Internetem. Gdy połączenie zostanie nawiązane,
ikona będzie świecić światłem ciągłym.
Aby wyłączyć połączenie bezprzewodowe:
Naciśnij i przytrzymaj przycisk zdalnego
sterowania przez 3 sekundy. Zostanie wyświetlone odliczanie „3- 2- 1”, a następnie
na wyświetlaczu pojawi się się symbol
„Off”.
Aby móc włączyć połączenie bezprzewodowe, konfigurację urządzenia należy przeprowadzić za pomocą aplikacji HomeWhiz. Po zakończeniu konfiguracji połączenie bezprzewodowe zostanie włączone automatycznie po naciśnięciu przycisku „Remote Control”.
6.9 Godzina zakończenia
Wyświetlacz czasu
Po wybraniu funkcji czasu zakończenia
czas pozostały do rozpoczęcia programu
jest wyświetlany w godzinach, na przykład
1h, 2h, a czas pozostały do zakończenia
programu po rozpoczęciu programu jest
wyświetlany w godzinach i minutach, na
przykład 01:30.
Czas trwania programu może się
różnić od podanego w „Tabeli programów i zużycia” zależnie od ciśnienia wody, jej twardości oraz
temperatury, temperatury otoczenia, ilości i rodzaju prania, wybranych funkcji pomocniczych oraz
wahań napięcia w sieci zasilającej.
Po pewnym czasie, gdy funkcja
czasu zakończenia jest aktywna,
urządzenie przełącza się w tryb
czuwania, a niektóre diody na wyświetlaczu są wyłączane. Diody
LED świecą się w przypadku jakiegokolwiek wejścia użytkownika.
Za pomocą funkcji Godzina Zakończenia
można ustawić program do 24 godzin. Po
naciśnięciu przycisku Godzina zakończenia
wyświetlana jest szacowana godzina zakończenia programu. Po ustawieniu funkcji
Godzina zakończenia podświetlony zostaje
wskaźnik Godzina zakończenia .
PL
EN
PL / 29
Page 30
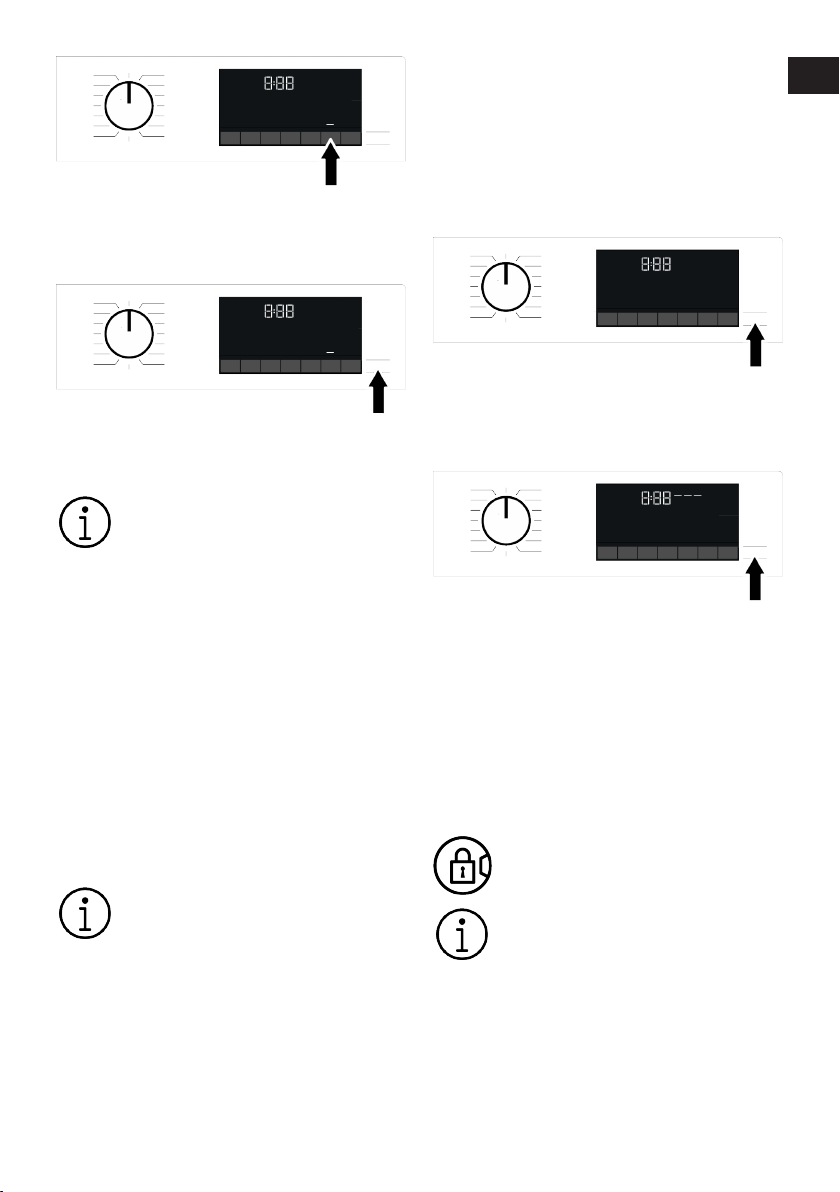
Aby uruchomić funkcję Godzina zakończenia i zakończyć program o wybranej godzinie, trzeba po jej nastawieniu nacisnąć
przycisk Start/Pauza.
Jeśli chcesz anulować funkcję Godzina zakończenia, naciśnij przycisk Wł./Wył., aby
wyłączyć i włączyć urządzenie.
Po włączeniu funkcji Godzina zakończenia nie wolno dodawać detergentu w płynie do komory nr 2 na
detergent w proszku. Grozi to zaplamieniem odzieży.
1. Otwórz drzwiczki, umieść pranie w pralce i wsyp detergent, itp.
2. Nastaw program prania, temperaturę,
prędkość wirowania oraz, jeśli potrzeba,
funkcje pomocnicze.
3. Ustaw wybraną godzinę zakończenia,
naciskając przycisk Godzina zakończenia. Zaświeci się wskaźnik Godzina zakończenia.
4. Naciśnij przycisk Start/Pauza. Rozpoczyna się odliczanie czasu.
W trakcie odliczania funkcji Godzina zakończenia można dodać pranie. Wraz z końcem odliczania
zwłoki czasowej wskaźnik godziny
zakończenia gaśnie, uruchomiony
zostaje cykl prania, a na wyświetlaczu pojawia się czas trwania wybranego programu.
6.10 Uruchamianie programu
1. Naciśnij przycisk Start/Pauza przez 1
sekundę, aby uruchomić program.
2. Przyciemnione światło przycisku Start/
Pauza świeci teraz światłem ciągłym,
wskazując, że program został uruchomiony.
3. Drzwiczki załadunkowe są zablokowane. Po zablokowaniu drzwiczek załadowczych na ekranie pojawia się symbol zamka drzwi.
4. Kontrolki kontynuacji programu na ekranie pokazują bieżący krok programu.
6.11 Blokada drzwiczek
Na drzwiach urządzenia znajduje się system blokujący, który zapobiega ich otwarciu
w przypadku, gdy poziom wody jest nieodpowiedni.
Po zablokowaniu drzwiczek na wyświetlaczu pojawia się symbol blokady drzwiczek.
Jeśli wybrana jest funkcja zdalnego
sterowania, drzwiczki będą zamknięte. Aby otworzyć drzwi, należy wyłączyć funkcję zdalnego sterowania, naciskając przycisk zdalnego sterowania lub zmieniając pozycję programu.
PL
EN
PL / 30
Page 31
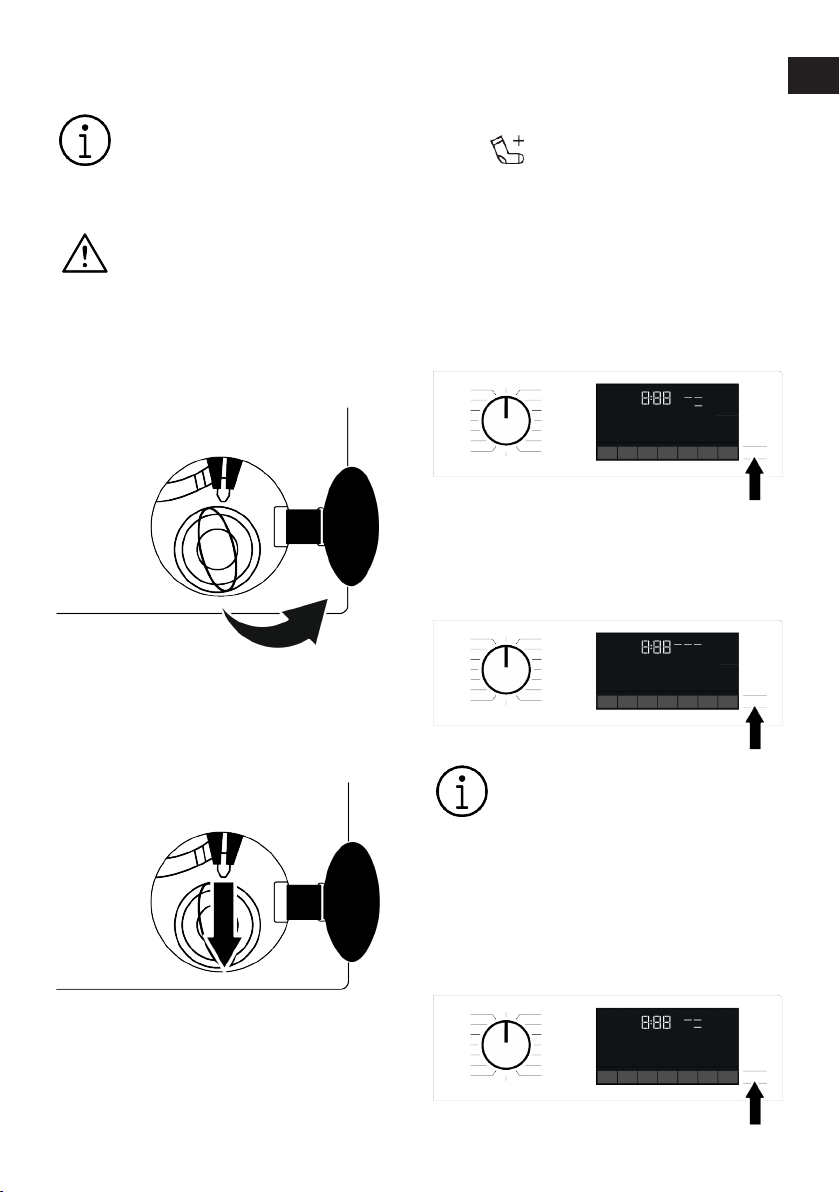
Otwieranie drzwiczek w przypadku przerwy w zasilaniu:
W przypadku przerwy w zasilaniu
można ręcznie otworzyć drzwiczki
pralki, korzystając z uchwytu awaryjnego drzwiczek, który znajduje
się pod pokrywką filtra pompy.
Aby uniknąć przelania się wody po
otwarciu drzwiczek, należy się
upewnić, że w bębnie nie ma żadnej
wody.
1. Wyłącz urządzenie i odłącz je od zasilania.
2. Otwórz osłonę filtra pompy.
6.12 Zmiana wyborów po uruchomieniu programu
Dodawanie prania po uruchomieniu pro-
gramu
Po naciśnięciu przycisku Start/Pauza, jeśli
poziom wody w pralce jest odpowiedni, blokada drzwi zostanie wyłączona, a drzwi
otworzą się, abyś mógł dodać pranie. Gdy
zamek drzwi jest dezaktywowany, symbol
zamka drzwi na ekranie znika. Po dodaniu
prania zamknij drzwi i ponownie naciśnij
przycisk Start/Pauza, aby kontynuować pranie.
Jeśli poziom wody w maszynie jest niewystarczający po naciśnięciu przycisku Start/
Pauza, nie można wyłączyć blokady drzwi,
a ikona zamka drzwi na wyświetlaczu będzie nadal widoczna.
:
PL
EN
3. Pociągnij w dół uchwyt awaryjny drzwiczek za pomocą narzędzia i zwolnij go.
Następnie otwórz drzwiczki.
4. Jeśli drzwiczki się nie otwierają, powtórz poprzedni krok.
Jeśli temperatura wody wewnątrz
urządzenia przekracza 50°C, ze
względów bezpieczeństwa nie
można wyłączyć zamka drzwi (nawet jeśli poziom wody jest odpowiedni).
Przełączenie maszyny w tryb pauzy:
Aby zatrzymać pralkę, naciśnij i przytrzymaj
przycisk Start/Pauza przez 1 sekundę. Na
wyświetlaczu zacznie migać symbol pauzy.
PL / 31
Page 32
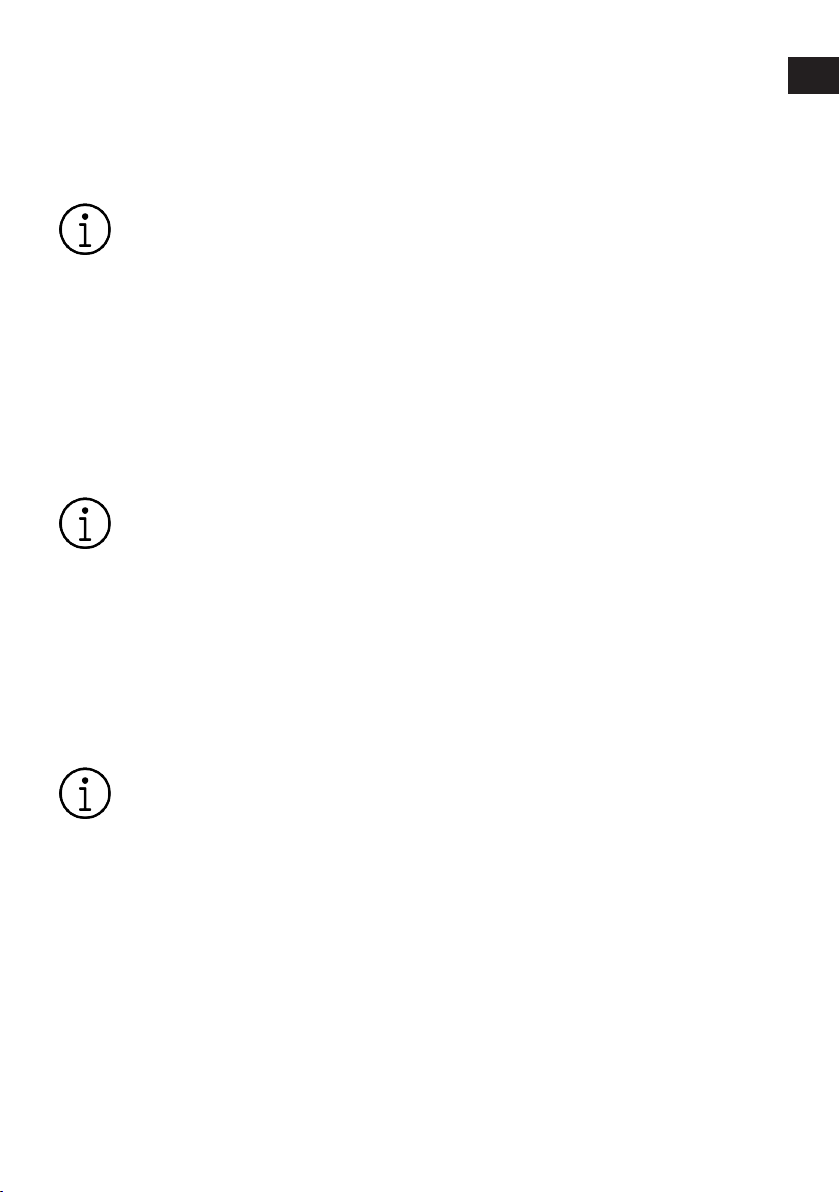
Zmiana wyboru programu po uruchomieniu
programu:
Jeśli blokada rodzicielska nie jest aktywna,
program można zmienić, gdy bieżący program jest uruchomiony. Spowoduje to anulowanie bieżącego programu.
Wybrany program rozpocznie się
od nowa.
Zmiana funkcji dodatkowych, ustawień
prędkości i temperatury:
W zależności od kroku, który osiągnął program, możesz wyłączyć lub włączyć funkcje pomocnicze. Patrz "Wybór funkcji pomocniczych"
Możesz także zmienić ustawienia prędkości wirowania i temperatury. Zobacz "Wybór prędkości wirowania" i "Wybór temperatury".
Jeśli temperatura wody wewnątrz
urządzenia jest wysoka lub poziom
wody przekracza linię pokrywy,
drzwiczki załadunku nie otworzą
się.
6.13 Anulowanie programu
Program zostaje anulowany wskutek przestawienia pokrętła wyboru programów na
inny program lub wyłączenia i ponownego
włączenia pralki za pomocą pokrętła wyboru programów.
Obrócenie pokrętła wyboru programów, gdy włączona jest blokada rodzicielska nie spowoduje anulowania bieżącego programu. Najpierw
należy wyłączyć blokadę rodzicielską.
Jeśli chcesz otworzyć drzwiczki po
anulowaniu programu, ale nie można ich otworzyć z powodu zbyt wysokiego poziomu wody w pralce,
nastaw pokrętło wyboru programów na program Odpompowanie+Wirowanie i spuść wodę z pralki.
6.14 Koniec programu
Po zakończeniu programu na wyświetlaczu
pojawi się symbol zakończenia.
Jeśli przez 10 minut nie zostanie naciśnięty
żaden przycisk, pralka przełączy się w tryb
wyłączenia. Wyłączy się wyświetlacz i
wszystkie wskaźniki.
Zakończone etapy programu zostaną wyświetlone po naciśnięciu przycisku Wł./Wył.
6.15 Funkcja HomeWhiz i funkcja zdalnego sterowania
Dzięki funkcji HomeWhiz można sprawdzać
pralkę za pomocą inteligentnych urządzeń i
uzyskiwać informacje o jej stanie. Za pomocą aplikacji HomeWhiz można wykonywać wiele operacji na urządzeniu z poziomu urządzenia inteligentnego. Co więcej,
niektórych właściwości można używać tylko z funkcją HomeWhiz.
Aby korzystać z funkcji Wi-Fi urządzenia,
należy pobrać aplikację HomeWhiz ze sklepu z aplikacjami na urządzeniu inteligentnym.
Aby korzystać z aplikacji, należy upewnić
się, że urządzenie inteligentne jest połączone z Internetem.
Jeśli korzystasz z aplikacji po raz pierwszy,
dokończ rejestrację konta użytkownika, postępując zgodnie ze wskazówkami w aplikacji. Po zakończeniu rejestracji możesz
korzystać ze wszystkich polecanych produktów HomeWhiz w swoim domu za pośrednictwem tego konta.
Bluetooth urządzenia inteligentnego powinien być włączony, a urządzenie powinno
być połączone z Internetem podczas konfiguracji. Urządzenie inteligentne powinno
znajdować się w pobliżu pralki. Po zakończeniu konfiguracji Bluetooth można wyłączyć, lub urządzenie inteligentne nie musi
znajdować się w pobliżu pralki. Z produktu
można korzystać pod warunkiem, że urządzenie inteligentne jest połączone z Internetem.
Możesz dotknąć zakładki "Urządzenia" w
aplikacji, aby wyświetlić urządzenia sparowane z Twoim kontem. Na tej stronie można wykonać operację parowania tych produktów.
PL / 32
PL
EN
Page 33
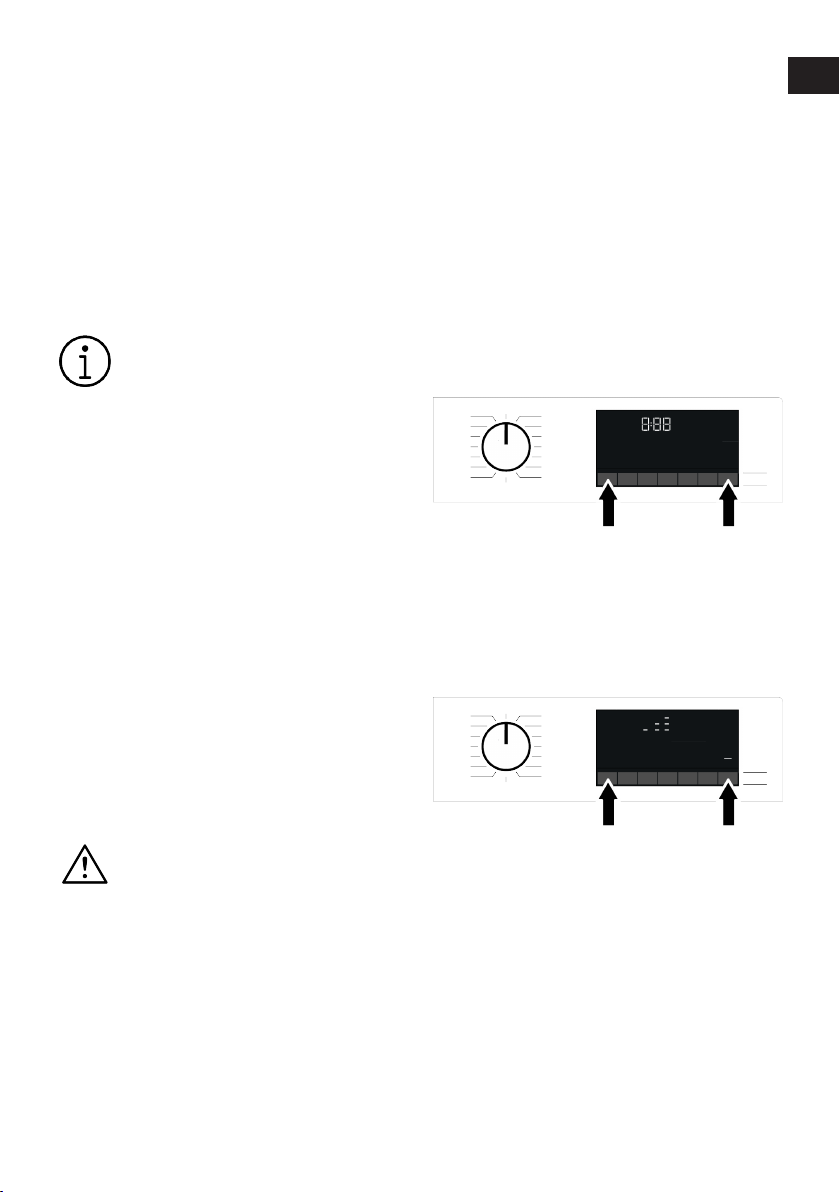
Po skonfigurowaniu aplikacji, dzięki funkcji
HomeWhiz, pralka może wysyłać natychmiastowe powiadomienia o stanie za pośrednictwem urządzenia inteligentnego.
Pralka będzie wysyłać powiadomienia za
pośrednictwem aplikacji HomeWhiz w
następujących przypadkach:
• Pod koniec programu,
• Po otwarciu drzwi pralki,
• W przypadku ostrzeżenia o odcięciu wody,
• W przypadku ostrzeżenia o zagrożeniu,
Aby korzystać z funkcji HomeWhiz,
należy upewnić się, że aplikacja HomeWhiz jest zainstalowana na
urządzeniu inteligentnym, a pralka
jest podłączona do domowej sieci
Wi-Fi. Gdy pralka nie jest podłączona do sieci, działa jak urządzenie
bez funkcji HomeWhiz.
Produkt powinien działać z połączeniem z siecią bezprzewodową w
sieci domowej. Sterowanie za pomocą aplikacji będzie możliwe za
pośrednictwem tej sieci. Dlatego siła sygnału bezprzewodowego w pobliżu lokalizacji urządzenia musi
być odpowiednia.
Urządzenie działa w paśmie częstotliwości HomeWhiz 2,4 GHz.
Prosimy odwiedzić stronę www.ho-
mewhiz.com , aby zapoznać się z wer-
sjami systemu Android oraz IOS,
które są obsługiwane przez aplikację HomeWhiz.
Wszystkie środki bezpieczeństwa
opisane w rozdziale „OGÓLNE IN-
STRUKCJE BEZPIECZEŃSTWA” w
instrukcji obsługi obowiązują również w przypadku zdalnej obsługi za
pomocą funkcji HomeWhiz.
6.15.1 Konfiguracja funkcji Home-
Whiz
Aby aplikacja działała, należy ustanowić połączenie między produktem a aplikacją. Wykonaj poniższe kroki, aby ustanowić to połączenie.
1. Jeśli dodajesz urządzenie po raz pierwszy, naciśnij „Urządzenia” w aplikacji HomeWhiz. Wybierz przycisk „DODAJ
URZĄDZENIE” (dotknij tutaj, aby skonfigurować nowe urządzenie) w prawym
górnym rogu. Przeprowadź konfigurację,
wykonując poniższe czynności oraz kroki w aplikacji HomeWhiz.
2. Aby rozpocząć konfigurację, należy się
upewnić, że pralka jest wyłączona. Nacisnąć i przytrzymać przez 3 sekundy jednocześnie przyciski temperatury orazfunkcji zdalnego sterowania, aby przełączyć urządzenie w tryb konfiguracji
funkcji HomeWhiz.
3. W trybie konfiguracji HomeWhiz na
ekranie pojawia się animacja, a ikona
połączenia bezprzewodowego miga, dopóki urządzenie nie połączy się z Internetem. W tym trybie aktywne będzie wyłącznie pokrętło programu. Inne przyciski są nieaktywne.
4. Postępuj zgodnie z instrukcjami wyświetlanymi na ekranie aplikacji Homewhiz.
5. Poczekaj, aż instalacja się zakończy. Po
ukończeniu konfiguracji nadać pralce
nazwę. Teraz widzisz produkt, który dodałeś w aplikacji HomeWhiz.
PL / 33
PL
EN
Page 34
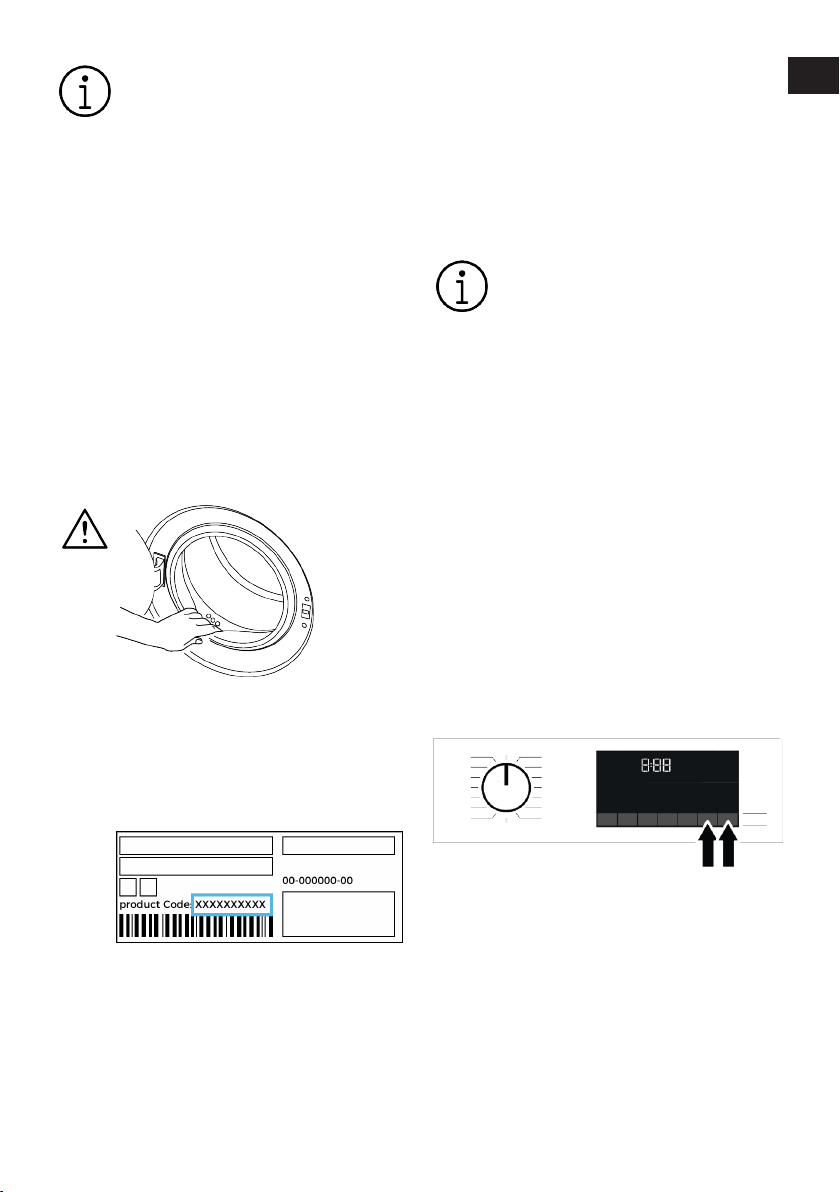
Pralka wyłączy się automatycznie,
jeśli w ciągu 5 minut nie uda się
przeprowadzić konfiguracji. W takim przypadku musisz rozpocząć
proces konfiguracji od nowa. Jeśli
problem nie ustąpi, należy się skontaktować z przedstawicielem autoryzowanego serwisu.
Można używać pralki z więcej niż
jednym urządzeniem inteligentnym.
W tym celu należy pobrać aplikację
HomeWhiz również na inne urządzenie inteligentne. Po uruchomieniu aplikacji należy zalogować się
na wcześniej utworzone konto, z
którym sparowana została pralka.
W przeciwnym razie należy się zapoznać z punktem „Konfigurowanie
pralki podłączonej do cudzego konta”.
Aplikacja HomeWhiz może zażądać
wpisania numeru produktu widniejącego na etykiecie wyrobu. Etykieta wyrobu znajduje się wewnątrz na
drzwiczkach urządzenia. Numer
produktu jest zapisany na tej etykiecie.
1. Pobierz aplikację HomeWhiz na urządzenie inteligentne, którego chcesz
użyć.
2. Utwórz nowe konto i zaloguj się do niego w aplikacji HomeWhiz.
3. Postępuj zgodnie z krokami opisanymi
w sekcji Konfiguracja HomeWhiz i kontynuuj procedurę konfiguracji.
Biorąc pod uwagę, że funkcja HomeWhiz i funkcja zdalnego sterowania produktu działają za pośrednictwem technologii Bluetooth lub
Wi-Fi, w zależności od modelu produktu, ważne jest, aby pamiętać, że
tylko jedna aplikacja HomeWhiz
może sterować produktem w danym momencie.
6.15.3 Usuwanie dopasowania kon-
ta HomeWhiz
Wykonaj następujące kroki, aby usunąć
pralkę wcześniej dodaną do konta innej
osoby.
1. Włącz urządzenie za pomocą przycisku
programu.
2. Jeśli urządzenie włączone, naciśnij i
przytrzymaj przez 5 sekund przycisk
funkcji zdalnego sterowania i przyciski
ustawiania godziny zakończenia.
PL
EN
6.15.2 Konfigurowanie pralki podłączonej do innego konta
Jeśli pralka, której chcesz użyć, została
wcześniej wprowadzona do systemu przy
użyciu konta innej osoby, musisz ustanowić
nowe połączenie między aplikacją HomeWhiz a produktem.
3. Urządzenie wyda sygnał ostrzegawczy,
aby powiadomić o Cię o żądaniu po odliczaniu na ekranie. Usuwanie dopasowania zajmie kilka sekund.
Po tej operacji nie możesz korzystać z
funkcji HomeWhiz pralki, dopóki nie wykonasz kolejnej konfiguracji.
Urządzenie nie musi być podłączone do Internetu, aby usunąć dopasowanie konta.
Twoja prośba zostanie odebrana. Dopaso-
PL / 34
Page 35
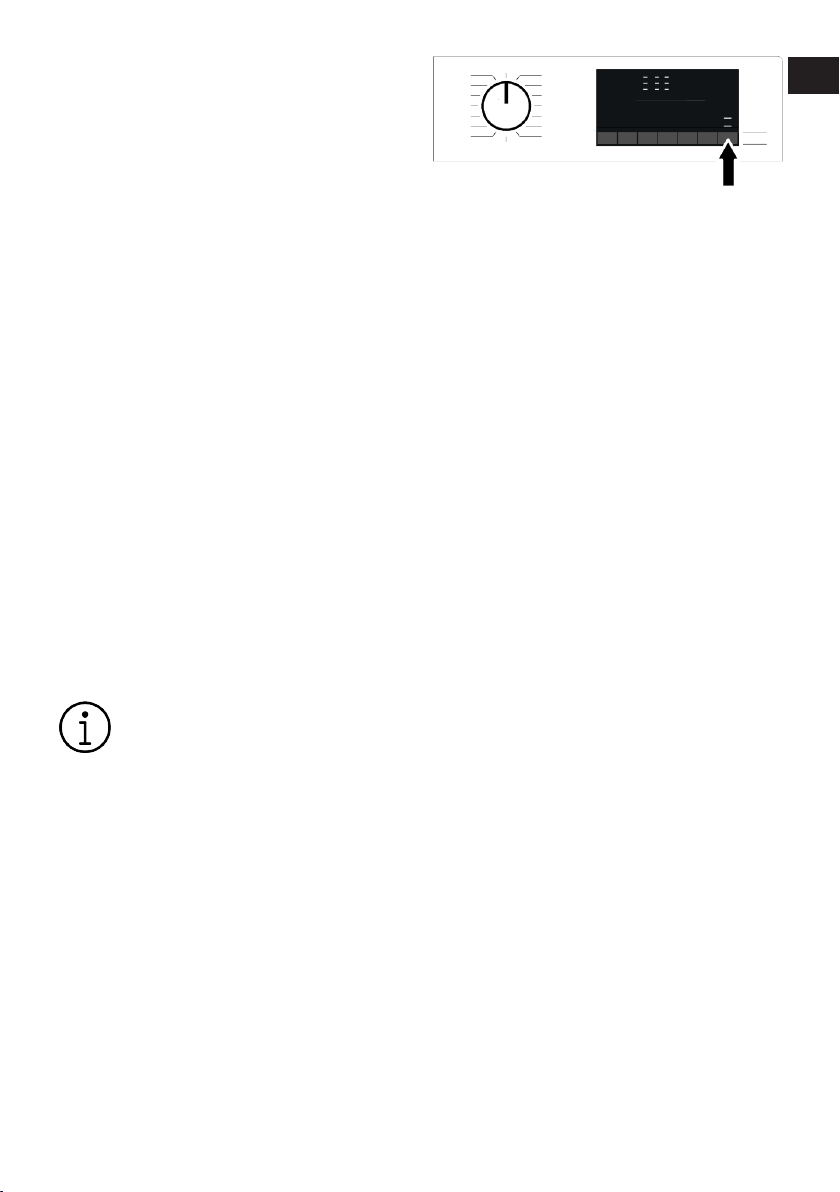
wanie zostanie automatycznie usunięte,
gdy produkt po raz pierwszy połączy się z
Internetem.
6.15.4 Funkcja zdalnego sterowania i jej zastosowanie
Po skonfigurowaniu HomeWhiz połączenie
bezprzewodowe włączy się automatycznie.
Aby aktywować lub dezaktywować połączenie bezprzewodowe, zobacz „Połączenie bezprzewodowe”.
Jeśli wyłączysz i włączysz urządzenie, gdy
połączenie bezprzewodowe jest aktywne,
automatycznie połączy się ono ponownie.
W przypadku zmiany hasła sieciowego lub
wyłączenia modemu połączenie bezprzewodowe zostanie automatycznie wyłączone. Z tego powodu, aby móc korzystać z
funkcji zdalnego sterowania, konieczne będzie ponowne włączenie połączenia bezprzewodowego.
Możesz sprawdzić symbol połączenia bezprzewodowego na wyświetlaczu, aby śledzić stan połączenia. Jeśli symbol jest stale włączony, oznacza to, że masz połączenie z Internetem. Jeśli symbol miga, oznacza to, że urządzenie próbuje nawiązać połączenie. Jeśli symbol nie świeci się, połączenia nie ma.
Gdy połączenie bezprzewodowe w
produkcie jest włączone, można
wybrać funkcję zdalnego sterowania.
Jeśli nie można wybrać funkcji
zdalnego sterowania, należy sprawdzić stan połączenia. Jeśli nie można nawiązać połączenia, należy powtórzyć wprowadzanie ustawień
początkowych na urządzeniu.
Aby zdalnie sterować pralką, należy aktywować funkcję zdalnego sterowania, naciskając przycisk zdalnego sterowania na panelu sterowania. Po nawiązaniu połączenia
pojawi się ekran podobny do poniższego.
PL
EN
Gdy funkcja zdalnego sterowania jest włączona, na pralce można zarządzać jedynie
jej włączaniem i wyłączaniem oraz kontrolować jej stan. Wszystkimi funkcjami, z wyjątkiem blokady dostępu dzieci, można zarządzać poprzez aplikację.
Wskaźnik funkcji na wyświetlaczu informuje, czy funkcja zdalnego sterowania jest
włączona, czy wyłączona.
Jeśli funkcja zdalnego sterowania jest wyłączona, wszystkie działania są uruchamiane z poziomu pralki i w aplikacji możliwa
jest tylko kontrola stanu.
Funkcja zdalnego sterowania może nie zostać aktywowana, jeśli połączenie zdalne
jest wyłączone lub drzwiczki produktu są
otwarte.
Po włączeniu funkcja zdalnego sterowania
w pralce pozostaje aktywna, chyba że mają
zastosowanie szczególne okoliczności. Ta
funkcja umożliwia kontrolowanie urządzenia przez Internet, niezależnie od tego, czy
urządzenie jest włączone, czy wyłączone, i
niezależnie od Twojej lokalizacji.
W niektórych przypadkach wyłącza się sam
ze względów bezpieczeństwa:
• Gdy nastąpi przerwa w zasilaniu urządzenia.
• Po otwarciu drzwiczek pralki.
• Gdy pokrętło programów zostanie przestawione na inny program lub urządzenie
AGD zostanie wyłączone.
6.15.5 Rozwiązywanie problemów
W razie problemu ze sterowaniem lub połączeniem należy wykonać następujące czynności. Obserwuj, czy po wykonaniu czynności problem nadal występuje.
1. Sprawdź, czy urządzenie inteligentne
jest podłączone do odpowiedniej sieci
domowej.
2. Ponownie uruchom aplikację produktu.
PL / 35
Page 36
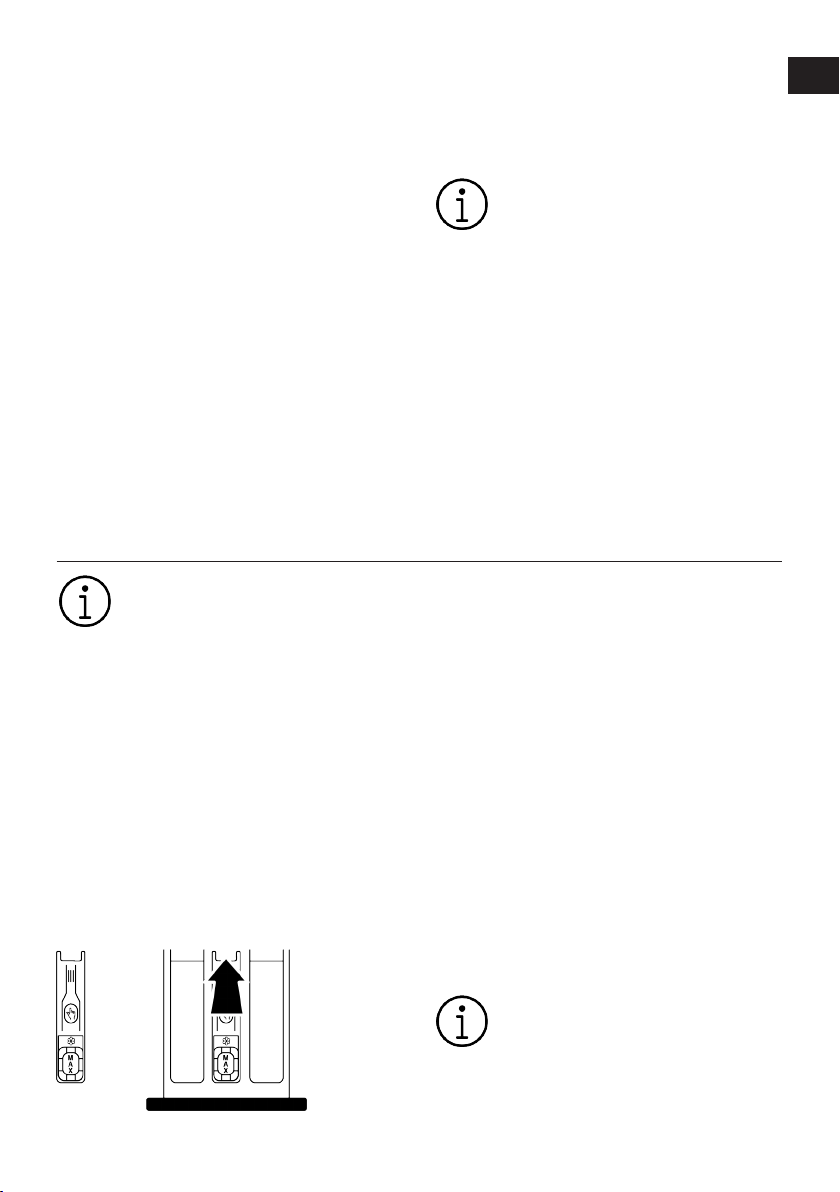
3. Wyłącz i włącz Bluetooth lub Wi-Fi za
pomocą panelu sterowania, w zależności od modelu produktu.
4. Jeśli nie można nawiązać połączenia za
pomocą powyższych czynności, należy
powtórzyć ustawienia konfiguracji początkowej pralki.
Jeśli problem nie ustąpi, należy się skontaktować z przedstawicielem autoryzowanego serwisu.
6.15.6 HomeWhiz Wyświetlanie
wartości zużycia energii
Twój produkt posiada funkcję zarządzania
zużyciem. Możliwości tej funkcji mogą się
różnić w zależności od modelu produktu,
obejmując takie funkcje, jak monitorowanie
zużycia energii, śledzenie zużycia wody i inne. Aby ta funkcja działała, produkt musi
być dodany do HomeWhiz i połączony z Internetem.
7 Konserwacja i czyszczenie
Najpierw przeczytaj Instrukcje bezpieczeństwa
Okres użytkowania pralki wydłuża się, a
częste występowanie problemów zmniejsza, jeśli pralkę czyści się z regularną częstotliwością.
7.1 Czyszczenie szuflady na deter-
gent
Szufladę na detergent należy myć regularnie (raz na 4 do 5 prań), jak opisano poniżej, co pozwoli zapobiec gromadzeniu się
proszku do prania.
Syfon należy wyczyścić, jeśli w komorze na
środek zmiękczający pozostaje nadmiar
wody i mieszanki do zmiękczania tkanin.
Dzięki tej funkcji można śledzić dane zużycia inteligentnego produktu w różnych przedziałach czasowych i korzystać z dostosowanych sugestii mających na celu zmniejszenie zużycia.
Należy pamiętać, że dane dotyczące zużycia energii wyświetlane w
aplikacji HomeWhiz są przeznaczone wyłącznie do celów informacyjnych i mogą nie odzwierciedlać rzeczywistego zużycia.
Wartości podane na etykiecie produktu zostały uzyskane w standardowych warunkach laboratoryjnych.
Należy pamiętać, że rzeczywiste zużycie energii może ulegać wahaniom w zależności od indywidualnych wzorców użytkowania i zmiennych warunków klimatycznych.
1. Naciśnij oznaczoną część syfonu w komorze na środek zmiękczający, a następnie pociągnij szufladę do siebie, aby
ją wyjąć.
2. Podnieś i wyjmij syfon od tyłu, jak pokazano na rysunku.
3. Wypłucz szufladę i syfon w zlewie dużą
ilością ciepłej wody. Używaj rękawiczek
lub odpowiedniej szczotki, aby zapobiec
kontaktowi pozostałości detergentów w
szufladzie ze skórą.
4. Po wyczyszczeniu należy dobrze zamocować syfon i szufladę.
7.2 Czyszczenie drzwiczek i bębna
W przypadku pralek z programem czyszczenia bębna, patrz rozdział „Obsługa pralki”.
Powtarzaj proces czyszczenia bębna co 2 miesiące.
UWAGA: Użyj odkamieniacza do
pralek.
PL
EN
PL / 36
Page 37
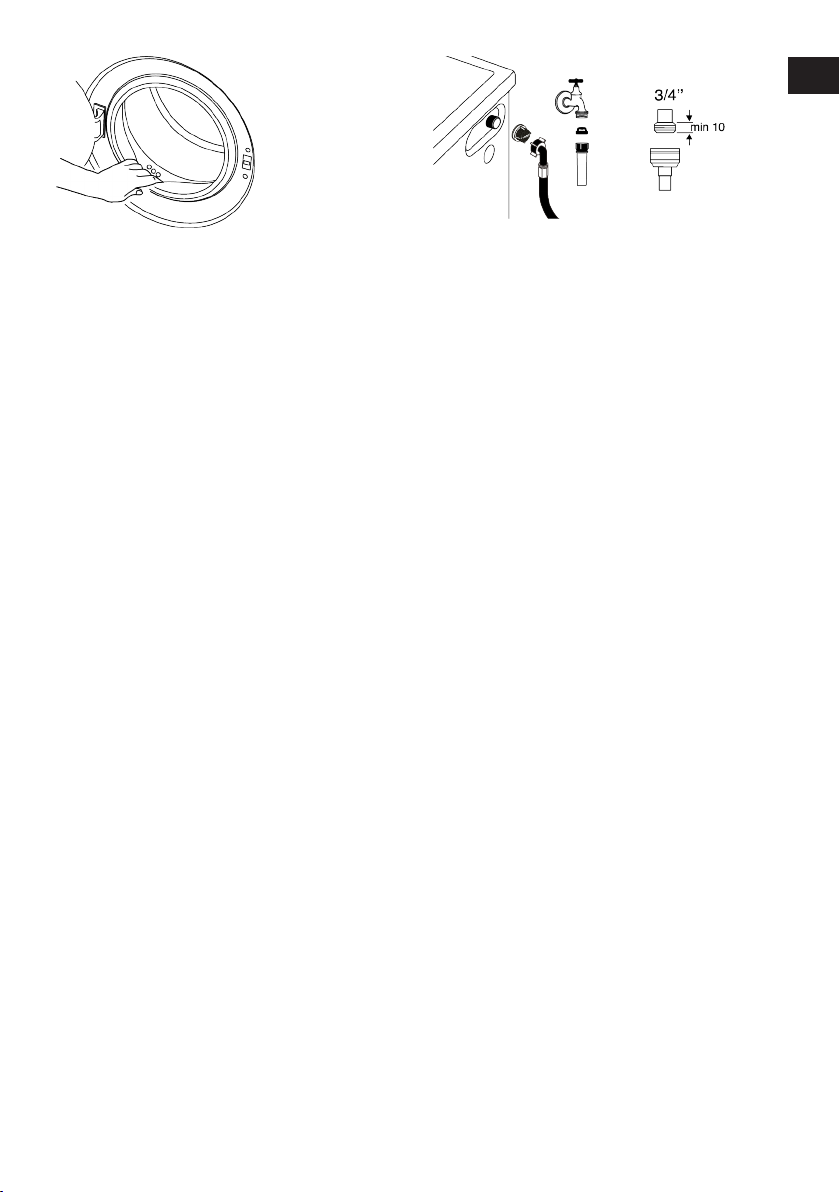
PL
EN
Po każdym praniu należy sprawdzać, czy w
urządzeniu nie pozostała jakaś obca substancja.
Jeśli otwory w uszczelce drzwiczek pokazane na rysunku zostały zablokowane,
udrożnij je używając wykałaczki.
Obce substancje metaliczne mogą powodować powstawanie plamy rdzy. Plamy na
powierzchni bębna czyści się przy użyciu
środków czyszczących do stali nierdzewnej.
Nie wolno używać wełny stalowej lub drucianej. Niszczą one części emaliowane,
chromowane i plastykowe.
Po zakończeniu programu zalecamy wytarcie uszczelki drzwi suchą i czystą szmatką.
Spowoduje to usunięcie osadów na
uszczelce drzwi i zapobiegnie tworzeniu się
nieprzyjemnych zapachów.
7.3 Czyszczenie korpusu i panelu sterowania
Przetrzyj korpus pralki wodą z mydłem lub,
jeśli to konieczne, łagodnym, niepowodującym korozji detergentem w żelu i wytrzyj do
sucha miękką ściereczką.
Używaj tylko miękkiej i wilgotnej ściereczki
w celu oczyszczenia panelu sterowania.
Nie używać środków czyszczących zawierających wybielacz.
7.4 Czyszczenie filtrów wlotu wody
Na końcu każdego zaworu dopływu wody z
tyłu pralki, a także na końcu każdego węża
zasilającego podłączanego do kranu znajduje się filtr. Filtry te zapobiegają przedostawaniu się do wnętrza urządzenia ciał obcych i brudu z wody. Filtry należy oczyścić,
kiedy się zabrudzą.
1. Zakręcić krany.
2. Zdejmij nakrętki z węży dopływu wody
aby dostać się do filtrów na zaworach
dopływu wody i wyczyść je za pomocą
szczotki. Jeśli filtry są bardzo brudne,
wyjmij je szczypcami z ich gniazd i
oczyść w ten sposób.
3. Filtry na płaskim końcu węży dopływu
wody wyjąć ręcznie wraz z uszczelkami
i starannie umyć pod bieżącą wodą.
4. Dokładnie umieścić uszczelki i filtry z
powrotem na miejscu i ręcznie dokręcić
nakrętki węża.
7.5 Spuszczanie pozostałej wody i
czyszczenie filtru pompy
System filtrów w pralce zapobiega zatkaniu
wirnika pompy takimi stałymi elementami,
jak guziki, monety czy włókna podczas usuwania wody. A zatem woda będzie spuszczana bez problemów, a okres użytkowania
pompy się przedłuży.
Jeżeli pralka nie odpompowuje wody, zatkany jest filtr pompy. Filtr trzeba czyścić
po każdym zatkaniu lub co 3 miesiące. Aby
wyczyścić filtr należy najpierw spuścić wodę.
Dodatkowo przed transportem produktu
(np. przy przeprowadzce do innego domu)
należy całkowicie spuścić wodę.
PL / 37
Page 38
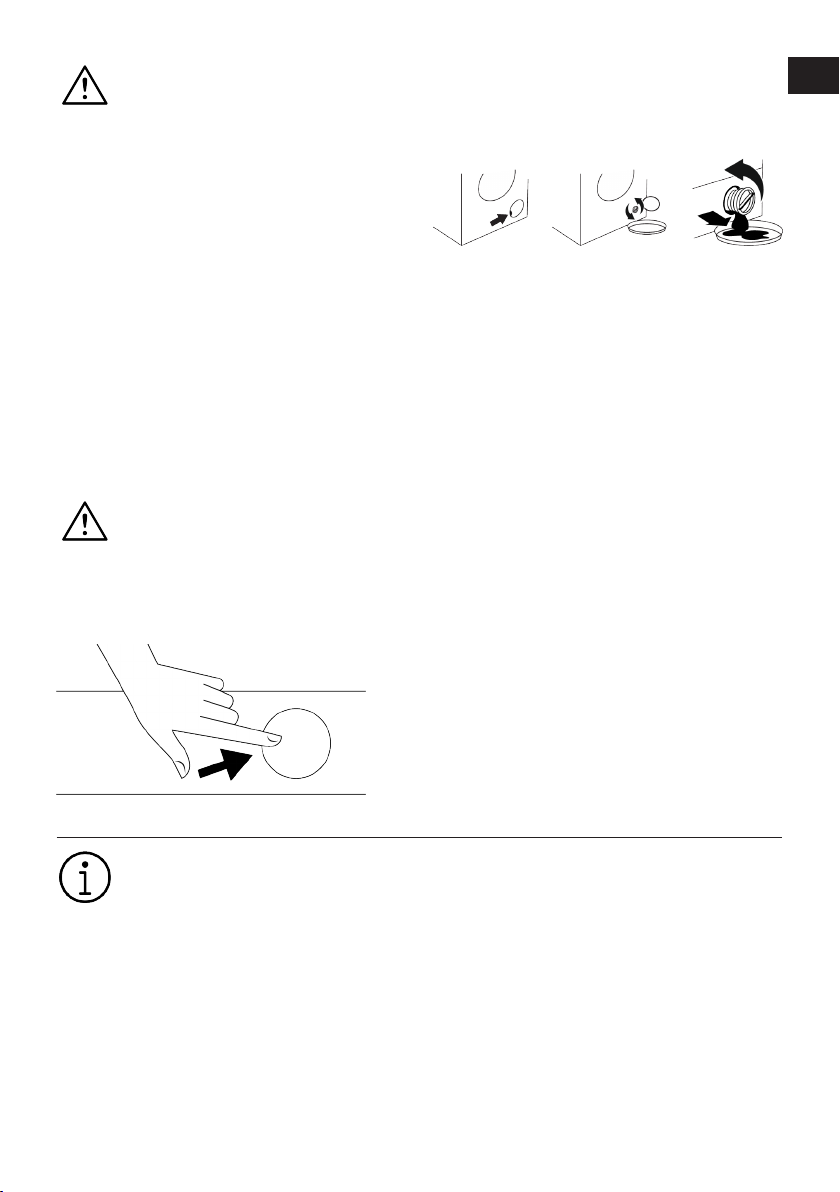
UWAGA:
Obce substancje pozostawione w
filtrze pompy mogą uszkodzić urządzenie lub powodować problemy z
hałasem.
Jeśli mieszkasz na obszarach narażonych na mróz, pamiętaj o zakręceniu kranu z wodą, odłączeniu
głównego węża i spuszczeniu wody
z produktu, gdy nie jest on używany.
Po każdym użyciu zakręć kurek dopływu wody, do którego przyłączony jest wąż zasilający.
Aby wyczyścić zabrudzony filtr i spuścić
wodę:
1. Wyjmij wtyczkę pralki gniazdka, aby
odłączyć ją od zasilania energią elektryczną.
Temperatura wody wewnątrz pralki
może wzrosnąć do 90 ºC. Aby uniknąć zagrożenia oparzeniem, filtr
czyści się dopiero po ostygnięciu
wody w pralce.
2. Otwórz pokrywę filtru.
3. Aby spuścić wodę, postępuj, jak opisano
to poniżej.
Aby spuścić wodę z pralki bez awaryjnego
węża spustowego:
• Umieść duży pojemnik na końcu węża,
aby zebrać wodę z filtra.
• Gdy z filtra pompy zacznie wyciekać wo-
da, poluzuj go, obracając (przeciwnie do
ruchu wskazówek zegara). Skieruj wypływającą wodę do pojemnika umieszczonego przed filtrem. Przygotuj szmatkę do
wytarcia ewentualnej wody, która może
się rozlać.
• Całkowicie obróć i wyjmij filtr pompy, gdy
woda z produktu wycieknie.
1. Usuń wszelkie pozostałości z wnętrza
filtru, a także włókna, które mogą zbierać się wokół wirnika.
2. Wymień filtr.
3. Jeśli pokrywka filtry składa się z dwóch
części, zamknij ją przyciskając klapkę.
Jeśli jest jednoczęściowa, najpierw wsadzić klapkę na jej miejsce w dolnej części, a następnie nacisnąć górną część,
aby zamknąć pokrywkę.
PL
EN
8 Rozwiązywanie problemów
Najpierw przeczytaj Instrukcje bezpieczeństwa
Programy nie uruchamiają się po zamknięciu drzwiczek.
• Nie naciśnięto przycisku Start/Pauza/
Anuluj. >>>Nacisnąć przycisk Start/Pauza/Anuluj.
• W przypadku załadowania zbyt dużej ilości prania mogą wystąpić problemy z zamykaniem drzwiczek. >>>W takim przy-
padku należy zmniejszyć ilość prania i
upewnić się, że drzwiczki są prawidłowo
zamknięte.
Nie można uruchomić lub wybrać programu.
• Pralka przełączyła się w tryb autoochrony
z uwagi na problem z zasilaniem (np. napięcie w sieci, ciśnienie wody itp.). >>> W
zależności od modelu produktu wybierz
inny program, przekręcając pokrętło wyboru programu lub naciskając i przytrzymując przycisk On/Off (wł./wył.) przez 3
PL / 38
Page 39

sekundy, aby anulować program. Poprzedni program zostanie anulowany.
Patrz Anulowanie programu [}32]
Woda wewnątrz pralki.
• Ze względu na proces kontroli jakości w
trakcie produkcji we wnętrzu pralki pozostało trochę wody. >>> To nie jest usterka; ta woda nie szkodzi pralce.
Pralka nie nabiera wody.
• Kran jest zakręcony. >>> Odkręcić krany.
• Wąż dopływu wody jest zagięty. >>> Rozprostować wąż.
• Filtr dopływu wody jest zatkany. >>> Wyczyść filtr.
• Nie zamknięto drzwiczek. >>> Zamknij
drzwiczki.
Pralka nie spuszcza wody.
• Wąż spustowy wody jest zatkany lub zagięty. >>> Odetkaj lub rozprostuj wąż spustowy wody.
• Filtr pompy jest zatkany. >>> Oczyścić
filtr pompy.
Pralka drga lub hałasuje.
• Pralka nie stoi równo. >>> Wyreguluj nóżki, aby zrównoważyć produkt.
• Do filtra pompy dostał się jakiś twardy
przedmiot. >>> Oczyścić filtr pompy.
• Nie usunięto śrub zabezpieczających
pralkę w transporcie. >>> Zdemontuj śruby zabezpieczające.
• Za mało prania w pralce. >>> Dodaj więcej prania do pralki.
• Za dużo prania w pralce. Wyjmij trochę
prania z pralki lub ręcznie rozłóż pranie w
pralce bardziej równomiernie.
• Pralka opiera się o jakiś sztywny przedmiot. >>> Upewnij się, że pralka o nic się
nie opiera.
Spod pralki wycieka woda.
• Wąż spustowy wody jest zatkany lub zagięty. >>> Odetkaj lub rozprostuj wąż spustowy wody.
• Filtr pompy jest zatkany. >>> Oczyścić
filtr pompy.
Pralka zatrzymała się wkrótce po rozpoczęciu programu.
• Pralka zatrzymała się na chwilę z uwagi
na niskie napięcie. >>> Pralka wznowi
działanie, gdy napięcie z powrotem osiągnie normalny poziom.
Pralka zrzuca wodę zaraz po jej pobraniu.
• Wąż spustowy jest na nieodpowiedniej
wysokości. >>> Podłączyć wąż spustowy
wody tak, jak opisano w instrukcji obsługi.
Nie widać wody w pralce w czasie prania.
• Woda jest w niewidocznej części pralki.
>>> To nie jest usterka.
Nie można otworzyć drzwiczek.
• Zamek w drzwiczkach jest zablokowany
z powodu poziomu wody w pralce. >>>
Spuść wodę przy użyciu programu Odpompowanie lub Odwirowanie.
• Pralka podgrzewa wodę lub wykonuje
cykl wirowania. >>> Odczekać, aż program się skończy.
• Drzwiczki mogą się zablokować z powodu ciśnienia wewnątrz pralki. >>> W takim przypadku chwycić za uchwyt i najpierw popchnąć, a potem pociągnąć
drzwiczki, aby je otworzyć.
• Jeśli nie ma zasilania, drzwiczki pralki się
nie otworzą. >>> Aby otworzyć drzwiczki,
otwórz korek filtra pompy i pociągnij w
dół uchwyt awaryjny umieszczony z tyłu
pokrywy bocznej. Patrz Blokada drzwiczek [}30]
Pranie trwa dłużej niż podano w instrukcji
obsługi. (*)
• Ciśnienie wody jest niskie. >>> Pralka
czeka, aż napełni się odpowiednią ilością
wody, aby zapobiec pogorszeniu jakości
prania z powodu mniejszej ilości wody.
Powoduje to przedłużenie czasu prania.
• Niskie napięcie. >>> Czas prania jest
przedłużany, aby uniknąć niedostatecznego efektu prania na skutek niskiego napięcia.
• Zbyt niska wlotowa temperatura wody.
>>> W zimnych porach roku wydłuża się
czas potrzebny do podgrzania wody.
PL
EN
PL / 39
Page 40

Czas prania może również zostać wydłużony, aby uniknąć niedostatecznego
efektu prania.
• Wzrosła liczba cyklów płukania i/lub ilość
wody do płukania. >>> Pralka zwiększa
ilość wody do płukania, gdy wymagane
jest dokładne płukanie i w razie potrzeby
dodaje jeszcze jeden krok płukania.
• Z powodu nadmiernej ilości użytego detergentu pojawiła się nadmierna ilość piany i uruchomił się automatyczny system
absorpcji piany. >>> Użyć zalecanej ilości
detergentu.
Nie odlicza się czas trwania programu. (W
modelach z wyświetlaczem) (*)
• Timer mógł się zatrzymać w trakcie pobierania wody. >>> Wskaźnik timera nie
będzie odliczał czasu, dopóki pralka nie
pobierze odpowiedniej ilości wody. Pralka odczeka, aż będzie wystarczająca
ilość wody, aby uniknąć niedostatecznego efektu prania na skutek braku wody.
Następnie wskaźnik timera od nowa podejmie odliczanie.
• Timer może się zatrzymać w trakcie podgrzewania wody. >>> Wskaźnik timera nie
będzie odliczał czasu, dopóki pralka nie
osiągnie nastawionej temperatury.
• Timer może się zatrzymać w trakcie odwirowywania. >>> Uruchomił się automatyczny system wykrywania nierównomiernego obciążenia z powodu nierównomiernego rozłożenia prania w bębnie.
Nie odlicza się czas trwania programu. (*)
• Pralka jest obciążona niesymetrycznym
ładunkiem. >>> Uruchomił się automatyczny system wykrywania nierównomiernego obciążenia z powodu nierównomiernego rozłożenia prania w bębnie.
Pralka nie przełącza się na odwirowanie.
(*)
• Pralka jest obciążona niesymetrycznym
ładunkiem. >>> Uruchomił się automatyczny system wykrywania nierównomiernego obciążenia z powodu nierównomiernego rozłożenia prania w bębnie.
• Pralka nie będzie wirować, dopóki woda
nie zostanie całkowicie spuszczona. >>>
Sprawdzić filtr i wąż spustowy.
• Z powodu nadmiernej ilości użytego detergentu pojawiła się nadmierna ilość piany i uruchomił się automatyczny system
absorpcji piany. >>> Użyć zalecanej ilości
detergentu.
Wydajność prania jest mała: Pranie szarzeje. (**)
• Przez dłuższy czas używano za mało detergentu. >>> Używać zalecanej ilości detergentu odpowiedniej do twardości wody i do rodzaju prania.
• Przez dłuższy czas prano w niskich temperaturach. >>> Wybrać temperaturę prania właściwą dla danych rzeczy do prania.
• Z twardą wodą użyto zbyt mało detergentu. >>> Użycie niedostatecznej ilości detergentu z twardą wodą sprawia, że brud
przywiera do tkaniny i z czasem tkaniny
od tego szarzeją. Takiej szarości trudno
jest się pozbyć. Używać zalecanej ilości
detergentu odpowiedniej do twardości
wody i do rodzaju prania.
• Użyto nadmiernej ilości detergentu. >>>
Używać zalecanej ilości detergentu odpowiedniej do twardości wody i do rodzaju
prania.
Wydajność prania jest mała: Plamy pozostają lub pranie nie jest całkiem białe. (**)
• Użyto niewystarczającej ilości detergentu. >>> Używać zalecanej ilości detergentu odpowiedniej do twardości wody i do
rodzaju prania.
• Za dużo prania w pralce. >>> Nie wkładaj
zbyt dużo prania. Przestrzegać ilości podanych w „Tabeli programów i zużycia”.
• Wybrano niewłaściwy program i temperaturę. >>> Wybrać temperaturę oraz program właściwe dla danego prania.
• Użyto niewłaściwego rodzaju detergentu.
>>> Użyć oryginalnego detergentu odpowiedniego dla danej pralki.
• Użyto nadmiernej ilości detergentu. >>>
Wlać detergent do właściwej komory. Nie
mieszaj wybielacza z detergentem.
PL
EN
PL / 40
Page 41

Wydajność prania jest mała: Na praniu pojawiły się oleiste plamy. (**)
• Bęben nie był regularnie czyszczony. >>>
Regularnie czyścić bęben. Patrz Czyszczenie drzwiczek i bębna [}36]
Wydajność prania jest mała: Odzież nieprzyjemnie pachnie. (**)
• W bębnie powstaje nieprzyjemny zapach
i zbiera się osad z bakterii w wyniku ciągłego prania w niskich temperaturach i/
lub na krótkich programach. >>> Pozostawiać uchyloną szufladę na detergent i
drzwiczki po każdym praniu. Dzięki temu
wewnątrz pralki nie powstanie wilgotne
środowisko sprzyjające namnażaniu się
bakterii.
Kolor odzieży blaknie. (**)
• Za dużo prania w pralce. >>> Nie wkładaj
zbyt dużo prania.
• Użyto wilgotnego detergentu. >>> Trzymać detergent zamknięty w środowisku
wolnym od wilgoci i nie narażać go na
działanie nadmiernych temperatur.
• Wybrano wyższą temperaturę. >>> Wybrać program i temperaturę odpowiednie
do typu, ilości i stopnia zabrudzenia prania.
Pralka nie płucze prawidłowo.
• Ilość, marka i warunki przechowywania
użytego detergentu mogą być niewłaściwe. >>> Używać detergentu właściwego
dla danej pralki i rzeczy do prania. Trzymać detergent zamknięty w środowisku
wolnym od wilgoci i nie narażać go na
działanie nadmiernych temperatur.
• Detergent podano do niewłaściwej komory. >>> Jeżeli detergent został umieszczony w komorze do prania wstępnego,
mimo że nie wybrano cyklu prania wstępnego, pralka może pobierać detergent na
etapie płukania lub dodawania środka
zmiękczającego. Podać detergent do
właściwej komory.
• Filtr pompy jest zatkany. >>> Sprawdzić
filtr.
• Wąż spustowy jest zagięty. >>> Sprawdzić wąż spustowy.
Rzeczy po praniu sztywnieją. (**)
• Użyto niewystarczającej ilości detergentu. >>> Jeżeli twardość wody jest wysoka, używanie niewystarczającej ilości detergentu może z czasem powodować
sztywnienie prania. Używać ilości detergentu odpowiedniej do twardości wody.
• Detergent podano do niewłaściwej komory. >>> Jeżeli detergent został umieszczony w komorze do prania wstępnego,
mimo że nie wybrano cyklu prania wstępnego, pralka może pobierać detergent na
etapie płukania lub dodawania środka
zmiękczającego. Podać detergent do
właściwej komory.
• Detergent zmieszano ze środkiem zmiękczającym. >>> Nie mieszać środka
zmiękczającego z detergentem. Umyć
szufladę gorącą wodą.
Pranie nie pachnie środkiem zmiękczającym. (**)
• Detergent podano do niewłaściwej komory. >>> Jeżeli detergent został umieszczony w komorze do prania wstępnego,
mimo że nie wybrano cyklu prania wstępnego, pralka może pobierać detergent na
etapie płukania lub dodawania środka
zmiękczającego. Umyć szufladę gorącą
wodą. Podać detergent do właściwej komory.
• Detergent zmieszano ze środkiem zmiękczającym. >>> Nie mieszać środka
zmiękczającego z detergentem. Umyć
szufladę gorącą wodą.
Pozostałości detergentu w szufladzie dozownika. (**)
• Detergent podano do wilgotnej szuflady.
>>> Przed wsypaniem detergentu wysuszyć szufladę na detergent.
• Detergent zawilgotniał. >>> Trzymać detergent zamknięty w środowisku wolnym
od wilgoci i nie narażać go na działanie
nadmiernych temperatur.
• Ciśnienie wody jest niskie. >>> Sprawdzić
ciśnienie wody.
• Detergent w komorze prania głównego
zawilgotniał podczas pobierania wody w
cyklu prania wstępnego. Zatkały się
PL
EN
PL / 41
Page 42
otwory w komorze detergentu. >>>
Sprawdzić otwory i udrożnić je, jeśli się
zatkały.
• Problem z zaworami szuflady na detergent. >>> Wezwać przedstawiciela autoryzowanego serwisu.
• Detergent zmieszano ze środkiem zmiękczającym. >>> Nie mieszać środka
zmiękczającego z detergentem. Umyć
szufladę gorącą wodą.
• Bęben nie był regularnie czyszczony. >>>
Regularnie czyścić bęben. Patrz Czyszczenie drzwiczek i bębna [}36]
W pralce tworzy się zbyt wiele piany. (**)
• Użyto detergentu niewłaściwego dla danej pralki. >>> Użyć detergentu właściwego dla danej pralki.
• Użyto nadmiernej ilości detergentu. >>>
Używać tylko właściwej ilości detergentu.
• Detergent przechowywano w niewłaściwych warunkach. >>> Przechowywać detergent w miejscu zamkniętym i suchym.
Nie wolno przechowywać detergentów w
miejscach, w których panuje nadmierna
temperatura.
• Niektóre rzeczy do prania o siatkowej
fakturze, np. tiul, mogą tworzyć zbyt wiele piany. >>> Używać mniejszej ilości detergentu do prania takich rzeczy.
• Detergent podano do niewłaściwej komory. >>> Należy upewnić się, że detergent
został umieszczony w odpowiedniej komorze.
• Pralka zbyt wcześnie pobiera środek
zmiękczający wodę. >>> Może występować problem z zaworami lub dozownikiem detergentu. Wezwać przedstawiciela autoryzowanego serwisu.
Z szuflady na detergent wypływa piana.
• Użyto zbyt wiele detergentu. >>> Wymieszać 1 łyżkę środka zmiękczającego z ½
litra wody i wlać do komory prania głównego szuflady na detergent. >>> Włożyć
do pralki detergent odpowiedni dla danych programów i maksymalnych ilości
prania wskazanych w „Tabeli programów
i zużycia”. Gdy używane są dodatkowe
środki chemiczne (takie jak odplamiacz,
wybielacz itd.), należy zmniejszyć ilość
detergentu.
Na koniec programu pranie pozostaje wilgotne. (*)
• Z powodu nadmiernej ilości użytego detergentu pojawiła się nadmierna ilość piany i uruchomił się automatyczny system
absorpcji piany. >>> Użyć zalecanej ilości
detergentu.
(*) Aby zapobiec uszkodzeniom pralki oraz
jej otoczenia, pralka nie przełącza się w
tryb wirowania, gdy pranie nie jest równomiernie rozłożone w bębnie. Pranie należy
na nowo rozmieścić w bębnie i odwirować.
(**) Bęben nie był regularnie czyszczony.
Regularnie czyścić bęben. Patrz Czyszczenie drzwiczek i bębna [}36]
Jeśli pomimo postępowania zgodnie z tą instrukcją nie można rozwiązać problemu, należy się skonsultować ze sprzedawcą pralki lub
przedstawicielem autoryzowanego
serwisu. Nigdy nie należy podejmować prób samodzielnego naprawiania niedziałającej pralki.
Sprawdź rozdział HomeWhiz, aby
uzyskać odpowiednie informacje
dotyczące rozwiązywania problemów.
PL
EN
9 ZASTRZEŻENIE
Niektóre (proste) awarie mogą być wykonane przez użytkownika końcowego bez jakichkolwiek problemów związanych z bezpieczeństwem lub niebezpiecznym użytkowaniem, pod warunkiem, że są one przepro-
wadzane w granicach i zgodnie z następującymi instrukcjami (patrz rozdział „Samodzielna naprawa”).
Dlatego też, o ile nie określono inaczej w
rozdziale „Samodzielna naprawa”, naprawy
powinny być wykonywane przez zarejestrowane profesjonalne serwisy naprawcze w
PL / 42
Page 43

celu uniknięcia problemów z bezpieczeństwem. Zarejestrowany profesjonalny serwis naprawczy to profesjonalny serwis zajmujący się naprawami, któremu producent
przyznał dostęp do instrukcji i listy części
zamiennych tego produktu zgodnie z metodami opisanymi w aktach prawnych zgodnymi z Dyrektywą 2009/125/WE.
Jednak tylko agent serwisowy (tj. autoryzowane profesjonalne serwisy naprawcze),
z którym można się skontaktować pod numerem telefonu podanym w instrukcji obsługi/karcie gwarancyjnej lub za pośrednictwem autoryzowanego sprzedawcy,
może świadczyć usługi serwisowe opartych na warunkach gwarancji. W związku z
tym należy pamiętać, że naprawy wykonywane przez profesjonalne warsztaty (nieautoryzowane przez Whirlpool ) spowodują
utratę gwarancji.
Samodzielna naprawa
Użytkownik końcowy może wykonać samodzielną naprawę wyłącznie w przypadku następujących części zamiennych: drzwi, zawiasy drzwi i uszczelki, inne uszczelki, zespół zamka drzwi i urządzenia peryferyjne z
tworzywa sztucznego, takie jak dozowniki
detergentu (aktualna lista jest również dostępna na https://parts-selfservice.europeanappliances.com od 1 marca 2021)
Ponadto, aby zapewnić bezpieczeństwo
produktu i zapobiec ryzyku poważnych obrażeń, wspomnianą samodzielną naprawę
należy wykonać zgodnie ze wskazówkami
zawartymi w instrukcji obsługi w rozdziale
„Samodzielna naprawa” lub które są dostępne na stronie https://parts-selfservice.europeanappliances.com Dla własnego
bezpieczeństwa przed wykonaniem samodzielnej naprawy odłącz urządzenie od zasilania.
Próby naprawy i naprawy dokonywane
przez użytkowników końcowych w przypadku części nieuwzględnionych na liście i/lub
niestosowanie się do wskazówek zawartych w podręcznikach użytkownika dotyczących samodzielnej naprawy lub które są
dostępne na stronie https://parts-selfservi-
ce.europeanappliances.com, mogą powodować problemy z bezpieczeństwem, które
nie zostały zawarte na stronie https://partsselfservice.europeanappliances.com, i utratę gwarancji.
W związku z tym zaleca się, aby użytkownicy końcowi powstrzymali się od prób przeprowadzania napraw wykraczających poza
wymieniony wykaz części zamiennych, kontaktując się w takich przypadkach z autoryzowanymi profesjonalnymi serwisami naprawczymi lub zarejestrowanymi profesjonalnymi serwisami naprawczymi. W takim
przypadku próby podejmowane przez użytkowników końcowych mogą powodować
problemy z bezpieczeństwem i uszkodzenie produktu, a następnie wywołać pożar,
powódź, porażenie prądem i poważne obrażenia ciała.
Przykładowo, ale nie tylko, następujące naprawy muszą być wykonane przez autoryzowane profesjonalne serwisy naprawcze
lub zarejestrowane profesjonalne serwisy
naprawcze: silnik, zespół pompy, płyta
główna, płyta silnika, tablica wyświetlacza,
grzałki itp.
Producent/sprzedawca nie ponosi odpowiedzialności w żadnym przypadku, gdy
użytkownicy końcowi nie przestrzegają powyższych zaleceń.
Dostępność części zamiennych zakupionej
pralki lub pralko-suszarki wynosi 10 lat. W
tym okresie dostępne będą oryginalne części zamienne umożliwiające prawidłową
obsługę pralki lub pralko-suszarki.
PL / 43
PL
EN
Page 44
Dostęp do licznika cykli prania
Gdy urządzenie jest wyłączone, naciśnięcie i przytrzymanie przycisków funkcji pomocniczych 1 i 2
przez dłuższy czas powoduje odliczanie 3-2-1 i wyświetlenie całkowitej liczby zakończonych cykli.
Po wyświetleniu całkowitego cyklu wyświetlane są ewentualne kody awarii. Sprawdź informacje na
ekranie, korzystając z poniższej tabeli.
Informacje
wyświetlane na ekranie
Err Włącza się algorytm bezpieczeństwa.
SC
E5 Filtr pompy może być zatkany.
E8 Pralka może nie pobierać wody.
E29
E17
E18
E12 W pralce może znajdować się woda.
E27 Sprawdź odpływ wody z urządzenia.
E84 Nie można nawiązać połączenia BLE.
autoochrony z uwagi na problem
z zasilaniem (np. napięcie w sieci,
Po zakończeniu cyklu w urządzeniu
ponieważ urządzenie wykryło, że
Przyczyna Rozwiązanie
Poczekaj aż zakończy pracę. Po naciśnięciu przycisków
funkcji pomocniczych 1 i 2 sprawdź informacje
Twoje zgłoszenie nie zostanie
rozwiązane podczas kontroli.
Pralka przełączyła się w tryb
ciśnienie wody itp.).
jest nadmiar piany.
Wirowanie nie rozpoczęło się,
bęben jest niewyważony.
wyświetlane na ekranie.
Skontaktuj się z przedstawicielem autoryzowanego
serwisu.
Oczyścić filtr pompy.
Patrz rozdział „Spuszczanie pozostałej wody i czyszczenie
filtru pompy”.
Spróbuj cyklu wirowania. Jeśli problem nie zostanie
rozwiązany, skontaktuj się z serwisem.
• Odkręcić krany.
• Upewnij się, że nie ma przerwy w dostawie wody.
•Sprawdź podłączenie węża dopływowego, jeśli jest
zagięty - wyprostuj go.
• Oczyścić filtr pompy. Patrz rozdział „Spuszczanie
pozostałej wody i czyszczenie filtru pompy”.
• Zamknij przednią pokrywę urządzenia. Upewnij się, że
pokrywa jest zablokowana.
Uruchom urządzenie ponownie. Jeśli problem nie zostanie
rozwiązany, skontaktuj się z serwisem.
W celu anulowania programu obróć pokrętło wyboru
programu, aby wybrać inny program. Poprzedni program
zostanie anulowany. Patrz rozdział „Anulowanie
programu”.
Jeśli problem nie zostanie rozwiązany, skontaktuj się z
serwisem.
• Przechowywać detergent w miejscu zamkniętym
i suchym. Nie wolno przechowywać detergentów w
miejscach, w których panuje nadmierna temperatura.
• Do porowatych tkanin, takich jak tiul, należy użyć
mniejszej ilości detergentu.
• Ilości detergentu powinna być odpowiednia do ilości
prania i stopnia zabrudzenia.
• Używać tylko właściwej ilości detergentu.
• Należy upewnić się, że detergent został umieszczony w
odpowiedniej komorze.
• Uruchom program czyszczenia bębna przy pustej
urządzeniu. Patrz program „Czyszczenie bębna”
Jeśli twoje urządzenie nie posiada programu czyszczenia
bębna, możesz użyć programu bawełna 90°C.
• Po uruchomieniu krótkiego programu bez detergentu,
sprawdź urządzenie. Jeśli problem nie zostanie
rozwiązany, skontaktuj się z serwisem.
Sprawdź, czy w pralce znajduje się pranie. Ilość prania
może być niewystarczająca. Spróbuj zwiększyć ilość
prania.
Pranie może powodować brak równowagi. Należy ręcznie
posortować pranie i równomiernie rozłożyć w urządzeniu.
Spróbuj ponownie cyklu wirowania.
Odłącz urządzenie od zasilania.
Pod pralką może znajdować się woda. Wyczyść wodę pod
urządzeniem.
Ponownie podłącz urządzenie do zasilania.
Spróbuj uruchomić krótki cykl.
Jeśli problem nie zostanie rozwiązany lub zauważysz
wyciek wody z jednego z węży, zamknij zawory i wezwij
serwis.
Sprawdź rozdział „Przyłączenie węża spustowego do
odpływu”.
Sprawdź i spróbuj podłączyć. Sprawdź rozdział „Funkcja
HomeWhiz i funkcja zdalnego sterowania”. Jeśli problem
nie zostanie rozwiązany, skontaktuj się z serwisem.
Page 45
under license
Washing Machine
User Manual
EN
WAM 764GKBC PL
1911863055/EN/ / 11.04.25 15:03
Page 46
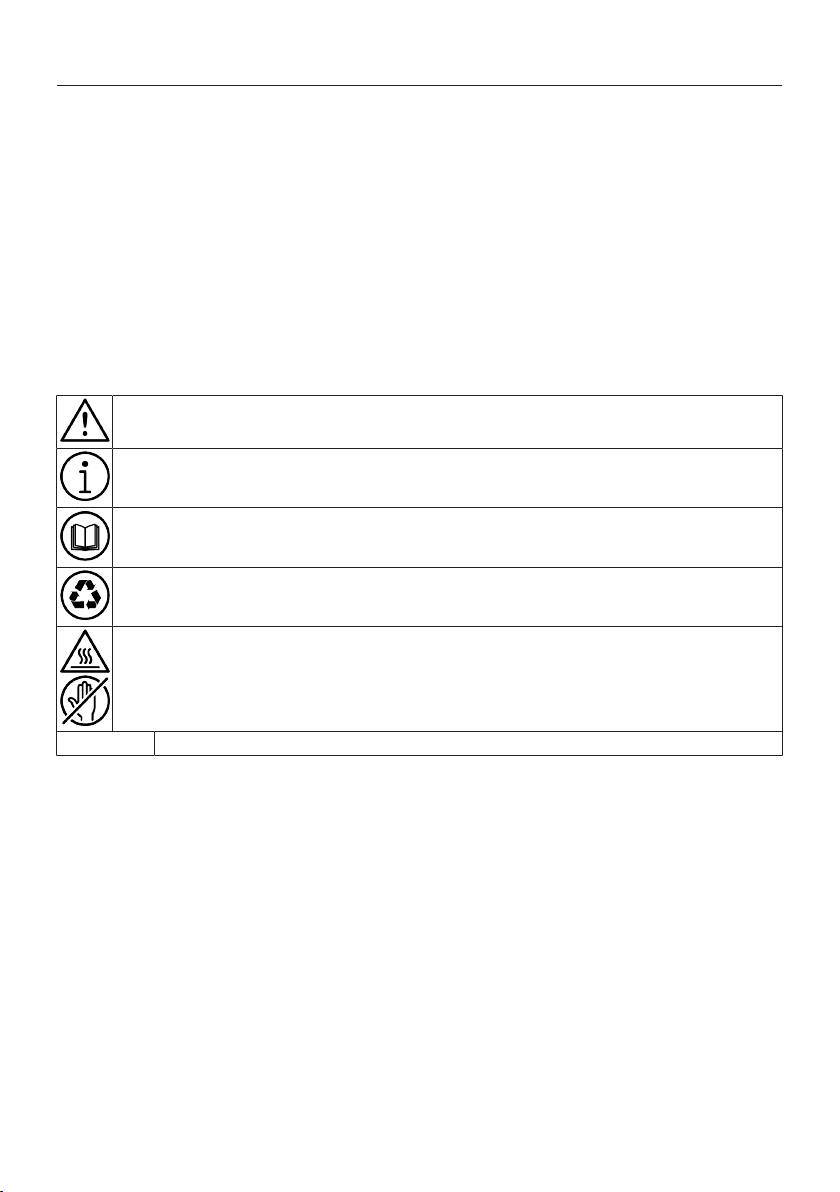
Please read this user manual first!
Dear Customer,
Thank you for choosing Whirlpool product.
Please register your product at www.register10.eu.
We hope that you get the best results from your product which has been manufactured
with high quality and state-of-the-art technology. Therefore, please read this entire user
manual and all other accompanying documents carefully before using the product.
Follow all warnings and information in the user manual. Thus, you protect yourself and
your product against possible dangers.
Keep the user manual. If you hand over the product to someone else, provide the user
manual as well. Warranty terms, usage and troubleshooting methods of your product are in
user manual.
Symbols and Definitions
The following symbols are used in the user manual:
Danger that could result in death or injury.
Important information or useful hints about usage.
Read the user manual.
Recyclable materials.
Hot surface warning.
WARNING Danger that may result in property damage to the product or its environment.
EN / 44
Page 47
Table of Contents
1 Safety Instructions......................... 46
1.1 Permitted Use................................ 46
1.2 Installation ..................................... 47
1.3 Electrical Warnings........................ 48
1.4 Cleaning and Maintenance ........... 49
2 Important Instructions for Environ-
ment ..............................................
2.1 Compliance with WEEE Directive . 49
2.2 Package Information..................... 49
3 Technical Specifications ................ 50
4 Installation..................................... 51
4.1 Unpacking and Transporting the
Product...........................................
4.2 Appropriate Installation Location. 51
4.3 Assembly of Bottom Panel Cov-
ers...................................................
4.4 Removing Transportation Safety
Bolts ...............................................
4.5 Connecting to Water Supply ......... 53
4.6 Connecting the Drain Hose to the
Drain ...............................................
4.7 Adjusting the Feet ......................... 54
4.8 Electrical Connection .................... 54
4.9 Start Up .......................................... 54
5 Preliminary Preparation ................. 54
5.1 Sorting the Laundry ....................... 55
5.2 Preparing Laundry for Washing.... 55
5.3 Tips for Energy and Water Saving 55
5.4 Loading the Laundry...................... 55
5.5 Correct Load Capacity .................. 55
5.6 Using Detergent and Softener ...... 56
5.7 Tips for Efficient Washing ............ 58
5.8 Displayed Programme Duration ... 58
6 Operating the Product.................... 59
6.1 Control Panel ................................. 59
6.2 Symbols on the Display................. 60
6.3 Programme and Consumption
Table...............................................
6.4 Programme Selection ................... 63
6.5 Programmes.................................. 63
6.6 Temperature Selection.................. 65
6.7 Spin Speed Selection .................... 66
6.8 Auxiliary Function Selection ......... 66
6.8.1 Auxiliary Functions .................... 67
49
51
52
52
53
61
6.8.2 Functions/Programmes Selected by Pressing the Function
Keys for 3 Seconds ....................
6.9 End Time ........................................ 69
6.10 Starting the Program ..................... 70
6.11 Loading Door Lock......................... 70
6.12 Changing Selections After Pro-
gram Starts.....................................
6.13 Cancelling the Programme ........... 72
6.14 End of Programme......................... 72
6.15 HomeWhiz Feature and Remote
Control Function ............................
6.15.1 HomeWhiz Setup........................ 73
6.15.2 Setting up a Washing Machine
Connected to Someone Else's
Account.......................................
6.15.3 Deleting the HomeWhiz Ac-
count Match................................
6.15.4 Remote Control Function and
Its Use .........................................
6.15.5 Troubleshooting......................... 75
6.15.6 HomeWhiz Consumption Val-
ues Display .................................
7 Maintenance and Cleaning............. 76
7.1 Cleaning the Detergent Drawer..... 76
7.2 Cleaning the Loading Door and
the Drum.........................................
7.3 Cleaning the Body and Control
Panel...............................................
7.4 Cleaning the Water Intake Filters.. 77
7.5 Draining Remaining Water and
Cleaning the Pump Filter...............
8 Troubleshooting ............................ 78
9 DISCLAIMER .................................. 82
68
71
72
74
74
74
75
76
77
77
PL
EN
EN / 45
Page 48
1 Safety Instructions
PL
Important to Be Read and Observe
Before using the appliance, read
these safety instructions. Keep
them nearby for future reference. These instructions and the
appliance itself provide important safety warnings, to be observed at all times. The manufacturer declines any liability for
failure to observe these safety
instructions, for inappropriate
use other appliance or incorrect
setting of controls. The warranty
conditions are specified in the
document supplied with the appliance.
• Keep very young children (0-3
years) away from the appliance. Keep young children (3-8
years) away from the appliance unless they are continuously supervised. Children
aged 8 and over, as well as individuals with reduced physical, sensory or mental capabilities or individuals with lack of
knowledge and experience can
use the appliance only under
supervision or after receiving
clear instructions on safe use
and understanding the possible risks. Children must not
play with the appliance. Children must not perform cleaning and maintenance tasks
without supervision. Do not
force the door open or use it
as a step.
1.1 Permitted Use
• The appliance is not intended
to be operated by means of an
external switching device, such
as a timer, or separate remote
controlled system.
• This appliance is intended for
household use and similar applications listed as follows:
– Staff kitchens in shops, of-
fices, and other work envir-
onments.
– Farmhouses
– Hotels, motels, bed & break-
fast and other residential en-
vironments
– Communal areas in apart-
ment buildings or laundro-
mats
• Do not load the appliance
above the maximum capacity
(kilogram of dry cloth) indicated in the programme table.
• This appliance is not for professional use. Do not use the
appliance outdoors.
• Do not use any solvents (e.g.
turpentine, benzene), detergents containing solvents,
scouring powder, glass or gen-
EN
EN / 46
Page 49
eral purpose cleaners, or flammable fluids. Do not machine
wash fabrics that have been
treated with solvents or flammable liquids.
1.2 Installation
• This appliance requires two or
more people to handle and install to prevent injuries. Wear
protective gloves during unpacking and installation to
avoid cuts.
• Before stacking a dryer on top
of your washing machine, contact our After-Sales Service or
your specialist dealer to verify
whether this is possible. This
is only possible if the dryer is
attached to the washing machine by means of appropriate
stacking kit available through
our After-Sales Service or your
specialist dealer.
• Do not install the appliance in
places where it may be exposed to extreme conditions
such as poor ventilation, temperatures below 5 °C or above
35 °C.
• Move the appliance without
lifting it by the worktop or top
lid.
• Installation, including water
supply (if any) and electrical
connections and repairs must
be carried out by a qualified
technician.
• Do not repair or replace any
part of the appliance unless
specifically stated in the user
manual.
• Keep children away from the
installation site.
• After unpacking the appliance,
make sure that it has not been
damaged during transport. In
the event of problems, contact
the dealer or your nearest
After-Sales Service.
• After installing the appliance,
keep the packaging waste
(plastic, styrofoam, etc.) out of
the reach of children to avoid
the risk of suffocation.
• Before any installation operation, disconnect the appliance
from the power supply to avoid
electric shock.
• During installation, ensure the
power cable is not damaged to
prevent fire or electric shock.
• Do not operate the appliance
until installation is complete.
• When installing the appliance,
make sure that the four feet
are stable and resting on the
floor, adjusting them as re-
PL
EN
EN / 47
Page 50

quired. Check that the appliance is perfectly to level using
a spirit level.
• When installing the appliance
on wood or floating floors (certain parquet and laminate
types), place a 60 x 60 x 3 cm
(minimum) plywood sheet under the appliance to provide
stability.
• Connect the water inlet
hose(s) to the water supply in
accordance with with the regulations of your local water
company.
• For cold fill only models: do
not connect to the hot water
supply.
• For models with hot fill: the hot
water inlet temperature must
not exceed 60 °C.
• The washing machine is fitted
with transport bolts to prevent
any possible damage to the interior during transport. Before
using the machine, it is imperative that the transport bolts
are removed. After their removal, cover the openings with
the enclosed plastic caps.
• After installation, wait a few
hours before operating the appliance so that it acclimates to
the environmental conditions
of the room.
• Make sure that the ventilation
openings in the base of your
washing machine (if available
on your model) are not obstructed by carpet or other material.
• Use only new hoses to connect
the appliance to the water supply. Do not reuse old hosesets.
• The supply water pressure
must be in the 0.1-1 MPa
range.
• Do not repair or replace any
part of the appliance unless
specifically stated in the user
manual. Use only authorized
After-Sales Service. Self or
non-professional repair may
lead to dangerous incident resulting in life or health threatening and/or significant property
damage.
• The spare parts for the household washing machines will be
available for 10 years after placing the last unit on the market
as dictated by the Ecodesign
for Sustainable Products Regulation.
1.3 Electrical Warnings
• To disconnect the appliance
from the power source:
– Unplug it (if the plug is ac-
cessible), or
PL
EN
EN / 48
Page 51
– use a multi-pole switch in-
stalled upstream of the
socket in accordance with
local wiring rules.
• Ensure the appliance is
earthed according to national
electrical safety standards.
• Do not use extension leads,
multiple sockets or adapters.
The electrical components
must not be accessible to the
user after installation. Do not
use the appliance when you
are wet or barefoot. Do not operate the appliance if the
power cord or plug is damaged, if the appliance is not
working properly, or if it has
been damaged or dropped.
• If the supply cord is damaged,
it must be replaced with an
identical one by the manufac-
turer, its service agent or similarly qualified persons in order
to avoid possible hazards and
the risk of electric shock.
1.4 Cleaning and Maintenance
• Before performing any maintenance, switch off and disconnect the appliance from the
power supply.
• Wear protective gloves and
safety shoes to avoid injury
during maintenance.
• Handle the appliance with two
or more people to prevent
strain or injury.
• Do not use steam cleaning
equipment on the appliance to
prevent electric shock.
• Non-professional repairs or
maintenance void the warranty
and may pose safety risks.
PL
EN
2 Important Instructions for Environment
2.1 Compliance with WEEE Directive
This product complies with EU
WEEE Directive (2012/19/EU).
This product bears a classification symbol for waste electrical
and electronic equipment
(WEEE).
This product has been manufactured with
high quality parts and materials which can
be reused and are suitable for recycling. Do
not dispose of the waste product with normal domestic and other wastes at the end
of its service life. Take it to the collection
center for the recycling of electrical and
electronic equipment. Please consult your
local authorities to learn about these collection centers.
2.2 Package Information
Packaging materials of the product are
manufactured from recyclable materials in
accordance with our National Environment
Regulations. Do not dispose of the packaging materials together with the domestic
or other wastes. Take them to the packaging material collection points designated
by the local authorities.
EN / 49
Page 52
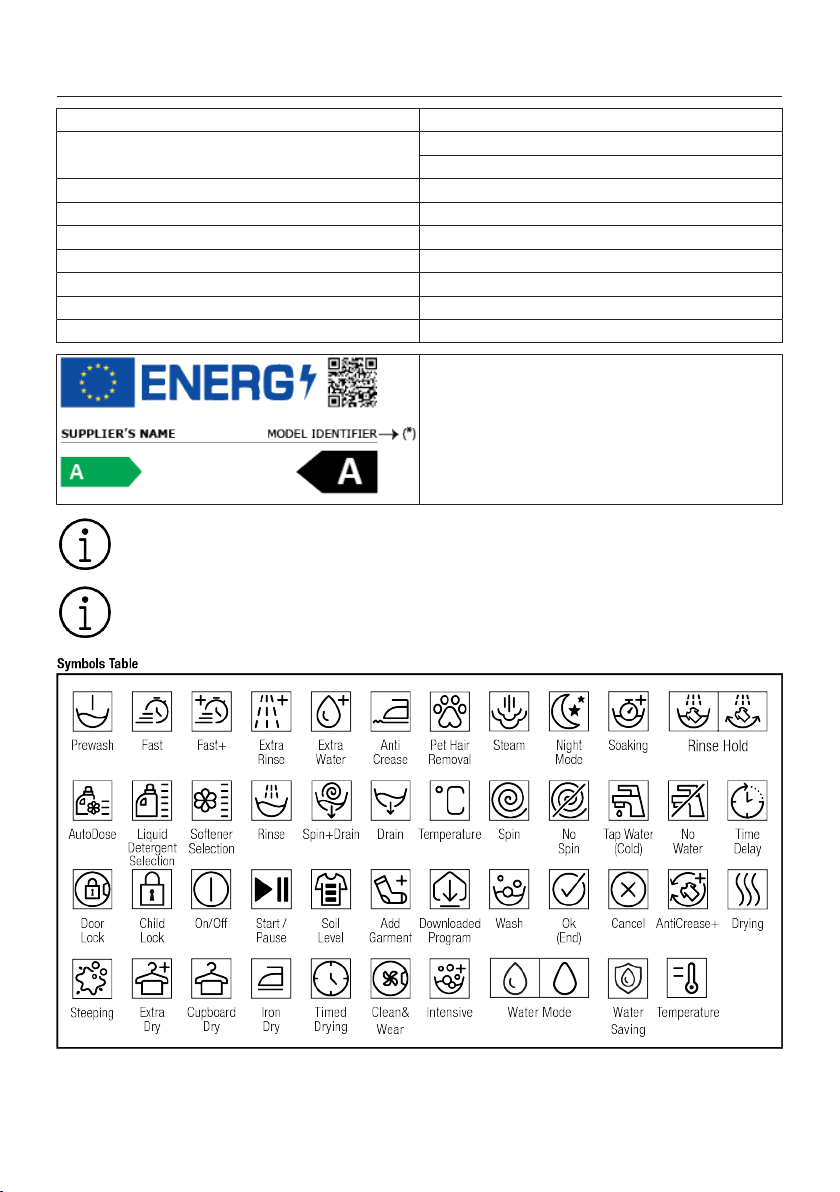
3 Technical Specifications
Supplier’s name or commercial brand WHIRLPOOL
Model name
Nominal Capacity (kg) 7
Maximum spin speed (cycle/min) 1400
Built-In No
Height (cm) 84.5
Width (cm) 60.0
Depth (cm) 49.6
Single Water inlet / Double Water inlet + / -
The model information as stored in the product database
can be reached by entering following website and searching for your model identifier (*) found on energy label.
https://eprel.ec.europa.eu/
The consumption values apply when wireless network connection is turned off.
The defined cybersecurity-related software update support period of the product is
the warranty period of the product. After this period, cybersecurity-related software
updates are not guaranteed.
WAM 764GKBC PL
7009640001
EN / 50
Page 53
4 Installation
Please read the “Safety Instructions” section first!
Your product automatically detects
the amount of laundry placed inside
when selecting a programme.
While installing the product, before
the first use, calibration should be
done to ensure that the laundry
amount is detected in the most accurate way.
To do this, select the Drum Cleaning* programme and cancel the
spin function. Start the programme
without laundry. Wait for the programme to finish, which will take
about 15 minutes.
*The programme name may vary
depending on the model. For the
appropriate programme selection,
review the programme descriptions
section.
• Please contact the nearest Authorised
Service for the installation of the product.
• Make sure that the installation and elec-
trical connections of the product are performed by authorised service agent. Manufacturer shall not be held responsible
for damages caused by operations performed by unauthorised persons.
• Preparation of the location and electrical,
tap water and wastewater installations at
the place of installation is under customer's responsibility.
• Make sure that the water inlet and dis-
charge hoses as well as the power cable
are not folded, pinched, or crushed while
pushing the product into its place after
installation or cleaning procedures.
• Prior to installation, visually check if the
product has any defects on it. Do not
have the product installed if it is damaged. Damaged products cause risks for
your safety.
4.1 Unpacking and Transporting the Product
Unpacking the Product
• Remove the cardboard box or Styrofoam
packaging.
• To remove the cardboard or Styrofoam
packaging underneath the product, lift
the product carefully. If this is not possible, remove it by tilting it slightly to the
side or by laying it on its side without
damaging the product.
• Open the door and remove the inlet hose
and any other accessories inside drum.
• Detach the power cable and drain hose
from their fixed positions.
• Remove the transportation safety bolts.
(see “Removing the Transportation
Safety Bolts”)
Transporting the Product
Read the “Transportation Safety”
section first!
• Ensure the door and detergent drawer are
closed.
• Install the transportation safety bolts
carefully without damaging the product's
drum. (see "Removing the Transportation
Safety Bolts")
• Pack the product with protective pack-
aging to prevent damage during transport.
4.2 Appropriate Installation Location
• Place the product on a hard, rigid and
level floor. Do not place the product on
surfaces such as long-pile carpets or
non-slip carpets, or on excessively
springy flooring such as acoustic floor
coverings. Improper surfaces may cause
noise and vibration problems.
• When the washing machine and the dryer
are placed on top of each other, their
total weight -when full- is approximately
180 kilograms. Place the product on a
solid and level surface with sufficient
load-carrying capacity.
EN / 51
PL
EN
Page 54
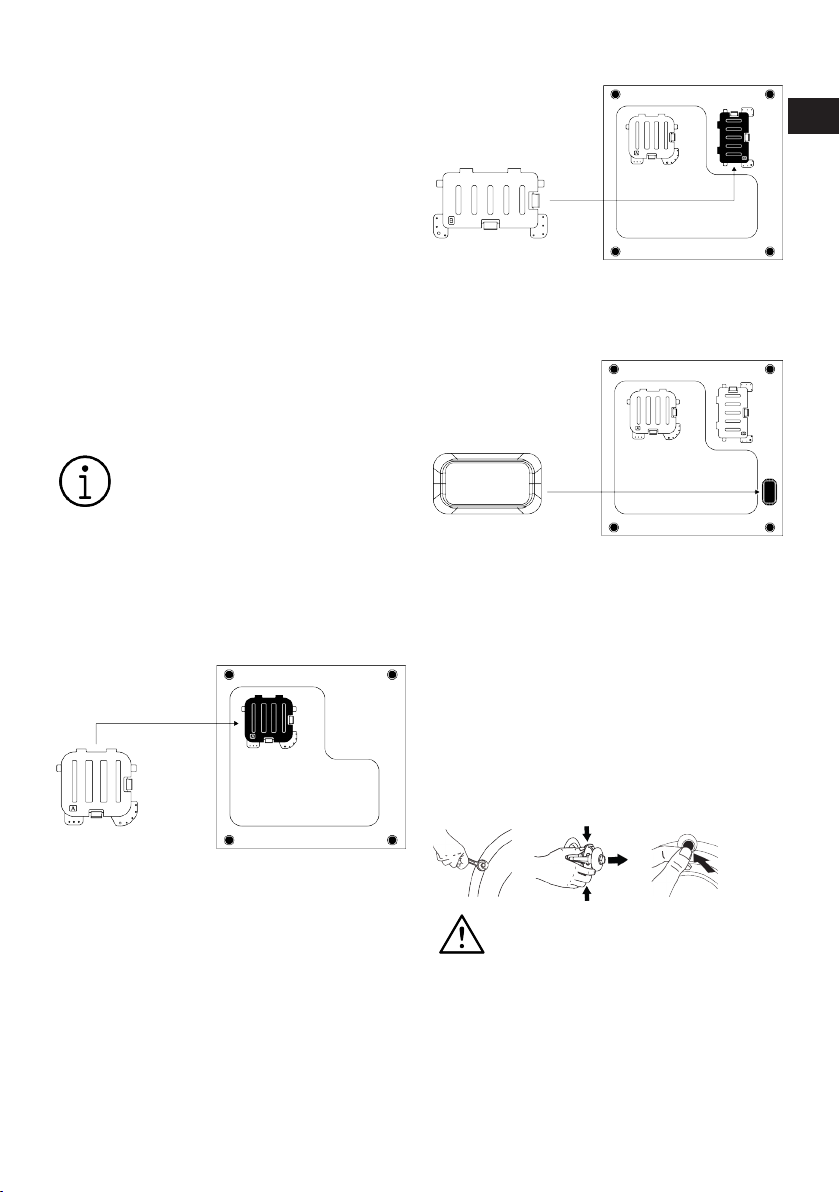
• Do not place the product on the power
cord.
• Do not install the product in places where
the temperature drops below 5ºC. This
may cause damage to your product due
to freezing.
• Leave a minimum space of 1 cm
between the product and the furniture.
• When installing the appliance on a
stepped surface, keep it away from
edges.
• Do not place the product on any platform.
• Do not place or use heat sources such as
cooktops, irons, ovens, heaters, etc. on
the product.
4.3 Assembly of Bottom Panel Cov-
ers
With some models, the base parts
of the products are completely
closed. These products do not have
plugs and covers.
• In order to increase the sound comfort of
the product, attach cover A after removing the package foam.
Cover A
Cover B
Rest the tabs of Cover B against the lower
panel. Complete the assembly by rotating
the cover.
Cap
Insert the cap by pushing it with your finger.
4.4 Removing Transportation Safety Bolts
1. Loosen all transportation safety bolts
with an appropriate wrench until they
turn freely.
2. Bend the inner part by pressing it at the
grip areas and pull the part out.
3. Attach the plastic covers supplied in the
User Manual bag into the holes on the
rear panel.
PL
EN
Tilt the product back slightly. Rest the tabs
of Cover A against the lower panel. Complete the assembly by rotating the cover.
• Cover B and the Cap are optional. If available, attach cover B and the Cap.
NOTICE
Remove the transportation safety
bolts before operating the product.
Otherwise, the product will get
damaged.
EN / 52
Page 55
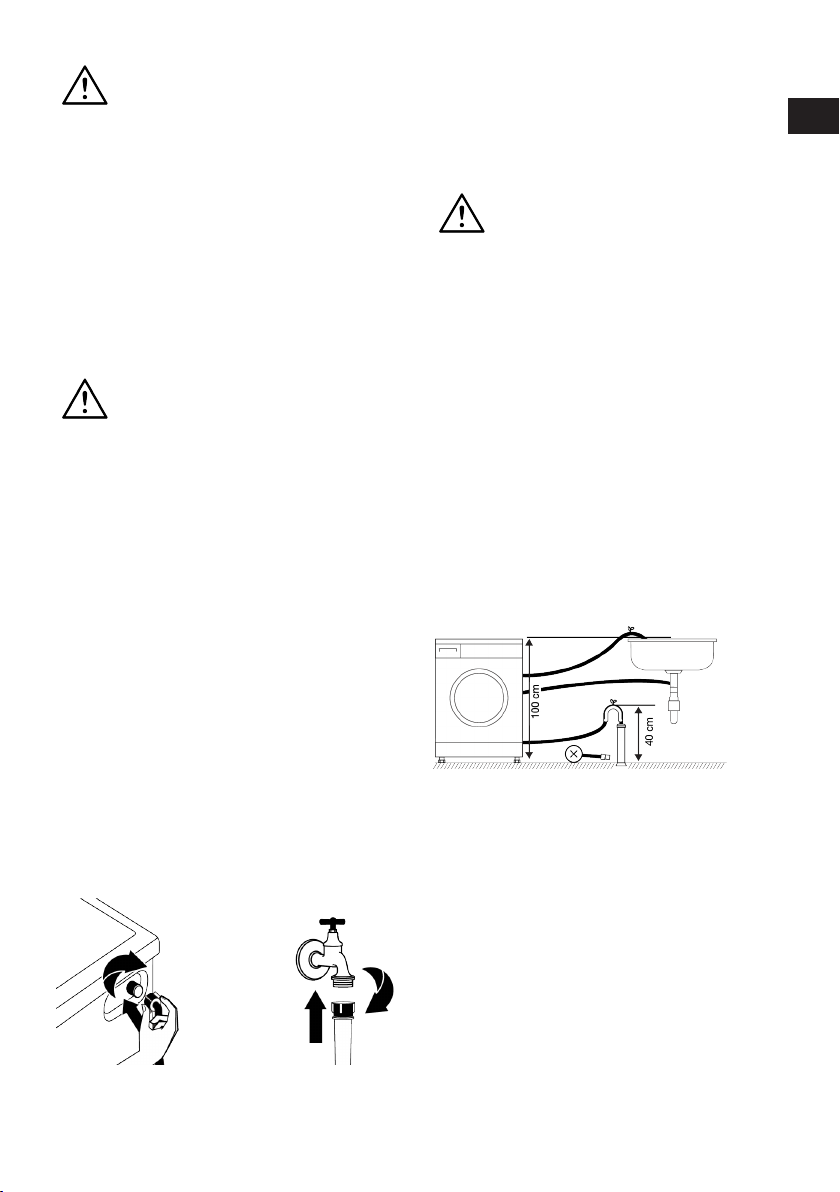
NOTICE
Keep the transportation safety
bolts in a safe place to reuse when
the product needs to be moved
again in the future.
Install the transportation safety
bolts in reverse order of the disassembly procedure.
Never move the product without the
transportation safety bolts properly
fixed in place.
4.5 Connecting to Water Supply
NOTICE
Models with a single water inlet
should not be connected to the hot
water tap. Laundry may be damaged or the product may go into
protection mode and not work.
Do not use old or used water inlet
hoses on your new product. This
may cause water leakage in your
product and stains on your laundry.
1. Tighten all hose nuts by hand. Make
sure to tighten all hose connections
completely. Never use a tool when tightening nuts.
2. After completing hose connection, open
the taps all the way and check if there is
any water leakage from the connection
points. In case of a leakage, turn off the
tap and unscrew the nut. Check the seal
and tighten the nut carefully again. To
prevent possible water leaks and damages that may occur, keep the taps
closed when the product is not in use.
4.6 Connecting the Drain Hose to the Drain
1. Attach the end of the drain hose directly
to waste water drain, washbasin or
bathtub.
Your house will be flooded if the
water draining hose is dislocated
during water draining. There is also
a risk of burning due to the high
washing temperatures. In order to
prevent such situations and make
sure that the product performs water intake and drain processes
without any problem, fix the drain
hose securely.
2. Connect the drain hose to a minimum
height of 40 cm and a maximum height
of 100 cm.
3. Installing the water draining hose at
ground level or close to the floor (40 cm
below) and then raising it makes water
discharge difficult and the laundry may
come out extremely wet. Thus, follow
the heights provided in the figure.
4. To prevent the waste water to go back
into the product again and to ensure
easy drainage, do not immerse the end
of the hose into the waste water or do
not insert it into the drain for more than
15 cm. If it is too long, cut it short.
5. The end of the hose should not be bent,
it should not be stepped on and the
hose must not be pinched between the
drain and the product. Otherwise, water
discharge issues may emerge.
6. If the length of the hose is too short, use
it by adding an original extension hose.
The overall length of the hose shall not
be longer than 3.2 m. To prevent water
PL
EN
EN / 53
Page 56
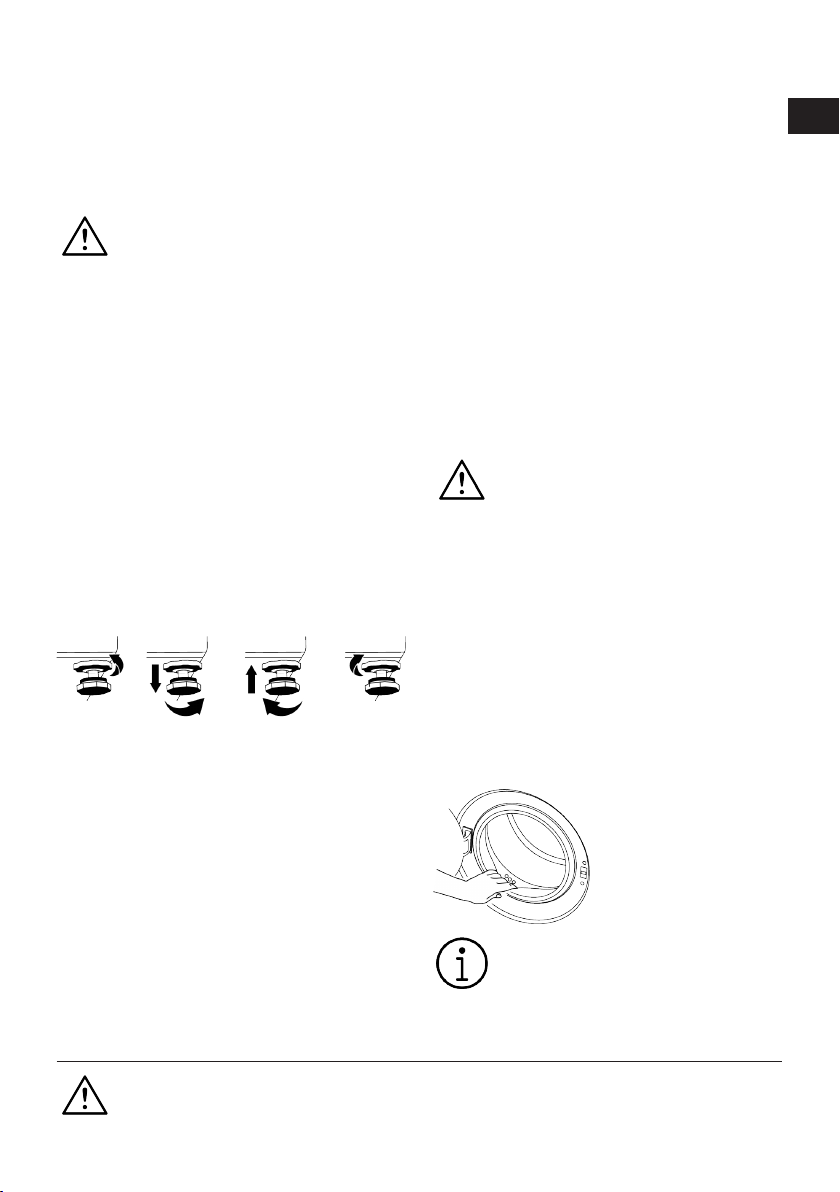
leaks, always secure the connection
between the extension hose and the
draining hose of the product with a suitable clamp so that it does not come off
and cause leaks.
4.7 Adjusting the Feet
WARNING
In order to ensure that the product
operates more silently and vibration-free, it must stand level and
balanced on its feet. Ensure that
the product is balanced by adjusting the feet. Otherwise, the product
may move from its place and cause
crushing, noise and vibration problems.
To avoid damaging the lock nuts,
do not use any tools to loosen the
nuts.
1. Loosen the lock nuts on the feet by
hand.
2. Adjust the feet until the product stands
level and balanced.
3. Tighten all lock nuts again by hand.
4.8 Electrical Connection
Connect the product to a grounded outlet
protected by a 16-amp fuse. Our company
shall not be responsible for the damages
that shall be incurred due to using the
product without grounding according to
local regulations.
• Connection must comply with national
regulations.
• The electrical connection cable infrastructure of the product must be adequate and suitable for product requirements. It is recommended to use a residual current device.
• Power cable plug must be within easy
reach after installation.
• If the current supply to the fuse or
breaker in the house is less than 16 amp,
have a qualified electrician install a 16amp supply.
• Your mains voltage must comply with the
voltage specified in the “technical specifications” section.
• Do not make connections via extension
cables or multi-plugs. Overheating and
burning may occur due to the connecting
cable.
Damaged power cables should be
replaced by the authorised service
in order to prevent possible danger.
4.9 Start Up
Before starting to use the product make
sure that the preparations described in section “Environmental instructions” and “Installation”. To prepare the product for
washing laundry, perform first operation in
Drum Cleaning programme. If this programme is not available in your product, apply the method which is described in section "Cleaning the loading door and the
drum".
Some water has remained in the
product due to the quality control
processes in the production. It is
not harmful for the product.
PL
EN
5 Preliminary Preparation
Please read the “Safety Instructions” section first!
EN / 54
Page 57

5.1 Sorting the Laundry
• Sort laundry according to type of fabric,
colour, and degree of soiling and allowable water temperature.
• Always observe the instructions given on
the garment care labels.
5.2 Preparing Laundry for Washing
• Laundry items with metal attachments
such as underwiring, belt buckles or
metal buttons will damage the product.
Remove the metal pieces or wash such
clothes by putting them in a laundry bag
or pillow case.
• Take out all items in the pockets such as
coins, pens and paper clips, and turn
pockets inside out and brush. Such objects may damage the product or cause
noise problem.
• Put small size clothes such as infant’s
socks and nylon stockings in a laundry
bag or pillow case.
• Place curtains in without compressing
them. Remove all curtain accessories
such as rings, hooks, and clips to prevent
damage to the curtains.
• Fasten zippers, sew loose buttons on securely, and mend rips and tears.
• Wash “Machine washable” or “Hand
washable” labelled products only with an
appropriate programme.
• Do not wash colours and whites together.
New, dark coloured cottons release a lot
of dye. Wash them separately.
• Tough stains must be treated properly
before washing.
• Wash trousers and delicate laundry
turned inside out.
• Laundry that are subjected to materials
such as flour, lime dust, milk powder, etc.
intensely must be shaken off before placing into the product. Such dusts and
powders on the laundry may build up on
the inner parts of the product in time and
can cause damage.
5.3 Tips for Energy and Water Saving
The following information will help you use
the product in an ecological and energy/
water-saving way.
• Operate the at the maximum load capa-
city for the programme selected, but do
not overload it. See "Programme and
consumption table".
• Follow the temperature recommenda-
tions on the detergent packaging.
• Wash your lightly soiled laundry at low
temperatures.
• Choose quick programmes for lightly
soiled and small amounts of laundry.
• Do not use prewash or high temperatures
for laundry that is not heavily dirty or
stained.
• If you are going to dry your laundry in the
dryer, select the highest spin speed recommended for your washing programme.
• Do not use more detergent than recom-
mended on the detergent packaging.
5.4 Loading the Laundry
1. Open the loading door.
2. Put the laundry items into the product in
a loose manner.
3. Push the loading door to close until you
hear a locking sound. Ensure that no
items are caught in the door. The loading door is locked while a programme is
running. The door lock will open once
the programme is completed. Then you
can open the loading door. If the door
does not open, apply the solutions
provided for “Loading door cannot be
opened” error in the Troubleshooting
section.
5.5 Correct Load Capacity
The maximum load capacity depends on
the type of laundry, the degree of soiling
and the desired washing programme.
The product automatically adjusts the water amount according to the weight of the
laundry put inside it.
EN / 55
PL
EN
Page 58
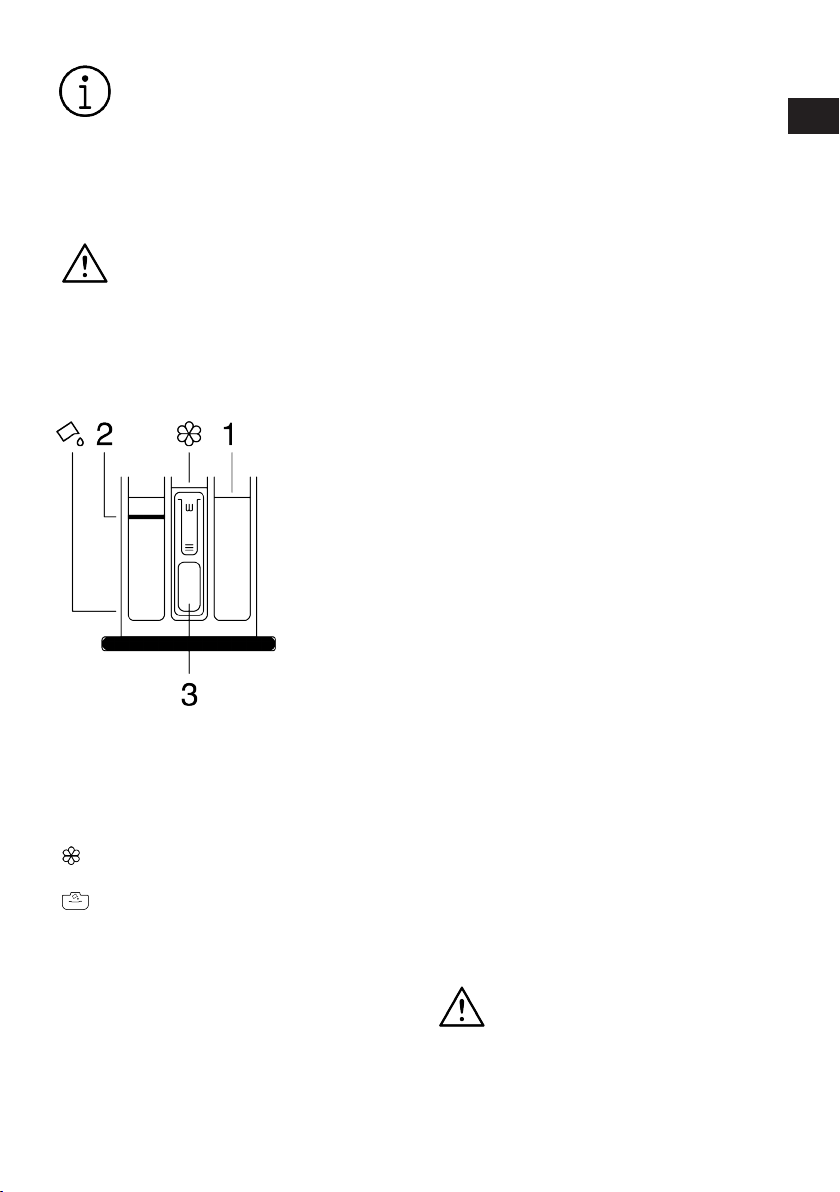
Follow the instructions in “Programme and consumption table”.
When the product is overloaded
product’s washing performance will
drop. Moreover, noise and vibration
problems may occur.
5.6 Using Detergent and Softener
WARNING
Read the manufacturer's instructions on the packaging when using
detergents, softeners, starch,
bleach and decolourants, anti-lime
scale and follow the dosage information provided. Use a measuring
cup, if any.
The detergent drawer comprises of three
compartments:
(1) for prewash - if your model has prewash
function available,
(2) for main washing,
(3) for softener,
) a syphon piece in the softener com-
(
partment,
) there is a liquid detergent flap for li-
(
quid detergent use in the main washing
compartment.
Detergent, Softener and Other Cleaning
Agents
• Add detergent and softener before starting the washing programme.
• Do not leave the detergent drawer open
when the washing programme is on.
• If you are using a programme without
prewashing, do not put detergent in the
prewash compartment (compartment 1).
• If your model has prewash function available - If you are using a program with prewash, start the product after adding
powder detergent to the prewash and
main wash compartments (compartments 1 and 2).
• If your model has prewash function available - Do not select a programme with
pre-washing if you are using a detergent
pod or dispensing ball. Place the detergent pod or the dispensing ball directly
among the laundry in the product.
• If you are using a liquid detergent, follow
the directions under “Liquid detergent
use” and hinge down the liquid detergent
flap.
Choosing the Detergent type
Detergent type to be used depends on the
washing programme, fabric type and colour.
• Use different detergents for coloured and
white laundry.
• Wash your delicate clothes only with special detergents (liquid detergent, wool
shampoo, etc.) intended solely for delicate clothes and on suggested programmes.
• When washing dark coloured clothes and
quilts, it is recommended to use liquid
detergent.
• Wash woollens on suggested programme with special detergent made
specifically for woollens.
• Please review the programme descriptions part for suggested programme for
different textiles.
• All recommendations about detergents
are valid for selectable temperature
range of programmes.
Only detergents, softeners and additives suitable for washing machines should be used.
Do not use soap powder.
PL
EN
EN / 56
Page 59
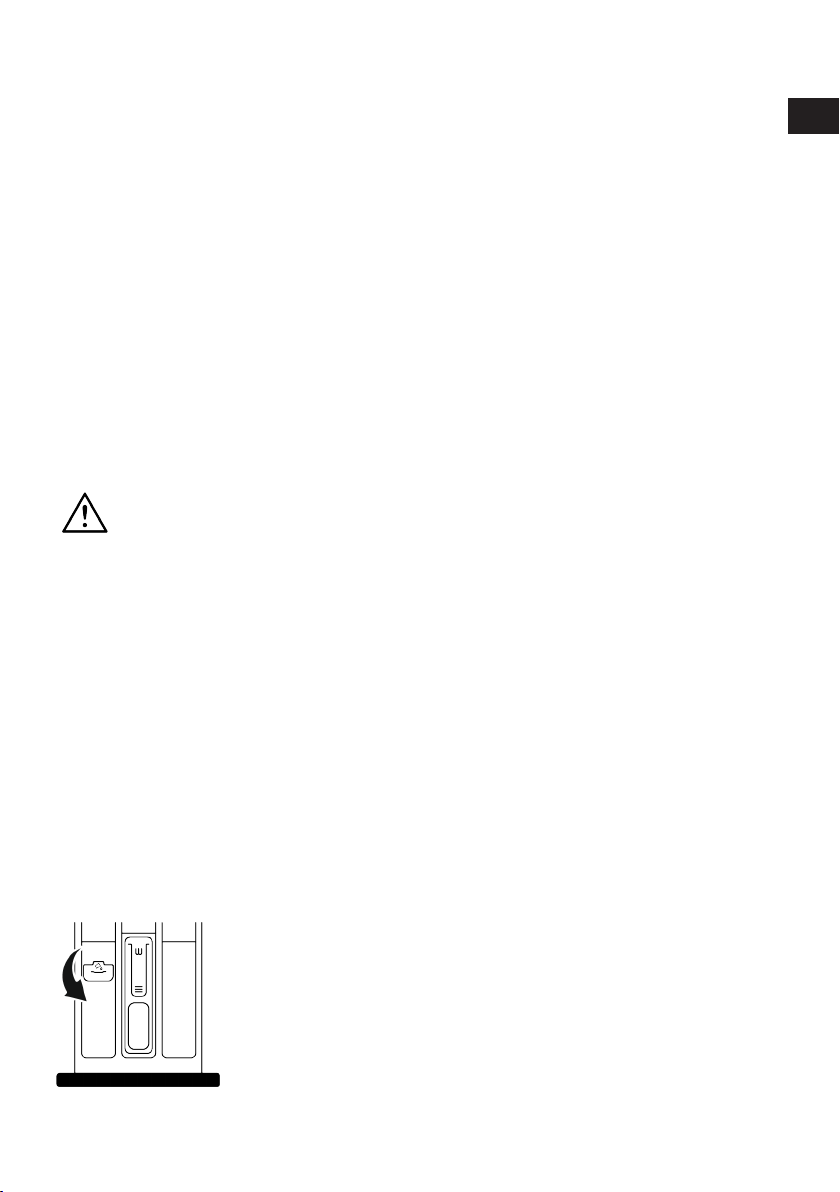
Adjusting the Detergent Amount
The amount of detergent depends on the
amount of laundry, how soiled it is and the
water hardness.
• Do not exceed the recommended dosage
values on the detergent packaging in order to eliminate excessive foam and poor
rinsing problems, to save money and protect the environment.
• Use less detergent for lightly soiled or
small amount of laundry.
Using Softeners
Put the softener in the softener compartment of the detergent drawer.
• Do not exceed the (>max<) level sign in
the softener compartment.
• If the softener is thick, dilute with water
before placing in the softener compartment.
WARNING
Do not use liquid detergents or
other materials with cleaning properties unless they are intended for
use in washing machines for
softening the laundry.
Using Liquid Detergents
If the Product Has a Liquid Detergent Flap
• Hinge down the liquid detergent flap
when you want to use liquid detergents.
The flap will serve as a barrier for liquid
detergent.
• Clean with water at its place or by removing from its place when it is necessary.
Do not forget to place the flap in the main
washing compartment (compartment 2)
after cleaning.
• The flap should be up if you will use a
powder detergent.
Use of Gel and Tablet Detergents
• If the detergent is fluid and there is no liquid detergent compartment in your
product, place the gel detergent in the
main washing detergent compartment in
first water intake. If your product has a liquid detergent compartment, fill the compartment with detergent before starting
the programme.
• If the gel detergent is not fluid or is in a
capsule liquid tablet, place directly inside
the drum before washing.
• Put the tablet detergent in the main
washing compartment (compartment 2)
or directly inside the drum before washing.
Using Starch
• Put in the liquid starch, powder starch or
fabric dye in the softener compartment.
• Do not use softener and starch in the
same washing programme simultaneously.
• Wipe the inside of the product with a
damp and clean cloth after using starch.
Using Anti-Limescale
• When necessary, only use anti-limescale
produced for washing machines.
Using Bleach and Decolourants
• Select a programme with pre-washing
and add bleach at the start of pre-washing. Do not put detergent in the pre-wash
compartment. As an alternative application, select a programme with additional
rinsing and add the bleach while the
product is receiving water to the detergent compartment in the first rinsing
step.
• Do not mix and use bleach and detergent
together.
• As bleach may cause skin irritation use
only small amounts (1/2 tea cups - approximately 50 ml and rinse the laundry
well.
• Do not pour bleach directly onto the laundry.
• Do not use bleach for coloured clothes.
PL
EN
EN / 57
Page 60
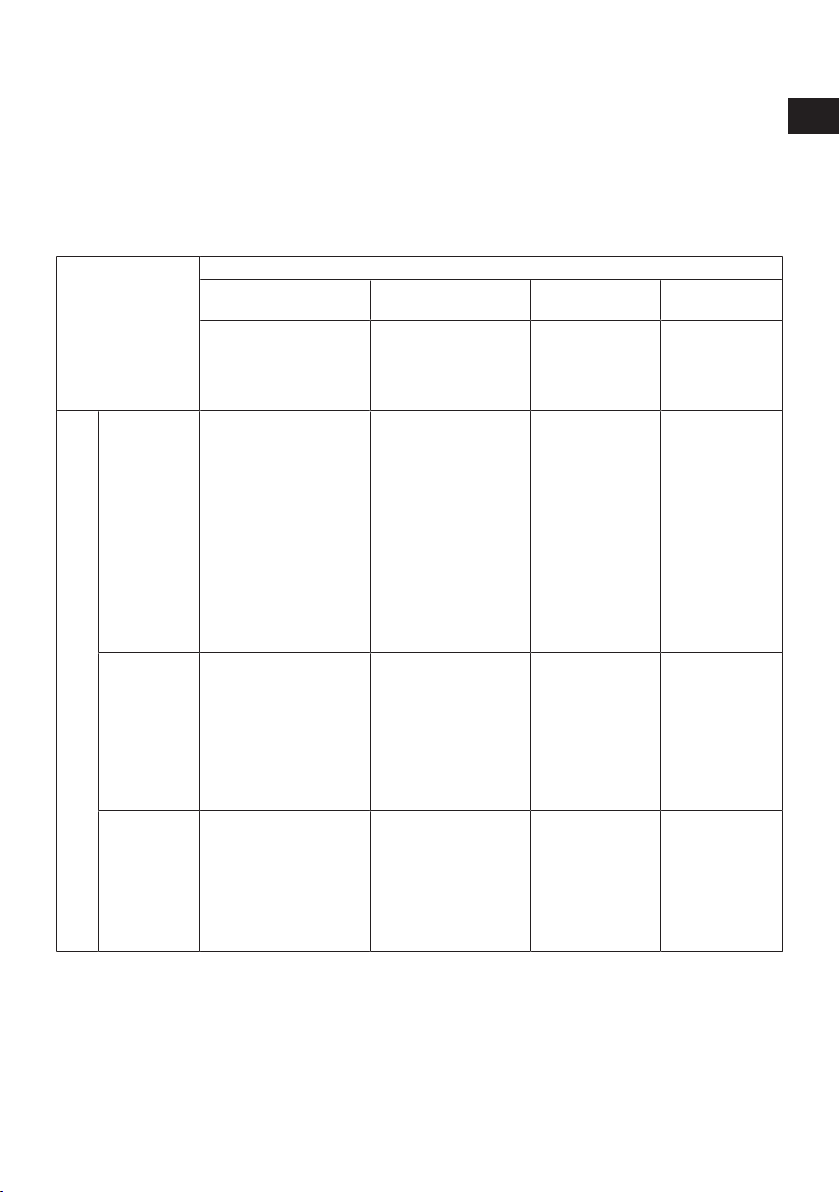
• Select a programme with low temperature washing while using oxygen-based
decolourants.
• Oxygen-based decolourants can be used
together with detergents. However, if it
does not have the same viscosity as the
detergent, first place the detergent in
5.7 Tips for Efficient Washing
Clothes
Light Colours and Whites Colours Black/Dark Colours
Soiling Level
Heavily Soiled
(difficult stains
such as grass,
coffee, fruits
and blood.)
Normally
Soiled
(For example,
stains caused
by body on collars and cuffs)
Lightly Soiled
(No visible
stains exist.)
(Recommended temperature range based on soil
level: 40-90 °C)
It may be necessary to
pre-treat the stains or perform prewash.
Powder and liquid detergents recommended for
whites can be used at
dosages recommended
for heavily soiled clothes.
It is recommended to use
powder detergents to
clean clay and soil stains
and the stains that are
sensitive to bleaches.
Powder and liquid detergents recommended for
whites can be used at
dosages recommended
for normally soiled
clothes.
Powder and liquid detergents recommended for
whites can be used at
dosages recommended
for lightly soiled clothes.
(Recommended temperature range based on
soil level: cool -40 °C)
Powder and liquid detergents recommended for
colours can be used at
dosages recommended
for heavily soiled
clothes. It is recommended to use powder detergents to clean clay
and soil stains and the
stains that are sensitive
to bleaches. Detergents
which do not contain decolourant should be
used.
Powder and liquid detergents recommended for
colours can be used at
dosages recommended
for normally soiled
clothes. Detergents
which do not contain decolourant should be
used.
Powder and liquid detergents recommended for
colours can be used at
dosages recommended
for lightly soiled clothes.
Detergents which do not
contain decolourant
should be used.
compartment no. “2” in the detergent
drawer and wait for the product to rinse
away the detergent during water intake.
Add the decolourant to the same compartment while the product continues
taking in water.
Delicates/Woollens/Silks
(Recommended
temperature range
based on soil level:
cool -40 °C)
Liquid detergents
suitable for colours
and black/dark colours can be used at
doses recommended for heavily
soiled clothes.
Liquid detergents
suitable for colours
and black/dark colours can be used at
doses recommended for moderately
soiled clothes.
Liquid detergents
suitable for colours
and black/dark colours can be used at
doses recommended for lightly
soiled clothes.
(Recommended
temperature
range based on
soil level: cool -30
°C)
Prefer liquid detergents produced
for delicate
clothes. Woollen
and silk clothes
must be washed
with special woollen detergents.
Prefer liquid detergents produced
for delicate
clothes. Woollen
and silk clothes
must be washed
with special woollen detergents.
Prefer liquid detergents produced
for delicate
clothes. Woollen
and silk clothes
must be washed
with special woollen detergents.
PL
EN
5.8 Displayed Programme Duration
You can view the programme duration on
the display of your product while selecting
a programme. Depending on the amount of
laundry you have loaded into your product,
foaming, unbalanced load conditions, fluctuations in power supply, water pressure
and programme settings, the programme
duration is automatically adjusted while the
programme is running.
SPECIAL CASE: At programme start of Cottons and Cotton Eco programmes, display
shows the duration of half load. It is the
most common use case. After programme
EN / 58
Page 61
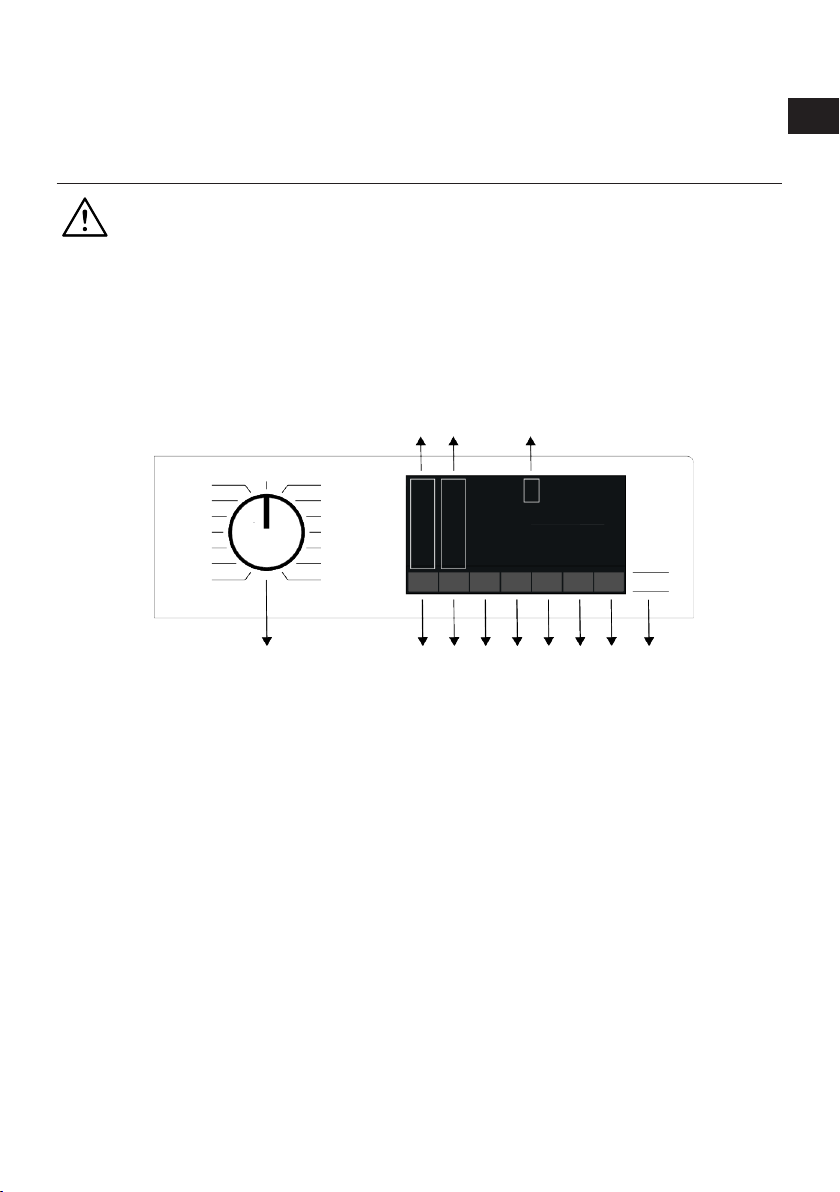
starts, in 20-25 minutes actual load is de-
1
2 3 4
56789101112
tected by the product. And if the detected
load is higher than half load; washing programme will be adjusted accordingly and
6 Operating the Product
Please read the “Safety Instructions” section first!
6.1 Control Panel
programme duration increased automatically. You can follow this change on the display.
PL
EN
1 Programme Selection Button 2 Temperature Level Lights
3 Spin Level Indicator Lights 4 Display
5 Start / Pause Button 6 Remote Control Button
7 End Time Setting Button 8 Auxiliary Function Button 3
9 Auxiliary Function Button 2 10 Auxiliary Function Button 1
11 Spin Speed Adjustment Button 12 Temperature Setting Button
EN / 59
Page 62
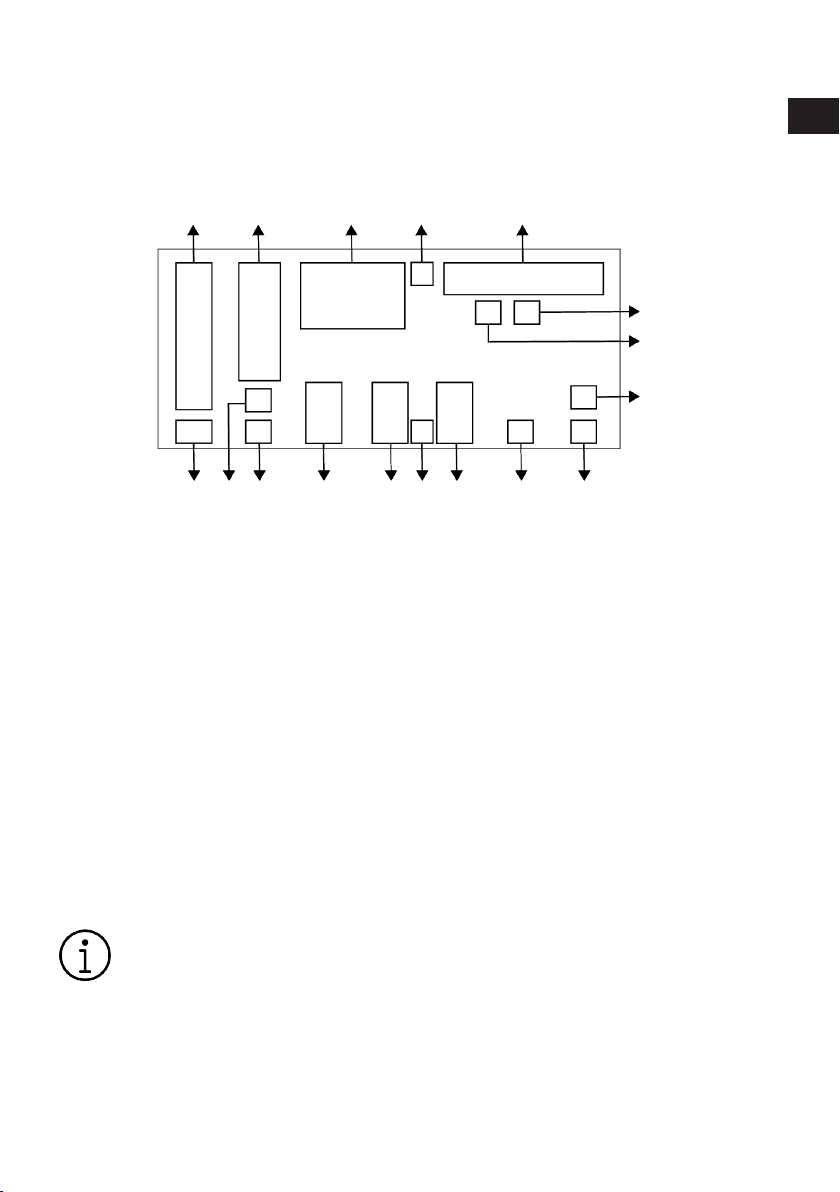
6.2 Symbols on the Display
1 2 3 4 5
6
7
8
91011121314151617
PL
EN
1 Temperature Indicator 2 Spin Speed Indicator
3 Duration Information 4 Door Lock Is Engaged Symbol
5 Programme Follow-up Indicator 6 No Water Indicator
7 Add Garment Indicator 8 Wireless Connection Indicator
9 Remote Control Indicator 10 Delayed Start Enabled Indicator
11 Auxiliary Function Indicators 3 12 Child Lock Enabled Symbol
13 Auxiliary Function Indicators 2 14 Auxiliary Function Indicators 1
15 No Spin Indicator 16 Rinse Hold Indicator
17 Cold Water Indicator
The visuals in this section are for illustrative purposes only and may
not represent the exact specifications of your product.
EN / 60
Page 63
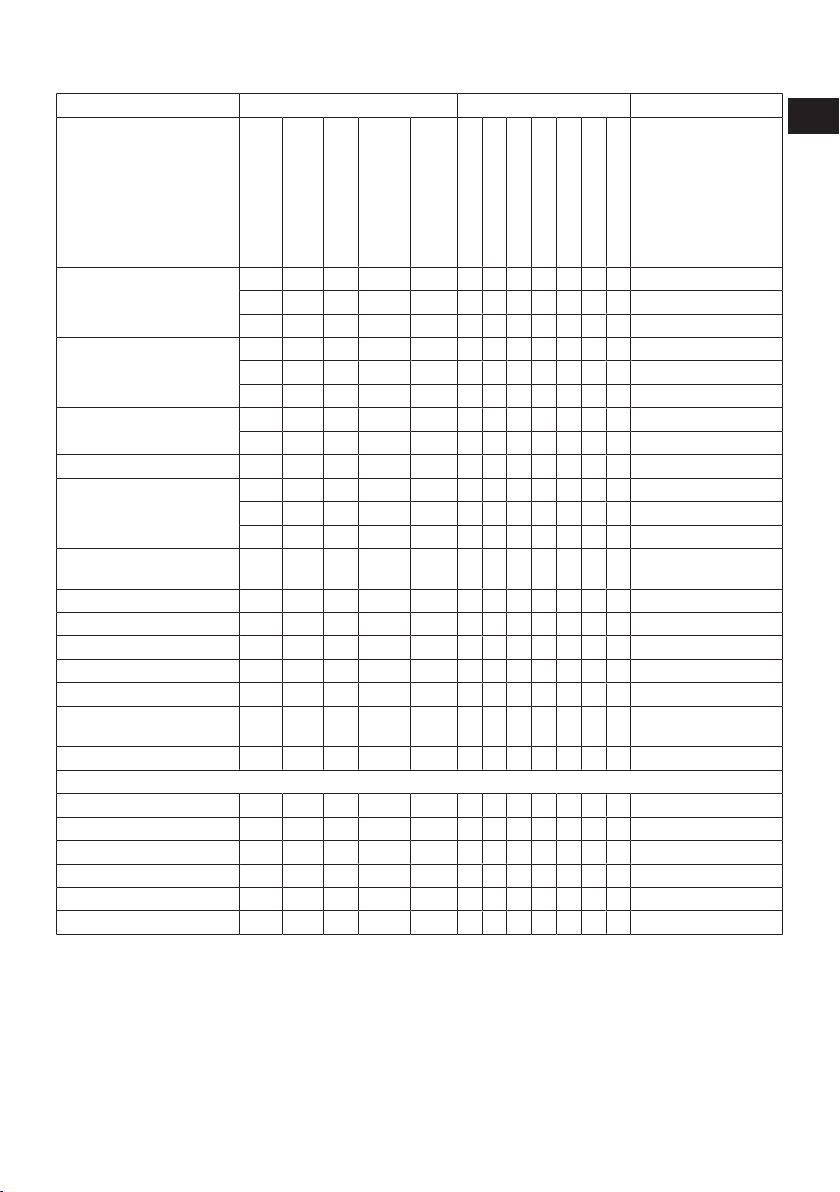
6.3 Programme and Consumption Table
Auxiliary functions
PL
EN
Program
Temperature °C
Maximum load (kg)
90 7,0 94,0 2,300 1400 • • • • • • • Cold - 90
Bawełna
Eco 40-60
Syntetyki
Mieszane 40 3,0 68,0 0,750 800 • • • • • Cold - 40
Szybki 28’
Szybki 28’ +
Szybki/Intensywne
Puchowe 60 2,0 75,0 1,200 800 • • • Cold - 60
Wełna / Delikatne 40 1,5 53,0 0,500 800 • Cold - 40
Czyszczenie bębna 90 - 73,0 2,600 600 * 90
20°C 20 7,0 92,0 0,700 1400 • • • • • • • 20
Ciemne ubrania 40 3,0 75,0 0,800 1200 • • • • • * Cold - 40
Intensywne pranie 90 7,0
Odświeżanie parą - 1,0 1,5 0,110 - * -
Shirt 60 3,0 57,0 1,200 800 • • • • * • • Cold - 60
Cold wash - 3,5 40,0 0,300 1400
Towel 60 2,0 75,0 1,200 800 • • * Cold - 60
Curtain 40 2,0 86,0 0,650 800 • • * Cold - 40
Sports 40 3,0 51,0 0,550 1200 • Cold - 40
Underwear 30 1,0 70,0 0,300 600 * Cold - 30
60 7,0 94,0 1,700 1400 • • • • • • • Cold - 90
40 7,0 92,0 1,050 1400 • • • • • • • Cold - 90
40*** 7,0 53,0 0,625 1400 40-60
40*** 3,5 42,0 0,413 1400 40-60
40*** 2,0 30,0 0,222 1400 40-60
60 3,0 65,0 1,200 1200 • • • • • • • Cold - 60
40 3,0 63,0 0,850 1200 • • • • • • • Cold - 60
90 7,0 66,0 2,150 1400 • • • • Cold - 90
60 7,0 66,0 1,150 1400 • • • • Cold - 90
30 7,0 66,0 0,200 1400 • • • • Cold - 90
30 2,0 39,0 0,150 1400 • • • • Cold - 90
120,
0
• : Selectable.
* : Automatically selected, cannot be cancelled.
*** : Eco 40-60 programme is a test programme according to 40 ° C temperature
selection, EU regulation EU / 2019/2014
(kWh)
Max RPM
Energy consumption
Water consumption (lt)
2,800 1400 * * 20-90
Program z aplikacji
Fresh Care
Fast/Intense
Prewash
Soaking
Steam
***** : These programmes can be used with
the HomeWhiz application. Power consumption may increase due to the connection.
- : See the programme description for maximum load.
Water Saving
Extra Rinse
Temperature °C
Cold
and EN 60456: 2016 / A11: 2020 standard.
EN / 61
Page 64
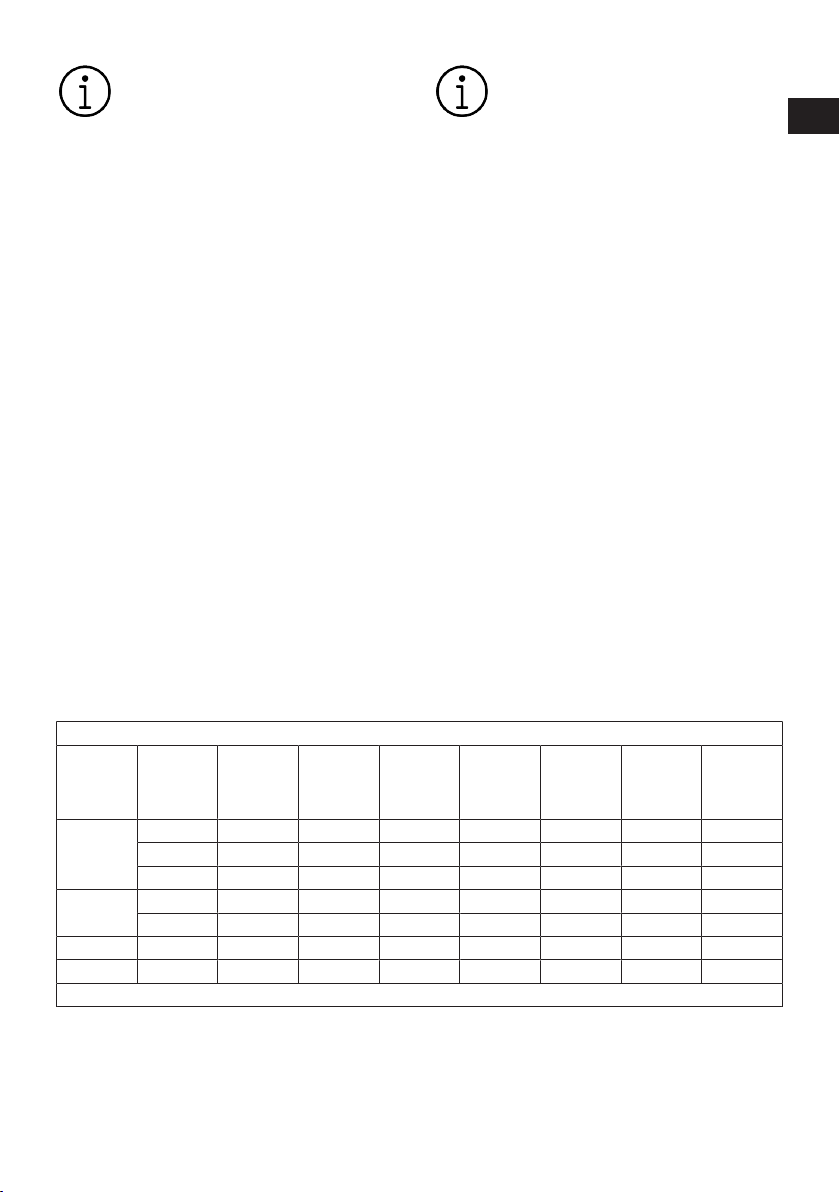
Please read Installation section of
the manual before first use.
The auxiliary functions in the table
may vary according to the model of
your machine.
Water and energy consumption
may vary subject to the changes in
water pressure, water hardness and
temperature, ambient temperature,
type and amount of laundry, selection of auxiliary functions and spin
speed, and changes in electric
voltage.
Selection patterns for auxiliary
functions can be changed by the
manufacturer company. New selection patterns can be added or removed.
The spin speed of your machine
may vary according to the programme; this spin speed cannot exceed the max. spin speed of your
machine.
The amount of noise and humidity
varies according to the spin speed;
when the higher spin speed is selected during the spinning phase,
the laundry contains less moisture
but higher noise occurs at the end
of the programme.
You can see the washing duration
on the display of your machine
while selecting a programme. Depending on the amount of laundry
you have loaded into your machine,
there may be a difference of 1-1.5
hours between the duration shown
on the display and the actual duration of the wash cycle. Duration will
be automatically updated soon
after the washing starts.
Always select the lowest appropriate temperature. The most efficient
programmes in terms of energy
consumption are generally those
that wash at low temperatures for a
long time.
The spin speed information given at
the program table indicates spin
speed option shown on the control
panel.
PL
EN
Consumption values (EN)
Temperature Selection °C
Eco 40-60
Bawełna
Syntetyki 40 1200 3,0 02:10 0,850 63,0 40 40,0
Szybki 28’ 30 1400 7,0 00:28 0,200 66,0 23 62,0
The consumption values given for programs other than the Eco 40-60 program are indicative only.
Spin Speed
(rpm)
40 1351 7,0 03:27 0,625 53,0 32 53,0
40 1351 3,5 02:41 0,413 42,0 29 53,0
40 1351 2,0 02:41 0,222 30,0 23 55,9
20 1400 7,0 03:15 0,700 92,0 20 53,9
60 1400 7,0 03:15 1,700 94,0 60 53,9
Capacity
(kg)
Program
duration
(h:min)
Energy consumption
(kWh/
cycle)
Water consumption
(litres/
cycle)
Laundry
temperature (°C)
% Of remaining humidity (%)
EN / 62
Page 65
6.4 Programme Selection
1. Determine the programme suitable for
the type, quantity and soiling level of the
laundry in accordance with "Programme
and consumption table".
Programmes are limited with the
highest spin speed appropriate for
that particular type of fabric.
When selecting a programme, always consider the type of fabric,
colour, degree of soiling and permissible water temperature.
2. Select the desired programme with the
Programme Selection knob.
6.5 Programmes
• Eco 40-60
The Eco 40-60 program is suitable for
washing normally soiled cotton laundry
labeled to be washable together at 40 °C or
60 °C. This programme is the standard test
programme according to the EU environmentally friendly design and energy labelling regulations.
Although this programme washes longer
than other washing programmes, it is more
efficient in terms of energy and water consumption. Actual water temperature may
be different from the stated wash temperature. When you load the product with less
laundry (e.g. ½ capacity or less), cycle duration may automatically get shorter. In this
way, energy and water consumption would
be much less.
• Bawełna
You can wash your durable cotton laundry
(sheets, bedlinen, towels, bathrobes, underwear etc.) in this programme. When the
quick wash function button is pressed, programme duration becomes notably shorter
but effective washing performance is ensured with intense washing movements. If
the quick wash function is not selected, effective washing and rinsing performance is
ensured for your heavily soiled laundry.
• Syntetyki
Use this programme to wash your clothes
such as t-shirts, blouses, synthetic/cottonblend fabrics etc. The quick wash function
shortens the programme duration significantly and ensures effective washing performance for lightly-soiled laundry. The
quick wash function is not suitable for
heavily-soiled laundry.
If your product does not have a specific
curtains programme, you can use this programme. Wash your curtains at 40 °C maximum and with a spin speed up to 800 rpm.
• Wełna / Delikatne
Use to wash your woollen/delicate laundry.
Select the appropriate temperature complying with the tag of your clothes. Your laundry will be washed with a very gentle washing action in order not to damage the
clothes.
• Intensywne pranie
Applying a steam step at the beginning of
the programme allows to soften the dirt
easily.
Use this programme for your laundry (baby
clothes, bed sheets, bedlinen, underwear,
etc. cotton items) that requires an anti-allergic and hygienic washing at high temperature with intensive and long washing
cycle. The high level of hygiene is ensured
thanks to the steam application before the
programme, long heating duration and additional rinsing step.
• Puchowe
Use this programme to wash your coats,
vest, jackets etc. containing feathers with a
"machine-washable" label on them. Thanks
to special spinning profiles, it is ensured
that the water reaches the air gaps
amongst the feathers.
Steam is applied at the end of the programme to soften bulky laundry such as
towels.
EN / 63
PL
EN
Page 66
• Wirowanie & Odpompowanie
You can use this program to remove the
water on the garment/inside the product.
• Płukanie & Wirowanie
Use when you want to rinse or starch separately.
• Odświeżanie parą
Use this programme to reduce the creases
and ironing times of a small amount of unspotted cotton, synthetic or mixed laundry.
This is not a washing programme.
Do not add chemicals such as detergent, bleach, stain remover, etc.
to the detergent drawer during this
program.
• Curtain
You can use this programme to wash your
tulles and curtains. As their meshed texture
causes excessive foaming, put little
amount of detergent into the main washing
compartment. Thanks to the special spin
profile of the programme, tulles and curtains crease less. Do not load your curtains
above the specified capacity in order not to
damage them.
It is recommended to use special
detergents produced for curtains in
the powder detergent compartment
in this programme.
• Shirt
This programme is used to wash the shirts
made from cotton, synthetic and synthetic
blended fabrics altogether. It reduces
wrinkles. Steam is applied at the end of the
programme to help the wrinkle reducing
function. The special spin profile and
steam applied at the end of the programme
reduce the wrinkles on your shirts. When
the quick wash function is selected, the
Pre-treatment algorithm is executed.
• Apply the pre-treatment chemical on your
garments directly or add it together with
the detergent in the powder detergent
compartment. Thus, you can obtain the
same performance as you obtain with
normal washing in a much shorter period
of time. Usage life of your shirts increases. Do not use pre-wash detergent
if you are planning to use delay function
of your product. Prewash detergent may
pour out on your clothes and cause
stains.
** It is recommended to operate the cycle
with no more than 6 shirts to minimize
wrinkles in your shirts using this cycle.
When washing more than 6 shirts, there
may be differences on the wrinkle levels
and humidity on shirts at the end of cycle.
• Szybki 28’
Use this programme to wash your lightly
soiled or unspotted cotton clothes in a
short time but not for towels or heavy cottons. The programme duration can be reduced down to 14 minutes when the quick
wash function is selected. When the quick
wash function is selected, maximum 2
(two) kg of laundry must be washed.
• Ciemne ubrania
Use this programme to protect the colour
of your dark-coloured garments or jeans. It
performs high performance washing with
special drum movement even if the temperature is low. It is recommended to use liquid detergent or woollen shampoo for
dark coloured laundry. Do not wash your
delicate clothes containing wool or etc.
• Czyszczenie bębna
Regularly clean (once every 1 to 2 months)
the drum for ensuring the required hygiene.
Steam is applied before the programme to
soften the residues in the drum. Turn on
the programme when the product is completely empty. For better results, use
powder anti-limescale (drum cleaning materials) suitable for washing machines
when the powder detergent function is selected. Leave the loading door half closed
after the programme ends for the inside of
the product to dry.
PL
EN
EN / 64
Page 67
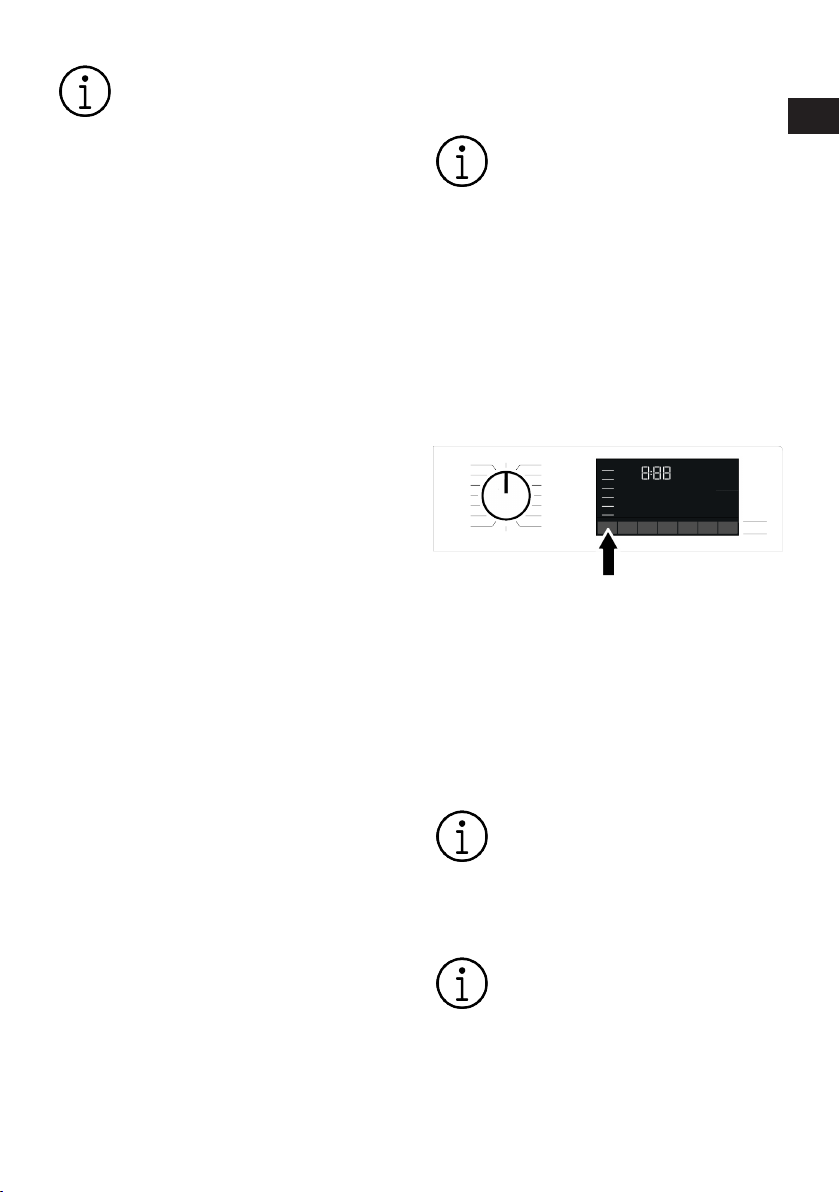
This is not a washing programme.
This is a maintenance programme.
Do not turn this programme on
when there is something inside the
product. When you attempt to operate, the product automatically
senses that there is load inside, and
may quit or resume the programme
as per the model of your product.
An effective cleaning is not
achieved if the programme is resumed.
• Mieszane
Use to wash your cotton and synthetic laundry items together without sorting them.
• Underwear
You can use this programme to wash delicate garments that are suitable for hand
wash and delicate women's underwear.
Small amount of garments must be
washed in a washing net. Hooks, buttons
etc. must be done up and zips must be
zipped up.
• Outdoor/Sports
You can use this programme to wash
sports and outdoors garments that contain
cotton/synthetics mix and waterproof fabric such as Gore-Tex etc. It makes sure
your garments are washed gently thanks to
special rotating movements.
• 20°C
You can wash your lightly soiled cotton
laundry in this program.
• Cold Wash
Use to wash your medium dirty and durable
cotton/synthetic laundry. Thanks to the
washing algorithm specially developed for
the program, effective washing is ensured
without exposing the laundry to high temperatures.
• Program z aplikacji
This is a special programme that allows
you to download different programmes
when you want to. At the start, there is a
programme you can see with the HomeWhiz application as default. However, you
can use the HomeWhiz application to se-
lect a programme from the predetermined
programme set, and then change and use
it.
If you want to use HomeWhiz feature and Remote Control function,
you must select Downloaded Programme. Detailed information can
be found in HomeWhiz Feature and
Remote Control Function.
• Towel
Use this programme to wash durable cotton laundry such as towels. Load the towels into the machine paying attention to
place them in a way that they will not contact the door gasket or the glass.
6.6 Temperature Selection
Whenever a new programme is selected,
the recommended temperature for the programme appears on the temperature indicator. It is possible that the recommended
temperature value is not the maximum
temperature that can be selected for the
current programme.
Press the Temperature Adjustment button
to change the temperature. Temperature
decreases gradually.
No change can be made in programmes where temperature adjustment is not allowed.
You can also change the temperature after
the washing starts. This change can only
be made if the washing steps allow it.
If you scroll to cold wash option
and press Temperature Adjustment
button again, the recommended
maximum temperature for the selected programme appears on the
display. Press the Temperature Adjustment button again to decrease
the temperature.
EN / 65
PL
EN
Page 68
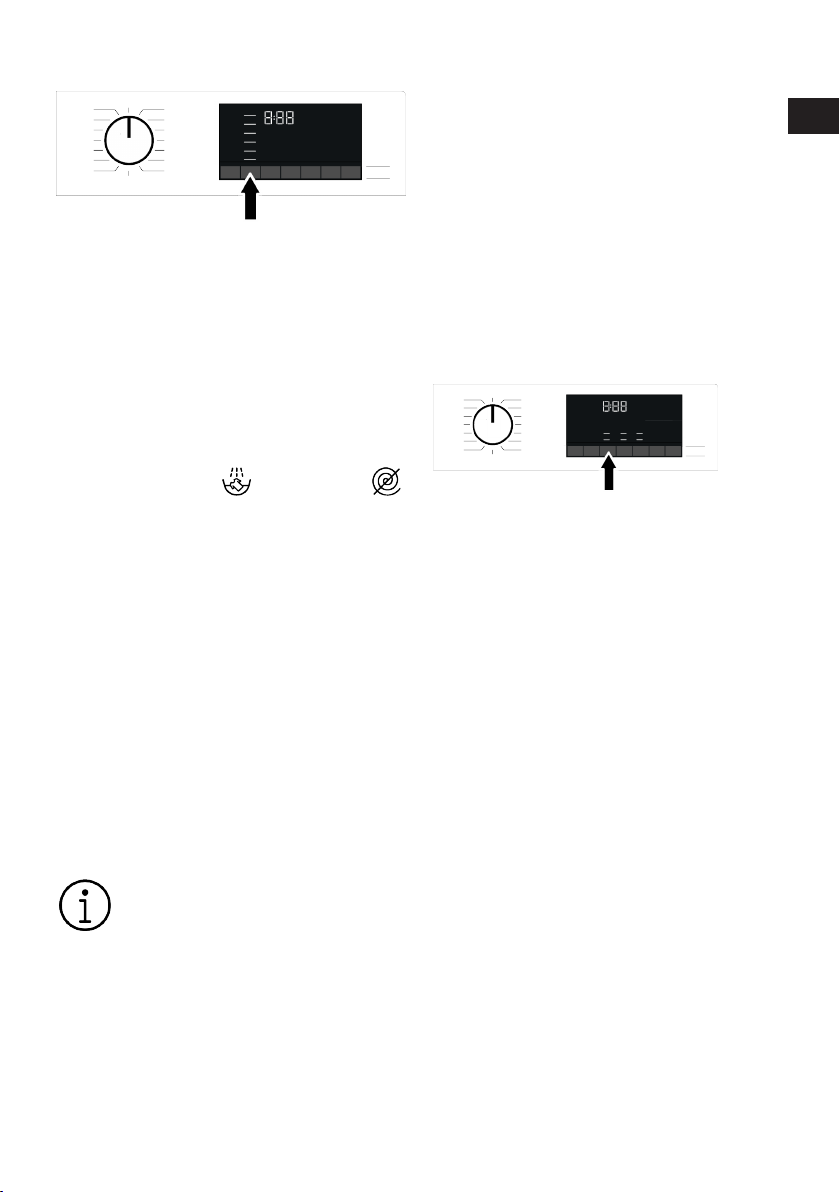
6.7 Spin Speed Selection
Whenever a new programme is selected,
the recommended spin speed of the selected programme is displayed on the Spin
Speed indicator. It is possible that the recommended spin speed value is not the
maximum spin speed that can be selected
for the current programme.
Press the Spin Speed Adjustment button to
change the spin speed. Spin speed decreases gradually.
Then, depending on the model of the
product, "Rinse Hold
" options appear on the display.
If you are not going to unload your laundry
immediately after the programme completes, you can use Rinse Hold function in
order to prevent them from getting wrinkled
when there is no water in the machine.
This function holds the laundry in the final
rinsing water. If you want to spin your laundry after the Rinse Hold function:
1. Adjust the Spin Speed.
2. Press Start / Pause. The programme will
resume. Machine drains the water and
spins the laundry.
If you want to drain the water at the end of
the programme without spinning, use No
Spin function.
No change can be made in programmes where spin speed adjustment is not allowed.
You can change the spin speed after the
washing starts if the washing steps allow it.
Changes cannot be made if the steps do
not allow it.
Soaking
If you are not going to unload your clothes
immediately after the programme completes, you can use rinse hold function to
" and "No Spin
keep your laundry in the final rinsing water
in order to prevent them from getting
wrinkled when there is no water in the machine. Press Start/Pause button after this
process if you want to drain the water
without spinning your laundry. Programme
will resume and complete after draining the
water.
If you want to spin the laundry held in water, adjust the Spin Speed and press Start/
Pause button. The programme will resume.
Water is drained, laundry is spun and the
programme is completed.
6.8 Auxiliary Function Selection
Select the desired auxiliary functions before starting the programme. Whenever a
programme is selected, icons of the auxiliary function symbol that is selected together with it illuminate.
EN / 66
PL
EN
Page 69
When an auxiliary function button
that cannot be selected with the
current programme is pressed, the
product will make a warning sound.
Some functions cannot be selected
together. If a second auxiliary function conflicting with the first one is
selected before starting the machine, the function selected first
will be cancelled and the second
auxiliary function selection will remain active. For example, if you
want to select Quick Wash after
you have selected the Additional
Water, Additional Water will be cancelled and Quick Wash will remain
active.
An auxiliary function that is not
compatible with the programme
cannot be selected. (See "Programme and consumption table")
Some programmes have auxiliary
functions that must be operated
simultaneously. Those functions
cannot be cancelled. The frame of
the auxiliary function will not be illuminated, only inner area will be illuminated.
6.8.1 Auxiliary Functions
• Fast/Intensive
You can shorten or extend the programme
duration with this function. Depending on
the programme selection, there may be differences in time increases and decreases.
In case the FAST or INTENSIVE LED is not
lit, the appropriate programme duration is
shown for your normally soiled clothes/
laundry.
Depending on the programme selection, the
Intensive feature can be selected automatically. In this case, the Intensive LED on the
panel will be lit. You can use the Intensive
selection to achieve a better washing performance when washing heavily soiled
laundry.
You can reduce the time for your lightly
soiled laundry by pressing the Fast/Intensive button in the programmes which come
with intense being selected. When you
press the button once, the LED will turn off
and you will reach the appropriate programme duration for your normally soiled
clothes/laundry. When you press the same
button a second time, the fast LED will light
up, the time will decrease a little and it will
show the minimum programme duration,
which is suitable for your less soiled laundry. The duration of programmes may
shorten by 50% when this function is selected. Thanks to optimized washing steps,
high mechanical agility and optimal water
consumption, high washing performance is
achieved despite the shorter duration.
• Steam
This function helps to reduce the creases in
your cotton, synthetic and mixed clothes,
shorten the ironing time and remove the
dirt by softening.
* Under conditions where the steam function is applied at the end of the programme,
your laundry may be warmer at the end of
the washing. This is expected within the
programme working conditions.
When you activate the steam function, do not use liquid detergent if
there is no liquid container or liquid
detergent dosing feature. There is
the risk of staining of the clothes.
• Przepływ wody
This auxiliary function key allows you to select the additional functions of Water Saving, Pre-Wash, and Extra Rinse or Extra water depending on the model of your machine. You can find detailed information
about the selection in the description of the
respective auxiliary function.
• Water Saving
Select this function by pressing the Water
Mode auxiliary function key once for all programs indicated as selectable in the Program and Consumption table.
This function is intended for lightly soiled
laundry that requires only a small amount
of detergent (see “Tips for Correct Washing”). It enables environmentally friendly
EN / 67
PL
EN
Page 70
washing by reducing the amount of water
used, without compromising on washing
performance.
• Extra Rinse
You can use this function for all programs
indicated as selectable in the Program and
Consumption table. Select this function by
pressing the Water Mode key twice for programs where the additional Water Saving
function can be selected, or by pressing the
Water Mode key once for programs where
the additional Water Saving function cannot be selected.
This function enables the product to make
additional rinsing in addition to the one
already made after the main wash. Thus,
the risk for sensitive skins (babies, allergic
skins, etc.) to be effected by the minimal
detergent remnants on the laundry can be
reduced.
• Remote Control
You can use this auxiliary function button
to connect your product to smart devices.
For detailed information, see HomeWhiz
Feature and Remote Control Function.
• Customized Program
This auxiliary function can only be used for
Cotton and Synthetic programmes together
with the HomeWhiz application. If this function is activated under the HomeWhiz “Personalize” menu, you can add up to five additional rinsing steps to the program. You
can select and use some auxiliary functions even though they are not found on
your product. You can increase and decrease the time of the Cotton and Synthetic
programmes within a safe range.
When the Specialised Programme
auxiliary function is selected, the
washing performance and energy
consumption will be different than
the declared value.
6.8.2 Functions/Programmes Selected by Pressing the Function
Keys for 3 Seconds
•Fresh Care
This function is selected when the relevant
Auxiliary function button is pressed and
held for 3 seconds and the programme follow-up light for the relevant step turns on.
When the function is selected, the drum rotates for up to 8 hours for preventing the
laundry from creasing at the end of the programme. You can cancel the programme
and take your laundry out at any time during the 8-hour duration. Press the function
selection button or the product on/off button to cancel the function. The programme
follow-up light will remain on until the function is cancelled, or the step is complete. If
the function is not cancelled, it will be active in the subsequent washing cycles as
well.
•Prewash
This function can be selected by pressing
and holding the related auxiliary function
button for 3 seconds.
A Prewash is only worthwhile for heavily
soiled laundry. Not using the Prewash will
save energy, water, detergent and time.
•Soaking
This function can be selected by pressing
and holding the related auxiliary function
button for 3 seconds.
The Soaking in Water auxiliary function ensures that the stains that have penetrated
into the laundry are cleaned better by soaking the laundry in detergent water before
the washing process starts.
•Child Lock
Use Child Lock function to prevent children
from tampering with the product. Thus you
can avoid any changes in a running programme.
PL
EN
EN / 68
Page 71
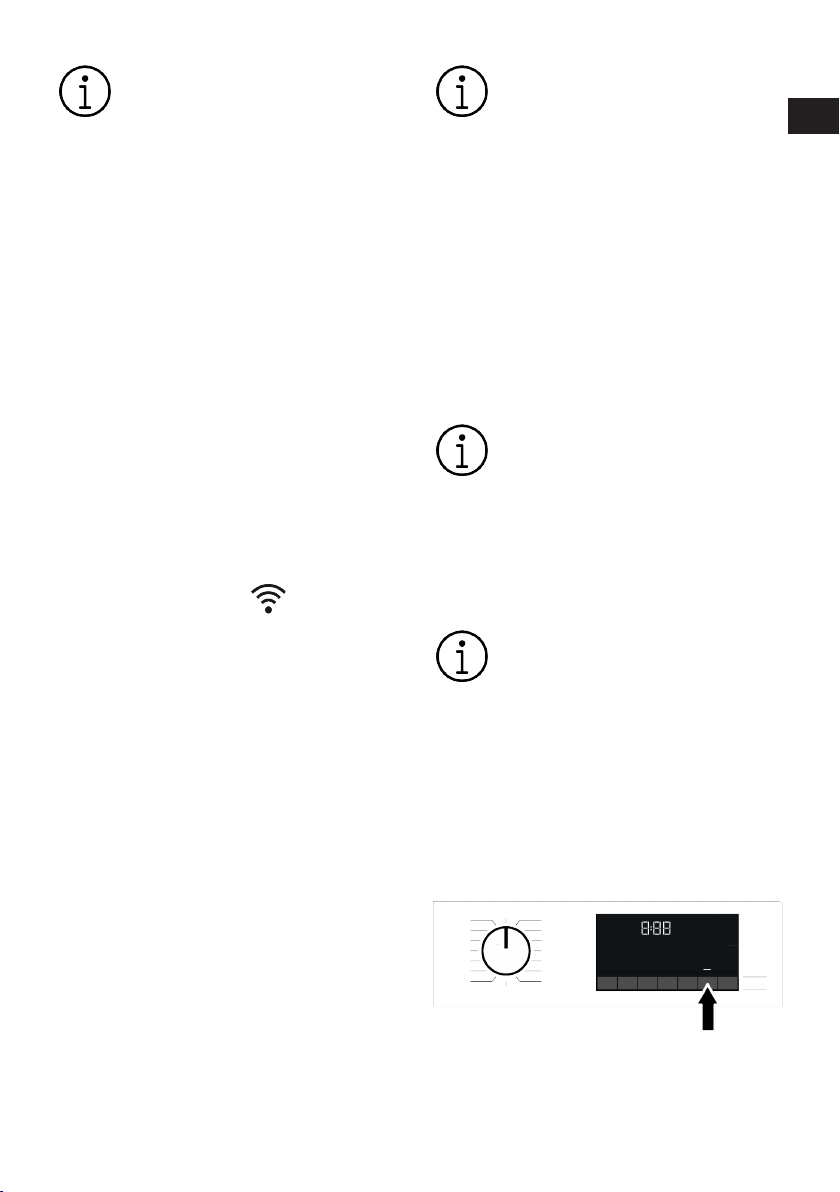
You can switch on and off the
product with On / Off button when
the Child Lock is active. When you
switch on the product again, programme will resume from where it
has stopped.
When the Child Lock is enabled, an
audio warning will be given if the
buttons are pressed. Audio warning
will be cancelled if the buttons are
pressed five times consecutively.
To activate the child lock:
Press and hold the related auxiliary function button for 3 seconds. After the countdown as “3-2-1" on the display is over, Child
Lock symbol appears on the display. When
this warning is displayed, you can release
the Auxiliary Function button 3.
To deactivate the child lock:
Press and hold the related auxiliary function button for 3 seconds. After the countdown as “3-2-1" on the display is over, Child
Lock symbol disappears.
• Wireless Connection
You can match your machine and your
smart devices with the wireless connection. This way, you can use your smart
device to get information about your machine and control it.
To activate wireless connection:
Press and hold Remote Control button for 3
seconds. After countdown “3-2-1” on the
display ends, “On” symbol appears. When
this notification is displayed stop pressing
the remote control button. The wireless
connection icon blinks when the product is
connecting the internet. If connection is
successful, icon will remain on.
To deactivate wireless connection:
Press and hold Remote Control button for 3
seconds. Countdown “3-2-1” will be displayed, and then “Off” symbol will appear
on the display.
To be able to enable wireless connection, machine setup should be
completed through HomeWhiz application. After setup, wireless connection will be enabled automatically if you press ”Remote Control”
button.
6.9 End Time
Time display
When the end time function is selected, the
remaining time until the programme starts
is shown in hours such as 1h, 2h, and the
remaining time to complete the programme
after your programme starts is shown in
hours and minutes as in the 01:30 example.
Programme duration may differ
from the values in section "Programme and consumption table"
depending on the water pressure,
water hardness and temperature,
ambient temperature, amount and
the type of laundry, auxiliary functions selected and the changes at
the mains voltage.
After a certain period when the end
time function is activated, the machine switches to stand-by mode
and some LEDs on the display are
turned off. LEDs are illuminated in
case of any user entry.
With the End Time function, the end time of
the programme may be set up to 24 hours.
After pressing End Time button, the programme's estimated ending time is displayed. If the End Time is set, End Time indicator is illuminated.
PL
EN
EN / 69
Page 72
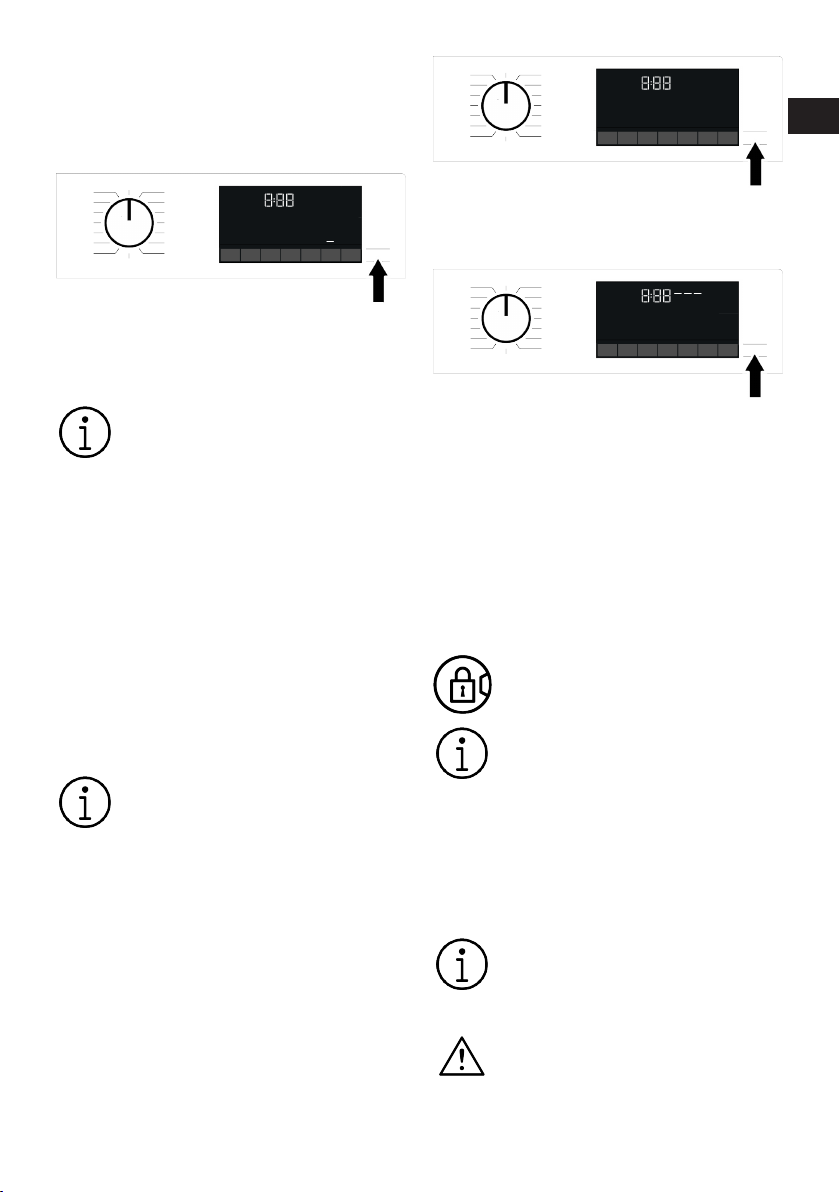
In order for the End Time function is activated and the programme is completed at
the end of the specified time, you must
press Start/Pause button after adjusting
the time.
If you want to cancel the End Time function, turn the machine off and on by turning
the program selection knob to the On/Off
position.
When you have activated the End
Time function, do not add liquid detergent in the powder detergent
compartment no 2. There is the risk
of staining of the clothes
1. Open the loading door, place the laundry
and put detergent, etc.
2. Select the washing programme, temperature, spin speed and, if required, the
auxiliary functions.
3. Set the End Time of your choice by
pressing the End Time button. End Time
indicator lights.
4. Press Start / Pause. Time countdown
starts.
Additional laundry can be added
into the machine during the End
Time countdown. At the end of the
countdown, End Time indicator
turns off, washing cycle starts and
the time of the selected programme
appears on the display.
6.10 Starting the Program
1. Press the Start/Pause button for 1
second to start the program.
2. The Start/Pause button's dim light now
becomes steady, indicating that the program has started.
PL
EN
3. The loading door is locked. After the
loading door is locked, the door lock
symbol appears on the screen.
4. The program follow-up indicator lights
on the screen show the current program
step.
6.11 Loading Door Lock
There is a locking system on the loading
door of the machine that prevents opening
of the loading door in cases when the water
level is unsuitable.
"Door Locked" symbol appears on the display when the loading door is locked.
If the Remote Control Function is
selected, the door will be locked. In
order to open the door you must deactivate Remote Control Function
by either pressing the Remote Control button or changing the programme position.
Opening the loading door in case of power
failure:
In case of power failure, you can
use the loading door emergency
handle under the pump filter cap to
open the loading door manually.
To avoid any water overflow before
opening the loading door, make
sure there is no water left inside the
product.
EN / 70
Page 73
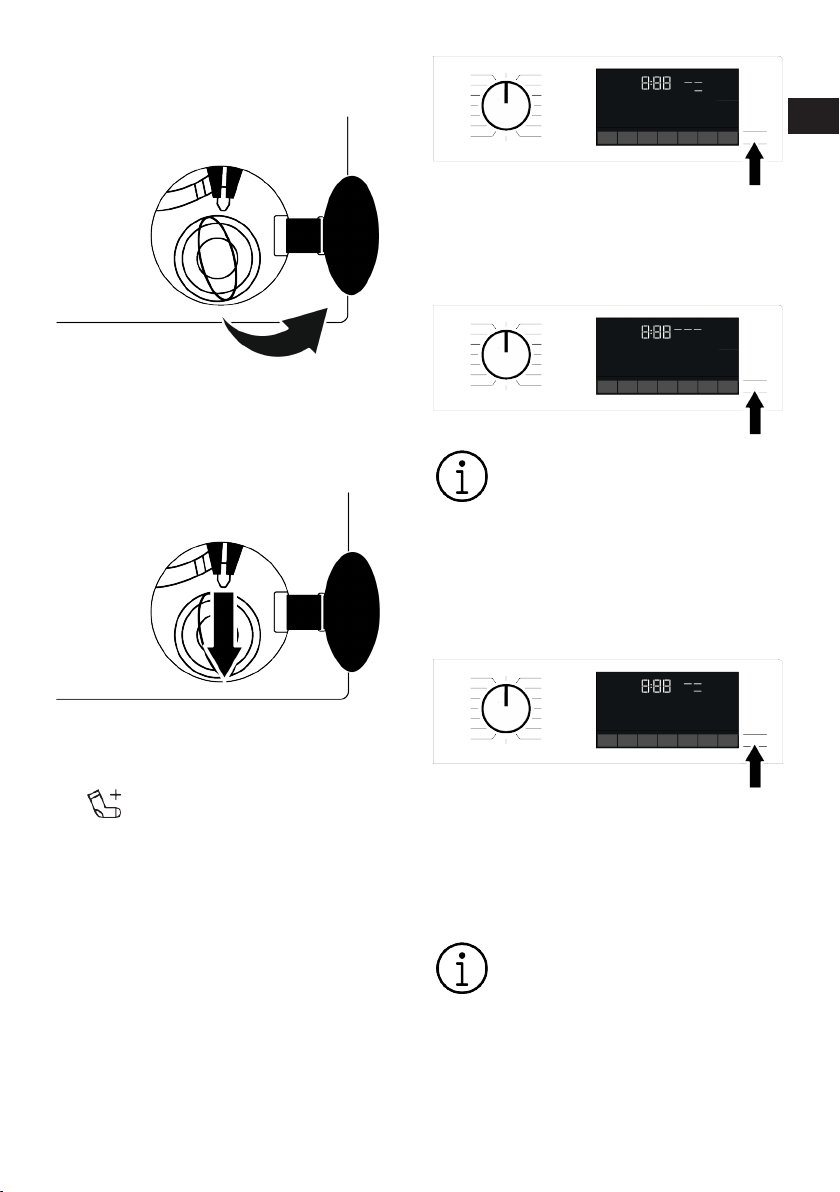
1. Turn off and unplug the product.
2. Open the pump filter lid.
3. Pull down the loading door emergency
handle with a tool and release. Then
open the loading door.
4. If the loading door does not open then
repeat the previous step.
PL
EN
If the water level in the machine is insufficient when you press the Start/Pause button, the door lock cannot be deactivated
and the door lock icon on the display will
continue to appear.
If the water temperature inside the
machine is above 50°C, you cannot
disable the door lock for safety
reasons (even if the water level is
suitable).
Putting the machine into pause mode:
To pause the washing machine, press and
hold the Start/Pause button for 1 second.
The pause symbol will flash on the display.
6.12 Changing Selections After Pro-
gram Starts
Adding laundry after the program has star-
ted
When you press the Start/Pause button, if
the water level in the machine is appropriate, the door lock is deactivated and the
door opens for you to add laundry. When
the door lock is deactivated, the door lock
symbol on the screen disappears. After
adding laundry, close the door and press
the Start/Pause button again to continue
washing.
:
Changing the program selection after the
program has started:
If Child Lock is not active, the program can
be changed while the current program is
running. This will cancel the current program.
The selected program starts over.
Changing auxiliary function, speed and
temperature settings:
Depending on the step the program has
reached, you can disable or enable auxiliary
functions. See "Auxiliary function selection"
EN / 71
Page 74
You can also change the spin speed and
temperature settings. See "Spin speed selection" and "Temperature selection".
If the water temperature inside the
machine is high or the water level is
above the cover line, the loading
door will not open.
6.13 Cancelling the Programme
The programme is cancelled when programme selection knob is turned to a different programme or product is turned off
and on again using the programme selection knob.
If you turn the programme selection
knob when the Child Lock is enabled, the programme will not be
cancelled. You should cancel the
Child Lock first.
If you want to open the loading
door after you have cancelled the
programme but if it is not possible
to open the loading door since the
water level in the product is above
the loading door baseline, then turn
the Programme Selection knob to
Pump+Spin programme and drain
the water in the product.
6.14 End of Programme
End symbol appears on the display when
the programme is completed.
If you do not press any button for 10
minutes, the product will switch to OFF
mode. Display and all indicators are turned
off.
Completed programme steps will be displayed if you press On/Off button.
6.15 HomeWhiz Feature and Re-
mote Control Function
You can check your washing machine from
smart devices and get information about
the status of your machine thanks to the
HomeWhiz function. You can carry out
many operations on your machine from
your smart device by using the HomeWhiz
application. Moreover, you can use certain
properties only with the HomeWhiz Function.
You must download the HomeWhiz application from the app store of your smart
device to use the Wifi feature of your machine.
To use the app, make sure your smart
device is connected to the internet.
If you are using the app for the first time,
complete user account registration by following the directions on the app. You can
use all HomeWhiz featured products in
your home through this account after registration is complete.
The , Bluetooth of your smart device should
be on and your device should be connected
to the internet during setup. Your smart
device should be close to the washing machine. After the setup, the Bluetooth can be
turned off or your smart device does not
need to be close to the washing machine.
You may use your product provided that
your smart device is connected to internet.
You can tap the “Devices” tab in the application to view appliances paired with your
account. You may perform the user pairing
operation of these products on this page.
After the app is setup, with the HomeWhiz
Function, your washing machine can give
you instant status notifications via your
smart device.
Your washing machine will send you notifications over HomeWhiz application in
the following cases:
• At the end of the programme,
• When the door of the washing machine is
opened,
• In case of water cut warning,
• In case of security warning,
PL
EN
EN / 72
Page 75
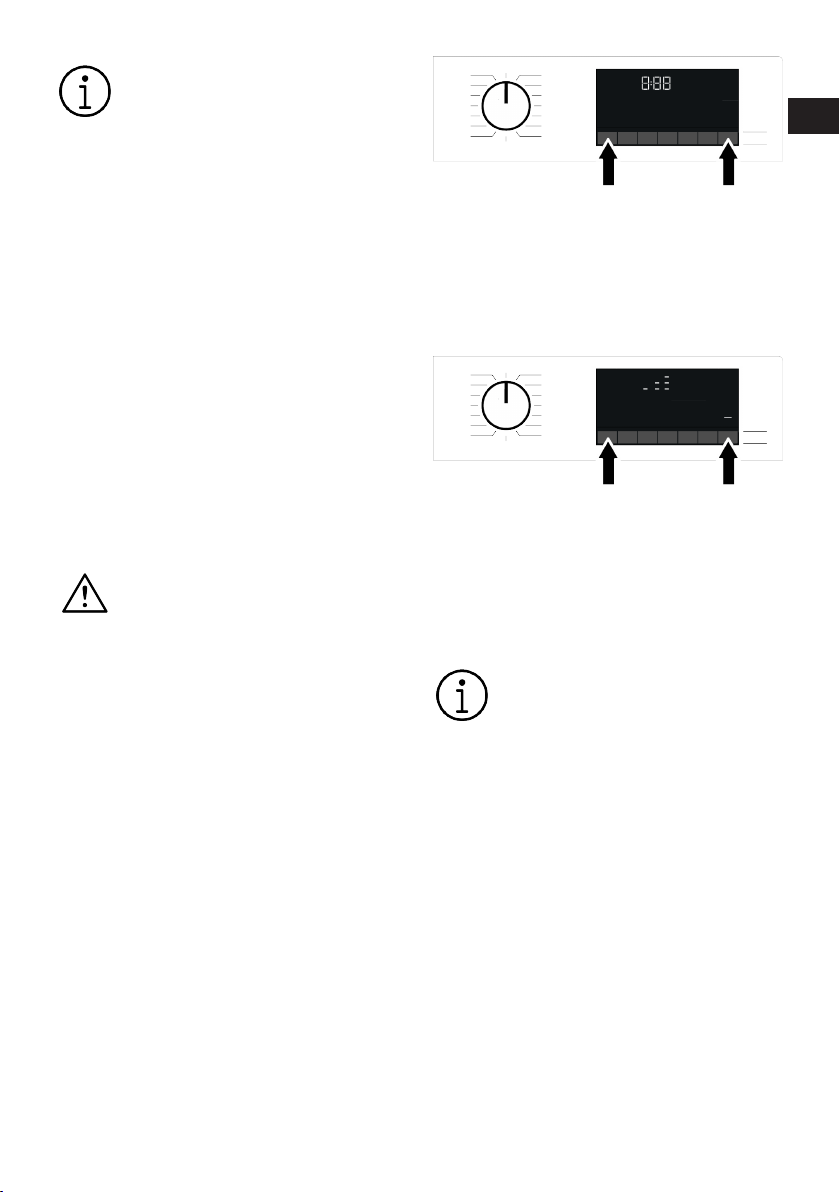
To utilize the HomeWhiz feature,
ensure that the HomeWhiz app is
installed on your smart device and
that your washing machine is connected to your home Wi-Fi network.
When your washing machine is not
connected to the network, it operates like a machine without HomeWhiz function.
Your product shall run with a connection to the wireless network in
your home network. The controls
made by means of the application
will be enabled through this network. Therefore, the wireless signal
strength near the machine's location must be adequate.
Operates at HomeWhiz 2.4 GHz frequency band.
Please visit www.homewhiz.com link to
learn which Android and IOS versions are supported by HomeWhiz
application.
All safety measures described in
the "GENERAL SAFETY INSTRUC-
TIONS" titled section of the user
manual are also valid for remote
operation with HomeWhiz function.
6.15.1 HomeWhiz Setup
A connection should be set between your
product and the app in order for the app to
function. Follow the steps below to establish this connection.
1. If you are adding a device for the first
time, touch “Appliances” tab on the
HomeWhiz Application. Select “ADD APPLIANCE” (touch here for setting up a
new appliance) button in the upper right
corner. Perform the setup by following
both the steps below and the steps in
the HomeWhiz Application.
2. To start the setup, make sure that your
machine is turned off. Press and hold
the Temperature button and the Remote
Control Function button simultaneously
for 3 seconds to switch your machine to
HomeWhiz setup mode.
PL
EN
3. When in HomeWhiz setup mode, an animation appears on the screen and the
Wireless Connection icon flashes until
your machine connects to the internet.
Only programme knob will be active in
this mode. Other buttons will be inactive.
4. Follow the instructions on the display of
HomeWhiz application.
5. Wait until the installation is complete.
When setup is complete, give your
washing machine a name. Now, you see
the product you have added in the
HomeWhiz Application.
Your washing machine will automatically turn off if you cannot realize the setup successfully within 5
minutes. In this case, you have to
start the setup process all over
again. If the problem continues,
please contact the Authorised Service.
You can use your washing machine
with more than one smart device.
To do this, download the HomeWhiz app on the other smart device
as well. When you launch the app,
you will need to log in with the account you previously created and
paired with your washing machine.
Otherwise, please read "Setting up
a washing machine that is connected to someone else's account".
EN / 73
Page 76
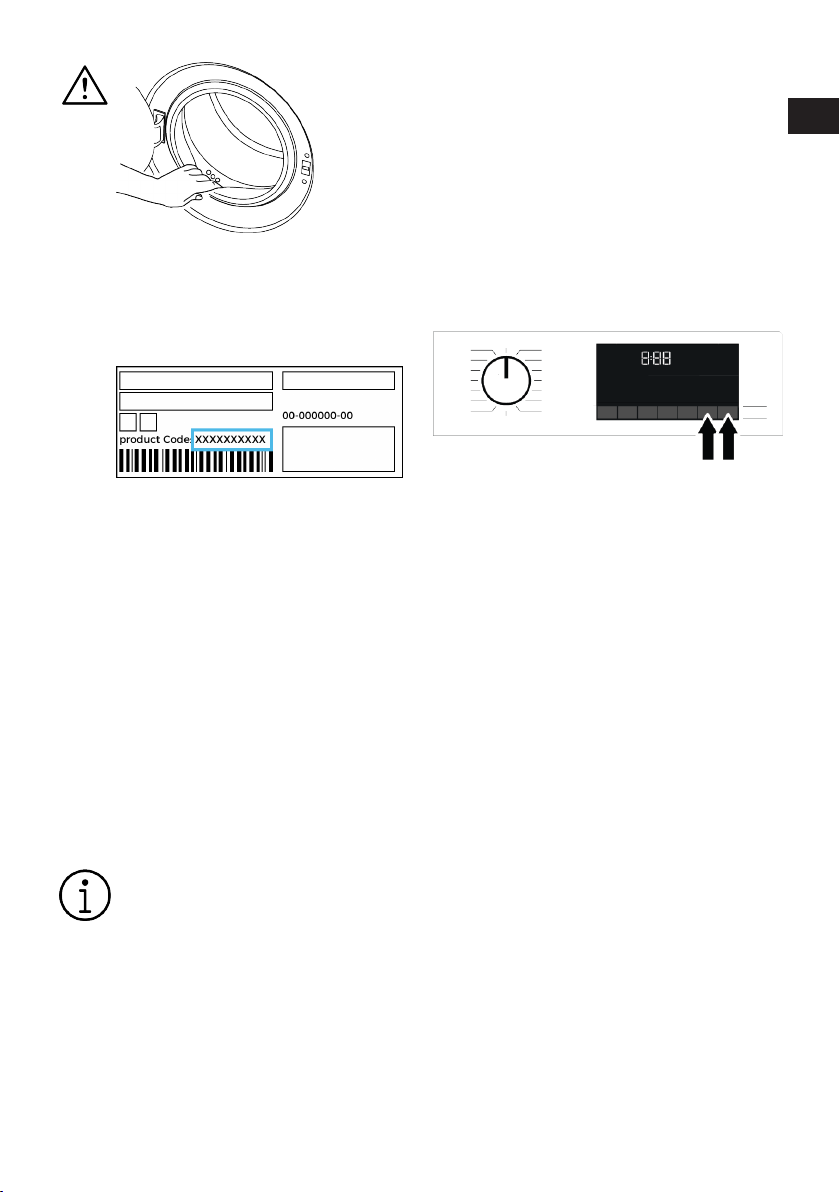
HomeWhiz Application may require
you to type the product number
shown on the product label. You
can find the product label inside the
appliance door. The product number is located on this label.
6.15.2 Setting up a Washing Machine Connected to Someone
Else's Account
If the washing machine you want to use
was previously introduced to the system
with someone else‘s account, you must establish a new connection between your
HomeWhiz Application and the product.
1. Download HomeWhiz Application on the
new smart device you want to use.
2. Create a new account and log in to this
account on the HomeWhiz app.
3. Follow the steps described in Home-
Whiz Setup Setup and proceed with the
setup procedure.
Given that your product's HomeWhiz Feature and Remote Control
functionality operate via either
Bluetooth or Wi-Fi technology, depending on your product model, it's
important to note that only one
HomeWhiz application can control
your product at any given moment.
6.15.3 Deleting the HomeWhiz Account Match
Follow the following steps in order to delete
a washing machine previously matched
with someone else’s account.
1. Turn on your machine using the pro-
gram button.
2. When your machine is running, push and
hold the Remote Control Function button and End Time Setting buttons for 5
seconds.
3. You will hear warning sound from the
product to notify your request after the
countdown on the screen. Deleting the
match will take a few seconds.
After this operation, you cannot use the
HomeWhiz function of your washing machine until you do another setup.
Your product does not need to be connected to the internet in order to delete an account matching. Your request will be received. This matching will be automatically
deleted when the product is first connected
to the internet.
6.15.4 Remote Control Function
and Its Use
After HomeWhiz setup, Wireless Connection will automatically turn on. To activate
or deactivate the wireless connection,
please see "Wireless Connection".
If you turn off and on your machine while
Wireless Connection is active, it will automatically reconnect. In cases of changing
your network password or turning the modem off, the wireless connection will automatically turn off. For this reason, you will
need to turn on the Wireless Connection
again if you want to use the Remote Control function.
PL
EN
EN / 74
Page 77
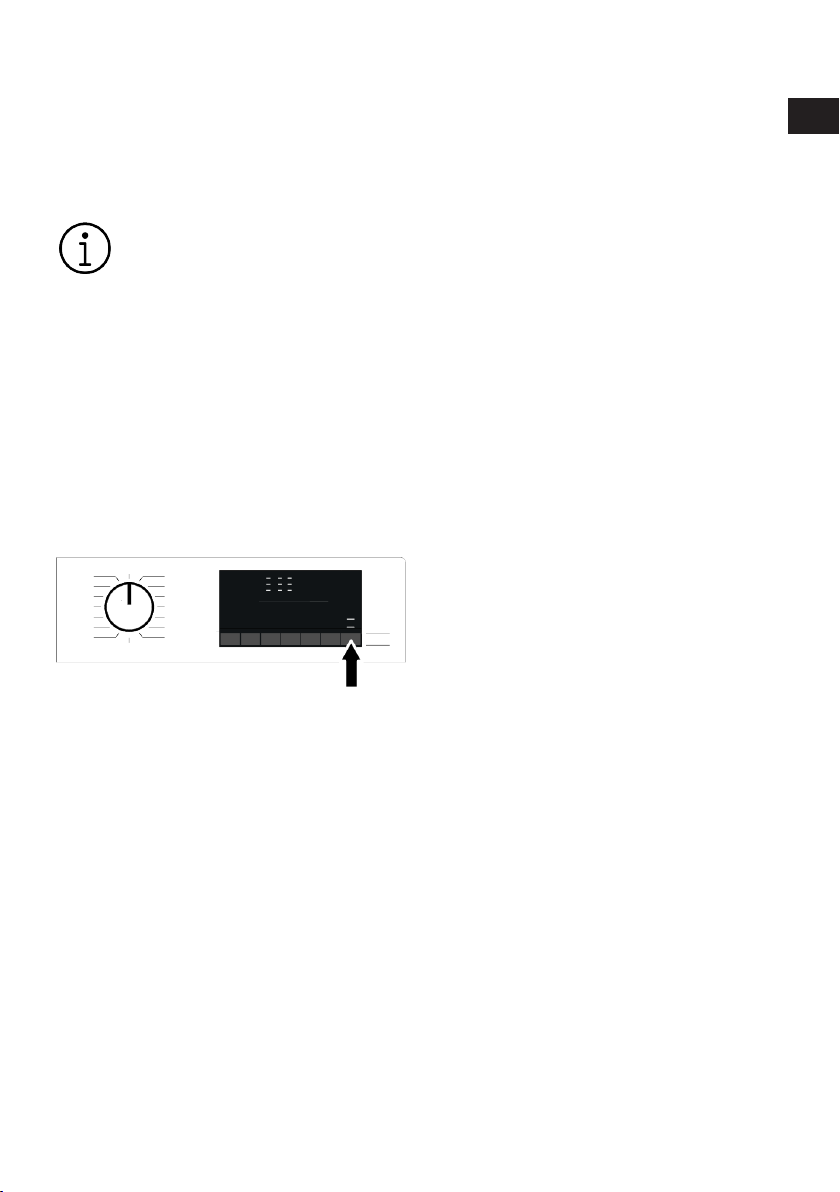
You can check the Wireless Connection
symbol on the display to track your connection status. If the symbol is continuously
on, it means you have internet connection.
If the symbol is blinking, it means the machine is trying to connect. If the symbol is
off, you have no connection.
When the wireless connection is on
in your product, Remote Control
function will be selectable.
If the Remote Control function cannot be selected, check the connection status. If the connection cannot be established, repeat the initial
setup settings on the appliance.
If you want to control your washing machine remotely, you must activate the remote control function by pressing the Remote Control button on the control panel.
Once access is established to the product,
you will see a screen similar to the one below.
When the Remote Control is enabled, you
can only manage the machine, turn it off
and follow the status through your washing
machine. And all functions except child
lock can be managed through the application.
You can follow whether the Remote Control
function is on or off through the function indicator on the display.
If the Remote Control function is Off, all the
operations are handled on the washing machine and only status follow-up is allowed
on the application.
Remote Control function may not be activated if the remote connection is off or the
product door is on.
Once activated, the remote control function
on your washing machine remains active
unless specific circumstances apply. This
feature enables you to control your ma-
chine via the internet, regardless of whether
the machine is turned on or off, and regardless of your location.
In certain cases, it deactivates itself for
safety reasons:
• When your washing machine undergoes
a power interruption.
• When the door of the washing machine is
opened,.
• When programme knob is turned and a
different programme selected or appliance is turned off.
6.15.5 Troubleshooting
Do the following if you have a problem with
controlling or connection. Observe whether
the problem persists or not after the action
you have performed.
1. Check whether your smart device is con-
nected to the relevant home network.
2. Restart the product application.
3. Turn Bluetooth or Wi-Fi off and on via
the control panel, depending on the
model of your product.
4. If the connection cannot be established
with the above processes, repeat the ini-
tial set-up settings on the washing ma-
chine.
If the problem persists, consult an Authorised Service Agent.
6.15.6 HomeWhiz Consumption
Values Display
Your product has a consumption management feature. The capabilities of this feature may vary between different product
models, encompassing functionalities such
as energy consumption monitoring, water
usage tracking, and more. For this feature
to work, your product must be added to
HomeWhiz and connected to the internet.
With this feature, you can track your smart
product's consumption data over various
time intervals and benefit from tailored
suggestions aimed at reducing consumption.
EN / 75
PL
EN
Page 78
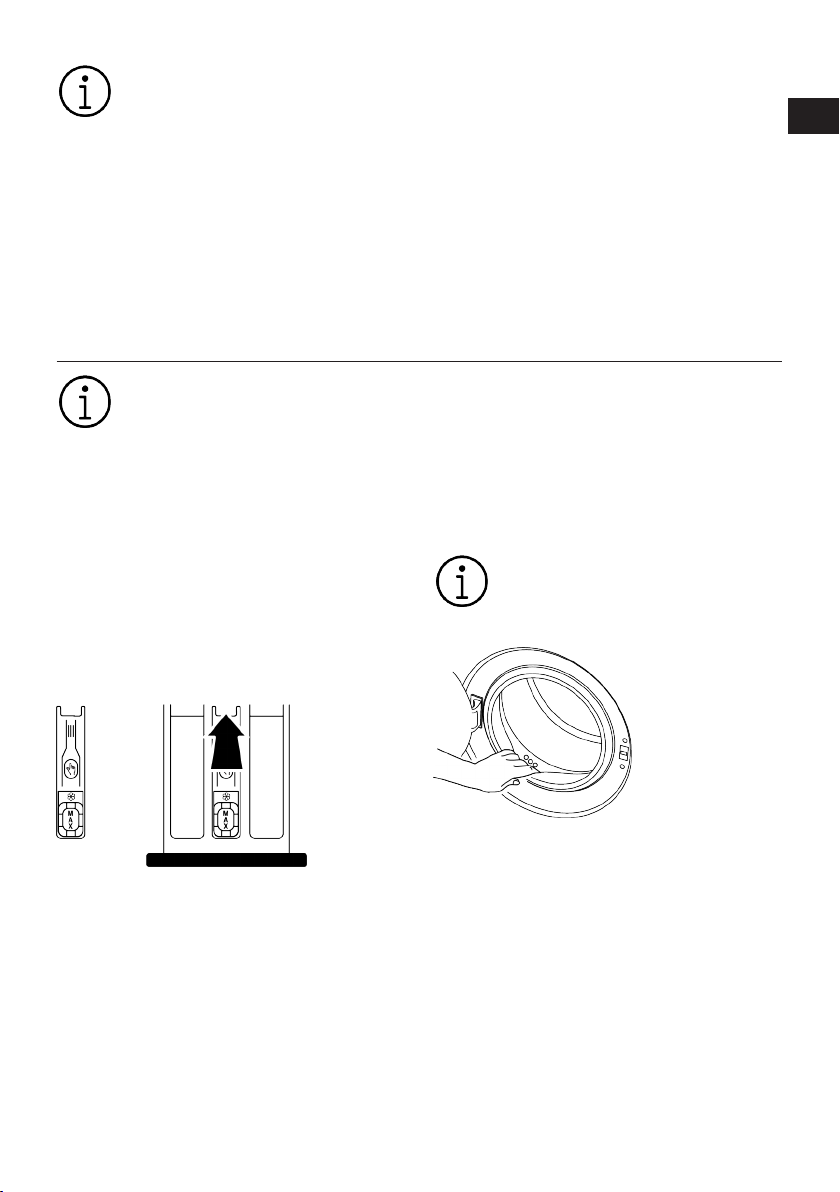
Please note that the consumption
data displayed in the HomeWhiz application is intended for informational purposes only and may not
accurately reflect actual usage.
The values specified on the product
label are obtained under standardized laboratory conditions. Be
aware that your actual consumption figures may fluctuate based on
individual usage patterns and varying climatic conditions.
7 Maintenance and Cleaning
Please read the “Safety Instructions” section first!
Service life of your product extends and frequently experienced problems will be reduced if it is cleaned at regular intervals.
7.1 Cleaning the Detergent Drawer
Clean the detergent drawer at regular intervals (once every 4 to 5 wash) as mentioned
below to prevent accumulation of powder
detergent.
Clean the syphon if excess amounts of water and fabric softener mixture remains in
the softener compartment.
PL
EN
4. Firmly fit the syphon and the drawer
back after cleaning.
7.2 Cleaning the Loading Door and
the Drum
For products with drum cleaning programme, please see the Operating the
product section.
Repeat Drum Cleaning process in
every 2 months.
NOTICE: Use an anti-limescale suitable for the washing machines.
1. Press the marked part of the syphon
within the softener compartment and
then pull the drawer towards yourself to
take it out.
2. Lift and remove the syphon from behind
as shown.
3. Rinse drawer and syphon in the sink
with plenty of warm water. Use gloves
or suitable brush to prevent contact of
residues in the drawer with your skin.
After every washing make sure that no foreign substance is left in the product.
If the holes on the door gasket shown in the
figure is blocked, open the holes using a
toothpick.
Foreign metal substances will cause rust
stains in the drum. Clean the stains on the
drum surface by using cleaning agents for
stainless steel.
Never use steel wool or wire wool. These
will damage the painted, chrome coated
and plastic surfaces.
EN / 76
Page 79
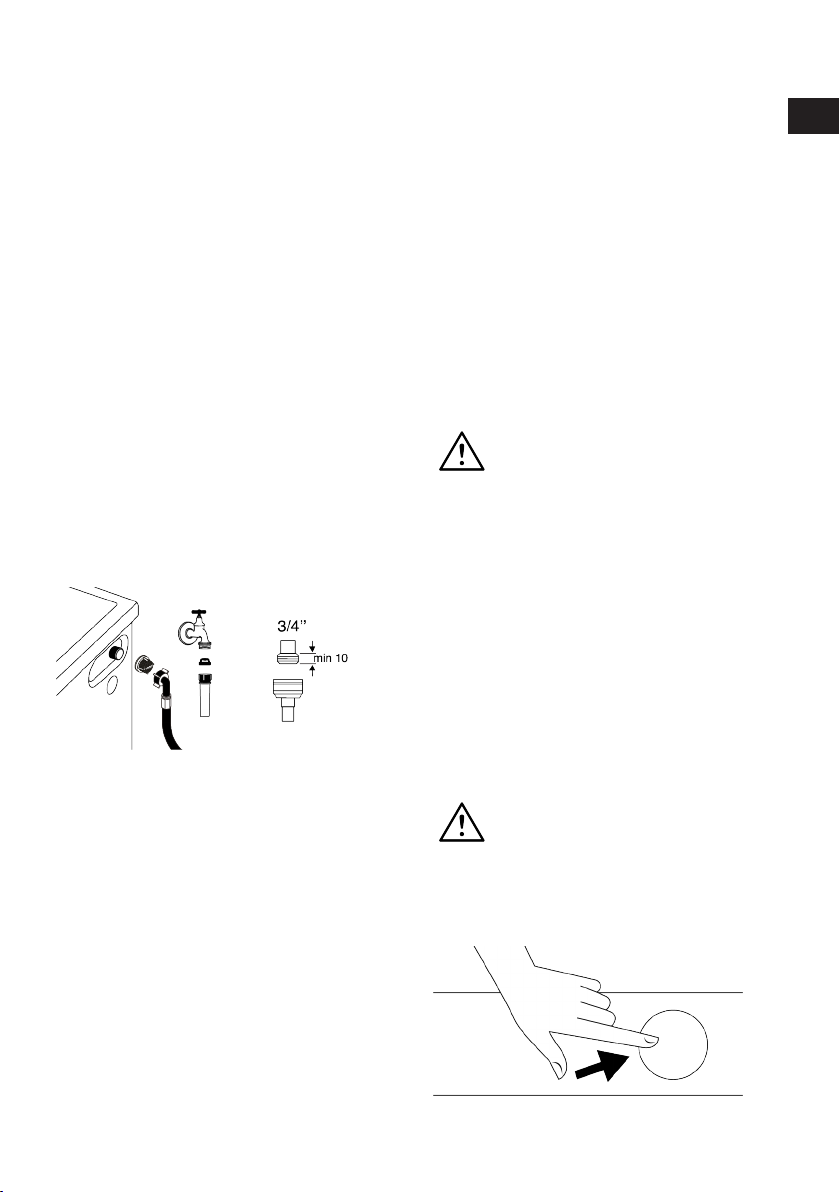
We recommend you to wipe the door gasket with a dry and clean cloth at the end of
the programme. This will remove residues
on the door gasket in your product and prevent formation of malodours.
7.3 Cleaning the Body and Control
Panel
Wipe the body of the product with soapy
water or non-corrosive mild gel detergents
as necessary, and dry with a soft cloth.
Use only a soft and damp cloth to clean the
control panel. Do not use cleaning products
that contain bleach
7.4 Cleaning the Water Intake Fil-
ters
There is a filter at the end of each water intake valve at the rear of the product and
also at the end of each water intake hose
where they are connected to the tap. These
filters prevent foreign substances and dirt
in the water to enter the product. Filters
should be cleaned if they are dirty.
1. Close the taps.
2. Remove the nuts of the water intake
hoses to access the filters on the water
intake valves and clean them with an appropriate brush. If the filters are too
dirty, remove them from their places
with a pliers and clean in this way.
3. Take out the filters on the flat ends of
the water intake hoses together with the
gaskets and clean thoroughly under running water.
4. Replace the gaskets and filters carefully
and tighten their nuts by hand.
7.5 Draining Remaining Water and Cleaning the Pump Filter
The filter system in your product prevents
solid items such as buttons, coins and fabric fibres clogging the pump impeller during
draining of washing water. Thus, the water
will be drained without any problem and the
service life of the pump will extend.
If the product fails to drain water inside it,
the pump filter is clogged. Filter must be
cleaned whenever it is clogged or in every 3
months. Water must be drained off first to
clean the pump filter.
In addition, prior to transporting the product
(e.g., when moving to another house) water
should be drained completely.
NOTE:
Foreign substances left in the
pump filter may damage your
product or may cause noise problem.
If you live in areas prone to frost, remember to turn off the water tap,
disconnect the main hose, and
drain the water from the product
when it's not in use.
After each use, turn off the tap to
which the mains hose is connected.
In order to clean the dirty filter and drain
the water:
1. Unplug the product to cut off the supply
power.
Temperature of the water inside the
product may rise up to 90 ºC. To
avoid the risk of scalding, clean the
filter after the water inside the
product is cooled down.
2. Open the filter cover.
PL
EN
EN / 77
Page 80
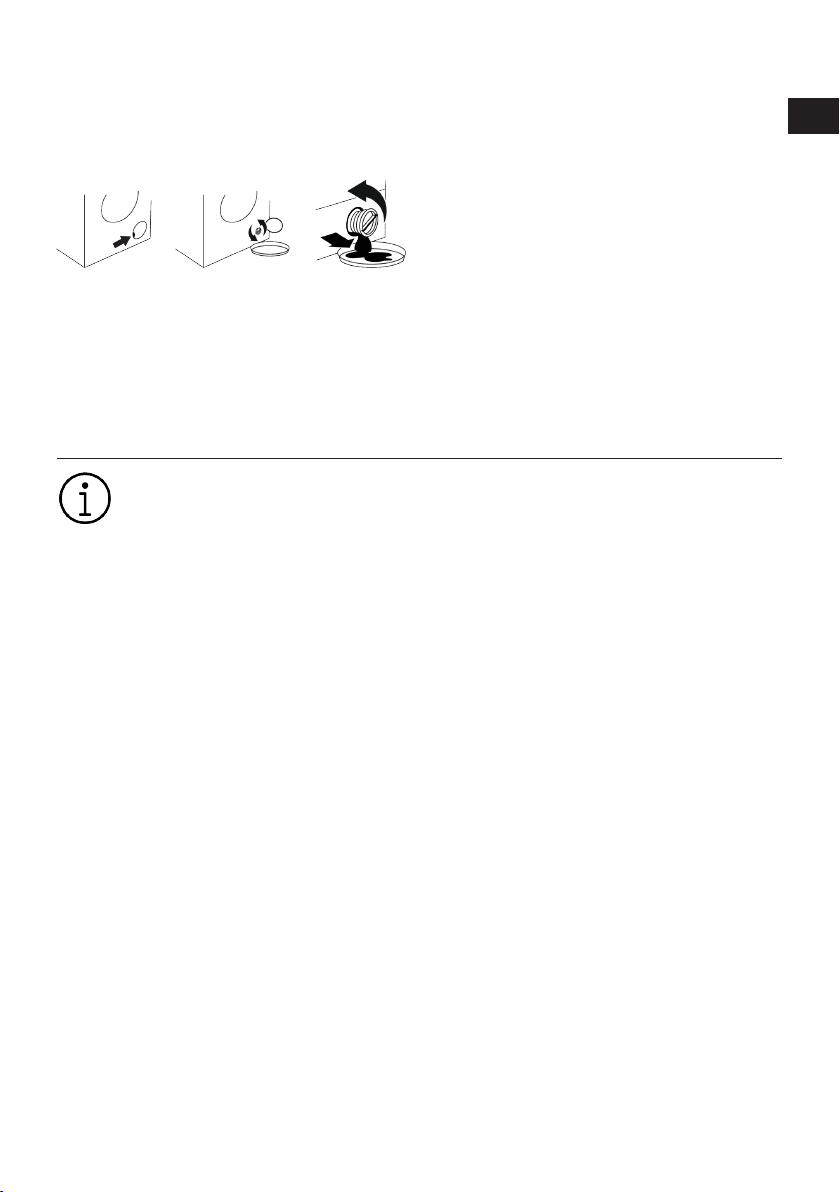
3. Follow the below procedures in order to
drain water.
If the product does not have an emergency
water draining hose, in order to drain the
water:
• Place a large container at the end of the
hose to collect the water from the filter.
• When the pump filter starts leaking water
loosen it by turning (opposite clockwise).
Fill the running water to the container you
placed in front of the filter. Keep a cloth
ready to clean the water that may spill.
8 Troubleshooting
Please read the “Safety Instructions” section first!
Programmes do not start after the loading
door is closed.
• Start / Pause / Cancel button is not
pressed. >>> Press Start / Pause / Cancel
button.
• It may be difficult to close the loading
door in case of excessive loading. >>>
Reduce the amount of laundry and make
sure that the loading door is closed properly.
Programme cannot be started or selected.
• The product has switched to self-protec-
tion mode due to a supply problem (line
voltage, water pressure, etc.). >>> Depending on the product model, select another program by turning the Program Selection button or pressing and holding
the On/Off button for 3 seconds to cancel the program. Previous programme
will be cancelled. See Cancelling the Programme [}72]
Water inside the product.
• Some water has remained in the product
due to the quality control processes in
the production. >>> This is not a failure;
water is not harmful to the product.
• Completely turn and remove the pump filter when the water in the product leaks
out.
1. Clean any residues inside the filter as
well as fibres, if any, around the pump
impeller region.
2. Replace the filter.
3. If the filter cap is composed of two
pieces, close the filter cap by pressing
on the tab. If it is one piece, seat the
tabs in the lower part into their places
first, and then press the upper part to
close.
The product does not take water in.
• Tap is turned off. >>> Turn on the taps.
• Water inlet hose is bent. >>> Flatten the
hose.
• Water inlet filter is clogged. >>> Clean the
filter.
• Loading door is not closed. >>> Close the
door.
The product does not drain water.
• Water drain hose is clogged or twisted.
>>> Clean or flatten the hose.
• Pump filter is clogged. >>> Clean the
pump filter.
Product vibrates or makes noise.
• Product is standing unbalanced. >>> Adjust the stands to balance the product.
• A hard substance has entered into the
pump filter. >>> Clean the pump filter.
• Transportation safety bolts are not removed. >>> Remove the transportation
safety bolts.
• Laundry quantity in the product is too
little. >>> Add more laundry to the
product.
• Excessive laundry is loaded in the
product. >>> Take out some of the laundry from the product or distribute the
load by hand to balance it homogeneously in the product.
PL
EN
EN / 78
Page 81

• Product is leaning on a rigid item. >>>
Make sure that the product is not leaning
on anything.
There is water leaking from the bottom of
the product.
• Water drain hose is clogged or twisted.
>>> Clean or flatten the hose.
• Pump filter is clogged. >>> Clean the
pump filter.
Product stopped shortly after the programme started.
• Product has stopped temporarily due to
low voltage. >>> Product will resume running when the voltage restores to the normal level.
Product directly drains the water it takes
in.
• Draining hose is not at adequate height.
>>> Connect the water draining hose as
described in the user manual.
No water can be seen in the product during
washing.
• Water is inside the invisible part of the
product. >>> This is not a failure.
Loading door cannot be opened.
• Loading door lock is activated because
of the water level in the product. >>>
Drain the water by running the Pump or
Spin programme.
• Product is heating up the water or it is at
the spinning cycle. >>> Wait until the programme completes.
• Loading door may be stuck because of
the pressure it is subjected to. >>> Hold
the handle and push and pull the loading
door to release and open it.
• If there is no power, loading door of the
product will not open. >>> To open the
loading door, open the pump filter cap
and pull down the emergency handle positioned at the rear side of the said cap.
See Loading Door Lock [}70]
Washing takes longer than specified in the
user manual. (*)
• Water pressure is low. >>> Product waits
until taking in adequate amount of water
to prevent poor washing quality due to
the decreased amount of water. Therefore, the washing time extends.
• Voltage is low. >>> Washing time is prolonged to avoid poor washing results
when the supply voltage is low.
• Input temperature of water is low. >>>
Required time to heat up the water extends in cold seasons. Also, washing
time can be lengthened to avoid poor
washing results.
• Number of rinses and/or amount of rinsing water have increased. >>> Product increases the amount of rinsing water
when good rinsing is needed and adds an
extra rinsing step if necessary.
• Excessive foam has occurred and automatic foam absorption system has been
activated due to too much detergent usage. >>> Use recommended amount of
detergent.
Programme duration does not countdown.
(On models with display) (*)
• Timer may stop during water intake. >>>
Timer indicator will not countdown until
the product takes in adequate amount of
water. The product will wait until there is
sufficient amount of water to avoid poor
washing results due to lack of water.
Timer indicator will resume countdown
after this.
• Timer may stop during heating step. >>>
Timer indicator will not countdown until
the product reaches the selected temperature.
• Timer may stop during spinning step. >>>
Automatic unbalanced load detection
system is activated due to the unbalanced distribution of the laundry in the
product.
PL
EN
EN / 79
Page 82

Programme duration does not countdown.
(*)
• There is unbalanced load in the product.
>>> Automatic unbalanced load detection
system is activated due to the unbalanced distribution of the laundry in the
product.
Product does not switch to spinning step.
(*)
• There is unbalanced load in the product.
>>> Automatic unbalanced load detection
system is activated due to the unbalanced distribution of the laundry in the
product.
• The product will not spin if water is not
drained completely. >>> Check the filter
and the draining hose.
• Excessive foam has occurred and automatic foam absorption system has been
activated due to too much detergent usage. >>> Use recommended amount of
detergent.
Washing performance is poor: Laundry
turns gray. (**)
• Insufficient amount of detergent has
been used over a long period of time. >>>
Use the recommended amount of detergent appropriate for water hardness and
the laundry.
• Washing has been made at low temperatures for a long time. >>> Select the
proper temperature for the laundry to be
washed.
• Insufficient amount of detergent is used
with hard water. >>> Using insufficient
amount of detergent with hard water
causes the soil to stick on the cloth and
this turns the cloth into gray in time. It is
difficult to eliminate graying once it happens. Use the recommended amount of
detergent appropriate for water hardness
and the laundry.
• Excessive amount of detergent is used.
>>> Use the recommended amount of detergent appropriate for water hardness
and the laundry.
Washing performance is poor: Stains persist or the laundry is not whitened. (**)
• Insufficient amount of detergent is used.
>>> Use the recommended amount of detergent appropriate for water hardness
and the laundry.
• Excessive laundry is loaded in. >>> Do
not overload the product. Load with
amounts recommended in the "Programme and consumption table".
• Wrong programme and temperature were
selected. >>> Select the proper programme and temperature for the laundry
to be washed.
• Wrong type of detergent is used. >>> Use
original detergent appropriate for the
product.
• Excessive amount of detergent is used.
>>> Put the detergent in the correct compartment. Do not mix the bleaching agent
and the detergent with each other.
Washing performance is poor: Oily stains
appeared on the laundry. (**)
• Regular drum cleaning is not applied. >>>
Clean the drum regularly. For this procedure, see Cleaning the Loading Door and
the Drum [}76]
Washing performance is poor: Clothes
smell unpleasantly. (**)
• Odours and bacteria layers are formed on
the drum as a result of continuous washing at lower temperatures and/or in short
programmes. >>> Leave the detergent
drawer as well as the loading door of the
product ajar after each washing. Thus, a
humid environment favourable for bacteria cannot occur in the product.
Colour of the clothes faded. (**)
• Excessive laundry was loaded in. >>> Do
not load the product in excess.
• Detergent in use is damp. >>> Keep detergents closed in an environment free of
humidity and do not expose them to excessive temperatures.
• A higher temperature was selected. >>>
Select the proper programme and temperature according to the type and soiling
degree of the laundry.
EN / 80
PL
EN
Page 83

The product does not rinse well.
• The amount, brand and storage conditions of the detergent used are inappropriate. >>> Use a detergent appropriate
for the product and your laundry. Keep
detergents closed in an environment free
of humidity and do not expose them to
excessive temperatures.
• Detergent was put in the wrong compartment. >>> If detergent is put in the prewash compartment although prewash
cycle is not selected, the product can
take this detergent during rinsing or
softener step. Put the detergent in the
correct compartment.
• Pump filter is clogged. >>> Check the filter.
• Draining hose is folded. >>> Check the
drain hose.
Laundry became stiff after washing. (**)
• Insufficient amount of detergent is used.
>>> Using insufficient amount of detergent for the water hardness can cause
the laundry to become stiff in time. Use
appropriate amount of detergent according to the water hardness.
• Detergent was put in the wrong compartment. >>> If detergent is put in the prewash compartment although prewash
cycle is not selected, the product can
take this detergent during rinsing or
softener step. Put the detergent in the
correct compartment.
• Detergent was mixed with the softener.
>>> Do not mix the softener with detergent. Wash and clean the drawer with hot
water.
Laundry does not smell like the softener.
(**)
• Detergent was put in the wrong compartment. >>> If detergent is put in the prewash compartment although prewash
cycle is not selected product, the can
take this detergent during rinsing or
softener step. Wash and clean the drawer
with hot water. Put the detergent in the
correct compartment.
• Detergent was mixed with the softener.
>>> Do not mix the softener with detergent. Wash and clean the drawer with hot
water.
Detergent residue in the detergent drawer.
(**)
• Detergent was put in wet drawer. >>> Dry
the detergent drawer before putting in detergent.
• Detergent has gotten damp. >>> Keep detergents closed in an environment free of
humidity and do not expose them to excessive temperatures.
• Water pressure is low. >>> Check the water pressure.
• The detergent in the main wash compartment got wet while taking in the prewash
water. Holes of the detergent compartment are blocked. >>> Check the holes
and clean if they are clogged.
• There is a problem with the detergent
drawer valves. >>> Call the Authorised
Service Agent.
• Detergent was mixed with the softener.
>>> Do not mix the softener with detergent. Wash and clean the drawer with hot
water.
• Regular drum cleaning is not applied. >>>
Clean the drum regularly. For this procedure, see Cleaning the Loading Door and
the Drum [}76]
Too much foam forms inside the product.
(**)
• Improper detergents for the product is
used. >>> Use detergents appropriate for
the product.
• Excessive amount of detergent is used.
>>> Use only sufficient amount of detergent.
• Detergent was stored under improper
conditions. >>> Store detergent in a
closed and dry location. Do not store in
excessively hot places.
• Some meshed laundry such as tulle may
foam too much because of their texture.
>>> Use smaller amounts of detergent for
this type of item.
PL
EN
EN / 81
Page 84
• Detergent was put in the wrong compartment. >>> Make sure you place the detergent in the appropriate compartment.
• Softener is being taken early by the
product. >>> There may be problem in the
valves or in the detergent drawer. Call the
Authorised Service Agent.
Foam is overflowing from the detergent
drawer.
• Too much detergent is used. >>> Mix 1
tablespoonful softener and ½ l water and
pour into the main wash compartment of
the detergent drawer. >>> Put detergent
into the product suitable for the programmes and maximum loads indicated
in the “Programme and consumption
table”. When you use additional chemicals (stain removers, bleaches and etc.),
reduce the amount of detergent.
Laundry remains wet at the end of the programme. (*)
• Excessive foam has occurred and automatic foam absorption system has been
activated due to too much detergent usage. >>> Use recommended amount of
detergent.
(*) The product does not switch to spinning
step when the laundry is not evenly distributed in the drum to prevent any damage to
the product and to its surrounding environment. Laundry should be rearranged and respun.
(**) Regular drum cleaning is not applied.
Clean the drum regularly. See Cleaning the
Loading Door and the Drum [}76]
If you cannot eliminate the problem
although you follow the instructions
in this section, consult your dealer
or the Authorised Service Agent.
Never try to repair a nonfunctional
product yourself.
Check the HomeWhiz section for
the relevant troubleshooting information.
PL
EN
9 DISCLAIMER
Some (simple) failures can be adequately
handled by the end-user without any safety
issue or unsafe use arising, provided that
they are carried out within the limits and in
accordance with the following instructions
(see the “Self-Repair” section).
Therefore, unless otherwise authorized in
the “Self-Repair” section below, repairs
shall be addressed to registered professional repairers in order to avoid safety issues. A registered professional repairer is a
professional repairer that has been granted
access to the instructions and spare parts
list of this product by the manufacturer according to the methods described in legislative acts pursuant to Directive 2009/125/
EC.
However, only the service agent (i.e. authorized professional repairers) that you
can reach through the phone number given
in the user manual/warranty card or
through your authorized dealer may
provide service under the guarantee terms.
Therefore, please be advised that repairs
by professional repairers (who are not authorized by Whirlpool ) shall void the guarantee.
Self-Repair
Self-repair can be done by the end-user
with regard exclusively to the following
spare parts: door, door hinge and seals,
other seals, door locking assembly and
plastic peripherals such as detergent dispensers (an updated list is also available in
https://parts-selfservice.europeanappliances.com as of 1st of March 2021)
Moreover, to ensure product safety and to
prevent risk of serious injury, the mentioned
self-repair shall be done following the instructions in the user manual for self-repair
or which are available in https://parts-self-
EN / 82
Page 85

service.europeanappliances.com For your
safety, unplug the product before attempting any self-repair.
Repair and repair attempts by end-users for
parts not included in such list and/or not
following the instructions in the user manuals for self-repair or which are available in
https://parts-selfservice.europeanappliances.com , might give raise to safety issues not attributable to https://parts-selfservice.europeanappliances.com , and will
void the warranty of the product.
Therefore, it is highly recommended that
end-users refrain from the attempt to carry
out repairs falling outside the mentioned
list of spare parts, contacting in such cases
authorized professional repairers or registered professional repairers. On the contrary, such attempts by end-users may
cause safety issues and damage the
product and subsequently cause fire, flood,
electrocution and serious personal injury to
occur.
By way of example, but not limited to, the
following repairs must be addressed to authorized professional repairers or registered professional repairers: motor,
pump assembly, main board, motor board,
display board, heaters etc.
The manufacturer/seller cannot be held liable in any case where end-users do not
comply with the above
The spare part availability of the washing
machine or washer-dryer that you purchased is 10 years. During this period, original spare parts will be available to operate the washing machine or washer-dryer
properly.
PL
EN
EN / 83
Page 86
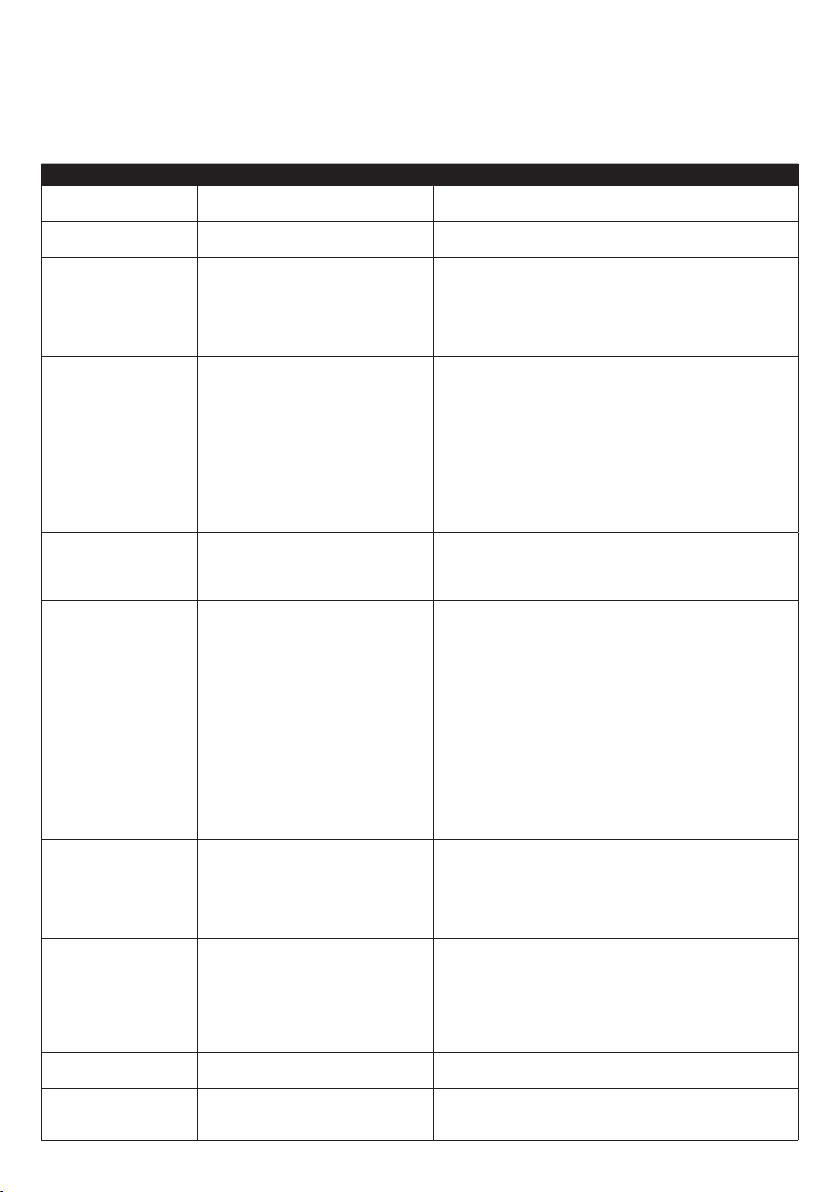
How to access the cycle counter
When the appliance is turned off, pressing 1 and 2 auxiliary function buttons are pressed for a long
time, a 3-2-1 countdown, and the total washing cycles completed on the appliance is displayed.
After the total washing cycle is displayed, the failure codes, if any, are displayed. Check the
information on the screen through the table below.
On-screen Information Cause Solution
Err
SC
E5 Pump filter may be clogged.
E8
E29
E17
E18
E12
E27
E84
Safety algorithm is run on the
appliance.
Your complaint is not solved during
the check.
The machine may not be taking in
water.
The product has switched to self
protection mode due to a supply
problem (line voltage, water
pressure, etc.).
Excess foam is present in the
machine after the completed cycle.
Spin cycle is not initiated due to an
imbalance of the machine.
There may be water inside the
machine.
Check the water drain of the
machine.
BLE connection cannot be
established.
Wait for the writing to pass. After pressing the auxiliary
function buttons 1 and 2, check the on-screen information.
Call the authorised service agent.
Clean the pump filter.
See “Draining remaining water and cleaning the pump
filter”
section.
Try in spin cycle. If the issue is not resolved, call the
service.
• Turn on the taps.
• Make sure there is no water outage.
• Check the water inlet hose connection, if there is any
folding
on the hose, straighten it.
• Clean the pump filter. See “Draining remaining water and
cleaning the pump filter” section.
• Close the front cover of the machine. Make sure that the
cover is locked.
Run the machine one more time. If the issue is not
resolved, call the service.
To cancel the programme, turn the Programme Selection
knob to select another programme. Previous programme
will be cancelled. See“Cancelling the programme” section.
If the issue persists, call the service.
• Store detergent in a closed and dry location. Do not store
in excessively hot places.
• Use smaller amounts of detergent for porous laundry like
tulle.
• Use amount of detergent appropriate to the amount of
laundry and the level of stain.
• Use only sufficient amount of detergent.
• Make sure you place the detergent in the appropriate
compartment.
• Run the Drum Cleaning programme with the machine
empty. See "Drum Cleaning" programme
If your machine does not include Drum Cleaning
programme, you can use Cotton 90C.
• After running a short programme without detergent,
check the machine. If the issue persists, call the service.
Check the laundry inside the machine. The amount of
laundry may not be sufficient. Try by increasing the
amount of laundry. The laundry may be causing an
imbalance; sort out the laundry by hand and distribute
evenly inside the appliance.
Retry in spin cycle.
Unplug the machine.
There may be water under the machine. Clean the water
under the machine.
Plug the machine again.
Try running a short cycle.
If the issue persists or you see water leaking from one of
the hoses, close the valves and call the service.
See “Connecting the drain hose to the drain”section.
Check it, try connecting it. See “HomeWhiz Feature and
Remote Control Function” section. If the issue persists,
call the service.
Page 87

Page 88

1911863055 _AA_PL_EN
 Loading...