

Whirlpool W5WCE128XW0, W5WCE085XW0, W5WCE105XW0 Owner’s Manual
_Jol ®
WINDOWAIR
CONDITIONER
For questions about features, operation/performance, parts
or service, call: 1-800-253-1301.
In Puerto Rico, call 1-787-999-7400.
or visit our website at... www.whirlpool.eom
In Canada, for assistance, installation or service,
call: 1-800-807-6777.
ACONDICIONADOR
DEAIREPARA
VENTANA
Si tiene preguntas respecto a las caracteristicas, funcionamiento,
o visite nuestro sitio de internet en... www.wbirlpool.com
rendimiento, partes o servicio t6cnico,
lame al: 1-800-253-1301.
En Puerto Rico, Ilame al 1-787-999-7400.
CLIMATISEUR
A
DE FENETRE
66161279
_+'_i ÷" "I ' I == "I
I _'I __+IIs*I'II _I'I I_Ql:lls 111,. ,_=.,...............===,,_............_:I d "_1'et{e_i?
Au Canada, pour assistance, installation ou service,
Table of Contents/[ndice/Table des matieres ...... 2
composez le : 1-800-807-6777.
ou visitez notre site web a... www.wbirlpool.eom
TABLEOFCONTENTS
AIR CONDITIONER SAFETY ......................................................... 3
PRODUCT REGISTRATION ........................................................... 3
In the U.S.A.................................................................................. 3
In Canada ..................................................................................... 3
INSTALLATION REQUIREMENTS ................................................ 4
Tools and Parts--All Models ....................................................... 4
Location Requirements--All Models ........................................... 4
Electrical Requirements--All Models ........................................... 5
INSTALLATION INSTRUCTIONS--
5500 BTU, 6300 BTU, 8000 BTU ................................................... 6
Unpack theAir Conditioner .......................................................... 6
Prepare Air Conditioner for Installation........................................ 6
Prepare Window for Installation................................................... 7
Prepare Window with Storm Window or Other Obstruction .......7
Position Air Conditioner ............................................................... 7
Complete Installation ................................................................... 9
INSTALLATION INSTRUCTIONS--10K BTU, 12K BTU .............. 9
Unpack the Air Conditioner .......................................................... 9
Prepare Air Conditioner for Installation ...................................... 10
INDICE
SEGURIDAD DEL ACONDICIONADOR DE AIRE ...................... 21
REGISTRO DEL PRODUCTO ...................................................... 21
En EE.UU .................................................................................... 21
REQUlSITOS DE INSTALACION ................................................. 22
Herramientas y piezas--Todos los modelos ............................. 22
Requisitos de ubicaci6n--Todos los modelos .......................... 22
Requisitos electricos--Todos los modelos ............................... 23
INSTRUCCIONES DE INSTALACION -- MODELOS DE
5500 BTU, 6300 BTU Y 8000 BTU ............................................... 24
Desempaque el acondicionador de aire .................................... 24
Prepare el acondicionador de aire para la instalacion .............. 24
Prepare la ventana para la instalacion ....................................... 25
Prepare la ventana con contraventane u otra obstruccion .......25
Coloque el acondicionador de aire en su lugar ......................... 26
Complete la instalacion .............................................................. 27
INSTRUCCIONES DE INSTALACION--MODELOS
DE 10.000 BTU Y 12.000 BTU ...................................................... 28
Desempaque el acondicionador de aire .................................... 28
Prepare Window for Installation ................................................. 10
Position Air Conditioner ............................................................. 10
Complete Installation .................................................................. 12
AIR CONDITIONER USE .............................................................. 13
Starting Your Air Conditioner ..................................................... 13
Using the Remote Control .......................................................... 15
Changing Air Direction ............................................................... 16
AIR CONDITIONER CARE ........................................................... 16
Cleaning the Air Filter ................................................................. 16
Cleaning the Front Panel ............................................................ 17
Repairing Paint Damage ............................................................ 17
Annual Maintenance ................................................................... 17
TROUBLESHOOTING .................................................................. 17
Normal Sounds ........................................................................... 18
ASSISTANCE OR SERVICE ......................................................... 18
In the U.S.A ................................................................................ 18
In Canada ................................................................................... 19
WAR RANTY .................................................................................. 19
Prepare el acondicionador de aire para lainstalacion ..............28
Prepare la ventana para la instalacion ....................................... 28
Coloque el acondicionador de aire en su lugar ......................... 29
Complete la instalacion .............................................................. 30
COMO USAR EL ACONDICIONADOR DE AIRE ........................ 31
Como poner en marcha su acondicionador de aire .................. 31
Como usar el control remoto ..................................................... 34
Como cambiar la direccion del aire ........................................... 35
CUlDADO DE SU ACONDICIONADOR DE AIRE ....................... 35
Limpieza del filtro de aire ........................................................... 35
Limpieza del panel frontal .......................................................... 36
Reparacion de la pintura da_ada ............................................... 36
Mantenimiento anual .................................................................. 36
SOLUCION DE PROBLEMAS ...................................................... 36
Sonidos normales ....................................................................... 37
AYUDA O SERVICIO TI_CNICO ................................................... 38
En los EE.UU.............................................................................. 38
GARANTiA ..................................................................................... 38
TABLEDESMATIERES
SleCURITle DU CLIMATISEUR .................................................... 40
ENREGISTREMENT DU PRODUlT ............................................. 40
Aux €:tats-Unis ........................................................................... 40
Au Canada .................................................................................. 40
EXIGENCES D'INSTALLATION ................................................... 41
Outils et pieces--tous les modeles ........................................... 41
Exigences d'emplacement--tous lesmodeles ......................... 41
Specifications electriques--Tous modeles ............................... 42
INSTRUCTIONS D'INSTALLATION --
5500 BTU, 6300 BTU, 8000 BTU ................................................. 43
Deballage du climatiseur ............................................................ 43
Preparation du climatiseur pour I'installation............................ 43
Preparation de la fen_tre pour I'installation ............................... 44
Preparation des fen_tres avec fen_tre anti-orage ou
autres obstacles ......................................................................... 44
Positionnement du climatiseur ................................................... 45
Achever I'installation .................................................................. 46
INSTRUCTIONS D'INSTALLATION-10000 BTU, 12000 BTU .......47
Deballage du climatiseur ............................................................ 47
2
Preparation le climatiseur pour I'installation .............................. 47
Preparation de la fen_tre pour I'installation ............................... 47
Positionnement du climatiseur ................................................... 48
Achever I'installation .................................................................. 49
UTILISATION DU CLIMATISEUR ................................................ 50
Mise en marche du climatiseur .................................................. 50
Utilisation de la tel6commande .................................................. 53
Changement de direction de I'air ............................................... 54
ENTRETIEN DU CLIMATISEUR .................................................. 54
Nettoyage du filtre h air .............................................................. 54
Nettoyage du panneau avant ..................................................... 55
Remise en etat de la peinture .................................................... 55
Entretien annuel .......................................................................... 55
DI_PANNAGE ................................................................................. 55
Sons normaux ............................................................................ 56
ASSISTANCE OU SERVICE ......................................................... 57
Aux #tats-Unis ............................................................................ 57
Au Canada .................................................................................. 57
GARANTIE ..................................................................................... 58

AIRCONDITIONERSAFETY
Your safety and the safety of others are very important.
We have provided many important safety messages in this manual and on your appliance. Always read and obey all safety
messages.
This is the safety alert symbol.
This symbol alerts you to potential hazards that can kill or hurt you and others.
All safety messages will follow the safety alert symbol and either the word "DANGER" or "WARNING."
These words mean:
You can be killed or seriously injured if you don't immediately
follow instructions.
You can be killed or seriously injured if you don't follow
instructions.
All safety messages will tell you what the potential hazard is, tell you how to reduce the chance of injury, and tell you what can
happen if the instructions are not followed.
IMPORTANT SAFETY INSTRUCTIONS
WARNING: To reduce the risk of fire, electrical shock or injury when using your air conditioner, follow these basic precautions:
[] Plug into a grounded 3 prong outlet.
[] Do not remove ground prong.
[] Do not use an adapter.
SAVE THESE iNSTRUCTiONS
[] Do not use an extension cord.
[] Unplug air conditioner before servicing.
[] Use two or more people to move and install air conditioner.
PRODUCTREGISTRATION
Thank you for purchasing a Whirlpool window air conditioner. In
order to better serve you, please take a moment to register your
product.
When calling or registering online, please know the purchase
date and the complete model and serial number of your air
conditioner. See "Assistance or Service." Failure to register your
product will not diminish your warranty rights.
Always keep a copy of the sales receipt showing the date of
purchase of your Whirlpool window air conditioner. Proof of
purchase will assure you of warranty coverage.
You MUST Register Your Product For:
• Recall Notifications--Proper registration will enable us to
contact you in the unlikely event of a product safety
notification and, in the U.S.A., assist us in complying with the
provisions of the Consumer Product Safety Act.
• Proof of Ownership--In the case of an insurance loss, such
as fire, flood or theft, your registration will serve as your proof
of purchase.
• Quality Assurance--Call within 10 days; the sooner we have
your information, the better we are able to help you.
Don't Forget--We know you are busy, but registering is
important, quick and easy!
Call the Whirlpool Customer eXperience Center
toll free: 1-800-253-1301, or register online at
https://www.registration.whirlpoolcorp.com/register/. In
Puerto Rico, call 1-787-999-7400.
Call the Whirlpool Canada LP Customer eXperience Centre toll
free: 1-800-807-6777, or go online at
https://www.whirlpoolappliances.ca/en/Registration/
Default.html.
INSTALLATIONREQUIREMENTS
Gather the required tools and parts before starting installation.
Read and follow the instructions provided with any tools listed
here.
Tools Needed
• Phillips screwdriver • Tape measure
• Scissors • Cordless drill and 1/8"bit
• Level • Pencil
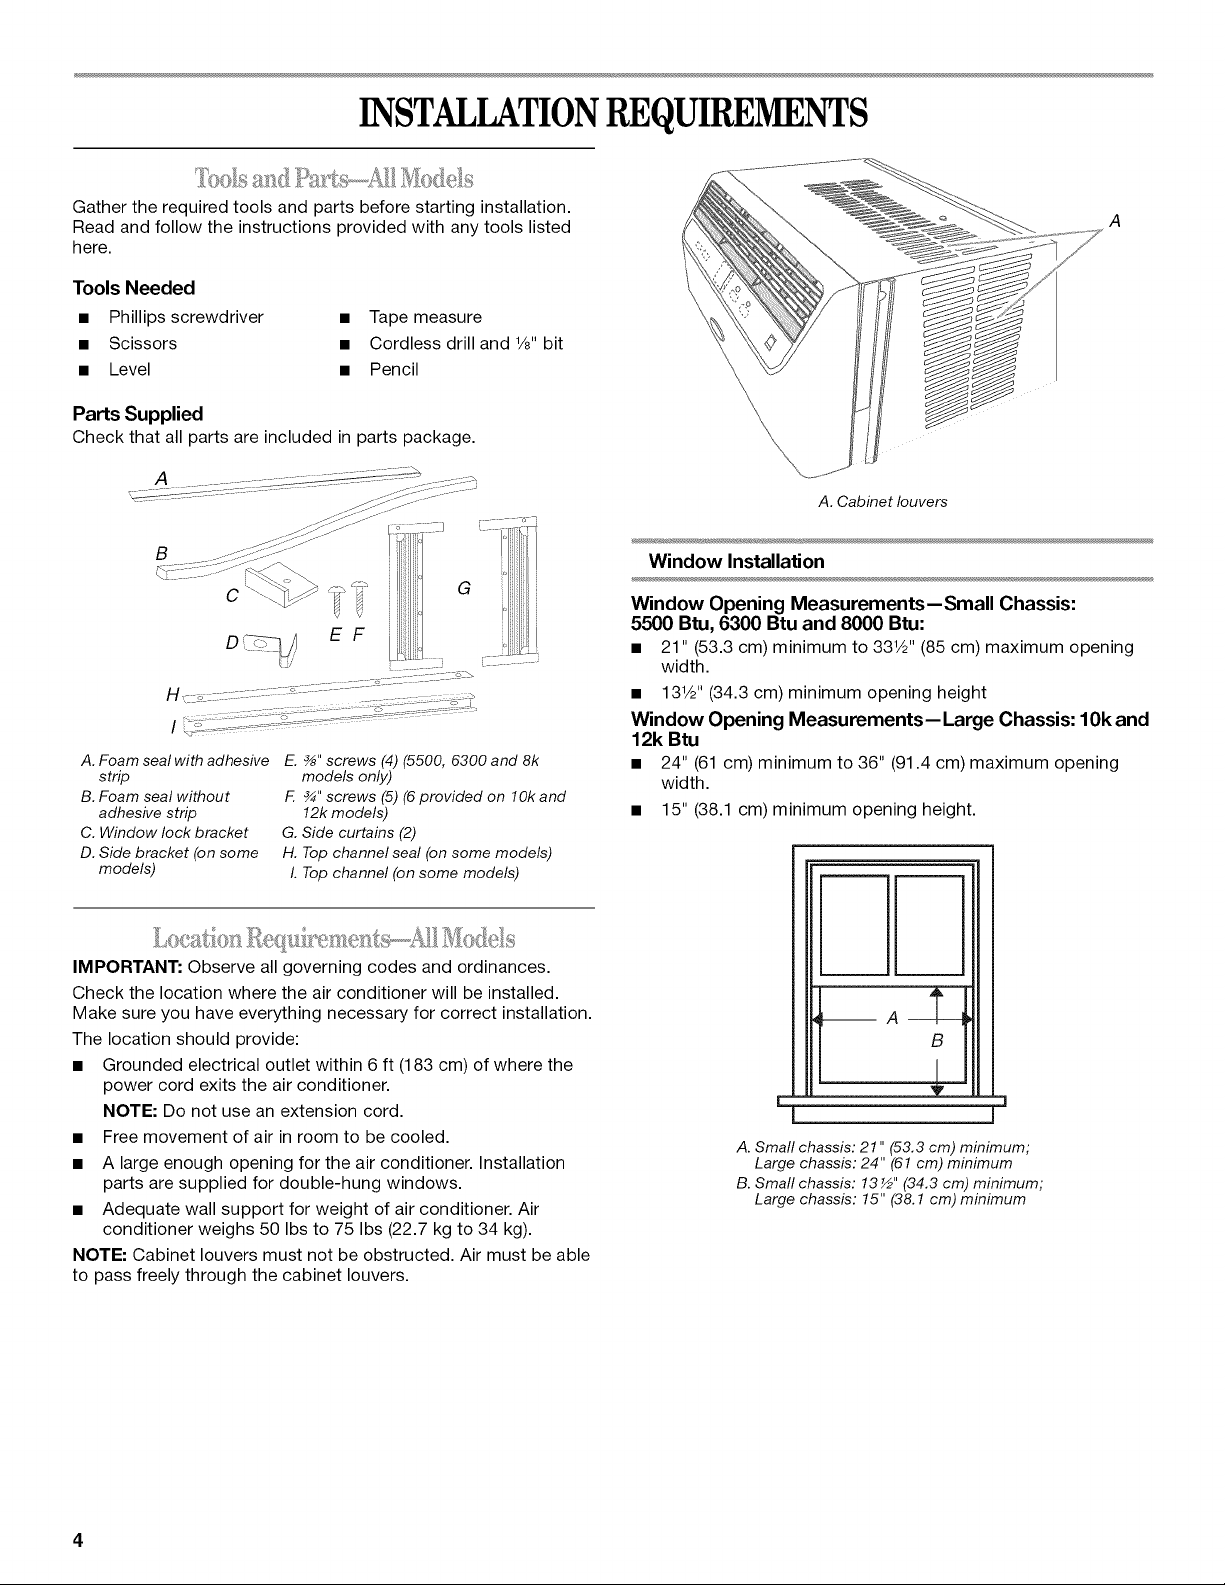
Parts Supplied
Check that all parts are included in parts package.
B
A.Foam sealwith adhesive
strip
B.Foam seal without
adhesive strip
C. Windowlock bracket
D.Side bracket (onsome
models)
E. %" screws (4) (5500, 6300 and 8k
models only)
F. ¾" screws (5) (6 provided on 1Ok and
12k models)
G. Side curtains (2)
H. Top channel seal (on some models)
I. Top channel (on some models)
A
A. Cabinet louvers
Window Installation
Window Opening Measurements--Small Chassis:
5500 Btu, 6300 Btu and 8000 Btu:
• 21" (53.3 cm) minimum to 331/2'' (85 cm) maximum opening
width.
• 131/2"(34.3 cm) minimum opening height
Window Opening Measurements-- Large Chassis: 1Ok and
12k Btu
• 24" (61 cm) minimum to 36" (91.4 cm) maximum opening
width.
• 15" (38.1 cm) minimum opening height.
:_,IR()II{ II
IMPORTANT: Observe all governing codes and ordinances.
Check the location where the air conditioner will be installed.
Make sure you have everything necessary for correct installation.
The location should provide:
• Grounded electrical outlet within 6 ft (183 cm) of where the
power cord exits the air conditioner.
NOTE: Do not use an extension cord.
• Free movement of air in room to be cooled.
• A large enough opening for the air conditioner. Installation
parts are supplied for double-hung windows.
• Adequate wall support for weight of air conditioner. Air
conditioner weighs 50 Ibs to 75 Ibs (22.7 kg to 34 kg).
NOTE: Cabinet louvers must not be obstructed. Air must be able
to pass freely through the cabinet louvers.
B
I I
L
l I
A. Small chassis: 21" (53.3 cm) minimum;
Large chassis: 24" (61 cm) minimum
B. Small chassis: 13½" (34.3 cm) minimum;
Large chassis: 15" (38.1 cm)minimum
v
Electrical Shock Hazard
Plug into a grounded 3 prong outlet.
Do not remove ground prong.
Do not use an adapter.
Do not use an extension cord.
Failure to follow these instructions can result in death,
fire, or electrical shock.
The electrical ratings for your air conditioner are listed on the
model and serial number label. The model and serial number
label is located on the right-hand side of the air conditioner
cabinet.
Specific electrical requirements are listed in the "Power Supply
Cord Electrical Requirements" chart. Follow the requirements for
the type of plug shown in the chart.
It is the customer's responsibility:
• To contact a qualified electrical installer.
• To assure that the electrical installation is adequate and in
conformance with National Electrical Code, ANSl/NFPA
70-latest edition, and all local codes and ordinances.
Copies of the standards listed may be obtained from:
National Fire Protection Association
1 Batterymarch Park
Quincy, MA 02169
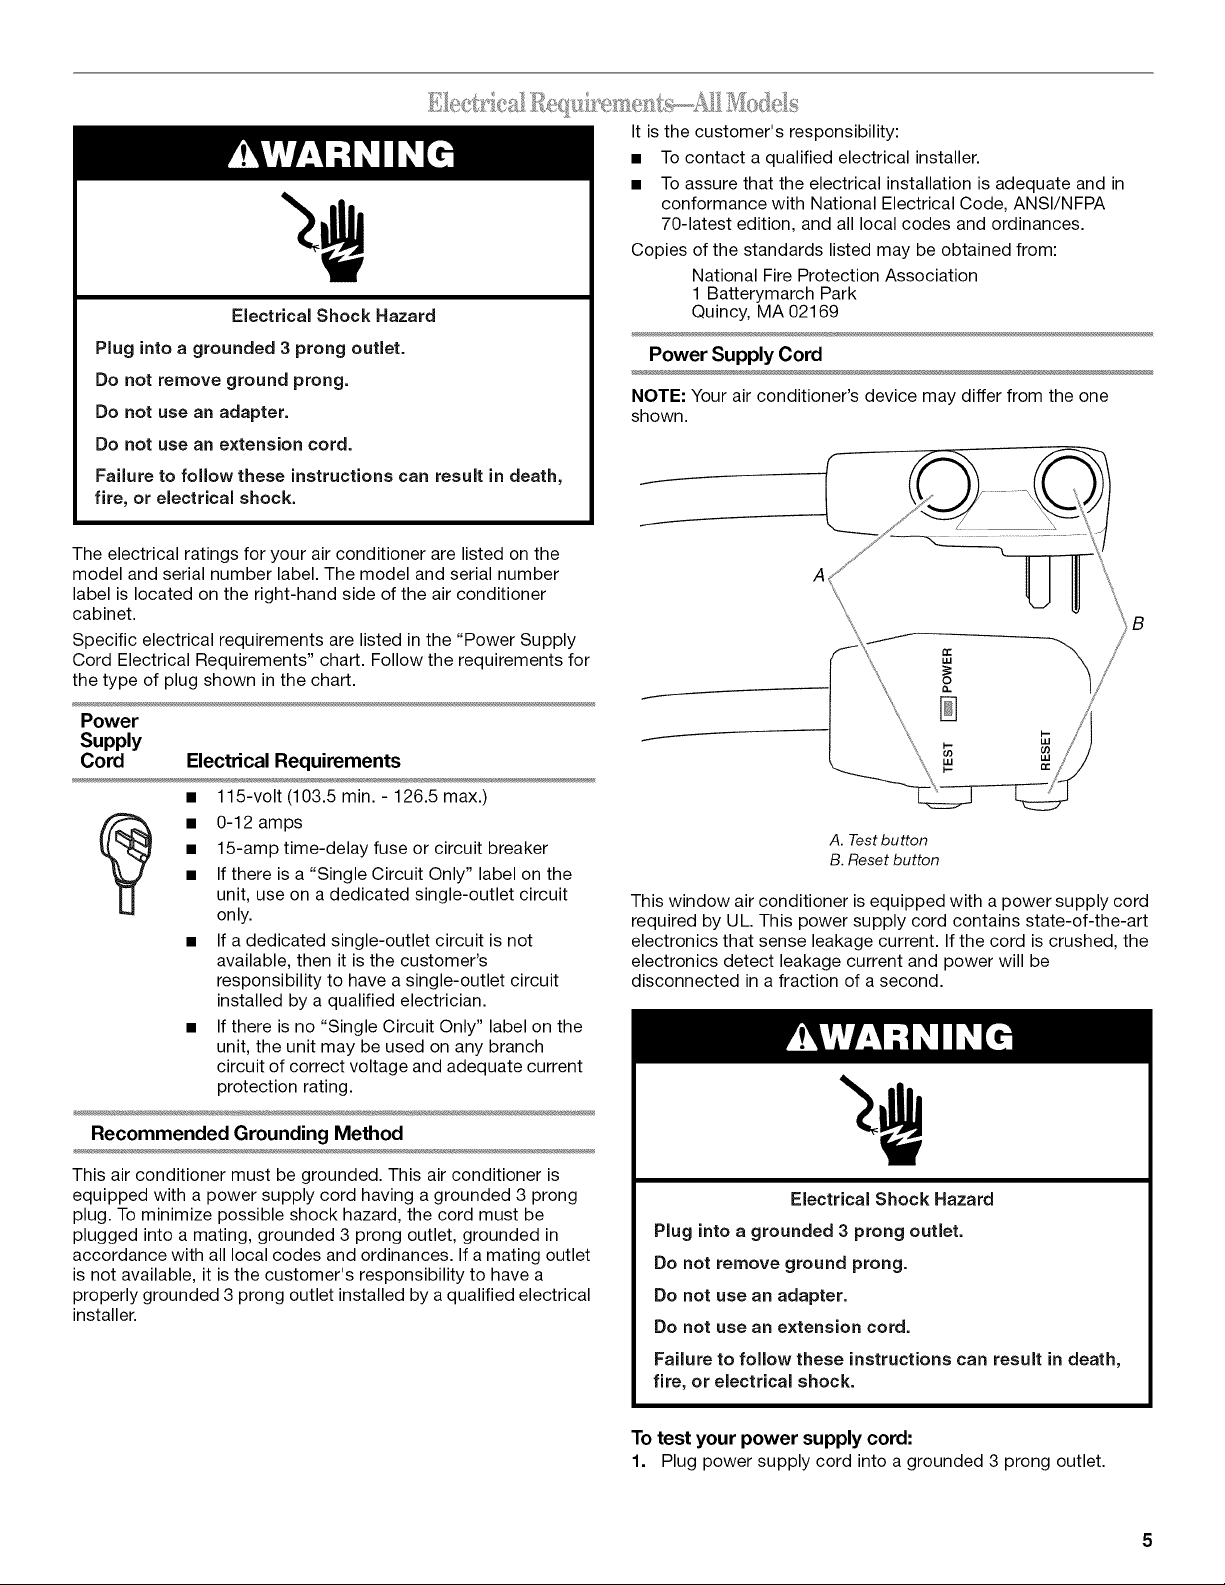
Power Supply Cord
NOTE: Your air conditioner's device may differ from the one
shown.
Power
Supply
Cord
Electrical Requirements
• 0-12 amps
• 15-amp time-delay fuse or circuit breaker
• If there is a "Single Circuit Only" label on the
unit, use on a dedicated single-outlet circuit
only.
• If a dedicated single-outlet circuit is not
available, then it is the customer's
responsibility to have a single-outlet circuit
installed by a qualified electrician.
• If there is no "Single Circuit Only" label on the
unit, the unit may be used on any branch
circuit of correct voltage and adequate current
protection rating.
Recommended Grounding Method
This air conditioner must be grounded. This air conditioner is
equipped with a power supply cord having a grounded 3 prong
plug. To minimize possible shock hazard, the cord must be
plugged into a mating, grounded 3 prong outlet, grounded in
accordance with all local codes and ordinances. If a mating outlet
is not available, it is the customer's responsibility to have a
properly grounded 3 prong outlet installed by a qualified electrical
installer.
A. Test button
B. Reset button
This window air conditioner is equipped with a power supply cord
required by UL. This power supply cord contains state-of-the-art
electronics that sense leakage current. If the cord is crushed, the
electronics detect leakage current and power will be
disconnected in a fraction of a second.
Electrical Shock Hazard
Plug into a grounded 3 prong outlet.
Do not remove ground prong.
Do not use an adapter.
Do not use an extension cord.
Failure to follow these instructions can result in death,
fire, or electrical shock.
To test your power supply cord:
1. Plug power supply cord into a grounded 3 prong outlet.
2. Press RESET (on some devices, a green light will turn on).
3. Press TEST (listen for click; Reset button will trip, and on
some devices, a green light will turn off).
4. Press and release RESET (listen for click; Reset button will
latch, and on some devices, a green light will turn on). The
power supply cord is ready for operation.
NOTES:
• The Reset button must be pushed in for proper operation.
INSTALLATIONINSTRUCTIONSI5500BTU,6300BTU,8000BTU
sa tse A: r
Excessive Weight Hazard
Use two or more people to move and install
air conditioner.
Failure to do so can result in back or other injury.
Remove Packaging Materials
• Handle the air conditioner gently while unpacking the unit.
• Cut the 4 plastic bands that secure the carton.
• Remove the carton top and lift the air conditioner from the
base pad.
• Remove tape and glue residue from surfaces before turning
on the air conditioner. Rub asmall amount of liquid dish soap
over the adhesive with your fingers. Wipe with warm water
and dry.
• Do not use sharp instruments, rubbing alcohol, flammable
fluids, or abrasive cleaners to remove tape or glue. These
products can damage the surface of your air conditioner.
• Remove any packaging materials inserted into the side
louvers.
• Dispose of/recycle packaging materials.
• The power supply cord must be replaced if it fails to trip when
the test button is pressed or fails to reset.
• Do not use the power supply cord as an off/on switch. The
power supply cord is designed as a protective device.
• A damaged power supply cord must be replaced with a new
power supply cord obtained from the product manufacturer
and must not be repaired.
• The power supply cord contains no user serviceable parts.
Opening the tamper-resistant case voids all warranty and
performance claims.
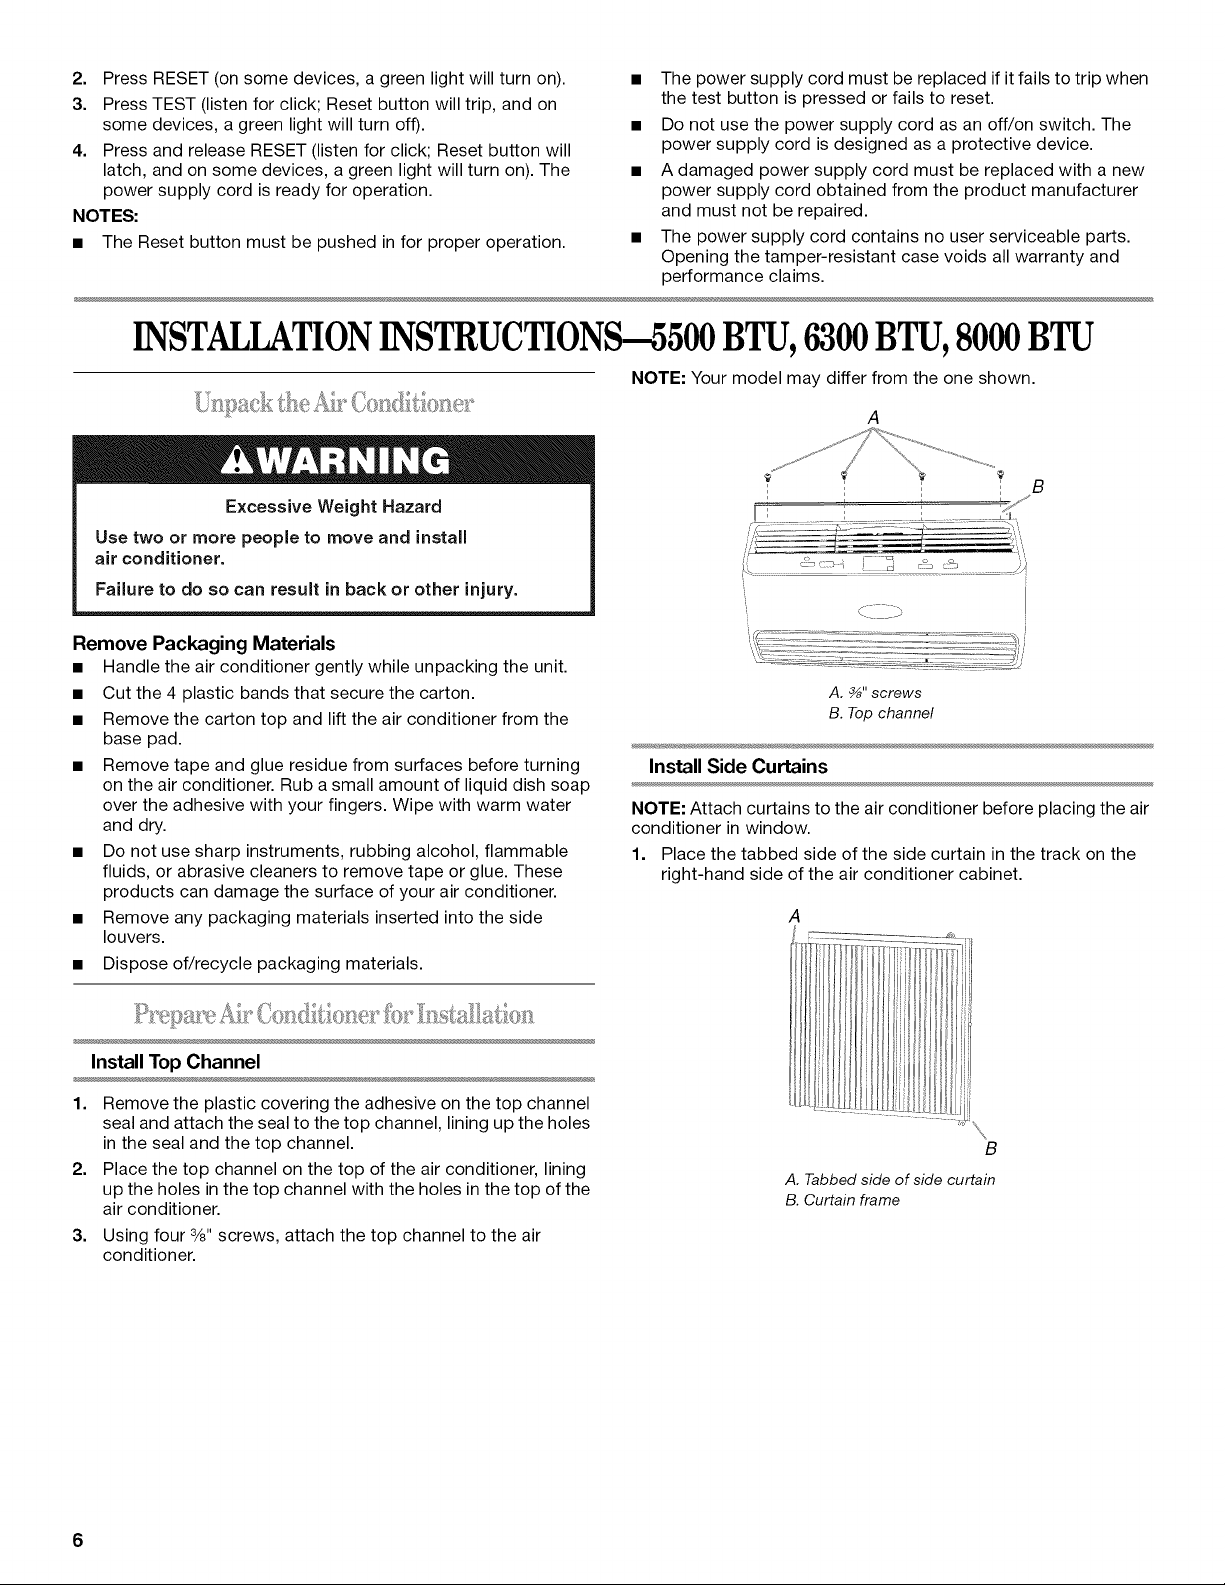
NOTE: Your model may differ from the one shown.
A
' < b
A, _" screws
B. Top channel
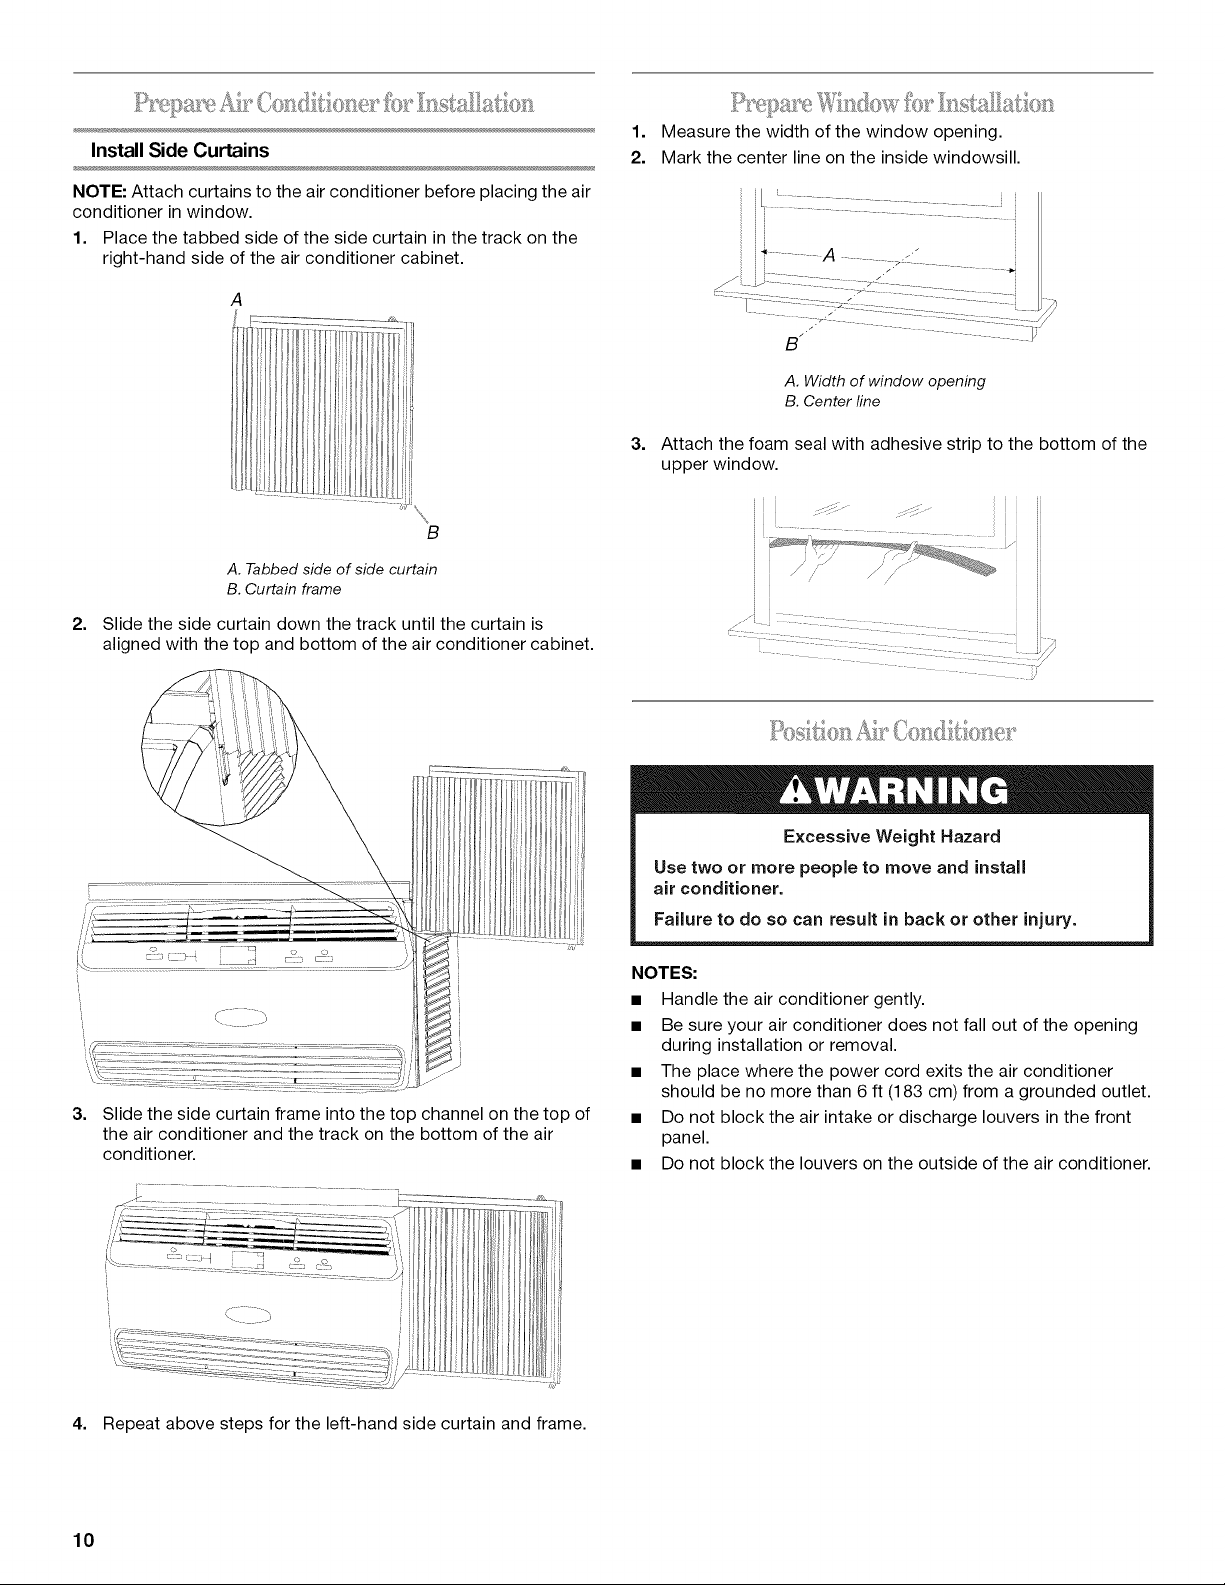
Install Side Curtains
NOTE: Attach curtains to the air conditioner before placing the air
conditioner in window.
1. Place the tabbed side of the side curtain in the track on the
right-hand side of the air conditioner cabinet.
Install Top Channel
1. Remove the plastic covering the adhesive on the top channel
seal and attach the seal to the top channel, lining up the holes
in the seal and the top channel.
2. Place the top channel on the top of the air conditioner, lining
up the holes in the top channel with the holes in the top of the
air conditioner.
3. Using four 3/8"screws, attach the top channel to the air
conditioner.
6
B
A. Tabbed side of side curtain
B. Curtain frame
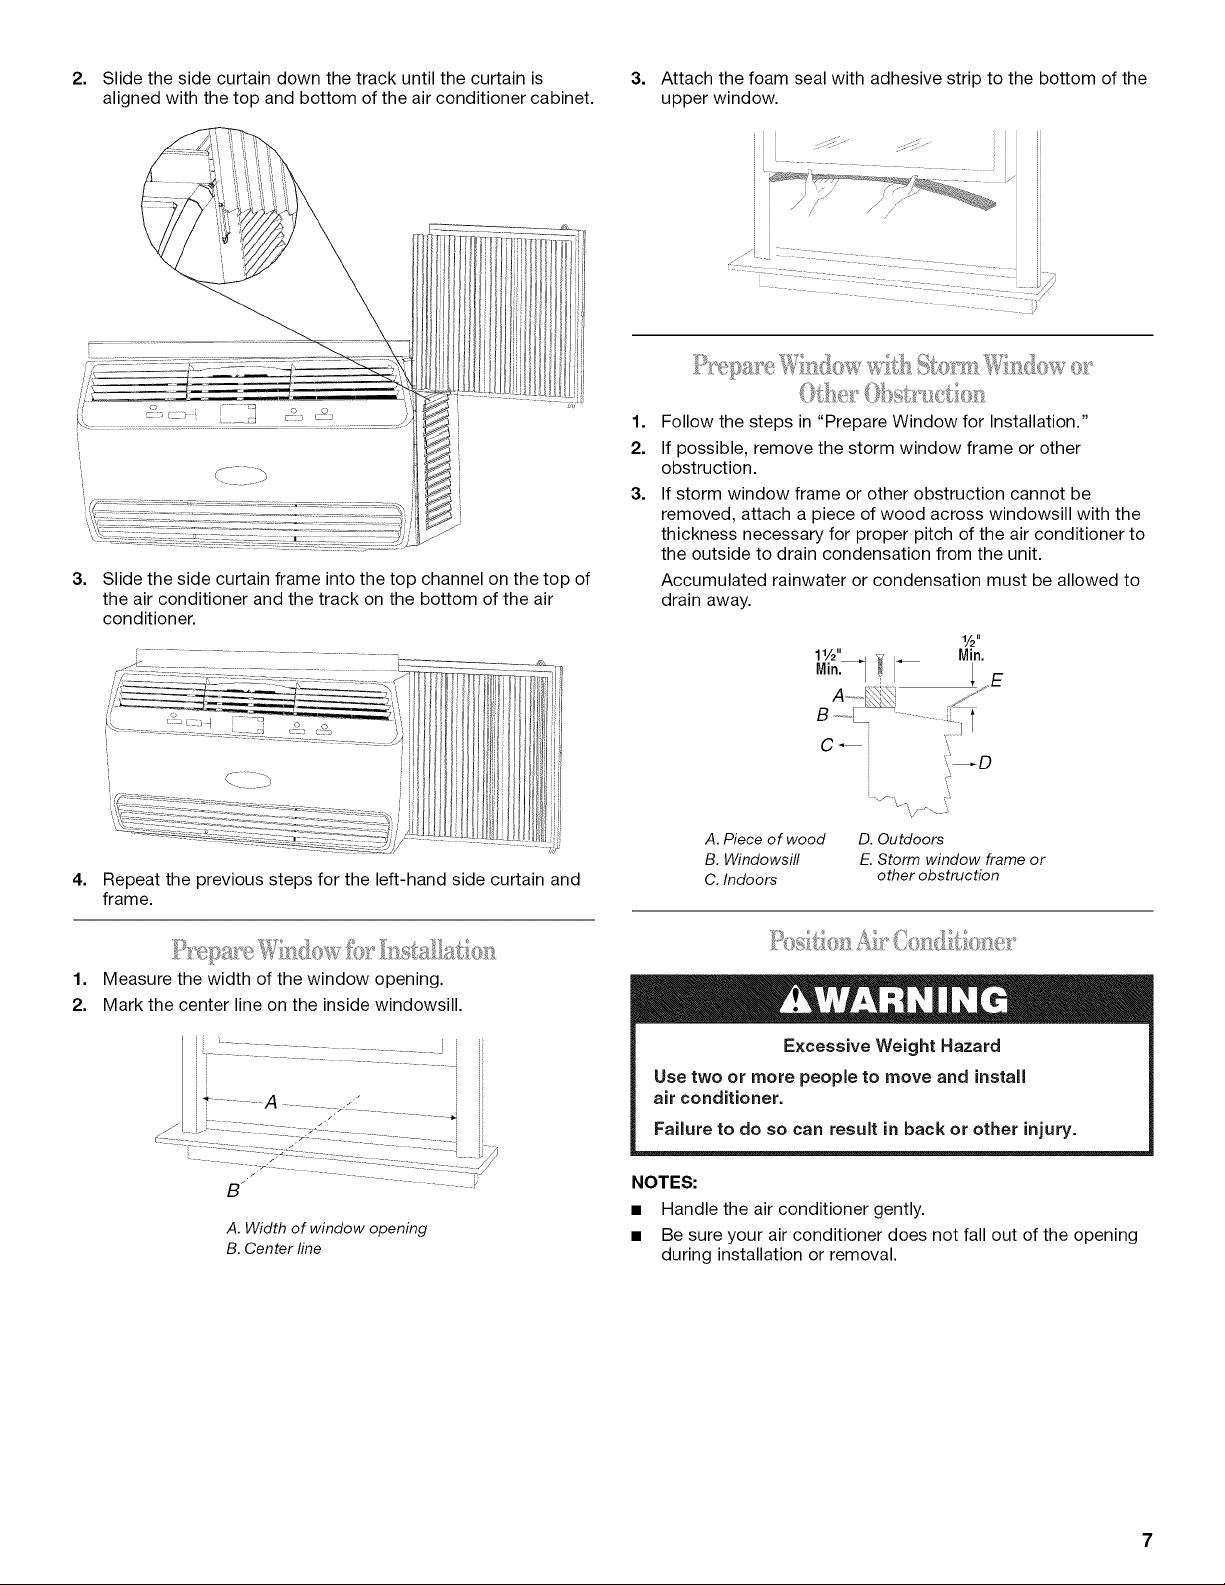
2.
Slide the side curtain down the track until the curtain is
aligned with the top and bottom of the air conditioner cabinet.
!l l i Ii
3.
Slide the side curtain frame into the top channel on the top of
the air conditioner and the track on the bottom of the air
conditioner.
ril r !l_-l'
Ill'illiI
! H
!!,jli!/Ji
sv
3.
Attach the foam seal with adhesive strip to the bottom of the
upper window.
.... <: i ii
ii ii
.............. ii ii
1.
Follow the steps in "Prepare Window for Installation."
2.
If possible, remove the storm window frame or other
obstruction.
3.
If storm window frame or other obstruction cannot be
removed, attach a piece ofwood across windowsill with the
thickness necessary for proper pitch of the air conditioner to
the outside to drain condensation from the unit.
Accumulated rainwater or condensation must be allowed to
drain away.
1,/2"
Min.
4.
Repeat the previous steps for the left-hand side curtain and
frame.
1. Measure the width of the window opening.
2. Mark the center line on the inside windowsill.
S _
A.Width of window opening
B.Center line
C _ i ",
A. Piece of wood
B. Windowsill
C. Indoors
D. Outdoors
E. Storm window frame or
other obstruction
Excessive Weight Hazard
Use two or more people to move and install
air conditioner.
Failure to do so can result in back or other injury.
NOTES:
• Handle the air conditioner gently.
• Be sure your air conditioner does not fall out of the opening
during installation or removal.
• Theplacewherethepowercordexitstheairconditioner
shouldbenomorethan6ft(183cm)fromagroundedoutlet.
• Donotblocktheairintakeordischargelouversinthefront
panel.
• Donotblockthelouversontheoutsideoftheairconditioner.
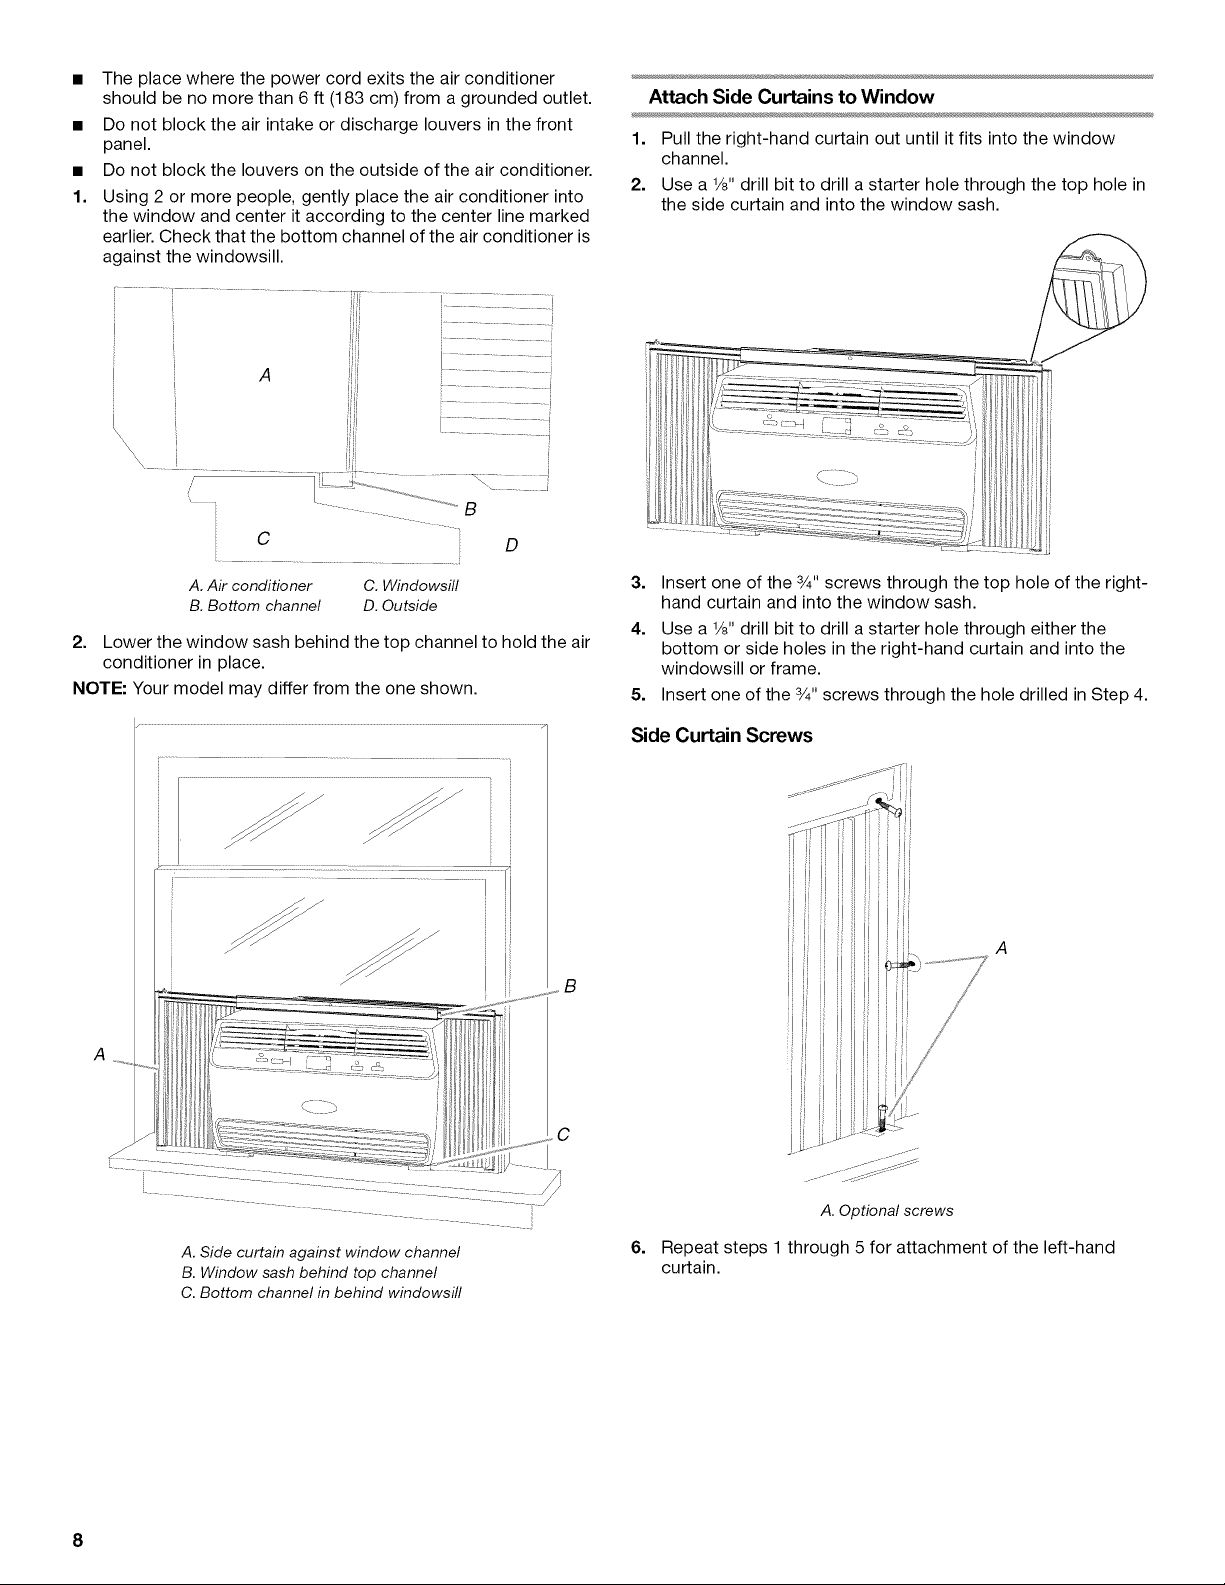
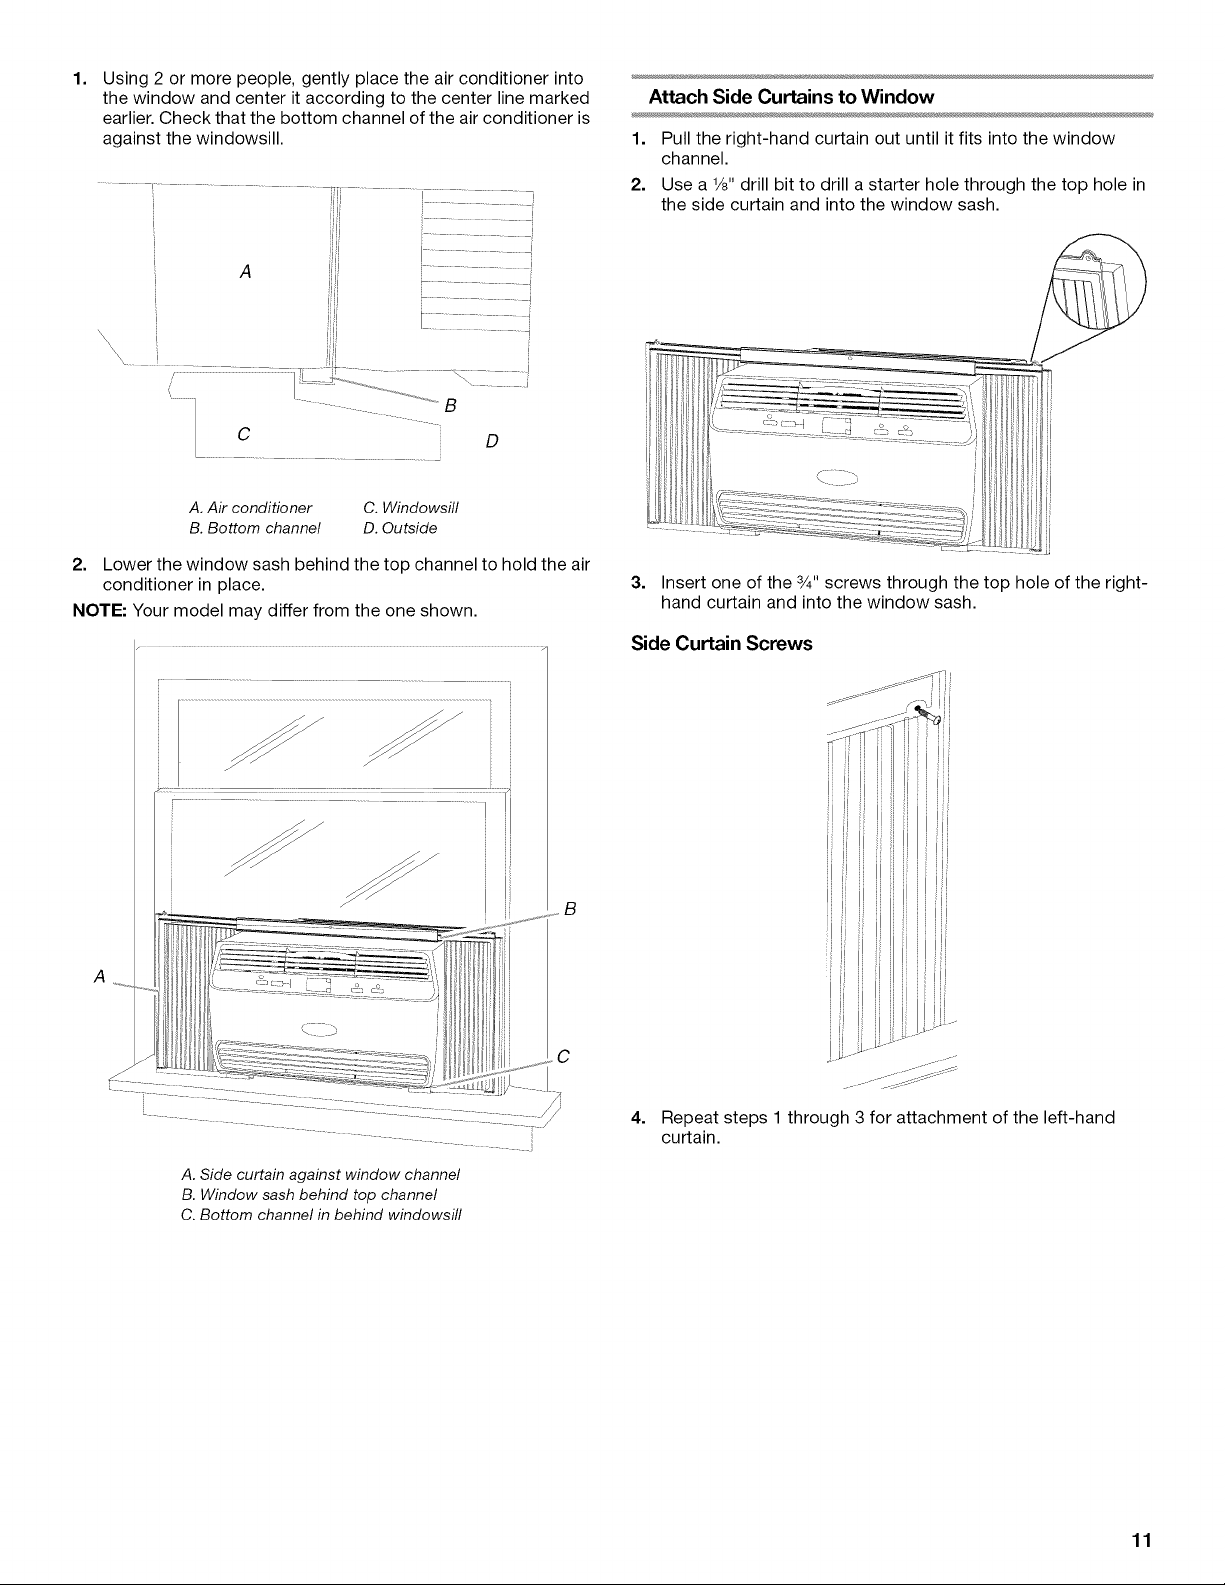
1. Using2ormorepeople,gentlyplacetheairconditionerinto
thewindowandcenteritaccordingtothecenterlinemarked
earlier.Checkthatthebottomchanneloftheairconditioneris
againstthewindowsill.
C
............................................ i
A.Air conditioner C. Windowsill
B.Bottom channel D.Outside
2. Lower the window sash behind the top channel to hold the air
conditioner in place.
NOTE: Your model may differ from the one shown.
Attach Side Curtains to Window
1. Pull the right-hand curtain out until it fits into the window
channel.
2. Use a 1/8"drill bit to drill a starter hole through the top hole in
the side curtain and into the window sash.
3. Insert one of the 3/4"screws through the top hole of the right-
hand curtain and into the window sash.
4. Use a 1/8"drill bit to drill a starter hole through either the
bottom or side holes in the right-hand curtain and into the
windowsill or frame.
5. Insert one of the 3/4"screws through the hole drilled in Step 4.
Side Curtain Screws
....... ........ ........ Z[[ ............
_B
A
C
6.
A. Side curtain against window channel
B. Window sash behind top channel
C. Bottom channel in behind windowsill
Repeat steps 1 through 5 for attachment of the left-hand
curtain.
)i
i
I
A. Optional screws
8
1=
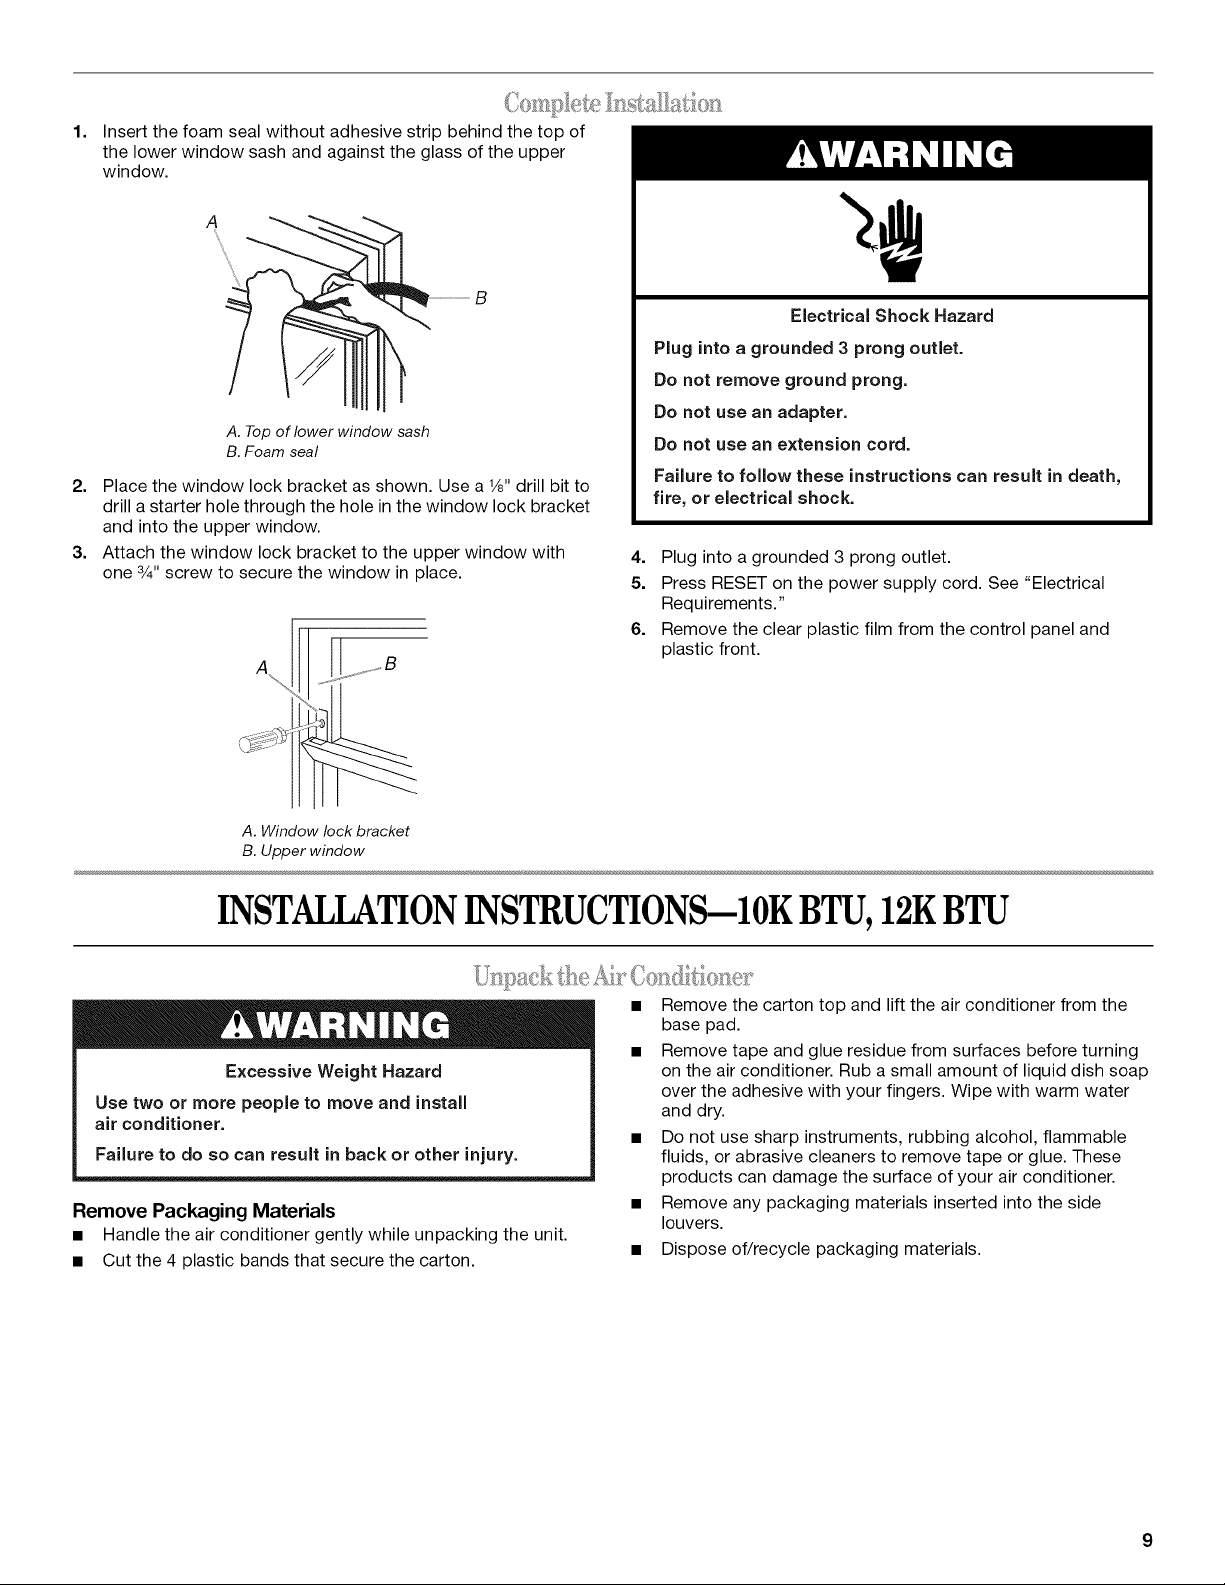
Insert the foam seal without adhesive strip behind the top of
the lower window sash and against the glass of the upper
window.
A. Top of lower window sash
B. Foam seal
2. Place the window lock bracket as shown. Use a 1/8"drill bit to
drill a starter hole through the hole in the window lock bracket
and into the upper window.
3. Attach the window lock bracket to the upper window with
one 3/4"screw to secure the window in place.
A
Electrical Shock Hazard
Plug into a grounded 3 prong outlet.
Do not remove ground prong.
Do not use an adapter.
Do not use an extension cord.
Failure to follow these instructions can result in death,
fire, or electrical shock.
4. Plug into a grounded 3 prong outlet.
5. Press RESET on the power supply cord. See "Electrical
Requirements."
6. Remove the clear plastic film from the control panel and
plastic front.
A. Window lock bracket
B. Upper window
INSTALLATIONINSTRUCTIONS--10KBTU,12KBTU
Excessive Weight Hazard
Use two or more people to move and install
air conditioner.
Failure to do so can result in back or other injury.
Remove Packaging Materials
• Handle the air conditioner gently while unpacking the unit.
• Cut the 4 plastic bands that secure the carton.
• Remove the carton top and lift the air conditioner from the
base pad.
• Remove tape and glue residue from surfaces before turning
on the air conditioner. Rub asmall amount of liquid dish soap
over the adhesive with your fingers. Wipe with warm water
and dry.
• Do not use sharp instruments, rubbing alcohol, flammable
fluids, or abrasive cleaners to remove tape or glue. These
products can damage the surface of your air conditioner.
• Remove any packaging materials inserted into the side
louvers.
• Dispose of/recycle packaging materials.
Install Side Curtains
NOTE: Attach curtains to the air conditioner before placing the air
conditioner in window.
1. Place the tabbed side of the side curtain in the track on the
right-hand side of the air conditioner cabinet.
A
B
A.Tabbed side of side curtain
B.Curtain frame
2.
Slide the side curtain down the track until the curtain is
aligned with the top and bottom of the air conditioner cabinet.
1. Measure the width of the window opening.
2. Mark the center line on the inside windowsill.
B
A. Width of window opening
B. Center line
3.
Attach the foam seal with adhesive strip to the bottom of the
upper window.
iHiiiiI i/
3.
Slide the side curtain frame into the top channel on the top of
the air conditioner and the track on the bottom of the air
conditioner.
(............................................
@1
_1_i (J
III J
11,)_1_!11_
Excessive Weight Hazard
Use two or more people to move and install
air conditioner.
Failure to do so can result in back or other injury.
NOTES:
• Handle the air conditioner gently.
• Be sure your air conditioner does not fall out of the opening
during installation or removal.
• The place where the power cord exits the air conditioner
should be no more than 6 ft (183 cm) from a grounded outlet.
• Do not block the air intake or discharge louvers in the front
panel.
• Do not block the louvers on the outside of the air conditioner.
4. Repeat above steps for the left-hand side curtain and frame.
10
1,
Using 2 or more people, gently place the air conditioner into
the window and center it according to the center line marked
earlier. Check that the bottom channel of the air conditioner is
against the windowsill.
i
i
i
A
: : : J ..................... J
C D
A. Air conditioner C. Windowsill
B. Bottom channel D. Outside
Attach Side Curtains to Window
1. Pull the right-hand curtain out until it fits into the window
channel.
2. Use a 1/8"drill bit to drill a starter hole through the top hole in
the side curtain and into the window sash.
2. Lower the window sash behind the top channel to hold the air
conditioner in place.
NOTE: Your model may differ from the one shown.
_B
A
C
3. Insert one of the 3/4"screws through the top hole of the right-
hand curtain and into the window sash.
Side Curtain Screws
4,
Repeat steps 1 through 3 for attachment of the left-hand
curtain.
A. Side curtain against window channel
B. Window sash behind top channel
C. Bottom channel in behind windowsill
11
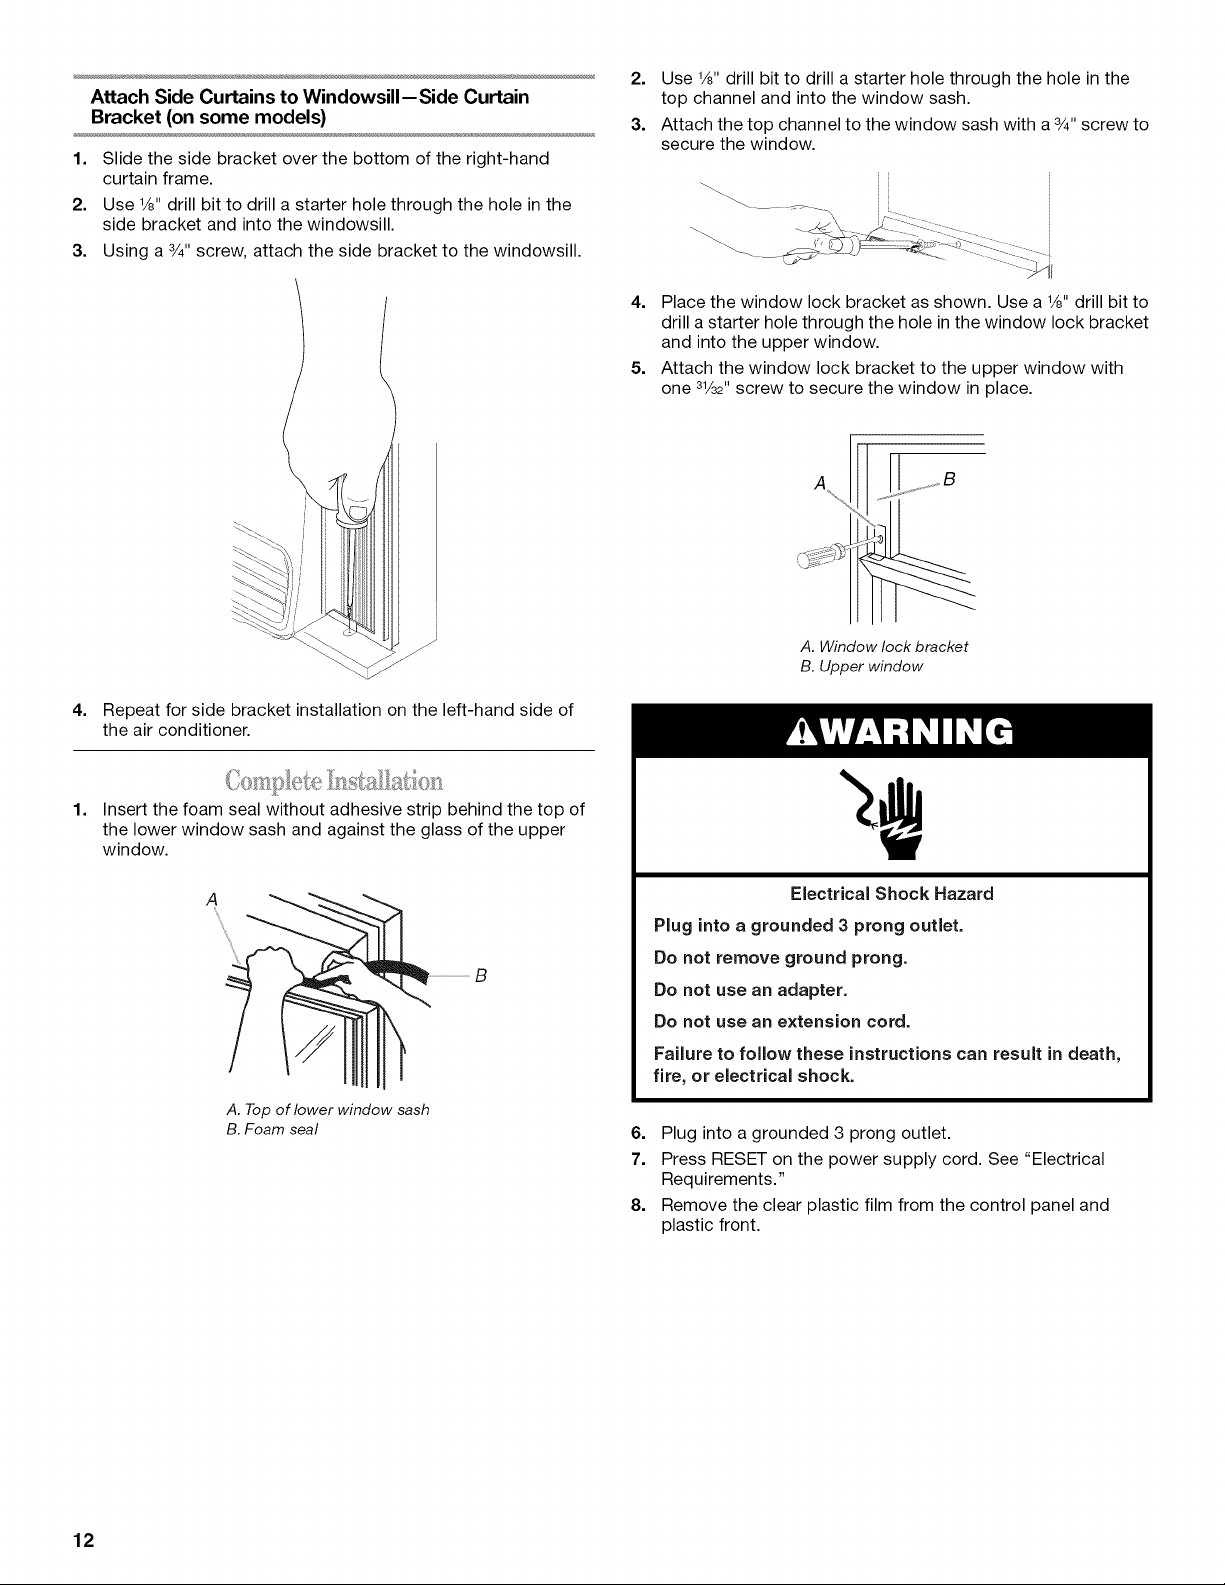
Attach Side Curtains to Windowsill--Side Curtain
Bracket (on some models)
1. Slide the side bracket over the bottom of the right-hand
curtain frame.
2. Use 1/8"drill bit to drill a starter hole through the hole in the
side bracket and into the windowsill.
3. Using a 3/4"screw, attach the side bracket to the windowsill.
2. Use %" drill bit to drill a starter hole through the hole in the
top channel and into the window sash.
3. Attach the top channel to the window sash with a 3/4"screw to
secure the window.
4. Place the window lock bracket as shown. Use a 1/8"drill bit to
drill a starter hole through the hole in the window lock bracket
and into the upper window.
5. Attach the window lock bracket to the upper window with
one 3V32"screw to secure the window in place.
A
A. Window lock bracket
B. Upper window
4.
Repeat for side bracket installation on the left-hand side of
the air conditioner.
1.
Insert the foam seal without adhesive strip behind the top of
the lower window sash and against the glass of the upper
window.
A. Top of lower window sash
B. Foam seal
Electrical Shock Hazard
Plug into a grounded 3 prong outlet.
Do not remove ground prong.
Do not use an adapter.
Do not use an extension cord.
Failure to follow these instructions can result in death,
fire, or electrical shock.
6. Plug into a grounded 3 prong outlet.
7. Press RESET on the power supply cord. See "Electrical
Requirements."
8. Remove the clear plastic film from the control panel and
plastic front.
12
AIRCONDITIONERUSE
Operating your air conditioner properly helps you to obtain the
best possible results.
This section explains proper air conditioner operation.
IMPORTANT:
• If you turn off the air conditioner, wait at least 3 minutes
before turning it back on. This keeps the air conditioner from
blowing a fuse or tripping a circuit breaker.
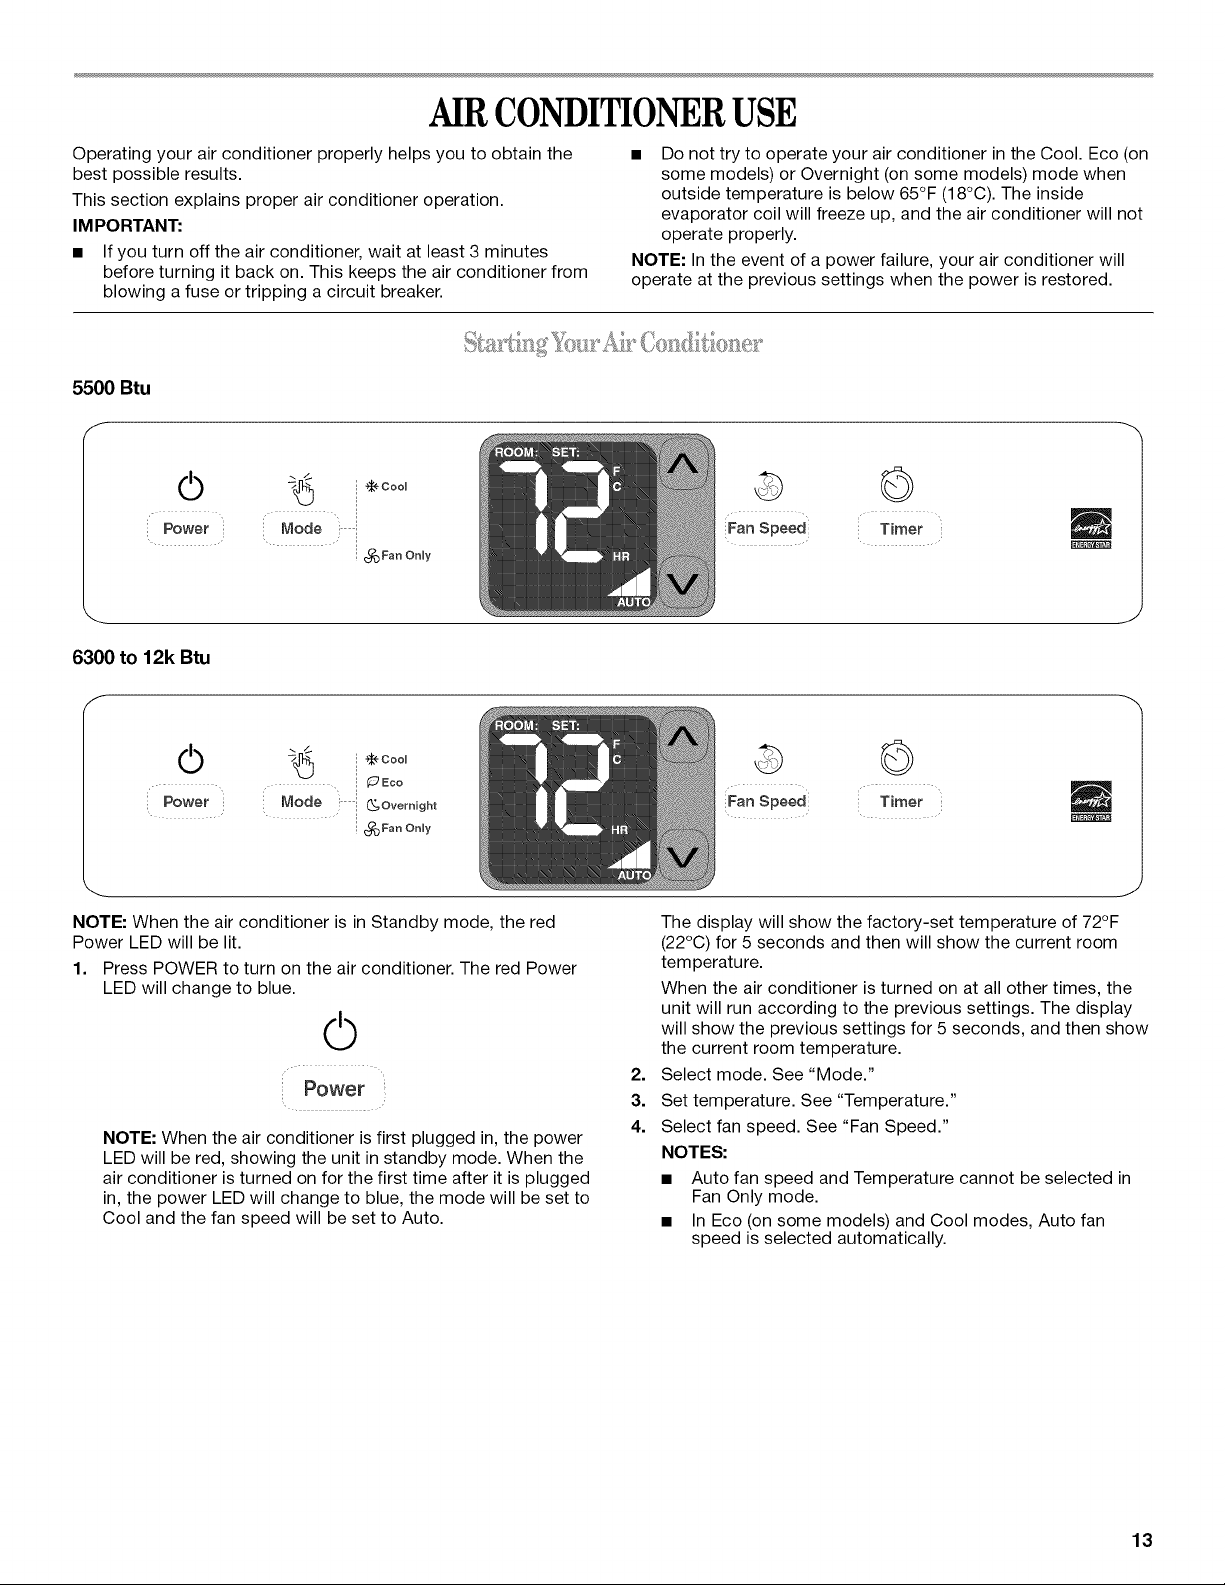
5500 Btu
f
O
Power
Node i
i @ eoou
i
! _)Fan OnUy
6300 to 12k Btu
f
• Do not try to operate your air conditioner in the Cool. Eco (on
some models) or Overnight (on some models) mode when
outside temperature is below 65°F (18°C). The inside
evaporator coil will freeze up, and the air conditioner will not
operate properly.
NOTE: In the event of a power failure, your air conditioner will
operate at the previous settings when the power is restored.
©
Fanspeed
Timer
O
Power
NOTE: When the air conditioner is in Standby mode, the red
Power LED will be lit.
1. Press POWER to turn on the air conditioner. The red Power
LED will change to blue.
-_ @CooU
, ¢2 Eco
Node i (_Ovemight
_Fan OnUy
©
Power
NOTE: When the air conditioner is first plugged in, the power
LED will be red, showing the unit in standby mode. When the
air conditioner is turned on for the first time after it is plugged
in, the power LED will change to blue, the mode will be set to
Cool and the fan speed will be set to Auto.
©
Timer ©
The display will show the factory-set temperature of 72°F
(22°C) for 5 seconds and then will show the current room
temperature.
When the air conditioner is turned on at all other times, the
unit will run according to the previous settings. The display
will show the previous settings for 5 seconds, and then show
the current room temperature.
2.
Select mode. See "Mode."
3.
Set temperature. See "Temperature."
4.
Select fan speed. See "Fan Speed."
NOTES:
• Auto fan speed and Temperature cannot be selected in
Fan Only mode.
• In Eco (on some models) and Cool modes, Auto fan
speed is selected automatically.
J
13
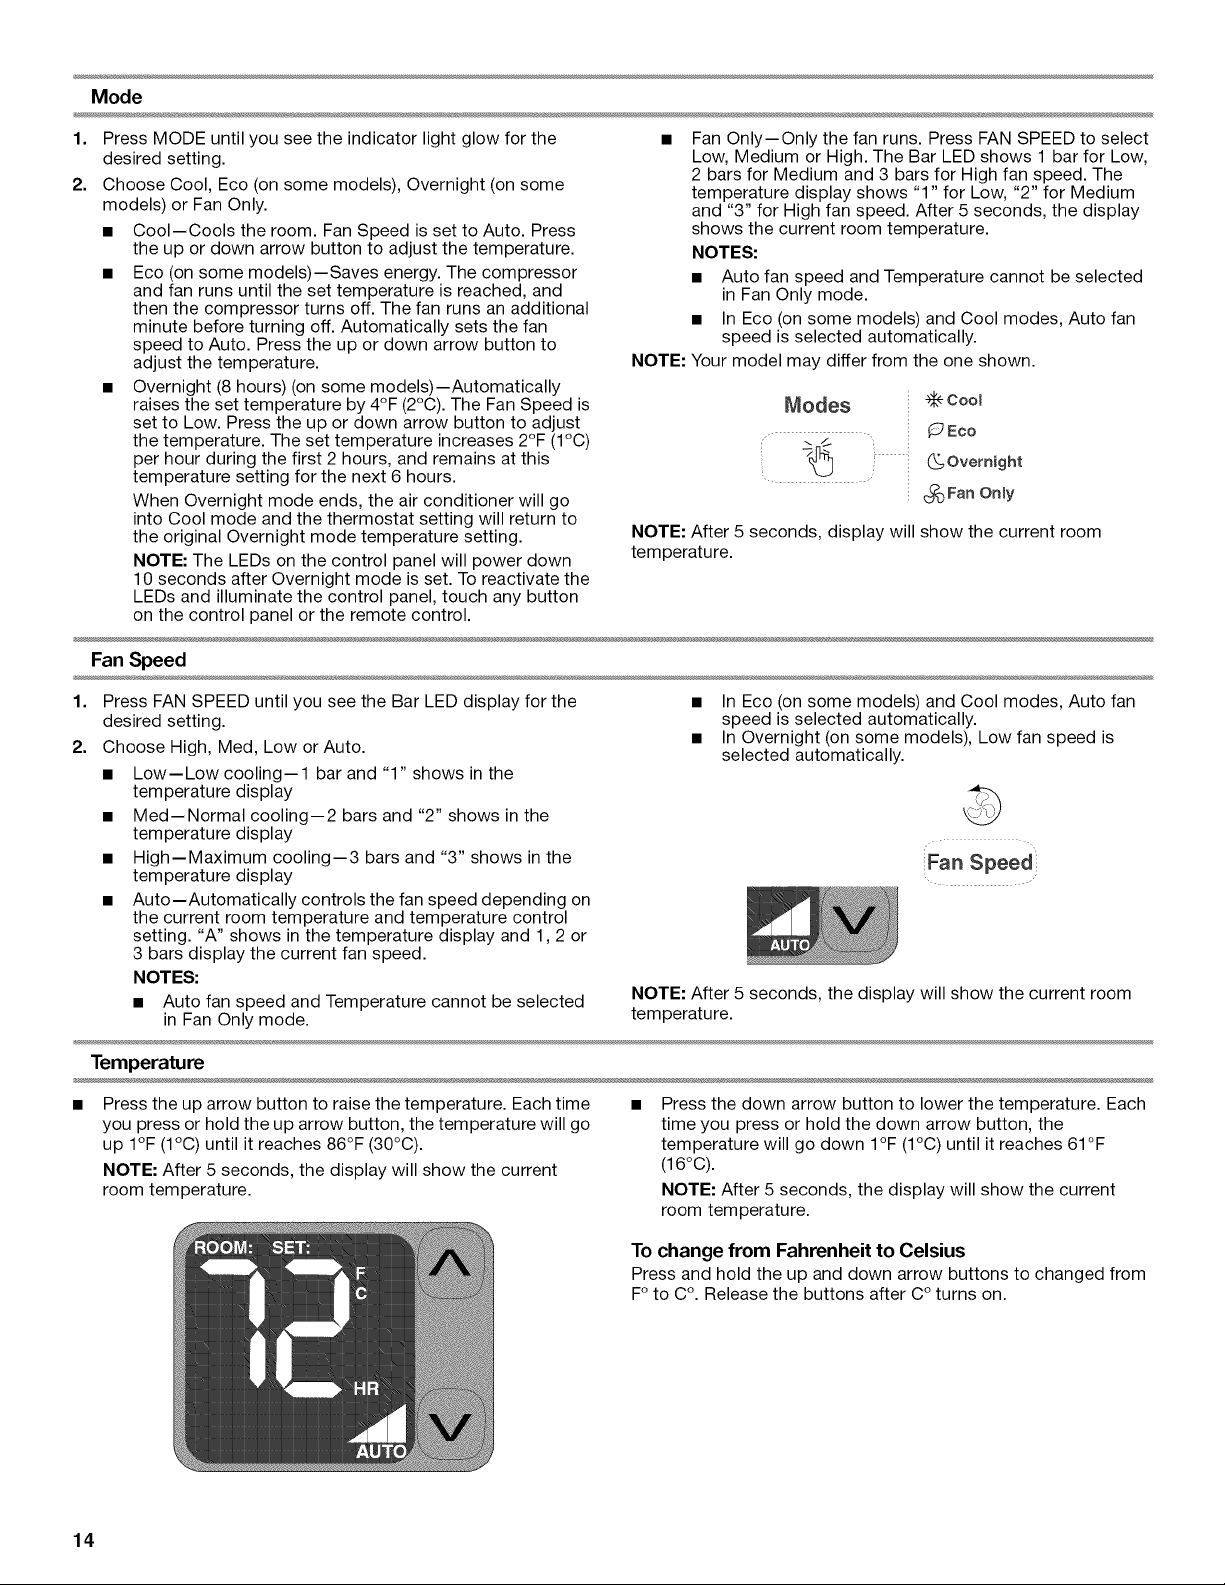
Mode
1=
Press MODE until you see the indicator light glow for the
desired setting.
2.
Choose Cool, Eco (on some models), Overnight (on some
models) or Fan Only.
• Cool--Cools the room. Fan Speed is set to Auto. Press
the up or down arrow button to adjust the temperature.
• Eco (on some models)--Saves energy. The compressor
and fan runs until the set temperature is reached, and
then the compressor turns off. The fan runs an additional
minute before turning off. Automatically sets the fan
speed to Auto. Press the up or down arrow button to
adjust the temperature.
• Overnight (8 hours) (on some models)--Automatically
raises the set temperature by 4°F (2°C). The Fan Speed is
set to Low. Press the up or down arrow button to adjust
the temperature. The set temperature increases 2°F (1°C)
per hour during the first 2 hours, and remains at this
temperature setting for the next 6 hours.
When Overnight mode ends, the air conditioner will go
into Cool mode and the thermostat setting will return to
the original Overnight mode temperature setting.
NOTE: The LEDs on the control panel will power down
10 seconds after Overnight mode is set. To reactivate the
LEDs and illuminate the control panel, touch any button
on the control panel or the remote control.
Fan Speed
Fan Only--Only the fan runs. Press FAN SPEED to select
Low, Medium or High. The Bar LED shows 1 bar for Low,
2 bars for Medium and 3 bars for High fan speed. The
temperature display shows "1" for Low, "2" for Medium
and "3" for High fan speed. After 5 seconds, the display
shows the current room temperature.
NOTES:
• Auto fan speed and Temperature cannot be selected
in Fan Only mode.
• In Eco (on some models) and Cool modes, Auto fan
speed is selected automatically.
NOTE: Your model may differ from the one shown.
Modes
.... _ -,
CooJ
Eco
-_ (_Ovemight
_Fan Only
NOTE: After 5 seconds, display will show the current room
temperature.
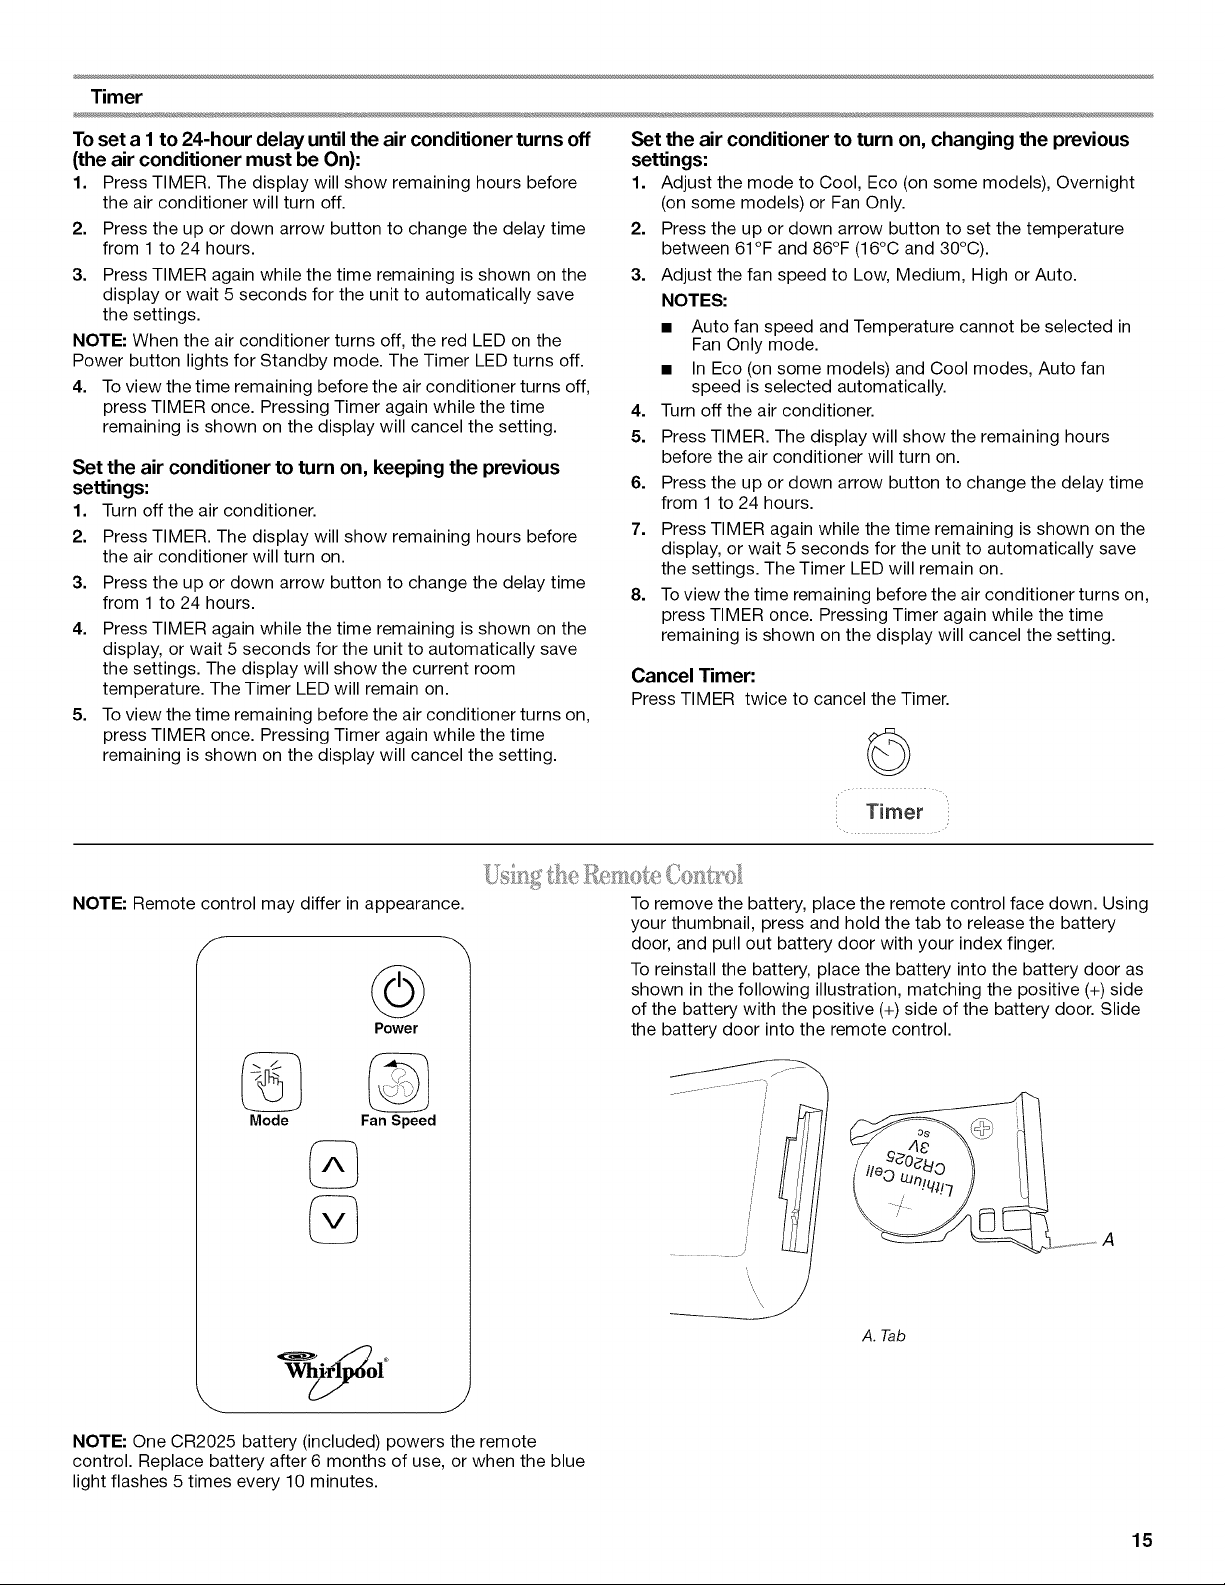
1=
Press FAN SPEED until you see the Bar LED display for the
desired setting.
2.
Choose High, Med, Low or Auto.
• Low--Low cooling--1 bar and "1" shows in the
temperature display
• Med--Normal cooling--2 bars and "2" shows in the
temperature display
• High--Maximum cooling--3 bars and "3" shows in the
temperature display
• Auto--Automatically controls the fan speed depending on
the current room temperature and temperature control
setting. "A" shows in the temperature display and 1,2 or
3 bars display the current fan speed.
NOTES:
• Auto fan speed and Temperature cannot be selected
in Fan Only mode.
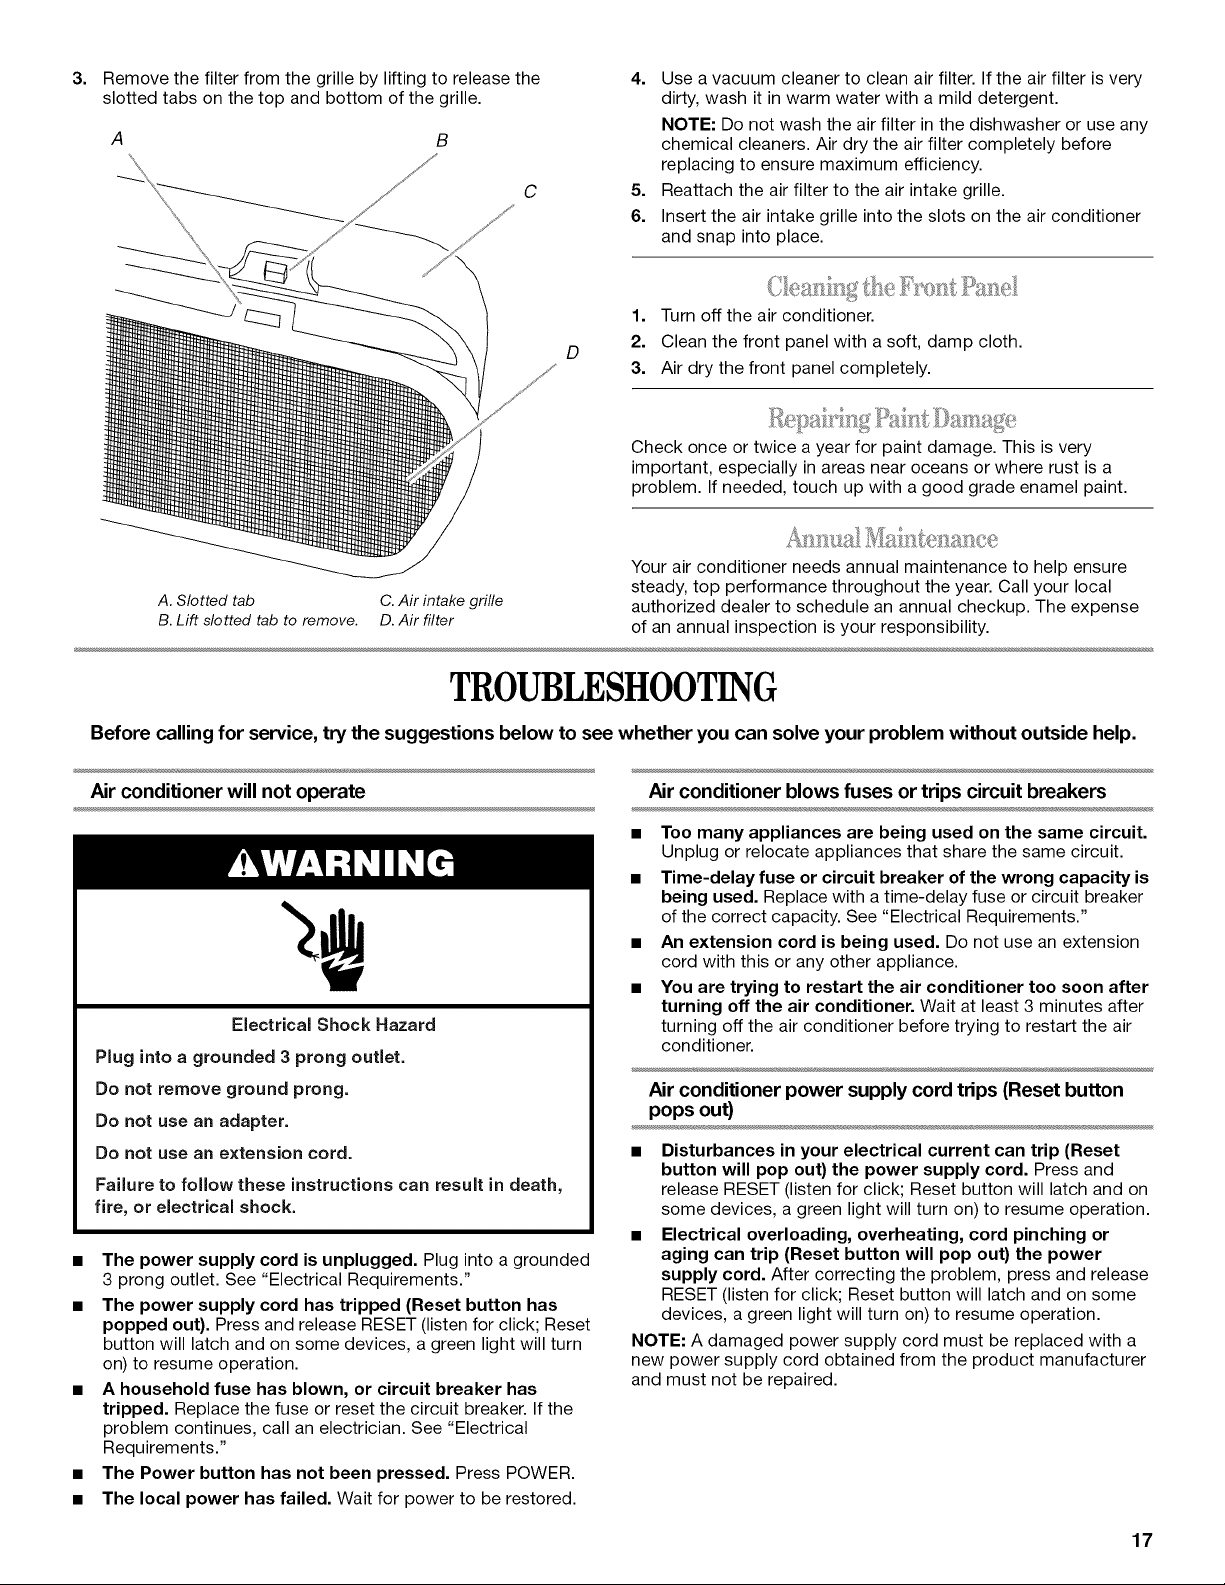
Temperature
Press the up arrow button to raise the temperature. Each time
you press or hold the up arrow button, the temperature will go
up I°F (1°C) until it reaches 86°F (30°C).
NOTE: After 5 seconds, the display will show the current
room temperature.
• In Eco (on some models) and Cool modes, Auto fan
speed is selected automatically.
• In Overnight (on some models), Low fan speed is
selected automatically.
Fan Speed
NOTE: After 5 seconds, the display will show the current room
temperature.
Press the down arrow button to lower the temperature. Each
time you press or hold the down arrow button, the
temperature will go down I°F (1°C) until it reaches 61°F
(16°C).
NOTE: After 5 seconds, the display will show the current
room temperature.
To change from Fahrenheit to Celsius
Press and hold the up and down arrow buttons to changed from
F° to C°. Release the buttons after C° turns on.
14
Timer
To set a I to 24-hour delay until the air conditioner turns off
(the air conditioner must be On):
1. Press TIMER. The display will show remaining hours before
the air conditioner will turn off.
2. Press the up or down arrow button to change the delay time
from 1 to 24 hours.
3. Press TIMER again while the time remaining is shown on the
display or wait 5 seconds for the unit to automatically save
the settings.
NOTE: When the air conditioner turns off, the red LED on the
Power button lights for Standby mode. The Timer LED turns off.
4. Toview the time remaining before the air conditioner turns off,
press TIMER once. Pressing Timer again while the time
remaining is shown on the display will cancel the setting.
Set the air conditioner to turn on, keeping the previous
settings:
1. Turn off the air conditioner.
2. Press TIMER. The display will show remaining hours before
the air conditioner will turn on.
3. Press the up or down arrow button to change the delay time
from 1 to 24 hours.
4. Press TIMER again while the time remaining is shown on the
display, or wait 5 seconds for the unit to automatically save
the settings. The display will show the current room
temperature. The Timer LED will remain on.
5. Toview the time remaining before the air conditioner turns on,
press TIMER once. Pressing Timer again while the time
remaining is shown on the display will cancel the setting.
Set the air conditioner to turn on, changing the previous
settings:
1. Adjust the mode to Cool, Eco (on some models), Overnight
(on some models) or Fan Only.
2. Press the up or down arrow button to set the temperature
between 61°F and 86°F (16°C and 30°C).
3. Adjust the fan speed to Low, Medium, High or Auto.
NOTES:
• Auto fan speed and Temperature cannot be selected in
Fan Only mode.
• In Eco (on some models) and Cool modes, Auto fan
speed is selected automatically.
4. Turn off the air conditioner.
5. Press TIMER. The display will show the remaining hours
before the air conditioner will turn on.
6. Press the up or down arrow button to change the delay time
from 1 to 24 hours.
7. Press TIMER again while the time remaining is shown on the
display, or wait 5 seconds for the unit to automatically save
the settings. The Timer LED will remain on.
8. Toview the time remaining before the air conditioner turns on,
press TIMER once. Pressing Timer again while the time
remaining is shown on the display will cancel the setting.
Cancel Timer:
Press TIMER twice to cancel the Timer.
©
NOTE: Remote control may differ in appearance.
Power
Mode Fan Speed
Timer
To remove the battery, place the remote control face down. Using
your thumbnail, press and hold the tab to release the battery
door, and pull out battery door with your index finger.
To reinstall the battery, place the battery into the battery door as
shown in the following illustration, matching the positive (+) side
of the battery with the positive (+)side of the battery door. Slide
the battery door into the remote control.
............................... i
............. J
k
A. Tab
NOTE: One CR2025 battery (included) powers the remote
control. Replace battery after 6 months of use, or when the blue
light flashes 5 times every 10 minutes.
15

Storing the Remote Control
Temperature
Store the remote control by placing the back side, containing a
magnet, against the side of the air conditioner cabinet in the
locations shown in the following illustration.
NOTE: The dotted lines do not appear on the unit cabinet. They
show the locations of the metal plates in the illustration only.
Power
1. Press POWER to turn on air conditioner.
2. Press POWER again to turn off the air conditioner.
• Press the up arrow button to raise the temperature. Each time
you press or hold the up arrow button, the temperature will go
up I°F (1°C) until it reaches 86°F (30°C).
Press the down arrow button to lower the temperature. Each
time you press or hold the down arrow button, the
temperature will go down I°F (1°C) until it reaches 61°F
(16°C).
Use tab to direct the air right or left.
Power
Mode
Press MODE to choose Cool, Eco (on some models), Overnight
(on some models) or Fan Only.
Mode
Fan Speed
1. Press FAN SPEED until you see the Bar LED on the air
conditioner control panel display for the desired setting.
2. Choose Low, Medium, High or Auto.
NOTES:
• Auto fan speed and Temperature cannot be selected in
Fan Only mode.
• In Eco (on some models) and Cool modes, Auto fan
speed is selected automatically.
A. Tab
AIRCONDITIONERCARE
Your new air conditioner is designed to give you many years of
dependable service. This section tells you how to clean and care
for your air conditioner properly. Call your local authorized dealer
for an annual checkup. Remember ... the cost of this service call
is your responsibility.
The air filter is removable for easy cleaning. A clean filter helps
remove dust, lint, and other particles from the air and is important
for best cooling and operating efficiency. Check the filter every
2 weeks to see whether it needs cleaning.
NOTE: Do not operate the air conditioner without the filter in
place.
1. Turn off the air conditioner.
2. Remove the air filter by pressing down on the tabs on the air
intake grille and pulling the grille away from the air
conditioner.
Fan Speed
NOTE: After 5 seconds, the display on the air conditioner control
panel will show the current room temperature.
16
-%
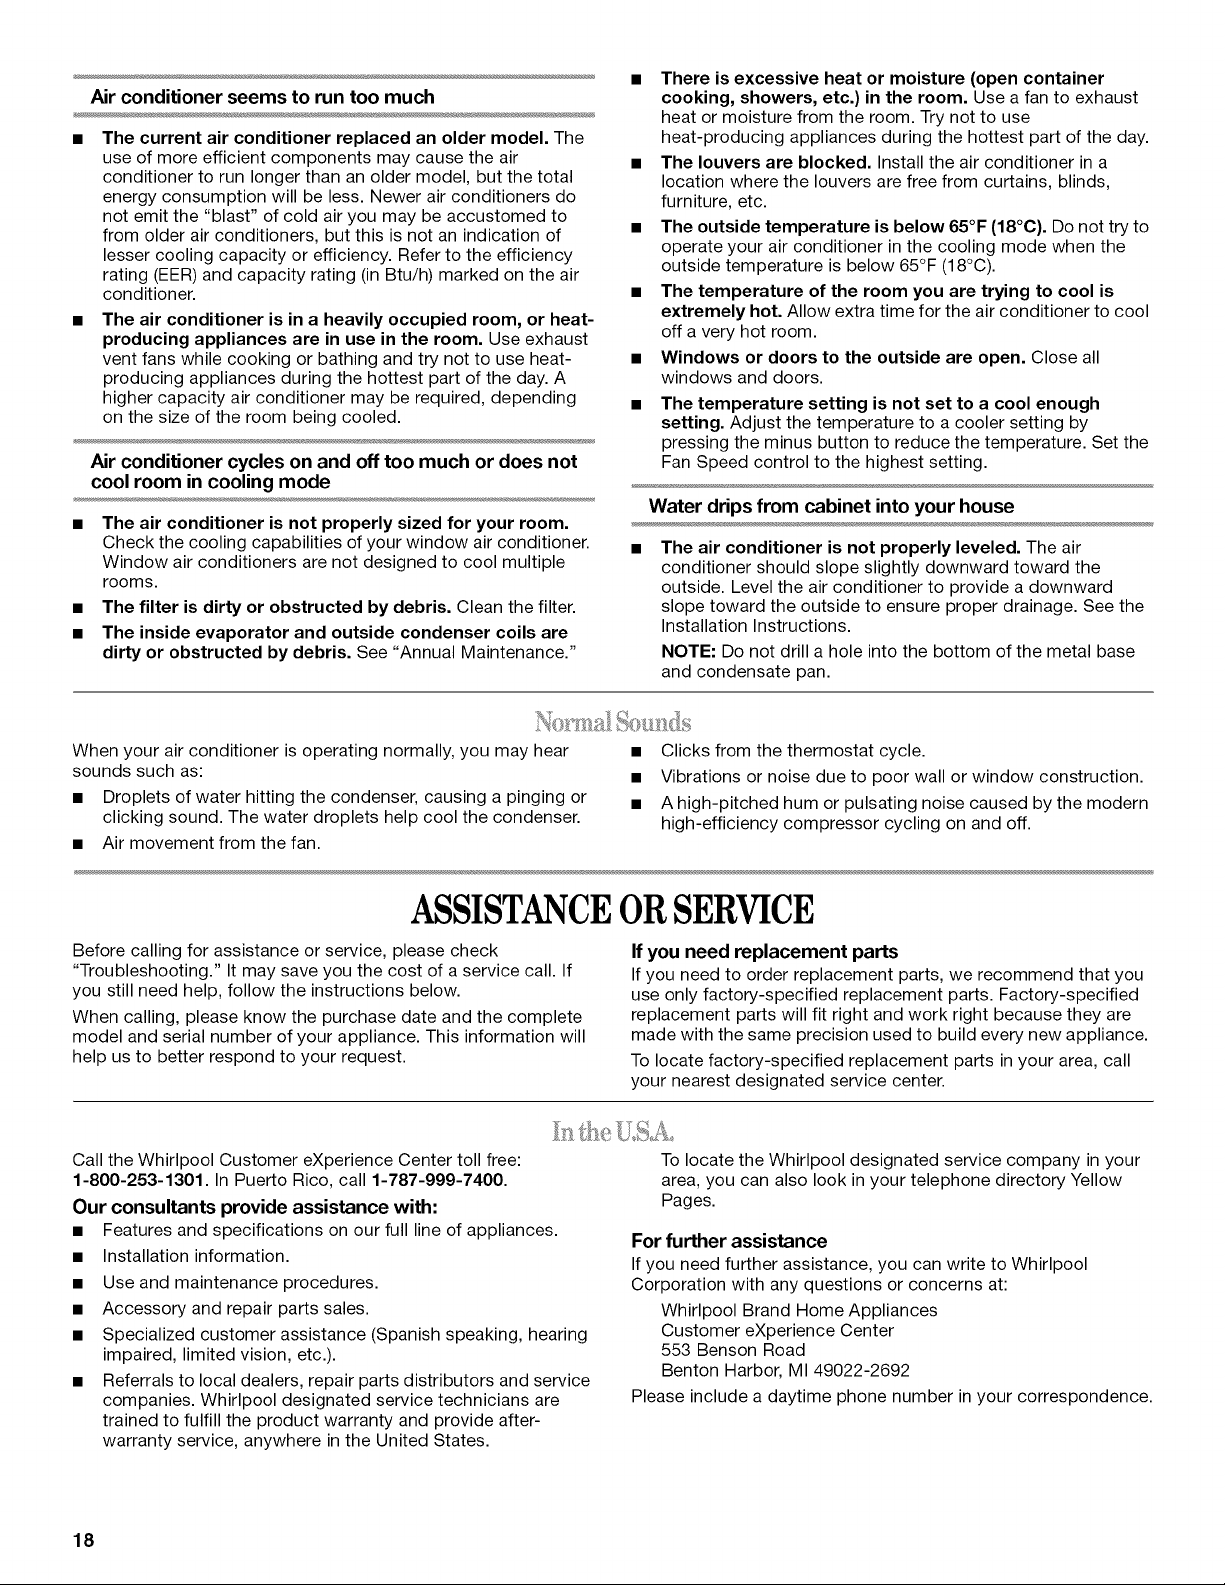
3.
Remove the filter from the grille by lifting to release the
slotted tabs on the top and bottom of the grille.
A B
A. Slotted tab C.Air intake grille
B. Lift slotted tab to remove. D. Air filter
4. Use a vacuum cleaner to clean air filter. If the air filter is very
dirty, wash it in warm water with a mild detergent.
NOTE: Do not wash the air filter in the dishwasher or use any
chemical cleaners. Air dry the air filter completely before
replacing to ensure maximum efficiency.
C
D
5. Reattach the air filter to the air intake grille.
6. Insert the air intake grille into the slots on the air conditioner
and snap into place.
1. Turn off the air conditioner.
2. Clean the front panel with a soft, damp cloth.
3. Air dry the front panel completely.
Check once or twice a year for paint damage. This is very
important, especially in areas near oceans or where rust is a
problem. If needed, touch up with a good grade enamel paint.
Your air conditioner needs annual maintenance to help ensure
steady, top performance throughout the year. Call your local
authorized dealer to schedule an annual checkup. The expense
of an annual inspection is your responsibility.
TROUBLESHOOTING
Before calling for service, try the suggestions below to see whether you can solve your problem without outside help.
Air conditioner will not operate
Electrical Shock Hazard
Plug into a grounded 3 prong outlet.
Do not remove ground prong.
Do not use an adapter.
Do not use an extension cord.
Failure to follow these instructions can result in death,
fire, or electrical shock.
• The power supply cord is unplugged. Plug into a grounded
3 prong outlet. See "Electrical Requirements."
• The power supply cord has tripped (Reset button has
popped out). Press and release RESET (listen for click; Reset
button will latch and on some devices, a green light will turn
on) to resume operation.
• A household fuse has blown, or circuit breaker has
tripped. Replace the fuse or reset the circuit breaker. If the
problem continues, call an electrician. See "Electrical
Requirements."
• The Power button has not been pressed. Press POWER.
• The local power has failed. Wait for power to be restored.
Air conditioner blows fuses or trips circuit breakers
• Too many appliances are being used on the same circuit.
Unplug or relocate appliances that share the same circuit.
• Time-delay fuse or circuit breaker of the wrong capacity is
being used. Replace with a time-delay fuse or circuit breaker
of the correct capacity. See "Electrical Requirements."
• An extension cord is being used. Do not use an extension
cord with this or any other appliance.
• You are trying to restart the air conditioner too soon after
turning off the air conditioner. Wait at least 3 minutes after
turning off the air conditioner before trying to restart the air
conditioner.
Air conditioner power supply cord trips (Reset button
pops out)
• Disturbances in your electrical current can trip (Reset
button will pop out) the power supply cord. Press and
release RESET (listen for click; Reset button will latch and on
some devices, a green light will turn on) to resume operation.
• Electrical overloading, overheating, cord pinching or
aging can trip (Reset button will pop out) the power
supply cord. After correcting the problem, press and release
RESET (listen for click; Reset button will latch and on some
devices, a green light will turn on) to resume operation.
NOTE: A damaged power supply cord must be replaced with a
new power supply cord obtained from the product manufacturer
and must not be repaired.
17
Air conditioner seems to run too much
• The current air conditioner replaced an older model. The
use of more efficient components may cause the air
conditioner to run longer than an older model, but the total
energy consumption will be less. Newer air conditioners do
not emit the "blast" of cold air you may be accustomed to
from older air conditioners, but this is not an indication of
lesser cooling capacity or efficiency. Refer to the efficiency
rating (EER) and capacity rating (in Btu/h) marked on the air
conditioner.
• The air conditioner is in a heavily occupied room, or heat-
producing appliances are in use in the room. Use exhaust
vent fans while cooking or bathing and try not to use heat-
producing appliances during the hottest part of the day. A
higher capacity air conditioner may be required, depending
on the size of the room being cooled.
Air conditioner cycles on and off too much or does not
cool room in cooling mode
• The air conditioner is not properly sized for your room.
Check the cooling capabilities of your window air conditioner.
Window air conditioners are not designed to cool multiple
rooms.
The filter is dirty or obstructed by debris. Clean the filter.
The inside evaporator and outside condenser coils are
dirty or obstructed by debris. See "Annual Maintenance."
• There is excessive heat or moisture (open container
cooking, showers, etc.) in the room. Use a fan to exhaust
heat or moisture from the room. Try not to use
heat-producing appliances during the hottest part of the day.
• The louvers are blocked. Install the air conditioner in a
location where the louvers are free from curtains, blinds,
furniture, etc.
• The outside temperature is below 65°F (18°C). Do not try to
operate your air conditioner in the cooling mode when the
outside temperature is below 65°F (18°C).
• The temperature of the room you are trying to cool is
extremely hot. Allow extra time for the air conditioner to cool
off a very hot room.
• Windows or doors to the outside are open. Close all
windows and doors.
• The temperature setting is not set to a cool enough
setting. Adjust the temperature to a cooler setting by
pressing the minus button to reduce the temperature. Set the
Fan Speed control to the highest setting.
Water drips from cabinet into your house
• The air conditioner is not properly leveled. The air
conditioner should slope slightly downward toward the
outside. Level the air conditioner to provide a downward
slope toward the outside to ensure proper drainage. See the
Installation Instructions.
NOTE: Do not drill a hole into the bottom of the metal base
and condensate pan.
When your air conditioner is operating normally, you may hear
sounds such as:
• Droplets of water hitting the condenser, causing a pinging or
clicking sound. The water droplets help cool the condenser.
• Air movement from the fan.
ASSISTANCEORSERVICE
Before calling for assistance or service, please check
"Troubleshooting." It may save you the cost of a service call. If
you still need help, follow the instructions below.
When calling, please know the purchase date and the complete
model and serial number of your appliance. This information will
help us to better respond to your request.
Call the Whirlpool Customer eXperience Center toll free:
1-800-253-1301. In Puerto Rico, call 1-787-999-7400.
Our consultants provide assistance with:
• Features and specifications on our full line of appliances.
• Installation information.
• Use and maintenance procedures.
• Accessory and repair parts sales.
• Specialized customer assistance (Spanish speaking, hearing
impaired, limited vision, etc.).
• Referrals to local dealers, repair parts distributors and service
companies. Whirlpool designated service technicians are
trained to fulfill the product warranty and provide after-
warranty service, anywhere in the United States.
• Clicks from the thermostat cycle.
• Vibrations or noise due to poor wall or window construction.
• A high-pitched hum or pulsating noise caused by the modern
high-efficiency compressor cycling on and off.
If you need replacement parts
If you need to order replacement parts, we recommend that you
use only factory-specified replacement parts. Factory-specified
replacement parts will fit right and work right because they are
made with the same precision used to build every new appliance.
To locate factory-specified replacement parts in your area, call
your nearest designated service center.
To locate the Whirlpool designated service company in your
area, you can also look in your telephone directory Yellow
Pages.
For further assistance
If you need further assistance, you can write to Whirlpool
Corporation with any questions or concerns at:
Whirlpool Brand Home Appliances
Customer eXperience Center
553 Benson Road
Benton Harbor, MI 49022-2692
Please include a daytime phone number in your correspondence.
18
 Loading...