

Page 1
Use & Care Guide
Guide d’utilisation et d’entretien
FRONT-LOADING AUTOMATIC WASHER
LAVEUSE AUTOMATIQUE À CHARGEMENT FRONTAL
W10554129C
W10554130C - SP
Para obtener acceso al
Manual de uso y
cuidado en español, o para
obtener información adicional
acerca de su producto, visite:
www.whirlpool.com
If you have any problems or questions, visit us at www.whirlpool.com
Designed to use only HE
High Efciency detergents.
Conçue pour l’utilisation
d’un détergent haute
efcacité seulement.
Page 2
TABLE OF CONTENTS
WASHER SAFETY ...................................................................2
ACCESSORIES ........................................................................ 3
CONTROL PANEL AND FEATURES ......................................4
USING THE DISPENSER DRAWER .......................................6
CYCLE GUIDE ......................................................................... 7
USING YOUR WASHER ..........................................................9
WASHER MAINTENANCE ....................................................13
TROUBLESHOOTING ........................................................... 16
WARRANTY ...........................................................................23
ASSISTANCE OR SERVICE ..................................Back Cover
WASHER SAFETY
TABLE DE MATIÈRES
SÉCURITÉ DE LA LAVEUSE ................................................24
ACCESSOIRES ...................................................................... 25
TABLEAU DE COMMANDE ET CARACTÉRISTIQUES .......26
UTILISATION DU TIROIR DU DISTRIBUTEUR ...................28
GUIDE DES PROGRAMMES ................................................ 29
UTILISATION DE LA LAVEUSE ............................................ 31
ENTRETIEN DE LA LAVEUSE ..............................................35
DÉPANNAGE .........................................................................38
GARANTIE ............................................................................. 47
ASSISTANCE OU SERVICE ...................... Couverture arrière
2
Page 3

ACCESSORIES
Customize your new washer and dryer with the following
genuine Whirlpool accessories. For more information on
options and ordering, call 1-800-442-9991, or visit us at:
www.whirlpool.com/accessories. In Canada, call
1-800-807-6777 or visit us at www.whirlpool.ca.
15" Pedestal
Color-matched pedestals raise the
washer and dryer to a more comfortable
working height. The large drawer
provides convenient storage.
Worksurface
The worksurface bridges the
washer and dryer, and provides
a convenient working and
storage area.
Stack Kit
If space is at a premium,
the stack kit allows the dryer
to be installed on top of
the washer.
3
Page 4
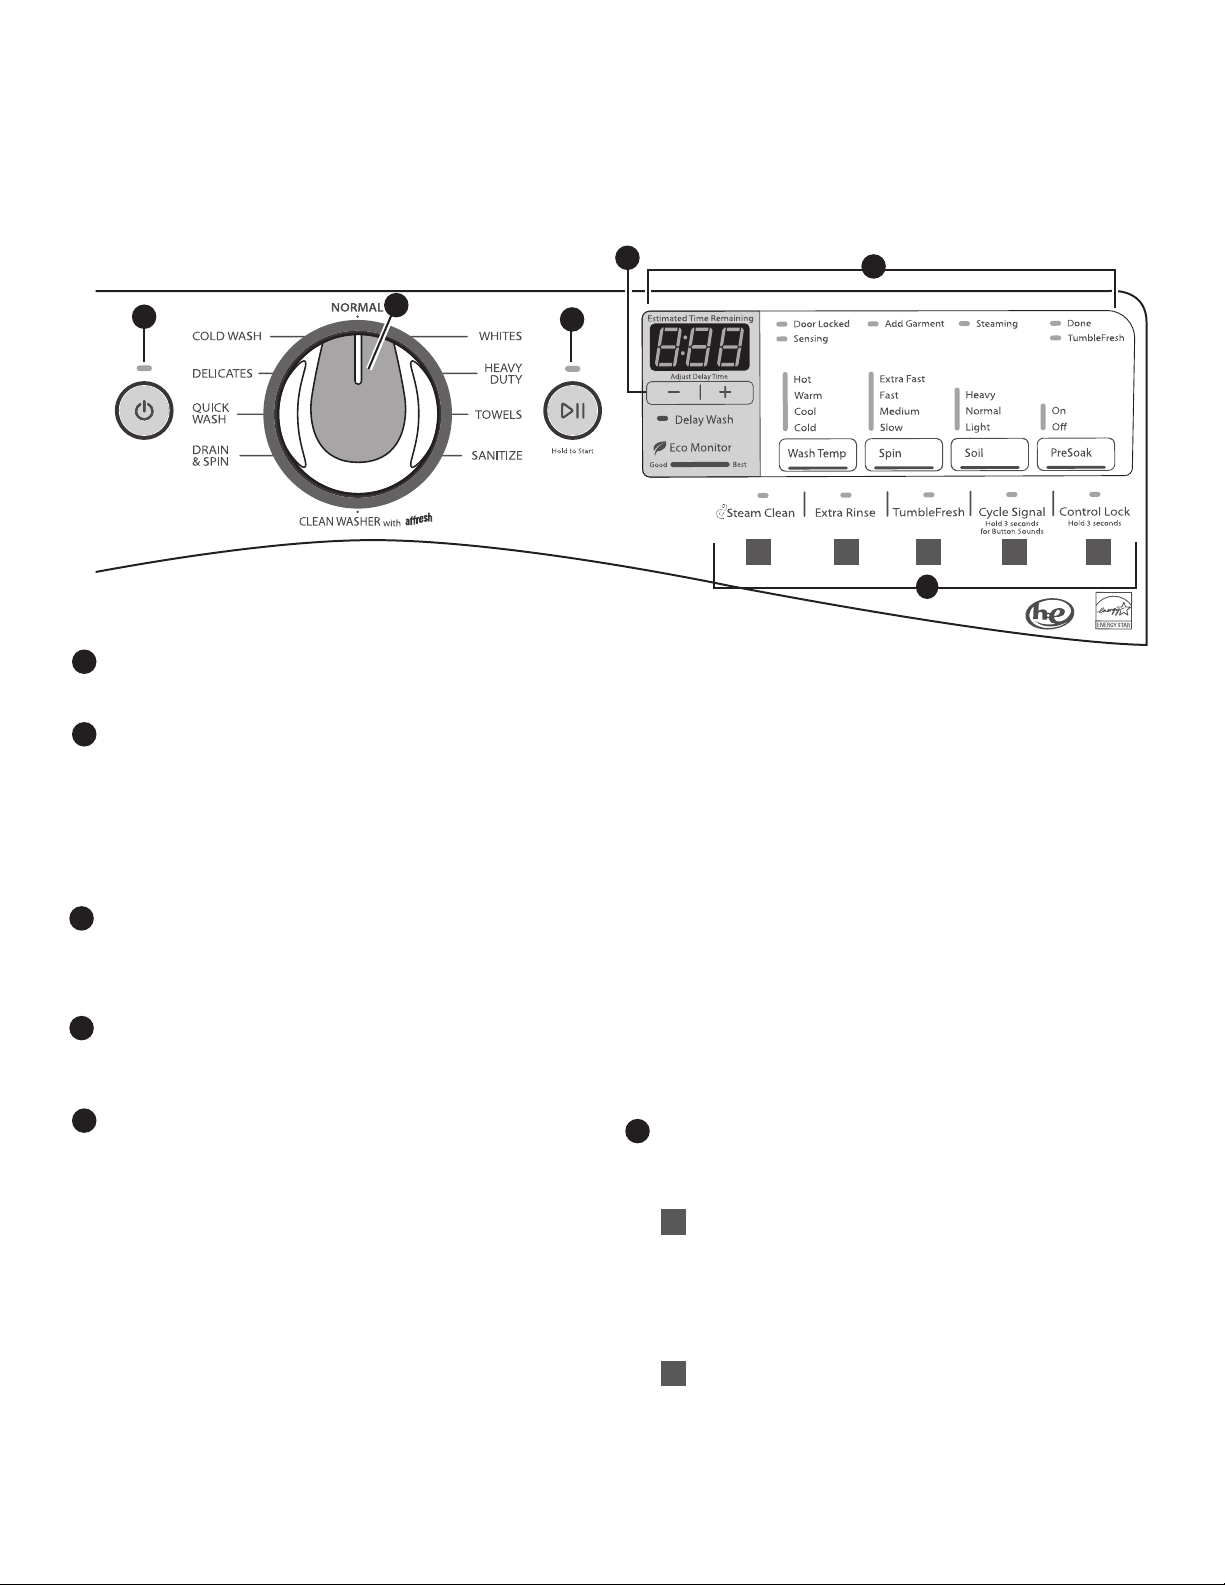
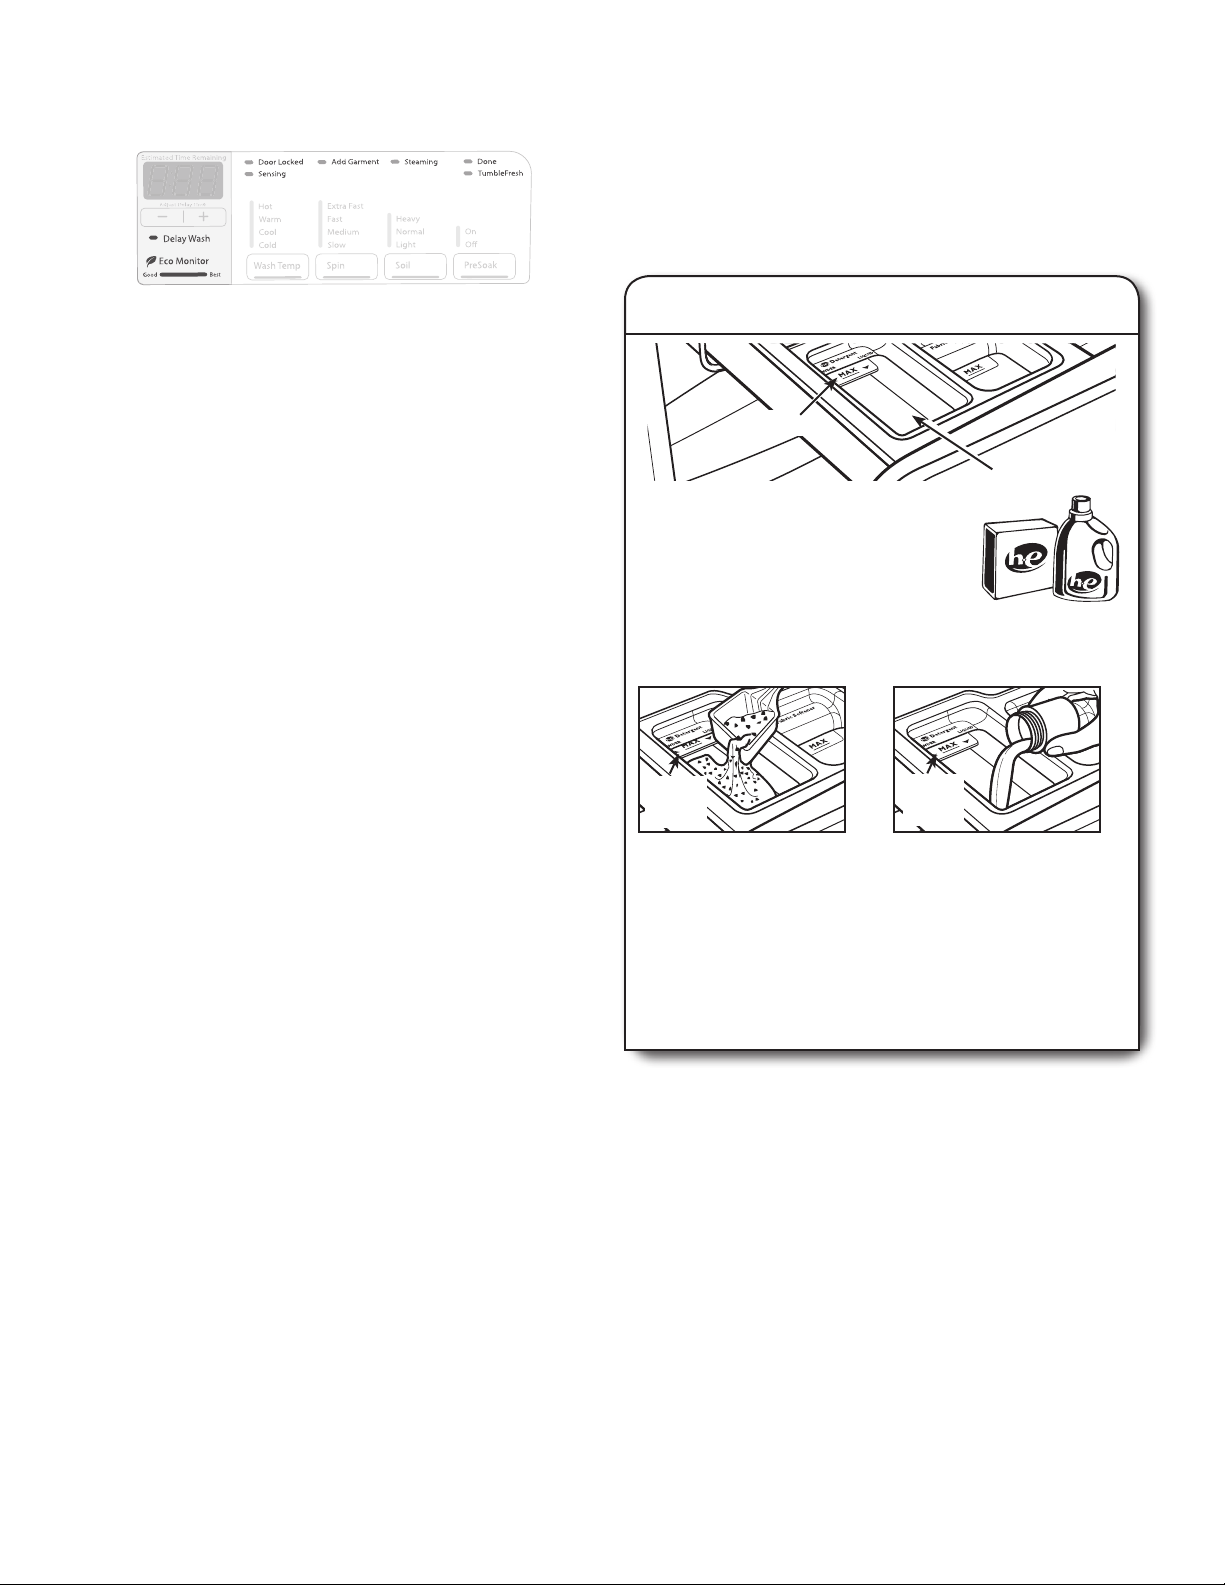
CONTROL PANEL AND FEATURES
Not all features and cycles are available on all models.
NOTE: The control panel features a sensitive surface that
responds to a light touch of your nger. To ensure your selections
are registered, touch the control panel with your nger tip, not
your ngernail. When selecting a setting or option, simply touch
its name.
Models WFW86HE and WFW61HE
4
5
1
POWER
1
Touch to turn the washer on and off. Touch to stop/cancel
a cycle at any time.
WASH CYCLE KNOB
2
Use your Wash Cycle knob to select available cycles on your
washer. Turn the knob to select a cycle for your laundry load.
An LED will light up for the cycle selected.
NOTE: The Clean Washer LED will ash when the washer
has run 30 wash cycles as a reminder to run the Clean
Washer cycle.
See “Cycle Guide” for detailed descriptions of cycles.
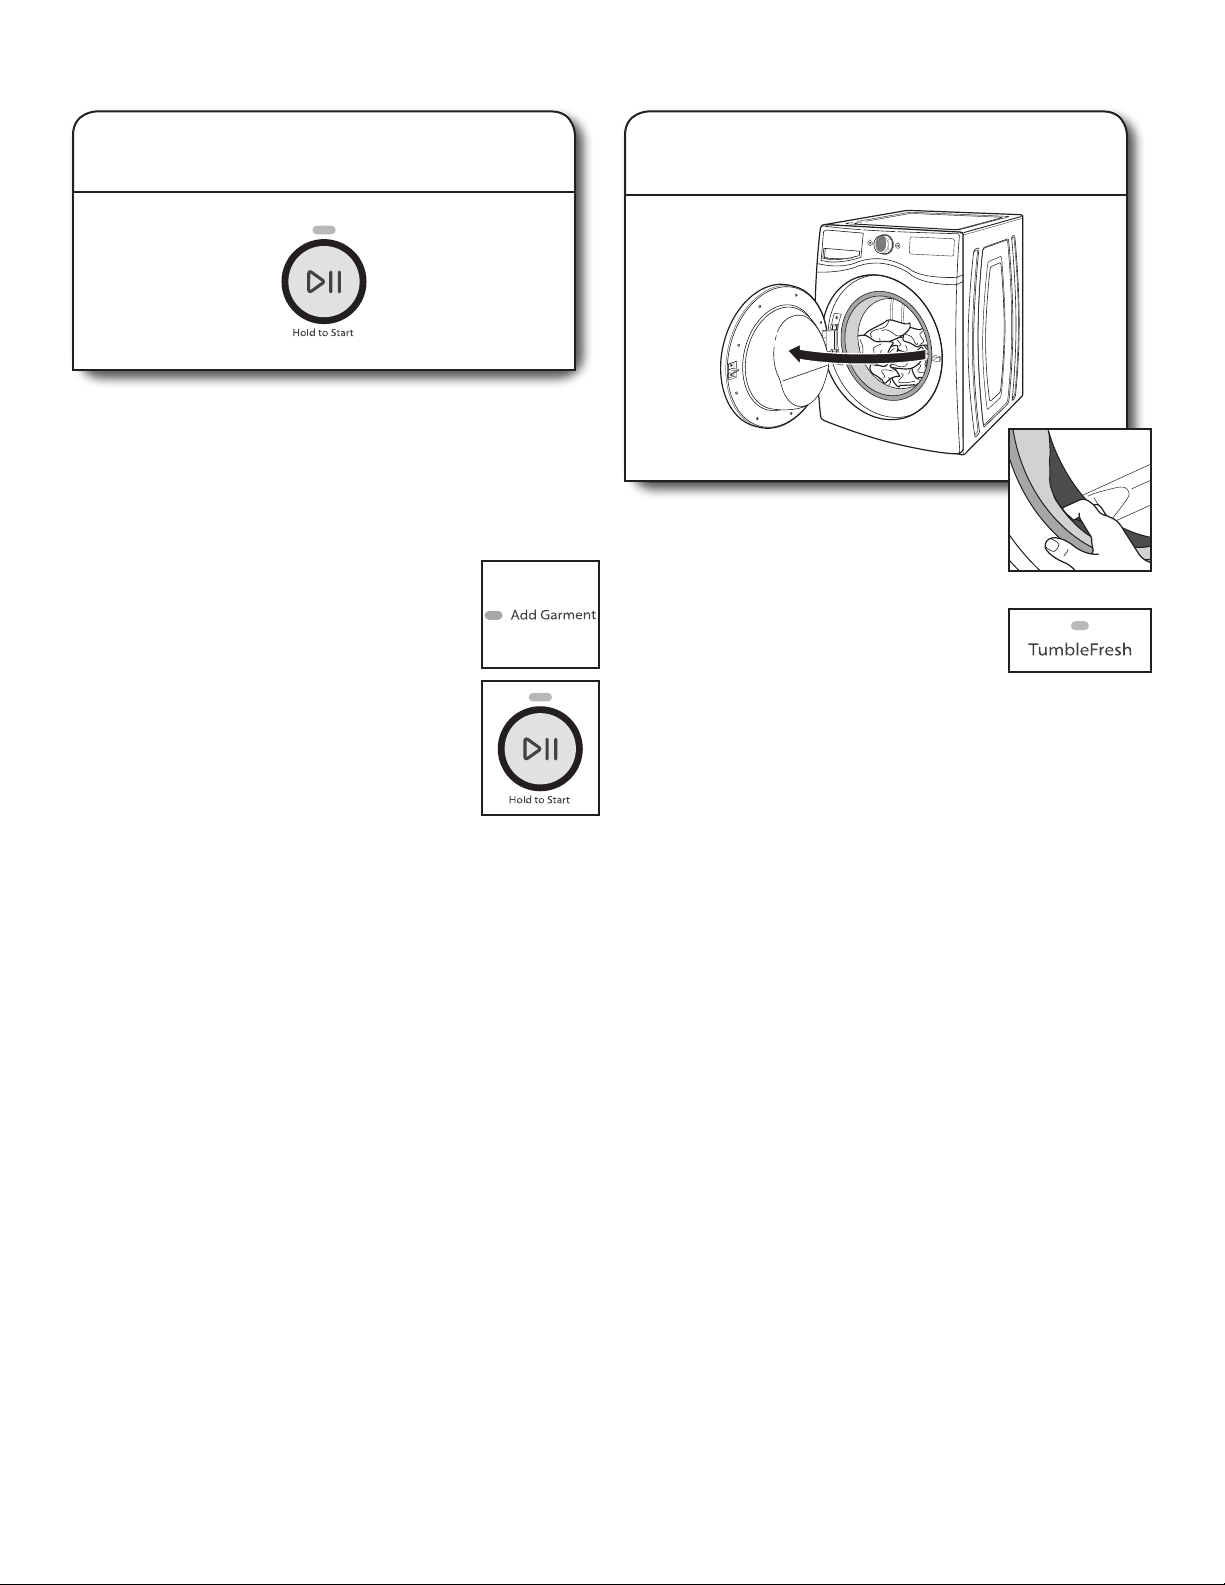
START
3
Touch and hold until the light above START comes on to
start a cycle, or touch once while a cycle is in process to
pause it. If you want to add a garment, you can touch START
when the “Add Garment” LED is on.
4
DELAY WASH
Use + and – to delay the start of the wash cycle by up to
12 hours. To turn off Delay Wash, use + and – to set the
delay time to “0,” or touch POWER.
5
LED DISPLAY AND SETTINGS
When you select a cycle, its default settings will light up and
the Estimated Time Remaining will be displayed. Factors
such as load size, wash temperature, and water pressure
may affect the time shown in the display during the cycle.
Tightly packing garments, unbalanced loads, or excessive
suds may cause the washer to adjust the cycle time, as well.
Touch the desired option along the bottom of the display to
adjust settings. See “Cycle Guide” for available settings on
each cycle. Not all settings are available with all cycles.
Cycle Status Lights
For details, see “Cycle Status Lights”.
Wash Temp
The recommended wash temperature is preset for each
cycle. You may also select a wash temperature based
on the type of fabric and soils being washed. For best
results, follow the garment label instructions. All wash
temperatures feature a cold rinse.
2
3
B EA C D
6
Spin
This washer automatically selects the spin speed based
on the cycle selected. Some preset speeds can be
changed.
• Faster spin speeds mean shorter dry times, but may
increase wrinkling in your load.
• Slower spin speeds reduce wrinkling, but will leave
your load more damp.
Soil
The Soil setting (wash time) is preset for each wash
cycle. For most loads, use this preset soil level. When
you change the soil setting, the cycle time will increase
or decrease in the Estimated Time Remaining display.
For heavily soiled and sturdy fabrics, use the Soil setting
to select more wash time. For lightly soiled and delicate
fabrics, use the Soil setting to select less wash time.
Lower soil level settings will help reduce tangling and
wrinkling.
Presoak
Touch to add a Presoak time of your choice to a wash
cycle. Items will gently tumble through the detergent and
water for the selected time to help loosen tough stains.
OPTIONS
6
Touch to activate additional wash options or additional
features on the washer. Not all options are available on all
models.
Steam Clean
A
The Steam Clean option adds additional soak and wash
time to many cycles to help remove tough stains, as well
as a steam boost for added cleaning power.
An integrated heater helps to maintain optimal wash
temperatures. See the “Cycle Guide” for cycles that
allow the Steam Clean option.
Extra Rinse
B
Activate this option to add an extra rinse to most cycles.
NOTE: Some cycles include this feature as a default.
See “Cycle Guide” for details.
4
Page 5
TumbleFresh™ Option (on some models)
C
The TumbleFresh™ option will periodically tumble
the load after the end of the cycle for up to 6 hours
to reduce humidity. To turn on the TumbleFresh™ option,
touch TumbleFresh. If, however, the TumbleFresh™
option is turned on, it will stay on for all future cycles
until turned back off – the washer remembers the last
on/off status set. To turn off the TumbleFresh™ option,
touch TumbleFresh.
You may also activate the TumbleFresh™ option without
running a cycle by touching and holding POWER for
one second, then touching and holding TumbleFresh
for 3 seconds, then touching and holding START for
3 seconds.
To turn off the TumbleFresh™ option when it is running,
touch POWER.
NOTE: The door will lock while the TumbleFresh™ option
is active. To cancel the option and unlock the door, touch
POWER.
Cycle Signal
D
Use this option to turn on or off the signal that sounds
at end of cycle.
To turn off the tones that sound when a setting is
touched: Touch and hold CYCLE SIGNAL for about
3 seconds. Repeat to turn them on.
Control Lock
E
Touch and hold for 3 seconds to lock the controls
to avoid unwanted changes or operation. Touch and hold
3 seconds again to unlock. You can still touch START to
pause the cycle, or touch POWER to turn the washer off.
Choosing the Right Detergent
Use only High Efciency detergents. The package will be marked
“HE” or “High Efciency.” Low-water washing creates excessive
sudsing with a non-HE detergent. Using non-HE detergent
will likely result in longer cycle times and reduced rinsing
performance. It may also result in component failure and, over
time, buildup of mold or mildew. HE detergents are low-sudsing
and quick-dispersing to produce the right amount of suds for
the best performance. They hold soil in suspension so it is not
re-deposited onto clean clothes. Follow the manufacturer’s
instructions to determine the amount of detergent to use.
Use only High Efciency (HE) detergent.
7
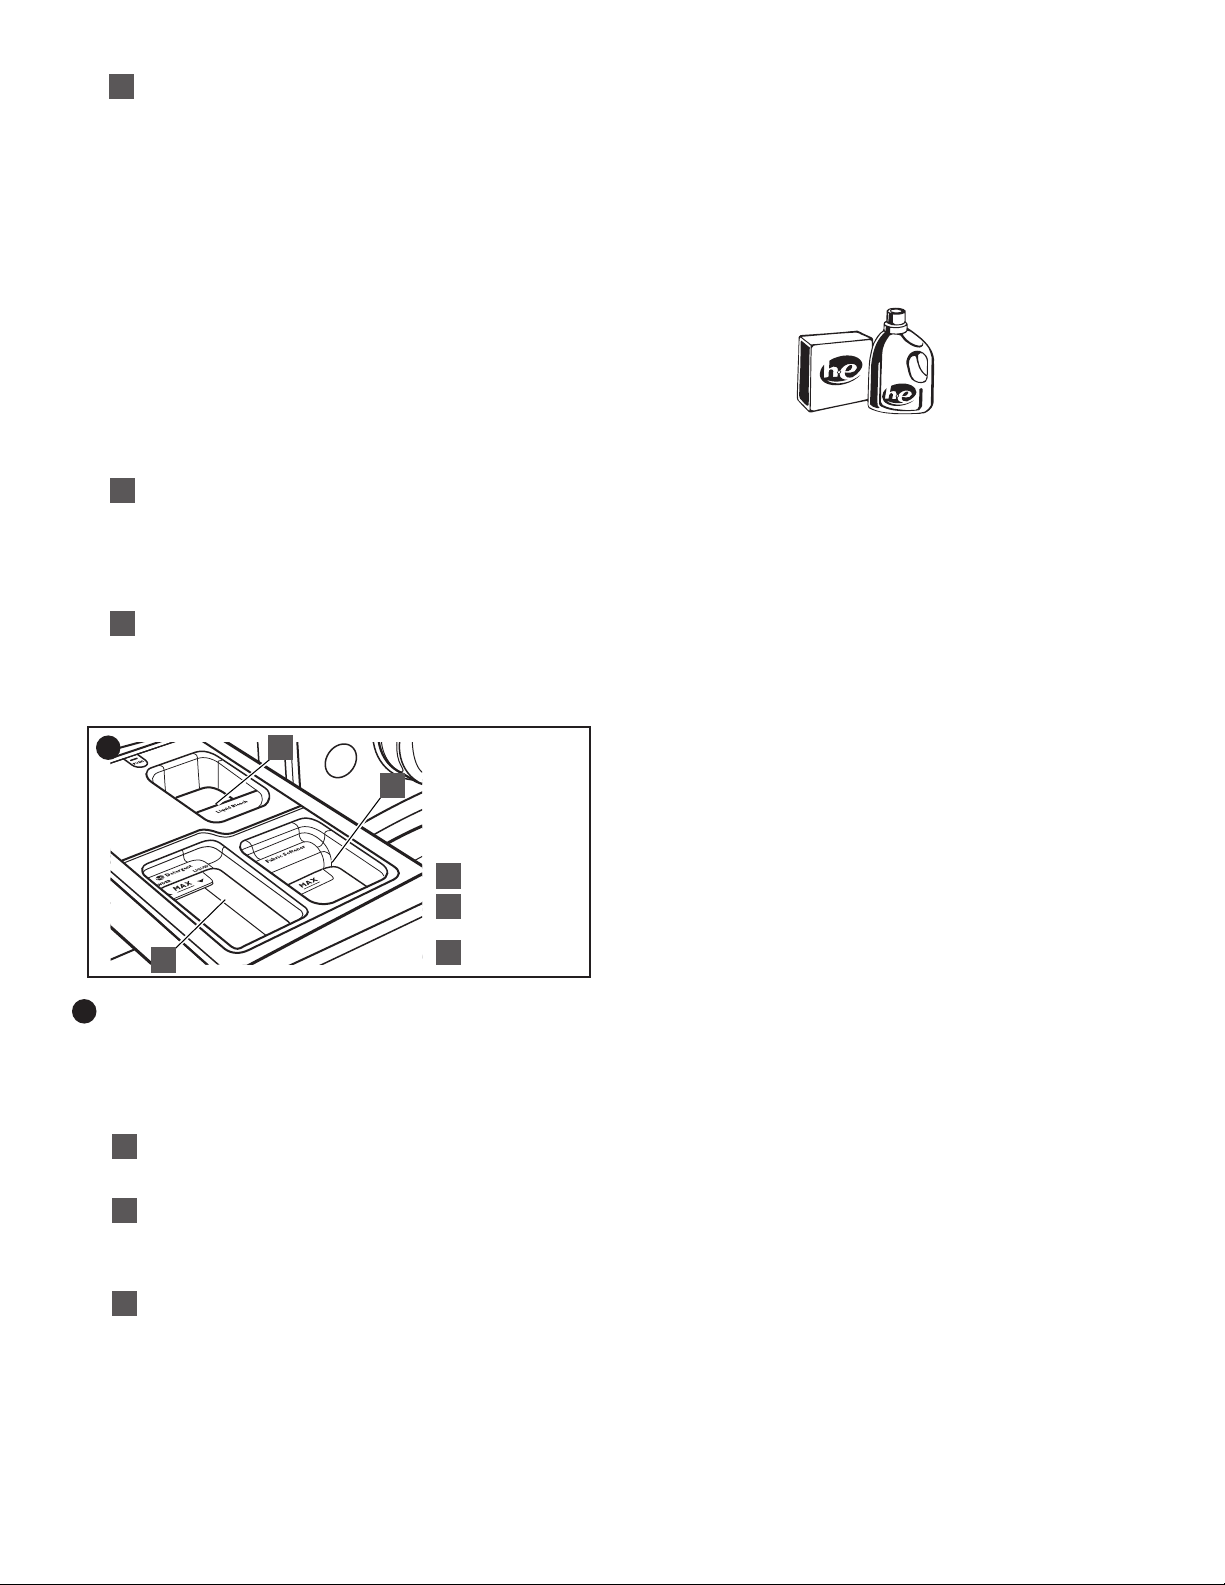
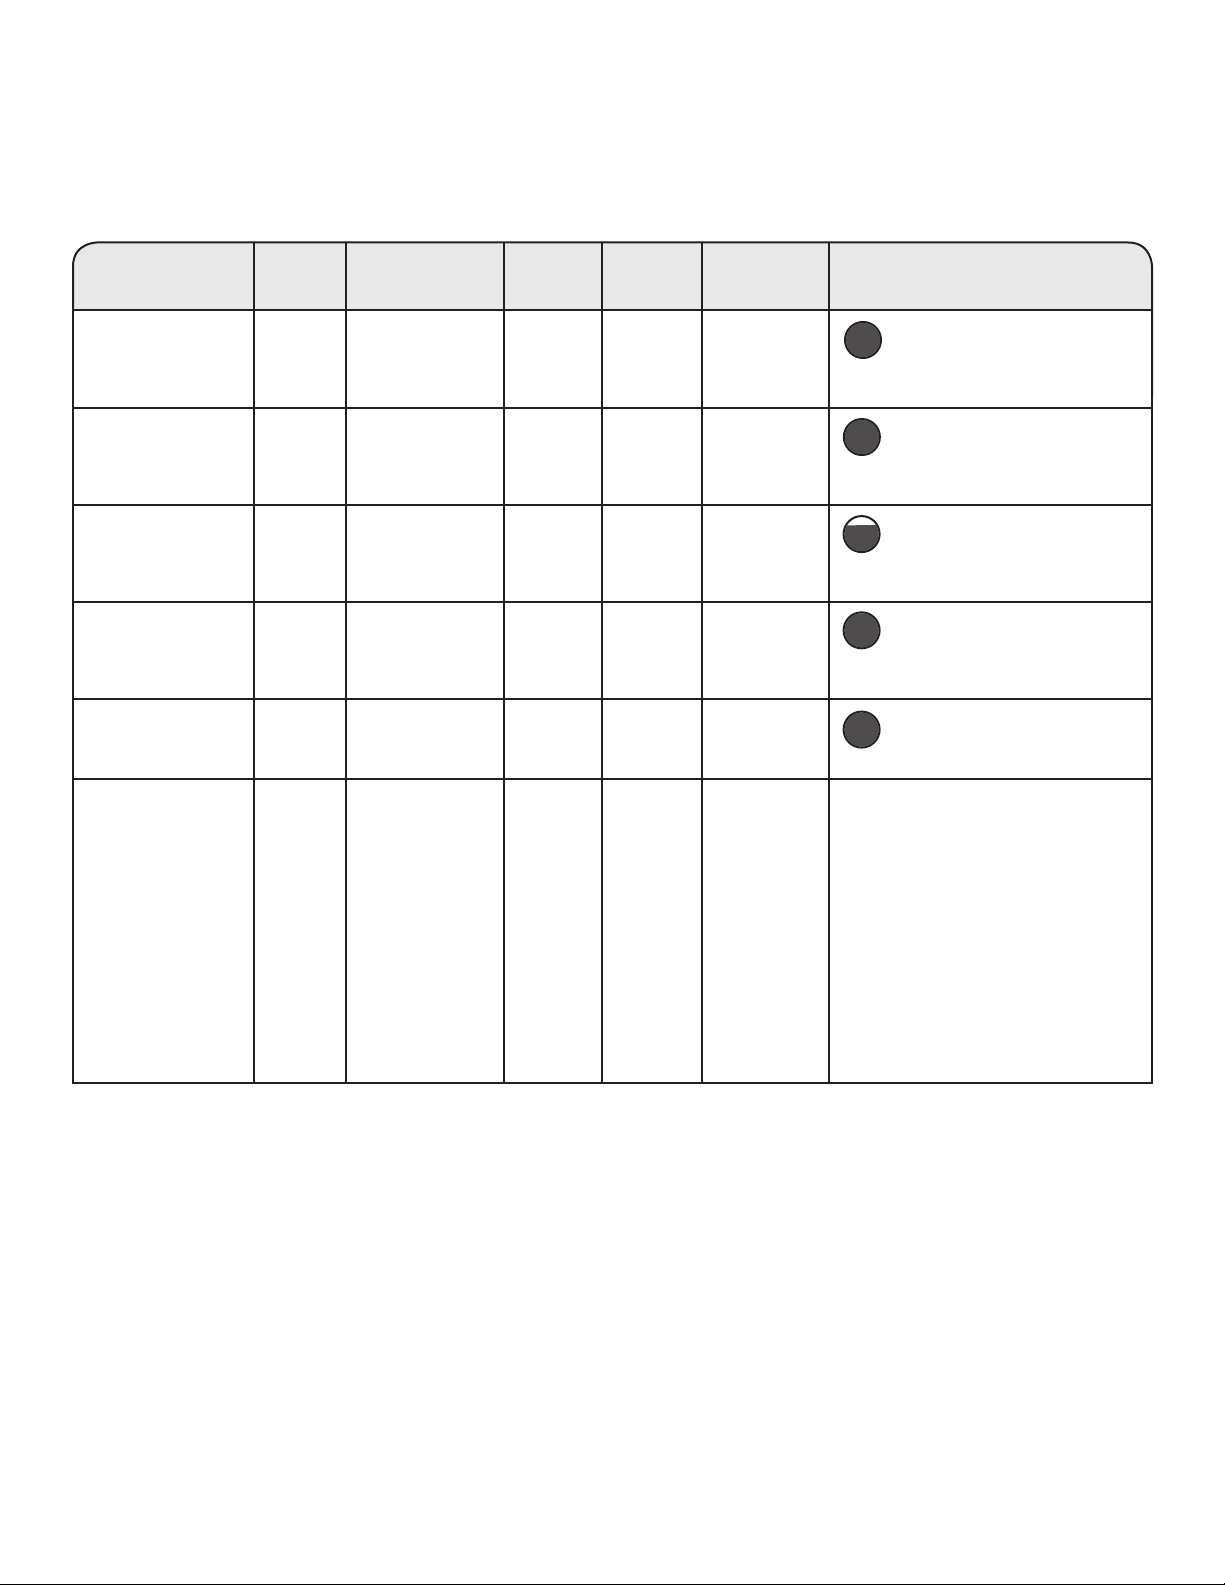
A
DISPENSER DRAWER
7
C
B
HE detergent
A
B
Liquid fabric
softener
Chlorine bleach
C
The dispenser drawer gives you the convenience of
automatically adding HE detergent, liquid chlorine bleach,
and liquid fabric softener to the wash load at the proper
time. See “Using the Dispenser Drawer” for information on
using the dispenser drawer.
High Efciency “HE” detergent compartment
A
This compartment holds liquid or powdered HE
detergent for your main wash cycle.
Liquid fabric softener compartment
B
Automatically dilutes and dispenses liquid fabric
softener at the optimum time in the cycle.
n
Use only liquid fabric softener in this dispenser.
Liquid chlorine bleach compartment
C
Automatically dilutes and dispenses liquid chlorine
bleach at the optimum time during the rst rinse
after the wash cycle. This compartment cannot
dilute powdered bleach.
5
Page 6
CONTROL PANEL AND FEATURES
Cycle Status Lights
USING THE DISPENSER DRAWER
1. Open the dispenser drawer.
2. Add laundry products as described in steps 4–6 in the “Using
Your Washer” section.
3. Slowly close the dispenser drawer. Make sure it is
completely closed.
NOTE: A small amount of water may remain in the dispensers
from the previous wash cycle. This is normal.
Delay Wash
If a Delay Wash is set, the Delay Wash indicator will light and
the delay time will count down in the display.
Door Locked
Door Locked will light to indicate that the door is locked and
cannot be opened without rst pausing or canceling the cycle.
Sensing
When START is touched, the washer will rst perform a
self-test on the door lock mechanism and the sensing light
will come on. You will hear a click, the drum will make a partial
turn, and the door will unlock briey before locking again.
Once the door has locked the second time, the washer will
drain to calibrate the sensors; then it will begin tumbling and
adding water. The sensing process will continue throughout
the cycle. You may also hear water owing through the
dispenser, adding detergent to the load.
After the load size is sensed, the estimated time based on
load size will be displayed. The actual cycle time may be
lengthened; however, the display will continue to show the
estimated time.
The sensing light will blink once a second at various times
during the cycle, such as when the washer is reducing extra
suds.
Add Garment
When “Add Garment” is lit, you may pause the washer, open
the door, and add items.
Steaming
This will light to show that the cycle is using a steam boost for
added cleaning power.
Done
Once the cycle is complete, this light will come on. Remove
the load promptly for best results. The Done indicator is also
lit during the TumbleFresh™ option.
TumbleFresh™ option
The TumbleFresh™ indicator will light when the TumbleFresh™
option is active. During this time, the washer will occasionally
tumble the load.
Eco Monitor
The Eco Monitor allows you to see how the settings you select
affect your energy savings. To use the Eco Monitor, choose
the best cycle, temperature, spin speed, soil level, and options
for the fabrics being washed. The Eco Monitor will rate the
water and energy use of those selections, from Good to Best.
You can then adjust the settings and options to decrease the
amount of energy used within that cycle.
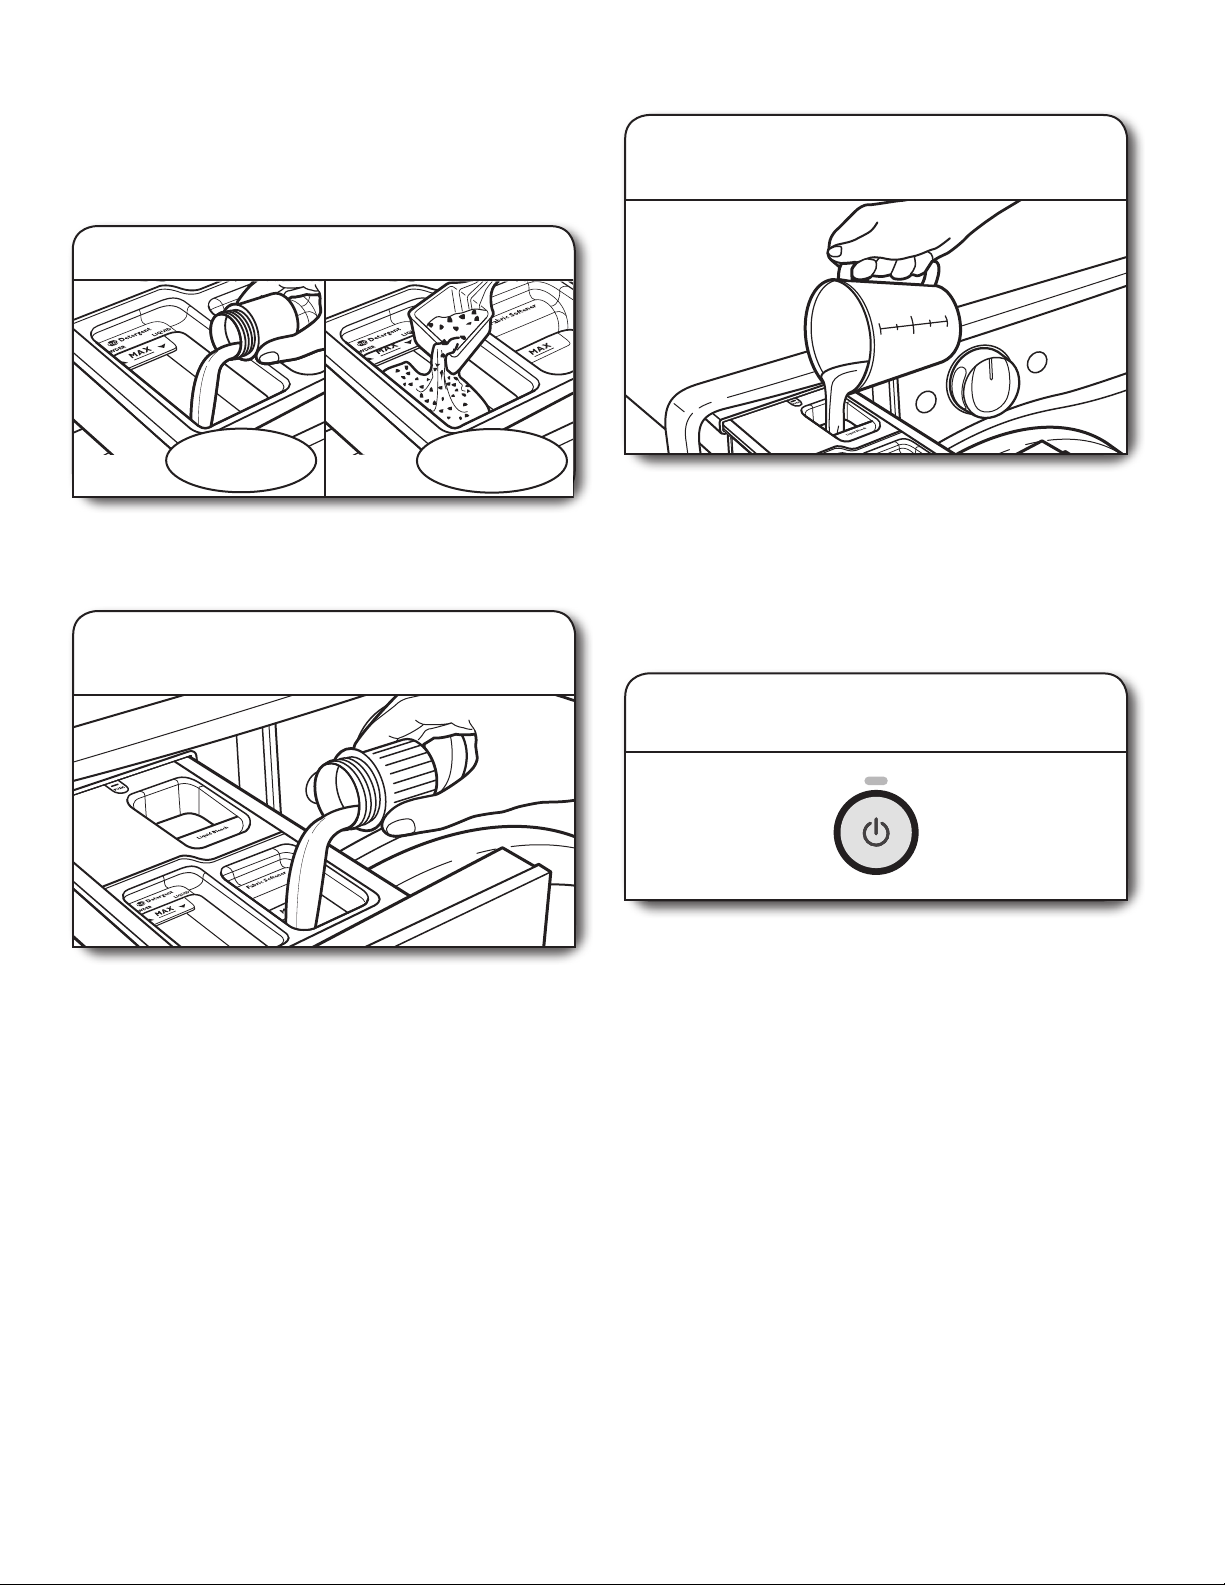
Adding HE detergent to dispenser
Selector
HE detergent
compartment
Pour a measured amount of HE
detergent into detergent compartment.
For powdered detergent, lift the selector
to the high position. For liquid detergent,
push down the selector to the low
position.
Do not overll; adding too much
detergent may cause detergent to be
dispensed into the washer too early.
Selector
in high
position
Powdered detergent:
Lift the selector to the high
position.
IMPORTANT:
n Do not add single-dose laundry packet to dispenser
drawer.
n Use powdered detergent when using the Delay Wash
option. Liquid detergent may seep out before the wash
begins.
Liquid detergent:
Push down the selector to
the low position.
Use only High Efciency
(HE) detergent.
Selector
in low
position
6
Page 7
CYCLE GUIDE
Settings and options shown in bold are default settings for that cycle. For best fabric care, choose the cycle, options, and settings
that best t the load being washed. Not all settings are available with each cycle, and some options cannot be used together.
NOTES:
n
Not all cycles, temperatures, options, or spin speeds are available on all models.
n
All wash temperature selections feature a cold rinse.
Items to wash
using default
cycle settings:
Normally soiled cottons, Normal Hot Extra Fast Heavy Steam Clean* This cycle combines medium-speed
linens, sheets, and Warm Fast Normal TumbleFresh™ tumbling and an extra-fast-speed
mixed garment loads Cool Medium Light Extra Rinse spin. This cycle is designed to
Cold PreSoak provide the most energy efciency.
Delay Wash
Heavily soiled white Whites Hot Extra Fast Heavy Steam Clean* Uses a longer wash time with
fabrics and garments Warm Fast Normal TumbleFresh™ fast-speed tumbling, extra rinsing,
Cool Medium Light Extra Rinse and an extra-fast-speed spin to
Cold Slow PreSoak provide optimal cleaning and rinsing
Delay Wash when bleach is used.
Sturdy colorfast Heavy Hot Extra Fast Heavy Steam Clean* Fast-speed tumbling and an
fabrics and heavily Duty Warm Fast Normal TumbleFresh™ extra-fast-speed nal spin help
soiled garments Cool Medium Light Extra Rinse provide optimal cleaning and
Cold Slow PreSoak reduce drying times.
Delay Wash
Sturdy towels and Towels Hot Extra Fast Heavy Steam Clean* Provides fast-speed tumbling,
wash cloths Warm Fast Normal TumbleFresh™ longer wash time, normal rinsing,
Cool Medium Light Extra Rinse and an extra-fast-speed spin to
Cold Slow PreSoak shorten drying time.
Delay Wash
Clothing, bedding Sanitize† Hot Extra Fast Heavy Steam Clean*
and towels requiring Fast Normal TumbleFresh™ available ensures sanitization.
sanitization Medium Light Extra Rinse Check recommended wash
Slow Delay Wash temperature of your items.
No clothes in washer Clean Use this cycle every 30 washes
Washer to keep the inside of your washer
with fresh and clean. This cycle uses a
affresh® higher water level. Use with affresh®
washer cleaner tablet or liquid
chlorine bleach to thoroughly clean
the inside of your washer. This
cycle should not be interrupted.
See “Washer Care.”
IMPORTANT: Do not place
garments or other items in the
washer during the Clean Washer
with affresh® cycle. Use this cycle
with an empty wash tub. See
“Washer Care” in “Washer
Maintenance.”
Cycle:
Wash
Temperature:
Spin
Speed:
Soil
Level:
Available
Options:
Cycle Details:
Using the highest wash temperature
* The Steam Clean option is only available when a Warm or Hot water temperature is selected.
† Sanitize
n This washer has a Sanitize Cycle that eliminates 99.9% of bacteria typically found on clothing,
bedding, and towels, based on independent, third-party laboratory testing. There is no carryover
of bacteria between loads after the cycle is complete.
n Use the Sanitize Cycle to clean heavily soiled, colorfast fabrics. This combines the hottest water
temperature to help ensure the removal of heavy soils and stains. It is recommended that you set your
hot water heater to 120°F (49°C) to ensure proper performance during this cycle.
continued on next page
7
Page 8
CYCLE GUIDE
Settings and options shown in bold are default settings for that cycle. For best fabric care, choose the cycle, options, and settings
that best t the load being washed. Not all settings are available with each cycle, and some options cannot be used together.
NOTES:
n
Not all cycles, temperatures, options, or spin speeds are available on all models.
n
All wash temperature selections feature a cold rinse.
Items to wash
using default
cycle settings:
Wet load of clothes Drain N/A Extra Fast N/A TumbleFresh™ Use Drain & Spin to remove excess
& Spin Fast Delay Wash water from the load. Spin speed
Medium can be set to a slower setting.
Slow
Swimwear, items Drain Hot Extra Fast Heavy TumbleFresh™ Select Drain & Spin; then select
that need rinsing & Spin Warm Fast Normal Delay Wash Extra Rinse to add water. The cycle
with Cool Medium Light includes an extra-fast-speed spin.
Extra Rinse Cold Slow For some fabrics, you may wish to
set the spin speed to a slower
setting.
Small loads of 3–4 Quick Wash Hot Extra Fast Heavy Steam Clean* For small loads (3–4 items) needed
lightly soiled garments Warm Fast Normal TumbleFresh™ quickly. This cycle combines
Cool Medium Light Extra Rinse fast-speed tumbling, a shortened
Cold Slow PreSoak wash time, and an extra-fast-speed
Delay Wash spin for reduced drying times.
Sheer fabrics, Delicates Hot Extra Fast Heavy Steam Clean* This cycle combines slow-speed
lingerie, sweaters, and Warm Fast Normal TumbleFresh™ tumbling and slow-speed spin
lightly-soiled shirts, Cool Medium Light Extra Rinse for gentle fabric care and reduced
blouses, trousers, Cold Slow PreSoak wrinkling.
pants, and skirts Delay Wash
Bright or darkly colored Cold Cold Extra Fast Heavy TumbleFresh™ This cycle uses a concentrated
cottons, linens, casual Wash Fast Normal Extra Rinse detergent solution along with cold
and mixed loads Medium Light Delay Wash water throughout the cycle to gently
lift out stains and care for fabrics.
* The Steam Clean option is only available when a Warm or Hot water temperature is selected.
Cycle:
Wash
Temperature:
Spin
Speed:
Soil
Level:
Available
Options:
Cycle Details:
Load Size Recommendations
For best results, follow the load size recommendations noted for each cycle.
Small load: Fill the washer drum with 3–4 items, not more than 1/4 full.
Medium load: Fill the washer drum up to about 1/2 full.
Large load: Fill the washer drum up to about 3/4 full.
Extra-large load: Fill the washer drum, but make sure clothes can tumble freely.
For best results, avoid packing tightly.
8
Page 9
USING YOUR WASHER
First wash cycle without laundry
Before washing clothes for the rst time, if not completed during
the nal installation step, choose the QUICK WASH cycle and
run it without clothes. Use only HE detergent. Use 1/2 the
manufacturer’s recommended amount for a medium-size load.
This initial cycle serves to ensure the interior is clean before
washing clothes.
2. Add laundry products (if desired)
1. Sort and prepare your laundry
Sort items by recommended cycle, water temperature, and
colorfastness. Separate heavily soiled items from lightly soiled.
Separate delicate items from sturdy fabrics. Treat stains
promptly and check for colorfastness by testing stain remover
products on an inside seam.
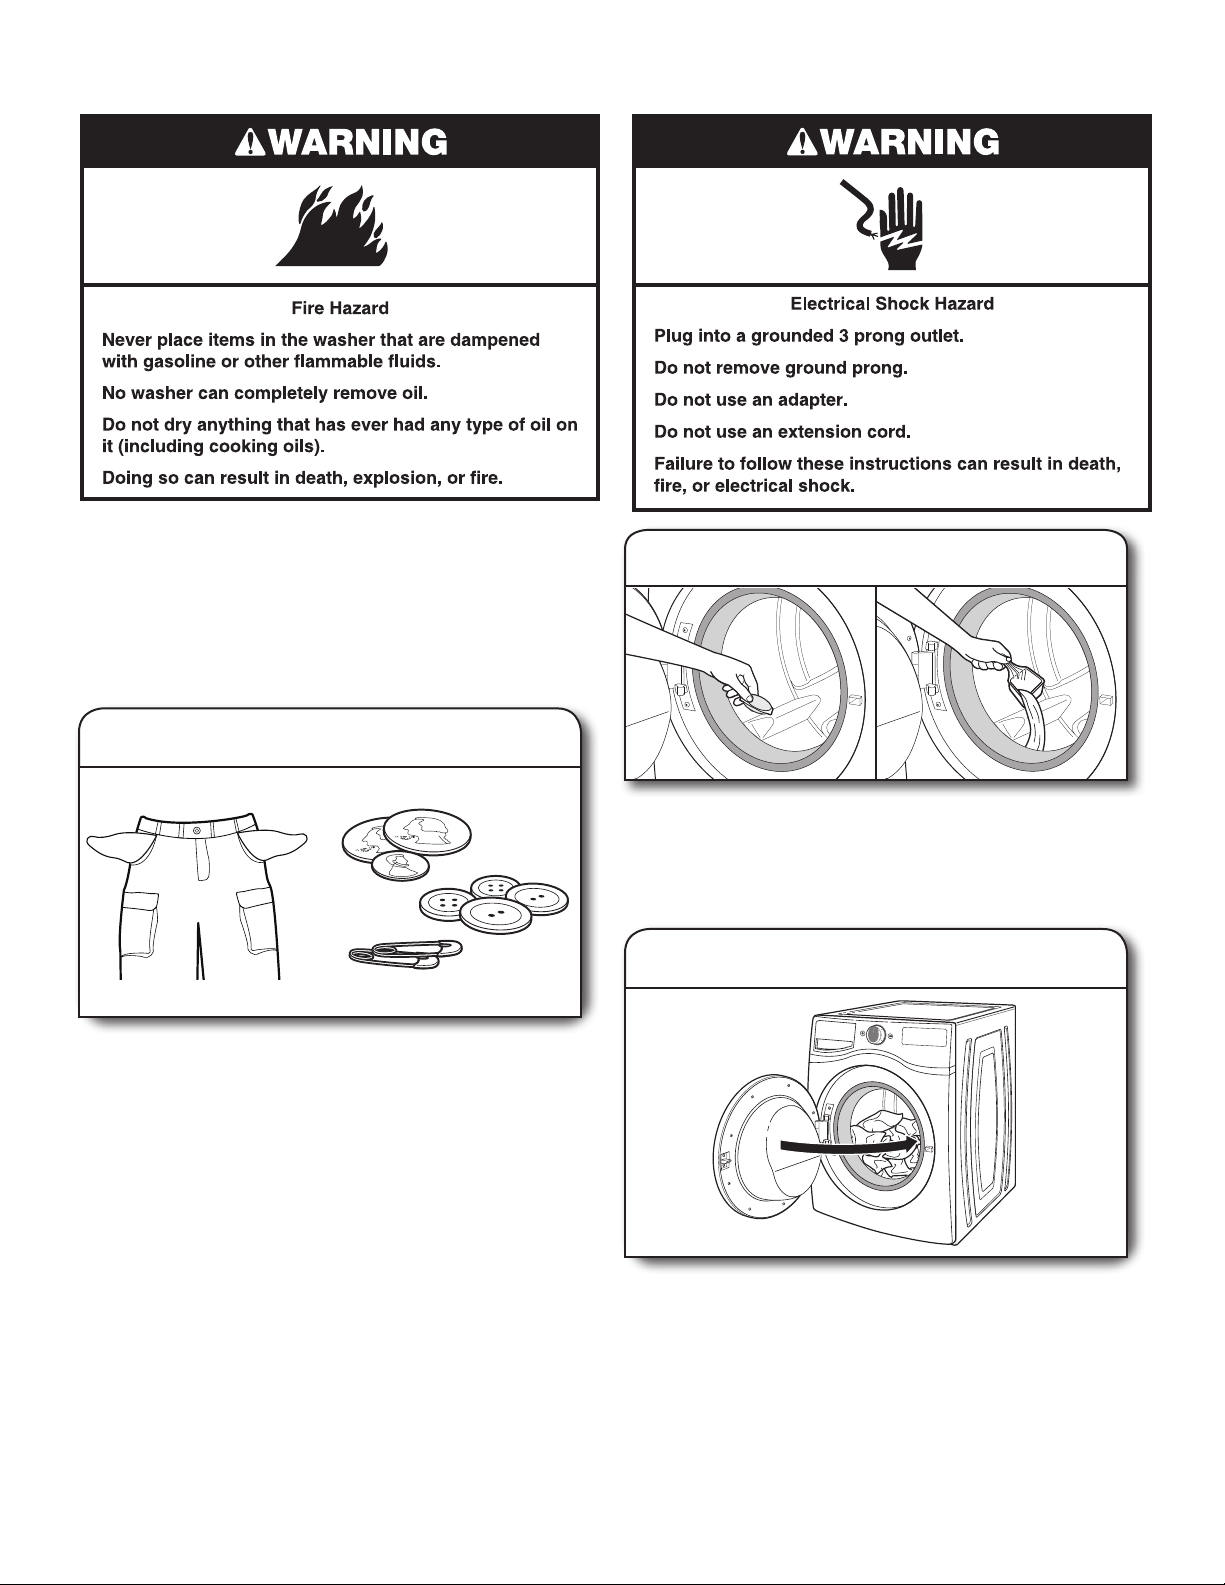
IMPORTANT:
n Empty pockets. Loose change, buttons, or any small object
can plug pumps and may require a service call.
n Close zippers, fasten hooks, tie strings and sashes, and
remove non-washable trim and ornaments.
n Mend rips and tears to avoid further damage to items
during washing.
n Turn knits inside out to prevent pilling. Separate lint-takers
from lint-givers. Synthetics, knits, and corduroy fabrics will
pick up lint from towels, rugs, and chenille fabrics.
n Do not dry garments if stains remain after washing, because
heat can set stains into fabric.
n Always read and follow fabric care labels and laundry
product instructions. Improper usage may cause damage
to your garments.
Single-dose laundry packet, Oxi-type boosters, color-safe
bleach, or fabric softener crystals can be added to the drum
prior to adding laundry.
NOTE: Do not add clothes to washer drum prior to adding
laundry products. Always follow manufacturer’s instructions.
3. Load laundry into washer
Place a load of sorted clothes loosely in the washer. Items need
to move freely for best cleaning and to reduce wrinkling and
tangling. Close the washer door by pushing it rmly until the
latch clicks.
n Depending on load type and cycle, the washer can be fully
loaded, but not tightly packed. Washer door should close
easily. See “Cycle Guide” for loading suggestions.
n Mix large and small items and avoid washing single items.
Load evenly.
n Wash small items in mesh garment bags. For multiple items,
use more than one bag and ll bags equally.
9
Page 10
USING YOUR WASHER
USING LAUNDRY PRODUCT DISPENSERS
NOTE: Do not add single-dose laundry packets, Oxi-type
boosters, color-safe bleach, or fabric softener crystals to
dispensers. They will not dispense correctly.
4. Add HE detergent
6. Add liquid chlorine bleach to dispenser
(if desired)
Liquid
HE detergent
Adjust the selector, based on type of HE detergent used
(either liquid or powdered). See “Using the Dispenser
Drawer” instructions on how to use the dispenser.
Powdered
HE detergent
5. Add liquid fabric softener to dispenser
(if desired)
Pour a measured amount of liquid fabric softener into liquid
fabric softener compartment. Always follow manufacturer’s
directions for correct amount of fabric softener based on your
load size.
Fabric softener is always dispensed in the last rinse, even if
Extra Rinse is selected.
IMPORTANT: Do not overll, dilute, or use more than 1/4 cup
(60 mL) of fabric softener. Do not ll past the MAX line.
Overlling dispenser will cause fabric softener to immediately
dispense into washer.
n Do not spill or drip any fabric softener onto the clothes.
n Do not use liquid fabric softener dispenser balls in this
washer. They will not dispense correctly.
Add liquid chlorine bleach to the bleach compartment.
Do not overll, dilute, or use more than 2/3 cup (165 mL).
Do not use color-safe bleach or Oxi in the same cycle with
liquid chlorine bleach.
n
Always measure liquid chlorine bleach. Use a measuring cup
with a pour spout; do not guess.
n
Do not ll beyond the “MAX” level. Overlling could cause
garment damage.
7. Touch POWER to turn on washer
(optional)
Slowly close the dispenser drawer. Make sure the drawer is
closed completely, then touch POWER to turn on the washer
or go to Step 8.
10
Page 11
8. Select CYCLE*
Turn cycle knob to select your wash cycle. See “Cycle Guide”
for details on cycle features.
10. Select any additional options*
To add an option to the cycle, touch its name – Steam Clean,
Extra Rinse, TumbleFresh, or Cycle Signal. To remove an
option from the selected cycle, touch the option again.
9. Adjust settings, if desired*
The display will show the default settings for the selected
cycle. To adjust a setting, touch its name – Wash Temp, Spin,
Soil, or Presoak. Adjusting settings will change the Estimated
Time Remaining. Tightly packing the load, unbalanced loads,
or excessive suds may also cause the washer to increase the
cycle time.
11. Setting a delayed wash
If you do not want to begin a cycle immediately, you may
choose the DELAY WASH option. This will delay the start
of the wash cycle by up to 12 hours.
To set a delayed wash:
1. Touch DELAY WASH + and – buttons to set the desired
delay time.
2. Touch and hold START to set the delay. The delay
countdown has started when the START light stops blinking.
* Not all options and settings are available with all cycles.
See “Cycle Guide” for available options and settings.
11
Page 12
OR
USING YOUR WASHER
12. Touch and hold START to begin
wash cycle
Touch and hold START to start the wash cycle. To pause a
cycle in progress, touch START once, then touch and hold
again to continue the cycle. To cancel a cycle, touch POWER.
Once you touch and hold START, you will hear the door lock,
unlock, and lock again. The washer door will remain locked
during the wash cycle.
Unlocking the door to add garments:
If you need to open the door to add 1 or 2
missed garments, you may do so while the
“Add Garment” light is lit.
Touch START once; the door will unlock
once the washer movement has stopped.
This may take several minutes. Then close
door and touch and hold START again to
restart the cycle.
13. Remove garments promptly
after cycle is nished
Promptly remove garments after cycle has
completed to avoid odor and rusting of
metal objects on garments. When unloading
garments, pull back the door seal and check
for small items between the tub and the washer drum.
If you will be unable to remove the load
promptly, use the TumbleFresh™ option
If selected, the TumbleFresh™ option will
tumble the load periodically for up to 6 hours.
To turn off the TumbleFresh™ option, touch POWER. To set the
washer so that the TumbleFresh™ option does not come on for
future cycles, touch TumbleFresh.
NOTE:
n
The door will remain locked while the TumbleFresh™ option
is active. To cancel the option and unlock the door, touch
POWER.
n
A small amount of water may remain in the dispensers after
the wash cycle is complete. This is normal.
n
This washer has a tight seal to avoid water leaks. To avoid
odors, leave the door open to allow the washer to dry
between uses.
.
12
Page 13
WASHER MAINTENANCE
WATER INLET HOSES
Replace inlet hoses after 5 years of use to reduce the risk
of hose failure. Periodically inspect and replace inlet hoses
if bulges, kinks, cuts, wear, or leaks are found.
When replacing your inlet hoses, mark the date of
replacement on the label with a permanent marker.
WASHER CARE
Recommendations to Help Keep Your Washer Clean
and Performing at its Best
1. Always use High Efciency (HE) detergents and follow the
HE detergent manufacturer’s instructions regarding the
amount of HE detergent to use. Never use more than the
recommended amount because that may increase the
rate at which detergent and soil residue accumulate inside
your washer, which in turn may result in undesirable odor.
2. Use warm or hot water washes sometimes (not exclusively
cold water washes), because they do a better job of
controlling the rate at which soils and detergent accumulate.
3. Always leave the washer door slightly ajar between uses
to help dry out the washer and prevent the buildup of
odor-causing residue.
Cleaning Your Front Loading Washer
Read these instructions completely before beginning the
routine cleaning processes recommended below. This
Washer Maintenance Procedure should be performed,
at a minimum, once per month or every 30 wash cycles,
whichever occurs sooner, to control the rate at which soils
and detergent may otherwise accumulate in your washer.
Cleaning the Door Seal
1. Open the washer door and remove any clothing or items
from the washer.
2. Inspect the colored seal between the door opening and
the drum for stained areas or soil buildup. Pull back the
seal to inspect all areas under the seal and to check for
foreign objects.
3. If stained areas or soil buildup are found, wipe down
these areas of the seal using either of the following
two procedures:
a. affresh
i. When the cycle is complete, gently pull back the
b. Dilute Liquid Chlorine Bleach Procedure:
i. Mix a dilute bleach solution, using 3/4 cup (177 mL)
ii. Wipe the seal area with the dilute solution, using
iii. Let stand 5 minutes.
iv. Wipe down area thoroughly with a dry cloth and let
IMPORTANT:
n Wear rubber gloves when cleaning with bleach.
n Refer to the bleach manufacturer’s instructions
®
Grit Grabber™ Cloth Procedure:
rubber door seal and clean the entire surface with
the rough side of the Grit Grabber™ cloth.
of liquid chlorine bleach and 1 gallon (3.8 L) of warm
tap water.
a damp cloth.
washer interior air dry with door open.
for proper use.
WASHER CARE (cont.)
Cleaning the Inside of the Washer
This washer has a special cycle that uses higher water
volumes in combination with affresh® Washer Cleaner or
liquid chlorine bleach to thoroughly clean the inside of the
washer. Steam washer models also utilize steam to enhance
cleaning in this special cycle.
NOTE: Read these instructions completely before beginning
the cleaning process.
Begin procedure
1. affresh® Washer Cleaner Cycle Procedure
(Recommended for Best Performance):
a. Open the washer door and remove any clothing
or items.
b. Add an affresh® Washer Cleaner tablet to the washer
drum.
c. Do not add the affresh® Washer Cleaner tablet
to the dispenser drawer.
d. Do not add any detergent or other chemical to the
washer when following this procedure.
e. Close the washer door.
f. Select the CLEAN WASHER cycle.
g. Touch and hold START to begin the cycle. The Clean
Washer Cycle Operation is described below.
2. Chlorine Bleach Procedure:
a. Open the washer door and remove any clothing
or items.
b. Open the dispenser drawer and add liquid chlorine
bleach to the MAX level in both the bleach
compartment and the fabric softener compartment.
NOTE: Use of more liquid chlorine bleach than is
recommended above could cause washer damage
over time.
c. Close the washer door and the dispenser drawer.
d. Do not add any detergent or other chemicals to the
washer when following this procedure.
e. Close the washer door.
f. Select the CLEAN WASHER cycle.
g. Touch and hold START to begin the cycle. The Clean
Washer Cycle Operation is described below.
NOTE: For best results, do not interrupt cycle.
Description of Clean Washer Cycle Operation:
1. The Clean Washer cycle will determine whether clothing
or other items are in the washer.
2. If no items are detected in the washer, it will proceed
with the cycle.
a. If any items are detected in the washer, “rL” (remove
load) will be displayed. The door will unlock. Open
washer and remove any garments from the washer
drum.
b. Touch POWER to clear the “rL” code.
c. Touch and hold START to restart the cycle.
After the cycle is complete, leave the door open slightly to
allow for better ventilation and drying of the washer interior.
13
Page 14
WASHER MAINTENANCE
WASHER CARE (cont.)
Cancellation of Clean Washer Cycle Operation:
If the Clean Washer cycle is canceled by the user after it has
been initiated, it may take up to 30 minutes for the washer
to purge any affresh® Cleaner, chlorine bleach, or other
chemistry from the wash system and to adequately rinse any
remaining chemistry. The washer door will remain locked until
the cancellation process has been completed. This ensures
no cleaning chemistry will be carried over to the next wash
cycle and reduces the potential for damage to subsequent
loads of laundry or to the washer itself.
Clean Washer Cycle Cancellation Procedure:
1. Touch POWER on the washer once.
2. The washer will begin to drain and rinse away the
remaining cleaning chemistry.
3. The cycle will complete the cancellation process in
approximately 30 minutes or less.
4. The washer then can be used to either repeat the Clean
Washer cycle or to wash laundry using one of the regular
wash cycles selected by the user.
Cleaning the Dispensers
After a period of using your washer, you may nd some
residue buildup in the washer’s dispensers. To remove
residue from the dispensers, remove the drawer and wipe
the surfaces with a damp cloth and towel dry either before
or after you run the Clean Washer cycle. Use an all-purpose
surface cleaner, if needed.
IMPORTANT: Dispenser is not dishwasher safe.
Cleaning the Outside of the Washer
Use a soft, damp cloth or sponge to wipe up any spills.
Occasionally wipe the outside of your washer to help
keep it looking new. Use mild soap and water.
IMPORTANT: To avoid damaging the washer’s nish, do not
use abrasive products.
CLEAN WASHER CYCLE REMINDER
The Clean Washer LED will ash at the
end of a wash cycle when the washer
has run 30 wash cycles. This is a
reminder to run the Clean Washer cycle.
If the Clean Washer cycle is not turned on, the LED will
stop ashing at the end of a wash cycle after running 3
more regular wash cycles. After 30 more wash cycles are
completed, the Clean Washer LED will again ash at the end
of a wash cycle as a reminder.
REMOVING THE DISPENSER
To remove:
1. Pull dispenser drawer out until it stops.
2. Press down on the release tab and pull straight out to
remove the dispenser.
3. Lift off cover panel by
pulling straight up.
To replace:
1. Slide cover panel back
onto posts on dispenser.
2. Align edges of dispenser
with guides in washer,
then slide dispenser
back into slot.
14
Page 15
NON-USE AND VACATION CARE
REINSTALLING/USING WASHER AGAIN
Operate your washer only when you are home. If moving,
or not using your washer for a period of time, follow these
steps:
1. Unplug or disconnect power to washer.
2. Turn off water supply to washer to avoid ooding due
to water pressure surges.
3. Clean the dispensers. See “Cleaning the Dispensers.”
WINTER STORAGE CARE
IMPORTANT: To avoid damage, install and store washer
where it will not freeze. Because some water may stay in
hoses, freezing can damage washer. If storing or moving
during freezing weather, winterize your washer.
To winterize washer:
1. Shut off both water faucets, disconnect and drain water
inlet hoses.
2. Put 1 qt. (1 L) of R.V.-type antifreeze in washer drum
and run washer on NORMAL cycle for about two
minutes to mix antifreeze and remaining water.
3. Unplug washer or disconnect power.
To reinstall washer after non-use, vacation, winter storage,
or moving:
1. Refer to Installation Instructions to locate, level, and
connect washer.
2. Before using again, run washer through the following
recommended procedure:
To use washer again:
1. Flush water pipes and hoses. Reconnect water inlet
hoses. Turn on both water faucets.
TRANSPORTING YOUR WASHER
1. Shut off both water faucets. Disconnect and drain water
inlet hoses.
2. If washer will be moved during freezing weather, follow
WINTER STORAGE CARE directions before moving.
3. Disconnect drain hose from drain system and from back
of washer.
4. Unplug power cord.
5. Place inlet hoses and drain hose inside washer drum.
6. Bundle power cord with a rubber band or cable tie to
keep it from hanging onto the ground.
IMPORTANT: Call for service to install new transport bolts.
Do not reuse transport bolts. Washer must be transported
in the upright position. To avoid structural damage to
your washer, it must be properly set up for relocation by a
certied technician.
2. Plug in washer or reconnect power.
3. Run washer through HEAVY DUTY cycle to clean washer
and remove antifreeze, if used. Use only HE detergent.
Use half the manufacturer’s recommended amount for a
medium-size load.
15
Page 16

TROUBLESHOOTING
First try the solutions suggested here or visit our website at www.whirlpool.com/product_help –
In Canada www.whirlpool.ca for assistance and to possibly avoid a service call.
If you experience
Error Code Appears in Display
Once any possible issues are corrected, touch POWER once to clear the code. Reselect and restart the cycle.
“Sud” (Excess suds)
appears in display
F
08 followed by E01
(water supply error)
appears in display
F
09 followed by E01
(drain pump system
error) appears in display
F
05 followed by E02
(door will not lock)
appears in display
F
07 followed by E01
(motor drive error)
appears in display
“rL” (remove load)
appears in display
Washer making error
beeps
Excessive suds in washer. Washer is
running a suds reduction routine.
Check for proper water supply.
Check plumbing for correct drain
hose installation. Drain hose extends
into standpipe farther than 41⁄2"
(114 mm).
Not using HE detergent or using too
much HE detergent.
Washer door not locking.
Motor is having difculty turning
the drum.
Load detected in drum during Clean
Washer with affresh® cycle.
Door has not been opened and closed
for at least 3 cycles.
Possible Causes
Solution
Allow the washer to continue. Use only HE detergent.
Always measure detergent, and base detergent quantity on
load size. Follow detergent manufacturer’s instructions.
Both hoses must be attached and have water owing to the
inlet valve.
Both hot and cold water faucets must be on.
Inlet valve screens on washer may be clogged.
Remove any kinks in the inlet hose.
Touch POWER once to clear the code. Then touch POWER
again to restart washer. If code appears again, call for service.
Check drain hose for proper installation.
Make sure the drain hose is not kinked, pinched, or blocked.
Remove any clogs from drain hose.
Use drain hose form and securely attach to drainpipe or tub.
Lower drain hose if the end is higher than 96" (2.4 m) above
the oor.
Use only HE detergent. Always measure detergent and follow
manufacturer’s directions based on load size and soil level.
Touch POWER to cancel the cycle. Make sure the door is
closed completely and latching. Check for items in the washer
drum that may be keeping the door from closing completely.
Washer is tightly packed. Remove some items. See “Cycle
Guide” for load size recommendations. Make sure that all
shipping materials have been removed. See the Installation
Instructions.
Remove items from washer drum and restart Clean Washer
with affresh® cycle.
This code may appear when the washer is rst turned on.
Open and close the door to clear the display.
Washer beeps when
START is touched
F
## E## code other
than as described above
appears in display
“Int” (interrupted)
appears in display
Clean Washer LED
ashing at end of wash
cycle
16
Door not closed.
System error code.
The cycle was paused or cancelled. The washer can take 20 to 30 minutes to stop spinning and
The washer has run 30 wash cycles
and is indicating a reminder to run the
Clean Washer cycle.
Close the door completely.
Touch POWER once to clear the code. Then touch POWER
again to restart washer. If code appears again, call for service.
drain and will display this error code during that time. Touch
POWER once to clear the code. Then touch POWER again to
restart washer.
Run the Clean Washer cycle. If the Clean Washer cycle is not
turned on, the LED will stop ashing at the end of a wash cycle
after running 3 more regular wash cycles. After 30 more wash
cycles are completed, the Clean Washer LED will again ash at
the end of a wash cycle as a reminder.
Page 17

TROUBLESHOOTING
First try the solutions suggested here or visit our website at www.whirlpool.com/product_help –
In Canada www.whirlpool.ca for assistance and to possibly avoid a service call.
If you experience
Vibration or Off-Balance
Vibration, rocking, or
“walking”
Noises
Clicking or metallic
noises
Gurgling or humming
Rolling or sloshing
and occasional clicking
(on slow-speed spin)
Possible Causes
Feet may not be in contact with the
oor and locked.
Washer may not be level.
Load could be unbalanced
or too large.
The shipping bolts are still in the
back of the washer.
Door locking or unlocking.
Objects caught in washer
drain system.
Washer may be draining water.
are balancing the load.
Solution
Front and rear feet must be in rm contact with oor, and washer
must be level to operate properly. Jam nuts must be tight
against the bottom of the cabinet.
Check oor for exing or sagging. If ooring is uneven, a 3/4"
(19 mm) piece of plywood under your washer will reduce sound.
See “Level the Washer” in Installation Instructions.
Avoid tightly packing the load. Avoid washing single items.
Balance a single item such as a rug or jeans jacket with a
few extra items.
Item or load not suitable for selected cycle. See “Cycle Guide”
and “Using Your Washer.”
See “Remove transport bolts from washer” in the
Installation Instructions.
The door will lock unlock and lock again. You will hear 3 clicks
after touching and holding START. This is normal.
Empty pockets before washing. Loose items such as coins
could fall between washer drum and tub or may block pump.
It may be necessary to call for service to remove items.
It is normal to hear metal items on clothing such as metal snaps,
buckles, or zippers touch against the stainless steel drum.
The pump may make a humming sound with periodic gurgling
or surging as nal amounts of water are removed during the
spin/drain cycles. This is normal at certain stages of the cycle.
This is normal at certain stages of the cycle.Steel balls in the balancing system
Water Leaks
Check the following for
proper installation
Water or suds leaking
from door or rear of
cabinet
Washer not performing as expected
Load not completely
covered in water
Fill hoses not attached tightly.
Fill hose washers.
Drain hose connection.
Check household plumbing for leaks
or clogged sink or drain.
Not using HE detergent or using too
much HE detergent.
Residue on door glass.
Door opened during “Add Garment.” Water can drip off the inside of the door when the door is
Water level not visible on door or
does not cover clothes.
Tighten ll-hose connection.
Properly seat all four ll-hose at washers.
Check that the drain hose is properly secured to drainpipe or
laundry tub.
Water can back up out of a clogged sink or drainpipe. Check
all household plumbing for leaks (laundry tubs, drain pipe,
water pipes, and faucets.)
Only use HE detergent. Suds from regular detergents can
cause leaking from the door or rear of cabinet. Always measure
detergent and follow manufacturer’s directions based on your
load requirements.
Periodically clean the underside of the glass window to avoid
potential leaks.
opened after the start of a cycle.
This is normal for an HE front load washer. The washer senses
load sizes and adds the correct amount of water for optimal
cleaning.
17
Page 18

TROUBLESHOOTING
First try the solutions suggested here or visit our website at www.whirlpool.com/product_help –
In Canada www.whirlpool.ca for assistance and to possibly avoid a service call.
If you experience
Washer not performing as expected (cont.)
Washer won’t run or ll,
washer stops working
Check for proper water supply.
Check proper electrical supply.
Normal washer operation.
The washer door is not rmly shut. The door must be closed during operation.
Washer not loaded as recommended.
Possible Causes
Solution
Both hoses must be attached and have water owing to
inlet valve.
Both hot and cold water faucets must be turned on.
Check that inlet valve screens have not become clogged.
Check for any kinks in inlet hoses, which can restrict water ow.
Plug power cord into a grounded 3-prong outlet.
Do not use an extension cord.
Ensure there is power to outlet.
Check electrical source or call an electrician to check if voltage
is low.
Reset a tripped circuit breaker. Replace any blown fuses.
NOTE: If problems continue, contact an electrician.
Door must be completely closed and latched for washer to run.
Washer will pause during certain phases of cycle.
Do not interrupt cycle.
The washer pauses for about 2 minutes during certain cycles.
Allow the cycle to continue. Some cycles feature periods of
tumbling and soak.
Washer may be stopped to reduce suds.
Cold Wash uses less water in the beginning of the cycle to
provide a high concentration of detergent for optimal cleaning
action. Following this concentrated tumbling, more water is
used to complete the wash.
Remove several items, rearrange load evenly in washer drum.
Close door and touch and hold START.
Do not add more than 1 or 2 additional items after cycle has
started to avoid tightly packing or unbalancing.
Do not add more water to the washer.
18
Page 19

TROUBLESHOOTING
First try the solutions suggested here or visit our website at www.whirlpool.com/product_help –
In Canada www.whirlpool.ca for assistance and to possibly avoid a service call.
If you experience
Washer not performing as expected (cont.)
Washer won’t run or ll,
washer stops working
(cont.)
Washer not draining/
spinning, loads are
still wet
Not using HE detergent or using too
much HE detergent.
Door not opened between cycles.
Drain hose extends into standpipe
farther than 4.5" (114 mm).
The drain hose is clogged, or the
end of the drain hose more than
96" (2.4 m) above the oor.
The drain hose ts too tightly
in the standpipe, or is it taped
to the standpipe.
Using cycles with a slower spin
speed.
Washer not loaded as recommended.
The load may be out of balance.
Not using HE detergent or using too
much HE detergent.
Small items may have been caught
in the pump or stuck between the
washer drum and the outer tub.
Possible causes
Solution
Only use HE detergent. Suds from regular detergents can
slow or stop the washer. Always measure detergent, following
manufacturer’s directions based on your load requirements.
To remove suds, cancel cycle. Select DRAIN & SPIN with Extra
Rinse. Touch and hold START. Do not add more detergent.
After 3 wash cycles in a row are completed, the door must be
opened and then closed before a new cycle can begin.
Check drain hose for proper installation. Use drain hose form
and securely attach to drainpipe or tub. Do not tape over drain
opening.
Lower drain hose if the end is higher than 96" (2.4 m) above
the oor. Remove any clogs from drain hose. See “Installation
Requirements” in Installation Instructions.
The drain hose should be loose yet t securely. Do not seal the
drain hose with tape. The hose needs an air gap. See “Secure
the Drain Hose” in Installation Instructions.
Cycles with slower spin speeds remove less water than cycles
with fast spin speeds. Use the recommended cycle/speed spin
for your garment.
A tightly packed or unbalanced load may not allow the washer
to spin correctly, leaving the load wetter than normal. See
“Cycle Guide” for load size recommendation for each cycle.
Avoid washing single items. Balance a single item such as a rug
or jeans jacket with a few extra items.
Use only HE detergent. Suds from regular detergent or using too
much detergent can slow or stop draining or spinning. Always
measure and follow manufacturer’s directions for your load.
To remove extra suds, select DRAIN & SPIN with Extra Rinse.
Do not add detergent.
Check the drum for any items sticking through the drum holes.
Empty pockets and use garment bags when washing small
items.
Door locked at end
of wash cycle
Door will not unlock
Incorrect or wrong
wash or rinse
temperatures
Water remaining in washer after cycle.
TumbleFresh™ option is on.
Door locks when cycle has started.
Check for proper water supply.
Washing many loads. Your hot water tank may not have enough hot water to keep up
Select DRAIN & SPIN to remove any water remaining in the
washer. The washer door will unlock at the end of the drain.
While this option is on, the load is tumbled periodically for up
to 6 hours. The door remains locked during this time. To unlock
the door, cancel the option by touching POWER.
If the “Add Garment” light is lit, touch START once. The door
will unlock.
Make sure hot and cold inlet hoses are not reversed.
Both hoses must be attached to both washer and faucet, and
have both hot and cold water owing to inlet valve.
Check that inlet valve screens are not clogged.
Remove any kinks in hoses.
with the number of hot or warm washes. This is normal.
19
Page 20

TROUBLESHOOTING
First try the solutions suggested here or visit our website at www.whirlpool.com/product_help –
In Canada www.whirlpool.ca for assistance and to possibly avoid a service call.
If you experience
Washer not performing as expected (cont.)
Desired setting or
option does not light
Load not rinsed
For best performance, not all
settings are available with each cycle,
and some options cannot be used
together.
Check for proper water supply.
Not using HE detergent or using too
much HE detergent.
Washer not loaded as recommended. Avoid tightly packing the washer. The washer will not rinse well
The load may be out of balance.
Possible Causes
Solution
See the “Cycle Guide” for the available settings and options for
each cycle.
Make sure hot and cold inlet hoses are not reversed.
Both hoses must be attached and have water owing to the
inlet valve.
Both hot and cold water faucets must be on.
Inlet valve screens on washer may be clogged.
Remove any kinks in the inlet hose.
The suds from regular detergent can cause the washer
to operate incorrectly.
Use only HE detergent. Always measure detergent and follow
manufacturer’s directions based on load size and soil level.
if tightly packed. Load with dry items only. See the “Cycle
Guide” for load size recommendations for each cycle.
Use cycle designed for the fabrics being washed.
Add only 1 or 2 garments after washer has started.
When load unbalance occurs, a washing process will start
to redistribute the load. This may lengthen the cycle time.
Avoid washing single items. Balance a single item such as
a rug or jeans jacket with a few extra items.
Load is wrinkled,
twisted, or tangled
Not cleaning or
removing stains
Washer not loaded as recommended. Add load loosely. Items need to move freely reduce
wrinkling and tangling. See the “Cycle Guide” for load
size recommendations for each cycle.
Reduce tangling by mixing types of load items. Use the
recommended cycle for the type of garments being washed.
Wash action and/or spin speed too
fast for load.
The washer is not unloaded promptly.
Not choosing the right cycle for the
load being washed.
The wash water was not warm
enough to relax wrinkles.
Washer not loaded as recommended.
Not using HE detergent or using too
much HE detergent.
Hard water or high level of iron (rust)
in water.
Fabric softener dispensing ball used.
Powdered detergent used for
slow-speed cycle.
Select a slower spin speed. Note that items will be wetter
than when using a faster speed spin.
Unload the washer as soon as it stops or use TumbleFresh
if you will not be able to unload the washer at the end of the
cycle.
Use the Delicates cycle or another cycle with a slow spin
speed to reduce wrinkling.
If safe for load, use warm or hot wash water.
Add load loosely. Items need to move freely for best cleaning.
See the “Cycle Guide” for load size recommendations for each
cycle.
Add only 1 or 2 garments after washer has started.
Use only HE detergent. Always measure detergent and follow
manufacturer’s directions based on load size and soil level.
You may need to install a water softener and/or iron lter.
Dispensing balls will not operate correctly with this washer.
Add liquid fabric softener to the fabric softener compartment.
Consider using liquid detergent.
™
20
Page 21

TROUBLESHOOTING
First try the solutions suggested here or visit our website at www.whirlpool.com/product_help –
In Canada www.whirlpool.ca for assistance and to possibly avoid a service call.
If you experience
Washer not performing as expected (cont.)
Not cleaning or
removing stains (cont.)
Odors
Fabric Damage
Gray whites, dingy
colors
Not using correct cycle for fabric type.
Not using dispensers.
Not washing like colors together.
Not enough detergent used,
or hard water.
Monthly maintenance not done as
recommended.
Not using HE detergent or using too
much HE detergent.
Door not left open after use.
Sharp items were in pockets during
wash cycle.
Strings and straps could have tangled.
Items may have been damaged before
washing.
Fabric damage can occur if washer is
tightly packed.
Liquid chlorine bleach may have been
added incorrectly.
Load not sorted properly.
Wash temperatures too low.
Not enough detergent used,
or hard water.
Possible Causes
Solution
Use a higher soil level setting and warmer wash temperature
to improve cleaning.
If using Quick Wash cycle, wash only a few items.
Use Whites and Heavy Duty cycle for tough cleaning.
Add an extra rinse for heavily soiled loads.
Use dispensers to avoid chlorine bleach and fabric softener
staining.
Load dispensers before starting a cycle.
Avoid overlling.
Do not add products directly to load.
Wash like colors together and remove promptly after the cycle is
complete to avoid dye transfer.
Use more detergent for washing heavy soils in cold or
hard water.
Run the Clean Washer cycle with affresh® cleaner monthly.
See “Washer Care” in “Washer Maintenance.”
Unload washer as soon as cycle is complete. Use the
TumbleFresh™ option if load cannot be removed immediately
after the wash is complete.
Use only HE detergent. Be sure to measure correctly. Always
follow the manufacturer’s directions.
See “Washer Care” section.
This washer has a tight seal to avoid water leaks. To avoid
odors, leave the door open to allow the washer to dry
between uses.
Empty pockets, zip zippers, and snap or hook fasteners before
washing to avoid snags and tears.
Tie all strings and straps before starting wash load.
Mend rips and broken threads in seams before washing.
Avoid tightly packing the washer. Load with dry items only.
Use cycle designed for the fabrics being washed.
Add only 1 or 2 garments after washer is started.
Do not pour liquid chlorine bleach directly onto load. Wipe up
bleach spills.
Undiluted bleach will damage fabrics. Do not use more than
recommended by manufacturer.
The transfer of dye can occur when mixing whites and colors in
a load. Sort dark clothes from whites and lights.
Use hot or warm temperatures if safe for the load. Make sure
your hot water system is adequate to provide a hot water wash.
Use more detergent for washing heavy soils in cold or
hard water.
21
Page 22

TROUBLESHOOTING
First try the solutions suggested here or visit our website at www.whirlpool.com/product_help –
In Canada www.whirlpool.ca for assistance and to possibly avoid a service call.
If you experience
Washer not performing as expected (cont.)
Incorrect dispenser
operation
Single-dose laundry
packet not dissolving
Cycle time changes or
cycle time too long
Clogged dispensers or laundry
products dispensing too soon.
Liquid chlorine bleach not used in
bleach compartment.
Water in dispenser after cycle has
nished.
Adding laundry packet incorrectly. Be sure laundry packet is added to washer drum before
Normal washer operation. The cycle times vary automatically based on your water
Excessive suds in washer.
Load may be out of balance.
Not using correct cycle for load type.
Possible Causes
Solution
Do not overll dispenser. Overlling causes immediate
dispensing.
Load dispensers before starting a cycle.
Homes with low water pressure may result in residual powder
in the dispenser. To avoid, select a warmer wash temperature if
possible, depending on your load.
Use only liquid chlorine bleach in the bleach compartment.
It is normal for small amounts of water to remain in dispenser at
the end of the cycle.
adding clothes. Do not add packet to dispenser. Follow the
manufacturer’s instructions to avoid damage to your garments.
pressure, water temperature, detergent, and clothes load.
The options you select will also affect the cycle times.
When excessive suds are detected, a special suds routine
automatically starts to remove extra suds and ensure proper
rinsing of your garments. This routine will add time to the
original cycle.
When load unbalance occurs, a washing process will start
to redistribute the load. This extends the cycle time. Avoid
washing single items. Balance a single item such as a rug or
jeans jacket with a few extra items.
The Quick Wash cycle is designed for smaller load sizes
(3–4 items) of lightly soiled garments. If larger loads are
washed in this cycle, cycle time will be increased.
When using the Quick Wash or Delicates cycles, you should
wash small loads. This ensures a gentle wash for your garments
without increasing cycle times.
22
Page 23

WHIRLPOOL CORPORATION LAUNDRY WARRANTY
LIMITED WARRANTY
For one year from the date of purchase, when this major appliance is installed, operated, and maintained according to instructions
attached to or furnished with the product, Whirlpool Corporation or Whirlpool Canada LP (hereafter “Whirlpool”) will pay for Factory
Specied Replacement Parts and repair labor to correct defects in materials or workmanship that existed when this major appliance
was purchased.
YOUR SOLE AND EXCLUSIVE REMEDY UNDER THIS LIMITED WARRANTY SHALL BE PRODUCT REPAIR AS PROVIDED HEREIN.
Service must be provided by a Whirlpool designated service company. This limited warranty is valid only in the United States or
Canada and applies only when the major appliance is used in the country in which it was purchased. This limited warranty is effective
from the date of original consumer purchase. Proof of original purchase date is required to obtain service under this limited warranty.
ITEMS EXCLUDED FROM WARRANTY
This limited warranty does not cover:
1. Replacement parts or repair labor if this major appliance is used for other than normal, single-family household use or when it is
used in a manner that is inconsistent to published user or operator instructions and/or installation instructions.
2. Service calls to correct the installation of your major appliance, to instruct you on how to use your major appliance, to replace or
repair house fuses, or to correct house wiring or plumbing.
3. Service calls to repair or replace appliance light bulbs, air lters, or water lters. Consumable parts are excluded from warranty
coverage.
4. Damage resulting from accident, alteration, misuse, abuse, re, ood, acts of God, improper installation, installation not in
accordance with electrical or plumbing codes, or use of products not approved by Whirlpool.
5. Cosmetic damage, including scratches, dents, chips or other damage to the nish of your major appliance, unless such damage
results from defects in materials or workmanship and is reported to Whirlpool within 30 days from the date of purchase.
6. Pick up and delivery. This major appliance is intended to be repaired in your home.
7. Repairs to parts or systems resulting from unauthorized modications made to the appliance.
8. Expenses for travel and transportation for product service if your major appliance is located in a remote area where service by an
authorized Whirlpool servicer is not available.
9. The removal and reinstallation of your major appliance if it is installed in an inaccessible location or is not installed in accordance
with Whirlpool published installation instructions.
10. Replacement parts or repair labor on major appliances with original model/serial numbers that have been removed, altered, or
cannot be easily determined.
The cost of repair or replacement under these excluded circumstances shall be borne by the customer.
DISCLAIMER OF IMPLIED WARRANTIES
IMPLIED WARRANTIES, INCLUDING ANY IMPLIED WARRANTY OF MERCHANTABILITY OR IMPLIED WARRANTY OF FITNESS
FOR A PARTICULAR PURPOSE, ARE LIMITED TO ONE YEAR OR THE SHORTEST PERIOD ALLOWED BY LAW. Some states and
provinces do not allow limitations on the duration of implied warranties of merchantability or tness, so this limitation may not apply
to you. This warranty gives you specic legal rights, and you also may have other rights that vary from state to state or province to
province.
DISCLAIMER OF REPRESENTATIONS OUTSIDE OF WARRANTY
Whirlpool makes no representations about the quality, durability, or need for service or repair of this major appliance other than the
representations contained in this Warranty. If you want a longer or more comprehensive warranty than the limited warranty that comes
with this major appliance, you should ask Whirlpool or your retailer about buying an extended warranty.
LIMITATION OF REMEDIES; EXCLUSION OF INCIDENTAL AND CONSEQUENTIAL DAMAGES
YOUR SOLE AND EXCLUSIVE REMEDY UNDER THIS LIMITED WARRANTY SHALL BE PRODUCT REPAIR AS PROVIDED HEREIN.
WHIRLPOOL SHALL NOT BE LIABLE FOR INCIDENTAL OR CONSEQUENTIAL DAMAGES. Some states and provinces do not allow
the exclusion or limitation of incidental or consequential damages, so these limitations and exclusions may not apply to you. This
warranty gives you specic legal rights, and you also may have other rights that vary from state to state or province to province.
If outside the 50 United States and Canada, contact your authorized Whirlpool dealer to determine if another warranty applies.
If you think you need repair service, rst see the “Troubleshooting” section of the Use & Care Guide. If you are unable to resolve
the problem after checking “Troubleshooting,” additional help can be found by checking the “Assistance or Service” section or by
calling Whirlpool. In the U.S.A., call 1 -800 -253-1301. In Canada, call 1-800 -807- 6777. 10/11
Keep this book and your sales slip together for future
reference. You must provide proof of purchase or installation
date for in-warranty service.
Write down the following information about your major appliance
to better help you obtain assistance or service if you ever need
it. You will need to know your complete model number and serial
number. You can nd this information on the model and serial
number label located on the product.
Dealer name _____________________________________________
Address __________________________________________________
Phone number ____________________________________________
Model number ____________________________________________
Serial number ____________________________________________
Purchase date ____________________________________________
23
Page 24

SÉCURITÉ DE LA LAVEUSE
24
Page 25

ACCESSOIRES
Personnalisez votre nouvelle laveuse et sécheuse grâce
aux authentiques accessoires Whirlpool suivants. Pour plus
d’informations sur les options et sur les possibilités de
commande, appelez 1-800-807-6777 ou consultez
www.whirlpool.ca.
Piédestal de 15"
Les piédestaux aux coloris assortis surélèvent
la laveuse et la sécheuse pour les amener
à une hauteur d’utilisation plus confortable.
Le grand tiroir offre une capacité de
rangement pratique.
Surface de travail
La surface de travail établit
la liaison entre la laveuse et
la sécheuse et offre une zone
de travail et d’entreposage
pratique.
Ensemble de superposition
Si l’espace disponible est restreint,
l’ensemble de superposition permet
à la sécheuse d’être installée par
dessus la laveuse.
25
Page 26

TABLEAU DE COMMANDE ET CARACTÉRISTIQUES
Certains programmes et caractéristiques ne sont pas disponibles sur certains modèles.
REMARQUE: La surface du tableau de commande est très sensible et il suft d’un léger toucher pour
l’activer. Pour s’assurer que vos sélections ont été sauvegardées, toucher le tableau de commande du bout
du doigt et non avec l’ongle. Pour sélectionner un réglage ou une option, il suft de toucher le nom qui lui
correspond.
Modèles WFW86HE et WFW61HE
4
5
1
MISE SOUS TENSION
1
Appuyer pour mettre la laveuse en marche et pour l’éteindre.
Appuyer pour arrêter/annuler un programme à tout moment.
2
BOUTON DE PROGRAMME DE LAVAGE
Utiliser le bouton de programme de lavage pour sélectionner
les programmes disponibles sur la laveuse. Tourner le
bouton de programme pour sélectionner un programme
correspondant à la charge de linge. Le témoin DEL
correspondant au programme sélectionné s’allume.
REMARQUE : Le témoin DEL Clean Washer (nettoyage
de la laveuse) clignote après que la laveuse a effectué 30
programmes de lavage pour rappeler à l’utilisateur qu’il doit
lancer le programme Clean Washer.
Voir “Guide de programmes” pour des descriptions de
programmes détaillées.
3
MISE EN MARCHE
Pour démarrer un programme, appuyer sans relâcher
jusqu’à ce que le témoin au-dessus de START (mise en
marche) s’allume, ou appuyer une fois dessus pendant
qu’un programme est en cours pour le suspendre. Pour
ajouter un vêtement, on peut appuyer sur START (mise en
marche) lorsque la DEL “Add Garment” (ajouter un vêtement)
est allumée.
4
DELAY WASH (lavage différé)
Utiliser + et – pour retarder le démarrage du programme de
lavage pendant un maximum de 12 heures. Pour désactiver
l’option Delay Wash (lavage différé), utiliser + et – pour
programmer une heure de mise en marche différée jusqu’à
“0” ou appuyer sur MISE SOUS TENSION.
AFFICHAGE DEL ET RÉGLAGES
5
Lorsqu’on sélectionne un programme, ses réglages par
défaut s’allument et la durée restante estimée s’afche.
Des facteurs tels que la taille de la charge, la température
et la pression de l’eau peuvent affecter la durée indiquée
sur l’afcheur pendant le programme. La laveuse peut
également ajuster la durée du programme si les vêtements
sont tassés à l’intérieur, si la charge est déséquilibrée ou
si la laveuse produit trop de mousse.
Appuyer sur l’option désirée située le long du bas de
l’afchage pour ajuster les réglages. Voir “Guide de
programmes” pour découvrir les réglages disponibles
sur chaque programme. Tous les réglages ne sont pas
disponibles avec tous les programmes.
26
2
3
B EA C D
6
Témoins lumineux de programme
Pour plus de détails, voir “Témoins de programmes”.
Wash Temp (Température de lavage)
La température de lavage recommandée est préréglée
pour chaque programme. On peut aussi sélectionner
une température de lavage en fonction du type de tissu
et de saleté à laver. Pour des résultats optimaux, suivre
les instructions sur l’étiquette du vêtement. Toutes les
températures de lavage comprennent un rinçage à l’eau
froide.
Essorage
Cette laveuse sélectionne automatiquement la vitesse
d’essorage en fonction du programme sélectionné.
Certaines vitesses préréglées peuvent être modiées.
• Des plus hautes vitesses d’essorage signient des
durées de séchage plus courtes mais elles peuvent
augmenter le froissement de la charge.
• Des plus basses vitesses d’essorage signient moins
de froissement mais laissent la charge plus humide.
Saleté
Le réglage de saleté (durée de lavage) est préréglé
pour chaque programme de lavage. Pour la plupart
des charges, utiliser le réglage de saleté préréglé pour
le programme choisi. Lorsqu’on modie le réglage du
niveau de saleté, la durée du programme augmente ou
diminue sur l’afchage de la durée résiduelle estimée.
Pour les tissus très sales et robustes, utiliser le réglage
Soil (saleté) pour prolonger la durée de lavage. Pour les
tissus peu sales et délicats, utiliser le réglage Soil (saleté)
pour raccourcir la durée de lavage. Des réglages de
saleté inférieurs aideront à réduire l’emmêlement et
le froissement.
Presoak (prétrempage)
Appuyer pour ajouter un prétrempage au programme
de lavage. Les articles culbutent doucement dans l’eau
et le détergent pendant la durée sélectionnée pour aider
à éliminer les taches.
Page 27

OPTIONS
6
Utiliser pour activer des options de lavage ou des
caractéristiques supplémentaires sur la laveuse. Certaines
options ne sont pas disponibles sur certains modèles.
Steam Clean (nettoyage avec vapeur)
A
L’option Steam Clean ajoute un trempage
supplémentaire et prolonge le lavage sur de nombreux
programmes pour aider à éliminer les taches. Sa
puissance de nettoyage peut aussi être renforcée en
l’associant à l’option Steam boost (puissance vapeur).
Un dispositif de chauffage intégré aide à maintenir
des températures de lavages idéales. Voir le “Guide
de programmes” pour découvrir les programmes qui
permettent l’utilisation de l’option Steam Clean.
Extra Rinse (rinçage supplémentaire)
B
Activer cette option pour ajouter un rinçage
supplémentaire à la plupart des programmes.
REMARQUE : Sur certains programmes, cette
caractéristique est installée par défaut. Voir “Guide
de programmes” pour plus de détails.
Option TumbleFresh™ (sur certains modèles)
C
Ceci entraîne le culbutage périodique de la charge après
la n du programme pendant une durée maximale de 6
heures pour réduire le taux d’humidité. Pour démarrer
l’option TumbleFresh™, appuyer sur TumbleFresh.
Si l’option TumbleFresh™ est activée, elle restera activée
pour tous les programmes suivants jusqu’à ce qu’on
la désactive à nouveau – la laveuse mémorise le dernier
statut programmé (activé/désactivé). Pour désactiver
l’option TumbleFresh™, appuyer sur TumbleFresh.
On peut aussi activer l’option TumbleFresh™ sans faire
fonctionner de programme en appuyant dessus MISE
SOUS TENSION pendant 1 seconde, puis en appuyant
sans relâcher sur TumbleFresh pendant 3 secondes,
puis en appuyant sans relâcher sur MISE EN MARCHE
pendant 3 secondes.
Pour éteindre l’option TumbleFresh™ pendant qu’elle est
en cours, appuyer MISE SOUS TENSION.
REMARQUE : La porte se verrouille pendant que l’option
TumbleFresh™ est active. Appuyer MISE SOUS TENSION
pour arrêter le programme et déverrouiller la port.
Cycle signal (signal de programme)
D
Utiliser cette option pour pour mettre en marche ou pour
éteindre le signal qui retentit à la n d’un programme.
Désactivation des signaux sonores qui retentissent
lorsqu'on appuie sur un réglage : Appuyer sur
CYCLE SIGNAL (signal de programme) pendant environ
3 secondes. Répéter pour les réactiver.
Control Lock (verrouillage des commandes)
E
Appuyer sans relâcher pendant 3 secondes pour
verrouiller les commandes an d’éviter tout changement
ou manipulation involontaires. Appuyer sans relâcher de
nouveau pendant 3 secondes pour déverrouiller. On peut
toujours appuyer sur MISE EN MARCHE pour suspendre
un programme ou sur MISE SOUS TENSION pour
éteindre la laveuse.
7
A
7
TIROIR DU DISTRIBUTEUR
C
B
Détergent HE
A
Assouplissant
B
pour tissu liquide
Agent de
C
blanchiment
au chlore
Le tiroir du distributeur offre la possibilité d’ajouter
automatiquement du détergent HE, de l’agent de blanchiment
liquide au chlore et de l’assouplissant pour tissu à la charge
de lavage, au moment approprié. Voir “Utilisation du tiroir
du distributeur” pour plus d’informations sur l’utilisation
du tiroir du distributeur.
Compartiment de détergent Haute efcacité “HE”
A
Ce compartiment contient le détergent HE liquide ou en
poudre qui seront utilisés lors du programme de lavage
principal.
Compartiment d’assouplissant pour tissu liquide
B
Dilue et distribue automatiquement l’assouplissant pour
tissu liquide au moment opportun lors du programme.
n
Utiliser uniquement de l’assouplissant pour tissu liquide
dans ce distributeur.
Compartiment pour agent de blanchiment au chlore
C
liquide
Dilue et distribue automatiquement l’agent de blanchiment
au chlore liquide au moment opportun lors du premier
rinçage qui suit le programme de lavage. Ce compartiment
ne peut diluer un agent de blanchiment en poudre.
Choix du détergent approprié
Utiliser uniquement des détergents Haute efcacité. L’emballage
portera la mention “HE” ou “High Efciency” (haute efcacité).
Un lavage avec faible consommation d’eau produit un excès
de mousse avec un détergent non HE ordinaire. Il est probable
que l’utilisation d’un détergent ordinaire prolongera la durée
des programmes et réduira la performance de rinçage. Ceci
peut aussi entraîner des défaillances de composants et, avec
le temps, une accumulation de moisissure. Les détergents HE
produisent peu de mousse et se dissolvent rapidement pour
produire une quantité de mousse idéale pour une performance
optimale. Ils retiennent les particules de saleté en suspension an
qu’elles ne se redéposent pas sur les vêtements propres. Suivre
les recommandations du fabricant pour déterminer la quantité
de détergent à utiliser.
Utiliser uniquement
un détergent Haute
efcacité (HE).
27
Page 28

TABLEAU DE COMMANDE ET
CARACTÉRISTIQUES
Témoins lumineux de programme
Delay Wash (lavage différé)
Si l’on programme un lavage différé, le témoin de lavage
différé s’allume et le compte à rebours de la mise en marche
différée s’afche.
Door Locked (porte verrouillée)
Door Locked s’allume pour indiquer que la porte est
verrouillée et ne peut être ouverte sans suspendre ou annuler
d’abord le programme.
Sensing (détection)
Lorsqu’on appuie sur le bouton MISE EN MARCHE, la laveuse
effectue un test automatique sur le mécanisme de verrouillage
de la porte et le témoin de détection s’allume. On entend alors
un déclic, le tambour effectue un tour partiel, et la porte se
déverrouille brièvement avant de se verrouiller à nouveau.
Une fois que la porte s’est verrouillée une seconde fois,
la laveuse videra l’eau pour calibrer les capteurs; alors elle
commence à culbuter et à ajouter de l’eau. Le processus de
détection se poursuit tout au long du programme. Il est aussi
possible que l’on entende de l’eau couler dans le distributeur,
ajoutant le détergent à la charge.
Une fois la charge de linge détectée par la laveuse, la durée
de lavage estimée en fonction de la taille de la charge
s’afche. Il est possible que la durée réelle du programme
soit prolongée, mais l’afchage continue d’afcher la durée
estimée.
Le témoin de détection clignote une fois par seconde à
plusieurs reprises au cours du programme, comme par
exemple lorsque la laveuse réduit la quantité de mousse.
Add Garment (ajouter un vêtement)
Lorsque Add Garment est allumé, on peut suspendre
le programme de la laveuse, ouvrir la porte et ajouter
des articles.
Steaming (vapeur)
Ce témoin s’allume pour indiquer que le programme utilise
un activateur avec vapeur pour renforcer le nettoyage.
Done (terminé)
Une fois le programme terminé, ce témoin s’allume. Retirer
la charge rapidement pour un résultat optimal. Le témoin Done
(terminé) s’allume également durant le fonctionnement de
l’option TumbleFresh™.
Option TumbleFresh
Le témoin TumbleFresh™ s’allume lorsque l’option
TumbleFresh™ est active. Pendant ce temps, la laveuse
fait culbuter la charge de temps à autre.
Eco Monitor (éco-moniteur)
La fonction Eco Monitor (éco-moniteur) permet à
l’utilisateur de contrôler l’effet des réglages sur les
économies d’énergie réalisées. Pour utiliser la fonction
Eco Monitor (éco-moniteur), sélectionner le programme, la
température, la vitesse d’essorage, le niveau de saleté et
les options les mieux adaptés aux tissus à laver. La fonction
Eco Monitor (éco-moniteur) évalue la consommation d’eau
et d’énergie en fonction de ces sélections, de Bon à Idéal.
L’utilisateur peut ensuite ajuster les réglages et options utilisés
avec un programme donné pour réduire la quantité d’énergie
consommée avec ce programme.
28
™
UTILISATION DU TIROIR
DU DISTRIBUTEUR
1. Ouvrir le tiroir du distributeur.
2. Ajouter les produits de lessive tel que décrit dans les étapes
4 à 6 à la section “Utilisation de la laveuse”.
3. Fermer lentement le tiroir du distributeur. Vérier qu’il est
complètement fermé.
REMARQUE : Il est possible qu’une petite quantité d’eau
provenant du programme de lavage précédent reste dans
les distributeurs. Ceci est normal.
Ajouter du détergent HE au distributeur
Sélecteur
Compartiment
Verser une mesure de détergent HE
dans le compartiment à détergent.
Pour du détergent en poudre, faire
glisser le sélecteur vers la gauche.
Pour du détergent liquide, faire
glisser le sélecteur vers la droite.
Ne pas faire remplir excessivement
le distributeur – le fait d’ajouter
trop de détergent peut entraîner sa
distribution prématurée dans la laveuse.
Sélecteur
en position
élevée
Détergent en poudre :
Soulever le sélecteur en
position élevée.
IMPORTANT :
n Ne pas ajouter de sachet de lessive à dose unique dans
le tiroir distributeur.
n Utiliser un détergent en poudre lorsque l’on utilise
l’option Delay Wash (lavage différé). Il est possible que
le détergent liquide s’écoule avant le début du lavage.
Sélecteur
en position
basse
Détergent liquide :
Appuyer sur le sélecteur
pour le placer en position
basse.
pour détergent HE
Utiliser uniquement
un détergent Haute
efcacité (HE).
Page 29

GUIDE DE PROGRAMMES
Les réglages et options indiqués en gras sont les réglages par défaut pour ce programme. Pour un meilleur soin des tissus, choisir
le programme, options, et réglages qui convient le mieux à la charge à laver. Tous les réglages ne sont pas disponibles sur tous les
programmes et certaines options ne peuvent pas être combinées.
NOTES :
n
Certains programmes, températures, options et vitesses d’essorage ne sont pas disponibles sur certains modèles.
n
Toutes les sélections de température de lavage comprennent un rinçage à l’eau froide.
Articles à laver
en utilisant
les réglages
de programmes
par défaut :
Charges de linge de Normal Hot Extra Fast Heavy Steam Clean* Ce programme combine un
maison, draps et Warm Fast Normal TumbleFresh™ culbutage à vitesse moyenne et un
vêtements mixtes Cool Medium Light Extra Rinse essorage à très haute vitesse. Ce
présentant un niveau Cold PreSoak programme est conçu pour fournir
de saleté normal Delay Wash la meilleure efcacité éconergétique.
Tissus et vêtements Whites Hot Extra Fast Heavy Steam Clean* Ce programme offre un lavage plus
blancs très sales (blancs) Warm Fast Normal TumbleFresh™ long avec un culbutage à vitesse
Cool Medium Light Extra Rinse rapide, un rinçage supplémentaire
Cold Slow PreSoak et un essorage à vitesse très élevée
Delay Wash pour une performance de
nettoyage et de rinçage optimale
lorsqu’on utilise un agent de
blanchiment.
Tissus robustes aux Heavy Hot Extra Fast Heavy Steam Clean* Un culbutage à haute vitesse et un
couleurs grand teint Duty Warm Fast Normal TumbleFresh™ essorage nal à très haute vitesse
et vêtements très sales (service Cool Medium Light Extra Rinse aident à fournir une performance
intense) Cold Slow PreSoak de nettoyage optimale et à réduire
Delay Wash le temps de séchage.
Serviettes et tissus de Towels Hot Extra Fast Heavy Steam Clean* Ce programme offre un culbutage à
lavage robustes (Serviettes) Warm Fast Normal TumbleFresh™ vitesse rapide, un lavage plus long
Cool Medium Light Extra Rinse et un essorage à vitesse très élevée
Cold Slow PreSoak pour réduire la durée de séchage.
Delay Wash
Vêtements, articles Sanitize† Hot Extra Fast Heavy Steam Clean*
de literie, et serviettes
nécessitant un Medium Light Extra Rinse élevée possible pour garantir
assainissement Slow Delay Wash l’assainissement de la charge.
Contrôler la température de lavage
recommandée pour les articles à
laver.
Pas de vêtements Clean Washer Utiliser ce programme à l’issue de chaque
dans la laveuse with affresh® série de 30 lavages pour que l’intérieur de
(nettoyage la laveuse reste frais et propre. Ce
de la laveuse programme utilise un niveau d’eau plus
avec affresh®) élevé. Utiliser une tablette de nettoyant
pour laveuse affresh® ou de l’eau de Javel
pour nettoyer soigneusement l’intérieur de
la laveuse. Ce programme ne doit pas être
interrompu. Voir “Entretien de la laveuse”.
IMPORTANT : Ne pas placer de
Programme:
(Assainissement)
Température
de lavage :
Vitesse
d’essorage :
Fast Normal TumbleFresh™ température de lavage la plus
de
saleté :
Options
disponibles :
Détails du programme :
Ce programme utilise la
vêtements ou autres articles dans la
laveuse pendant que le programme Clean
Washer (nettoyage de la laveuse avec
affresh®) fonctionne. Utiliser ce programme
avec une cuve de lavage vide. Voir
“Entretien de la laveuse” dans la section
“Entretien de la laveuse”.
Niveau
* L’option Steam Clean est seulement disponible quand une température d’eau tiède ou chaude est choisie
† Sanitize (Assainissement)
n Cette laveuse comporte un programme d’assainissement qui
élimine 99,9 % des bactéries que l’on trouve généralement sur
les vêtements, articles de literie et serviettes
laboratoire indépendant et tiers
entre les charges une fois le programme terminé.
n Utiliser le programme Sanitize (assainissement) pour laver des
tissus grand teint très sales. Ce programme utilise la température
la plus chaude pour garantir l’élimination des saletés et taches
importantes. Il est recommandé de régler le chauffe-eau à 120ºF
(49ºC) pour assurer un rendement efcace pendant ce programme.
. Il n’y a pas de transfert de bactéries
, basé sur l’essai en
suite à la page suivante
29
Page 30

GUIDE DE PROGRAMMES
Les réglages et options indiqués en gras sont les réglages par défaut pour ce programme. Pour un meilleur soin des tissus, choisir
le programme, options, et réglages qui convient le mieux à la charge à laver. Tous les réglages ne sont pas disponibles sur tous les
programmes et certaines options ne peuvent pas être combinées.
NOTES :
n
Certains programmes, températures, options et vitesses d’essorage ne sont pas disponibles sur certains modèles.
n
Toutes les sélections de température de lavage comprennent un rinçage à l’eau froide.
Articles à laver
en utilisant
les réglages
de programmes
par défaut :
Charge de vêtements Drain N/A Extra Fast N/A TumbleFresh™ Utiliser la fonction Drain & Spin
mouillée & Spin Fast Delay Wash (vidange et essorage) pour retirer
(vidange Medium l’excédent d’eau de la charge.
et essorage) Slow La vitesse d’essorage peut être
réglée à un réglage inférieur.
Maillots de bain et Drain Hot Extra Fast Heavy TumbleFresh™ Choisir Drain & Spin; puis choisir
articles nécessitant & Spin Warm Fast Normal Delay Wash un rinçage supplémentaire pour
uniquement un rinçage with Cool Medium Light ajouter de l’eau. Ce programme
Extra Rinse Cold Slow inclut une très haute vitesse
(vidange d’essorage. Pour certains tissus,
et essorage il peut être judicieux de régler la
avec rinçage vitesse d’essorage à un réglage
supplémentaire
Petites charges de 3 à 4 Quick Wash Hot Extra Fast Heavy Steam Clean* Pour les petites charges (de 3 à 4
vêtements légèrement (lavage Warm Fast Normal TumbleFresh™ articles) dont on a besoin
sales rapide) Cool Medium Light Extra Rinse rapidement. Ce programme
Cold Slow PreSoak combine un culbutage à haute
Delay Wash vitesse, un lavage plus court, et
une très haute vitesse d’essorage
pour réduire le temps de séchage.
Tissus transparents, Delicates Hot Extra Fast Heavy Steam Clean* Ce programme combine un
lingerie, pulls et (articles Warm Fast Normal TumbleFresh™ culbutage et un essorage à basse
chemises, chemisiers, délicats) Cool Medium Light Extra Rinse vitesse pour assurer un soin
pantalons et robes Cold Slow PreSoak délicat des tissus et réduire
légèrement sales Delay Wash le froissement.
Vêtements en coton Cold Cold Extra Fast Heavy TumbleFresh™ Ce programme utilise une solution
de couleurs vives Wash Fast Normal Extra Rinse de détergent concentré avec
ou foncées, lin, (lavage Medium Light Delay Wash de l’eau froide tout au long
vêtements tout-aller froid) du programme pour extraire
et charges mixtes les taches en douceur et pour
prendre soin des tissus.
Programme:
)
Température
de lavage :
Vitesse
d’essorage :
Niveau
de
saleté :
Options
disponibles :
Détails du programme :
faible.
* L’option Steam Clean est seulement disponible quand une température d’eau tiède ou chaude est choisie
Recommandations concernant le volume de la charge
Pour des résultats optimaux, suivre les recommandations
concernant la taille de la charge indiquées pour chaque
programme.
Petite charge : Remplir le tambour de la laveuse avec
3 ou 4 articles, à pas plus d’un quart de sa capacité.
Charges de taille moyenne : Remplir le tambour
de la laveuse à environ la moitié de sa capacité.
Grande charge : Remplir le tambour de la laveuse environ
Options de
Température de lavage :
Hot (Chaude)
Warm (
Tiède
Élevé
(Normal)
Léger
)
)
)
Cool (Frais)
Cold (Froide)
Options de
Niveau de saleté :
Heavy (
Normal
Light (
aux trois quarts.
Très grande charge : Remplir le tambour de la laveuse
tout en veillant à ce que les vêtements puissent culbuter
librement. Pour des résultats optimaux, éviter de tasser
les vêtements.
30
Options de
Vitesse d’essorage :
Extra Fast (Très haute)
Fast (
Haute
Medium (Moyenne)
Slow (
Options disponibles :
Steam Clean (
TumbleFresh
Extra Rinse (
Presoak (Pré-trempage)
Delay Wash (Lavage différé)
)
Basse
)
Nettoyage avec vapeur
™
Rinçage supplémentaire
)
)
Page 31

UTILISATION DE LA LAVEUSE
Premier programme de lavage sans vêtements
Avant de laver les vêtements pour la première fois, choisir le
programme QUICK WASH (lavage rapide) et l’exécuter sans linge
(si cela n’a pas déjà été fait au cours de l’étape d’installation
nale). Utiliser uniquement un détergent HE. Utiliser la moitié
de la quantité recommandée par le fabricant pour une charge
de taille moyenne. Ce programme préalable sert à garantir que
l’intérieur est propre avant de laver des vêtements.
1. Trier et préparer le linge
Trier les articles en fonction du programme et de la température
d’eau recommandés, ainsi que la solidité des teintures. Séparer
les articles très sales des articles peu sales. Séparer les articles
délicats des tissus résistants. Traiter les taches sans délai
et contrôler la solidité des teintures en essayant les produits
d’élimination de taches sur une couture intérieure.
IMPORTANT :
n Vider les poches. Les pièces de monnaie, boutons et autres
petits objets peuvent obstruer les pompes et nécessiter une
intervention de dépannage.
n Fermer les fermetures à glissière, attacher les crochets,
cordons et ceintures en tissu, et retirer tout accessoire et
ornement non lavables.
n Réparer les déchirures pour éviter que les articles ne
s’endommagent encore davantage lors du nettoyage.
n Retourner les tricots pour éviter le boulochage. Séparer les
articles qui forment la charpie de ceux qui la retiennent. Les
articles synthétiques, tricots et articles en velours retiennent
la charpie provenant des serviettes, des tapis et des tissus
chenille.
n Ne pas sécher les vêtements si les taches sont toujours
présentes après le lavage car la chaleur pourrait xer les
taches sur le tissu.
n Toujours lire et suivre les instructions gurant sur les étiquettes
de soin des tissus et sur les produits de lessive. Une mauvaise
utilisation pourrait endommager les vêtements.
2. Ajouter les produits de lessive
(si désiré)
On peut ajouter des sachets de lessive à dose unique, des
activateurs de lessive de type Oxi, de l’agent de blanchiment
sans danger pour les couleurs ou de l’assouplissant pour tissu
sous forme de cristaux dans le tambour avant d’ajouter le linge.
REMARQUE : Ne pas placer de vêtements dans le tambour
de la laveuse avant de verser les produits de lessive. Toujours
suivre les instructions du fabricant.
3. Charger les vêtements dans la laveuse
Placer une charge de linge trié dans la laveuse sans les
tasser. Les articles doivent pouvoir se déplacer librement
pour un nettoyage optimal et pour réduire le froissement et
l’emmêlement. Fermer la porte de la laveuse en la poussant
fermement jusqu’à ce que le loquet émette un clic.
n Il est possible de charger complètement la laveuse, selon
le type de charge et le programme, mais les vêtements ne
doivent pas être tassés. La porte de la laveuse doit fermer
facilement. Voir “Guide de programmes” pour des suggestions
sur le mode de chargement.
n Mélanger les gros articles avec les petits et éviter de laver
des articles seuls. Charger de façon uniforme.
n Laver les petits articles dans des sacs à linge en let. Si les
petits articles sont nombreux, utiliser plus d’un sac et remplir
les sacs de façon égale.
31
Page 32

UTILISATION DE LA LAVEUSE
UTILISATION DES DISTRIBUTEURS
DE PRODUITS DE LESSIVE
REMARQUE : Ne pas placer de sachets de lessive à dose
unique, d’activateurs de lessive de type Oxi, d’agent de
blanchiment sans danger pour les couleurs ou d’assouplissant
pour tissu sous forme de cristaux dans les distributeurs. Ces
produits ne se dissoudront pas correctement.
4. Ajouter du détergent HE
6. Ajouter de l’agent de blanchiment
liquide au chlore dans le distributeur
(si désiré)
Détergent liquide
HE
Ajuster le sélecteur en fonction du type de détergent HE
utilisé (liquide ou en poudre). Voir les instructions de la
section “Utilisation du tiroir du distributeur” pour savoir
comment utiliser le distributeur.
Détergent en
poudre HE
5. Verser de l’assouplissant pour tissu
dans le distributeur (si désiré)
Verser une mesure de l’assouplissant pour tissu liquide dans
le compartiment d’assouplissant pour tissu liquide. Toujours
suivre les instructions du fabricant pour connaître la quantité
d’assouplissant pour tissu adéquate en fonction de la taille
de la charge.
L’assouplissant pour tissu est toujours distribué lors
du rinçage nal, même si l’on a sélectionné Extra Rinse
(rinçage supplémentaire).
IMPORTANT : Ne pas remplir excessivement le
distributeur, diluer le produit ou utiliser plus de 1/4 de tasse
(60 mL) d’assouplissant pour tissu. Ne pas remplir au-delà
du niveau MAX. Si l’on remplit excessivement le distributeur,
l’assouplissant pour tissu sera distribué dans la laveuse
immédiatement.
n Ne pas renverser ou faire couler d’assouplissant pour tissu
sur les vêtements.
n Ne pas utiliser de boules distributrices d’assouplissant pour
tissu dans cette laveuse. Elles ne distribueront pas leur
contenu correctement.
Ajouter une mesure d’agent de blanchiment liquide au chlore
dans le compartiment d’agent de blanchiment. Ne pas remplir
excessivement le distributeur, diluer le produit ou utiliser plus
de 2/3 de tasse (165 mL). Ne pas ajouter d’agent de blanchiment
sans danger pour les couleurs ou de produit Oxi dans le même
programme avec l’agent de blanchiment liquide au chlore.
n
Toujours mesurer la quantité d’agent de blanchiment liquide.
Utiliser une tasse à mesurer avec un bec verseur; ne pas
utiliser une quantité approximative.
n
Ne pas remplir au-delà du niveau “MAX”. Un remplissage
excessif peut endommager les vêtements.
7. Appuyer sur POWER (mise sous
tension) pour mettre la laveuse
en marche (facultatif)
Fermer lentement le tiroir du distributeur. S’assurer que
le tiroir est complètement fermé, puis appuyer sur MISE
SOUS TENSION pour mettre la laveuse en marche ou passer
à l’étape 8.
32
Page 33

8. Sélectionner le PROGRAMME*
10. Sélectionner toute option
supplémentaire*
Tourner le bouton de programme pour choisir un programme
de lavage. Voir “Guide de programmes” pour plus de détails
concernant les caractéristiques de programmes.
9. Ajuster les réglages, si désiré*
L’afchage indique les réglages par défaut correspondant
au programme sélectionné. Pour ajuster un réglage, appuyer
son nom – Wash Temp, Spin, Soil ou Presoak. Le fait d’ajuster
les réglages modiera la durée estimée restante. La laveuse peut
également prolonger le programme si les vêtements sont tassés
à l’intérieur, si la charge est déséquilibrée ou si la laveuse produit
trop de mousse.
Pour ajouter une option au programme, appuyer son nom –
Steam Clean, Extra Rinse, TumbleFresh, ou Cycle Signal.
Pour retirer une option du programme sélectionné, appuyer
de nouveau sur cette option.
11. Régler un lavage différé
Si l’on ne souhaite pas démarrer un programme
immédiatement, on peut choisir l’option DELAY WASH (lavage
différé). Ceci retarde le démarrage du programme de lavage
pendant un maximum de 12 heures.
Pour régler un lavage différé :
1. Appuyer sur + et – de DELAY START (lavage différé) pour
régler la durée de mise en marche différée souhaitée.
2. Appuyer sans relâcher sur MISE EN MARCHE pour régler
la mise en marche différée. Le compte à rebours de la mise
en marche différée commence lorsque le témoin MISE EN
MARCHE cesse de clignoter.
* Tous les réglages et options ne sont pas disponibles sur tous les
programmes. Voir “Guide de programmes” pour les options et
les réglages disponibles.
33
Page 34

OR
UTILISATION DE LA LAVEUSE
12. Appuyer sans relâcher sur
MISE EN MARCHE pour démarrer
le programme de lavage
Appuyer sans relâcher sur MISE EN MARCHE pour démarrer
le programme de lavage. Pour suspendre un programme en
cours, appuyer une fois sur MISE EN MARCHE, puis appuyer
de nouveau sans relâcher pour poursuivre le programme. Pour
annuler un programme, appuyer sur MISE SOUS TENSION.
Une fois que l’on a appuyé sans relâcher sur MISE EN
MARCHE, on entend la porte se verrouiller, se déverrouiller puis
se verrouiller à nouveau. La porte de la laveuse demeurera
verrouillée durant le programme de lavage.
Déverrouillage de la porte pour pouvoir ajouter
des vêtements :
Si l’on doit ouvrir la porte pour pouvoir ajouter
1 ou 2 vêtements oubliés, on peut le faire lorsque
le témoin lumineux “Add Garment” (ajouter
vêtement) est allumé.
Appuyer une fois sur MISE EN MARCH; la porte
se déverrouille une fois que le mouvement de
la laveuse a cessé. Cela peut prendre plusieurs
minutes. Fermer ensuite la porte et appuyer sur
MISE EN MARCH pour redémarrer le programme.
13. Retirer rapidement les vêtements
une fois le programme terminé
Retirer rapidement les vêtements une fois
le programme terminé pour éviter que des
odeurs ne se développent et que les objets
métalliques faisant partie des vêtements ne
rouillent. Lorsqu’on décharge les vêtements,
irer le dispositif de verrouillage de la porte et vérier qu’il
ne reste pas de petits articles entre la cuve et le tambour.
Si l’on n’est pas en mesure de retirer
rapidement la charge, utiliser l’option
TumbleFresh™. Si l’on sélectionne l’
TumbleFresh™ fait culbuter la charge
périodiquement pendant un maximum de 6 heures. Pour
désactiver l’option TumbleFresh™, appuyer sur MISE SOUS
TENSION. Pour que l’option TumbleFresh™ ne s’active pas
pour les prochains programmes, appuyer sur TumbleFresh.
REMARQUE :
n
La porte restera verrouillée tant que l’option TumbleFresh™
est active. Pour annuler l’option et déverrouiller la porte,
appuyer sur MISE SOUS TENSION.
n
Il est possible qu’une petite quantité d’eau reste dans
les distributeurs une fois le programme de lavage terminé.
Ceci est normal.
n
Cette laveuse dispose d’une fermeture étanche pour éviter
les fuites d’eau. Pour éviter la formation d’odeurs, laisser la
porte ouverte an de permettre à la laveuse de sécher entre
deux utilisations.
option
34
Page 35

ENTRETIEN DE LA LAVEUSE
TUYAUX D’ARRIVÉE D’EAU
Remplacer les tuyaux d’arrivée d’eau après 5 ans d’utilisation
pour réduire le risque de défaillance intempestive. Inspecter
périodiquement les tuyaux; les remplacer en cas de
renement, de déformation, de coupure et d’usure ou de fuite.
Lorsque vous remplacez les tuyaux d’arrivée d’eau, noter la
date de remplacement au marqueur indélébile sur l’étiquette.
ENTRETIEN DE LA LAVEUSE
Recommandations pour le maintien de la propreté
de la laveuse et du niveau de performance optimal
1. Utiliser toujours un détergent HE (Haute efcacité) et
employer la quantité de détergent recommandée par le
fabricant du détergent HE. Ne jamais utiliser plus que
la quantité recommandée de détergent, car ceci peut
augmenter le taux d’accumulation de résidus de détergent
et de souillures à l’intérieur de la laveuse, ce qui susciterait
la formation d’odeurs indésirables.
2. Exécuter périodiquement des lavages avec de l’eau tiède
ou chaude (pas exclusivement des lavages à l’eau froide),
car l’eau chaude facilite l’élimination des résidus de
détergent et de souillures.
3. Veiller à toujours laisser la porte de la laveuse entrouverte
pour qu’elle puisse sécher, et pour éviter l’accumulation
de résidus générateurs d’odeurs.
Nettoyage de la laveuse à chargement par l’avant
Lire complètement ces instructions avant d’entreprendre
les opérations de nettoyage de routine recommandées
ci-dessous. Le processus d’entretien de la laveuse devrait
être exécuté au moins une fois par mois, ou à intervalles
de 30 lavages (première limite atteinte); ceci permettra de
minimiser l’accumulation de résidus de détergent et de
souillures à l’intérieur de la laveuse.
Nettoyage du joint de la porte
1. Ouvrir la porte de la laveuse; retirer tous les articles
présents dans la laveuse.
2. Inspecter le joint gris entre l’embrasure de la porte et
le tambour – noter toute zone tachée ou d’accumulation
de souillures. Tirer sur le joint et inspecter partout sous
le joint – rechercher la présence éventuelle d’objets
étrangers.
3. S’il y a des zones tachées ou d’accumulation de
souillures, nettoyer ces zones du joint par essuyage,
selon l’une des deux méthodes ci-dessous :
a. Tampon de récurage affresh® Grit Grabber™ Cloth :
i. Tirer doucement sur le joint en caoutchouc de
la porte et nettoyer toute la surface avec la face
rugueuse du tampon Grit Grabber™.
b.
Avec un agent de blanchiment liquide au chlore (dilué) :
i. Préparer une solution diluée de l’agent de
blanchiment au chlore – 3/4 tasse (177 mL) de
l’agent de blanchiment au chlore liquide et 1 gallon
(3,8 L) d’eau tiède puisée au robinet.
ii. Appliquer la solution sur les zones concernées du
joint avec un chiffon imbibé de la solution diluée.
iii. Laisser le produit agir pendant 5 minutes.
iv. Essuyer parfaitement la surface du joint avec un
chiffon sec, et laisser la porte de la laveuse ouverte
pour que l’intérieur puisse sécher.
ENTRETIEN DE LA LAVEUSE (suite)
IMPORTANT :
n Porter des gants de caoutchouc lors des
manipulations de l’agent de blanchiment au chlore.
n Consulter et observer les instructions et
recommandations du fabricant pour l’utilisation
appropriée de l’agent de blanchiment au chlore.
Nettoyage de l’intérieur de la laveuse
Cette laveuse comporte un programme spécial avec
utilisation d’un volume d’eau important en conjonction
avec le nettoyant pour laveuse affresh® ou un agent de
blanchiment liquide au chlore pour le nettoyage approfondi
de l’intérieur de la laveuse. Les modèles avec génération
de vapeur utilisent également la vapeur avec ce programme
spécial pour le nettoyage approfondi de l’appareil.
REMARQUE : Lire complètement ces instructions avant
d’entreprendre les opérations de nettoyage.
Commencement du processus de nettoyage
1. Programme avec nettoyant pour laveuse affresh®
(Recommandé – Performance supérieure) :
a. Ouvrir la porte de la laveuse; retirer tous les articles
présents dans la laveuse.
b. Ajouter une pastille de nettoyant pour laveuse affresh®
dans le tambour de la laveuse.
c. Ne pas ajouter de pastille de nettoyant pour laveuse
affresh® dans le tiroir du distributeur.
d. Ne pas ajouter de détergent ou autre composé
chimique dans la laveuse lors de l’exécution de cette
opération.
e. Fermer la porte de la laveuse.
f. Sélectionner le programme CLEAN WASHER
(nettoyage de la laveuse).
g. Appuyer sans relâcher sur MISE EN MARCHE pour
lancer le programme. Le processus du programme de
nettoyage de la laveuse est décrit ci-dessous.
2. Méthode avec l’agent de blanchiment au chlore :
a. Ouvrir la porte de la laveuse; retirer tous les articles
présents dans la laveuse.
b. Ouvrir le tiroir du distributeur et ajouter de l’agent
de blanchiment au chlore au niveau MAX à la fois
dans les compartiments d’agent de blanchiment
et d’assouplissant pour tissu.
REMARQUE : L’emploi répétitif d’une quantité d’agent
de blanchiment liquide au chlore supérieure à ce qui est
recommandé ci-dessus pourrait faire subir des dommages
à la laveuse.
c. Fermer la porte de la laveuse et le tiroir du distributeur.
d. Ne pas ajouter de détergent ou autre composant
chimique dans la laveuse lors de l’exécution de cette
opération.
e. Fermer la porte de la laveuse.
f. Sélectionner le programme CLEAN WASHER
(nettoyage de la laveuse).
g. Appuyer sans relâcher sur MISE EN MARCHE pour
lancer le programme. Le processus du programme
de nettoyage de la laveuse est décrit ci-dessous.
REMARQUE : Pour de meilleurs résultats, ne pas
interrompre le programme.
35
Page 36

ENTRETIEN DE LA LAVEUSE
ENTRETIEN DE LA LAVEUSE (suite)
Description du programme de nettoyage de la laveuse :
1. Le programme Clean Washer (nettoyage de la laveuse)
détecte la présence éventuelle de linge dans la laveuse.
2. Si aucun article n’est détecté dans la laveuse, l’exécution
du programme se poursuit.
a. Si un quelconque article est détecté dans la laveuse,
le code “rL” (retirer la charge) est présenté sur
l’afcheur. La porte se déverrouille. Ouvrir la laveuse
et retirer tout le linge qui se trouve dans le tambour
de la laveuse.
b. Appuyer sur MISE SOUS TENSION de l’appareil pour
faire disparaître le code “rL” de l’afcheur.
c. Appuyer sans relâcher sur MISE EN MARCHE pour
redémarrer le programme.
3. Après l’achèvement du programme, laisser la porte de la
laveuse entrouverte pour que l’intérieur puisse sécher et
pour permettre l’aération.
Annulation du programme de nettoyage de la laveuse :
Si l’utilisateur décide d’annuler l’exécution du programme de
nettoyage de la laveuse après le lancement du programme,
un délai qui peut atteindre 30 minutes est nécessaire pour
que l’appareil puisse éliminer le produit nettoyant affresh®,
l’agent de blanchiment au chlore ou tout autre composé
chimique du circuit de lavage et rincer adéquatement
le circuit de lavage. La porte de la laveuse demeurera
verrouillée jusqu’à la n de l’exécution du processus. Ceci
empêche le transfert de résidus du produit chimique de
nettoyage aux charges de linge ultérieures et minimise ainsi
le risque de détérioration du linge ou de l’appareil lui-même.
Processus d’annulation du programme de nettoyage
de la laveuse :
1. Appuyer une fois sur MISE SOUS TENSION de la laveuse.
2. L’appareil entreprend une opération de vidange et
élimination des composés chimiques de nettoyage.
3. Le processus d’annulation du programme sera exécuté
en approximativement 30 minutes ou moins.
4. L’utilisateur peut ensuite exécuter de nouveau sur la
laveuse le programme de nettoyage de la laveuse, ou
sélectionner un programme de lavage quelconque pour
laver une charge de linge.
Nettoyage du distributeur
Après avoir utilisé la laveuse pendant un certain temps, on
trouvera peut-être des traces de produits de lessive dans les
compartiments de distributeurs. Pour éliminer ces traces,
retirer le tiroir et essuyer les surfaces avec un chiffon humide,
et sécher avec une serviette avant ou après l’exécution du
programme de nettoyage de la laveuse. Si nécessaire, utiliser
un nettoyant tout-usage.
IMPORTANT : Le distributeur n’est pas lavable
au lave-vaisselle.
Nettoyage de l’extérieur de la laveuse
Utiliser un chiffon doux humide ou une éponge pour
éliminer les traces de tout renversement de produit. Essuyer
occasionnellement les surfaces externes de la laveuse pour
entretenir son aspect de produit neuf.
IMPORTANT : Pour ne pas endommager la nition
de la laveuse, ne jamais utiliser un produit abrasif.
RAPPEL DE LANCEMENT
DU PROGRAMME CLEAN WASHER
(NETTOYAGE DE LA LAVEUSE)
Le témoin DEL Clean
Washer (nettoyage de la
laveuse) clignote à la n d’un
programme de lavage après
que la laveuse a effectué 30 programmes de lavage. Il fait
ofce de rappel indiquant à l’utilisateur qu’il faut lancer le
programme de nettoyage de la laveuse.
Si le programme de nettoyage de la laveuse n’est pas activé,
le témoin DEL cesse de clignoter à la n d’un programme
de lavage après que la laveuse a effectué 3 programmes
de lavage ordinaires supplémentaires. Après que la laveuse
a effectué 30 programmes de lavage supplémentaires, le
témoin DEL de nettoyage de la laveuse clignote à nouveau
à la n d’un programme de lavage en guise de rappel.
POUR RETIRER LE DISTRIBUTEUR
Pour retirer :
1. Tirer le tiroir du distributeur jusqu’à la butée.
2. Appuyer sur la patte de déverrouillage et dégager
le distributeur en le tirant tout droit.
3. Soulever le panneau du
couvercle et le tirer tout
droit vers le haut.
Pour remettre :
1. Faites glisser le panneau
du couvercle sur les pitons
du distributeur.
2. Aligner les bords du
distributeur avec les guides
situés dans la laveuse, puis
réinsérer le distributeur
dans la fente en le faisant
glisser.
36
Page 37

NON UTILISATION ET ENTRETIEN
EN PÉRIODE DE VACANCES
Faire fonctionner la laveuse seulement lorsqu’on est présent.
En cas de déménagement ou si l’on n’utilise pas la laveuse
pendant longtemps, suivre les étapes suivantes :
1. Débrancher la laveuse ou déconnecter la source de
courant électrique.
2. Fermer l’alimentation en eau à la laveuse pour éviter toute
inondation due à une surpression.
3. Nettoyer les distributeurs. Consulter “Nettoyage des
distributeurs”.
ENTRETIEN POUR
ENTREPOSAGE HIVERNAL
IMPORTANT : Pour éviter tout dommage, installer et
remiser la laveuse à l’abri du gel. L’eau qui peut rester
dans les tuyaux risque d’abîmer la laveuse en temps de
gel. Si la laveuse doit faire l’objet d’un déménagement ou
d’entreposage au cours d’une période de gel, hivériser la
laveuse.
Hivérisation de la laveuse :
1. Fermer les deux robinets d’eau; déconnecter et vidanger
les tuyaux d’arrivée d’eau.
2. Placer 1 qt (1 L) d’antigel pour véhicule récréatif
dans le tambour et faire fonctionner la laveuse sur
un programme NORMAL (Normal) pendant environ
deux minutes pour mélanger l’antigel et l’eau restante.
3. Débrancher la laveuse ou déconnecter la source de
courant électrique.
RÉINSTALLATION/RÉUTILISATION
DE LA LAVEUSE
Pour réinstaller la laveuse après une période de nonutilisation, de vacances, de remisage pour l’hiver ou après
un déménagement :
1. Consulter les instructions d’installation pour choisir
l’emplacement, régler l’aplomb de la laveuse et la
raccorder.
2. Avant de réutiliser la laveuse, exécuter la procédure
recommandée suivante :
Remise en marche de la laveuse :
1. Vidanger les canalisations d’eau et les tuyaux.
Reconnecter les tuyaux d’arrivée d’eau. Ouvrir
les deux robinets d’eau.
TRANSPORT DE LA LAVEUSE
1. Fermer les deux robinets d’eau. Débrancher et vidanger
les tuyaux d’arrivée d’eau.
2. Si l’on déplace la laveuse pendant une période de gel,
suivre les instructions de la section ENTRETIEN POUR
ENTREPOSAGE HIVERNAL avant de la déplacer.
3. Déconnecter le tuyau d’évacuation du système
d’évacuation et de l’arrière de la laveuse.
4. Débrancher le cordon d’alimentation.
5. Placer les tuyaux d’arrivée d’eau et le tuyau
d’évacuation dans le tambour de la laveuse.
6. Enrouler le cordon d’alimentation et l’attacher avec un
élastique ou avec un attache-câble pour l’empêcher de
traîner sur le plancher.
IMPORTANT : Demander une intervention de dépannage
si l’on doit installer de nouveau boulons de transport.
Ne pas réutiliser les boulons de transport. La laveuse
doit être transportée en position verticale. An d’éviter
d’endommager la structure de la laveuse, celle-ci doit être
correctement installée pour pouvoir être déplacée par un
technicien agréé.
2. Brancher la laveuse ou reconnecter la source de courant
électrique.
3. Faire exécuter à la laveuse le programme HEAVY
DUTY (service intense) pour nettoyer la laveuse et
éliminer l’antigel, le cas échéant. Utiliser uniquement
un détergent HE. Utiliser la moitié de la quantité
recommandée par le fabricant pour une charge
de taille moyenne.
37
Page 38

DÉPANNAGE
Essayer d’abord les solutions suggérées ici ou consulter le site Web www.whirlpool.com/product_help –
Au Canada www.whirlpool.ca pour obtenir de l’aide et pour éviter une intervention de réparation.
Si les phénomènes
suivants
Causes possibles
se produisent
Un code d’erreur apparaît sur l’afchage
Une fois que tout problème éventuel a été résolu, appuyer sur MISE SOUS TENSION pour effacer le code. Puis appuyer de
nouveau sur MISE SOUS TENSION pour redémarrer la laveuse.
“Sud” (mousse
excessive) apparaît
sur l’afchage
F
08 suivi de E01
(erreur d’approvisionnement
en eau) apparaît sur
l’afchage
F
09 suivi de E01
(erreur du système
de pompe de vidange)
apparaît sur l’afchage
F
05 suivi de E02 (la
porte ne se verrouille
pas) apparaît sur
l’afchage
F
07 suivi de E01
(erreur du moteur
d’entraînement)
apparaît sur l’afchage
“rL” (retirer la charge)
apparaît sur l’afchage
La laveuse émet des
signaux sonores pour
signaler une erreur
La laveuse émet un bip
lorsqu’on appuie sur
START (mise en marche)
Un code F## E## autre
que les codes décrits
ci-dessus apparaît sur
l’afchage
“Int” (interrompu)
apparaît sur l’afchage
Témoin lumineux DEL
de nettoyage de la
laveuse clignotant à la
n du programme de
lavage
Il y a trop de mousse dans la
laveuse. La laveuse exécute
une procédure de réduction de
la quantité de mousse.
Vérier que l’alimentation en eau est
correcte.
Inspecter le circuit de plomberie pour
vérier que le tuyau de vidange est
correctement installé. Le tuyau de
vidange se prolonge dans le tuyau
rigide de rejet à l’égout au-delà de
41/2" (114 mm).
Détergent HE non utilisé ou utilisation
excessive de détergent HE.
La porte de la laveuse ne se
verrouille pas.
Le moteur a des difcultés à faire
tourner le tambour.
Charge détectée dans le tambour durant
le programme Clean Washer with affresh®
(nettoyage de la laveuse avec affresh®).
La porte n’a été ni ouverte ni fermée
pendant au moins 3 programmes.
La porte n’est pas fermée.
Code d’erreur du système.
Le programme a été suspendu
ou annulé.
La laveuse a effectué 30 programmes
de lavage et un témoin de rappel
indiquant à l’utilisateur qu’il doit lancer
le programme Clean Washer s’allume.
Laisser la machine continuer. Utiliser uniquement un détergent
HE. Toujours mesurer le détergent et baser la quantité de
détergent sur la taille de la charge. Suivre les instructions
du fabricant du détergent.
Les deux tuyaux doivent être xés et l’eau doit pénétrer dans
la valve d’arrivée.
Les robinets d’eau chaude et d’eau froide doivent être ouverts tous les deux.
Les tamis des valves d’arrivée d’eau de la laveuse sont
peut-être obstrués.
Éliminer toute déformation du tuyau d’arrivée.
Appuyer une fois sur MISE SOUS TENSION pour effacer le code.
Puis appuyer de nouveau sur MISE SOUS TENSION pour redémarrer
la laveuse. Si le code réapparaît, faire un appel de service.
Vérier que le tuyau de vidange est correctement installé.
Vérier que le tuyau d’évacuation n’est pas déformé, écrasé ou obstrué.
Retirer toute obstruction du tuyau de vidange.
Utiliser la bride de retenue pour tuyau de vidange et la xer
solidement au tuyau de rejet à l’égout ou à la cuve.
Abaisser le tuyau de vidange si l’extrémité se trouve à plus de
96" (2,4 m) au-dessus du plancher.
Utiliser uniquement un détergent HE. Toujours mesurer
le détergent et suivre les instructions du fabricant en fonction
de la taille et du niveau de saleté de la charge.
Appuyer sur MISE SOUS TENSION pour annuler le programme.
S’assurer que la porte est parfaitement fermée et verrouillée.
Vérier qu’aucun article dans le tambour de la laveuse n’est
susceptible d’empêcher la porte de se fermer complètement.
La laveuse est tassée. Retirer des articles. Voir “Guide de
programmes” pour les volumes de charge recommandés.
Vérier que tous les matériaux d’expédition ont été retirés.
Voir les Instructions d’installation.
Retirer les articles du tambour et redémarrer le programme Clean
Washer with affresh® (nettoyage de la laveuse avec affresh®).
Ce code peut apparaître lorsque la laveuse est mise en marche
pour la première fois. Ouvrir et fermer la porte pour effacer
l’afchage.
Fermer la porte complètement.
Appuyer une fois sur MISE SOUS TENSION pour effacer le
code. Appuyer ensuite de nouveau sur MISE SOUS TENSION
pour redémarrer la laveuse. Si le code réapparaît, faire un appel
de service.
La laveuse peut mettre entre 20 et 30 minutes à essorer et
vidanger l’eau de la charge – elle afchera ce code d’erreur
durant cette période. Appuyer une fois sur MISE SOUS
TENSION pour effacer le code. Appuyer ensuite de nouveau
sur MISE SOUS TENSION pour redémarrer la laveuse.
Lancer le programme Clean Washer. Si le programme de
nettoyage de la laveuse n’est pas activé, le témoin DEL cesse
de clignoter après que la laveuse a effectué 3 programmes
de lavage ordinaires supplémentaires. Après que la laveuse a
effectué 30 programmes de lavage supplémentaires, le témoin
DEL de nettoyage de la laveuse clignote à nouveau à la n d’un
programme de lavage en guise de rappel.
38
Solution
Page 39

DÉPANNAGE
Essayer d’abord les solutions suggérées ici ou consulter le site Web www.whirlpool.com/product_help –
Au Canada www.whirlpool.ca pour obtenir de l’aide et pour éviter une intervention de réparation.
Si les phénomènes
suivants
se produisent
Vibrations ou déséquilibre
Vibrations, balancement
ou effet de “marche” de
la laveuse
Causes possibles
Les pieds ne sont peut-être pas
en contact avec le plancher ou
verrouillés.
La laveuse n’est peut-être pas
d’aplomb.
La charge est peut-être déséquilibrée
ou de trop grande taille.
Les boulons d’expédition se trouvent
toujours à l’arrière de la laveuse.
Solution
Les pieds avant et arrière doivent être en contact ferme avec
le plancher et la laveuse doit être d’aplomb pour fonctionner
correctement. Les contre-écrous doivent être bien serrés
contre le bas de la caisse.
Vérier que le plancher n’est pas incurvé ou qu’il ne s’affaisse
pas. Si le plancher est irrégulier, un morceau de contreplaqué de
3/4" (19 mm) placé sous la laveuse permettra de réduire le bruit.
Voir “Réglage de l’aplomb de la laveuse” dans les Instructions
d’installation.
Éviter de tasser la charge. Éviter de laver un article seul. Compenser
le poids d’un article seul tel qu’un tapis ou une paire de jeans par
quelques articles supplémentaires pour équilibrer le tout.
L’article ou la charge ne convient pas au programme
sélectionné. Voir “Guide de programme” et “Utilisation
de la laveuse”.
Voir “Élimination des accessoires de transport” dans les
Instructions d’installation.
Bruits
Cliquetis ou bruits
métalliques
Gargouillement ou
bourdonnement
Roulement, ballotement
ou cliquetis occasionnel
(pour un essorage à
faible vitesse)
Fuites d’eau
Vérier ce qui suit pour
que l’installation soit
correcte :
Porte qui se verrouille ou
se déverrouille.
Des objets sont coincés dans le
système de vidange de la laveuse.
La laveuse est peut-être en
train d’évacuer de l’eau.
d’équilibrage équilibrent la charge.
Les tuyaux de remplissage ne sont
pas solidement xés.
Rondelles d’étanchéité des tuyaux
de remplissage.
Raccord du tuyau de vidange.
Inspecter le circuit de plomberie du
domicile pour vérier qu’il n’y a pas
de fuites ou que l’évier ou le tuyau
de vidange n’est pas obstrué.
La porte se verrouillera, se déverrouillera puis se verrouillera à
nouveau. Trois déclics se font entendre une fois que l’on appuie
sans relâcher sur MISE EN MARCHE. Ceci est normal.
Vider les poches avant le lavage. Les articles mobiles tels
des pièces de monnaie sont susceptibles de tomber entre
le tambour et la cuve; ils peuvent aussi obstruer la pompe.
Un appel pour intervention de dépannage s’avérera peut-être
nécessaire pour retirer ces objets.
Il est normal d’entendre des articles métalliques faisant partie
des vêtements comme les boutons-pression métalliques, boucles
ou fermetures à glissière toucher le tambour en acier inoxydable.
Il est normal d’entendre la pompe produire un bourdonnement
continu accompagné de gargouillements ou de bruits de
pompage périodiques lorsque l’eau de n de programme est
éliminée au cours des programmes d’essorage/de vidange.
Ceci est normal pour certaines étapes du programme.Les boules d’acier du système
Serrer le raccord du tuyau de remplissage.
Installer correctement les quatre rondelles d’étanchéité plates
des tuyaux de remplissage d’eau.
Vérier que le tuyau d’évacuation est bien xé au tuyau de rejet
à l’égout ou à l’évier de buanderie.
De l’eau pourrait refouler de l’évier ou du tuyau de rejet à
l’égout obstrué. Inspecter tout le circuit de plomberie du
domicile (éviers de buanderie, tuyau de vidange, conduites
d’eau et robinets) pour vérier qu’il n’y a aucune fuite.
Eau ou mousse
suintant par la porte ou
par l’arrière de la caisse
Détergent HE non utilisé ou
utilisation excessive de
détergent HE.
Utiliser uniquement un détergent HE. La mousse produite par
des détergents ordinaires peut causer des fuites au niveau
de la porte ou de l’arrière de la caisse. Toujours mesurer la
quantité de détergent et suivre les instructions du détergent
en fonction des modalités de nettoyage de la charge.
39
Page 40

DÉPANNAGE
Essayer d’abord les solutions suggérées ici ou consulter le site Web www.whirlpool.com/product_help –
Au Canada www.whirlpool.ca pour obtenir de l’aide et pour éviter une intervention de réparation.
Si les phénomènes
suivants
se produisent
Fuites d’eau
Eau ou mousse
suintant par la porte ou
par l’arrière de la caisse
(suite)
Causes possibles
Résidus sur le hublot de la porte.
Porte ouverte pendant que
la fonction “Add Garment”
(ajouter un vêtement) est activée.
Solution
Nettoyer régulièrement le dessous du hublot en verre pour
éviter toute fuite éventuelle.
De l’eau peut suinter de l’intérieur de la porte si celle-ci est
ouverte après le début d’un programme.
La laveuse ne fonctionne pas comme prévu
La charge n’est
pas complètement
submergée dans l’eau.
La laveuse ne
fonctionne pas ou
ne se remplit pas; elle
cesse de fonctionner
Niveau d’eau non visible par
la porte ou eau ne recouvrant pas
les vêtements.
Vérier que l’alimentation en eau est
correcte.
Vérier que l’alimentation électrique
à la laveuse est correcte.
Fonctionnement normal de la
laveuse.
40
Ceci est normal pour une laveuse HE à chargement frontal. La
laveuse détecte la taille de la charge et ajoute la quantité d’eau
adéquate pour un nettoyage optimal.
Les deux tuyaux doivent être xés et l’eau doit pénétrer dans
la valve d’arrivée.
Les deux robinets d’eau chaude et d’eau froide doivent être
ouverts.
Vérier que les tamis des valves d’arrivée ne sont pas obstrués.
Vérier que les tuyaux d’arrivée d’eau ne sont pas déformés;
ceci peut réduire le débit.
Brancher le cordon d’alimentation dans une prise à 3 alvéoles
reliée à la terre.
Ne pas utiliser de câble de rallonge.
Vérier que la prise est alimentée.
Inspecter la source de courant électrique ou appeler
un électricien pour vérier si la tension est basse.
Remettre un disjoncteur qui serait ouvert en marche. Remplacer
tout fusible grillé.
REMARQUE : Si le problème persiste, appeler un électricien.
La porte doit être complètement fermée et verrouillée pour que
la laveuse puisse fonctionner.
La laveuse fait des pauses durant certaines phases du
programme. Ne pas interrompre le programme.
La laveuse fait une pause d’environ 2 minutes au cours de
certains programmes. Laisser le programme se poursuivre.
Certains programmes comprennent des périodes de culbutage
et de trempage.
On peut arrêter la laveuse pour réduire la production de
mousse.
Page 41

DÉPANNAGE
Essayer d’abord les solutions suggérées ici ou consulter le site Web www.whirlpool.com/product_help –
Au Canada www.whirlpool.ca pour obtenir de l’aide et pour éviter une intervention de réparation.
Si les phénomènes
suivants
se produisent
La laveuse ne fonctionne pas comme prévu (suite)
La laveuse ne
fonctionne pas ou
ne se remplit pas; elle
cesse de fonctionner
La laveuse ne se
vidange/n’essore pas;
les charges restent
mouillées
Causes possibles
Fonctionnement normal de
la laveuse. (suite)
La porte de la laveuse n’est pas
bien fermée.
La laveuse n’a pas été chargée tel
que recommandé.
Détergent HE non utilisé ou utilisation
excessive de détergent HE.
La porte n’a pas été ouverte entre
deux programmes.
Le tuyau de vidange se prolonge dans
le tuyau rigide de rejet à l’égout au-delà
de 4,5" (114 mm).
Le tuyau de vidange est obstrué,
ou l’extrémité du tuyau de vidange
se trouve à plus de 96" (2,4 m)
au-dessus du plancher.
Le tuyau de vidange est trop serré
dans le tuyau rigide de rejet à l’égout,
ou est xé au tuyau rigide de rejet à
l’égout avec du ruban adhésif.
Utiliser des programmes comportant
une vitesse d’essorage inférieure.
La laveuse n’a pas été chargée tel que
recommandé.
La charge est peut-être déséquilibrée.
Détergent HE non utilisé ou utilisation
excessive de détergent HE.
Solution
Le programme de lavage à l’eau froide utilise moins d’eau
au début du programme an de permettre une concentration
élevée de détergent et un lavage optimal. Après ce culbutage
dans une eau concentrée en détergent, le lavage se poursuit
avec davantage d’eau.
La porte doit être fermée lorsque la laveuse est en marche.
Retirer plusieurs articles et ré-agencer la charge dans le tambour.
Fermer la porte et appuyer sans relâcher sur MISE EN MARCHE.
Ne pas ajouter plus de 1 ou 2 articles supplémentaires après
que le programme a commencé an d’éviter que les vêtements
ne soient tassés ou la charge déséquilibrée.
Ne pas ajouter d’eau dans la laveuse.
Utiliser uniquement un détergent HE. La mousse produite par des
détergents ordinaires peut ralentir ou arrêter la laveuse. Toujours
mesurer la quantité de détergent et suivre les instructions du
fabricant en fonction des modalités de nettoyage de la charge.
Pour éliminer la mousse, sélectionner DRAIN & SPIN with Extra
Rinse (vidange et essorage avec rinçage supplémentaire). Appuyer
sans relâcher sur MISE EN MARCHE. Ne pas ajouter de détergent.
Lorsque 3 programmes de lavage ont été effectués à la suite,
la porte doit être ouverte puis refermée avant qu’un nouveau
programme puisse commencer.
Vérier que le tuyau de vidange est correctement installé.
Utiliser la bride de retenue pour tuyau de vidange et la xer
solidement au tuyau rigide de rejet à l’égout ou à la cuve. Ne pas
placer de ruban adhésif sur l’ouverture du système de vidange.
Abaisser le tuyau de vidange si l’extrémité se trouve à plus de
96" (2,4 m) au-dessus du plancher. Retirer toute obstruction du
tuyau de vidange. Voir “Exigences d’installation” dans les
Instructions d’installation.
Le tuyau de vidange doit être lâche mais bien xé. Ne pas
sceller le tuyau de vidange avec du ruban adhésif. Le tuyau
a besoin d’une ouverture pour l’air. Voir “Immobilisation du
tuyau de vidange”dans les Instructions d’installation.
Les programmes avec vitesses d’essorage réduites éliminent
moins d’eau que les programmes qui comportent des vitesses
d’essorage supérieures. Utiliser la vitesse d’essorage/
le programme recommandé approprié pour le vêtement.
Des vêtements tassés ou une charge déséquilibrée empêchent
la laveuse d’essorer correctement, ce qui laisse la charge plus
mouillée qu’elle ne devrait l’être. Voir “Guide de programmes”
pour consulter le volume de charge recommandé pour chaque
programme.
Éviter de laver un article seul. Compenser le poids d’un article
seul tel qu’un tapis ou une veste en jeans par quelques articles
supplémentaires pour équilibrer le tout.
Utiliser uniquement un détergent HE. Un excès de mousse
causé par l’utilisation d’un détergent ordinaire ou d’un surplus
de détergent peut ralentir ou arrêter la vidange ou l’essorage.
Toujours mesurer le détergent et suivre les instructions du
fabricant en fonction de la charge. Pour éliminer tout excès
de mousse, sélectionner DRAIN & SPIN with Extra Rinse
(vidange et essorage avec rinçage supplémentaire). Ne pas
ajouter de détergent.
41
Page 42

DÉPANNAGE
Essayer d’abord les solutions suggérées ici ou consulter le site Web www.whirlpool.com/product_help –
Au Canada www.whirlpool.ca pour obtenir de l’aide et pour éviter une intervention de réparation.
Si les phénomènes
suivants
se produisent
La laveuse ne fonctionne pas comme prévu (suite)
La laveuse ne se
vidange/n’essore pas;
les charges restent
mouillées (suite)
Porte verrouillée à la
n du programme de
lavage
Causes possibles
Des petits articles sont peut-être
coincés dans la pompe ou entre le
tambour et la partie externe de la
cuve de la laveuse.
Il reste de l’eau dans la laveuse après le
programme.
L’option TumbleFresh™ est activée.
Solution
Inspecter le tambour pour vérier qu’aucun article ne dépasse
par les trous du tambour. Vider les poches et utiliser des sacs
à linge pour laver les petits articles.
Sélectionner DRAIN & SPIN (vidange et essorage) pour évacuer
toute eau restée dans la laveuse. La porte de la laveuse se
déverrouillera à la n de la vidange.
Lorsque cette option est activée, la charge est culbutée de
façon périodique pendant un maximum de 6 heures. La porte
est verrouillée durant cette période. Pour annuler cette option
et déverrouiller la porte, appuyer sur MISE SOUS TENSION.
La porte ne se
déverrouille pas.
Températures de
lavage ou de rinçage
incorrectes
L’option ou le réglage
souhaité ne s’allume pas
Charge non rincée
La porte se verrouille une fois que
le programme a démarré.
Vérier que l’alimentation en eau est
correcte.
Lavage de plusieurs charges. Votre réservoir d’eau chaude n’a peut-être pas sufsamment
Pour une performance optimale,
tous les réglages ne sont pas
disponibles sur tous les programmes
et certaines options ne peuvent pas
être combinées.
Vérier que l’alimentation en eau est
correcte.
Si le témoin lumineux “Add Garment” (ajouter un vêtement)
est allumé, appuyer une fois sur MISE EN MARCHE. La porte
se déverrouille.
Assurez-vous que les tuyaux d’arrivée d’eau chaude et froide
n’ont pas été inversés.
Les deux tuyaux doivent être raccordés à la fois à la laveuse et
au robinet, et la valve d’arrivée doit recevoir à la fois de l’eau
chaude et de l’eau froide.
Vérier que les tamis des valves d’arrivée ne sont pas obstrués.
Éliminer toute déformation des tuyaux.
d’eau chaude à fournir pour le nombre de lavages à l’eau
chaude ou tiède requis. Ceci est normal.
Consulter le “Guide de programmes” pour connaître les
réglages et options possibles pour chaque programme.
Assurez-vous que les tuyaux d’arrivée d’eau chaude et froide
n’ont pas été inversés.
Les deux tuyaux doivent être xés et l’eau doit pénétrer dans
la valve d’arrivée.
Les robinets d’eau chaude et d’eau froide doivent être ouverts
tous les deux.
Les tamis des valves d’arrivée d’eau de la laveuse sont peut-être
obstrués.
Éliminer toute déformation du tuyau d’arrivée.
42
Détergent HE non utilisé ou utilisation
excessive de détergent HE.
La mousse produite par un détergent ordinaire peut empêcher
la laveuse de fonctionner correctement.
Utiliser uniquement un détergent HE. Toujours mesurer la
quantité de détergent et suivre les instructions du fabricant
en fonction de la taille et du niveau de saleté de la charge.
Page 43

DÉPANNAGE
Essayer d’abord les solutions suggérées ici ou consulter le site Web www.whirlpool.com/product_help –
Au Canada www.whirlpool.ca pour obtenir de l’aide et pour éviter une intervention de réparation.
Si les phénomènes
suivants
se produisent
La laveuse ne fonctionne pas comme prévu (suite)
Causes possibles
Solution
Charge non rincée
(suite)
La charge est
froissée, entortillée
ou enchevêtrée
La laveuse n’a pas été chargée tel
que recommandé.
La charge est peut-être déséquilibrée.
La laveuse n’a pas été chargée tel
que recommandé.
Action de lavage et/ou vitesse
d’essorage trop rapide pour
la charge.
Les vêtements n’ont pas été retirés
rapidement.
Le programme choisi ne correspond
pas au programme qui doit être utilisé
pour la charge de lavage.
L’eau de lavage n’est pas
sufsamment chaude pour
réduire le froissement.
Éviter de tasser le linge dans la laveuse. La laveuse ne
rincera pas bien si les vêtements sont tassés. Charger la laveuse
uniquement avec des articles secs. Voir “Guide de programmes”
pour consulter le volume de charge recommandé pour chaque
programme.
Utiliser le programme conçu pour les tissus à laver.
Si l’on souhaite ajouter des vêtements une fois que la laveuse
a démarré, n’en rajouter qu’un ou deux.
En cas de déséquilibre de la charge, un processus de lavage
est lancé pour répartir à nouveau la charge. Ceci peut rallonger
le programme. Éviter de laver un article seul. Compenser le
poids d’un article seul tel qu’un tapis ou une veste en jeans
par quelques articles supplémentaires pour équilibrer le tout.
Ajouter les vêtements sans les tasser. Les articles doivent
pouvoir se déplacer librement pour réduire le froissement
et l’emmêlement. Voir “Guide de programmes” pour consulter
le volume de charge recommandé pour chaque programme.
Réduire l’emmêlement en mêlant plusieurs types d’articles
dans la charge. Utiliser le programme recommandé
correspondant aux types de vêtements à laver.
Sélectionner une vitesse d’essorage plus basse. Notons que
les articles seront plus mouillés que si l’on utilise une vitesse
d’essorage supérieure.
Décharger la laveuse dès qu’elle s’arrête ou utiliser l’option
TumbleFresh™ si l’on n’est pas en mesure de décharger la
laveuse dès la n du programme.
Utiliser le programme Delicates (articles délicats) ou un autre
programme avec basse vitesse d’essorage pour réduire le
froissement.
Si c’est sans danger pour la charge, utiliser une eau de lavage
tiède ou chaude.
Ne nettoie pas, ne
détache pas
La laveuse n’a pas été chargée tel
que recommandé.
Détergent HE non utilisé ou utilisation
excessive de détergent HE.
Eau dure ou niveau élevé de fer
(rouille) dans l’eau.
Une boule distributrice
d’assouplissant pour tissu
a été utilisée.
Du détergent en poudre a été utilisé
pour le programme à basse vitesse.
Ajouter les vêtements sans les tasser. Les articles doivent
pouvoir se déplacer librement pour réduire le froissement et
l’emmêlement. Voir “Guide de programmes” pour consulter
le volume de charge recommandé pour chaque programme.
Si l’on souhaite ajouter des vêtements une fois que la laveuse
a démarré, n’en rajouter qu’un ou deux.
Utiliser uniquement un détergent HE. Toujours mesurer la
quantité de détergent et suivre les instructions du fabricant
en fonction de la taille et du niveau de saleté de la charge.
La mousse produite par un détergent non HE peut former une
pellicule résiduelle.
Il faut peut-être installer un adoucisseur d’eau et/ou
un ltre à fer.
Les boules distributrices ne fonctionnent pas correctement avec
cette laveuse. Verser un assouplissant pour tissu liquide dans
le compartiment d’assouplissant pour tissu.
Essayer d’utiliser du détergent en liquide.
43
Page 44

DÉPANNAGE
Essayer d’abord les solutions suggérées ici ou consulter le site Web www.whirlpool.com/product_help –
Au Canada www.whirlpool.ca pour obtenir de l’aide et pour éviter une intervention de réparation.
Si les phénomènes
suivants
se produisent
La laveuse ne fonctionne pas comme prévu (suite)
Ne nettoie pas, ne
détache pas (suite)
Programme utilisé incorrect par
rapport au type de tissu.
Causes possibles
Les distributeurs ne sont pas utilisés.
Solution
Utiliser une option de programme de niveau de saleté plus
élevée et une température de lavage plus chaude pour
améliorer le nettoyage.
Si l’on utilise un programme Quick Wash (lavage rapide),
ne laver que quelques articles.
Utiliser le programme Whites (blancs) et Heavy Duty (service
intense) pour un nettoyage puissant.
Ajouter un rinçage supplémentaire pour les charges très sales.
Utiliser les distributeurs pour éviter que l’agent de blanchiment
au chlore ou l’assouplissant pour tissu ne tachent les vêtements.
Remplir les distributeurs avant de démarrer un programme.
Éviter de les remplir excessivement.
Ne pas verser de produits directement sur la charge.
Odeurs
Dommages aux tissus
Les couleurs similaires ne sont pas
lavées ensemble.
Quantité de détergent utilisée
insufsante ou eau dure.
L’entretien mensuel n’est pas effectué
tel que recommandé.
Détergent HE non utilisé ou utilisation
excessive de détergent HE.
La porte n’est pas restée ouverte
après utilisation.
Des objets pointus se trouvaient dans
les poches au moment du programme
de lavage.
Les cordons et les ceintures se sont
peut-être emmêlés.
Les articles étaient peut-être
endommagés avant le lavage.
Les tissus peuvent subir des
dommages si l’on tasse le linge
dans la laveuse.
Vous n’avez peut-être pas ajouté
l’agent de blanchiment liquide au
chlore correctement.
Laver ensemble les couleurs semblables et les retirer
rapidement une fois le programme terminé pour éviter
tout transfert de teinture.
Utiliser plus de détergent pour laver la saleté intense à l’eau
froide ou dure.
Faire fonctionner le programme Clean Washer With affresh™
cleaner (nettoyage de la laveuse avec le décapant affresh™)
une fois par mois. Voir “Nettoyage de la laveuse” dans la
section “Entretien de la laveuse”.
Décharger la laveuse dès que le programme est terminé.
Utiliser l’option TumbleFresh™ si l’on ne peut pas retirer
immédiatement la charge une fois le lavage terminé.
Utiliser uniquement un détergent HE. Veiller à mesurer
correctement. Toujours suivre les directives du fabricant.
Voir la section “Nettoyage de la laveuse”.
Cette laveuse dispose d’une fermeture étanche pour éviter les
fuites d’eau. Pour éviter la formation d’odeurs, laisser la porte
ouverte an de permettre à la laveuse de sécher entre deux
utilisations.
Vider les poches, fermer les fermetures à glissière,
les boutons-pression et les agrafes avant le lavage
pour éviter d’accrocher et de déchirer le linge.
Attacher tous les cordons et les ceintures avant de démarrer le
lavage de la charge.
Raccommoder les déchirures et repriser les ls cassés
des coutures avant le lavage.
Éviter de tasser le linge dans la laveuse. Charger la laveuse
uniquement avec des articles secs.
Utiliser le programme conçu pour les tissus à laver.
Si l’on souhaite ajouter des vêtements une fois que la laveuse
a démarré, n’en rajouter qu’un ou deux.
Ne pas verser d’agent de blanchiment liquide au chlore
directement sur la charge. Essuyer tous les renversements
d’agent de blanchiment.
Un agent de blanchiment non dilué endommagera les tissus. Ne
pas utiliser plus que la quantité recommandée par le fabricant.
44
Page 45

DÉPANNAGE
Essayer d’abord les solutions suggérées ici ou consulter le site Web www.whirlpool.com/product_help –
Au Canada www.whirlpool.ca pour obtenir de l’aide et pour éviter une intervention de réparation.
Si les phénomènes
suivants
se produisent
La laveuse ne fonctionne pas comme prévu (suite)
Blancs grisâtres,
couleurs défraîchies
Causes possibles
La charge n’a pas été correctement
triée.
Les températures de lavage sont trop
basses.
Quantité de détergent utilisée
insufsante ou eau dure.
Solution
Un transfert de teinture peut se produire lors du mélange
d’articles blancs et de couleur dans une même charge. Séparer
les articles de teinte foncée des articles blancs ou clairs.
Utiliser les lavages à l’eau tiède ou chaude si celle-ci est sans
danger pour la charge. S’assurer que le système d’eau chaude
est adéquat pour fournir un lavage à l’eau chaude.
Utiliser plus de détergent pour laver la saleté intense à l’eau
froide ou dure.
Fonctionnement
incorrect du
distributeur
Le sachet de lessive
à dose unique ne se
dissout pas
La durée du
programme varie
ou la durée du
programme est
trop longue
Distributeurs obstrués ou produits
de lessive distribués trop tôt.
L’agent de blanchiment liquide
au chlore n’a pas été versé dans
le compartiment d’agent de
blanchiment.
Il reste de l’eau dans le distributeur
une fois le programme terminé.
Sachet de lessive mal utilisé. Veiller à placer le sachet de lessive dans le tambour de la
Fonctionnement normal de
la laveuse.
Il y a trop de mousse dans la laveuse.
La charge est peut-être déséquilibrée.
Ne pas remplir excessivement le distributeur. Un remplissage
excessif peut entraîner une distribution immédiate.
Remplir les distributeurs avant de démarrer un programme.
Pour les domiciles présentant une basse pression d’eau, il est
possible qu’il reste de la poudre dans le distributeur. Pour éviter
cela, sélectionner une température de lavage plus chaude
(si possible - en fonction de la charge).
Utiliser seulement de l’agent de blanchiment liquide au chlore
dans le compartiment d’agent de blanchiment.
Il est normal qu’il reste de petites quantités d’eau dans
le distributeur une fois le programme terminé.
laveuse avant d’ajouter les vêtements. Ne pas placer de sachet
dans le distributeur. Suivre les instructions du fabricant pour
éviter d’endommager les vêtements.
Les durées de programme varient automatiquement en fonction
de la pression et de la température de l’eau, du détergent et de
la charge de vêtements. Les options sélectionnées affectent
aussi les durées de programme indiquées dans le guide de
programmes.
Lorsqu’un excès de mousse est détecté, une procédure
spéciale contre la mousse se met en marche automatiquement
pour éliminer l’excès de mousse et assurer un rinçage efcace
pour les vêtements. Cette procédure prolonge la durée initiale
du programme.
En cas de déséquilibre de la charge, un processus de lavage
sera lancé pour redistribuer la charge. Ceci prolonge la durée
du programme. Éviter de laver un article seul. Compenser le
poids d’un article seul tel qu’un tapis ou une veste en jeans par
quelques articles supplémentaires pour équilibrer le tout.
Programme utilisé incorrect par
rapport au type de tissu.
Le programme Quick Wash (lavage rapide) est conçu pour les
charges plus petites (3 à 4 articles) de vêtements légèrement
sales. Si des charges plus importantes sont lavées avec ce
programme, la durée de lavage augmente.
Si l’on utilise les programmes Quick Wash (lavage rapide) ou
Delicates (articles délicats), il faut laver uniquement des petites
charges. Ceci garantit un lavage en douceur des vêtements
sans augmenter les durées de programme.
45
Page 46

NOTES
46
Page 47

GARANTIE DES APPAREILS DE BUANDERIE DE WHIRLPOOL CORPORATION
GARANTIE LIMITÉE
Pendant un an à compter de la date d’achat, lorsque ce gros appareil ménager est ulisé et entretenu conformément aux instrucons
jointes à ou fournies avec le produit, Whirlpool Corporaon ou Whirlpool Canada LP (ci-après désignées “Whirlpool”) paiera pour les
pièces spéciées par l’usine et la main-d’oeuvre pour corriger les vices de matériaux ou de fabricaon qui existaient déjà lorsque ce
gros appareil ménager a été acheté.
LE SEUL ET EXCLUSIF RECOURS DU CLIENT DANS LE CADRE DE LA PRÉSENTE GARANTIE LIMITÉE CONSISTE EN LA RÉPARATION
PRÉVUE CI-DESSUS. Le service doit être fourni par une compagnie de service désignée par Whirlpool. Cee garane limitée est valide
uniquement aux États-Unis ou au Canada et s’applique exclusivement lorsque le gros appareil ménager est ulisé dans le pays où il
a été acheté. La présente garane limitée entre en vigueur à compter de la date d’achat inial par le consommateur. Une preuve de
la date d’achat d’origine est exigée pour obtenir un service dans le cadre de la présente garane limitée.
ÉLÉMENTS EXCLUS DE LA GARANTIE
La présente garantie limitée ne couvre pas :
1. Les pièces de rechange ou la main-d’oeuvre lorsque ce gros appareil ménager est ulisé à des ns autres que l’usage unifamilial
normal ou lorsque les instrucons d’installaon et/ou les instrucons de l’opérateur ou de l’ulisateur fournies ne sont pas
respectées.
2. Les visites de service pour recer l’installaon du gros appareil ménager, montrer à l’ulisateur comment uliser l’appareil,
remplacer ou réparer des fusibles ou recer le câblage ou la plomberie du domicile.
3. Les visites de service pour réparer ou remplacer les ampoules électriques, les ltres à air ou les ltres à eau de l’appareil. Les
pièces consompbles ne sont pas couvertes par la garane.
4. Les dommages imputables à : accident, modicaon, usage impropre ou abusif, incendie, inondaon, actes de Dieu, installaon
fauve ou installaon non conforme aux codes d’électricité ou de plomberie, ou l’ulisaon de produits non approuvés par
Whirlpool.
5. Les défauts apparents, notamment les éraures, les bosses, ssures ou tout autre dommage au ni du gros appareil ménager, à
moins que ces dommages soient dus à des vices de matériaux ou de fabricaon et soient signalés à Whirlpool dans les 30 jours
suivant la date d’achat.
6. L’enlèvement et la livraison. Ce gros appareil ménager est conçu pour être réparé à domicile.
7. Les réparaons aux pièces ou systèmes résultant d’une modicaon non autorisée faite à l’appareil.
8. Les frais de déplacement et de transport pour le service d’un produit si votre gros appareil ménager est situé dans une région
éloignée où un service d’entreen Whirlpool autorisé n’est pas disponible.
9. La dépose et la réinstallaon de votre gros appareil ménager si celui-ci est installé dans un endroit inaccessible ou n’est pas
installé conformément aux instrucons d’installaon fournies par Whirlpool.
10. Les pièces de rechange ou la main-d’oeuvre pour les gros appareils ménagers dont les numéros de série et de modèle originaux
ont été enlevés, modiés ou qui ne peuvent pas être facilement idenés.
Le coût d’une réparaon ou d’un remplacement dans le cadre de ces circonstances exclues est à la charge du client.
CLAUSE D’EXONÉRATION DE RESPONSABILITÉ AU TITRE DES GARANTIES IMPLICITES
LES GARANTIES IMPLICITES, Y COMPRIS LES GARANTIES APPLICABLES DE QUALITÉ MARCHANDE OU D’APTITUDE À UN USAGE
PARTICULIER, SONT LIMITÉES À UN AN OU À LA PLUS COURTE PÉRIODE AUTORISÉE PAR LA LOI. Certains États et certaines provinces
ne permeent pas de limitaon sur la durée de garanes implicites de qualité marchande ou d’aptude à un usage parculier,
de sorte que la limitaon ci-dessus peut ne pas être applicable dans votre cas. Cee garane vous confère des droits juridiques
spéciques, et vous pouvez également jouir d’autres droits qui peuvent varier d’une juridicon à l’autre.
EXONÉRATION DE RESPONSABILITÉ EN DEHORS DE LA GARANTIE
Whirlpool ne prend aucun engagement quant à la qualité ou la durabilité de l’appareil, ou en cas de dépannage ou de réparaon
nécessaire sur ce gros appareil ménager, autre que les engagements énoncés dans la présente garane. Si vous souhaitez une
garane prolongée ou plus complète que la garane limitée fournie avec ce gros appareil ménager, renseignez-vous auprès de
Whirlpool ou de votre détaillant à propos de l’achat d’une extension de garane.
LIMITATION DES RECOURS; EXCLUSION DES DOMMAGES FORTUITS OU INDIRECTS
LE SEUL ET EXCLUSIF RECOURS DU CLIENT DANS LE CADRE DE LA PRÉSENTE GARANTIE LIMITÉE CONSISTE EN LA RÉPARATION PRÉVUE
CI-DESSUS. WHIRLPOOL N’ASSUME AUCUNE RESPONSABILITÉ POUR LES DOMMAGES FORTUITS OU INDIRECTS. Certains États et
certaines provinces ne permeent pas l’exclusion ou la limitaon des dommages fortuits ou indirects de sorte que ces limitaons
et exclusions peuvent ne pas être applicables dans votre cas. Cee garane vous confère des droits juridiques spéciques, et vous
pouvez également jouir d’autres droits qui peuvent varier d’une juridicon à l’autre.
Si vous résidez à l’extérieur du Canada et des 50 États des États-Unis, contactez votre marchand Whirlpool autorisé pour déterminer
si une autre garane s’applique.
Si vous avez besoin d’un service de réparaon, voir d’abord la secon “Dépannage” du Guide d’ulisaon et d’entreen. Si vous
n’êtes pas en mesure de résoudre le problème après avoir consulté la secon “Dépannage”, vous pouvez trouver de l’aide
supplémentaire en consultant la secon “Assistance ou Service” ou en appelant Whirlpool. Aux É.-U., composer le 1-800-253-1301.
Au Canada, composer le 1-800-807-6777. 10/11
Conservez ce manuel et votre reçu de vente ensemble pour
référence ultérieure. Pour le service sous garantie, vous
devez présenter un document prouvant la date d’achat ou
d’installation.
Inscrivez les renseignements suivants au sujet de votre gros
appareil ménager pour mieux vous aider à obtenir assistance ou
service en cas de besoin. Vous devrez connaître le numéro de
modèle et le numéro de série au complet. Vous trouverez ces
renseignements sur la plaque signaléque située sur le produit.
Nom du marchand ____________________________________
Adresse _____________________________________________
Numéro de téléphone _________________________________
Numéro de modèle ___________________________________
Numéro de série ______________________________________
Date d’achat _________________________________________
47
Page 48

AssistAnce or service
Before calling for assistance or service, please check “Troubleshooting” or visit www.whirlpool.com/help.
It may save you the cost of a service call. If you still need help, follow the instructions below.
When calling, please know the purchase date and the complete model and serial number of your appliance.
These parts will t right and work right because they are made with the same precision
To locate FSP® replacement parts, assistance in your area, or accessories:
Whirlpool Corporation Customer eXperience Center
1-800-253-1301 www.whirlpool.com
1-800-442-9991 (Accessories)
www.whirlpool.com/accessories
or call your nearest designated service center or refer to your Yellow Pages telephone directory.
In the U.S.A.
Features and specications on our full line of appliances.
Installation information.
Specialized customer assistance (Spanish speaking,
hearing impaired, limited vision, etc.).
Whirlpool Corporation
Customer eXperience Center
553 Benson Road
Benton Harbor, MI 49022-2692
This information will help us to better respond to your request.
If you need replacement parts or to order accessories
We recommend that you use only FSP® Factory Specied Parts.
used to build every new WHIRLPOOL® appliance.
Our consultants provide assistance with
You can write with any questions or concerns at:
Please include a daytime phone number in your correspondence.
Whirlpool Canada LP
Customer eXperience Centre
1-800-807-6777
www.whirlpool.ca
In the U.S.A. and Canada
Use and maintenance procedures.
Accessory and repair parts sales.
Referrals to local dealers, repair parts distributors,
and service companies. Whirlpool designated service
technicians are trained to fulll the product warranty
and provide after-warranty service, anywhere in the
United States and Canada.
Customer eXperience Centre
Whirlpool Canada LP
Unit 200 - 6750 Century Ave.
Mississauga, ON L5N 0B7
AssistAnce oU service
Avant de faire un appel pour assistance ou service, veuillez vérier la section “Dépannage” ou consulter
www.whirlpool.com/help. Cette vérication peut vous faire économiser le coût d’une visite de réparation.
Lors d’un appel, veuillez connaître la date d’achat et les numéros au complet de modèle et de série de votre appareil.
Si vous avez besoin de pièces de rechange ou pour commander des accessoires
Si vous avez besoin de commander des pièces de rechange, nous vous recommandons d’utiliser seulement des pièces
spéciées par l’usine FSP®. Ces pièces conviendront et fonctionneront bien parce qu’elles sont fabriquées selon les mêmes
spécications précises utilisées pour construire chaque nouvel appareil WHIRLPOOL®.
Pour trouver des pièces de rechange FSP® ou des accessoires dans votre région :
Nos consultants fournissent
l’assistance pour :
Procédés d’utilisation et d’entretien.
Vente d’accessoires et de pièces de rechange.
Les références aux concessionnaires, compagnies
de service de réparation et distributeurs de pièces de
rechange locaux. Les techniciens de service désignés
par Whirlpool® sont formés pour remplir la garantie des
produits et fournir un service après la garantie, partout au
Canada.
08/13
W10554129C Printed in U.S.A.
W10554130C - SP Imprimé aux É.-U.
Si vous avez encore besoin d’aide, suivre les instructions ci-dessous.
Ces renseignements nous aideront à mieux répondre à votre demande.
Whirlpool Canada LP Centre pour l’eXpérience de la clientèle
1-800-807-6777 www.whirlpool.ca
Pour plus d’assistance
Vous pouvez nous soumettre toute question ou problème en
Dans votre correspondance, veuillez indiquer un numéro
de téléphone où on peut vous joindre dans la journée.
®/TM
© 2013 Whirlpool. All rights reserved.
Used under license in Canada.
®/TM
© 2013 Whirlpool. Tous droits réservés.
Emploi sous licence au Canada.
écrivant à l’adresse ci-dessous :
Centre pour l’eXpérience de la clientèle
Whirlpool Canada LP
Unit 200 - 6750 Century Ave.
Mississauga, ON L5N 0B7
 Loading...