

Page 1
WASHER
INSTRUCTIONS
USER
INSTRUCTIONS
Para una version de estas instrucciones en español, visite www.Whirlpool.com
D’UTILISATION
DE LA LAVEUSE
Table of Contents Table des matières
WASHER SAFETY .........................................................1
CONTROL PANEL AND FEATURES ............................3
WASHER USE .......................................................................5
WASHER CARE ....................................................................6
TROUBLESHOOTING .........................................................7
WARRANTY ...................................................................9
ACCESSORIES ............................................................19
ASSISTANCE OR SERVICE ............................. Back Cover
SÉCURITÉ DE LA LAVEUSE ...................................... 10
TABLEAU DE COMMANDE
ET CARACTÉRISTIQUES ........................................... 11
UTILISATION DE LA LAVEUSE...................................... 13
ENTRETIEN DE LA LAVEUSE ........................................ 14
DÉPANNAGE ...................................................................... 16
GARANTIE ...................................................................18
ACCESSOIRES ............................................................19
ASSISTANCE OU SERVICE ................. Couverture arrière
WASHER SAFETY
W10330947A
W10331732A - SP
Page 2
2
Page 3
CONTROL PANEL AND FEATURES
1
1
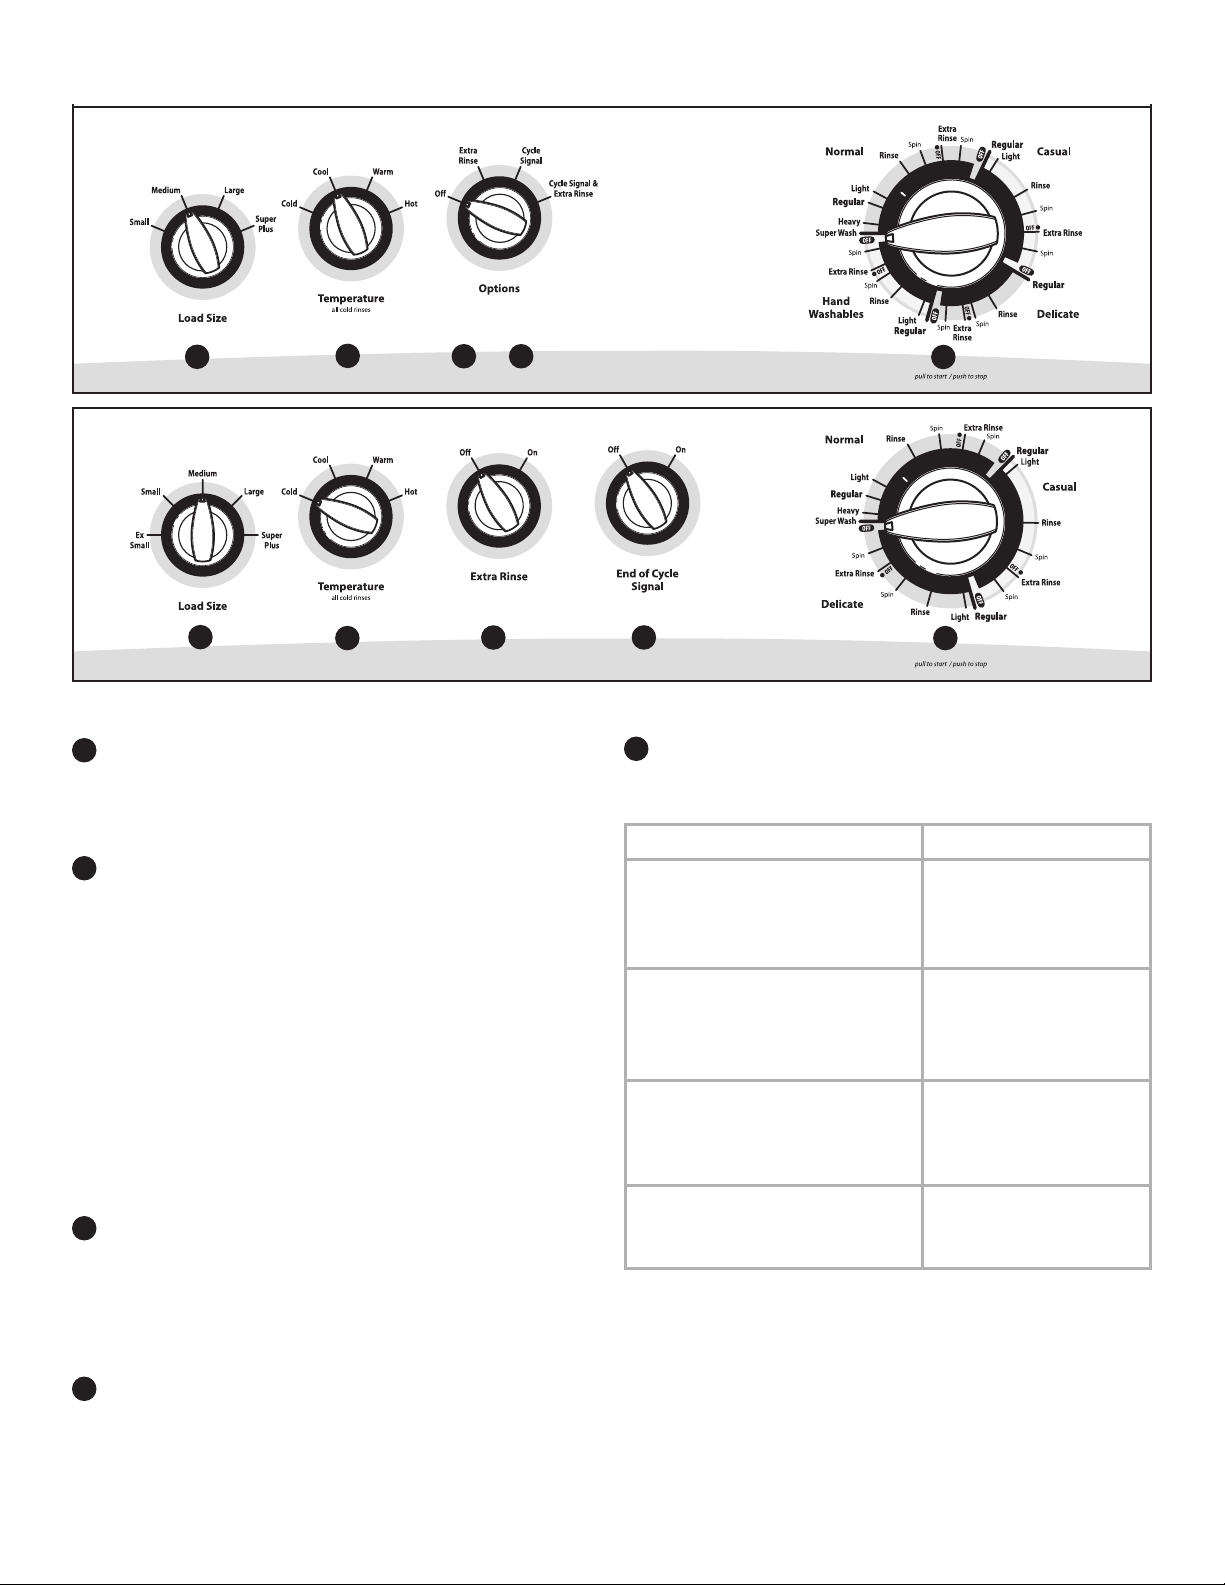
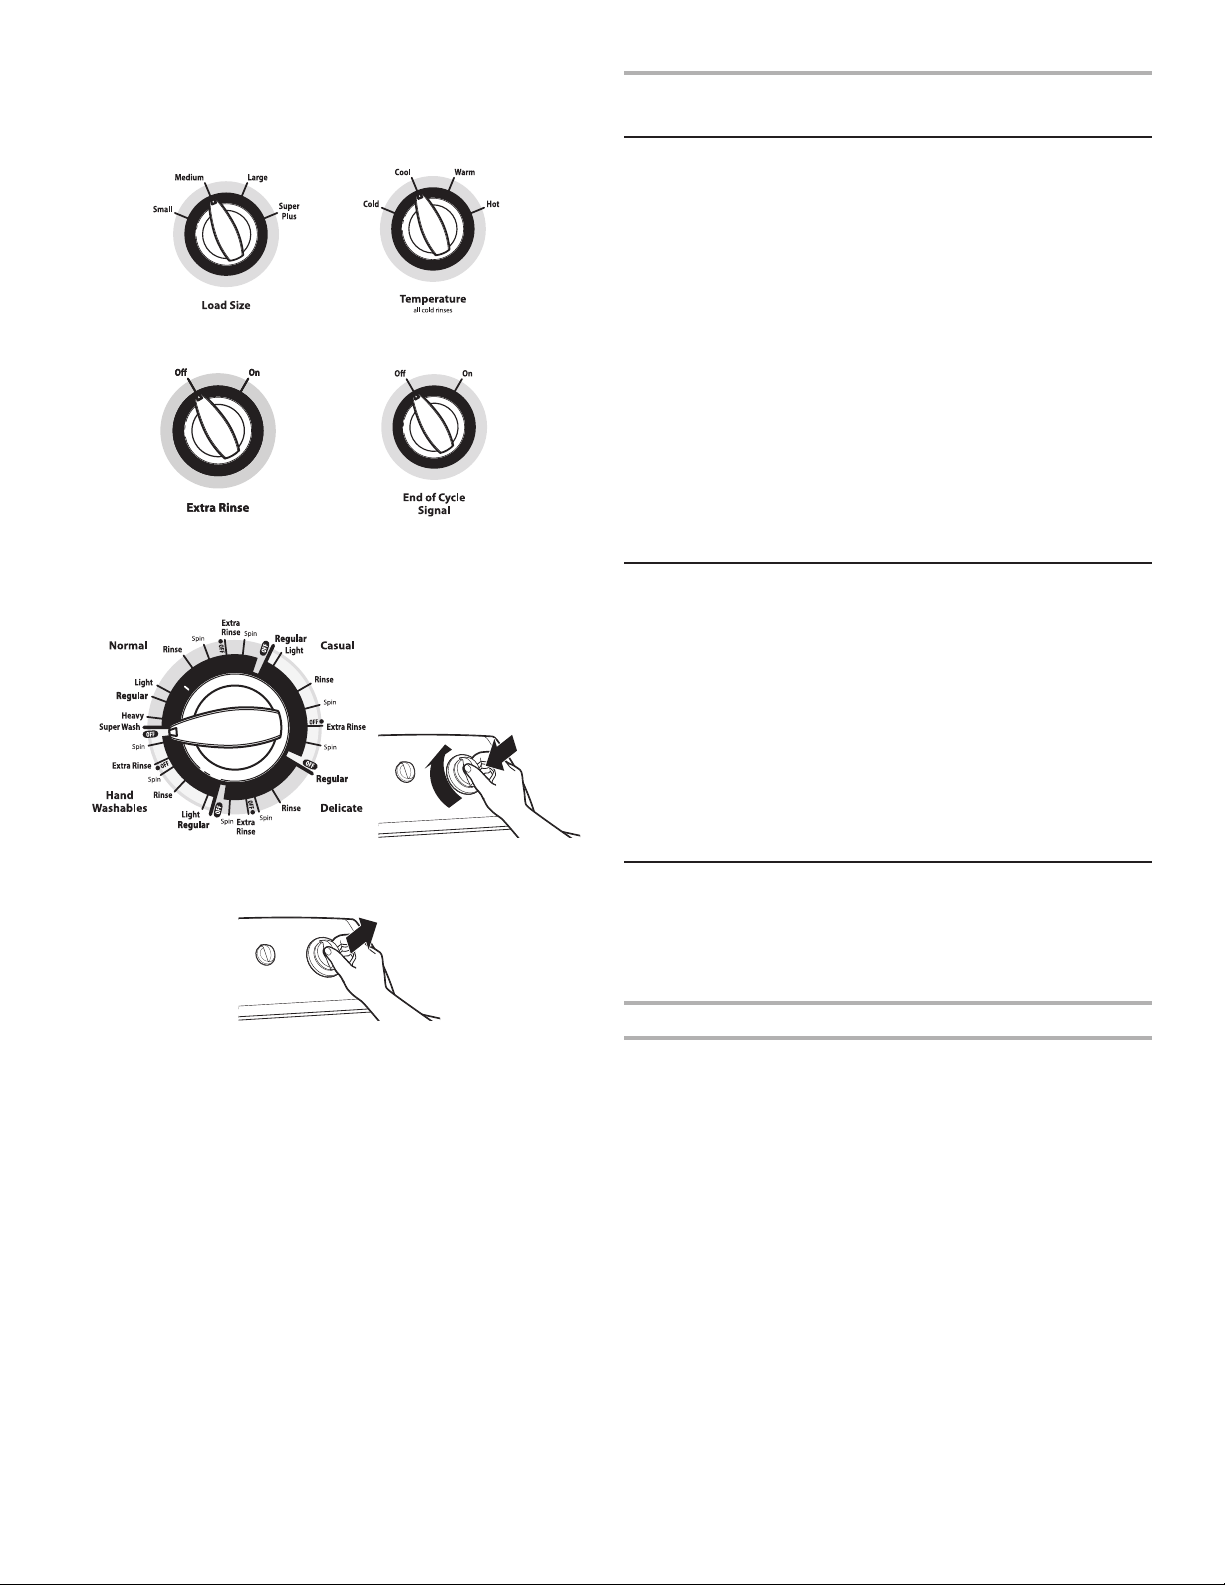
Load Size Control
1
Use this option to adjust the amount of water used with
your load size. Use enough water to allow the load to
move freely.
Temperature Control
2
Temperature Control senses and maintains uniform water
temperatures by regulating incoming hot and cold water.
Warm and hot water will be cooler than what your
previous washer provided.
Even in Cool wash, some warm water is let into washer
to maintain a consistent minimum temperature.
Select a wash temperature based on the type of fabric and
soils being washed. For best results, follow the garment
label instructions, using the warmest wash water safe for
your fabric. See “Wash Temperature” Chart.
NOTE: In wash water temperatures colder than 60° F (15.6° C),
detergents do not dissolve well and soils can be difcult to
remove.
2
2
Not all features and options are available on all models.
3 4
3
Appearance may vary.
5
4
Cycle Control knob
5
Select the wash cycle best suited for your type of fabric.
See “Cycle Guide” for more details.
Wash Temperature
Hot
Some cold water is added to
save energy. This will be cooler
than your hot water heater setting.
Warm
Some cold water will be added,
so this will be cooler than what
your previous washer provided.
Cool - brights/darks
Warm water is added to assist
in soil removal and to help
dissolve detergents.
5
Suggested Fabrics
Whites and pastels
Durable garments
Heavy soils
Bright colors
Moderate to light soils
Colors that bleed or fade
Light soils
Extra Rinse
3
If you desire an extra rinse at the end of your regular cycle,
turn the Extra Rinse knob to ON.
On models without the Extra Rinse knob, choose a second
rinse by pushing the Cycle Control knob in and rotating it to
any of the “Rinse” cycle settings.
End of Cycle Signal
4
The End of Cycle Signal sounds when the cycle is complete.
Cold
This is the temperature from
your faucet.
Dark colors that bleed
or fade
Light soils
3
Page 4
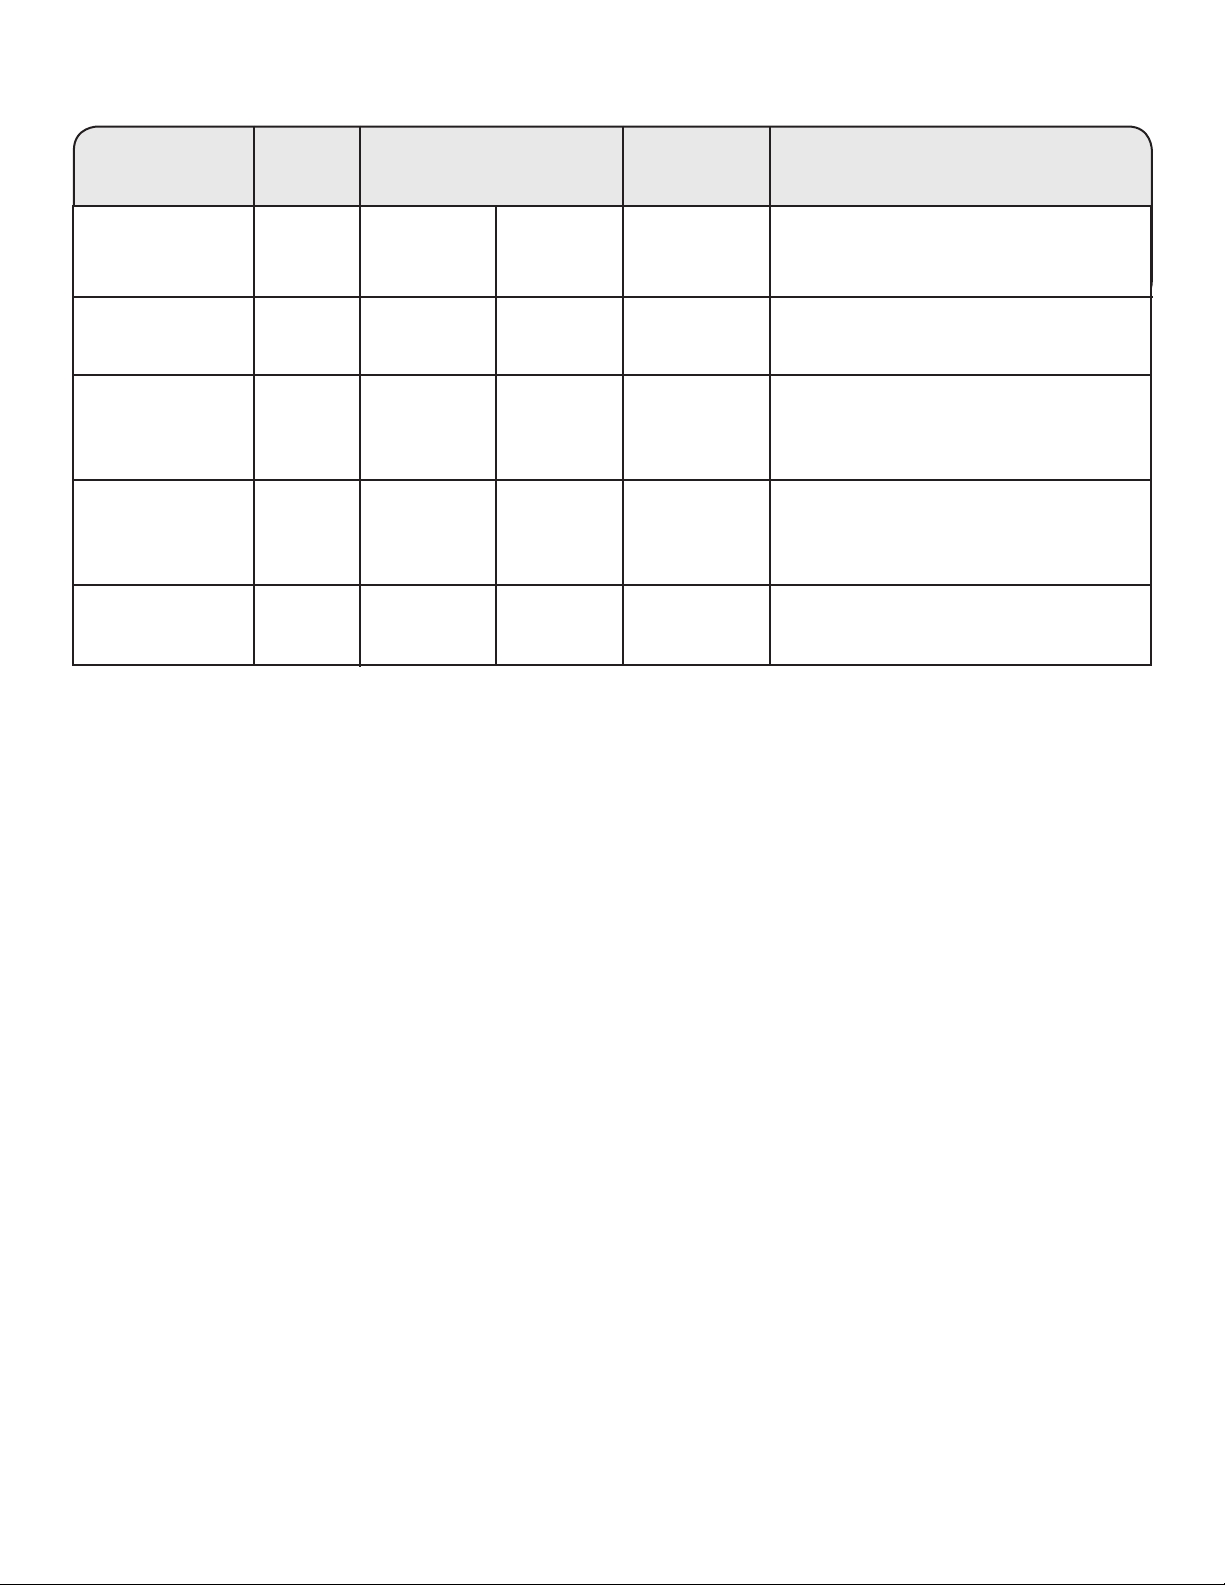
CYCLE GUIDE
Types of Fabric Soil
Level
Cottons, linens,
synthetic fabrics
Sturdy fabrics,
Colorfast items
Machine wash silks,
hand wash fabrics
Washable knits,
machine washable
silks
Work shirts and
pants, synthetic
fabrics
* Approximate time in minutes
Not all cycles are available on all models. Refer to the cycle control knob on your washer.
Heavy
Regular
Super Wash
Heavy
Regular
Regular
Regular
Light
4 Speed
combinations
High/High
12-15
High/High
15-18
Intermittent
Low/Low
6
Low/Low
6
High/Low
6-9
2 Speed
combinations
High/High
10-14
High/High
14-16
N/A
Intermittent
High/High
6
High/High
8-10
CycleSpin Speed & Wash Time*
Normal
Normal
Hand
Washables
Delicate
Casual
Cycle Details:
Use this cycle for normally soiled cottons
and mixed fabric loads
Use this cycle for heavily soiled cottons
or sturdy fabrics.
Use for special care items. Brief low-speed
agitations/ spins and short soaks provide
the gentlest cleaning while minimizing
wrinkling.
Use for special care items. Brief agitations
and short soaks provide gentler cleaning.
Use this cycle to wash no-iron fabrics
and blends to minimize wrinkling.
4
Page 5
STARTING YOUR WASHER
WASHER USE
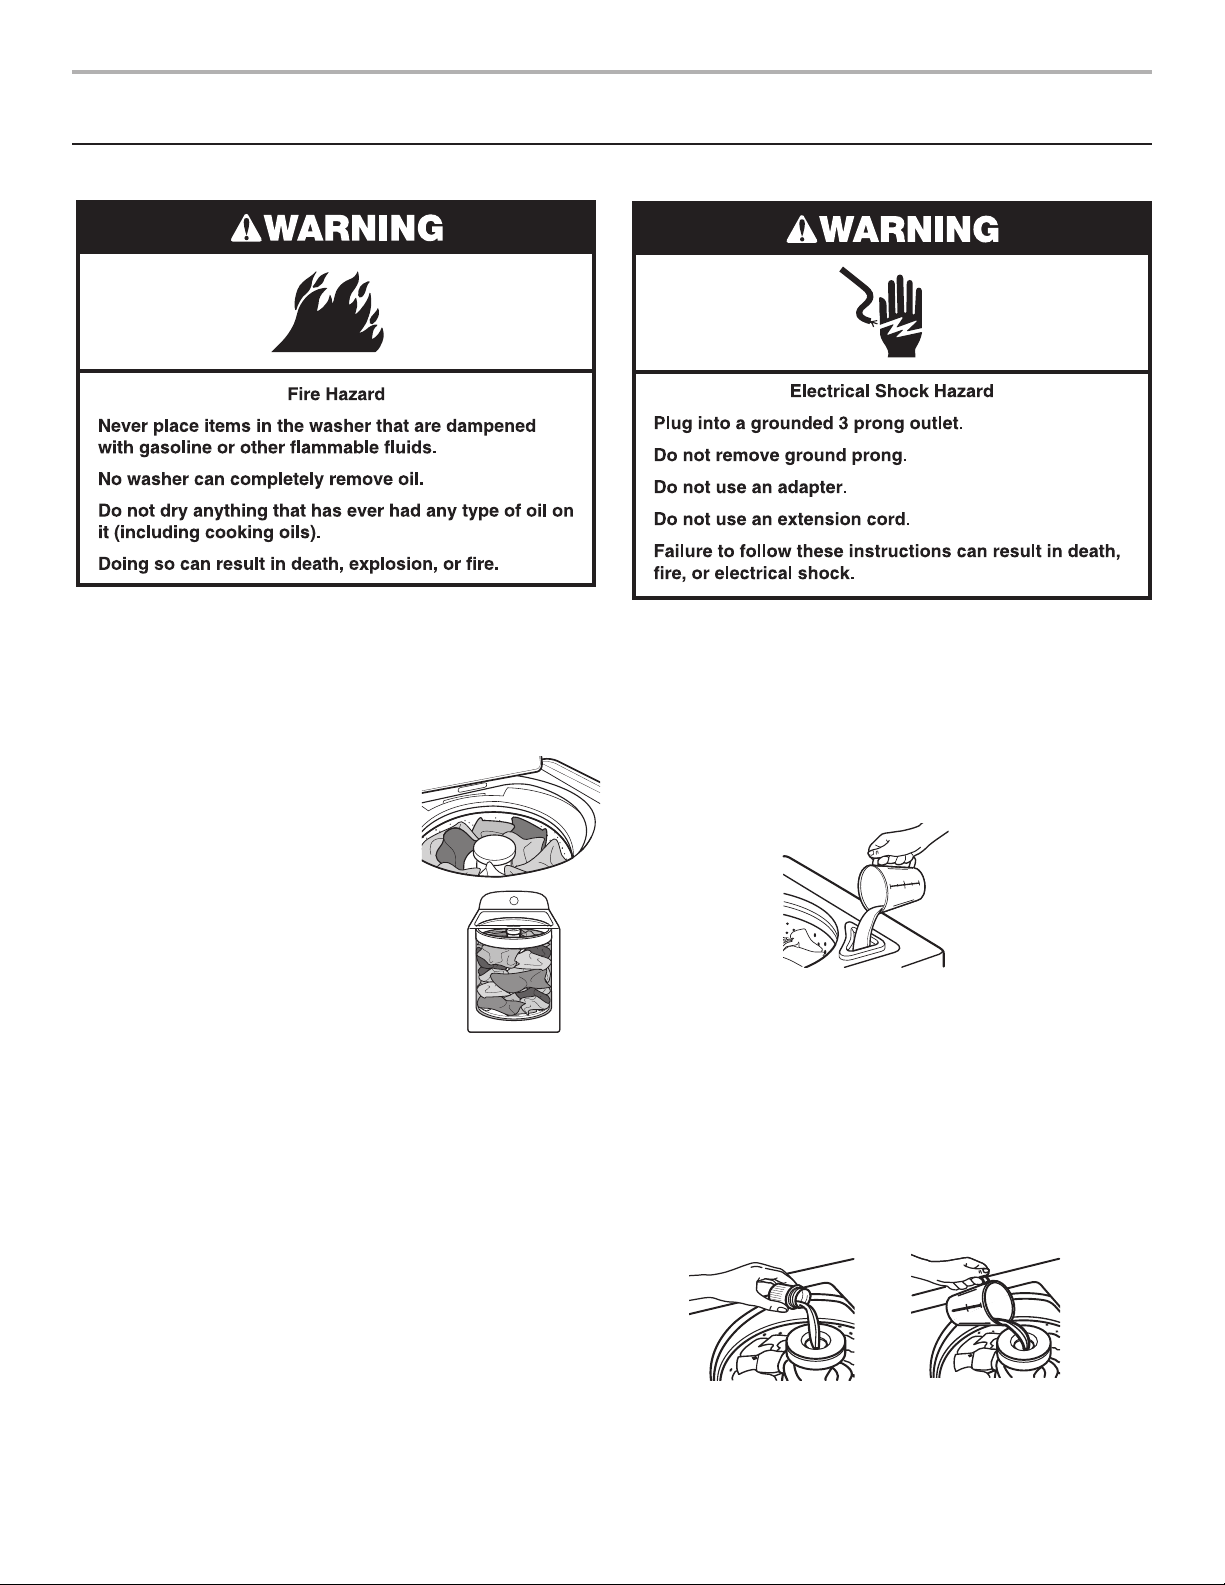
IMPORTANT: When washing any article of clothing, always
follow fabric care labels and manufacturer’s directions.
1. Measure detergent and add to the bottom of the washer. If
desired, add oxi or color-safe bleach products to the bottom
of the washer as well.
2. Loosely add sorted load of clothes
to wash basket.
Load evenly to maintain washer
balance.
Mix large and small items.
Use garment bags for smaller
items.
Do not wrap large items such as
sheets around the agitator. Items need
to move freely for best cleaning and to
reduce wrinkling and tangling.
3. Add only liquid chlorine bleach to the dispenser. Bleach
is immediately added into the washer and is diluted
automatically during the wash cycle.
NOTE: Do not use this dispenser to add powdered chlorine
or color-safe bleach to your load.
Style 1: Without liquid chlorine bleach dispenser
(on some models)
Let the washer ll and begin agitating the load.
Add bleach 5 minutes into the wash cycle for best
dispensing. Pour bleach around the agitator, not directly
onto the load to avoid damaging clothing or other
items in the load.
Style 2: With liquid chlorine bleach dispenser
(on some models.)
Using a cup with a pouring spout, measure amount of
bleach. Do not allow bleach to spill, splash, drip, or run
into the basket or on load. Do not use more than the
recommended amount.
NOTE: Undiluted bleach will damage any fabric it touches.
Damage may appear several washings later as rips, tears,
holes, and color loss.
4. Add liquid fabric softener to dispenser. Fabric softener is
added automatically during the nal rinse cycle.
Style 1: With liquid fabric softener dispenser
(on some models.)
Measure recommended amount of liquid fabric softener.
Do not allow liquid fabric softener to spill, splash, drip, or
run into the basket or on load. Do not use more than the
recommended amount.
Always dilute liquid fabric softener by lling the dispenser
with warm water until reaching the Max Fill Line arrows.
Undiluted fabric softener can stain fabrics.
Style 2: Without liquid fabric softener dispenser
(on some models.)
In the nal rinse only, add fabric softener that has been
diluted with 1/2 to 1 cup (125 to 250 mL) warm water.
5
Page 6
5. Close the washer lid. Washer will not operate with lid open.
6. Select Load Size and Temperature Options.
7. Select Extra Rinse Option and End of Cycle Signal, if desired.
8. Select Cycle.
Push the Cycle Control knob in and turn clockwise to the
cycle you want.
WASHER CARE
Cleaning Your Washer
Use a soft, damp cloth or sponge to wipe up any spills such as
detergent or bleach from the outside of your washer.
Clean your washer interior by mixing 1 cup (250 mL) of chlorine
bleach and enough detergent to equal twice the manufacturer’s
recommended amount for a normal wash load. Pour this mixture
into your washer and run it through a complete cycle using hot
water. Repeat this process if necessary.
Remove any hard water deposits using only cleaners labeled as
washer safe.
Cleaning the liquid fabric softener dispenser
1. Remove dispenser by grasping top with both hands and
squeezing, while pushing upward with thumbs.
2. Rinse dispenser under warm water, then replace it.
NOTE: To avoid damage to the washer or clothing, do not wash
clothes with the liquid fabric softener dispenser removed.
Water Inlet Hoses
This washer does not include water inlet hoses. Whirlpool
Corporation recommends use of factory specied parts. See
“Accessories” for a list of factory specied hoses available for
separate purchase. These hoses are manufactured and tested to
meet Whirlpool Corporation’s specications.
Replace inlet hoses after 5 years of use to reduce the risk of hose
failure. Periodically inspect and replace inlet hoses if bulges,
kinks, cuts, wear, or leaks are found.
When replacing your inlet hoses, mark the date of replacement
on the label with a permanent marker.
9. Start the washer by pulling out the Cycle control knob.
To stop at any time, push in the Cycle Control knob.
To restart, close the lid and pull out the Cycle Control knob.
Moving and Storage
Because some water may stay in the hoses, freezing can damage
your washer. If storing or moving your washer during freezing
weather, winterize it.
Winterizing your washer
1. Shut off both water faucets. Disconnect and drain water inlet
hoses. Pour 1 qt (1 L) of R.V.-type antifreeze into the basket.
2. Run washer on a drain and spin setting for about 30 seconds
to mix the antifreeze and remaining water.
3. Unplug washer or disconnect power.
6
Page 7

To use washer again
1. Flush water pipes and hoses. Reconnect water inlet hoses.
Turn on both water faucets.
2. Plug in washer or reconnect power.
3. Run the washer through a complete Normal cycle with
1 cup (250 mL) of detergent to clean out antifreeze.
Storage, non-use, or vacation care
Operate your washer only when you are at home. If you will be
on vacation or not using your washer for an extended period of
time, you should:
1. Unplug washer or disconnect power.
2. Turn off the water supply to the washer. This helps avoid
ooding (due to a water pressure surge) while you are away.
TROUBLESHOOTING
First try the solutions suggested here or visit our website and reference FAQs (Frequently
Asked Questions) to possibly avoid the cost of a service call.
In U.S.A. www.whirlpool.com/help
Noisy
Is the load balanced and the washer level? The wash load
should be balanced and not tightly packed. The washer must
be level. The front feet should be properly installed and the
jam nuts tightened. Reset the rear leveling legs (if needed).
See “Installation Instructions.”
Did you completely remove the yellow shipping strap with
shipping pins? See “Installation Instructions.”
Are the gears engaging after the drain and before spin, or
is the upper part of agitator clicking during wash? These
are normal washer noises.
Leaking
Check the following:
Are the ll hoses tight?
Are the ll hose washers properly seated?
Is the drain hose installed? See “Installation Instructions.”
Is the sink or drain clogged? Sink and standpipe must be
able to handle 17 gal. (64 L.) of water per minute.
Is water deecting off the tub ring or the load? Center
the tub before starting the washer. The wash load should
be balanced and not tightly packed. The ll or spray rinses
can bounce off the load. The washer must be level. The front
feet should be properly installed and the jam nuts tightened.
Reset the rear leveling legs (if needed). See “Installation
Instructions.”
Check household plumbing for leaks.
Water level seems too low
Does the water level seem too low, or does the washer
appear to not ll completely? The top of the agitator is
much higher than the highest water level. This is normal and
necessary for clothes to move freely.
Dispensers clogged or bleach leaking
Did you follow the manufacturer’s directions when adding
fabric softener to the dispenser? Measure detergent and
fabric softener. Slowly pour into the dispensers. Wipe up all
spills. Dilute fabric softener in the fabric softener dispenser.
Periodically clean the dispensers.
Did you put powdered color-safe bleach into the liquid
chlorine bleach dispenser? Add powdered color-safe bleach
directly to the basket.
7
Page 8

Washer won’t run, ll, rinse, or agitate; washer stops
Is the power cord plugged into a grounded 3 prong
outlet? Plug power cord into a grounded 3 prong outlet.
Are you using an extension cord? Do not use an extension
cord.
Is the indicator on the Timer knob properly lined up with a
cycle? Turn the Timer knob to the right slightly and pull knob
out to start.
Are the water inlet valve screens clogged? Turn off the
water and remove inlet hoses from the washer. Remove any
accumulated lm or particles. Reinstall hoses, turn on water,
and check for leaks.
Are both the hot and cold water faucets turned on?
Turn on the water.
Is the water inlet hose kinked? Straighten the hoses.
Has a household fuse blown, or has a circuit breaker
tripped? Replace the fuse or reset the circuit breaker. If the
problem continues, call an electrician.
Is the washer in a normal pause in the cycle? The washer
pauses for about 2 minutes during certain cycles. Allow the
cycle to continue. Some cycles feature periods of agitation
and soak.
Did you wash a large load? Was the wash load tightly
packed? Wash smaller loads and load in loose heaps.
Is the lid open? The lid must be closed during operation.
Washer will not agitate or spin with the lid open.
Washer won’t drain or spin, or loads are wet
Is the drain hose clogged, or the end of the drain hose
more than 96" (2.4 m) above the oor? See “Installation
Instructions” for proper installation of drain hose.
Is the lid open? The lid must be closed during operation.
Washer will not agitate or spin with the lid open.
Is there excessive sudsing? Always measure detergent.
Follow manufacturer’s directions. If you have very soft water,
you might need to use less detergent.
Did you use the right cycle for the load being washed?
Select a cycle with a higher spin speed (if available).
Is the drain hose length fed too far down the drain pipe?
Use the drain hose form to raise the end of the hose. The
hose should be no more than 4.5" (113 mm) down the pipe.
Secure drain hose to drain pipe.
Washer continues to ll or drain; cycle seems stuck
Is the top of drain hose lower than the water level in
washer? The top of the hose must be higher than the water
level in the washer for proper operation. See “Installation
Instructions.”
Does the drain hose t too tightly in the standpipe, or is it
taped to the standpipe? The drain hose should be loose yet
t securely. Do not seal the drain hose with tape. The hose
needs an air gap. See “Installation Instructions.”
Wash/Rinse temperature not what I selected
Are the hot and cold water inlet hoses reversed? See
“Installation Instructions” for more information.
Does the Hot or Warm wash seem cooler than you
expected? Hot and warm temperatures are controlled by the
washer and may be cooler than your previous washer. This is
normal. The cooler temperatures save energy while providing
good cleaning.
Garments damaged
Check the following: Empty pockets, zip zippers, snap
or hook fasteners before washing. Tie strings and sashes
to avoid tangling. Were items damaged before washing?
Mend rips and broken threads in seams before washing.
8
Page 9

WHIRLPOOL CORPORATION LAUNDRY WARRANTY
LIMITED WARRANTY
For one year from the date of purchase, when this major appliance is operated and maintained according to instructions attached to or
furnished with the product, Whirlpool Corporation or Whirlpool Canada LP (hereafter “Whirlpool”) will pay for Factory Specified Parts
and repair labor to correct defects in materials or workmanship that existed when this major appliance was purchased. Service must be
provided by a Whirlpool designated service company. YOUR SOLE AND EXCLUSIVE REMEDY UNDER THIS LIMITED WARRANTY
SHALL BE PRODUCT REPAIR AS PROVIDED HEREIN. This limited warranty is valid only in the United States or Canada and applies
only when the major appliance is used in the country in which it was purchased. Proof of original purchase date is required to obtain
service under this limited warranty.
ITEMS EXCLUDED FROM WARRANTY
This limited warranty does not cover:
1. Replacement parts or repair labor if this major appliance is used for other than normal, single-family household use or when it is
used in a manner that is inconsistent to published user or operator instructions and/or installation instructions.
2. Service calls to correct the installation of your major appliance, to instruct you on how to use your major appliance, to replace or
repair house fuses, or to correct house wiring or plumbing.
3. Service calls to repair or replace appliance light bulbs, air filters or water filters. Consumable parts are excluded from warranty
coverage.
4. Damage resulting from accident, alteration, misuse, abuse, fire, flood, acts of God, improper installation, installation not in
accordance with electrical or plumbing codes, or use of products not approved by Whirlpool.
5. Cosmetic damage, including scratches, dents, chips or other damage to the finish of your major appliance, unless such damage
results from defects in materials or workmanship and is reported to Whirlpool within 30 days from the date of purchase.
6. Pick up and delivery. This major appliance is intended to be repaired in your home.
7. Repairs to parts or systems resulting from unauthorized modifications made to the appliance.
8. Expenses for travel and transportation for product service if your major appliance is located in a remote area where service by an
authorized Whirlpool servicer is not available.
9. The removal and reinstallation of your major appliance if it is installed in an inaccessible location or is not installed in accordance
with Whirlpool’s published installation instructions.
10. Replacement parts or repair labor on major appliances with original model/serial numbers that have been removed, altered, or
cannot be easily determined.
DISCLAIMER OF IMPLIED WARRANTIES
IMPLIED WARRANTIES, INCLUDING ANY IMPLIED WARRANTY OF MERCHANTABILITY OR IMPLIED WARRANTY OF FITNESS FOR
A PARTICULAR PURPOSE, ARE LIMITED TO ONE YEAR OR THE SHORTEST PERIOD ALLOWED BY LAW. Some states and provinces
do not allow limitations on the duration of implied warranties of merchantability or fitness, so this limitation may not apply to you. This
warranty gives you specific legal rights, and you also may have other rights that vary from state to state or province to province.
LIMITATION OF REMEDIES; EXCLUSION OF INCIDENTAL AND CONSEQUENTIAL DAMAGES
YOUR SOLE AND EXCLUSIVE REMEDY UNDER THIS LIMITED WARRANTY SHALL BE PRODUCT REPAIR AS PROVIDED HEREIN.
WHIRLPOOL SHALL NOT BE LIABLE FOR INCIDENTAL OR CONSEQUENTIAL DAMAGES. Some states and provinces do not allow
the exclusion or limitation of incidental or consequential damages, so these limitations and exclusions may not apply to you. This
warranty gives you specific legal rights, and you also may have other rights that vary from state to state or province to province.
If outside the 50 United States and Canada, contact your authorized Whirlpool dealer to determine if another warranty applies.
If you think you need repair service, first see the “Troubleshooting” section of the Use & Care Guide. If you are unable to resolve the
problem after checking “Troubleshooting,” additional help can be found by checking the “Assistance or Service” section or by calling
Whirlpool. In the U.S.A., call 1800253-1301. In Canada, call 18008076777. 7/08
Keep this book and your sales slip together for future
reference. You must provide proof of purchase or installation
date for in-warranty service.
Write down the following information about your major appliance
to better help you obtain assistance or service if you ever need it.
You will need to know your complete model number and serial
number. You can find this information on the model and serial
number label located on the product.
Dealer name____________________________________________________
Address ________________________________________________________
Phone number__________________________________________________
Model number __________________________________________________
Serial number __________________________________________________
Purchase date __________________________________________________
9
Page 10

SÉCURITÉ DE LA LAVEUSE
10
Page 11

TABLEAU DE COMMANDE ET CARACTÉRISTIQUES
1
1
Contrôle du volume de la charge
1
Utiliser cette option pour ajuster la quantité d’eau utilisée
en fonction du volume de la charge. Utiliser sufsamment
d’eau pour permettre au linge de circuler librement.
Contrôle de la température
2
La fonction de contrôle de température détecte et maintient
une température uniforme de l’eau en régulant le débit
d’arrivée d’eau chaude et d’eau froide.
Les températures de l’eau tiède et de l’eau chaude
seront inférieures à celles de votre précédente laveuse.
Même avec un lavage Cool (frais), de l’eau tiède
pénètre dans la laveuse pour maintenir une température
minimum.
Sélectionner une température de lavage en fonction du type
de tissu et de saleté à laver. Pour des résultats optimaux,
suivre les instructions sur l’étiquette du vêtement et utiliser
la température d’eau de lavage la plus chaude possible
qui reste sans danger pour le tissu. Voir le tableau
“Température de lavage”.
REMARQUE : Dans des températures d’eau de lavage
inférieures à 60° F (15,6° C), les détergents ne se dissolvent
pas bien et les saletés peuvent être difciles à éliminer.
Extra Rinse (rinçage supplémentaire)
3
Si l’on souhaite un rinçage supplémentaire à la n d’un
programme ordinaire, tourner le bouton de rinçage
supplémentaire sur ON (marche).
Sur les modèles sans le bouton de commande Extra Rinse
(rinçage supplémentaire), on peut choisir un second rinçage
en appuyant sur le bouton de commande de programme et
en le tournant jusqu’au réglage de programme de rinçage
désiré.
2
2
Certains programmes et options ne sont pas disponibles sur certains modèles.
3 4
3
L’apparence des appareils peut varier.
5
4
Température de lavage
Hot (chaude)
De l’eau froide est rajoutée pour
économiser de l’énergie. Ceci
sera plus froid que le réglage du
chauffe-eau pour l’eau chaude de
votre domicile.
Warm (tiède)
De l’eau froide sera ajoutée; l’eau
sera donc plus froide que celle
que fournissait votre laveuse
précédente.
Cool - brights/darks (fraîche)
De l’eau chaude est ajoutée pour
favoriser l’élimination de la saleté
et pour aider à dissoudre les
détergents.
Cold (froide)
Ceci est la température à votre
robinet.
End of Cycle Signal (signal de n de programme)
4
Le signal de n de programme retentit à la n d’un
programme.
Bouton de commande des programmes
5
Sélectionner le programme de lavage le mieux adapté à
votre type de tissu. Voir “Guide de programme” pour plus
de détails.
5
Tissus suggérés
Blancs et couleurs claires
Vêtements durables
Saleté intense
Couleurs vives
Saletés modérées
à légères
Couleurs qui déteignent
ou s’atténuent
Saletés légères
Couleurs sombres qui
déteignent ou s’atténuent
Saletés légères
11
Page 12

GUIDE DE PROGRAMME
Types de tissus
Niveau
de saleté
Coton, linge de
maison, tissus
synthétiques
Tissus robustes,
articles grand-teint
Articles en soie
lavables en
machine, tissus
lavables à la main
Tricots lavables,
articles en soie
lavables en
machine
Chemises et
pantalons de travail,
tissus synthétiques
* Durée approximative en minutes
Certains programmes ne sont pas disponibles sur certains modèles. Se reporter au bouton de sélection de programme de la laveuse.
Heavy (très sale)
Regular (ordinaire)
Super Wash
(super lavage)
Heavy
(très sale)
Regular (ordinaire)
Regular (ordinaire)
Regular (ordinaire)
Light (léger)
Durée et vitesse d’essorage et
lavage)*
4 combinaisons
de vitesse
High/High
(élevée/élevée)
12-15
High/High
(élevée/élevée)
15-18
Intermittent
Low/Low
(basse/basse)
6
Low/Low
(basse/basse)
6
High/Low
(élevée/basse)
6-9
2 combinaisons
de vitesse
High/High
(élevée/élevée)
10-14
High/High
(élevée/élevée)
14-16
N/A
Intermittent
High/High
(élevée/élevée)
6
High/High
(élevée/élevée)
8-10
Programme
Normal
Normal
Hand
Washables
(articles
lavables à
la main)
Delicate
(articles
délicats)
Casual
(tout-aller)
Détails du programme
Utiliser ce programme pour les articles
en coton et les charges de tissus mixtes
d’une saleté normale.
Utiliser ce programme pour les articles en
coton très sales ou les tissus robustes.
Utiliser pour les articles nécessitant un soin
particulier. De brèves séries d’agitation /
d’essorage à basse vitesse et de courtes
durées de trempage fournissent un nettoyage
en douceur tout en minimisant le froissement.
Utiliser pour les articles nécessitant un soin
particulier. De brèves périodes d’agitation et
de trempage offrent un nettoyage plus doux.
Utiliser ce programme pour le lavage de
tissus ne pouvant pas être repassés et de
tissus mixtes pour minimiser le froissement.
12
Page 13

UTILISATION DE LA LAVEUSE
MISE EN MARCHE DE LA LAVEUSE
IMPORTANTE : Lorsqu’on lave un vêtement, toujours suivre les
directives des étiquettes de soin du tissu et celles du fabricant.
1. Mesurer la quantité de détergent et le verser dans le fond
de la laveuse. Si désiré, ajouter également des agents
de blanchiment oxi ou sans danger pour les couleurs au fond
de la laveuse.
2. Ajouter la charge de linge triée sans
la tasser dans le panier de lavage.
Répartir la charge uniformément
pour maintenir l’équilibre de
la laveuse.
Mélanger les gros et les petits
articles.
Utiliser des sacs à vêtements
pour les articles plus petits.
Ne pas enrouler de gros articles tels des
draps autour de l’agitateur. Les articles
doivent pouvoir circuler librement pour
un nettoyage idéal et pour réduire le
froissement et l’emmêlement.
3. Verser uniquement de l’eau de Javel dans ce distributeur.
L’eau de Javel est introduite dans la laveuse immédiatement
et elle est automatiquement diluée durant le programme
de lavage.
REMARQUE : Ne pas utiliser ce distributeur pour ajouter un
agent de blanchiment en poudre ou sans danger pour
les couleurs à votre charge de lavage.
Style 1 : Sans distributeur d’eau de Javel (sur certains
modèles).
Laisser la laveuse se remplir et commencer l’agitation
de la charge.
Ajouter l’eau de Javel 5 minutes après le démarrage du
programme de lavage pour une meilleure distribution des
produits. Verser l’eau de Javel autour de l’agitateur et non
directement sur la charge an d’éviter d’endommager les
vêtements ou tout autre article constituant la charge.
Style 2 : Avec distributeur d’eau de Javel
(sur certains modèles).
À l’aide d’une tasse avec bec verseur, mesurer la
quantité d’agent de blanchiment. Ne pas renverser, faire
éclabousser, égoutter ou couler de l’agent de blanchiment
dans le panier ou sur la charge de linge. Ne pas utiliser
plus que la quantité recommandée.
REMARQUE : L’eau de Javel non diluée endommagera tout
tissu avec lequel elle entre en contact. Des dommages tels
que des déchirures, des trous ou une décoloration pourraient
apparaître au cours de lavages ultérieurs.
4. Verser de l’assouplissant pour tissu liquide dans le
distributeur. L’assouplissant pour tissu est automatiquement
ajouté au cours du programme de rinçage nal.
Style 1 : Avec distributeur d’assouplissant pour tissu liquide
(sur certains modèles).
Mesurer la quantité recommandée d’assouplissant pour
tissu liquide. Ne pas renverser, faire éclabousser, égoutter
ou couler de l’assouplissant pour tissu liquide dans
le panier ou sur la charge de linge. Ne pas utiliser plus
que la quantité recommandée.
Toujours diluer l’assouplissant pour tissu liquide en
remplissant le distributeur avec de l’eau tiède jusqu’à ce
que le mélange atteigne les èches de la ligne Max Fill.
L’assouplissant de tissu non dilué peut tacher les tissus.
13
Page 14

Style 2 : Sans distributeur d’assouplissant de tissu liquide
(sur certains modèles).
Ajouter l’assouplissant de tissu dilué avec1/2 à 1 tasse
(125 à 250 mL) d’eau tiède au rinçage nal seulement.
5. Rabattre le couvercle de la laveuse. La laveuse
ne fonctionnera pas si le couvercle est ouvert.
6. Sélectionner la taille de la charge et les options
de température.
7. Sélectionner l’option Extra Rinse (rinçage supplémentaire)
et End of Cycle Signal (signal sonore de n de programme),
si désiré.
ENTRETIEN DE LA LAVEUSE
Nettoyage de votre laveuse
Utiliser un linge doux humide ou une éponge humide pour
essuyer les renversements de détergents ou d’eau de Javel à
l’extérieur de votre laveuse.
Nettoyer l’intérieur de votre laveuse en mélangeant 1 tasse (250
mL) d’eau de Javel et deux fois plus de détergent que la quantité
recommandée par le fabricant pour une charge de lavage
normale. Verser ceci dans votre laveuse et lui faire faire
un programme complet à l’eau chaude. Répéter ce processus
au besoin.
Enlever tous les résidus d’eau dure en utilisant seulement des
nettoyants sans danger pour la laveuse.
Nettoyage du distributeur d’assouplissant de tissu
liquide :
1. Retirer le distributeur en prenant le dessus à deux mains et en
le pressant, tout en poussant vers le haut avec les pouces.
2. Rincer le distributeur sous l’eau tiède, puis le remettre
en place.
REMARQUE : An d’éviter d’endommager la laveuse ou
les vêtements, ne pas laver les vêtements si le distributeur
d’assouplissant pour tissu liquide a été retiré.
8. Sélectionner le programme.
Appuyer sur le bouton de commande de programme
et le tourner dans le sens horaire jusqu’au programme désiré.
9. Démarrer la laveuse en tirant le bouton de commande de
programme vers l’extérieur.
Pour arrêter le programme à tout moment, appuyer
sur le bouton de commande de programme.
Pour le remettre en marche, tirer sur le bouton
de commande de programme.
Tuyaux d’arrivée d’eau
Aucun tuyau d’arrivée d’eau n’est fourni avec cette laveuse.
Whirlpool recommande l’utilisation de pièces spéciées par
l’usine. Voir la section “Accessoires” pour obtenir une liste des
tuyaux spéciés par l’usine disponibles à l’achat. Ces tuyaux FSP
sont fabriqués et testés an de répondre aux spécications de
Whirlpool Corporation.
Remplacer les tuyaux d’arrivée d’eau après 5 ans d’utilisation
an de réduire le risque de défaillance des tuyaux. Inspecter
périodiquement les tuyaux; les remplacer en cas de renement,
de déformation, de coupure et d’usure ou si une fuite se
manifeste.
Lorsque vous remplacez vos tuyaux d’arrivée d’eau, noter la date
de remplacement au marqueur indélébile sur l’étiquette.
Préparation avant un entreposage
ou un déménagement
L’eau qui peut rester dans les tuyaux risque d’abîmer votre
laveuse en temps de gel. Si vous rangez ou déplacez votre
laveuse quand il gèle, préparez-la pour l’hiver.
Préparation de votre laveuse pour l’hiver
1. Fermer les deux robinets d’eau. Débrancher et vidanger les
tuyaux d’arrivée d’eau. Mettre 1 pinte (1 L) d’antigel pour
véhicule récréatif dans le panier.
2. Faire tourner la laveuse au réglage vidange et essorage
pendant 30 secondes environ pour mélanger l’antigel à l’eau
restante.
3. Débrancher la laveuse ou déconnecter la source de courant
électrique.
14
Page 15

Réutilisation de la laveuse
1. Vidanger les canalisations d’eau et les tuyaux. Reconnecter
les tuyaux d’arrivée d’eau. Ouvrir les deux robinets d’eau.
2. Brancher la laveuse ou reconnecter la source de courant
électrique.
3. Faire faire un programme Normal complet à la laveuse avec
1 tasse (250 mL) de détergent pour enlever les restes
d’antigel.
Entretien en cas d’entreposage, de non-utilisation
ou en période de vacances
On ne doit faire fonctionner la laveuse que lorsqu’on est présent.
Si l’utilisateur doit partir en vacances ou n’utilise pas la laveuse
pendant une période prolongée, il convient d’exécuter les
opérations suivantes :
1. Débrancher la laveuse ou déconnecter la source de courant
électrique.
2. Fermer l’alimentation d’eau de la laveuse. Ceci aide à éviter
les inondations (dues à une augmentation de la pression)
quand vous êtes absent.
15
Page 16

DÉPANNAGE
Essayer d’abord les solutions suggérées ici ou visiter notre site Web et consulter notre FAQ (Foire aux questions),
pour éventuellement éviter le coût d’un appel de service.
Aux É.-U. www.whirlpool.com/help - Au Canada www.whirlpool.ca
Bruit
La charge est-elle équilibrée et la laveuse d’aplomb?
La charge de lavage devrait être équilibrée et pas tassée.
La laveuse doit être d’aplomb. Les pieds avant devraient
être correctement installés et les écrous serrés. Régler les
pieds de nivellement arrière (au besoin). Voir “Instructions
d’installation”.
Avez-vous retiré complètement la sangle jaune
d’expédition avec les broches d’expédition? Voir
“Instructions d’installation”.
Les mécanismes s’enclenchent-ils après la vidange et
avant l’essorage, ou la partie supérieure de l’agitateur
émet-elle un cliquetis pendant le lavage? Ce sont des
bruits normaux pour la laveuse.
Fuites
Vérier ce qui suit :
Les tuyaux de remplissage sont-ils bien serrés?
Les rondelles de tuyaux de remplissage d’eau sont-elles
correctement installées?
Le tuyau de vidange est-il correctement installé? Voir
“Instructions d’installation”.
L’évier ou le conduit d’évacuation est-il obstrué? L’évier
et le tuyau rigide de rejet à l’égout doivent pouvoir drainer
17 gal. (64 L) d’eau par minute.
L’eau fait-elle dévier l’anneau de la cuve ou la charge?
Centrer la cuve avant de mettre la laveuse en marche. La
charge de lavage devrait être équilibrée et pas tassée. L’eau
de rinçage ou de remplissage peut faire dévier de la charge.
La laveuse doit être d’aplomb. Les pieds avant devraient
être correctement installés et les écrous serrés. Régler les
pieds de nivellement arrière (au besoin). Voir “Instructions
d’installation”.
Vérier la plomberie du domicile pour voir s’il y a des
fuites.
Le niveau d’eau semble trop faible
Le niveau d’eau semble-t-il trop bas, ou la laveuse ne se
remplit-elle pas complètement? Le sommet de l’agitateur
est beaucoup plus haut que le niveau d’eau le plus élevé.
Ceci est normal et nécessaire au libre mouvement des
vêtements.
Distributeurs obstrués ou fuite d’eau de Javel
Avez-vous suivi les directives du fabricant pour l’ajout
d’assouplissant pour tissu dans le distributeur? Mesurer
la quantité de détergent et d’assouplissant de tissu. Verser
lentement dans les distributeurs. Essuyer tout renversement.
Diluer l’assouplissant dans le distributeur d’assouplissant.
Nettoyer les distributeurs périodiquement.
Avez-vous mis de l’agent de blanchiment en poudre sans
danger pour les couleurs dans le distributeur d’eau de
Javel? Ajouter de l’agent de blanchiment en poudre sans
danger pour les couleurs directement dans le panier.
La laveuse ne fonctionne pas, ne se remplit pas,
ne rince pas, l’agitateur ne tourne pas; la laveuse
s’arrête
Le cordon d’alimentation est-il branché dans une prise
à 3 alvéoles reliée à la terre? Brancher le cordon
d’alimentation dans une prise à 3 alvéoles reliée à la terre.
Utilisez-vous un câble de rallonge? Ne pas utiliser un câble
de rallonge.
L’indicateur sur le bouton de commande de la minuterie
est-il correctement aligné avec un programme? Tourner
le bouton de commande de la minuterie légèrement vers la
droite et le tirer pour mettre en marche.
Les tamis de la valve d’arrivée d’eau sont-ils obstrués?
Couper l’arrivée d’eau et retirer les tuyaux d’arrivée d’eau
de la laveuse. Ôter toute pellicule ou particule accumulée.
Réinstaller les tuyaux, ouvrir l’arrivée d’eau et vérier s’il y a
des fuites.
Les deux robinets d’eau (chaude et froide) sont-ils
ouverts? Ouvrir les robinets d’eau.
Le tuyau d’arrivée d’eau est-il déformé? Redresser les
tuyaux.
Un fusible est-il grillé ou le disjoncteur s’est-il déclenché?
Remplacer le fusible ou réenclencher le disjoncteur. Si le
problème persiste, appeler un électricien.
La laveuse est-elle en pause normale du programme?
La laveuse fait une pause d’environ 2 minutes dans certains
programmes. Laisser le programme se poursuivre. Certains
programmes comprennent des périodes d’agitation et de
trempage.
Avez-vous lavé une charge importante? La charge de
lavage était-elle tassée? Laver de petites charges et charger
sans tasser les vêtements.
Le couvercle est-il ouvert? Le couvercle doit être fermé
lorsque la laveuse est en marche. La laveuse n’effectuera pas
d’agitation ni d’essorage avec le couvercle ouvert.
16
Page 17

Absence de vidange ou d’essorage de la laveuse;
ou le linge reste-t-il mouillé?
La température de lavage/rinçage n’est pas celle
qui a été sélectionnée
Le tuyau de vidange est-il obstrué, ou l’extrémité du
tuyau de vidange se trouve-t-elle à plus de 96" (2,4 m)
au-dessus du plancher? Voir “Instructions d’installation pour
une installation correcte du tuyau de vidange.”
Le couvercle est-il ouvert? Le couvercle doit être fermé
lorsque la laveuse est en marche. La laveuse n’effectuera pas
d’agitation ni d’essorage avec le couvercle ouvert.
Y a-t-il un excès de mousse? Toujours mesurer le détergent.
Suivre les directives du fabricant. Si vous avez de l’eau très
douce, il faudra peut-être utiliser moins de détergent.
Avez-vous utilisé le bon programme pour la charge à
laver? Choisir un programme avec une vitesse d’essorage
plus élevée (si disponible).
Le tuyau d’évacuation est-il enfoncé trop profondément
dans le tuyau de rejet à l’égout? Utiliser le tuyau
d’évacuation pour redresser l’extrémité du tuyau. Le tuyau
ne doit pas pénétrer plus de 4,5" (113 mm) dans le tuyau de
rejet à l’égout. Fixer le tuyau d’évacuation au tuyau de rejet à
l’égout.
La laveuse continue de se remplir ou la vidange se
poursuit, le programme semble bloqué
Le dessus du tuyau de vidange est-il plus bas que le
niveau de l’eau dans la laveuse? Le dessus du doit être
plus haut que le niveau de l’eau dans la laveuse pour un bon
fonctionnement. Voir “Instructions d’installation”.
Le tuyau de vidange est-il trop serré dans le tuyau rigide
de rejet à l’égout, ou est-il xé au tuyau rigide de rejet
à l’égout avec du ruban adhésif? Le tuyau de vidange
devrait être lâche mais bien xé. Ne pas sceller le tuyau
de vidange avec du ruban adhésif. Le tuyau a besoin d’une
ouverture pour l’air. Voir “Instructions d’installation”.
Les robinets d’arrivée d’eau chaude et froide ont-ils été
inversés? Voir “Instructions d’installation” pour plus de
renseignements.
Le lavage à température chaude ou tiède semble-t-il
plus frais que prévu? Les températures chaude et tiède
sont contrôlées par la laveuse et peuvent sembler plus
froides que celles fournies par votre laveuse précédente.
Ceci est normal. Des températures plus froides permettent
d’économiser de l’énergie tout en assurant un bon nettoyage.
Endommagement des vêtements
Vérier ce qui suit : Vider les poches, fermer les fermetures
à glissière, les boutons pression et les agrafes avant le
lavage. Attacher les cordons et les ceintures pour éviter
l’emmêlement. Les articles étaient-ils endommagés avant
le lavage? Raccommoder les déchirures et repriser les ls
cassés des coutures avant le lavage.
17
Page 18

GARANTIE DES APPAREILS DE BUANDERIE DE
WHIRLPOOL CORPORATION
GARANTIE LIMITÉE
Pendant un an à compter de la date d'achat, lorsque ce gros appareil ménager est utilisé et entretenu conformément aux instructions
jointes à ou fournies avec le produit, Whirlpool Corporation ou Whirlpool Canada LP (ci-après désignées “Whirlpool”) paiera pour les
pièces spécifiées par l'usine et la main-d'œuvre pour corriger les vices de matériaux ou de fabrication qui existaient déjà lorsque ce
gros appareil ménager a été acheté. Le service doit être fourni par une compagnie de service désignée par Whirlpool. LE SEUL ET
EXCLUSIF RECOURS DU CLIENT DANS LE CADRE DE LA PRÉSENTE GARANTIE LIMITÉE CONSISTE EN LA RÉPARATION PRÉVUE
CI-DESSUS. Cette garantie limitée est valide uniquement aux États-Unis ou au Canada et s’applique exclusivement lorsque le gros
appareil ménager est utilisé dans le pays où il a été acheté. Une preuve de la date d'achat d'origine est exigée pour obtenir un service
dans le cadre de la présente garantie limitée.
ÉLÉMENTS EXCLUS DE LA GARANTIE
La présente garantie limitée ne couvre pas :
1. Les pièces de rechange ou la main-d'œuvre lorsque ce gros appareil ménager est utilisé à des fins autres que l'usage unifamilial
normal ou lorsque les instructions d'installation et/ou les instructions de l'opérateur ou de l'utilisateur fournies ne sont pas
respectées.
2. Les visites de service pour rectifier l'installation du gros appareil ménager, montrer à l'utilisateur comment utiliser l'appareil,
remplacer ou réparer des fusibles ou rectifier le câblage ou la plomberie du domicile.
3. Les visites de service pour réparer ou remplacer les ampoules électriques, les filtres à air ou les filtres à eau de l'appareil. Les pièces
consomptibles ne sont pas couvertes par la garantie.
4. Les dommages imputables à : accident, modification, usage impropre ou abusif, incendie, inondation, actes de Dieu, installation
fautive ou installation non conforme aux codes d'électricité ou de plomberie, ou l'utilisation de produits non approuvés par
Whirlpool.
5. Les défauts apparents, notamment les éraflures, les bosses, fissures ou tout autre dommage au fini du gros appareil ménager, à
moins que ces dommages soient dus à des vices de matériaux ou de fabrication et soient signalés à Whirlpool dans les 30 jours
suivant la date d'achat.
6. L'enlèvement et la livraison. Ce gros appareil ménager est conçu pour être réparé à domicile.
7. Les réparations aux pièces ou systèmes résultant d'une modification non autorisée faite à l'appareil.
8. Les frais de déplacement et de transport pour le service d'un produit si votre gros appareil ménager est situé dans une région
éloignée où un service d'entretien Whirlpool autorisé n'est pas disponible.
9. La dépose et la réinstallation de votre gros appareil ménager si celui-ci est installé dans un endroit inaccessible ou n'est pas installé
conformément aux instructions d'installation fournies par Whirlpool.
10. Les pièces de rechange ou la main-d'œuvre pour les gros appareils ménagers dont les numéros de série et de modèle originaux ont
été enlevés, modifiés ou qui ne peuvent pas être facilement identifiés.
CLAUSE D'EXONÉRATION DE RESPONSABILITÉ AU TITRE DES GARANTIES IMPLICITES
LES GARANTIES IMPLICITES, Y COMPRIS LES GARANTIES APPLICABLES DE QUALITÉ MARCHANDE OU D'APTITUDE À UN
USAGE PARTICULIER, SONT LIMITÉES À UN AN OU À LA PLUS COURTE PÉRIODE AUTORISÉE PAR LA LOI. Certains États et
certaines provinces ne permettent pas de limitation sur la durée de garanties implicites de qualité marchande ou d'aptitude à un usage
particulier, de sorte que la limitation ci-dessus peut ne pas être applicable dans votre cas. Cette garantie vous confère des droits
juridiques spécifiques, et vous pouvez également jouir d'autres droits qui peuvent varier d'une juridiction à l'autre.
LIMITATION DES RECOURS, EXCLUSION DES DOMMAGES FORTUITS OU INDIRECTS
LE SEUL ET EXCLUSIF RECOURS DU CLIENT DANS LE CADRE DE LA PRÉSENTE GARANTIE LIMITÉE CONSISTE EN LA
RÉPARATION PRÉVUE CI-DESSUS. WHIRLPOOL N'ASSUME AUCUNE RESPONSABILITÉ POUR LES DOMMAGES FORTUITS OU
INDIRECTS. Certains États et certaines provinces ne permettent pas l'exclusion ou la limitation des dommages fortuits ou indirects de
sorte que ces limitations et exclusions peuvent ne pas être applicables dans votre cas. Cette garantie vous confère des droits juridiques
spécifiques, et vous pouvez également jouir d'autres droits qui peuvent varier d'une juridiction à l'autre.
Si vous résidez à l'extérieur du Canada et des 50 États des États-Unis, contactez votre marchand Whirlpool autorisé pour déterminer si
une autre garantie s'applique.
Si vous avez besoin d'un service de réparation, voir d'abord la section “Dépannage” du Guide d'utilisation et d'entretien. Si vous n'êtes
pas en mesure de résoudre le problème après avoir consulté la section “Dépannage”, vous pouvez trouver de l'aide supplémentaire en
consultant la section “Assistance ou Service” ou en appelant Whirlpool. Aux É.U., composer le 1-800-253-1301. Au Canada,
composer le 18008076777.
7/08
Conservez ce manuel et votre reçu de vente ensemble pour
référence ultérieure. Pour le service sous garantie, vous
devez présenter un document prouvant la date d'achat ou
d'installation.
Inscrivez les renseignements suivants au sujet de votre gros
appareil ménager pour mieux vous aider à obtenir assistance ou
service en cas de besoin. Vous devrez connaître le numéro de
modèle et le numéro de série au complet. Vous trouverez ces
renseignements sur la plaque signalétique située sur le produit.
Nom du marchand ______________________________________________
Adresse ________________________________________________________
Numéro de téléphone ___________________________________________
Numéro de modèle______________________________________________
Numéro de série ________________________________________________
Date d’achat____________________________________________________
18
Page 19

ACCESSORIES
Enhance your washer with these premium accessories.
For more high-quality items or to order, call 1-800-901-2042, or visit us at www.whirlpool.com/accessories.
In Canada, call 1-800-807-6777 or visit us at www.whirlpoolparts.ca.
Part Number Accessory Part Number Accessory
8212656RP 10 ft (3.0 m) Black EPDM (2 pack) 8212641RP 5 ft (1.5 m) Black EPDM (2 pack)
8212638RP 6 ft (1.8 m) Nylon braided space-saving inlet 8212546RP 4 ft (1.2 m) Black EPDM (2 pack)
hose, 90° elbow, hypro-blue steel couplings.
(2-pack)
8212487RP 5 ft (1.5 m) Nylon braided inlet hose. (2-pack) 8212526 Washer drip tray, ts under all
8212637RP 6 ft (1.8 m) Black EPDM, space saving 90° 31682 All purpose appliance cleaner
elbow, hypro-blue steel couplings. (2 pack)
8212545RP 5 ft (1.5 m) Red and Blue EPDM. (2-pack) 1903WH Laundry supply storage cart
ACCESSOIRES
Vous pouvez faciliter l’utilisation de votre laveuse avec ces accessoires de première qualité.
Pour la commande de divers articles de qualité, composez le 1-800-901-2042 ou consultez le site www.whirlpool.com/accessories.
Au Canada, composez le 1-800-807-6777 ou consultez le site Internet www.whirlpoolparts.ca.
Produit numéro Accessoire Produit numéro Accessoire
8212656RP EPDM noir de 10 pi (3 m) (Lot de 2) 8212641RP EPDM noir de 5 pi (1,5 m) (Lot de 2)
8212638RP Tuyau d’arrivée d’eau compact de 6 pi 8212546RP EPDM noir de 4 pi (1,2 m) (Lot de 2)
(1,8 m) en nylon tressé, coude à 90° et
raccords en acier hypro-blue. (Lot de 2)
8212487RP Tuyau d’arrivée d’eau de 5 pi (1,5 m) 8212526 Plateau d’égouttement de la laveuse,
en nylon tressé. (Lot de 2) convient à tous les modèles.
8212637RP EPDM noir de 6 pi (1,8 m) coude compact 31682 Produit de nettoyage polyvalent pour
de 90º, raccords acier hypro-blue. (Lot de 2) appareils ménagers
8212545RP EPDM rouge et bleu de 5 pi (1,5 m). (Lot de 2) 1903WH Casier de rangement de fournitures
de buanderie
19
Page 20

ASSISTANCE OR SERVICE
Before calling for assistance or service, please check “Troubleshooting” or visit www.whirlpool.com/help.
It may save you the cost of a service call. If you still need help, follow the instructions below.
When calling, please know the purchase date and the complete model and serial number of your appliance.
This information will help us to better respond to your request.
Whirlpool Corporation
Customer eXperience Center
553 Benson Road
Benton Harbor, MI 49022-2692
Customer eXperience Centre
Whirlpool Canada LP
1901 Minnesota Court
Mississauga, Ontario L5N 3A7
You can write with any questions or concerns at:
Whirlpool Corporation Customer eXperience Center
1-800-253-1301 www.whirlpool.com
1-800-442-9991 (Accessories)
www.whirlpool.com/accessories
Whirlpool Canada LP
Customer eXperience Centre
1-800-807-6777
www.whirlpool.ca
Our consultants provide assistance with
Please include a daytime phone number in your correspondence.
If you need replacement parts or to order accessories
We recommend that you use only FSP® Factory Speci ed Parts.
These parts will t right and work right because they are made with the same precision
used to build every new WHIRLPOOL® appliance.
To locate FSP® replacement parts, assistance in your area, or accessories:
or call your nearest designated service center or refer to your Yellow Pages telephone directory.
In the U.S.A.
Features and speci cations on our full line of appliances.
Installation information.
Specialized customer assistance (Spanish speaking,
hearing impaired, limited vision, etc.).
In the U.S.A. and Canada
Use and maintenance procedures.
Accessory and repair parts sales.
Referrals to local dealers, repair parts distributors,
and service companies. Whirlpool designated service
technicians are trained to ful ll the product warranty
and provide after-warranty service, anywhere in the
United States and Canada.
ASSISTANCE OU SERVICE
Avant de faire un appel pour assistance ou service, veuillez véri er la section “Dépannage” ou consulter
www.whirlpool.com/help. Cette véri cation peut vous faire économiser le coût d'une visite de réparation.
Si vous avez encore besoin d'aide, suivre les instructions ci-dessous.
Lors d'un appel, veuillez connaître la date d'achat et les numéros au complet de modèle et de série de votre appareil.
Ces renseignements nous aideront à mieux répondre à votre demande.
Si vous avez besoin de pièces de rechange ou pour commander des accessoires
Si vous avez besoin de commander des pièces de rechange, nous vous recommandons d'utiliser seulement des pièces
spéci ées par l'usine FSP®. Ces pièces conviendront et fonctionneront bien parce qu'elles sont fabriquées selon les mêmes
spéci cations précises utilisées pour construire chaque nouvel appareil WHIRLPOOL®.
Pour trouver des pièces de rechange FSP® , de l'aide ou des accessoires dans votre région :
Whirlpool Canada LP Centre pour l'eXpérience de la clientèle
1-800-807-6777 www.whirlpool.ca
ou contacter votre centre de réparation désigné le plus proche, ou encore consulter les Pages Jaunes.
Pour plus d'assistance
Vous pouvez nous soumettre toute question ou problème en
écrivant à l'adresse ci-dessous :
Centre pour l'eXpérience de la clientèle
Whirlpool Canada LP
1901 Minnesota Court
Mississauga, Ontario L5N 3A7
Dans votre correspondance, veuillez indiquer un numéro
de téléphone où on peut vous joindre dans la journée.
Nos consultants fournissent
l'assistance pour :
Procédés d'utilisation et d'entretien.
Vente d'accessoires et de pièces de rechange.
Les références aux concessionnaires, compagnies
de service de réparation et distributeurs de pièces de
rechange locaux. Les techniciens de service désignés
par Whirlpool sont formés pour remplir la garantie des
produits et fournir un service après la garantie, partout
au Canada.
W10330947A
W10331732A - SP
© 2010 5/10
All rights reserved Printed in U.S.A.
Tous droits réservés. Imprimé aux É.-U.
® Marque déposée/TM Marque de commerce de Whirlpool, U.S.A., emploi licencié par
® Registered Trademark/TM Trademark of Whirlpool, U.S.A., Whirlpool Canada LP
licensee in Canada
Whirlpool Canada LP au Canada
 Loading...