

Page 1

CABRIO™
®
AUTOMATIC WASHER
Use & Care Guide
For questions about features, operation/performance, parts,
accessories, or service, call: 1-800-253-1301
or visit our website at...
www.whirlpool.com
In Canada, call: 1-800-807-6777
or visit our website at...
www.whirlpool.ca
QUICK START GUIDE............PG. 5
Para una versión en español, visite:
www.whirlpool.com
Número de pieza W10240443A
LAVEUSE
AUTOMATIQUE CABRIO™
Guide d’utilisation et d’entretien
Pour assistance, installation, ou service, composez le : 1-800-807-6777
ou visitez notre site internet à..
www.whirlpool.ca
TABLE OF CONTENTS
Page
ASSISTANCE OR SERVICE........................................................................2
WASHER SAFETY .......................................................................................3
BENEFITS AND FEATURES .......................................................................4
QUICK START GUIDE/WASHER USE....................................................... 4
Starting Your Washer................................................................................ 6
Cycles .......................................................................................................6
Additional Features...................................................................................8
Modifiers ...................................................................................................8
Options...................................................................................................... 9
Changing Cycles, Modifiers, an
Normal Sounds.........................................................................................9
LAUNDRY TIPS..........................................................................................10
WASHER CARE .........................................................................................10
Cleaning Your Washer............................................................................10
Water Inlet Hoses....................................................................................10
Vacation, Storage, and Moving Care .....................................................10
TROUBLESHOOTING ...............................................................................11
Washer and Components.......................................................................11
Washer Operation ..................................................................................12
Clothing Care ..........................................................................................13
WARRANTY ...............................................................................................15
d Options................................................9
GUIDE DE DÉMARRAGE RAPIDE....PG. 19
TABLE DES MATIÈRES
Page
ASSISTANCE OU SERVICE...................................................................... 16
SÉCURITÉ DE LA LAVEUSE .................................................................... 16
AVANTAGES ET CARACTÉRISTIQUES..................................................17
GUIDE DE DÉMARRAGE RAPIDE/UTILISATION DE LA LAVEUSE..... 18
Mise en marche de la laveuse.........
Programmes ...........................................................................................20
Caractéristiques supplémentaires......
Modificateurs.......................................................................................... 22
Options ................................................................................................... 23
Changement des programmes,
modificateurs et options.........................................................................24
Sons normaux.........................................................................................24
CONSEILS DE LESSIVAGE ...................................................................... 24
ENTRETIEN DE LA LAVEUSE.................................................................. 25
Nettoyage de la laveuse
Tuyaux d'arrivée d'eau ...........................................................................25
Précautions à prendre avant les va
déménagement....................................................................................... 25
DÉPANNAGE .............................................................................................26
La laveuse et ses composants............................................................... 26
Fonctionnement de la laveuse ..............................................................27
Soin des vêtements................................................................................ 29
GARANTIE..................................................................................................31
.........................................................................25
....................................................... 20
.................................................... 22
cances, un entreposage ou un
W10240442A
W10240443A - SP
Page 2

ASSISTANCE OR SERVICE
Before calling for assistance or service, please check
“Troubleshooting.” It may save you the cost of a service call. If
you still need help, follow the instructions below.
When calling, please know the purchase date and the complete
model and serial number of your appliance. This information will
help us to better respond to your request.
If you need replacement parts
If you need to order replacement parts, we recommend that you
only use FSP
and work right because they are made with the same precision
used to build every new WHIRLPOOL
To l o c a t e FS P® replacement parts in your area:
In the U.S.A., call the Customer eXperience Center at
1-800-253-1301, or your nearest designated service center.
In Canada, call 1-800-807-6777, or your nearest designated
service center.
®
Factory Specified Parts. These parts will fit right
®
appliance.
In the U.S.A.
Call the Whirlpool Customer eXperience Center toll free:
1-800-253-1301.
Our consultants provide assistance with:
■ Features and specifications on our full line of appliances
■ Installation information
■ Use and maintenance procedures
■ Accessory and repair parts sales
■ Specialized customer assistance (Spanish speaking, hearing
impaired, limited vision, etc.)
■ Referrals to local dealers, repair parts distributors, and service
companies
Whirlpool designated service technicians are trained to fulfill the
product warranty and provide after-warranty service anywhere in
the United States.
To locate the Whirlpool designated service company in your area,
you can also look in your telephone directory Yellow Pages.
For further assistance
If you need further assistance, you can write to Whirlpool
Corporation with any questions or concerns at:
Whirlpool Brand Home Appliances
Customer eXperience Center
553 Benson Road
Benton Harbor, MI 49022-2692
Please include a daytime phone number in your correspondence.
In Canada
Call the Whirlpool Canada LP Customer Interaction Centre toll
free: 1-800-807-6777.
Our consultants provide assistance with:
■ Use and maintenance procedures
■ Accessory and repair parts sales
■ Features and specifications on our full line of appliances
■ Referrals to local dealers, repair parts distributors, and service
companies. Whirlpool Canada LP designated service
technicians are trained to fulfill the product warranty and
provide after-warranty service anywhere in Canada.
For further assistance
If you need further assistance, you can write to Whirlpool
Canada
Please include a daytime phone number in your correspondence.
LP with any questions or concerns at:
Customer Interaction Centre
Whirlpool Canada LP
1901 Minnesota Court
Mississauga, Ontario L5N 3A7
2
Page 3
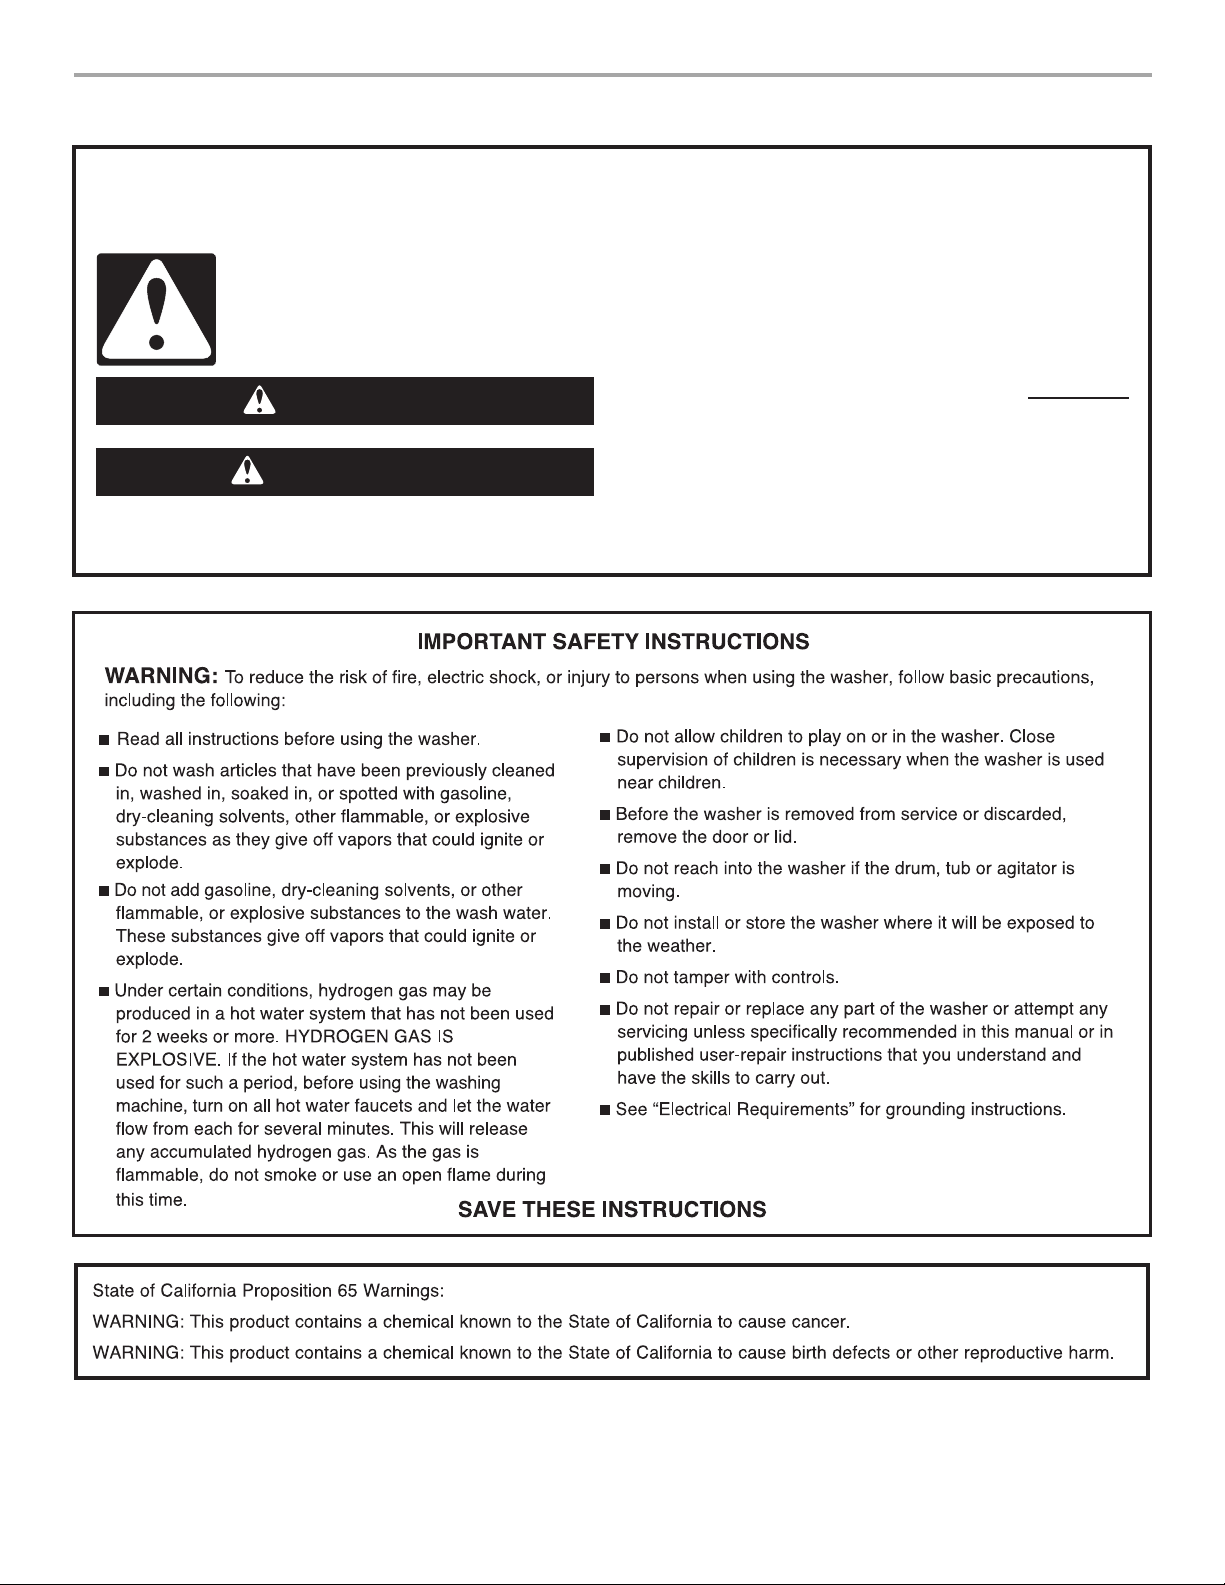
WASHER SAFETY
Your safety and the safety of others are very important.
We have provided many important safety messages in this manual and on your appliance. Always read and obey all safety
messages.
This is the safety alert symbol.
This symbol alerts you to potential hazards that can kill or hurt you and others.
All safety messages will follow the safety alert symbol and either the word “DANGER” or “WARNING.”
These words mean:
You can be killed or seriously injured if you don't immediately
DANGER
WARNING
All safety messages will tell you what the potential hazard is, tell you how to reduce the chance of injury, and tell you what can
happen if the instructions are not followed.
follow instructions.
can be killed or seriously injured if you don't
You
instructions.
follow
3
Page 4
BENEFITS AND FEATURES
Your washer has several benefits and features that are summarized here. Some items may not apply to your model.
Electronic Controls
Benefits
Auto Water Level
This washer senses the load size and composition through a
series of fills and wash motion. It then adjusts the water level for
the best cleaning and rinsing performance. It eliminates the
guesswork. The water level is just right for every wash load size.
Care Control Temperature Management
The Care Control Temperature Management system on this
washer electronically senses and maintains a uniform water
temperature by regulating incoming water temperatures. Using
Care Control will help dissolve detergent.
Deep Clean Cleaning Action
The Deep Clean option uses Direct Inject Cleaning Action to help
ensure better soil and stain removal. Deep Clean reduces the
need for pretreatment. The washer fills to a low level, wetting the
clothes and dissolving the detergent. The detergent mixture is
then sprayed onto the load while the washer spins at low speed.
This cleaning action will last up to 10 minutes depending on the
cle selected. The washer then stops spinning, fills with water to
cy
the appropriate level and continues washing with the selected
cycle.
Features
Your new washer includes these features that help to reduce
noise, increase the ease of use and improve wash performance.
Electronic controls with preset cycles are easy to use whether you
are a beginner or an “expert.”
Quiet Operation
This washer is insulated with sound-dampening materials to
reduce washer operation sounds and noises. On some models,
an additional tub wrap is added for superb vibration- and sounddampening.
Suspension System
To reduce washer “walk” and “out of balance” conditions, your
new washer combines:
■ 4 Spring damper struts to isolate vibration
■ Balance ring at the top and bottom of the wash basket to
minimize vibration
■ Operating software designed to sense and correct off-balance
loads
Stainless Steel Basket
The stainless steel basket is corrosion resistant and enables
higher spin speeds for more water extraction than traditional topload washers, reducing drying time.
Force Filter Wash/Rinse System
This washer filters 100% of the wash and rinse water. The water is
filtered then recirculated. The force filter traps sand and dirt,
flushing them down the drain, so they are not redeposited onto
the clean clothes.
6th Sense™ Technology
6th Sense™ Technology features built-in intelligence that “knows
each wash load” for optimal cleaning, fabric care and efficiency.
From weighing the size of the load to determining how much
water is needed to clean it, the 6th Sense™ combination of
intuitive features takes the guesswork out of clothes care. Three
levels of off-balance protection and a suds detection sensor help
ensure worry- and error-free operation for further peace of mind.
QUICK START GUIDE/WASHER USE
Delay Wash
Delay Wash allows you to load your washer and pause the start of
the cycle for up to 8 hours.
End of Cycle Signal
The End of Cycle Signal produces an audible sound when the
wash cycle is finished. This signal is helpful when you are
removing items from the washer as soon as it stops.
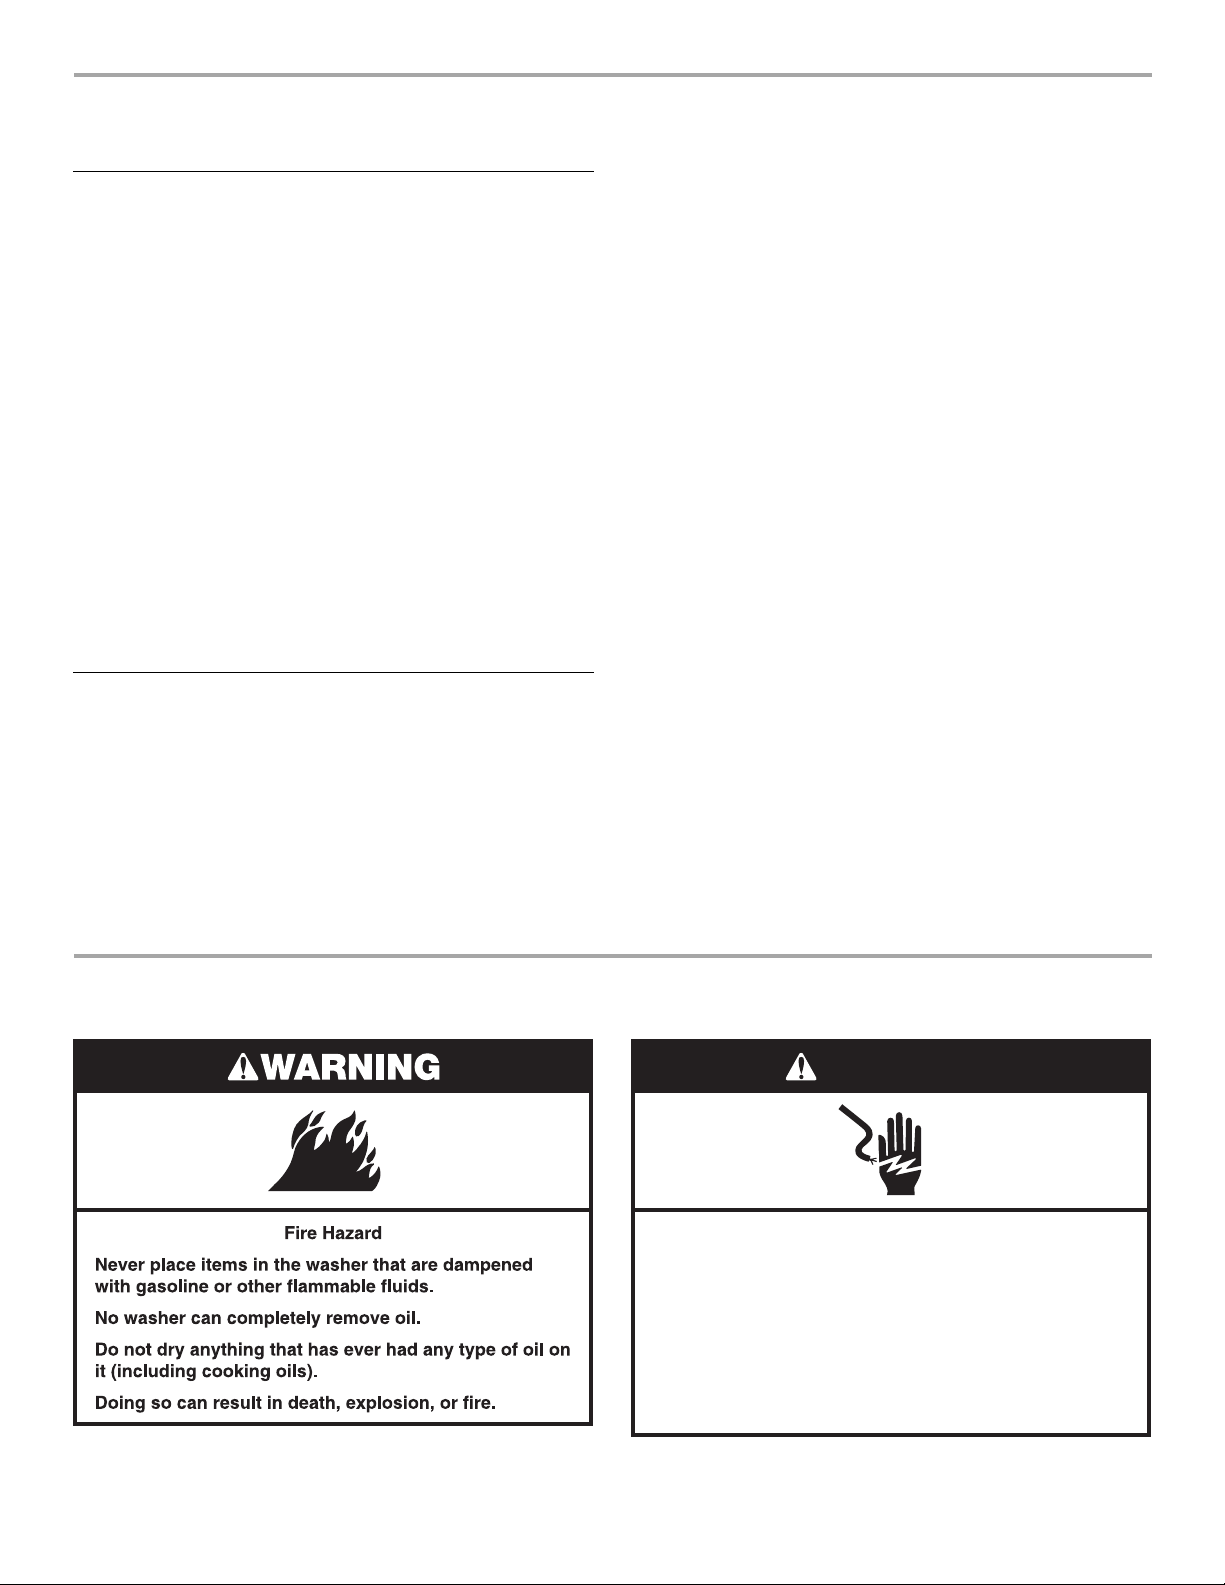
WARNING
Electrical Shock Hazard
Plug into a grounded 3 prong outlet.
Do not remove ground prong.
Do not use an adapter.
Do not use an extension cord.
Failure to follow these instructions can result in death,
re, or electrical shock.
For a summary of how to use your washer following installation, see the QUICK START GUIDE on the next page.
4
Page 5
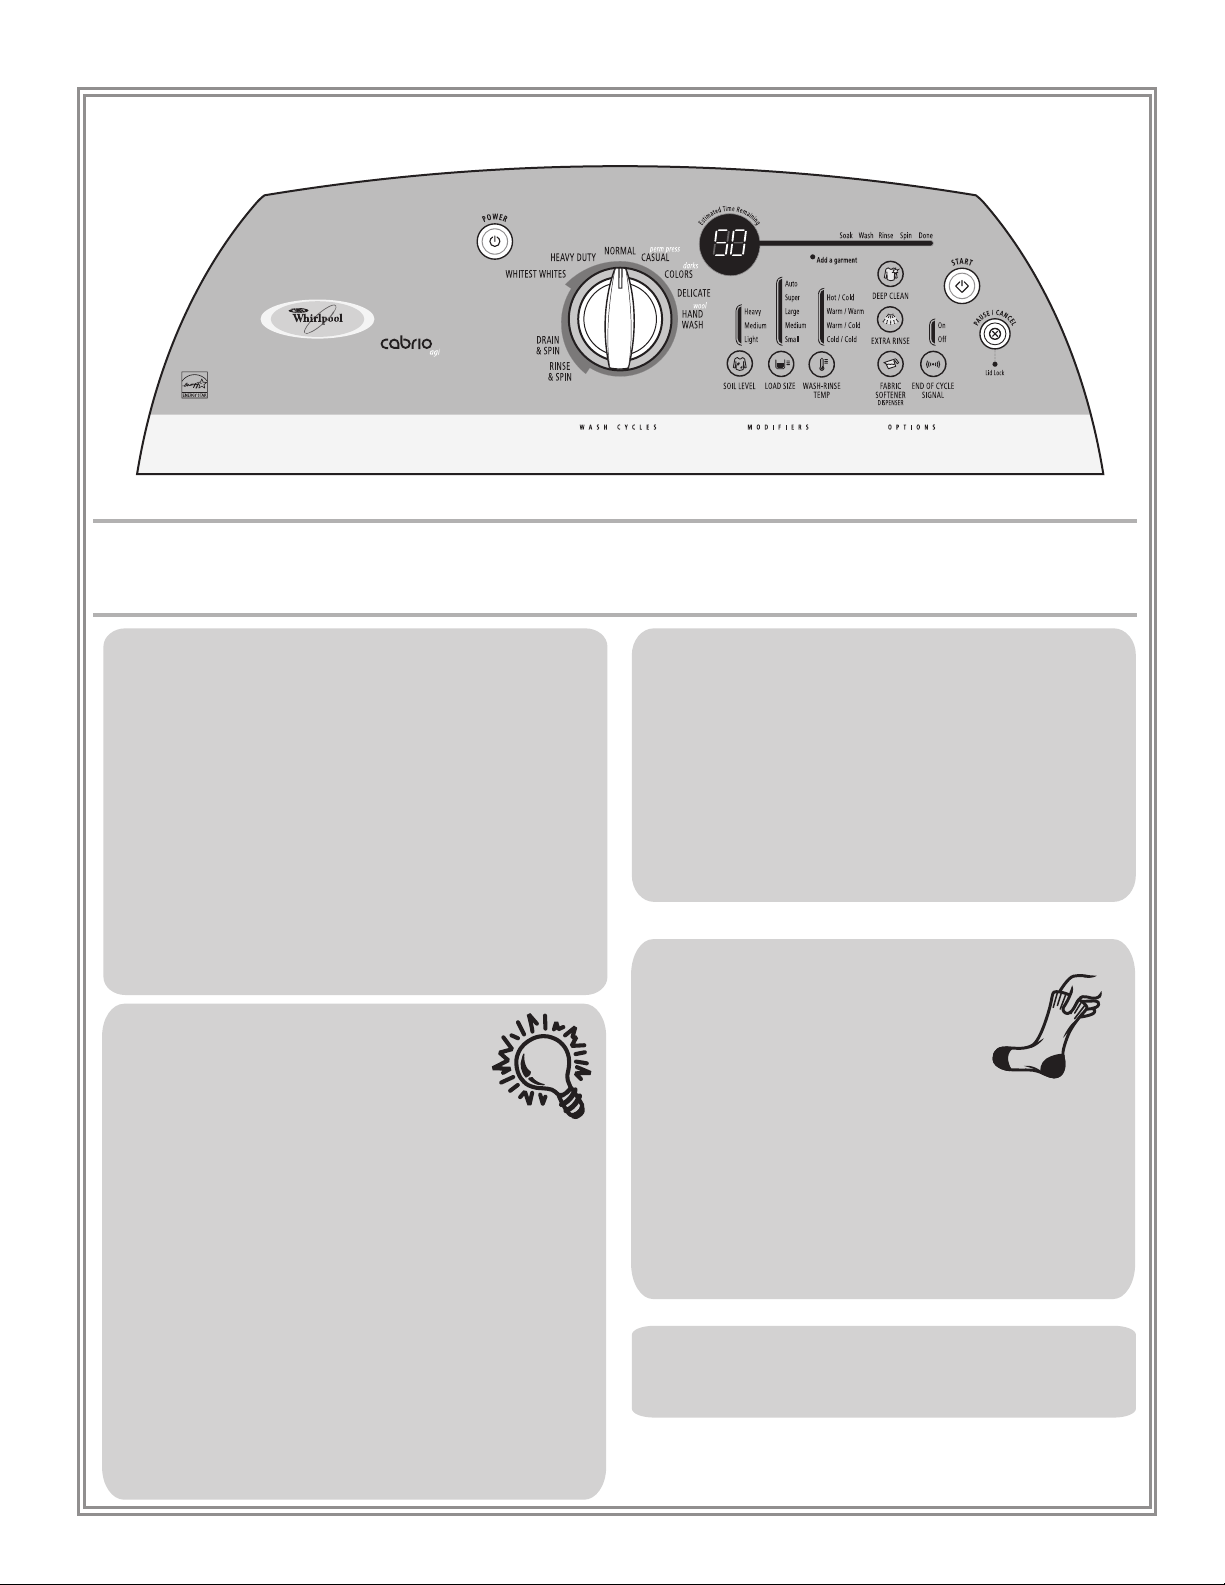
QUICK START GUIDE
NOTE: The panel shown above may be different from that of your model.
WARNING: To reduce the risk of re, electric shock, or injury to persons, read the IMPORTANT SAFETY INSTRUCTIONS
before operating this appliance.
The following is a guide to using your washer. Please refer to specic sections of this manual for more detailed information.
OPERATING CONTROLS
Power - Press POWER to turn the washer on or off.
Start - Press START to start your washer after a cycle has
been selected. Be sure all desired Modiers and Options
have been selected. The lid must be closed for the washer
to start.
Pause/Cancel - Press PAUSE/CANCEL once to pause or
stop the washer at any time. Press PAUSE/CANCEL once to
unlock the lid and add garments. Press START to complete
the cycle from where it was stopped.
Press PAUSE/CANCEL twice to stop the wash cycle.
The washer will then drain and turn off.
Lid Lock - When the Lid Lock status light glows, the washer
lid is locked.
NOTE: You must wait until the Lid Lock Light turns off before
the lid can be opened.
DETERGENT USE
Pour measured powdered or liquid detergent into the
detergent dispenser. Do not put detergent directly onto
clothes. Then add color-safe or chlorine bleach (optional)
and measured liquid fabric softener (optional) into the
marked dispensers. If the liquid fabric softener dispenser is
used, select the Fabric Softener option on the console. You
can ll all dispensers prior to starting the wash cycle. The
washer releases them automatically at the proper time during
the cycle.
For more information, see “Using the Proper Detergent.”
ADD A GARMENT, PAUSING, OR
RESTARTING the WASHER
OPTIONS and MODIFIERS
You can change Options and Modiers anytime
before Start is pressed.
Press POWER.
Select Wash Cycle.
Select desired OPTIONS and MODIFIERS.
Press START or select DELAY WASH (on some models) to
start wash at a later time.
Changing cycles after pressing Start:
Press PAUSE/CANCEL twice to cancel the cycle.
Select desired Wash Cycle.
Select desired OPTIONS and MODIFIERS.
Press START or select DELAY WASH (on some models)
to start wash at a later time. Washer restarts at the beginning
of the new cycle.
NOTE: To help protect your garments, not all OPTIONS and
MODIFIERS can be selected with all wash cycles.
Allows you to add garments to the washer
after the wash cycle begins. The ADD A
GARMENT indicator light will illuminate, at
which time, you can:
Press PAUSE/CANCEL. (Lid Lock light turns off,
then open the lid.)
Add garments. (Close washer lid.)
Press START to restart.
To unlock the lid after the Add a garment period,
Press PAUSE/CANCEL once. Pressing PAUSE/CANCEL
twice will cancel the wash cycle.
STOPPING YOUR WASHER
You can stop the wash cycle and drain the tub by pressing
the Pause/Cancel button twice or the Power button once.
5
Page 6
Starting Your Washer
The following is a guide to starting your washer. Periodic
references to other sections of this manual provide more detailed
information.
1. Pour mea
Add color-safe bleach (powdered or liquid) if needed. Be sure
to match powdered color-safe bleach with powdered
detergent or match liquid color-safe bleach with liquid
detergent.
2. Pla
Tips.”
■ Load evenly to maintain washer balance. Mix large and
■ Load only to the top of the basket as shown. Overloading
■ Load only to the top of the basket as shown. Overloading
sured powdered or liquid detergent into the washer.
ce a load of sorted clothes into the washer. See “Laundry
small items.
can cause poor cleaning. Items should move easily
through the wash water.
can cause poor cleaning. Items should move easily
through the wash water.
7. Adju
st the Modifiers, if desired. See “Modifiers.”
8. Select desired Options. See “Options.”
9. On some models, select Delay Wash, if desired. See “Delay
Wash” in the “Modifiers” section.
ess START. The wash cycle begins, and the display shows
10. Pr
the estimated remaining time. The lid will lock.
NOTE: If
you do not press Start within 5 minutes of pressing
Power, the washer automatically shuts off.
11. If liquid fabric so
■ When the washer has finished filling for the Rinse Cycle,
ftener is desired, select Extra Rinse.
press PAUSE and listen for the lid to unlock.
■ Lift the lid and add the measured amount of liquid fabric
softener.
■ Close the lid and press START to resume the cycle.
■ Do not pour undiluted fabric softener directly on the
clothes.
■ Do not use a fabric softener dispenser ball. Dispensing
balls will not operate correctly with this washer.
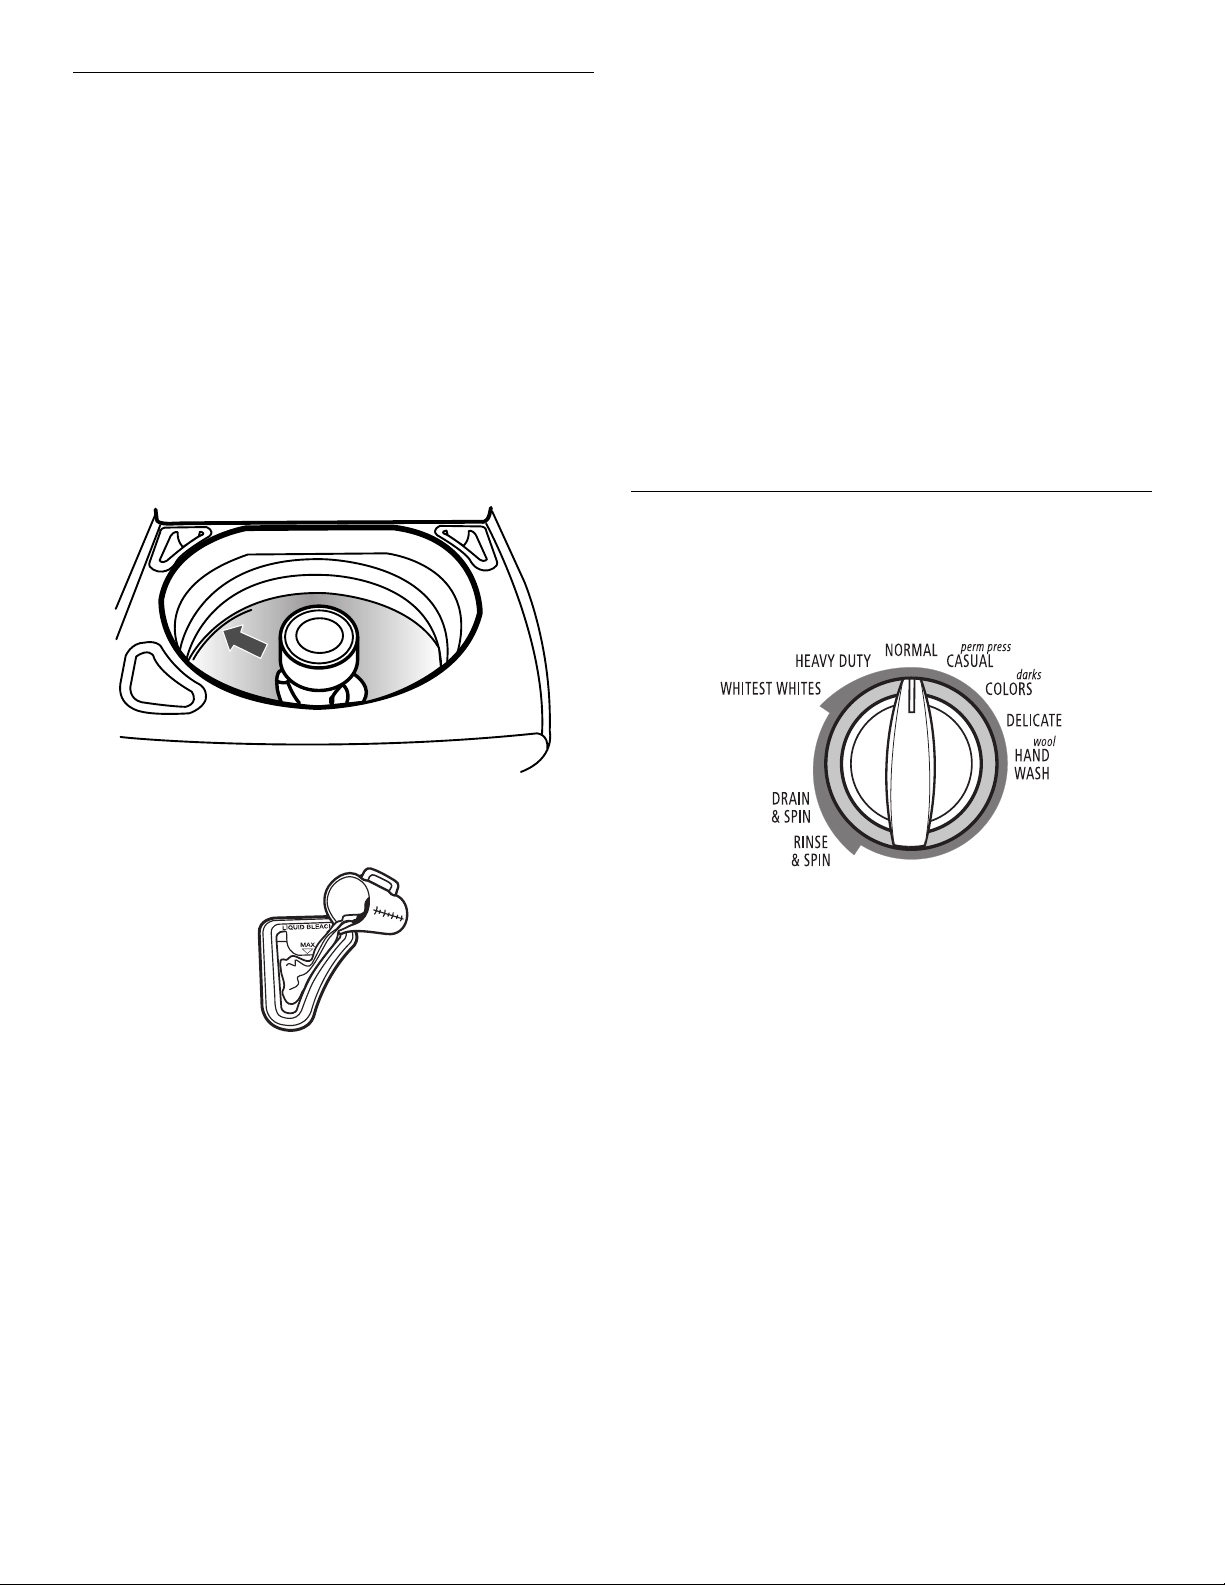
Cycles
Turn the knob to choose the right wash cycle for the type of
fabrics you are washing. When the knob points to a cycle, the
indicator light for the cycle will glow. If the default settings for the
Modifiers and Options are suitable for your wash load, you may
press Start to begin the wash cycle.
3. Pour measured liquid chlorine bleach into the liquid chlorine
bleach dispenser, if needed. Bleach is fed into the washer and
is diluted automatically during the wash cycle.
■ Do not overfill. Do not dilute. Do not use more than 1 cup
(250 mL) for a full load. Use less with a smaller load size.
■ Follow the garment and the chlorine bleach
manufacturer’s directions for proper use.
■ To avoid spilling, use a cup with a pouring spout. Do not
let bleach splash, drip, or run down into the washer basket.
■ At the end of the cycle, a small amount of water may be
left in the dispenser. This is normal.
NOTE: Use only liquid chlorin
4. Close the
5. Pr
6. Select a W
washer lid.
ess POWER. This turns on the washer display.
ash Cycle. See “Cycles.”
e bleach in this dispenser.
Preset Cycle Settings
For ease of use, preset cycle settings provide the recommended
fabric care settings for each cycle.
To use the preset cycle settings:
1. Press POWER.
2. Select th
cycle settings will be displayed (see the following chart).
NOTE: Th
your model.
3. Pr
e cycle you want by turning the knob. The preset
e preset cycle times may vary slightly depending on
ess START. The wash cycle will begin.
6
Page 7

Preset Cycle Settings
Cycle Preset
Minutes
Whitest Whites 73 Heavy Hot/Cold
Heavy Duty 68 Heavy Hot/Cold
Normal 46 Normal Warm/Cold
Casual/Perm Press 46 Medium Warm/Cold
Colors/Darks 45 Normal Cold/Cold
Delicate 35 Medium Warm/Cold
Hand Wash/Wool 36 Light Cold/Cold
Rinse & Spin 33 Not
Drain & Spin 16 Not
*Cycle time in minutes will
appear in the display while you are
making selections. The total cycle time will appear, including an
estimated time for drain and fill times, once Start is pressed.
Load only to the top of the basket. Overloading can cause
NOTE:
poor cleaning. See “Starting Your Washer.”
Whitest Whites
This cycle introduces liquid chlorine bleach to the load at the
proper time for improved whitening of your heavily soiled white
fabrics. Cycle combines high-speed wash action and high-speed
spin. The default option setting for this cycle is Extra Rinse to
thoroughly remove detergent and bleach. For maximum soil and
stain removal, liquid chlorine bleach should be used.
Heavy Duty
Use this cycle for heavily soiled cotton or sturdy items. Cycle
combines high-speed wash action and high-speed spin. Deep
Clean is the default option for this cycle, but it may be turned off.
See “Changing Cycles, Modifiers, and Options.” Extra Rinse
Cycle may be desired for heavily soiled clothes.
Normal
Use this cycle for normally soiled cottons and linens, such as
sheets, blankets, and towels. This cycle combines high-speed
wash action and high-speed spin.
Casual/Perm Press
Use this cycle to wash loads of no-iron fabrics such as sport
shirts, blouses, casual business clothes, permanent press, and
blends. This cycle uses medium-speed wash action, a mediumspeed spin and a cool down process to reduce wrinkling.
Soil Level*
applicable
applicable
Wash/Rinse Te mp
Not
applicable
Not
applicable
Delicate
Use this cycle to wash lightly soiled garments indicating “Machine
Washable Silks” or “Gentle” cycle on the care label. This cycle
uses low-speed wash action and low spin speeds for increased
fabric care and less wrinkling.
When washing waterproof items, su
ch as plastic-lined mattress
pads, shower curtains, tarpaulin (tarps), or waterproof or waterresistant sleeping bags, use the Delicate or Hand Wash/Wool
cycle with the lowest spin speed setting available for the washer
model that you have.
Hand Wash/Wool
Use this cycle to clean lightly soiled special care garments or for
items labeled as “Machine Washable Wool.” (Check label
instructions to make sure that the garment is washable.) This
cycle uses intermittent-low speed wash action and low-speed
spin for the gentlest fabric care with less wrinkling.
When washing waterproof items, su
ch as plastic-lined mattress
pads, shower curtains, tarpaulin (tarps), or waterproof or waterresistant sleeping bags, use the Delicate or Hand Wash/Wool
cycle with the lowest spin speed setting available for the washer
model that you have.
Garments are labeled “H
■ The fiber construction may be sensitive to wash action.
■ The fabric contains sensitive dyes that may bleed.
NOTE: Some “Hand wash” items naturally shrink
andwash” because:
when washed.
Keep this in mind when you purchase items labeled “Hand wash.”
Items that shrink should be dried flat. When these items are still
wet, “block” them by gently stretching to the original
measurements.
Rinse & Spin
Use this option to get a deep rinse followed by a high-speed spin.
The time display will include an estimate of how long it will take to
fill and drain the washer.
When to use Rinse & Spin:
■ For loads that need rinsing only.
■ For completing a cycle after the power has been off.
To use or change Rinse & Spin setting:
1. Turn knob to RINSE & SPIN until the Rinse & Spin indicator
light glows.
ess START.
2. Pr
Drain & Spin
An extra drain and spin may help shorten drying times for some
heavy fabrics or special-care items. Drain & Spin may also be
used for draining the washer after canceling a cycle or completing
a cycle after a power failure.
To use or change Drain & Spin setting:
urn knob to DRAIN & SPIN until the Drain & Spin indicator
1. T
light glows.
2. Pr
ess START.
Colors/Darks
Use this cycle for dark or highly dyed natural fabrics such as jeans
or other cotton items that may be susceptible to dye loss. This
cycle uses low to medium-speed wash action and high-speed
spin. For best results use cold or warm water.
7
Page 8
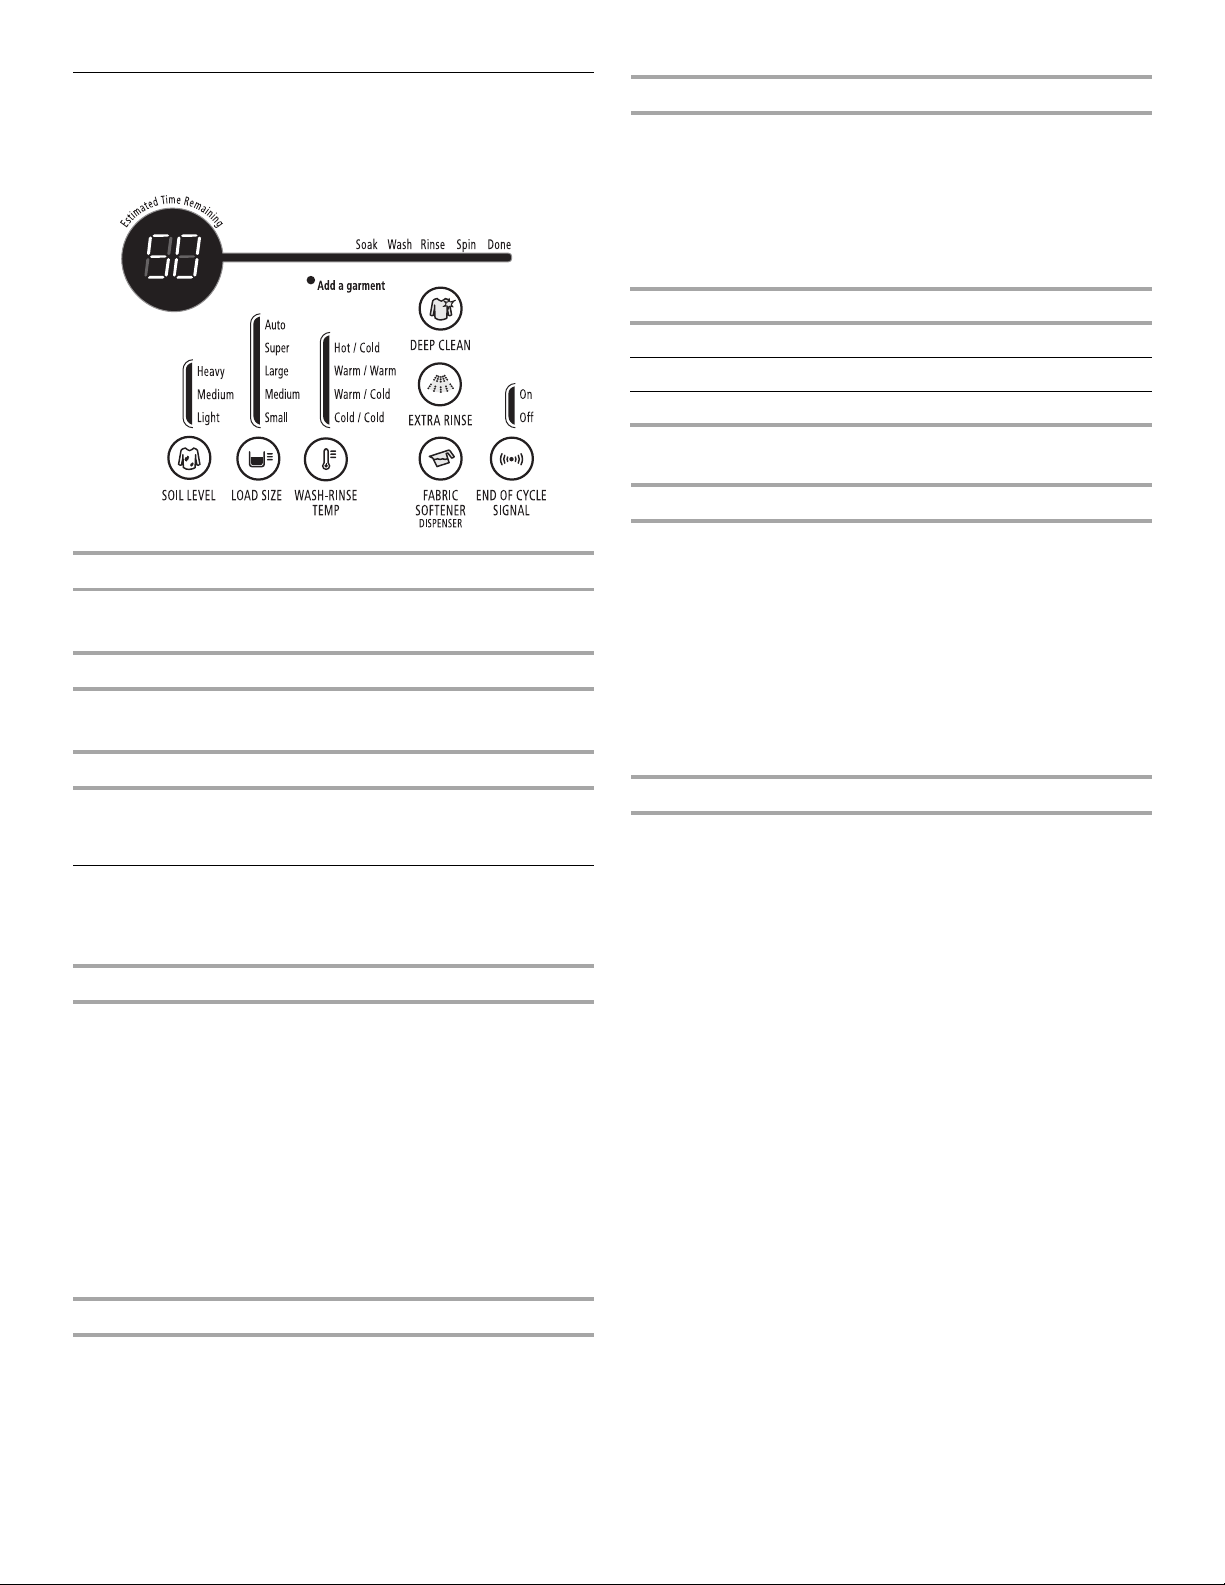
Additional Features
These lights show which portion of the cycle the washer is
operating. They also indicate when you can add other garments to
the wash load.
Wash-Rinse Temp
Select a water temperature based on the type of load you are
washing. Use the warmest wash water safe for fabrics. Follow
garment label instructions.
Warm rinses leave the loads drier and mor
e comfortable to handle
than with cold rinses. However, warm rinses also increase
wrinkling. Cold rinses may help with wrinkling and save energy.
Temperature Guide
Wash Water Temperature Suggested Fabrics
Hot Whites and pastels
Warm Bright colors
Cold Colors that bleed or fade
Load is Done
The Done light stays on until the lid is opened or the Power or
Pause/Cancel button is pressed.
Indicator lights
An indicator light shows which Cycle, Modifiers, and Options you
have selected.
Estimated Time Remaining
When a wash cycle is started, the estimated time remaining for
the cycle, including fills and drains, will be displayed. The time will
count down to the end of the cycle.
Modifiers
Modifiers allow you to further customize your cycles and save
energy.
Soil Level
Soil level (wash time) is preset for each wash cycle. See “Preset
Cycle Settings” in “Cycles.” As you press the Soil Level pad, the
cycle time (minutes) will increase or decrease in the Estimated
Time Remaining display and a different wash time will appear. To
get the minimum wash time, press the pad until the indicator light
next to Light Soil Level illuminates. This is the shortest wash time
available for that cycle.
■ For most loads, use the time recommended in the preset
cycle settings.
■ For heavy soil and sturdy fabrics, press Soil Level to select
more wash time, if needed.
■ For light soil and delicate fabrics, press Soil Level to select
less wash time, if needed.
Load Size
This washer automatically selects Auto for the water level when
the cycle is selected. The Auto feature senses the size of the load
and adds the correct amount of water for the load size. You can
also manually change the water level settings.
NOTE: In wash
water temperatures colder than 60°F (15.6°C),
detergents do not dissolve well. Soils may be difficult to remove.
Care Control Temperature Management
Care Control Temperature Management electronically senses
and maintains a uniform wash and r
inse water temperature.
Care Control regulates incoming hot and cold water and is
tomatically turned on when a cycle is selected. (See “Preset
au
Cycle Settings” in “Cycles.”)
Care Control is available with Warm/Warm, Warm/Cold and
Cold/Cold settings. The water temperature in the Hot/Cold setting
depends on the
■ Care Control ensures consistent cleaning.
■ Today’s detergents work well at temperatures above 60°F
water temperature at the water inlet faucets.
(15.6°C).
Delay Wash
You can use the Delay Wash feature to delay the start of a wash
cycle for up to 8 hours (depending on your model).
1. Loa
2. Close the
d the washer and fill the dispensers.
washer lid.
3. Press POWER.
4. Select the desired Cycle, Modifiers, and Options.
5. Press DELAY WASH. 1H (one hour) will be displayed in the
time display window. The indicator light for Delay Wash will
glow.
a longer delay time, press DELAY WASH. The Start time
6. For
will increase by 1-hour steps.
ess START. The countdown in hours to the wash cycle will
7. Pr
show in the time display window and the indicator light will
begin to flash.
NOTE: Th
e Start indicator light will not flash when Delay Wash
is chosen. You must press Start to initiate a countdown for the
cycle to begin.
To change the Delay Wash time:
■ Press PAUSE/CANCEL.
■ Press DELAY WASH to select the desired delay time.
■ Press START to begin the countdown.
To cancel Delay Wash:
Press START again to begin the c
ycle right away or press
PAUSE/CANCEL twice.
8
Page 9

Options
Use these pads to select the desired options for your wash cycle.
Deep Clean
This option provides enhanced cleaning action for tough stains.
The Heavy Duty cycle automatically includes Deep Clean.
Choosing Deep Clean will add approximately 10 minutes to a
ycle. Deep Clean should be started on a dry load only and
c
cannot be selected after the tub has started filling with water.
Deep Clean may be selected as an option with other cycles. See
table for details.
Cycle Deep Clean
(Adds time to the wash cycle)
Whitest Whites Option
Heavy Duty Default
Normal Option
Casual/Perm Press Option
Colors/Darks Option
Delicate Option
Hand Wash/Wool Option
Rinse & Spin Not available
Drain & Spin Not available
Extra Rinse
An extra rinse can be used to aid in the removal of soil, detergent
or bleach residue from garments. This option provides an
additional rinse with the same water temperature as the first rinse.
This is the default rinse setting for the Whitest Whites cycle.
Changing Cycles, Modifiers, and Options
You can change Cycles, Modifiers, and Options anytime before
Start is pressed. Not all Modifiers and Options are available for all
cycles.
■ A short tone sounds when a change is selected.
■ Three short tones sound if an unavailable combination is
selected. The last selection will not be accepted.
Changing Cycles after pressing Start
1. Press PAUSE/CANCEL twice to cancel the cycle. The washer
will drain.
ess POWER.
2. Pr
3. Select the desired wash cycle.
4. Select the desired Modifiers and Options.
ess START.
5. Pr
The washer restarts at the beginning of the new cycle.
NOTE: If
washer, the washer automatically shuts off.
you do not press Start within 5 minutes of pausing the
Changing Modifiers and Options after pressing Start
Options and Modifiers can be changed anytime after Start has
been selected and before the selected Option and Modifier cycle
begins.
NOTE: An e
rror tone will sound if your selection is unavailable.
To manually drain the washer and spin the load
1. Press PAUSE/CANCEL twice to cancel the wash cycle and
drain the washer.
ess POWER.
2. Pr
3. Turn knob to select DRAIN & SPIN.
4. Press START.
When the spin is complete, the lid unlocks. Items can be removed
from the washer.
Normal Sounds
Your new washer may make sounds your old one didn’t. Because
the sounds might be unfamiliar, you may be concerned about
them. These sounds are normal.
Fabric Softener
If the liquid fabric softener dispenser is used, select the Fabric
Softener option on the console.
Pre Soak (on some models)
Use this option for set-in stains and soil that need extra time for
removal. Soaking in this washer is different than in a conventional
washer. The washer sprays the load with water and detergent for
4 minutes at extra-low spin speed, followed by a soak period. This
allows for the detergent to work on the soils. This is followed by
alternating periods for spray and soak. Using Presoak will extend
your wash cycle by about 14 minutes.
End of Cycle Signal Volume
The End of Cycle Signal produces an audible sound when the
wash cycle is finished. This signal is helpful when you are
removing items from the washer as soon as it stops. Select On or
Off.
During washing
If you select the Deep Clean option, you will hear a spin/spray
noise at the start of the cycle.
During drain
If water is drained quickly from your washer (depending on your
installation), you may hear air being pulled through the pump
during the end of draining.
During wash and spin
This washer does not have a transmission. The motor provides
direct drive for agitation and spin. You will hear sounds that are
different from those of a conventional washer.
9
Page 10
LAUNDRY TIPS
Preparing clothes for washing
Follow these recommendations to help you prolong the life of your
garments.
■ Close zippers, snaps, and hooks to avoid snagging other
items. Tie strings and sashes to avoid tangles.
■ Remove pins, buckles, and other hard objects to avoid
scratching the washer interior. Remove non-washable trim
and ornaments.
■ Empty pockets and turn them inside out; turn down cuffs.
Turn wool and synthetic knits inside out to avoid pilling.
■ Brush away lint and dirt. Treat spots and stains, stained or wet
garments should be washed promptly for best results.
■ Mend tears, loose hems, and seams.
Sorting
■ Separate heavily soiled items from lightly soiled ones, even if
they would normally be washed together. Separate lint-givers
(towels, chenille) from lint-takers (corduroy, synthetics,
permanent press). When possible, turn lint-givers inside out.
WASHER CARE
Cleaning Your Washer
Use a soft, damp cloth or sponge to wipe up any spills such as
detergent or bleach from the outside of your washer.
Clean your washer interior wi
Pour this into your washer and run it through a complete cycle
using hot water, super water level. Select the Super Load Size.
Repeat this process if necessary.
Remove any hard water deposits using only cl
washer safe.
th 1 cup (250 mL) of chlorine bleach.
eaners labeled as
■ Separate dark colors from light colors, colorfast items from
noncolorfast items.
■ Sort by fabric and construction (sturdy cottons, knits, delicate
items).
■ When washing waterproof/water-resistant items, such as
plastic-lined mattress pads, shower curtains, tarpaulins,
jackets or sleeping bags, use one of the following cycles:
Delicate, Hand Wash/Wool, Colors/Darks, or Wh
itest Whites.
Cycle Options
■ For additional performance and enhancements to desired
cycle, select options such as Deep Clean, Extra Rinse, and
Fabric Softener Dispenser.
Unloading
■ Remove clothes from washer after the cycle is completed.
Metal objects such as zippers, snaps, and buckles may rust if
left in the washer basket for a long time.
To use washer again:
1. Flush water pipes and hoses. Reconnect water inlet hoses.
Turn on both water faucets.
WARNING
Water Inlet Hoses
Replace inlet hoses after 5 years of use to reduce the risk of hose
failure. Periodically inspect and replace inlet hoses if bulges,
kinks, cuts, wear or leaks are found.
When replacing your inlet hoses, mark the date of r
the label with a permanent marker.
eplacement on
Vacation, Storage, and Moving Care
Install and store your washer where it will not freeze. Because
some water may stay in the hoses, freezing can damage your
washer. If storing or moving your washer during freezing weather,
winterize it.
Non-use or vacation care:
Operate your washer only when you are at home. If you will be on
vacation or not using your washer for an extended period of time,
you should:
■ Unplug washer or disconnect power.
■ Turn off the water supply to the washer. This helps avoid
unintended flooding (due to a water pressure surge) while you
are away.
To winterize washer:
1. Shut off both water faucets.
isconnect and drain water inlet hoses.
2. D
3. Pu
t 1 qt (1 L) of R.V.-type antifreeze in the basket.
4. Run washer on the Rinse & Spin setting for about 30 seconds
to mix the antifreeze and remaining water.
5. Unplug wa
sher or disconnect power.
Electrical Shock Hazard
Plug into a grounded 3 prong outlet.
Do not remove ground prong.
Do not use an adapter.
Do not use an extension cord.
Failure to follow these instructions can result in death,
re, or electrical shock.
2. Plug in washer or reconnect power.
n the washer using any cycle and a Super Load Size water
3. Ru
level to clean the washer and remove the antifreeze, if used.
Use ½ the manufacturer's recommended amount for a
medium-size load.
To transport the washer:
1. Shut off both water faucets.
2. Disconnect and drain water inlet hoses.
3. If the washer will be moved during f
(1 L) of R.V.-type antifreeze in the
Rinse & Spin setting for about 30 seconds to mix the
tifreeze and remaining water.
an
4. Disconn
5. Unplug the power cor
6. Pl
7. Drape the power cord and drain hose over edge into the
basket.
ect the drain from the drain system.
d.
ace the inlet hoses into the basket.
reezing weather, put 1 qt
basket. Run washer on the
10
Page 11

8. Place foam packing ring from the original shipping materials in
the top of washer. If you do not have the original foam packing
ring, place heavy blankets, towels, etc. into basket opening.
Close the lid and put a piece of tape over the lid and down to
the front of the washer. Keep lid taped until the washer is
placed into the new location.
TROUBLESHOOTING
First try the solutions suggested here and possibly avoid the cost of a service call...
Washer and Components
Washer displaying code messages
■ “LF” (Washer is taking too long to fill)
Check the following:
Are the water inlet hoses kinked or clogged?
Are the water inlet valve screens clear?
Press PAUSE/CANCEL to clear display.
■ “Ld” (Washer is taking too long to drain water from
the wash tub)
Check the following:
Is the drain hose kinked or clogged?
Is the drain hose installed properly? See “Connect the Drain
e” in the Installation Instructions. Press PAUSE/CANCEL
Hos
to clear display.
■ “uL” (Unbalanced Load)
If the load is unbalanced, the washer will displa
while running an imbalanced load correction routine at the end
of the wash cycle and before the final spin. If the code remains
and the wash cycle dial is flashing after the recovery routine
has stopped, open lid and redistribute the load. Close lid and
press START.
■ “oL” (Over Load)
Is the washer overloaded? The washer has attempted to fill
d begin the wash cycle. If the washer is overloaded, it will
an
drain any water and detergent that was added during the fill.
To correct the overload, remove several items and add
detergent. Close lid and press START.
■ “Sd” (Suds Detected)
Did you add too much detergent?
Always measure detergent. Follow detergent manufacturer’s
ections.
dir
If excessive suds are detected, the
washer will display this
code while running a suds reduction correction routine at the
end of the wash cycle. The suds reduction routine removes
extra suds and assures proper rinsing of your garments. If the
code remains and the wash cycle dial is flashing after the
recovery routine has stopped, re-select your desired cycle
using cold water. Press START. Do not add detergent.
■ “lid” (Lid Opened)
Is the lid open? Close the lid to
■ “HC” (Cold and Hot hoses switched)
This code will appear at the end of the
clear the display.
wash cycle to indicate
that the cold and hot water inlet hoses are switched. If an error
code does not appear but you are experiencing poor washing
performance, check to see whether the inlet hoses are
reversed. See “Connect the Inlet Hoses” in the Installation
Instructions.
■ “dL” (Door/Lid cannot lock)
Indicates lid is not locked. Check for it
ems caught in the lid
keeping it from closing. Press PAUSE/CANCEL once to clear
the code.
y this code
Reinstalling the washer
1. Follow the “Installation Instructions” to locate, level, and
connect the washer.
n the washer using any cycle and a Super Load Size water
2. Ru
level to clean the washer and remove the antifreeze, if used.
Use ½ the manufacturer's recommended amount for a
medium-size load.
■ “dU” (Door/Lid cannot unlock)
Is there excessive weight on the lid, such as a basket of
aundry? Excessive weight will keep the lid from unlocking.
l
Press PAUSE/CANCEL once to clear the code.
■ “F##” code
Press PAUSE/CANCEL once to clear code. Press START. If
ppears again, call for service.
code a
Noisy, vibrating, off-balance
■ Is the washer level? Does the washer rock when pushed
against the corners?
The washer must be level. The front and rear feet must be in
firm contact with the floor. Check that the locknuts are
tightened. See “Level the Washer” in the Installation
Instructions.
■ Is the floor flexing, sagging, or not level?
Flooring that flexes or is uneven can contribute to noise and
bration of the washer. A ¾" (19 mm) piece of plywood under
vi
asher will reduce the sounds. See “Location
the w
Requirements” in the Installation Instructions.
■ Is the load balanced?
Evenly distribute th
the height of the load does not exceed the top row of basket
holes. See “Starting Your Washer.”
■ Do you hear clicking or other noises when the cycle
changes from washing to draining or spinning?
When the drive system shifts o
between cycles you may hear noises that are different from
your previous washer. These are normal washer noises.
■ Is the washer gurgling or humming?
When the washer drains, the pump will make a continuous
umming with periodic gurgling or surging sounds as the final
h
amounts of water are removed. This is normal.
■ Are you washing a small load?
You will hear more splashing sounds when washing
loads. This is normal.
■ The washer basket moves while washing.
This is normal.
Washer leaks
■ Are the water inlet hoses tight?
■ Are the water inlet hose washers properly seated?
Check both ends of each hose. See “Connect the Inlet Hoses”
the Installation Instructions.
in
■ Did you pull the drain hose from the washer cabinet and
install it in a standpipe or laundry tub?
The drain hose should be pulled from the washer cabinet and
ed to the drainpipe or laundry tub. See “Connect Drain
secur
Hose” and “Secure the Drain Hose” in the Installation
Instructions.
e load in the washer basket and make sure
r the washer basket settles
small
11
Page 12

■ Is the sink or drain clogged?
Sink and drainpipe must b
e able to carry away 17 gal. (64 L) of
water per minute. If sink or drainpipe is clogged or slow, water
can back up out of drainpipe or sink.
■ Is water splashing off the tub ring or the load?
The wash load should be balanced and not overloaded. If the
sh load is unbalanced or overloaded, incoming water can
wa
deflect off the load.
■ Is the washer properly installed?
The washer must be level. The feet should be properly
stalled and the nuts tightened. See “Level the Washer” in the
in
Installation Instructions.
■ Was the cycle interrupted and then the Deep Clean option
selected?
The Deep Clean option should be
started on a dry load only.
The Deep Clean option cannot be selected after the tub has
started filling with water.
■ Check household plumbing (laundry tubs, faucets,
drainpipe, water pipes) for leaks.
Dispenser operation
■ Are the laundry products in the correct dispensers?
Add the correct amount of liquid ch
lorine bleach to the
dispenser. Use only liquid chlorine bleach in the dispenser.
■ Is there water remaining in the bottom of a dispenser? Did
the dispenser drain properly?
A small amount of water may be left in a dispenser at the end
of the cycle. This is normal.
■ Did you put powdered or liquid color-safe bleach into the
liquid chlorine bleach dispenser (on some models)?
Add powdered or liquid color-safe bleach directly to the
washer basket. Do not use the chlorine bleach dispenser for
color-safe bleach.
Washer Operation
WARNING
■ Is there power at the plug?
Check electrical source or call electrician.
■ Is the indicator on the Cycle Control knob properly lined
up with a cycle?
Turn the Cycle Control knob to the right slightly.
■ Are the water inlet valve screens clogged?
Turn off the water and remove inlet hoses from the washer.
Remove any accumulated film or part
icles. Reinstall hoses,
turn on water, and check for leaks.
■ Are the hot and cold water faucets turned on?
Turn on the water.
■ Is the water inlet hose kinked?
Straighten the hoses.
■ Does the water level seem too low, or does the washer
appear to not fill completely?
The Auto Water Level feature senses the size of the load and
adds the
■ Are you using Auto Water Level?
correct amount of water for the load size.
The Auto feature senses the size of the load and adds the
ect amount of water for the load size.
corr
■ Has a household fuse blown, or has a circuit breaker
tripped?
Replace the fuse or reset the circuit breaker. If the problem
tinues, call an electrician.
con
■ Is the washer in a normal pause in the cycle?
The washer may pause during ce
rtain cycles. Allow the cycle
to continue.
■ Is the washer overloaded?
Wash smaller loads. See “Starting
Your Washer” for maximum
load size.
■ Is there oversudsing?
Cancel the current cycle. Select DRAIN & SPIN to drain the
ad. Re-select your desired cycle and press START. Do not
lo
add detergent. Use cold water.
■ Is the lid open?
The lid must be closed during op
eration. The washer will not
operate with the lid open.
■ Did you add more items to the load once the washer
started?
Once the load is wet, there may appear to be space for more
items. Do not add more than 1 or 2 garments after the cycle
has started. For best results determine load size with dry
items only.
Electrical Shock Hazard
Plug into a grounded 3 prong outlet.
Do not remove ground prong.
Do not use an adapter.
Do not use an extension cord.
Failure to follow these instructions can result in death,
re, or electrical shock.
Washer won’t fill, rinse or agitate; washer stops
■ Is the power cord plugged into a grounded 3 prong outlet?
Plug power cord into a grounded 3 prong outlet.
■ Are you using an extension cord?
Do not use an extension cord.
12
Washer continues to fill or drain, or the cycle seems stuck
■ Is the top of drain hose lower than the control knobs on
washer?
The top of the drain hose must be at least 39" (990 mm) above
the floor. See “Drain System” in the Installation Instructions.
■ Does the drain hose fit too tightly in the standpipe, or is it
taped to the standpipe?
The drain hose should be loose yet fi
t securely. Do not seal the
drain hose with tape. The hose needs an air gap. See
“Installation Instructions.”
Page 13

Washer won’t drain or spin; water remains in washer
■ Is the drain hose clogged, or the end of the drain hose
more than 96" (2440
mm) above the floor?
See “Drain System” in the Installation Instructions.
■ Is the lid open?
The lid must be closed during operation. The washer will not
operate with the lid open.
Wash/Rinse temperature
■ Are the hot and cold water inlet hoses reversed?
If the hot and cold water inlet hoses are reversed, the washer
will display an “HC” error code at the end of the cycle. If an
error code does not appear but you are experiencing poor
washing performance, check to see whether the inlet hoses
are reversed. See “Connect the Inlet Hoses” in the Installation
Instructions.
■ Are you washing many loads?
As your frequency of loads washed increases, the water
temperature may decrease for hot and warm temperatures.
This is normal.
■ Do you have an ENERGY STAR
®
qualified washer?
The wash water temperatures may feel cooler to you than
those of your previous washer. This is normal.
■ Does the wash water temperature feel lower than usual?
As washing progresses, the wash temperature will decrease
slightly for hot and warm washes. This is normal.
To reduce wrinkling, the warm rinse is regulated to be cooler
than the warm wash.
Excessive sudsing
■ Is there excessive sudsing?
Always measure detergent. Follow detergent manufacturer’s
directions. If you have very soft water, you might need to use
less detergent.
■ Was the cycle interrupted and then the Deep Clean option
selected?
The Deep Clean option should be started on a dry load only.
The Deep Clean option cannot be selected after the tub has
started filling with water.
Cycle did not run Deep Clean option
■ Did you select the Deep Clean option?
The Deep Clean option must be selected for it to be included
in a wash cycle. The Deep Clean option should be started on a
dry load only. Deep Clean cannot be selected after the tub has
started filling with water.
■ The Deep Clean option is a default in the Heavy Duty cycle
and may be added to other cycles.
Clothing Care
Load too wet
■ Did you use the right cycle for the load being washed?
Select a higher spin speed.
■ Did you use a cold rinse?
Cold rinses leave loads wetter than warm rinses. This is
normal.
■ Did you wash an extra large load?
A large unbalanced load could result in a reduced spin speed
and wet clothes at the end of the cycle. Evenly distribute the
load and make sure the height of the load does not exceed the
top row of basket holes.
Residue or lint on load
■ Did you sort properly?
Sort lint givers (towels, chenille) from lint takers (corduroy,
synthetics). Also sort by color.
■ Did you overload the washer?
The wash load must be balanced and not overloaded. Clothes
should move freely. Lint or powdered detergent can be
trapped in the load if the washer is overloaded. Wash smaller
loads. See “Starting Your Washer” for maximum load size.
■ Did you use enough detergent?
Follow detergent manufacturer’s directions. Use enough
detergent to hold the lint in the water.
■ Did you line dry your clothing?
If so, you can expect some lint on the clothing. The air
movement and tumbling of a dryer removes lint from the load.
■ Was paper or tissue left in pockets?
■ Is your water colder than 60°F (15.6°C)?
Wash water colder than 60°F (15.6°C) may not completely
dissolve the detergent.
■ Did you use the proper Soil Level and Wash Cycle for the
■ Did you add detergent to the dispenser?
■ Did you unload the washer promptly?
■ Did you use the right cycle for the load being washed?
■ Did you overload the washer?
■ Was the wash water warm enough to relax wrinkles?
■ Are the hot and cold water inlet hoses reversed?
load?
Reducing wash time (duration) and wash speed are ways to
reduce lint.
For best results, use the dispenser to dissolve the detergent.
Load is wrinkled, twisted, or tangled
Unload the washer as soon as it stops.
To reduce wrinkling, tangling, and twisting, select a cycle with
low wash and spin speeds, such as Delicate or Hand Wash/
Wool.
The wash load must be balanced and not overloaded. Loads
should move freely during washing to reduce wrinkling,
tangling, and twisting.
If safe for the load, use warm or hot wash water. Use cold
rinse water.
A hot rinse followed by spin will cause wrinkling. Check that
the hot and cold water hoses are connected to the correct
faucets. If the hot and cold water inlet hoses are reversed, the
washer will display an “HC” error code at the end of the cycle.
If an error code does not appear but you are experiencing
poor washing performance, check to see whether the inlet
hoses are reversed. See “Connect the Inlet Hoses” in the
Installation Instructions.
13
Page 14

Stains, gray whites, dingy colors
Garments damaged
■ Did you properly sort the load?
The transfer of dye can occur when mixing whites and colors
in a load. Sort dark clothes from whites and lights.
■ Was the wash temperature too low?
Use hot or warm washes if safe for the load. Make sure your
hot water system is adequate to provide a hot water wash.
■ Did you use enough detergent, or do you have hard
water?
Use more detergent for washing heavy soils in cold or hard
water. Water temperature should be at least 60°F (15.6°C) for
soap to dissolve and work properly. For best performance,
use the detergent manufacturer's recommended amounts.
■ Did you follow the manufacturer’s directions when adding
detergent and fabric softener?
Measure detergent and fabric softener. Use enough detergent
to remove soil and hold it in suspension. Dilute fabric softener
and add to the rinse portion of a cycle only. Do not drip fabric
softener onto clothes.
■ Is there above average iron (rust) in water?
You may need to install an iron filter.
■ Did you add detergent to the dispenser?
For best results, use the dispenser to dissolve the detergent.
■ Did you add fabric softener directly to the load?
Use your fabric softener dispenser. Do not drip fabric softener
onto clothes.
■ Did you use a fabric softener dispensing ball?
Use the fabric softener dispenser provided with the washer.
Dispensing balls will not operate correctly with this washer.
■ Did you unload the washer promptly?
To avoid the transfer of dye, unload the washer as soon as it
stops.
■ Did you add detergent, chlorine bleach, or fabric softener
too late in the cycle?
Detergent, chlorine bleach, and fabric softener should be
added to the dispensers before starting the washer.
■ Were sharp items removed from pockets before washing?
Empty pockets, zip zippers, snap, or hook fasteners before
washing to avoid snagging and tearing of load.
■ Were strings and sashes tied to avoid tangling?
Straps and strings can easily become entangled in the load,
causing strain on seams and tearing.
■ Were items damaged before washing?
Mend rips and broken threads in seams before washing.
■ Did you overload the washer?
The wash load must be balanced and not overloaded. Loads
should move freely during washing.
■ Did you add chlorine bleach properly?
Do not pour chlorine bleach directly onto load. Wipe up
bleach spills. Undiluted bleach will damage fabrics. Do not
place load items on top of the bleach dispenser when loading
and unloading the washer (on some models). Do not use more
than the manufacturer's recommended amount for a full load.
■ Did you follow the garment manufacturer’s care label
instructions?
14
Page 15

WHIRLPOOL CORPORATION LAUNDRY WARRANTY
LIMITED WARRANTY
For one year from the date of purchase, when this major appliance is operated and maintained according to instructions attached to or
furnished with the product, Whirlpool Corporation or Whirlpool Canada LP (hereafter “Whirlpool”) will pay for Factory Specified Parts
and repair labor to correct defects in materials or workmanship that existed when this major appliance was purchased. Service must be
provided by a Whirlpool designated service company. YOUR SOLE AND EXCLUSIVE REMEDY UNDER THIS LIMITED WARRANTY
SHALL BE PRODUCT REPAIR AS PROVIDED HEREIN. This limited warranty is valid only in the United States or Canada and applies
only when the major appliance is used in the country in which it was purchased. Proof of original purchase date is required to obtain
service under this limited warranty.
ITEMS EXCLUDED FROM WARRANTY
This limited warranty does not cover:
1. Replacement parts or repair labor if this major appliance is used for other than normal, single-family household use or when it is
used in a manner that is inconsistent to published user or operator instructions and/or installation instructions.
2. Service calls to correct the installation of your major appliance, to instruct you on how to use your major appliance, to replace or
repair house fuses, or to correct house wiring or plumbing.
3. Service calls to repair or replace appliance light bulbs, air filters or water filters. Consumable parts are excluded from warranty
coverage.
4. Damage resulting from accident, alteration, misuse, abuse, fire, flood, acts of God, improper installation, installation not in
accordance with electrical or plumbing codes, or use of products not approved by Whirlpool.
5. Cosmetic damage, including scratches, dents, chips or other damage to the finish of your major appliance, unless such damage
results from defects in materials or workmanship and is reported to Whirlpool within 30 days from the date of purchase.
6. Pick up and delivery. This major appliance is intended to be repaired in your home.
7. Repairs to parts or systems resulting from unauthorized modifications made to the appliance.
8. Expenses for travel and transportation for product service if your major appliance is located in a remote area where service by an
authorized Whirlpool servicer is not available.
9. The removal and reinstallation of your major appliance if it is installed in an inaccessible location or is not installed in accordance
with Whirlpool’s published installation instructions.
10. Replacement parts or repair labor on major appliances with original model/serial numbers that have been removed, altered, or
cannot be easily determined.
DISCLAIMER OF IMPLIED WARRANTIES
IMPLIED WARRANTIES, INCLUDING ANY IMPLIED WARRANTY OF MERCHANTABILITY OR IMPLIED WARRANTY OF FITNESS FOR
A PARTICULAR PURPOSE, ARE LIMITED TO ONE YEAR OR THE SHORTEST PERIOD ALLOWED BY LAW. Some states and provinces
do not allow limitations on the duration of implied warranties of merchantability or fitness, so this limitation may not apply to you. This
warranty gives you specific legal rights, and you also may have other rights that vary from state to state or province to province.
LIMITATION OF REMEDIES; EXCLUSION OF INCIDENTAL AND CONSEQUENTIAL DAMAGES
YOUR SOLE AND EXCLUSIVE REMEDY UNDER THIS LIMITED WARRANTY SHALL BE PRODUCT REPAIR AS PROVIDED HEREIN.
WHIRLPOOL SHALL NOT BE LIABLE FOR INCIDENTAL OR CONSEQUENTIAL DAMAGES. Some states and provinces do not allow
the exclusion or limitation of incidental or consequential damages, so these limitations and exclusions may not apply to you. This
warranty gives you specific legal rights, and you also may have other rights that vary from state to state or province to province.
If outside the 50 United States and Canada, contact your authorized Whirlpool dealer to determine if another warranty applies.
If you think you need repair service, first see the “Troubleshooting” section of the Use & Care Guide. If you are unable to resolve the
problem after checking “Troubleshooting,” additional help can be found by checking the “Assistance or Service” section or by calling
Whirlpool. In the U.S.A., call 1800253-1301. In Canada, call 18008076777.7/08
Keep this book and your sales slip together for future
reference. You must provide proof of purchase or installation
date for in-warranty service.
Write down the following information about your major appliance
to better help you obtain assistance or service if you ever need it.
You will need to know your complete model number and serial
number. You can find this information on the model and serial
number label located on the product.
Dealer name____________________________________________________
Address ________________________________________________________
Phone number__________________________________________________
Model number __________________________________________________
Serial number __________________________________________________
Purchase date __________________________________________________
15
Page 16

ASSISTANCE OU SERVICE
Avant de téléphoner pour assistance ou service, veuillez vérifier
“Dépannage”. Ceci pourrait vous éviter le coût d’une visite de
service. Si vous avez encore besoin d’aide, veuillez suivre les
instructions ci-dessous.
Lors de l'appel, il fau
modèle et de série complets de votre appareil ménager. Ces
renseignements nous aideront à mieux répondre à votre
demande.
Si vous avez besoin de pièces de rechange
Si vous avez besoin de commander des pièces de rechange, nous
vous recommandons d’utiliser seulement des pièces FSP
spécifiées par l'usine. Ces pièces de rechange conviendront et
fonctionneront bien parce qu’elles sont fabriquées selon les
mêmes spécifications précises utilisées pour construire chaque
nouvel appareil électroménager WHIRLPOOL
Pour localiser des pièces de rechange FSP® dans votre
région :
Aux États-Unis, téléphoner au Centre pour l'eXpérience de la
lientèle au 1-800-253-1301, ou à votre centre de service désigné
c
le plus proche.
Au Canada, composer le 1
service désigné le plus proche.
Téléphoner sans frais au Centre pour l'eXpérience de la clientèle
Whirlpool au : 1-800-253-1301.
Nos consultants fournissent de l’assistance pour :
■ Caractéristiques et spécifications de notre gamme complète
d'appareils ménagers
■ Renseignements d'installation
■ Procédés d'utilisation et d'entretien
■ Vente d'accessoires et de pièces de rechange
■ Assistance spécialisée au client (langue espagnole,
malentendants, malvoyants, etc.)
■ Références aux marchands, compagnies de service de
réparation et distributeurs de pièces de rechange locaux.
t connaître la date d'achat et les numéros de
®
®
.
-800-807-6777, ou appeler le centre de
Aux États-Unis
Les techniciens de service désign
pour remplir la garantie des produits et fournir un service après
garantie partout aux États-Unis.
Pour localiser la compagnie de service désignée par Whirlpool
dans votre région, vous pouvez aussi consulter les Pages jaunes.
Pour plus d'assistance
Si vous avez besoin de plus d'assistance, vous pouvez écrire
à Whirlpool Corporation en soumettant toute question ou
problème à :
Whirlpool Brand Home Appliances
Customer eXperience Center
553 Benson Road
Benton Harbor, MI 49022-2692
Dans votre correspondance, veuillez indiquer un numér
téléphone ou l'on peut vous joindre dans la journée.
és par Whirlpool sont formés
o de
Au Canada
Téléphoner sans frais au Centre d'eXpérience à la clientèle de
Whirlpool Canada LP au : 1-800-807-6777.
Nos consultants fournissent de l'assistance pour :
■ Procédés d'utilisation et d'entretien
■ Vente d'accessoires et de pièces de rechange
■ Caractéristiques et spécifications de notre gamme complète
d'appareils ménagers
■ Les références aux concessionnaires, compagnies de service
de réparation et distributeurs de pièces de rechange locaux.
Les techniciens de service désignés par Whirlpool Canada LP
sont formés pour remplir la garantie des produits et fournir un
service après la garantie, partout au Canada.
Pour plus d'assistance
Si vous avez besoin de plus d'assistance, vous pouvez écrire à
rlpool Canada LP en soumettant toute question ou problème
Whi
au :
Centre pour l'eXpérience de la clientèle
Whirlpool Canada LP
1901 Minnesota Court
Mississauga, Ontario L5N 3A7
Dans votre correspondance, veuillez indiquer un numér
téléphone ou l'on peut vous joindre dans la journée.
o de
SÉCURITÉ DE LA LAVEUSE
Votre sécurité et celle des autres est très importante.
Nous donnons de nombreux messages de sécurité importants dans ce manuel et sur votre appareil ménager. Assurez-vous de
toujours lire tous les messages de sécurité et de vous y conformer.
Voici le symbole d’alerte de sécurité.
Ce symbole d’alerte de sécurité vous signale les dangers potentiels de décès et de blessures graves à vous
et à d’autres.
Tous les messages de sécurité suivront le symbole d’alerte de sécurité et le mot “DANGER” ou
“AVERTISSEMENT”. Ces mots signient :
Risque possible de décès ou de blessure grave si vous ne
DANGER
AVERTISSEMENT
Tous les messages de sécurité vous diront quel est le danger potentiel et vous disent comment réduire le risque de blessure et
ce qui peut se produire en cas de non-respect des instructions.
16
suivez pas immédiatement les instructions.
Risque possible de décès ou de blessure grave si vous
ne suivez pas les instructions.
Page 17

Avertissements de la proposition 65 de l'État de Californie :
AVERTISSEMENT : Ce produit contient un produit chimique connu par l’État de Californie pour être à l’origine de cancers.
AVERTISSEMENT : Ce produit contient un produit chimique connu par l’État de Californie pour être à l’origine de malformations
et autres déciences de naissance.
AVANTAGES ET CARACTÉRISTIQUES
Votre laveuse présente plusieurs avantages et caractéristiques qui sont résumés ici. Certains articles peuvent ne pas s'appliquer à votre modèle.
Action de nettoyage en profondeur
Avantages
Niveau d'eau automatique
Cette laveuse détecte le volume de la charge et sa composition à
travers une série de
Elle ajuste ensuite le niveau d'eau pour un rendement de
nettoyage et de rinçage optimal. Ceci élimine les calculs
approximatifs. Le niveau d'eau correspond exactement au volume
de chaque charge de lavage.
Gestion de la température de la commande de soin
Le système de gestion de la températur
sur cette laveuse détecte et maintient électroniquement une
température uniforme de l'eau en contrôlant la température de
l'eau d'arrivée. L'utilisation de la commande de soin favorisera la
dissolution du détergent.
remplissages et de mouvements de lavage.
e de la commande de soin
L'option Deep Clean (nettoyage en profondeur) utilise l'action de
ttoyage à injection directe pour aider à garantir une meilleure
ne
élimination des taches et salissures. L'action Deep Clean réduit le
besoin de prétraitement. La laveuse se remplit à un niveau bas,
permettant ainsi de mouiller les vêtements et de dissoudre le
détergent. Le mélange de détergent est ensuite vaporisé sur la
charge tandis que la laveuse effectue un essorage à basse
vitesse. Cette action de nettoyage durera jusqu'à 10 minutes
selon le programme sélectionné. Puis la laveuse arrête l'essorage,
se remplit au niveau d'eau approprié et poursuit le lavage avec le
programme sélectionné.
17
Page 18

Caractéristiques
Votre nouvelle laveuse présente des caractéristiques qui aident à
réduire le bruit, augmentent la facilité d'utilisation et améliorent la
performance de lavage.
Technologie 6th Sense™
La technologie 6th Sense™ comprend une mémoire incorporée
qui “connaît chaque charge de lavage” pour un nettoyage, une
efficacité et un soin des tissus optimaux. En évaluant le volume de
la charge pour déterminer la quantité d'eau nécessaire à son
nettoyage, la combinaison de caractéristiques intuitives 6th
Sense™ évite les réglages approximatifs pour le soin des
vêtements. Trois niveaux de protection contre le déséquilibre et un
capteur de détection de la mousse garantissent un
fonctionnement sans inquiétude et sans erreur pour une plus
grande tranquillité d'esprit.
Commandes électroniques
Les commandes électroniques avec les programmes préréglés
sont faciles à utiliser, que vous soyez un débutant ou un “expert”.
Système de suspension
Pour réduire le “déplacement” ou le “déséquilibre” de la laveuse,
celle-ci combine :
■ 4 jambes élastiques à ressort pour isoler les vibrations
■ Un anneau d'équilibrage en haut et au fond du panier de
lavage pour minimiser les vibrations
■ Un logiciel d'exploitation concu pour détecter et corriger les
charges déséquilibrées
Panier en acier inoxydable
Le panier en acier inoxydable résiste à la corrosion et permet des
vitesses d'essorage plus élevées pour une meilleure extraction de
l'eau par rapport aux laveuses traditionnelles à chargement par le
dessus et une réduction de la durée de séchage.
Système de lavage/rinçage par filtre forcé
Cette laveuse filtre 100% de l'eau de lavage et de rinçage. L'eau
est filtrée puis remise en circulation. Le filtre forcé coince le sable
et les saletés, les chasse par le tuyau d'évacuation afin qu'ils ne
se redéposent pas sur les vêtements propres.
Fonctionnement silencieux
Cette laveuse est insonorisée à l'aide de materiaux isolants afin
de réduire les sons et bruits de fonctionnement de la laveuse. Sur
certains modèles, une enveloppe supplémentaire pour la cuve est
ajoutée pour l'amortissement supérieur des sons et des
vibrations.
Delay Wash (lavage différé)
L'option Delay Wash permet de charger la laveuse et de différer le
début du programme jusqu'à 8 heures.
Signal de fin de programme
Le signal de fin de programme émet un signal sonore qui indique
la fin du programme de lavage. Ce signal est utile lorsqu'on retire
les articles de la laveuse aussitôt qu'elle s'arrête.
GUIDE DE DÉMARRAGE RAPIDE/UTILISATION DE LA LAVEUSE
AVERTISSEMENT
Risque de choc électrique
Brancher sur une prise à 3 alvéoles reliée à la terre.
Ne pas enlever la broche de liaison à la terre.
Ne pas utiliser un adaptateur.
Ne pas utiliser un câble de rallonge.
Le non-respect de ces instructions peut causer
un décès, un incendie ou un choc électrique.
Pour obtenir un résumé sur le mode d'utilisation de la laveuse après installation, voir le GUIDE DE DÉMARRAGE RAPIDE à la page
suivante.
18
Page 19

GUIDE DE DÉMARRAGE RAPIDE
REMARQUE : Le tableau de commande de votre modèle peut différer de celui illustré ci-dessus.
AVERTISSEMENT : Pour réduire le risque d’incendie, de choc électrique ou de blessures à autrui, lire les IMPORTANTES
INSTRUCTIONS DE SÉCURITÉ avant de faire fonctionner cet appareil. Voici un guide concernant l'utilisation de la laveuse.
Veuillez vous référer aux sections spéciques de ce manuel pour obtenir des renseignements plus détaillés.
COMMANDES D’UTILISATION
Power (mise sous tension) - Appuyer sur POWER pour mettre
en marche ou éteindre la laveuse.
Start (mise en marche) – Appuyer sur START pour mettre
votre laveuse en marche après qu'un programme a été
sélectionné. S’assurer que tous les modicateurs et options
désirés ont été sélectionnés. Le couvercle doit être fermé pour
que la laveuse se mette en marche.
Pause/Cancel (pause/annulation) - Appuyer une fois sur
PAUSE/CANCEL pour mettre la laveuse en pause ou l’arrêter
à tout moment. Appuyer une fois sur PAUSE/CANCEL
(pause/annulation) pour déverrouiller le couvercle et ajouter
des vêtements. Appuyer sur START (mise en marche) pour
reprendre le programme là où il s’était arrêté.
Appuyer deux fois sur PAUSE/CANCEL pour arrêter le
programme de lavage. La laveuse se vidange et s'arrête.
Lid Lock (verrouillage du couvercle) - Lorsque le témoin
Lid Lock est allumé, le couvercle de la laveuse est verrouillé.
REMARQUE : Il est nécessaire d'attendre que le témoin
Lid Lock s’éteigne pour pouvoir ouvrir le couvercle.
AJOUTER UN VÊTEMENT, METTRE
EN PAUSE OU REMETTRE EN
MARCHE la LAVEUSE
Vous permet d’ajouter des vêtements à la
laveuse après que le programme de lavage
ait commencé. Le témoin lumineux
ADD A GARMENT (ajouter un vêtement) s’allume; à partir de
ce moment-là, on peut :
Appuyer sur PAUSE/CANCEL (pause/annulation).
(Le témoin lumineux Lid Lock [couvercle verrouillé] s'éteint;
ouvrir alors le couvercle.)
Ajouter des vêtements. (Rabattre le couvercle de la laveuse.)
Appuyer sur START (mise en marche) pour remettre
en marche.
Pour déverrouiller le couvercle à la n de la période Add a
Garment, appuyer une fois sur PAUSE/CANCEL. En
appuyant deux fois sur PAUSE/CANCEL, on annule le
programme de lavage.
UTILISATION DE DÉTERGENT
Verser la quantité mesurée de détergent en poudre ou liquide
dans le distributeur de détergent. Ne pas verser le détergent
directement sur les vêtements. Puis ajouter l’agent de
blanchiment sans danger pour les couleurs ou l’agent de
blanchiment au chlore (facultatif) et la quantité mesurée
d’assouplissant de tissu liquide (facultatif) dans les distributeurs
indiqués. Si l’on utilise le distributeur d’assouplissant pour tissu
liquide, sélectionner l’option d’assouplissant pour tissu sur la
console. Vous pouvez remplir tous les distributeurs avant le
début du programme de lavage. La laveuse ajoute
automatiquement les produits au moment opportun durant
le programme.
Pour plus de renseignements, voir la section “Utilisation du
détergent approprié”.
OPTIONS et MODIFICATEURS
Il est possible de changer les options et
modicateurs à tout moment tant que l’on
n’a pas appuyé sur Start (mise en marche).
Appuyer sur POWER (mise sous tension).
Sélectionner le programme de lavage.
Sélectionner les OPTIONS et MODIFICATEURS désirés.
Appuyer sur START (mise en marche) ou sélectionner
DELAY WASH (lavage différé) (sur certains modèles) pour
mettre la laveuse en marche ultérieurement.
Changement des programmes après avoir
appuyé sur Start :
Appuyer deux fois sur PAUSE/CANCEL (pause/annulation)
pour annuler le programme.
Sélectionner le programme de lavage désiré.
Sélectionner les OPTIONS et MODIFICATEURS désirés.
Appuyer sur START (mise en marche) ou sélectionner
DELAY WASH (lavage différé) (sur certains modèles) pour
mettre la laveuse en marche ultérieurement. La laveuse
recommence au début du nouveau programme.
REMARQUE : Pour aider à protéger vos vêtements, les
OPTIONS et MODIFICATEURS ne peuvent pas tous être
sélectionnés avec tous les programmes de lavage.
ARRÊT DE LA LAVEUSE
fois sur le bouton Pause/Cancel ou une fois sur le bouton Power.
On peut arrêter le programme de lavage et effectuer une vidange de la cuve en appuyant deux
19
Page 20

Mise en marche de la laveuse
Les renseignements suivants vous aideront à mettre votre laveuse
en marche. Les renvois périodiques à d'autres sections de ce
guide permettent d'obtenir des renseignements plus détaillés.
erser la quantité mesurée de détergent en poudre ou liquide
1. V
dans la laveuse. Ajouter de l'agent de blanchiment (en poudre
ou liquide) sans danger pour les couleurs si nécessaire. Veiller
à utiliser un agent de blanchiment en poudre sans danger
pour les couleurs avec du détergent en poudre ou un agent de
blanchiment liquide sans danger pour les couleurs avec du
détergent liquide.
ttre une charge de vêtements triés dans la laveuse. Voir
2. Me
“Conseils de lessivage”.
■ Répartir la charge uniformément pour maintenir l'équilibre
de la laveuse. Mélanger les gros et les petits articles.
■ Charger uniquement jusqu'en haut du panier - voir
l'illustration. Une surcharge peut causer un nettoyage
médiocre. Les articles doivent pouvoir se déplacer
facilement dans l'eau de lavage.
■ Charger uniquement jusqu'en haut du panier tel qu'illustré.
Une surcharge peut causer un nettoyage médiocre. Les
articles doivent pouvoir se déplacer facilement dans l'eau
de lavage.
5. Appuyer sur POWER
(mise sous tension). Ceci active
l'afficheur de la laveuse.
6. Sélectionner un pr
ogramme de lavage. Voir “Programmes”.
7. Ajuster les modificateurs, si désiré. Voir “Modificateurs”.
8. Sélectionner les options désirées. Voir “Options”.
9. Sur certains modèles, sélection
ner Delay Wash (lavage
différé), si désiré. Voir “Delay Wash” (lavage différé) dans la
section “Modificateurs”.
10. Appuyer sur ST
ART (mise en marche). Le programme de
lavage commence et l'afficheur indique la durée résiduelle
estimée. Le couvercle se verrouillera.
REMARQUE :
Si l’on n’appuie pas sur Start (mise en marche)
en moins de 5 minutes après avoir appuyé sur Power
(alimentation), la laveuse s’éteint automatiquement.
11. Si l'on souhaite
ajouter de l'assouplissant pour tissu,
sélectionner Extra Rinse (rinçage supplémentaire).
■ Lorsque la laveuse a terminé le remplissage pour le
programme de rinçage, appuyer sur PAUSE; on doit
entendre le couvercle se déverrouiller.
■ Soulever le couvercle et verser la quantité mesurée
d'assouplissant liquide pour tissu.
■ Fermer le couvercle et appuyer sur START (mise en
marche) pour reprendre le programme.
■ Ne pas verser d'assouplissant pour tissu non dilué
directement sur les vêtements.
■ Ne pas utiliser de boule distributrice d'assouplissant pour
tissu. Les boules distributrices ne fonctionnent pas
correctement avec cette laveuse.
3. Verser la quantité mesurée d'agent de blanchiment au chlore
liquide le distributeur d'agent de blanchiment au chlore
liquide, si nécessaire. L'agent de blanchiment est dilué et
automatiquement distribué au moment approprié au cours du
programme de lavage.
■ Ne pas remplir excessivement. Ne pas diluer. Ne pas
utiliser plus de 1 tasse (250 mL) pour une charge
complète. Réduire la quantité pour une plus petite charge.
■ Suivre les instructions du fabricant des vêtements et de
l'agent de blanchiment au chlore pour une utilisation
correcte.
■ Pour éviter les renversements, utiliser une tasse avec un
bec verseur. Ne pas laisser l'agent de blanchiment
éclabousser, se renverser ou couler dans le panier de la
laveuse.
■ À la fin du programme, il est possible qu'une petite
quantité d'eau reste dans le distributeur. Ceci est normal.
REMARQUE : Utiliser seulement un agent de blanchiment au
chlore liquide dans ce distributeur.
battre le couvercle de la laveuse.
4. Ra
Programmes
Tourner le bouton pour choisir le programme de lavage correct
pour le type de tissus à laver. Lorsque le bouton est sur un
programme, le témoin lumineux correspondant s'allume. Si les
réglages par défaut pour les modificateurs et les options
conviennent à votre charge de lavage, appuyer sur Start pour
commencer le programme de lavage.
Préréglages de programme
Par commodité, les préréglages de pr
réglages de soin recommandé pour le tissu pour chaque
programme.
Utilisation des préréglages de programme :
1. Appuyer sur POWER
2. Sélectionner le pr
(alimentation).
ogramme désiré en tournant le bouton. Les
préréglages de programme seront affichés (voir tableau
suivant).
REMARQUE :
Les durées préréglées peuvent varier
légèrement en fonction du modèle.
3. Appuyer sur ST
ART (mise en marche). Le programme de
lavage commencera.
ogramme fournissent les
20
Page 21

Préréglages de programme
Programme Minutes
Whitest Whites
(blancs
les plus
blancs)
préréglées
73 Trè s sale Hot/Cold
Niveau de saleté*
Te mp . lavage/ rinçage
ude/
(cha
froide)
Normal
Utiliser ce programme pour les articles en coton et en lin
normalement sales, tels que draps, couvertures et serviettes. Le
programme combine une action de lavage à haute vitesse et un
essorage à haute vitesse.
Casual/Perm Press (tout-aller/pressage permanent)
Heavy Duty (service intense)
68 Trè s sale Hot/Cold
ude/
(cha
froide)
Normal 46 Normal Warm/Cold
Casual/Perm Press
(tout-aller/pressage
(tiède/fr
46 Moyen Warm/Cold
(tiède/fr
oide)
oide)
permanent)
Colors/Darks
couleurs/articles
(
foncés)
Delicate (articles délicats)
Hand Wash/Wool (articles lavables à la main/lainages)
Rinse & Spin
(rinçage et
45 Normal Cold/Cold
(froide/
froide)
35 Moyen Warm/Cold
(tiède/fr
oide)
36 Léger Cold/Cold
oide/
(fr
froide)
33 Non
applicable
Non
applicable
essorage)
Drain & Spin
idange et
(v
16 Non
applicable
Non
applicable
essorage)
Utiliser ce programme pour laver des charges de vêtements qui
ne se repassent pas tels que chemises de sport, chemisiers,
vêtements de travail tout-aller, pressage permanent et mélanges.
Ce programme combine une action de lavage à vitesse moyenne,
un essorage à vitesse moyenne et un processus de
refroidissement de la charge pour réduire le froissement.
Colors/Darks (couleurs/articles foncés)
Utiliser ce programme pour les articles foncés ou les tissus
naturels teints tels que les jeans ou les articles de coton
susceptibles de déteindre. Ce programme combine une action de
lavage à vitesse moyenne et un essorage à haute vitesse. Pour
des résultats optimaux, utiliser de l'eau froide ou tiède.
Delicate (articles délicats)
Utiliser ce programme pour laver des vêtements légèrement sales
pour lesquels l'étiquette de soin indique “Soie lavable en
machine” ou “Programme délicat”. Ce programme utilise une
action de lavage à basse vitesse et un essorage à basse vitesse
pour un meilleur soin des tissus et une réduction du froissement.
Pour le lavage d'articles imperméables ou imperméab
ilisés tels
que les couvre-matelas à doublure en plastique, les rideaux de
douche, les bâches ou les sacs de couchage, utiliser le
programme Delicate (articles délicats) ou Hand Wash/Wool
(lavage à la main/lainages) avec le réglage de vitesse d'essorage
le plus bas disponible sur votre modèle de laveuse.
Hand Wash/Wool (articles lavables à la main/lainages)
*La durée du programme en minutes apparaîtr
a sur l'afficheur
pendant que vous faites les sélections. Une fois qu'on a appuyé
sur Start (mise en marche), la durée totale du programme
apparaît, incluant la durée estimée pour la vidange et le
remplissage.
REMARQUE : C
harger uniquement jusqu'en haut du panier. Une
surcharge peut causer un nettoyage médiocre. Voir “Mise en
marche de la laveuse”.
Whitest Whites (blancs les plus blancs)
Ce programme introduit l'agent de blanchiment au chlore liquide à
la charge au moment approprié pour un blanchiment amélioré des
tissus blancs très sales. Le programme combine une action de
lavage à haute vitesse et un essorage à haute vitesse. L'option
Extra Rinse (rinçage supplémentaire) est l'option par défaut pour
ce programme et permet d'éliminer efficacement le détergent et
l'agent de blanchiment. Pour une élimination optimale des saletés
et des taches, un agent de blanchiment au chlore liquide doit être
utilisé.
Heavy Duty (service intense)
Utiliser ce programme pour les articles en coton ou robustes très
sales. Le programme combine une action de lavage à haute
vitesse et un essorage à haute vitesse. L'option Deep Clean
(nettoyage en profondeur) est l'option par défaut pour ce
programme, mais elle peut être désactivée. Voir “Changement
des programmes, modificateurs et options”. Le programme Extra
Rinse (rinçage supplémentaire) est souhaitable pour les
vêtements très sales.
Utiliser ce programme pour nettoyer les vêtements peu sales
nécessitant un soin spécial ou pour les articles dont l'étiquette
indique “Laine lavable en machine”. (Consulter les consignes de
l'étiquette pour s'assurer que le vêtement est lavable.) Ce
programme utilise une action de lavage intermittente à basse
vitesse et un essorage à basse vitesse pour le meilleur soin des
tissus avec réduction du froissement.
Pour le lavage d'articles imperméables ou imperméab
ilisés tels
que les couvre-matelas à doublure en plastique, les rideaux de
douche, les bâches ou les sacs de couchage, utiliser le
programme Delicate (articles délicats) ou Hand Wash/Wool
(lavage à la main/lainages) avec le réglage de vitesse d'essorage
le plus bas disponible sur votre modèle de laveuse.
L'etiquette des vêtements mentionne “Hand Wash” (lavage à
la main) p
■ Les fibres peuvent être sensibles à l'action de lavage.
■ Le tissu contient des teintures sensibles qui peuvent
arce que :
déteindre.
REMARQUE : C
ertains articles “lavables à la main” rétrécissent
naturellement au lavage. Garder ceci à l'esprit en cas d'achat
d'articles dont l'étiquette indique “Hand Wash” (lavage à la main).
Les articles qui rétrécissent doivent être séchés à plat. Pendant
qu'ils sont encore mouillés, mettre ces articles en forme en les
étirant délicatement à la taille originale.
21
Page 22

Rinse & Spin (rinçage et essorage)
Durée résiduelle estimée
Utiliser cette option pour obtenir un rinçage en profondeur suivi
d'un essorage à haute vitesse. L'affichage de la durée inclut une
estimation du temps nécessaire pour le remplissage et la vidange
de la laveuse.
Quand utiliser Rinse & Spin (rinçage et essorage) :
■ Pour les charges qui nécessitent un rinçage uniquement.
■ Pour achever un programme après que l'alimentation a été
interrompue.
Utilisation ou modification du réglage Rinse & Spin (rinçage et essorage) :
ourner le bouton à RINSE & SPIN jusqu'à ce que le témoin
1. T
lumineux Rinse & Spin s'allume.
2. Appuyer sur ST
Drain & Spin (vidange et essorage)
Une vidange et un essorage supplémentaires peuvent aider à
diminuer les durées de séchage pour les tissus robustes ou les
articles qui nécessitent un soin particulier. L'option Drain & Spin
(vidange et essorage) peut également être utilisée pour vidanger
l'eau après avoir annulé un programme ou pour terminer un
programme après une panne de courant.
Utilisation ou modification du réglage Drain & Spin (vidange et essorage) :
ourner le bouton à DRAIN & SPIN jusqu'à ce que le témoin
1. T
lumineux Drain & Spin s'allume.
2. Appuyer sur ST
ART (mise en marche).
ART (mise en marche).
Caractéristiques supplémentaires
Ces témoins lumineux indiquent quelle partie du programme la
laveuse est en train d'effectuer. Ils indiquent aussi à quel moment
il est possible d'ajouter d'autres vêtements à la charge de lavage.
Lorsqu'un programme de lavage commence, la durée résiduelle
estimée pour le programme, comprenant les périodes de
remplissage et de vidange, s'affiche. Le compte à rebours reste
affiché jusqu'à la fin du programme.
Modificateurs
Les modificateurs vous permettent de personnaliser vos
programmes et d'économiser de l'énergie.
Soil Level (niveau de saleté)
Le niveau de saleté (durée de lavage) est préréglé pour chaque
programme de lavage. Voir “Préréglages de programmes” dans
“Programmes”. Lorsqu'on appuie sur la touche Soil Level (niveau
de saleté), la durée du programme (en minutes) augmente ou
diminue sur l'afficheur de la durée résiduelle estimée et une durée
de lavage différente s’affiche. Pour obtenir la durée de lavage
minimum, appuyer sur la touche jusqu'à ce que le témoin
lumineux proche de Light Soil Level (niveau de saleté - léger)
s'allume. Il s'agit de la plus courte durée de lavage disponible
pour ce programme.
■ Pour la plupart des charges, utiliser la durée recommandée
dans les préréglages de programme.
■ Pour les tissus très sales et robustes, appuyer sur Soil Level
(niveau de saleté) pour prolonger la durée de lavage, si
nécessaire.
■ Pour les tissus peu sales et délicats, appuyer sur Soil Level
(niveau de saleté) pour abréger la durée de lavage, si
nécessaire.
Load Size (volume de la charge)
Cette laveuse sélectionne automatiquement le niveau d'eau Auto
lorsqu'on choisit ce programme. La caractéristique automatique
détecte le volume de la charge et ajoute en conséquence la
quantité correcte d'eau. On peut aussi modifier manuellement les
réglages de niveau d'eau.
Load is Done (charge prête)
Le témoin Done (charge prête) reste allumé jusqu'à l'ouverture du
couvercle ou l'appui sur le bouton Power (alimentation) ou Pause/
Cancel (pause/annulation).
Témoins lumineux
Un témoin lumineux indique le programme, les modificateurs et
les options qui ont été sélectionnés.
Wash-Rinse Temp (température de lavage/rinçage)
Sélectionner une température de l'eau selon le type de charge à
laver. Utiliser l'eau de lavage la plus chaude sans danger pour les
tissus. Suivre les instructions sur l'étiquette des vêtements.
Les rinçages à l'eau tiède rendent les charges plus sèches et plus
ciles à manipuler que les rinçages à l'eau froide. Cependant, les
fa
rinçages à l'eau tiède peuvent augmenter le froissement. Les
rinçages à l'eau froide diminuent le risque de froissement et
économisent de l'énergie.
Guide de température
Température de l'eau de lavage
Hot (chaude) Blancs et couleurs claires
Warm (tiède) Couleurs vives
Cold (froide) Couleurs qui déteignent ou
REMARQUE : Dans le
à 60ºF (15,6ºC), les détergents ne se dissolvent pas bien. Les
saletés peuvent être difficiles à enlever.
s températures d'eau de lavage inférieures
Tissus suggérés
s'atténuent
22
Page 23

Gestion de la température de la commande de soin
L'option Deep Clean peut être sélection
née comme option avec
d'autres programmes. Voir le tableau pour les détails.
Cette fonction détecte et maintient électroniquement une
température uniforme de l'eau de lavage et de rinçage. La
commande de soin régule l'arrivée d'eau chaude et d'eau froide et
est automatiquement activée lorsqu'un programme est
sélectionné. (Voir “Préréglages de programmes” dans
“Programmes”).
La commande de soin est disponible avec les réglages Warm/
arm (tiède/tiède), Warm/Cold (tiède/froide) et Cold/Cold (froide/
W
froide). La température de l'eau dans les réglages Hot/Cold
(chaude/froide) dépend de la température de l'eau aux robinets
d'arrivée d'eau.
■ La commande de soin assure un nettoyage uniforme.
■ Les détergents actuels fonctionnent bien à des températures
supérieures à 60°F (15,6°C).
Delay Wash (lavage différé)
On peut utiliser la caractéristique Delay Wash lorsqu'on souhaite
différer la mise en marche du programme de lavage jusqu'à
8 heures (selon le modèle).
1. Charger la laveuse et remplir les distributeurs.
2. Rabattre le couvercle de la laveuse.
3. Appuyer sur POWER (alimentation).
4. Sélectionner le programme, les modificateurs et les options
désirés.
5. Appuyer sur DELA
Y WASH (lavage différé). 1H (une heure)
s'affichera sur la fenêtre d'affichage de la durée. Le témoin
lumineux pour Delay Wash s'allumera.
6. Pou
r un délai plus long, appuyer sur DELAY WASH. Le délai
de mise en marche augmentera par incréments d'une heure.
7. Appuyer sur ST
ART (mise en marche). Le compte à rebours en
heures jusqu'au programme de lavage apparaîtra dans la
fenêtre d'affichage de la durée et le témoin lumineux
commencera à clignoter.
REMARQUE : L
e témoin lumineux Start ne clignote pas
lorsqu'on sélectionne Delay Wash (lavage différé). Il faut
appuyer sur Start pour lancer le compte à rebours de début
du programme.
Pour modifier l'heure de lavage différé :
■ Appuyer sur PAUSE/CANCEL (pause/annulation).
■ Appuyer sur DELAY WASH (lavage différé) pour
sélectionner la durée de délai désirée.
■ Appuyer sur START (mise en marche) pour commencer le
compte à rebours.
Pour annuler le lavage différé :
Appuyer à nouveau sur START (mise en marche) pour mettre
le pr
ogramme en marche immédiatement, ou appuyer deux
fois sur PAUSE/CANCEL (pause/annulation).
Options
Utiliser ces touches pour sélectionner les options désirées pour
votre programme de lavage.
Deep Clean (nettoyage en profondeur)
Cette option fournit une action de nettoyage améliorée pour les
taches tenaces. Le programme Heavy Duty (service intense)
comporte automatiquement l'option Deep Clean. La sélection de
l'option Deep Clean prolongera le programme d'environ 10
minutes. L'option Deep Clean doit être activée seulement sur une
charge sèche et ne peut pas être sélectionnée alors que le
remplissage de la cuve a commencé.
Programme Deep Clean (nettoyage en
ofondeur)
pr
(Prolonge le programme de lavage)
Whitest Whites
Option
(blancs les plus
blancs)
Heavy Duty
Par défaut
(service intense)
Normal Option
Casual/Perm Press
(
tout-aller/pressage
Option
permanent)
Colors/Darks
Option
(couleurs/articles
foncés)
Delicate (articles
Option
délicats)
Hand Wash/Wool
(articles
lavables
Option
à la main/lainages)
Rinse & Spin (rinçage
Non disponible
et essorage)
Drain & Spin (vidange
Non disponible
et essorage)
Extra Rinse (rinçage supplémentaire)
Un rinçage supplémentaire peut être effectué pour favoriser
l'élimination des saletés, des résidus de détergent ou d'agent de
blanchiment sur les vêtements. Cette option fournit un rinçage
supplémentaire avec une eau à la même température que pour le
premier rinçage. Il s'agit du réglage de rinçage par défaut pour le
programme Whitest Whites (blancs les plus blancs).
Fabric Softener (assouplissant de tissu)
Si l’on utilise le distributeur d’assouplissant pour tissu liquide,
sélectionner l’option d’assouplissant pour tissu sur la console.
Pre Soak (prétrempage) (sur certains modèles)
Utiliser cette option pour les taches tenaces et les salissures qui
nécessitent plus de temps pour être éliminées. Avec cette
laveuse, le trempage diffère de celui des laveuses traditionnelles.
La laveuse vaporise de l’eau et du détergent sur la charge
pendant 4 minutes et à une vitesse très lente, processus suivi
d’une période de trempage. Ceci permet au détergent d'être
efficace pour tous les types de saleté. Ce processus est suivi de
périodes alternées de vaporisation et de trempage. L’utilisation de
Presoak (prétrempage) prolongera le programme de lavage
d’environ 14 minutes.
Volume du signal de fin de programme
La fin du programme de lavage est indiquée par un signal sonore.
Ce signal est utile lorsqu'on retire les articles de la laveuse
aussitôt qu'elle s'arrête. Sélectionner On ou Off (activé ou
désactivé).
23
Page 24

Changement des programmes,
modificateurs et options
Il est possible de changer les programmes, modificateurs et
options en tout temps lorsque le bouton Start (mise en marche)
n'a pas encore été enfoncé. Tous les modificateurs et toutes les
options ne sont pas disponibles avec tous les programmes.
■ Un bref signal sonore marque le choix d'un changement.
■ Trois brefs signaux sonores marquent le choix d'une
combinaison non disponible. La dernière sélection ne sera
pas acceptée.
Changement des programmes après avoir appuyé sur Start
1. Appuyer deux fois sur PAUSE/CANCEL (pause/annulation)
pour annuler le programme. La laveuse effectuera une
vidange.
2. Appuyer sur POWER (alimentation).
3. Sélectionner le programme de lavage désiré.
4. Sélectionner les modificateurs et options désirés.
5. Appuyer sur START (mise en marche).
La laveuse recommence au début d'un nouveau programme.
REMARQUE : Si on n'appuie pas sur Start (mise en marche) en
deçà de 5 minutes après avoir mis en pause la laveuse, celle-ci
s'arrête automatiquement.
Changement des modificateurs et options après avoir appuyé sur Start
Il est possible de changer un modificateur ou une option à tout moment après avoir sélectionné Start et avant que le modificateur ou l'option choisi(e) ne commence.
REMARQUE : Un signal sonore d'erreur sera émis si la sélection
n'est pas disponible.
Pour vidanger la laveuse manuellement et essorer la charge
1. Appuyer deux fois sur PAUSE/CANCEL (pause/annulation)
pour annuler le programme de lavage et vidanger la laveuse.
2. Appuyer sur POWER (alimentation).
3. Tourner le bouton pour sélectionner DRAIN & SPIN (vidange et
essorage).
4. Appuyer sur START (mise en marche). Lorsque l'essorage est terminé, le couvercle se déverrouille. Les
articles peuvent être retirés de la laveuse.
Sons normaux
Votre nouvelle laveuse est susceptible de faire des sons que votre
ancienne laveuse ne produisait pas. Comme ces sons ne vous
sont pas familiers, ils peuvent vous inquiéter. Ces sons sont
normaux.
Pendant le lavage
Si vous sélectionnez l'option Deep Clean (nettoyage en
profondeur), vous entendrez un bruit d'essorage/vaporisation au
début du programme.
Pendant la vidange
Si l'eau est évacuée rapidement de la laveuse (en fonction de
votre installation), vous pouvez entendre l'air aspiré par la pompe
à la fin de la vidange.
Pendant le lavage et l'essorage
Cette laveuse ne comporte pas de transmission. Le moteur fournit
un entraînement direct pour le lavage et l'essorage. Vous
entendrez des sons qui sont différents de ceux d'une laveuse
conventionnelle.
CONSEILS DE LESSIVAGE
Préparation des vêtements pour le lavage
Suivre les recommandations suivantes pour prolonger la vie de
vos vêtements.
■ Fermer les fermetures à glissière, les boutons pression et les
crochets pour éviter d'accrocher d'autres articles. Attacher les
cordons et les ceintures pour éviter l’emmêlement.
■ Retirer les épingles, boucles et autres objets durs pour éviter
d'égratigner l'intérieur de la laveuse. Ôter les garnitures et les
ornements non lavables.
■ Vider les poches et les retourner; déplier les manches.
Retourner les tricots synthétiques et les lainages pour éviter le
boulochage.
■ Brosser les vêtements pour enlever la charpie et la poussière.
Traiter les taches; les vêtements tachés ou mouillés doivent
être lavés sans délai pour obtenir des résultats optimaux.
■ Raccommoder les déchirures, les ourlets défaits et les
coutures.
Tr i
■ Séparer les articles très sales des articles légèrement sales,
même si on les lave normalement ensemble. Séparer les
articles qui forment de la charpie (serviettes, chenille) des
articles qui retiennent la charpie (velours côtelé, synthétiques,
pressage permanent). Dans la mesure du possible, retourner
sur l'envers les articles qui forment de la charpie.
■ Séparer les couleurs foncées des couleurs claires et les
articles grand teint des articles qui déteignent.
■ Trier en fonction des tissus et de la confection (cotons solides,
tricots, articles délicats).
■ Pour le lavage d'articles imperméables ou impérmeabilisés
tels que les couvre-matelas à doublure en plastique, les
rideaux de douche, les bâches, les vestes ou les sacs de
couchage, utiliser l'un des programmes suivants : Delicate
(articles délicats), Hand Wash/Wool (lavage à la main/
lainages), Colors/Darks (couleurs/articles foncés) ou Whitest
Whites (blancs les plus blancs).
Options de programmes
■ Pour un meilleur rendement et des améliorations au
programme désiré, sélectionner des options telles que Deep
Clean (nettoyage en profondeur), Extra Rinse (rinçage
supplémentaire) et Fabric Softener Dispenser (distributeur
d'assouplissant pour tissu).
Déchargement
■ Retirer les vêtements de la laveuse une fois que le programme
est terminé. Des objets en métal comme les fermetures à
glissière, les boutons-pression et les boucles peuvent rouiller
si on les laisse longtemps dans le panier de la laveuse.
24
Page 25

ENTRETIEN DE LA LAVEUSE
Nettoyage de la laveuse
Utiliser un linge doux, humide ou une éponge pour essuyer les
renversements de détergents ou d'agent de blanchiment à
l'extérieur de votre laveuse.
Nettoyer l'intérieur de votre laveuse avec 1 tasse (250 mL) d'agent
blanchiment au chlore. Verser ceci dans votre laveuse et lui
de
faire faire un programme complet à l'eau chaude au niveau d'eau
supérieur. Sélectionner le niveau Super Load Size (grosse charge).
Répéter ce processus au besoin.
Enlever tous les résidus d'eau dur
nettoyants sans danger pour la laveuse.
Tuyaux d'arrivée d'eau
Remplacer les tuyaux d'arrivée d'eau après 5 ans d'utilisation
pour réduire le risque de défaillance des tuyaux. Inspecter
périodiquement les tuyaux; les remplacer en cas de renflement,
de déformation, de coupure et d'usure ou si une fuite se
manifeste.
Lorsque vous remplacez vos tuyaux
de remplacement au marqueur indélébile sur l'étiquette.
e en utilisant seulement des
d'arrivée d'eau, noter la date
Réutilisation de la laveuse :
1. Vidanger les canalisations d'eau et les tuyaux. Reconnecter
les tuyaux d'arrivée d'eau. Ouvrir les deux robinets d'eau.
AVERTISSEMENT
Risque de choc électrique
Brancher sur une prise à 3 alvéoles reliée à la terre.
Ne pas enlever la broche de liaison à la terre.
Ne pas utiliser un adaptateur.
Ne pas utiliser un câble de rallonge.
Le non-respect de ces instructions peut causer
un décès, un incendie ou un choc électrique.
Précautions à prendre avant les vacances,
un entreposage ou un déménagement
Installer et remiser la laveuse à l'abri du gel. L'eau qui peut rester
dans les tuyaux risque d'abîmer la laveuse en temps de gel. Si la
laveuse doit faire l'objet d'un déménagement ou de remisage au
cours d'une période de gel, préparer l'appareil pour l'hiver.
Entretien en cas de non-utilisation ou de période de vacances :
Faire fonctionner la laveuse seulement lorsqu'on est présent. Si
vous deve
pendant une période prolongee, vous devez exécuter les
opérations suivantes :
■ Débrancher la laveuse ou déconnecter la source de courant
■ Fermer l'alimentation d'eau de la laveuse. Ceci aide à éviter
Préparation de la laveuse pour l'hiver :
1. Fermer les deux r
2. Débrancher et vidanger les tuyaux d'arrivée d'eau.
3. V
4. Fai
5. Débrancher la laveuse ou déconnecter la source de courant
z partir en vacances ou ne pas utiliser la laveuse
électrique.
les inondations accidentelles (dues à une augmentation de la
pression) quand vous êtes absent.
obinets d'eau.
erser 1 pinte (1 L) d'antigel pour véhicule récréatif dans le
panier.
re fonctionner la laveuse au réglage Rinse & Spin (rinçage
et essorage) pendant environ 30 secondes pour mélanger
l'antigel à l'eau qui reste.
électrique.
2. Brancher la laveuse ou reconnecter la source de courant
électrique.
3. Fair
Transport de la laveuse :
1. Fermer les deux r
2. Débrancher et vidanger les tuyaux d'arrivée d'eau.
3. Si la laveu
4. Dé
5. Dé
6. Placer les tuyaux d'arrivée d'eau dans le panier.
7. Fair
8. Pla
Réinstallation de la laveuse
1. Su
2. Fair
e exécuter à la laveuse n'importe quel programme et
sélectionner le niveau d'eau Super Load Size pour nettoyer la
laveuse et éliminer l'antigel, le cas échéant. Utiliser la moitié
de la quantité recommandée par le fabricant pour une charge
de taille moyenne.
obinets d'eau.
se doit être déplacée en temps de gel, mettre une
pinte (1 L) d'antigel pour véhicule récréatif dans le panier. Faire
fonctionner la laveuse au réglage Rinse & Spin (rinçage et
essorage) pendant environ 30 secondes pour mélanger
l'antigel à l'eau qui reste.
connecter le tuyau de vidange du système de vidange.
brancher le cordon d'alimentation.
e passer le cordon d'alimentation et le tuyau de vidange
par le dessus et les mettre dans le panier.
cer l'anneau d'emballage en mousse provenant des
matériaux d'expédition sur le dessus de la laveuse. Si vous
n'êtes pas en possession de l'anneau d'emballage en mousse
original, placer des couvertures lourdes, des serviettes, etc.
dans l'ouverture du panier. Fermer le couvercle et le bloquer
en utilisant du ruban adhésif vers le bas de l'avant de la
laveuse. Conserver le couvercle fixé jusqu'à ce que la laveuse
soit installée à son nouvel emplacement.
ivre les “Instructions d'installation” pour choisir
l'emplacement, régler l'aplomb de la laveuse et la raccorder.
e exécuter à la laveuse n'importe quel programme et
sélectionner le niveau d'eau Super Load Size pour nettoyer la
laveuse et éliminer l'antigel, le cas échéant. Utiliser la moitié
de la quantité recommandée par le fabricant pour une charge
de taille moyenne.
25
Page 26

DÉPANNAGE
Essayer d'abord les solutions suggérées ici, ce qui vous évitera peut-être le coût d'une visite de service...
La laveuse et ses composants
La laveuse affiche des messages codés
■ “LF” (La laveuse prend trop de temps pour se remplir)
Vérifier ce qui suit :
Les tuyaux d'arrivée d'eau sont-ils déformés ou obstrués?
Les tamis de la valve d'arrivée
Appuyer sur PAUSE/CANCEL (pause/a
remettre l'affichage à zéro.
■ “Ld” (La laveuse prend trop de temps pour vidanger
l'eau provenant de la cuve de lavage)
Vérifier ce qui suit :
Le tuyau de vidange est-il déformé ou obstrué?
Le tuyau de vidange est-il correctement installé? Voir
ccordement du tuyau de vidange” dans les Instructions
“Ra
d'installation. Appuyer sur PAUSE/ CANCEL (pause/
annulation) pour remettre l'affichage à zéro.
■ “uL” (charge déséquilibrée)
Si la charge est déséquilibrée, la laveuse affiche ce code tout
mettant en route une procédure de rééquilibrage de la
en
charge à la fin du programme de lavage et avant l'essorage
final. Si le code reste affiché et que le bouton de commande
du programme de lavage clignote alors que la procédure de
rééquilibrage est terminée, ouvrir le couvercle et redistribuer la
charge. Fermer le couvercle et appuyer sur START.
■ “oL” (surcharge)
La laveuse est-elle surchargée? La laveuse a tenté de se
emplir et de commencer le programme de lavage. Si la
r
laveuse est surchargée, elle évacue toute eau et tout
détergent ajoutés au cours du remplissage. Pour mettre fin à
l'état de surcharge, retirer quelques articles et verser le
détergent. Fermer le couvercle et appuyer sur START.
■ “Sd” (excès de mousse détecté)
Avez-vous versé trop de détergent?
Toujours mesurer la quantité de déter
directives du fabricant de détergent.
En cas d'excès de mousse détecté, la laveuse affiche ce code
n mettant en route une procédure d'élimination de l'excès de
e
mousse à la fin du programme de lavage. Cette procédure
élimine l'excès de mousse et permet un rinçage satisfaisant
de vos vêtements. Si le code reste affiché et que le bouton de
commande du programme de lavage clignote alors que la
procédure d'élimination de l'excès de mousse est terminée,
sélectionner à nouveau le programme désiré en utilisant de
l'eau froide. Appuyer sur START (mise en marche).
Ne pas ajouter de détergent.
■ “lid” (couvercle ouvert)
Le couvercle est-il ouvert?
Fermer le couvercle pour effacer l'affichage.
■ “HC” (tuyaux d'eau chaude et d'eau froide inversés)
Ce code s'affiche à la fin du pr
indiquer que les tuyaux d'arrivée d'eau chaude et d'eau froide
sont inversés. Si aucun code d'erreur n'apparaît mais que la
performance de lavage n'est pas satisfaisante, vérifier que les
tuyaux d'arrivée d'eau ne sont pas inversés. Voir
“Raccordement des tuyaux d'alimentation” dans les
Instructions d'installation.
■ “dL” (verrouillage porte/couvercle impossible)
Indique que le couvercle n'est pas verr
article n'est pris dans le couvercle et empêche sa fermeture.
Appuyer une fois sur PAUSE/CANCEL (pause/ annulation)
pour effacer le code.
d'eau sont-ils dégagés?
nnulation) pour
gent. Suivre les
ogramme de lavage pour
ouillé. Vérifier qu'aucun
■ “dU” (déverrouillage porte/couvercle impossible)
Y a-t-il un poids excessif sur le couvercle, tel qu'un panier de
lessive?
Le poids excessif empêchera le couvercle de se
déverrouiller. Appuyer une fois sur PAUSE/CANCEL (pause/
annulation) pour effacer le code.
■ Code “F##”
Appuyer une fois sur PAUSE/CANCEL (pause/annulation)
facer le code. Appuyer sur START (mise en marche). Si
pour ef
le code réapparaît, faire un appel de service.
Bruit, vibrations, déséquilibre
■ La laveuse est-elle d'aplomb? La laveuse bascule-t-elle
lorsqu'on la pousse contre les coins?
La laveuse doit être d'aplomb. Le
s pieds avant et arrière
doivent être bien en contact avec le plancher. Vérifier que les
écrous de blocage sont serrés. Voir “Réglage de l'aplomb de
la laveuse” dans les Instructions d'installation.
■ Le plancher est-il souple, affaissé ou pas d'aplomb?
Un plancher souple ou qui n'est pas d'aplom
b peut provoquer
bruit et vibrations de la part de la laveuse. Un morceau de
contreplaqué de ¾" (19 mm) sous la laveuse réduira les sons.
Voir “Exigences d'emplacement” dans les Instructions
d'installation.
■ La charge est-elle équilibrée?
Répartir uniformément la charge dans
le panier de la laveuse
et veiller à ce que la hauteur de la charge n'excède pas la
rangée de trous supérieure du panier. Voir “Mise en marche de
la laveuse”.
■ Entendez-vous un cliquetis ou d'autres bruits lors des
changements de programme de lavage à vidange ou
essorage?
Lors du déplacement du système d'entraînement ou lor
sque
le panier de la laveuse se met en place entre les programmes,
il est possible d'entendre des bruits que la précédente laveuse
ne faisait pas. Ce sont des bruits normaux pour la laveuse.
■ La laveuse fait-elle un bruit de gargouillement ou de
bourdonnement?
Au moment de la vidange, la po
mpe émet un bourdonnement
continu avec des sons réguliers de gargouillement et de
pompage à mesure que les dernières quantités d'eau sont
évacuées. Ceci est normal.
■ Lavez-vous une petite charge?
Vous entendrez davantage de bruits
d'éclaboussement en cas
de lavage de petites charges. Ceci est normal.
■ Le panier de la laveuse se déplace pendant le lavage.
Ceci est normal.
La laveuse fuit
■ Les tuyaux d'arrivée d'eau sont-ils serrés?
■ Les rondelles des tuyaux d'arrivée d'eau sont-elles
correctement installées?
Vérifier les deux extrémités de chaque tuyau. Voir
“Rac
cordement des tuyaux d'alimentation” dans les
Instructions d'installation.
■ Avez-vous tiré le tuyau de vidange hors de la caisse de la
laveuse et installé celui-ci dans un tuyau de rejet à l'égout
ou un évier de buanderie?
Le tuyau de vidange doit être tiré de
la caisse de la laveuse et
immobilisé au tuyau de rejet à l'égout ou à l'évier de
buanderie. Voir “Raccordement du tuyau de vidange” et
“Immobilisation du tuyau de vidange” dans les Instructions
d'installation.
26
Page 27

■ L'évier ou le conduit d'évacuation est-il obstrué?
L'évier et le tuyau de rejet à l'égout doivent pouv
17 gal. (64 L) d'eau par
minute. Si l'évier ou le tuyau de rejet à
oir drainer
l'égout est obstrué ou ralenti, l'eau peut refouler du tuyau de
rejet à l'égout ou de l'évier.
■ De l'eau gicle-t-elle de l'anneau de la cuve ou de la
charge?
La charge de lavage doit être équilibr
ée et pas surchargée. Si
la charge de lavage est déséquilibrée ou surchargée, l'eau
entrante peut faire dévier la charge.
■ La laveuse est-elle correctement installée?
La laveuse doit être d'aplomb. Les pied
s doivent être
correctement installés et les écrous serrés. Voir “Réglage de
l'aplomb de la laveuse” dans les Instructions d'installation.
■ Le programme a-t-il été interrompu et l'option Deep Clean
(nettoyage en profondeur) sélectionnée par la suite?
L'option Deep Clean doit être activée sur une charge sèche
uniquement. L'option Deep Clean ne peut pas être
sélectionnée après le début du remplissage de la cuve d'eau.
■ Vérifier la plomberie du domicile (éviers de buanderie,
robinets, tuyau de rejet à l'égout, conduites d'eau) pour
voir s'il y a des fuites.
Fonctionnement de la laveuse
AVERTISSEMENT
Risque de choc électrique
Brancher sur une prise à 3 alvéoles reliée à la terre.
Ne pas enlever la broche de liaison à la terre.
Ne pas utiliser un adaptateur.
Ne pas utiliser un câble de rallonge.
Le non-respect de ces instructions peut causer
un décès, un incendie ou un choc électrique.
Fonctionnement du distributeur
■ Les produits de lessive se trouvent-ils dans les
distributeurs adéquats?
Verser les quantités appropriées un
agent de blanchiment au
chlore liquide dans le distributeur. Utiliser uniquement un
agent de blanchiment au chlore liquide dans le distributeur.
■ Reste-t-il de l'eau au fond d'un distributeur? Le
distributeur s'est-il vidangé correctement?
Une petite quantité d'eau peut être restée dans un distributeur
à la fin du programme. Ceci est normal.
■ Avez-vous placé un agent de blanchiment en poudre ou
liquide sans danger pour les couleurs dans le distributeur
d'agent de blanchiment au chlore liquide (sur certains
modèles)?
Verser un agent de blanchiment en poudre ou liquide sans
ger pour les couleurs directement dans le panier de la
dan
laveuse. Ne pas utiliser le distributeur d'agent de blanchiment
au chlore pour l'agent de blanchiment sans danger pour les
couleurs.
La laveuse ne se remplit pas, ne rince pas ou l'agitateur ne tourne pas; la laveuse s'arrête
■ Le cordon d'alimentation est-il branché dans une prise à 3
alvéoles reliée à la terre?
Brancher le cordon d'alimentation dans une prise à 3 alvéoles
reliée à la terre.
■ Utilisez-vous un câble de rallonge?
Ne pas utiliser un câble de rallonge.
■ La prise est-elle alimentée par le courant électrique?
Vérifier la source de courant électrique ou appeler un
ien.
électric
■ L'indicateur sur le bouton de commande de programme
est-il correctement aligné avec un programme?
Tourner le bouton de commande de programme légèrement
vers la dr
■ Les tamis de la valve d'arrivée d'eau sont-ils obstrués?
oite.
Couper l'arrivée d'eau et retirer les tuyaux d'arrivée d'eau de
aveuse. Ôter toute pellicule ou particules accumulées.
la l
Réinstaller les tuyaux, ouvrir l'arrivée d'eau et vérifier s'il y a
des fuites.
■ Les robinets d'eau chaude et d'eau froide sont-ils
ouverts?
Ouvrir les robinets d'eau.
27
Page 28

■ Le tuyau d'arrivée d'eau est-il déformé?
Redresser les tuyaux.
■ Le niveau d'eau semble-t-il trop bas, ou la laveuse ne se
remplit-elle pas complètement?
La caractéristique de niveau d'eau automatique détecte le
volume de la charge et ajoute en conséquence la quantité
correcte d'eau.
■ Utilisez-vous la caractéristique de niveau d'eau
automatique?
La caractéristique automatique détecte le volume de la charge
et ajoute en consequénce la quantité correcte d'eau.
■ Un fusible est-il grillé ou le disjoncteur s'est-il déclenché?
Remplacer le fusible ou réenclencher le disjoncteur. Si le
problème persiste, appeler un électricien.
■ La laveuse fait-elle une pause normale au cours du
programme?
La laveuse peut faire une pause au cours de certains
programmes. Laisser le programme se poursuivre.
■ La laveuse est-elle surchargée?
Laver des charges plus petites. Voir “Mise en marche de la
laveuse” pour la taille de charge maximale.
■ Y a-t-il un excès de mousse?
Annuler le programme en cours. Appuyer sur DRAIN & SPIN
(vidange et essorage) pour vidanger la charge. Sélectionner à
nouveau le programme désiré et appuyer sur START (mise en
marche). Ne pas ajouter de détergent. Utiliser de l'eau froide.
■ Le couvercle est-il ouvert?
Le couvercle doit être fermé lorsque la laveuse est en marche.
La laveuse ne fonctionnera pas si le couvercle est ouvert.
■ Avez-vous ajouté des articles à la charge alors que la
laveuse avait commencé un programme?
Une fois que la charge est mouillée, il peut sembler y avoir de
la place pour des vêtements supplémentaires. Ne pas ajouter
plus de 1 ou 2 vêtement(s) après le début du programme.
Pour des résultats optimaux, déterminer le volume de la
charge avec des articles secs uniquement.
La laveuse continue de se remplir ou la vidange se poursuit, ou le programme semble bloqué
■ Le dessus du tuyau de vidange est-il plus bas que les
boutons de commande sur la laveuse?
Le dessus du tuyau de vidange doit être au moins à
39" (990 mm) au-dessus du plancher. Voir “Système de
vidange” dans les Instructions d'installation.
■ Le tuyau de vidange est-il trop serré dans le tuyau de rejet
à l'égout, ou est-il fixé au tuyau de rejet à l'égout avec du
ruban adhésif?
Le tuyau de vidange doit être lâche mais bien fixé. Ne pas
sceller le tuyau de vidange avec du ruban adhésif. Le tuyau à
besoin d'une ouverture pour l'air. Voir “Instructions
d'installation”.
Température de lavage/rinçage
■ Les robinets d'arrivée d'eau chaude et froide ont-ils été
inversés?
Si les robinets d'eau chaude et d'eau froide ont été inversés,
la laveuse affiche un code d'erreur “HC” à la fin du
programme. Si aucun code d'erreur n'apparaît mais que la
performance de lavage n'est pas satisfaisante, vérifier que les
tuyaux d'arrivée d'eau ne sont pas inversés. Voir
“Raccordement des tuyaux d'alimentation” dans les
Instructions d'installation.
■ Lavez-vous un nombre important de charges?
Lorsque la fréquence de charges lavées augmente, la
température de l'eau peut baisser lorsqu'on choisit une
température chaude ou tiède. Ceci est normal.
■ Possédez-vous une laveuse certifiée ENERGY STAR
®
?
Les températures de l'eau de lavage peuvent sembler plus
froides que celles de votre précédente laveuse. Ceci est
normal.
■ La température de l'eau de lavage paraît-elle plus basse
que d'habitude?
Au fur et à mesure de l'avancement du programme, la
température de l'eau de lavage diminuera légèrement pour les
lavages à l'eau chaude et à l'eau tiède. Ceci est normal.
Pour réduire les faux plis, le rinçage à l'eau tiède est réglé de
façon à être plus froid que le lavage à l'eau tiède.
Excès de mousse
■ Y a-t-il un excès de mousse?
Toujours mesurer la quantité de détergent. Suivre les
directives du fabricant de détergent. Si l'eau est très douce,
on peut utiliser moins de détergent.
■ Le programme a-t-il été interrompu et l'option Deep Clean
(nettoyage en profondeur) sélectionnée par la suite?
L'option Deep Clean doit être activée sur une charge sèche
uniquement. L'option Deep Clean ne peut pas être
sélectionnée après le début du remplissage de la cuve d'eau.
L'option Deep Clean (nettoyage en profondeur) n'a pas fonctionné durant le programme
■ Avez-vous sélectionné l'option Deep Clean?
L'option Deep Clean doit être sélectionnée pour pouvoir être
incluse dans un programme de lavage. Elle doit être activée
sur une charge sèche uniquement. L'option Deep Clean ne
peut pas être sélectionnée après le début du remplissage de
la cuve d'eau.
■ L'option Deep Clean est une option par défaut dans le
programme Heavy Duty (service intense) et peut être ajoutée
aux autres programmes.
La laveuse n'effectue pas de vidange ni d'essorage; l'eau reste dans la laveuse
■ Le tuyau de vidange est-il obstrué ou l'extrémité du tuyau
de vidange se trouve-t-elle à plus de 96" (2440 mm) audessus du plancher?
Voir “Système de vidange” dans les Instructions d'installation.
■ Le couvercle est-il ouvert?
Le couvercle doit être fermé lorsque la laveuse est en marche.
La laveuse ne fonctionnera pas si le couvercle est ouvert.
28
Page 29

Soin des vêtements
Charge trop mouillée
■ Avez-vous utilisé le bon programme pour la charge à
laver?
Choisir une vitesse d'essorage plus élevée.
■ Avez-vous utilisé un rinçage à froid?
Les charges sont plus humides après un rinçage à froid
qu'après un rinçage tiède. Ceci est normal.
■ Avez-vous lavé une très grosse charge?
Une grosse charge déséquilibrée peut entraîner une réduction
de la vitesse d'essorage et laisser les articles mouillés à la fin
du programme. Répartir uniformément la charge et veiller à ce
que la hauteur de la charge n'excède pas la rangée de trous
supérieure du panier.
Résidus ou charpie sur le linge
■ Avez-vous effectué le tri correctement?
Trier les articles causant la charpie (serviettes, chenille) des
articles qui retiennent la charpie (velours côtelé, synthétiques).
Trier également en fonction des couleurs.
■ Avez-vous surchargé la laveuse?
La charge de lavage doit être équilibrée et pas surchargée.
Les charges doivent pouvoir culbuter librement. De la charpie
ou du détergent en poudre peuvent être coincés dans la
charge s'il y a surcharge. Laver des charges plus petites. Voir
“Mise en marche de la laveuse” pour la taille de charge
maximale.
■ Avez-vous utilisé suffisamment de détergent?
Suivre les directives du fabricant de détergent. Utiliser
suffisamment de détergent pour maintenir la charpie dans
l'eau.
■ Avez-vous fait sécher vos vêtements sur un fil à linge?
Si c'est le cas, attendez-vous à trouver de la charpie sur les
vêtements. Le mouvement de l'air et le culbutage d'une
sécheuse suppriment la charpie de la charge.
■ Avez-vous laissé du papier ou des mouchoirs en papier
dans les poches?
■ La température de l'eau est-elle inférieure à 60°F (15,6°C)?
Une eau de lavage dont la température est inférieure à 60°F
(15,6°C) peut ne pas dissoudre complètement le détergent.
■ Avez-vous utilisé le niveau de saleté et le programme de
lavage appropriés pour la charge?
La diminution de la durée et de la vitesse de lavage
constituent un moyen de réduire la charpie.
■ Avez-vous versé le détergent dans le distributeur?
Pour des résultats optimaux, utiliser le distributeur pour
dissoudre le détergent.
La charge est froissée, entortillée ou enchevêtrée
■ Avez-vous déchargé la laveuse immédiatement?
Decharger la laveuse dès qu'elle s'arrête.
■ Avez-vous utilisé le bon programme pour la charge à
laver?
Pour réduire le froissement, l'entortillement et
l'enchevêtrement, sélectionner un programme avec vitesses
de lavage et d'essorage basses, tels que les programmes
Delicate (articles délicats) ou Hand Wash/Wool (lavage à la
main/lainages).
■ Avez-vous surchargé la laveuse?
La charge de lavage doit être équilibrée et pas surchargée.
Les charges doivent pouvoir se déplacer librement durant le
lavage pour réduire le froissement, l'entortillement et
l'enchevêtrement.
■ L'eau de lavage était-elle suffisamment chaude pour
réduire le froissement?
Si c'est sans danger pour la charge, utiliser une eau de lavage
tiède ou chaude. Utiliser une eau de rinçage froide.
■ Les robinets d'eau chaude et froide ont-ils été inversés?
Un rinçage à l'eau chaude suivi d'un essorage provoquera un
froissement. Vérifier que les tuyaux d'eau chaude et d'eau
froide sont connectés aux bons robinets. Si les robinets d'eau
chaude et d'eau froide ont été inversés, la laveuse affiche un
code d'erreur “HC” à la fin du programme. Si aucun code
d'erreur n'apparaît mais que la performance de lavage n'est
pas satisfaisante, vérifier que les tuyaux d'arrivée d'eau ne
sont pas inversés. Voir “Raccordement des tuyaux
d'alimentation” dans les Instructions d'installation.
Taches, blancs grisâtres, couleurs défraîchies
■ Avez-vous bien trié la charge?
Le transfert de teinture peut se produire lors du mélange
d'articles blancs et de couleur dans une même charge.
Séparer les articles de teinte foncée des articles blancs ou
clairs.
■ La température de lavage était-elle trop basse?
Utiliser les lavages à l'eau tiède ou chaude si celle-ci est sans
danger pour la charge. S'assurer que le système d'eau
chaude est adéquat pour fournir un lavage à l'eau chaude.
■ Avez-vous utilisé suffisamment de détergent, ou avez-
vous une eau dure?
Utiliser plus de détergent pour laver la saleté intense à l'eau
froide ou dure. La température de l'eau doit être d'au moins
60°F (15,6°C) pour que le détergent se dissolve et fonctionne
correctement. Pour des résultats optimaux, utiliser les
quantités recommandées par le fabricant de détergent.
■ Avez-vous suivi les directives du fabricant pour l'ajout de
détergent et d'assouplissant?
Mesurer la quantité de détergent et d'assouplissant de tissu.
Utiliser suffisamment de détergent pour enlever la saleté et la
maintenir en suspension. Diluer l'assouplissant et l'ajouter
seulement à la section de rinçage d'un programme. Ne pas
laisser couler d'assouplissant de tissu sur les vêtements.
29
Page 30

■ La présence de fer (rouille) dans l'eau est-elle supérieure à
la moyenne?
Vous aurez peut-être besoin d'installer un filtre à fer.
■ Avez-vous versé le détergent dans le distributeur?
Pour des résultats optimaux, utiliser le distributeur pour
dissoudre le détergent.
■ Avez-vous versé l'assouplissant de tissu directement sur
à charge?
Utiliser le distributeur d'assouplissant de tissu. Ne pas laisser
couler d'assouplissant de tissu sur les vêtements.
■ Avez-vous utilisé une boule distributrice d'assouplissant
de tissu?
Utiliser le distributeur d'assouplissant de tissu fourni avec la
laveuse. Les boules distributrices ne fonctionnent pas
correctement avec cette laveuse.
■ Avez-vous déchargé la laveuse immédiatement?
Pour éviter le transfert de teinture, décharger la laveuse dès
qu'elle s'arrête.
■ Avez-vous versé le détergent, l'agent de blanchiment au
chlore liquide ou l'assouplissant de tissu trop tard dans le
programme?
Le détergent, l'agent de blanchiment au chlore et
l'assouplissant de tissu doivent être ajoutés aux distributeurs
avant la mise en marche de la laveuse.
Endommagement des vêtements
■ Les articles pointus ont-ils été retirés des poches avant le
lavage?
Vider les poches, fermer les fermetures à glissière, les boutons
pression et les agrafes avant le lavage pour éviter d'accrocher
et de déchirer la charge.
■ Les cordons et les ceintures ont-ils été attachés pour
éviter l'enchevêtrement?
Les bretelles et les cordons peuvent facilement s'emmêler
dans la charge, ce qui cause une déformation des coutures et
des déchirements.
■ Les articles étaient-ils endommagés avant le lavage?
Raccommoder les déchirures et repriser les fils cassés des
coutures avant le lavage.
■ Avez-vous surchargé la laveuse?
La charge de lavage doit être équilibrée et pas surchargée.
Les charges doivent pouvoir culbuter librement durant le
lavage.
■ Avez-vous versé l'agent de blanchiment au chlore
correctement?
Ne pas verser l'agent de blanchiment au chlore directement
sur la charge. Essuyer tous les renversements d'agent de
blanchiment. Un agent de blanchiment non dilué
endommagera les tissus. Ne pas placer des articles de la
charge sur le dessus du distributeur d'agent de blanchiment
lorsque vous chargez et déchargez la laveuse (sur certains
modèles). Ne pas utiliser plus que la quantité recommandée
par le fabricant pour une charge complète.
■ Avez-vous suivi les instructions d'entretien du fabricant
indiquées sur l'étiquette du vêtement?
30
Page 31

GARANTIE DES APPAREILS DE BUANDERIE DE
WHIRLPOOL
GARANTIE LIMITÉE
Pendant un an à compter de la date d'achat, lorsque ce gros appareil ménager est utilisé et entretenu conformément aux instructions
jointes à ou fournies avec le produit, Whirlpool Corporation ou Whirlpool Canada LP (ci-après désignées “Whirlpool”) paiera pour les
pièces spécifiées par l'usine et la main-d'œuvre pour corriger les vices de matériaux ou de fabrication qui existaient déjà lorsque ce
gros appareil ménager a été acheté. Le service doit être fourni par une compagnie de service désignée par Whirlpool. LE SEUL ET
EXCLUSIF RECOURS DU CLIENT DANS LE CADRE DE LA PRÉSENTE GARANTIE LIMITÉE CONSISTE EN LA RÉPARATION PRÉVUE
CI-DESSUS. Cette garantie limitée est valide uniquement aux États-Unis ou au Canada et s’applique exclusivement lorsque le gros
appareil ménager est utilisé dans le pays où il a été acheté. Une preuve de la date d'achat d'origine est exigée pour obtenir un service
dans le cadre de la présente garantie limitée.
ÉLÉMENTS EXCLUS DE LA GARANTIE
La présente garantie limitée ne couvre pas :
1. Les pièces de rechange ou la main d'œuvre lorsque ce gros appareil ménager est utilisé à des fins autres que l'usage unifamilial
normal ou lorsque les instructions d'installation et/ou les instructions de l'opérateur ou de l'utilisateur fournies ne sont pas
respectées.
2. Les visites de service pour rectifier l'installation du gros appareil ménager, montrer à l'utilisateur comment utiliser l'appareil,
remplacer ou réparer des fusibles ou rectifier le câblage ou la plomberie du domicile.
3. Les visites de service pour réparer ou remplacer les ampoules électriques, les filtres à air ou les filtres à eau de l'appareil. Les pièces
consomptibles ne sont pas couvertes par la garantie.
4. Les dommages imputables à : accident, modification, usage impropre ou abusif, incendie, inondation, actes de Dieu, installation
fautive ou installation non conforme aux codes d'électricité ou de plomberie, ou l'utilisation de produits non approuvés par
Whirlpool.
5. Les défauts apparents, notamment les éraflures, les bosses, fissures ou tout autre dommage au fini du gros appareil ménager, à
moins que ces dommages soient dus à des vices de matériaux ou de fabrication et soient signalés à Whirlpool dans les 30 jours
suivant la date d'achat.
6. L'enlèvement et la livraison. Ce gros appareil ménager est conçu pour être réparé à domicile.
7. Les réparations aux pièces ou systèmes résultant d'une modification non autorisée faite à l'appareil.
8. Les frais de déplacement et de transport pour le service d'un produit si votre gros appareil ménager est situé dans une région
éloignée où un service d'entretien Whirlpool autorisé n'est pas disponible.
9. La dépose et la réinstallation de votre gros appareil ménager si celui-ci est installé dans un endroit inaccessible ou n'est pas installé
conformément aux instructions d'installation fournies par Whirlpool.
10. Les pièces de rechange ou la main-d'oeuvre pour les gros appareils ménagers dont les numéros de série et de modèle originaux
ont été enlevés, modifiés ou qui ne peuvent pas être facilement identifiés.
CORPORATION
CLAUSE D'EXONÉRATION DE RESPONSABILITÉ AU TITRE DES GARANTIES IMPLICITES
LES GARANTIES IMPLICITES, Y COMPRIS LES GARANTIES APPLICABLES DE QUALITÉ MARCHANDE OU D'APTITUDE À UN
USAGE PARTICULIER, SONT LIMITÉES À UN AN OU À LA PLUS COURTE PÉRIODE AUTORISÉE PAR LA LOI. Certains États et
certaines provinces ne permettent pas de limitation sur la durée de garanties implicites de qualité marchande ou d'aptitude à un usage
particulier, de sorte que la limitation ci-dessus peut ne pas être applicable dans votre cas. Cette garantie vous confère des droits
juridiques spécifiques, et vous pouvez également jouir d'autres droits qui peuvent varier d'une juridiction à l'autre.
LIMITATION DES RECOURS, EXCLUSION DES DOMMAGES FORTUITS OU INDIRECTS
LE SEUL ET EXCLUSIF RECOURS DU CLIENT DANS LE CADRE DE LA PRÉSENTE GARANTIE LIMITÉE CONSISTE EN LA
RÉPARATION PRÉVUE CI-DESSUS. WHIRLPOOL N'ASSUME AUCUNE RESPONSABILITÉ POUR LES DOMMAGES FORTUITS OU
INDIRECTS. Certains États et certaines provinces ne permettent pas l'exclusion ou la limitation des dommages fortuits ou indirects de
sorte que ces limitations et exclusions peuvent ne pas être applicables dans votre cas. Cette garantie vous confère des droits juridiques
spécifiques, et vous pouvez également jouir d'autres droits qui peuvent varier d'une juridiction à l'autre.
Si vous résidez à l'extérieur du Canada et des 50 États des États-Unis, contactez votre marchand Whirlpool autorisé pour déterminer si une autre garantie s'applique.
Si vous avez besoin d'un service de réparation, voir d'abord la section “Dépannage” du Guide d'utilisation et d'entretien. Si vous n'êtes
pas en mesure de résoudre le problème après avoir consulté la section “Dépannage”, vous pouvez trouver de l'aide supplémentaire en
consultant la section “Assistance ou Service” ou en appelant Whirlpool. Aux É.U., composer le 1-800-253-1301. Au Canada,
composer le 18008076777.
Conservez ce manuel et votre reçu de vente ensemble pour
référence ultérieure. Pour le service sous garantie, vous
devez présenter un document prouvant la date d'achat ou
d'installation.
Inscrivez les renseignements suivants au sujet de votre gros
appareil ménager pour mieux vous aider à obtenir assistance ou
service en cas de besoin. Vous devrez connaître le numéro de
modèle et le numéro de série au complet. Vous trouverez ces
renseignements sur la plaque signalétique située sur le produit.
7/08
Nom du marchand ______________________________________________
Adresse ________________________________________________________
Numéro de téléphone ___________________________________________
Numéro de modèle______________________________________________
Numéro de série ________________________________________________
Date d’achat____________________________________________________
31
Page 32

W10240442A
W10240443A - SP
© 2008 Whirlpool Corporation.
All rights reserved.
Tous droits réservés.
® Registered Trademark/TM Trademark of Whirlpool, U.S.A., Whirlpool Canada LP Licensee in Canada
® Marque déposée/TM Marque de commerce de Whirlpool, U.S.A., emploi sous licence par Whirlpool Canada LP au Canada
Printed in U.S.A.
Imprimé aux É.-U.
12/08
 Loading...