

Page 1

use&care guide
AVhmpool
TU 4100 Series ' TF 4600 Series
(built-in model) and (free standing model)
(shown)
COMPACTORS
TU 8100 Series
(built-in model)
Page 2

Contents
Page
Safety First...............................................
Installation Safety
Before You Use Your Compactor.. .... 2
Parts and Features..................................
Using Your Compactor........................... .... 4
How the compactor works.................
...................................
... . 2
.... 2
.... 3
.... 5
Removing a filled bag
Installing a new bag
Caring for Your Compactor........................
Changing Your Compactor’s Colour..
If You Need Service or Assistance....
Warranty for Your Waste Compactor..
...........................
.............................
Safety First
Read all instructions before using your compactor.
CAUTION: Do not let children operate or play with your compactor. Anything placed in the unit
will be crushed or compacted.
Keep the compactor locked when it’s not in use. Remove the key-knob to a safe place.
WARNING: Always place glass bottles, etc., on their sides in the center of the drawer so the
wastepaper below and beside the bottle can help keep broken glass near the center of the bag,
away from the sides. Never lift the bag by the sides. Broken giass or other sharp objects in the
bag can cause injury.
Always carry a filled compactor bag by the folded top or a bag carrier. Watch out for glass that
may have cut through the bag sides.
Always use the compactor only for the job it was designed to do.
Do not use the compactor as a counter for electrical cooking appliances nor as a cutting board.
Do not set hot pans, etc., on the compactor top.
Do not spill any liquids on compactor top.
WARNING: Always wipe off any broken giass before touching the ram cover.
Do not shove items down into the compactor with hands or feet. To avoid being cut, let the
compactor do the compacting.
WARNING: Do not compact any container or material which might contain poisonous or
explosive products.
WARNING: Do not compact cioths or cans containing paint iiquids, thinners, etc. which
could create a fire hazard.
Page
.. 6
.. 7
.. 8
.. 10
.. 11
. . 12
instaliation Safety
OBSERVE ALL GOVERNING ELECTRICAL CODES AND ORDINANCES.
Be sure your compactor is electrically grounded in an approved manner.
Do not remove the power supply cord ground prong.
Do not use an extension cord.
• Use care when leveling your compactor, so that the unit does not drop on your hand.
• Use care when changing front panels As with any cut metal edges, they could cause
injury if handled carelessly.
• Never operate the compactor when the drawer handle is removed.
• Be sure your compactor is properly installed in an appropriate level area and a place
suitable for the size, function and protection of the compactor.
• SEE INSTALLATION INSTRUCTIONS FOR COMPLETE DETAIL.
Before You Use Your Compacfor
It is your responsibility and obligation to be sure your compactor:
• Has been installed where it is protected from the elements.
• Has been installed on a floor strong enough to support its weight
• Is properly maintained.
• Has not been installed where flammable materials are stored or used Fumes from these
^ materials may result in a fire or explosion.
Page 3
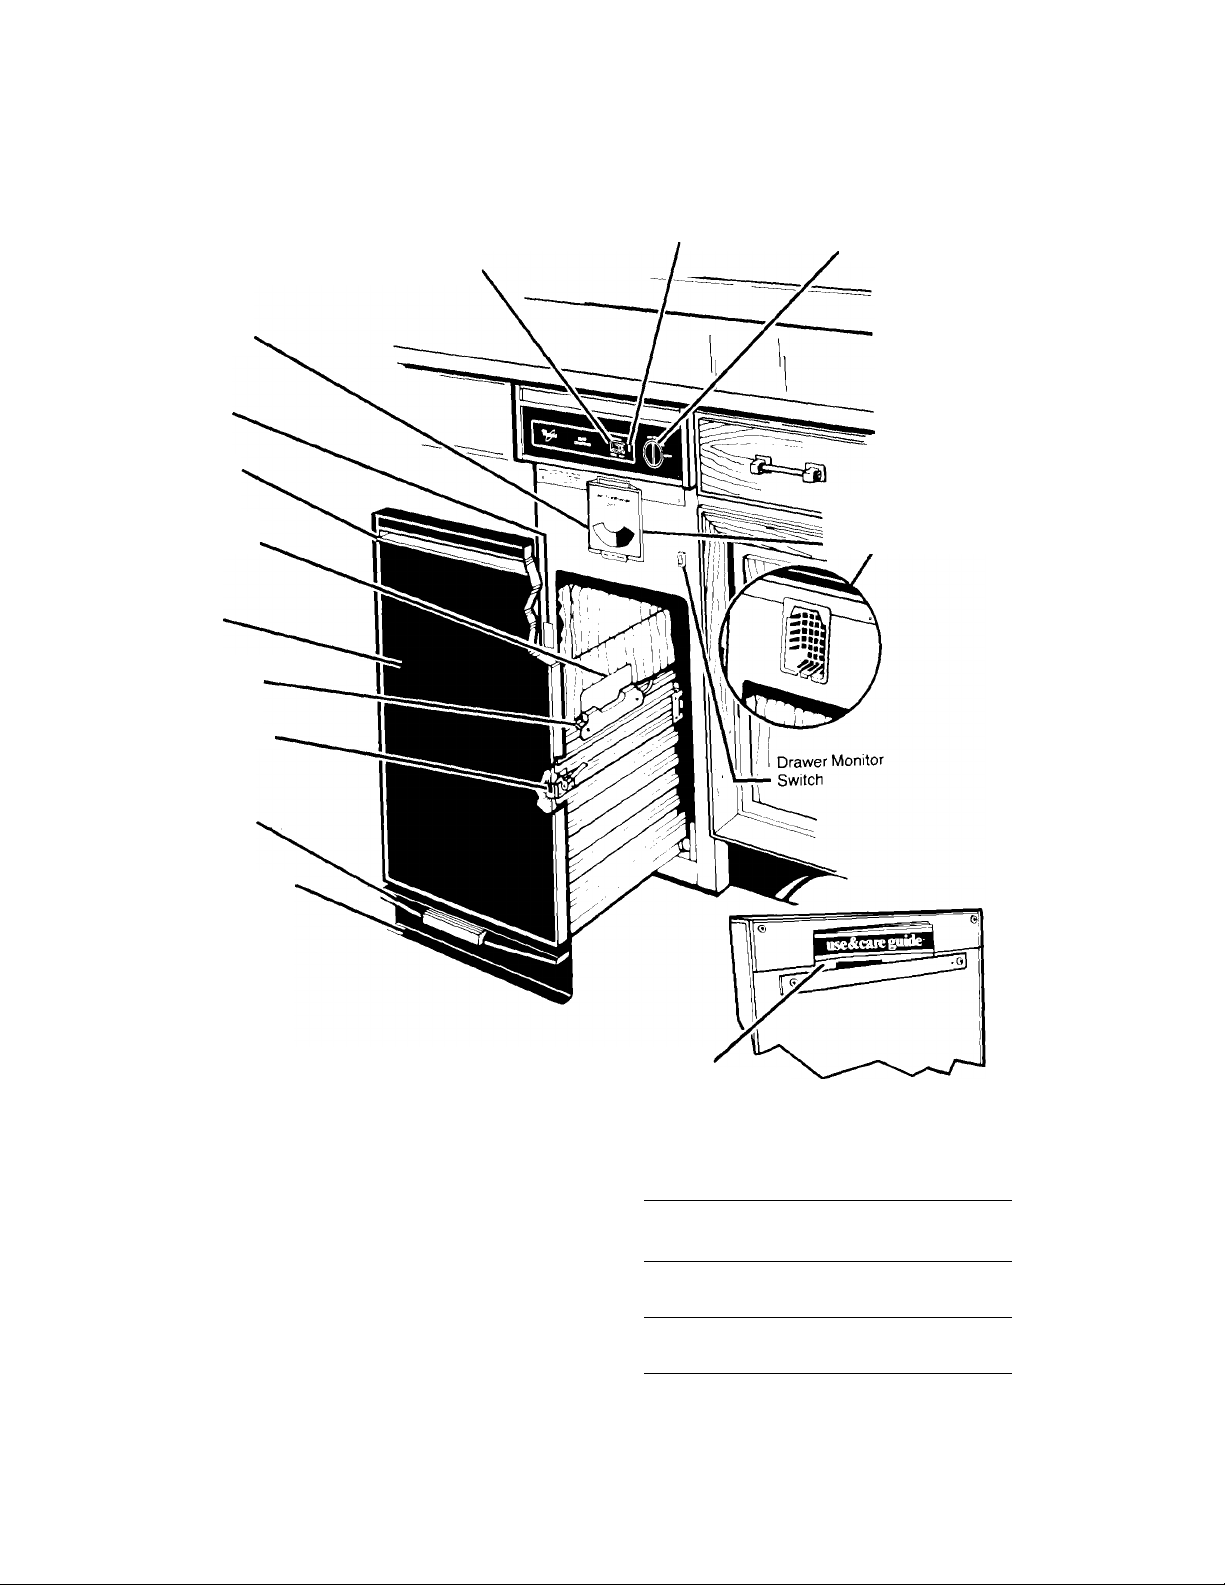
Compactor
TF/TU Model Series
Air Freshener
Compartment
(TU 8100 Series)
Model-Serial
Number Plate
Drawer Handle
Cycle Selector
(TU 8100 Series)
Dense Pack
Indicator Light
(TU 8100 Series)
Key-Knob
Start-Off Switch
Bag Retainers
(TU 8100 Senes)
Reversible
Front Panel
Bag Carrier Handle
(TU 8100 Series)
Lever-Action Lock
“Touch-Toe Bar”
Drawer Opener
Adjustable Toe Plate
Air Freshener
Compartment
(TF 4600/TU4100 Series)
Literature Storage
(inside door behind handle)
(TU 8100 Series)
Copy your Modol snd SorisI Numbors here
When you need service or call with a question, have
this information ready:
1. Complete Model and Serial Numbers (from the
plate located as shown).
2. Purchase date from sales slip.
Copy this information in these spaces. Keep this
book, your warranty and sales slip together in a handy
place.
There is no warranty card to be returned.
Model Number
Serial Number
Purchase Date
Service Company Telephone Number
Page 4

Using Your Compactor
1. Open the drawer.
Lift and pull the handle or press the
Touch-Toe Bar to open the drawer.
2. Put in the trash.
• Load almost any kind of trash.
• Wrap or cover wet or messy trash.
• Load bottles or cans on their sides in the center of the drawer.
DANGER: DO NOT compact
• Any container or aerosol cans which might contain insecticide, hair spray,
engine starting fluid or any other poisonous or explosive products.
• Cloths or cans containing paint liquids, thinners, etc. which would create a
fire hazard.
• Items that may develop offensive odors such as raw meat, fish, grapefruit
rinds, disposable diapers, or personal hygiene items.
NOTE: Your Compactor is designed for household use only.
3. Close the drawer; position cycle selector to
NORMAL (TU 8100 Series only); turn the key-knob
to START; let the knob go.
• The compactor will stop at the end of the cycle.
• To remove the key-knob, turn it to LOCK/OFF. Remove and store in a
safe place out of children's reach.
• To stop the compactor during a cycle, turn the key-knob to LOCK/OFF.
Then turn it to ON. The compacting ram will rise. When it stops rising, you
can open the drawer.
The DENSE PACK cycle
(TU 8100 Series only)
The DENSE PACK Cycle is a convenience feature that allows you to use
fewer bags by extending the use of a bag. This cycle puts constant pres
sure on trash to keep it from springing back. Regular use of this feature can
increase bag capacity up to 20% NOTE: The cycle selector should be in
the NORMAL position when DENSE PACK-HEAVY setting is not being
used.
To use DENSE PACK Cycle:
• Move cycle selector from the NORMAL to HEAVY setting.
• Turn the key-knob to START and release.
• The ram will stay in the down position for extra compacting and the
DENSE PACK indicator light will come on. Remember, the drawer can
not be opened when ram is down and the DENSE PACK light is on.
• For best results, use DENSE PACK-HEAVY setting for at least one half
hour each time the cycle is used.
• To raise the ram, turn key-knob to START or move the cycle selector
back to the NORMAL position.
NOTE: Fully compacted trash bags will be heavier than normal.
Handle with care.
Page 5
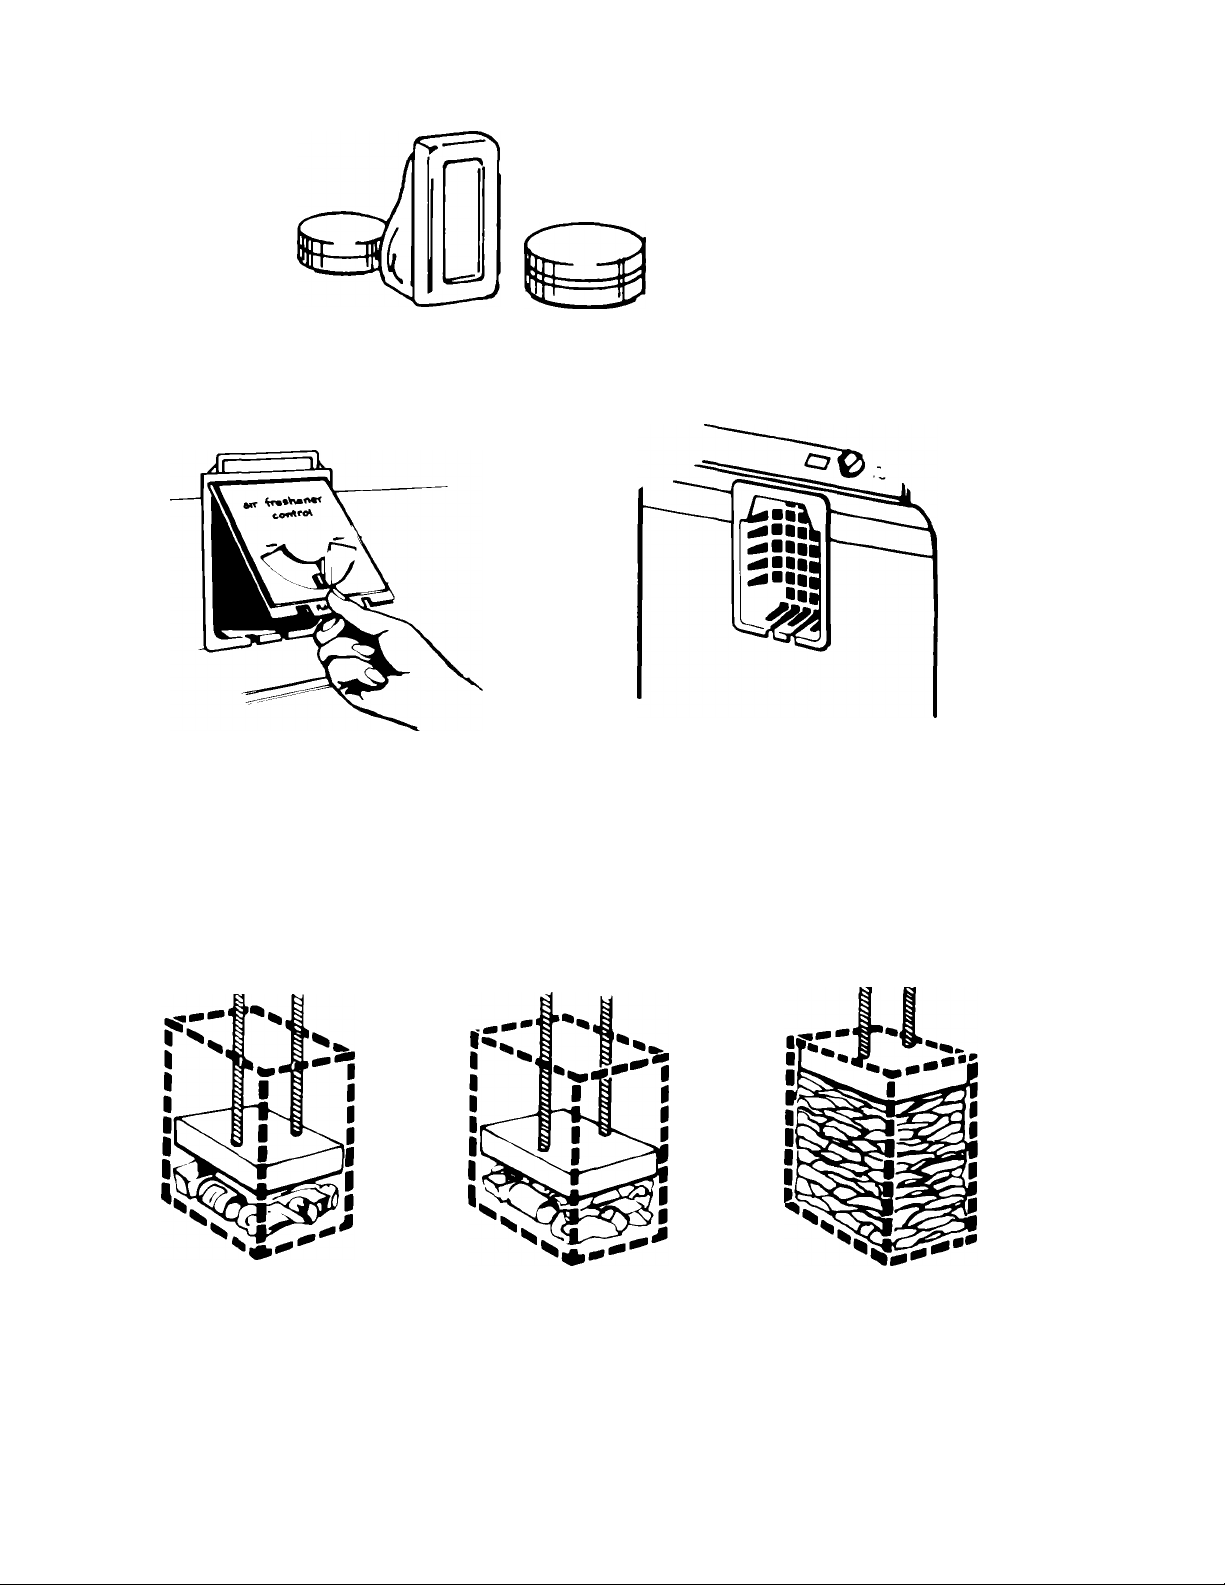
Air Fresheners
The Air Freshener Control is designed to help control odors that might develop in the trash.
There are many solid air fresheners available on the market.
TU 8100 Model Series
• Raise the door
• Put in solid air freshener
• Set dial to NORMAL
• Move to MAXimum or MINimum if needed
TF 4600/TU 4100 Model Series
• Put “adjustable" air freshener in compartment
• Adjust according to directions
• Check air freshener occasionally, it should last
4 to 6 weeks
How the compactor works (in NORMAL Cycle)
The compacting ram does not go to
the drawer bottom. You will not see
compacting of the first few loadings.
Compaction starts after the drawer is The trash m a full compactor bag will
about '/3 full. You may hear a noise be about ' < the size of its original
when glass breaks. Strong glass bulk,
bottles may not break at all.
Bottles or cans not placed in center may become caught between the ram and the drawer. The
Drawer Monitor Switch senses a "misload," and will cause the ram to return to the 'up" position
without compacting. Load bulky trash, bottles and cans in the center of the drawer.
Page 6
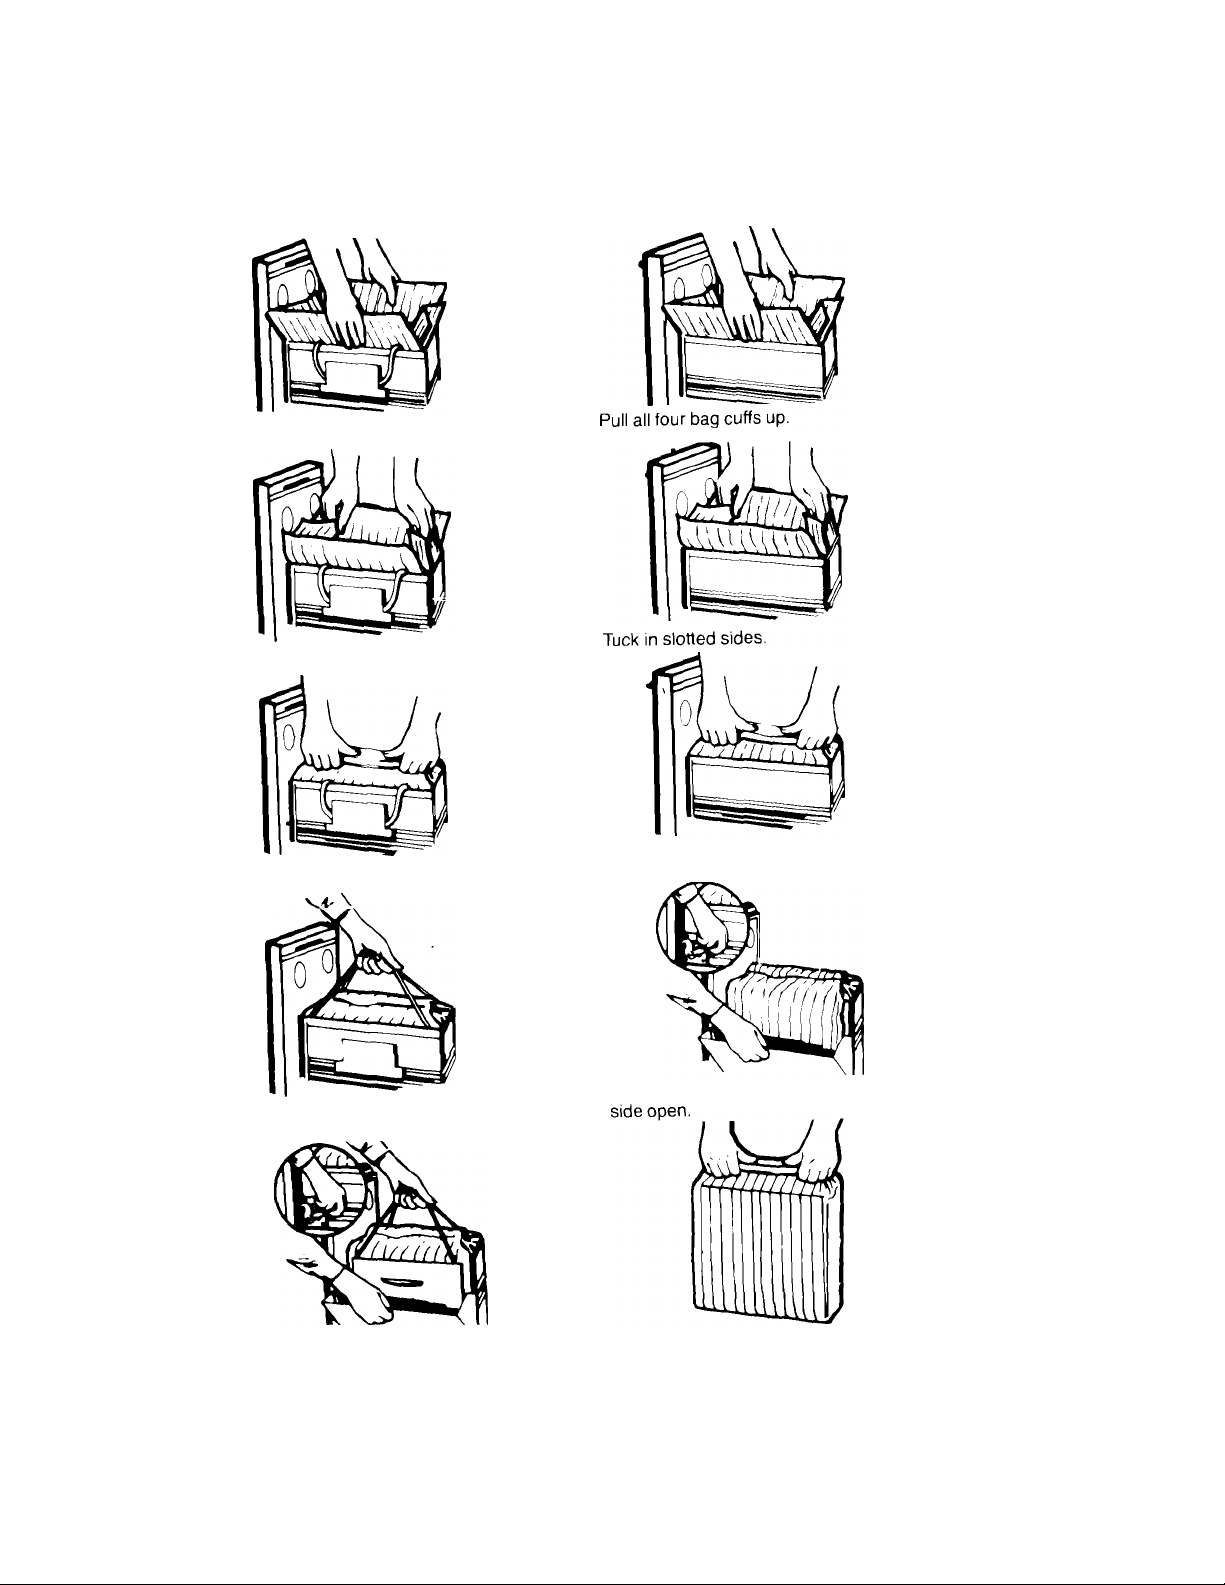
Removing a filled bag
TU 8100 Model Series
Pull all four bag cuffs up.
Tuck in slotted sides.
TF 4600/TU 4100 Model Series
Bring top edges together and roll or fold to
close bag.
Remove bag carrier handles from side
retainers and hold.
Push side-lock latch down and lilt drawer
side open.
WARNING: To avoid personal injury
from broken glass sticking through
the bag, use bag carrier to carefully
remove and carry the bag.
6
Bring top edges together and fold to close
bag.
Push side-lock lever down and till drawer
Using both hands on the fold, remove
the bag.
WARNING: To avoid personal injury
from broken glass sticking through
the bag carefully remove and carry the
filled bag only by the folded top.
Page 7
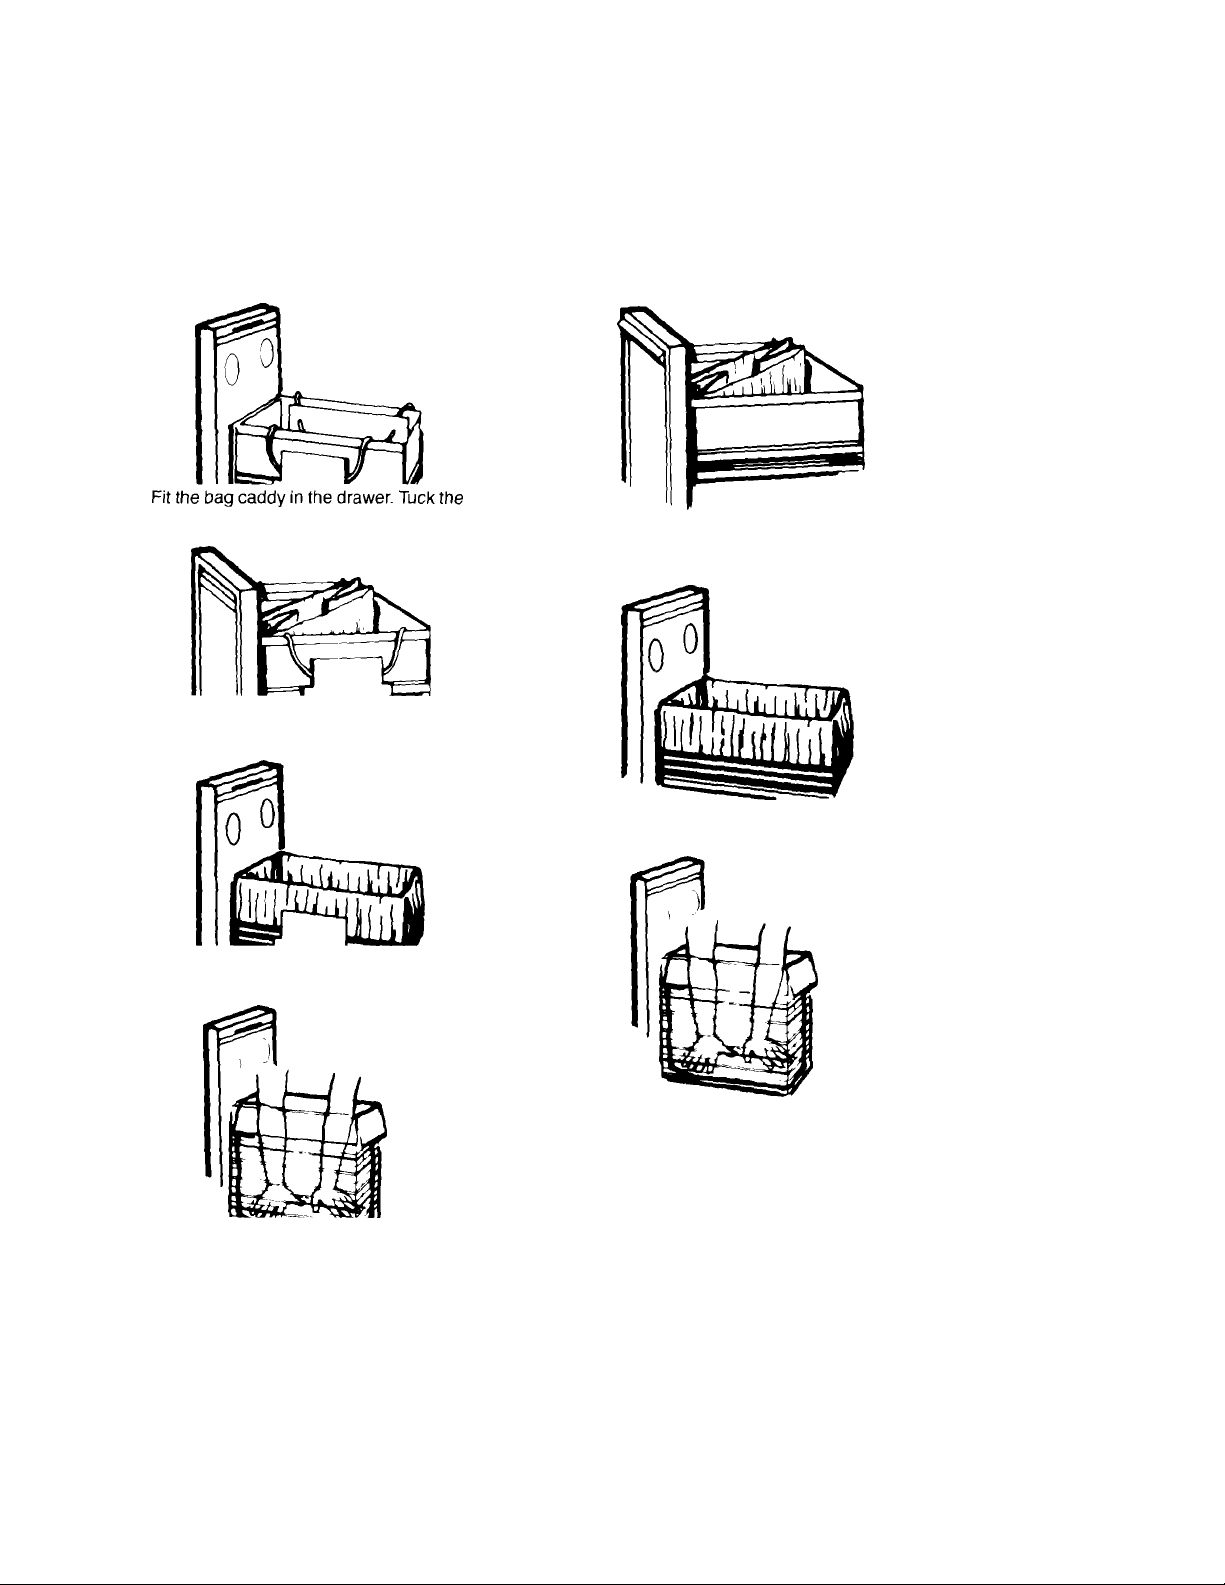
Installing a new bag
Before installing a new bag, be sure;
1. The drawer side is securely locked.
2. The container is clean and free of sharp
debris that may have punctured the bag.
TU 8100 Model Series
TF 4600/TU 4100 Model Series
rope handles behind the bag retainers as
shown.
Put unopened bag in drawer as shown.
Spread front bag corners and slide cuff
over right-front corner.
Spread rear bag corners and slide cuff
over left rear corner. Tuck cuffs behind bag
retainers as shown.
Put unopened bag in drawer as shown.
Spread front bag corners and slide cuff
over right-front corner.
Spread rear bag corners and slide cuff
over left-rear corner.
Press inside of bag against drawer
bottom, sides and corners for smooth fit.
Press inside of bag against drawer
bottom, sides and corners for smooth fit.
DO NOT USE ANY KIND OF BAG
OTHER THAN THOSE DESIGNED
ESPECIALLY FOR USE IN YOUR
COMPACTOR.
Compactor bags may be purchased
from the dealer from whom you purchased
your appliance, your Inglis Factory Direct
Service Branch, or the nearest Inglisauthorized service organization. Ask for
part no. 675186.
Page 8
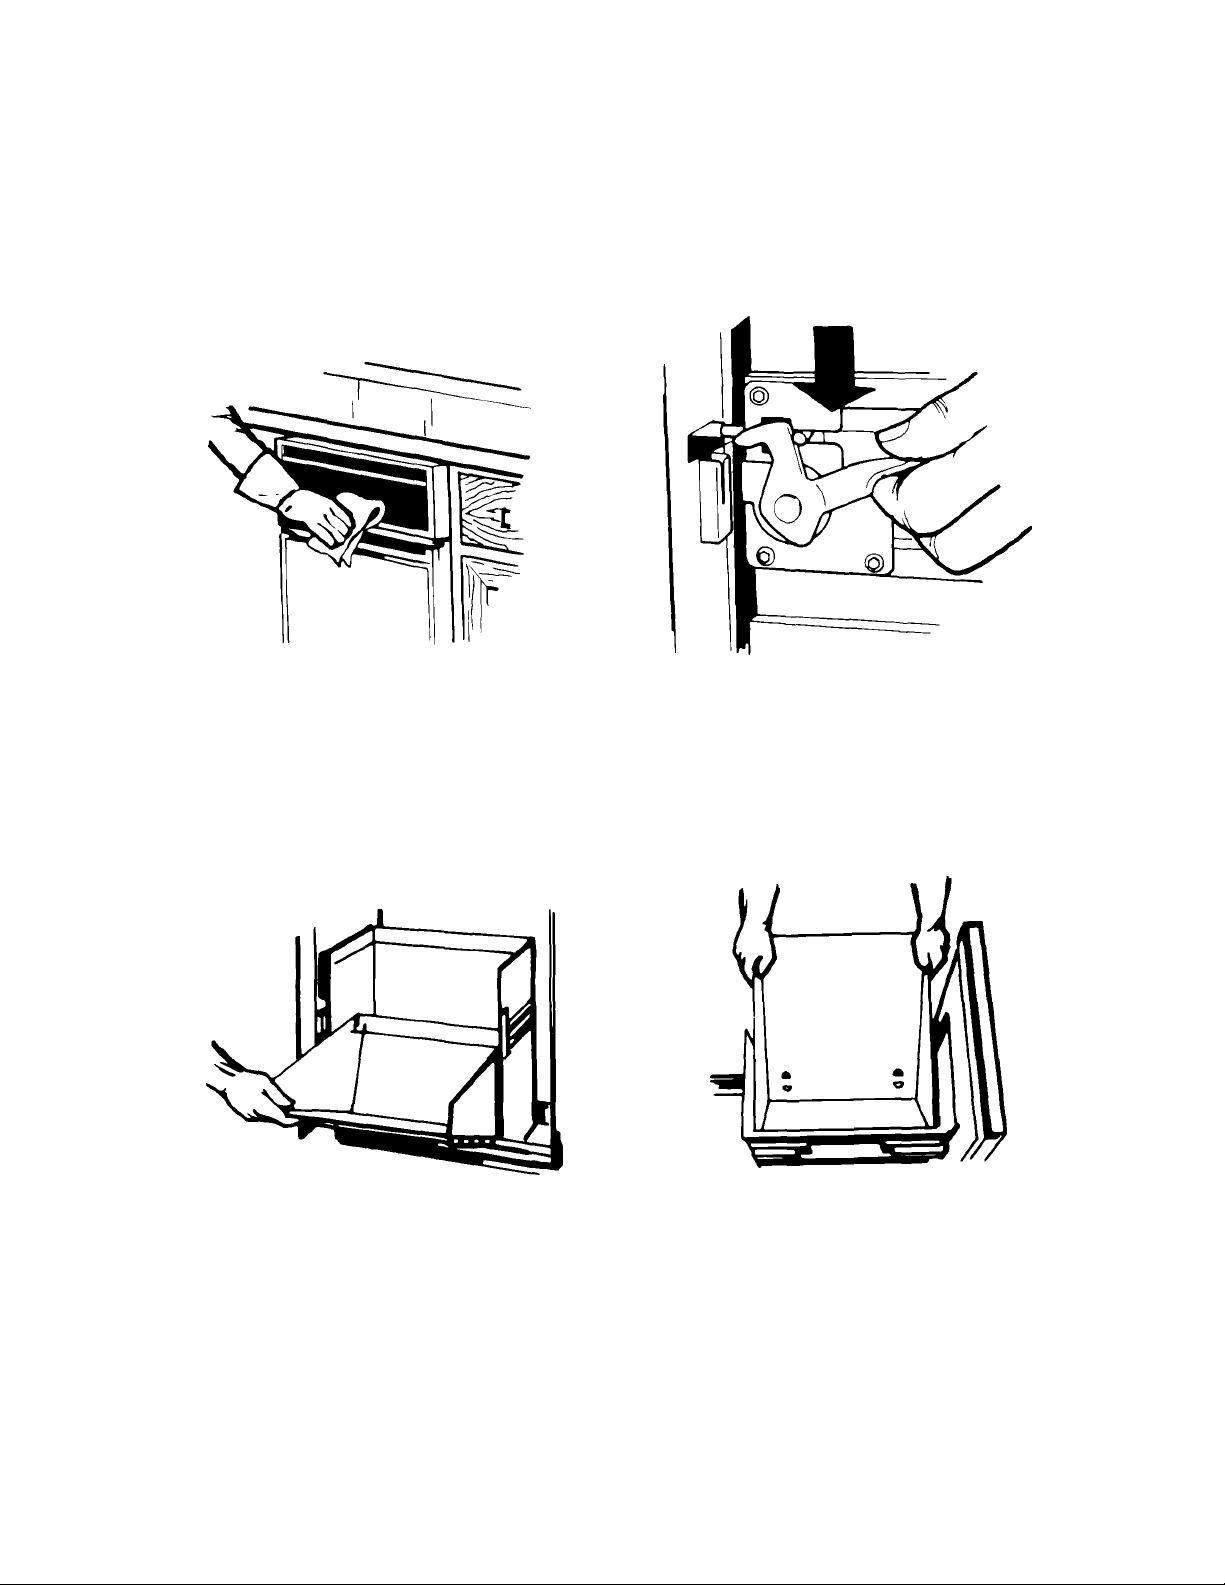
Caring for Your Compactor
As is true of most appliances, proper care is needed to give you continued satisfaction.
Before cleaning the compactor, turn the key knob to the OFF position and remove.
Clean exterior surfaces
• Wipe with warm, sudsy water and a damp
cloth. Rinse. Dry with a soft cloth.
• Wipe up spills right away. Some foods can mar
the finish if left on the compactor surface.
Clean inside the drawer
WARNING: To avoid personal injury from
broken glass in the drawer, wear rubber
gloves when cleaning.
• Wash with a damp cloth using warm, sudsy
water. Rinse. Dry with a soft cloth.
Tilt the drawer side open
• Press side-lock latch down.
• Hold latch and tilt side of drawer until the latch
clears the drawer front.
Removing and replacing the drawer side
• To remove the drawer side, tilt it out. Then lift
it out.
• To replace it, slide it back, tilted. Press the latch
down while pushing the side to upright position.
• Lock the latch.
If you will be away for more than a couple of days, remove the compactor bag.
Lock the compactor and remove the key-knob. Store the key-knob in a safe place.
Page 9
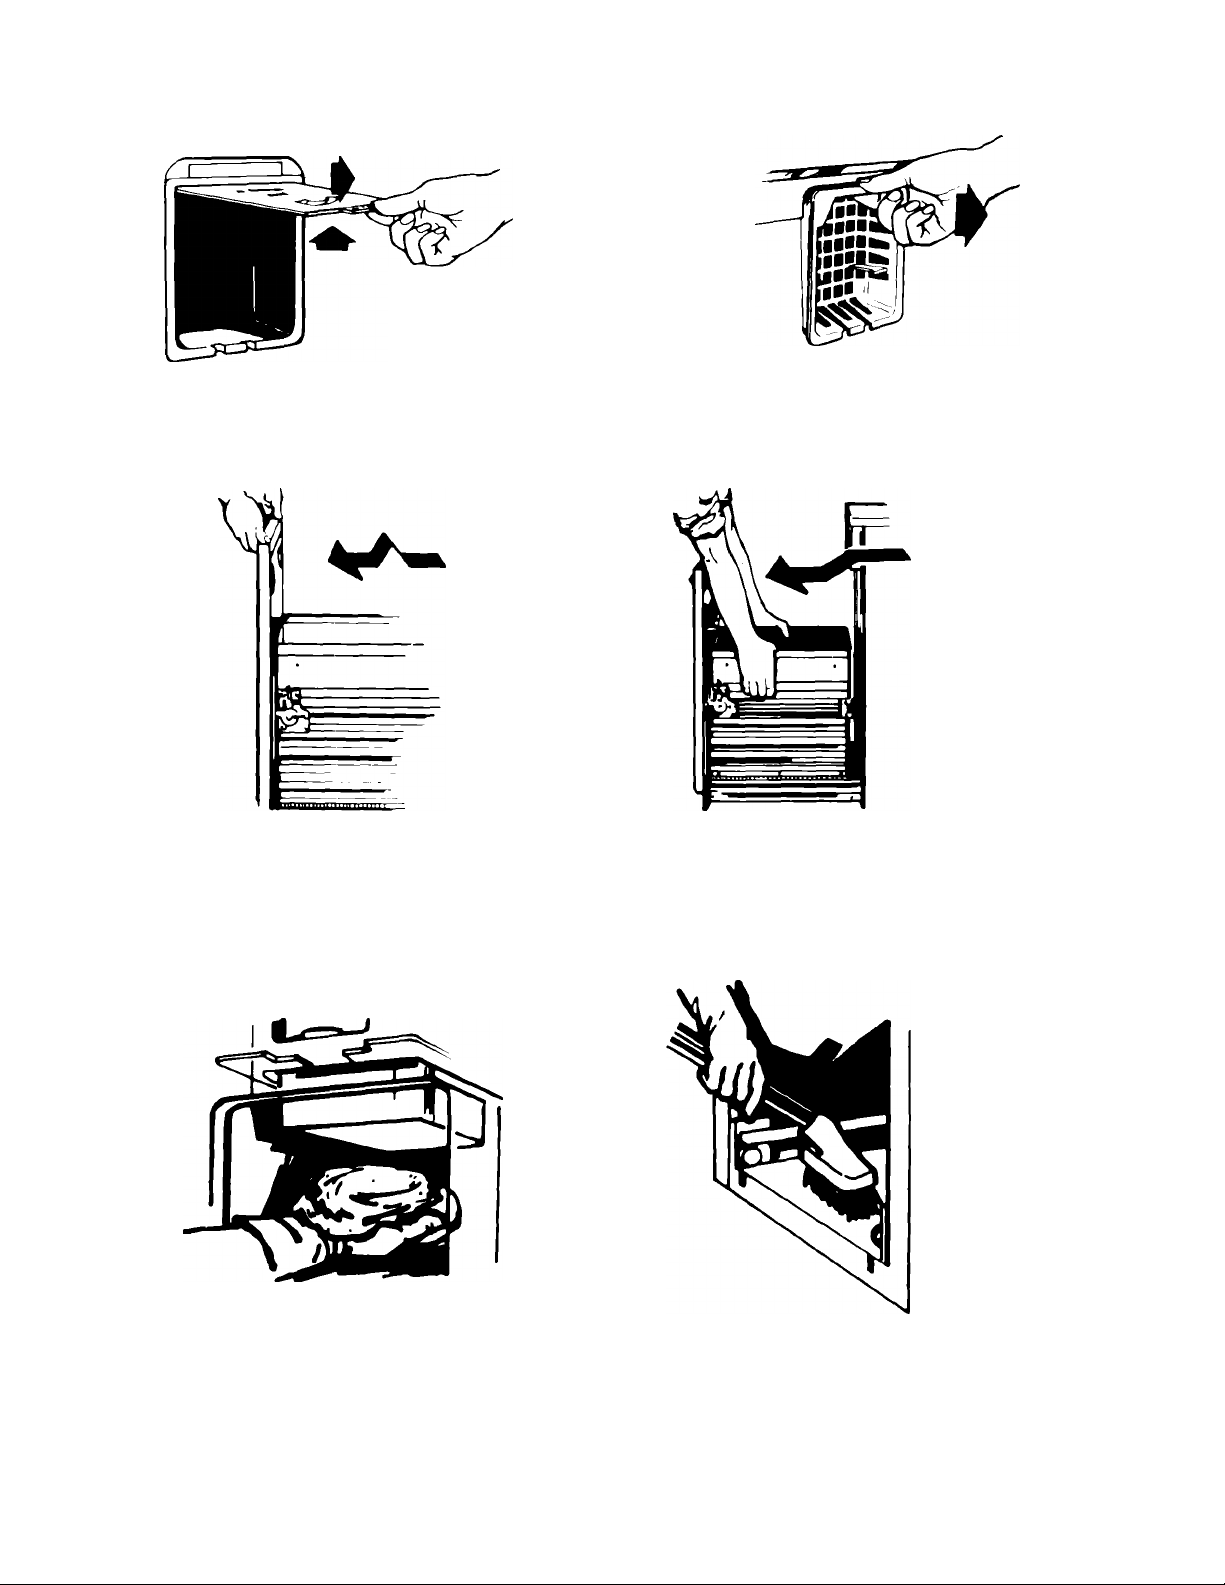
To remove and replace the air freshener compartment for cleaning
• To remove it, lift cover and pull.
• To replace it, set in the bottom first.
Then snap it at the top.
(TU 8100 Model Series) (TF 4600/TU 4100 Model Series)
To clean inside the cabinet, remove the drawer
• Pull the drawer out until it stops.
• Note the tracks in which the drawer rollers
move.
• Lift the front to clear the drawer stops.
Wipe off the ram cover
WARNING: To avoid personal injury from
broken glass on the ram cover, wear rubber
gloves.
• Wipe glass particles off ram cover with a cloth
or paper towels.
• Use warm sudsy water to remove foods. Rinse.
Dry with soft cloth.
• Grasp the drawer on the sides.
• Pull it out the rest of the way.
• Set it down gently.
Clean inside the cabinet
• WEAR RUBBER GLOVES.
• Vacuum inside of cabinet. Liquid spills or wet
trash should be cleaned up by hand, or use
a vacuum designed to pick up liquids.
• Wash, rinse and dry inside. 9
• Replace drawer.
Page 10
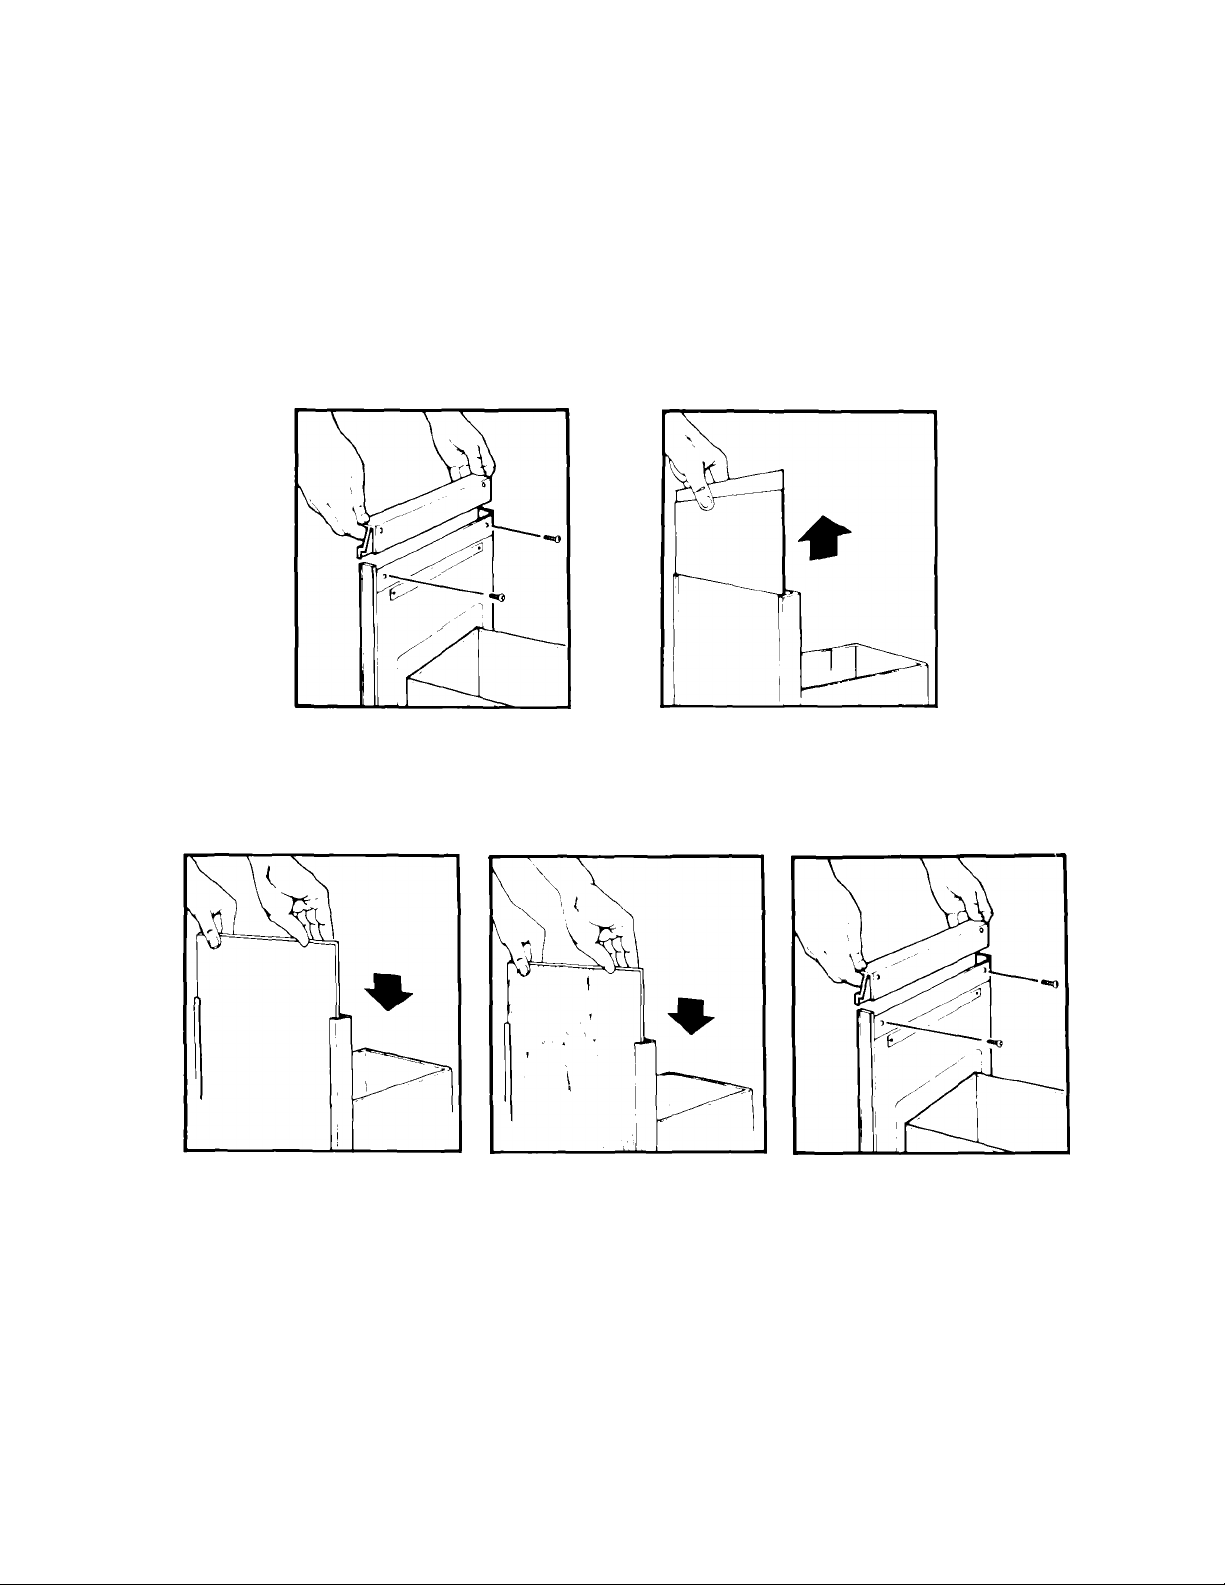
Changing Your Compactor’s Colour
The colour panel on the front of your compactor's drawer reverses to another colour.
To change the colour of your compactor’s front panel, follow the directions below. All you
need is a medium-sized screwdriver.
• Slide drawer out.
• Remove two screws shown.
• Remove handle.
• Make sure panel is all the way
down.
• Be sure to replace cardboard
spacer in its former position.
• Replace handle and screws.
• Be careful - edges may be sharp.
• Remove colour panel and reverse.
Option; Match your kitchen’s
colour scheme by replacing
colour panel with your own
creation (wallpaper, panelling).
See Installation Instructions.
• WARNING: REPLACE HANDLE
BEFORE OPERATING COM
PACTOR TO AVOID INJURY
FROM MOVING PARTS.
• Slide drawer back in.
10
Page 11

If You Need Service or Assistance We
Suggest You Follow These Steps:
1. Before calling for assistance...
Performance problems often result from little
things you can find and fix yourself without tools of
any kind.
If your compactor won't operate:
• Is the power cord plugged into a live circuit with the
proper voltage?
• Have you checked your home’s main fuses or cir
cuit breaker box?
• Is the drawer completely closed?
• Is the key-knob turned all the way to START before
it is released?
Drawer won’t open:
• Drawer will open only when ram is all the way up.
• To raise the ram, turn the key-knob to START and
release or move the DENSE PACK switch back to
NORMAL (TU 8100 Series only).
If trash is not compacting:
• Is the drawer loaded properly? If anything gets be
tween the ram and the drawer, the ram will return to
the “up” position without compacting.
• Drawer must be at least Vs full before compactor will
compact.
Not enough compaction or force:
• Compacting works best when only a few items are
loaded. Use the compacting cycle frequently.
DENSE PACK can be used on TU 8100 Series
compactors, see page 4.
Bottles don’t break:
• Not all bottles break every time, depending on
bottle and trash load below it.
2. If you need service...
It’s reassuring to know that Inglis Limited stands
behind your Whirlpool appliance with its network of
Branches and Service Depots. Service by Inglis is
designed to fulfill your Warranty and provide after
warranty service and maintenance to keep your new
Whirlpool appliance in top-notch condition, any
where in Canada. Inglis wants you to get the service
that you would expect on quality Whirlpool home
appliances.
To obtain service:
1. Contact the appliance dealer from whom you
purchased your appliance.
or
2. Contact your nearest Inglis Factory Direct Serv
ice Branch, listed in the Yellow Pages.
3. If you move...
To make sure that your Whirlpool appliance is cor
rectly installed and to ensure its continued satisfac
tory operation, please telephone your nearest Inglis
Direct Factory Service Branch, or the nearest Serv
ice Organization authorized by Inglis to service
Whirlpool products. Normal service charges will
apply.
REMEMBER: Please include the complete model
and serial number of your appliance when requesting
service. Also, retain your sales slip and Warranty to
verify your Warranty status.
11
Page 12
WARRANTY FOR YOUR
WASTE COMPACTOR
During your first year after purchase, all parts of the appliance which prove to be defective in
materials or workmanship will be repaired or replaced free of charge (parts and labour).
For any home service beyond 32km (20 miles) from the nearest Company-authorized service
organization, there will be a charge for the cost of transportation and travelling expenses for the
excess distance.
Parts repaired or replaced under this warranty are warranted throughout the remainder of the
original warranty period only.
This protection covers your home use of the appliance. The same protection applies to any
subsequent owner during the applicable warranty period based on the original owner's purchase
date.
This warranty does not cover damage by accident, misuse, improper installation, fire, flood, or
acts of God.
This is the only warranty covering this appliance given by the manufacturer.
The provisions of this warranty are in addition to and not a modification of or subtraction from
the statutory warranties and other rights and remedies contained in any applicable legislation.
Part No. 4152836
Whirlpool
Distributed by: Inglis Limited,
1901 Minnesota Court, Mississauga,
Ontario L5N 3A7 Branches across Canada
Trademark In Canada, Used by Authority of
Canadian Trademark Owner,
WHIRLPOOL CORPORATION, U S A.
Printed in U.S.A.
 Loading...