

Page 1
Self-Cleaning
TM
Gas Ranges
A Note to You.............2
Range Safety ......... 3-5
Parts and Features .... 6
Using Your Range ...... 7
Using the Self-
Cleaning Cycle......... 21
Caring for Your
Range ...................... 24
Troubleshooting....... 30
Requesting
Assistance or
Service .....................32
TO THE INSTALLER: PLEASE LEAVE THIS INSTRUCTION
BOOK WITH THE UNIT.
TO THE CONSUMER: PLEASE READ AND KEEP THIS
BOOK FOR FUTURE REFERENCE.
4.65 Cubic Foot Oven
MODELS SF360BEE SF360PEE
PART NO. 3196290 Rev. B
Index ........................35
Warranty .................. 36
1-800-253-1301
Call our Consumer Assistance Center
with questions or comments.
Page 2
A NOTE TO YOU
Thank you for buying a WHIRLPOOL® appliance.
Because your life is getting busier and more complicated, WHIRLPOOL appliances are easy to use, save
time, and help you manage your home better. To
ensure that you enjoy years of trouble-free operation,
we developed this Use and Care Guide. It is full of
valuable information about how to operate and
maintain your appliance properly and safely. Please
read it carefully.
Also, complete and mail the Product Registration
Card provided with your appliance. The card helps
us notify you about any new information on
your appliance.
Please record your model’s information.
Whenever you call to request service for your appliance, you need to know your complete model number
and serial number. You can find this information on the
model and serial number label/plate (see the diagram
in the “Parts and Features” section). Also, record the
other information shown in the next column.
Look for these tips!
Look for these Time Smart Tips located
throughout your Use and Care Guide. They
will help you save time and make the most
of your new appliance.
Model Number __________________________________
Serial Number ___________________________________
Purchase Date __________________________________
Dealer Name ____________________________________
Dealer Address __________________________________
Dealer Phone ___________________________________
Keep this book and the sales slip together in a safe place for future reference.
Our Consumer Assistance Center number is toll free.
WARNING: If the information in this manual is not followed exactly, a fire or
explosion may result causing property damage, personal injury or death.
– Do not store or use gasoline or other flammable vapors and liquids in the vicinity
of this or any other appliance.
– WHAT TO DO IF YOU SMELL GAS
Do not try to light any appliance.
•
Do not touch any electrical switch; do not use any phone in your building.
•
Immediately call your gas supplier from a neighbor’s phone. Follow the gas
•
supplier’s instructions.
If you cannot reach your gas supplier, call the fire department.
•
1-800-253-1301
– Installation and service must be performed by a qualified installer, service
agency or the gas supplier.
2
Page 3
RANGE SAFETY
Your safety and the safety of others is very important.
We have provided many important safety messages in this manual and on your appliance. Always read and
obey all safety messages.
This is the safety alert symbol.
This symbol alerts you to hazards that can kill or hurt you and others.
All safety messages will be preceded by the safety alert symbol and the word “DANGER” or
“WARNING.” These words mean:
You will be killed or seriously injured if you don’t
wDANGER
wWARNING
All safety messages will identify the hazard, tell you how to reduce the chance of injury, and tell you what can
happen if the instructions are not followed.
follow instructions.
You can be killed or seriously injured if you don’t
follow instructions.
wWARNING
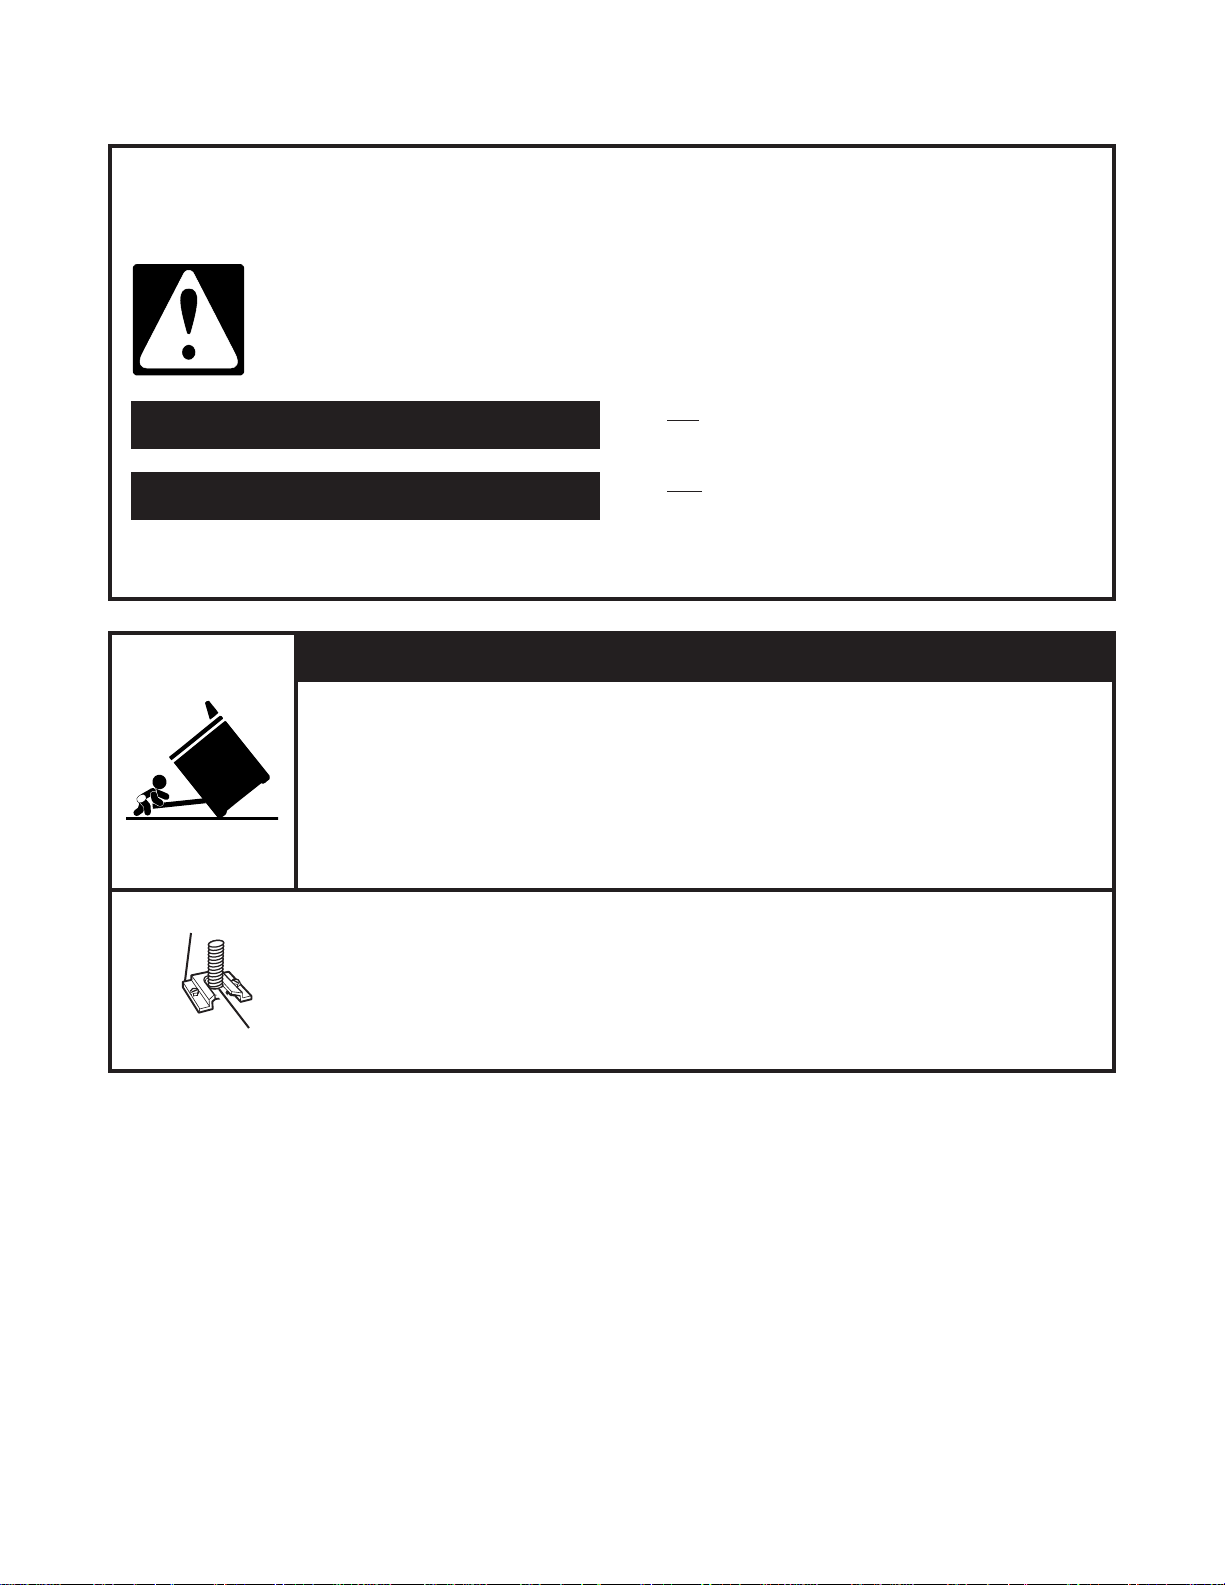
Anti-Tip Bracket
Range Foot
Tip Over Hazard
A child or adult can tip the range and be killed.
Connect anti-tip bracket to rear range foot.
Reconnect the anti-tip bracket, if the range is moved.
See the installation instructions for details.
Failure to follow these instructions can result in death or serious burns
to children and adults.
Making sure the anti-tip bracket is installed:
Slide range forward.
•
Look for the anti-tip bracket securely attached to floor.
•
Slide range back so rear range foot is under anti-tip bracket.
•
continued on next page
3
Page 4

RANGE SAFETY
IMPORTANT SAFETY INSTRUCTIONS
WARNING: To reduce the risk of fire, electrical
shock, injury to persons, or damage when using
the range, follow basic precautions, including the
following:
WARNING – TO REDUCE THE RISK OF
•
TIPPING OF THE RANGE, THE RANGE MUST
BE SECURED BY PROPERLY INSTALLED
ANTI-TIP DEVICES. TO CHECK IF THE DEVICES
ARE INSTALLED PROPERLY, SLIDE RANGE
FORWARD, LOOK FOR ANTI-TIP BRACKET
SECURELY ATTACHED TO FLOOR, AND SLIDE
RANGE BACK SO REAR RANGE FOOT IS
UNDER ANTI-TIP BRACKET.
CAUTION – Do not store items of interest to
•
children in cabinets above a range or on the
backguard of a range – children climbing on the
range to reach items could be seriously injured.
Proper Installation – The range, when installed,
•
must be electrically grounded in accordance with
local codes or, in the absence of local codes,
with the
Be sure the range is properly installed and
grounded by a qualified technician.
This range is equipped with a three-prong
•
grounding plug for your protection against shock
hazard and should be plugged directly into a
properly grounded receptacle. Do not cut or
remove the grounding plug from this plug.
Disconnect the electrical supply before servicing
•
the appliance.
Never Use the Range for Warming or Heating
•
the Room.
Do Not Leave Children Alone – Children should
•
not be left alone or unattended in area where the
range is in use. They should never be allowed to
sit or stand on any part of the range. Injuries may
result from the misuse of appliance doors or
drawers such as stepping, leaning, or sitting on
the doors or drawers.
Wear Proper Apparel – Loose-fitting or hanging
•
garments should never be worn while using
the range.
User Servicing – Do not repair or replace any part
•
of the range unless specifically recommended in
the manual. All other servicing should be referred
to a qualified technician.
Maintenance – Keep range area clear and free
•
from combustible materials, gasoline, and other
flammable vapors and liquids.
National Electrical Code, ANSI/NFPA 70.
Storage in or on the Range – Flammable
•
materials should not be stored in an oven or
near surface units.
Do Not Use Water on Grease Fires – Smother
•
fire or flame or use dry chemical or foam-type
extinguisher.
Use Only Dry Potholders – Moist or damp
•
potholders on hot surfaces may result in burns
from steam. Do not let potholder touch hot
heating elements. Do not use a towel or other
bulky cloth.
DO NOT TOUCH SURFACE UNITS OR AREAS
•
NEAR UNITS – Surface units may be hot even
though they are dark in color. Areas near surface
units may become hot enough to cause burns.
During and after use, do not touch, or let clothing
or other flammable materials contact surface units
or areas near units until they have had sufficient
time to cool. Among those areas are the cook-top
and surfaces facing the cook-top.
Use Proper Pan Size – The range is equipped with
•
one or more surface units of different size. Select
utensils having flat bottoms large enough to cover
the surface unit heating element. The use of
undersized utensils will expose a portion of the
heating element to direct contact and may result
in ignition of clothing. Proper relationship of
utensil to burner will also improve efficiency. Top
burner flame size should be adjusted so it does
not extend beyond the edge of the cooking utensil.
Never Leave Surface Units Unattended at High
•
Heat Settings – Boilover causes smoking and
greasy spillovers that may ignite.
Make Sure Reflector Pans or Drip Bowls Are in
•
Place – Absence of these pans or bowls during
cooking may subject wiring or components
underneath to damage.
Protective Liners – Do not use aluminum foil to
•
line surface unit drip bowls or oven bottoms,
except as suggested in the manual. Improper
installation of these liners may result in a risk of
electric shock, or fire.
Glazed Cooking Utensils – Only certain types of
•
glass, glass/ceramic, ceramic, earthenware, or
other glazed utensils are suitable for range-top
service without breaking due to the sudden
change in temperature.
– SAVE THESE INSTRUCTIONS –
4
Page 5

IMPORTANT SAFETY INSTRUCTIONS
RANGE SAFETY
Utensil Handles Should Be Turned Inward and
•
Not Extend Over Adjacent Surface Units – To
reduce the risk of burns, ignition of flammable
materials, and spillage due to unintentional
contact with the utensil, the handle of a utensil
should be positioned so that it is turned inward,
and does not extend over adjacent surface units.
Use Care When Opening Door – Let hot air or
•
steam escape before removing or replacing food.
Do Not Heat Unopened Food Containers –
•
Build-up of pressure may cause container to
burst and result in injury.
Keep Oven Vent Ducts Unobstructed.
•
Placement of Oven Racks – Always place oven
•
racks in desired location while oven is cool. If
rack must be moved while oven is hot, do not let
potholder contact hot heating element in oven.
DO NOT TOUCH HEATING ELEMENTS OR
•
INTERIOR SURFACES OF OVEN – Heating
elements may be hot even though they are dark
in color. Interior surfaces of an oven become hot
enough to cause burns. During and after use, do
not touch, or let clothing or other flammable
materials contact heating elements or interior
surfaces of oven until they have had sufficient
time to cool. Other surfaces of the appliance may
become hot enough to cause burns – among
these surfaces are oven vent openings and
surfaces near these openings, oven doors, and
windows of oven doors.
For self-cleaning ranges –
Do Not Clean Door Gasket – The door gasket is
•
essential for a good seal. Care should be taken
not to rub, damage, or move the gasket.
Do Not Use Oven Cleaners – No commercial
•
oven cleaner or oven liner protective coating of
any kind should be used in or around any part
of the oven.
Clean Only Parts Listed in Manual.
•
Before Self-Cleaning the Oven – Remove broiler
•
pan and other utensils. Wipe off all excessive
spillage before initiating the cleaning cycle.
For units with ventilating hood –
Clean Ventilating Hoods Frequently – Grease
•
should not be allowed to accumulate on hood
or filter.
When flaming foods under the hood, turn the fan
•
off. The fan, if operating, may spread the flame.
– SAVE THESE INSTRUCTIONS –
5
Page 6
PARTS AND FEATURES
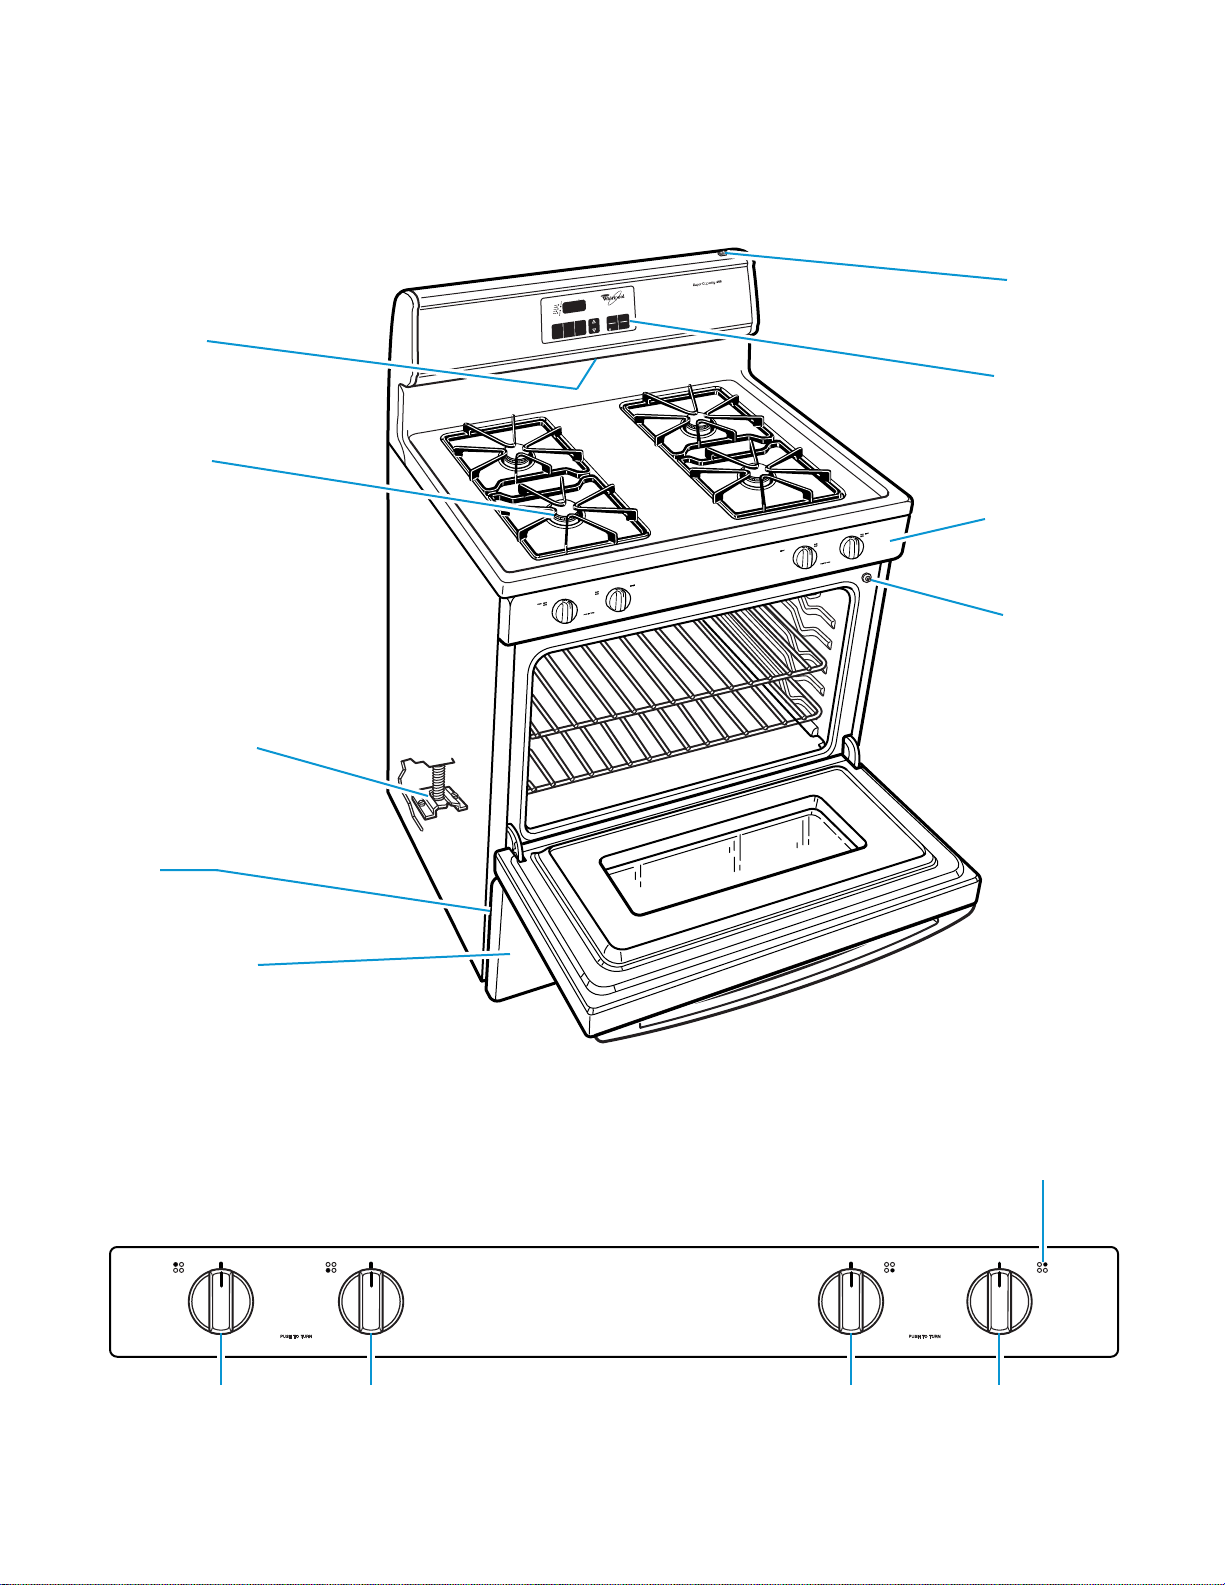
This section contains captioned pictures of your range. Use them to learn where all parts and
features are and what they look like. Use the page references to help you quickly find out more
about the part or feature you are interested in.
Manual oven
light switch
(model SF360PEE)
Oven control
Control panel
(pp. 7, 24)
Automatic oven
light switch
Oven vent
(p. 19)
Surface burners
and grates
(pp. 7, 24-27)
ON
CLOSE DOORCLOSE DOOR
BAKE
BROIL
SELF-CLEANING OVENSELF-CLEANING OVEN
START ?ART ?
PREHEAT
CLEAN
DOOR LOCKEDDOOR LOCKED
BAKE
OFF
START
CANCEL
ENTER
TEMP
AUTO
5 SEC
CUSTOM
CLEAN
BROIL
(pp. 11, 12, 15, 16, 22)
(p. 29)
(p. 29)
Anti-tip bracket
(p. 19)
Model and
serial number
plate
(behind left side
of storage door)
Storage drawer
(p. 20)
CONTROL PANEL
NOTE: Window on
Model SF360PEE
only.
Surface burner marker
(shows which burner
you are setting)
Left rear
control knob
Left front
control knob
Right front
control knob
Right rear
control knob
6
Page 7
USING YOUR RANGE
To get the best cooking results, you should use your range the correct way. This section tells you
what you need to know to use your range safely and efficiently.
USING THE SURFACE BURNERS
wWARNING
Carbon Monoxide Poisoning Hazard
Do not operate with a yellow flame.
Doing so can result in death, heart attack,
or convulsions.
Your range comes with electric ignitors. Electric
ignitors automatically light the burners each time
you turn the control knobs to LIGHT.
Using the control knobs
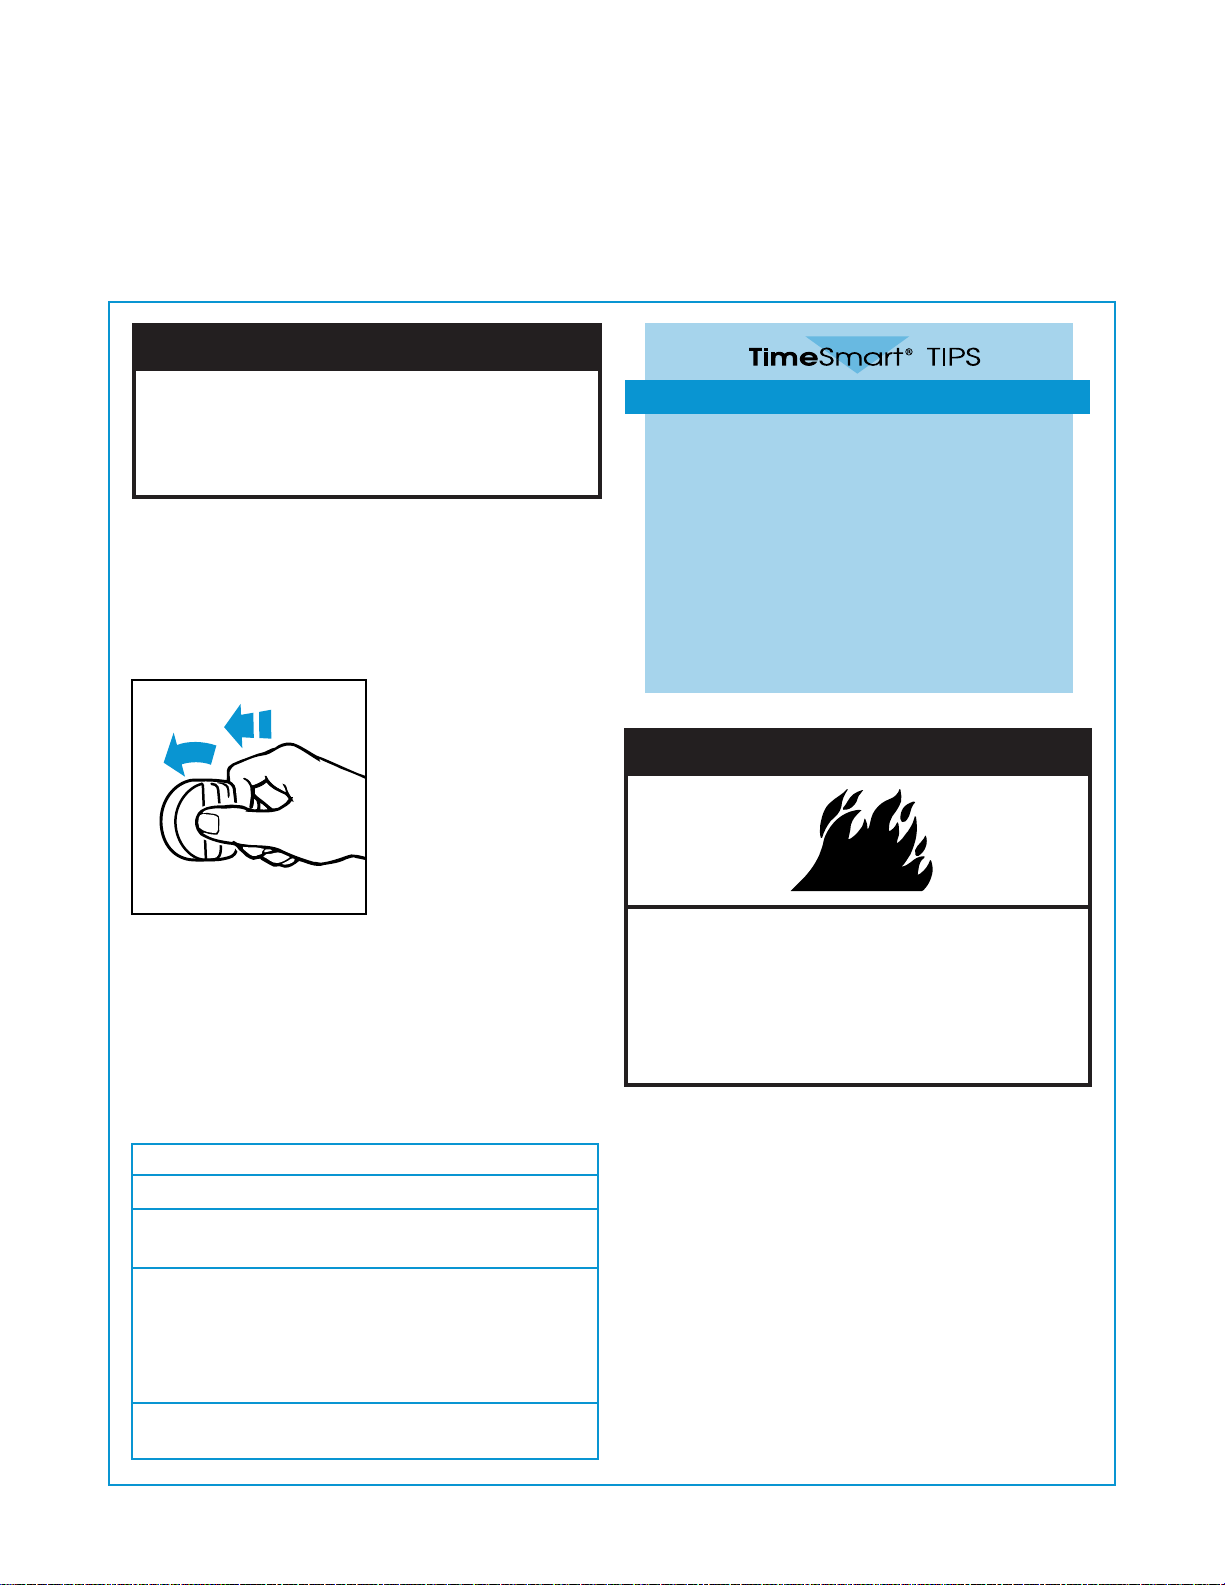
Push in the control knob and turn it counter-
•
settings. However, you can set the control knob
anywhere between HIGH and LOW.
NOTE: All four electric ignitors will click at the same
time. However, the burner with the control knob
turned to LIGHT is the one that will ignite.
clockwise to the
LIGHT position. The
clicking sound is the
ignitor sparking. Make
sure the burner has lit.
To stop the clicking
•
sound after the burner
lights, turn the control
knob to the cook setting
you want. The control
knob has two cook
Burner heat settings
Use the following chart as a guide.
SETTING
LIGHT
HIGH
Between
HIGH
and LOW
RECOMMENDED USE
To light the burner.
•
To start foods cooking.
•
To bring liquids to a boil.
•
To hold a rapid boil.
•
To fry chicken or pancakes.
•
For gravy, pudding, and icing.
•
To cook large amounts of
•
vegetables.
Easy ways to save energy
To help shorten your cooking time, use
•
the least amount of liquid possible.
Preheat your pots and pans only when
•
recommended and for the shortest time
possible.
Start your food on a higher heat setting,
•
then turn the control to a lower setting to
finish cooking.
Place a filled pan on the burner grate
•
before turning on the surface burner.
wWARNING
Fire Hazard
Do not let the burner flame extend beyond
the edge of the pan.
Turn off all control knobs when not cooking.
Failure to follow these instructions can
result in death or fire.
NOTE: Do not leave empty cookware, or cookware
which has boiled dry, on a hot surface burner. The
cookware could overheat, causing damage to the
cookware or cooking product.
LOW
To keep food warm until ready
•
to serve.
7
Page 8
USING YOUR RANGE
USING THE SURFACE BURNERS (CONT.)
In case of a prolonged power failure
You can manually light surface burners. Hold a lit
match near a burner and turn the control knob to
the LIGHT position. After the burner lights, turn the
control knob to the setting you want.
Home canning information
The large diameter of most water-bath or pressure
canners combined with high heat settings for long
periods of time can cause damage to the cooktop.
To protect your range:
For best results, use a canner which can be
•
centered over the surface burner.
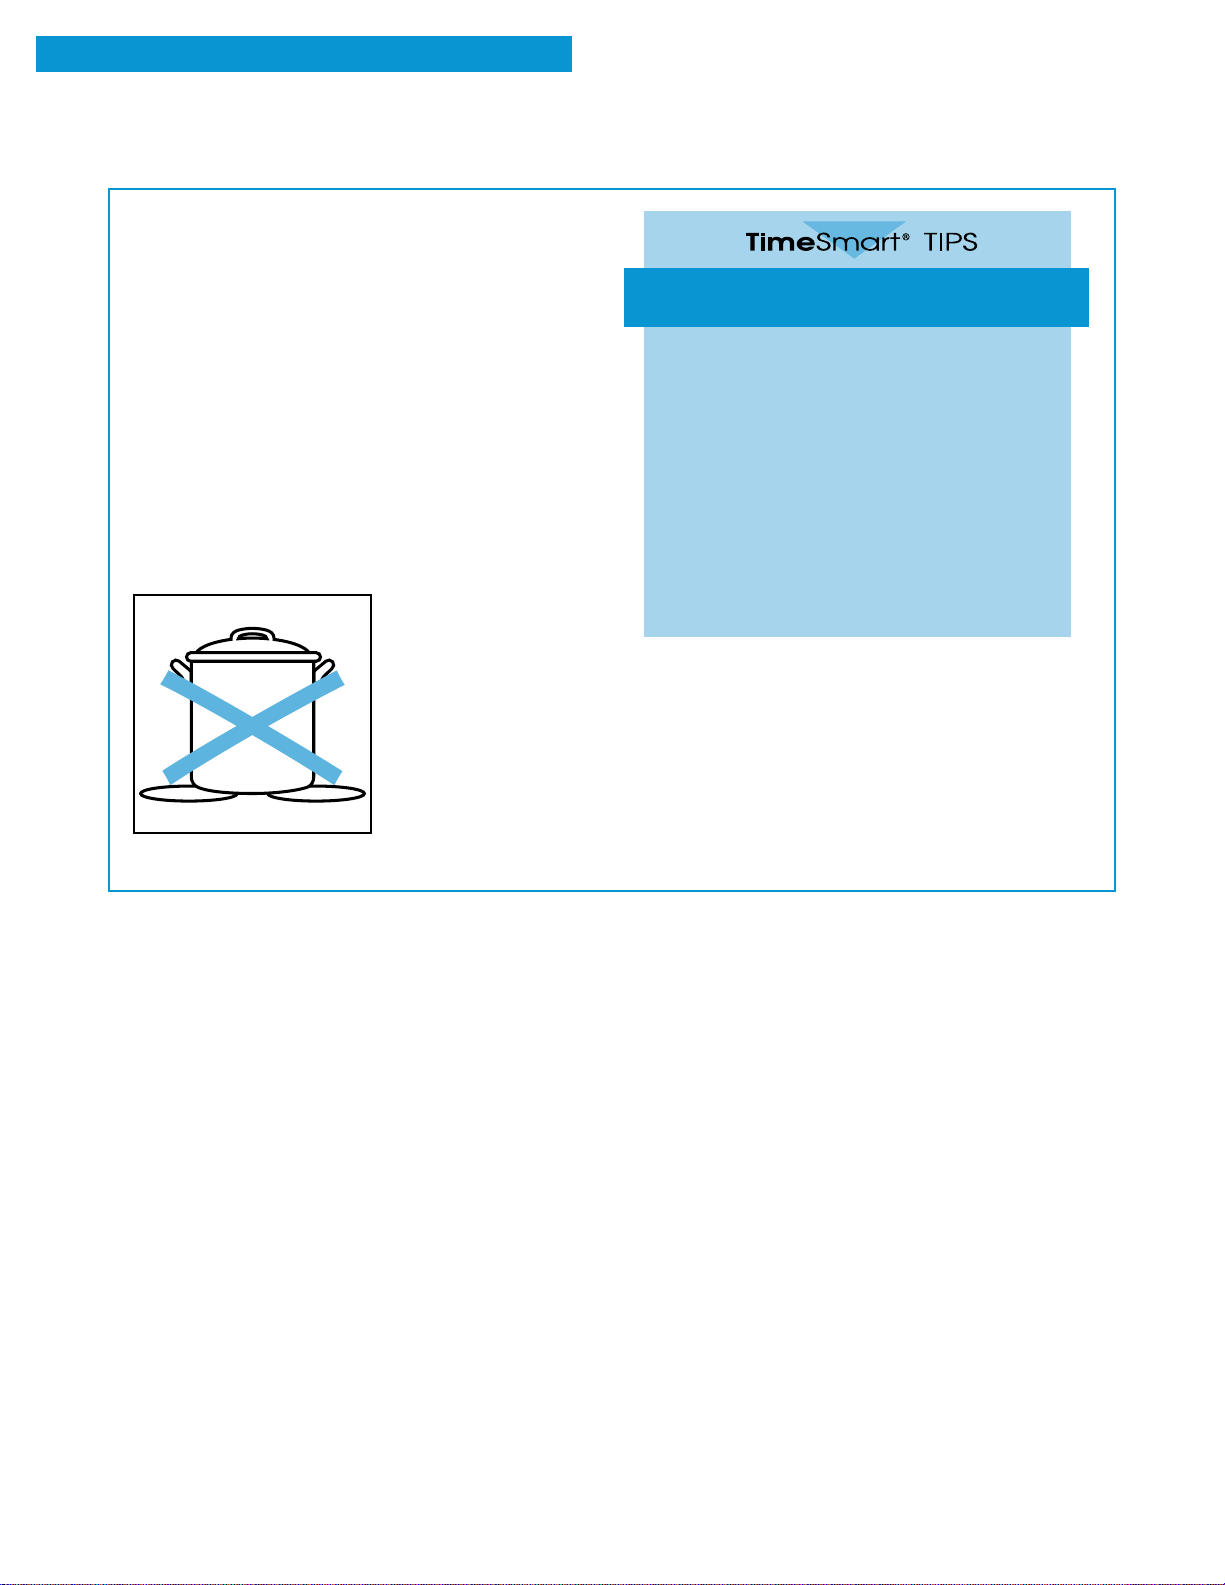
Do not place your canner on 2 surface burners at
•
Refer to your canner manual for specific instructions.
•
the same time. Too
much heat will build
up and damage the
cooktop.
Start with hot water.
•
This reduces the time
the control is set on
high. Reduce the heat
setting to the lowest
position needed to
keep the water boiling.
Using the right cookware
makes a big difference
The pan should have a flat bottom,
•
straight sides, and a well-fitting lid.
Choose medium to heavy gauge (thick-
•
ness) cookware.
The pan material (metal or glass) affects
•
how quickly and evenly the pan heats.
When using glass or ceramic cookware,
•
check to make sure it is suitable for use
on surface burners.
To avoid tipping, make sure pots and pans
•
are centered on the grates.
8
Page 9
POSITIONING RACKS AND PANS
USING YOUR RANGE
General guidelines
Follow this section carefully to get the best
cooking results.
Before turning on the oven, place oven racks
•
where you need them.
To move a rack, pull it out to the stop, raise the
•
front edge, and lift it out.
Be sure the rack(s) is level.
•
Use pot holders or oven mitts to protect your
•
hands if rack(s) must be moved while the oven
is hot.
When baking/roasting with 1 rack, place the
•
rack so the top of the food will be centered in
the oven.
When baking/roasting on 2 racks, position racks
•
in oven to allow good circulation of air around all
the food.
Do not place items on the oven door when it
•
is open.
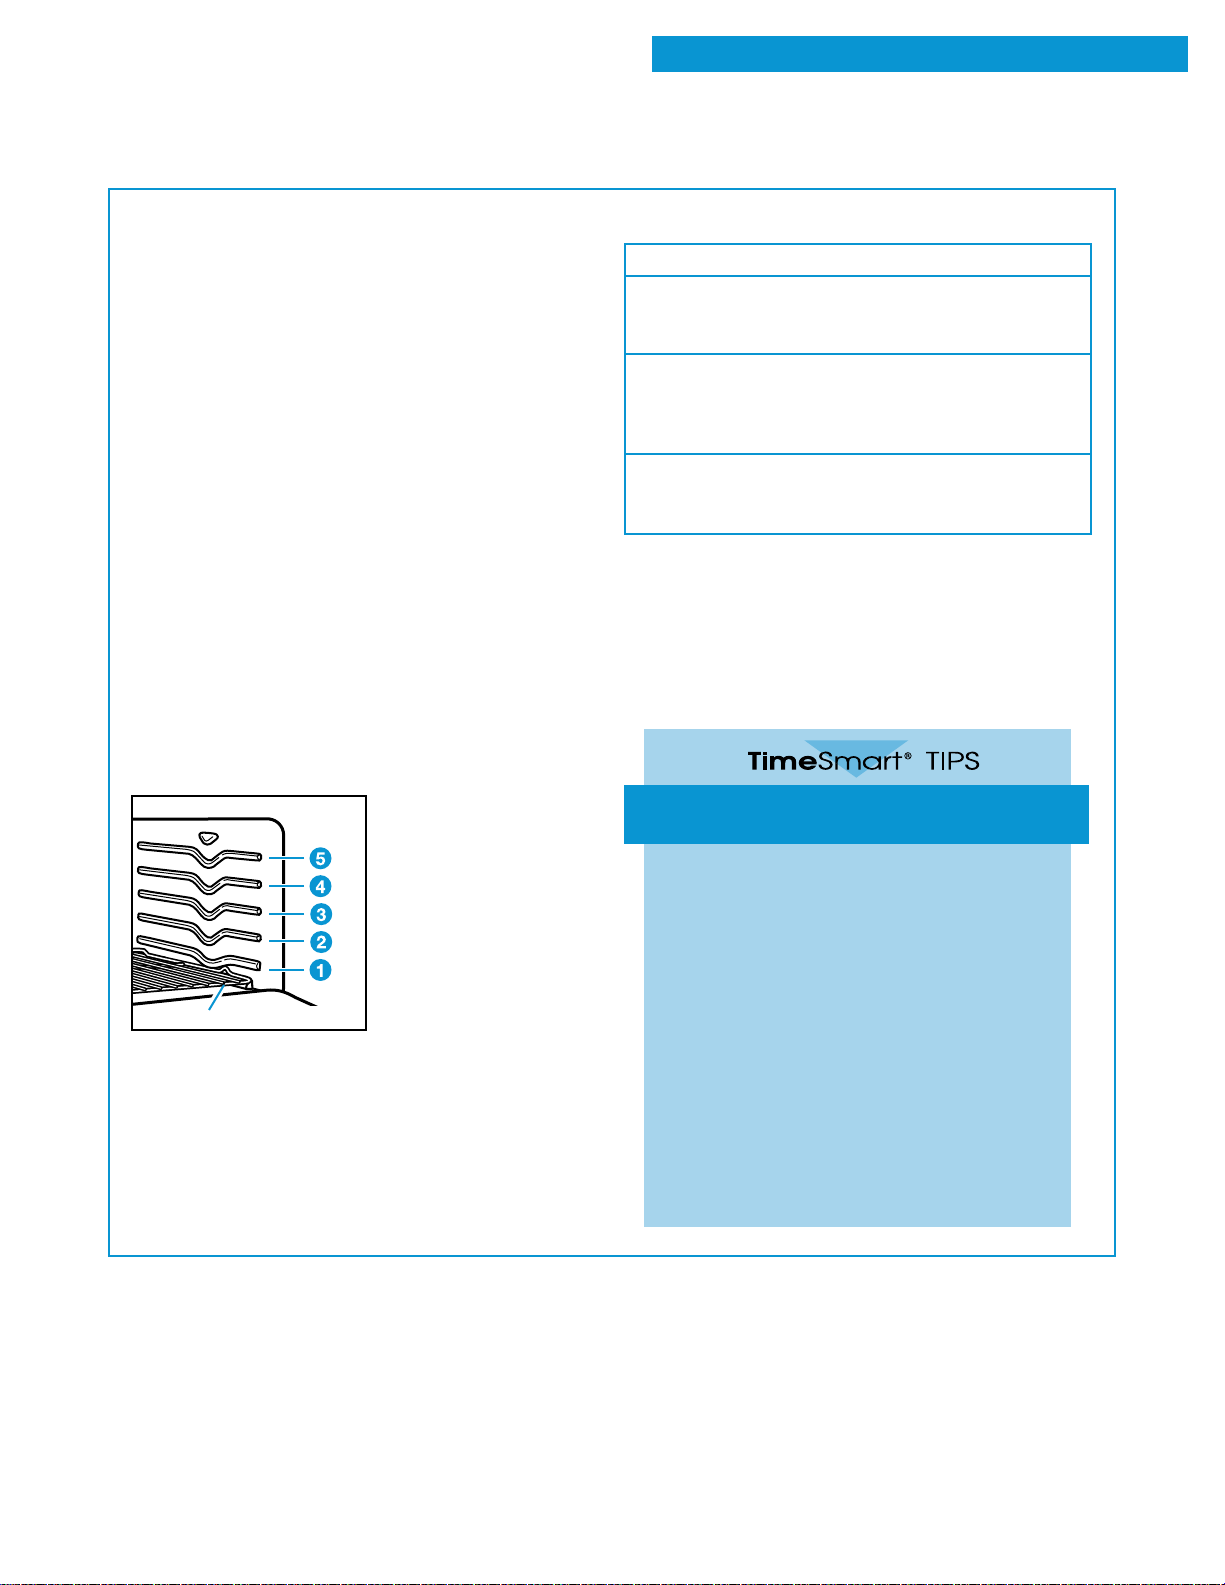
Extra oven rack position (roasting rack)
Use this rack position when roasting food too large
to be placed on the first
rack position.
For proper roasting,
follow these
guidelines:
The rack must be level.
•
Use an adequate
•
amount of liquid in the
pan (meat juices or
Extra oven rack position
To pull the rack over the door you must tilt the
•
rack up at the front. If the rack is loaded with food,
tilting the rack could cause the food to spill. To
avoid spilling, do not try to pull out the rack when
removing large amounts of food.
water) so your food
does not get overdone.
Rack placement for specific foods:
FOOD
Frozen pies, large
roasts, turkeys, angel
food cakes
Bundt cakes, most
quick breads, yeast
breads, casseroles,
meats
Cookies, biscuits,
muffins, cakes,
nonfrozen pies
NOTE: For information on where to place your
rack when broiling, see “Broiling guide” later in
this section.
Using insulated bakeware, ovenproof
glassware, and dark metal pans
When baking with insulated cookie sheets
•
or baking pans, place them in the bottom
third of the oven. You may need to increase the recommended baking times,
so test for doneness before removing from
the oven.
When using ovenproof glassware or dark
•
bakeware, reduce the oven temperature
by 25°F but use the same baking time.
Because these pans absorb heat, producing darker bottom browning and crispier
crusts, place the rack in the center of the
oven. When baking pies and bread, you
can use the temperature suggested in
the recipe.
RACK POSITION
1st or 2nd rack
guide from bottom
2nd rack guide
from bottom
2nd or 3rd rack
guide from bottom
9
Page 10
USING YOUR RANGE
FOR BEST AIR CIRCULATION
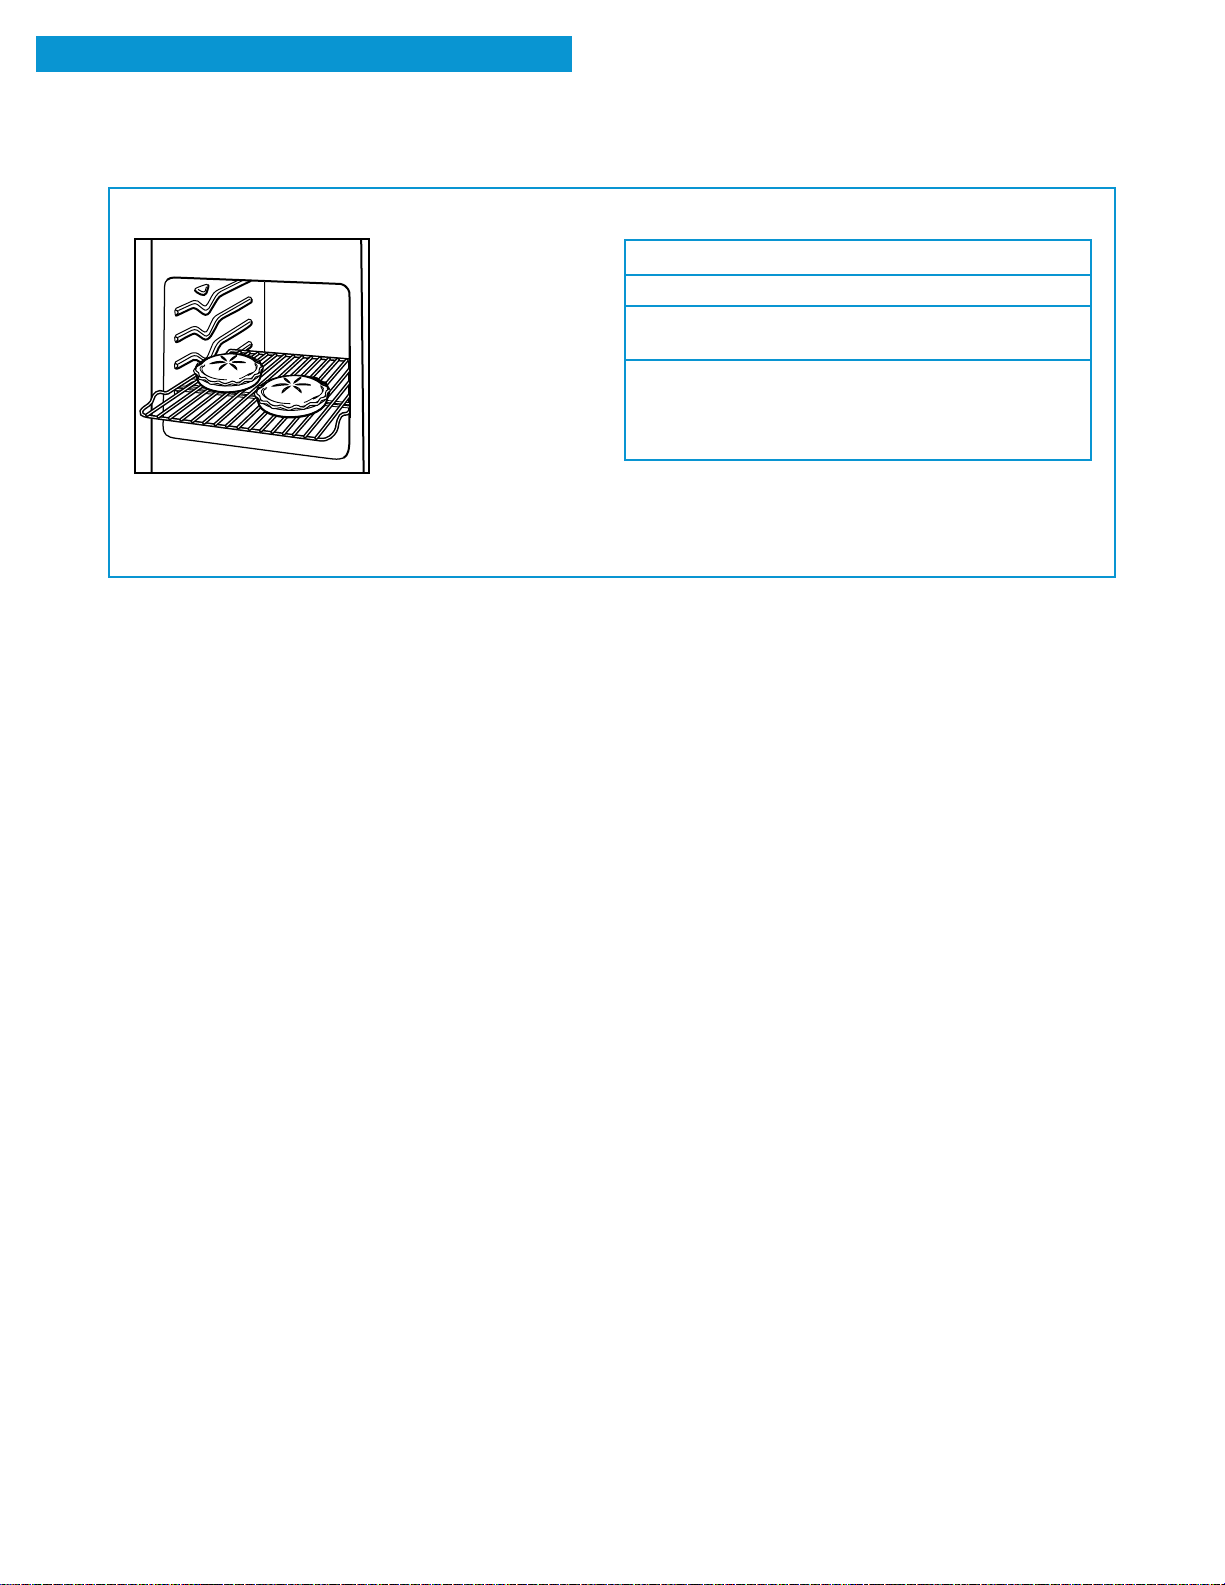
Hot air must circulate around the pans in the oven
for even heat to reach
all parts of the oven.
This results in better
baking.
Place the pans so
•
that one is not directly
over the other.
For best results,
•
allow 11⁄2-2 inches of
space around each
pan and between pans
and oven walls.
For best baking results, bake 1 sheet of cookies
•
at a time.
Where to place pans:
WHEN YOU HAVE
1 pan
2 pans
3 or 4 pans
PLACE
In center of the oven rack.
Side by side or slightly
staggered.
In opposite corners on
each oven rack. Stagger
pans so no pan is directly
over another.
10
Page 11
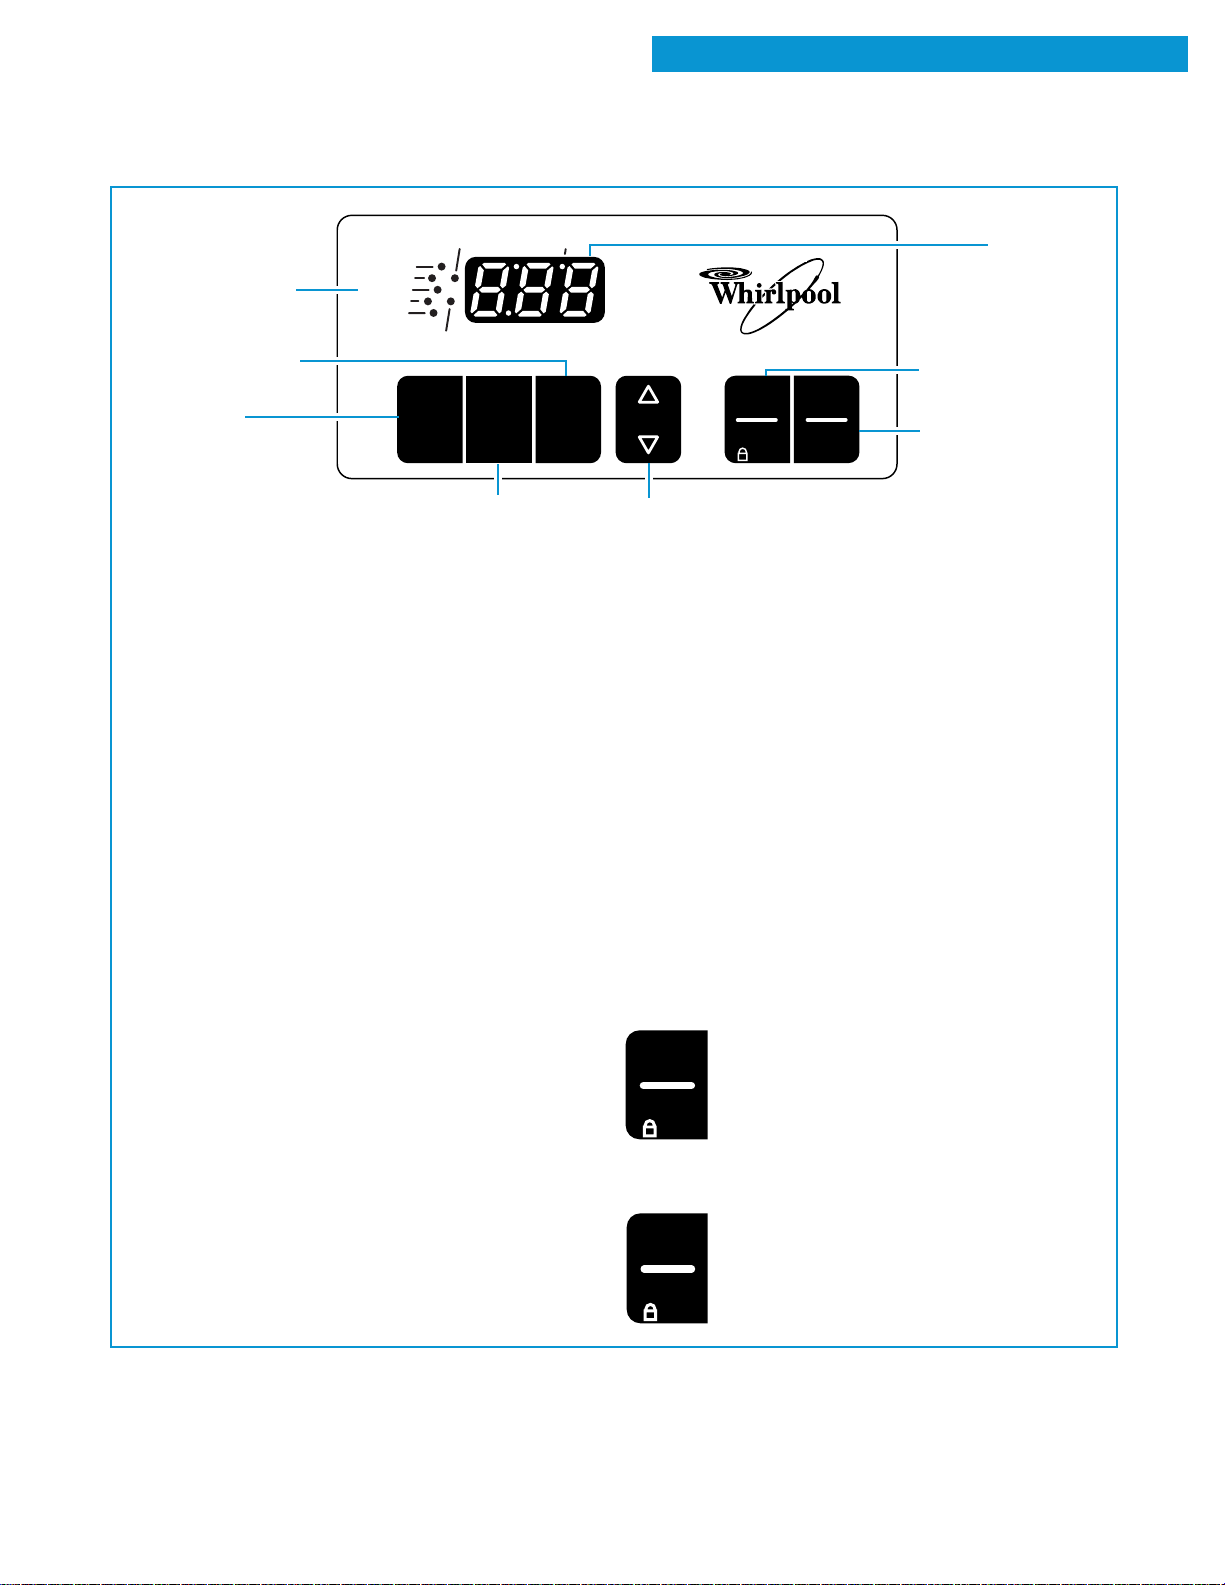
THE ELECTRONIC OVEN CONTROL
USING YOUR RANGE
ON
AUTO
CLEAN
Indicator lights
(see below)
Auto clean pad
(p. 22)
Bake pad
(p. 12)
BAKE
BROIL
START ?
PREHEAT
CLEAN
CLOSE DOOR
DOOR LOCKED
CUSTOM
BAKE
Custom broil
pad
(p. 16)
BROIL
Display
When you first plug in the range, “PF” will appear
•
on the display until you press any command pad.
If “PF” again appears on the display, your electricity was off for a while. You will need to reprogram
any temperature adjustments you may have
made. See the “Adjusting the oven temperature
control” section.
When you are using the oven, the display will
•
show preheat times and temperature settings.
When you are not cleaning or cooking with the
•
oven, the display will be blank.
When setting a function, if you do not press the
•
start/enter pad within 5 seconds, the Start?
indicator light will flash. If you do not press the
start/enter pad within 5 minutes, the function
will be canceled.
Indicator lights
An indicator light to the left of the display lights up
when you are in a setting. An indicator light also
lights up to tell you when the door is locked. An
indicator light on the display lights up when the
oven is on.
Electronic
display
SELF-CLEANING OVEN
TEMP
Temperature
pads
(pp. 12, 15, 17)
START
ENTER
5 SEC
OFF
CANCEL
Start /enter pad
(p. 12)
Of f/cancel pad
(p. 12)
Using the control lock
The control lock lets you disable the control panel
command pads. The control lock comes in handy
when you want to prevent others from using the oven.
NOTES:
You can only use the control lock when the oven is
•
not in use or the control has not been set.
Set the control lock when cleaning the control
•
panel to prevent yourself from accidentally turning
on the oven.
You must reset the control lock if the power goes
•
out for more than 1 second.
To lock the control panel:
Press and hold the start/enter pad for 5 seconds.
You will hear a single tone and “Loc” will
START
ENTER
5 SEC
To unlock the control panel:
Press and hold the start/enter pad for 5 seconds.
START
ENTER
appear on the temperature display for
5 seconds. “Loc” will then appear whenever a command pad is pressed.
A single tone will sound and “Loc” will
disappear from the temperature display.
5 SEC
11
Page 12
USING YOUR RANGE
ON
STARTING/CANCELING A FUNCTION
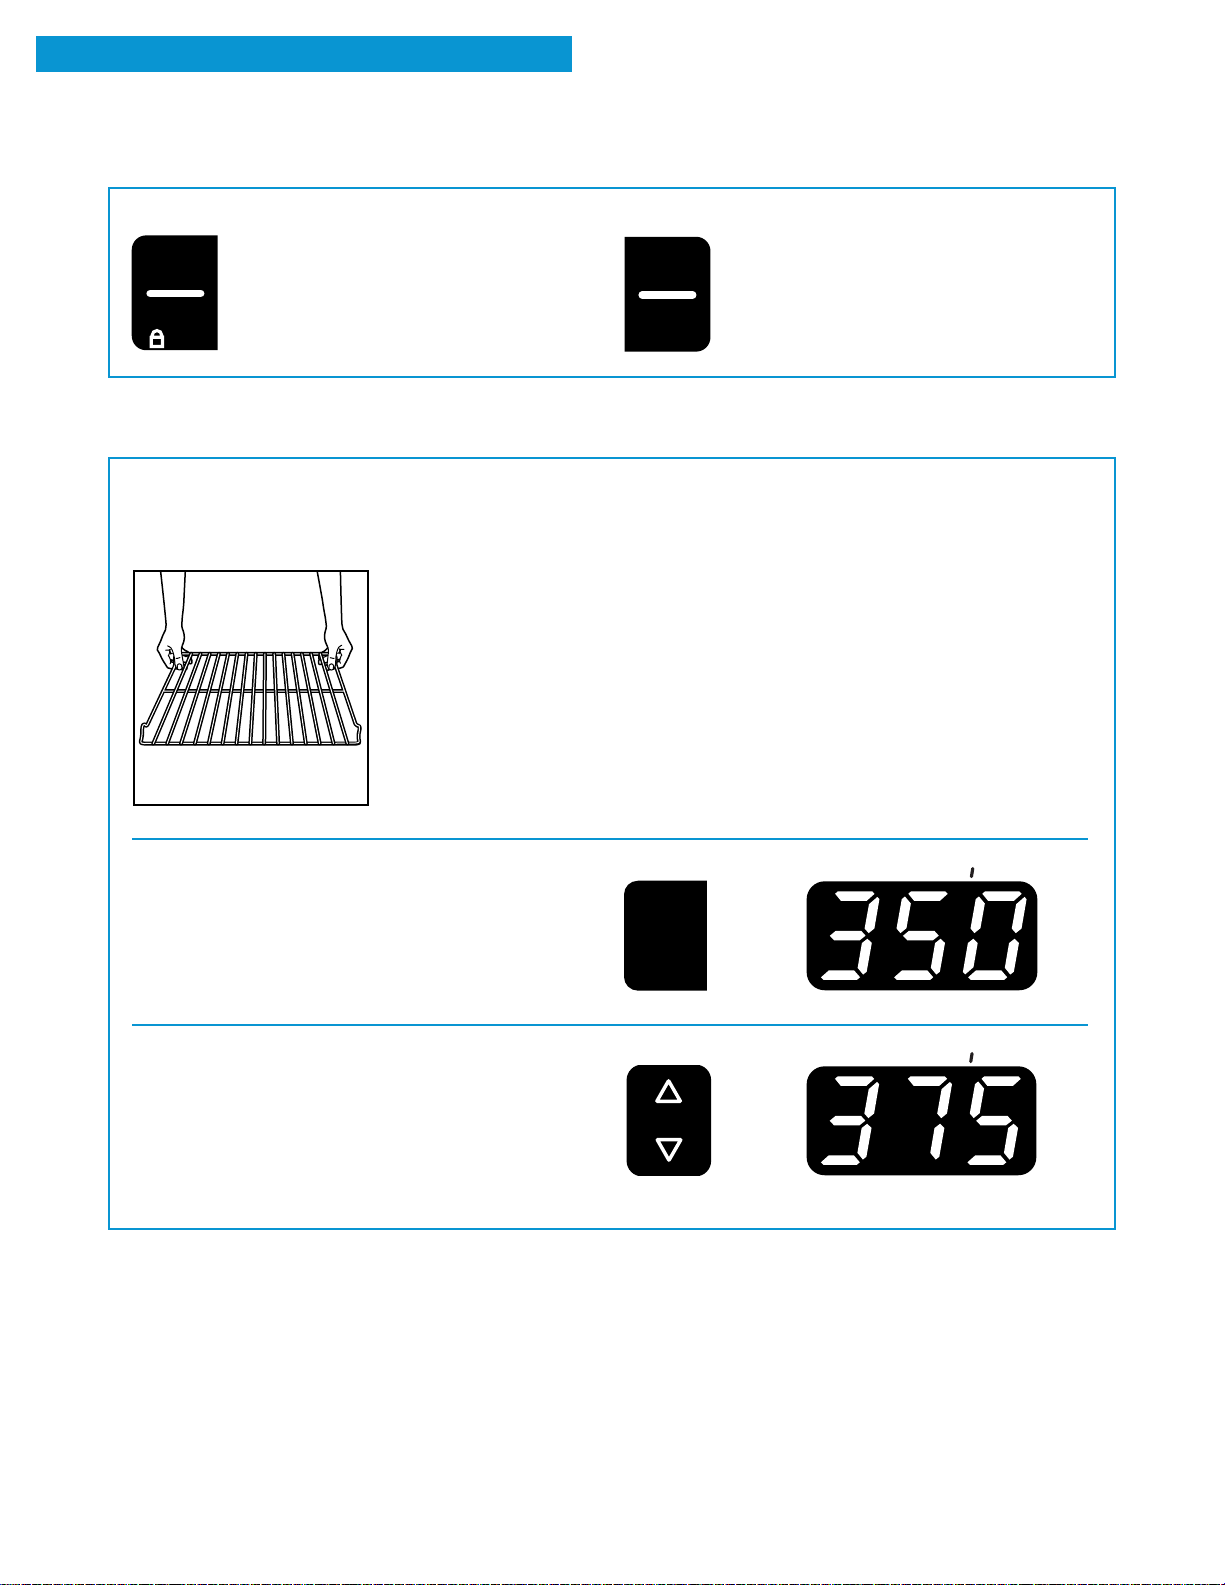
After setting a function for the first time, you must
press the start/enter pad to start the
START
ENTER
5 SEC
function.
BAKING/ROASTING
IMPORTANT: Do not try to light the oven burner
during a power failure.
1. Place the racks where you need them in the oven.
For more information,
see the “Positioning
Front
Rear
racks and pans” section.
The off/cancel pad will cancel any function except
for the control lock.
OFF
CANCEL
2. Choose the bake setting.
The bake indicator light will light up.
3. Set the temperature (optional).
Do this step if you want to set a temperature
other than 350°F. Press ▲ to raise the temperature or ▼ to lower the temperature in 5°F
amounts. You can set a temperature anywhere
from 170°F to 500°F. Use these pads until the
temperature you want shows on the display.
PRESS YOU SEE
BAKE
PRESS YOU SEE
TEMP
(example for bake at 375°F)
ON
12
Page 13
BAKING/ROASTING (CONT.)
ON
ON
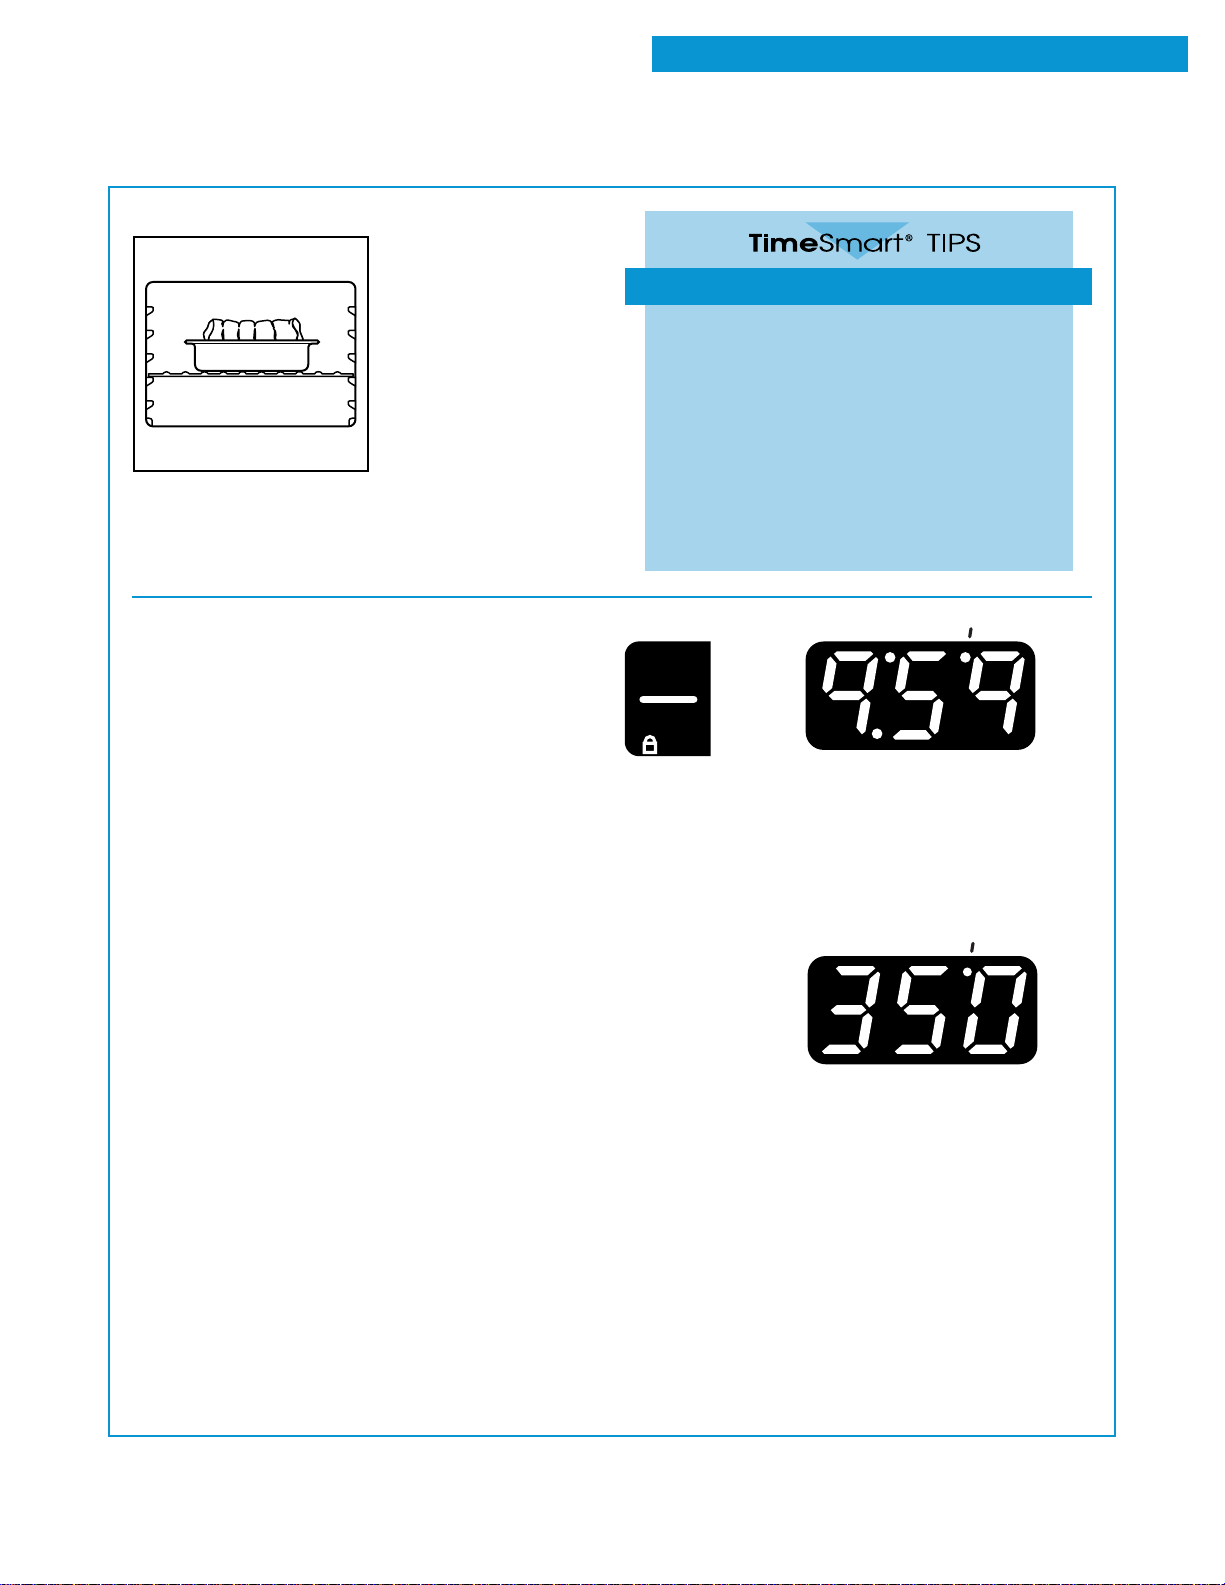
4. When roasting, put the food in the oven. You do
not have to preheat the
oven when roasting,
unless your recipe
recommends it.
USING YOUR RANGE
Roasting meats and poultry
For even cooking, place the meat on a
•
rack in a shallow pan. This keeps the
meat out of the drippings and allows the
heat to circulate better.
Use a meat thermometer for the most
•
accurate doneness. Insert it so the tip is
in the center of the largest muscle or
thickest portion of the meat or poultry.
Make sure the thermometer is not touching bone, fat, or the bottom of the pan.
5. Press the start/enter pad.
A preheating time will count down on the display.
The preheat, bake, and on indicator lights will
light up. The oven control automatically sets
preheating times based on the oven temperature
you select:
For 245°F and less, the preheating time is
•
4 minutes.
For 250°F-445°F, the preheating time is
•
10 minutes.
For 450°F and above, the preheating time is
•
15 minutes.
The oven is preheated and ready to use when
the preheat indicator light goes off and the
countdown is finished.
The preheat and set temperatures may be
different at the end of the countdown. This is
normal.
NOTES:
The preheat countdown will be displayed in
•
minutes from 14 minutes to 10 minutes, then
minutes and seconds from 9:59 until the
preheat countdown is finished.
When the oven temperature is greater than
•
170°F, no preheating time will be shown on
the display.
You can change the temperature setting any
•
time after pressing the start/enter pad. You
have to press the start/enter pad again.
The preheating time will not change if you
•
reset the temperature before the countdown
time ends.
PRESS YOU SEE
START
ENTER
5 SEC
(example for set temperature
of 350°F)
YOU SEE
continued on next page
13
Page 14
USING YOUR RANGE
BAKING/ROASTING (CONT.)
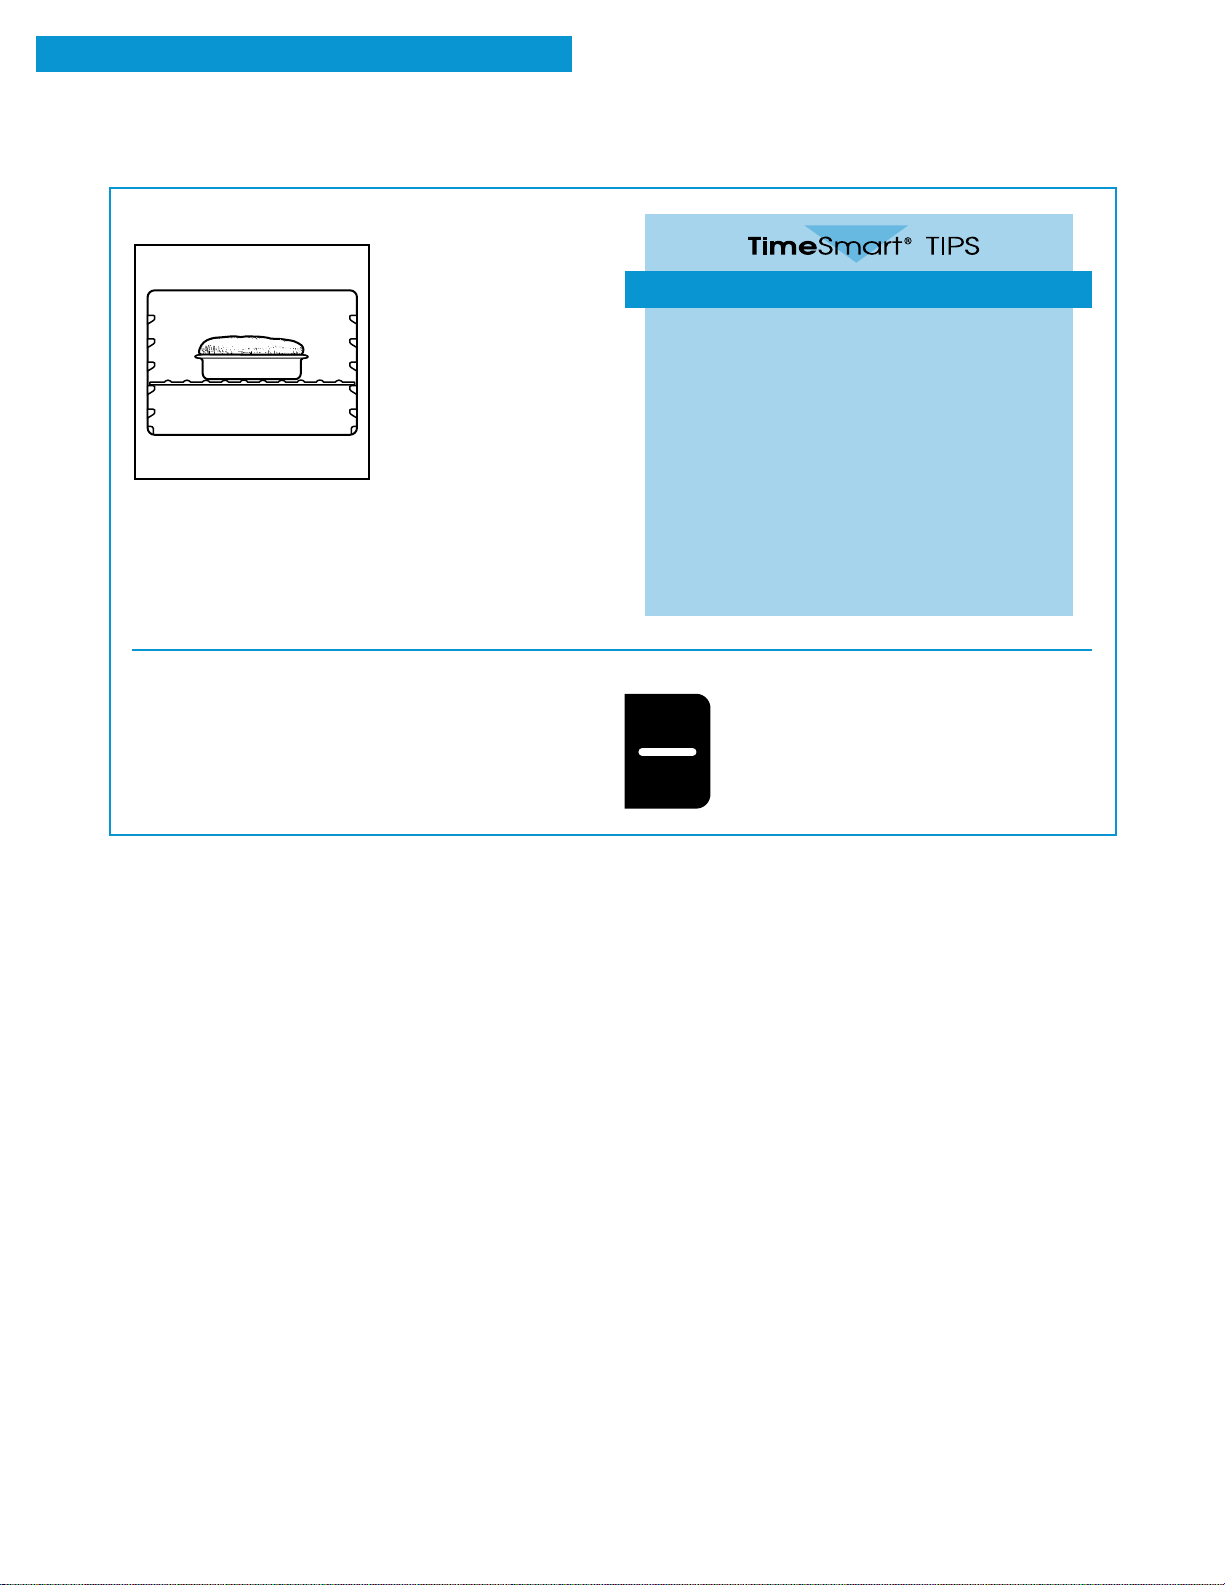
6. When baking, put your food in the oven after the
preheat countdown time
ends. During baking/
roasting, the oven burner
will turn on and off to
keep the oven temperature at the setting.
Save energy and save money
“Oven peeking” can make cooking times
•
longer and affect food quality.
Rely on a timer to keep track of
•
cooking time.
Plan your meals for the most efficient use
•
of the oven by cooking more than one
food at a time, or baking while the oven
is still hot after cooking a meal.
It is not necessary to preheat the oven
•
when broiling or roasting, unless your
recipe recommends doing so.
7. After cooking, turn off the oven.
PRESS YOU SEE
(a blank display)
OFF
CANCEL
14
Page 15
ADJUSTING THE OVEN TEMPERATURE CONTROL
ON
Although your new oven is properly adjusted to
provide accurate temperatures, it may cook faster
or slower than your old oven.
If you are not satisfied with the baking/roasting
results, you can change the offset temperature by
following the steps below.
NOTE: DO NOT measure the oven temperature with
a thermometer. Opening the oven door will lower
the oven temperature and give you an incorrect
reading. Also, the thermometer temperature reading
will change as your oven cycles.
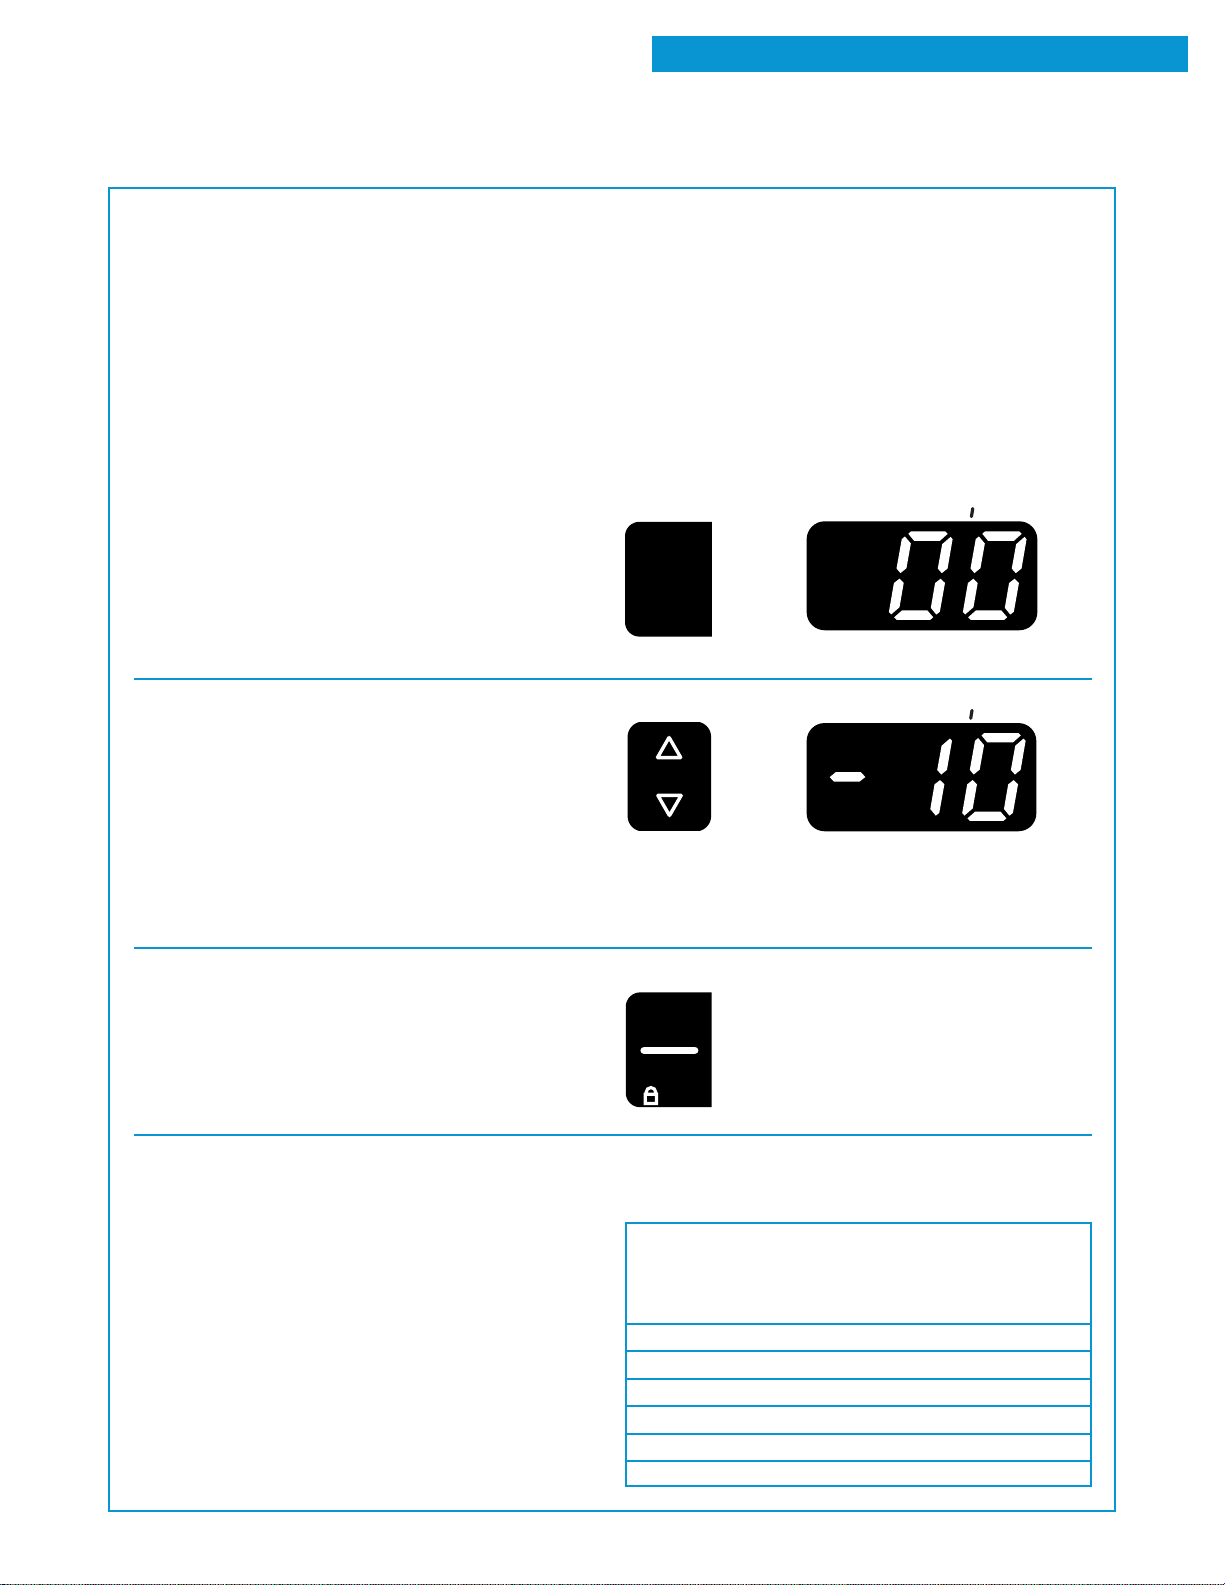
1. Press and hold the bake pad for 4 seconds.
The display will show 350°F for 4 seconds. Then
you will see the current offset temperature, for
example “00,” if you have not already adjusted
the temperature.
PRESS YOU SEE
BAKE
USING YOUR RANGE
ON
2. Set the new offset temperature.
Press s to raise the temperature or t to lower
the temperature in 10°F amounts. You can set
the temperature change to as low as -30°F or as
high as +30°F. A minus (-) sign will appear before
the number when decreasing the temperature
setting. The minus sign shows the oven will be
cooler by the displayed amount. There is no sign
in front of the number when increasing the
temperature setting.
3. Enter the adjustment.
NOTE: The offset temperature resets to “00” if
the power goes out for more than 1 second.
How to determine the amount of
adjustment needed
The chart at the right tells you how much to adjust
the offset temperature to get the cooking results
you want. You can figure out cooking results by the
amount of browning, moistness, and rising times for
baked foods.
(factory setting of “0”)
PRESS YOU SEE
TEMP
(example when making oven
10°F cooler)
PRESS YOU SEE
(a blank display)
START
ENTER
5 SEC
TO COOK
FOOD ...
A little more
Moderately more
Much more
A little less
Moderately less
Much less
ADJUST BY
THIS NUMBER
OF DEGREES
(FAHRENHEIT)
+10
+20
+30
-10
-20
-30
15
Page 16
USING YOUR RANGE
BROILING
NOTES:
Do not preheat when broiling, unless your recipe
•
recommends it.
See “Broiling tips” later in this section.
•
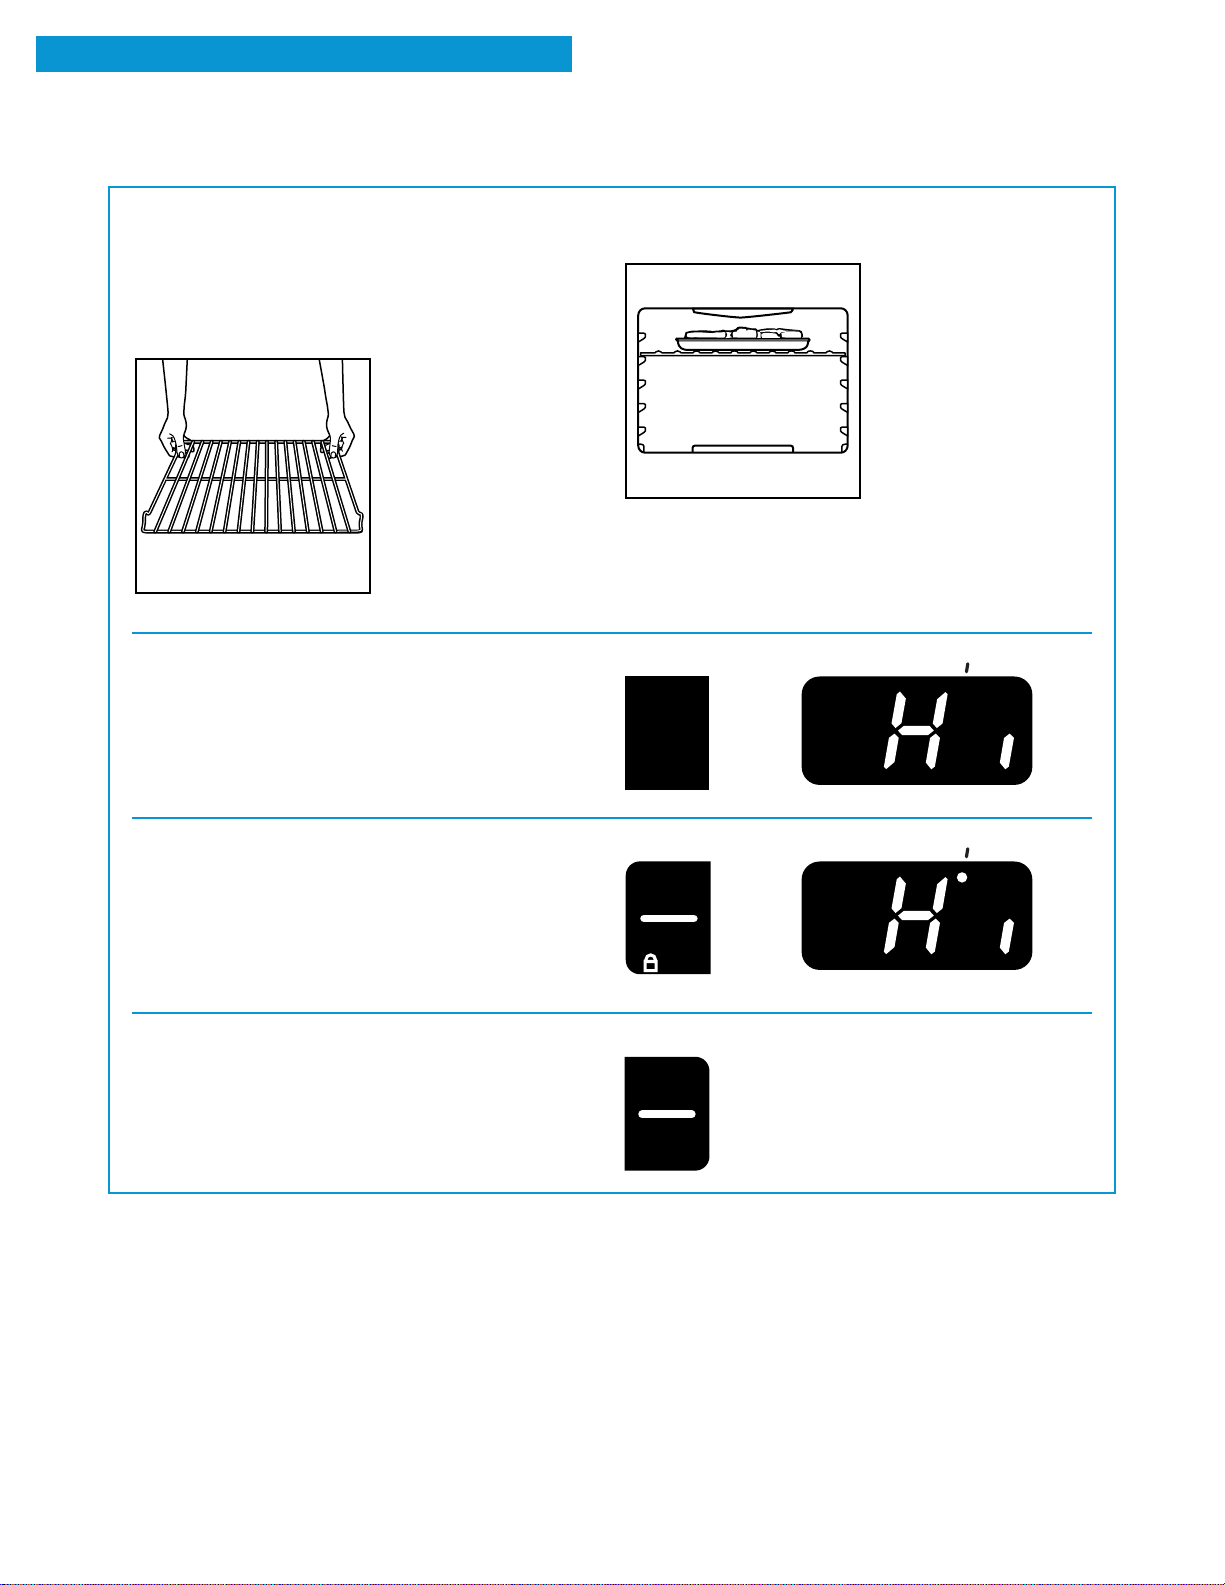
1. Place the rack where you need it in the oven.
Front
Rear
2. Put your food on the broiler pan and place the
pan in the center of the
oven rack.
See “Broiling guide”
later in this section.
3. Close the door.
4. Press the custom broil pad.
The broil indicator light will light up.
5. Start the oven.
The on indicator light will light up.
NOTE: You can change the temperature setting
any time after pressing the start/enter pad. To
change the setting, see “To custom broil at a
lower temperature” later in this section.
6. After broiling, turn off the oven.
PRESS YOU SEE
CUSTOM
BROIL
PRESS YOU SEE
START
ENTER
5 SEC
PRESS YOU SEE
(a blank display)
OFF
CANCEL
ON
ON
16
Page 17
BROILING (CONT.)
ON
USING YOUR RANGE
To custom broil at a lower temperature:
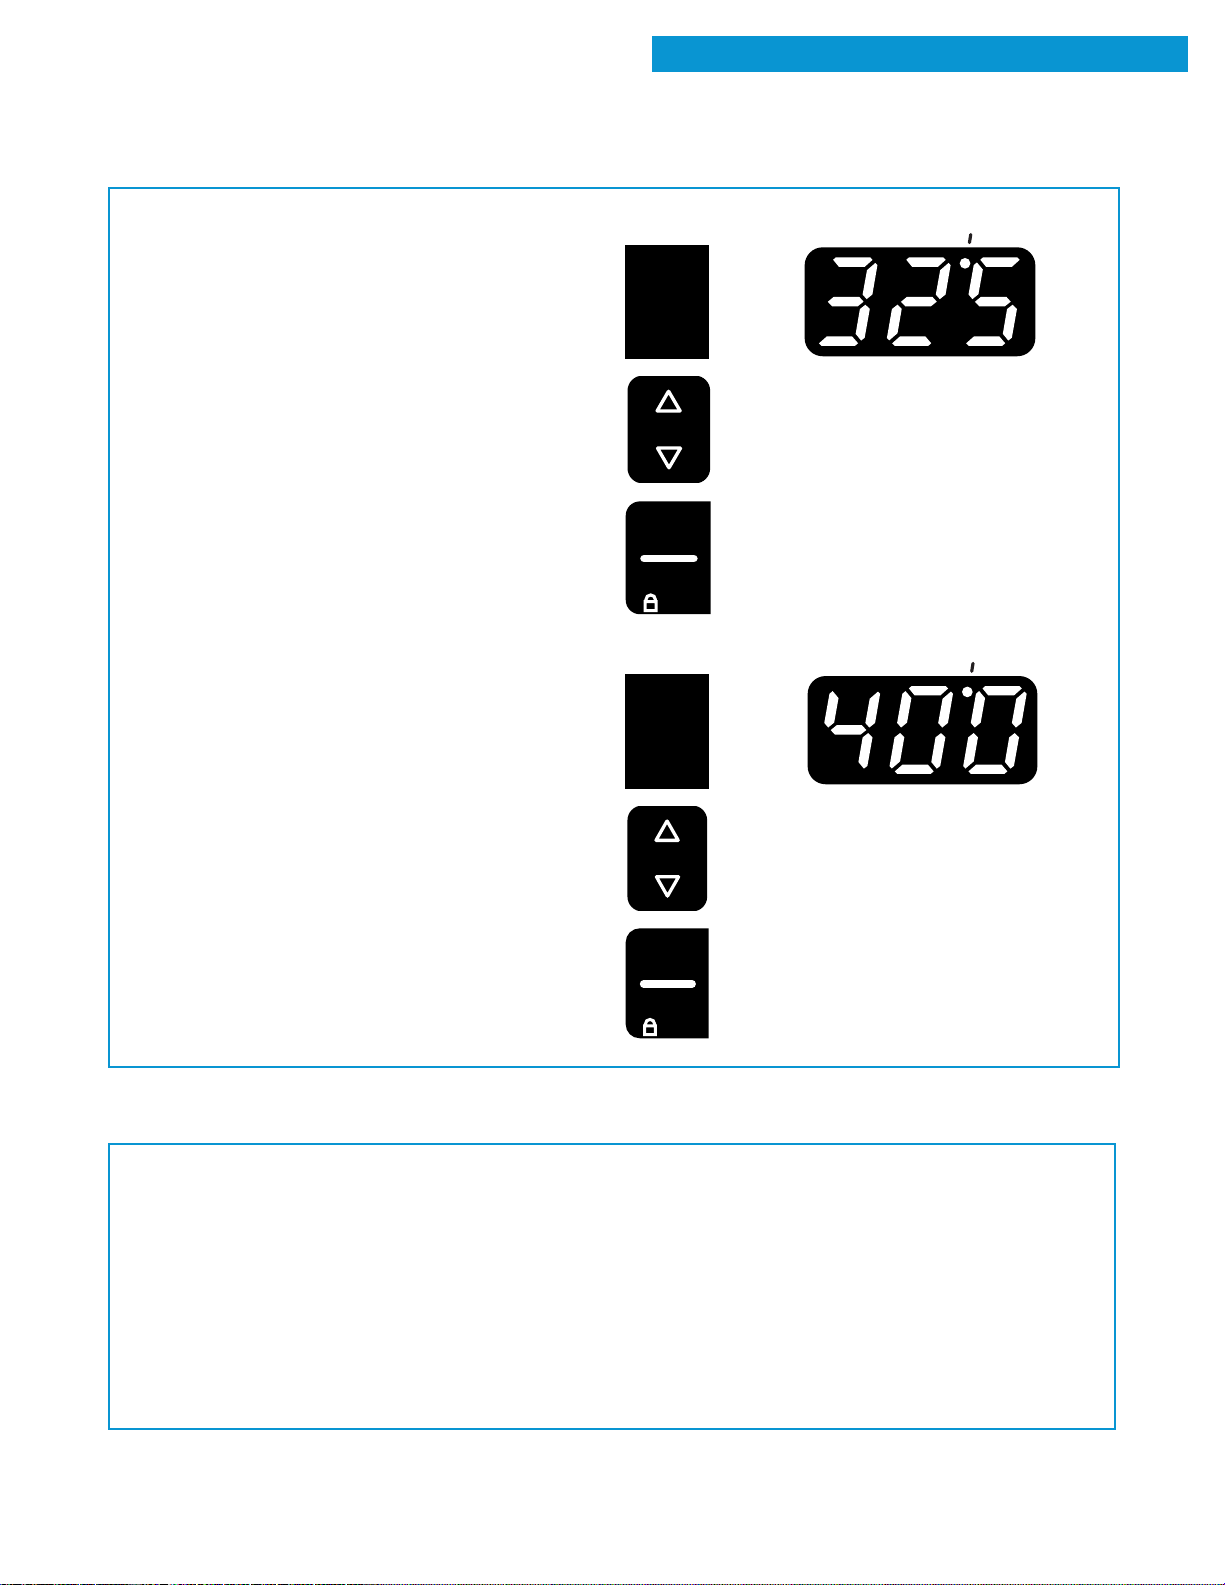
If your food is cooking too fast, press the custom
•
broil pad and press the t temp pad until “325°F”
shows on the display. Then press the start/
enter pad.
If you want your food to broil slower from the
•
start, press the custom broil pad and press the
t temp pad so a temperature between 300°F
and 525°F shows on the display. Press the
start/enter pad.
Lower temperature settings let the broil burner
cycle and slow cooking. The lower the temperature, the slower the cooking.
NOTE: Fish and chicken are some foods that
may cook better if you use lower broiling temperatures.
PRESS YOU SEE
CUSTOM
BROIL
(example shows broil at
325°F)
TEMP
START
ENTER
5 SEC
PRESS YOU SEE
CUSTOM
BROIL
(example shows broil at
400°F)
TEMP
ON
BROILING TIPS
Use the broiler pan and grid for broiling. They are
•
designed to drain excess liquid and grease away
from the cooking surface to help prevent spatter
or smoke.
If you broil small quantities, you may want to use
•
a small broiler pan. You can get them in the
housewares section of many department stores.
Do not cover the broiler grid with foil.
•
To make sure the grease drains well, do not use
•
cookie sheets or similar pans for broiling.
START
ENTER
5 SEC
Place food about 3 inches or more from the broil
•
burner.
The broiling rack position determines how the
•
burner cooks your food. The lower the position,
the more broiler grid area covered. See the
“Broiling guide” later in this section for more
information.
To sear meat, place the broiler pan at one of the
•
higher rack positions.
continued on next page
17
Page 18
USING YOUR RANGE
BROILING TIPS (CONT.)
Thin (3⁄4") steaks may be broiled in the higher rack
•
positions.
To cook thick (11⁄2") steaks and other thick cuts of
•
meat well done, start cooking on a lower rack
position or move them to a lower rack position
after searing.
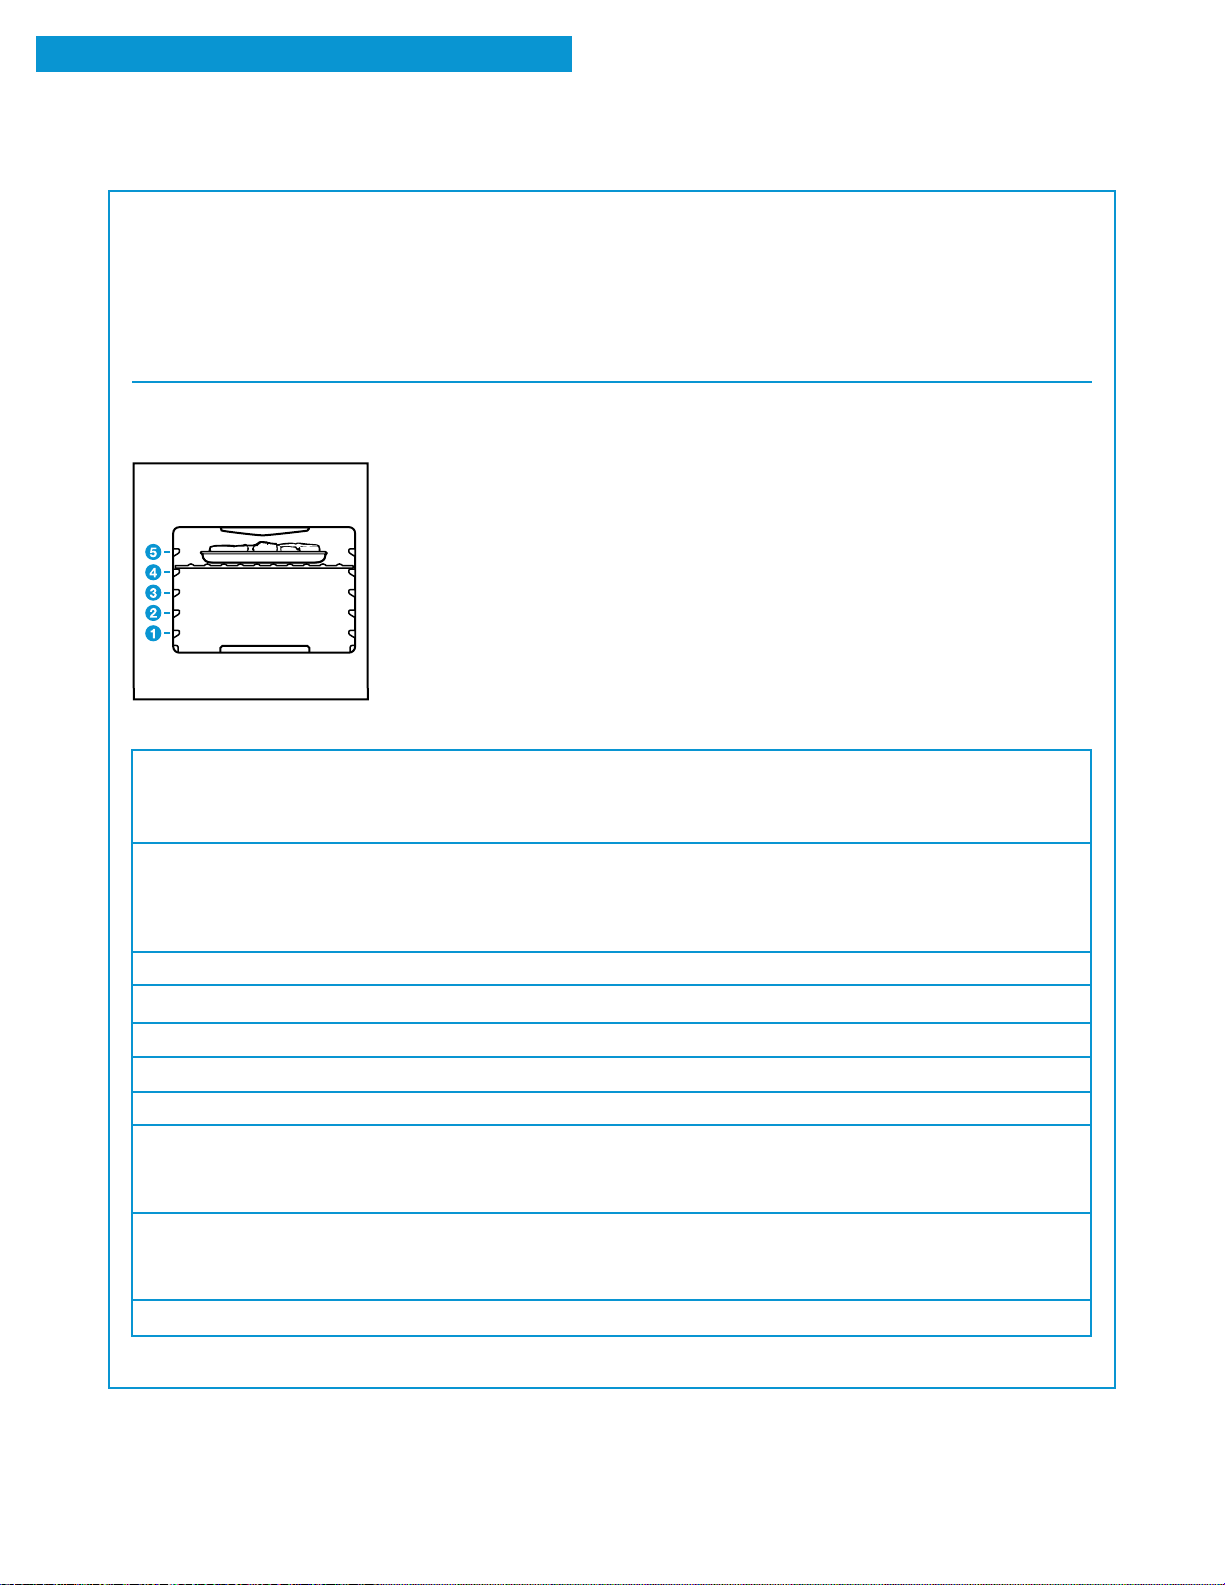
Broiling guide
Recommended rack positions are numbered from
the bottom (1) to the
top (5). For best results,
turn meat after approximately 2⁄3 of the broiling
time. Turn chicken
pieces after approximately half of the
broiling time. Very thin
cuts, such as fish fillets,
may not need to be
turned at all. Lobster
tails are not turned.
MEAT
Steak, 1" thick
medium rare
medium
well done
Ground Meat Patties, 3⁄4" thick, well done
Pork Chops, 1" thick
Ham Slice, 1⁄2" thick, precooked
Frankfurters
Lamb Chops, 1" thick
After broiling, remove the broiler pan from the oven
•
when you remove the food. Drippings will bake on
the pan if you leave it in the heated oven.
APPROXIMATE TIME
RACK
POSITION
4
4
4
4
4
4
SIDE 1
14-15
15-16
18-19
13-14
21-22
8-10
6-7
15-17
(MINUTES)
SIDE 2
7-8
8-9
9-10
6-7
10-11
4-5
3-4
8-9
Chicken
bone-in pieces
boneless breasts
Fish
fillets 1⁄4-1⁄2" thick
steaks 3⁄4-1" thick
Lobster Tails, 6-8 oz
Times are guidelines only and may need to be adjusted for individual tastes.
18
3
4
4
3
18-20
12-16
8-10
15-18
18-21
18-20
11-16
4-5
7-9
N/A
Page 19
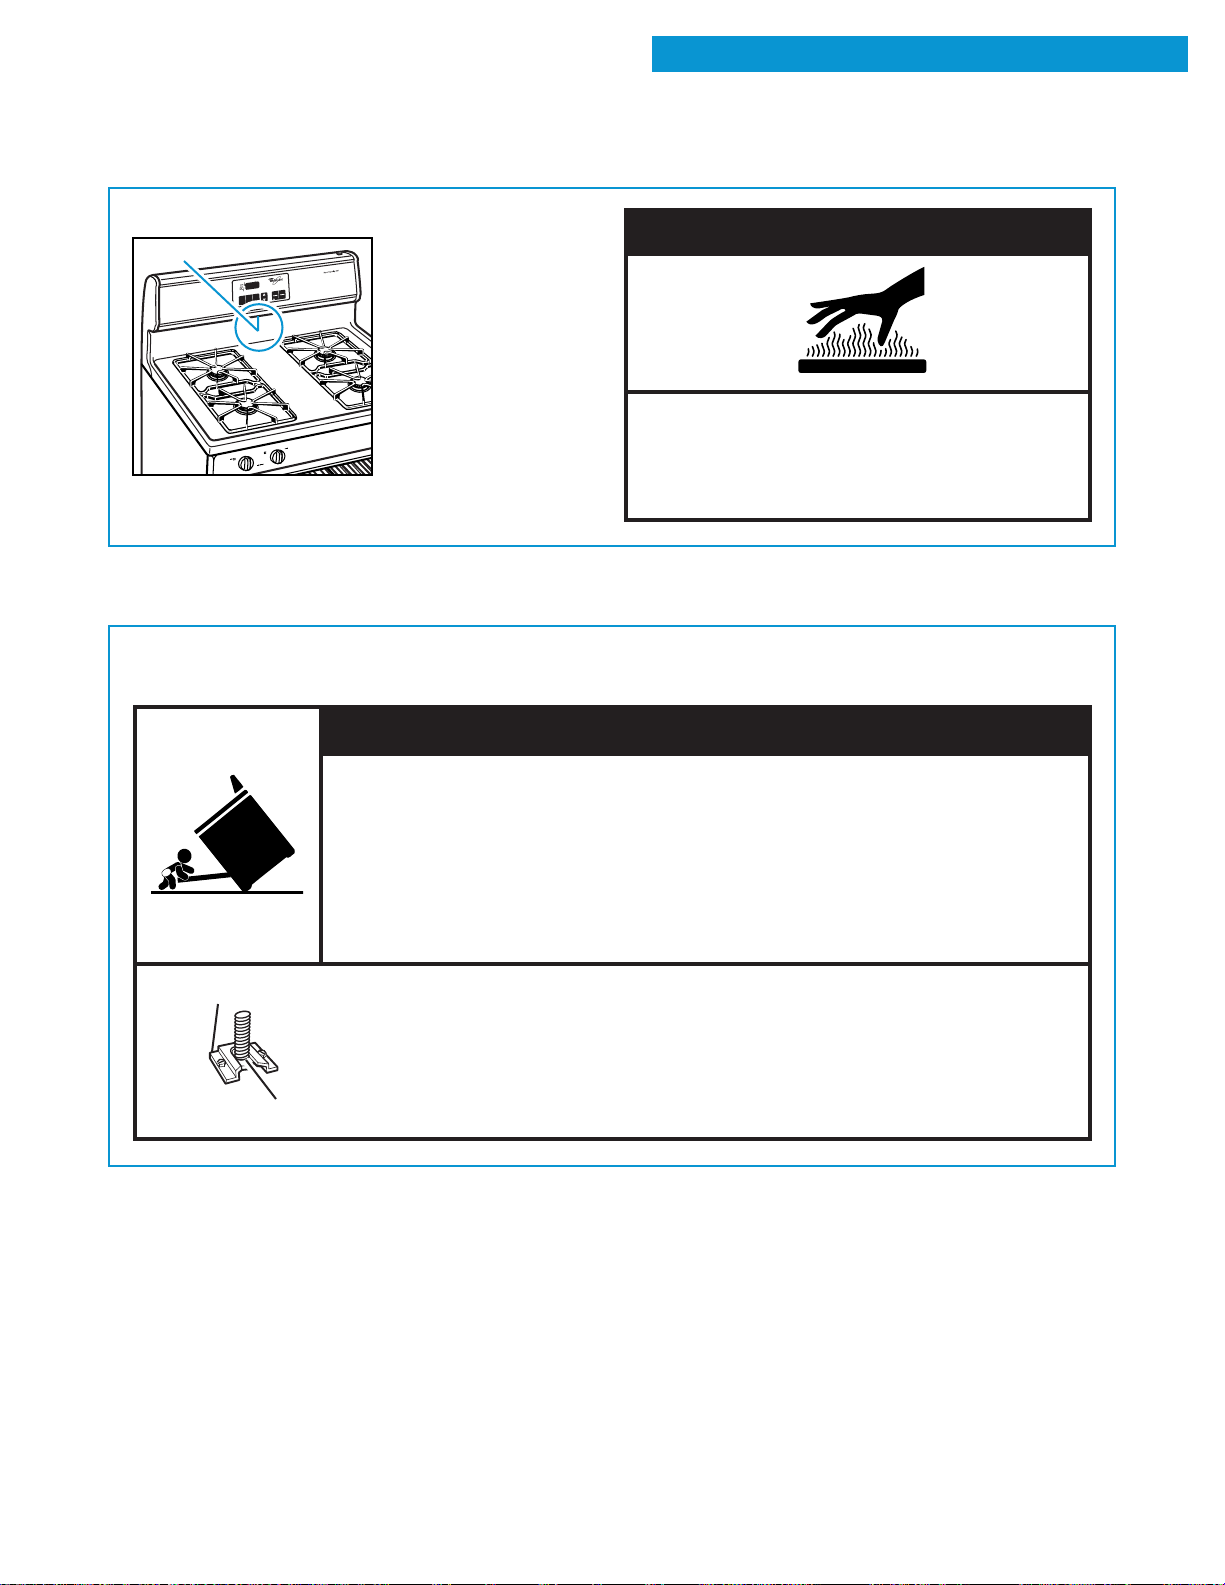
THE OVEN VENT
Hot air and moisture escape from the oven through
Oven vent
ONON
CLOSE DOORCLOSE DOOR
BAKEBAKE
BROILBROIL
SELF-CLEANING OVENSELF-CLEANING OVEN
STSTART ?ART ?
PREHEAPREHEAT
CLEANCLEAN
DOOR LOCKEDDOOR LOCKED
OFFOFF
STSTARTART
L
E
C
N
A
C
CANCEL
R
TE
N
E
ENTER
TEMPTEMP
AUTAUTO
C
E
5 S
5 SEC
CUSTOM
CLCLEANAN
BROIL
BAKEAKE
a vent that’s near the
middle of the
backguard.
The vent lets air circulate properly. Be careful
not to block the vent,
or you will get poor
baking/roasting results.
NOTE: Never store
plastics, paper, or
other items that could
melt or burn near the
oven vent, or any of the surface burners.
THE ANTI-TIP BRACKET
USING YOUR RANGE
wWARNING
Burn Hazard
Use pot holders when touching items left
near oven vent.
Failure to do so can result in burns.
The range will not tip during normal use. However, the range can tip if you apply too much force or weight
to the open door without the anti-tip bracket fastened down properly.
wWARNING
Tip Over Hazard
A child or adult can tip the range and be killed.
Connect anti-tip bracket to rear range foot.
Reconnect the anti-tip bracket, if the range is moved.
See the installation instructions for details.
Failure to follow these instructions can result in death or serious burns
to children and adults.
Anti-Tip Bracket
Making sure the anti-tip bracket is installed:
Slide range forward.
•
Look for the anti-tip bracket securely attached to floor.
•
Slide range back so rear range foot is under anti-tip bracket.
Range Foot
•
19
Page 20
USING YOUR RANGE
THE STORAGE DRAWER
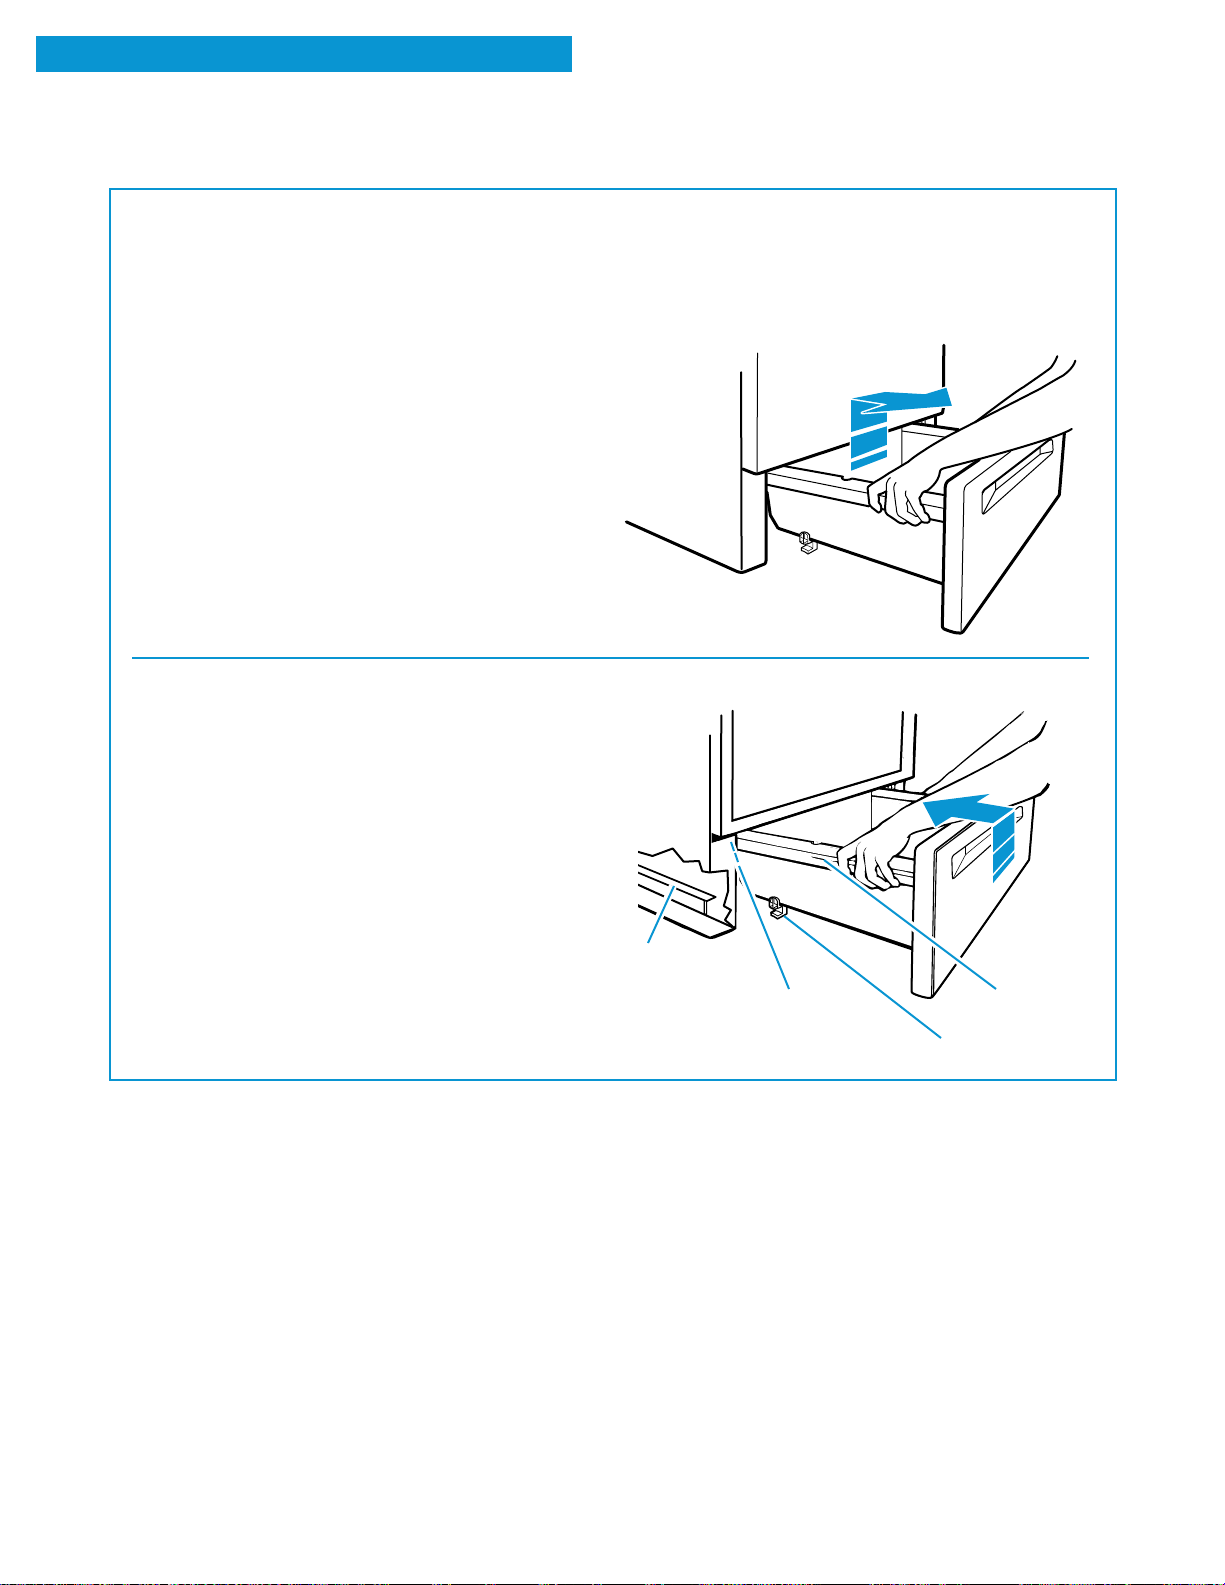
Use the storage drawer to store cookware. You can
remove the drawer to make it easier to clean under
the range. Be careful when handling the drawer.
Removing the storage drawer:
1. Empty the drawer before you remove it. Pull the
drawer straight out to the first stop. (The stops
are small, round objects formed in the slide rail.
They keep the drawer from sliding all the way
out.) Then lift the front of the drawer and pull it
out to the second stop.
2. Lift the back of the drawer slightly and slide it all
the way out.
Replacing the storage drawer:
1. Fit the ends of the drawer slide rails into the
drawer guides on both sides of the opening.
Also, be sure the lower guide is fitted onto the
lower slide rail.
2. Lift the front of the drawer and push it in until the
metal stops on the drawer slide rails clear the
drawer guides. Then slide the drawer closed.
Lower slide rail
(inside drawer
opening)
Upper drawer
guides
(on inside walls)
Drawer
slide rail
Lower
drawer guide
20
Page 21
USING THE SELF-CLEANING CYCLE
The Self-Cleaning cycle saves you from the toil and mess that often come with hand-cleaning the
inside of the oven. Like the other functions of your range, you run the Self-Cleaning cycle with the
easy-to-use controls. Please review the instructions in this section to keep your oven spotless.
wWARNING
Burn Hazard
Do not touch the oven during the Self-Cleaning cycle.
Keep children away from oven during Self-Cleaning cycle.
Do not use commercial oven cleaners in your oven.
Failure to follow these instructions can result in burns, or illness from inhaling
dangerous fumes.
BEFORE YOU START
Before you start the Self-Cleaning cycle, make
sure you:
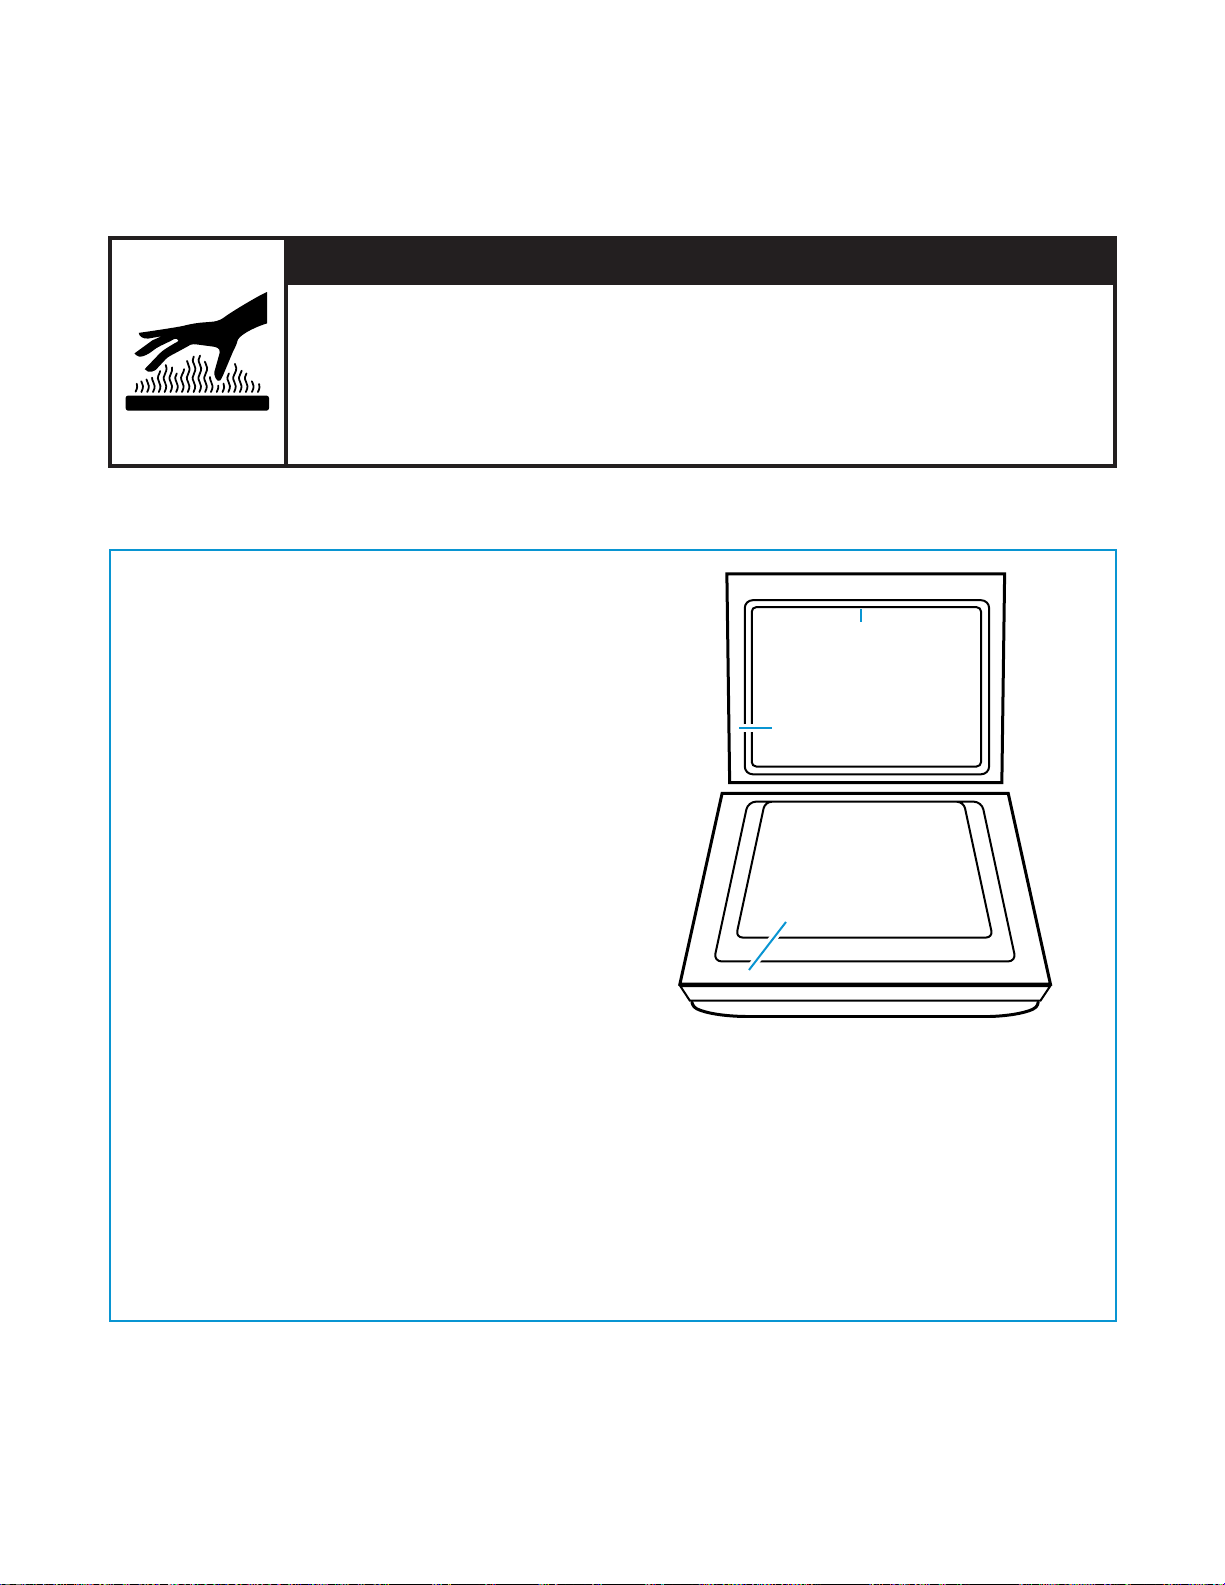
Hand-clean the areas shown. They do not get hot
•
enough during the Self-Cleaning cycle for soil to
burn away. Use hot water and detergent or a
soapy, steel-wool pad for cleaning.
NOTE: DO NOT clean, move, or bend the gasket.
You may get poor cleaning, baking, and roasting.
Remove the broiler pan and grid and any pots
•
and pans being stored in the oven.
Wipe out any loose soil or grease. This will help
•
reduce smoke during the Self-Cleaning cycle.
Wipe up food spills containing sugar as soon as
•
possible after the oven cools down. When sugar
is heated to a high temperature in the SelfCleaning cycle, the high temperature can cause
the sugar to burn and react with the porcelain.
This can cause staining and etching or pitting.
Remove the oven racks from the oven if you want
•
them to remain shiny. You can clean the oven
racks in the Self-Cleaning cycle, but they will
become harder to slide. (See the “Cleaning chart”
in the “Caring for Your Range” section.) If you
clean the racks in the Self-Cleaning cycle, place
them on the 2nd and 4th rack guides. (The guides
are counted from bottom to top.)
Heat and odors are normal during the Self-
•
Cleaning cycle. Keep the kitchen well ventilated
by opening a window or by turning on a vent
hood or other kitchen vent during the cycle.
TIPS:
Do not block the vent during the Self-Cleaning
•
cycle. Air must move freely for best cleaning results.
Do not leave plastic utensils on the cooktop. They
•
may melt.
Do not leave any foil in the oven during the
•
Self-Cleaning cycle. Foil could burn or melt and
damage the oven surface.
The oven light will not work during the Self-
•
Cleaning cycle.
DO NOT
hand-clean
gasket
Hand-clean
frame
Hand-clean
door around
edge
21
Page 22
USING THE SELF-CLEANING CYCLE
ON
ON
ON
ON
SETTING THE CONTROLS
SETTING THE CONTROLS
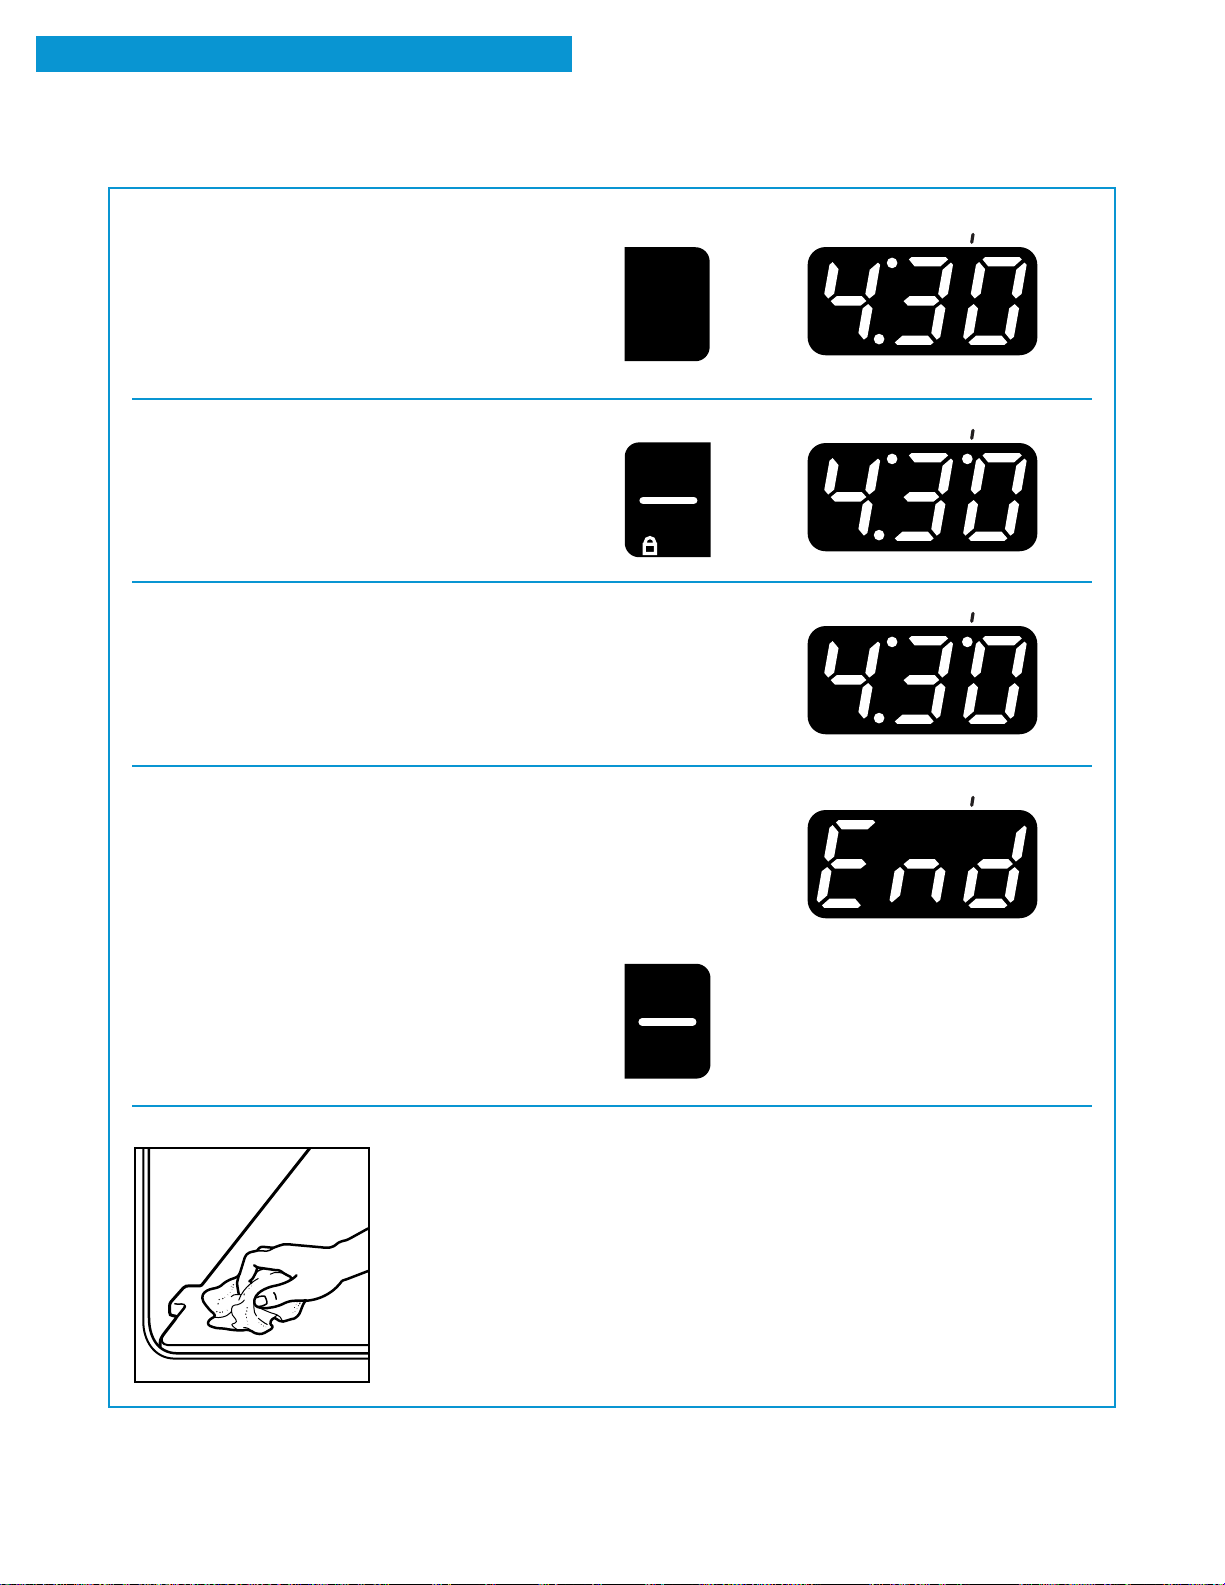
1. Press the auto clean pad.
The clean indicator light will light up.
This will automatically set a 41⁄2-hour
Self-Cleaning cycle.
NOTE: There will be a 30-minute cool-down
1
⁄2 hour before the cycle is over.
2. Start the oven.
NOTE: The on indicator light will light up and the
close door indicator light will flash if the door is
not closed.
3. After the Self-Cleaning cycle starts:
The door locked indicator light will light up when
the oven door locks. The door cannot be opened
when the door locked indicator light is on.
4. After the Self-Cleaning cycle ends and the oven
reaches normal baking/roasting temperatures:
The clean, door locked, and on indicator lights
will go out.
PRESS YOU SEE
AUTO
CLEAN
PRESS YOU SEE
START
ENTER
5 SEC
YOU SEE
YOU SEE
Press the off/cancel pad to clear the display.
5. After the oven cools to room temperature, wipe
off any residue or ash
with a damp cloth or
sponge. If needed,
touch up spots with a
mild abrasive cleanser
or cleaning sponge.
PRESS
OFF
CANCEL
22
Page 23
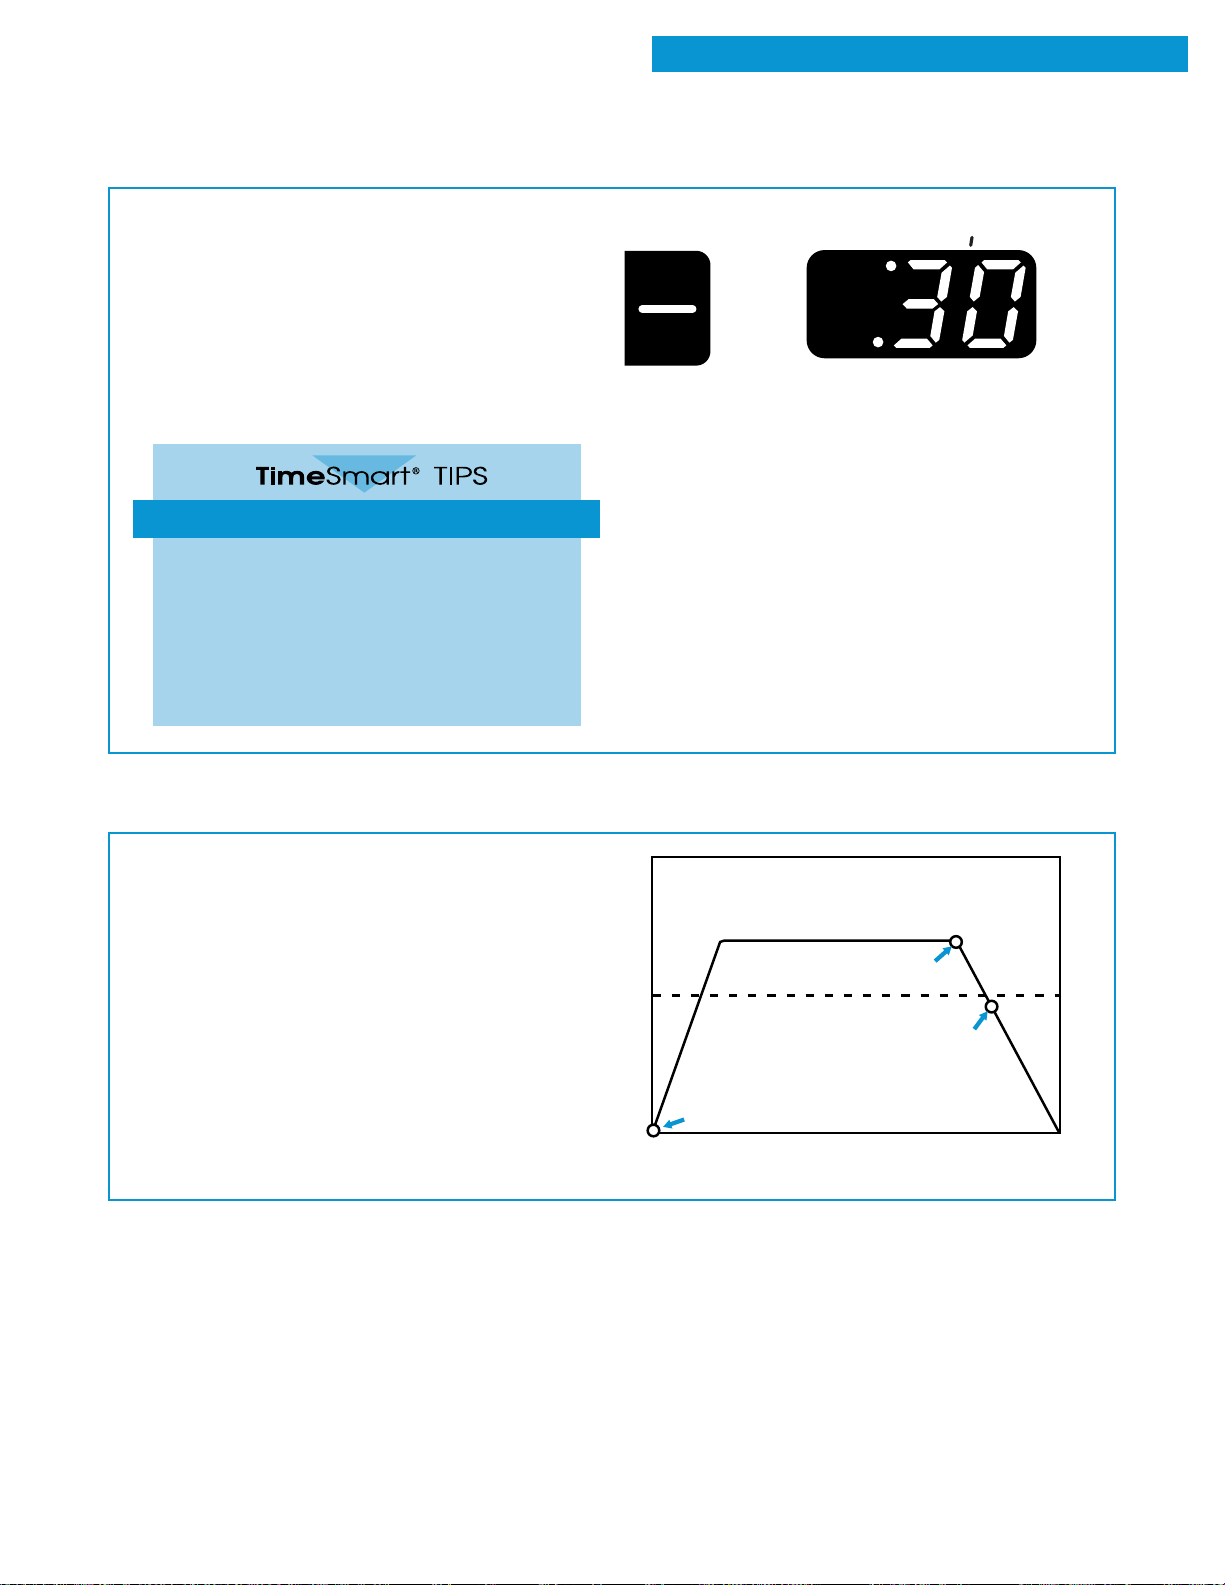
SETTING THE CONTROLS (CONT.)
ON
USING THE SELF-CLEANING CYCLE
To stop the self-cleaning cycle at
any time:
If the oven temperature is above normal broiling
temperatures, the Self-Cleaning cycle will start a
30-minute cool down. The clean and door locked
indicator lights will stay on. When the door locked
indicator light goes out, you can open the door.
Self-cleaning tips
Keep the kitchen well ventilated during
•
the Self-Cleaning cycle to help get rid
of heat, odors, and smoke.
Clean the oven before it gets heavily
•
soiled. Cleaning a very soiled oven takes
longer and could cause an increased
amount of smoke.
PRESS YOU SEE
OFF
CANCEL
HOW THE CYCLE WORKS
The Self-Cleaning cycle uses very high heat to burn
away soil and grease. During the cycle, the oven
gets much hotter than it does for normal baking or
broiling. This high heat breaks up the soil or grease
and burns it away.
Your oven is automatically preset for a 41⁄2-hour
Self-Cleaning cycle.
The graph at the right shows you what happens
in a 41⁄2-hour Self-Cleaning cycle. Notice that the
heating stops 1⁄2 hour before the 41⁄2-hour setting
is up.
875°F ( 468°C )
CLEANING CYCLE
OVEN SHUT OFF
( normal broiling temperature )
Temperature
DOOR LOCKS
START 11 2 3 4 STOP
Time In Hours
DOOR UNLOCKS
23
Page 24
CARING FOR YOUR RANGE
Your range is designed so you can care for it easily. You can do most cleaning with items found
around your home. Cleaning your range whenever spills or soiling occurs will help to keep it
looking and working like new.
wWARNING
Explosion Hazard
Do not store flammable materials such as gasoline near this appliance.
Doing so can result in death, explosion, or fire.
CLEANING CHART
Use this chart to get specific information on cleaning your range. Before cleaning, always make sure all
controls are off and the range is cool.
PART
Control knobs
Control panel
Exterior
surfaces
(other than
control panel)
HOW TO CLEAN
1. Turn the knobs off and pull them straight away from the control panel.
2. Wash the knobs with a sponge and warm, soapy water. Rinse and dry them well. Do
not soak them. Do not use steel wool or gritty cleansers, which can damage the
finish of the knobs.
3. Replace the knobs. Make sure all knobs are turned off.
Wash the panel with a sponge and warm, soapy water. Wipe the panel with clean water
•
and dry it well. Do not use steel wool or gritty cleansers, which can damage the finish.
OR
Wash the panel with a paper towel and spray glass cleaner. Do not spray the cleaner
•
directly on the panel. Apply the cleaner to the paper towel.
Remove the grates.
•
Wash the surface with a sponge and warm, soapy water or paper towel and spray
•
glass cleaner. Wipe with clean water and dry thoroughly. Use a nonabrasive, plastic
scrubbing pad on heavily soiled areas.
Do not use steel wool, abrasives, or harsh cleansers. They may damage the finish.
•
If you use soap or detergent solutions, wipe thoroughly to prevent filmy residue.
•
NOTE: Do not let foods containing acids (such as vinegar, tomato, or lemon juice) remain
on the surface. Acids may remove the glossy finish. Also, wipe up milk or egg spills when
the cooktop is cool. Be careful when cleaning around the model and serial number
plate; too much scrubbing could remove the numbers.
Replace the grates.
•
Surface
burner grates
and caps
Surface
burners
Broiler pan
and grid
24
Clean as soon as they become dirty and when they are cool enough to handle.
•
Wash with a mildly abrasive plastic scrubbing pad and warm, soapy water. Rinse and
•
dry well.
For stubborn stains, clean with a scrubbing pad and/or powdered cleanser and water.
•
Repeat these cleaning steps as needed.
See “Sealed surface burners and cooktop” later in this section.
•
Wash the pan and grid with a steel-wool pad and warm, soapy water. Rinse and dry well.
•
Do not clean in the Self-Cleaning cycle. (See “Before you start” in the “Using the
•
Self-Cleaning Cycle” section.)
OR
Wash the pan and grid in a dishwasher.
•
Page 25
CLEANING CHART (CONT.)
CARING FOR YOUR RANGE
PART
Oven racks
Oven door glass
Oven cavity
HOW TO CLEAN
Wash with a steel-wool pad and warm, soapy water. Rinse and dry well.
•
OR
Leave the racks in the oven during the Self-Cleaning cycle.
•
NOTE: If you leave your racks in the oven during the Self-Cleaning cycle, they
will lose their original color and become harder to slide. If you need to, apply a
small amount of vegetable oil to the side rungs to make the racks easier to slide.
Wash with a paper towel and spray glass cleaner or a nonabrasive plastic
•
scrubbing pad and warm, soapy water. Wipe with clean water and dry well.
Follow the directions that come with the cleaner.
•
Wipe up food spills containing sugar as soon as possible after the oven cools
•
down. (See “Before you start” in the “Using the Self-Cleaning Cycle” section.)
See the “Using the Self-Cleaning Cycle” section.
•
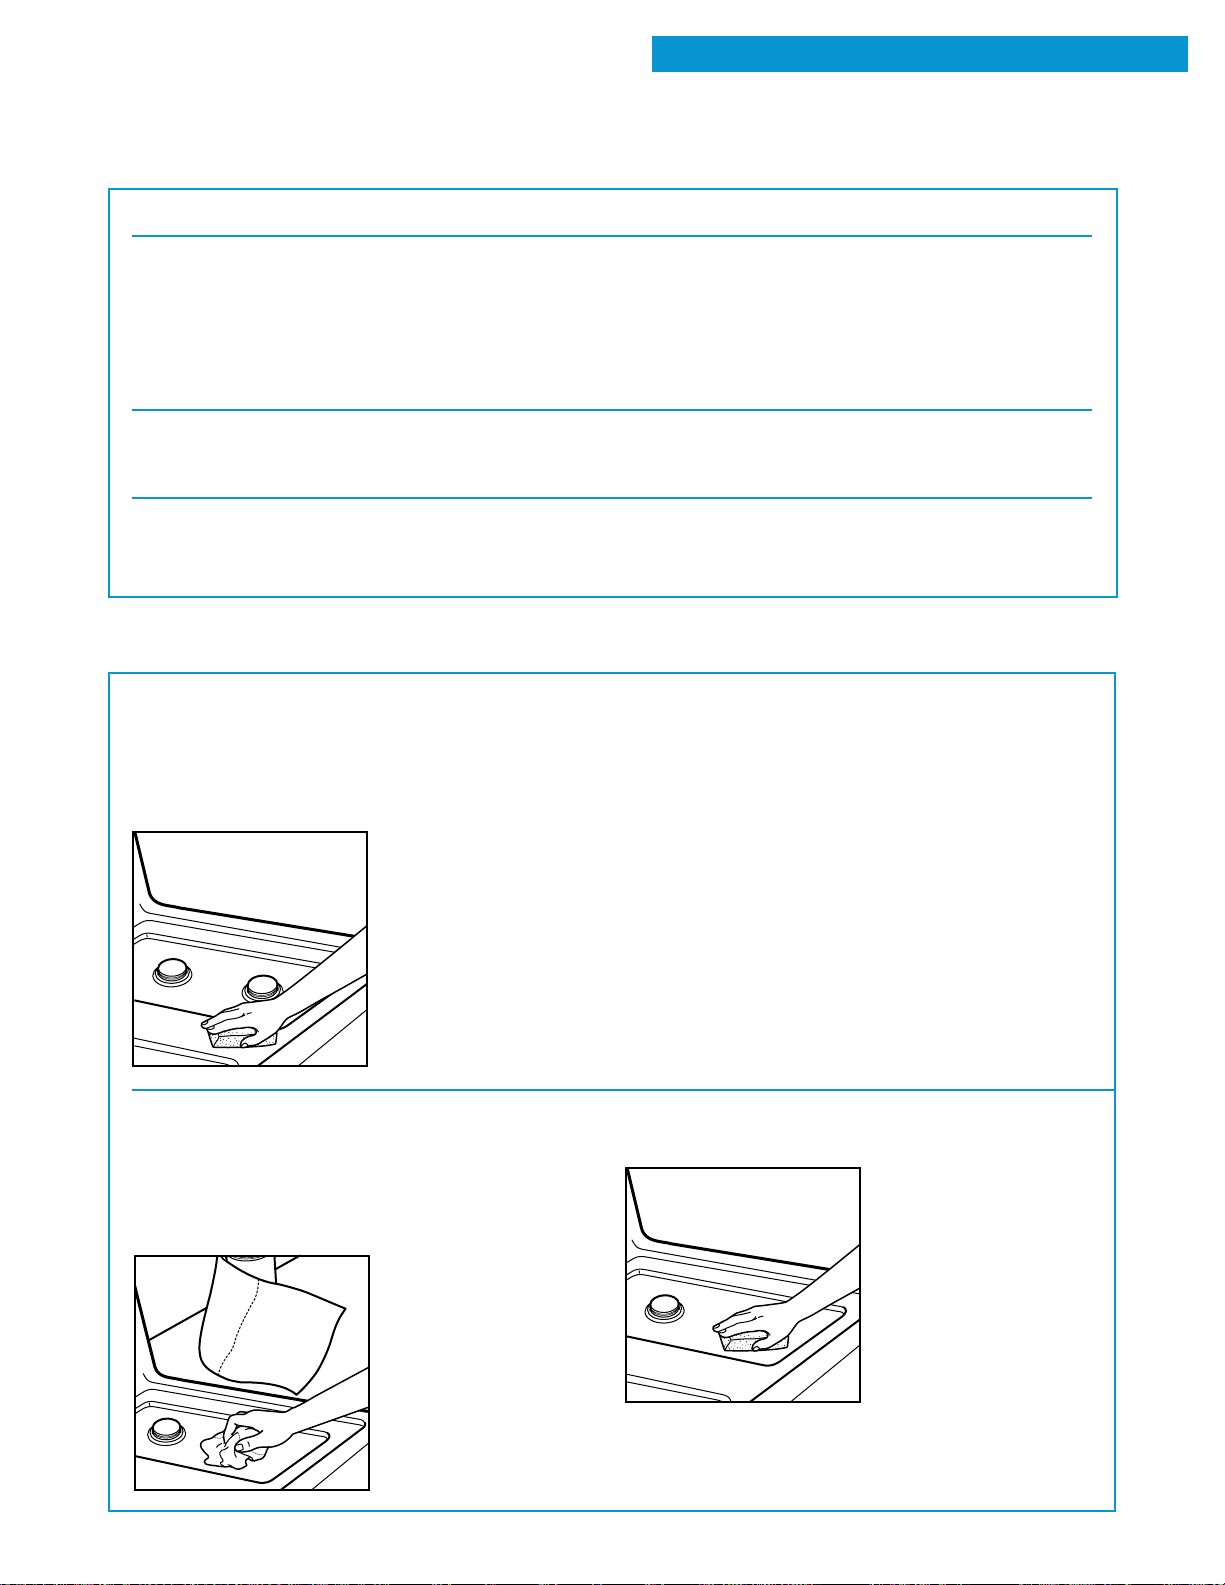
SEALED SURFACE BURNERS AND COOKTOP
The sealed burner cooktop is specially designed to
make cleaning easier.
Cleaning the cooktop
Wipe the cooktop with a damp sponge and dry.
•
NOTE: Do not remove
the cooktop. Doing so
could result in product
damage.
Cleaning the contoured well areas
The contoured well is an area around each burner
that is lower than the rest of the cooktop.
If spills occur in the contoured well section:
1. Blot up the spill with a paper towel.
2. Wipe up what’s left with a clean, damp
sponge. Dry.
25
Page 26
CARING FOR YOUR RANGE
5
8
"
SEALED SURFACE BURNERS AND COOKTOP (CONT.)
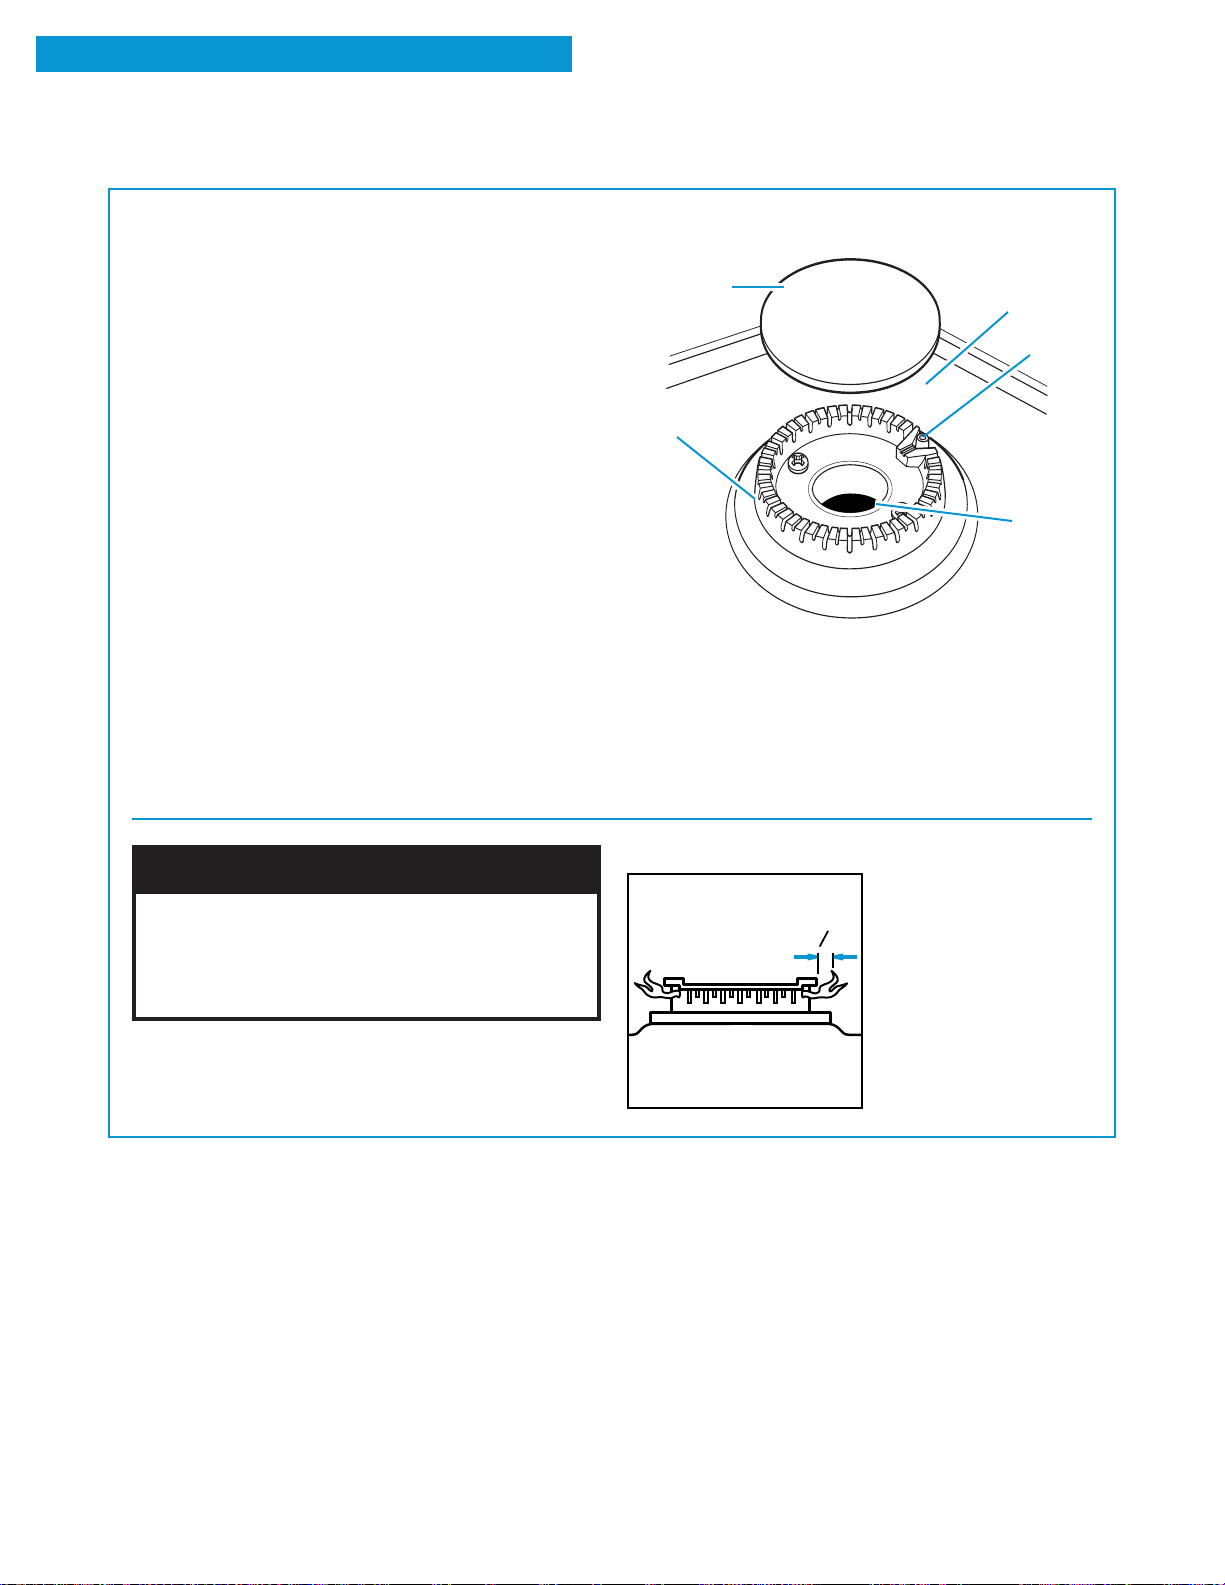
Cleaning the surface burners
You should routinely remove and clean the
•
burner cap. Always clean the burner cap after
a spillover. Keeping the burner cap clean prevents improper ignition and an uneven flame.
For the proper flow of gas and ignition of the
•
burner, do not allow spills, food, cleaning
agents, or any other material to enter the
gas tube opening or burner ports.
Gas must flow freely through the gas tube
•
opening for the burner to light properly. You
must keep this area free of any soil and protect
it from boilovers or spillovers. Always keep the
burner cap in place whenever a surface burner
is in use.
Let the cooktop cool before cleaning.
•
Do not use oven cleaners, bleach, or rust
•
removers.
Do not obstruct the flow of combustion and
•
ventilation air.
Be careful not to allow moisture to collect in the
•
burner control knob areas. Moisture can cause
the ignitor switches to fail.
Porcelain
burner cap
Burner
base
Contoured
well area
Ignitor
Gas tube
opening
wWARNING
Carbon Monoxide Poisoning Hazard
Do not operate with a yellow flame.
Doing so can result in death, heart attack,
or convulsions.
Occasionally check the burner flames for proper
•
size and shape as
shown. A good flame
is blue in color. If the
flames are uneven,
you may need to clean
the burner ports.
26
Page 27
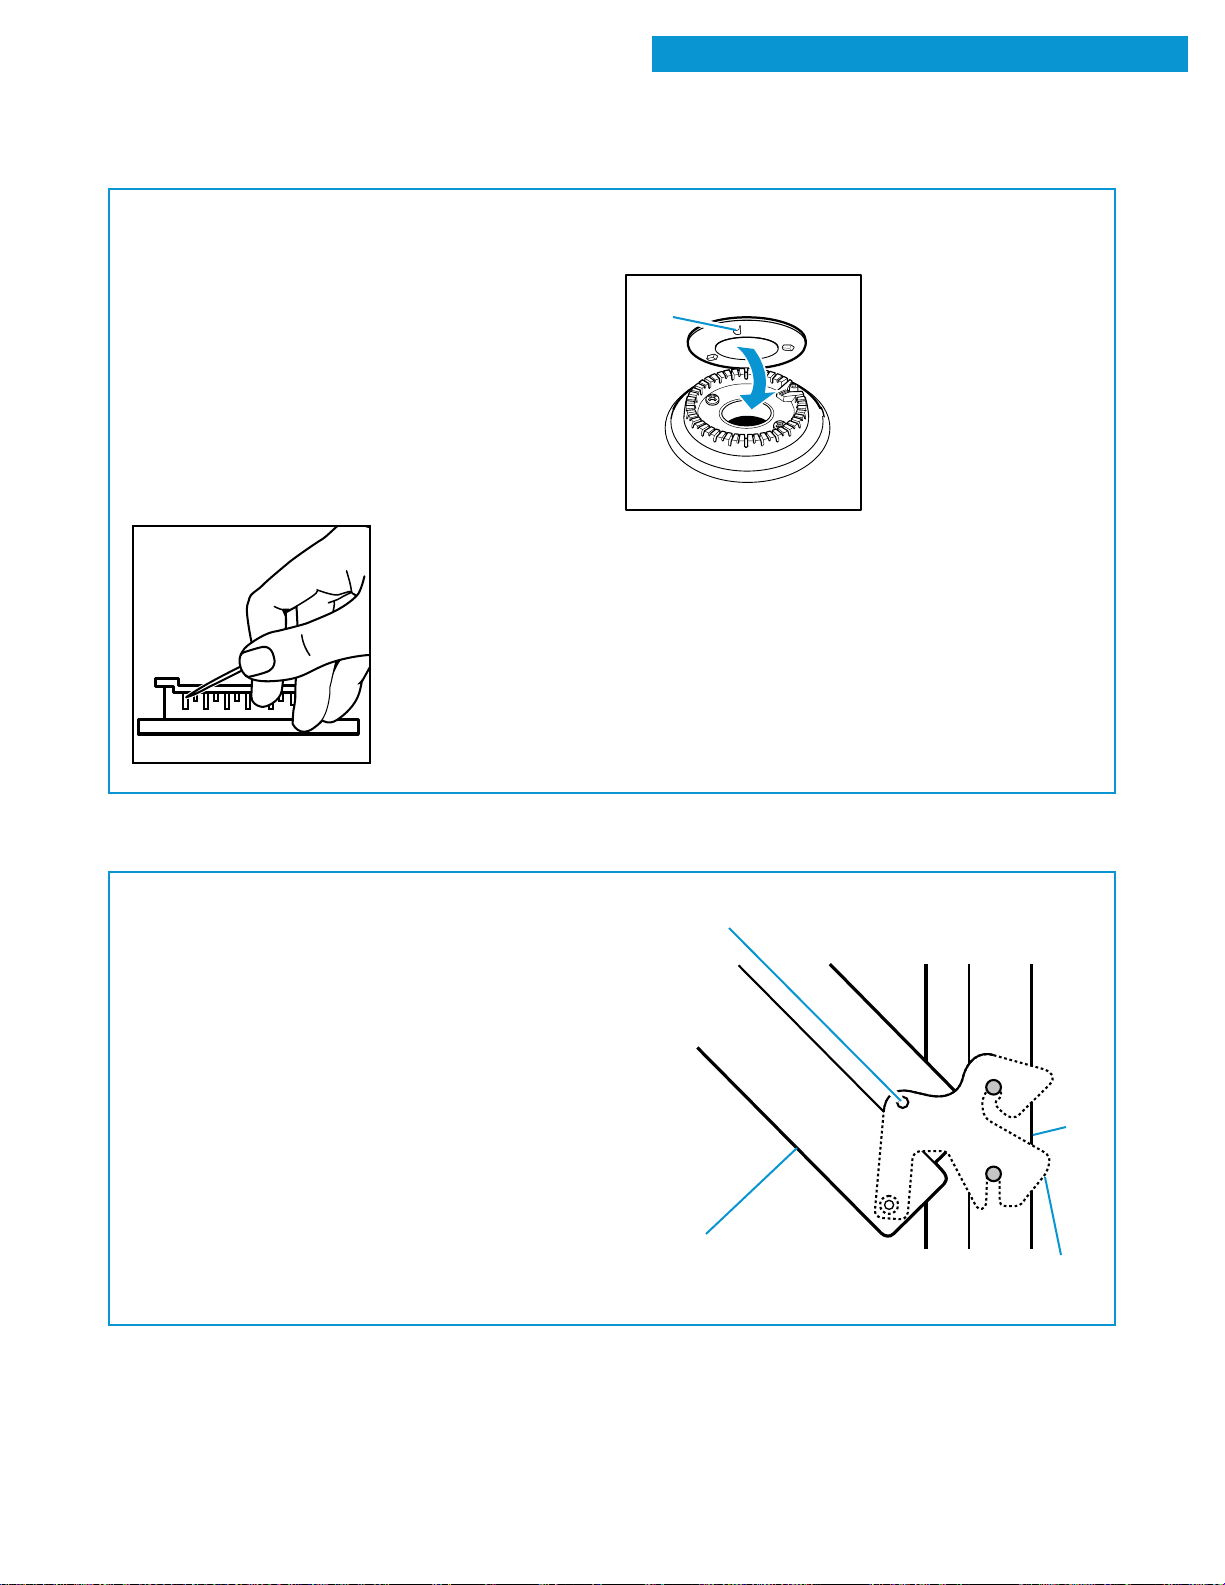
SEALED SURFACE BURNERS AND COOKTOP (CONT.)
To clean the burners:
1. Pull the burner cap straight up from the
burner base.
2. Clean the burner cap with warm, soapy water
and a sponge. You can also clean it with a
mildly abrasive scrubbing pad or cleanser.
Do not clean the burner cap in a dishwasher
or self-cleaning oven.
3. If the gas tube opening has become soiled or
clogged, use a cotton swab or a soft cloth to
clean the area.
4. If the ports are clogged, clean them with a
straight pin. Do not
enlarge or distort the
port. Do not use a
wooden toothpick. If
the burner needs to be
adjusted, call a qualified
technician for service.
5. After cleaning the gas tube opening and ports,
Alignment
pin
6. Turn on the burner to see if it will light. If the
burner does not light after you have cleaned it,
recheck cap alignment or contact an authorized
service technician. Do not service the sealed
burner yourself.
CARING FOR YOUR RANGE
replace the burner cap.
To replace the burner
cap, make sure the
alignment pins on the
cap are properly aligned
with the burner base.
REMOVING THE OVEN DOOR
For normal use of your range, you do not need to
remove the door. However, if you have to remove
the door follow the instructions in this section.
NOTE: If the door removal pins included in the
Anti-Tip Bracket Package are not available, nails
or screws may be used. Be careful that the length
of the nail or screw does not damage the oven
by chipping or scratching the porcelain surface.
Insert door removal
pin here
Range
Oven door
Hinge
hanger
continued on next page
27
Page 28
CARING FOR YOUR RANGE
REMOVING THE OVEN DOOR (CONT.)
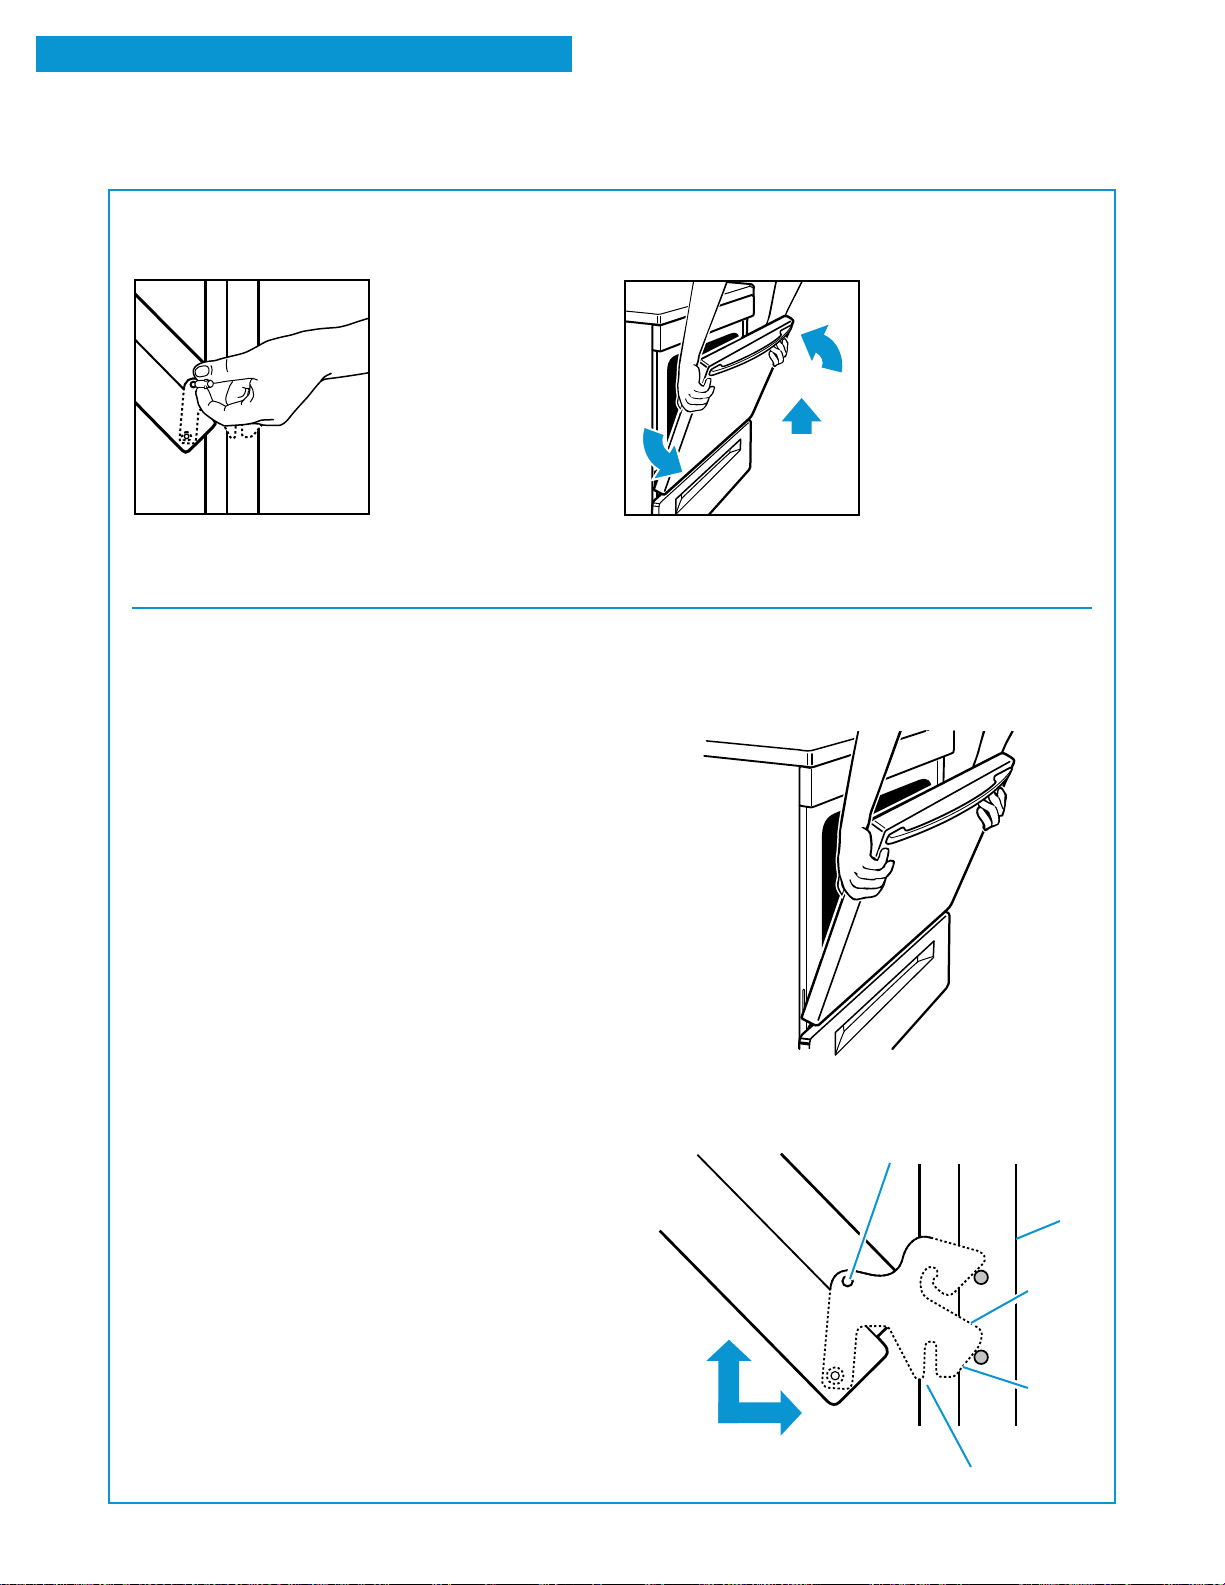
To remove:
1. Open the door about halfway. Insert door
removal pins into both
hinge hangers. Do not
remove them while
the door is removed
from the range.
2. Close the door as far as the door removal pins
will let you.
To replace:
3. Rotate the door toward the range. Lift up the door
until it stops. Do not use
the door handle to lift the
door. Rotate the door
toward the floor and pull
it toward you.
NOTE: The door removal pins you inserted must still
be in both sides of the door.
1. Grasp the door on the sides with your fingers
on the front of the door and your thumbs on the
inside surface.
2. Rest the hinge hanger so that it is flat (at the
bottom of the hinge hanger on the bottom of
the front frame slot).
3. Position the door with the hinge hanger slots
almost parallel to the front frame.
4. Push up and in until the hinge hanger slots
become fastened to the range. Lower the door
and rotate it slightly from the front to the back
until the slots are fully fastened. The hinge
hanger will be close to the bottom of the front
frame slot.
5. Pull door open about halfway and remove the
door removal pins. Save door removal pins for
future use.
6. Close the door.
Oven door
Remove door
removal pin
Range
Hinge
hanger
Up
Hinge
hanger
flat
In
Front frame
slot bottom
28
Page 29
THE OVEN LIGHT
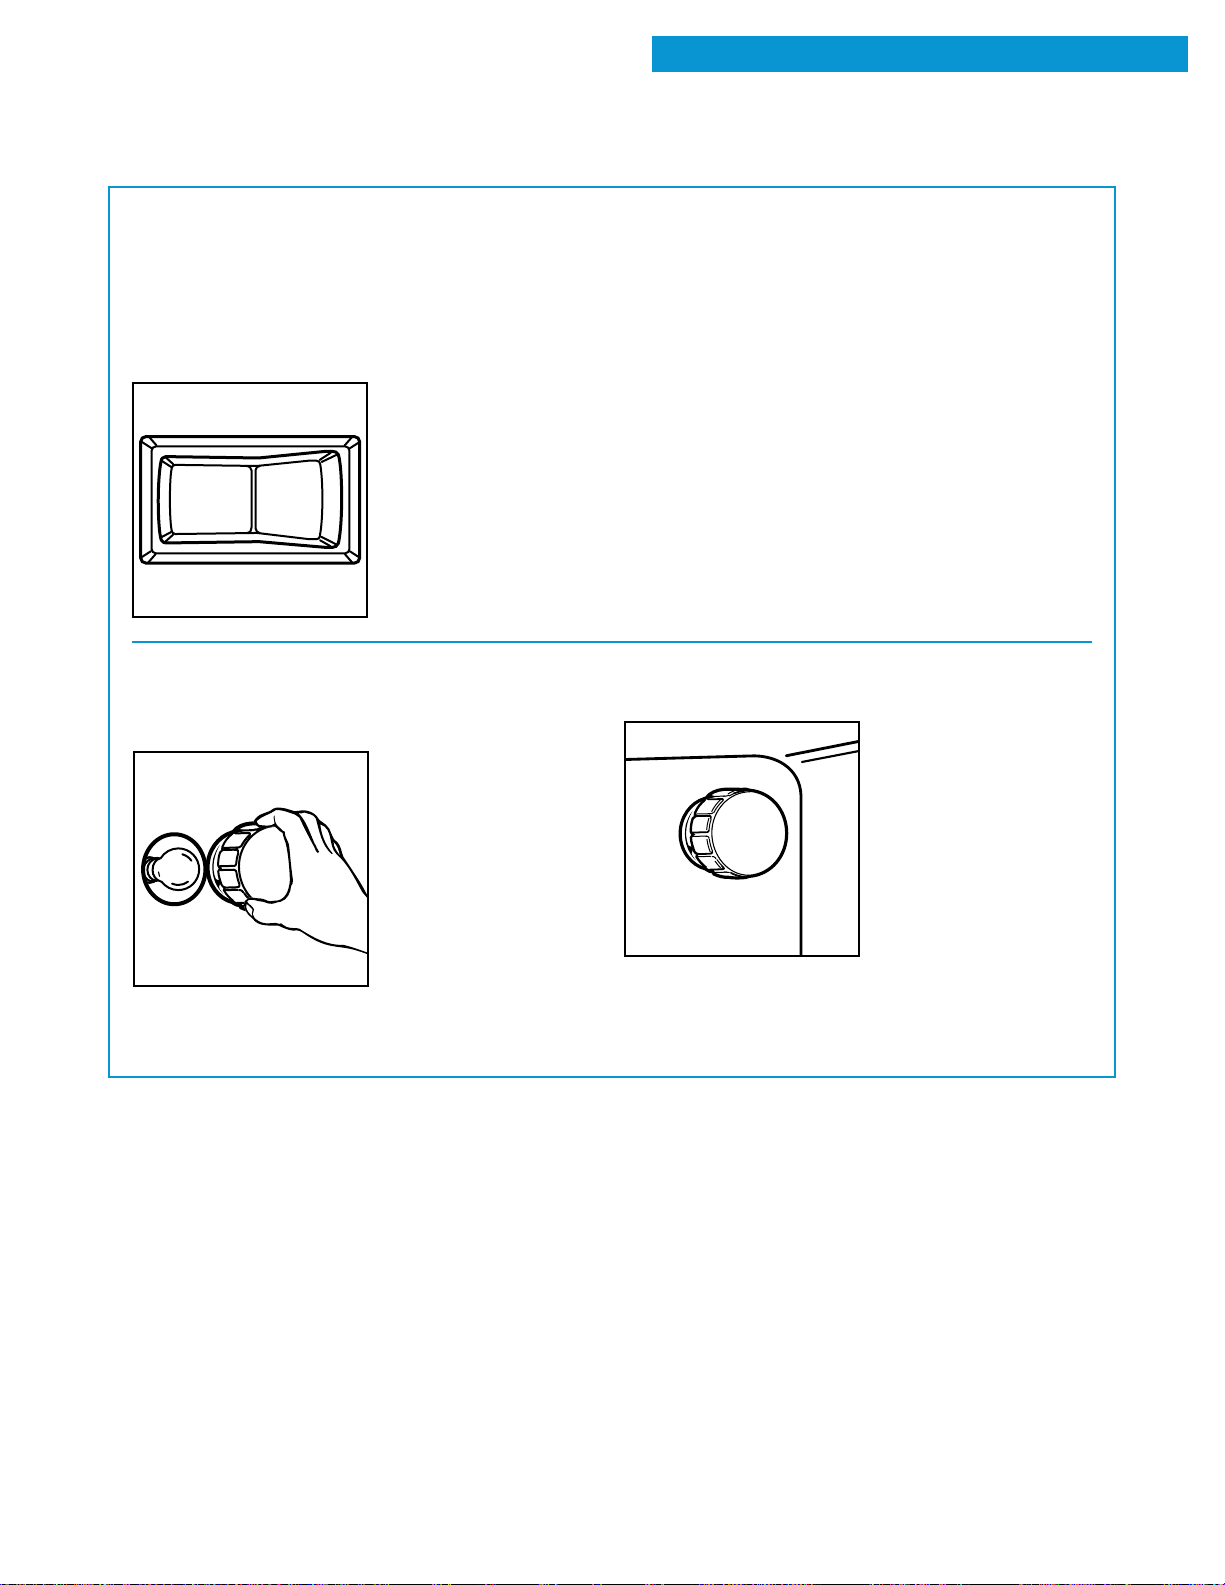
The oven light will come on when you open the
oven door.
To turn the light on or off when the oven door
is closed (Model SF360PEE):
Push the oven light switch on the backguard.
•
CARING FOR YOUR RANGE
To replace the oven light:
1. Unplug range or disconnect power.
2. Remove the glass bulb cover in the back of
the oven by turning it
counterclockwise.
3. Remove the light bulb from its socket. Replace
the bulb with a 40-watt appliance bulb.
4. Replace the light bulb cover by turning it
clockwise.
5. Plug in range or reconnect power.
NOTE: The oven light will not work during the
Self-Cleaning cycle.
29
Page 30

TROUBLESHOOTING
Most cooking problems often are caused by little things you can find and fix without tools of any
kind. Check the lists below and on the next page before calling for assistance or service. If you still
need help, see “Requesting Assistance or Service” on page 32.
RANGE DOES NOT WORK
PROBLEM
Nothing works
CAUSE
The range is not properly connected to the gas supply. Contact an autho-
•
rized service technician to reconnect the range to the gas supply. (See the
Installation Instructions.)
You have blown a household fuse or tripped a circuit breaker.
•
The control knob is not set correctly. Push in the control knobs before
•
turning them.
OVEN/BROILER BURNER
PROBLEM
The oven does not work
The burner fails to light
The burner flames lift
away from the ports, are
yellow, or are noisy
CAUSE
You have not set the electronic control correctly. Refer to the proper
•
instructions.
The main or regulator gas shutoff valve is in the off position. (See the
•
Installation Instructions.)
The ignitor is broken. Contact an authorized service technician to replace it.
•
You have blown a household fuse or tripped a circuit breaker.
•
The air/gas mixture is incorrect. Contact an authorized service technician to
•
check the air/gas mixture or see the Installation Instructions.
SURFACE BURNERS
PROBLEM
The burner fails to light
The burner flames are
uneven
The burner flames lift off
the ports, are yellow, or
are noisy when turned off
The burner makes a
popping noise when on
30
CAUSE
You have blown a household fuse or tripped a circuit breaker.
•
The burner ports may be clogged. Clean them with a straight pin. (See page 27.)
•
The burner ports may be clogged. Clean them with a straight pin.
•
(See page 27.)
The burner needs cleaning. (See page 27.)
•
The air/gas mixture is incorrect. Contact an authorized service technician to
•
check the air/gas mixture or see the Installation Instructions.
The burner is wet from washing. Let it dry.
•
Page 31

TROUBLESHOOTING
WHEN SELF
PROBLEM
The Self-Cleaning cycle
will not work
CLEANING YOUR OVEN
-
COOKING RESULTS
PROBLEM
Cooking results are
not what you expected
CAUSE
You did not press the start/enter pad.
•
The door is not closed all the way.
•
CAUSE
The oven temperature seems too low or too high. See “Adjusting the oven
•
temperature control” on page 15 to adjust the oven temperature.
You did not preheat the oven before baking (if called for in the recipe).
•
You are using a pan that is not the correct type or size. Refer to a reliable
•
cookbook or recipe for the recommended pan type and size.
There is not enough air space around the pan when baking. Allow 11⁄2 to
•
2 inches of air space on all sides of the pan.
The flame size does not fit the cookware being used.
•
When broiling, you have not completely closed the oven door.
•
The flow of combustion and/or ventilation air to the range is blocked. Make
•
sure nothing is blocking the middle front of the backguard.
The range is not level. (See the Installation Instructions.)
•
DISPLAY MESSAGES
PROBLEM
The display is showing
“PF”
“F” followed by a number
shows on the display
The indicator light(s)
is flashing
If none of these items are causing your problem, see “Requesting Assistance or Service” on page 32.
CAUSE
There has been a power failure. Press the off/cancel pad to clear the display
•
if needed.
Press the off/cancel pad to clear the display. If an “F” code appears again,
•
call for service. (See “If You Need Assistance or Service” on page 32.)
The function(s) indicated may not be working. Refer to the section in this
•
Use and Care Guide discussing the function. If the indicator light(s) keeps
flashing, call for service. (See “If You Need Assistance or Service” on page 32.)
31
Page 32
R
EQUESTING
To avoid unnecessary service calls, please check the “Troubleshooting” section. It may save you
the cost of a service call. If you still need help, follow the instructions below.
IF
YOU NEED ASSISTANCE OR SERVICE
A
SSISTANCE OR SERVICE
Call the Whirlpool Consumer Assistance
Center toll free at 1-800-253-1301.
Our consultants are available to
assist you.
When calling:
Please know the purchase date, and
the complete model and serial number of your
appliance (see the “A Note to You” section).
This information will help us better respond to
your request.
Our consultants provide assistance with:
Features and specifications on our full line
•
of appliances
Installation information
•
Use and maintenance procedures
•
IF
YOU NEED REPLACEMENT PARTS
If you need to order replacement parts, we recommend that you only use FSP
parts. FSP replacement parts will fit right and work
right, because they are made to the same exacting
specifications used to build every new
WHIRLPOOL
®
appliance.
®
factory authorized
Accessory and repair parts sales
•
Do-it-yourself repair help
•
Specialized customer assistance (Spanish speak-
•
ing, hearing impaired, limited vision, etc.)
Referrals to local dealers, service companies, and
•
repair parts distributors
Whirlpool service technicians are trained to fulfill
the product warranty and provide after-warranty
service, anywhere in the United States.
To locate the authorized Whirlpool service company
in your area, you can also look in your telephone
directory Yellow Pages.
To locate FSP replacement parts in your area, call
our Consumer Assistance Center telephone number
or your nearest authorized service center.
F
OR FURTHER ASSISTANCE
If you need further assistance, you can write to
Whirlpool with any questions or concerns at:
Whirlpool Brand Home Appliances
Consumer Assistance Center
c/o Correspondence Dept.
2000 North M-63
Benton Harbor, MI 49022-2692
32
Please include a daytime phone number in your
correspondence.
Page 33

NOTES
33
Page 34

NOTES
34
Page 35

INDEX
This index is alphabetical. It contains all the topics included in this manual, along with the page(s)
on which you can find each topic.
TOPIC PAGE
AIR CIRCULATION.....................................................10
ANTI-TIP BRACKET ...................................................19
ASSISTANCE .............................................................32
BAKING
Pans ...................................................................9, 10
Preheating .............................................................. 13
Racks........................................................................9
Setting cycle ........................................................... 12
Tips ..................................................................... 9, 13
BROILING
Grid......................................................................... 17
Guide ......................................................................18
Pan ............................................................. 16, 17, 18
Setting cycle ........................................................... 16
Tips ......................................................................... 17
CLEANING
Broiler pan and grid ................................................ 24
Control knobs ......................................................... 24
Control panel ..........................................................24
Exterior surfaces ....................................................24
Oven cavity ............................................................. 25
Oven door glass ..................................................... 25
Oven racks .............................................................25
Self-cleaning cycle ................................................. 21
Surface burners ................................................ 25-27
Surface burner grates and caps ............................. 24
CONTROL PANEL
Burner heat settings .................................................7
Control knobs ........................................................... 7
Surface burner markers............................................ 6
TOPIC PAGE
OVEN DOOR ..............................................................27
OVEN LIGHT ..............................................................29
OVEN TEMPERATURE
Adjusting ................................................................15
Setting ..............................................................12, 16
OVEN VENT ...............................................................19
PANS......................................................................9, 10
PARTS..........................................................................6
RACKS .........................................................................9
ROASTING
Pans ...................................................................9, 10
Racks........................................................................9
Setting cycle ........................................................... 12
Tips ......................................................................... 13
SAFETY .................................................................... 3-5
SELF-CLEANING CYCLE
Before you start ......................................................21
How the cycle works ..............................................23
Setting the controls ................................................22
Special tips ............................................................. 23
SERVICE .................................................................... 32
STORAGE DRAWER ..................................................20
SURFACE BURNERS
Control knobs ..................................................... 7, 24
Control setting guide ................................................ 7
Power failure.............................................................8
Surface burner markers............................................ 6
COOKWARE
Canning .................................................................... 8
Tips ........................................................................... 8
ELECTRONIC OVEN CONTROL
Canceling ...............................................................12
Control lock ............................................................11
Display .................................................................... 11
Indicator lights ........................................................11
Starting ...................................................................12
FEATURES ...................................................................6
MODEL AND SERIAL NUMBER .................................. 2
TIPS
Bakeware..................................................................9
Broiling ...................................................................17
Cookware ................................................................. 8
Roasting ................................................................. 13
Saving energy ..................................................... 7, 14
Self-cleaning...........................................................23
TROUBLESHOOTING .......................................... 30-31
WARRANTY ............................................................... 36
35
Page 36

WARRANTY
WHIRLPOOL® GAS RANGE
LENGTH OF WARRANTY
FULL ONE-YEAR
WARRANTY
FROM DATE OF PURCHASE
WHIRLPOOL WILL NOT PAY FOR
A. Service calls to:
1. Correct the installation of your range.
2. Instruct you how to use your range.
3. Replace house fuses or correct house wiring or plumbing.
4. Replace owner-accessible light bulbs.
B. Repairs when your range is used in other than normal, single-family household use.
C. Pickup and delivery. Your range is designed to be repaired in the home.
D. Damage to your range caused by accident, misuse, fire, flood, acts of God, or use of products not
approved by Whirlpool.
E. Repairs to parts or systems caused by unauthorized modifications made to the appliance.
WHIRLPOOL CORPORATION SHALL NOT BE LIABLE FOR INCIDENTAL OR CONSEQUENTIAL DAMAGES.
Some states do not allow the exclusion or limitation of incidental or consequential damages, so this exclusion or
limitation may not apply to you. This warranty gives you specific legal rights, and you may also have other rights
which vary from state to state.
Outside the United States, a different warranty may apply. For details, please contact your authorized
Whirlpool dealer.
If you need service, first see the “Troubleshooting” section of this book. After checking “Troubleshooting,”
additional help can be found by checking the “Requesting Assistance or Service” section, or by calling the
Whirlpool Consumer Assistance Center telephone number, 1-800-253-1301, from anywhere in the U.S.A.
WHIRLPOOL WILL PAY FOR
FSP® replacement parts and repair labor to correct defects in materials or
workmanship. Service must be provided by an authorized Whirlpool
service company.
3/96
PART NO. 3196290 Rev. B
© 1997 Whirlpool Corporation ® Registered Trademark/TM Trademark of Whirlpool, U.S.A. Printed in U.S.A.
7/97
 Loading...