

Page 1

HHoommee AApppplliiaanncceess
UseAndCare
G U I D E
A Note to You ......................... 2
Cooktop Safety ................... 3-5
Getting to Know Your
Cooktop ..................................
Air shutter adjustment ........ 7
LO flame adjustment .......... 8
Controls ................................. 9
Using .................................. 9
Caring for .......................... 11
Surface Burners .................. 12
Installing .......................... 12
Using ................................ 15
Caring for ......................... 16
Grill ....................................... 18
Installing ........................... 18
Using ................................ 20
Caring for .......................... 23
Griddle ................................. 25
Installing ........................... 25
Using ................................ 26
Caring for .......................... 28
Vent ...................................... 29
Using ................................ 29
Caring for .......................... 30
Troubleshooting ................. 31
Requesting Assistance or
30" GAS MODULAR DOWNDRAFT
COOKTO
TO THE INSTALLER: PLEASE LEAVE THIS
INSTRUCTION BOOK WITH THE UNIT.
P
Servic
Warranty .............................. 36
e ................................. 33
1-800-253-1301
Call us with questions or comments.
6
TO THE CONSUMER: PLEASE READ AND
KEEP THIS BOOK FOR FUTURE REFERENCE.
PART NO. 8111P466-60/9763399
MODEL SC8720ED
Page 2
A Note to You
Thank you for buying a WHIRLPOOL® appliance.
Because your life is getting busier and more complicated, WHIRLPOOL cooktops are easy
to use, save time, and help you manage your home better. To ensure that you enjoy years
of trouble-free operation, we developed this Use and Care Guide. It is full of valuable information about how to operate and maintain your appliance properly and safely. Please read
it carefully.
Also, please complete and mail in the Product Registration Card provided with your
appliance. The card helps us notify you about any new information on your appliance.
Please record your model’s information.
Whenever you call to request service for
your appliance, you need to know your
complete model number and serial number.
You can find this information on the model
and serial number plate (see diagram on
page 6 for location of plate).
Please also record the purchase date of
your appliance and your dealer’s name,
address, and telephone number.
Keep this book and the sales slip together in a safe place for future reference.
Model Number __________________________
Serial Number __________________________
Purchase Date __________________________
Dealer Name ___________________________
Dealer Address _________________________
Dealer Phone ___________________________
Our Consumer Assistance Center
number is toll-free 24 hours a day.
1-800-253-1301
WARNING: If the information in this manual is not followed exactly,
a fire or explosion could result causing death, personal injury, or
property damage.
Do not store or use gasoline or other flammable vapors and liquids
in the vicinity of this or any other appliance.
WHAT TO DO IF YOU SMELL GAS:
• Do not try to light any appliance.
• Do not touch any electrical switch; do not use any phone in your
building.
• Immediately call your gas supplier from a neighbor’s phone.
Follow the gas supplier’s instructions.
• If you cannot reach your gas supplier, call the fire department.
Installation and service must be performed by a qualified installer,
service agency, or the gas supplier.
– SAVE THESE INSTRUCTIONS FOR FUTURE REFERENCE –
2
Page 3
IMPORTANT SAFETY INSTRUCTIONS
Cooktop Safety
Your safety is important to us.
This guide contains safety statements
under warning symbols. Please pay special
attention to these symbols and follow any
instructions given. Here is a brief explanation
of the use of the symbol.
IMPORTANT SAFETY INSTRUCTIONS
READ AND SAVE THESE INSTRUCTIONS
Gas cooktops have been thoroughly tested for safe and efficient operation. However, as with
any appliance, there are specific installation and safety precautions which must be followed
to ensure safe and satisfactory operation.
wWARNING
This symbol alerts you to such
dangers as fire, electrical shock,
burns, and personal injury.
wWARNING
To reduce the risk of fire, electrical shock, injury to
persons, or damage when using the cooktop, follow
basic precautions, including the following:
General
• Install or locate the cooktop only in
accordance with the provided Installation Instructions. The cooktop must be
installed by a qualified installer. The
cooktop must be properly connected to
the proper gas supply and checked for
leaks. The cooktop must also be properly connected to electrical supply and
grounded.
• Gas fuels and their use in appliances
could cause minor exposures to benzene, formaldehyde, carbon monoxide,
and soot, primarily from incomplete
combustion. Significant exposure to
these substances could cause cancer
or reproductive harm. Properly adjusted
burners with a blue, rather than a
yellow, flame will minimize incomplete
combustion. Venting with a hood or an
open window will further minimize
exposure.
• CAUTION: Do not store things children
might want above the cooktop. Children
could be burned or injured while climbing on it.
• Do not leave children alone or unattend-
ed in area where the cooktop is in use.
They should never be allowed to sit or
stand on any part of the cooktop. They
could be burned or injured.
• Do not operate the cooktop if it is
damaged or not working properly.
• Do not use the cooktop for warming or
heating the room. Persons could be
burned or injured, or a fire could start.
• Use the cooktop only for its intended
use as described in this manual.
• Do not touch grill and surface burner
areas, or perimeter trim around cooktop.
During and after use, these areas may
be hot enough to cause burns. Avoid
contact with these areas by clothing or
other flammable materials until they
have had sufficient time to cool.
continued on next page
3
Page 4

COOKTOP SAFETY
• Do not wear loose or hanging garments
when using the cooktop. They could
ignite if they touch an open flame and
you could be burned.
• Use only dry pot holders. Moist or damp
pot holders on hot surfaces could result
in burns from steam. Do not let pot
holder touch an open flame. Do not use
a towel or bulky cloth for a pot holder. It
could catch on fire.
• Do not heat unopened containers. They
could explode. The hot contents could
cause burns and container particles
could cause injury.
• Do not store flammable materials on or
near the cooktop. The fumes could
create an explosion and/or fire hazard.
• Do not use aluminum foil to line aeration
tray, burner basin, or any other part of
the cooktop. Use aluminum foil only as
recommended in this manual.
• A faint gas odor may indicate a gas
leak. If a gas odor is detected, shut off
the gas supply to the cooktop. Call your
installer or local gas company to have
the possible leak checked. Never use a
match or other flame to locate a gas
leak. Explosion and injury could result.
• Know where your main gas shutoff valve
is located.
When using the cooktop
• Make sure the utensils you use are
large enough to contain food and avoid
boilovers and spillovers. Heavy splattering or spillovers left on a cooktop could
ignite and burn you. Pan size is especially important in deep fat frying.
• Check to be sure glass cooking utensils
are safe for use on the cooktop. Only
certain types of glass, glass-ceramic,
ceramic, earthenware, or other glazed
utensils are suitable for cooktops
without breaking due to the sudden
change in temperature.
• Never leave surface burners unattended
at high heat settings. A boilover could
result and cause smoking and greasy
spillovers that could ignite.
• Turn pan handles inward, but not over
other surface burners. This will help
reduce the chance of burns, igniting of
flammable materials, and spills due to
bumping of the pan.
• Do not use decorative covers or trivets
over the surface burners.
Grease
• Grease is flammable. Do not allow
grease to collect around cooktop. Wipe
spillovers immediately.
• Do not use water on grease fires. Never
pick up a flaming pan. Smother flaming
pan by covering with a well-fitted lid,
cookie sheet, or flat tray. Flaming grease
outside of pan can be extinguished with
baking soda or, if available, a multipurpose dry chemical or foam-type
extinguisher.
4
Page 5

COOKTOP SAFETY
Care and cleaning
• Do not repair or replace any part of
the cooktop unless specifically recommended in this manual. All other
servicing should be referred to a
qualified technician.
• Any additions, changes, or conversions
required in order for this appliance to
satisfactorily meet the application needs
must be made by a Whirlpool service
company or Qualified Agency.
• Disconnect the electrical supply and the
gas supply at the shut-off valve near the
cooktop before servicing the cooktop.
Additional safety precautions
• Avoid pans that are unstable and easily
tipped. In choosing pans, look for easilygrasped handles that will stay cool.
Pans that are too heavy when filled with
food can also be a hazard. If pan
handles twist and cannot be tightened,
discard the pan.
• Keep all controls “OFF” when cooktop
is not in use.
• Keep vent ducts unobstructed.
• If the cooktop is installed near a window,
proper precautions should be taken to
prevent curtains from blowing over
burners creating a FIRE HAZARD.
• Do not use cookware on the grill section
of this appliance.
• Always allow hot pans to cool in a safe
place out of the reach of small children.
• Clean only parts listed in this manual
and use procedures recommended.
• Flame size should be adjusted so it
does not extend beyond the edge of
the cookware, this instruction is based
on safety considerations.
• This appliance has been tested for
safe performance using conventional
cookware. Do not use any devices or
accessories that are not specifically
recommended in this manual. Do not
use eyelid covers for the surface burners
or stovetop grills. The use of devices or
accessories that are not expressly
recommended in this manual can create
serious safety hazards, result in performance problems, and reduce the life of
the components of the appliance.
– READ AND SAVE THESE INSTRUCTIONS –
5
Page 6

6
Page 7

GETTING TO KNOW YOUR COOKTOP
Air shutter adjustment
To adjust grill burner air
shutters or surface burner air
shutters
To open
Air opening
To close
Air shutter
Insert screwdriver blade in slot
and twist with slight pressure to
allow air shutter to slide easily.
The left air shutter controls the rear half of
the grill burner. The right shutter controls the
front half.
Slide the air shutter backward or forward to
increase or decrease the size of the air
opening. Air shutters fit snugly on the grill
burner, so you may need a screwdriver
blade to make the adjustment. Notice how
the flame changes as you move the air
shutter. The adjustment is satisfactory when
you get a clearly defined, even blue flame at
the HI flame setting. The snug fit of the air
shutter will allow it to remain positioned
correctly.
On any burner, closing the air shutter too
far will cause the flame to become soft and
yellow tipped. Opening the air shutter too
wide will cause the flame to blow away from
the burner ports. Proper adjustment will
produce a sharp, clearly defined, even
blue flame.
To adjust surface burner air
shutter (on some models)
Rotate air
shutter on
Screw
Air opening
To open
Loosen the fastening screw with a phillips
screwdriver and rotate the air shutter to
increase or decrease the size of the air
opening. As you turn the shutter notice how
the flame changes. The adjustment is
satisfactory when you get a clearly defined,
even blue flame at the HI flame setting. After
the adjustment, tighten the screw.
mixer head
to make air
adjustment
Air shutter
To close
7
Page 8

GETTING TO KNOW YOUR COOKTOP
LO flame adjustment
This appliance has been shipped from the
factory with LO and MED flame settings
adjusted for use with natural gas and
average installations. There is a wide variety
of conditions caused by altitude and gas
mixtures controlled by utility companies
which will vary and affect the gas flame and
performance. Adjustments should be made
at time of installation. If conditions change,
follow the procedures outlined below to
adjust the LO setting.
Counterclockwise
to increase flame
Clockwise to
reduce
flame size
size
4. Turn the center stem adjusting screw
slightly to set the flame size.
NOTE: Turn clockwise to reduce or coun-
terclockwise to increase the flame size.
5. Replace the control knob when you have
completed the adjustment.
Proper adjustment will produce a stable,
steady blue flame of minimum size. The final
adjustment should be checked by turning the
knob from HI to LO several times without
extinguishing the flame. This adjustment, at
the LO setting, will automatically provide the
proper flame size at the MED setting.
Valve stem
1. Light the burner and set the control knob
for a low flame.
2. Remove the control knob from the valve
stem.
IMPORTANT: Never use a metal blade to
pry the knob off. If you cannot easily
remove the knob tuck the folds of a cloth
dishtowel under the knob skirt and pull
the towel upward with steady, even
pressure.
3. Insert a slender, thin-blade screwdriver
into the recess at the center of the valve
stem and insert the blade in the slot of the
adjusting screw.
8
Page 9

Controls
USING YOUR RANGE
wWARNING
Explosion Hazard
Do not store flammable materials
such as gasoline near the cooktop.
Doing so can result in death,
explosion, fire, or burns.
Using
Your cooktop has electric ignitors. Electric
ignitors light the burners each time the
controls are turned to LITE.
Turning the knobs
wWARNING
Carbon Monoxide Poisoning Hazard
Do not operate with a yellow flame.
Doing so can result in death, heart
attack, or convulsions.
Cooking on the left side
The LO setting is the lowest setting you can
use for the grill burner. However, when you
use surface burners on the left side of the
cooktop you can turn the control knob lower
than the LO setting.
Push down on control knob and turn
counterclockwise to the LITE position. The
clicking sound is the ignitor sparking. Look
at the burner to make sure it has lit.
To stop the clicking sound after the
burner lights, turn the control knob to the
cook setting you want. The control knob has
three cook settings. However, you can set
the control knob anywhere between HI and LO.
Cooking on the right side
You can only use surface burners on the
right side of the cooktop. You cannot install
either the grill or the griddle on the right side
of the cooktop.
9
Page 10
CONTROLS
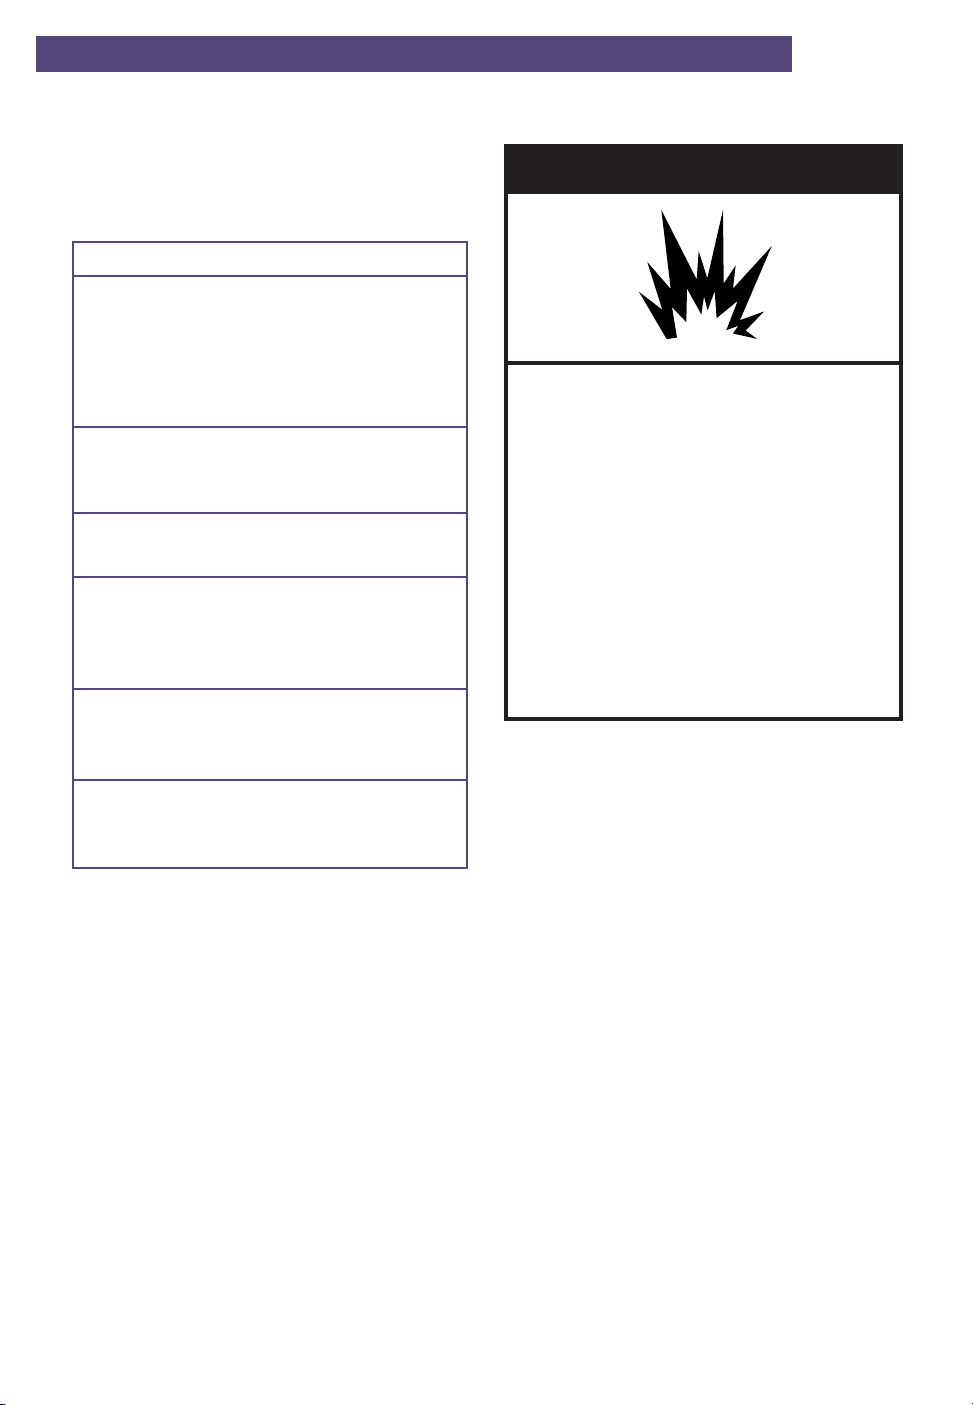
Until you get used to the settings, use
the following as a guide. For best results,
start cooking at the high setting; then turn
the control knob down to continue cooking.
wWARNING
SETTING
LITE
HI
(High)
Medium High
MED
Medium Low
LO
NOTE: Do not cook with the control set at
LITE.
RECOMMENDED USE
• To light the burner.
After the burner lights,
turn control back to a
desired setting to stop
the clicking of the
ignitor.
• To start foods cooking.
• To bring liquids to a
boil.
• To hold a rapid boil.
• To fry chicken.
• For gravy, pudding,
and most frying.
• To cook large amounts
of vegetables.
• To keep food cooking.
• To poach and stew.
• To simmer.
• To keep food warm
until ready to serve.
• To melt.
In case of a long power failure
Surface burners can be lit by hand. Hold a
lit match near a burner and turn the control
knob to the LITE setting. After the burner
lights, turn the control knob to the setting
you want.
Do not use the grill during a power failure.
The vent fan will not work.
Explosion Hazard
Turn the burners off if a flame goes
out while cooking, or if there is a
strong gas odor. Wait five minutes
for the gas odor to disappear before
relighting burner. If gas odor is still
present, see safety note on page 2.
Do not let the burner flame extend
beyond the edge of the pan.
Turn off all control knobs when not
cooking.
Failure to do so can result in death,
explosion, fire, or burns.
NOTES:
• Do not leave an empty utensil, or one
which has boiled dry, on a hot surface
burner. The utensil could overheat and
damage the utensil or cooking surface.
• Do not allow large pans to extend over
the control knobs. Heat trapped between
large pans and control knobs could
possibly damage the control knobs.
10
Page 11

CONTROLS
Caring for controls
NOTE: Do not use oven cleaners, bleach, or rust removers to clean any part of the cooktop.
Use this chart to help you clean your control knobs and panel.
PART
Control knobs
Control panel
WHAT TO USE
Sponge and warm,
soapy water
OR
Dishwasher
Sponge and warm,
soapy water
OR
Paper towel and
mild liquid soap
HOW TO CLEAN
• Turn knobs to OFF and pull straight up.
• Wash, rinse, and dry well. Do not soak.
• Do not use steel wool or gritty
cleansers. They may damage the
finish.
• Replace knobs. Make sure all knobs
point to OFF.
• Wash, wipe with clean water, and dry
well.
• Do not use steel wool or gritty
cleansers. They may damage the
finish.
• Do not spray cleaner directly on panel.
Spray cleaner on paper towel.
11
Page 12
Surface Burners
wWARNING
Explosion Hazard
Do not store flammable materials
such as gasoline near the cooktop.
Doing so can result in death,
explosion, fire, or burns.
Installing
You can install extra surface burners on the
left side of your cooktop. To get the surface
burner accessory, order Part Number
SCM10DB/DW from a Whirlpool service
company or dealer (see Step 2 on page 33)
or call the Whirlpool Consumer Assistance
Center toll-free 1-800-253-1301.
wWARNING
Carbon Monoxide Poisoning Hazard
Do not operate with a yellow flame.
Doing so can result in death, heart
attack, or convulsions.
NOTE: Do not take apart the surface
burner accessory.
To install:
1. Make sure the control knobs are
turned off.
12
2. If the grill burner and grates are in place,
remove them before installing surface
burners. Clean out any grease that may
be in the burner basin. (See pages 19
and 24 for more information.)
Page 13
SURFACE BURNERS
Orifices
Mixer tube openings
Ignitor
Flash tubes
Ignitor
opening
Side openings
Supports
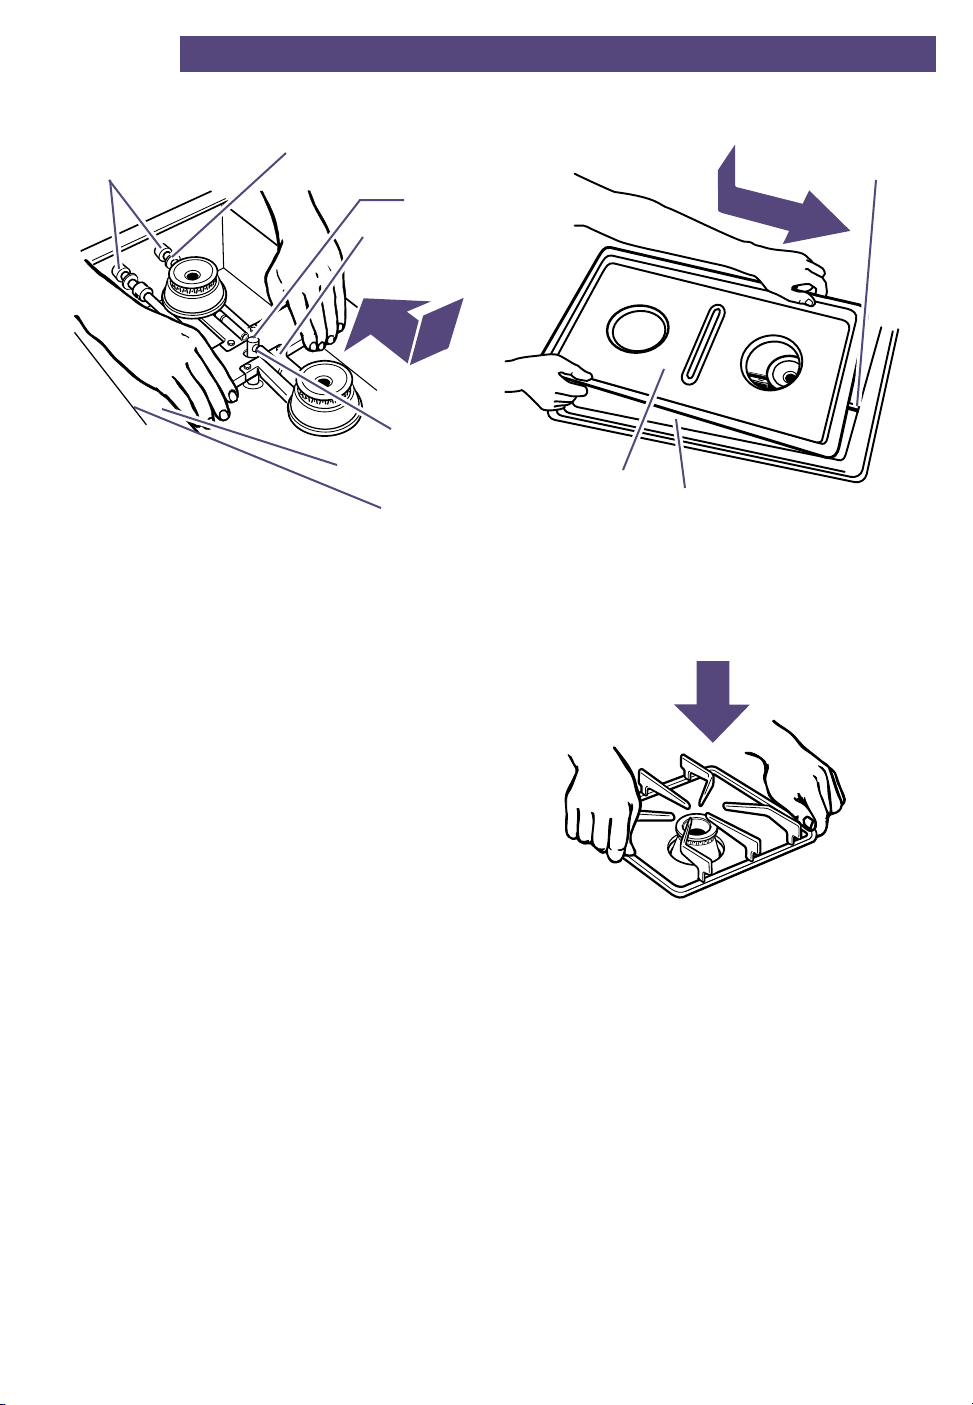
3. Set the surface burner accessory into place.
Mixer tube openings should be pointed
toward the orifices. Slide the burner
toward the orifices until the opening for the
ignitor is over the ignitor. Lower into place
until the notches in the side of the burner
bracket rest on the burner supports, and
the ignitor is centered between the two
flash tubes. Be sure mixer tubes are over
the orifices.
Prong
Aeration tray
Burner basin
4. Set the aeration tray into place. Insert
the prong at the end of the tray into the
opening in the end of the burner basin.
Lower the other end into the cooktop.
5. Place burner grates on aeration tray.
13
Page 14
SURFACE BURNERS
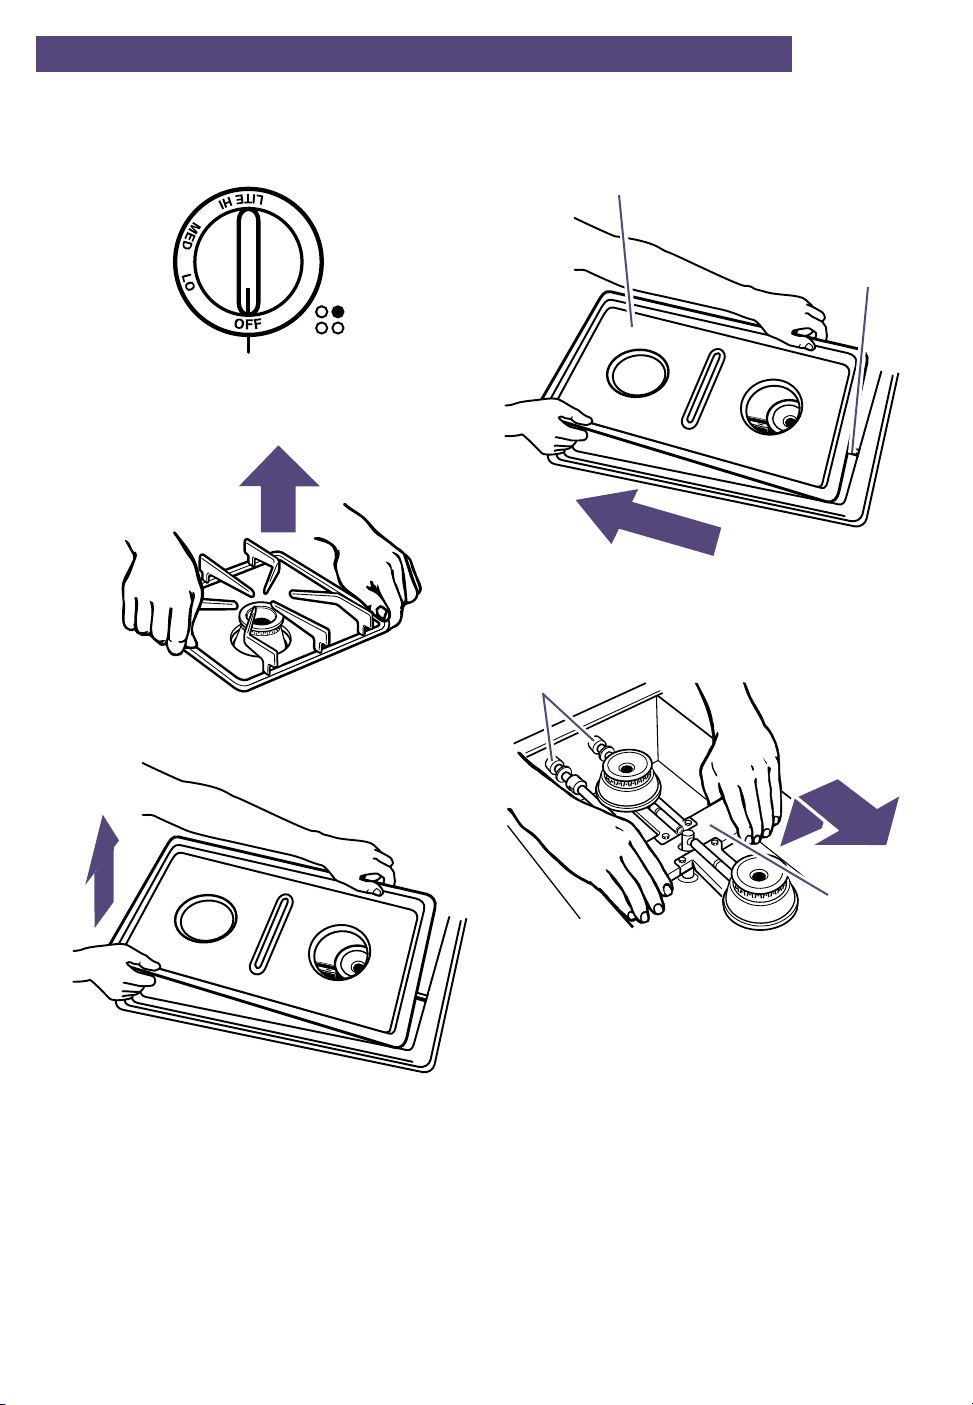
To remove:
1. Make sure the control knobs are turned
off and the cooktop is cool.
Aeration tray
Prong
4. Hold the aeration tray by the sides and
slide away to remove the prong from the
opening and clear the surface burners.
2. Remove burner grates.
3. Remove the aeration tray by lifting up the
front end on the right side (back end on
the left side). Lift until the top clears the
opening of the cooktop by about five
inches.
Orifices
Bracket
5. Lift up on the sides of the surface burner
accessory bracket about two inches.
Slide away from the orifices.
14
Page 15

Using
SURFACE BURNERS
Cookware tips
No one brand of cookware is best for all
people. Knowing something about pan
materials and construction will help you
select the correct cookware for your needs.
• NOTE: For best results and greater fuel
efficiency, use only flat-bottomed cook-
ware in good condition.
• The pan should have straight sides and a
tight-fitting lid.
• Choose medium to heavy gauge (thick-
ness) pans that are fairly lightweight.
• The pan material (metal or glass) affects
how fast heat transfers from the surface
burners through the pan material and how
evenly heat spreads over the pan bottom.
Choose pans that provide the best cooking
results.
• IMPORTANT: Do not allow large pans to
contact or extend over the control knobs.
Heat trapped between large pans and
control knobs could possibly damage the
control knobs.
• IMPORTANT: Leave a minimum of 11⁄2"
between the side of the pan and surrounding surfaces, such as countertop
backsplash or side walls. This allows heat
to escape, avoiding possible damage to
these areas.
• Handles should be made of a sturdy, heat-
resistant material and be securely attached
to the pan.
• Pans should be easy to clean. Check to
be sure there are no crevices, rough
edges, or areas where food might collect.
• Be sure pans do not tip, whether they are
full or empty.
• Use cookware only as it was intended to
be used. Follow pan instructions. This is
very important for glass cookware because
some should be used only in the oven.
Other pans are marked as flameware and
may be used on the surface burners.
Home canning information
The larger diameter of most water-bath or
pressure canners combined with high heat
settings for long periods of time can cause
damage to the cooktop.
To protect your cooktop:
• For best results, use a canner which can
be centered over the surface burner.
• Do not place canner on two surface
burners at the same time. Too much heat
will build up and will damage the cooktop.
• Start with hot water. This reduces the
time the control is set on HI. Reduce heat
setting to lowest position needed to keep
water boiling.
• Refer to your canner manual for specific
instructions.
Energy saving tips
Although the energy used for cooking is
usually a very small percentage of the total
energy used in the home, cooking energy
can be used efficiently. Here are some tips
to help you save energy when using your
cooking product:
• Use pans with flat bottoms, straight sides,
and tight-fitting lids.
• Cook with a minimum of liquid or fat to
help shorten cooking time.
• Preheat pans only when recommended
and for the shortest time possible.
• Start food on higher heat settings, then
set surface burner control on LO to finish
cooking.
• Turn on the surface burner only after
placing filled pan on the burner grate.
• Plan your meals for the most efficient use
of the cooktop.
• Cover pans.
15
Page 16

SURFACE BURNERS
Caring for surface burners
Use this chart to help you clean your surface burner accessory.
PART
Surface burner
grates
Surface burners/
exterior surfaces/
area under
burners/
aeration tray
WHAT TO USE
Warm, soapy water
and a nonabrasive,
plastic scrubbing
pad
OR
Dishwasher
Warm, soapy water
and a sponge
Warm, soapy water
and a nonabrasive,
plastic scrubbing pad
HOW TO CLEAN
• In dishwasher, wash with other cooking
utensils.
• Dry completely.
• Do not use gritty or harsh cleansers.
They may damage the finish.
• Although the burner grate is durable, it will
gradually lose its shine and/or discolor,
regardless of the care you take of it. This
is due to its exposure to the high temperature of the gas flames. To preserve the
porcelain enamel finish as long as possible, have a pan on the grate before you
turn on the burner, and lower the flame
when the food reaches the desired cooking temperature.
• Wipe off spills immediately after burner
has cooled.
For cooked-on food:
• Wash with warm, soapy water and a
plastic scrubbing pad.
• Rinse with clean water and dry well.
• If ports are clogged, clean with a
straight pin. Do not enlarge or distort
ports. Do not use a wooden toothpick.
• Do not clean surface burner in dish-
washer or self-cleaning oven.
• Do not use gritty or harsh cleansers.
They may damage the finish.
Ignitor cap
and stem
16
Warm, soapy water
and a nonabrasive,
plastic scrubbing pad
Small brush
NOTE: Do not allow foods containing
acids (such as vinegar, tomato, or lemon
juice) to remain on surface. Acids may
remove the glossy finish. Also, wipe up
milk or egg spills when cooktop is cool.
Remove sugar spills immediately.
• Wash, rinse, and dry well.
• The wire electrode inside the cap can
be cleaned with a small brush.
Page 17
Burner flame
wWARNING
Carbon Monoxide Poisoning Hazard
Do not operate with a yellow flame.
Doing so can result in death, heart
attack, or convulsions.
SURFACE BURNERS
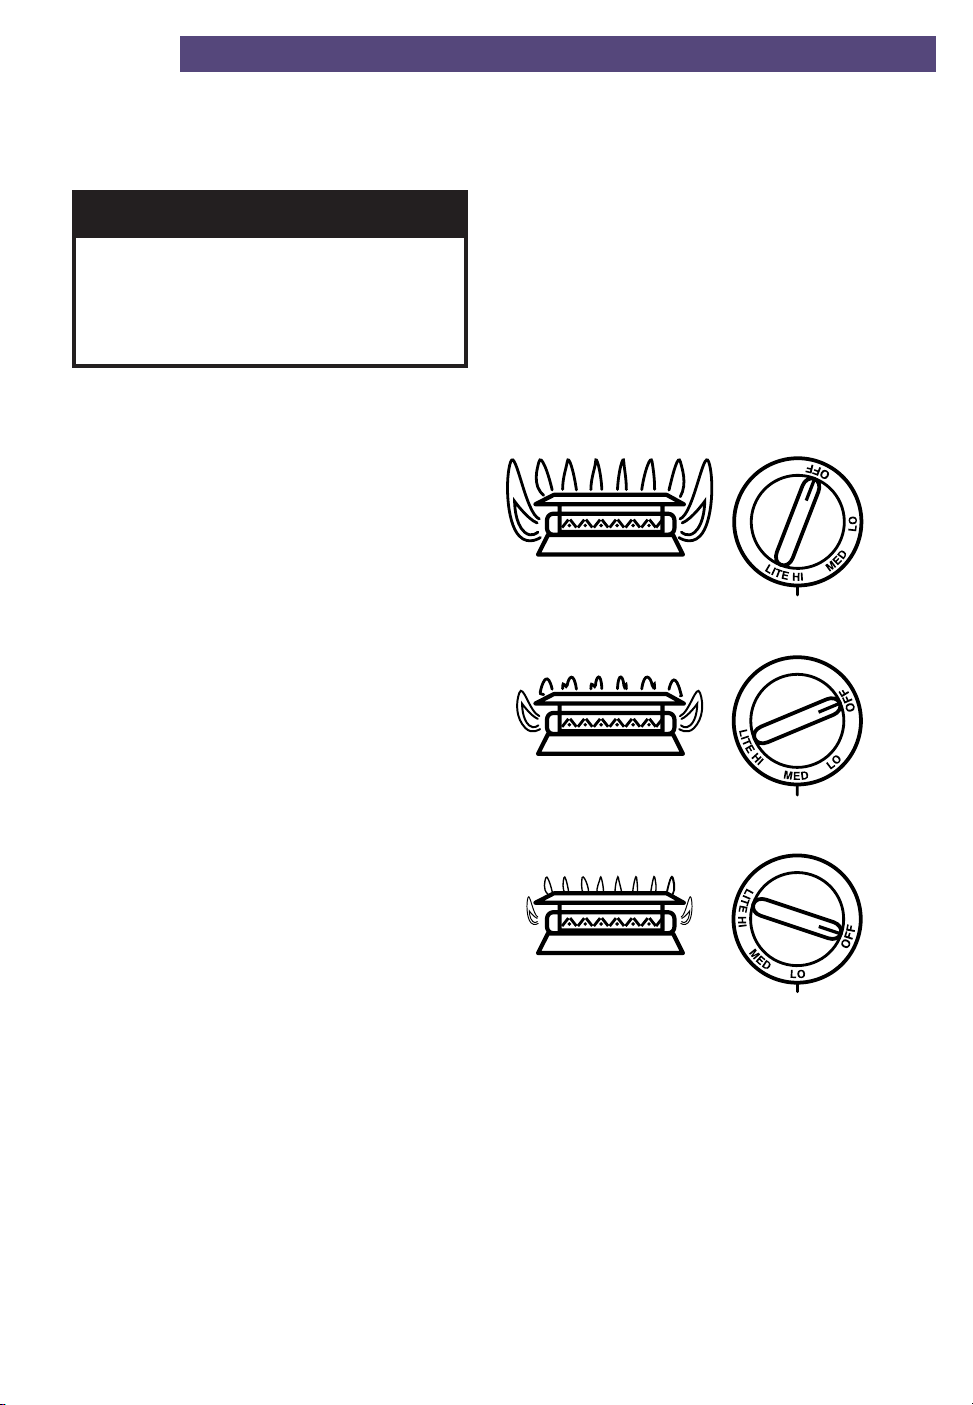
NOTE: Occasionally check the burner
flames for proper size and shape as shown.
A good flame is blue in color. If flames lift off
ports, are yellow, or are noisy when turned
off, you may need to clean the burners (see
page 16), or call a qualified technician for
adjustment.
Flame shape
and size
Setting
17
Page 18
Grill
wWARNING
Explosion Hazard
Do not store flammable materials
such as gasoline near the cooktop.
Doing so can result in death,
explosion, fire, or burns.
Installing
The grill is made up of two black grill grates
and a grill burner. Only install the grill on the
left side of your cooktop. To get the grill
accessory, order Part Number SCM20DB
from a Whirlpool service company or dealer
(see Step 2 on page 33) or call the Whirlpool
Consumer Assistance Center toll-free
1-800-253-1301.
To install:
1. Make sure the control knobs are turned
off.
18
Page 19
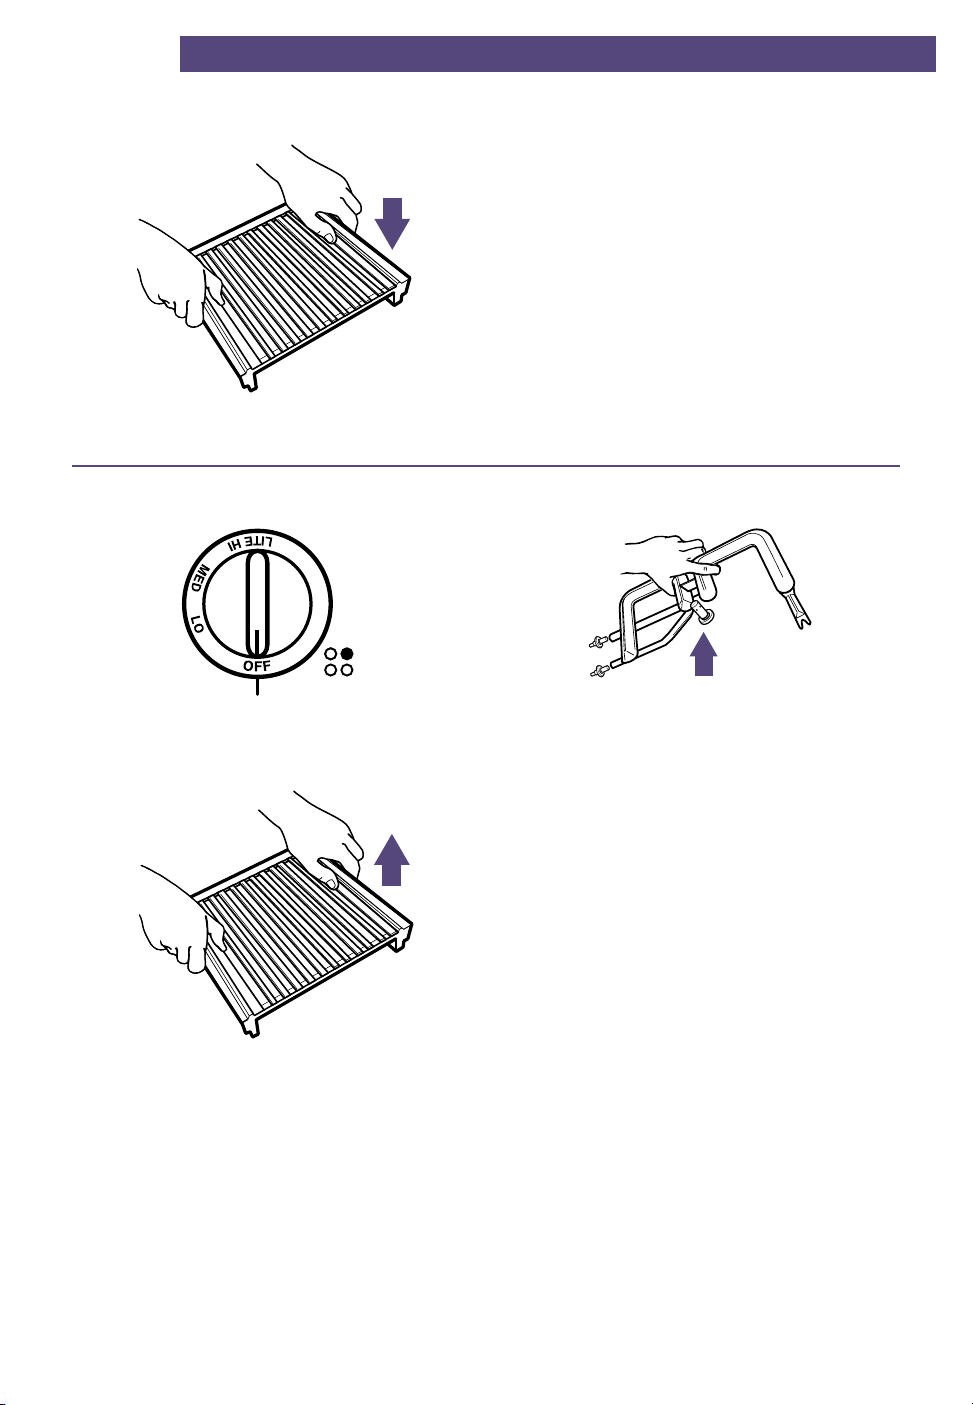
3. Place the grill grates on the top of the
cooktop.
To remove:
GRILL
1. Make sure the control knobs are turned
off and the grill is cool.
2. Remove grill grates.
3. Remove grill burner.
19
Page 20

GRILL
Using
Before you use the grill for the
first time:
1. Heat the grill burner to remove the
protective shipping coating. Heat on HI
for 10 minutes. Use the vent system to
remove any additional smoke during
cooling. When the grill burner stops
smoking, it is ready to use.
2. Wash with warm, soapy water. Rinse
and dry. Never use a metal scrubbing
pad or gritty cleanser on the grill; these
will damage the nonstick surface.
3. After cleaning, lightly wipe the cooking
surface with cooking oil. This will prevent
the food from sticking.
Grilling tips
Choosing meat
• For best results, buy top grade meat.
Meat that is at least 3⁄4" thick will grill better
than thinner cuts.
Preparing to grill
• Meat that usually has a lot of fat will smoke
more when cooking and could cause flareups. However, fatty meat cooks faster than
lean meat. Trim fat from meat before
placing on the grill to prevent a large
amount of smoke or flare-ups.
• Remove the grill cover before heating the
grill. Because a heated grill cover would
not look hot, someone could be burned if
they touched the cover. Heating the grill
cover could also damage the finish.
• Precondition grates by brushing them
with vegetable oil or spraying them with a
nonstick coating prior to each use.
• Score fat on the edges of steak, but
do not cut into the meat. This will prevent
curling while cooking.
• Preheat the grill on the HI setting for five
to 10 minutes. Preheating makes meat
taste and look better. It also lets you
quickly sear the meat to help keep
juices in.
• The fan switch turns on by itself while you
are using the grill. Do not use the grill if the
fan does not go on.
• Do not cover the entire cooking surface
with meat. Leave space between the food
items to help smoke and steam clear away
quickly.
What to use while grilling
• Use tongs with long handles or spatulas
for turning meats. Do not use forks
because they make holes in the meat,
letting juices run out.
What not to use in the
grill area
• Do not use aluminum foil.
• Do not use charcoal or wood chips.
While cooking
• Before turning, let one side of meat cook
until it is as done as you want, or cook until
juices appear on the top of the meat. Turn
steaks and hamburgers just once; turning
and moving food causes it to lose juice.
• When basting meats or putting sauces on
food, remember that extra sauce winds up
inside your grill and does not improve the
food’s flavor. Put on sauces during the last
15-20 minutes of cooking unless the recipe
tells you to do it differently. If you put on
too much of a sugary sauce, it will leave a
caramel-like glaze on the grill grates. This
glaze is hard to clean.
• There are many meat marinades which
will help make less expensive cuts of meat
tender for cooking on the grill.
• Some foods, such as poultry and nonoily
fish, may need some extra fat. Brush with
oil or melted butter from time to time while
grilling.
• To help keep juices in meat, salt after
turning meat or after cooking is done.
20
Page 21
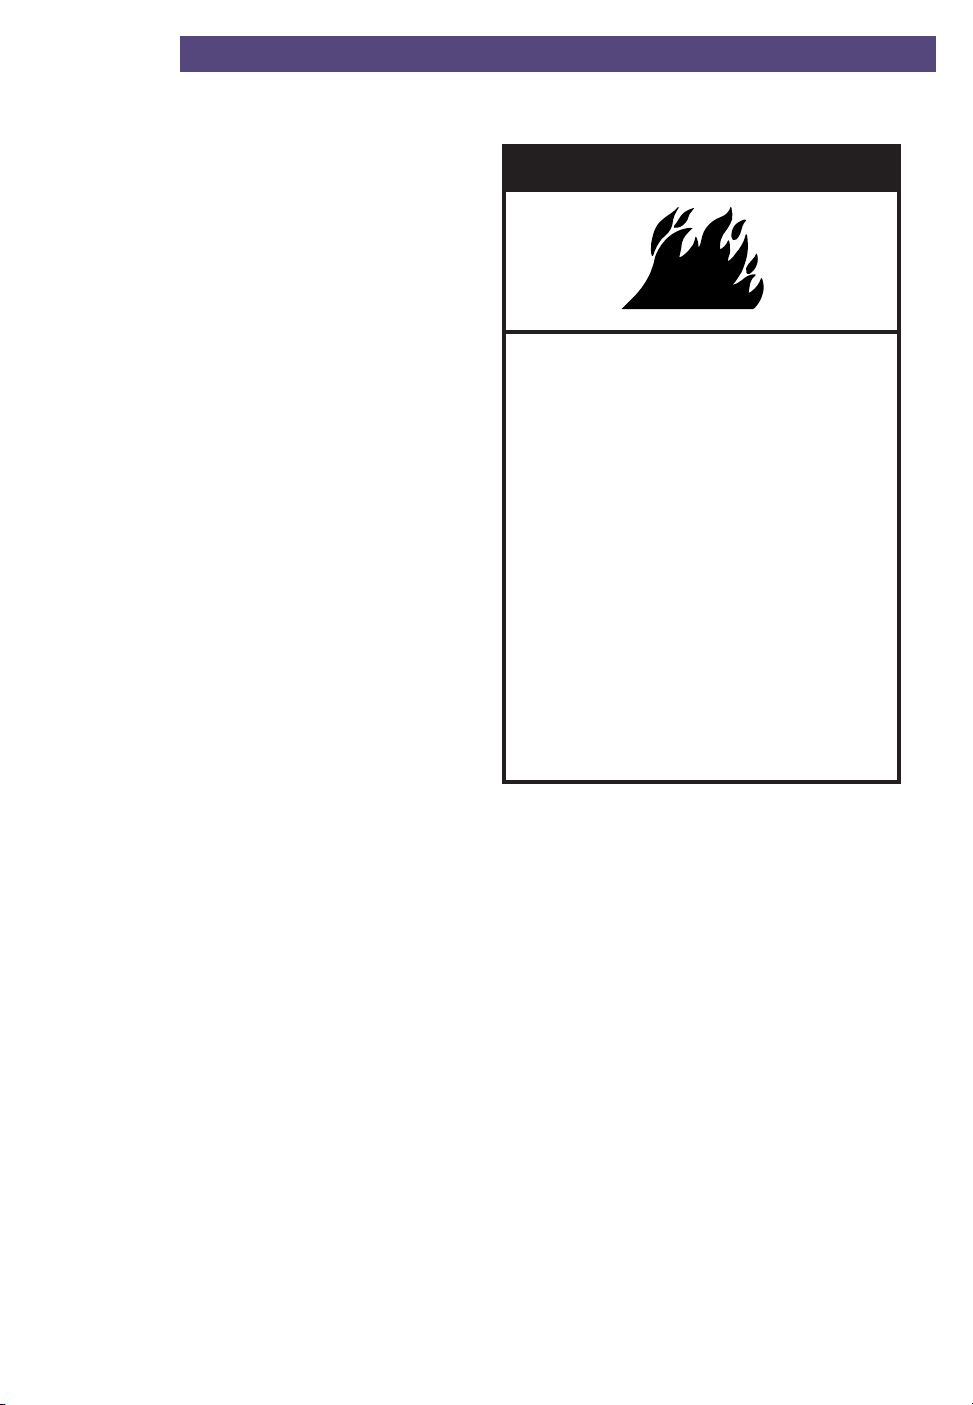
Grilling tips (continued)
• If meat begins to cook too quickly, turn
the grill control knob to a lower setting.
• Grease drippings will ignite occasionally
to produce harmless puffs of flame for a
second or two. This is normal while cooking. If you have too many flare-ups: you
need to clean the grill interior, you have
not trimmed the meat properly, or there is
too much fat in the meat.
What not to do while cooking
• Do not leave the optional grill while it is
cooking.
After grilling
• Clean the basin area after each use. Do
not allow the burner basin to become
overloaded with grease.
• Do not place the optional grill cover over a
heated grill. Let the grill cool before putting
the cover in place.
NOTES:
• Do not set utensils or other items that
could cause scratches on the grill cover.
Do not set very hot containers on the
cover or handles, since these could mar
or change the color of the cover.
• Use the cover over the grill grates only.
Do not place the cover over the griddle or
surface burner grates.
GRILL
wWARNING
Fire Hazard
Grease can cause large flare-ups.
To put out fire:
Make sure vent system has been
switched on.
Turn grill control off, cover grill with
large metal pan, and remove food
from grill.
Do not put water on a grease fire.
To prevent fire and burns:
Do not light grill/griddle burners
during a power failure.
Do not use pots or pans on grill.
They will become very hot.
Failure to follow the above can
result in fire or burns.
NOTES:
• The vent system will not work if there is
a power failure. Without the vent system
working, the grill/griddle burners will not
be kept cool enough.
• Use only nylon or plastic utensils. The use
of metal utensils could scratch the nonstick coating.
• When using nylon or plastic utensils, do
not leave them on the grill. They could melt.
21
Page 22

GRILL
Grill chart
Preheat on HI for 5 or 10 minutes for best flavor. Grilling times are guidelines only and may
need to be adjusted to get the taste and/or doneness you want.
COOKING TIME
FOOD
Steak (1⁄2-3⁄4")
• Rare
• Medium
• Well-done
Steak (1-11⁄4")
• Rare
• Medium
• Well-done
Hamburgers (3-4 oz)
SETTING
HI
HI
HI
HI
HI
HI
MED
(in minutes)
6-10
10-16
21-24
14-24
18-30
24-34
20-25
COMMENTS
Turn after half the time.
Turn after half the time.
Turn after half the time.
Turn after half the time.
Turn after half the time.
Turn after half the time.
Turn after half the time.
Pork chops
Fully cooked
smoked pork chops
Ham slices (1⁄2")
Pork ribs
Fully cooked sausages
• Hot dogs, brats
• Polish
Fresh sausage
• Links
• Patties (3" diameter)
• Italian sausage
Lamb chops
Chicken
• Pieces: Bone-in
• Boneless breasts
• Wings
Cornish hen (halved)
MED
MED
MED
MED
HI
HI
MED
MED
MED
MED
MED
MED
MED
MED
20-30
10-15
15-20
50-65
7-12
13-16
15-25
15-20
25-30
20-30
35-50
25-35
25-35
35-45
Turn occasionally.
Turn once. Glaze if desired.
Turn after half the time.
Turn occasionally. Brush with
barbecue sauce during last
15 minutes.
Turn occasionally.
Turn occasionally.
Turn occasionally.
Turn after half the time.
Pierce casing with a fork.
Turn once.
Turn occasionally. Brush with
glaze, if desired.
Turn occasionally.
Turn occasionally.
Turn occasionally.
Turn occasionally.
22
Page 23

FOOD
Fish
• Small, whole (1")
• Steaks (1")
• Fillets (1⁄2") (with skin on)
• Shrimp (skewered)
SETTING
MED
MED
MED
MED
COOKING TIME
(in minutes)
15-20
20-25
10-15
10-20
GRILL
COMMENTS
Brush with butter. Turn after
half the time.
Brush with butter. Turn after
half the time.
Start skin side down. Brush
with butter. Turn after half
the time.
Turn and brush with butter
or marinade often.
Garlic bread
Hot dog and
hamburger buns
MED
MED
4-6
1-2
Turn after half the time.
Turn after half the time.
Caring for grill
NOTE: Do not use bleach or rust removers to clean any part of the grill.
Cleaning your grill whenever spills or soiling occurs will help to keep it looking and working
like new.
PART
Grates
Drain jar
(under cooktop)
WHAT TO USE
Warm, soapy water
and a nonabrasive,
plastic scrubbing pad
OR
Dishwasher
Warm, soapy water
and a sponge or a
nonabrasive, plastic
scrubbing pad
OR
Dishwasher
HOW TO CLEAN
• Wash, rinse, and dry well.
• For heavy soil soak in hot, soapy water
mixed with a cleanser, such as household
ammonia.
NOTE: Do not use metal brushes, abrasive
scouring pads, or other scrubbers made to
clean outdoor grills. These will remove the
finish as well as scratch the grates. Do not
clean in a self-cleaning oven or use oven
cleaners.
• Empty the jar from time to time to prevent
spillovers.
• Unscrew and remove the jar to empty it. If
the jar is broken replace it with any heattempered jar, such as a canning jar. The jar
should have a standard screw neck.
continued on next page
23
Page 24

GRILL
PART
Grill burner
Cover
Area under
grill burner
WHAT TO USE
Warm, soapy water
and a nonabrasive,
plastic scrubbing pad
OR
Dishwasher
Warm, soapy water
and a sponge
Warm, soapy water
and a sponge or
nonabrasive, plastic
scrubbing pad
OR
Paper towels and
household cleanser
HOW TO CLEAN
• Clean with a soapy, nonabrasive scrubbing
pad or in a dishwasher. Rinse and dry well
before using again.
• For heavy soil first clean with pad, rinse,
and dry. Then clean in a self-cleaning oven
for two hours.
• If ports are clogged, clean with a straight
pin. Do not enlarge or distort ports. Do
not use a wooden toothpick.
• Wash, rinse, and dry well.
• Do not clean in a dishwasher.
• Wash, wipe with clean water, and dry well.
• Use nonabrasive, plastic scrubbing pad on
heavily soiled areas.
• Do not use gritty or harsh cleansers.
They may damage the finish.
• For heavy soil, soak paper towels in
household cleanser and lay them on the
soil for at least 1⁄2 hour or longer.
24
Page 25
Griddle
wWARNING
Explosion Hazard
Do not store flammable materials
such as gasoline near the cooktop.
Doing so can result in death,
explosion, fire, or burns.
Installing
You can install a griddle accessory on the
left side of your cooktop. To use this accessory you must have grill accessory Part
Number SCM20DB. To get the griddle
accessory, order Part Number SCM40DB
from a Whirlpool service company or dealer
(see Step 2 on page 33) or call the Whirlpool
Consumer Assistance Center toll-free
1-800-253-1301.
wWARNING
Carbon Monoxide Poisoning Hazard
Do not operate with a yellow flame.
Doing so can result in death, heart
attack, or convulsions.
Side openings
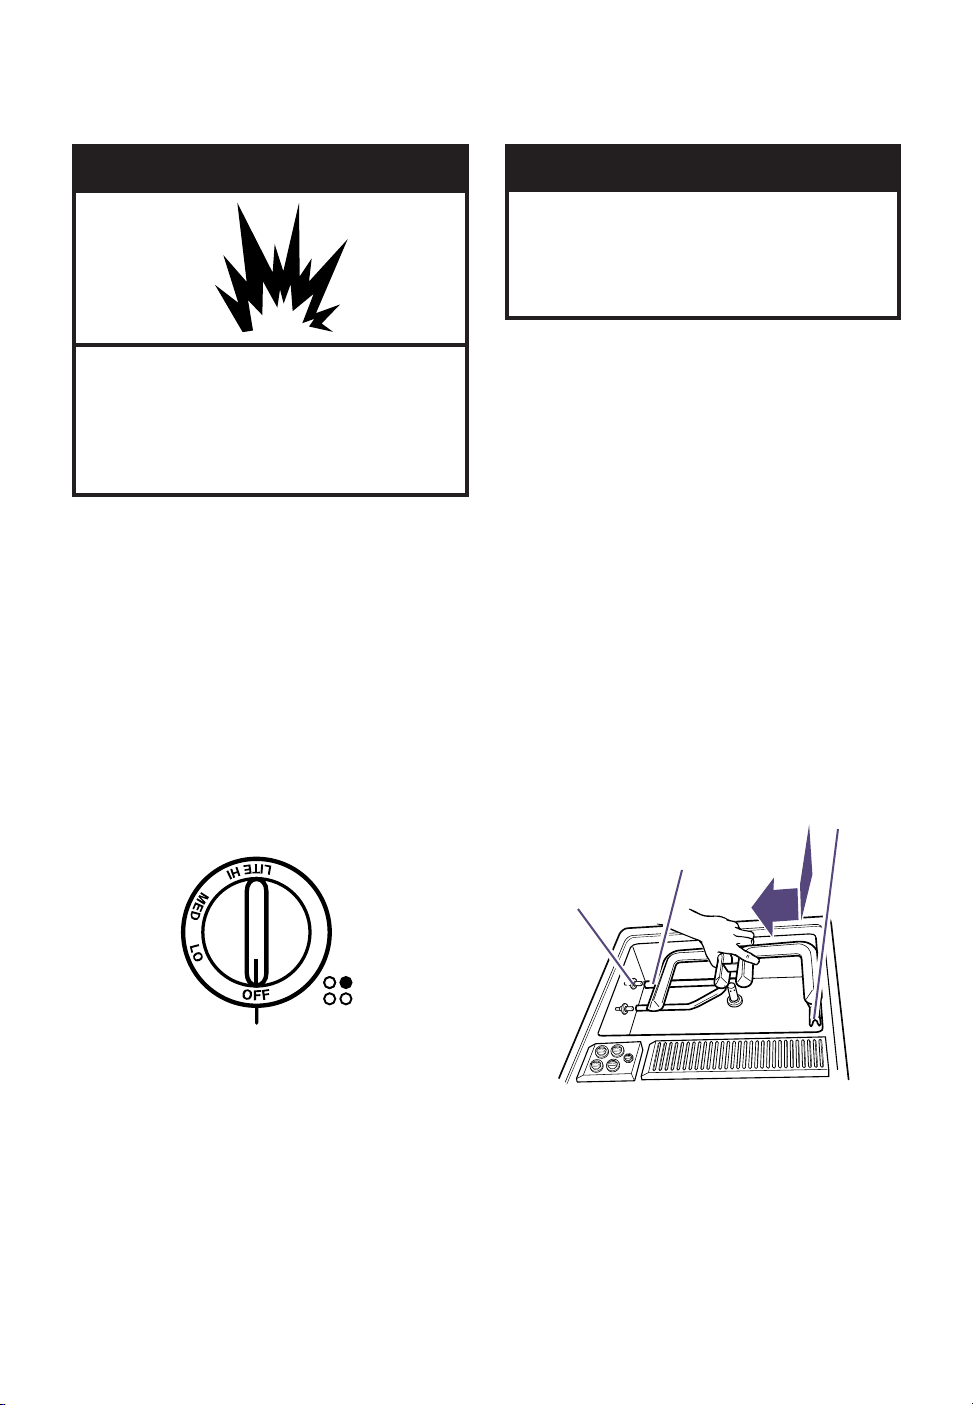
1. Make sure the grill burner is installed and
the control knobs are turned off.
Mixer tube openings
Orifices
2. If grill burner is not installed, set
the grill burner into place. Mixer tube
openings should be pointed toward the
orifices. Slide the burner toward the orifices
until the ignitor is in between the front and
rear grill sections. Lower into place until the
notches in the side of the burner bracket
rest on the burner support pins.
NOTE: Do not use the grill grates.
continued on next page
25
Page 26
GRIDDLE
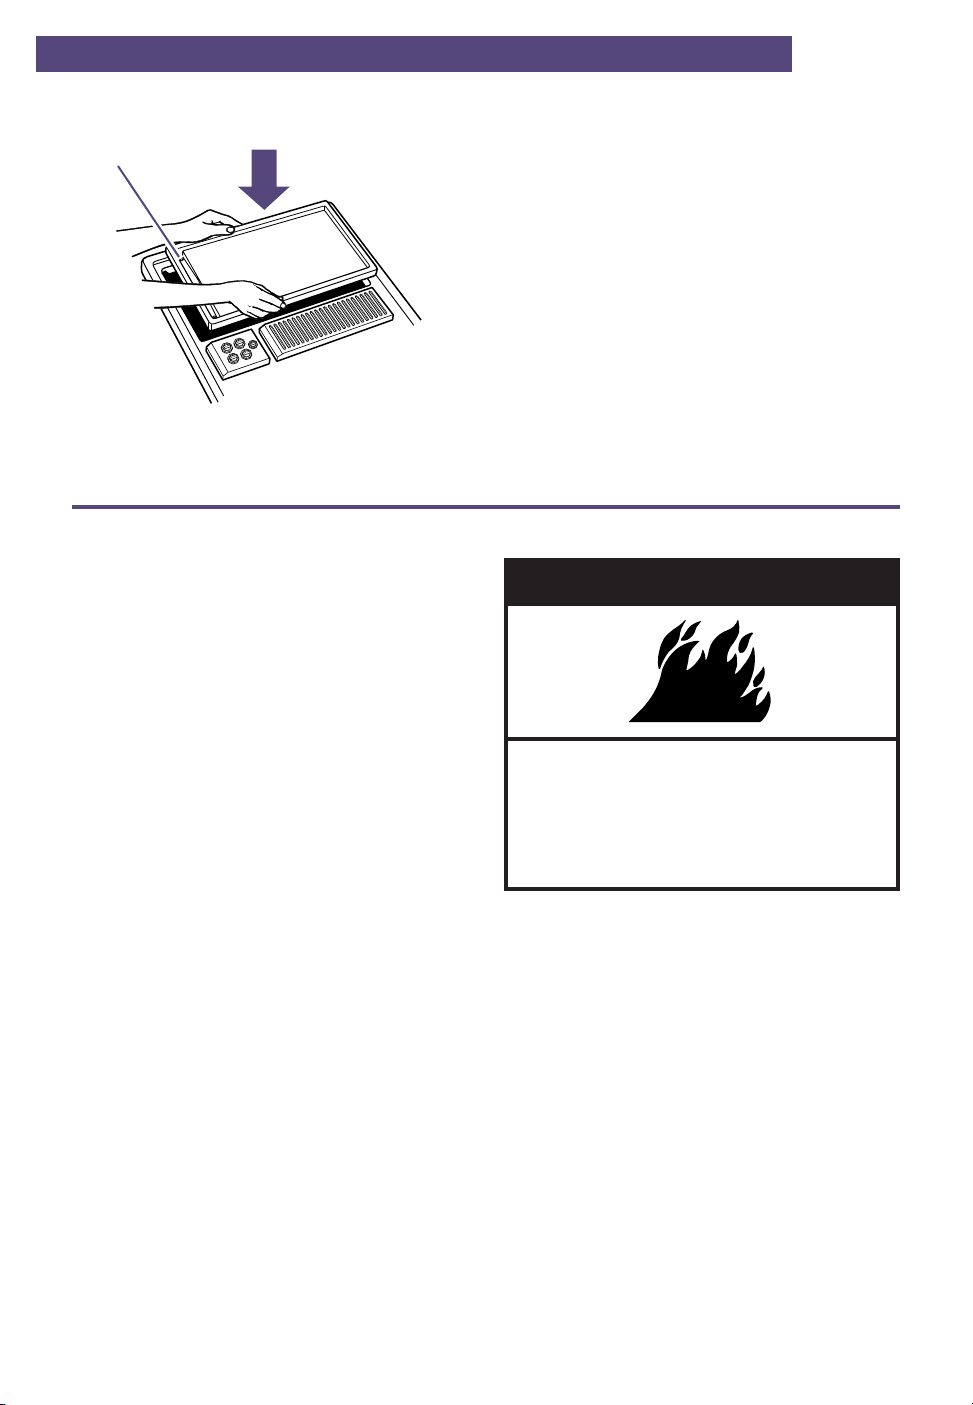
Drain groove
3. Place the griddle over the grill burner so
that the drain groove is in front. This will
let extra grease collect in the drain jar.
Using
Before using the griddle for
the first time:
1. Wash griddle in warm, soapy water.
Rinse and dry well.
2. Preheat griddle for five minutes at the
settings shown in the “Griddle chart” on
this page.
3. After preheating, lightly wipe the top of
the griddle with cooking oil. This prevents
sticking. Do not use shortening or butter
to grease the griddle.
NOTE: Do not preheat a seasoned
griddle. If the griddle is seasoned during
preheat, oil changes its chemical composition and forms a varnish-like finish,
which is difficult to remove.
wWARNING
Fire Hazard
Be sure the griddle control is off and
the griddle is cool when not in use.
Failure to do so can result in fire
or burns.
Griddling tips
• Place food right on the cooking surface of
the griddle.
• Turn off the grill burner when cooking is
finished. Leaving the burner on will damage the griddle.
• Do not use cookware on the griddle. Use
only plastic or nylon kitchen utensils on the
griddle. Metal could damage the nonstick
cooking surface.
26
Page 27

GRIDDLE
Griddle chart
Preheat for five minutes at the setting listed below. Griddling times are guidelines only and
may need to be adjusted to get the taste and/or doneness you want.
APPROXIMATE COOKING TIME (in minutes)
FIRST SIDE
6
SECOND SIDE
4
FOOD
Sausage patties
CONTROL
SETTING
MED
GRIDDLE
Bacon (slice)
Ham slice
Hamburgers
Fish sticks (frozen)
Hot dogs
Buns
French toast
Grilled cheese
sandwiches
Pancakes
Eggs
MED
MED
HI
MED
HI
MED
HI
HI
HI
MED
4-5
6-7
5
9
5
3-4
3-4
2
1-2
2
3-4
5-6
4
9
5
2-3
2
1-2
1 or less
27
Page 28

GRIDDLE
Caring for griddle
You must clean your griddle after each use to keep the finish in good shape.
PART
Griddle
Grill Burner
Area under
grill burner
WHAT TO USE
Warm, soapy water
and a nonabrasive,
plastic scrubbing pad
Warm, soapy water
and a sponge
OR
Dishwasher
Warm, soapy water
and a sponge
OR
Paper towels and
household cleanser
HOW TO CLEAN
• Wash once griddle has cooled. Do not put a
hot griddle in cold water.
• For heavy soil, use a nonabrasive scrubbing
pad.
NOTE: Do not wash in a dishwasher. Strong
detergents can remove some of the nonstick
finish.
• Clean with a soapy, nonabrasive scrubbing
pad or in a dishwasher. Rinse and dry well
before using again.
• For heavy soil, first clean with pad, rinse, and
dry. Then clean in a self-cleaning oven for
two hours.
• If ports are clogged, clean with a straight pin.
Do not enlarge or distort ports. Do not
use a wooden toothpick.
• Wash, wipe with clean water, and dry well.
• Use nonabrasive, plastic scrubbing pad on
heavily soiled areas.
• Do not use gritty or harsh cleansers. They
may damage the finish.
• For heavy soil, soak paper towels in house-
hold cleanser and lay them on the soil for at
least 1⁄2 hour or longer.
28
Page 29
Vent
Using
The built-in vent system removes cooking
vapors, odors, and smoke from foods
prepared on the cooktop, grill, and griddle.
The vent system will go on by itself when the
grill burner is being used.
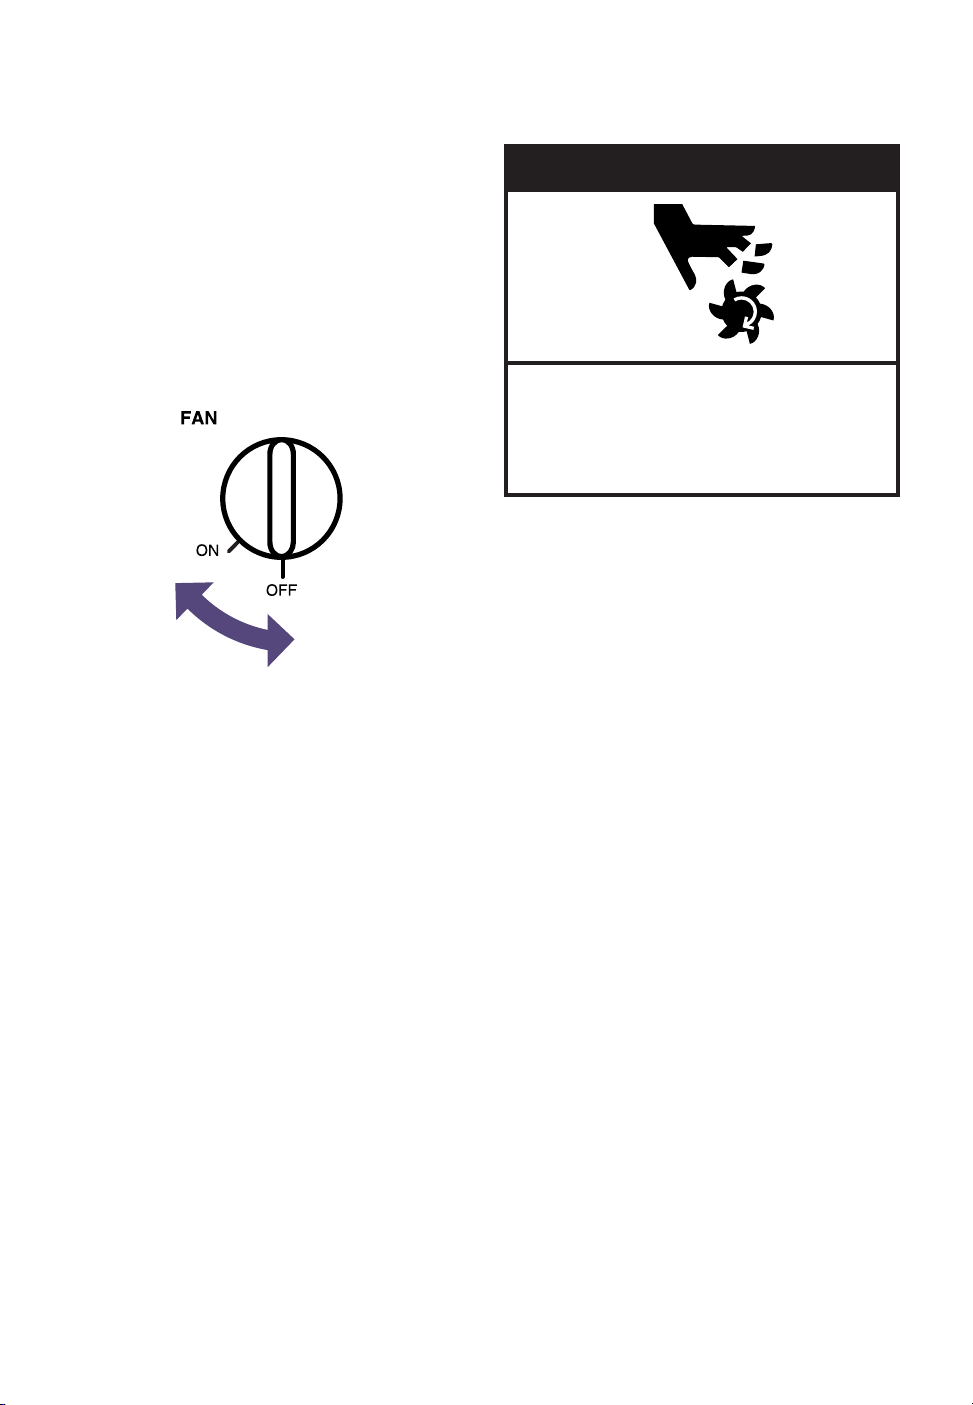
To turn on the vent system
yourself:
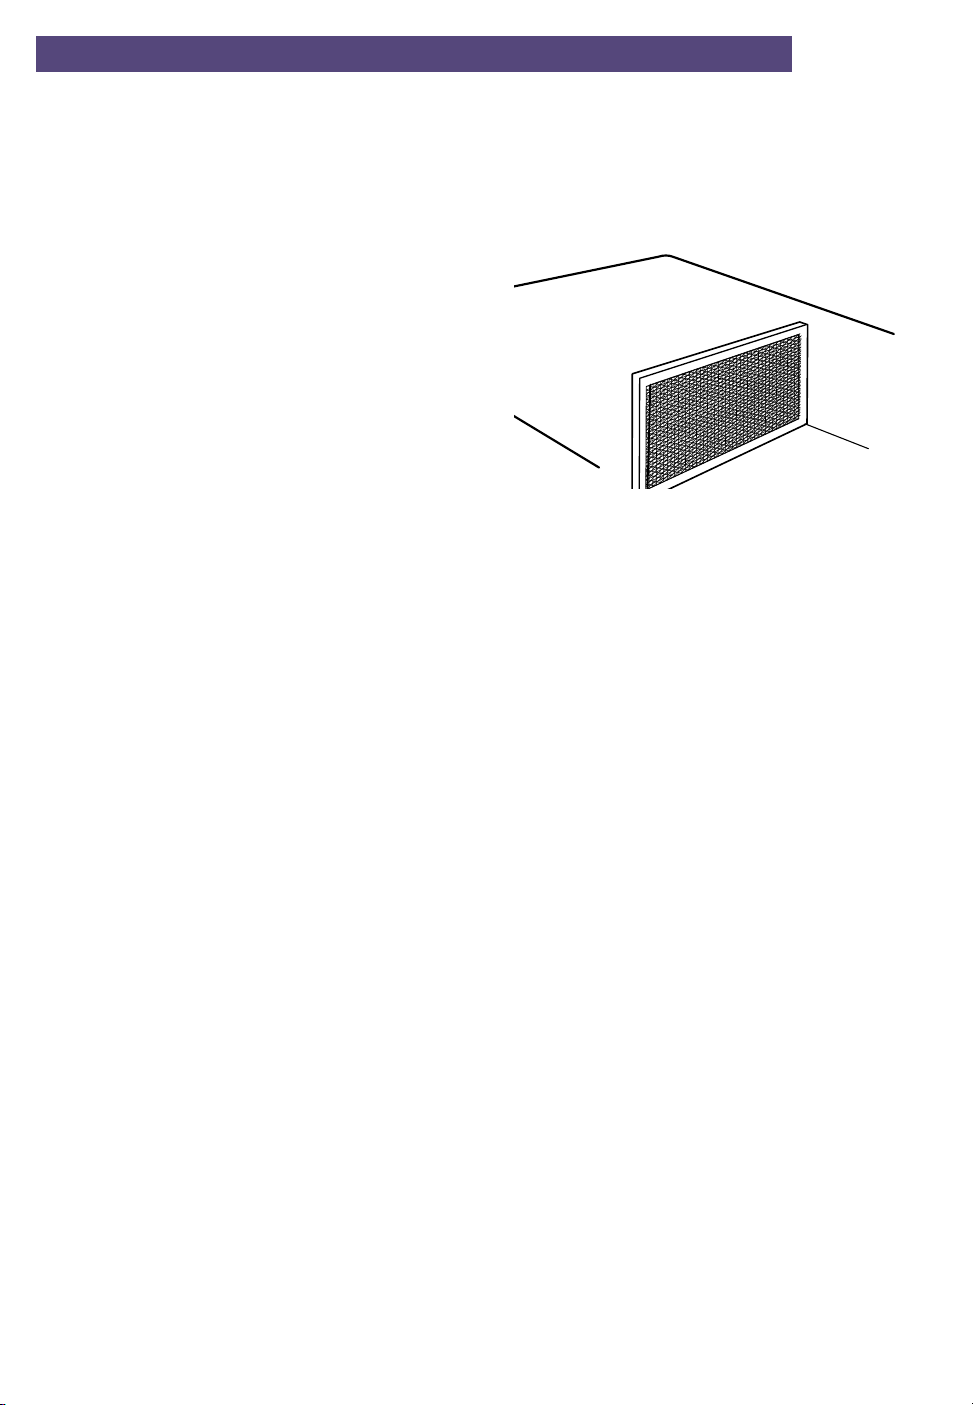
• Turn the fan knob in front of the air grille
to ON.
• You can manually control the vent fan
only when using the surface burners. You
cannot manually control the vent fan while
you are using the grill or griddle.
• If the vent fan turns on automatically, it
will turn off automatically when you turn
off the grill or griddle. If you turn the vent
fan on manually, you will need to shut it
off manually.
wWARNING
Cut Hazard
Do not put hands into vent when fan
or controls are on.
Doing so can result in serious cuts.
29
Page 30
30
Page 31

Troubleshooting
Most cooking problems often are caused by little things you can find and fix without tools of
any kind. Check the lists below and on the next page before calling for assistance or service.
If you still need help, see “Requesting Assistance or Service” on page 33.
If nothing operates, check the following:
Is the cooktop properly connected to gas and electrical supplies?
(See Installation Instructions.)
▼
Have you blown a household fuse or tripped a circuit breaker?
▼
Is the control knob set correctly?
▼
Is the flow of combustion and/or ventilation air to the cooktop blocked?
▼
31
Page 32

TROUBLESHOOTING
PROBLEM
Burner flames lift off
ports, are yellow,
or are noisy when
turned off
Burner makes popping
noise when on
Grill does not work
properly
Control knob(s) will
not turn
Venting results are not
what you expected
CAUSE
• Air/gas mixture is incorrect. Contact an authorized
Whirlpool service technician to check air/gas mixture.
• Burner is wet from washing. Let dry.
• You have not left space between food items.
• You have not preheated the grill for the proper amount of
time.
• Food was partially frozen or very cold before grilling. This
will make cooking time longer.
• You are not pushing in before turning.
• Exhaust fan is not turned on.
• Vent filters are not clean or are not in place.
• Vent duct or outside opening is blocked.
• There is a draft in room where cooktop is installed.
• Meat is not well trimmed.
• Vent system has not been installed according to the
Installation Instructions.
Cooking results are not
what you expected
If none of these items was causing your problem, see “Requesting Assistance or Service” on
page 33.
• The cooktop is not level.
• The recipe you are using may need to be altered to
improve the taste or appearance of the food.
• You are using a pan that is not the correct type or size.
Refer to a reliable cookbook or recipe for recommended
pan type and size.
• The flame size does not fit the cooking utensil being used.
32
Page 33
Requesting Assistance or Service
Before calling for assistance or service, please check “Troubleshooting” on pages 31-32.
It may save you the cost of a service call. If you still need help, follow the instructions below.
1. If you need assistance* …
Call the Whirlpool Consumer Assistance
Center telephone number.
Dial toll-free from anywhere
in the U.S.A.:
1-800-253-1301
and talk with one of our trained
consultants. The consultant can instruct you
in how to obtain satisfactory operation from
your appliance or, if service is necessary,
recommend a qualified service company in
your area.
If you prefer, write to:
Whirlpool Brand Home Appliances
Consumer Assistance Center
c/o Correspondence Dept.
414 N. Peters Rd.
Knoxville, TN 37922
Please include a daytime phone number in
your correspondence.
3. If you need FSP
replacement parts …
FSP is a registered trademark of Whirlpool
Corporation for quality parts. Look for this
symbol of quality whenever you need a
replacement part for your WHIRLPOOL
appliance. FSP replacement parts will fit right
and work right, because they are made to the
same exacting specifications used to build
every new WHIRLPOOL appliance.
To locate FSP replacement parts in your
area, refer to Step 2 or call the Whirlpool
Consumer Assistance Center number
in Step 1.
4. If you are not satisfied
with how the problem
was solved …
• Contact the Major Appliance Consumer
Action Program (MACAP). MACAP is a
®
group of independent consumer experts
2. If you need service* …
Whirlpool has a nationwide network of
authorized Whirlpool service
companies. Whirlpool service
technicians are trained to fulfill
the product warranty and
provide after-warranty service,
anywhere in the United States. To locate
the authorized Whirlpool service company
that voices consumer views at the highest
levels of the major appliance industry.
• Contact MACAP only when the dealer,
authorized servicer, and Whirlpool have
failed to resolve your problem.
Major Appliance Consumer Action Program
20 North Wacker Drive
Chicago, IL 60606
• MACAP will in turn inform us of your action.
in your area, call our Consumer Assistance
Center telephone number (see Step 1) or
look in your telephone directory Yellow
Pages under:
•APPLIANCE-HOUSEHOLD- • WASHING MACHINES &
MAJOR, SERVICE & REPAIR DRYERS, SERVICE & REPAIR
- See:
Whirlpool Appliances or -
Authorized Whirlpool Service Authorized Whirlpool Service
Example:
XYZ Service Co.) (
(
See:
Whirlpool Appliances or
Example:
XYZ Service Co.)
* When asking for help or service:
Please provide a detailed description of the problem, your appliance’s complete model
and serial numbers, and the purchase date. (See page 2.) This information will help us
respond properly to your request.
®
33
Page 34

WHIRLPOOL CORPORATION MAJOR APPLIANCE WARRANTY
ONE YEAR LIMITED WARRANTY
For one year from the date of purchase, when this major appliance is operated and maintained according to instructions attached to or
furnished with the product, Whirlpool Corporation or Whirlpool Canada LP (hereafter “Whirlpool”) will pay for FSP® replacement parts
and re
pair labor to correct defects in materials or workmanship. Service must be provided by a Whirlpool designated service company.
ITEMS WHIRLPOOL WILL NOT PAY FOR
1. Service calls to correct the installation
house fuses or to correct house wiring or plumbing.
2. Service calls to repair or replace appliance light bulbs, air filters or water filters. Those consumable parts are excluded fr
coverage
3. Repairs when your major appliance is used for other than normal, single-family household use.
4. Damage resulting from accident, alteration, misuse, abuse, fire, flood, acts of God, improper installation, installation not in
accordance with electrical or plumbing codes, or use of products not approved by Whirlpool.
5. Any food loss due to refrigerator or freezer product failures
6. Replacement parts or repair labor costs for units operated outside the United States or Canada
7. Pickup and delive
8. Repairs to parts or systems resulting from unauthorized modifications made to the appliance.
9. Expenses for travel and
10. The removal and reinstallation of your appliance if it is installed in an inaccessible location or is not installed in accordance with
published installation instructions
CUSTOMER'S SOLE AND EXCLUSIVE REMEDY UNDER THIS LIMITED WARRANTY SHALL BE PRODUCT REPAIR
HEREIN. IMPLIED WARRANTIES, INCLUDING WARRANTIES OF MERCHANTABILITY OR FITNESS FOR A PARTICULAR PURPOSE,
ARE LIMITED TO ONE YEAR OR THE SHORTEST PERIOD ALLOWED BY LAW. WHIRLPOOL SHALL NOT BE LIABLE FOR
INCIDENTAL OR CONSEQUENTIAL DAMAGES. SOME STATES AND PROVINCES DO NOT ALLOW THE EXCLUSION OR LIMITATION
OF INCIDENTAL OR CONSEQUENTIAL DAMAGES, OR LIMITATIONS ON THE DURATION OF IMPLIED WARRANTIES OF
MERCHANTABILITY OR FITNESS, SO THESE EXCLUSIONS OR LIMITATIONS MAY NOT APPLY TO YOU. THIS WARRANTY GIVES
YOU SPECIFIC LEGAL RIGHTS AND YOU MAY ALSO HAVE OTHER RIGHTS, WHICH VARY FROM STATE TO STATE OR PROVINCE
TO PROVINCE.
.
ry. This major appliance is designed to be repaired in the home.
transportation for product service in remote locations.
DISCLAIMER OF IMPLIED WARRANTIES; LIMITATION OF REMEDIES
of your major appliance, to instruct you how to use your major appliance, to replace or repair
om warranty
.
.
.
AS PROVIDED
Outside the 50 United States and Canada, this warranty does not apply. Contact your authorized Whirlpool dealer to determine if
another warranty applies.
If you need service,
can be found by checking the
call 1-800-807-6777. 8/05
PART NO. 8111P466-60/9763399
© 2005 Whirlpool Corporation ® Registered Trademark/TM Trademark of Whirlpool, U.S.A. Printed in U.S.A.
first see the “Troubleshooting” section of the Use & Care Guide. After checking “Troubleshooting,” additional help
“Assistance or Service” section or by calling Whirlpool. In the U.S.A., call 1-800-253-1301. In Canada,
10/2005
 Loading...