

Page 1

use&care guide
BUILT-IN
GAS OVEN
Model SB100PSR/ER
ave Ovens, Trash Compactors. Room Air Conditioners, Dehumidifiers. Automatic Washers. Clothes Dryers. Freezers. Refrigerator-Freezers.
Page 2

Contents
Before You Use Your Cven
Important Safety Instructions
Parts and Features
Using your Cven
Setting the Clock
Using the Minute Timer
Using the Oven Control........ . 7 Assistance
Baking
Broiling ..............................
Oven Vent
LIGHTING STANDING 3. If You Need Service
OVEN PILOT
Caring for Your Cven
...............................
...................
.......................
.................
.............................
.....................
...............
©1986 Whirlpool Corporation
Page
___
. 2
. 3
. 5
. 6
. 6
........
. 6
. 7
. 8
. 8
. 9 4. If You Have a Problem .
. 10
Control Panel
Oven Door
Standard Oven Cleaning
Cleaning Chart
Changing the Oven Light
If You Need Service or
1. Before Calling for
Assistance
2. If You Need Assistance
..........................
.............................
.....................
...................
.....................
___
Before you use your oven
Read and carefully follow fhe “INSTALLATION INSTRUCTIONS” packed
wHh your oven.
Read this Use ft Care Guide and the Cooking Guide for Important safety
Information.
Page
.. 10
.. 11
.. 11
.. 11
.. 12
.. 12
.. 12
.. 13
.. 13
.. 13
• FOR YOUR SAFETY •
TO PREVENT FIRE AND
EXPLOSION, DO NOT
STORE OR USE
GASOLINE OR OTHER
FLAMMABLE VAPORS
AND LIQUIDS IN THE
VICINITY OF THIS OR
ANY OTHER APPLIANCE.
• FOR YOUR SAFETY •
IF YOU SMELL GAS:
1. OPEN WINDOWS.
2. DON’T TOUCH
ELECTRICAL
SWITCHES.
3. EXTINGUISH ANY
OPEN FLAMES.
4. IMMEDIATELY CALL
YOUR GAS SUPPLIER.
• FOR YOUR SAFETY •
DO NOT OBSTRUCT THE FLOW OF COMBUSTION AND
VENTILATION AIR.
Page 3

You are personally responsible for:
• Reading and following all safety precautions in this Use & Care Guide and
the Cooking Guide.
• Having your oven installed by a qualified installer.
• Having your oven installed and leveled in a wall or cabinet that will hold the
weight.
• Having your oven properly connected to electrical supply and grounded.
(See "Installation Instructions.")
• Having your oven properly connected to the proper gas supply and
checked for leaks. (See "Installation Instructions.")
• Making sure the oven is not used by children or anyone unable to operate
it properly.
• Using the oven only for jobs expected of a home oven.
See “Cooking Guide” for important safety and use information.
IMPORTANT
SAFETY INSTRUCTIONS
WARNiNG - When using your oven, foiiow basic precautions, inciuding the foiiowing:
1. DO NOT allow children to use
or play with any part of the
oven, or leave them unat
tended near it. They could be
burned or injured.
2. DO NOT store things children
might want above the oven.
Children could be burned or
injured while climbing on it
3. KEEP children away from the
oven when it is on. The oven
walls, racks and doors can
get hot enough to cause
burns.
• Put oven racks where you
want them before turning on
the oven. Heated racks
could cause severe burns.
• Let steam and hot air es
cape from the oven before
removing food to prevent
burns.
4. DO NOT use the oven to heat
a room. Persons in the room
could be burned or injured, or
a fire could start.
5. DO NOT wear loose or hang
ing garments when using the
oven. They could ignite and
you could be burned.
6. DO NOT heat unopened con
tainers. They could explode.
The hot contents could burn
and container particles
could cause injury.
7. When adding or removing
food. MAKE SURE to open the
oven door all the way to
prevent burns.
8. DO NOT use a wet pot holder.
Steam burns can result.
DO NOT use a towel or bulky
cloth as a pot holder. They
could catch fire and burn
you.
9. MAKE SURE the utensils you
use are large enough to con
tain food and avoid boil
overs and spill-overs. This will
prevent hazardous build-ups
of food. Heavy splattering
and spill-overs left in the oven
can ignite and burn you.
continued on next page
Page 4

10. GREASE is flamable and
should be handled carefully.
Let fat cool before attempting
to handle it. Do not allow
grease to collect around the
broiler oven or In the vents.
Wipe spill-overs immediately.
11. NEVER use a match or other
flame to look for a gas leak.
Explosion and injury could
result.
• FOR YOUR SAFETY •
DO NOT STORE OR USE GASOLINE OR OTHER FLAMMABLE VAPORS AND LIQUIDS
IN THE VICINITY OF THIS OR ANY OTHER APPLIANCE. THEY COULD IGNITE
CAUSING EXPLOSION AND/OR FIRE.
12. DO NOT repair or replace
any parts unless specifically
recommended in this manual.
All other servicing should be
referred to a qualified service
technician.
13. DO NOT use oven for storage.
Stored items and oven could be
damaged if oven is turned on
accidentally
- SAVE THESE INSTRUCTIONS -
Copy your Model and Serial Numbers here...
If you need service, or call with a
question, have this information
ready:
1. Complete Model and Serial
Numbers (from the plate located
as shown).
2. Purchase date from sales slip.
Copy this information in these
spaces. Keep this book, your war
ranty and sales slip together in a
handy place.
Model Number
Serial Number
Purchase Date
Service Company Phone Number
Page 5
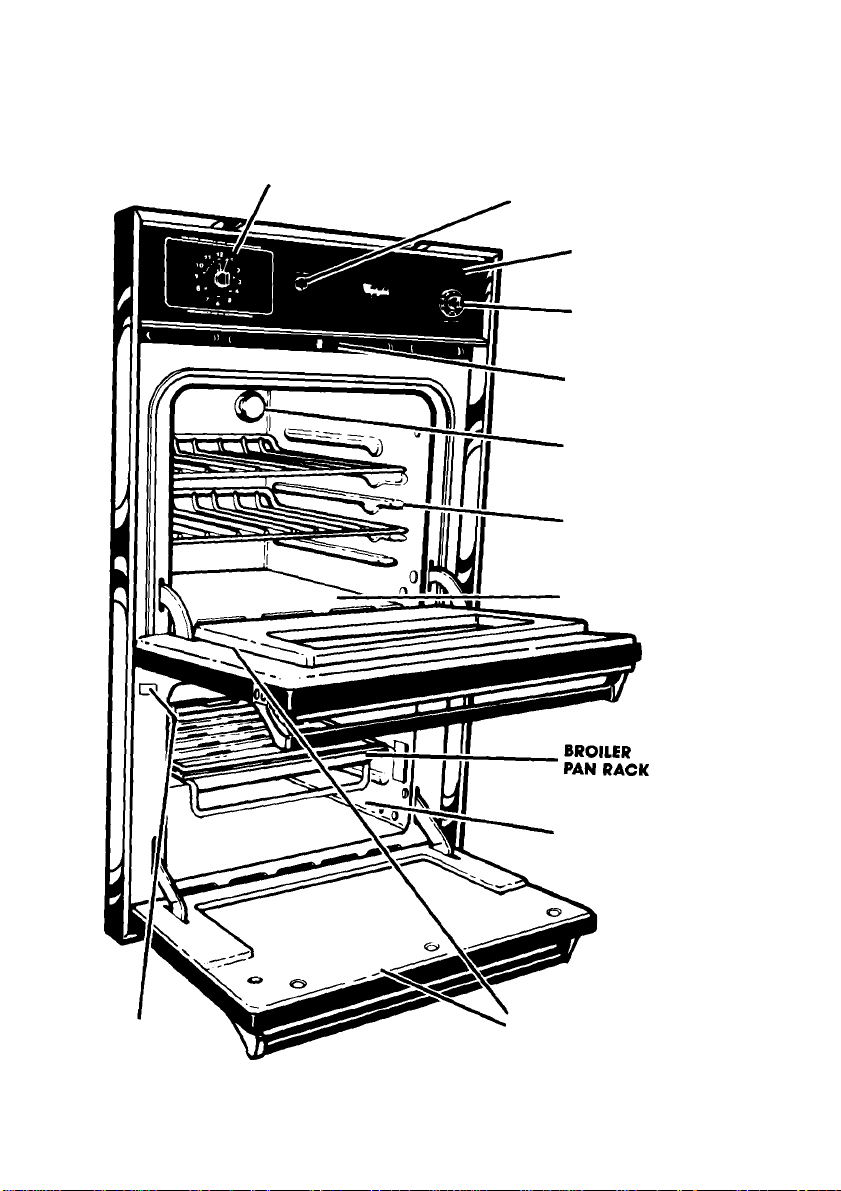
Parts and features
Model SB100PSR/ER
CLOCK/
MINUTE TIMER
OVEN LIGHT SWITCH
CONTROL PANEL
OVEN CONTROL
OVEN VENT
OVEN LIGHT
OVEN RACK
GUIDES
OVEN BURNER
(not shown)
MODEL AND
SERIAL NUMBER
PLATE
BROILER OVEN
REMOVABLE
OVEN DOORS
Page 6
Using your oven
This oven is equipped with either a standing oven piiot or electronic ignitor.
Standing piiots must be iit initiaiiy with a match foiiowing the directions on
page 9. The oven piiot wili remain iit when the burner is turned off. To turn the
oven burner on again, just turn the oven control to a temperature setting or
BROIL and the oven will light.
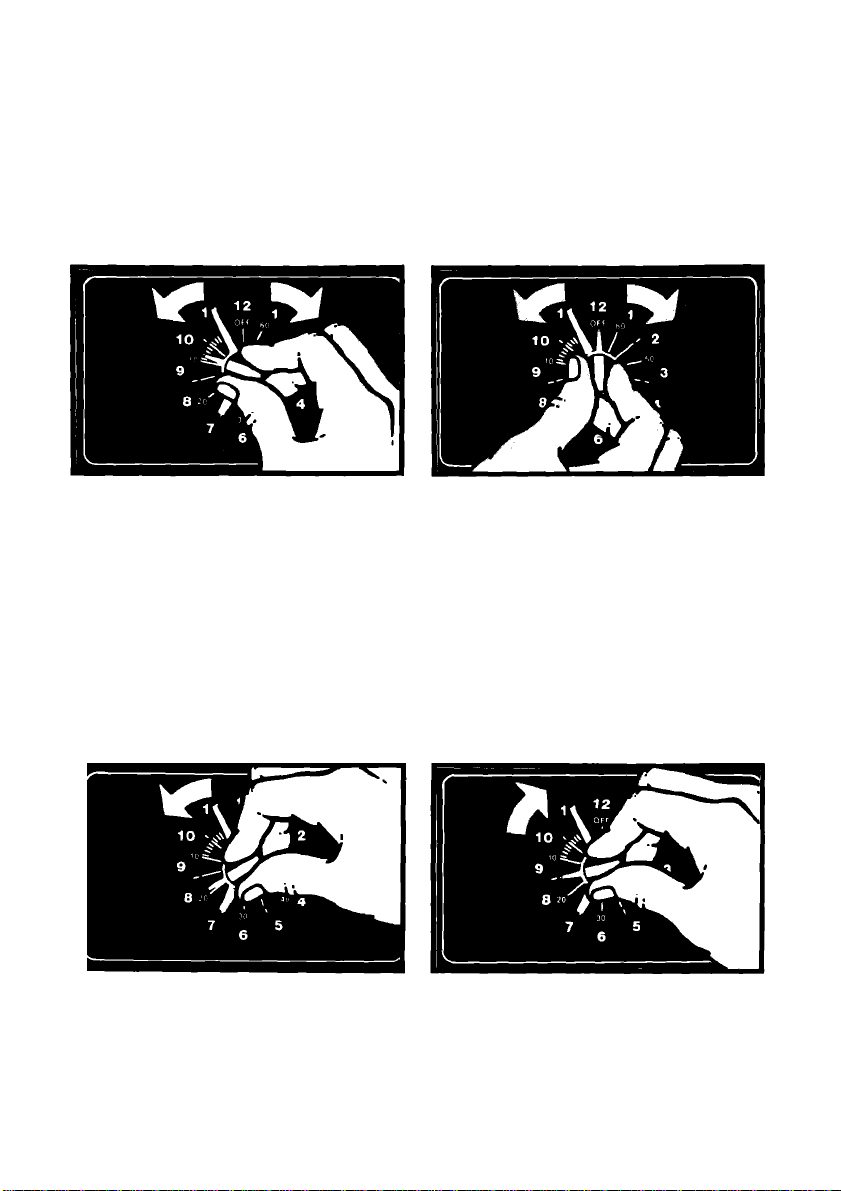
Setting the Clock
Push In and turn the Minute Timer Knob to set the Clock.
1. Push In Minute Timer Knob and
turn in either direction untii clock
shows the right time of day.
2. Let the Minute Timer Knob pop
out. Turn in either direction until
Minute Timer hand points to OFF.
The clock setting will change if
you push in the knob when
turning.
Using the Minute Tinier
The Minute Timer does not start or stop the oven, it works like a kitchen timer.
Set it in minutes up to an hour. You wiil hear a buzzer when the set time is up.
DO NOT PUSH IN THE KNOB when setting the Minute Timer.
1. Without pushing it in, turn the
Minute Timer Knob untii the hand
passes the setting you want.
2. without pushing in, turn the knob
back to the setting you want.
When the time is up, a buzzer will
sound. To stop the buzzer, turn the
Minute Timer hand to OFF.
PUSHING IN AND TURNING THE MINUTE TIMER KNOB CHANGES THE CLOCK SETTING.
6
Page 7
Using the Oven Control
The oven control is used to control the upper oven temperature or to broil in
the lower broiler oven. Baking and broiling can not be done at the same time.
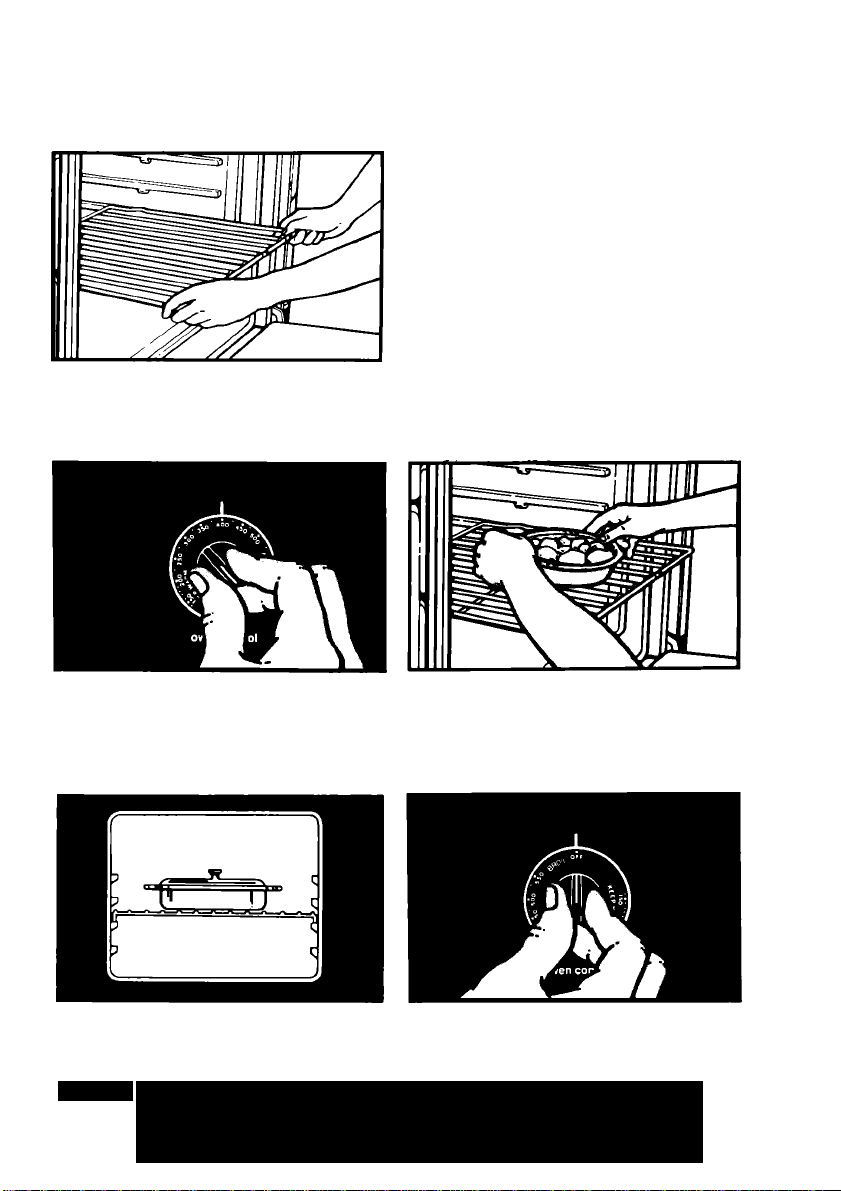
Baking
Racks should be placed so the top
of the food will be centered In the
oven. Always leave at least to 2
inches (4-5 cm) between the sides
of the pan and the oven walls and
other pans. For more information,
see the "Cooking Guide.”
1. Position the racks properly before
turning on the oven. To change
rack position, pull rack out to
stop, raise front edge and lift out.
2. Set the Oven Control to the baking
temperature you want. The oven
burner will automatically light in
50-60 seconds.
4. During baking, the oven burner
will turn on and off to maintain the
temperature setting.
WARNING: If the flame should go out while cooking, or it
there is a strong gas odor, turn the oven burner OFF. Wait five
minutes for gas odor to disappear before reiighting burner. IF
GAS ODOR IS STILL PRESENT, SEE SAFETY NOTE ON PAGE 2.
Preheat the oven forlO minutes
before adding food. NOTE: Oven
racks, walls and door will be hot.
Do not place food directly on
oven bottom.
When baking is done, turn the
Oven Control to OFF.
Page 8
Broiling
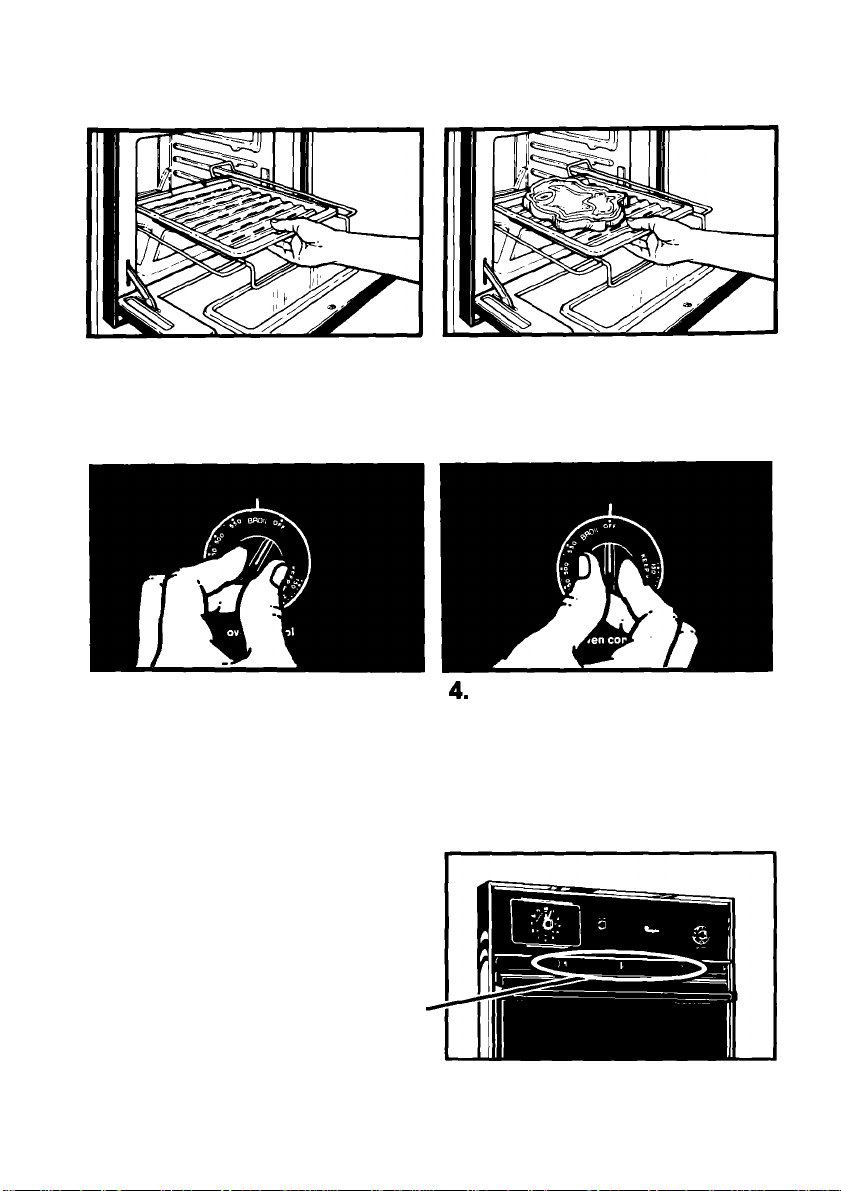
The Broiler Oven is located below the oven. Always broil with both oven
doors completely closed.
1. Position the broiler pan rack
before turning on the broiler. See
pan placement chart in the
"Cooking Guide" for recom
mended pan position.
3. Set the Oven Control to BROIL. The
broiler will automatically light in
50-60 seconds.
DO NOT PREHEAT THE BROILER OVEN BEFORE USING. COMPLETELY CLOSE
BOTH OVEN DOORS BEFORE BROILING.
2. Place food on the broiler pan.
When broiling is done, turn the
Oven Control to OFF.
The Oven Vent
Flot air and moisture escape from the
oven through a vent located under
the control panel. Do not block vent.
Poor baking will result.
OVEN VENT
Page 9
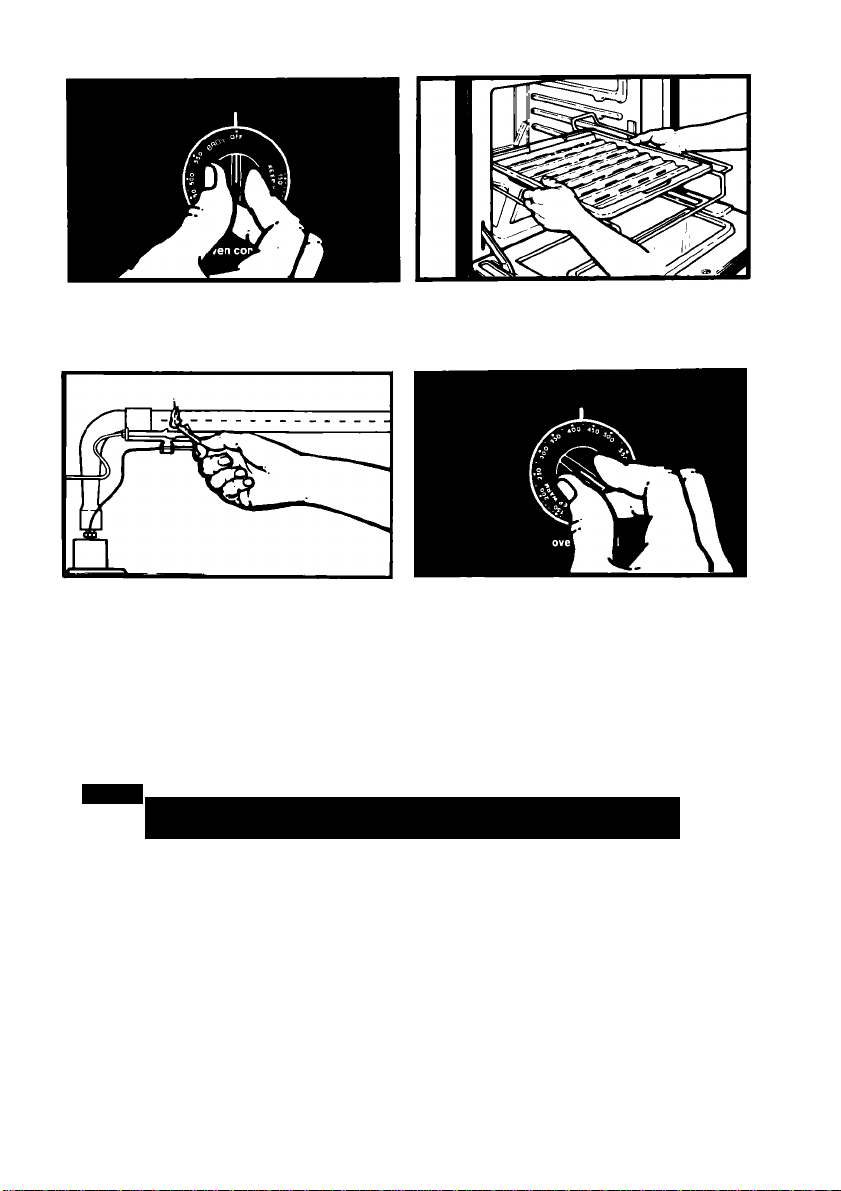
Lighting Standing Oven Pilot
Make sure the oven control is OFF.
3. Hold a lit match over the oven
burner pilot located at the rear of
the burner.
WARNING; Do not attempt to light the oven burner during a
power failure. Personal injury could result.
2. Open the lower oven door and
remove the broiler pan rack from
the broiler oven.
4. After the oven burner pilot is burn
ing steady, check burner lighting
by turning the Oven Control to a
temperature above140°F (60°C).
The burner will take 50-60 seconds
to light.
5. Replace the broiler drawer.
Page 10
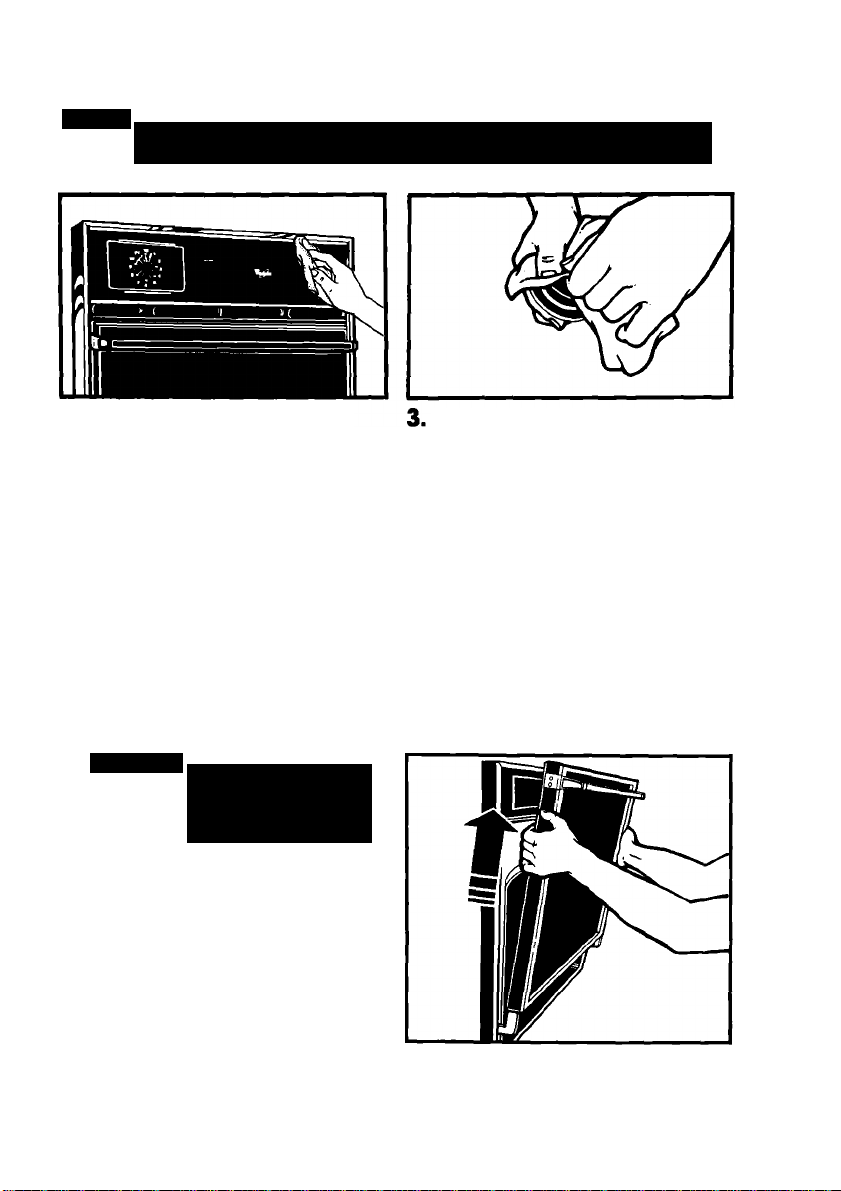
Caring for your oven
Control Panel
WARNING: To avoid burns, first make sure the control is OFF and
the ovens are COOL.
1. Pull knobs straight off.
2. Use warm soapy water, baking
soda and a damp soft cloth or
spray glass cleaner to wipe the
control panels. Rinse and wipe
dry.
Wash knobs in warm soapy
water or use baking soda and
a damp, soft cloth or follow
directions provided with glass
cleaner. Rinse well and dry.
CAUTION: Do not soak or use
abrasive cleansers. They could
rub off the markings.
4. Push the knobs straight back on.
Make sure they point to OFF.
The Oven Doors
Removing the oven doors will make it easier to clean the ovens.
1.1
Open a door to the first stop
position.
2. Hold the door at both sides and
lift off of hinges at bottom corners
of door.
3. To replace, fit the bottom corners
of the door over the ends of the
hinges.
Push the door down evenly. The
door will close only when it is on
the hinges correctly.
WARNING: To avoid
burns, be sure the
ovens are OFF and
COOL.
10
Page 11

Standard Oven Cleaning
The Standard Oven has to be hand cleaned. Use warm soapy water and
steel wool pads and a commercial oven cleaner. See "Cleaning Chart" for
further Instructions.
Do not allow commercial oven cleaner to contact the oven seals,
thermostat or exterior surfaces of the oven. Damage will result.
Cleaning Chart
^ WARNING: To avoid burns, be sure all controls are OFF and the
^ y oven is COOL.
PART WHAT TO USE
Exterior
surfaces
Broiler pan,
grid and
rack
Control knobs
Control panel
Oven racks Warm soapy water and
Oven door
glass
Standard
oven or
broiler oven
Soft cloth and worm soapy
water or baking soda.
Nylon or plastic scrub
pad for stubborn spots.
Warm soapy water or a
soapy steel wool pad
Warm soapy water and
soft cloth.
Warm soapy water or
baking soda, soft cloth
and spray glass cleaner.
plastic scrub pad.
Spray glass cleaner;
warm soapy water and
soft cloth.
Warm sOapy water or
soapy steel-wool pad.
Commercial oven
cleaners.
HOW TO CLEAN
• Wipe off regularly when both
ovens are cool.
• Do not allow food containing
acids (such as vinegar, tomato,
lemon Juice or milk) to remain on
surface. Acids will remove the
finish.
• Do not use abrasive or harsh
cleansers.
• Clean otter each use.
• Wash pan, grid and rack with
other utensils.
• After broiler oven Is cool,
wipe interior with warm damp
cloth. For stubborn spots, use a
soapy steel wool pad.
• Wash, rinse and dry well.
• Do not soak.
• Wash, rinse and dry well.
• Follow directions provided with
cleaner.
• Wash, rinse and dry well.
Use plastic scrub pad for
stubborn areas.
• Make sure oven Is cool.
• Follow directions provided
with cleaner.
• Wash, rinse and dry well.
• Remove door for easier access.
• Place newspaper on floor to
protect floor surface.
• Follow directions provided with
the oven cleaner.
• Rinse well with Clearwater.
• Use In well ventilated room.
• Do not allow commercial oven
cleaner to contact the even
seals, thermostat or exterior
surfaces of the oven. Damage
will occur.
11
Page 12
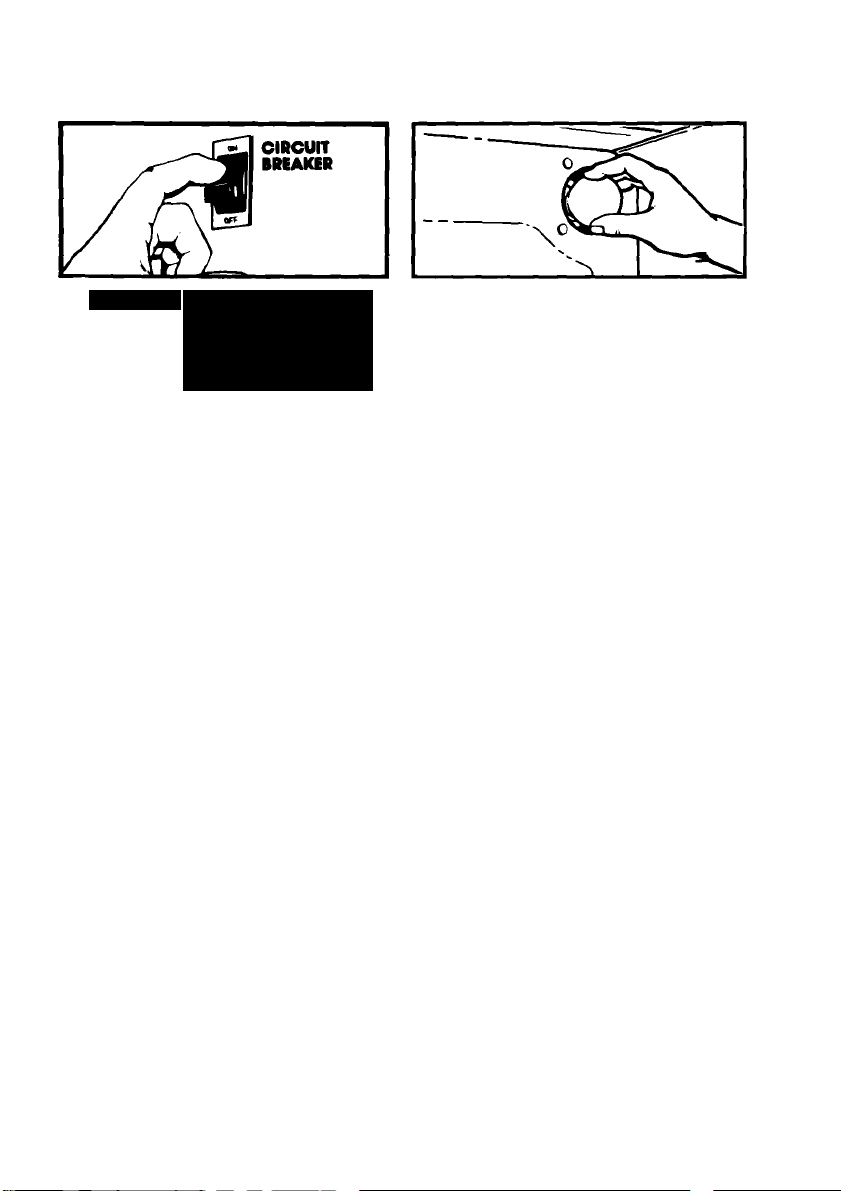
Changing the Oven Light
The oven light in the upper oven will only come on when you turn the Oven
Light switch on the control panel. Turn it again to turn off the light.
WARNING: To avoid
possible shock haz
ard, turn oft electric
power at the main
power supply.
, Remove the light bulb from its
socket. Replace the bulb with a
40-watt appliance bulb.
Turn the power back on at the
main power supply.
If you need service or assistance, we suggest you follow these four steps:
!• Before calling for
assistance...
Performance problems often result
from little things you can find and fix
without tools of any kind.
If nothing operates:
• Is the oven properly connected to
gas and electrical supplies? (See
“Installation Instructions”)
• Have you checked your home’s
main fuses or circuit breaker box?
• Is the flow of combustion and/or
ventilation air to the oven blocked?
Do not block the air flow to and
around the oven.
• Is the Oven Control turned to a tem
perature setting or BROIL?
If burner falls to light:
• Is the oven connected to electrical
power?
• Have you checked your home's
main fuses or circuit breaker box?
If cooking results aren’t what you
expected:
• Is the oven level?
• Are you using pans recommended
In the “Cooking Guide”?
• If baking, have you allowed 11^2 to 2
inches (4-5 cm) on all sides of the
pans for air circulation?
• Have you preheated the oven as the
recipe calls for?
• Are the pans the size called for in the
recipe?
• Are you following a tested recipe
from a reliable source?
See the Cooking Guide for more Infor
mation on cooking problems and
how to solve them.
12
Page 13
2. If you need assistance*...
Call Whirlpool COOL-LINE® serv
ice assistance telephone number.
Dial free from:
Continental U.S. . (800) 253-1301
Michigan
...............
(800) 632-2243
Alaska & Hawaii (800) 253-1121
and talk with one of our trained Con
sultants. The Consultants can instruct
you in howto obtain satisfactory oper
ation from your appliance or, if senrice is necessary, recommend a
quaiified service company in your
area.
3» If you need service*...
Whirlpool has
a nationwide
network of fran
chised TECHCARE® Service
Companies.
TECH-CARE serv
are trained to fuifiil the product war
ranty and provide after-warranty
service, anywhere in the United States.
To locate TECH-CARE service in your
area, call our COOL-LINE service as
sistance teiephone number (see Step
2) or look in your telephone directory
Yellow Pages under:
ice technicians
4* tf you have a
problem*...
Call our COOL-LINE senrice assistance
telephone number (see Step 2) and
talk with one of our Consultants, or If
you prefer, write to:
Mr. Robert Stanley
Division Vice President
Whirlpool Corporation
2000 US-33, North
Benton Harbor, Ml 49022
*lf you must call or write, please pro
vide; model number, serial number,
date of purchase, and a complete
description of the problem. This infor
mation is needed in order to better
respond to your request for
assistance.
FSP Is a registered trademark
of Whirlpool Corporation for
quality parts. Look for this
symbol of quality whenever
you need a replocement part
® for your Whirlpool appliance.
FSP replacement parts
will fit right and work right, because they are
made to the some exacting specifications
used to build every new Whirlpool appliance.
APPLIANCES-HOUSEHOLD- ELECTRICAL APPLIANCES-
MAJOR-SERVICE 8 REPAIR MAJOR-REPAIRING 8 PARTS
WHIRLPOOL APPLIANCES WHIRLPOOL APPLIANCES
FRANCHISED TECH-CARE SERVICE FRANCHISED TECH-CARE SERVICE
SERVICE COMPANIES
XYZ SERVICE CO
123 Maple
.........................
999-9999
OR
WASHING MACHINES, DRYERS
8 IRONERS-SERVICING
WHIRLPOOL APPLIANCES
FRANCHISED TECH-CARE SERVICE
SERVICE COMPANIES
XYZ SERVICE CO
I23Map»e
............................
SERVICE COMPANIES
XYZ SERVICE CO
)23 Maple
.......................
999-9999
999-9999
13
Page 14

Notes
14
Page 15

Notes
15
Page 16

Home i Appliances
Making your world a little easier.
Part No, 36-061098-03-0/786777 ©1986 Whirlpool Corporation
itic Washers, Clothes Dryers, Freezers. Refrigerator-Freezers, Ice Mahers. Dishwashers, Built-In Dvens and Surface Units, Ranges. Microw:
Printed in U.S.A.
 Loading...