

Whirlpool RV15EFR User Manual
Vertical Freezer
Use and
Care Guide
TM
a
Thank you for choosing a Roper Appliance.
This Use and Care Guide will help you
operate and maintain your new, qualitybuilt Roper freezer. Keep this Use and
Care Guide in a safe place for future
reference.
Complete and mail the
Product Registration Card.
This card enters your warranty into our
warranty system that ensures efficient
claim processing, can be used as a proof
of purchase for insurance claims and
helps Roper to contact you immediately
in the unlikely event of a product-safety
recall.
NOTE: Because this Use and Care Guide
covers two models, not all features
discussed will apply to your specific
model.
You are responsible for
It is your responsibility to be sure your
freezer:
■ Is properly installed and leveled on
a floor that wiU hold the weight,
and in an area suitable for its size
and use.
■ Is properly connected to a
grounded electrical circuit that
meets the electrical requirements
on page 2.
■ Is used only for the job it was
designed to do.
■ Is not near an oven, radiator or
other heat source.
■ Is properly maintained.
■ Is out of the weather.
■ Is used in an area where the
temperature will not exceed 110°F
(43.3°C) or drop below 55°F (13°C).
■ Is not used by children or anyone
unable to operate it properly.
■ Is not loaded with food before it
has time to get properly cold.
Home Appliances
RV12EFR
RV15EFR
Contents
_____
_______
___
___
___
Important Safety Instructions _
Food Storage _
Before Using Your Freezer
Parts And Features
Using Your Freezer ^
Setting the temperature control
Adjusting the temperature control.
Refrigerated shelves
Lower storage gate
The key eject lock _
Defrosting And Cleaning Your Freezer _5
Caring For Your Freezer
If electricity goes off
Moving
Before You Call For Service_____________6
Limited Domestic Food Loss Coverage _ 7
Warranty
_____________________________
_____________________________
How to get service or assistance
_________
______________
_______________
________________
__________________
Page
5
5
5
8
8
_4
_4
_4
2
2
2
4
4
4
Important Safety
Before Using Your Freezer
Instructions
▲ warning
To reduce the risk of fire, electrical
shock, or injury when using your
freezer, follow basic precautions
including the following:
1. Read all operating instructions
before using your freezer.
2. Child entrapment and suffocations
are not problems of the past.
Junked or abandoned freezers are
still dangerous...even if they will
"just sit in the garage for a few
days."
If you are getting rid of your old
freezer, do it safely. Please read
the enclosed safety booklet from
the Association of Home Appliance
Manufacturers. Help prevent
accidents.
3. Never allow children to operate,
play with, or crawl inside the
freezer.
4. Never clean freezer parts with
flammable fluids. The fumes can
create a fire hazard or explosion.
« FOR YOUR SAFETY ■
DO NOT STORE OR USE GASOLINE
OR OTHER FLAMMABLE VAPORS
AND LIQUIDS IN THE VICINITY OF
THIS OR ANY OTHER APPLIANCE.
THE FUMES CAN CREATE A FIRE
HAZARD OR EXPLOSION.
• SAVE THESE INSTRUCTIONS •
Food Storage
A. Remove packing materials
Remove materials, tape and inside labels
before using the freezer. To remove any
remaining glue:
■ Rub briskly with thumb to make a
ball, then remove.
OR
■ Soak area with liguid hand
dishwashing detergent before
removing glue as described above.
Do not use sharp instruments, rubbing
alcohol, flammable fluids or abrasive
cleaners. These can damage the
m.atenal. See “Important Safety
Instructions” at left.
NOTE: Do not remove the Tech Sheet
located on the back of the freezer.
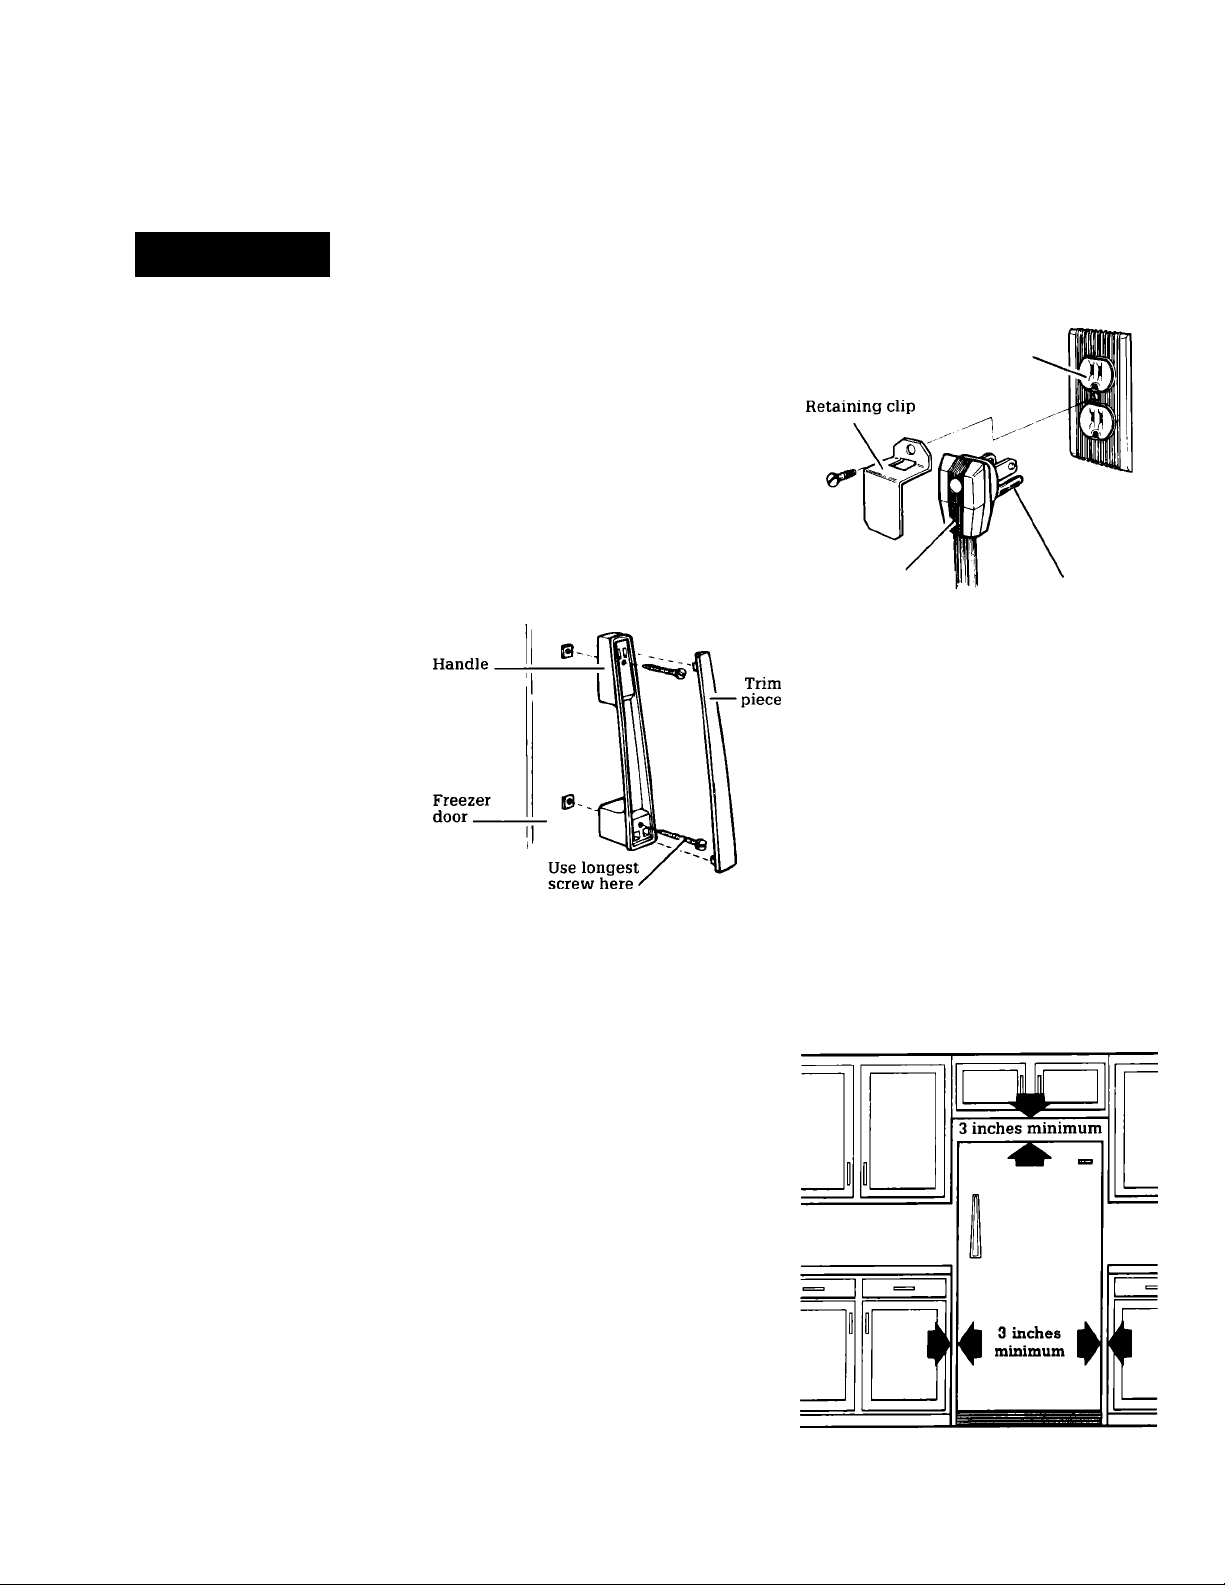
B. Install handle
1. Remove screws from front of
freezer door and discard.
2. Locate handle assembly kit among
packing materials.
3. Attach top of handle to top hole in
door with shorter of 2 screws
provided.
4. Attach bottom of handle to lower
hole in door with longer of 2
screws.
5. Snap trim piece into place.
Use a receptacle which cannot be turned
off with a switch or pull chain. Do not
use an extension cord.
Attach retaining clip, from literature
package inside the freezer, over power
cord plug.
3-prong grounding
type wall receptacle.
Freezer
power plug
3-prong
grounding
plug
E. Choose freezer location
1. Pick a safe place, indoors, away
from flammables such as
gasoline.
2. Check the strength of the floor. It
should hold the weight of a fully
loaded freezer.
3. Allow at least 3 inches (7.5 cm) of
air space at top of freezer.
4. Allow at least 1 inch (2.5 cm)
between back of freezer and the
wall.
5. Allow 3 inches (7.5 cm) on each
side of the freezer for ease of
installation.
6. If the freezer is to be against a
wall, you might want to leave ex
tra space on the hinge side so the
door can be opened wider.
Your freezer is designed for storage of
commercially frozen food and for
freezing food at home. For further
information about preparing food for
freezing or food storage times, contact
your local Cooperative Extension Service
or check a freezer guide or cookbook.
Page 2
C. Clean it
Clean your freezer before using it.
1. Use a sponge, cloth or paper towel
and mild detergent in warm water
to clean outside and inside of
freezer, door liner and gasket.
2. Rinse and dry thoroughly.
D. Locate proper electrical
supply
Recommended Grounding Method
A 115 Volt, 60 Hz., AC only 15 or 20
ampere fused and properly grounded
electrical supply is required. It is
recommended that a separate circuit
serving only this appliance be provided.
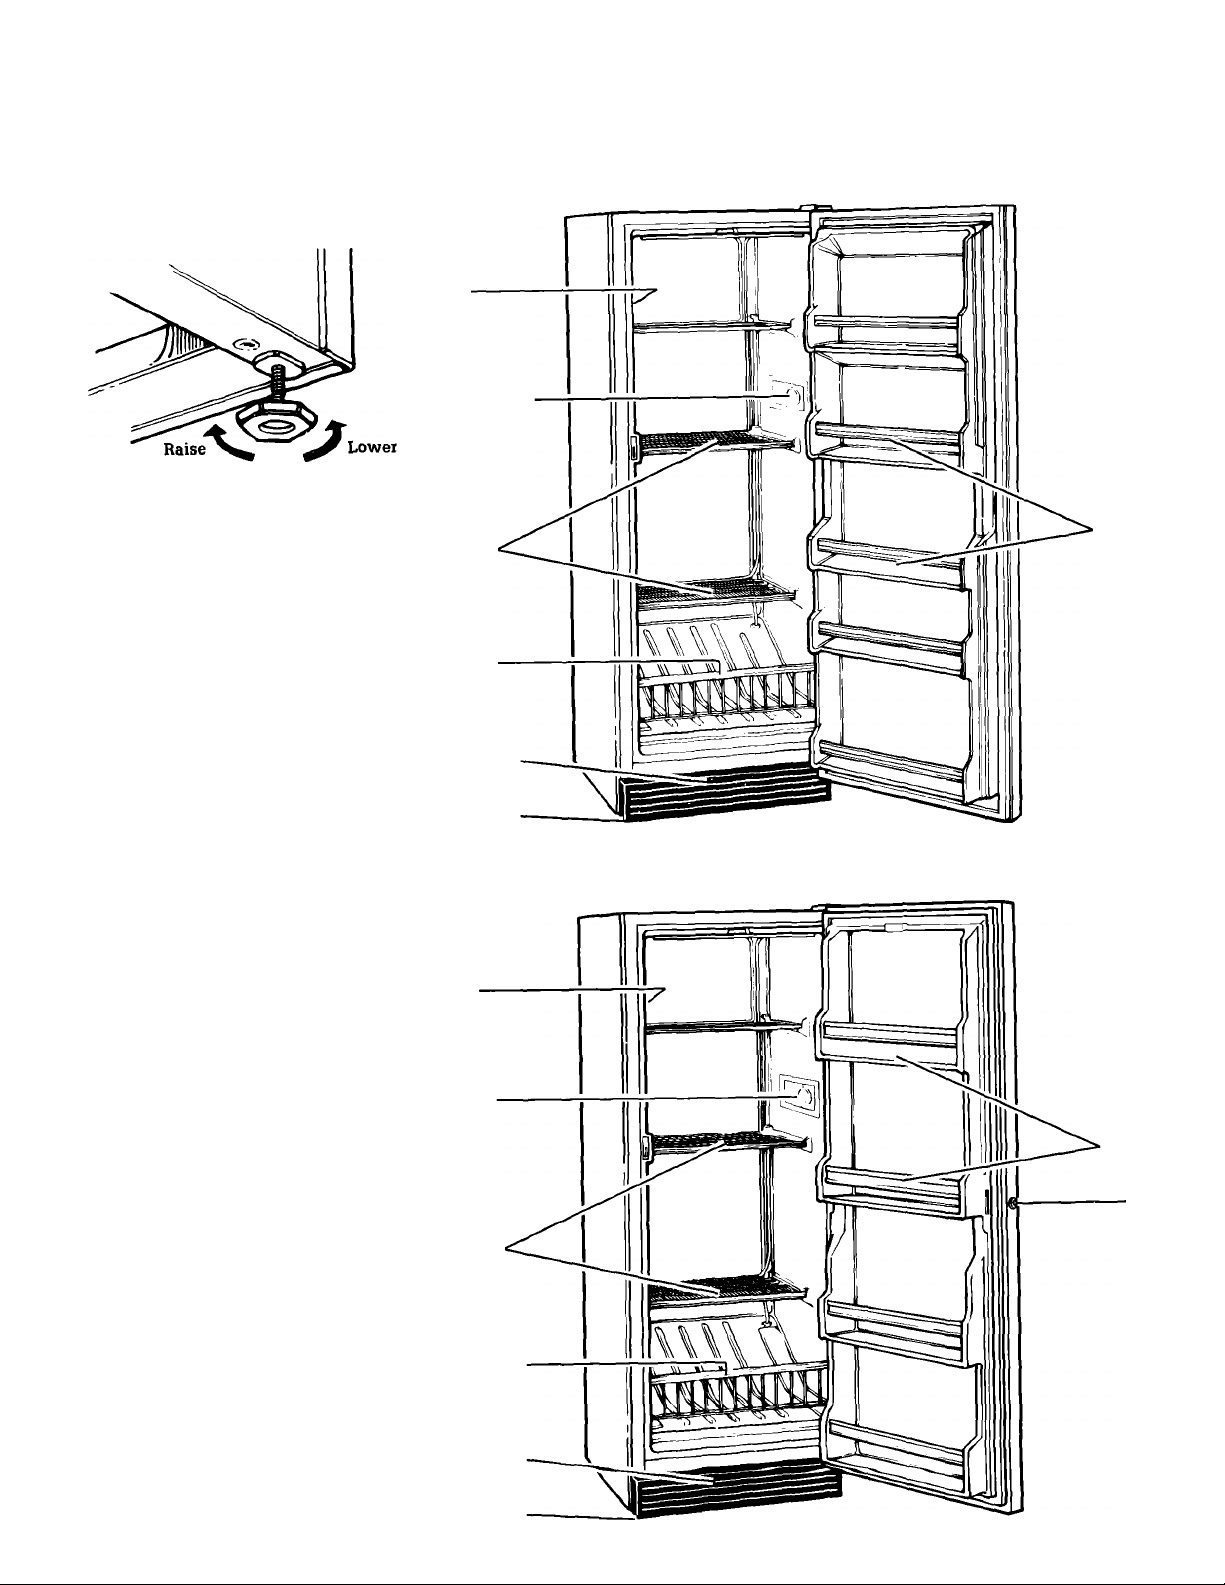
Parts And Features
E. Install freezer
Level freezer so the door will stay open
at any position.
1. Locate, remove and discard the 4
bolts that held the freezer in the
shipping crate.
2. Locate the 2 front leveling legs
among the packing materials.
3. Screw these legs into the front
holes on the bottom of the freezer.
The back of the freezer rests on 2
fixed supports.
4. Adjust the 2 front legs so freezer
does not rock.
5. Connect freezer to proper electrical
supply and attach retaining clip.
(Refer to “D. Locate proper
electrical supply" on page 2.)
6. Slide freezer into place.
7. Place a level on top of the freezer first side to side then front to back.
Turn leg clockwise to raise a
corner. Turn leg counter-clockwise
to lower a corner.
8. Repeat step 7 until the freezer is
level.
9. After freezer is fully loaded,
recheck with level.
Model RV12EFR
Model and
serial number
label
(on side wall)
Temperature
control
Refrigerated
stationary
shelves
Lower
storage
gate
Base grille
Leveling
legs
(not shown)
Model RV15EFR
Model and
serial number
label
(on side wall)
Stationary
door
shelves
Temperature
control
Refrigerated
stationary
shelves
Lower
storage
gate
Base grille
Leveling
legs —
(not shown)
Stationary
door
shelves
Key eject
lock
Page 3
 Loading...