

1
MI
VENTED KITCHEN RANGE HOOD
FOR 120 V. OPERATION
READ AND SAVE THESE INSTRUCTIONS
Before you begin,
completely and carefully. If followed, they will simplify
the installation job.
IMPORTANT: OBSERVE ALL GOVERNING CODES
SAVE THESE INSTRUCTIONS FOR THE LOCAL
ELECTRICAL INSPECTOR’S USE
For most efficient operation, the top of the hood should be
approximately 66 inches (167.6 cm) from the floor. See Figure
5 for examples of two typical ductwork installations. Choose
the best method for your installation.
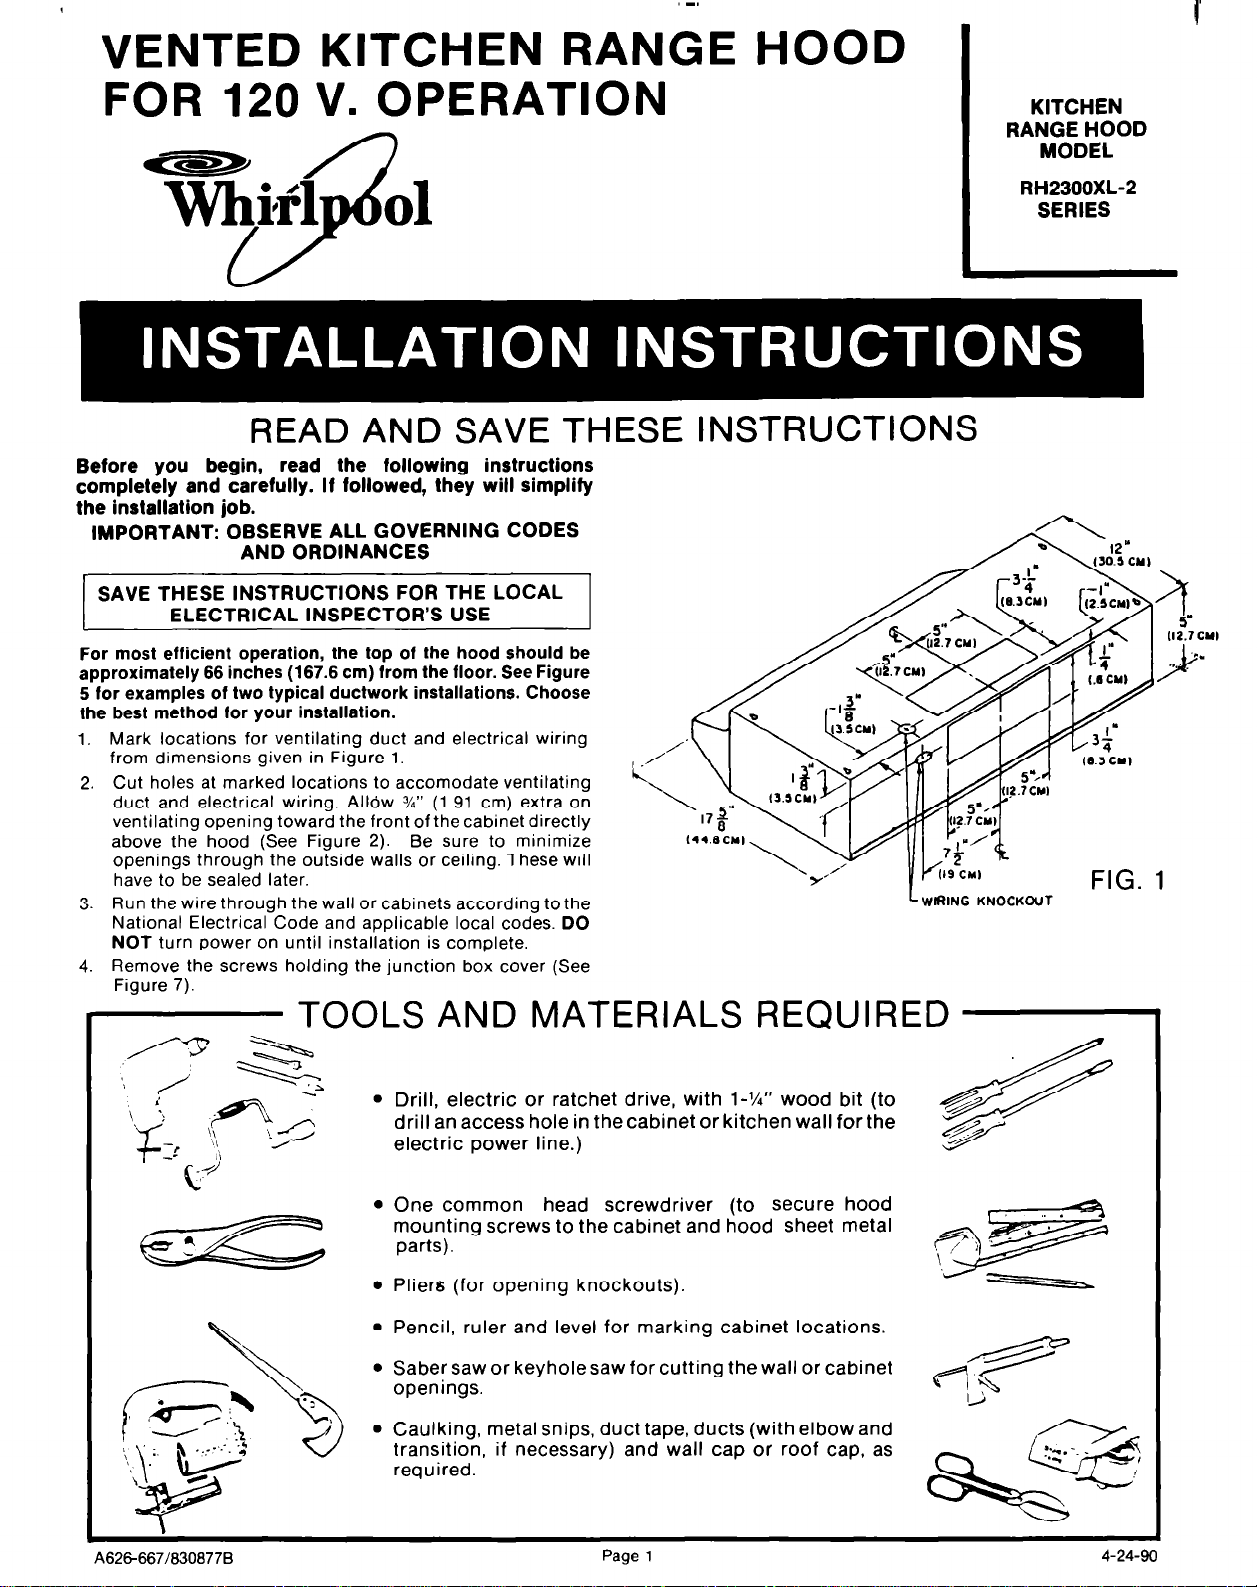
1. Mark locations for ventilating duct and electrical wiring
from dimensions given in Figure 1.
2. Cut holes at marked locations to accomodate ventilating
duct and electrical wiring. Alldw %” (1.91 cm) extra on
ventilating opening toward the front of the cabinet directly
above the hood (See Figure 2). Be sure to minimize
openings through the outside walls or ceiling. These will
have to be sealed later.
3. Run the wire through the wall or cabinets according tothe
National Electrical Code and applicable local codes. DO
NOT turn Power on until installation is complete.
4. Remove the screws holding the junction box cover (See
Figure 7).
read the following instructions
AND ORDINANCES
KITCHEN
RANGE HOOD
MODEL
RH2300XL-2
SERIES
\626-667/6306778
TOOLS AND MATERIALS REQUIRED
l
Drill, electric or ratchet drive, with 1-X” wood bit (to
drill an access hole in the cabinet or kitchen wall for the
electric power line.)
l
One common head screwdriver (to secure hood
mounting screws to the cabinet and hood sheet
parts).
l
Pliers (for opening knockouts).
l
Pencil, ruler and level for marking cabinet locations.
l
Saber saw or keyhole saw for cutting the wall or cabinet
openings.
l
Caulking, metal snips, duct tape, ducts (with elbow and
transition, if necessary) and wall cap or roof cap, as
required.
Page
1
metal
4-24-90

5. Lift the hood into position and mark the hole locations on
the cabinet for each of the four keyhole mounting slots.
6. Remove the hood and start all four screws in the
Center
of
the narrow neck of the keyhole slot marked on the cabinet
bottom (See Figure 3).
7. Install proper ductwork.
9. Lift the hood into position simultaneously feeding the
electrical wire through the knockout.
9. Tighten the four mounting screws to secure the hood to
the cabinet. Be sure the screw heads are in the narrow
neck of the keyhole slot (Figure 3).
10. Complete electrical wiring in the junction box
according
to the National Electrical Code and applicable local codes.
NOTE: This unit must be permanently grounded,
11. Replace junction box cover.
12. Seal holes around ventilating pipe and wiring passing
through ceiling or outside wall with caulking or insulation
to prevent energy loss.
NOTE: It has been found that a large part of the energy loss
of the average home is due to outside air infiltrating the
structure. Seal around duct work where it passes through
outside walls or ceiling. Seal around electrical wiring. And
be sure damper is working properly.
13. Be sure that damper which is supplied with this product
is properly installed. (See Figures 4 8 5).
CABINET CUTOUTS
pEYHOLE SLOT.
\ IN CANOPY
r
ScREWi
(IN INSTALLiTION
PARTS BAG)
FIG. 3
TRAIN CAP
IF RAIN CAP HAS
P OAMPER, 8EMOVE
DAMPER 3LAOE
FROM 3000.
FIG. 2
IF RAIN
CAP
A OAMPER, REMOVE
OAMPER 3LAOE
FROM HOOO.
HAS
Vertical Venting
3%” x 10” Rectangular
Horizontal Venting
Page 2

CARE OF FILTERS:
ALUMINUM FILTER: For greater efficiency, the permanent
type aluminum filter should be removed and cleaned
periodically.
To clean, the filter should be soaked in hot water and detergent.
and thoroughly rrnsed. The aluminum filter can be cleaned in a
dishwasher.
LIGHTS:
Do not use bulb larger than 60 watts in light socket.
CARE OF FAN MOTOR:
Fan motor has life time sealed bearings that never need oiling
under normal usage. A few drops on each bearing after three
years of heavy usage will prolong the motor life. Clean
motor
with a damp cloth and grease cutting detergent when a heavy
coating of grease has accumulated.
CARE OF EXTERIOR SURFACES:
Your range hood is a beautifully finished addition to your
kitchen and requires only the care you give your range to
preserve its lasting beauty. Clean with a mild detergent to
preserve finish. DO NOT use abrasive cleaners.
For most effective removal of smoke and odors, turn on fan at
beginning of cooking operation and allow to run until smoke
and odors are removed from room.
IMPORTANT SAFEGUARDS FOR
ELECTRICAL APPLIANCES
When using electrical appliances, basic safety precautions
should always be followed including the following:
1. Read and follow all instructions.
2. Close supervision is necessary when any appliance is
used by or near children.
3. To avoid providing fuel for a grease pan fire, clean lint
and grease from all hood surfaces - interior and exterior. Be
sure to remove and clean air filter every three months.
4. Do not saturate electrical connections, switches, and
motor in water during cleaning. Remember, WATER AND
ELECTRICITY DO NOT MIX!
5. If any electrical malfunction becomes evident during
use, disconnect power to hood at your home fuse or breaker
box.
6. To prevent risk of fire, electric shock, or injury, be sure to
disconnect power before cleaning or servicing.
WARNING: To reduce the risk of fire or electric shock, do not
use this fan with any solid-state speed control device.
FIG. 6
If you need service or assistance, we
1. Befom oauhlg for aomistluloo...
Performance problems oflen result lrom lillle things you can find
and fix yourself without 1001s.
I1 nolhlng operalw
l
Have you checked the main luse or circuit breaker box?
2. If yw mood au&tanco...
Cdl the WhIrlpool COOL -LINE’J moda nslslanw ~tiphom
number. Dkl hw loom:
Conllnmt~l U.S. ................................. (800) 252-1301
Mkhlgm
........................................
*lask~6H~wall..................... ............. (@00)253-1121
and lalk wlh one of our trained Consultants. The Consultanl can
instruct you m how lo obtain satisfactory operation lrom your
apphance or. if servnce is necessary. recommend a qualified servi~
company in your area.
(800)632-2242
suggest
Page 3
you follow these four
3.
If yaw mod sordoo...
warranly serwce anywhere in the United States. To locate TECHCARE service in YOM area. call our COOL-LINE service assistance
telephone numb& (see Step 2) or look in your telephone directory
Yellow Pages under:
FRANCHISE0 TECHCARE SERVICE
SERWCE COYPlNlES
XI,? SER”lCE co
123 M.ca 95¶-ssss
4.
If you bare a problem...
Call our COOL-LINE serwce assistance lelepone number (see
Step 2) and talk with one01 ourConSultantS. or11 you prefer. wile to.
Mr. Robert Stanley. Division Vice Presidenl
Whirlpool Corporation
Adminislrative Center
2000 US-33 North
Benton Harbor, MI 49022
If you musl call or write. please provide model number. serial
number, dale 01 purchase. and a complete description of the
problem. This mlormation IS needed m order to belter respond to
your request lor assislance.
steps:
Whwlpool has a nationwide network of franchised
TECH-CAREQ Service
Compames.
service technicians are
trained to fulfill Ihe product
warranty and prowde after-
TECH-CARE
 Loading...