

Whirlpool RF365PXMW1 Owner’s Manual

ELECTRIC RANGE
For questions about features, operation/performance,
parts, accessories or service, call: 1-800-253-1301
or visit our website at...
www.whirlpool.com
Table of Contents ................................................. 2
9761862
To the installer: Please leave this
instruction book with the unit.
To the consumer: Please read and
keep this book for future reference.

TABLEOFCOb, H NTS
RANGE SAFETY ............................................................................. 3
The Anti-Tip Bracket .................................................................... 3
PARTS AND FEATURES ................................................................ 5
COOKTOP USE .............................................................................. 7
Cooktop Controls ......................................................................... 7
ACCUSIM MER®Feature .............................................................. 7
Dual Cooking Zone ...................................................................... 8
Warm Zone Element .................................................................... 8
Ceramic Glass .............................................................................. 8
Coil Elements and Burner Bowls ................................................. 9
Lift-up Cooktop .......................................................................... 10
Home Canning ........................................................................... 10
Cookware ................................................................................... 10
ELECTRONIC OVEN CONTROLS ............................................... 11
Display ........................................................................................ 11
Start ............................................................................................ 11
Off/Cancel .................................................................................. 12
Clock .......................................................................................... 12
Tones .......................................................................................... 12
Fahrenheit and Celsius ............................................................... 12
Timer ........................................................................................... 12
Control Lock ............................................................................... 13
12-Hour Shut-Off ....................................................................... 13
Oven Temperature Control ........................................................ 13
OVEN USE ..................................................................................... 13
Aluminum Foil............................................................................. 13
Positioning Racks and Bakeware .............................................. 14
Split Oven Rack .......................................................................... 14
Bakeware .................................................................................... 15
Meat Thermometer ..................................................................... 15
Oven Vent ................................................................................... 15
Baking and Roasting .................................................................. 15
Choice Bake ®Function .............................................................. 16
Broiling ........................................................................................ 16
Convection Cooking ................................................................... 17
Convection Baking and Roasting .............................................. 17
Warm Hold Feature .................................................................... 18
Timed Cooking ........................................................................... 19
Sequence Programming ............................................................ 20
Warming Drawer ........................................................................ 21
RANGE CARE ............................................................................... 21
Self-Cleaning Cycle .................................................................... 21
General Cleaning ........................................................................ 23
Oven Light .................................................................................. 24
Oven Door .................................................................................. 25
Storage Drawer .......................................................................... 25
Warming Drawer ........................................................................ 26
TROUBLESHOOTING .................................................................. 26
ASSISTANCE OR SERVICE ......................................................... 27
WARRANTY .................................................................................. 28

RANGESAFETY
Your safety and the safety of others are very important.
We have provided many important safety messages in this manual and on your appliance. Always read and obey all safety
messages.
This is the safety alert symbol.
This symbol alerts you to potential hazards that can kill or hurt you and others.
All safety messages will follow the safety alert symbol and either the word "DANGER" or "WARNING."
These words mean:
You can be killed or seriously injured if you don't immediately
follow instructions.
You can be killed or seriously injured if you don't follow
instructions.
All safety messages will tell you what the potential hazard is, tell you how to reduce the chance of injury, and tell you what can
happen if the instructions are not followed.
The range will not tip during normal use. However, the range can tip if you apply too much force or weight to the open door without
having the anti-tip bracket fastened down properly.
Tip Over Hazard
A child or adult can tip the range and be killed.
Connect anti-tip bracket to rear range foot.
Reconnect the anti-tip bracket, if the range is moved.
See the installation instructions for details.
Failure to follow these instructions can result in death or serious burns to children and adults.
Anti-Tip Bracket
Range Foot
The California Safe Drinking Water and Toxic Enforcement Act requires the Governor of California to publish a list of substances
known to the State of California to cause cancer, birth defects, or other reproductive harm, and requires businesses to warn of
potential exposure to such substances.
WARNING: This product contains a chemical known to the State of California to cause cancer, birth defects, or other
reproductive harm.
This appliance can cause low-level exposure to some of the substances listed, including benzene, formaldehyde, carbon
monoxide, and toluene.
Making sure the anti-tip bracket is installed:
• Slide range forward.
• Look for the anti-tip bracket securely attached to floor.
• Slide range back so rear range foot is under anti-tip bracket.
iMPORTANT SAFETY iNSTRUCTiONS
WARNING: To reduce the risk of fire, electrical shock,
injury to persons, or damage when using the range, follow
basic precautions, including the following:
[] WARNING: TO REDUCE THE RISK OF TIPPING OF
THE RANGE, THE RANGE MUST BE SECURED BY
PROPERLY INSTALLED ANTI-TIP DEVICES. TO CHECK
IF THE DEVICES ARE INSTALLED PROPERLY, SLIDE
RANGE FORWARD, LOOK FOR ANTI-TIP BRACKET
SECURELY ATTACHED TO FLOOR, AND SLIDE RANGE
BACK SO REAR RANGE FOOT IS UNDER ANTI-TIP
BRACKET.
[] CAUTION: Do not store items of interest to children in
cabinets above a range or on the backguard of a range -
children climbing on the range to reach items could be
seriously injured.
[] Proper Installation - Be sure the range is properly installed
and grounded by a qualified technician.
[] Never Use the Range for Warming or Heating the Room.
[] Do Not Leave Children Alone - Children should not be left
alone or unattended in area where the range is in use.
They should never be allowed to sit or stand on any part of
the range.
[] Wear Proper Apparel - Loose-fitting or hanging garments
should never be worn while using the range.
[] User Servicing - Do not repair or replace any part of the
range unless specifically recommended in the manual. All
other servicing should be referred to a qualified technician.
[] Storage in or on the Range - Flammable materials should
not be stored in an oven or near surface units.
[] Do Not Use Water on Grease Fires - Smother fire or flame
or use dry chemical or foam-type extinguisher.
[] Use Only Dry Potholders - Moist or damp potholders on
hot surfaces may result in burns from steam. Do not let
potholder touch hot heating elements. Do not use a towel
or other bulky cloth.
[] DO NOT TOUCH SURFACE UNITS OR AREAS NEAR
UNITS - Surface units may be hot even though they are
dark in color. Areas near surface units may become hot
enough to cause burns. During and after use, do not touch,
or let clothing or other flammable materials contact surface
units or areas near units until they have had sufficient time
to cool. Among those areas are the cooktop and surfaces
facing the cooktop.
[] Use Proper Pan Size - The range is equipped with one or
more surface units of different size. Select utensils having
flat bottoms large enough to cover the surface unit heating
element. The use of undersized utensils will expose a
portion of the heating element to direct contact and may
result in ignition of clothing. Proper relationship of utensil to
burner will also improve efficiency.
[] Never Leave Surface Units Unattended at High Heat
Settings - Boilover causes smoking and greasy spillovers
that may ignite.
[] Make Sure Reflector Pans or Drip Bowls Are in Place -
Absence of these pans or bowls during cooking may
subject wiring or components underneath to damage.
[] Protective Liners - Do not use aluminum foil to line surface
unit drip bowls or oven bottoms, except as suggested in
the manual. Improper installation of these liners may result
in a risk of electric shock, or fire.
[] Glazed Cooking Utensils - Only certain types of glass,
glass/ceramic, ceramic, earthenware, or other glazed
utensils are suitable for range-top service without breaking
due to the sudden change in temperature.
[] Utensil Handles Should Be Turned Inward and Not Extend
Over Adjacent Surface Units - To reduce the risk of burns,
ignition of flammable materials, and spillage due to
unintentional contact with the utensil, the handle of a
utensil should be positioned so that it is turned inward, and
does not extend over adjacent surface units.
[] Do Not Soak Removable Heating Elements - Heating
elements should never be immersed in water.
[] Do Not Cook on Broken Cooktop - If cooktop should
break, cleaning solutions and spillovers may penetrate the
broken cooktop and create a risk of electric shock. Contact
a qualified technician immediately.
[] Clean Cooktop With Caution - If a wet sponge or cloth is
used to wipe spills on a hot cooking area, be careful to
avoid steam burn. Some cleaners can produce noxious
fumes if applied to a hot surface.
[] Use Care When Opening Door - Let hot air or steam
escape before removing or replacing food.
[] Do Not Heat Unopened Food Containers - Build-up of
pressure may cause container to burst and result in injury.
[] Keep Oven Vent Ducts Unobstructed.
[] Placement of Oven Racks - Always place oven racks in
desired location while oven is cool. If rack must be moved
while oven is hot, do not let potholder contact hot heating
element in oven.
[] DO NOT TOUCH HEATING ELEMENTS OR INTERIOR
SURFACES OF OVEN - Heating elements may be hot even
though they are dark in color. Interior surfaces of an oven
become hot enough to cause burns. During and after use,
do not touch, or let clothing or other flammable materials
contact heating elements or interior surfaces of oven until
they have had sufficient time to cool. Other surfaces of the
appliance may become hot enough to cause burns - among
these surfaces are oven vent openings and surfaces near
these openings, oven doors, and windows of oven doors.
For self-cleaning ranges -
[] Do Not Clean Door Gasket - The door gasket is essential
for a good seal. Care should be taken not to rub, damage,
or move the gasket.
[] Do Not Use Oven Cleaners - No commercial oven cleaner
or oven liner protective coating of any kind should be used
in or around any part of the oven.
[] Clean Only Parts Listed in Manual.
[] Before Self-Cleaning the Oven - Remove broiler pan and
other utensils.
For units with ventilating hood -
[] Clean Ventilating Hoods Frequently - Grease should not
be allowed to accumulate on hood or filter.
[] When flaming foods under the hood, turn the fan on.
SAVE THESE INSTRUCTIONS
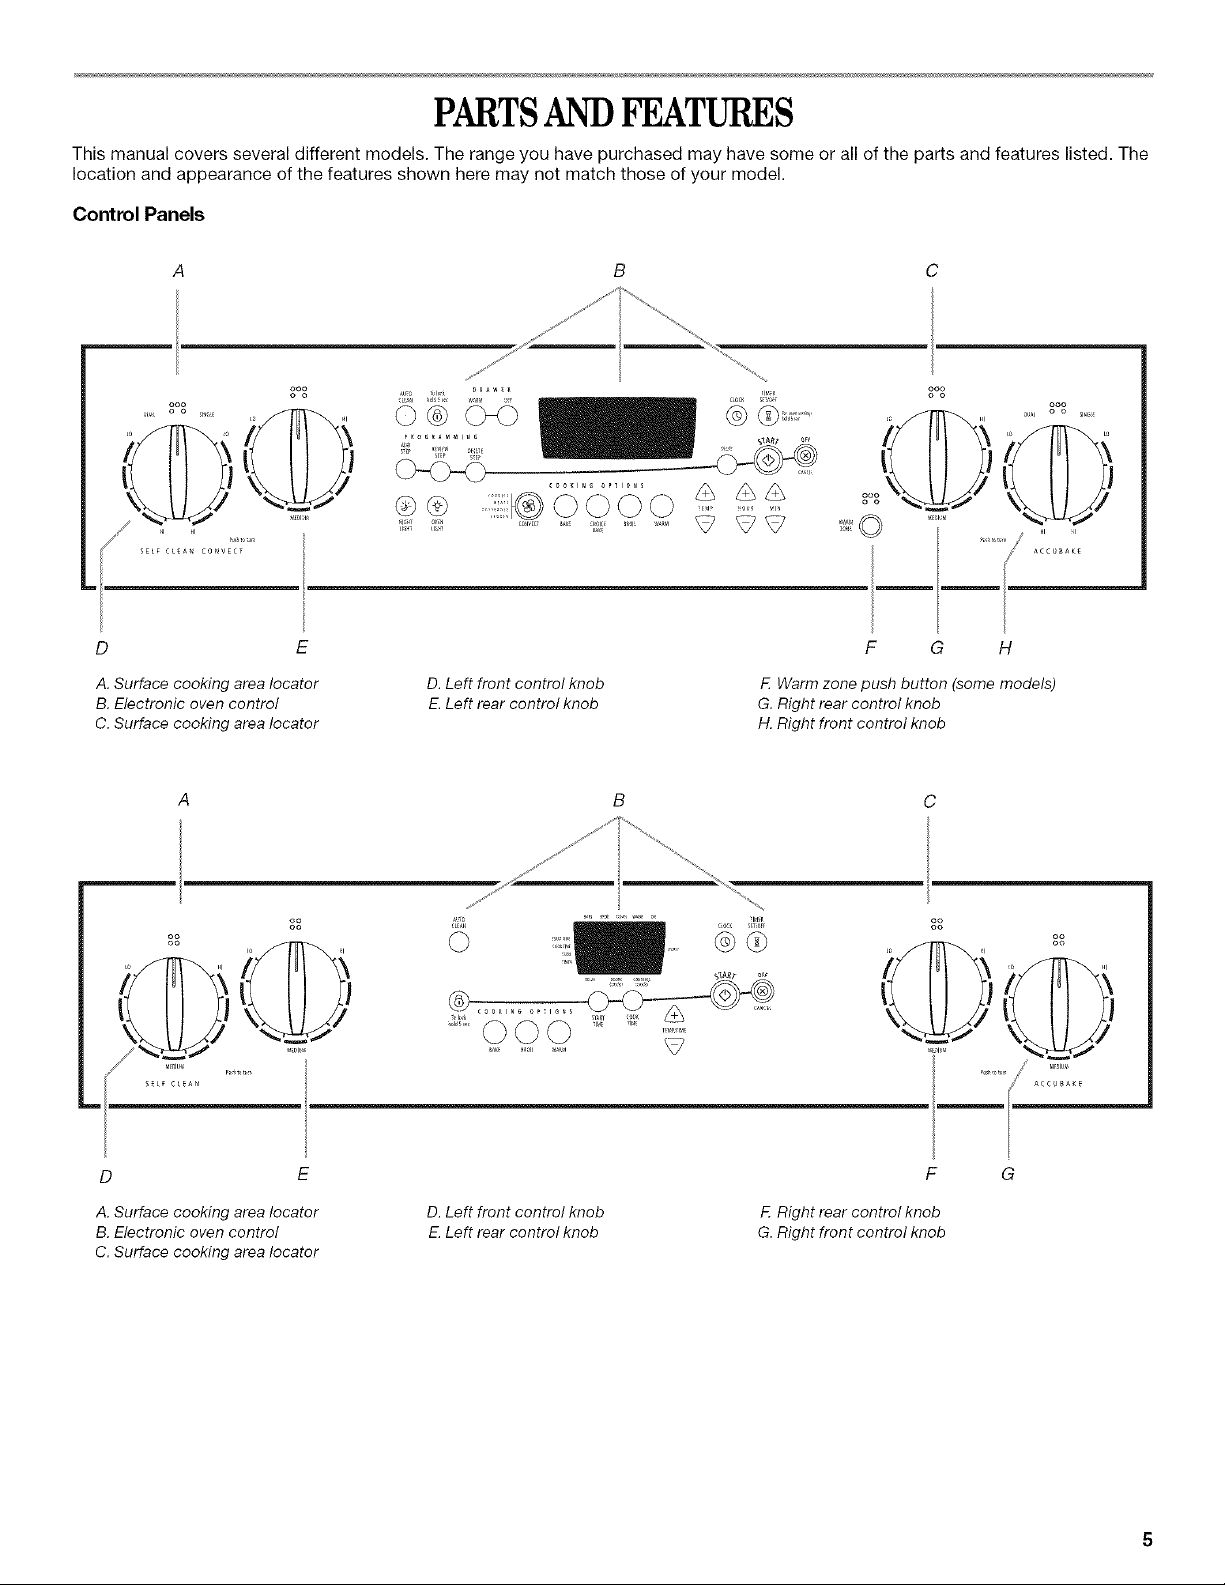
PARTSANDFEATURES
This manual covers several different models. The range you have purchased may have some or all of the parts and features listed. The
location and appearance of the features shown here may not match those of your model.
Control Panels
C
ooo
oo
ooo
D
A. Surface cooking area locater
B. Electronic oven control
C. Surface cooking area locater
D E
A. Surface cooking area locater
B. Electronic oven control
C. Surface cooking area locater
D. Left front control knob
E.Left rear control knob
D. Left front control knob
E.Left rear control knob
F G H
E Warm zone push button (some models)
G. Right rear control knob
H. Right front control knob
ACCUSA_E
F
F. Right rear control knob
G. Right front control knob
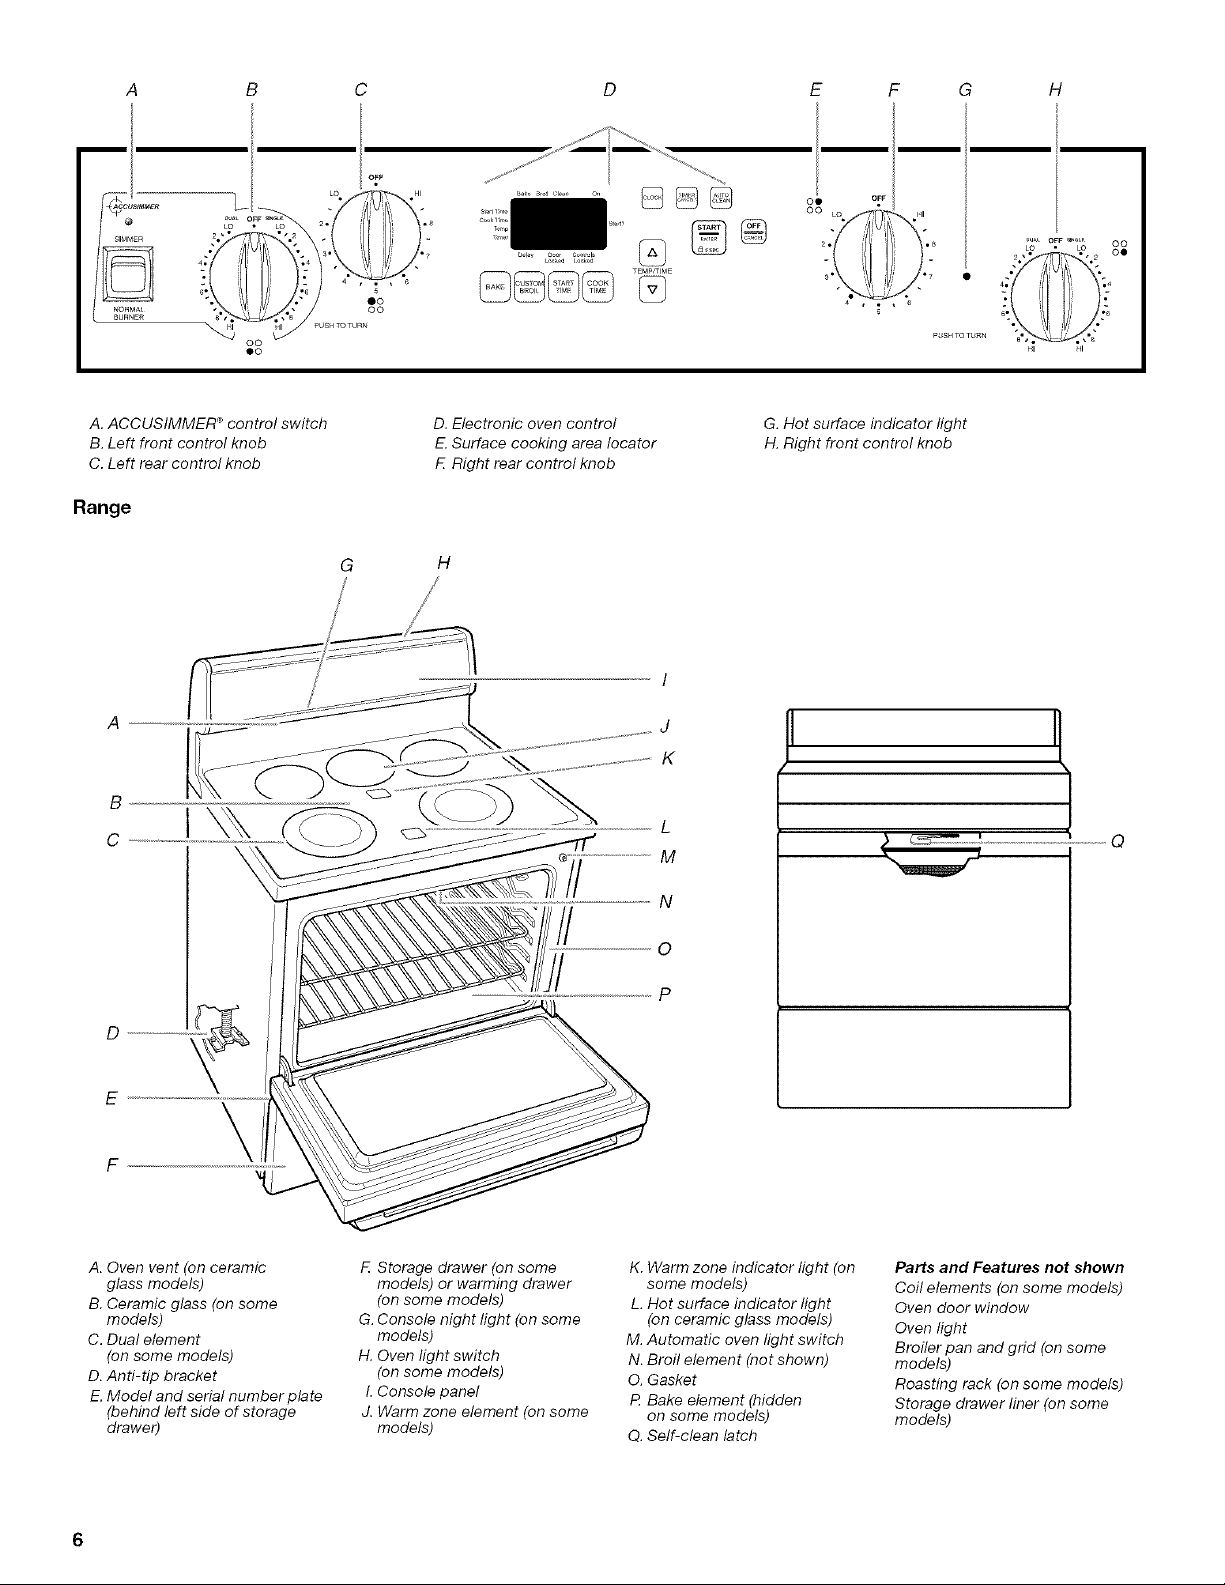
A B
A_CUSJM_ER
SIMMER
NOHMAL
_URNE_
D
TEMPrrlt_E
0O
E F G H
m m
3" •
PUSHmaTURN
A. ACCUSIMMER _control switch
B. Left front control knob
C. Left rear control knob
Range
B
C
D. Electronic oven control
G H
E.Surface cooking area Iocator
F Right rear control knob
G. Hot surface indicator light
H. Right front control knob
I
J
K
E
\
A. Oven vent (on ceramic
glass models)
B. Ceramic glass (on some
models)
C. Dual element
(on some models)
D.Anti-tip bracket
E. Model and serial number plate
(behind left side of storage
drawer)
E Storage drawer (on some
models) or warming drawer
(on some models)
G. Console night light (on some
models)
H. Oven light switch
(on some models)
I. Console panel
J. Warm zone element (on some
models)
K. Warm zone indicator light (on
some models)
L. Hot surface indicator light
(on ceramic glass models)
M. Automatic oven light switch
N. Broil element (not shown)
O. Gasket
P. Bake element (hidden
on some models)
Q. Self-clean latch
Parts and Features not shown
Coil elements (on some models)
Oven door window
Oven light
Broiler pan and grid (on some
models)
Roasting rack (on some models)
Storage drawer liner (on some
models)

COOKTOPUSE
Fire Hazard
Turn off all controls when done cooking.
Failure to do so can result in death or fire.
The control knobs can be set anywhere between HI and LO. Push
in and turn to setting. Use the following chart as a guide when
setting heat levels.
SETTING RECOMMENDED USE
HI • Start food cooking.
• Bring liquid to a boil.
Medium High • Hold a rapid boil.
Between
MEDIUM & HI • Quickly brown or sear food.
or 6-8
MEDIUM
or
Between
4-6
Medium Low
Between
MEDIUM & LO
or 2-4
• Maintain a slow boil.
• Fry or saute foods.
• Cook soups, sauces and gravies.
• Stew or steam food.
• Simmer.
The ACCUSIMMER ®feature setting is an adjustable heat setting
for more precise simmering. It is the left front surface cooking
area or element. The indicator light will glow when the
ACCUSIMMER ®feature is in use.
oo
NOTE: Picture may vary depending on your modeL
The ACCUSIMMER ®control switch has 2 settings: SIMMER and
NORMAL BURNER. When the control is set on NORMAL
BURNER, the left front surface cooking area or element will
function as a single or dual element (on some models).
To use:
1. Push the ACCUSIMMER ®control switch to the SIMMER
position. The indicator light will glow.
2. Push in and turn the left front control knob to a setting
anywhere between HI and LO.
Select a knob position near medium or medium low (4 or 5)
for a low simmer or when using lids. Select a knob position
near medium-high (7 or 8) for a high simmer or when not
using lids.
On some models, select either the Single or Dual Zone
settings. See "Dual Watt Element" section.
3.
Push the ACCUSIMMER ®control switch back to the
NORMAL BURNER setting when finished cooking. The
indicator light will go out.
LO • Keep food warm.
• Melt chocolate or butter.
Warm Zone • Keep cooked foods warm.
Element
(on some ceramic
glass models)
REMEMBER: When range is in use or (on some models)
during the Self-Cleaning cycle, the entire cooktop area may
I
become hot.
" 1
\\\\\ 1
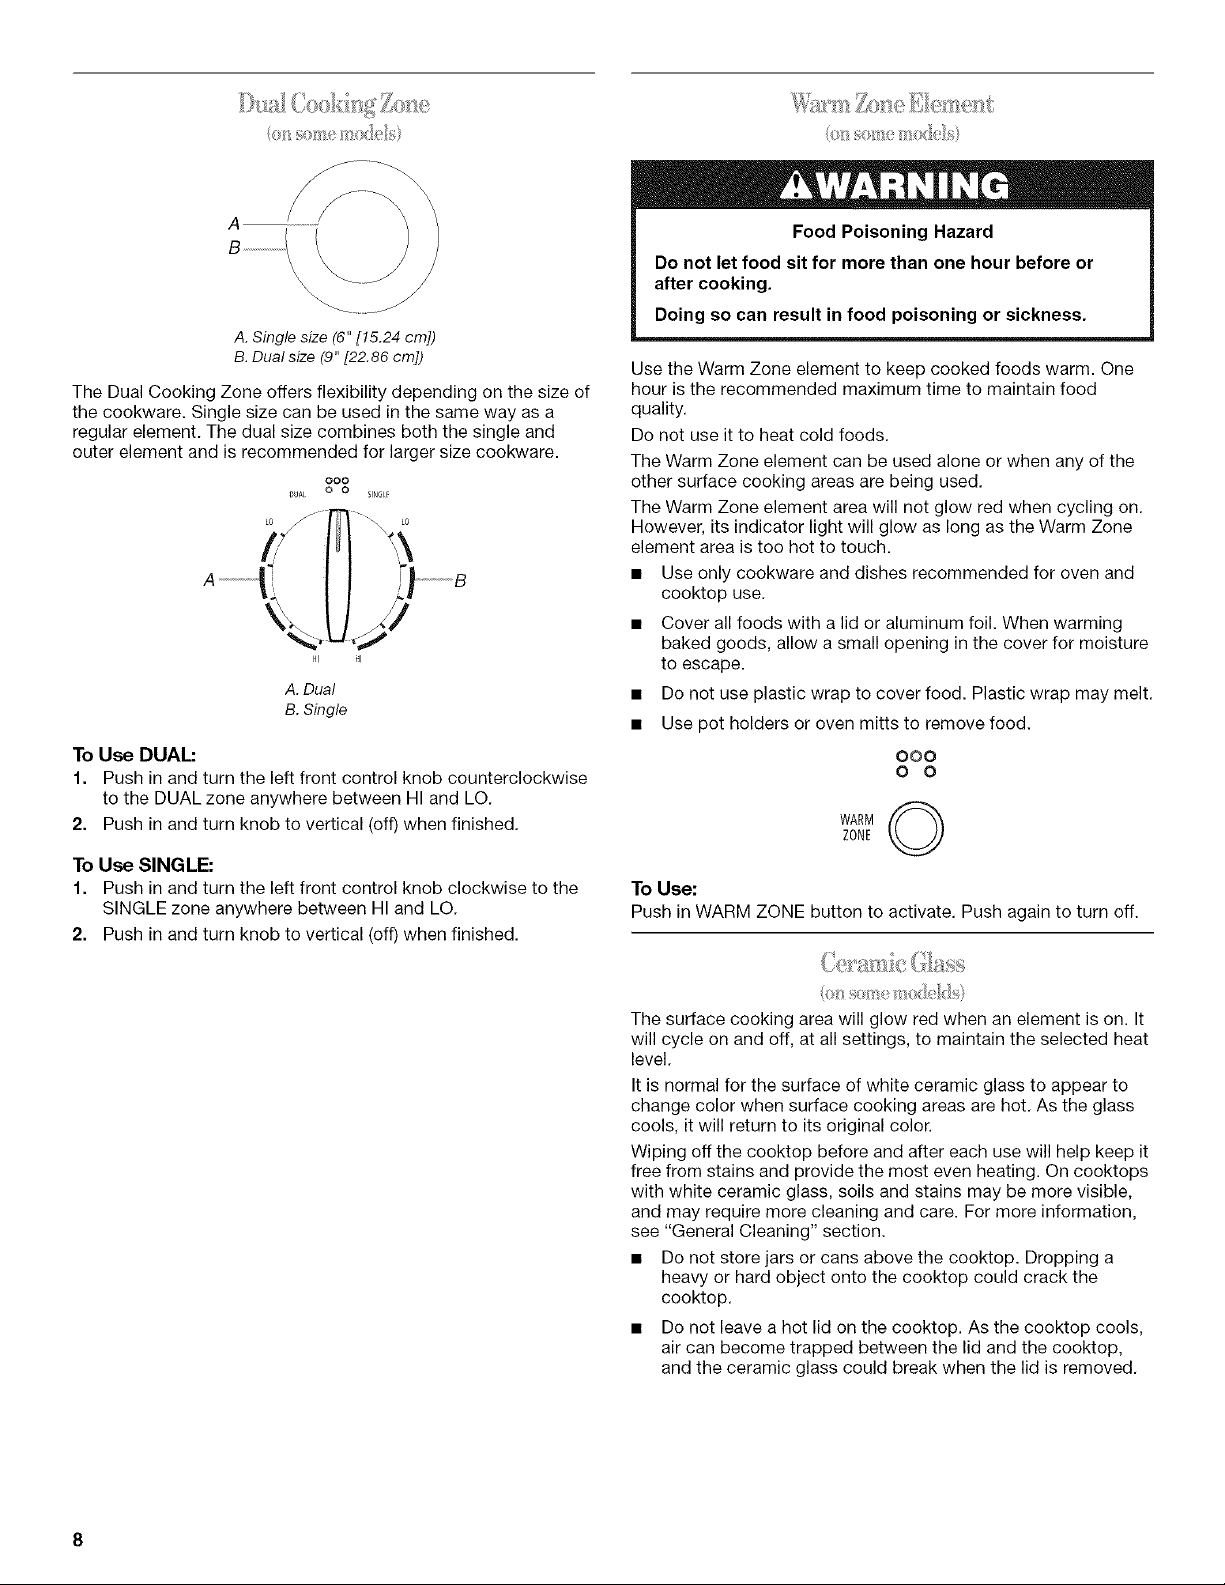
A. Single size (6" [!5.24 cm])
B. Dual size (9" [22.86 cm])
The Dual Cooking Zone offers flexibility depending on the size of
the cookware. Single size can be used in the same way as a
regular element. The dual size combines both the single and
outer element and is recommended for larger size cookware.
000
IUAL o 0 SIN6LF
HI tl
A.Dual
B.Single
To Use DUAL:
1. Push in and turn the left front control knob counterclockwise
to the DUAL zone anywhere between HI and LO.
2. Push in and turn knob to vertical (off) when finished.
To Use SINGLE:
1. Push in and turn the left front control knob clockwise to the
SINGLE zone anywhere between HI and LO.
2. Push in and turn knob to vertical (off) when finished.
Food Poisoning Hazard
Do not let food sit for more than one hour before or
after cooking.
Doing so can result in food poisoning or sickness.
Use the Warm Zone element to keep cooked foods warm. One
hour is the recommended maximum time to maintain food
quality.
Do not use it to heat cold foods.
The Warm Zone element can be used alone or when any of the
other surface cooking areas are being used.
The Warm Zone element area will not glow red when cycling on.
However, its indicator light will glow as long as the Warm Zone
element area is too hot to touch.
• Use only cookware and dishes recommended for oven and
cooktop use.
• Cover all foods with a lid or aluminum foil. When warming
baked goods, allow a small opening in the cover for moisture
to escape.
• Do not use plastic wrap to cover food. Plastic wrap may melt.
• Use pot holders or oven mitts to remove food.
000
0 0
ZONE
WARM O
To Use:
Push in WARM ZONE button to activate. Push again to turn off.
The surface cooking area will glow red when an element is on. It
will cycle on and off, at all settings, to maintain the selected heat
level.
It is normal for the surface of white ceramic glass to appear to
change color when surface cooking areas are hot. As the glass
cools, it will return to its original color.
Wiping off the cooktop before and after each use will help keep it
free from stains and provide the most even heating. On cooktops
with white ceramic glass, soils and stains may be more visible,
and may require more cleaning and care. For more information,
see "General Cleaning" section.
• Do not store jars or cans above the cooktop. Dropping a
heavy or hard object onto the cooktop could crack the
cooktop.
• Do not leave a hot lid on the cooktop. As the cooktop cools,
air can become trapped between the lid and the cooktop,
and the ceramic glass could break when the lid is removed.
Forfoodscontainingsugarinanyform,cleanupallspillsand
soilsassoonaspossible.Allowthecooktoptocooldown
slightly.Then,whilewearingovenmitts,removethespills
whilethesurfaceisstillwarm.Ifsugaryspillsareallowedto
cooldown,theycanadheretothecooktopandcancause
pittingandpermanentmarks.
Donotslidecookwareorbakewareacrossthecooktop.
Aluminumorcopperbottomsandroughfinisheson
cookwareorbakewarecouldleavescratchesormarksonthe
cooktop.
Donotcookpopcorninprepackagedaluminumcontainers
onthecooktop.Theycouldleavealuminummarksthat
cannotberemovedcompletely.
Donotallowobjectsthatcouldmelt,suchasplasticor
aluminumfoil,totouchanypartoftheentirecooktop.
Donotusethecooktopasacuttingboard.
Usecookwareaboutthesamesizeasthesurfacecooking
area.Cookwareshouldnotextendmorethan1"(2.5cm)
outsidethearea.
Coilelementsshouldbelevelforoptimalcookingresults.Burner
bowls,whenclean,reflectheatbacktothecookware.Theyalso
helpcatchspills.
Cookwareshouldnotextendmorethan1"(2.5cm)overthecoil
element.Ifcookwareisunevenortoolarge,itcanproduce
excessheatcausingtheburnerbowltochangecolor.Formore
information,seethe"GeneralCleaning"section.
NOTE:Beforeremovingorreplacingcoilelementsandburner
bowls,makesuretheyarecoolandthecontrolknobsareinthe
Offposition.
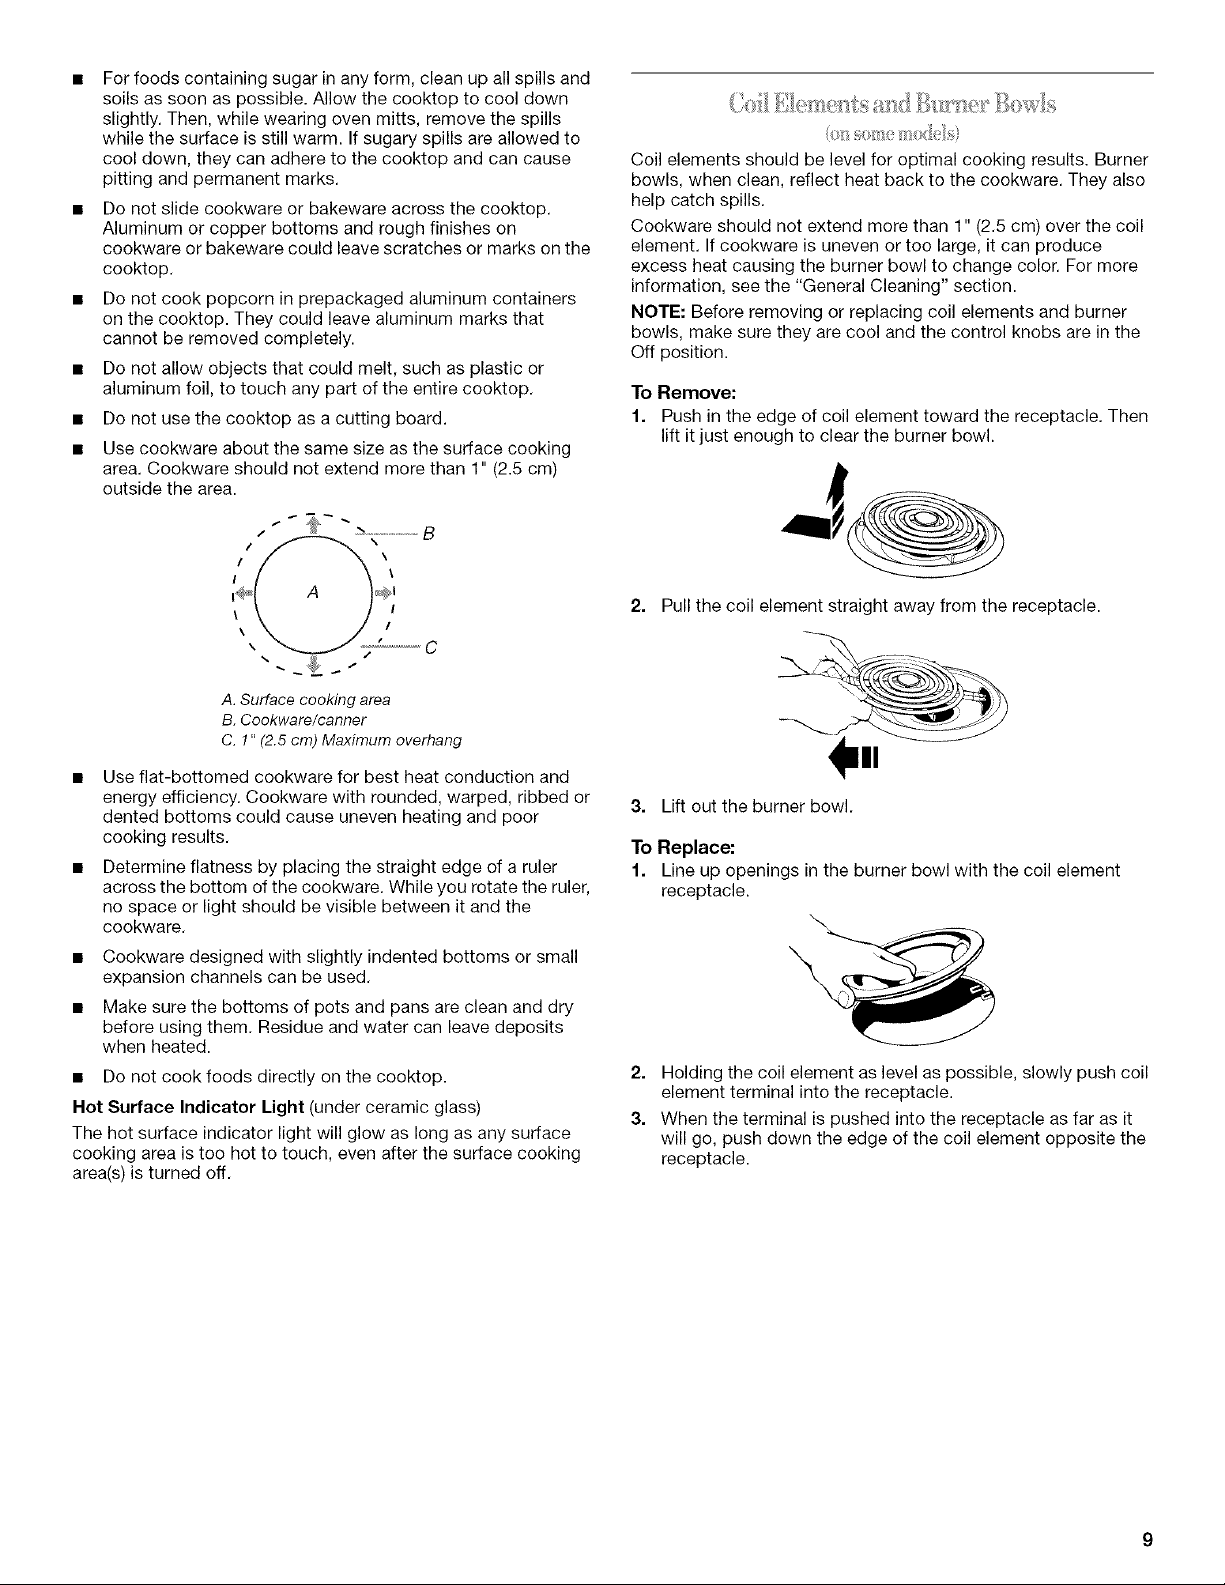
To Remove:
1. Push in the edge of coil element toward the receptacle. Then
lift it just enough to clear the burner bowl.
2. Pull the coil element straight away from the receptacle.
A. Surface cooking area
B. Cookware/canner
C. 1" (2.5 cm) Maximum overhang
Use flat-bottomed cookware for best heat conduction and
energy efficiency. Cookware with rounded, warped, ribbed or
dented bottoms could cause uneven heating and poor
cooking results.
Determine flatness by placing the straight edge of a ruler
across the bottom of the cookware. While you rotate the ruler,
no space or light should be visible between it and the
cookware.
Cookware designed with slightly indented bottoms or small
expansion channels can be used.
Make sure the bottoms of pots and pans are clean and dry
before using them. Residue and water can leave deposits
when heated.
• Do not cook foods directly on the cooktop.
Hot Surface Indicator Light (under ceramic glass)
The hot surface indicator light will glow as long as any surface
cooking area is too hot to touch, even after the surface cooking
area(s) is turned off.
3. Lift out the burner bowl.
To Replace:
1. Line up openings in the burner bowl with the coil element
receptacle.
\
2. Holding the coil element as level as possible, slowly push coil
element terminal into the receptacle.
3. When the terminal is pushed into the receptacle as far as it
will go, push down the edge of the coil element opposite the
receptacle.
 Loading...