

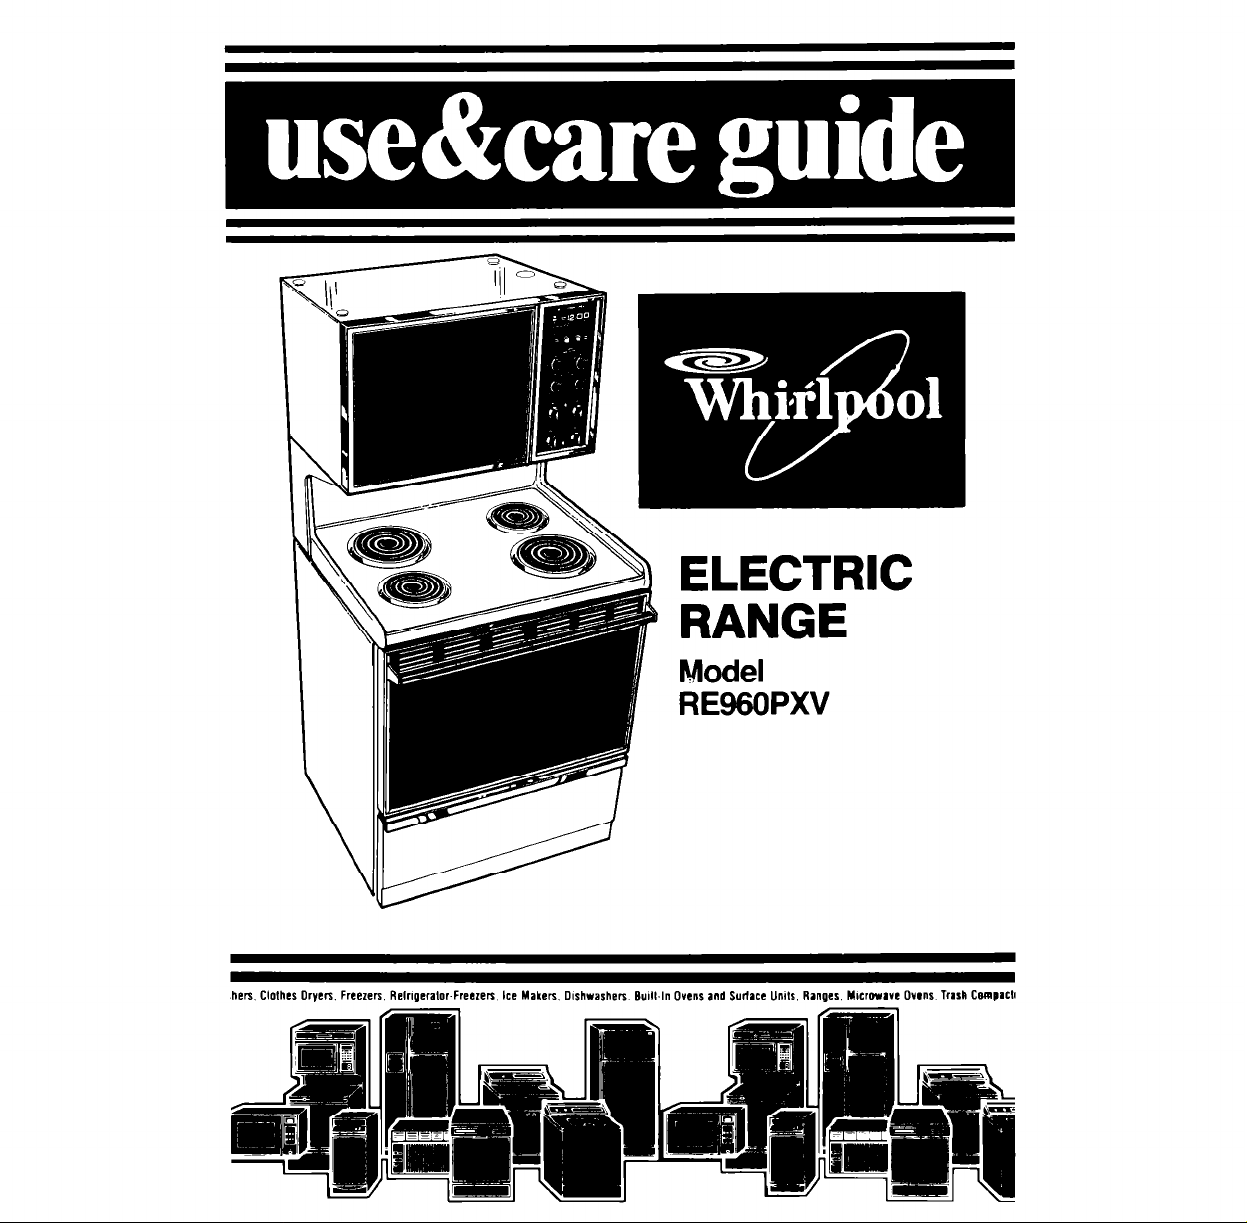
Whirlpool RE960PXV User Manual
Contents
BEFORE YOU USE YOUR RANGE
IMPORTANT SAFETY
INSTRUCTIONS . . . . .
PARTS AND FEATURES . . .
USING YOUR RANGE. . .
Using the Surface Units
Optional Canning Kit .
Setting the Clock .
Using the Minute Timer .
Using the Oven Controls
Baking....................
Adjusting the Oven
Temperature Controls .
Broiling . . . . .
Using the Automatic
MEALTIMER’” Clock . . .
The Oven Vent . . . . .
The Storage Drawer . . .
Optional Rotisserie . . . . , . .
Optional Door Panel Pat .
CARING FOR YOUR RANGE,
Control Panel and Knobs
Surface Units and
Reflector Bowls
Lift-Up Cooktop
The Upper Oven Rack
Guides . . . . . . . . . . . . . .._
The Continuous-Cleaning
Upper Oven .
Using the Self-Cleaning
Cycle . . .
Cleaning Chart .
10
11
Using and Replacing the
Light Bulbs . , .
The Cooktop Light . .
12
13
14
15
15
The Oven Lights .
IF YOU NEED SERVICE
OR ASSISTANCE. ,
WHIRLPOOL RANGE
WARRANTY .
Page
. 15
. 24
01989 Whirlpool Corporation
Before you use your range
You are responsible for:
l
Reading and following all safety precautions in this Use and Care Guide
and the Cooking Guide.
l
Installing and leveling the range on a floor strong enough to hold its weight,
and where it is protected from the elements. (See the Installation Instructions.)
l
Making sure the range is not used by anyone unable to operate it properly.
l
Properly maintaining the range.
l
Using the range only for jobs expected of a home range.
Remove the Consumer Buy Guide label. It will be easier to remove before the
range is used. To remove any remaining glue:
l
Rub briskly with thumb to make a ball, then remove.
or
l
Soak area with liquid hand dishwashing detergent before removing glue
as described above.
Do not use rubbing alcohol or flammable or toxic solvents, such as acetone,
gasoline, carbon tetrachloride, etc. These can damage the finish.
15
16
18
18
19
21
26
26
27
29
32
2
IMPORTANT
SAFETY INSTRUCTIONS
To reduce the risk of fire, electrical shock,
Injury to persons, or damage when using the
range, follow basic precautions, including
l
Read all instructions before using
the range.
l
Install or locate the range only in
accordance with the provided
Installation Instructions. It is recommended that the range be
installed by a qualified installer.
The range must be properly
connected to electrical supply
and grounded.
l
Do not use the range for warm-
ing or heating the room. Persons
could be burned or injured, or
a fire could start.
l
Do not leave children alone or
unattended in area where the
range is in use. They should
never be allowed to sit or stand
on any part of the range. They
could be burned or injured.
l
Do not wear loose or hanging
garments when using the range.
They could ignite if they touch a
hot surface unit or heating element and you could be burned.
0 Do not repair or replace any
part of the range unless specifically recommended in this manual. All other servicing should
be referred to a qualified
technician.
l
Do not store flammable materials in or near the range. They
could explode or burn.
l
Do not use water on grease fires.
Never pick up a flaming pan.
Smother flaming pan on cooktop by covering with a well-fitted
lid, cookie sheet or flat tray. Flaming grease outside of pan can
be extinguished with baking
soda or, if available, a multipurpose dry chemical or foam-type
extinguisher.
. Use only dry potholders. Moist
or damp potholders on hot sur-
faces may result in burns from
steam. Do not let potholder touch
hot heating elements. Do not use
a towel or bulky cloth for a potholder. They could catch on fire.
l
Select a pan with a flat bottom
that is about the same size as
the surface unit. If pan is smaller
than the surface unit, some of
the heating element will be
exposed and may result in the
igniting of clothing or potholders.
Correct pan size also improves
cooking efficiency.
l
Never leave surface units unattended at high heat settings. A
boil-over could result and cause
smoking and greasy spill-overs
that may ignite.
l
Make sure the reflector bowls
are in place during cooking.
Cooking without reflector bowls
may subject the wiring and
components underneath them
to damage.
l
Do not line reflector bowls with
aluminum foil or other liners.
Improper installation of these
liners may result in a risk of
electric shock or fire.
l
Check to be sure glass cooking
utensils are safe for use on the
cooktop. Only certain types of
glass, glass ceramic, ceramic,
earthenware or other glazed
utensils are suitable for cooktops
without breaking due to the
sudden change in temperature.
l
Turn pan handles inward, but
not over other surface units. This
will help reduce the chance
of burns, igniting of flammable
materials, and spills due to
bumping of the pan.
l
Do not soak removable heating
elements in water. The element
will be damaged and shock or
fire could result.
l
Use care when opening oven
door. Let hot air or steam escape
before removing or replacing
food.
l
Do not heat unopened containers. They could explode. The
hot contents could cause burns
and container particles could
cause injury
l
Keep range vents unobstructed.
l
Always position oven racks in
desired location while oven is
cool. If rack must be moved
while oven is hot, do not let
potholder contact hot heating
element in oven.
l
Do not clean door seal. It is
essential for a good seal. Care
should be taken not to rub,
damage, or move the seal.
Clean only parts recommended
in this Use and Care Guide.
l
Do not use oven cleaners. No
commercial oven cleaner or
oven liner protective coating of
any kind should be used in or
around any part of the oven.
l
Before self-cleaning the lower
oven, remove broiler pan, broiler
grid, oven racks and other
utensils. Do not use your oven to
clean miscellaneous parts.
- SAVE THESE INSTRUCTIONS -
l
Do not store things children
might want above the range.
Children could be burned or
injured while climbing on it.
l
Do not touch surface units, areas
near units, heating elements or
interior surfaces of oven. Surface
units and heating elements may
be hot even though they are
dark in color. Areas near surface
units and interior surfaces of an
oven become hot enough to
cause burns. During and after
use, do not touch, or let clothing
or other flammable materials
contact surface units, areas near
units, heating elements or interior
surfaces of oven until they have
had sufficient time to cool. Other
surfaces of the range may
become hot enough to cause
burns; such as, the oven vent
opening, the surface near the
vent opening, the cooktop, the
oven door and window.
. FOR YOUR SAFETY
l
DO NOT STORE OR USE GASOLINE
OR OTHER FLAMMABLE VAPORS
AND LIQUIDS IN THE VICINITY OF
THIS OR ANY OTHER APPLIANCE.
THE FUMES CAN CREATE A FIRE
HAZARD OR EXPLOSION.
Thank you for buying a Whirlpool appliance. Please complete and
mall the Owner Registration Card provided with this product. Then
complete the form below. Have this information ready if you need service
or call with a question.
l
Copy model and serial numbers
from plate (behind the oven door
Modef Number
on the oven frame] and purchase
date from sales slip.
l
Keep this book, the Cooking Guide
and sales slip together in a handy
place.
Serial Number
Purchase Date
Service Company Phone Number
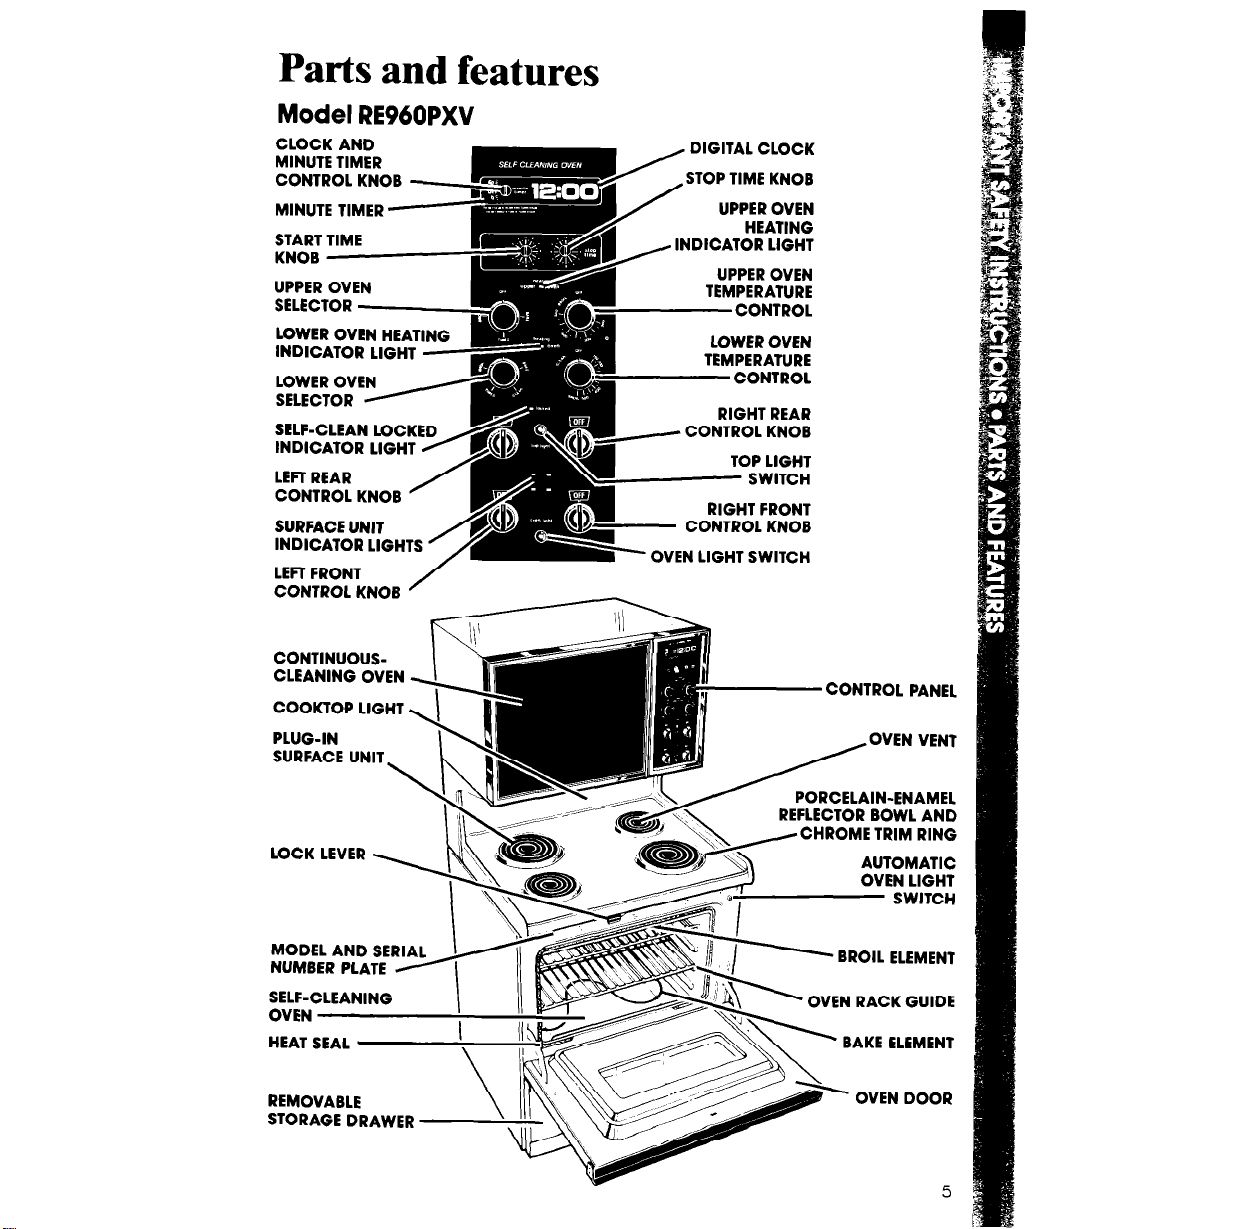
Parts and features
Model RE960PXV
CLOCK AND
MINUTE TIMER
CONTROL KNOB
MINUTE TIMER START TIME
KNOB
UPPER OVEN
SELECTOR LOWER OVEN HEATING
INDICATOR LIGHT -
--
UPPER OVEN
HEATING
INDICATOR LIGHT
SELF-CLEAN LOCKED
INDICATOR LIGHT H
LEFT REAR
CONTROL KNOB
SURFACE UNIT
INDICATOR LIGHTS ’
LEFT FRONT
CONTROL KNOB
CONTINUOUS-
COOK-TOP LIGHT
PLUG-IN
SURFACE UNIT _
LOCK LEVER \
MODEL AND SERIAL
NUMBER PLATE j
SELF-CLEANING
OVEN
HEAT SEAL -
- __-_. . .-. .- -._.. --.
-OVEN
-
RIGHT REAR
RIGHT FRONT
CONTROL KNOB
LIGHT
SWITCH
PORCELAIN-ENAMEL
REFLECTOR
CONTROL PANEL
CHROME TRIM RING
OVEN RACK GUIDE
BOWL AND
AUTOMATIC
OVEN LIGHT
BROIL ELEMENT
_-.--
BAKE El
LEMENT
REMOVABLE
STORAGE DRAWER
- OVEN
DOOR

Using your range
Using the Surface Units
Surface Unit
Indicator lights
One of the surface unit indicator
lights on the control panel will glow
when a surface unit is on.
,
Burn and Fire Hazard
Surface unit control knobs must be
pushed In before turning. Turn either
way until setting you want shows in
the window. Set them anywhere
between HI and LOW.
Until you get used to the settings, use the following as a guide. For best results,
start cooking at the high seitinas; then turn the control knob down to continue
cooking.
Be sure all control knobs are
turned to OFF and all indicator
lights are OFF when you are not
cooking. Someone could be
burned or a fire could start If a
surface unit is accidentally
letl ON.
Use HI to start Use MED-HI
foods cooking; to bring
liquids to a
boil.
to hold a
rapid boil; to
fry chicken
or pancakes.
Use MED
for gravy,
puddings
and icing; to
cook large
amounts of
vegetables.
Use MED-LO
to keep food
cooking after
starting it
on a higher
setting.
Use LO to
keep food
warm until
ready to
serve. Set the
heat higher
or lower
within the LO
band to keep
food at the
temperature
you want.
Use only flat-bottomed utensils for best cooking results and to prevent damage
to the cooktop. Specialty items with rounded or ridged bottoms (woks. ridged
bottom canners or tea kettles] are not recommended
Burn and Product Damage Hazard
l
If the pan is too small for the surface unit, you could be burned by
the heat from the exposed section of the surface unit. Use correctly
sized cooking utensils to prevent injury.
l
If a surface unlt stays red for a long time, the bottom of the pan is not
flat enough or is too small for the surface unit. Prolonged usage of
Incorrect utensils for long periods of time can result in damage to the
surface unit, cooktop, wiring and surroundlng areas. To prevent
damage, use correct utensils, start cooking on HI and turn control
down to continue cooking.
See the Cooking Guide for additional utensil information.
Optional Canning Kit
(Part No. 242905)
The large diameter of most water-bath or pressure canners combined with high
heat settings for long periods of time can shorten the life of regular surface units
and cause damage to the cook-top.
If you plan to use the cooktop for canning, we recommend the installation of a
Canning Kit. Order the kit from your Whirlpool dealer or authorized WhirlpooP
service company.
See the Cooking Guide for additional canning information.
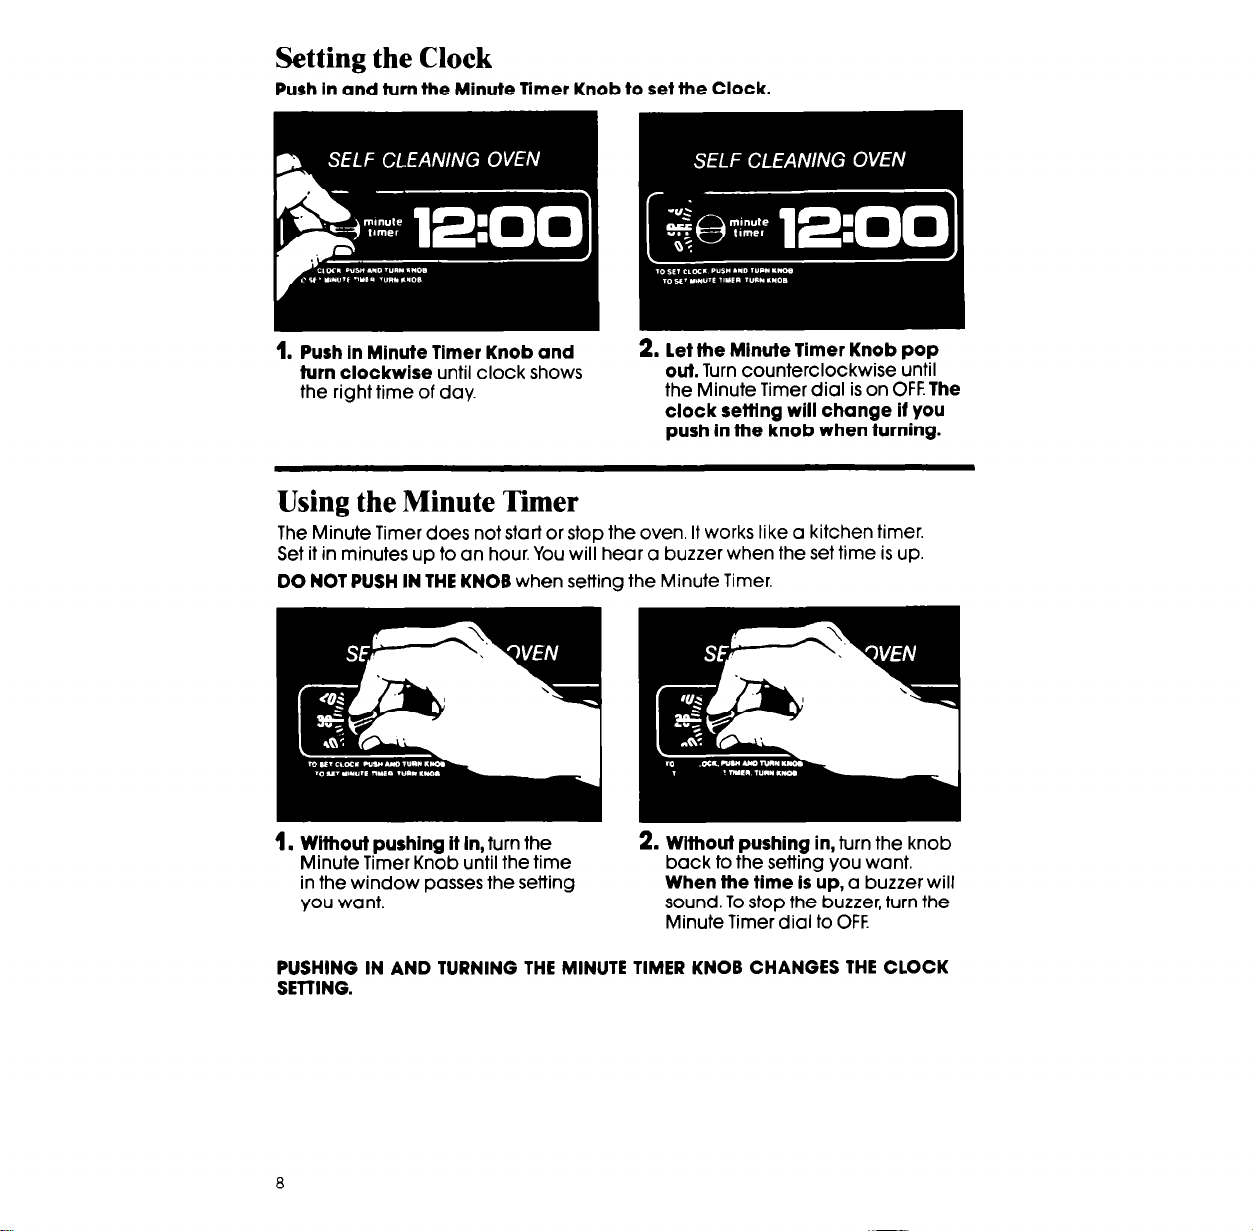
Setting the Clock
Push in and turn the Minute Timer Knob to set the Clock.
1. Push in Minute Timer Knob and
turn clockwise until clock shows
the right time of day.
2. let the Minute Timer Knob pop
out. Turn counterclockwise until
the Minute Timer dial is on OFF The
clock sefflng will change if you
push in the knob when turning.
Using the Minute Timer
The Minute Timer does not start or stop the oven. It works like a kitchen timer.
Set it in minutes up to an hour. You will hear a buzzer when the set time is up.
DO NOT PUSH IN THE KNOB when setting the Minute Timer.
1. Without pushing it In, furn the
Minute Timer Knob until the time
in the window passes the setting
You want.
2. Wlthout pushing in, turn the knob
back to the setting you want.
When the time Is up, a buzzer will
sound. To stop the buzzer, turn the
Minute Timer dial to OFF.
PUSHING IN AND TURNING THE MINUTE TIMER KNOB CHANGES THE CLOCK
SETTING.
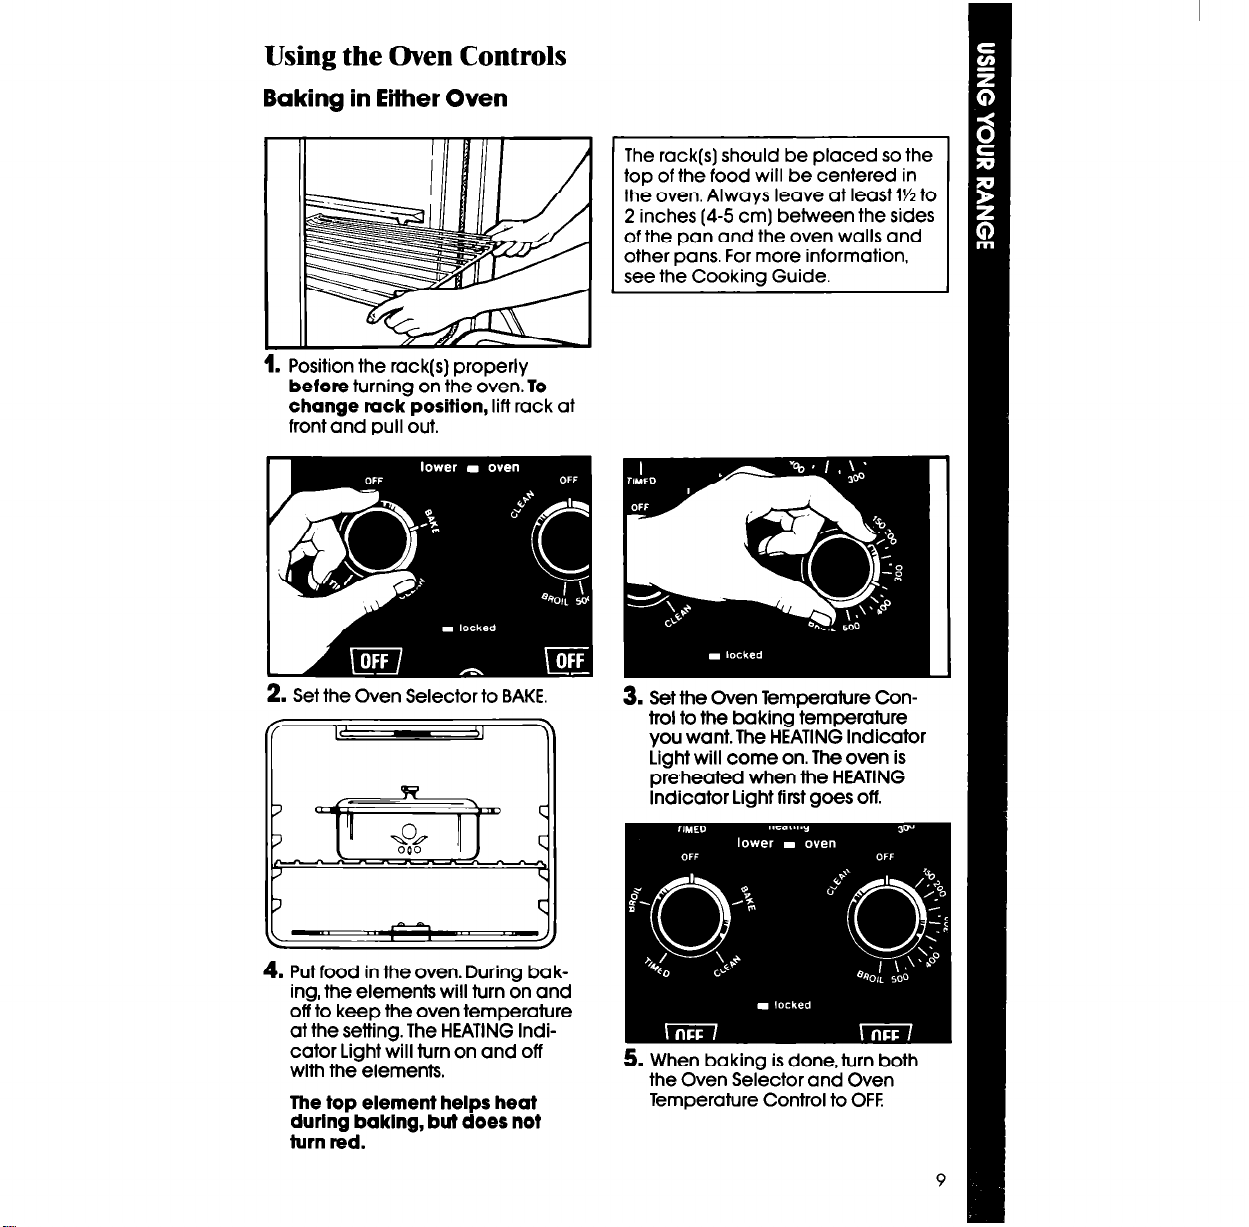
Using the Oven Controls
Baking in Either Oven
. Position the rack(s) properly
before turning on the oven. To
change rack position, lift rack at
front and pull out.
The rack(s) should be placed so the
top of the food will be centered in
the oven. Always leave at least 1M to
2 inches (4-5 cm) between the sides
of the pan and the oven walls and
other pans. For more information,
see the Cooking Guide.
2. Set the Oven Selector to BAKE.
I:
4. Put food in the oven. During ba king, the elements will turn on and
off to keep the oven temperature
at the setting. The HEATING indicator Light will turn on and off
with the elements.
The top element helps heat
during baking,
turn red.
but
does not
3. Set the Oven Temperature Control to the baking temperature
you want.The HEATING Indicator
Light will come on. The oven is
preheated when the HEATING
indicator Light first goes off.
5. When baking is done, turn both
the Oven Selector and Oven
Temperature Control to OFF
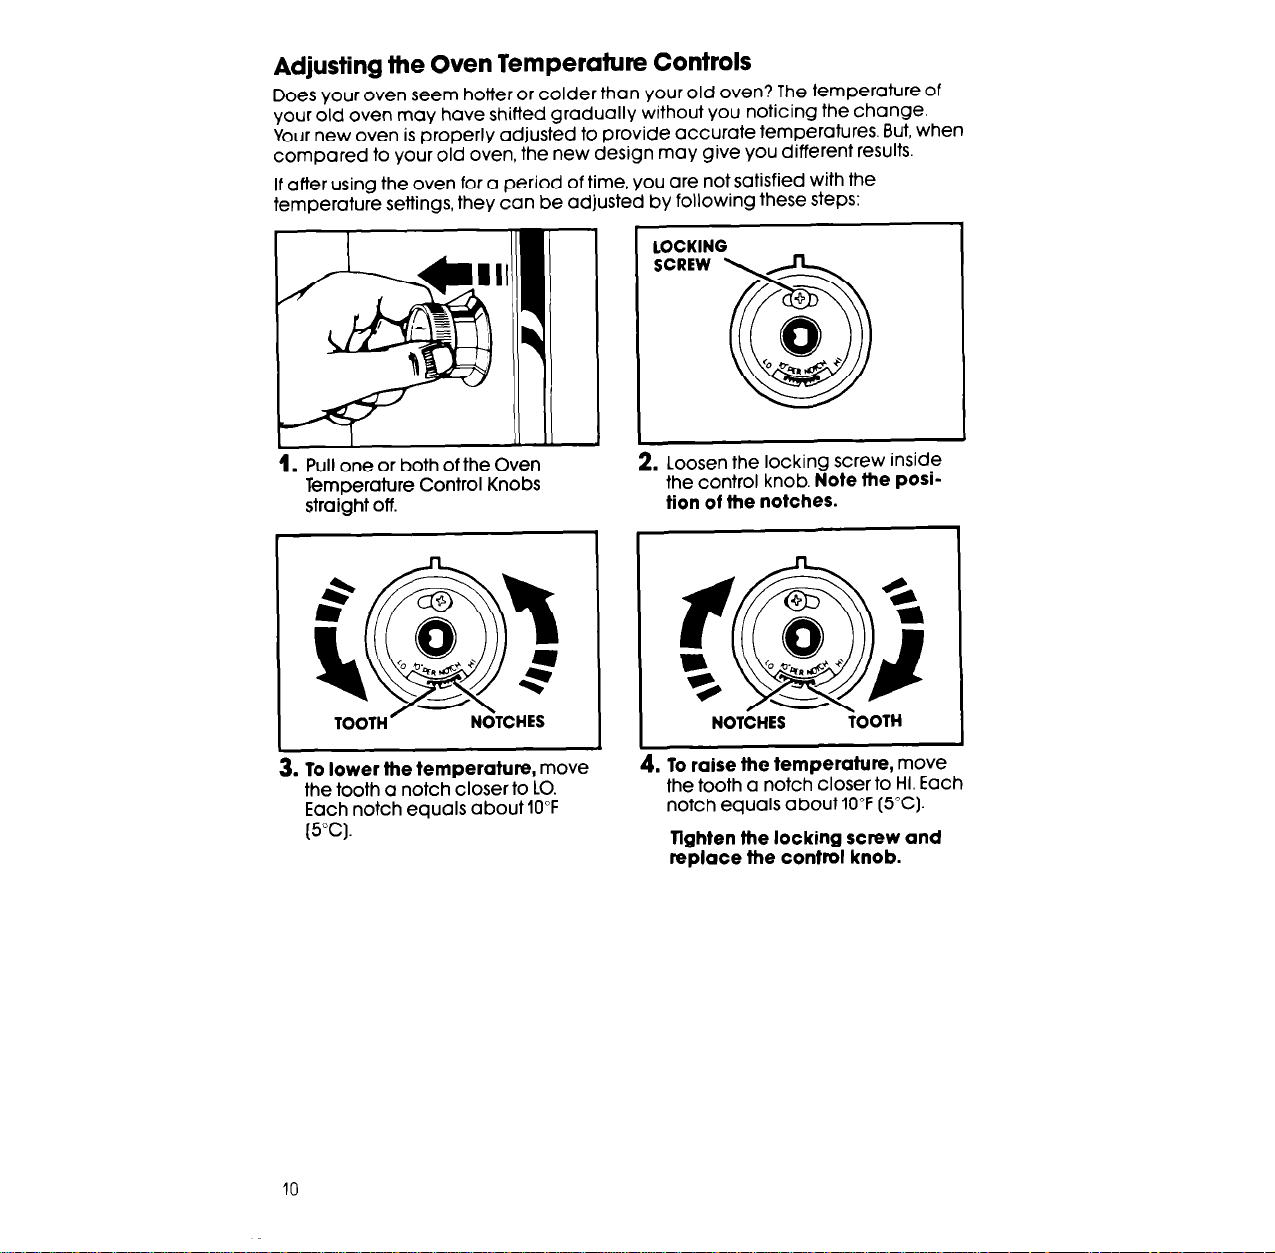
Adjusting the Oven Temperature Controls
Does your oven seem hotter or colder than your old oven? The temperature of
your old oven may have shifted gradually without you noticing the change.
Your new oven is properly adjusted to provide accurate temperatures. But, when
compared to your old oven, the new design may give you different results
If after using the oven for a period of time, you are not satisfied with the
temperature settings, they can be adjusted
by following these steps:
LOCKING
SCREW
1. Pull one or both of the Oven
Temperature Control Knobs
straight off.
3.
To lower the temperature, move
the tooth a notch closer to LO.
Each notch equals about 10°F
(5°C).
2. Loosen the locking screw inside
the control knob. Note the pOSition of the notches.
NOTCHES TOOTH
4. To raise the temperature, move
the tooth a notch closer to HI. Each
notch equals about 10°F (5°C).
Tighten the locking screw and
replace the control knob.
IO
 Loading...