

Whirlpool PCCF 30201050, PCCF 50201260, PCCF 30201051, PCCF 80211260, PCCF 50201250 User Manual
...
Gebrauchsanweisung
Instructions for use
Mode d’emploi
Gebruiksaanwijzing
Istruzioni per l’uso
Brugsanvisning
Bruksanvisning
Käyttöohje
Manual de utilização
Instrucciones para el uso
Instrukcje użytkowania
Használati utasítás
ИнструкциЯ за употреба
Návod k použití
Návod na použitie
Instruc∑iuni de utilizare
Инструкции по эксплуатации

Electric free standing cooker
Dear customer!
Instructions for
Instructions for
connection
connection
Rating plateRating plate
We sincerely thank you for your purchase. We believe
you will soon fi nd ample evidence that you can really
rely on our products. To make the use of the appliance
easier, we attach these comprehensive instruction manual.
The instructions should aid you in getting familiar with your
new appliance. Please, read them carefully before using the
appliance for the fi rst time.
In any case, please make sure the appliance was supplied to you
undamaged. Should you identify and transport damage, contact
your sales representative or the regional warehouse from where
the product was delivered. You will fi nd the telephone number on
the receipt or delivery report. We wish you a lot of pleasure with
your new household appliance.
The connection should be carried out in compliance with the
instructions in the section “Connection to the power mains”, and
the relevant effective regulations and standards. This should only
be performed by a qualifi ed technician.
The rating plate indicating the basic information on the appliance
is attached to the edge of the oven and it is visible when you
open the oven door.
315222
Important warnings ..................................................... 3
Appliance description ................................................. 5
Cooking surface ..........................................................8
Operating the cooking hob – conventional zones .10
Operating the cooking hob – glass ceramic zones 11
The oven ..................................................................... 12
Food preparation ....................................................... 19
Cleaning and maintenance ....................................... 31
Special warnings and error reporting...................... 38
Instructions for installation and connection ...........40
Technical characteristics .......................................... 43
2

Important warnings
• The appliance may only be connected to the power mains by a service technician or other qualifi ed
expert.
• Unprofessional tampering and repairs may result in serious physical injury and damage to
the appliance. The repairs may only be carried out by the service personnel or an authorized
technician.
• During cooking, the overheated fat or oil on the hob may ignite. There is a risk of burning and fi re;
therefore, control the cooking process at all times.
• Attention: the danger of burning is considerable particularly for small children and children who
are not fully aware of the danger. There is a risk of burning or scalding. Therefore, keep small
children away from the appliance and only let older children use the appliance under suitable
supervision.
• Attention: danger of burning. Heating elements, the oven, and parts of the utensils may become
very hot during use; therefore, always use a kitchen cloth or kitchen gloves when handling
cookware, and take every precaution necessary to avoid burns.
• Power cords of other appliances located in the vicinity of this large appliance may be damaged
if they are pinched e.g. by oven door, which can result in a short circuit. Therefore, keep the
power cords of any other appliances at a suitable distance.
• Do not use steam cleaners or high-pressure cleaners to clean the cooking hob, as this may result
in an electric shock.
• Pay a special attention when preparing the food in the oven. Baking pans, wire shelf and the
whole interior of the oven are very hot due to high temperatures, therefore the use of protective
gloves is highly recommended.
• During operation, oven door heats up. A third glass is installed for extra protection, reducing the
surface temperature of the outside door (only with some models).
• Do not cover the oven interior in aluminum foil and do not place the baking trays and other
containers on the oven bottom. Aluminum foil will prevent air circulation in the oven, thus impeding
the cooking process, and damage the enamel coating.
• Do not use the cooking hob for room heating. Do not place empty pans on the hob.
• Do not store any fl ammable, explosive, or temperature-sensitive or volatile objects (e.g. paper,
kitchen cloths, plastic bags, cleaning agents, and various sprays) in the drawer underneath the
appliance, as these objects could catch fi re and cause a fi re during oven operation. Use the drawer
for storing oven equipment and accessories (shallow baking tray, drip tray, etc.).
• Do not use the glass ceramic hob if it is cracked or broken as there is a risk of electric shock. If any
visible crack appears, immediately disconnect all cooking zone switches and remove the fuse, or
trip the main fuse to completely disconnect the cooker from the power supply network. Call your
service center.
• Glass ceramic hob should not be used as a worktop as it can be damaged or scratched. Due to
the danger of melting or fi re and the resulting damage to the cooking surface, never use a glass-
ceramic hob to warm food stored in aluminum foil or in a plastic container.
• Oven door hinges can be damaged when overloaded. Do not place heavy pans on the open door,
and do not lean against them when cleaning the oven interior. Before cleaning, remove the oven
door (see section Removing and replacing the oven door). Do not step on the open oven door or
sit on them – this applies particularly for children.
• The appliance is intended for installation directly on the fl oor, without the use of any supports.
315222
3

• The appliance is manufactured in compliance with the relevant effective safety standards.
Nevertheless, we strongly recommend that persons with impaired physical, motoric, or mental
capacity, or persons with inadequate experience or knowledge, do not use the appliance unless
attended by a qualifi ed person. The same recommendation applies when the appliance is used by
persons of less-than-legal age.
• After a prolonged use of cast iron plates, the area of the plate and the edge of the cooking zone
may discolour. Repair service is not covered by the warranty.
The symbol on the product or on its packaging indicates that this product may not
be treated as household waste. Instead it shall be handed over to the applicable
collection point for the recycling of electrical and electronic equipment. By ensuring
this product is disposed of correctly, you will help prevent potential negative consequences
for the environment and human health, which could otherwise be caused by inappropriate
waste handling of thisproduct. For more detailed information about recycling of this product,
please contact your local city offi ce, your household waste disposal service or the shop
where you purchased the product.
Appliance purposeAppliance purpose
The appliance is intended for conventional preparation of food
in households and should not be used for any other purpose.
Individual options of use are comprehensively described in this
instruction manual.
315222
4
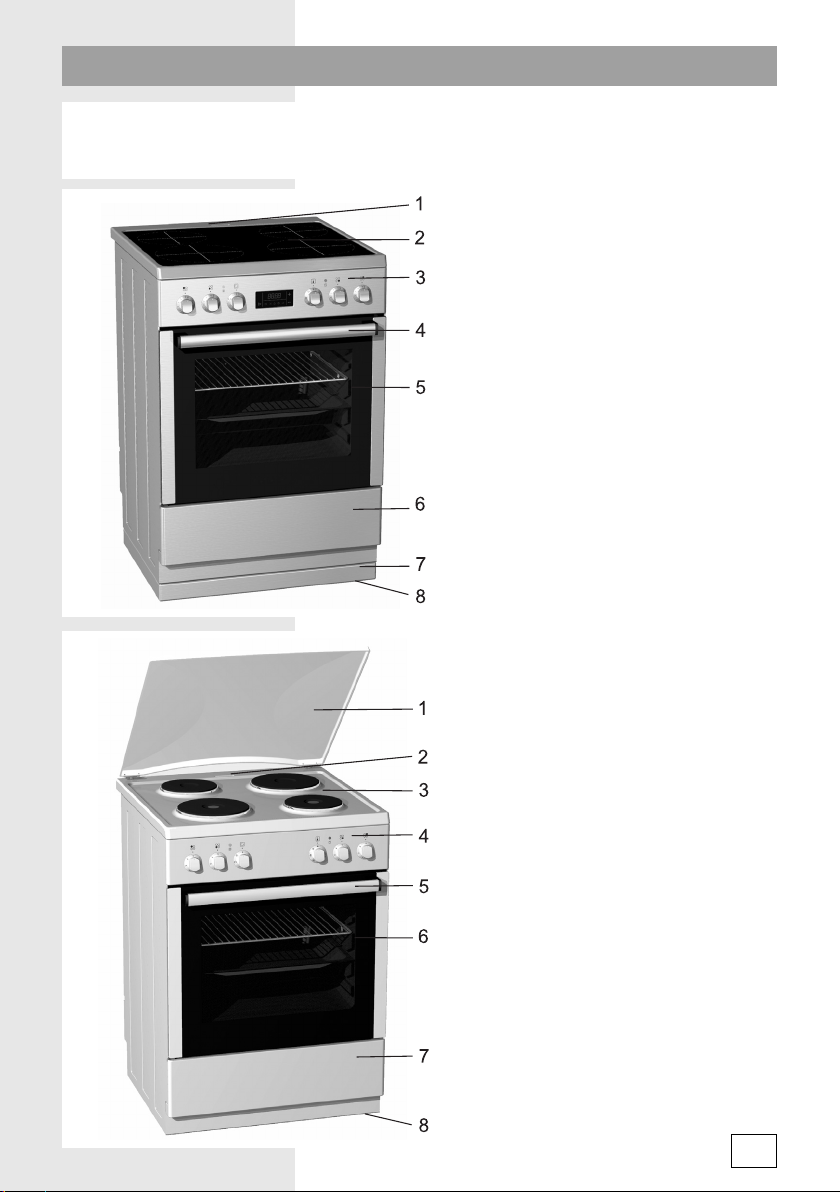
Appliance description
The fi gure represents one of the appliance models. Since a group of appliances to which these
instructions apply, have different features, the instruction manual may describe functions and
equipment that may not be available in your appliance.
1 Vapor discharge opening
2 Glass-ceramic cooking hob
3 Control panel
4 Oven handle
5 Oven door
6 Cooker drawer
7 Additional support (only with some
models)
8 Adjustable feet; accessible when the
cooker drawer is removed (only with
some models)
1 Cooking hob cover (only with some
models)
2 Vapor discharge opening
3 Area surrounding the cooking zones
4 Control panel
5 Oven door handle
6 Oven door
7 Cooker drawer
8 Adjustable feet; accessible when the
cooker drawer is removed (only with
some models)
5
315222
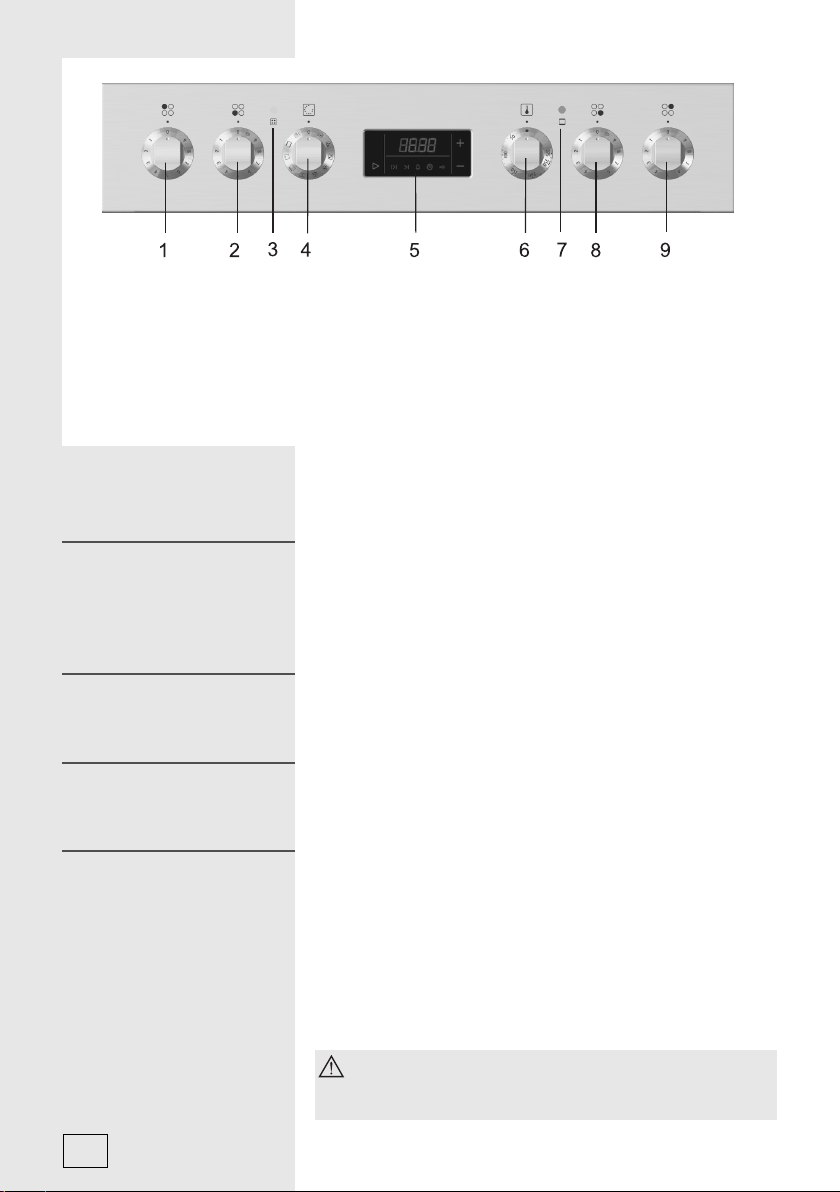
1 Cooking zone knob, rear left
2 Cooking zone knob, front left
3 Operation control lamp. It indicates that
oven or one of the cooking zones is in
operation.
4 On/off and operation mode knob
5 Program timer (only with some models)
(only with some models)
6 Oven temperature setting knob
7 Oven control lamp. The lamp is lit when
the oven is heating up; when the selected
temperature is reached, it goes off.
8 Cooking zone knob, front right
9 Cooking zone knob, rear right
Cooker coverCooker cover
Cooling fanCooling fan
Extended operation of
Extended operation of
the cooling fan
the cooling fan
Recessed knobs Recessed knobs
315222
Before opening the cover, make sure it is clean and that there
are now liquid residues on it. The cooker cover is lacquer coated
and made of glass; it can only be closed once the cooking zones
have cooled down completely.
The appliance features a built-in cooling fan which cools the
appliance housing and control panel.
After the oven is switched off, the cooling fan continues to operate
for a while in order to additionally cool down the appliance.
• First, push the knob slightly, to make it pop out of the control
panel. Then, select the operation mode and the temperature,
or the cooking zone power level.
• When the oven or at least one of the cooking zones is turned
on, the knob dial is lit (only in models with lit knob dials).
• After each use, turn the knob back to the off position and
press it back into its recessed position when it is fl ush with the
control panel front.
The recessed knob may only be pushed back into
its recessed position when it is in the “off” position
(illuminated button models only).
6
Control lampsControl lamps
Yellow lamp
The lamp is lit when any of the appliance functions are activated.
Red lamp
The red lamp is lit when heaters in the oven are operating; when
the selected temperature is reached, the lamp goes off.
Backlit knob dials
(only with some models)
The dial of an activated knob is lit when a function is selected.
Appliances with this feature do not have the yellow control lamp.
Program timerProgram timer
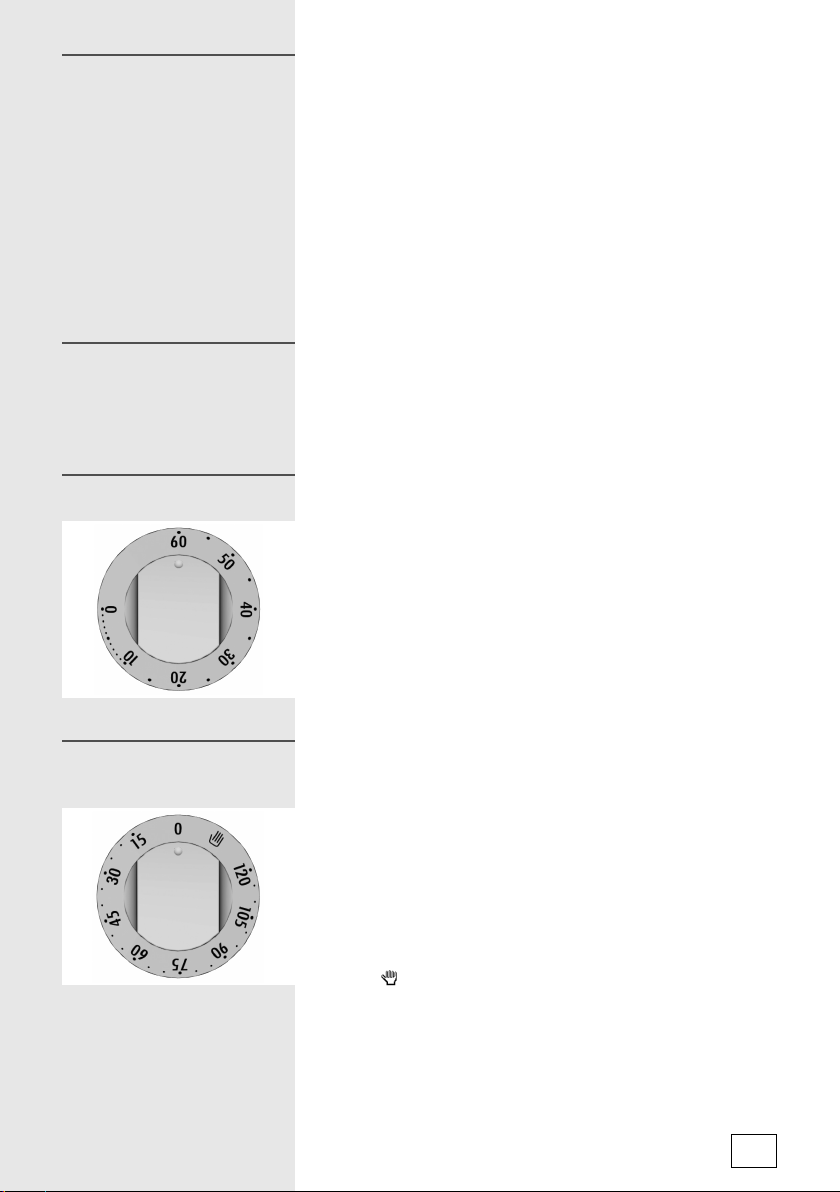
Mechanical minute timerMechanical minute timer
Switch-off timer - 120
Switch-off timer - 120
minutes (timer switch)
minutes (timer switch)
Set the time of day as described in the separate instructions for
the program timer, supplied with your appliance. Setting the time
of day is requisite for the use of the appliance. Oven operation is
only possible once the time of day has been set.
Maximum setting time is 60 minutes. After the set time has
elapsed, an audible signal is emitted, lasting approximately fi ve
seconds. Select the countdown time roughly by rotating the
knob forward in the clockwise direction; then rotate it in the other
direction (anticlockwise) to fi ne-tune the setting.
Switch-off timer enables settings from 0 to 120 minutes.
• Rotate the dial in the clockwise direction until the desired
time is selected. After the set time has elapsed, the selected
operation / heating mode is switched off.
• If you do not wish to use the switch-off timer, or if the
preparation time is shorter than 15 minutes (preheating,
preparing pizzas, etc.) or longer 120 minutes (for dishes
that require a longer cooking time), the manual setting is
recommended.
• For manual setting, rotate the knob to the left (anticlockwise)
to the
operate.
(hand) symbol. In the “0” position, the oven will not
315222
7

Cooking surface
Before using the
Before using the
appliance for the fi rst
appliance for the fi rst
time (depending on the
time (depending on the
model)
model)
Important warningsImportant warnings
315222
• Switch on each cooking zone to the highest power level
without any cookware on them for three to fi ve minutes. During
the fi rst heating, the protective layer over the cooking hob may
discharge some fumes. This way, the protective layer reaches
its maximum solidness.
• Clean the glass-ceramic surface with a damp cloth and
some manual dishwashing detergent. Do not use aggressive
cleaners such as abrasive cleaning agents or sponges which
may leave scratches, or stain removers.
• Do not switch on the cooking zones without any cookware on
them and never use them for room heating!
• Make sure the cooking zones and the pan bottom are clean
and dry; this will enable good heat transmission and prevent
damage to the cooking zone.
• During cooking, the overheated fat or oil on the hob may
ignite. Therefore, be careful when preparing food with fat or oil
(e.g. French fries) and control the cooking process at all times.
• Do not place damp cookware or steam-covered lids on the
cooking zones. Moisture is detrimental to the cooking zones.
• Do not leave a hot pan to cool down on the cooking zones,
because moisture will be generated under it, causing
corrosion.
Important warnings related to the glass-ceramic hob
• The cooking zone will reach the selected power level or
temperature very quickly; however, the area surrounding the
cooking zones remains relatively cool.
• The hob is resistant to temperature changes.
• The hob is also impact-resistant. The pans may be placed onto
the hob roughly without damaging the hob.
• Glass ceramic hobs should not be used as a worktop. Sharp
objects can cause scratches.
• Preparing food in thin aluminum of plastic containers on hot
cooking zones is not allowed. Do not place any plastic objects
or aluminum foil on the glass ceramic hob.
• Never use a glass-ceramic hob that is cracked or broken.
If an object falls on the hob with a sharp edge downwards,
this could cause the hob / glass ceramic panel to break. The
consequences are visible immediately, or only after a while. If
any visible crack should appear, immediately disconnect the
appliance from the power supply.
• If sugar is spilt on a hot glass ceramic hob, or a sugar-laden
food, immediately wipe the hob.
8
CookwareCookware
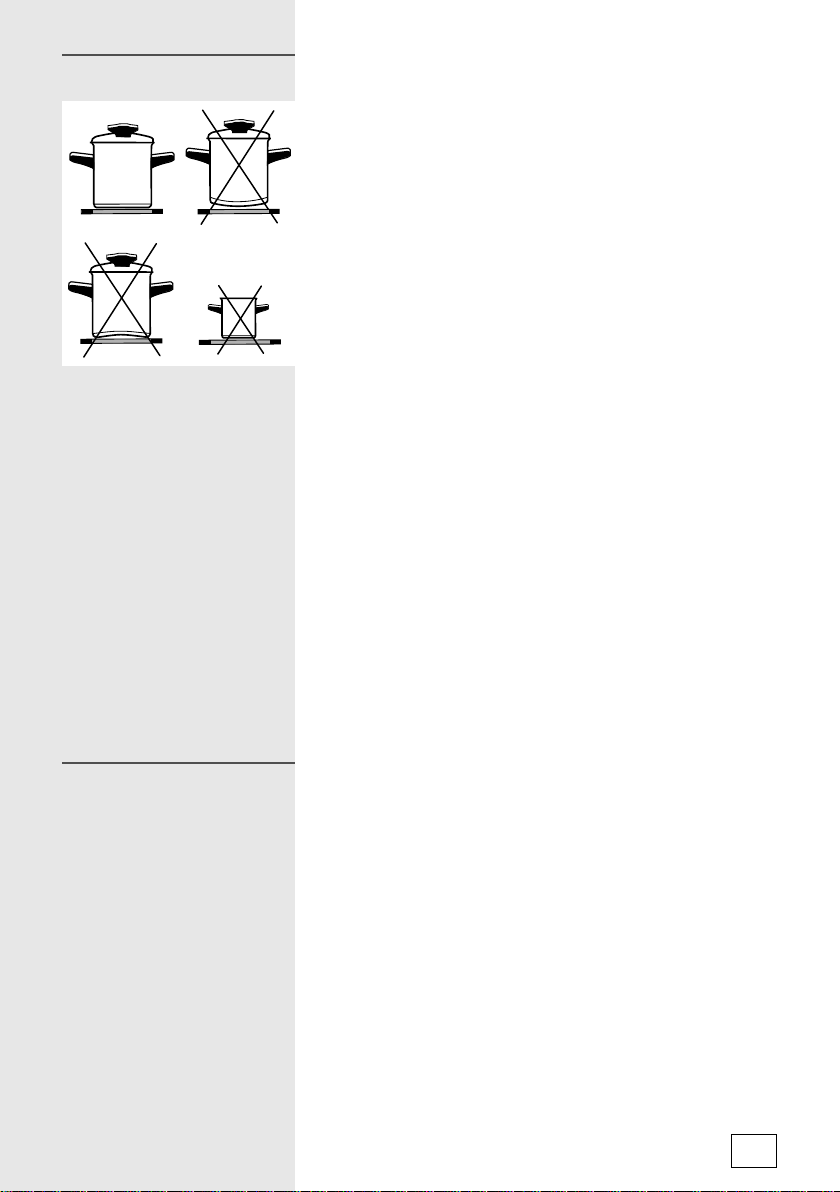
Tips on the use of cookware
Use high-quality cookware with a fl at and stable bottom.
• Transmission of heat is best when the pan bottom and the
cooking zone are of the same diameter, and the pan is placed
on the middle of the cooking zone.
• When using a tempered glass (Pyrex) or porcelain cookware,
please follow the cookware manufacturer’s instructions.
• When using a pressure cooker, do not leave it unattended until
the desired pressure is reached. The cooking zone should
initially be set to the maximum power level; as the pressure
rises, use the sensors to decrease the power level according
to the pressure cooker manufacturer’s instructions.
• Make sure there is always enough water, either in a pressure
cooker or in any other piece of cookware, as using an empty
pan on the cooking hob will result in overheating which will
damage both the pan and the cooking zone.
• Tempered glass (Pyrex) cookware with a specially brushed
bottom is suitable for use on cooking hobs if it fi ts the diameter
of the cooking zone. Cookware with larger diameter may break
due to thermal stress.
• When using any special or unconventional cookware, follow
the cookware manufacturer’s instructions.
• When a highly refl ective pan (bright metal surface) or a pan
with a thick bottom is used for cooking on a glass-ceramic
hob, cooking time can be extended by several minutes (up to
10 minutes). If you wish to boil a larger quantity of food, it is
recommended to use a container with a fl at dark bottom.
• Do not use clay cookware, because it may leave scratches on
the glass-ceramic hob.
Energy savingEnergy saving
• Pan bottom diameters should match the diameter of the
cooking zone. If the pan is too small, some heat is wasted;
furthermore, using a too small pan can damage the cooking
zone.
• Whenever possible given the cooking process, use a lid.
• The pan should be appropriately sized given the quantity of
food prepared. Preparing a small quantity of food in a large
pan will cause a waste of energy.
• Dishes that take a long time to cook should be prepared in a
pressure cooker.
• Various vegetables, potatoes, etc., can be cooked in a small
quantity of water; however, the lid should be closed tightly.
When the water is brought to boil, reduce the power level to a
setting that maintains a temperature just above boiling point.
315222
9
Operating the cooking hob – conventional zones
• Turn on the cooking zone using the knobs installed on the
control panel.
• The symbol next to each knob indicates which cooking zone is
operated by it.
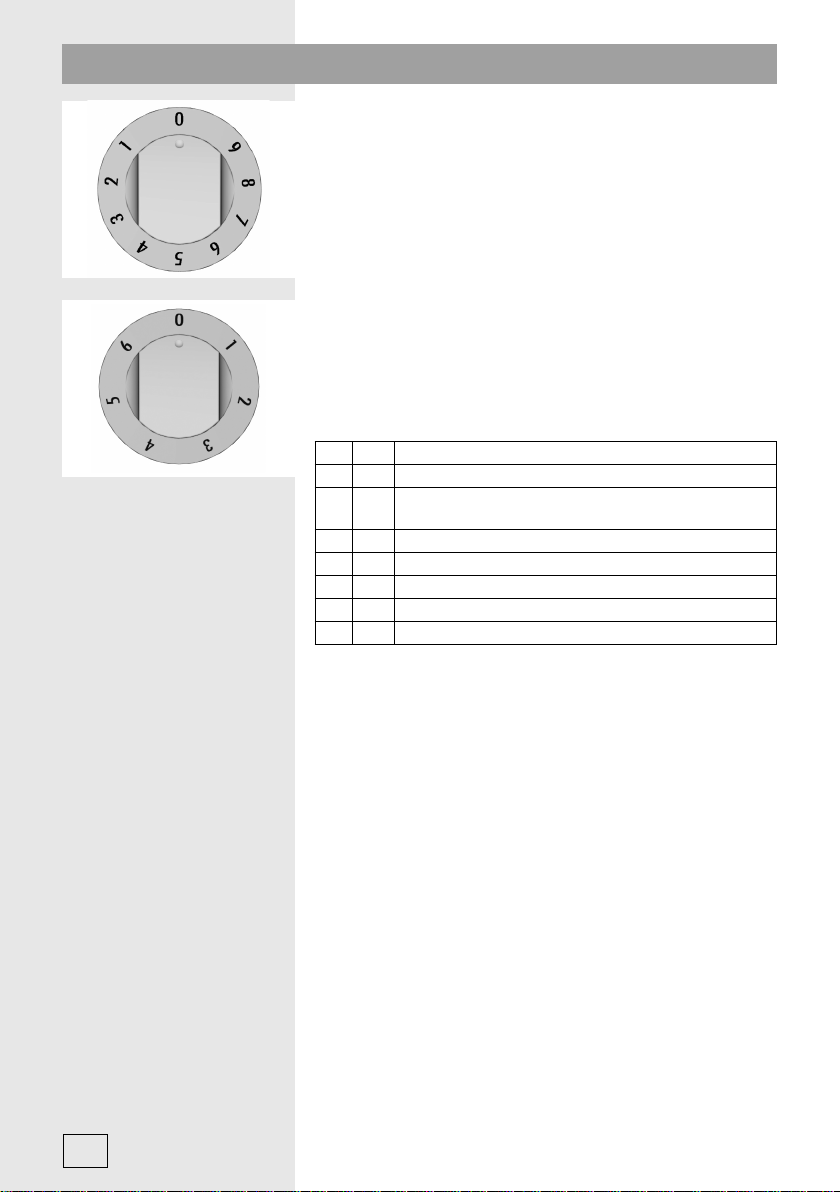
• Cooking zone power level can be set continuously (1-9) or
stepwise (1-6).
• The step knobs can be rotated in both directions. With
continuous knobs, the power level is increased as you rotate
them in the clockwise direction, and reduced as you turn them
in the anticlockwise direction.
• The cooking zone may be turned off three to fi ve minutes
before the end of cooking in order to make use of the residual
heat and save some energy (the following table lists some
examples for using individual power levels).
SE
00 Cooking zone turned off
1 1-2
2 3-4 Reheating
3 5-6 Reheating or longer cooking of larger quantities
47 Consecutive cooking / frying (e.g. omelets etc.)
58 Deep frying
69 Quick heating
Maintaining the temperature and reheating of
smaller quantities of food
315222
Rapid cooking zones (only available in some models) differ from
the conventional cooking zones by their maximum power which
allows them to heat up faster.
These cooking zones are indicated by a red dot in the middle;
after a while, due to repeated use and cleaning, this dot may
disappear.
10
Operating the cooking hob – glass ceramic zones
(only available in some models)
Operating the triple
Operating the triple
cooking zone
cooking zone
Operating the double
Operating the double
cooking zone and the
cooking zone and the
baking tray cooking
baking tray cooking
zone
zone
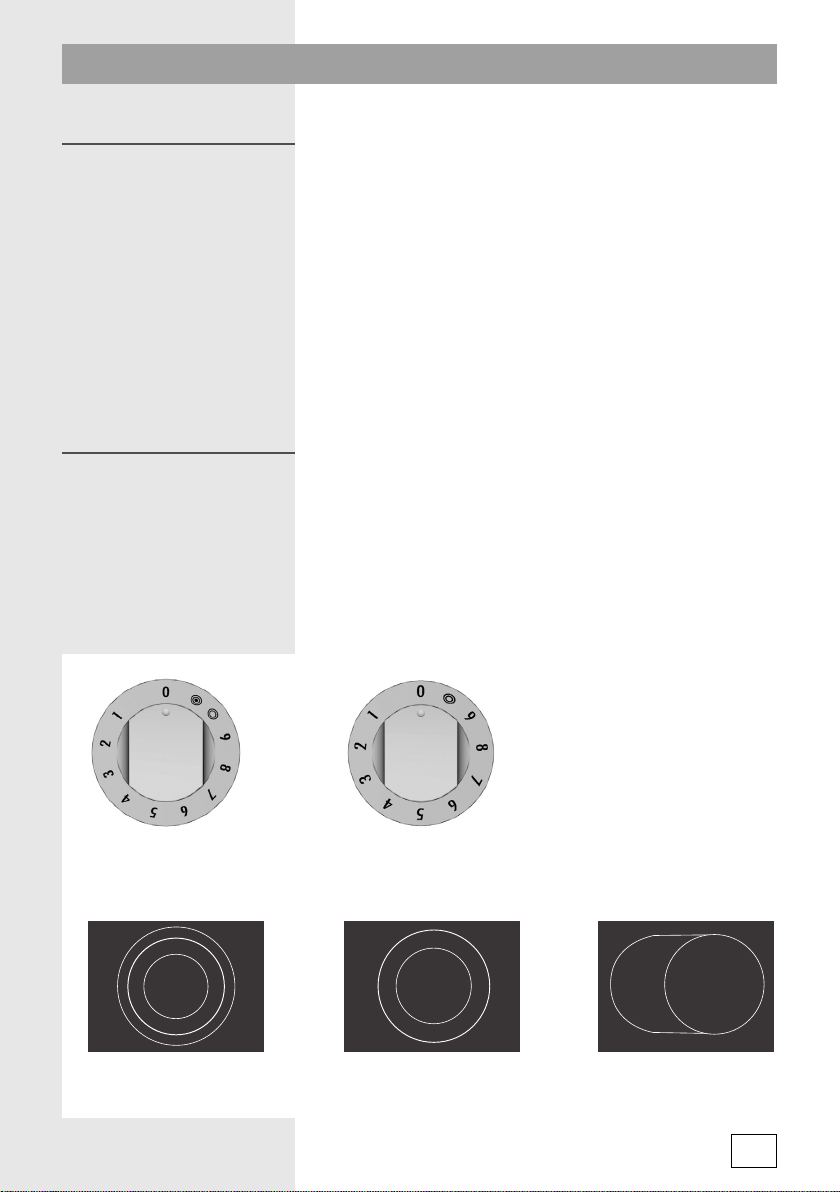
• With triple cooking zones, the cooking surface can be adjusted
to the actual size and shape of the cookware. Turn the cooking
zone on and off with the relevant knob.
• The middle cooking zone is turned on by rotating the knob of
the desired cooking zone to the symbol for the double zone.
Then, set the power level.
• The largest, outermost cooking zone, or heating coil, is turned
on by rotating the knob of the corresponding zone as far as it
will go (see the symbol; the knob will click), Then set the power
level.
• All coking zones are turned off by rotating the knob to the “0”
position (off).
• With the double cooking zone and cooking zone for the baking
tray, the heating surface can be adjusted to match the size and
the shape of the cookware.
• Turn the cooking zone on and off with the relevant knob.
• Turn on the larger heating one by rotating the knob as far as it will
go (see the symbol; the knob will click), Then set the power level.
• All coking zones are turned off by rotating the knob to the “0”
position (off).
Knob for the cooking zone
with two additional heating
coils / expansion zones.
Triple cooking zone Cooking zone for the
Knob for the cooking zone with
one additional heating coil /
expansion zone.
Double cooking zone
oval-shaped baking tray
315222
11

HI-Light cooking zonesHI-Light cooking zones
The oven
Hi-Light cooking zones differ from the conventional zones by
rapid heating; therefore, the cooking process begins very soon.
Remaining heat indicator
Each cooking zone has a signal lamp which is lit whenever the
cooking zone is hot. When the cooking zone cools down, the
lamp goes off. The remaining heat indicator may be lit when a
hot pan was placed on it, even if the cooking zone hasn’t been
used for a while.
Before using the oven
Before using the oven
for the fi rst time
for the fi rst time
Important warningsImportant warnings
• Remove all accessories from the oven and clean them with
warm water and a conventional detergent. Do not use abrasive
cleaning aids.
• When the oven is heated up for the fi rst time, a specifi c odor of
a “new appliance” will be discharged; therefore, ventilate the
room thoroughly while the oven heats up.
• Use dark, black silicon coated or enamel coated baking trays,
as these transmit the heat particularly well.
• Only preheat the oven if specifi cally stated in the recipe or in
the instruction tables herein.
• Heating up an empty oven uses a lot of energy; therefore,
a lot of power is saved if several types of pastry are cooked
consecutively, as the oven is already heated up.
• Approximately ten minutes before the anticipated end of the
cooking process, the oven may be turned off. This way, you
will save some power and make use of the accumulated heat.
315222
12
Operating the oven
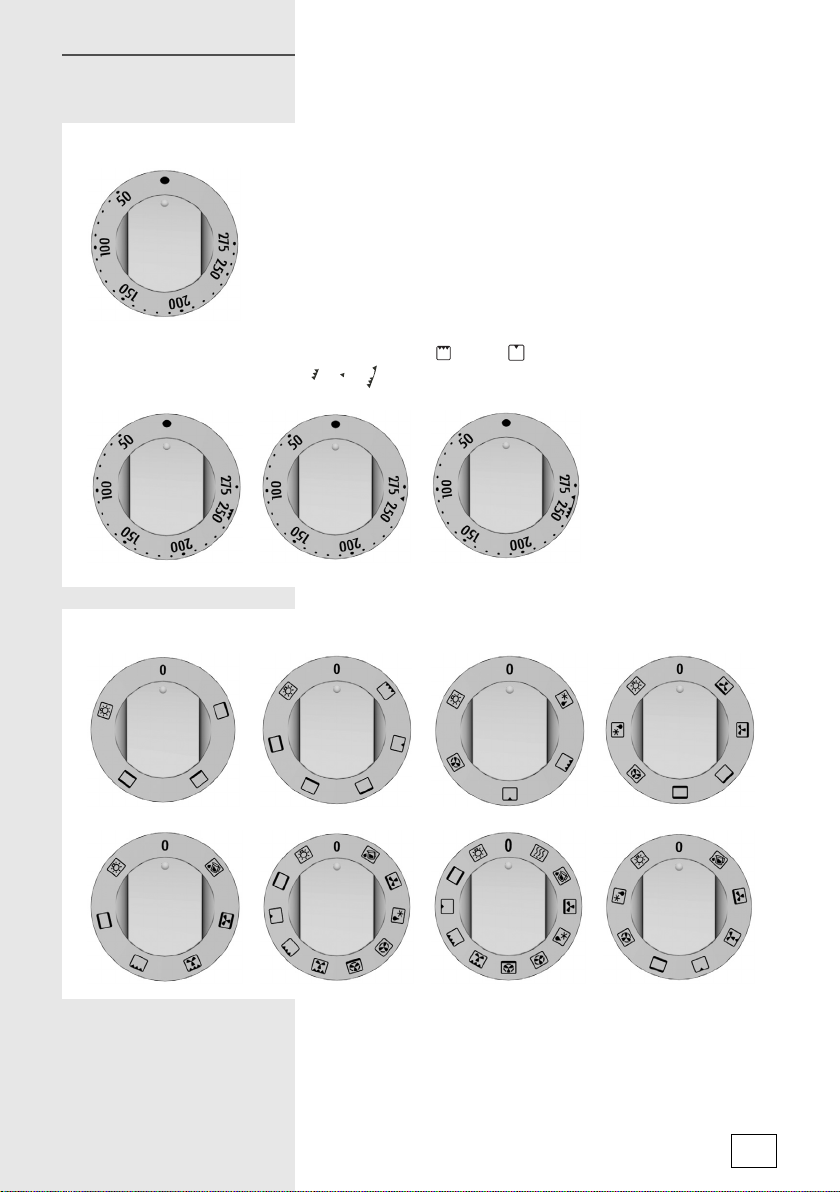
Temperature setting knob / dial
The oven is operated by the on/off and operation mode selection
knob and the temperature setting knob / dial.
Note: When using the operation mode Large grill
knob to the position indicated
On/off and operation mode knob.
, , as appropriate for these two operation modes.
or Grill , set the temperature selection
13
315222
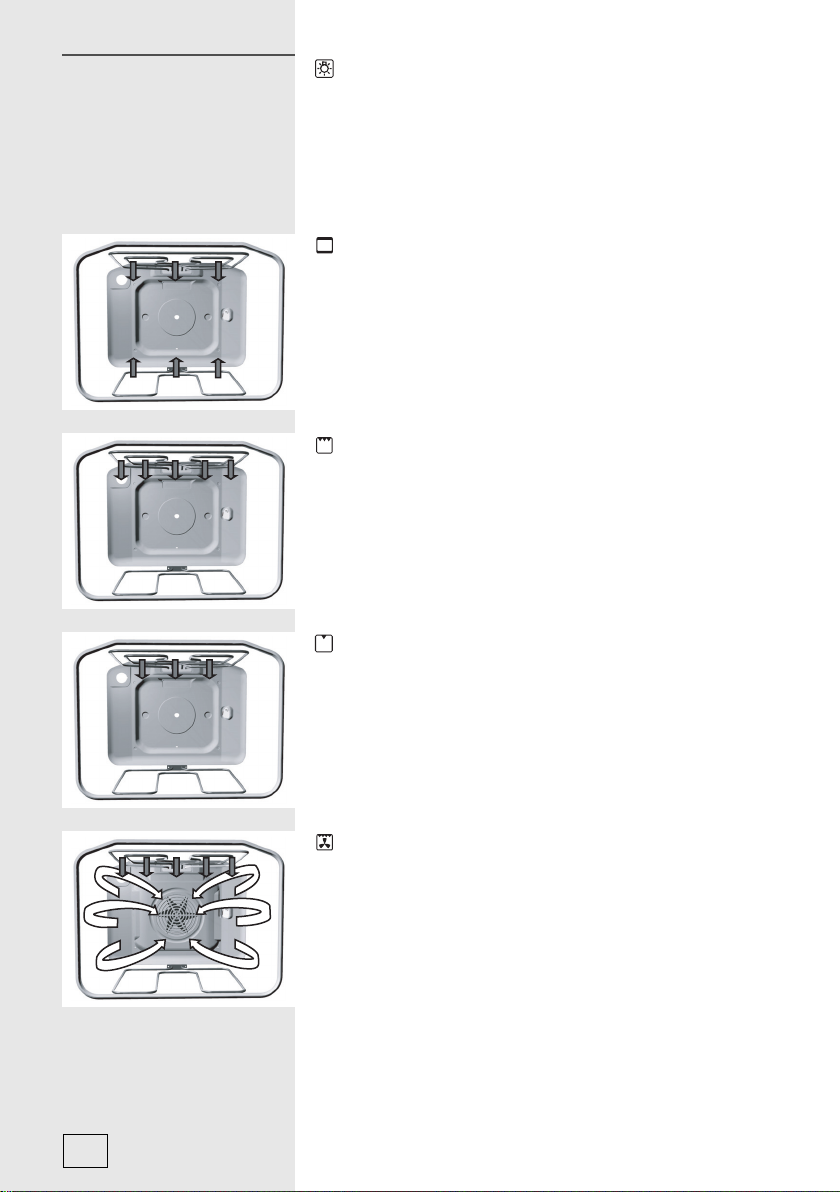
The oven may be
The oven may be
operated in the following
operated in the following
modes
modes
Oven lighting
With some models, there are two interior lighting lamps: one on
the upper part of the back wall, and the other, additional lamp
on middle of the right side wall. Oven lighting can be selected
independently, without selecting another function. With all other
modes of operation, the oven lighting is turned on automatically
when the operation mode is selected.
Upper / lower heater
The heaters on the upper and lower side of the oven radiate heat
uniformly and evenly into the oven interior. Pastry and meat can
be cooked on one shelf level only.
Large grill
With this operation mode, the upper heater and the infra heater
are activated simultaneously. The infra heater installed on the
oven interior ceiling radiates heat directly. To boost the heating
effect or to make optimal use of the entire area of the oven
grid, the upper heater is also activated. This operation mode is
appropriate for cooking smaller chunks of meat, such as steaks,
roasts, chops, ribs, etc.
Grill
Only the infra heater is activated (which also operates, along
with the upper heater, in the Large grill mode). This mode is
appropriate for grilling smaller quantities of toasted sandwiches,
grill sausages, or simply for toasting bread.
315222
Grill & fan
With this operation mode, the infra heater and the fan are
activated simultaneously. It is appropriate for grilling meat
and large chunks of meat or poultry on one shelf level. Also
appropriate for cooking food au gratin or browning.
14
 Loading...