

Whirlpool MW-25BC Instructions For Use Manual
Instructions for use
MW-25BG
MW-25BC

Vipul Sabharwal
1

INSTRUCTION MANUAL
Microwave Oven
SAVE THESE INSTRUCTIONS CAREFULLY
Read these instructions carefully before using your
microwave oven, and keep it carefully.
If you follow the instructions, your oven will provide you with
many years of good service.
MODEL:
MW-25BC
2

Model:
Rated Voltage:
Rated Input Power(Microwave):
Rated Output Power(Microwave):
Rated Input (Grill):
Oven Capacity:
Turntable Diameter:
External Dimensions(LxWxH):
Net Weight:
PRECAUTIONS TO AVOID POSSIBLE EXPOSURE
TO EXCESSIVE MICROWAVE ENERGY
(a) Do not attempt to operate this oven with the door open since this can
result in harmful exposure to microwave energy. It is important not to
break or tamper with the safety interlocks.
(b) Do not place any object between the oven front face and the door or allow
soil or cleaner residue to accumulate on sealing surfaces.
(c) WARNING: If the door or door seals are damaged, the oven must not
be operated until it has been repaired by a competent person.
Specifications
315mm
Rated Input (Convection):
230V~50Hz
900W
1400W
2400W
Approx.1 . kg
If the apparatus is not maintained in a good state of cleanliness, its surface may
de-grade and affect the performance and life of the product. This may lead to
ADDENDUM
25L
6 5
513X470X305 mm
MW-25BC
1500W
potentially hazardous situation.
3

IMPORTANT SAFETY INSTRUCTIONS
WARNING
To reduce the risk of fire, electric shock, injury to persons
or exposure to excessive microwave oven energy when
using your appliance, follow basic precautions, including
the following:
3. Warning: Only allow children to use the
oven without supervision when adequate
instructions have been given so that the
child is able to use the oven in a safe way
and understand the hazards of improper
use.
4. Warning: When the appliance is operated
in the combination mode, children should
only use the oven under adult supervision
due to the temperatures generated.
(only for grill series)
5. Only use utensils suitable for use in
microwave ovens.
6. The oven should be cleaned regularly and
any food deposits should be removed.
7. Read and follow the specific:"PRECAU TIONS TO AVOID POSSIBLE EXPOSURE
TO EXCESSIVE MICROWAVE ENERGY".
8. Do not leave the oven unattended when
using paper,plastic or other combustible
material in the cooking process. Paper
9. If smoke is observed, switch off or unplug
the appliance and keep the door closed
in order to stifle any flames.
10. Do not overcook food.
11. Do not use the oven cavity for storage
purposes. Do not store items,
such as bread, cookies, etc. inside the
oven.
12. Remove wire twist-ties and metal handles
from paper or plastic containers/bags
before placing them in the oven.
13. Install or locate this oven only in
accordance with the installation
instructions provided.
14. Eggs in the shell and whole hard-boiled
eggs should not be heated in microwave
ovens since they may explode, even
after microwave heating has ended.
15. Use this appliance only for its intended
uses as described in manual. Do not
use corrosive chemicals or vapors
in this appliance. This oven is especially
designed to heat. It is not designed for
industrial or laboratory use.
16. If the supply cord is damaged, it must
be replaced by the manufacturer, its
service agent or similarly qualified
persons in order to avoid a hazard.
Warning: Service or repair of your microwave
oven should be carried out by competent
1. When heating beverages or water in your
microwave oven, overheating of the liquid
beyond boiling point
can occur without
evidence of bubbling. This could result
in a sudden boil over of the hot liquid.
To prevent this possibility the following
steps
should be taken:
1) Avoid using straight-sided containers
with narrow necks.
2) Stir the liquid before placing the container
in the
oven and let the teaspoon remain
in the conta i ner.
3) After heating, please allow liquid to stand
for a short time. Stir before removing the
2.
container carefully from the microwave oven.
persons only.
can char or burn and some plastic can
melt if used when heating foods. Do not
leave the oven unattended if you are using
a lot of fat or oil since they can re-heat and
cause fire.
4

25.The microwave oven shall not be placed
in a cabinet unless it has been tested in a
cabinet.
26.The appliances are not intended to be
operated by means of an external timer
or
separate remote-control system.
27. WARNING: Ensure that the appliance is
switched
off
before replacing the lamp to
avoid
the possibility
of electric shock.
28. Young children should be use the steam
Surface of a storage drawer can get hot.
30.
Do not use harsh abrasive cleaners or
sharp
metal scrapers to clean the oven
door
glass since
they can scratch the
surface,
which may result in
shattering
of the glass.
31. During use the appliance becomes hot.
Care
should be taken to avoid touching
heating
elements inside the oven.
32. Only use the temperature probe
recommended
for this oven.(for ovens
provided
with a facility to
use a
temperature-sensing probe.)
The rear surface of appliance shall
be placed
against a wall
.
33.
24.Children should be supervised to ensure
that they do not play with the appliance.
23.The appliance is not intended for use by
persons (including children) with reduced
physical , sensory or mental capabilities,
or lack of experience and knowledge,
unless they have been given supervision
or instruction concerning use of the
appliance by a person responsible for their
safety.
20. Do not let cord hang over edge of table
or counter.
21. Failure to maintain the oven in a clean
condition could lead to deterioration
of the surface that could adversely
affect the life of the appliance and
possibly result in a hazardous situation.
29.
bottles, baby food or liquids in a jar,
always stir and check the temperature
22. After heating the contents of feeding
before serving.
clean function in the oven.
19. The temperature of accessible surfaces
may be high when the appliance is
operating.
The surfaces are liable to get
hot during use .
Keep cord away from
heated surface, and do not cover any
ventilation openings on the oven.
17. Do not store or use this appliance
outdoors.
18. Do not use this oven near water, in a
wet basement or near a swimming
pool.
5

DANGER
Electric Shock Hazard
Touching some of the internal
components can cause serious
personal injury or death. Do not
disassemble this appliance.
WARNING
Electric Shock Hazard
Improper use of the grounding
can result in electric shock. Do
not plug into an outlet until
appliance is properly installed
and grounded.
To Reduce the Risk of Injury to Persons
Grounding Installation
CLEANING
1. Clean the inside of the oven after using
with a slightly damp cloth.
2. Clean the accessories in the usual way
in soapy water.
3. The door frame and seal and
neighbouring parts must be cleaned
carefully with a damp cloth when they
are dirty.
This appliance must be grounded. In the event of
an electrical short circuit, grounding reduces the
risk of electric shock by providing an escape wire
for the electric current. This appliance is equipped
with a cord having a grounding wire with a
grounding plug. The plug must be plugged into an
outlet that is properly installed and grounded.
Consult a qualified electrician or serviceman if the
grounding instructions are not completely
understood or if doubt exists as to whether the
appliance is properly grounded.
The earthing of this appliance is compulsory.
The manufacturer will accept no responsibility
for injury to
persons, animals or damage to
objects arising from the non-observance of this
requirement.
Before cleaning the oven be sure to
disconnect it from the power supply.
Three-round-pin plug
6

CAUTION
Personal Injury Hazard
It is hazardous for anyone
other than a compentent person
to carry out any service or repair
operation that involves the removal
of a cover which gives protection
against exposure to microwave
energy.
Utensil Test:
1. Fill a microwave-safe container with 1 cup of cold
water (250ml) along with the utensil in question.
2. Cook on maximum power for 1 minute.
3. Carefully feel the utensil. If the empty utensil is
warm, do not use it for microwave cooking.
4. Do not exceed 1 minute cooking time.
Materials you can use in microwave oven
Utensils Remarks
Aluminum foil Shielding only. Small smooth pieces can be used to cover thin parts of
meat or poultry to prevent overcooking. Arcing can occur if foil is too
close to oven walls. The foil should be at least 1 inch (2.5cm) away from
oven walls.
Follow manufacturer’s instructions. The bottom of browning dish must be
at least 3/16 inch (5mm) above the turntable. Incorrect usage may cause
the turntable to break.
Microwave-safe only. Follow manufacturer's instructions. Do not use
cracked or chipped dishes.
Always remove lid. Use only to heat food until just warm. Most glass jars
are not heat resistant and may break.
Heat-resistant oven glassware only. Make sure there is no metallic trim.
Do not use cracked or chipped dishes.
Follow manufacturer’s instructions. Do not close with metal tie. Make
slits to allow steam to escape.
Use for short–term cooking/warming only. Do not leave oven unattended
while cooking.
Use to cover food for reheating and absorbing fat. Use with supervision
for a short-term cooking only.
Use as a cover to prevent splattering or a wrap for steaming.
Microwave-safe only. Follow the manufacturer’s instructions. Should be
labeled "Microwave Safe". Some plastic containers soften, as the food
inside gets hot. "Boiling bags" and tightly closed plastic bags should be
slit, pierced or vented as directed by package.
Microwave-safe only. Use to cover food during cooking to retain
moisture. Do not allow plastic wrap to touch food.
Thermometers Microwave-safe only (meat and candy thermometers).
Wax paper Use as a cover to prevent splattering and retain moisture.
Browning dish
Glass jars
Glassware
UTENSILS
See the instructions on "Materials you can use in
microwave oven or to be avoided in microwave oven."
There may be certain non-metallic utensils that are not
safe to use for microwaving. If in doubt, you can test the
utensil in question following the procedure below.
Oven cooking
bags
Paper plates
and cups
Paper towels
Parchment
paper
Plastic
Plastic wrap
Dinnerware
7
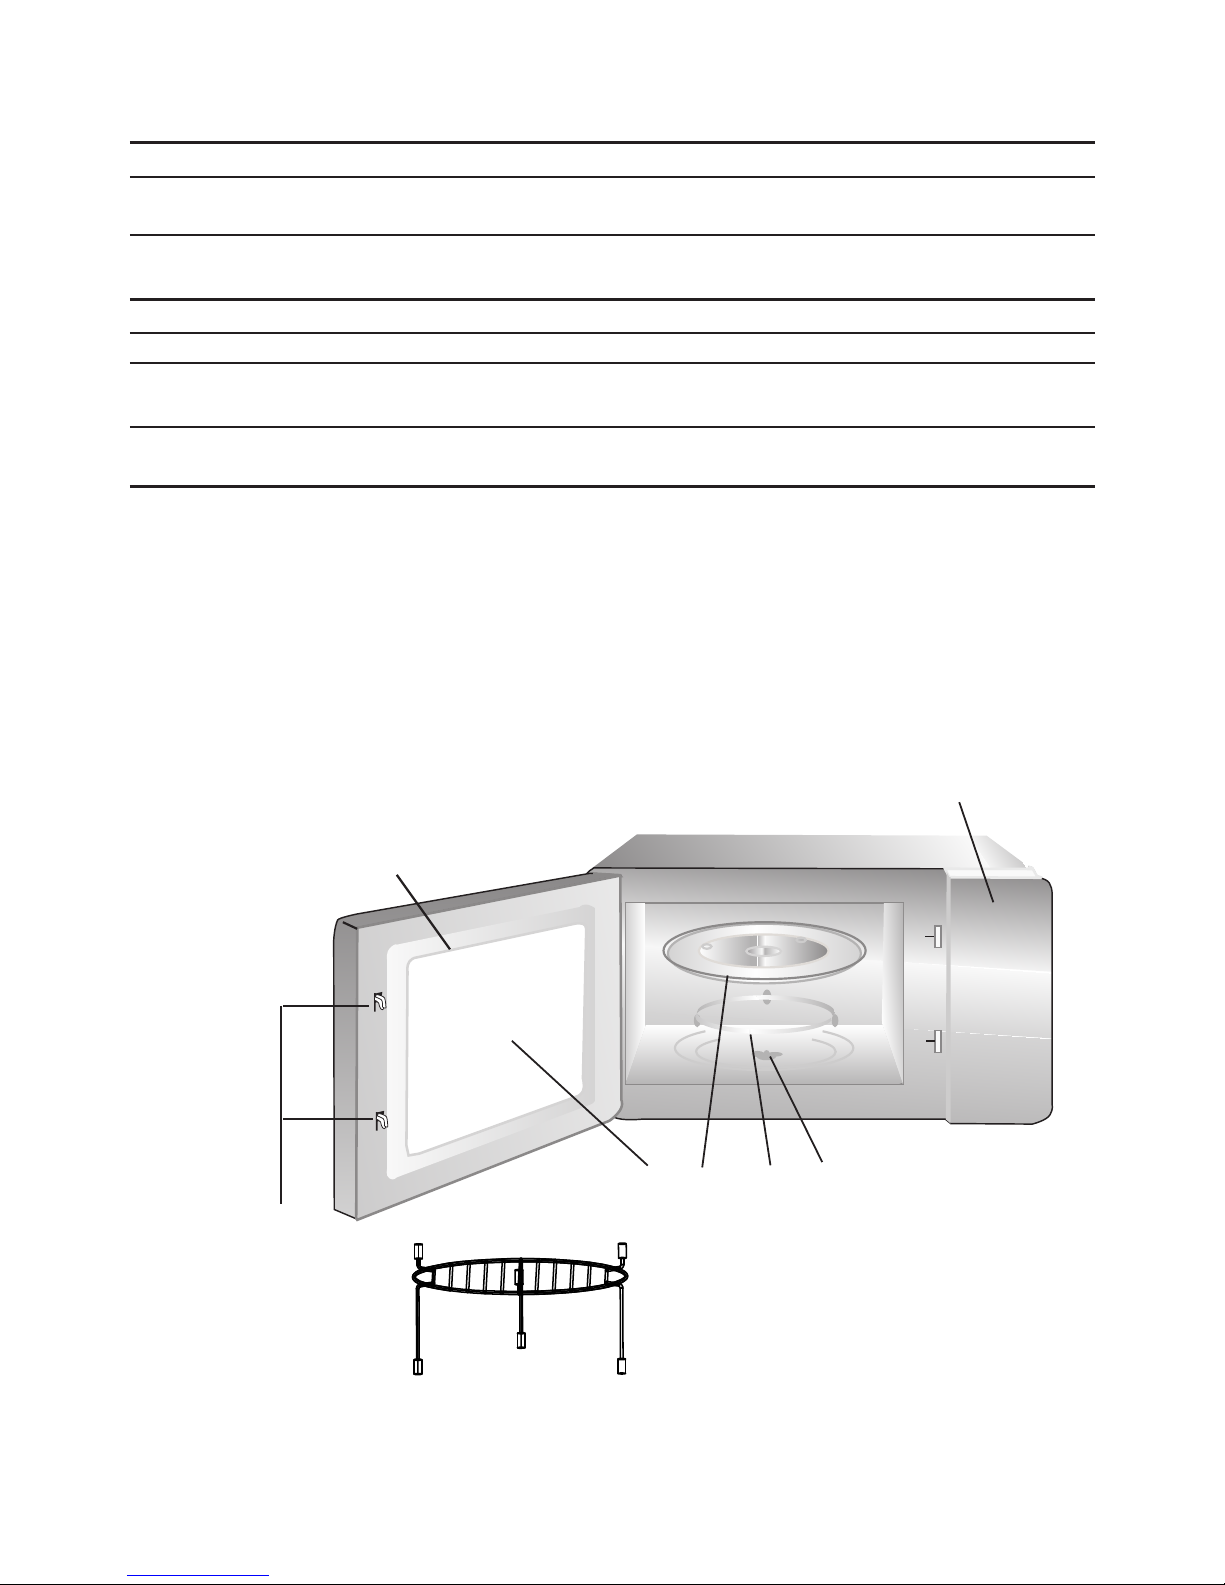
A) Control panel
B) Turntable shaft
C) Turntable ring assembly
D) Glass tray
E) Observation window
F) Door assembly
G) Safety interlock system
Materials to be avoided in microwave oven
Utensils Remarks
Aluminum tray
Food carton with
metal handle
Metal or metal-
trimmed utensils
Metal twist ties
Paper bags
Plastic foam
Wood
F
G
A
C B
E
D
SETTING UP YOUR OVEN
Names of Oven Parts and Accessories
Remove the oven and all materials from the carton and oven cavity.
Your oven comes with the following accessories:
Glass tray 1
Turntable ring assembly 1
Instruction Manual 1
Metal shields the food from microwave energy. Metal trim may
cause arcing.
May cause a fire in the oven.
Plastic foam may melt or contaminate the liquid inside when exposed
to high temperature.
Wood will dry out when used in the microwave oven and may split
or crack.
May cause arcing. Transfer food into microwave-safe dish.
May cause arcing. Transfer food into microwave-safe dish.
May cause arcing and could cause a fire in the oven.
Grill Rack ( Only for Grill series )
H)
Grill Rack
( Only for Grill series )
8
Remove all packing material and accessories.
Examine the oven for any damage such as
dents or broken door. Do not install if oven is
damaged.
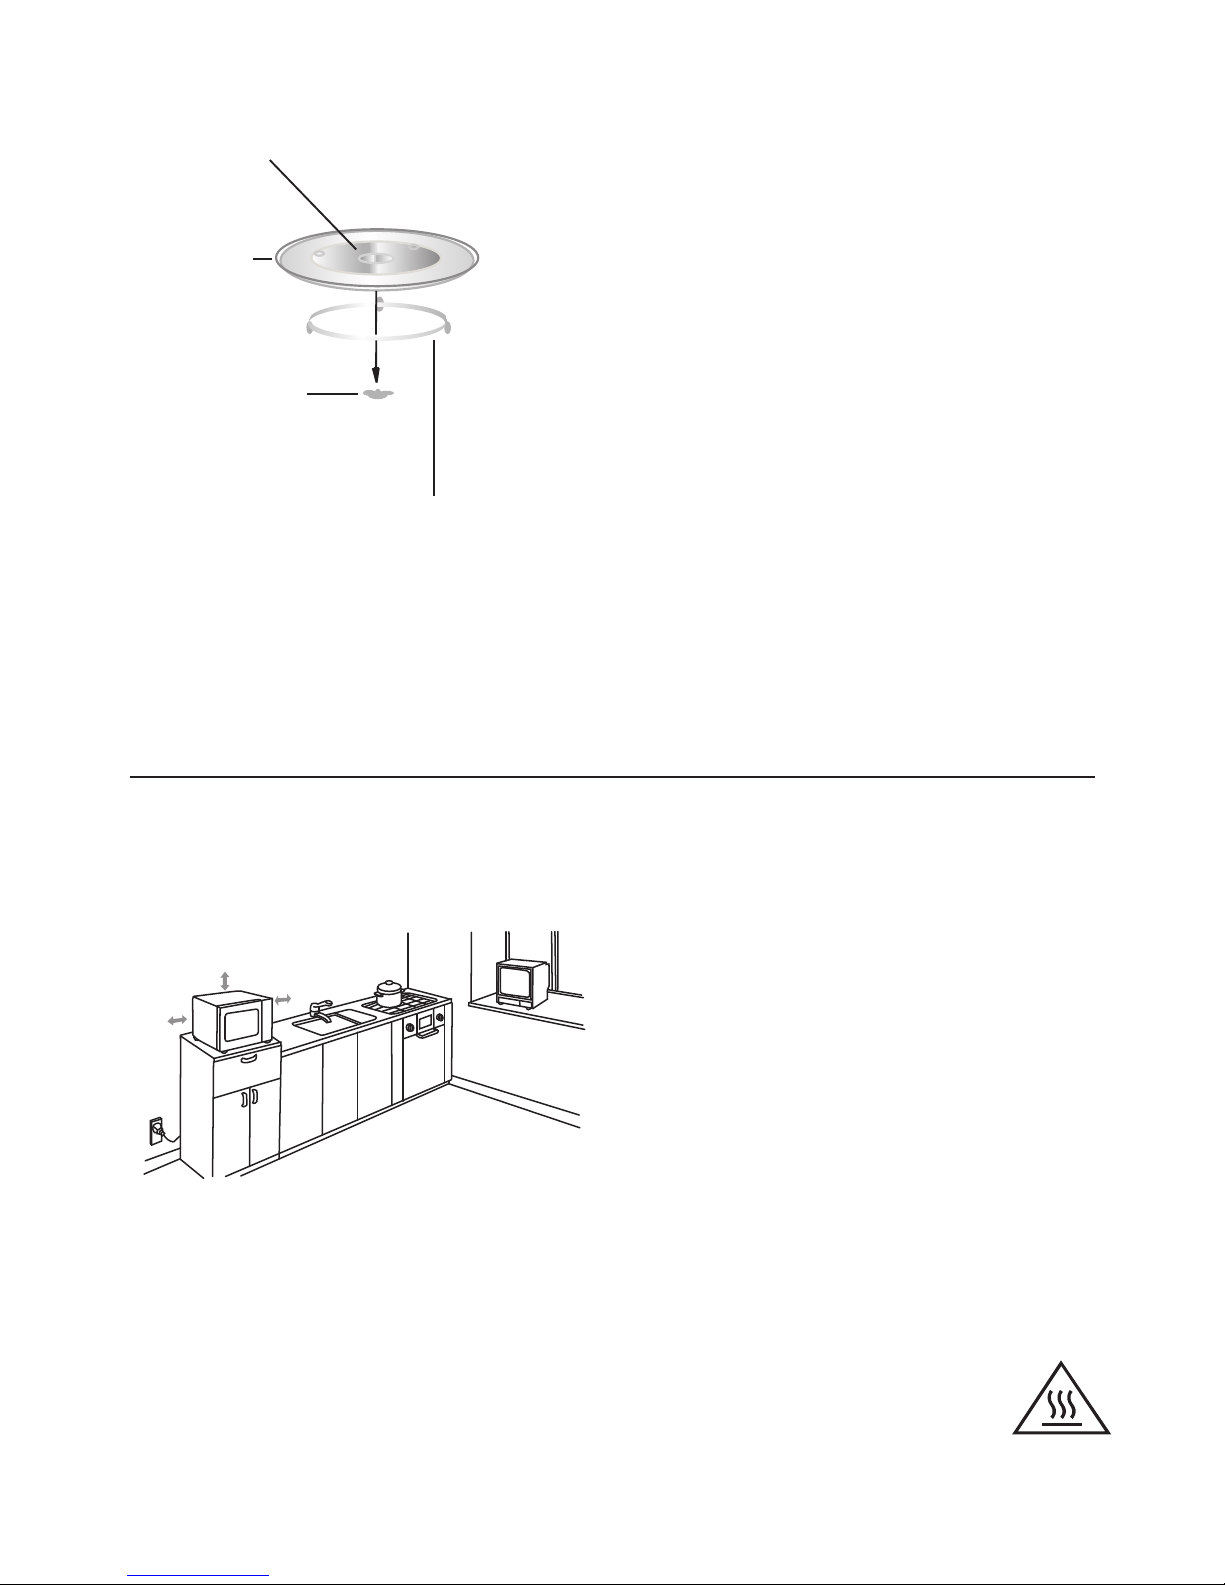
Countertop Installation
Cabinet: Remove any protective film found
on the microwave oven cabinet surface.
Do not remove the light brown Mica cover
protect the magnetron.
Installation
1. Select a level surface that provide
enough open space for the intake
and/or outlet vents.
A minimum clearance of 3.0 inches
(7.5cm) is required between the oven and
any adjacent walls. One side must be open.
(1) Leave a minimum clearance of 12
inches (30cm) above the oven.
(2) Do not remove the legs from the
bottom of the oven.
(3) Blocking the intake and/or outlet openings
can damage the oven.
(4) Place the oven as far away from
radios and TV as possible.
Operation of microwave oven may
cause interference to your radio or TV
reception.
2. Plug your oven into a standard household
outlet. Be sure the voltage and the
frequency is the same as the voltage
and the frequency on the rating label.
WARNING: Do not install oven over a
range cooktop or other heat-producing
appliance. If installed near or over a heat
source, the oven could be damaged and
the warranty would be void.
Hub (underside)
Glass tray
Turntable ring assembly
3.0 inch(7.5cm)
12 inch(30cm)
OPEN
a. Never place the
glass tray
upside down. The glass
tray should turn freely.
b. Both
glass tray
and
turntable ring assembly
must
always be used during cooking.
c. All food and containers of food are always placed
on the
glass tray
for cooking.
d. If
glass tray
or
turntable ring assembly
cracks or
breaks, contact your nearest authorized service
center.
Turntable Installation
Turntable shaft
The accessible surface
may be hot during operation.
The temperature of accessible
surfaces of
the grill rack may be
high when the appliance is
operating.
that is attached to the oven cavity to
The rear surface of appliance shall be
placed against a wall.
9

Example: If you want to use 80% microwave power to cook for 10 minutes, you can
operate the oven as the following steps.
2. Grill Cooking
Example: If you want to use 100% to cook for 35 minutes, you can operate
the oven as the following steps.
1) Press the "GRILL" key , the oven will display " G-1 ".
OPERATION INSTRUCTION
1. Microwave Cooking
Select different microwave power level and set cooking time as you wish. There are five
power levels available for choosing. Keep on pressing "MICROWAVE" to choose the power.
2) Press the number buttons of "3","5","0","0" in order, the oven will display "35:00".
3) Press the "
" key to start cooking.
1) Press "MICROWAVE" once, the oven will display "P100".
Presses
Instructions
Microwave
Power
Display
1
2
3
4
5
100%
80%
50%
30%
10%
2) Press "MICROWAVE" once again to choose 80% power, the oven will display "P80".
3) Press the number buttons of "1","0","0","0" in order, the oven will display "10:00"
P100
P 80
P 50
P 30
P 10
Note: "MICROWAVE" Pad presses instructions
Note:If half the grill time passes, the oven sounds twice, and this is normal.
In order to have a better effect of grilling food, you should turn the food over,
close the door, and then press "
" to resume cooking.
If there is no operation, the oven will not pause and continue cooking.
4) Press "START " to start cooking, ":" will light.
START
START
10

3. Convection Cooking(With preheating function)
4. Convection Cooking(Without preheating function)
1
2
Presses
Instructions
Display
Convection
1) Press the "CONVEC." key once, the oven will display "150".
(Press the "CONVEC." key several times to select the temperature.)
2) Press the "
" key to start cooking. The
temperature figure will flash temperature in advance
and buzzer will ring twice to remind you to put the food into the oven.
3) Press the number buttons of "4","0","0","0" in order, the oven will display "40:00".
4) Press the "
" key to start cooking.
1) Press the "CONVEC." key once, the oven will display "150".
(Press the "CONVEC." key several times to select the temperature.)
2) Press the number buttons of "4", "0", "0", "0" in order, the oven will display"40:00".
3) Press the "
" key to start cooking.
150
160
Note: "CONVEC." Pad presses instructions
6
7
8
9
10
3
4
5
190
200
210
220
230
240
170
180
START
START
START
once it reaches the
11

6. Reheat
1) Press "REHEAT" pad , the "h-1" will display and flash.
(Press the "REHEAT" pad several times to select the the cooking program as desired .)
2) Press "
" button to confirm, display will show "h-1" .
3) Press "REHEAT" pad , the oven will display "150".
(Press the "REHEAT" pad several times to select the the weight of the cooking food.)
4) Press "
" key to start cooking.
5. Combination Cooking
Example: If you want to use combination to cook (C-1) for 40 minutes, you can
operate the oven as per the following steps.
1) Press the "COMBINE" key once, the oven will display "C-1".
2) Press the number buttons of "4", "0", "0", "0" in order, the oven will display "40:00".
Presses
Instructions
Microwave
Power
Display
Convection
1
2
3
4
Grill
C-1
C-2
C-3
C-4
Note: "COMBINE" Pad presses instructions
3) Press the "
" key to start cooking.
START
START
START
12

7. Auto Menu Cooking
Pad
Cook
Pad Cook Pad Cook
1
2
3
4
5
6
7
8
Reheat Chart
Menu
Weight(g)
Display
h-1
(Auto Reheat)
h-2
(Dinner Plate)
h-3
(Coffee)
h-4
(Roll)
150
250
350
450
600
250
350
450
1(approximately 240g)
2(approximately 480g)
3(approximately 720g)
1(approximately 70g)
2(approximately 140g)
3(approximately 210g)
150
250
350
450
600
250
350
450
1
2
3
1
2
3
(1) Press "Beverages" button.
(2) Press "
Beverages
"bE01", "bE02", .. ."bE07".
(4) Press "
START
" to start cooking, and time will count down.
Beverages
Indian
snacks
Rice
Health
Menu
Curries
Western
Snacks
Dessert
Veggies
The numeral pads 1—8 are matching with eight different food categories ;
Example: Cooking coffee of 600ml:
" button to choose different food menu, the oven will display
(3) Press "Weight" button to choose the menu weight or portion.
13

Category
Display Recipe Name Cooking Mode
bE01
Cardamom Tea
300 ml 600 ml
Microwave
bE02
Coffee
300 ml 600 ml
Microwave
bE03
Boil Milk
500 ml
Microwave
bE04
Tomato Rasam
300 ml 600 ml
Microwave
bE05
Cream of Spinach Soup
300 gms 600 gms
Microwave
bE06
Cream of Tomato Soup
200 gms 400 gms
Microwave
bE07
Chicken Sweet Corn Soup
235 gms 475 gms
Microwave
Scrambled Eggs
100 gms 200 gms
Microwave
Masala Omelette
100 gms 200 gms
Microwave
Rice Idli
200 gms
Microwave
Sooji Upma
100 grams 200 grms
Microwave
Poha
100 grams 200 grms
Microwave
Savoury Vermicelli
100 gms 200 gms
Microwave
Aloo Tikki
250 gms 500 gms
Combination
Pav Bhaji
200 gms 400 gms
Microwave
Seekh Kabab
100 gms 200 gms
Combination
Lehsuni Aloo Tikka
200 gms 400 gms
Grill
Murg Tangri Kabab
350 gms 700 gms
Combination
Murg Malai Tikka
200 gms 400 gms
Combination
Fish Tikka
200 gms 400 gms
Combination
Masala Peanuts
125 gms 250 gms
Microwave
Salted Cashewnuts
100 gms 200 gms
Microwave
Corn Chaat
200 gms 400 gms
Microwave
uS01
Toast
100 gms
Grill
uS02
Chilli Cheese Toast
100 gms
Convection
uS03
Popcorn
85 gms
Microwave
uS04
Crispy Potatoes
200 gms 400 gms
Convection
uS05
Onion Capsicum Pizza
480 gms
Convection
uS06
Warm Macaroni Salad
100 gms 200 gms
Microwave
uS07
Veg Chowmien
100 gms 200 gms
Microwave
uS08
Chicken Fried Rice
150 gms 300 gms
Microwave
uS09
Instant Noodles
60 gms
Microwave
uS10
Instant Pasta
83 gms
Microwave
uS11
Pizza Topping
330 gms 670 gms
Microwave
uS12
Caramelize Sugar
75 gms
Microwave
ri01
Steamed Rice
150 gms 300 gms
Microwave
Beverages
ri02 150 gms
300 gms
Microwave
ri03
Chicken Pulao
150 gms 300 gms
Microwave
ri04
lemon Rice
150 gms 300 gms
Microwave
ri05
Tomato Rice
150 gms 400 gms
Microwave
ri06
Moong Dal Khichdi
150 gms 300 gms
Microwave
ri07
Sago Khichdi
100 gms 200 gms
Microwave
Arhar Dal
300 gms 600 ml
Microwave
Sukhi Urad Dal Microwave
HE03
Panchmel Dal
200 gms 400 gms
Microwave
HE04
Sambhar
235 gms 475 gms
Microwave
HE05
Masala Papad
30 gms
Microwave
HE06
Roasted Chirwa
100 gms 200 gms
Microwave
HE07
Dalia
50 gms 100 grms
Microwave
HE08
Oats
50 gms 100 grms
Microwave
HE09
Sprouted Moong Chaat Microwave
HE10
Rava Idli
200 gms
Microwave
HE11
Dhokla
200 gms
Microwave
HE12
Baked Cutlets
100 gms 200 gms
Combination
HE13
Baked Bread Rolls
200 gms 400 gms
Convection
HE14
Paneer Tikka
200 gms 400 gms
Grill
HE15
Baked Fish Fingers
100 grms 200 grms
Combination
Rice
Variant 1 (for 2)
Variant 2 (for 4)
Indian
snacks
Western
Snacks
Health
Menu
1000 ml
200 gms 400 gms
200 gms 400 gms
iS01
iS02
iS03
iS04
iS05
iS06
iS07
iS08
iS09
iS10
iS11
iS12
iS13
iS14
iS15
iS16
HE02
HE01
Vegetable Pulao
14

HE16
Sundal
75 gms 150 gms
Microwave
CU01
Paneer Makhani
100 gms 200 gms
Microwave
CU02
Dal Makhani
100 gms 200 gms
Microwave
CU03
Navrattan Curry
200 gms 400 gms
Microwave
CU04
Mushroom Mutter
200 gms 400 gms
Microwave
CU05
Kadi Pakoda
200 gms 400 gms
Microwave
CU06
Chana Masala
100 gms 200 gms
Microwave
CU07
Butter Chicken
350 gms 700 gms
Microwave
CU08
Chicken Korma
250 gms
Microwave
CU09
Chicken Curry
200 gms 400 gms
Microwave
CU10
Fish Masala
200 gms 400 gms
Microwave
CU11
Egg Curry
200 gms 400 gms
Microwave
CU12
Onion Tomato Curry
100 gms 200 gms
Microwave
CU13
Seekh Kabab Curry
100 gms 200 gms
Microwave
UE01
Aloo Muttar
100 gms 200 fms
Microwave
UE02
Palak Paneer
100 gms 200 gms
Microwave
UE03
Dahi Ke Aloo
200 gms 500 gms
Microwave
UE04
Boil Potatoes
500 gms
Microwave
Curries
UE05
Blanch Tomatoes
200 gms 400 gms
Microwave
UE06
Blanch Leafy Vegetables
100 gms 200 gms
Microwave
UE07
Steamed Vegetables
200 gms 400 gms
Microwave
UE08
Aloo Gobhi
200 gms 400 gms
Microwave
UE09
Stuffed Capsicum
200 gms 400 gms
Microwave
UE10
Bhindi Masala
100 gms 200 gms
Microwave
UE11
Khatte Baigan
200 gms 400 gms
Microwave
UE12
Patta Gobhi Muttar
200 gms 400 gms
Microwave
UE13
Zeera Aloo
200 gms 400 gms
Microwave
UE14
Mixed Vegetables
200 gms 400 gms
Microwave
Chocolate Sponge Cake
500 gms 1000 gms
Combination
Banana Walnut Bread
550 gms 1100 gms
Combination
Pineapple Cake
1050 gms
Combination
Sooji Biscuits
150 gms
Convection
Choco Chip Cookies
70 gms
Convection
Gajar Ka Halwa
500 gms
Microwave
Sooji Ka Halwa
100 gms 200 gms
Microwave
Meethe Chawal
100 gms 200 gms
Microwave
Besan Ke Laddoo
100 gms 200 gms
Microwave
Dry Fruit Kheer
500 ml 1000 ml
Microwave
Sewian Payasam
500 ml 1000 ml
Microwave
Basundi
300 ml 600 ml
Microwave
Coconut Burfi
100 gms 200 gms
Microwave
Crème Caramel
150 gms
Microwave
Fruit Custard
150 ml 450 ml
Microwave
Dessert
Veggies
500 gms
dE01
dE02
dE03
dE04
dE05
dE06
dE07
dE08
dE09
dE10
dE11
dE12
dE13
dE14
dE15
15

9.Quick defrost
8.Steam cleaning function
1) Press “Steam cleaning”.
2) Press “Start”, the oven starts steam cleaning. Totall time is 8 minutes,
the microwave power in initial
4 minutes and no power in 5 to 8 minutes.
1) Press “Quick defrost”, the “ “ will light.
2)Press number button to the weight of food..The effective weight is 100-2000g.
3) Press “Start”, the oven starts defrosting.
If one of the stages is defrosting,
it should
be put in the first stage, and auto menu cooking should not be set as one of the stage.
The buzzer will ring once after each stage and the next stage will begin.
Example: If you want to cook the food with 100% microwave power for 10 minutes+ 80%
microwave power for 15 minutes. Do it as following:
1) Press "MICROWAVE" once to choose 100% microwave power;
2) Press number keys "1","0","0","0" in order to adjust the cooking time;
3) Press ""MICROWAVE" twice to choose 80% microwave power;
4) Press number keys "1","5","0","0" in order to adjust the cooking time;
5) Press "START" to start cooking.
10.Multi-Stage Cooking
NOTE: Put a microwave safe bowl filled with water and add 2-3 drops of lemon.
After the Microwave stops, wipe the insides with a clean cloth.
Maximum two stages of cooking can be set at one time. NOTE:
16

"MICROWAVE"
, the current power will be displayed for 2~3 seconds.
(1) In waiting state, the oven will display 0:00.
(2) In function setting state, the oven will display the related setting.
(3) In the operation and suspending state, the oven will display the residual cooking time.
the end of cooking and continuous no operation in 1 minute,
the oven will enter the lock
state and LED display " ".
In lock state,
pressing any keys is invalid
and LED will display " " .
Press
(the maximum setting is 99 minutes and 99 seconds).
When the oven is in the microwave, grill or combination cooking states, pressing
"START" key will add 30 seconds cooking time each time.
(Note: Multi-stage cooking or Auto Menu state is invalid with speed cooking function.)
In microwave, grill or combination cooking state, press "COMBINE
","CONVEC." or
11. Speed Cooking
12. Inquiring Function
13. Lock-out Function for Children
14. Display Specification
Lock: If there will be no operation in 1 minute in stand by mode or in 10 minutes after
Start button to start cooking with full microwave power for 30 seconds.
Unlock: In locked state, open and close the oven door one time,
the lock is
released and " " will go out.
and "door"
17
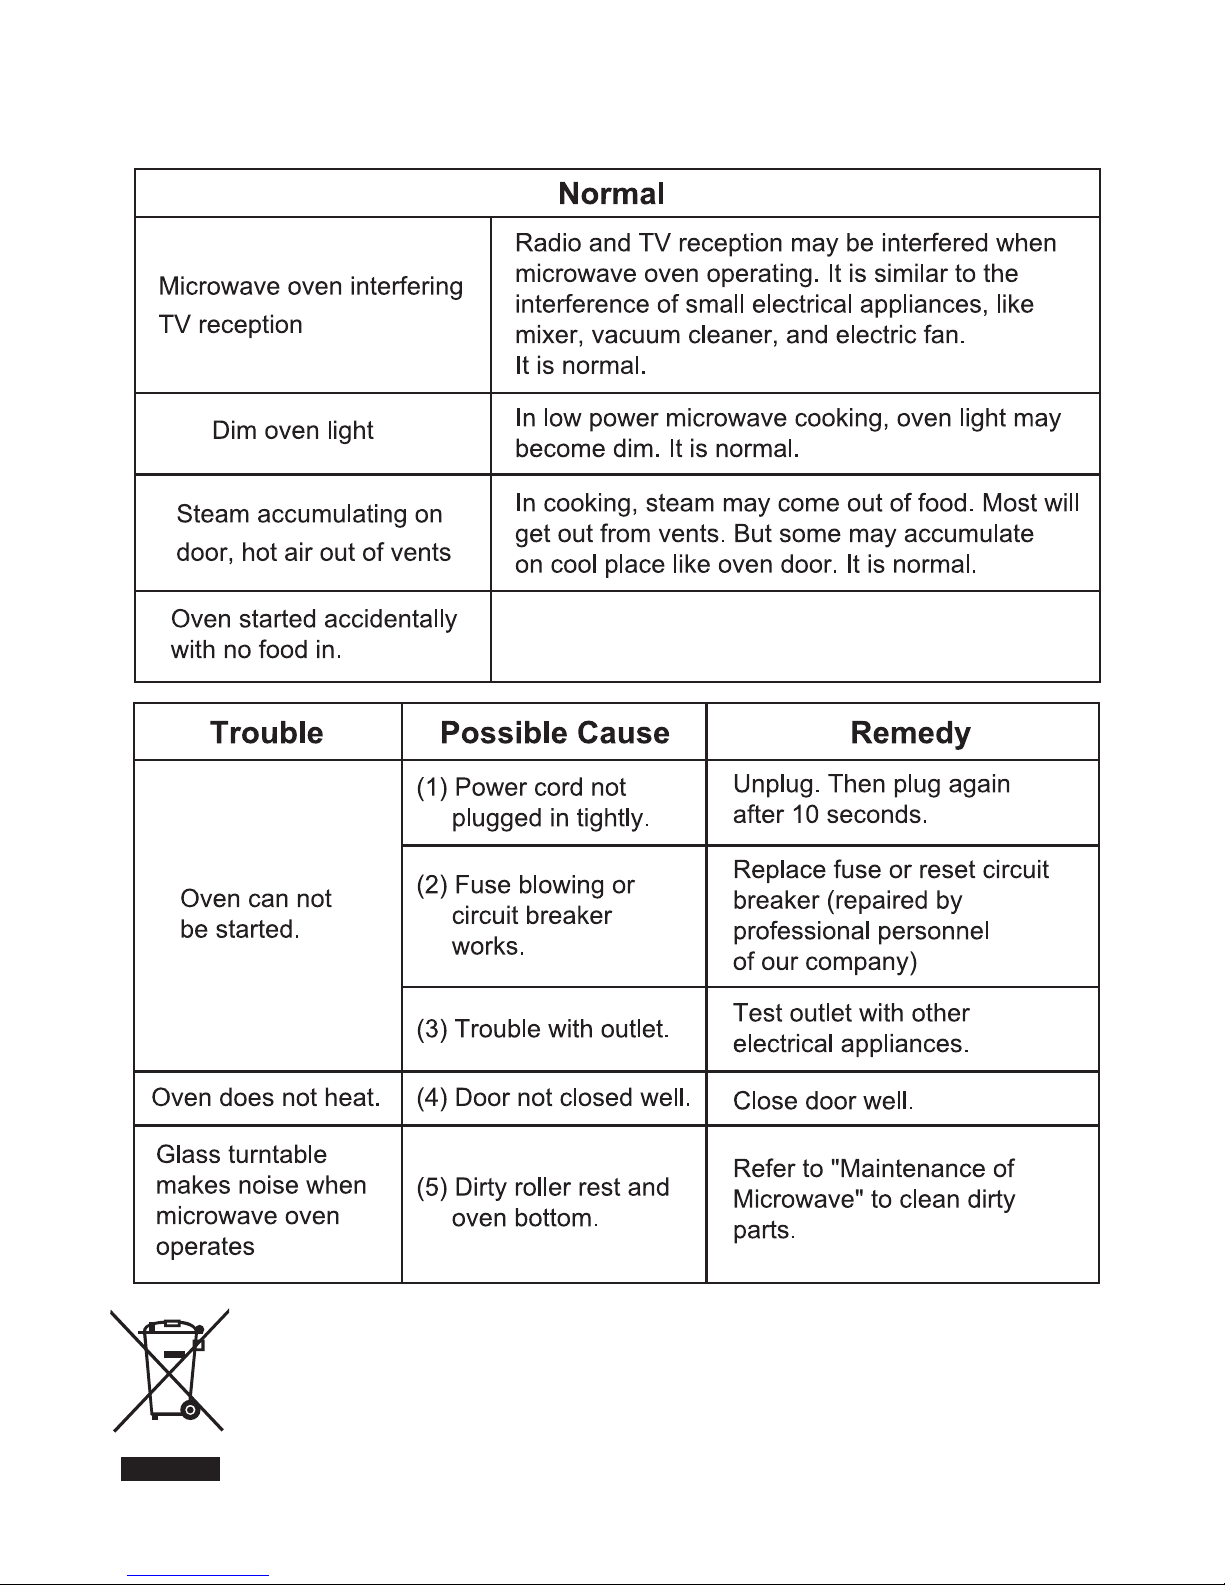
Troubleshooting
Maintenance
It is forbidden to run the unit without any food inside.
It is very dangerous.
Operation in this manner is likely
to damage the appliance.
The symbol on the product, or on the documents accompanying the product, indicates that this
appliance may not be treated as household waste. Instead it shall be handed over to the
applicable collection point for the recycling of electrical and electronic equipment.
Disposal must be carried out in accordance with local environmental regulations for waste
disposal.
For more detailed information about treatment, recovery and recycling of this product, please
contact your local city office, your household waste disposal service or the shop where you
purchased the product.
Before scrapping, cut off the mains cord so that the appliance cannot be connected to the mains.
18

Recipe Index
Auto Cook Recipe #Recipe Name
Beverages
bE01 Cardamom Tea
bE02 Coffee
bE03 Boil Milk
bE04 Tomato Rasam
bE05 Cream of Spinach Soup
bE06 Cream of Tomato Soup
bE07 Chicken Sweet Corn Soup
Health Menu
HE 01 Arhar Dal
HE 02 SukhiUrad Dal
HE 03 Panchmel Dal
HE 04 Sambhar
HE 05 Masala Papad
HE 06 Roasted Chiwra
HE 07 Dalia
HE 08 Oats
HE 09 Sprouted MoongChaat
HE 10 RavaIdli
HE 11 Dhokla
HE 12 Baked Cutlets
HE 13 Baked Bread Rolls
HE 14 PaneerTikka
HE 15 Baked Fish Fingers
HE 16 Sundal
Indian Snacks
iS01 Scrambled Eggs
iS02 Masala Omlette
iS03 Rice Idli
iS04 SoojiUpma
iS05 Poha
iS06 Savoury Vermicelli
iS07 AlooTikki
iS08 PavBhaji
iS09 SeekhKabab
iS 10 LehsuniAlooTikka
iS 11 MurgTangriKabab
iS 12 MurgMalaiTikka
iS 13 Fish Tikka
iS 14 Masala Peanuts
iS 15 Salted Cashewnuts
iS 16 Corn Chaat
Western Snacks
uS01 Toast
uS02 Chilli Cheese Toast
uS03 Popcorn
uS04 Crispy Potatoes
uS05 Onion Capsicum Pizza
uS06 Warm Macaroni Salad
uS07 Veg Chowmien
Auto Cook Recipe # Recipe Name
uS08 Chicken Fried Rice
uS09 Instant Noodles
uS 10 Instant Pasta
uS 11 Pizza Topping
uS 12 Caramelize Sugar
Rice
ri01 Steamed Rice
ri02 VegetablePulao
ri03 Chicken Pulao
ri04 lemon Rice
ri05 Tomato Rice
ri06 Moong Dal Khichdi
ri07 Sago Khichdi
Curries
CU 01 PaneerMakhani
CU 02 Dal Makhani
CU 03 Navratan Curry
CU 04 Mushroom Mutter
CU 05 KadiPakoda
CU 06 Chana Masala
CU 07 Butter Chicken
CU 08 Chicken Korma
CU 09 Chicken Curry
CU 10 Fish Masala
CU 11 Egg Curry
CU 12 Onion Tomato Curry
CU 13 SeekhKabab Curry
Vegetables
UE01 Aloo Mutter
UE02 PalakPaneer
UE03 DahiKeAloo
UE04 Boil Potatoes
UE05 Blanch Tomatoes
UE06 Blanch Leafy Vegetables
UE07 Steamed Vegetables
UE08 AlooGobhi
UE09 Stuffed Capsicum
UE 10 Bhindi Masala
UE 11 KhatteBaingan
UE 12 Cabbage Mutter
UE 13 ZeeraAloo
UE 14 Mixed Vegetables
Desserts
dE01 Chocolate Sponge Cake
dE02 Banana Walnut Bread
dE03 Pineapple Cake
dE04 Sooji Biscuits
dE05 Choco Chip Cookies
dE06 GajarKaHalwa
19

Auto Cook Recipe # Recipe Name
dE 07 SoojiKaHalwa
dE 08 MeetheChawal
dE09 BesanKeLaddoo
dE 10 Dry Fruit Kheer
dE 11 SewaiPayasam
dE 12 Basundi
dE 13 Coconut Burfi
dE 14 Crème Caramel
dE 15 Fruit Custard
NOTE: Please use microwave safe glass utensils for the Grill and Convection modes as mentioned in the table.
20

BEVERAGES
bE 01 : Cardamom Tea
Ingredients For 2 Persons
(300 Ml)
For 4 Persons
(600 Ml)
Water 300 ml 600 Ml
Milk (chilled) 100 ml 200 Ml
Tea Leaves 1 teaspoon 2 teaspoons
Cinnamon Stick ½” 1”
Green Cardamoms 4 4-6
Dish / carafe size 1 litre 1.5 litre
Method
1. Pour the water, milk and spices into a microwave safe utensil.
2. Cover with the lid after removing the infuser (strainer).
3. Press 1 to select bE01.
4. Press weight button to select quantity as per requirement.
5. Press start.
6. Place the tea leaves in the infuser (strainer). Place inside the carafe. Press start.
7. Remove from the oven.
8. Sweeten to taste and serve hot.
bE 02: Coffee
Ingredients For 2 Persons
(300 Ml)
For 4 Persons
(600 Ml)
Milk (chilled) 300 ml 600 Ml
Instant Coffee Powder ½ teaspoon 1 teaspoon
Sugar to taste to taste
Dish / carafe size 1 litre 1.5 litre
Method
1. Pour the milk into a microwave safe utensil.
2. Press 1 repeatedly to select bE02.
3. Press weight button to select quantity.
4. Press start.
5. Remove from the oven.
6. Mix in the coffee powder and sweeten to taste.
7. Serve hot.
bE 03 : Boil Milk
Ingredients For 500 Ml For 1 Litre
Milk (Chilled) 500 Ml
Dish Size 1.5 Litre 2.5 Litre
Method
1. Pour chilled milk into a dish.
2. Press 1 repeatedly to select bE03.
3. Press weight button to select quantity.
4. Press start.
5. Remove from the oven..
6. Allow to cool for 5:00 minutes before using.
7. Cool completely and refrigerate until required.
1000MI
21

Note:
1. We have used chilled milk (straight out of the refrigerator) for your convenience.
2. Remember to use a dish of atleast 3 times the capacity of milk to be boiled from avoid the
milk from boiling over.
bE 04: Tomato Rasam
Ingredients For 2 Persons
(300 Ml)
For 4 Persons
(600 Ml)
Tamarind 25 grams 50 grams
Water 125 ml 250 ml
Tomatoes, chopped 60 grams 125 grams
Garlic, chopped 2 cloves 4 cloves
Mustard Seeds ¼ teaspoon ½ teaspoon
Peppercorns 3 -4 6 – 8
Cumin Seeds ¼ teaspoon ½ teaspoon
Dry Red Chillies 2 4
Curry leaves 4 – 6 4 – 6
Salt To taste To taste
Oil ½ tablespoon 1 tablespoon
Rasam Powder ½ teaspoon / to taste 1.5 teaspoon / to
taste
Water, extra 250 ml 500 Ml
Dish size 1 Litres 2 Litres
Method
1. Boil the tamarind with 250 ml water. Cool, strain and extract the pulp.
2. Pour the tamarind extract, tomatoes, garlic, salt and peppercorns in a dish.
3. Press 1 repeatedly to select bE04.
4. Press weight button to select quantity.
5. Press start.
6. When the microwave oven starts to beep, remove from the oven and strain.
7. Pour the oil into another dish. Add the cumin seeds, mustard seeds, curry leaves and dry red
chillies. Press start.
8. Add the strained extract, 500 ml water and Rasam powder. Mix and press start.
9. Remove from the oven.
10. Allow to cool for 2:00 minutes, before serving.
11. Serve hot with pappadums
bE 05: Cream of Spinach Soup
Ingredients For 2 Persons
(300 g rams)
For 4 Persons
(600 grams)
Onions, chopped 250 grams 50 grams
Tomatoes, chopped 75 grams 150 grams
Spinach Leaves, chopped 200 grams 400 grams
Water 125 ml 250 ml
Salt to taste to taste
Pepper Powder ½ teaspoon 1 teaspoon
22
 Loading...