

Page 1
®
MICROWAVE OVEN
Use & Care Guide
For questions about features, operation/performance
parts, accessories or service, call: 1-800-253-1301
or visit our website at...
www.whirlpool.com
Table of Contents.......................................2
8205085/3828W5A3932
Model MT4155SP
Page 2
TABLE OF CONTENTS
MICROWAVE OVEN SAFETY........................................................3
INSTALLATION INSTRUCTIONS..................................................5
Unpacking ....................................................................................5
Location Requirements................................................................5
Electrical Requirements ...............................................................5
PARTS AND FEATURES................................................................6
Turntable ......................................................................................6
MICROWAVE OVEN CONTROL....................................................6
Display..........................................................................................6
Start..............................................................................................6
Off-Cancel ....................................................................................6
JET START™ Feature ..................................................................7
Clock ............................................................................................7
Tones............................................................................................7
Timer.............................................................................................7
Child Lock ....................................................................................7
Demo Mode..................................................................................7
Options.........................................................................................7
MICROWAVE OVEN USE ..............................................................8
Food Characteristics....................................................................8
Cooking Guidelines......................................................................8
Cookware and Dinnerware ..........................................................9
Aluminum Foil and Metal .............................................................9
Cooking Power.............................................................................9
Cooking ......................................................................................10
Cooking in Stages......................................................................10
Popcorn......................................................................................10
Sensor Cooking..........................................................................11
Sensor Reheat............................................................................11
Defrosting...................................................................................12
Warm Hold .................................................................................12
MICROWAVE OVEN CARE..........................................................13
General Cleaning........................................................................13
TROUBLESHOOTING ..................................................................14
ASSISTANCE OR SERVICE.........................................................15
Replacement Parts.....................................................................15
Built-in Kits .................................................................................15
WARRANTY ..................................................................................16
®
2
Page 3
MICROWAVE OVEN SAFETY
Your safety and the safety of others are very important.
We have provided many important safety messages in this manual and on your appliance. Always read and obey all
safety messages.
This is the safety alert symbol.
This symbol alerts you to potential hazards that can kill or hurt you and others.
All safety messages will follow the safety alert symbol and either the word “DANGER” or
“WARNING.” These words mean:
You can be killed or seriously injured if you don't
immediately follow instructions.
can be killed or seriously injured if you don't
You
follow instructions.
All safety messages will tell you what the potential hazard is, tell you how to reduce the chance of injury, and tell you
what can
When using electrical appliances basic safety precautions should be followed, including the following:
WARNING: To reduce the risk of burns, electric
shock, fire, injury to persons or exposure to excessive
microwave energy:
■ Read all instructions before using the microwave
oven.
■ Read and follow the specific “PRECAUTIONS TO
AVOID POSSIBLE EXPOSURE TO EXCESSIVE
MICROWAVE ENERGY” found in this section.
■ The microwave oven must be grounded. Connect
only to properly grounded outlet. See “GROUNDING
INSTRUCTIONS” found in the “Installation
Instructions” section.
■ Install or locate the microwave oven only in
accordance with the installation instructions.
■ Some products such as whole eggs and sealed
containers – for example, closed glass jars – are
able to explode and should not be heated in the
microwave oven.
■ Use the microwave oven only for its intended use as
described in this manual. Do not use corrosive
chemicals or vapors in the microwave oven. This
type of oven is specifically designed to heat, cook,
or dry food. It is not designed for industrial or
laboratory use.
■ As with any appliance, close supervision is
necessary when used by children.
happen if the instructions are not followed.
IMPORTANT SAFETY INSTRUCTIONS
■
Do not operate the microwave oven if it has a
damaged cord or plug, if it is not working properly,
or if it has been damaged or dropped.
■
The microwave oven should be serviced only by
qualified service personnel. Call an authorized
service company for examination, repair or
adjustment.
■
Do not cover or block any openings on the
microwave oven.
■
Do not store the microwave oven outdoors. Do not
use the microwave oven near water – for example,
near a kitchen sink, in a wet basement, or near a
swimming pool, or similar locations.
■
Do not immerse cord or plug in water.
■
Keep cord away from heated surfaces.
■
Do not let cord hang over edge of table or counter.
■
See door surface cleaning instructions in the
“Microwave Oven Care” section.
■
Do not operate any heating or cooking appliance
beneath the microwave oven.
■
Do not mount microwave oven over or near any
portion of a heating or cooking appliance.
■
Do not mount over a sink.
■
Do not store anything directly on top of the
microwave oven surface when the microwave oven
is in operation.
SAVE THESE INSTRUCTIONS
3
Page 4
IMPORTANT SAFETY INSTRUCTIONS
To reduce the risk of fire in the oven cavity:
■
– Do not overcook food. Carefully attend the
microwave oven when paper, plastic, or other
combustible materials are placed inside the oven
to facilitate cooking.
– Remove wire twist-ties from paper or plastic bags
before placing bag in oven.
– If materials inside the oven ignite, keep oven
door closed, turn oven off, and disconnect the
power cord, or shut off power at the fuse or
circuit breaker panel.
– Do not use the cavity for storage purposes. Do not
leave paper products, cooking utensils, or food in
the cavity when not in use.
SAVE THESE INSTRUCTIONS
■
Liquids, such as water, coffee, or tea are able to be
overheated beyond the boiling point without appearing
to be boiling. Visible bubbling or boiling when the
container is removed from the microwave oven is not
always present. THIS COULD RESULT IN VERY HOT
LIQUIDS SUDDENLY BOILING OVER WHEN THE
CONTAINER IS DISTURBED OR A SPOON OR
OTHER UTENSIL IS INSERTED INTO THE LIQUID.
To reduce the risk of injury to persons:
– Do not overheat the liquid.
– Stir the liquid both before and halfway through
heating it.
– Do not use straight-sided containers with narrow
necks.
– After heating, allow the container to stand in the
microwave oven for a short time before removing
the container.
– Use extreme care when inserting a spoon or other
utensil into the container.
PRECAUTIONS TO AVOID POSSIBLE EXPOSURE TO
EXCESSIVE MICROWAVE ENERGY
(a) Do not attempt to operate this oven with the door
open since open-door operation can result in
harmful exposure to microwave energy. It is
important not to defeat or tamper with the
safety interlocks.
(b) Do not place any object between the oven front
face and the door or allow soil or cleaner residue
to accumulate on sealing surfaces.
This device complies with Part 18 of the FCC Rules.
(c) Do not operate the oven if it is damaged. It is
particularly important that the oven door close
properly and that there is no damage to the:
(1) Door (bent),
(2) Hinges and latches (broken or loosened),
(3) Door seals and sealing surfaces.
(d) The oven should not be adjusted or repaired by
anyone except properly qualified service personnel.
4
Page 5
INSTALLATION INSTRUCTIONS
Unpacking
1. Empty the microwave oven of any packing materials.
2. Clean the inside with a soft, damp cloth.
3. Check for damage, such as:
■ a door that is not lined up correctly
■ damage around the door, or
■ dents on the interior or exterior of the oven.
If there is any damage, do not operate the oven until a
designated service technician has checked it and made any
needed repairs.
Location Requirements
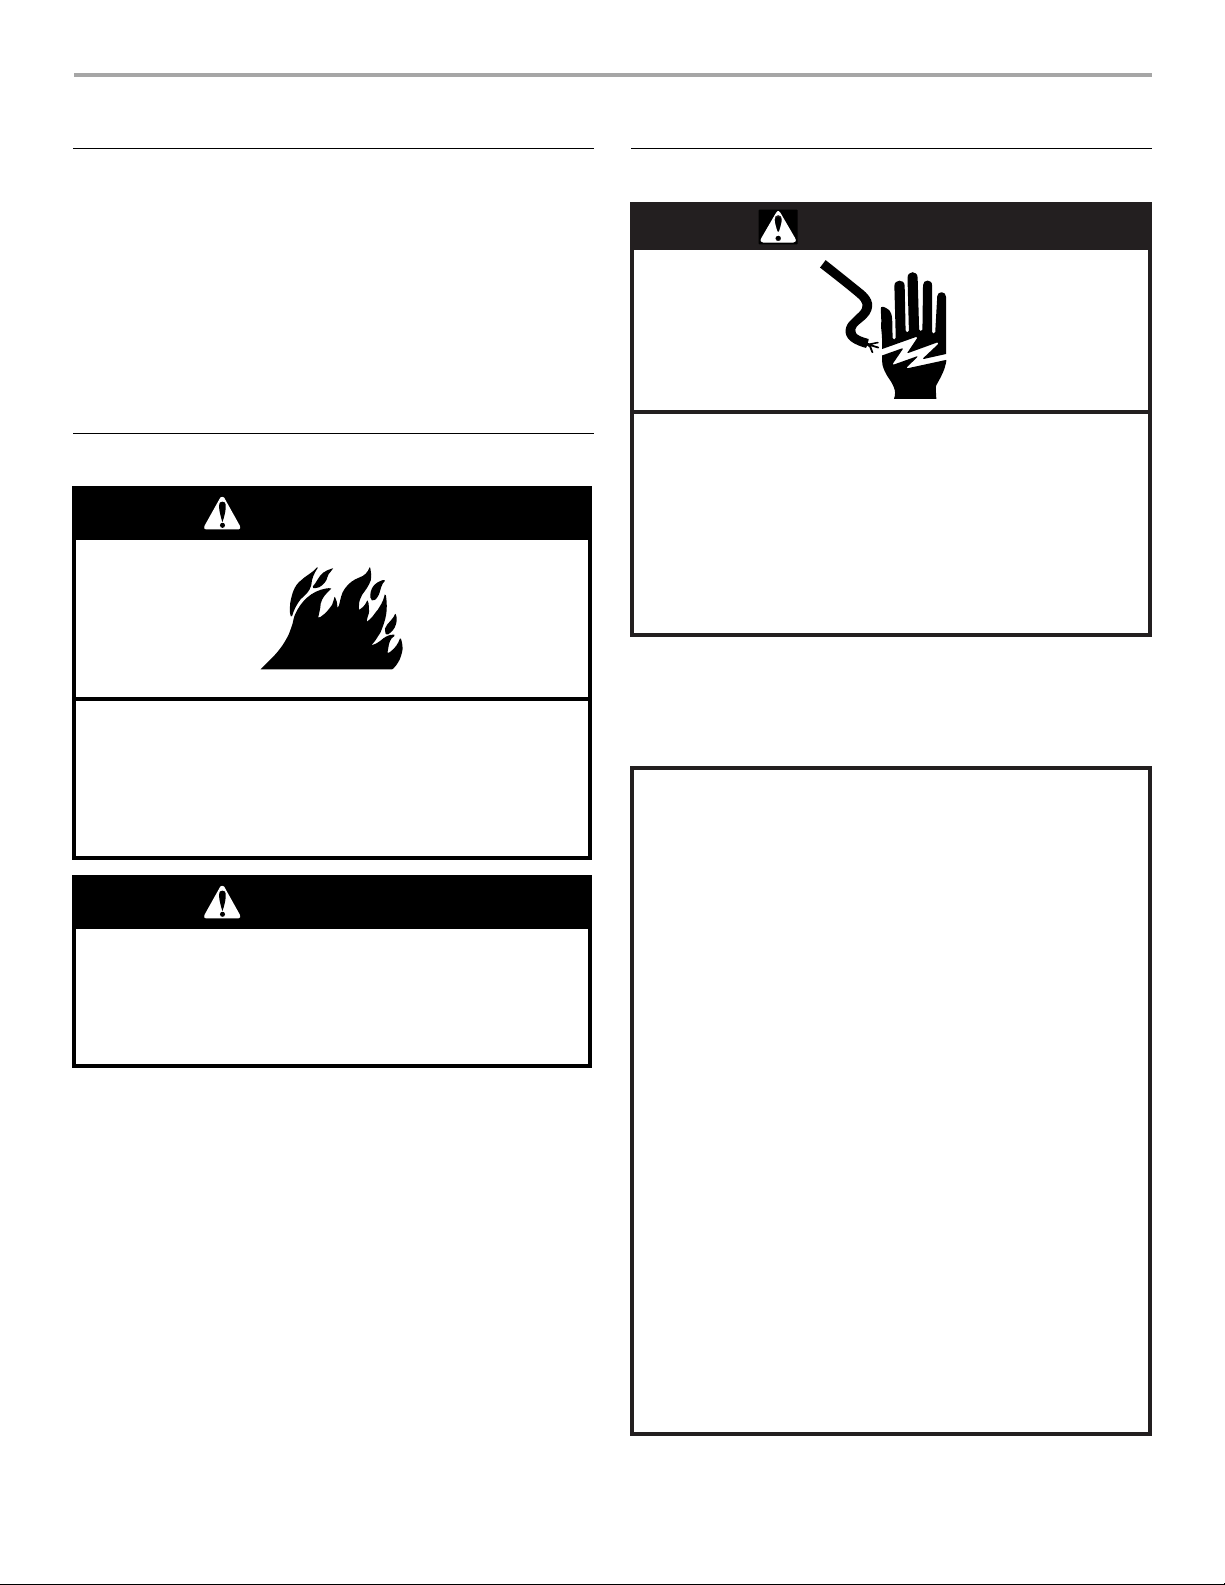
WARNING
Fire Hazard
Do not install the oven next to or over a heat
source without a UL approved trim kit.
Doing so can result in death, fire, or
electrical shock.
WARNING
Excessive Weight Hazard
Use two or more people to move and install
microwave oven.
Electrical Requirements
WARNING
Electrical Shock Hazard
Plug into a grounded 3 prong outlet.
Do not remove ground prong.
Do not use an adapter.
Do not use an extension cord.
Failure to follow these instructions can result in
death, fire, or electrical shock.
Observe all governing codes and ordinances. A 120-Volt, 60-Hz,
AC-only, 15- or 20-amp fused electrical supply (or circuit breaker)
is required. (A time-delay fuse is recommended.) It is
recommended that a separate circuit serving only this appliance
be provided.
GROUNDING INSTRUCTIONS
■ For all cord connected appliances:
The microwave oven must be grounded. In the event
of an electrical short circuit, grounding reduces the
risk of electric shock by providing an escape wire for
the electric current. The microwave oven is equipped
with a cord having a grounding wire with a grounding
plug. The plug must be plugged into an outlet that is
properly installed and grounded.
Failure to do so can result in back or other injury.
IMPORTANT: The control side of the unit is the heavy side. Use
care when handling the oven. The weight of the oven is more
than 35 lbs (15.9 kg).
■ Place the oven on a cart, counter, table or shelf that is strong
enough to hold the oven and the food and utensils you place
inside it.
■ The microwave oven should be at a temperature above 50°F
(10°C) for proper operation.
NOTE: Some models can be built into a wall or cabinet by using
one of the trim kits listed in the “Installation Instructions for BuiltIn Trim Kit.”
■ Do not block the exhaust vents or air intake openings. Allow a
few inches of space at the back of the oven where the
exhaust vents are located. Blocking the exhaust vents could
cause damage to the oven and poor cooking results.
■ Make sure the microwave oven legs are in place to ensure
proper airflow. If vents are blocked, a sensitive thermal safety
device may automatically turn the oven off. The oven should
work properly once it has cooled.
WARNING:
result in a risk of electric shock. Consult a qualified
electrician or serviceman if the
are not completely understood
whether the microwave oven is properly grounded.
Do not use an extension cord. If the power supply cord
is too short, have a qualified electrician or serviceman
install an outlet near the microwave oven.
■ For a permanently connected appliance:
This appliance must be connected to a grounded,
metallic, permanent wiring system, or an equipment
grounding conductor should be run with the circuit
conductors and connected to the equipment
grounding terminal or lead on the appliance.
Improper use of the grounding plug can
grounding instructions
, or if doubt exists as to
SAVE THESE INSTRUCTIONS
5
Page 6
PARTS AND FEATURES
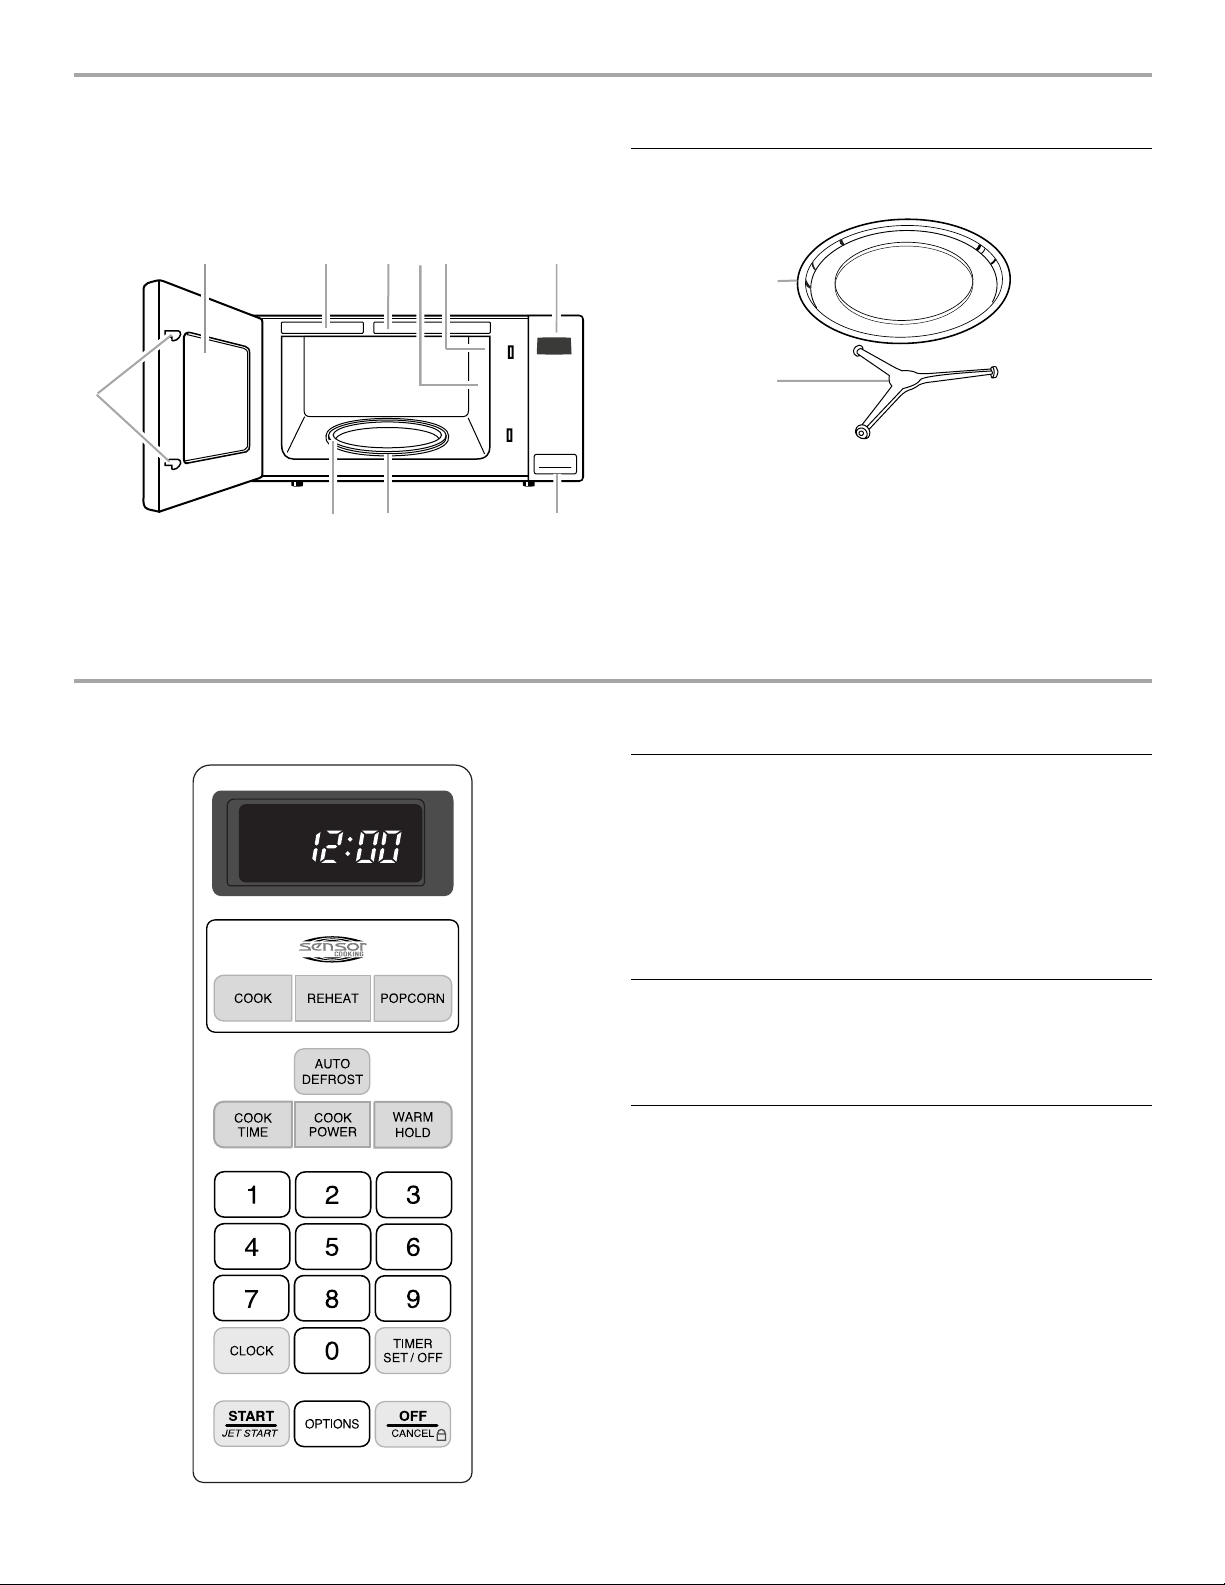
This manual may cover several different models. The model you
have purchased may have some or all of the features shown here.
The appearance of your particular model may differ slightly from
the illustrations in this manual.
Turntable
BCDE
A
A. Door safety lock system
B. Metal shielded window
C. Model and serial number plate
D. Cooking guide label
E. Microwave inlet cover
(not shown)
F
J
I
F. Microwave oven light
(not shown)
G. Control panel
H. One-touch door open button
I. Removable turntable support
J. Glass turntable
G
A
B
H
The turntable can rotate in either direction to help cook food
more evenly. Do not operate the oven without the turntable in
place. See “Assistance or Service” to reorder any of the parts.
To Install:
1. Place the support on the oven cavity bottom.
2. Place the turntable on the support.
MICROWAVE OVEN CONTROL
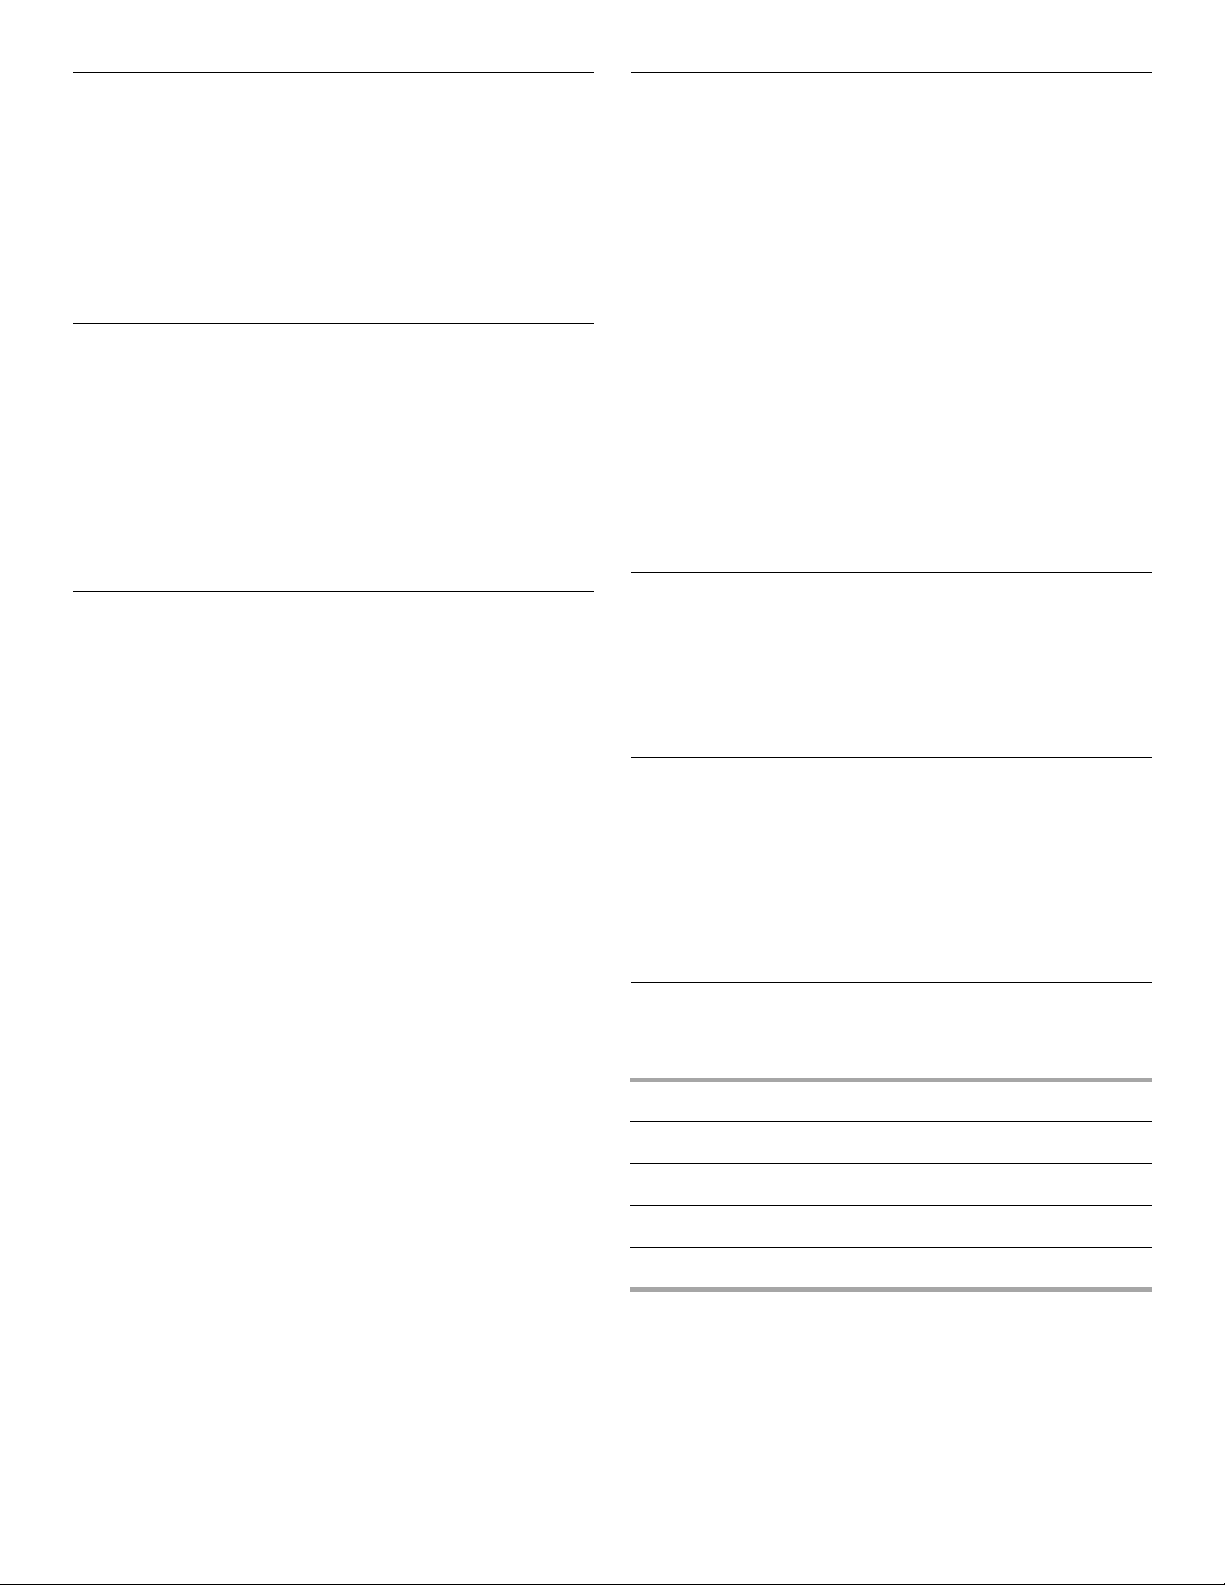
When power is first supplied to the microwave oven, “:” will
appear on the display. If the “:” appears on the display at any
other time, a power failure has occurred. Reset the clock if
needed.
When the microwave oven is in use, the display counts down the
remaining cook time. When the microwave oven is not in use, the
display shows the time of day (if the Clock is set) or Timer
countdown.
A. Turntable
B. Support
Display
Start
The START pad begins any function.
If cooking is interrupted, touching START will resume the preset
cycle (for non-sensor functions only).
Off-Cancel
The OFF-CANCEL pad clears any incorrect command and
cancels any program during cooking. It will not erase the time of
day.
The microwave oven will also turn off when the door is opened.
Close the door and touch START to resume the cycle (for nonsensor functions only).
6
Page 7
JET START™ Feature
Touch JET START™ control to automatically start the microwave
oven for a 30-second cook time at 100% cooking power. Each
additional touch of JET START™ control will add 30 seconds of
cook time, up to 3 minutes, then 1 minute of cook time up to
10 minutes.
While the oven is operating, touch JET START™ control to add
30 seconds of cook time at the set cooking power.
After a cycle ends, touch JET START™ control to add
30 seconds of cook time at 100% cooking power.
Clock
This is a 12-hour clock.
To S et:
Before setting, make sure the microwave oven and Timer are off.
1. Touch CLOCK.
2. Touch number pads to enter correct time of day.
3. Touch CLOCK.
The clock may be turned off using the OPTIONS pad. See
“Options” section.
Timer
The Timer can be set in minutes and seconds, up to 99 minutes
99 seconds, and counts down the set time.
NOTE: The Timer does not start or stop the microwave oven.
When the Timer is in use, the microwave oven can also operate.
To see the time count down for 5 seconds when the microwave
oven is in use, touch TIMER SET/OFF.
To S et:
1. Touch TIMER SET/OFF.
2. Touch number pads to enter desired time.
3. Touch TIMER SET/OFF or START, or allow the Timer to start
automatically after a brief delay.
When the set time ends, “TIMER END” will scroll across the
display and the end-of-Timer tones will sound.
4. Touch TIMER SET/OFF anytime to cancel the Timer.
Remember, touching the OFF-CANCEL pad will turn the
microwave oven off.
The time can be reset during the countdown by repeating the
above steps.
Tones
Tones are audible signals, indicating the following:
One tone
■ Valid entry (short tone)
■ Hidden feature entered (long tone)
Two tones
■ End of stage in multistage cooking
■ Invalid entry (short tones)
■ Every minute after end-of-cycle tones, as reminder
■ Hidden feature exited
Three tones
■ End of cycle
Five tones
■ End of Timer countdown
■ During DEFROST cycle, reminder to check, turn, rearrange,
or separate food
Tones may be disabled using the OPTIONS pad. See “Options”
section.
Child Lock
The Child Lock disables the control panel pads to prevent
unintended use of the microwave oven.
To Lock/Unlock Control: The microwave oven and Timer must
be off. Touch and hold OFF-CANCEL for 5 seconds until 1 tone
sounds and “LOCKED” appears on the display. Repeat to unlock
and clear the display (2 tones will sound).
Demo Mode
The Demo Mode is ideal for learning how to use the microwave
oven. When set, functions can be entered without actually turning
on the magnetron. The microwave oven light will come on, the
fan will run, the countdown will run very quickly in the display
and, if on, the turntable will rotate.
To Tu rn On /Off : The microwave oven and Timer must be off.
Touch and hold TIMER SET/OFF for 5 seconds until 1 tone
sounds. Repeat to turn off.
Options
Functions can be selected, and displays can be changed by
touching OPTIONS.
FUNCTION OPTION
Sound Turn on or off.
Clock Turn on or off.
Scroll Speed Change speed (slow, normal or fast).
Weight Change to standard (lbs) or metric (kgs).
To U se O pt ion s: Touch OPTIONS repeatedly to scroll through
the functions, then follow directions on the display.
7
Page 8

MICROWAVE OVEN USE
A magnetron in the oven produces microwaves which reflect off
the metal floor, walls and ceiling and pass through the turntable
and appropriate cookware to the food. Microwaves are attracted
to and absorbed by fat, sugar and water molecules in the food,
causing them to move, producing friction and heat which cooks
the food.
■ Do not lean on or allow children to swing on the oven door.
■ Do not operate microwave oven when it is empty.
■ The turntable must be in place and correct side up when
oven is in use. Do not use if turntable is chipped or broken.
See “Assistance or Service” section to reorder.
■ Baby bottles and baby food jars should not be heated in the
oven.
■ Clothes, flowers, fruit, herbs, wood, gourds, paper, including
brown paper bags and newspaper should not be dried in the
oven.
■ Do not use the microwave oven for canning, sterilizing or
deep frying. The oven cannot maintain appropriate
temperatures.
■ Paraffin wax will not melt in the oven because it does not
absorb microwaves.
■ Use oven mitts or pot holders when removing containers from
oven.
■ Do not overcook potatoes. At the end of the recommended
cook time, potatoes should be slightly firm. Let potatoes
stand for 5 minutes. They will finish cooking while standing.
■ Do not cook or reheat whole eggs inside the shell. Steam
buildup in whole eggs may cause them to burst. Cover
poached eggs and allow a standing time.
Cooking Guidelines
Covering
Covering food helps retain moisture, shorten cook time and
reduce spattering. Use the lid supplied with cookware. If a lid is
not available, wax paper, paper towels or plastic wrap approved
for microwave ovens may be used. Plastic wrap should be turned
back at one corner to provide an opening to vent steam.
Condensation on the door and cavity surfaces is normal during
heavy cooking.
Stirring and Turning
Stirring and turning redistributes heat evenly to avoid
overcooking the outer edges of food. Stir from outside to center.
If possible, turn food over from bottom to top.
Arranging
If heating irregularly shaped or different sized foods, the thinner
parts and smaller sizes should be arranged toward the center. If
cooking several items of the same size and shape, place them in
a ring pattern, leaving the center of the ring empty.
Piercing
Before heating, use a fork or small knife to pierce or prick foods
that have a skin or membrane, such as potatoes, egg yolks,
chicken livers, hot dogs, and sausage. Prick in several places to
allow steam to vent.
Shielding
Use small, flat pieces of aluminum foil to shield the thin pieces of
irregularly shaped foods, bones and foods such as chicken
wings, leg tips and fish tail. See “Aluminum Foil and Metal” first.
Food Characteristics
When microwave cooking, the amount, size and shape, starting
temperature, composition and density of the food affect cooking
results.
Amount of Food
The more food heated at once, the longer the cook time. Check
for doneness and add small increments of time if necessary.
Size and Shape
Smaller pieces of food will cook more quickly than larger pieces,
and uniformly shaped foods cook more evenly than irregularly
shaped food.
Starting Temperature
Room temperature foods will heat faster than refrigerated foods,
and refrigerated foods will heat faster than frozen foods.
Composition and Density
Foods high in fat and sugar will reach a higher temperature and
heat faster than other foods. Heavy, dense foods, such as meat
and potatoes, require a longer cook time than the same size of a
light, porous food, such as cake.
Standing Time
Food will continue to cook by the natural conduction of heat even
after the microwave cycle ends. The length of standing time
depends on the volume and density of the food.
8
Page 9
Cookware and Dinnerware
Cookware and dinnerware must fit on the turntable. Always use
oven mitts or pot holders when handling because any dish may
become hot from heat transferred from the food. Do not use
cookware and dinnerware with gold or silver trim. Use the
following chart as a guide, then test before using.
MATERIAL RECOMMENDATIONS
Aluminum Foil,
Metal
Browning Dish Bottom must be at least ³⁄₁₆" (5 mm) above
Ceramic Glass,
Glass
China,
Earthenware
Melamine Follow manufacturer’s recommendations.
Paper Towels,
Dinnerware,
Napkins
Plastic Wraps,
Bags, Covers,
Dinnerware,
Containers
Pottery and Clay Follow manufacturer’s recommendations.
Styrofoam* Do not use in oven.
Straw, Wicker,
Wooden
Containers
Wax Paper Acceptable for use.
To Test Cookware or Dinnerware for Microwave Use:
1. Put cookware or dinnerware in oven with 1 cup (250 mL) of
water beside it.
2. Cook at 100% cooking power for 1 minute.
Do not use cookware or dinnerware if it becomes hot and the
water stays cool.
See “Aluminum Foil and Metal” section.
the turntable. Follow manufacturer’s
recommendations.
Acceptable for use.
Follow manufacturer’s recommendations.
Use nonrecycled and those approved by
the manufacturer for microwave oven use.
Use those approved by the manufacturer
for microwave oven use.
Do not use in oven.
Do Not Use
Metal cookware and bakeware, gold, silver, pewter, nonapproved meat thermometers, skewers, twist ties, foil liners such
as sandwich wrappers, staples and objects with gold or silver
trim or a metallic glaze should not be used in the oven.
Cooking Power
Many recipes for microwave cooking specify which cooking
power to use by percent, name or number. For example,
70%=7=Medium-High.
Use the following chart as a general guide for the suggested
cooking power of specific foods.
PERCENT/
NAME
100%, High
(default setting)
90% 9 Cooking small tender pieces of
80% 8 Heating rice, pasta or
70%,
Medium-High
60% 6 Cooking sensitive foods such as
50%, Medium 5 Cooking ham, whole poultry and
NUMBER USE
10 Quick heating convenience
foods and foods with high water
content, such as soups,
beverages and most
vegetables.
meat, ground meat, poultry
pieces and fish fillets.
Heating cream soups.
casseroles.
Cooking and heating foods that
need a cook power lower than
high. For example, whole fish
and meat loaf.
7 Reheating a single serving of
food.
cheese and egg dishes,
pudding and custards.
Cooking non-stirrable
casseroles, such as lasagna.
pot roasts.
Simmering stews.
Aluminum Foil and Metal
Always use oven mitts or pot holders when removing dishes from
the microwave oven.
Aluminum foil and some metal can be used in the oven. If not
used properly, arcing (a blue flash of light) can occur and cause
damage to the oven.
OK for Use
Racks and bakeware supplied with the oven (on some models),
aluminum foil for shielding, and approved meat thermometers
may be used with the following guidelines:
■ Do not allow aluminum foil or metal to touch the inside cavity
walls, ceiling or floor.
■ Always use the turntable.
■ Do not allow contact with another metal object during
cooking.
40% 4 Melting chocolate.
Heating bread, rolls and
pastries.
30%, MediumLow, Defrost
20% 2 Softening butter, cheese, and
10%, Low 1 Taking chill out of fruit.
3 Defrosting bread, fish, meats,
poultry and precooked foods.
ice cream.
9
Page 10

Cooking
To U se:
1. Touch COOK TIME.
“STAGE 1 ENTER COOK TIME” will scroll across display.
Enter the length of time to cook.
If cooking with 100% power, skip Step 2.
2. Touch COOK POWER, then set the desired cooking power.
See “Cooking Power.”
3. Touch START.
When the cycle ends, “END” will appear in the display, and
the end-of-cycle tones will sound, followed by reminder
tones.
4. Touch OFF-CANCEL or open the door to clear the display.
Cooking in Stages
The oven can be set to cook at different cooking powers for
various lengths of time, up to 3 stages, plus a defrosting stage
and a warming stage. Cook settings can be used in any order,
except defrosting, which must be the first stage, and Warm Hold,
which must be the last stage.
To Cook in Stages:
1. Touch COOK TIME.
“STAGE 1 ENTER COOK TIME” will scroll across display.
Enter the length of time to cook during the 1st stage.
2. Touch COOK POWER, then enter the desired cooking power
for the 1st stage. See “Cooking Power.”
3. Repeat steps 1-4 for each additional stage.
Warm Hold may be programmed to follow the last stage.
4. Touch START.
Two tones will sound between stages.
When the cycle ends, “END” will appear in the display, and
the end-of-cycle tones will sound, followed by reminder
tones.
5. Touch OFF-CANCEL or open the door to clear the display
and/or stop reminder tones.
Cook time may be added in 30-second increments during the
cycling stage by touching JET START™ control.
Popcorn
Popcorn is a sensor function. The sensor determines the
appropriate popping time of commercially packaged
microwavable popcorn.
■ Do not use regular paper bags or glassware.
■ Pop only 1 package of popcorn at a time.
■ Follow manufacturer’s instructions when using a microwave
popcorn popper.
■ Listen for popping to slow to 1 pop every 1 or 2 seconds,
then stop the cycle. Do not try to pop unpopped kernels.
■ Use fresh bags of popcorn for optimal results.
■ Cooking results may vary by brand and fat content.
There are 2 popcorn functions: Regular and Snack. Use Regular
for bag sizes 3.5 oz (99 g) and 3.0 oz (85 g). Use Snack for sizes
1.75 oz (50 g) and smaller.
To Use POPCORN:
1. Place popcorn bag on the turntable.
2. Touch POPCORN once for Regular, or twice for Snack.
Touch START, or wait for the oven to start the popping cycle
automatically.
When the cycle ends, “END” will appear in the display, and
the end-of-cycle tones will sound, followed by reminder
tones.
3. Touch OFF-CANCEL or open the door to clear the display
and/or stop reminder tones.
10
Page 11
Sensor Cooking
A sensor in the microwave oven detects humidity released from
the food and automatically sets a cooking time based on the
selected pad.
Use the following chart as a guide.
Sensor Reheat
A sensor in the microwave oven detects humidity released from
the food and automatically sets a reheat time based on the
selection.
Use the following chart as a guide.
FOOD SERVING SIZE INSTRUCTIONS
Baked
Potatoes
Frozen
Vegetables
Fresh
Vegetables
Frozen
Entrée
Rice 0.5-2 cups
1-4 medium,
10-13 oz
(283-369 g) each
1-4 cups
(250 mL-1 L)
1-4 cups
(250 mL-1 L)
10-20 oz
(283-567 g)
(125-500 mL) dry
rice
(Use medium or
long grain rice.)
Pierce each one several
times with a fork. Place on
turntable around edges, at
least 1" (2.5 cm) apart. At
the end of cooking, let stand
5 minutes.
Remove from package.
Place in microwavable
container. Cover with plastic
wrap and vent. Stir and let
stand 2-3 minutes.
Place in microwavable
container and add 2-4 tbsp
(30-60 mL) water. Cover with
plastic wrap and vent. Stir
and let stand 2-3 minutes.
Remove from package.
Loosen cover on three sides.
If not in microwavable
container, place on plate,
cover with plastic wrap and
vent.
Follow measurements on
package for ingredient
amounts. Place rice and
liquid in microwavable dish.
Cover with loose-fitting lid.
At the end of cooking, allow
rice to stand for 5 minutes,
or until liquid is absorbed.
Stir.
FOOD SERVING SIZE/INSTRUCTIONS
Dinner Plate
(refrigerated)
Soup 1-4 cups (250 mL-1 L)
Sauce 1-4 cups (250 mL-1 L)
Casserole
(refrigerated)
8-16 oz (227-454 g)
Cover with plastic wrap and vent.
Cover with plastic wrap and vent.
Cover with plastic wrap and vent.
1-4 cups (250 mL-1 L)
Cover with plastic wrap and vent.
To U se Reh ea t:
Before using, make sure the microwave oven has been plugged
in for at least 3 minutes, the room temperature is not above 95°F
(35°C) and the outside of the container and microwave oven
cavity are dry.
1. Place food on the turntable and close the door.
2. Touch REHEAT until the desired food type is displayed.
The microwave oven will automatically turn on after a brief
delay.
When the cycle ends, “END” will appear in the display, and
the end-of-cycle tones will sound, followed by reminder
tones.
3. Touch OFF-CANCEL or open the door to clear the display
and/or stop reminder tones.
Fish
Seafood
0.25-2 lbs
(113-907 g)
Place in microwavable dish.
Cover with plastic wrap and
vent. At the end of cooking,
let stand for 2-3 minutes.
To Use Cook:
Before using, make sure the microwave oven has been plugged
in for at least 3 minutes, the room temperature is not above 95°F
(35°C) and the outside of the container and microwave oven
cavity are dry.
1. Place food on the turntable and close the door.
2. Touch COOK until the desired food type is displayed.
The microwave oven will automatically turn on after a brief
delay.
When the cycle ends, “END” will appear in the display, and
the end-of-cycle tones will sound, followed by reminder
tones.
3. Touch OFF-CANCEL or open the door to clear the display
and/or stop reminder tones.
11
Page 12
Defrosting
The Auto Defrost feature’s preset programs can be used or the
microwave oven can be manually set to defrost. To defrost
manually, use 30% cook power. Refer to a reliable cookbook for
defrosting information.
■ Food should be 0°F (-18°C) or colder at defrosting for optimal
results. How foods are stored can affect results.
■ Unwrap foods and remove lids (from fruit juice) before
defrosting.
■ Shallow packages will defrost more quickly than deep blocks.
■ Separate food pieces as soon as possible during or at the
end of the cycle for more even defrosting.
■ Use small pieces of aluminum foil to shield parts of food such
as chicken wings, leg tips and fish tails. See “Aluminum Foil
and Metal” first.
The Auto Defrost feature has preset times and cook powers for
3 categories: Meat, Poultry and Fish. It should not be used for
food left outside the freezer for more than 20 minutes, or for
frozen ready-made food. Use the following chart as a guide.
MEAT
Beef: ground, steaks, roast,
stew
Lamb: stew and chops
Pork: chops, ribs, roasts,
sausage
POULTRY
The narrow or fatty areas of
irregular shaped cuts should
be shielded with foil before
defrosting.
Do not defrost less than ¹⁄₄ lb
(113 g) or two 4 oz (113 g)
patties.
Place all meats in
microwavable baking dish.
Warm Hold
WARNING
Food Poisoning Hazard
Do not let food sit in oven more than one hour
before or after cooking.
Doing so can result in food poisoning or
sickness.
Hot cooked food can be kept warm in the microwave oven. Warm
Hold can be used by itself or can be programmed to follow a
cooking cycle. Opening the door during Warm Hold will cancel
the function.
To U se:
Put hot cooked food in the oven. Cover plates of food and foods
that were cooked covered. Pastries, pies, turnovers, etc. should
remain uncovered.
1. Touch WARM HOLD.
2. Touc h STA RT.
“WARM” will appear in the display during the entire cycle.
When the cycle ends, “END” will appear in the display, and
the end-of-cycle tones will sound, followed by reminder
tones.
3. Touch OFF-CANCEL or open the door to clear the display
and/or stop reminder tones.
To Set at end of cycle: Touch WARM HOLD while setting a
cooking cycle before touching START, or during cooking.
Chicken: whole and cut up Place in microwavable baking
Cornish hens
Tur ke y: breast
FISH
Fillets, Steaks, Whole Shellfish Place in microwavable baking
dish, chicken breast side up.
Remove giblets from whole
chicken.
dish.
To Use Auto Defrost:
1. Touch AUTO DEFROST.
The display will show the setting for defrosting Meat. Touch
AUTO DEFROST a second time for the Poultry setting, and a
third time for the Fish setting.
2. Touch the number pads to enter the weight.
Weight can be set from 0.1 lb to 6.0 lbs (45 g to 2.7 kg).
3. Touch START.
The display will count down the defrost time.
During defrosting, 5 short tones will sound. These tones
indicate it is time to check, turn, rearrange, or separate food.
Open door, turn food if necessary, close door, and touch
START to resume defrosting.
When the cycle ends, “END” will appear in the display, and
the end-of-cycle tones will sound, followed by reminder
tones.
4. Touch OFF-CANCEL or open the door to clear the display
and/or stop reminder tones.
12
Page 13

MICROWAVE OVEN CARE
General Cleaning
IMPORTANT: Before cleaning, make sure all controls are off and
the oven is cool. Always follow label instructions on cleaning
products.
Soap, water and a soft cloth or sponge are suggested first unless
otherwise noted.
OVEN CAVITY
Do not use soap-filled scouring pads, abrasive cleaners, steelwool pads, gritty washcloths or some recycled paper towels.
Damage may occur.
On stainless steel models, rub in direction of grain to avoid
damaging.
The area where the oven door and frame touch when closed
should be kept clean.
Average soil
■ Mild, nonabrasive soaps and detergents:
Rinse with clean water and dry with soft, lint-free cloth.
Heavy soil
■ Mild, nonabrasive soaps and detergents:
Heat 1 cup (250 mL) of water for 2 to 5 minutes in oven.
Steam will soften soil. Rinse with clean water and dry with
soft, lint-free cloth.
Odors
■ Lemon juice or vinegar:
Heat 1 cup (250 mL) of water with 1 tbsp (15 mL) of either
lemon juice or vinegar for 2 to 5 minutes in oven.
Microwave Inlet Cover
The microwave inlet cover (see “Parts and Features”) should be
kept clean to avoid arcing and oven damage.
■ Wipe with wet cloth.
OVEN DOOR AND EXTERIOR
The area where the oven door and frame touch when closed
should be kept clean.
■ Mild, nonabrasive soaps and detergents:
Rinse with clean water and dry with soft, lint-free cloth.
■ Glass cleaner and paper towels or nonabrasive plastic
scrubbing pad:
Apply glass cleaner to towel, not directly to surface.
TURNTABLE
Replace turntable immediately after cleaning. Do not operate the
microwave oven without the turntable in place.
■ Mild cleanser and scouring pad
■ Dishwasher
13
Page 14
TROUBLESHOOTING
Try the solutions suggested here first in order to avoid the cost of an unnecessary service call.
Nothing will operate
■ Has a household fuse blown or has a circuit breaker
tripped?
Replace the fuse or reset the circuit.
Oven will not operate
■ Is the door completely closed?
Firmly close door.
■ Is a spacer (on some models) attached to the inside of the
door?
Remove spacer and then firmly close door.
■ Is the electronic oven control set correctly?
See “Microwave Oven Control” section.
■ On some models, is the Child Lock set?
See “Child Lock” section.
■ Is the magnetron working properly?
Try to heat 1 cup (250 mL) of cold water for 2 minutes at
100% cooking power. If water does not heat, call for service.
See “Assistance or Service” section.
Oven makes humming noise
■ This is normal and occurs when the power supply switches
the magnetron on and off.
Oven door looks wavy
■ This is normal and will not affect performance.
Turntable will not operate
■ Is the turntable properly in place?
Make sure turntable is correct side up and is sitting securely
on the turntable support.
■ Is the turntable support operating properly?
Remove turntable. Remove and replace turntable support.
Replace turntable. Place 1 cup (250 mL) of water on the
turntable, then restart oven. If it still is not working, call for
service. See “Assistance or Service” section. Do not operate
the oven without turntable and turntable support working
properly.
Display shows messages
■ Is the display showing “:”?
There has been a power failure or the Clock time has been
turned off. See “Display” section to clear display. See “Clock”
section to reset or turn on Clock.
Fan running slower than usual
■ Has the oven been stored in a cold area?
The fan will run slower until the oven warms up to normal
room temperature.
Cooking times seem too long
■ Is the cooking power set properly?
See “Cooking Power” section.
■ Are large amounts of food being heated?
Larger amounts of food need longer cooking times.
■ Is the incoming voltage less than specified in “Microwave
Oven Safety?”
Have a qualified electrician check the electrical system in the
home.
Radio or TV Interference
■ Is the microwave oven plugged into the same outlet?
Try a different outlet.
■ Is the radio or TV receiver near the microwave oven?
Move the receiver away from the microwave oven, or adjust
the radio or TV antenna.
■ Are the microwave oven door and sealing surfaces clean?
Make sure these areas are clean.
Turntable rotates in both directions
■ This is normal and depends on motor rotation at the
beginning of the cycle.
14
Page 15
ASSISTANCE OR SERVICE
Before calling for assistance or service, please check
“Troubleshooting.” It may save you the cost of a service call. If
you still need help, follow the instructions below.
When calling, please know the purchase date and the complete
model and serial number of your appliance. This information will
help us to better respond to your request.
Tur nt ab le
Part No. 8205147
Replacement Parts
Turn ta bl e S u pport /
Roller Assembly
Part No. 8205148
Turntable Rollers
Part No. 8205149
If you need replacement parts
If you need to order replacement parts, we recommend that you
use only FSP
right and work right because they are made with the same
precision used to build every new WHIRLPOOL
To locate FSP
Interaction Center telephone number or your nearest Whirlpool
designated service center.
®
replacement parts. FSP
®
replacement parts in your area, call our Customer
®
replacement parts will fit
®
appliance.
In the U.S.A.
Call the Whirlpool Customer Interaction Center
toll free: 1-800-253-1301.
Our consultants provide assistance with:
■ Features and specifications on our full line of appliances.
■ Installation information.
■ Use and maintenance procedures.
■ Accessory and repair parts sales.
■ Specialized customer assistance (Spanish speaking, hearing
impaired, limited vision, etc.).
■ Referrals to local dealers, repair parts distributors, and
service companies. Whirlpool designated service technicians
are trained to fulfill the product warranty and provide afterwarranty service, anywhere in the United States.
To locate the Whirlpool designated service company in your
area, you can also look in your telephone directory Yellow
Pages.
Built-in Kits
This countertop microwave oven can be built in by using one of
the following trim kits*. These kits are available from the dealer or
can be ordered by kit model number. See “Assistance or Service”
section for the Whirlpool Customer Interaction Center’s toll-free
number.
KIT
SIZE
24"
(61 cm)
27"
(69 cm)
30"
(76 cm)
*Approved, electric single microwave ovens only
KIT MODEL NUMBERS/
COLORS
MK1154XPQ / White
MK1154XPB / Black
MK1154XPT / Biscuit
MK1154XPS / Stainless
MK1157XPQ / White
MK1157XPB / Black
MK1157XPT / Biscuit
MK1157XPS / Stainless
MK1150XPQ / White
MK1150XPB / Black
MK1150XPT / Biscuit
MK1150XPS / Stainless
FOR INSTALLATION
OVER OVEN MODELS
RBS240PD
RBS245PD
RBS275PD
GBS277PD
RBS305PD
GBS307PD
For further assistance
If you need further assistance, you can write to Whirlpool
Corporation with any questions or concerns at:
Whirlpool Brand Home Appliances
Customer Interaction Center
553 Benson Road
Benton Harbor, MI 49022-2692
Please include a daytime phone number in your correspondence.
15
Page 16
WHIRLPOOL® MICROWAVE OVEN WARRANTY
ONE-YEAR FULL WARRANTY
For one year from the date of purchase, when this appliance is operated and maintained according to instructions attached to or
furnished with the product, Whirlpool Corporation will pay for FSP
materials or workmanship. Service must be provided by a Whirlpool designated service company.
SECOND THROUGH FIFTH YEAR LIMITED WARRANTY ON MAGNETRON TUBE
In the second through fifth years from the date of purchase, when this appliance is operated and maintained according to instructions
attached to or furnished with the product, Whirlpool Corporation will pay for FSP
if defective in materials or workmanship.
Whirlpool Corporation will not pay for:
1. Service calls to correct the installation of your appliance, to instruct you how to use your appliance, to replace house fuses or
correct house wiring, or to replace owner-accessible light bulbs.
2. Repairs when your appliance is used in other than normal, single-family household use.
3. In-home service. Your microwave oven must be taken to a Whirlpool designated service company.
4. Damage resulting from accident, alteration, misuse, abuse, fire, flood, improper installation, acts of God or use of products not
approved by Whirlpool Corporation.
5. Repairs to parts or systems resulting from unauthorized modifications made to the appliance.
6. Replacement parts or repair labor costs for units operated outside the United States.
7. Any labor costs during the limited warranty period.
WHIRLPOOL CORPORATION SHALL NOT BE LIABLE FOR INCIDENTAL OR CONSEQUENTIAL DAMAGES.
Some states do not allow the exclusion or limitation of incidental or consequential damages, so this exclusion or limitation may not
apply to you. This warranty gives you specific legal rights and you may also have other rights which may vary from state to state.
Outside the 50 United States this warranty does not apply. Contact your authorized Whirlpool dealer to determine if another
warranty applies.
If you need service, first see the “Troubleshooting” section of this book. After checking “Troubleshooting,” additional help can be found
by checking the “Assistance or Service” section or by calling the Whirlpool Customer Interaction Center, 1-800-253-1301 (toll-free),
from anywhere in the U.S.A.
®
replacement parts and repair labor costs to correct defects in
®
replacement parts for the microwave magnetron tube
5/00
Keep this book and your sales slip together for future
reference. You must provide proof of purchase or installation
date for in-warranty service.
Write down the following information about your appliance to
better help you obtain assistance or service if you ever need it.
You will need to know your complete model number and serial
number. You can find this information on the model and serial
number label/plate, located on your appliance as shown in the
“Parts and Features” section.
Dealer name____________________________________________________
Address ________________________________________________________
Phone number __________________________________________________
Model number __________________________________________________
Serial number __________________________________________________
Purchase date __________________________________________________
8205085/3828W5A3932
© 2004 Whirlpool Corporation.
All rights reserved.
® Registered Trademark/TM Trademark of Whirlpool, U.S.A.
*Styrofoam is a Registered Trademark of The Dow Chemical Company.
Printed in China
5/04
 Loading...