

Page 1
Microwave Ovens
A Note to You.............. 2
Microwave Oven
Safety....................... 3-4
Installation
Instructions................. 5
Getting to Know Your
Microwave Oven......... 7
Standard Microwave
Cooking .................... 18
Sensor Cooking ........ 30
Caring for Your
Microwave Oven....... 33
Cooking Guide.......... 34
Questions and
Answers .................... 39
MODELS MT1135SG MT1195SG
PART NO. 3828W5A0589/4359605
Troubleshooting........ 40
Requesting
Assistance or
Service ...................... 42
Index ......................... 43
Warranty ................... 44
1-800-253-1301
Call our Consumer Assistance Center
with questions or comments.
Page 2
A NOTE TO YOU
Thank you for buying a WHIRLPOOL® appliance.
The Whirlpool Brand is committed to designing quality
products that consistently perform for you to make
your life easier. To ensure that you enjoy years of
trouble-free operation, we developed this Use and
Care Guide. It is full of valuable information about how
to operate and maintain your appliance properly and
safely. Please read it carefully.
Also, complete and mail the Product Registration
Card provided with your appliance. The card helps
us notify you about any new information on
your appliance.
Please record your model’s information.
Whenever you call to request service for your appliance, you need to know your complete model number
and serial number. You can find this information on the
model and serial number label/plate (see the diagram
in the “Getting to Know” section). Also, record the
other information shown in the next column.
Look for these tips!
Look for these Time Smart Tips located
throughout your Use and Care Guide. They
will help you save time and make the most
of your new appliance.
Model Number __________________________________
Serial Number ___________________________________
Purchase Date __________________________________
Dealer Name ____________________________________
Dealer Address __________________________________
Dealer Phone ___________________________________
Keep this book and the sales slip together in a safe place for future reference.
Our Consumer Assistance Center number is toll free.
To find detailed product information, the location of the nearest Whirlpool dealer or authorized servicer, to
purchase an accessory item, or register your appliance on-line, please visit our Web site at
www.whirlpool.com
1-800-253-1301
2
Page 3
MICROWAVE OVEN SAFETY
Your safety and the safety of others is very important.
We have provided many important safety messages in this manual and on your appliance. Always read and
obey all safety messages.
This is the safety alert symbol.
This symbol alerts you to hazards that can kill or hurt you and others.
All safety messages will be preceded by the safety alert symbol and the word “DANGER” or
“WARNING.” These words mean:
You will be killed or seriously injured if you don’t
wDANGER
wWARNING
All safety messages will identify the hazard, tell you how to reduce the chance of injury, and tell you what can
happen if the instructions are not followed.
IMPORTANT SAFETY INSTRUCTIONS
When using electrical appliances basic safety precautions should be followed, including the following:
follow instructions.
You can be killed or seriously injured if you don’t
follow instructions.
WARNING – To reduce the risk of burns,
electric shock, fire, injury to persons or exposure
to excessive microwave energy:
Read all instructions before using the
•
microwave oven.
Read and follow the specific “PRECAUTIONS TO
•
AVOID POSSIBLE EXPOSURE TO EXCESSIVE
MICROWAVE ENERGY” found in this section.
The microwave oven must be grounded. Connect
•
only to properly grounded outlet. See “GROUNDING INSTRUCTIONS” found in the “Installation
Instructions” section.
Install or locate the microwave oven only in
•
accordance with the installation instructions.
Some products such as whole eggs and sealed
•
containers – for example, closed glass jars –
may explode and should not be heated in the
microwave oven.
Use the microwave oven only for its intended use
•
as described in this manual. Do not use corrosive
chemicals or vapors in the microwave oven. This
type of oven is specifically designed to heat, cook,
or dry food. It is not designed for industrial or
laboratory use.
As with any appliance, close supervision is
•
necessary when used by children.
Do not operate the microwave oven if it has a
•
damaged cord or plug, if it is not working properly,
or if it has been damaged or dropped.
The microwave oven should be serviced only by
•
qualified service personnel. Call an authorized
service company for examination, repair or
adjustment.
Do not cover or block any openings on the
•
microwave oven.
Do not store the microwave oven outdoors. Do
•
not use the microwave oven near water – for
example, near a kitchen sink, in a wet basement,
or near a swimming pool, and the like.
Do not immerse cord or plug in water.
•
Keep cord away from heated surfaces.
•
Do not let cord hang over edge of table or
•
counter.
See door surface cleaning instructions in the
•
“Caring for Your Microwave Oven” section.
– SAVE THESE INSTRUCTIONS –
continued on next page
3
Page 4
MICROWAVE OVEN SAFETY
IMPORTANT SAFETY INSTRUCTIONS
Do not mount over a sink.
•
Do not store anything directly on top of the
•
microwave oven surface when the microwave
oven is in operation.
To reduce the risk of fire in the oven cavity:
•
– Do not overcook food. Carefully attend the
microwave oven if paper, plastic, or other
combustible materials are placed inside the
oven to facilitate cooking.
PRECAUTIONS TO AVOID POSSIBLE EXPOSURE TO
– Remove wire twist-ties from paper or plastic
bags before placing bag in oven.
– If materials inside the oven should ignite, keep
oven door closed, turn oven off, and disconnect the power cord, or shut off power at the
fuse or circuit breaker panel.
– Do not use the cavity for storage purposes. Do
not leave paper products, cooking utensils, or
food in the cavity when not in use.
– SAVE THESE INSTRUCTIONS –
EXCESSIVE MICROWAVE ENERGY
(a)Do not attempt to operate this oven with the door
open since open-door operation can result in
harmful exposure to microwave energy. It is
important not to defeat or tamper with the safety
interlocks.
(b)Do not place any object between the oven front
face and the door or allow soil or cleaner residue
to accumulate on sealing surfaces.
(c) Do not operate the oven if it is damaged. It is
particularly important that the oven door close
properly and that there is no damage to the:
(1) door (bent),
(2) hinges and latches (broken or loosened),
(3) door seals and sealing surfaces.
(d) The oven should not be adjusted or repaired by
anyone except properly qualified service personnel.
4
Page 5
INSTALLATION INSTRUCTIONS
Before you begin operating the oven, carefully read the following instructions.
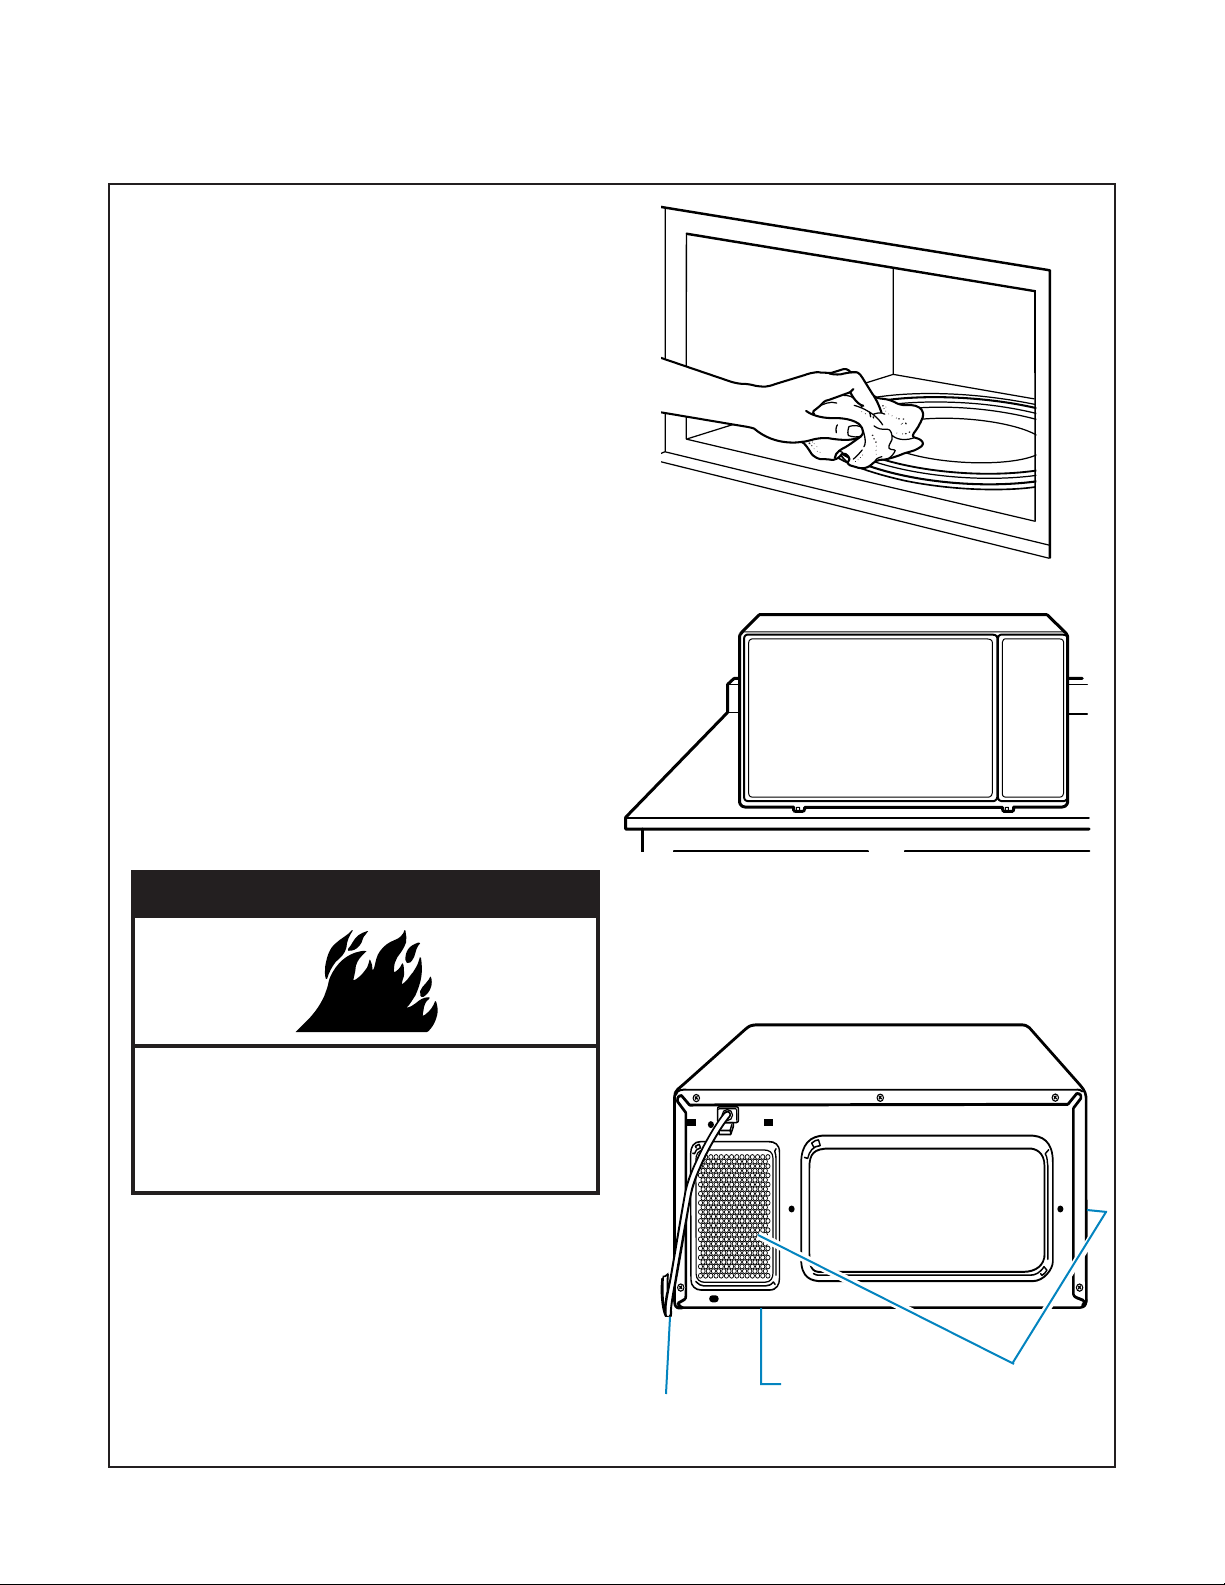
1. Empty the microwave oven and clean inside it
with a soft, damp cloth. Check for damage such
as a door that isn’t lined up correctly, damage
around the door, or dents inside the oven or
on the exterior. If there is any damage, do not
operate the oven until an authorized service
technician has checked it and made any
needed repairs.
2. Put the oven on a cart, counter, table, or shelf
that is strong enough to hold the oven and the
food and utensils you put in it. (The control side
of the unit is the heavy side. Use care when
handling the oven.) The weight of the oven is
about 40 lbs. The microwave oven should be at
a temperature above 50°F for proper operation.
NOTE: You can build your microwave oven into
a wall or cabinet by using one of the trim kits
listed in the “Built-in kits” section.
wWARNING
Fire Hazard
Do not install the oven next to or over a heat
source without a UL approved trim kit.
Doing so can result in death, fire,
or electrical shock.
NOTE: Do not block the exhaust vents or air intake
openings. Allow a few inches of space at the back
and side of the oven where the exhaust vents are
located. Blocking the exhaust vents could cause
damage to the oven and poor cooking results.
Make sure the microwave oven legs are in place
to ensure proper airflow. If vents are blocked, a
sensitive thermal safety device automatically turns
the oven off. The oven will not work until it has
cooled enough.
Power
supply cord
Air intake
openings (on
bottom in front)
Exhaust vents
(on side and
in rear)
5
Page 6
INSTALLATION INSTRUCTIONS
ELECTRICAL REQUIREMENTS
Observe all governing codes and ordinances.
A 120 Volt, 60 Hz, AC only, 15 amp fused electrical
supply is required. (A time-delay fuse is recommended.) It is recommended that a separate
circuit serving only this appliance be provided.
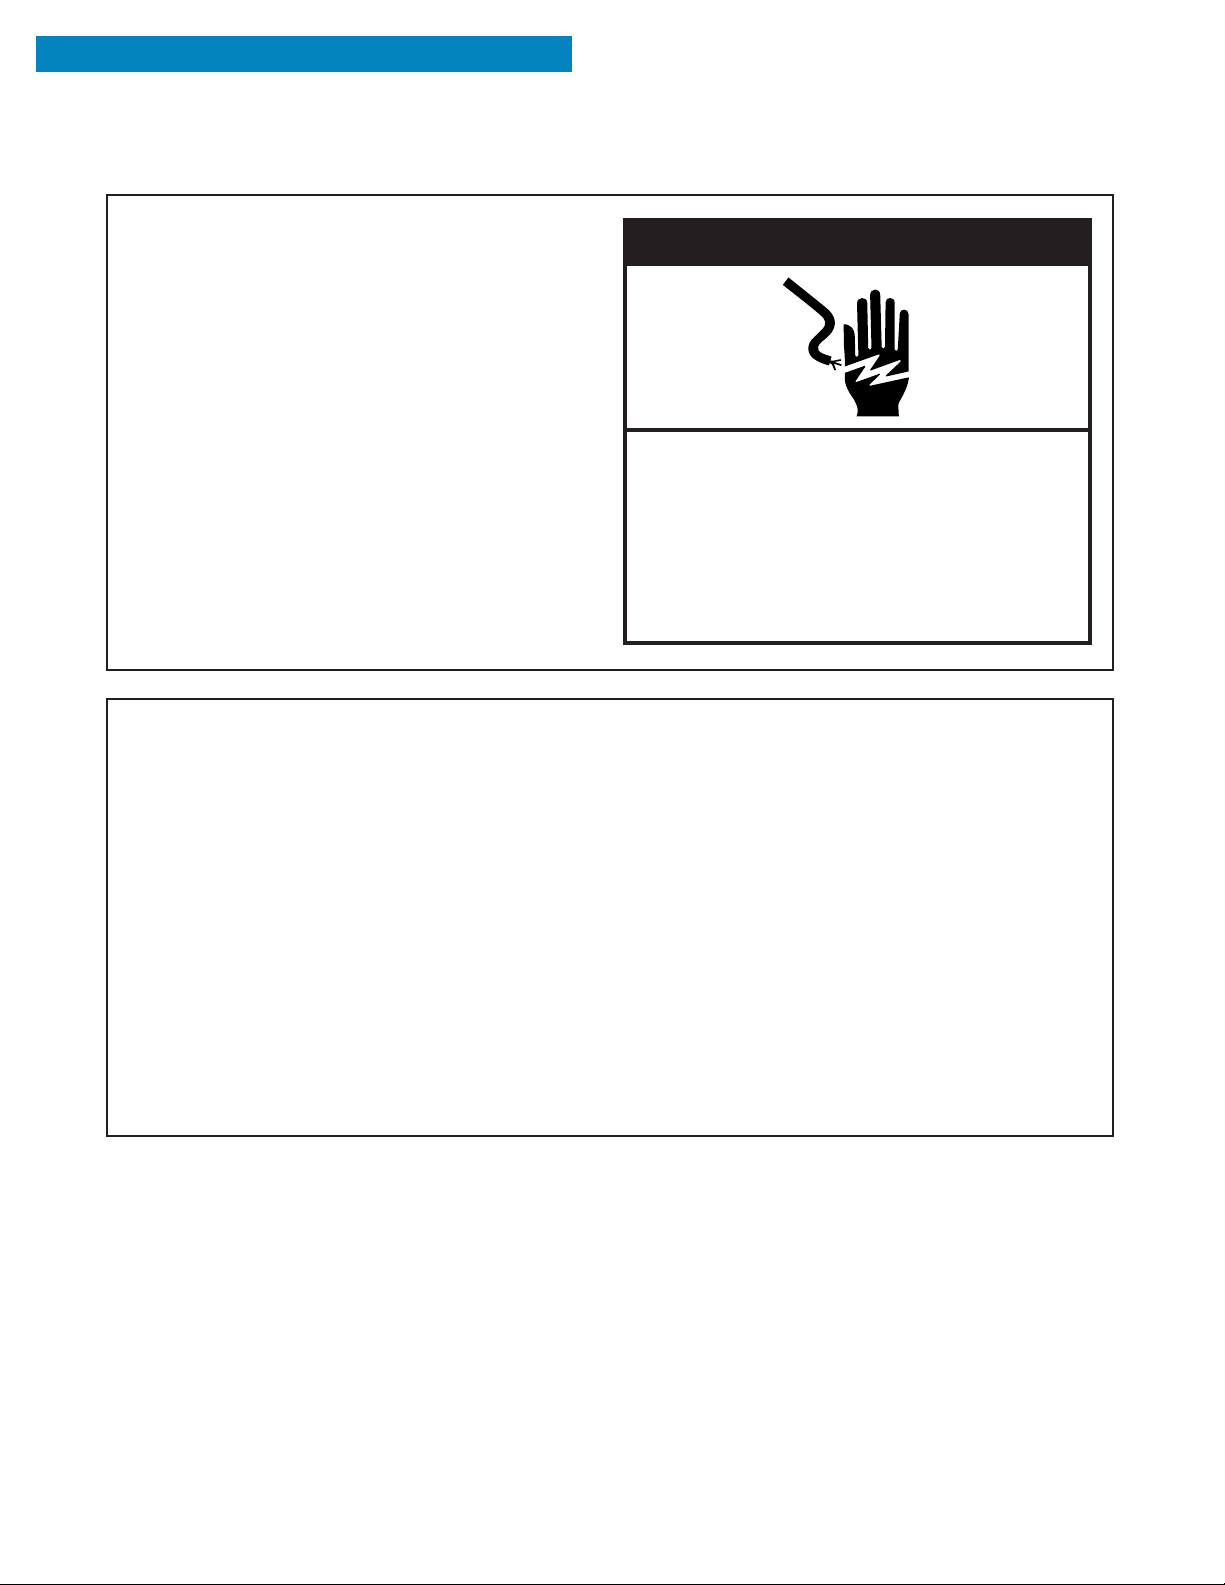
wWARNING
Electrical Shock Hazard
Plug into a grounded 3 prong outlet.
Do not remove ground prong.
Do not use an adapter.
Do not use an extension cord.
Failure to follow these instructions can
result in death, fire, or electrical shock.
GROUNDING INSTRUCTIONS
For all cord connected appliances:
The microwave oven must be grounded. In the event
of an electrical short circuit, grounding reduces the
risk of electric shock by providing an escape wire
for the electric current. The microwave oven is
equipped with a cord having a grounding wire with
a grounding plug. The plug must be plugged into
an outlet that is properly installed and grounded.
WARNING – Improper use of the grounding can
result in a risk of electric shock.
Consult a qualified electrician or serviceman if the
grounding instructions are not completely understood
or if doubt exists as to whether the microwave oven
is properly grounded.
Do not use an extension cord. If the power supply
cord is too short, have a qualified electrician or
serviceman install an outlet near the microwave oven.
For a permanently connected appliance:
The microwave oven must be connected to a
grounded, metallic, permanent wiring system, or an
equipment grounding conductor should be run with
the circui
grounding terminal or lead on the microwave oven.
,
t conductors and connected to the equip
ment
6
Page 7
GETTING TO KNOW YOUR MICROWAVE OVEN
This section discusses the concepts behind microwave cooking. It also shows you the basics
you need to know to operate your microwave oven. Please read this information before you use
your oven.
wWARNING
Explosion Hazard
Do not store flammable materials such as gasoline near the microwave oven.
Doing so can result in death, explosion, or fire.
HOW YOUR MICROWAVE OVEN WORKS
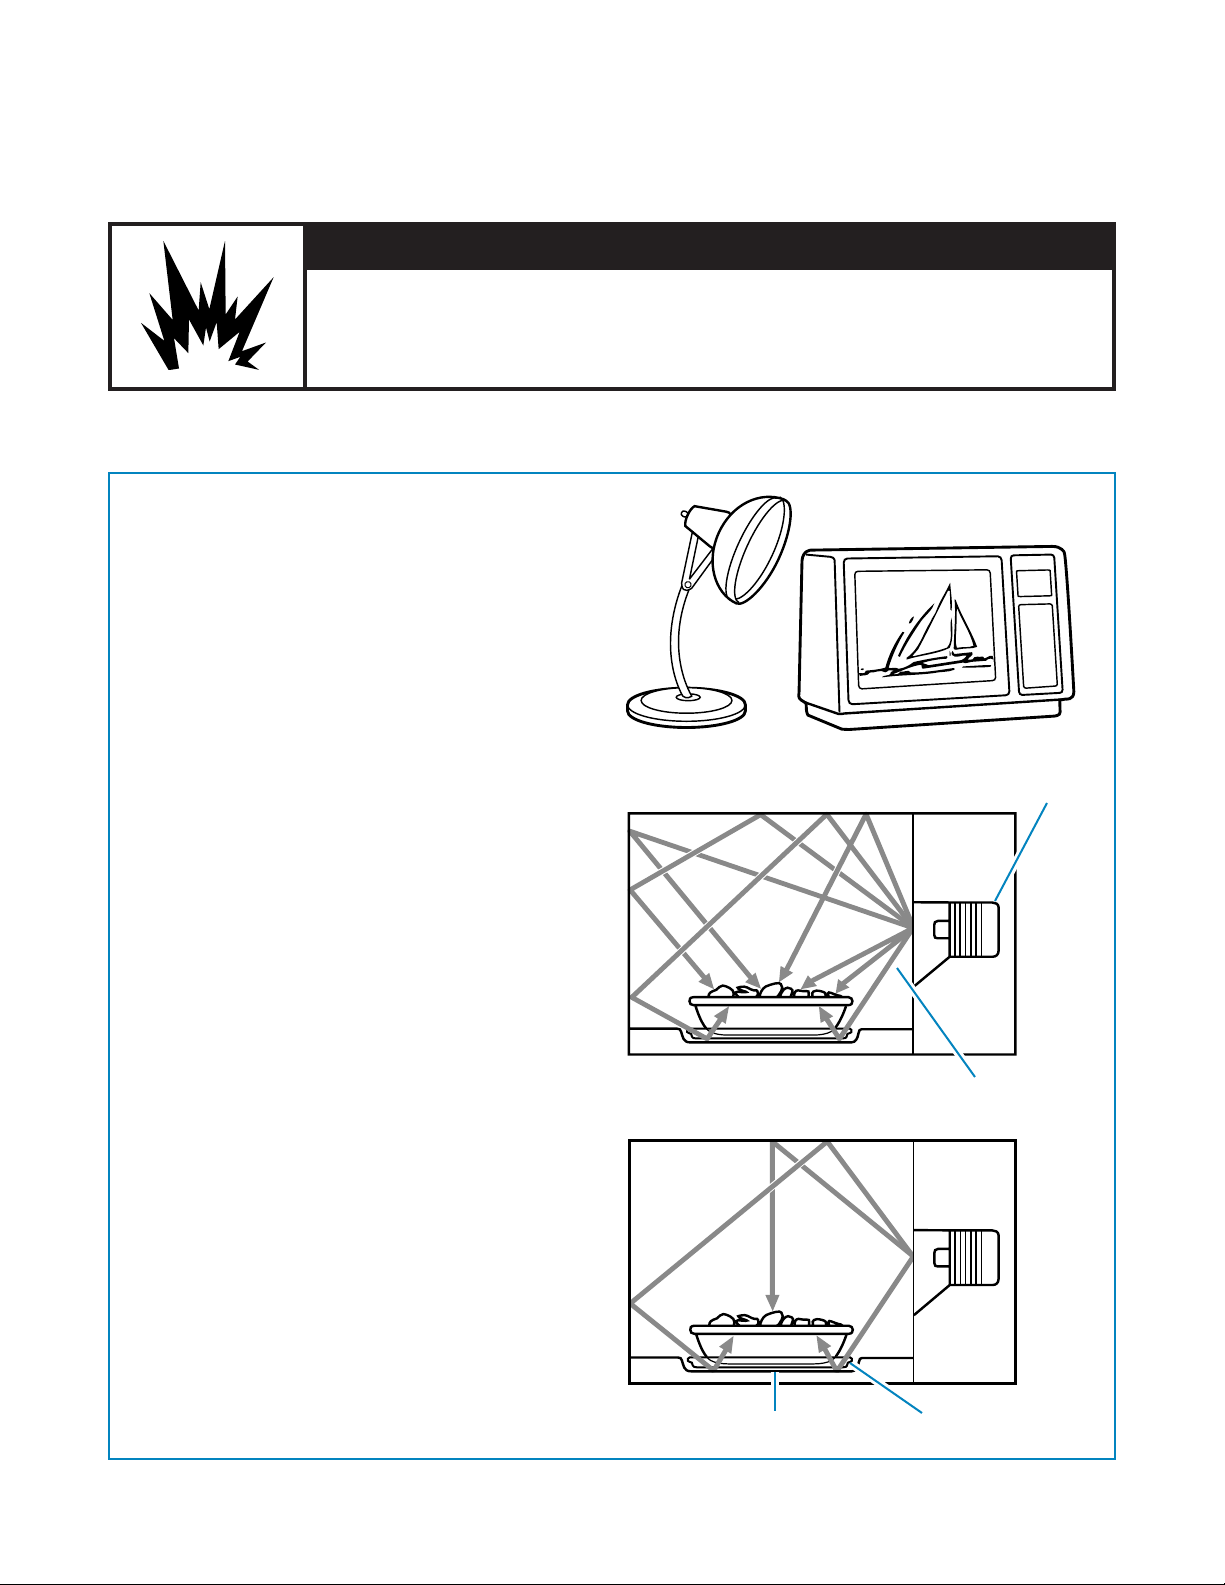
Microwave ovens are safe. Microwave energy is
not hot. It causes food to make its own heat, and
it’s this heat that cooks the food.
Microwaves are like TV waves or light waves. You
cannot see them, but you can see what they do.
A magnetron in the microwave oven produces
microwaves. The microwaves move into the oven
where they contact food as it turns on the turntable.
The glass turntable of your microwave oven lets
microwaves pass through. Then they bounce off a
metal floor, back through the glass turntable, and
are absorbed by the food.
Magnetron
Oven cavity
Metal floor Glass turntable
continued on next page
7
Page 8
GETTING TO KNOW YOUR MICROWAVE OVEN
HOW YOUR MICROWAVE OVEN WORKS (CONT.)
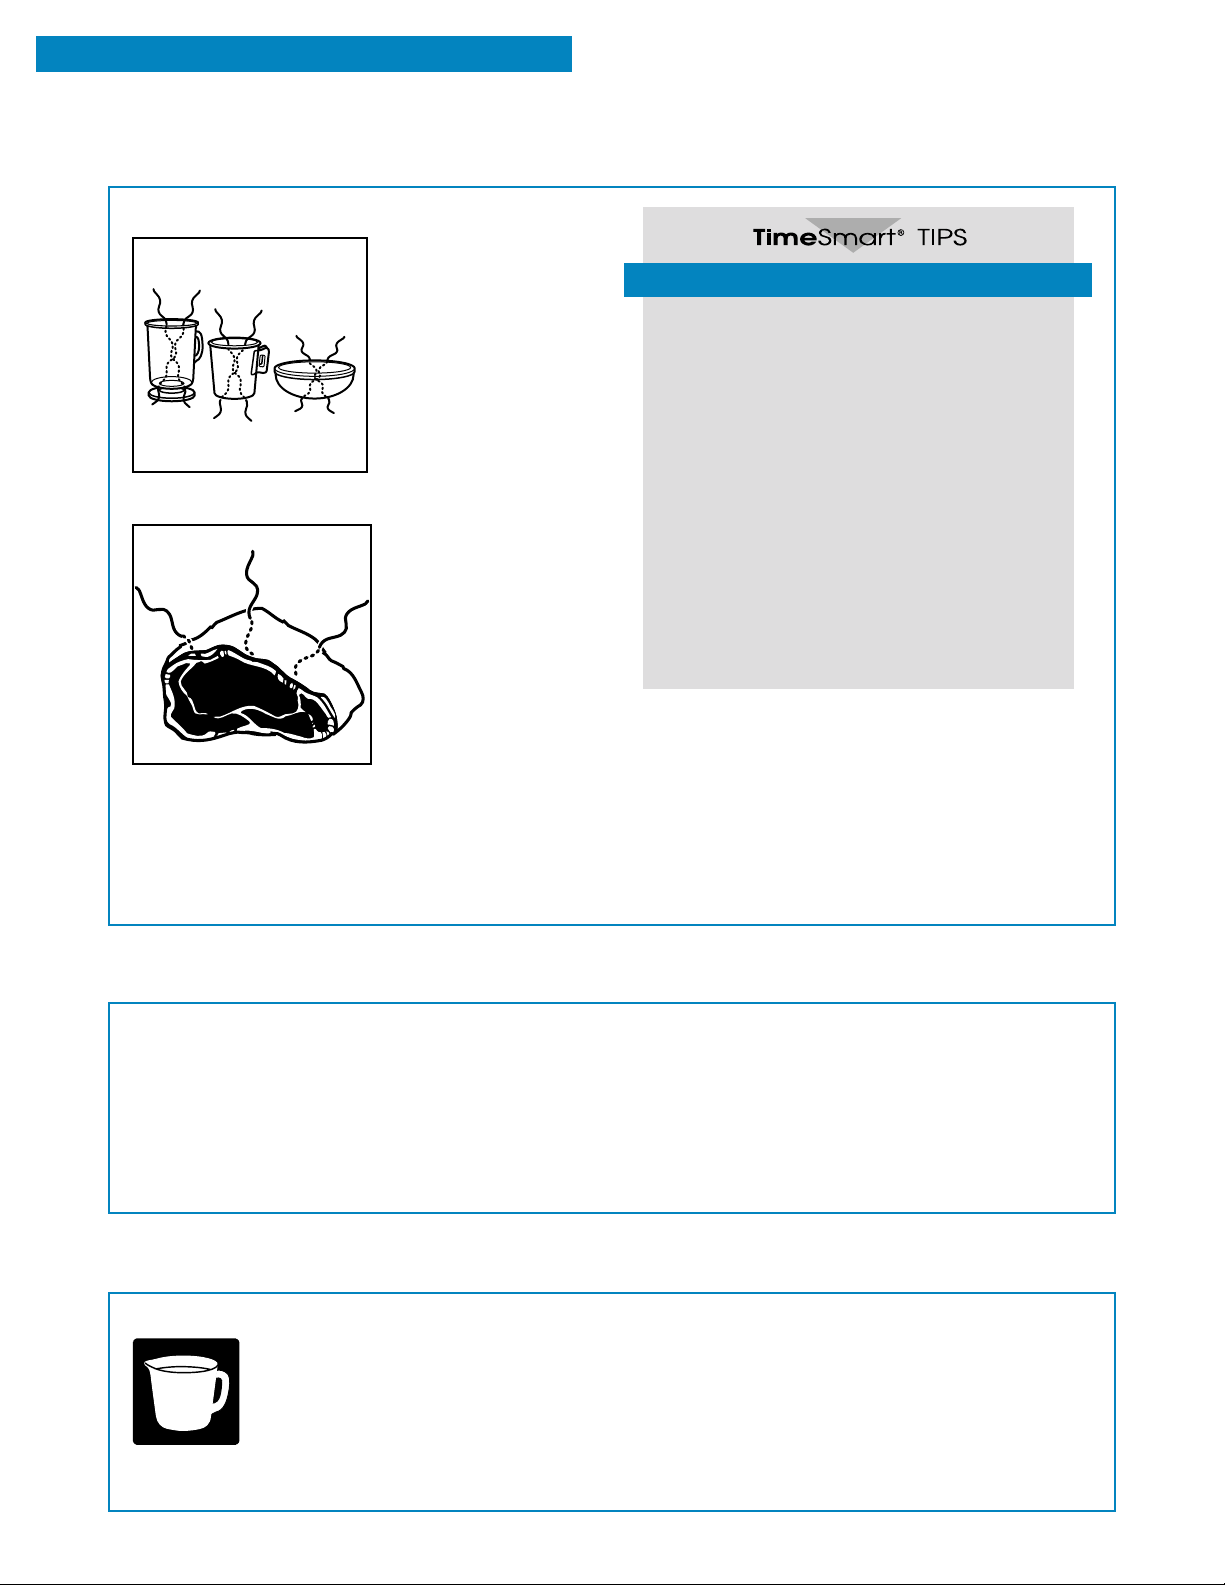
Microwaves pass through most glass, paper, and
plastics without heating
them so food absorbs
the energy. Microwaves
bounce off metal containers so food does
not absorb the energy.
Microwaves may not reach the center of a roast.
The heat spreads to
the center from the
outer, cooked areas
just as in regular oven
cooking. This is one
of the reasons for
letting some foods
(for example, roasts
or baked potatoes)
stand for a while after
cooking, or for stirring
some foods during the cooking time.
The microwaves disturb water molecules in the
food. As the molecules bounce around bumping
into each other, heat is made, like rubbing
your hands together. This is the heat that does
the cooking.
•
•
•
NOTE: Do not deep fry in the oven. Microwavable
cookware is not suitable and it is difficult to
maintain appropriate deep-frying temperatures.
For the best cooking results
Always cook food for the shortest cooking
time recommended. Check to see how
the food is cooking. If needed, touch ADD
MINUTE while the oven is operating or
after the cooking cycle is over (see the
“Using ADD MINUTE” section).
Stir, turn over, or rearrange the food being
cooked about halfway through the cooking
time for all recipes. This will help make
sure the food is evenly cooked.
If you do not have a cover for a dish, use
wax paper, or microwave-approved paper
towels or plastic wrap. Remember to turn
back a corner of the plastic wrap to vent
steam during cooking.
RADIO INTERFERENCE
Using your microwave oven may cause interference
to your radio, TV, or similar equipment. When there
is interference, you can reduce it or remove it by:
Cleaning the door and sealing surfaces of
•
the oven.
Adjusting the receiving antenna of the radio
•
or television.
TESTING YOUR MICROWAVE OVEN
To test the oven put about 1 cup of cold water in a
glass container in the oven. Close the
door. Make sure it latches. Follow the
directions in “Cooking at high cook
power” in the “Using Your Microwave
Oven” section to set the oven to cook
for 2 minutes. When the time is up, the water
should be heated.
8
Moving the radio/TV away from the microwave
•
oven.
Plugging the microwave oven into a different
•
outlet so that the microwave oven and radio/TV
are on different branch circuits.
Page 9

TESTING YOUR DINNERWARE OR COOKWARE
Test dinnerware or cookware before using.
To test a dish for safe use, put it into the oven
with a cup of water beside it. Cook at 100% cook
power for one minute. If the dish gets hot and
water stays cool, do not use it. Some dishes
(melamine, some ceramic dinnerware, etc.) absorb
microwave energy, becoming too hot to handle and
slowing cooking times. Cooking in metal containers
not designed for microwave use could damage the
oven, as could containers with hidden metal (twistties, foil lining, staples, metallic glaze or trim).
GETTING TO KNOW YOUR MICROWAVE OVEN
OPERATING SAFETY PRECAUTIONS
Never cook or reheat a whole egg inside the
shell. Steam buildup
in whole eggs may
cause them to burst
and burn you, and
possibly damage the
oven. Slice hard-boiled
eggs before heating.
In rare cases, poached
eggs have been known
to explode. Cover
poached eggs and
allow a standing time of one minute before cutting
into them.
For best results, stir any liquid several times
during heating or
reheating. Liquids
heated in certain
containers (especially
containers shaped like
cylinders) may become
overheated. The liquid
may splash out with a
loud noise during or
after heating or when
adding ingredients
(coffee granules, tea bags, etc.). This can harm
the oven and possibly injure someone.
Never lean on the door or allow a child to swing on it
when the door is open.
Injury could result.
Use hot pads. Microwave energy does not heat
containers, but the heat
from the food can make
the container hot.␣
continued on next page
9
Page 10
GETTING TO KNOW YOUR MICROWAVE OVEN
OPERATING SAFETY PRECAUTIONS (CONT.)
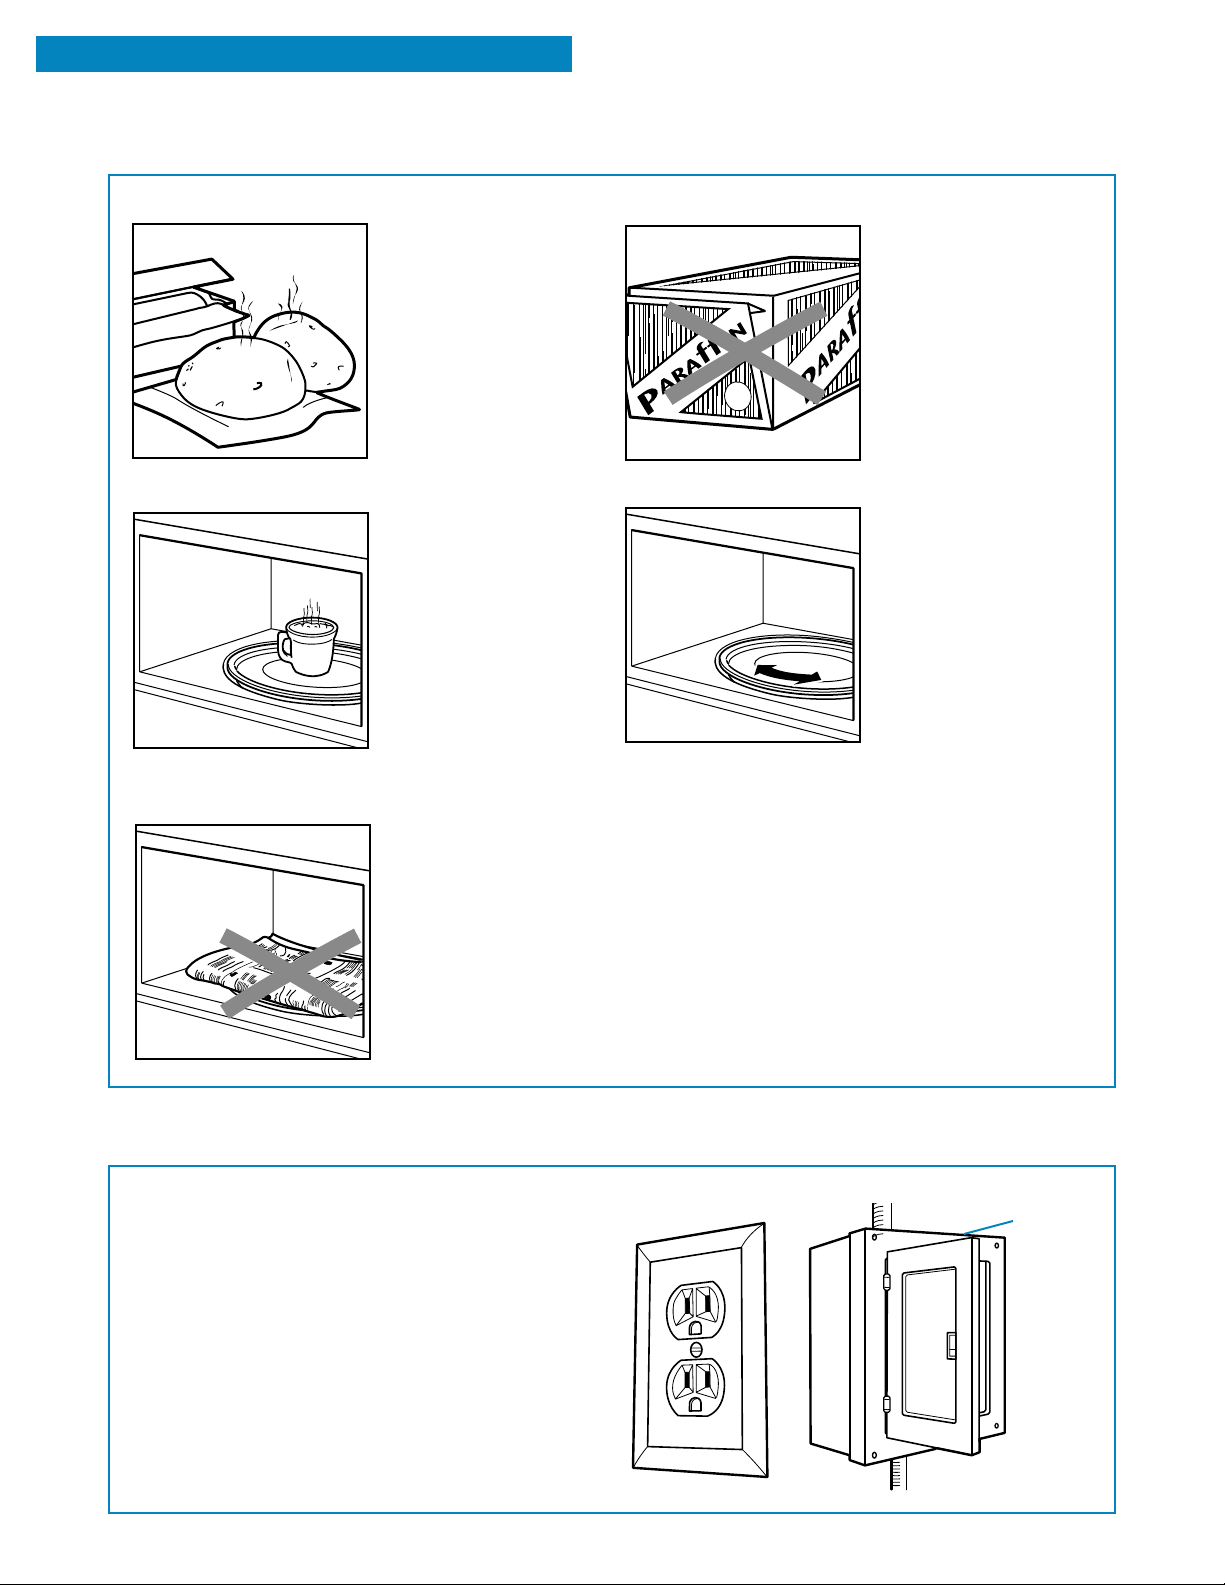
Do not overcook potatoes. Fire could result. At
the end of the recommended cooking time,
potatoes should be
slightly firm because
they will continue cooking during standing
time. After micro-
waving, let potatoes
stand for 5 minutes.
They will finish cooking
while standing.
Do not start a microwave oven when it is empty.
Product life may be
shortened.
If you practice
programming the oven,
put
a container of water
in the oven or use the
Demo Feature (see the
“Using PERSONAL
CHOICE” section).
It is normal for the
oven door to look wavy
after the oven has been running for a while.
Do not use newspaper or other printed paper in the
oven. Fire could result.
Do not dry flowers,
fruit, herbs, wood,
paper, gourds, or
clothes in the oven.
Fire could result.
Do not try to melt paraffin wax in the oven. Paraffin
wax will not melt in a
microwave oven because
it allows microwaves to
pass through it.
Do not operate the microwave oven unless the
glass turntable is
securely in place and
can rotate freely on the
support rollers. The
turntable can rotate in
either direction.
Make sure the rollers
are completely inside
the center circle of the
turntable; this will let the
turntable rotate properly.
Make sure the turntable is correct-side up in the
oven. Carefully place the cookware on your
turntable to avoid possibly breaking it.
Handle your turntable with care when removing
it from the oven to avoid possibly breaking it. If your
turntable cracks or breaks, contact your dealer for
a replacement.
When you use a browning dish, the browning
dish bottom must be at least 3⁄16 inch above the
turntable. Follow the directions supplied with the
browning dish.
ELECTRICAL CONNECTION
If your electric power line or outlet voltage is less
than 110 volts, cooking times may be longer. Have
a qualified electrician check your electrical system.
10
Circuit breaker or
fuse box
Page 11
MICROWAVE OVEN FEATURES
GETTING TO KNOW YOUR MICROWAVE OVEN
ENTER
POWER
SENSOR
DEF
START
CONV
TEMP
COOK
AUTO
REHEAT
TIME
WEIGHT
Q,TY
COMBI
SENSOR
REHEATPOPCORN
COOK
(3 SIZES)
ADD
AUTO
WARM
MINUTE
COOK
HOLD
PERSONAL
LESSMORE
CHOICE
AUTO DEFROST
• MEAT
• POULTRY
• FISH
COOK
COOK
CLOCK
TIME
POWER
SET
123
654
789
OFF
START
0
CANCEL
ENTER
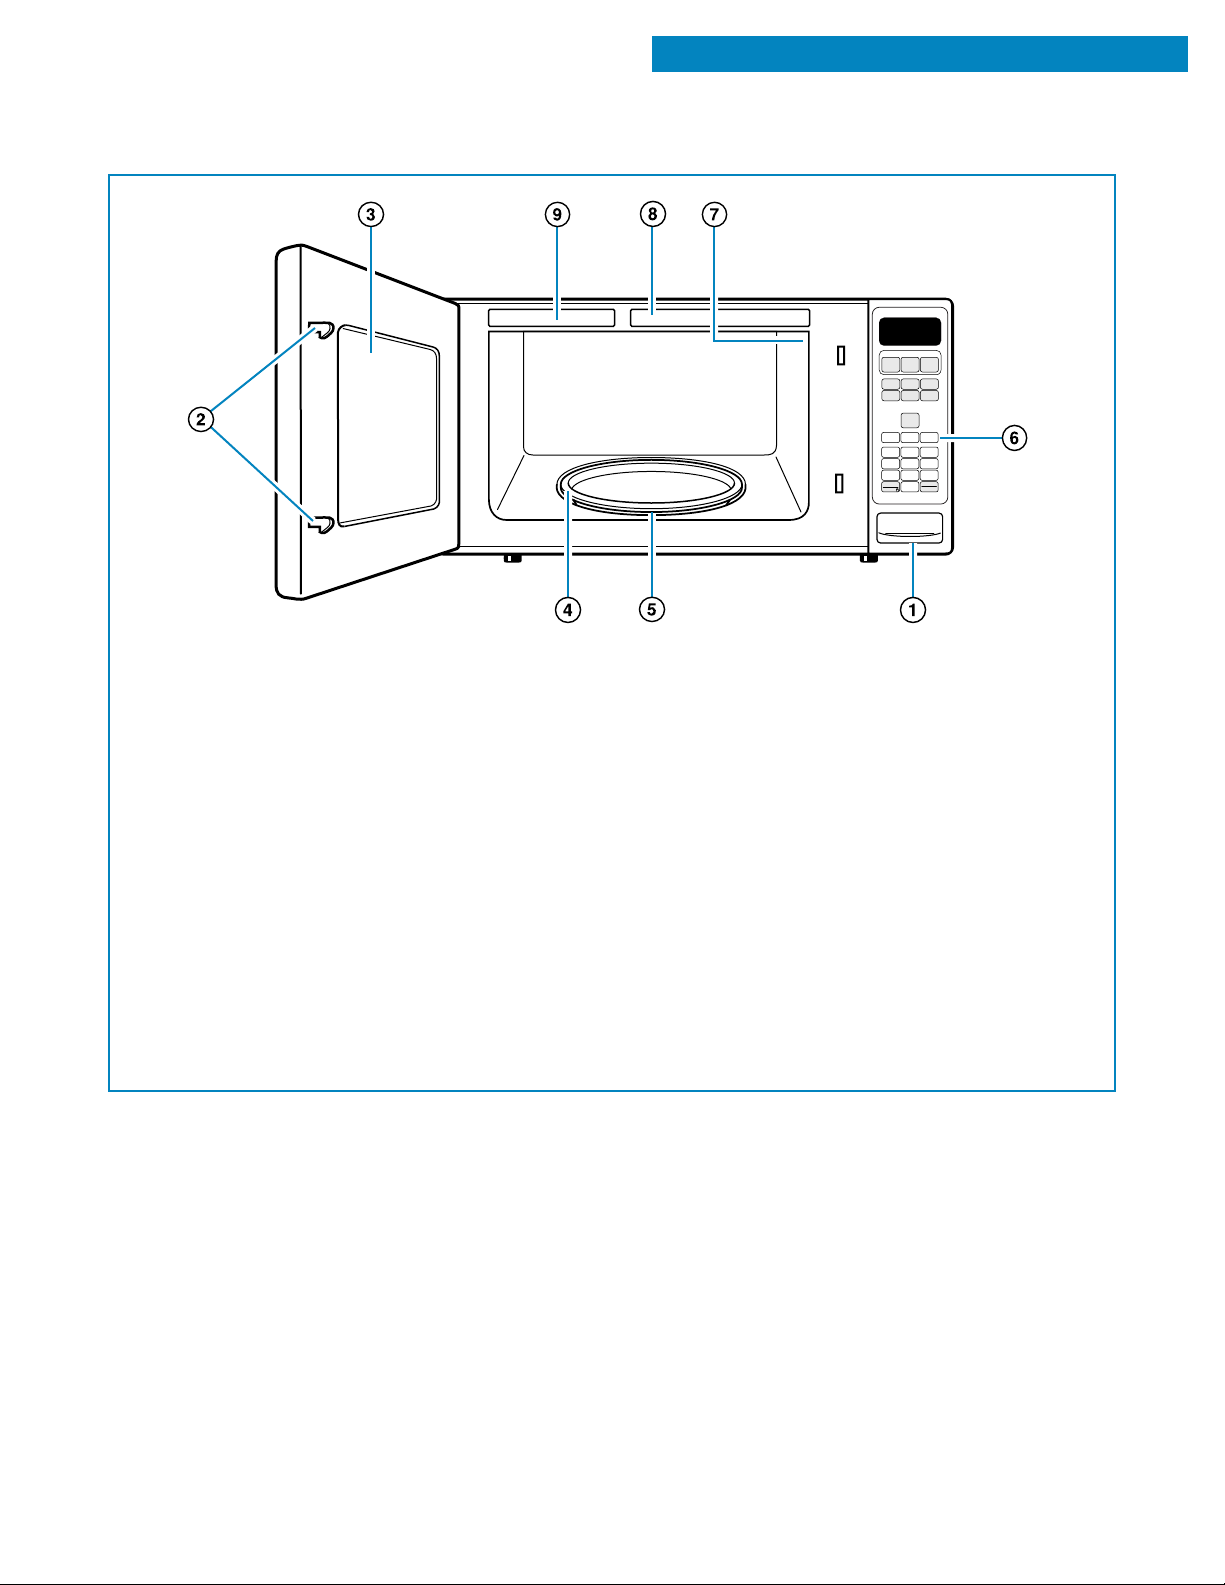
Your microwave oven is designed to make your
cooking experience enjoyable and productive. To
help get you up and running quickly, the following
is a list of the oven’s basic features:
1. One-Touch Door Open Button. Push this
button to open the door.
2. Door Safety Lock System. The oven will not
work unless the door is securely closed.
3. Window with Metal Shield. The shield prevents
microwaves from escaping. It is designed as a
screen to allow you to view food as it cooks.
4. Glass Turntable. This turntable turns food
as it cooks for more even cooking. It must be
in the oven during operation. The turntable is
sunken into the cavity floor to give you more
cooking space and better cooking results. See
pages 7, 10, 33, and 39 for more details.
5. Removable Turntable Support (under turntable).
6. Control Panel. Touch pads on this panel to
perform all functions. See pages 12-13 for more
information.
7. Light (not shown). The light automatically turns
on when the door is opened or when the oven is
running.
8. Cooking Guide Label.
9. Model and Serial Number Plate.
11
Page 12
GETTING TO KNOW YOUR MICROWAVE OVEN
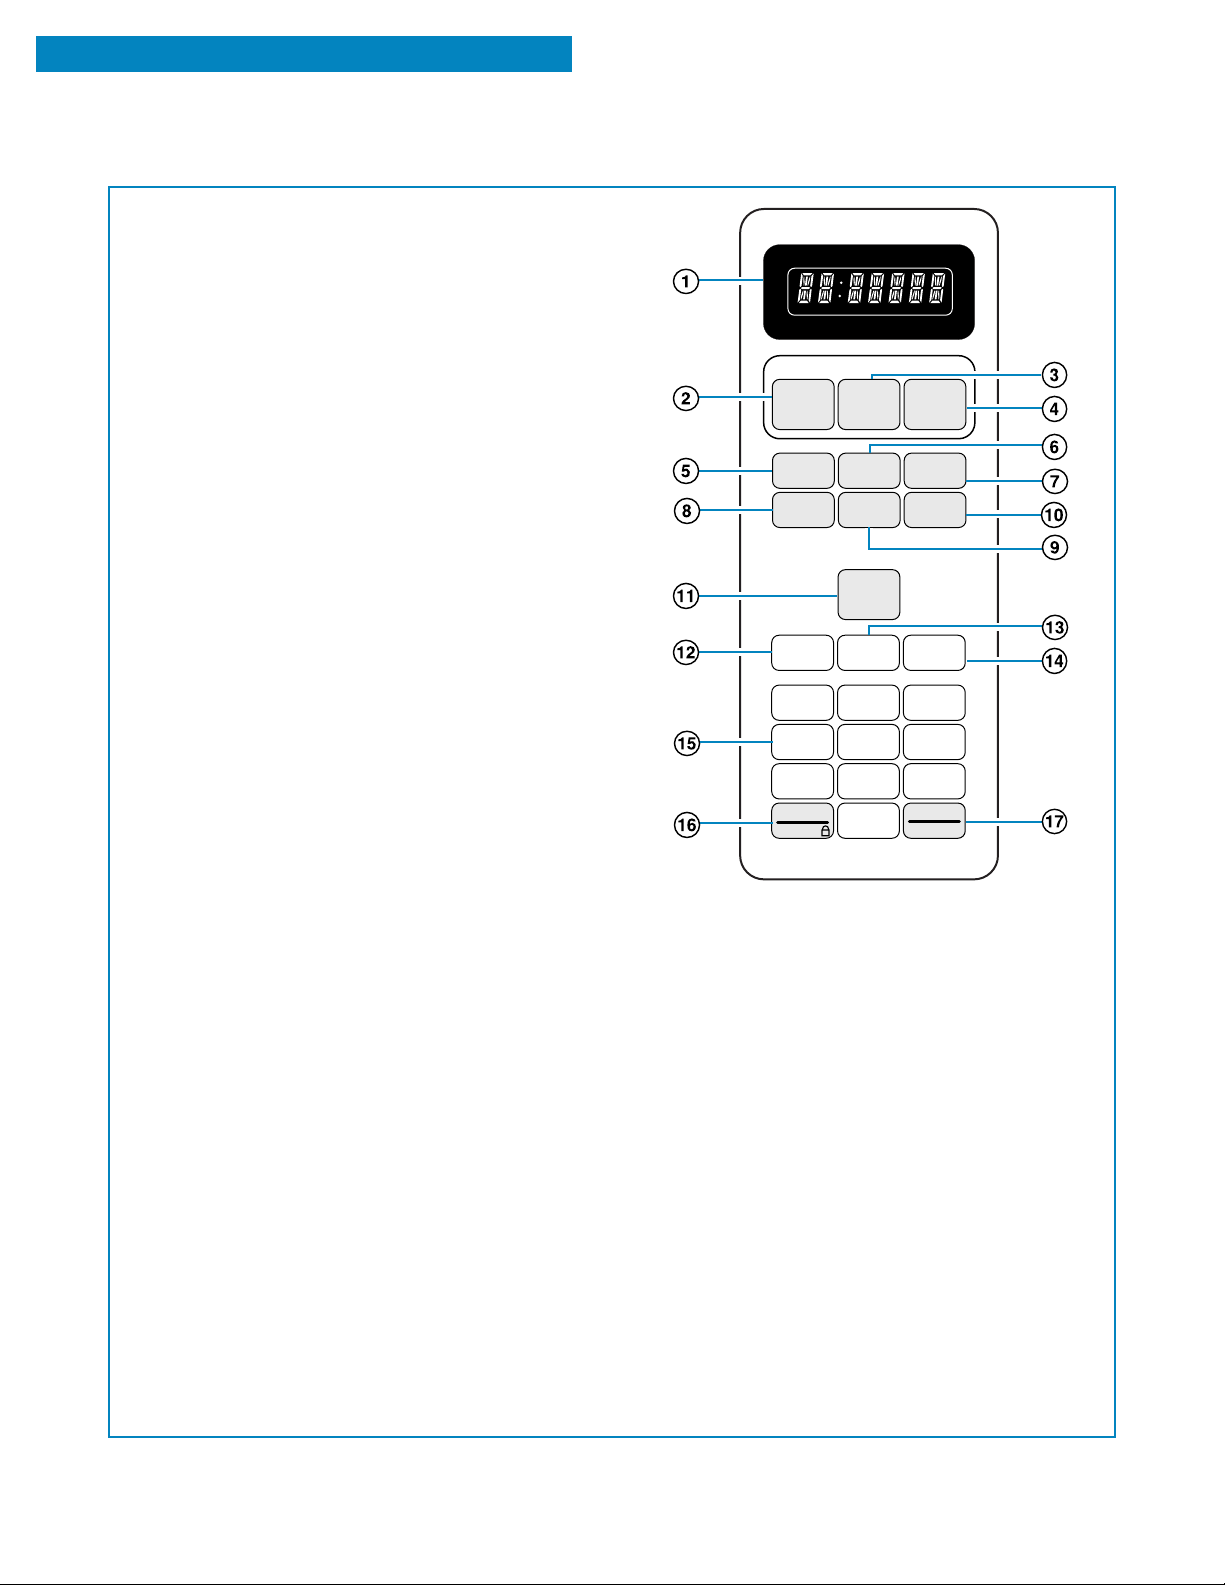
CONTROL PANEL FEATURES
Your microwave oven control panel lets you
choose the cooking function you want quickly and
easily. All you have to do is touch the necessary
Command pad. The following is a list of all the
Command and Number pads located on the control
panel. For more information, see pages 14-32.
1. Display. This display includes a clock and
scrolling words to tell you what to do when
you touch a pad.
2. POPCORN. Touch this pad to pop popcorn,
without entering a cook power or time. The
oven’s sensor will tell the oven how long to
cook depending on the amount of humidity it
detects from the popcorn. See page 32 for
more information.
3. REHEAT. Touch this pad to reheat food,
without entering a cook power or time. The
oven’s sensor will tell the oven how long to
reheat depending on the amount of humidity
it detects from the food. See page 32 for
more information.
4. COOK. Touch this pad to cook food, without
entering a cook power or time. The oven’s
sensor will tell the oven how long to cook
depending on the amount of humidity it
detects from the food. See page 30 for more
information.
5. AUTO COOK. Touch this pad to cook food,
without entering a cook power or time. See
page 23 for more information.
6. WARM HOLD. Touch this pad to keep hot,
cooked foods safely warm in your microwave
oven for up to 99 minutes, 99 seconds. You
can use WARM HOLD by itself, or to automatically follow a cooking cycle. See page 29 for
more information.
7. ADD MINUTE. Touch this pad to cook for
1 minute at 100% cook power. See page 28
for more information.
8. PERSONAL CHOICE. Touch this pad and a
Number pad to turn off tones, turn off the clock,
change scroll speed, change weight measurement to kilograms, or turn on the demonstration
mode. See page 14 for more information.
9. MORE. Each time you touch this pad you will
add 10 seconds to Auto Cook or regular timed
cooking. See page 28 for more information.
10. LESS. Each time you touch this pad you will
subtract 10 seconds from Auto Cook or regular
timed cooking. See page 28 for more information.
OFF
COOK
(3 SIZES)
AUTO
COOK
PERSONAL
CHOICE
COOK
TIME
HEATER
OZ
SENSOR
REHEATPOPCORN
WARM
HOLD
AUTO DEFROST
• MEAT
• POULTRY
• FISH
COOK
POWER
T/TABLE
COOK
ADD
MINUTE
LESSMORE
CLOCK
SET
123
654
789
START
ENTER
0
OFF
CANCEL
12
Page 13
CONTROL PANEL FEATURES (CONT.)
GETTING TO KNOW YOUR MICROWAVE OVEN
11. AUTO DEFROST. Touch this pad to thaw
frozen food by weight. See page 24 for more
information.
12. COOK TIME. Touch this pad followed by
Number pads to set a cooking time. See
pages 16, 18, and 20 for more information.
13. COOK POWER. Touch this pad, after the
cook time has been set, followed by a
Number pad to set the amount of microwave
energy released to cook the food. The higher
the number, the higher the power or faster the
“cooking speed.” See page 19 for more information. See the “Microwave cooking guide”
on page 34 for specific cook powers to use
for the foods you are cooking.
14. CLOCK SET. Touch this pad to enter the
correct time of day. See page 15 for more
information.
15. Number pads. Touch Number pads to enter
cooking times, cook powers, quantities, or
weights.
16. START/ENTER. Touch this pad to start a
function you have set.
17. OFF/CANCEL. Touch this pad once to erase
an incorrect command or twice to cancel a
program during cooking. This pad will not
erase the time of day.
NOTE: If you try to enter unacceptable instructions,
“ERROR” will appear on the display. Touch OFF/
CANCEL and re-enter the instructions.
Audible signals
Your microwave oven comes with audible signals
that can guide you when setting and using
your oven:
A programming tone will sound each time you
•
touch a pad.
Three tones signal the end of a cooking cycle or
•
Minute Timer function.
Interrupting cooking
You can stop the oven during a cycle by opening
the door. The oven stops heating and the fan
stops, but the light stays on. To restart cooking,
close the door and
TOUCH
START
ENTER
If you do not want to continue cooking:
Close the door and the light goes off.
•
THEN
TOUCH
•
OFF
CANCEL
NOTE: Before setting a function, touch OFF/CANCEL
to make sure no other function is on.
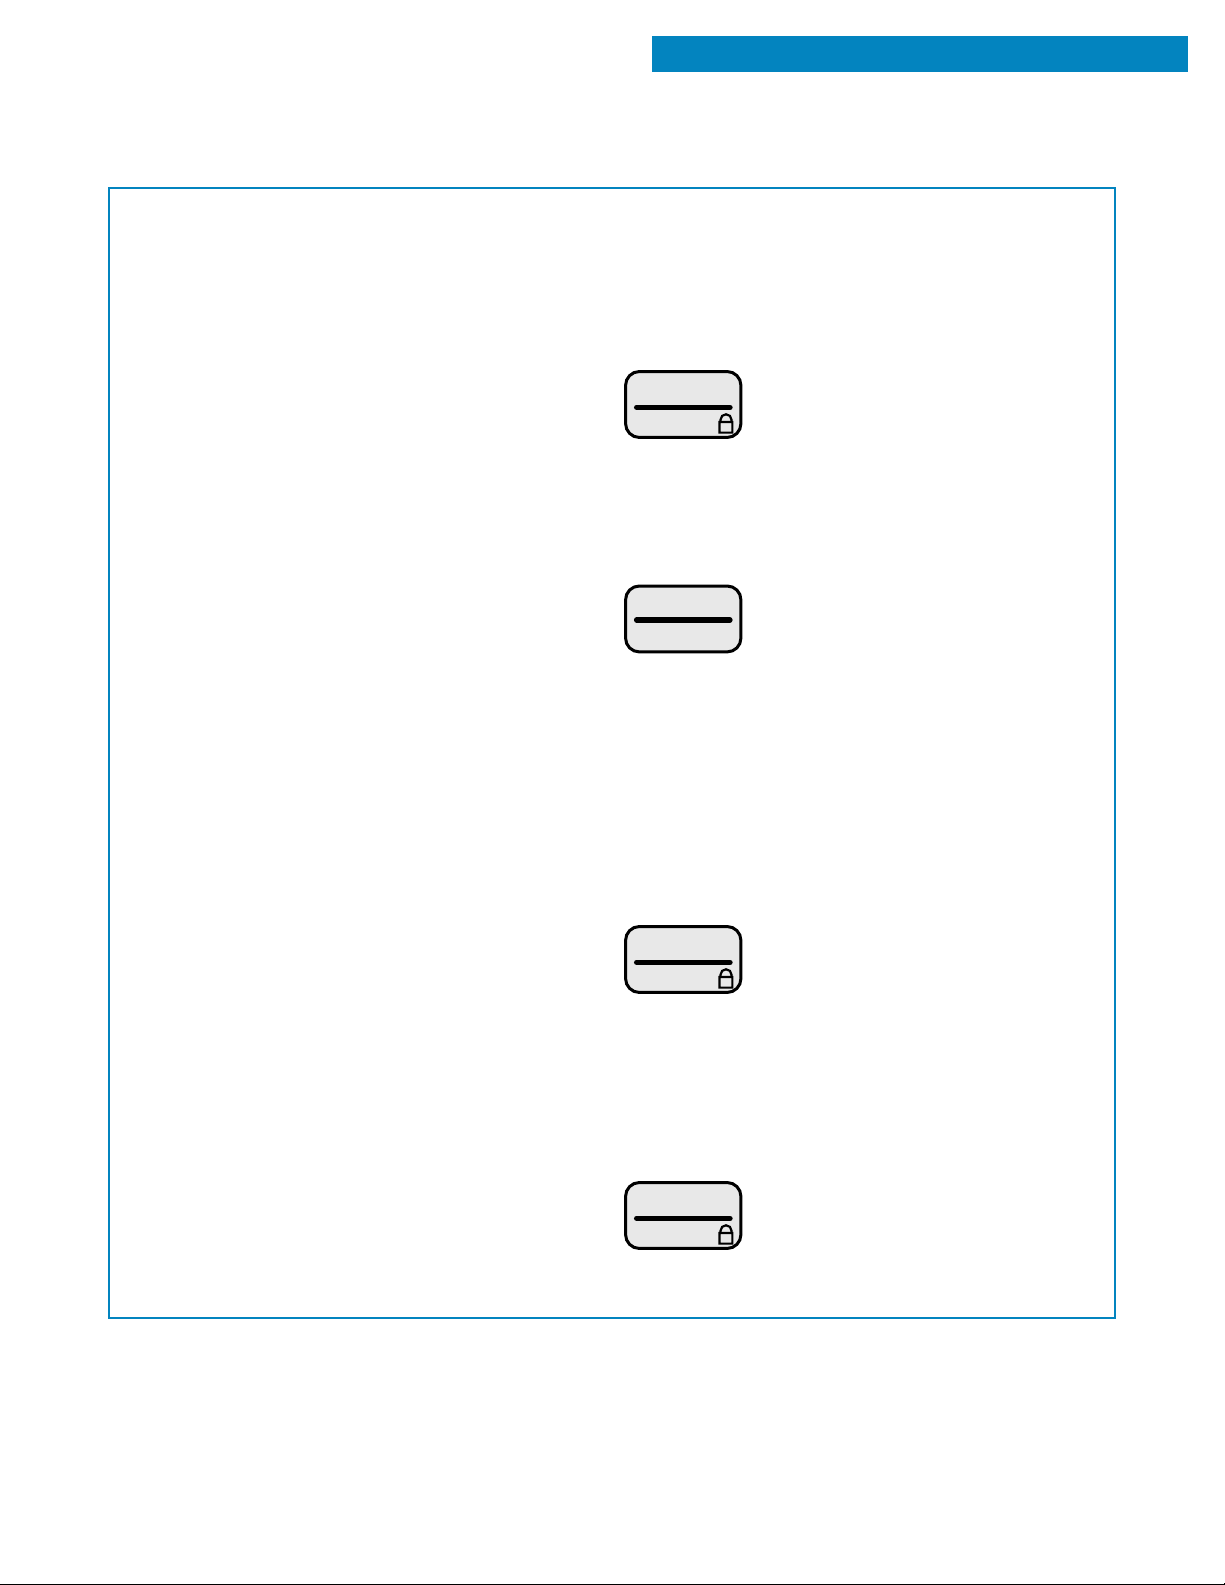
Using the child lock
The Child Lock locks the control panel so children
cannot use the microwave when you do not want
them to.
To lock the control panel:
TOUCH
START
ENTER
until LOCKED appears and
2 tones sound (4 seconds)
“LOCKED” will appear on the display if a pad is
touched.
To unlock the control panel:
TOUCH
START
ENTER
until LOCKED disappears
and 2 tones sound (4 seconds)
13
Page 14
GETTING TO KNOW YOUR MICROWAVE OVEN
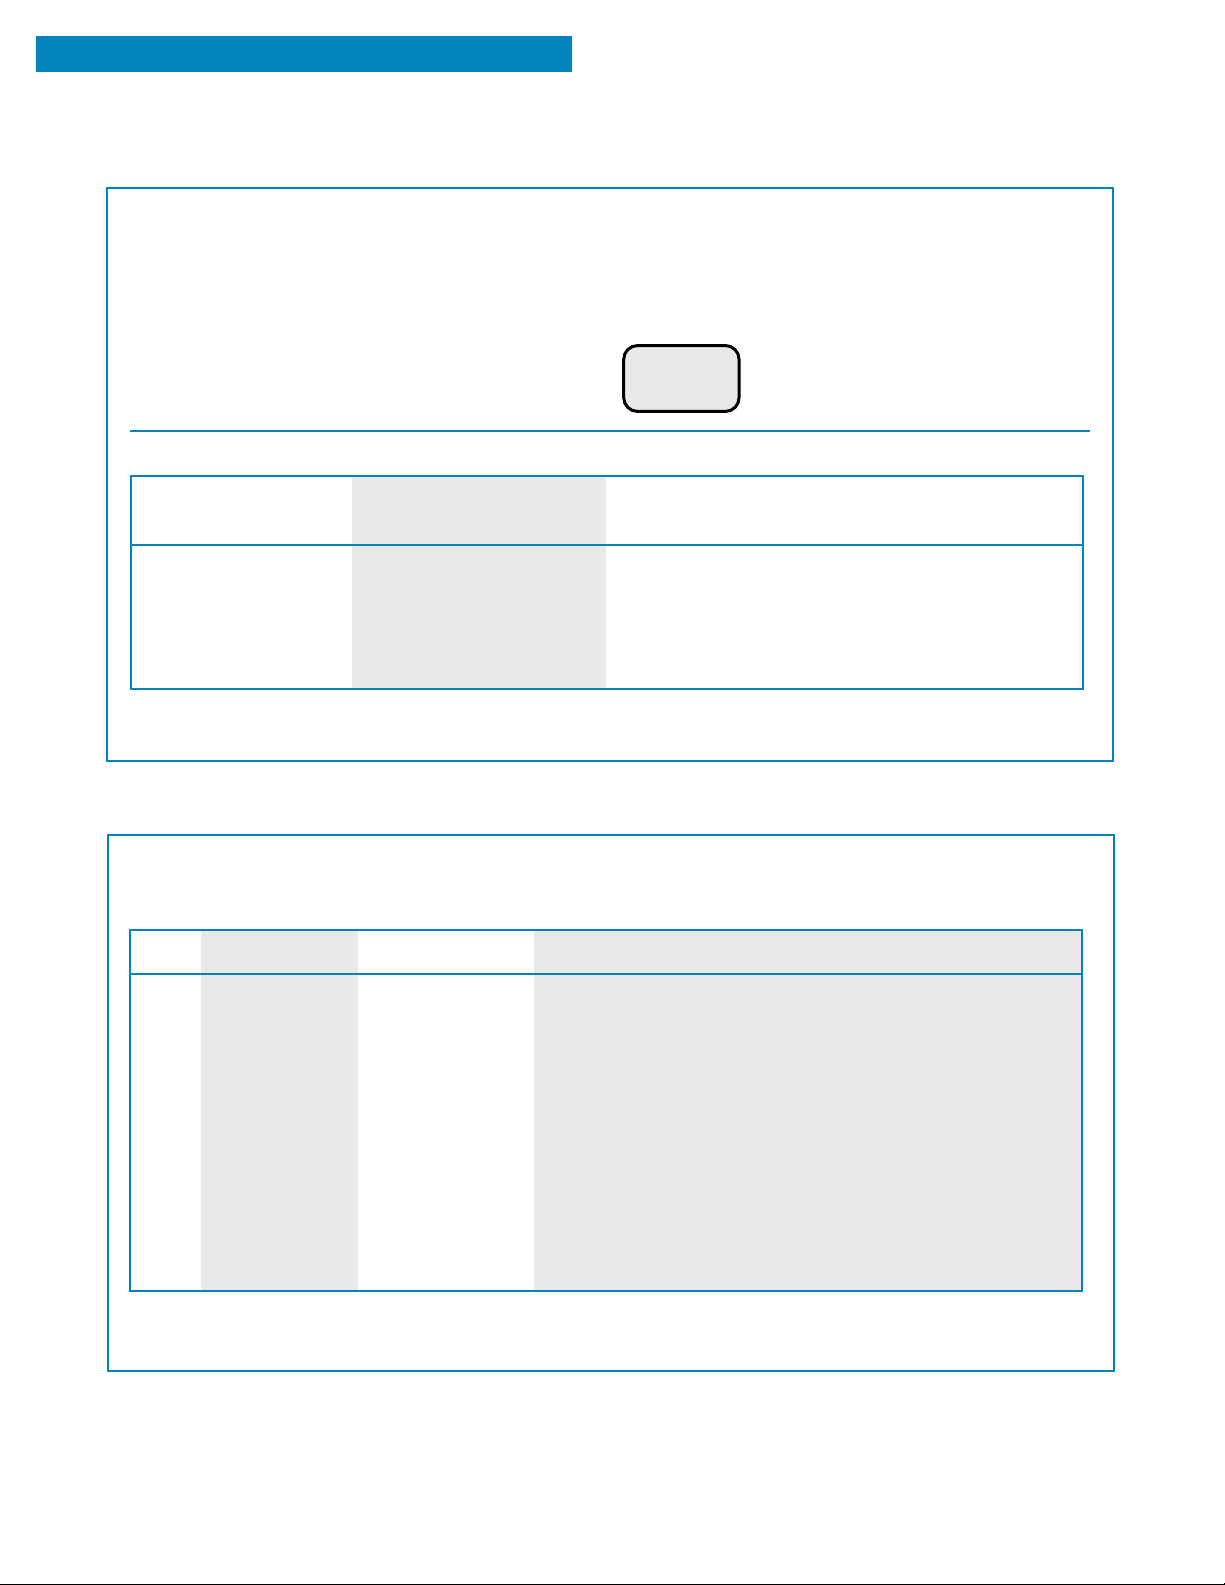
USING PERSONAL CHOICE
PERSONAL CHOICE lets you turn on or off tones,
the clock, or the demonstration mode; change scroll
speed; or switch weight measurement back and
forth between pounds and kilograms.
1. Touch PERSONAL CHOICE.
TOUCH YOU SEE
PERSONAL
your display scrolls
through the options
CHOICE
2. Touch a Number pad.
TOUCH
NUMBER PAD
1
2
3
4
5
NOTE: When you first plug in your microwave oven, tones are set on, the clock is set on, the scroll speed
is set at normal, the weight measurement is set at lbs, and the demonstration mode is off.
TO SET
sound on/off
clock on/off
scroll speed
lbs/kg choice
demo on/off
1 for slow, 2 for normal, 3 for fast
THEN TOUCH
1 for on, 2 for off
1 for on, 2 for off
1 for lbs, 2 for kg
1 for on, 2 for off
BUILT-IN KITS
You can build in your microwave oven by using one of the following trim kits.* These kits are available
from your dealer. If your dealer does not stock the kit you can order it, by kit part number, by calling
1-800-253-1301 and following the instructions and telephone prompts you hear.
SIZE
24"
27"
27"**
30"
30"**
24"
27"
27"**
30"
30"**
* Whirlpool-approved, electric single ovens only
** Model MT1195SG only
14
COLOR
Black
Black
Black
Black
Black
White
White
White
White
White
KIT MODEL NO.
MK1134XGB
MK1137XGB
MK1197XGB
MK1130XGB
MK1190XGB
MK1134XGQ
MK1137XGQ
MK1197XGQ
MK1130XGQ
MK1190XGQ
FOR INSTALLATION OVER WHIRLPOOL OVEN MODEL
RBS240PD RBS245PD
RBS270PD RBS275PD RBS277PD
RBS270PD RBS275PD RBS277PD
RBS305PD RBS307PD
RBS305PD RBS307PD
RBS240PD RBS245PD
RBS270PD RBS275PD RBS277PD
RBS270PD RBS275PD RBS277PD
RBS305PD RBS307PD
RBS305PD RBS307PD
Page 15
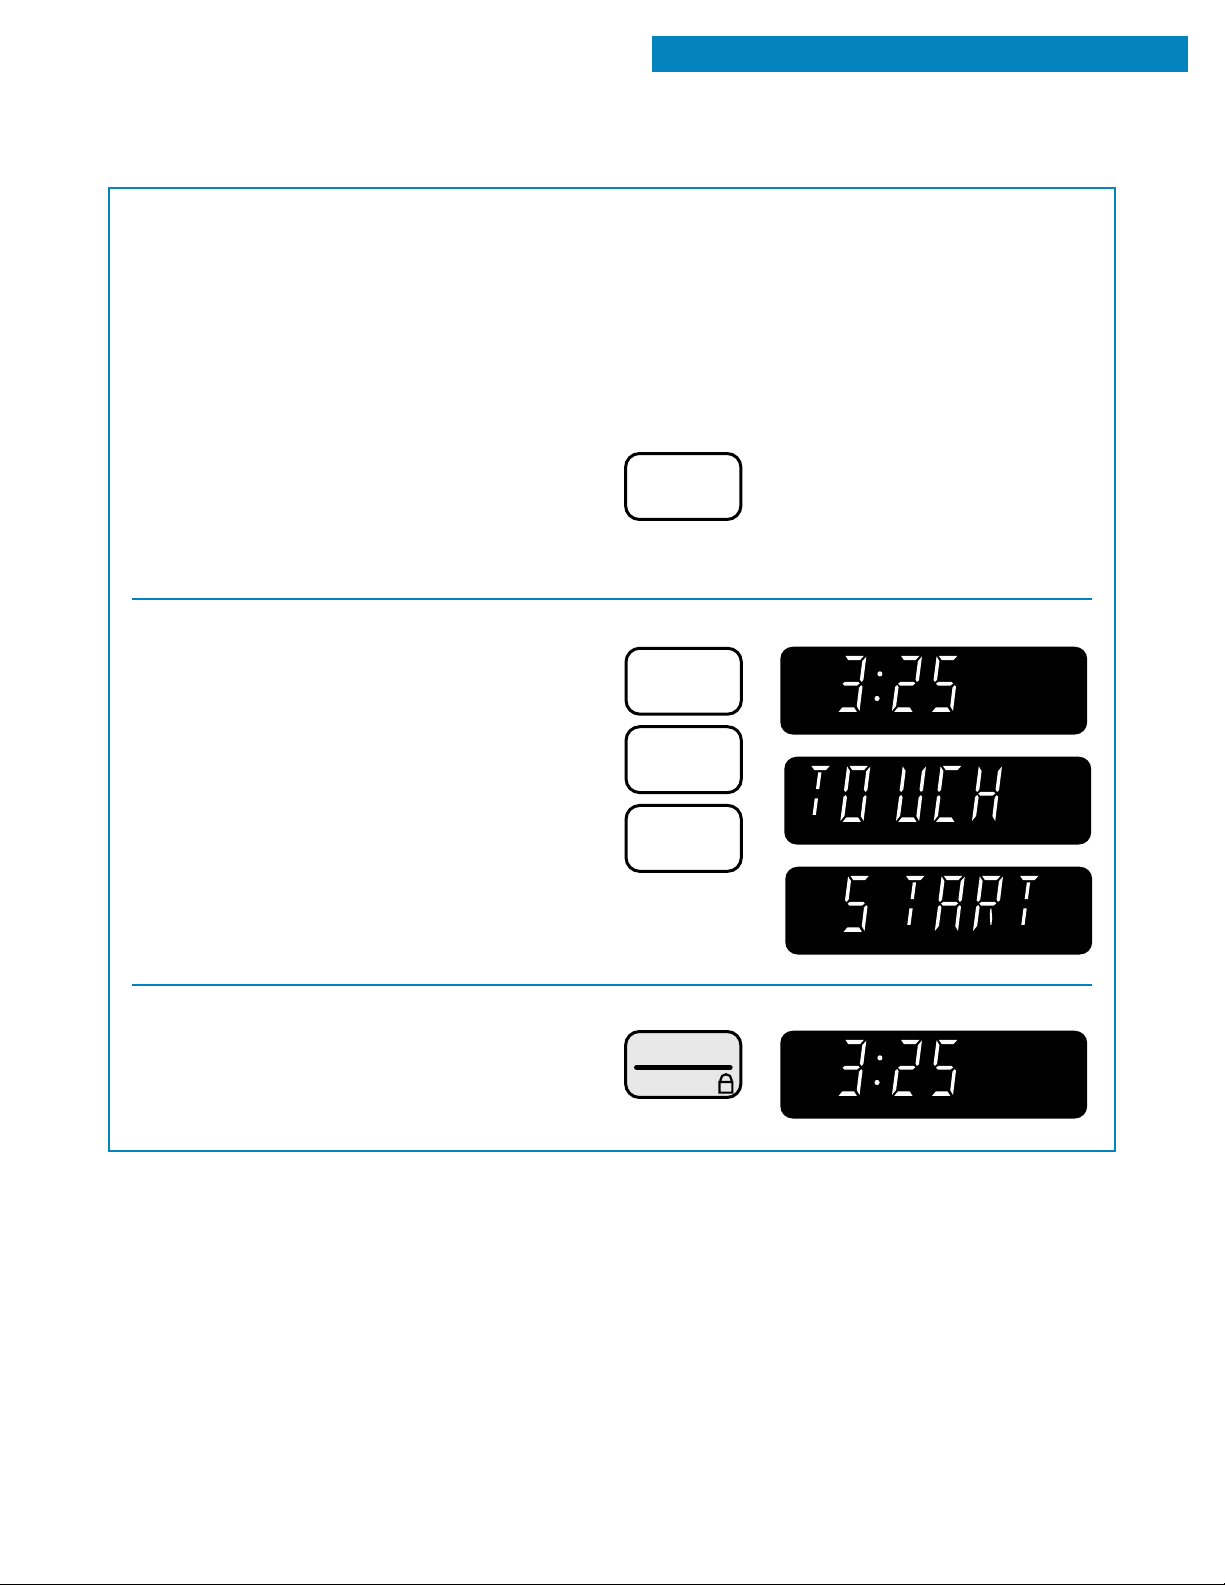
SETTING THE CLOCK
When you first plug in your microwave oven, the
display tells you to “PLEASE SET TIME OF DAY.”
Then the display shows “:”. If the electric power
ever goes off, the display will repeat this message
when the power comes back on.
NOTE: You can cook without setting the clock, but
the display will not show the correct time of day
after cooking.
GETTING TO KNOW YOUR MICROWAVE OVEN
1. Choose the setting.
2. Enter the time of day.
Example for 3:25:
3. Complete your entry.
TOUCH YOU SEE
CLOCK
SET
TOUCH YOU SEE
display scrolls the words “(AM
or PM) ENTER TIME OF DAY”
NOTE: You can switch between
AM and PM by touching
CLOCK SET.
3
2
5
TOUCH YOU SEE
START
ENTER
15
Page 16
GETTING TO KNOW YOUR MICROWAVE OVEN
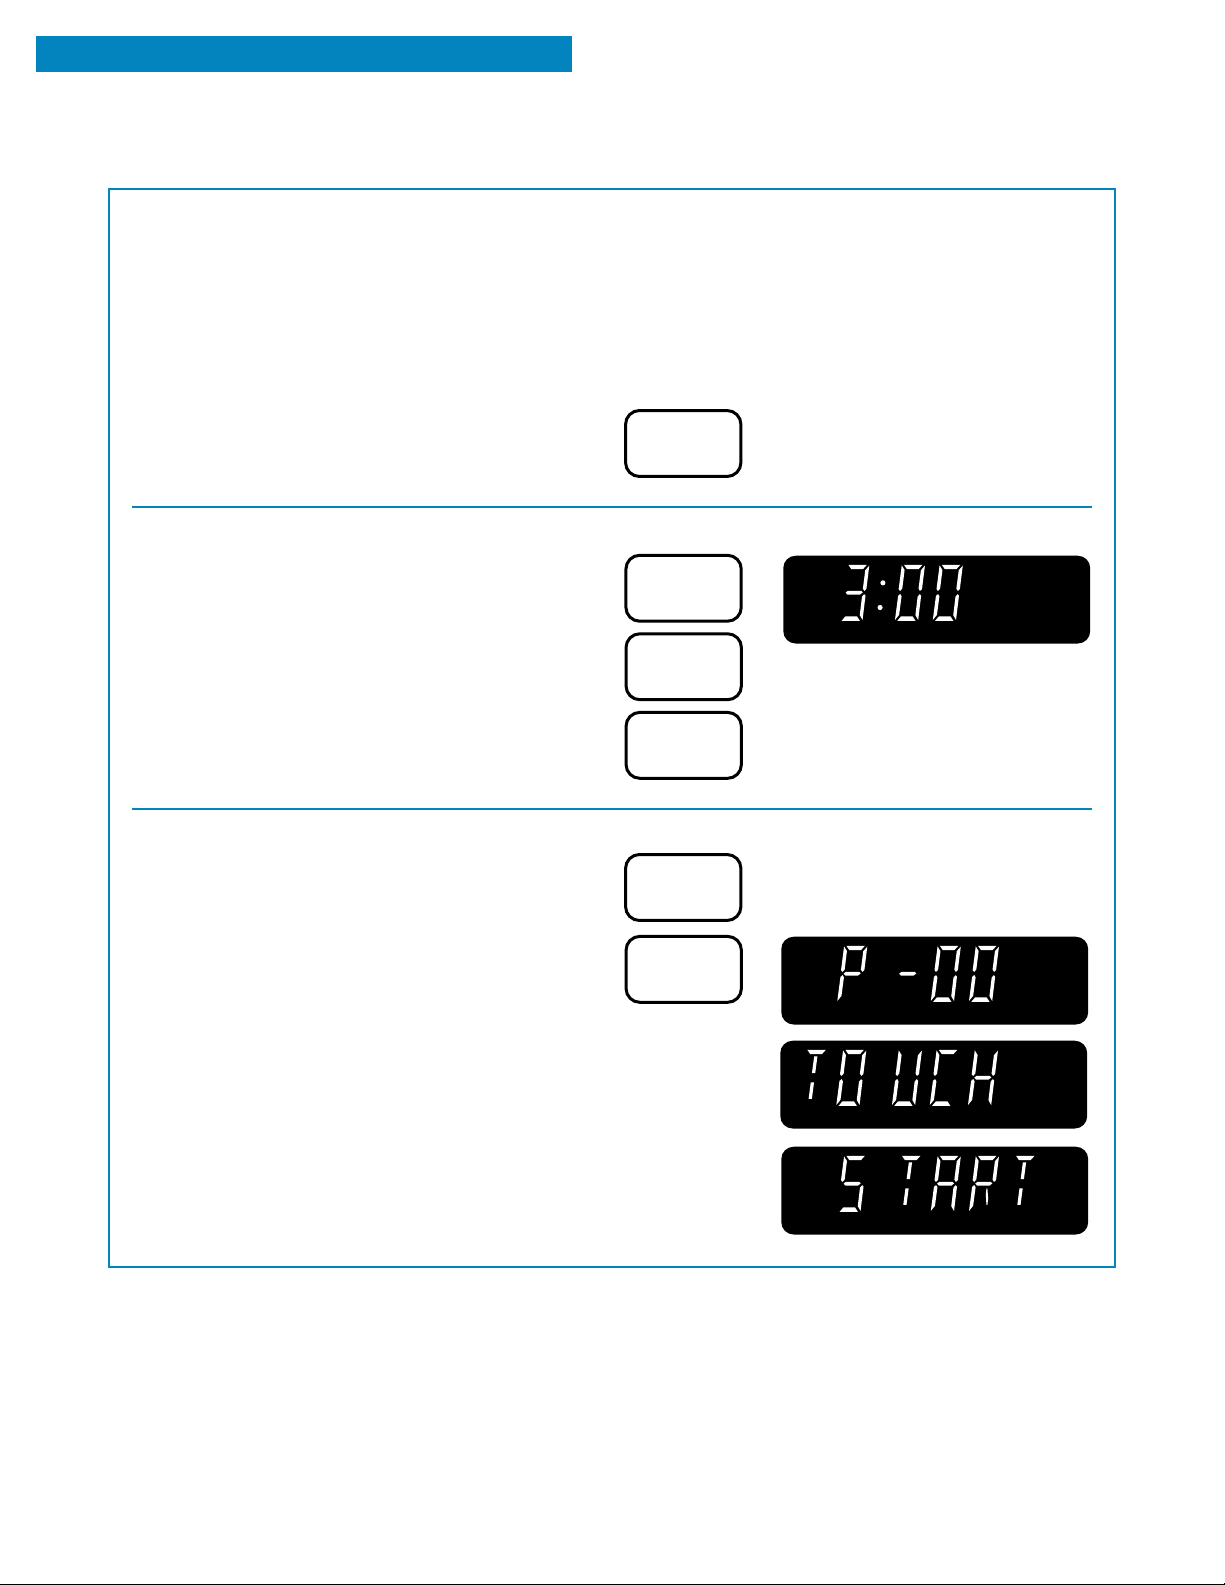
USING THE MINUTE TIMER
You can use your microwave oven as a kitchen
timer. Use the Minute Timer for timing up to
99 minutes, 99 seconds.
NOTE: If you want to use other Command pads
while the Minute Timer is counting down, touch
OFF/CANCEL to cancel the Minute Timer.
1. Touch COOK TIME.
2. Enter the time to be counted down.
Example for 3 minutes:
3. Set a “0” cook power.
TOUCH YOU SEE
COOK
TIME
TOUCH YOU SEE
display scrolls the words
“ENTER COOKING TIME”
3
0
display scrolls the words
“TOUCH START OR POWER”
0
TOUCH YOU SEE
COOK
POWER
display scrolls the words
“ENTER POWER LEVEL 1 TO 10”
0
16
Page 17
USING THE MINUTE TIMER (CONT.)
GETTING TO KNOW YOUR MICROWAVE OVEN
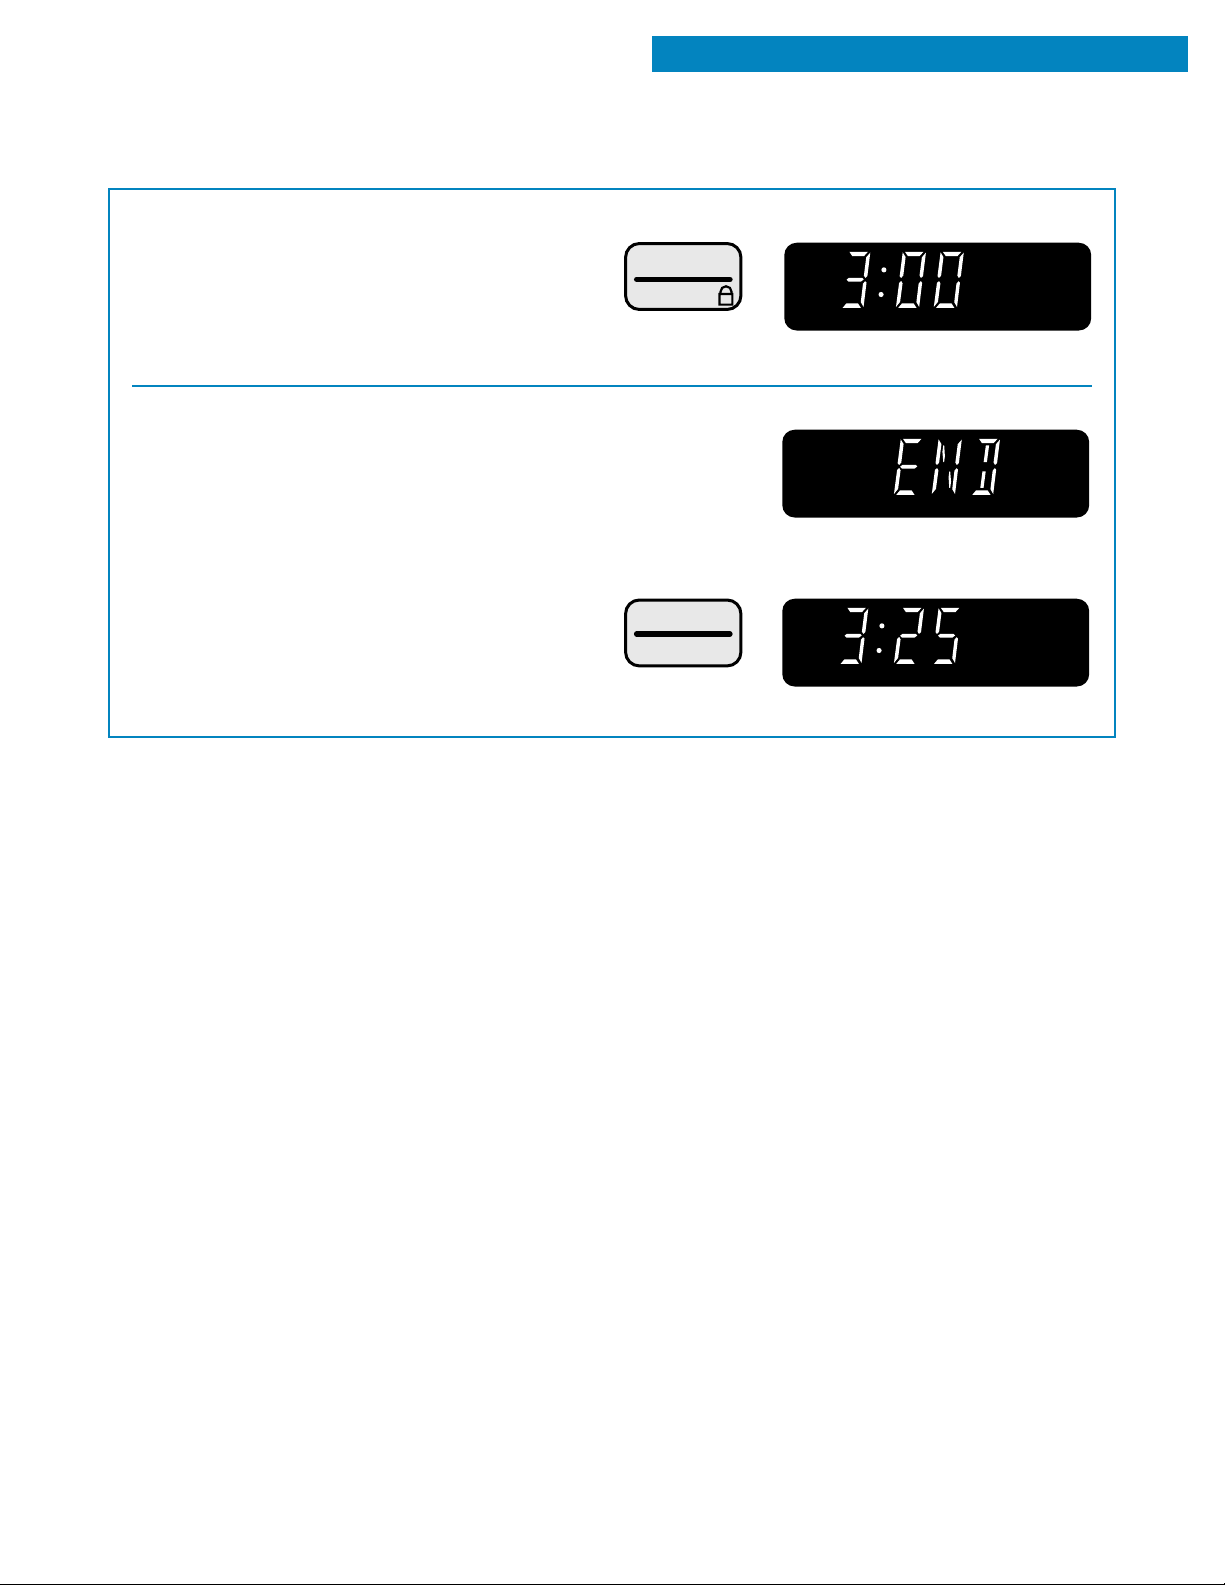
4. Start the countdown.
5. At the end of the set time:
The display will show the time of day when you
touch OFF/CANCEL.
TOUCH YOU SEE
START
ENTER
COOK
(display counts down set time)
YOU SEE
(3 tones sound)
TOUCH YOU SEE
OFF
CANCEL
(time of day)
17
Page 18
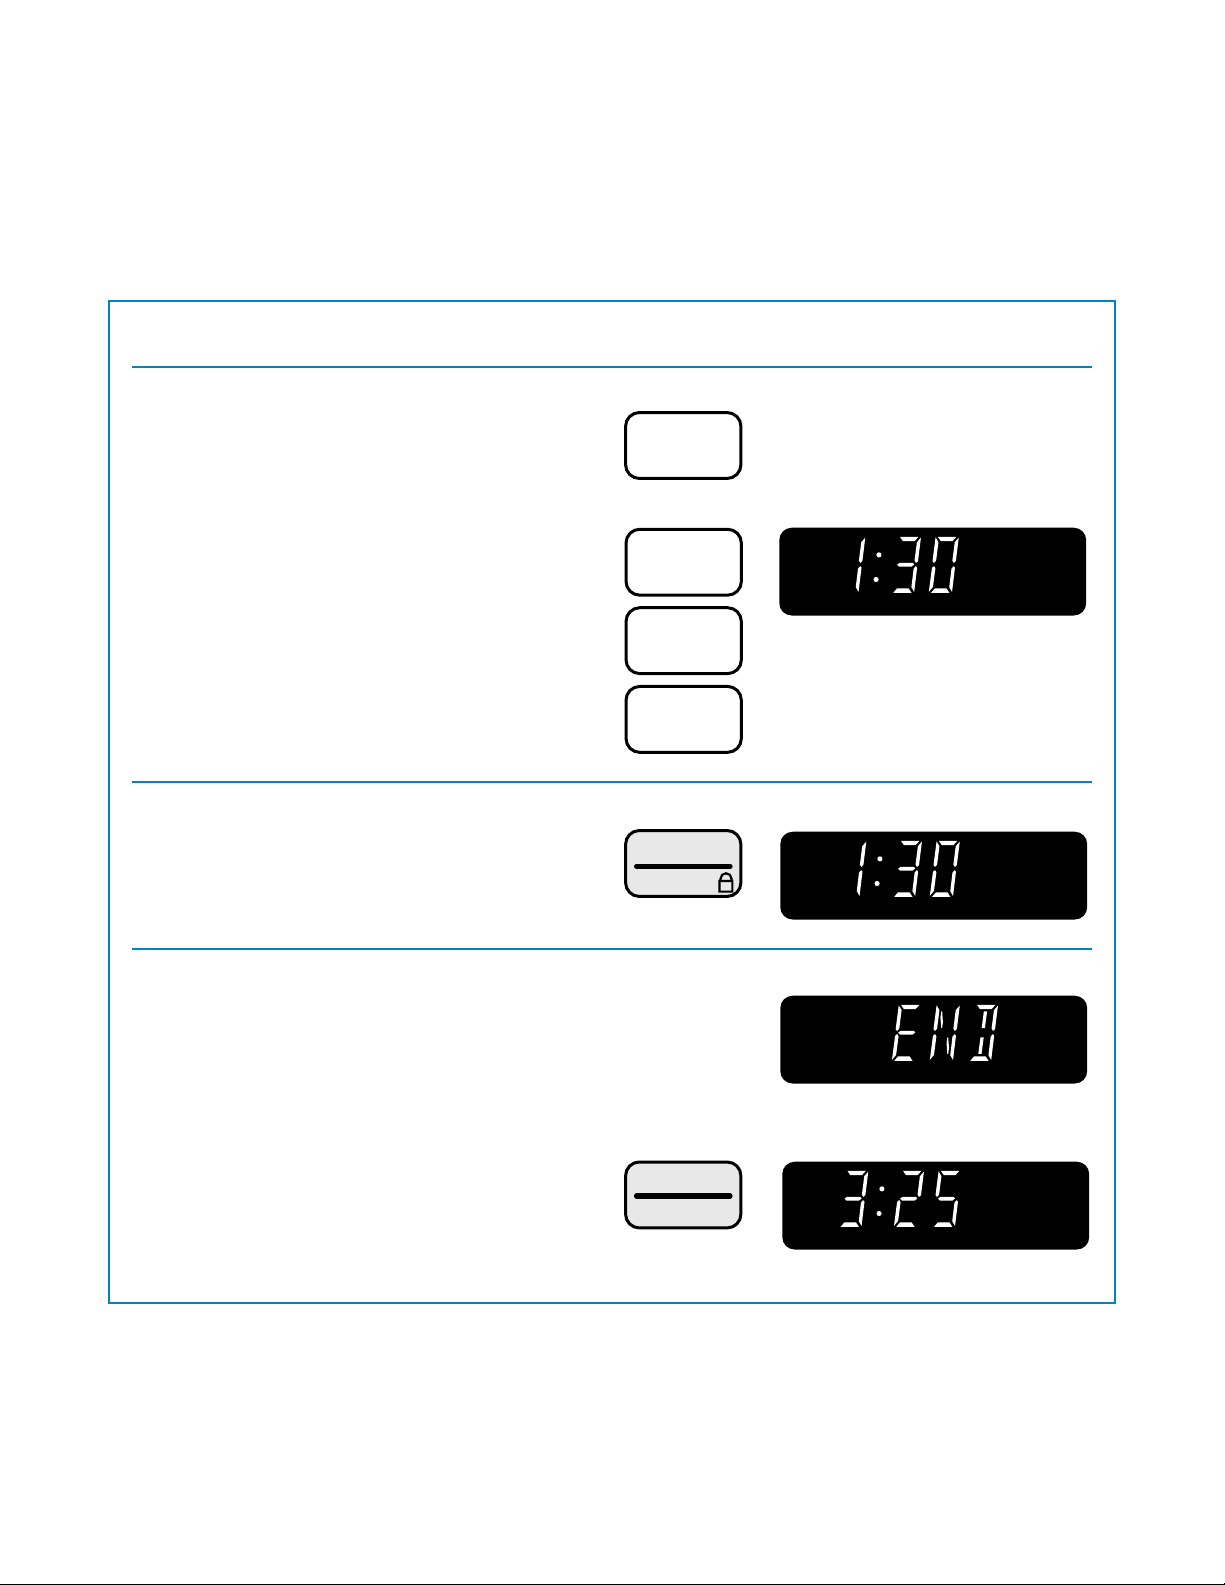
STANDARD MICROWAVE COOKING
This section gives you instructions for standard microwave cooking. Please read these instructions
carefully.
COOKING AT HIGH COOK POWER
1. Put the food in the oven and close the door.
2. Set the cooking time.
Example for 1 minute, 30 seconds:
3. Start the oven.
TOUCH YOU SEE
COOK
TIME
TOUCH YOU SEE
display scrolls the words
“ENTER COOKING TIME”
1
3
display scrolls the words
“TOUCH START OR POWER”
0
TOUCH YOU SEE
START
ENTER
COOK
4. At the end of the cooking time:
The display will show the time of day when you
touch OFF/CANCEL.
18
YOU SEE
(3 tones sound)
TOUCH YOU SEE
OFF
CANCEL
(time of day)
Page 19
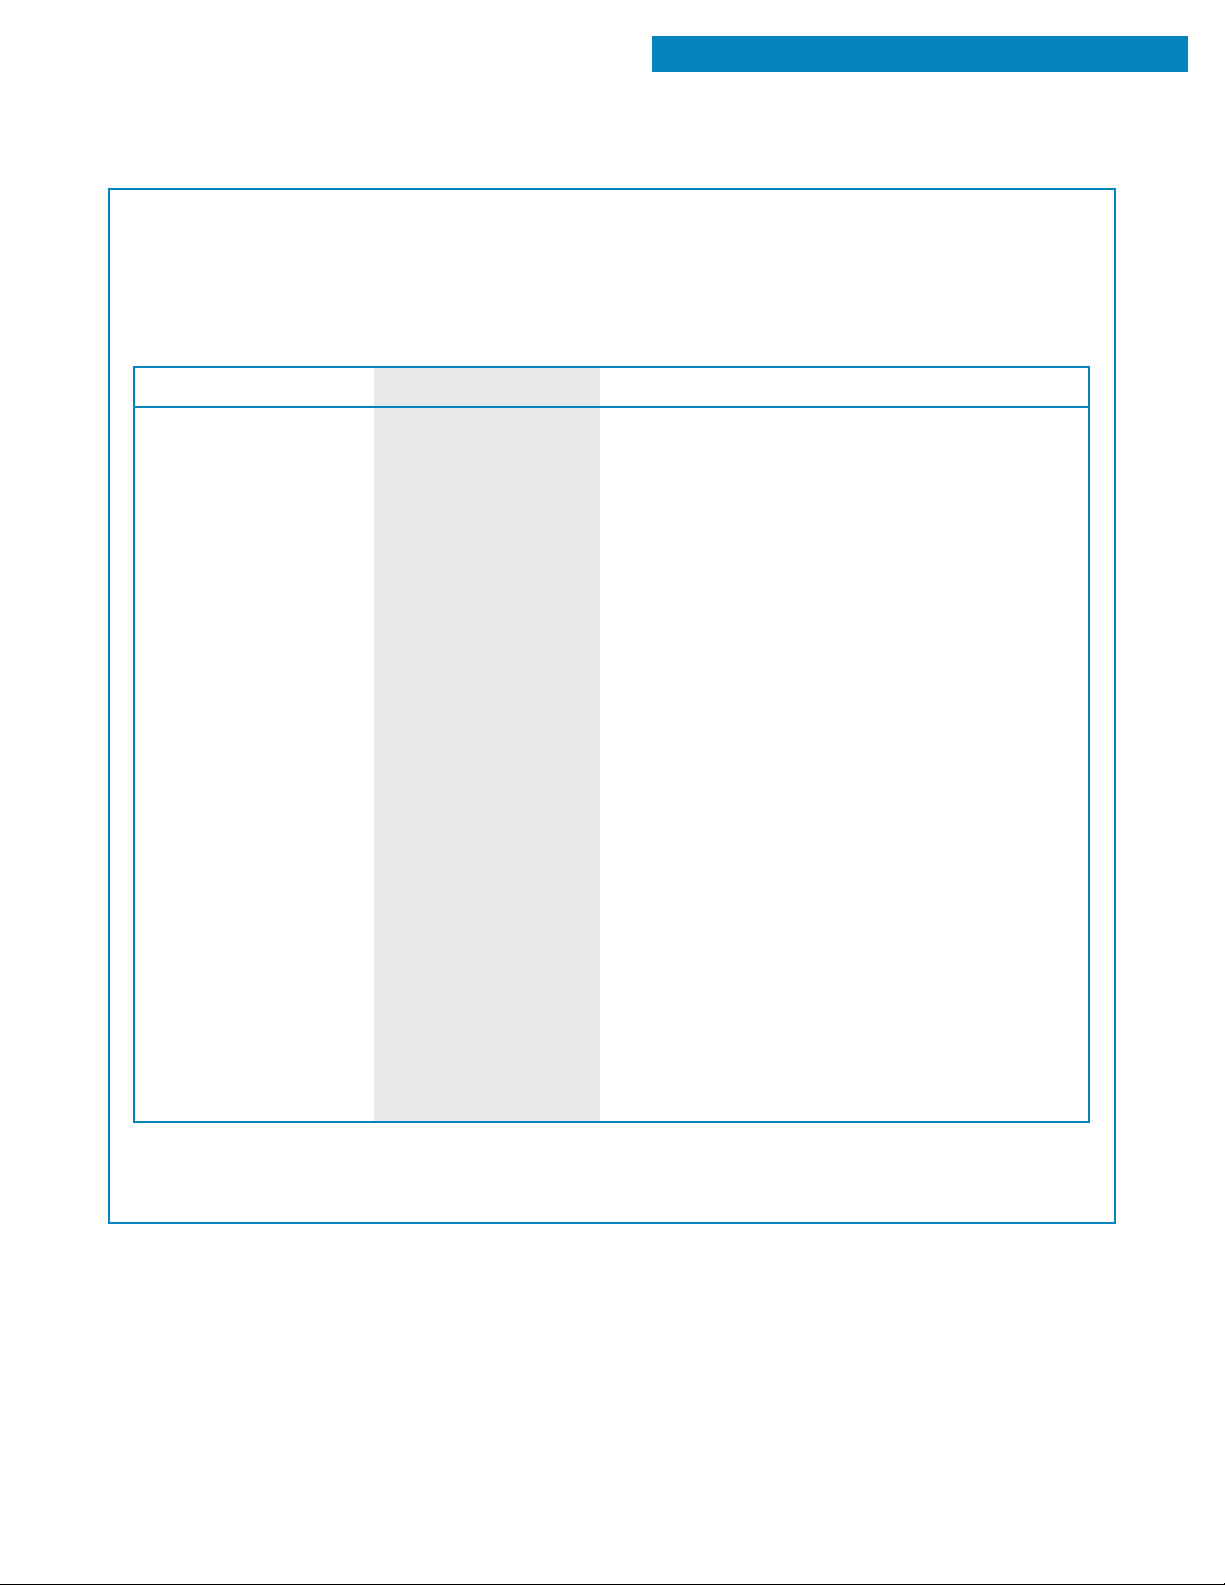
COOKING AT DIFFERENT COOK POWERS
STANDARD MICROWAVE COOKING
For best results, some recipes call for different cook
powers. The lower the cook power, the slower the
cooking. Each Number pad also stands for a different percentage of cook power. Many microwave
cookbook recipes tell you by number, percent, or
name which cook power to use.
COOK POWER
100% of full power
(automatic)
9=90% of full power
8=80% of full power
7=70% of full power
6=60% of full power
5=50% of full power
4=40% of full power
3=30% of full power
NAME
High
Medium-High
Medium
Medium-Low,
Defrost
The following chart gives the percentage of cook
power each Number pad stands for, and the cook
power name usually used. It also tells you when to
use each cook power. Follow recipe or food package
instructions if available.
NOTE: Refer to a reliable cookbook for cooking times.
WHEN TO USE IT
Quick heating many convenience foods and
•
foods with high water content, such as soups
and beverages
Cooking small tender pieces of meat, ground
•
meat, poultry pieces, fish fillets, and vegetables
Heating cream soups
•
Heating rice, pasta, or casseroles
•
Cooking and heating foods that need a
•
cook power lower than high (for example, whole
fish and meat loaf) or when food is cooking
too fast
Reheating a single serving of food
•
Cooking requiring special care, such as cheese
•
and egg dishes, pudding, and custards
Finishing cooking casseroles
•
Cooking ham, whole poultry, and pot roasts
•
Melting chocolate
•
Simmering stews
•
Heating pastries
•
Defrosting foods, such as bread, fish, meats,
•
poultry, and precooked foods
2=20% of full power
1=10% of full power
NOTE: Once cook time has been entered you can also use the COOK POWER pad as a second Minute
Timer by entering “0” for the cook power. The oven will count down the cooking time you set without
cooking.
Low
Softening butter, cheese, and ice cream
•
Keeping food warm
•
Taking chill out of fruit
•
continued on next page
19
Page 20
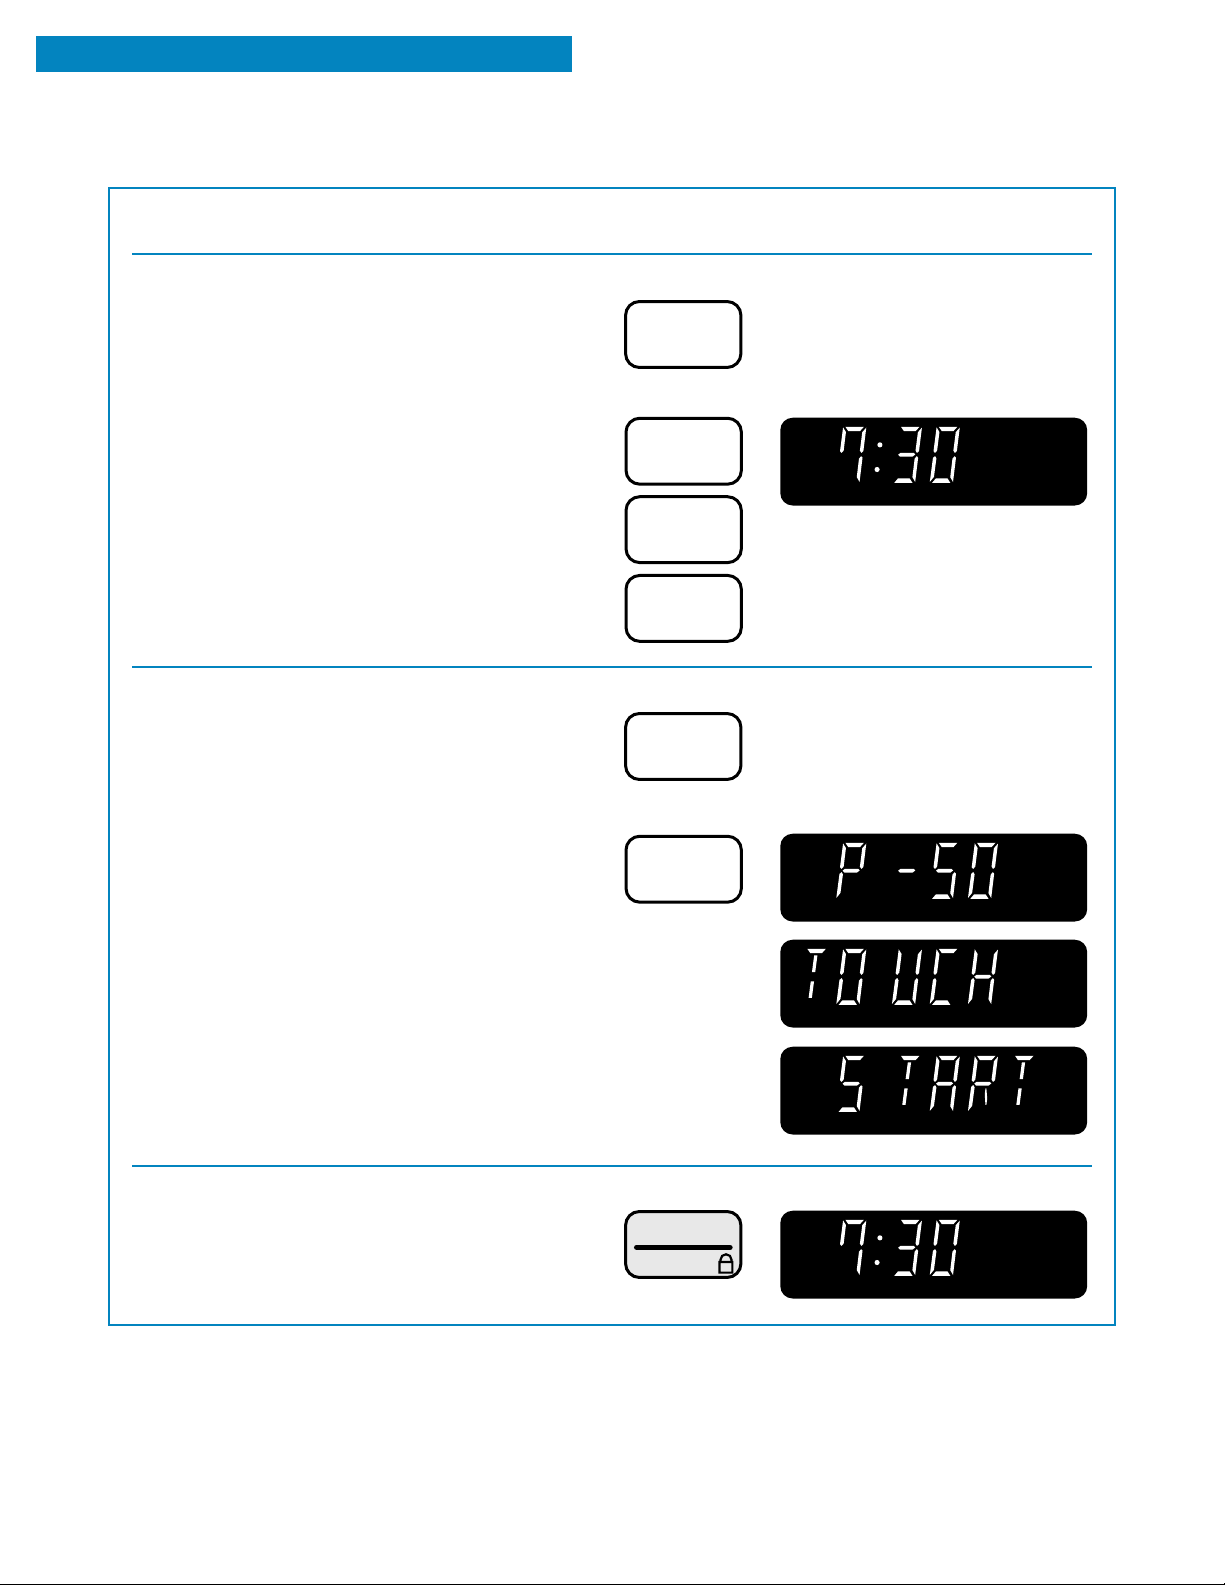
STANDARD MICROWAVE COOKING
COOKING AT DIFFERENT COOK POWERS (CONT.)
1. Put your food in the oven and close the door.
2. Set the cooking time.
Example for 7 minutes, 30 seconds:
3. Set the cook power.
Example for 50% cook power:
TOUCH YOU SEE
COOK
TIME
TOUCH YOU SEE
display scrolls the words
“ENTER COOKING TIME”
7
3
display scrolls the words
“TOUCH START OR POWER”
0
TOUCH YOU SEE
COOK
POWER
TOUCH YOU SEE
display scrolls the words
“ENTER POWER LEVEL 1 TO 10”
4. Start the oven.
5
TOUCH YOU SEE
START
ENTER
COOK
20
Page 21
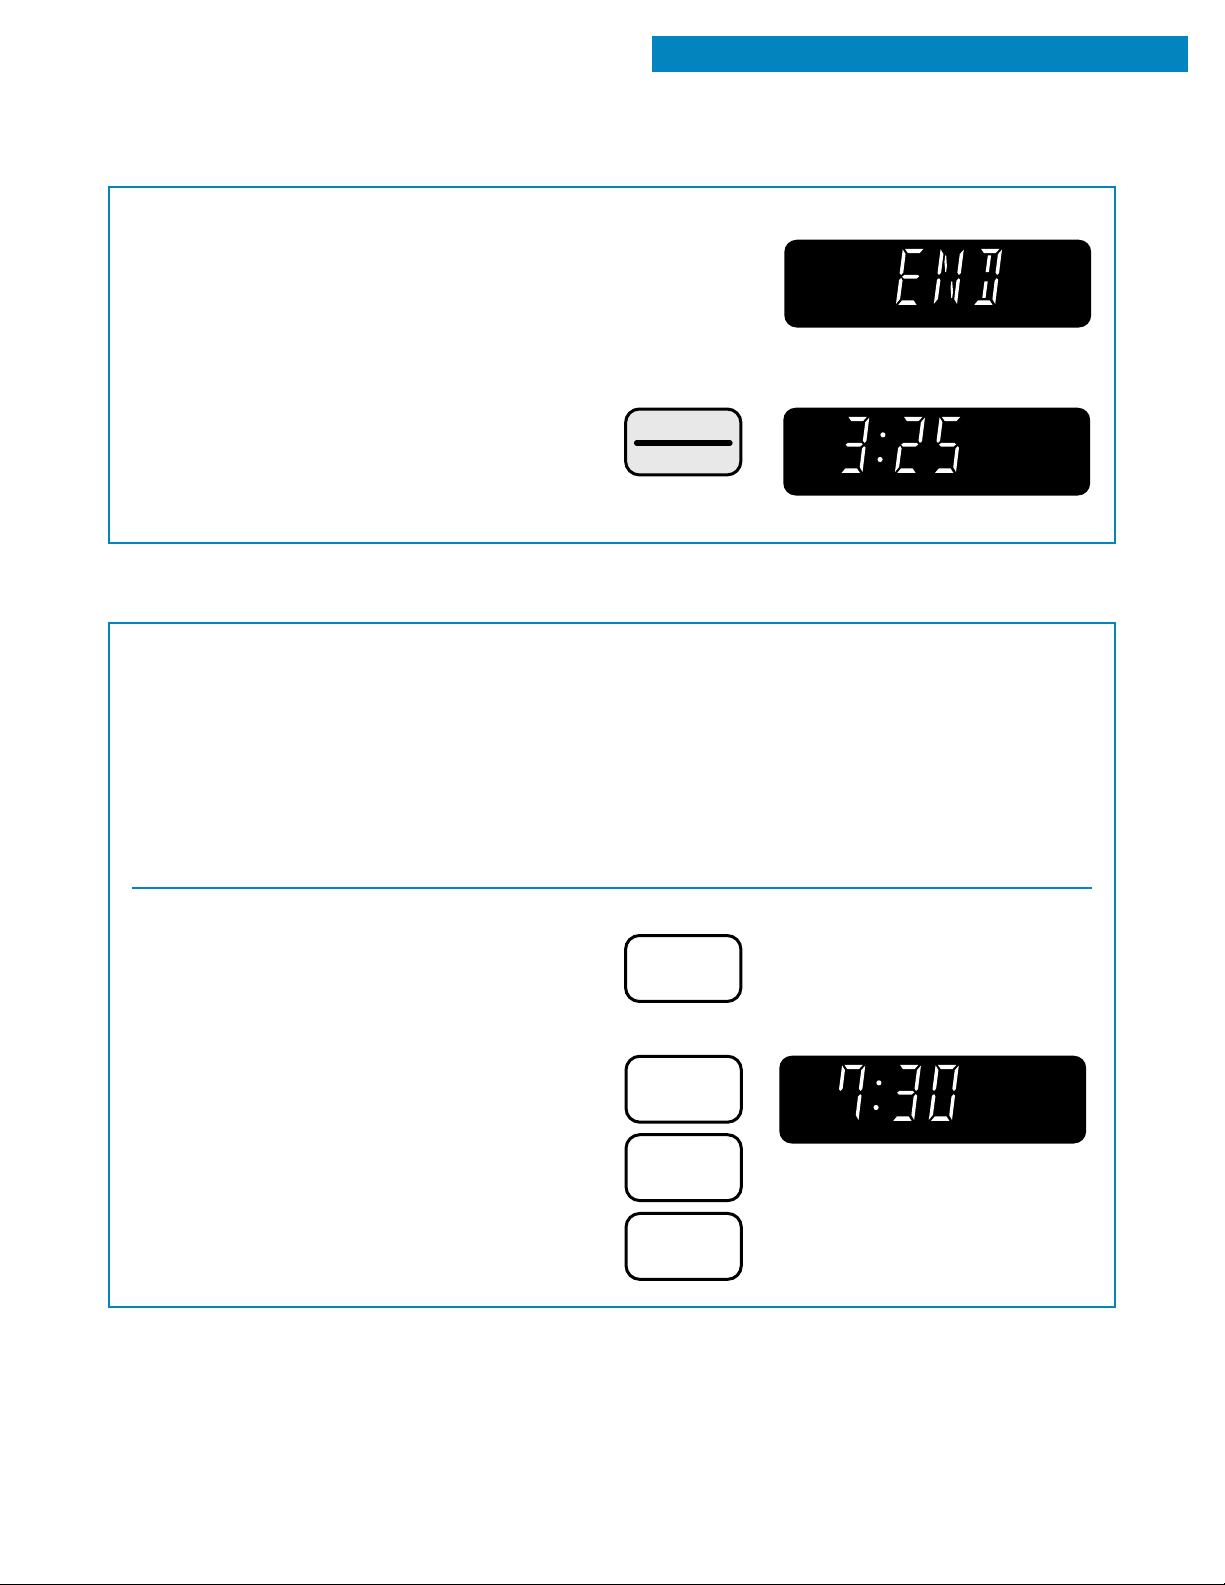
COOKING AT DIFFERENT COOK POWERS (CONT.)
STANDARD MICROWAVE COOKING
YOU SEE5. At the end of the cooking time:
(3 tones sound)
The display will show the time of day when you
touch OFF/CANCEL.
COOKING IN STAGES
For best results, some recipes call for one cook
power for a certain length of time, and another cook
power for another length of time. Your oven can be
set to change from one to another automatically, for
up to 2 stages.
You can set your chosen cook functions in any
order. However, when you use AUTO DEFROST,
it must be the first stage.
1. Put your food in the oven and close the door.
2. Set the cooking time for the first stage.
TOUCH YOU SEE
OFF
CANCEL
(time of day)
TOUCH YOU SEE
COOK
TIME
display scrolls the words
“ENTER COOKING TIME”
Example for 7 minutes, 30 seconds:
TOUCH YOU SEE
7
3
display scrolls the words
“TOUCH START OR POWER”
0
continued on next page
21
Page 22
STANDARD MICROWAVE COOKING
COOKING IN STAGES (CONT.)
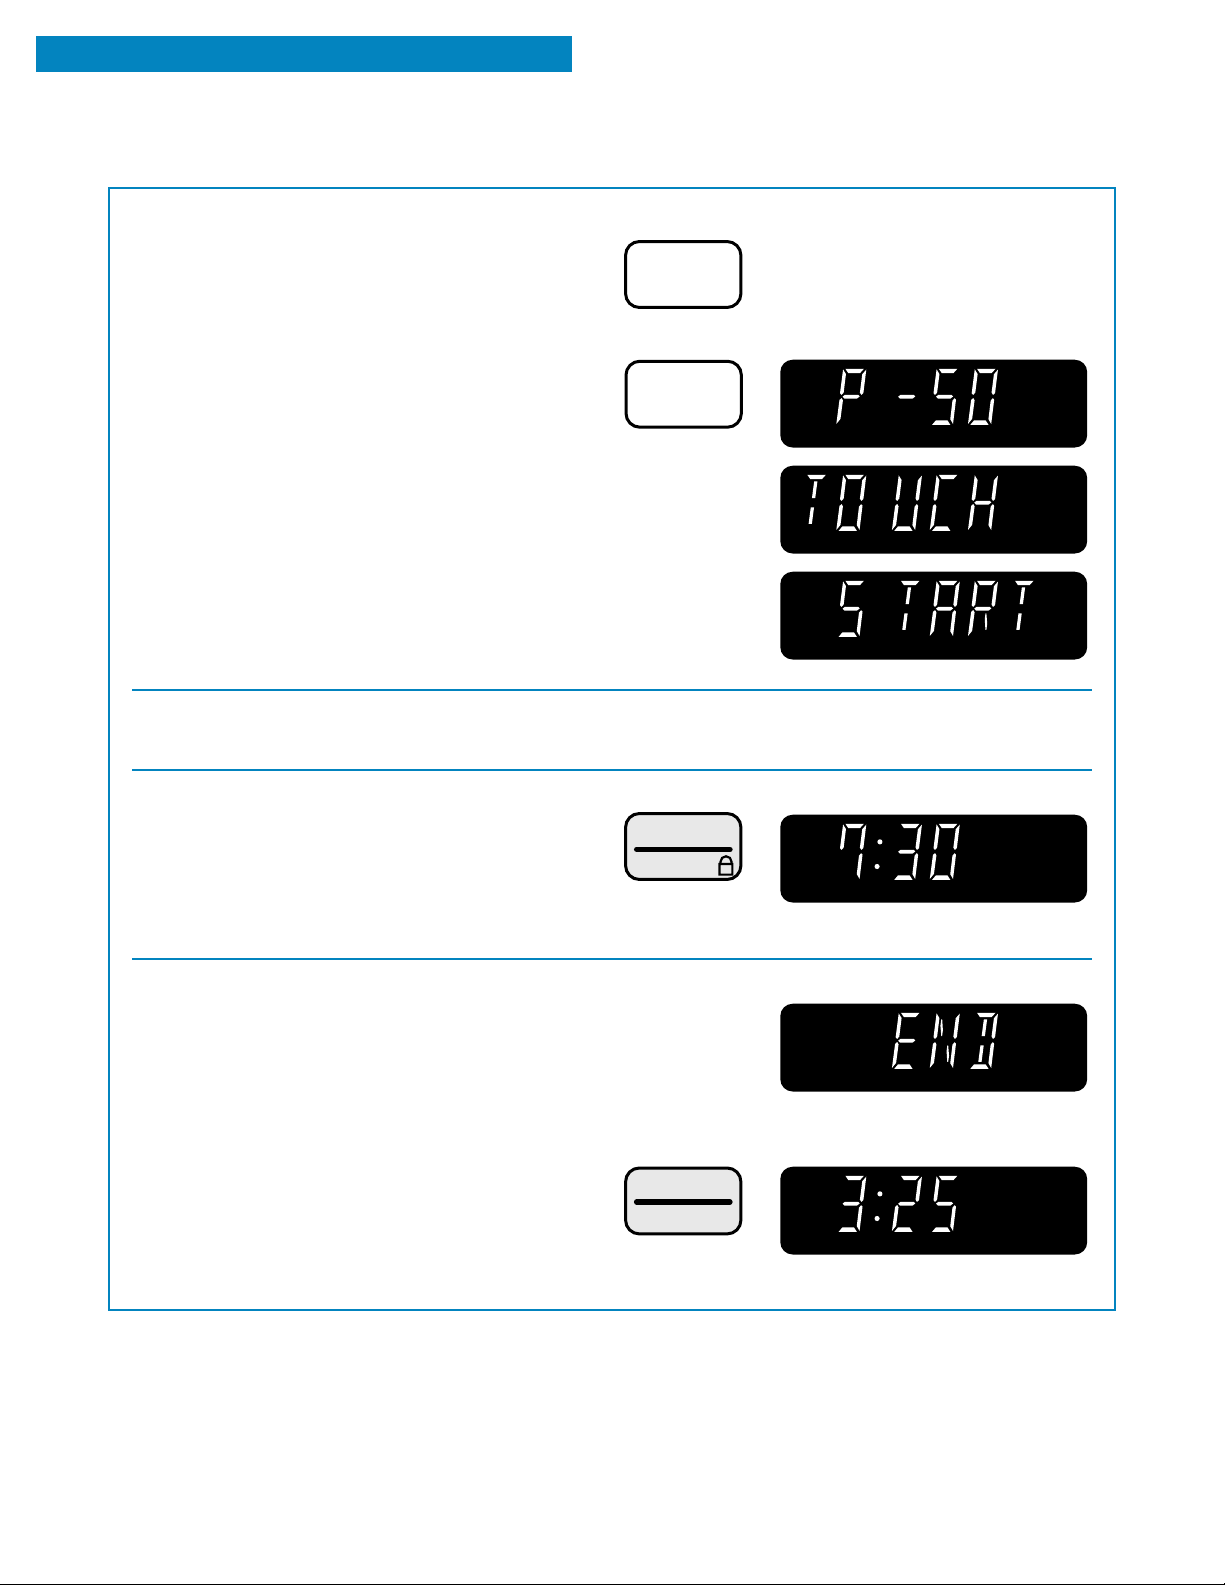
3. Set the cook power for the first stage.
Example for 50% cook power:
4. Repeat Steps 2 and 3 to set the cooking time
and cook power for the second stage.
5. Start the oven.
After the first stage is over, 2 tones sound and
the next stage will count down.
TOUCH YOU SEE
COOK
POWER
TOUCH YOU SEE
display scrolls the words
“ENTER POWER LEVEL 1 TO 10”
5
TOUCH YOU SEE
START
ENTER
COOK
(first stage)
6. At the end of the cooking time:
The display will show the time of day when you
touch OFF/CANCEL.
22
YOU SEE
(3 tones sound)
TOUCH YOU SEE
OFF
CANCEL
(time of day)
Page 23
USING AUTO COOK
STANDARD MICROWAVE COOKING
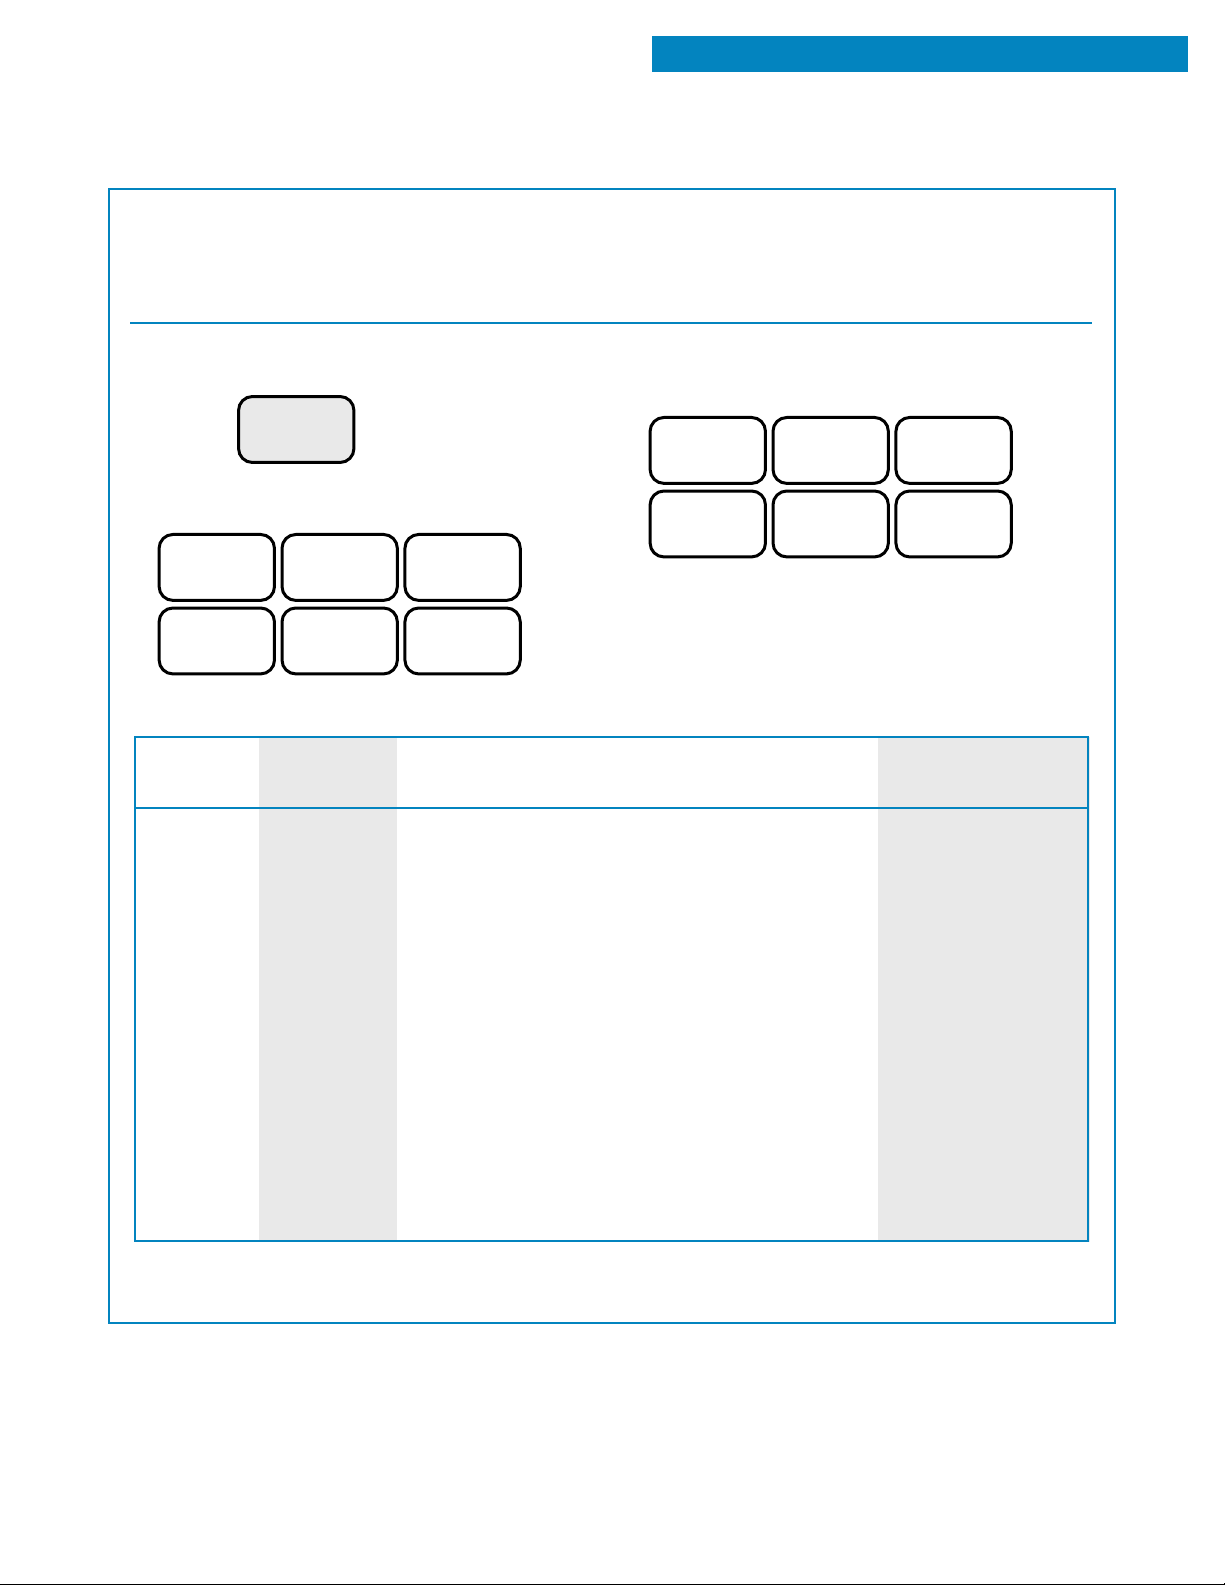
AUTO COOK lets you cook common microwaveprepared foods without needing to set times and
cook powers. AUTO COOK has preset times and
cook power for six major types of food.
To use AUTO COOK:
1. Put your food in the oven and close the door.
2. Touch
AUTO
COOK
NOTE: If you want to cook by entering a time and
cook power, see the “Microwave cooking guide”
in the “Cooking Guide” section.
4. Touch one or more of these Number pads
to enter the amount.
123
3. Touch one of these Number pads to choose
the type of food.
123
654
This chart tells you how to choose a food type and what amounts you can cook.
NUMBER
PAD
1
2
3
4
5
6
FOOD
Bacon
Frozen
Roll/Muffin
Fresh
Roll/Muffin
Beverage
Chicken
Pieces
Hot Cereal
Place bacon strips on a paper plate or dinner
plate lined with paper towels or on a microwave
bacon rack.
Remove from the package and place on a plate.
If baked good size is over 3 oz each, enter serving
size as “2”.
Remove from the package and place on a plate.
If baked good size is over 3 oz each, enter serving
size as “2”.
Stir liquid several times during heating. Be careful
when removing the beverage. It will be very hot.
Place the chicken pieces in a microwavable
container. Cover with plastic wrap and vent.
Prepare as directed on the package and cook.
Stir before eating. Use only instant hot cereal.
INSTRUCTIONS
654
AMOUNT
2 to 6 slices
1 to 6 each
(2 to 3 ounces each)
1 to 6 each
(2 to 3 ounces each)
1 to 2 cups
1
⁄2 to 2.0 lbs
1 to 6 servings
NOTE: If you open the door or touch OFF/CANCEL during cooking, the oven will stop cooking and you
will have to touch START/ENTER.
23
Page 24
STANDARD MICROWAVE COOKING
USING AUTO DEFROST
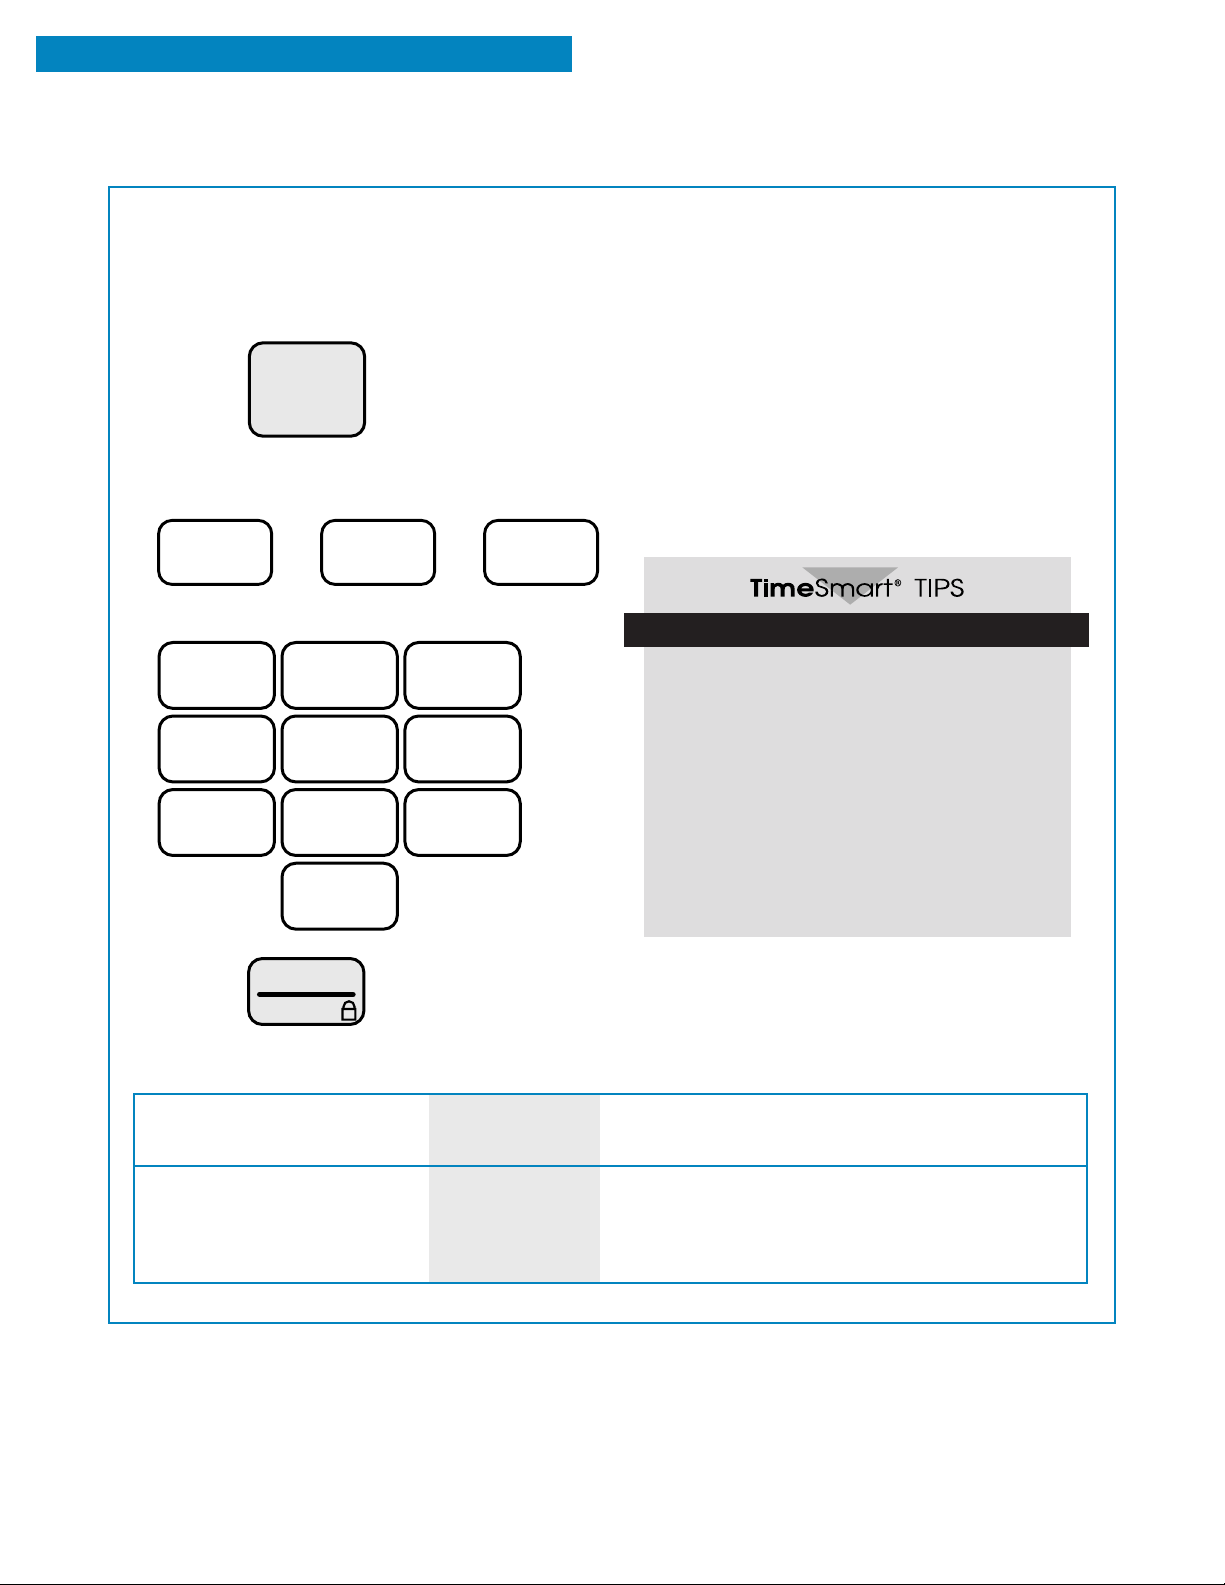
You can defrost food by choosing a category and
setting a weight. AUTO DEFROST has preset times
and cook powers for 3 categories: Meat, Poultry,
and Fish.
To use AUTO DEFROST, follow the steps below:
1. Touch
• MEAT
• POULTRY
• FISH
2. Touch one of three Number pads to choose
the type of food.
1
23
or
or
3. Touch Number pad(s) to enter the weight.
123
654
789
0
NOTES:
See the “Auto defrost chart” later in this section
•
for defrosting directions for each food.
To defrost items not listed in the “Auto defrost
•
chart,” use 30% cook power. Refer to a reliable
cookbook for defrosting information.
Twice during defrosting, the display will ask you
•
to turn food over. After you do so, close the door
and touch START/ENTER to continue defrosting.
See the “Auto defrost chart” later in this section
for instructions on what to do when you see this
message.
For even, complete defrosting
The shape of the package affects how
•
quickly food will defrost. Shallow packages
will defrost more quickly than a deep block.
As food begins to defrost, separate the
•
pieces. Separated pieces defrost more
evenly.
Use small pieces of aluminum foil to shield
•
parts of food such as chicken wings, leg
tips, fish tails, or areas that start to get
warm. Make sure the foil does not touch
the sides, top, or bottom of the oven.
4. Touch
This chart shows you how to choose a type of food and the weights you can set for each type.
FOOD
Meat
Poultry
Fish
24
START
ENTER
TOUCH
NUMBER PAD
1
2
3
WEIGHTS YOU CAN SET
(tenths of a pound)
.1 to 6.0
.1 to 6.0
.1 to 6.0
Page 25

AUTO DEFROST CHART
1. Meat setting
STANDARD MICROWAVE COOKING
FOOD
Beef
Ground Beef,
Bulk
Ground Beef,
Patties
Round Steak
Tenderloin
Steak
Stew Beef
Pot Roast,
Chuck Roast
Rib Roast
Rolled Rump
Roast
Lamb
Cubes for Stew
Chops
(1 inch thick)
WHEN YOU SEE MESSAGE
Remove thawed portions with fork.
Turn over. Return remainder to oven.
Separate and rearrange.
Turn over. Cover warm areas with
aluminum foil.
Turn over. Cover warm areas with
aluminum foil.
Remove thawed portions with fork.
Separate remainder. Return
remainder to oven.
Turn over. Cover warm areas with
aluminum foil.
Turn over. Cover warm areas with
aluminum foil.
Turn over. Cover warm areas with
aluminum foil.
Remove thawed portions with fork.
Return remainder to oven.
Separate and rearrange.
SPECIAL INSTRUCTIONS
Meat of irregular shape and large, fatty cuts
of meat should have the narrow or fatty areas
shielded with foil at the beginning of a
defrost cycle.
Do not defrost less than 1⁄4 lb.
Do not defrost less than two 4 oz patties.
Place on a microwavable roasting rack.
Place on a microwavable roasting rack.
Place in a microwavable baking dish.
Place on a microwavable roasting rack.
Place on a microwavable roasting rack.
Place on a microwavable roasting rack.
Place in a microwavable baking dish.
Place on a microwavable roasting rack.
Pork
Chops
(1⁄2 inch thick)
Hot Dogs
Spareribs,
Country-Style
Ribs
Sausage,
Links
Sausage,
Bulk
Loin Roast,
Boneless
Separate and rearrange.
Separate and rearrange.
Turn over. Cover warm areas with
aluminum foil.
Separate and rearrange.
Remove thawed portions with fork.
Turn over. Return remainder to oven.
Turn over. Cover warm areas with
aluminum foil.
Place on a microwavable roasting rack.
Place on a microwavable roasting rack.
Place on a microwavable roasting rack.
Place on a microwavable roasting rack.
Place in a microwavable baking dish.
Place on a microwavable roasting rack.
continued on next page
25
Page 26

STANDARD MICROWAVE COOKING
AUTO DEFROST CHART
2. Poultry setting
FOOD
Chicken
Whole
Cut Up
Cornish Hens
Whole
Turkey
Breast
3. Fish setting
FOOD
Fish
Fillets
Steaks
Whole
WHEN YOU SEE MESSAGE
Turn over (finish defrosting breastside down). Cover warm areas with
aluminum foil.
Separate pieces and rearrange.
Turn over. Cover warm areas with
aluminum foil.
Turn over. Cover warm areas with
aluminum foil.
Turn over. Cover warm areas with
aluminum foil.
WHEN YOU SEE MESSAGE
Turn over. Separate fillets when
partially thawed.
Separate and rearrange.
Turn over.
SPECIAL INSTRUCTIONS
Place chicken breast-side up on a microwavable roasting rack. Finish defrosting by
immersing in cold water. Remove giblets
when chicken is partially defrosted.
Place on a microwavable roasting rack.
Finish defrosting by immersing in cold water.
Place on a microwavable roasting rack.
Finish defrosting by immersing in cold water.
Place on a microwavable roasting rack.
Finish defrosting by immersing in cold water.
SPECIAL INSTRUCTIONS
Place in a microwavable baking dish.
Carefully separate fillets under cold water.
Place in a microwavable baking dish.
Run cold water over to finish defrosting.
Place in a microwavable baking dish.
Cover head and tail with foil; do not let foil
touch sides of microwave oven. Finish
defrosting by immersing in cold water.
Shellfish
Crabmeat
Lobster Tails
Shrimp
Scallops
26
Break apart. Turn over.
Turn over and rearrange.
Separate and rearrange.
Separate and rearrange.
Place in a microwavable baking dish.
Place in a microwavable baking dish.
Place in a microwavable baking dish.
Place in a microwavable baking dish.
Page 27
DEFROSTING TIPS
STANDARD MICROWAVE COOKING
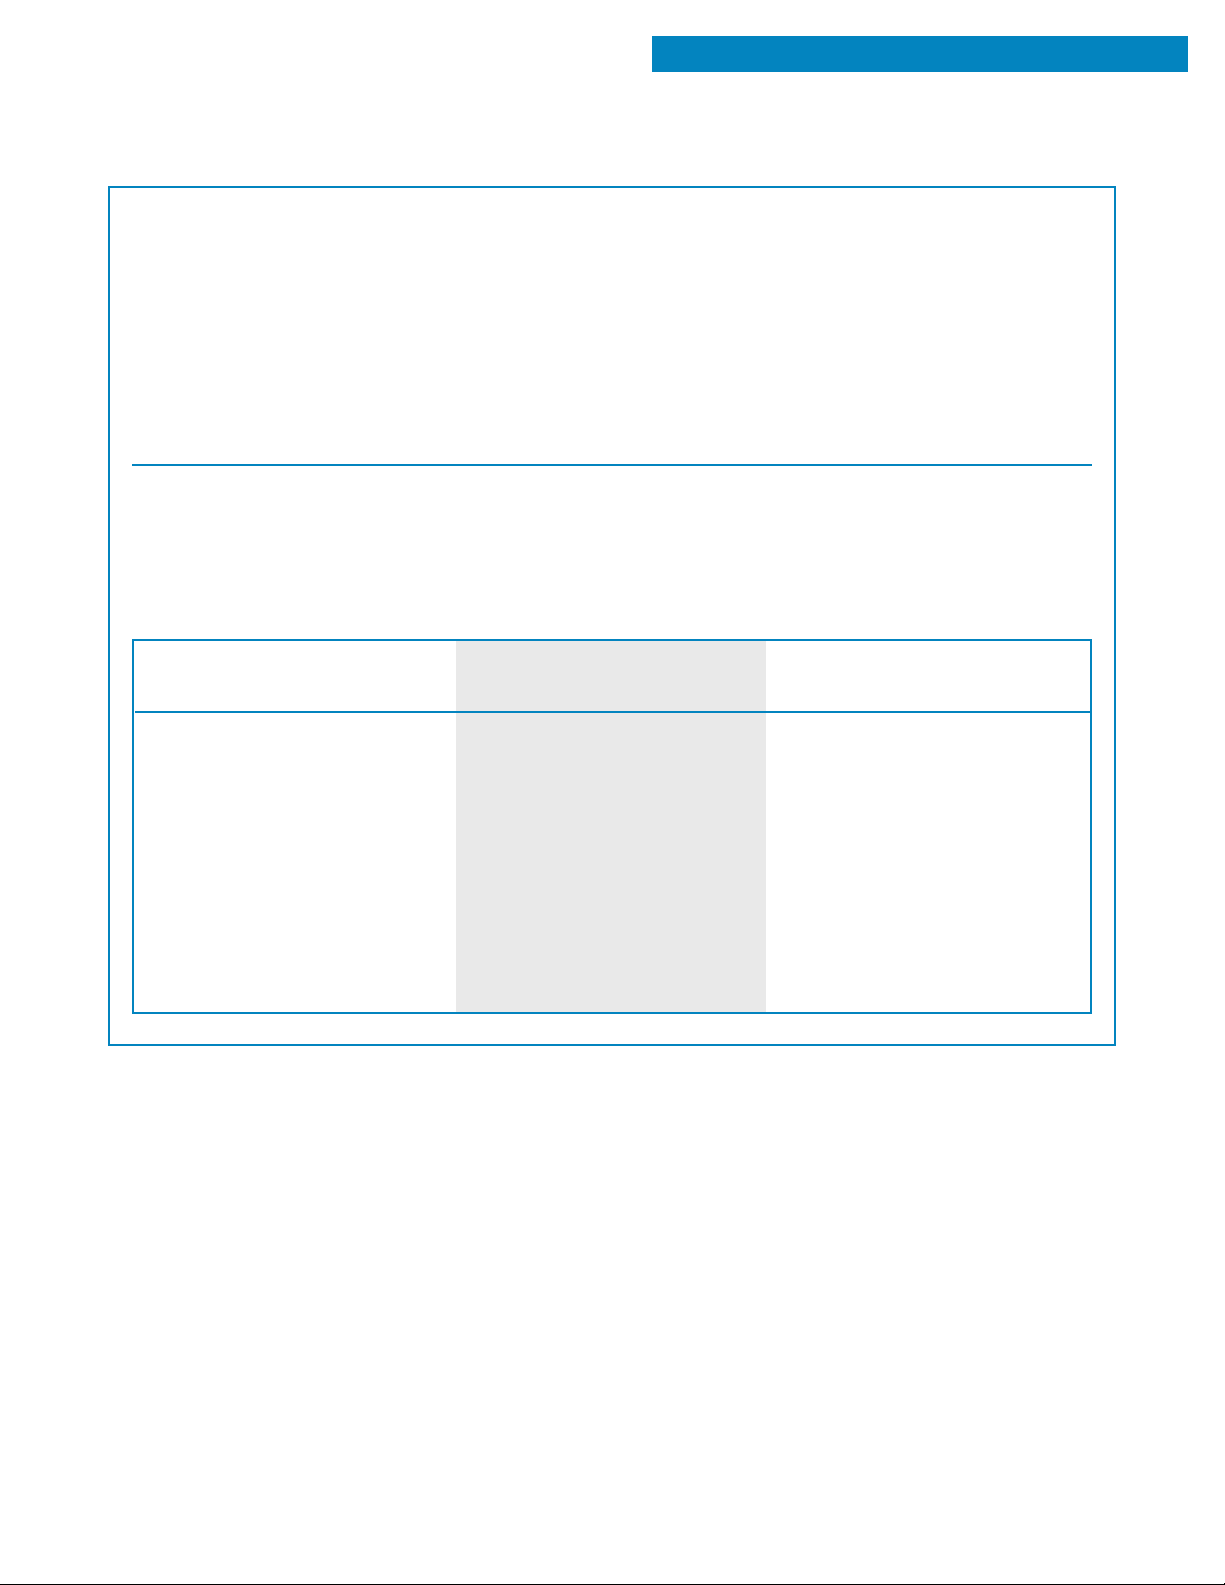
When using AUTO DEFROST, you need to
•
enter the net weight (the weight of the food
minus the container). Enter the weight to the
nearest 1⁄10 lb.
Only use AUTO DEFROST for raw food. AUTO
•
DEFROST gives best results when the food to
be thawed is completely frozen. If the food is
partially defrosted, always set a lower food weight
(for a shorter defrosting time) to prevent cooking
the food.
Weight conversion chart
You are probably used to food weights as being in
pounds and ounces that are fractions of a pound
(for example 4 ounces equals 1⁄4 pound). However,
in order to enter food weight in AUTO DEFROST,
you must specify pounds and tenths of a pound.
EQUIVALENT
DECIMAL WEIGHT
.10
.20
.25 One-Quarter Pound
.30
.40
.50 One-Half Pound
.60
.70
.75 Three-Quarters Pound
.80
.90
1.00 One Pound
OUNCE WEIGHT
For better results, a preset standing time is
•
included in the defrosting time. This may make
the defrosting time seem longer than expected.
(For more information on standing time, see
the “Microwave cooking tips” in the “Cooking
Guide” section.)
If the weight on the food package is in fractions of a
pound, you can use the following chart to convert the
weight to decimals.
EQUIVALENT
GRAM WEIGHT
1.6
3.2
4.0
4.8
6.4
8.0
9.6
11.2
12.0
12.8
14.4
16.0
45
91
113
136
181
227
272
318
340
363
408
454
27
Page 28
STANDARD MICROWAVE COOKING
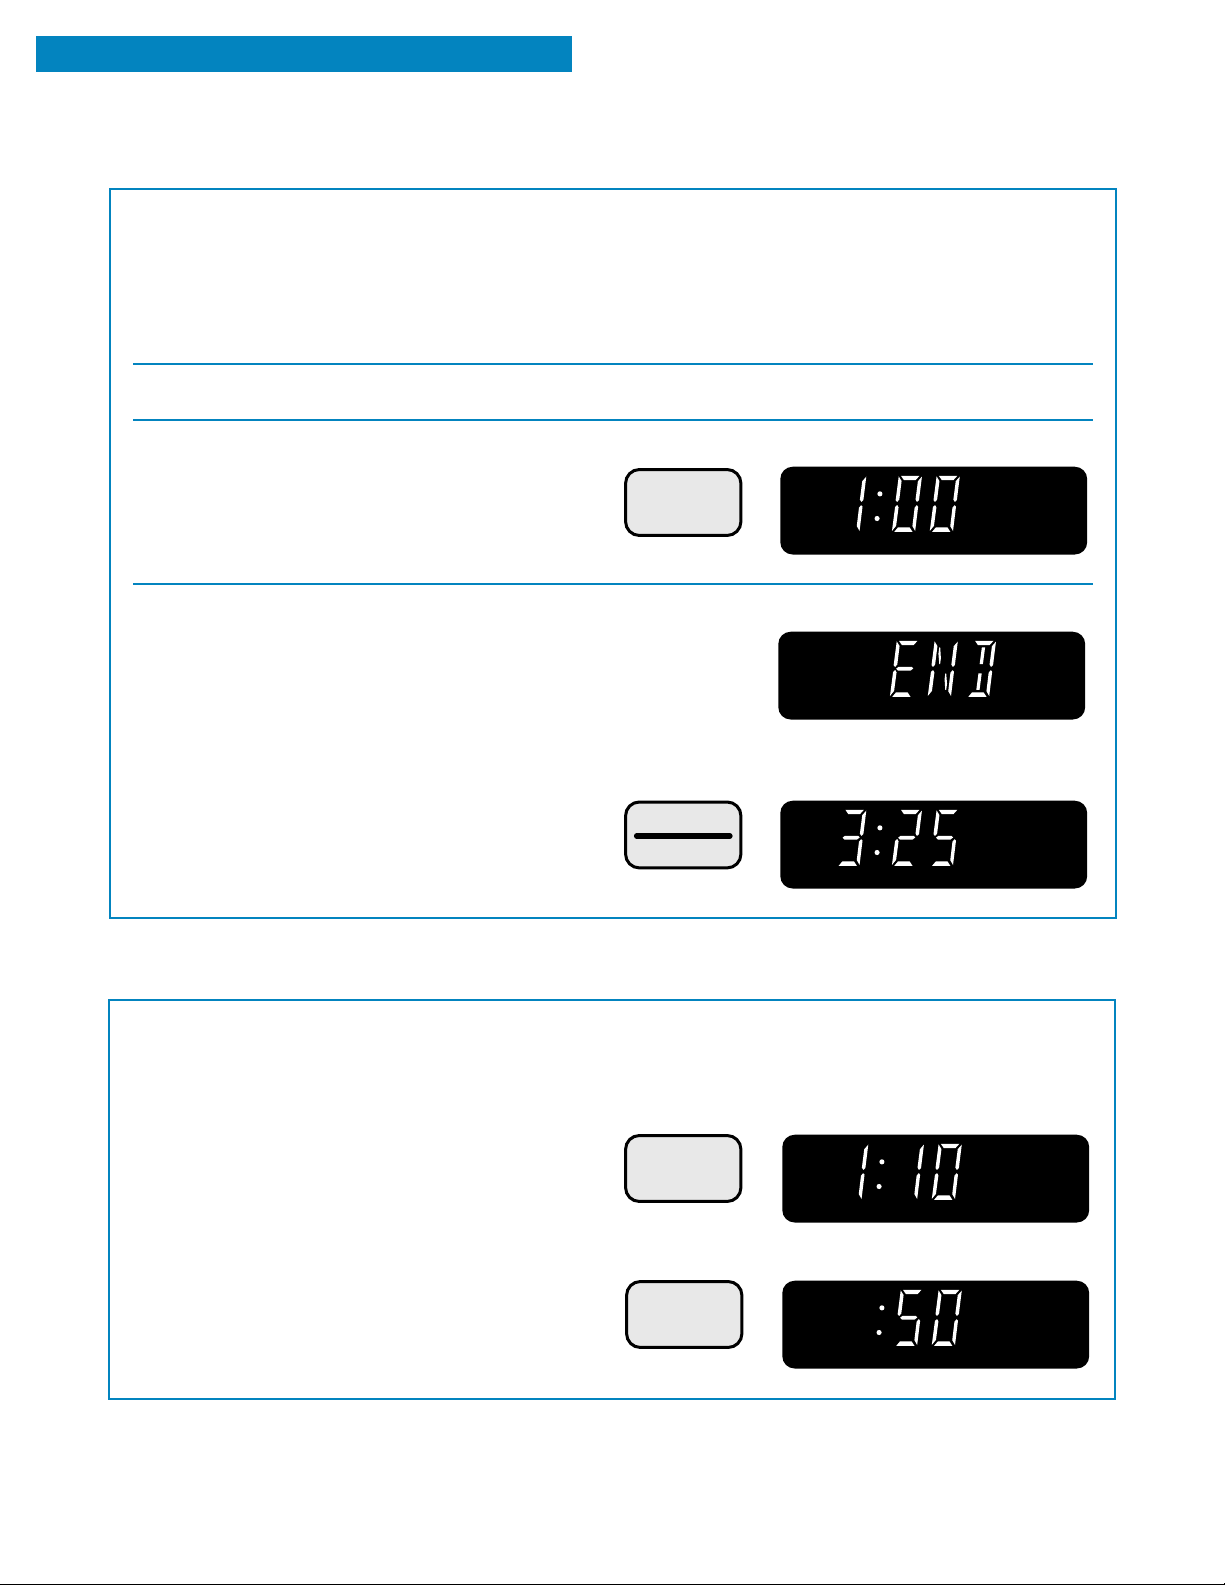
USING ADD MINUTE
ADD MINUTE lets you cook food for 1 minute at
100% cook power.
NOTES:
Each time you touch ADD MINUTE, it will add
•
1 minute.
1. Make sure your food is in the oven.
2. Touch ADD MINUTE.
Example when cooking for one minute:
3. At the end of the cooking time:
The display will show the time of day when you
touch OFF/CANCEL.
You can enter ADD MINUTE only after closing
•
the door or after touching OFF/CANCEL.
You can only use ADD MINUTE to start the oven
•
if no other cooking function is running.
TOUCH YOU SEE
ADD
MINUTE
once
TOUCH YOU SEE
OFF
CANCEL
COOK
YOU SEE
(3 tones sound)
(time of day)
USING MORE OR LESS
If a preset cooking time is too long or too short,
you can lengthen or shorten the cooking time
during the cooking cycle.
To add 10 seconds to a remaining cook time
of 1 minute:
To subtract 10 seconds from a remaining
cook time of 1 minute:
28
NOTE: You can only use MORE and LESS with
Auto Cook or regular timed cooking.
TOUCH YOU SEE
MORE
COOK
TOUCH YOU SEE
LESS
COOK
Page 29
USING WARM HOLD
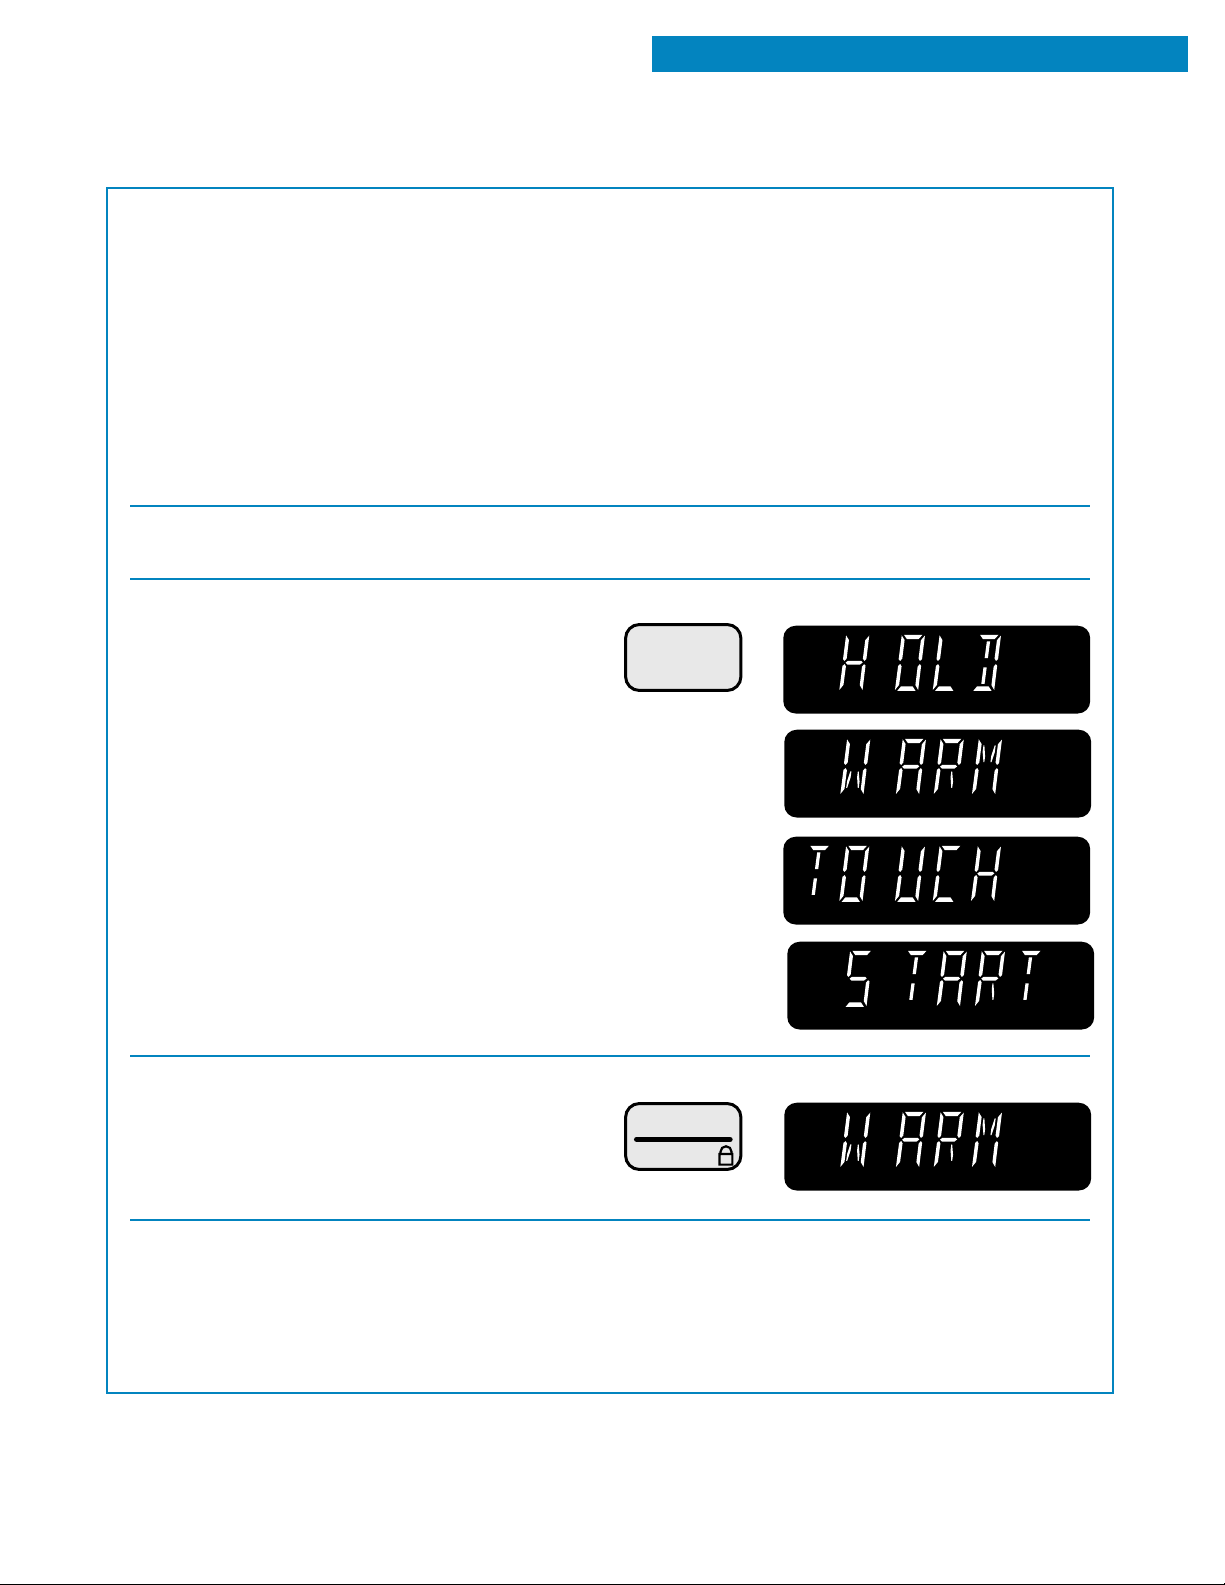
STANDARD MICROWAVE COOKING
You can safely keep hot, cooked food warm in your
microwave oven for up to 99 minutes, 99 seconds.
You can use WARM HOLD by itself, or to automatically follow a cooking cycle.
NOTES:
WARM HOLD operates for up to 99 minutes,
•
99 seconds.
Opening the oven door cancels WARM HOLD.
•
Close the door and touch WARM HOLD, then
touch START/ENTER if additional WARM HOLD
time is desired.
1. Put hot, cooked food in the oven and close
the door.
2. Touch WARM HOLD.
Food cooked covered should be covered during
•
WARM HOLD.
Pastry items (pies, turnovers, etc.) should be
•
uncovered during WARM HOLD.
Complete meals kept warm on a dinner plate
•
should be covered during WARM HOLD.
Do not use more than 1 complete WARM HOLD
•
cycle (about 1 hour, 40 minutes). The quality of
some foods will suffer with extended time.
TOUCH YOU SEE
WARM
HOLD
3. Start the oven.
To make WARM HOLD automatically
follow another cycle:
While you are entering cooking instructions, touch
•
WARM HOLD before touching START/ENTER.
TOUCH YOU SEE
START
ENTER
When the last cooking cycle is over, you will hear
•
2 tones. “WARM” will come on while the oven
continues to run.
29
Page 30
SENSOR COOKING
Your microwave oven has a sensor that detects the humidity released by the food. The amount
of humidity detected tells the oven how long to cook or heat your food. The sensor is used by
3 special functions: SENSOR COOK, SENSOR REHEAT, and SENSOR POPCORN. The simple
instructions for these functions are on the following pages.
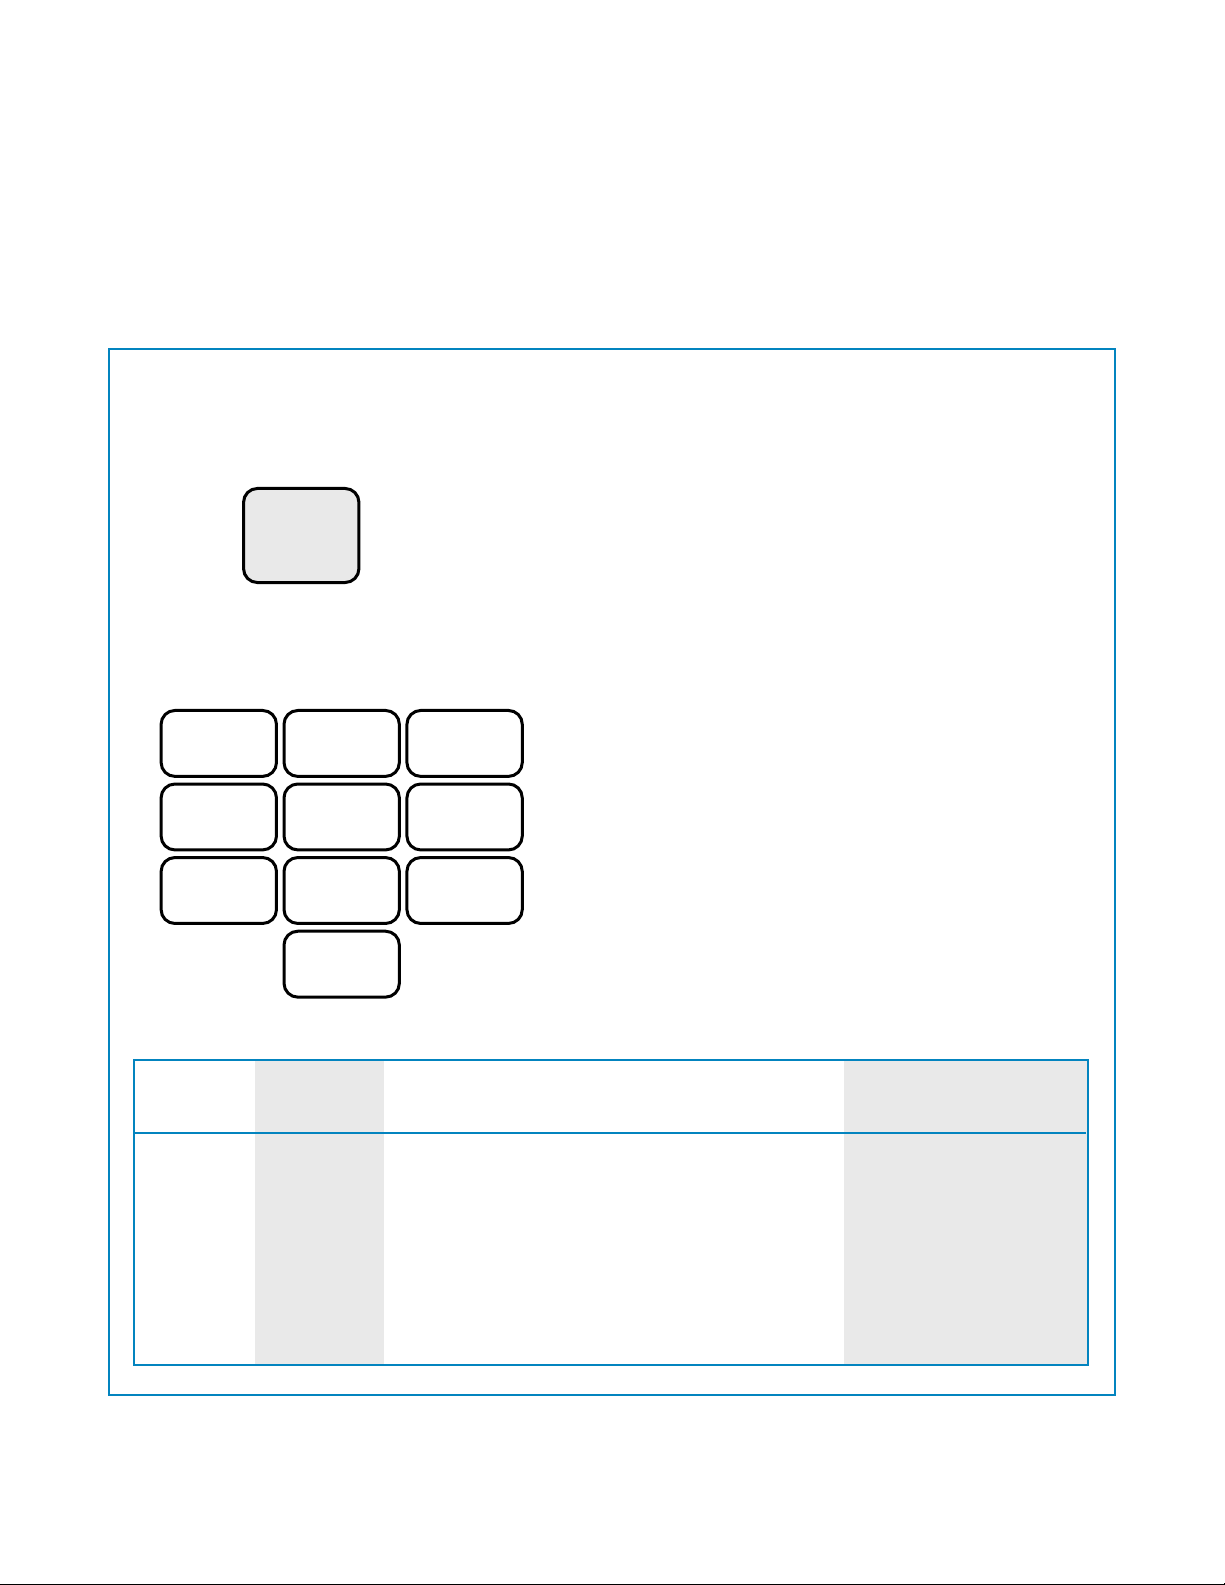
USING SENSOR COOK
SENSOR COOK has preset cook powers for
cooking 10 different types of food.
To use SENSOR COOK:
1. Put the food in the oven and close the door.
2. Touch
COOK
3. Touch a Number pad to choose the type
of food.
NOTE: See the chart below for the types of food
to choose from.
123
654
789
0
NOTES:
If you want to cook by entering a time and cook
•
power, see “Microwave cooking guide” in the
“Cooking Guide” section.
The oven should be plugged in at least 5 minutes
•
before sensor cooking.
Room temperature should not exceed 95°F.
•
Be sure the exterior of the cooking container and
•
the interior of the oven are dry. Wipe off each with
a paper towel.
The oven will not generate microwave energy for
•
approximately 28 seconds at the beginning of the
sensor cooking cycle.
This chart tells you how to choose a food type and what amounts you can cook.
NUMBER
INSTRUCTIONS
30
PAD
1
2
3
FOOD
Potato
Fresh
Vegetable
Frozen
Vegetable
Pierce each potato with a fork and place
on the oven tray around the edge, at least
1 inch apart.
Place moist vegetables in a microwavable
container. Cover with plastic wrap and vent.
Remove from package. Place vegetables in a
microwavable container. Cover with plastic
wrap and vent.
AMOUNT
1 to 4 medium,
about 8 to 10 oz each
1 to 4 cups
1 to 4 cups
Page 31

USING SENSOR COOK (CONT.)
NUMBER
PAD
4
5
6
7
8
FOOD
Frozen
Entrée
Rice
Casserole
Ground
Meat
Fish,
Seafood
INSTRUCTIONS
Remove from outer package. Loosen cover on
three sides. If entrée is not in a microwave-safe
container, place it on a plate, cover with plastic
wrap and vent.
Follow measurements on package for ingredient
amounts. Place rice and liquid (water or chicken
or vegetable stock) in a microwavable dish.
Cover with plastic wrap. When cooking is
complete, allow rice to stand 5 minutes or until
liquid is absorbed. Stir rice.
Combine the ingredients per the recipe in a
1- to 2-quart casserole. Cover with plastic wrap
and vent. After cooking is complete, allow 5
minutes standing time.
Crumble meat into a microwavable container.
Season and cover with plastic wrap. Vent cover
for well-done meat.
Place the food around the sides of a microwave
safe container. Season and add 1⁄4- to 1⁄2-cup
liquid (wine, water, salsa, etc.) if desired. Cover
with plastic wrap, vented.
AMOUNT
Works best if entrée is
10 to 20 oz.
1
⁄2 to 2 cups of dry rice
Use medium or long
grain rice. Cook instant
rice according to directions on the package.
1 to 3 cups
1
⁄4 to 2 lbs
1
⁄4 to 2 lbs
-
SENSOR COOKING
9
0
NOTE: If you open the door or touch OFF/CANCEL during cooking, the oven will stop cooking and you will
have to touch START/ENTER.
Eggs,
Scrambled
Frozen
Pizza
Break eggs into a 4-cup measuring cup or
1-quart casserole. Add 1 tablespoon milk or
water per egg and beat. Cover with plastic
wrap, vented. When cooking is complete,
remove from oven, stir, and allow 1 to 2 minutes
standing time.
Follow package directions.
1 to 4 eggs
1 to 2 servings
31
Page 32
SENSOR COOKING
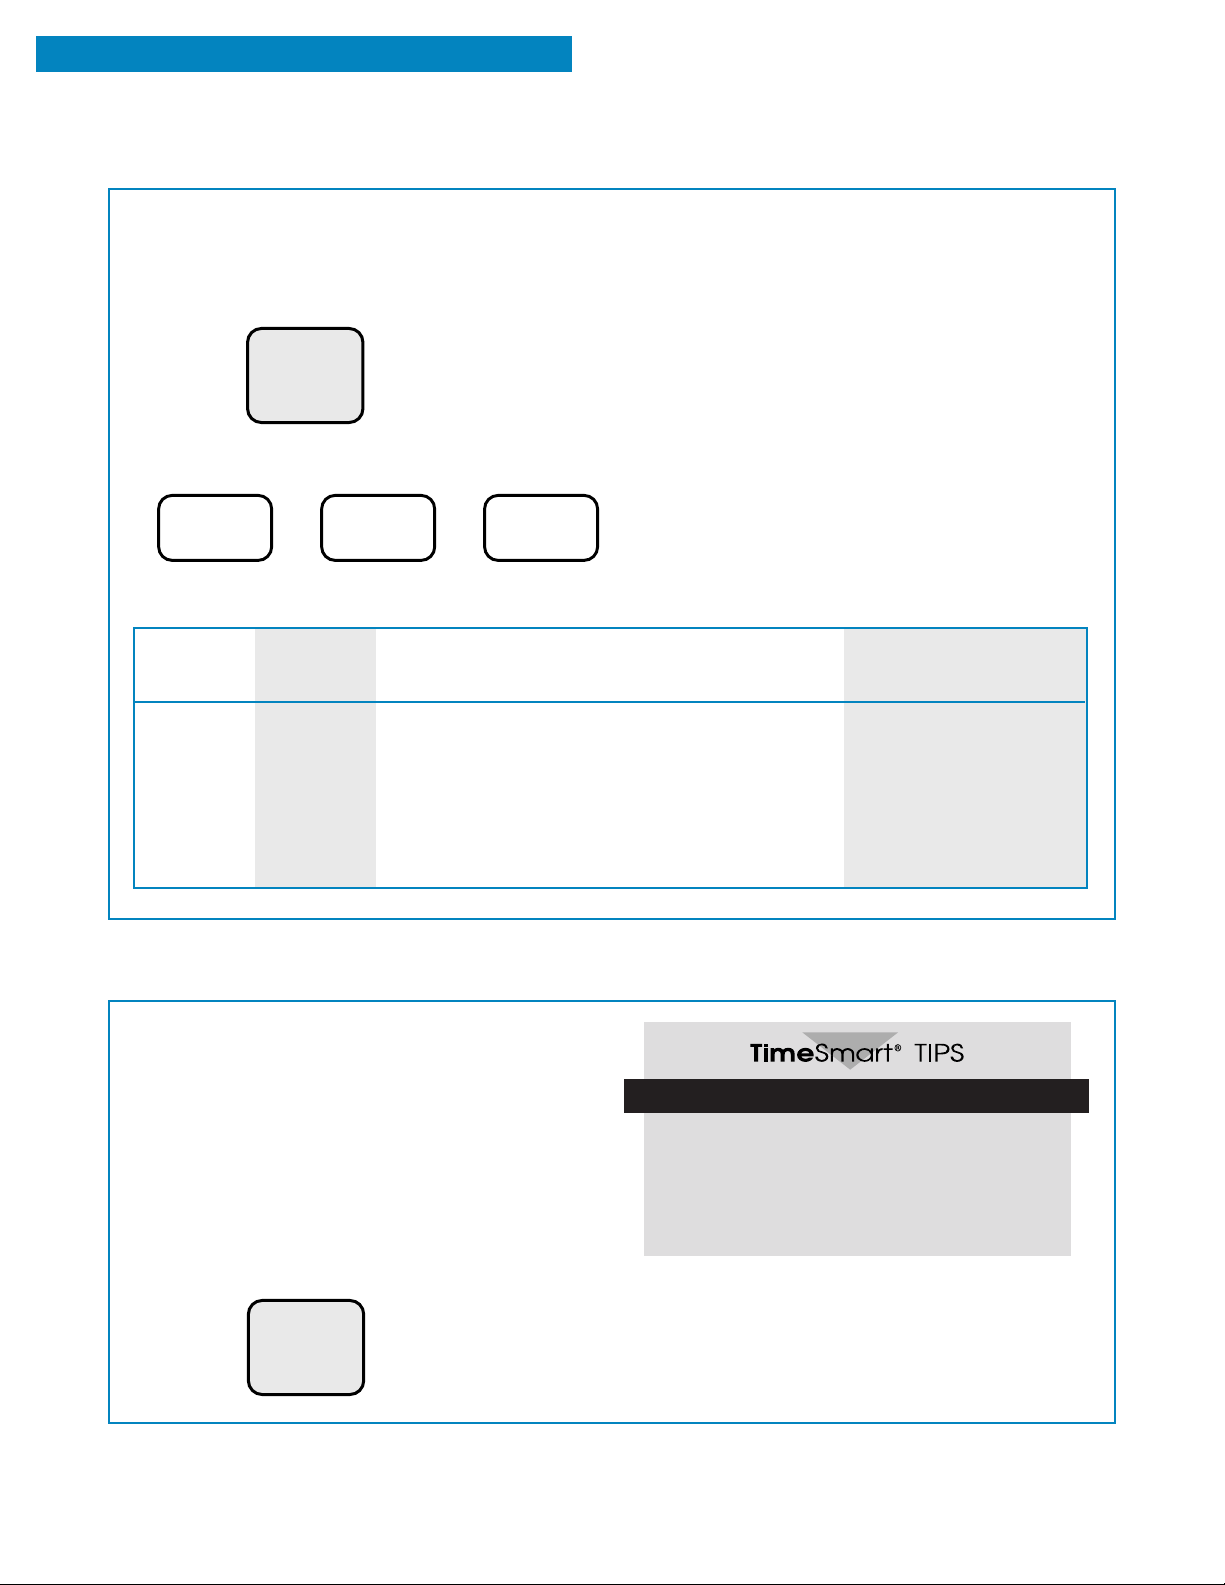
USING SENSOR REHEAT
SENSOR REHEAT has preset cook powers for
3 different types of food.
To use SENSOR REHEAT:
NOTE: If you want to reheat by entering a time and
cook power, see the “Heating/reheating chart” in
the “Cooking Guide” section.
1. Put the food in the oven and close the door.
2. Touch
REHEAT
3. Touch one of three Number pads to choose
the type of food.
1
This chart tells you how to choose a food type and what amounts you can reheat.
NUMBER
PAD
1
2
23
or
FOOD
Dinner
Plate
Soup/
Sauce
or
Place food to be heated on a dinner plate
or similar dish. Cover with plastic wrap.
Place food to be heated in a microwave
container. Cover with plastic wrap.
INSTRUCTIONS
AMOUNT
about 8 to 16 oz
1 to 4 cups
3
Casserole
Place food to be heated in a microwave
container. Cover with plastic wrap.
USING SENSOR POPCORN
SENSOR POPCORN lets you pop commercially
packaged microwave popcorn by touching just
1 pad.
NOTES:
Pop only 1 package at a time.
•
If you are using a microwave popcorn popper,
•
follow manufacturer’s instructions.
To use SENSOR POPCORN:
1. Place the bag in the center of the turntable
and close the door.
2. Touch
POPCORN
(3 SIZES)
1 to 2 cups
Popcorn brands make a difference
How well your popcorn cooks will depend
on the brand of popcorn and how much fat
it has in it. Try several brands to decide
which pops the best. For best results use
fresh bags of popcorn.
32
Page 33
CARING FOR YOUR MICROWAVE OVEN
To make sure your microwave oven looks good and works well for a long time, you should
maintain it properly. For proper care, please follow these instructions carefully.
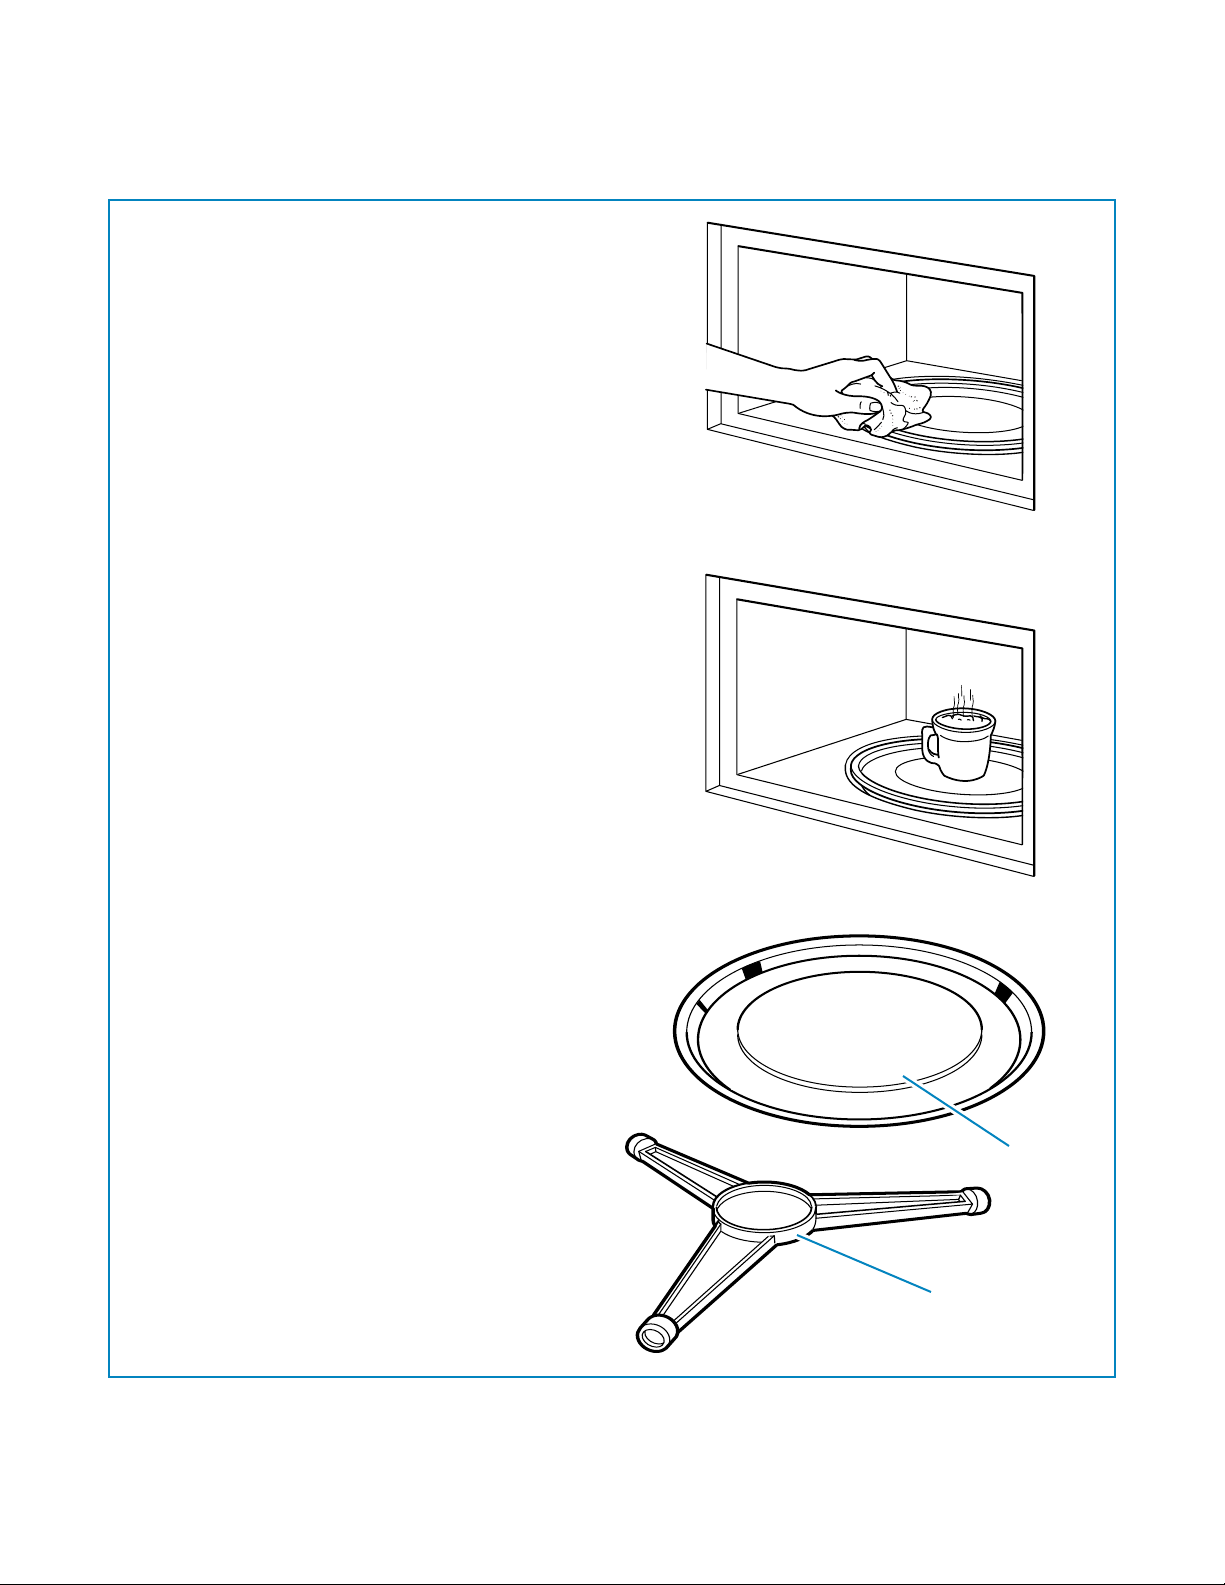
For interior surfaces: Wash often with warm,
sudsy water and a sponge or soft cloth. Use only
mild, nonabrasive soaps or a mild detergent. Be
sure to keep the areas clean where the door and
oven frame touch when closed. Wipe well with
clean water. Over time, stains can occur on the
surfaces as the result of food particles spattering
during cooking. This is normal.
For stubborn soil, boil a cup of water in the oven for
2 or 3 minutes. Steam will soften the soil. To get rid
of odors inside the oven, boil a cup of water with
lemon juice or vinegar.
For exterior surfaces and control panel: Use a
soft cloth with spray glass cleaner. Apply the spray
glass cleaner to the soft cloth; do not spray directly
on the oven.
NOTE: Abrasive cleansers, steel-wool pads,
gritty wash cloths, some paper towels, etc.,
can damage the control panel and the interior
and exterior oven surfaces.
To clean turntable and turntable support, wash
in mild, sudsy water; for heavily soiled areas use a
mild cleanser and scouring sponge. The turntable
and turntable support are dishwasher-safe.
Glass
turntable
Turntable
support
33
Page 34
COOKING GUIDE
MICROWAVE COOKING GUIDE
NOTES:
Do not use aluminum foil during the cooking cycle.
•
See “Using SENSOR COOK” in the “Sensor
•
Cooking” section for instructions on how to
cook without cooking time and cook power.
Meat
1. Prepare the roast as you normally would and
season it if
before cooking.
2. Place the meat on a microwave roasting rack or
oven proof plate and place on the turntable.
3. Cook by following the “Meat cooking chart”
below. Use the longer time for large meats and
the shorter time for smaller meats. For thicker
chops, use the longer time.
4.
Turn the meat once halfway through the cooking time.
5. After cooking, let stand for 5 to 10 minutes
wrapped in foil before serving. The standing time
is very important because it finishes the cooking.
6. Use a meat thermometer. Make sure meat, espe-
cially pork, is completely cooked before eating.
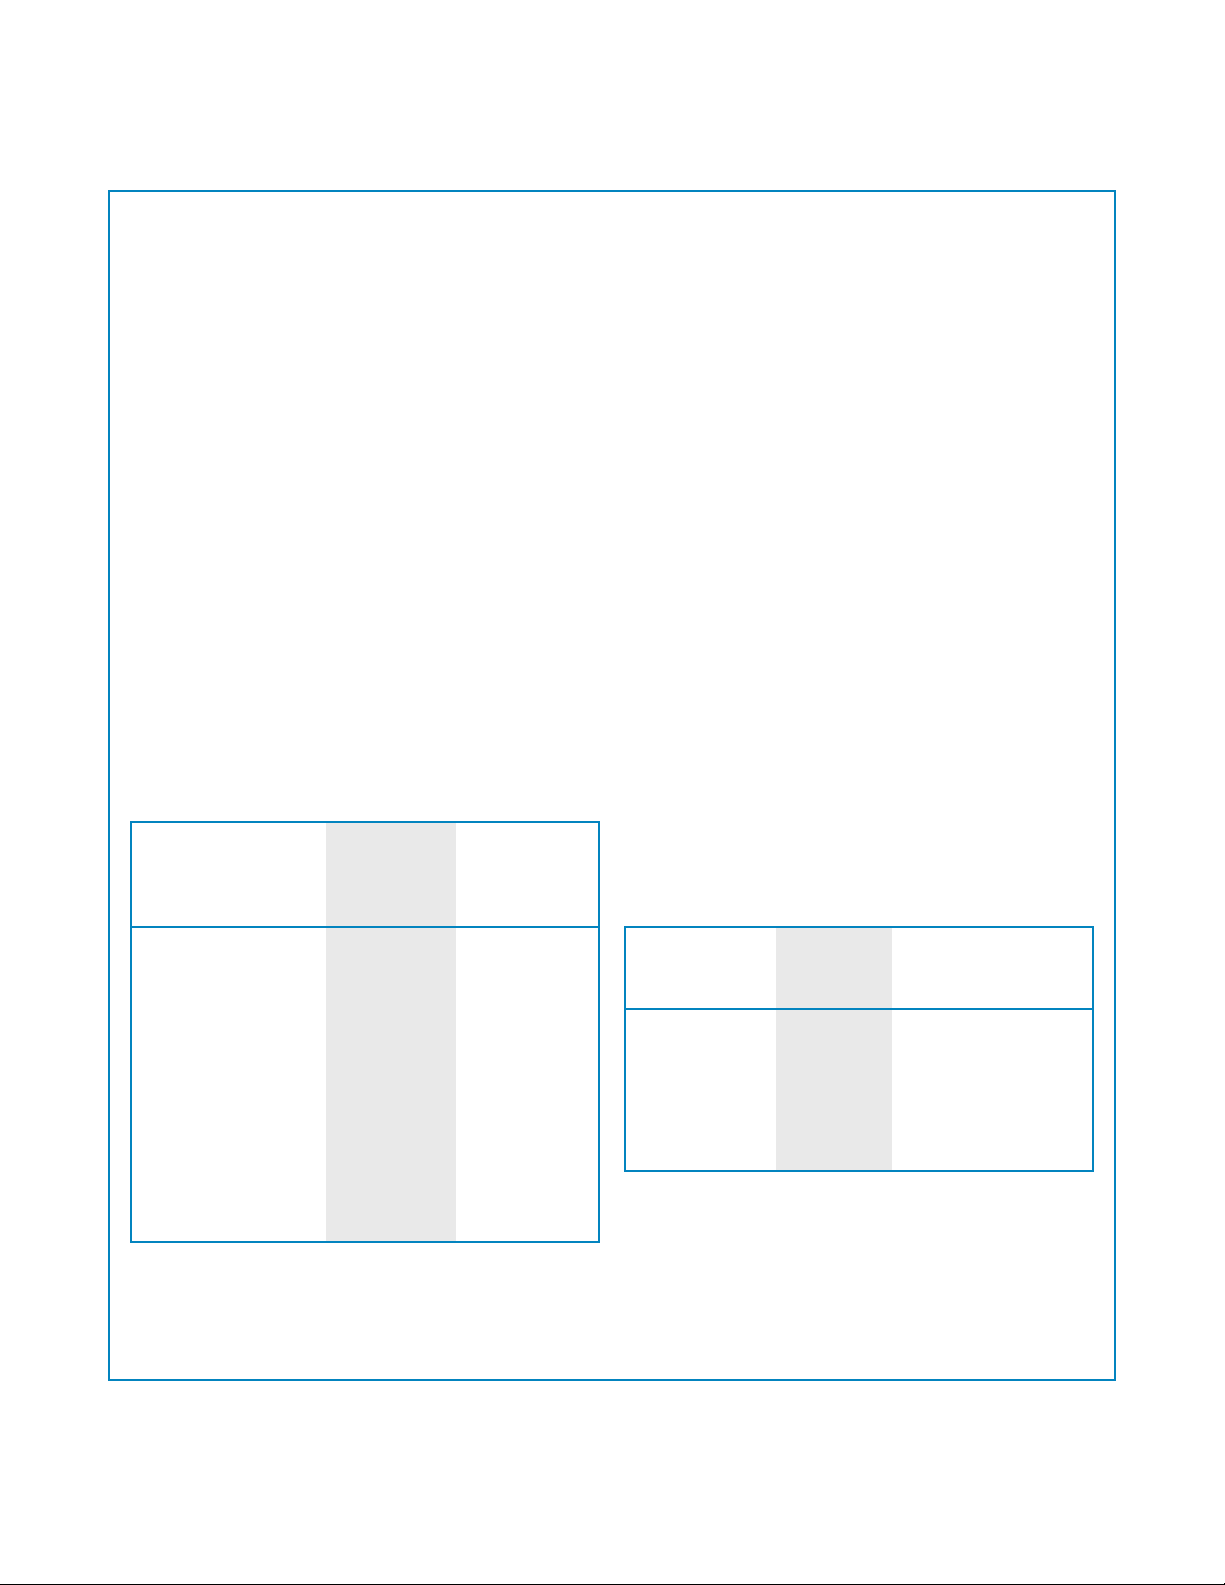
Meat cooking chart
Beef
Standing/Rolled Rib
– Rare
– Medium
– Well-done
Hamburgers,
Fresh or Defrosted
(4 oz each)
– 2 patties
– 4 patties
Pork
Loin, Leg
NOTE: Use the above times only as a guide. Change
times as needed to suit your taste. The times may
vary due to the shape, cut, and quality of the meat.
you want. Defrost meat completely
COOK
CUT
POWER
8
8
8
HIGH (100%)
HIGH (100%)
8
COOKING
TIME
PER POUND
(IN MINUTES)
81⁄2 to 9
9 to 10
11 to 121⁄2
2 to 4
3 to 5
12 to 15
Poultry
1. Prepare the poultry as you normally would and
season it if you want.
2. Make sure poultry is completely defrosted.
Remove giblets and any metal clamps.
3. Prick the skin. Brush the skin lightly with veg-
etable oil, unless the poultry is self basting.
4. Place all poultry on a microwave roasting rack
or microwave-proof plate. Then place on the
turntable.
5. Cook by following the “Poultry cooking chart”
below. Turn the bird over halfway through the
cooking time. Poultry, because of its shape,
tends to cook unevenly, especially in very bony
parts. Turning the bird during roasting helps to
cook these areas evenly.
6. After cooking, let stand for 5 to 10 minutes
wrapped in foil before carving. The standing time
is very important because it finishes the cooking.
7. Use a meat thermometer. Make sure poultry
is completely cooked before eating. Whole
poultry is completely cooked when the internal
temperature is 180°F and the juices run clear
from the inside thigh when it is pierced with a
sharp knife. Pierce poultry portions through the
thickest part to make sure that the juices are
clear and flesh is firm.
Poultry cooking chart
COOKING TIME
COOK
POULTRY
Chicken
Whole
Breast (boned)
Portions
Turkey
Whole
NOTES:
Use the above times only as a guide. Change
•
times as needed to suit your taste. The times
may vary due to the shape, cut, and quality of
the food.
If whole birds are stuffed, use the weight of the
•
stuffed bird when figuring the cooking time.
POWER
8
8
8
8
PER POUND
(IN MINUTES)
10 to 12
9 to 11
10 to 13
10 to 12
34
Page 35
MICROWAVE COOKING GUIDE (CONT.)
Fish
1. Arrange fish in a large, shallow, nonmetallic dish
or casserole.
2. Cover with pierced microwave plastic film or
casserole lid.
3. Place the dish on the turntable.
4. Cook by following the “Fresh fish cooking chart”
below. You can add flakes of butter to the fish if
you want.
HEATING/REHEATING CHART
COOKING GUIDE
5. After cooking, let stand before serving. The
standing time is very important because it finishes
the cooking.
6. After standing time, check to see that the fish is
completely cooked. The fish should not look clear
and should flake easily.
For best heating or reheating results in your
microwave oven, follow these guidelines:
Measure the amount of food to determine the
•
time needed to reheat.
Arrange the food in a circular pattern.
•
Take canned foods out of the can and place
•
them in a microwavable container.
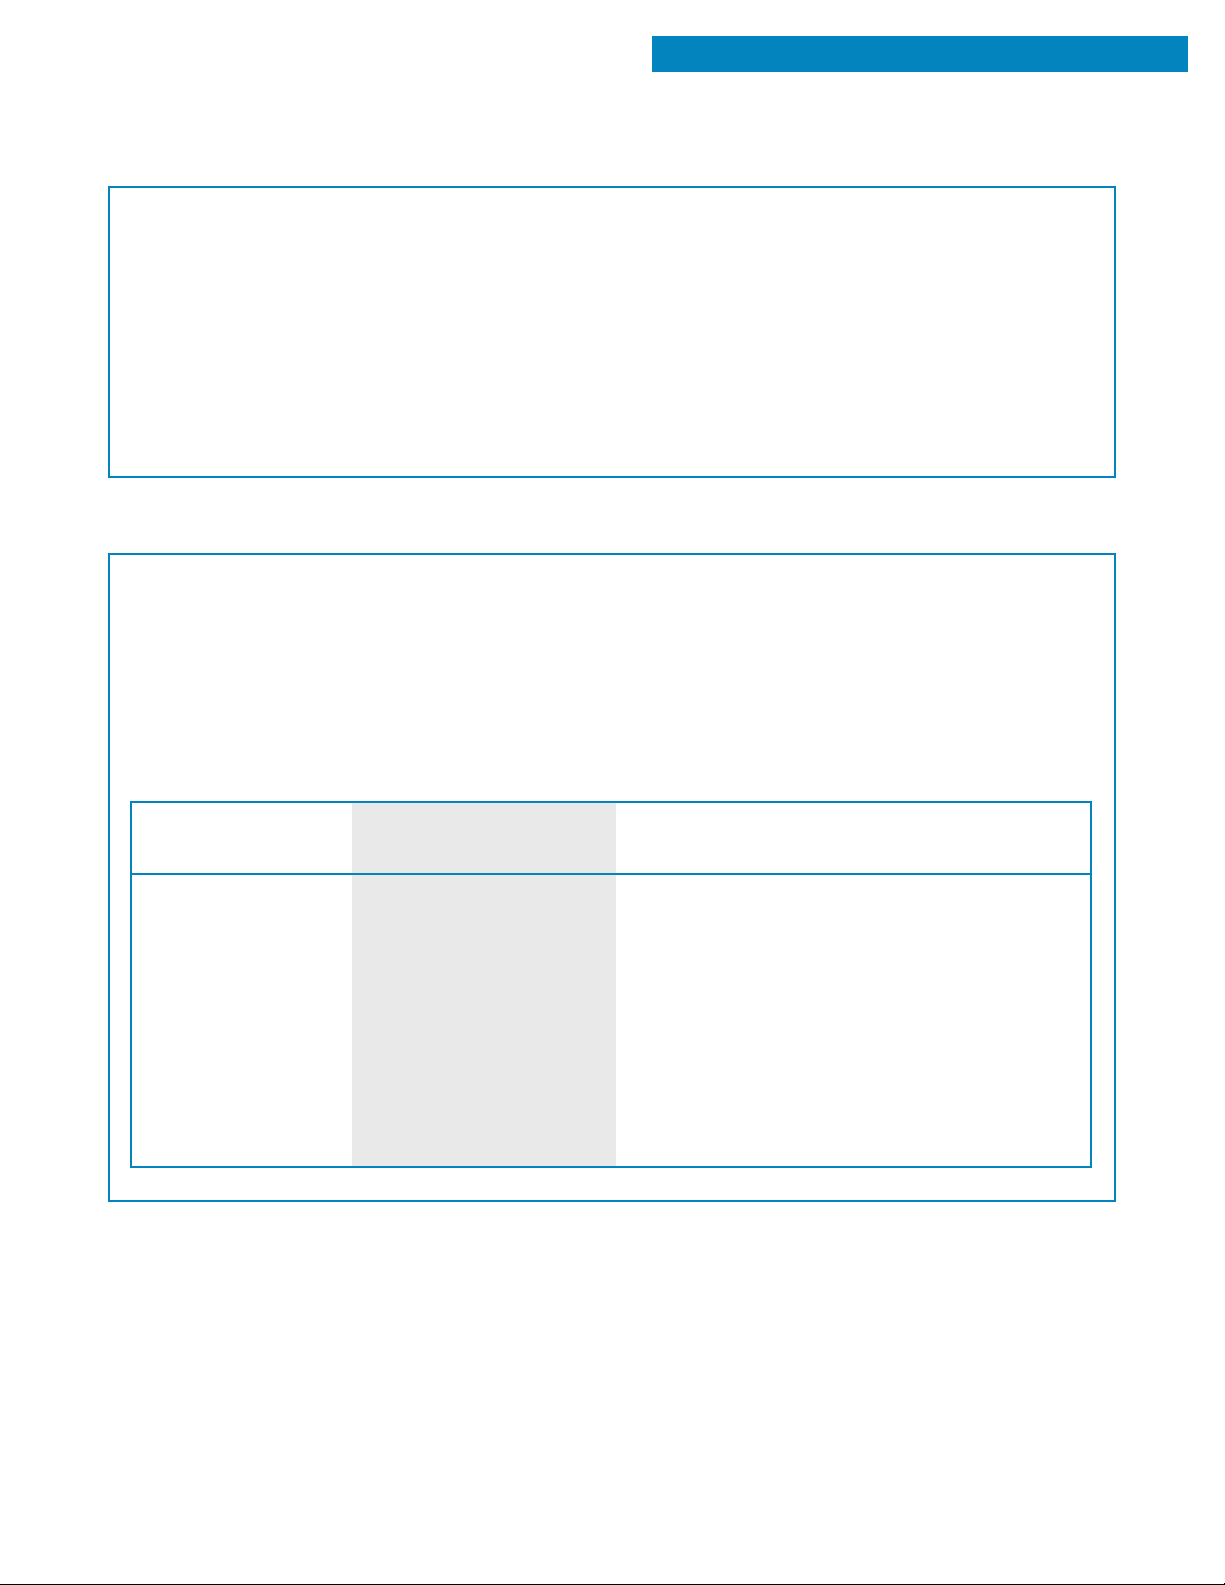
Use the following chart as a guide for reheating cooked food.
COOKING TIME
FOOD
Sliced Meat
3 slices (1⁄4 inch thick)
Chicken Pieces
1 breast
1 leg and thigh
Fish Fillet
(6 to 8 oz)
Lasagna
1 serving (101⁄2 oz)
(IN MINUTES AT HIGH)
1 to 11⁄2
2 to 3
11⁄2 to 21⁄2
2 to 3
4 to 51⁄2
For more even heating, cover food with a micro-
•
wavable lid or plastic wrap, vented. Remove the
cover carefully to prevent steam burns.
NOTE: See “Using SENSOR REHEAT” in the
“Sensor Cooking” section for instructions on how
to reheat without cooking time and cook power.
Place sliced meat on a microwavable dish.
Cover with plastic wrap and vent.
NOTE: Gravy or sauce helps to keep meat juicy.
Place chicken pieces on microwavable dish.
Cover with plastic wrap and vent.
Place fish on microwavable dish.
Cover with plastic wrap and vent.
Place lasagna on microwavable dish.
Cover with plastic wrap and vent.
INSTRUCTIONS
continued on next page
35
Page 36

COOKING GUIDE
HEATING/REHEATING CHART (CONT.)
COOKING TIME
FOOD
(IN MINUTES AT HIGH)
INSTRUCTIONS
Sloppy Joe or
Barbecued Beef
1 sandwich
(1⁄2-cup meat filling)
without bun
Mashed Potatoes
1 cup
4 cups
Baked Beans
1 cup
Ravioli or Pasta
in Sauce
1 cup
4 cups
Rice
1 cup
4 cups
1 to 2
11⁄2 to 21⁄2
5 to 7
11⁄2 to 21⁄2
21⁄2 to 31⁄2
71⁄2 to 101⁄2
11⁄2 to 3
41⁄2 to 6
Reheat filling and bun separately.
Heat filling covered in microwavable dish.
Stir once. Heat bun separately.
Heat covered in microwavable dish.
Stir once halfway through cooking.
Heat covered in microwavable dish.
Stir once halfway through cooking.
Heat covered in microwavable dish.
Stir once halfway through cooking.
Heat covered in microwavable dish.
Stir once halfway through cooking.
36
Page 37

MICROWAVE COOKING TIPS
COOKING GUIDE
Amount of food
If you increase or decrease the amount of food
•
you prepare, the time it takes to cook that food
will also change. For example, if you double a
recipe, add a little more than half the original
cooking time. Check for doneness and, if
necessary, add more time in small increments.
Starting temperature of food
The lower the temperature of the food being
•
put into the microwave oven, the longer it takes
to cook. Food at room temperature will be reheated more quickly than food at refrigerator
temperature.
Composition of food
Food with a lot of fat and sugar will be heated
•
faster than food containing a lot of water. Fat and
sugar will also reach a higher temperature than
water in the cooking process.
The more dense the food, the longer it takes
•
to heat. “Very dense” food like meat takes longer
to reheat than lighter, more porous food like
sponge cakes.
Size and shape
Smaller pieces of food will cook faster than
•
larger pieces. Also, same-shaped pieces cook
more evenly than different-shaped pieces.
With foods that have different thicknesses,
•
the thinner parts will cook faster than the thicker
parts. Place the thinner parts of chicken wings
and legs in the center of the dish.
Cov\ering food
Cover food to:
Reduce splattering
•
Shorten cooking times
•
Keep food moist
•
You can use any covering that lets microwaves pass
through.
Releasing pressure in foods
Several foods (for example: baked potatoes,
•
sausages, egg yolks, and some fruits) are tightly
covered by a skin or membrane. Steam can build
up under the membrane during cooking, causing
the food to burst. To relieve the pressure and to
prevent bursting, pierce these foods before
cooking with a fork, cocktail pick, or toothpick.
Using standing time
Always allow food to stand after cooking. Stand-
•
ing time after defrosting and cooking allows the
temperature to evenly spread throughout the food,
improving the cooking results.
The length of the standing time depends on
•
how much food you are cooking and how dense
it is. Sometimes it can be as short as the time it
takes you to remove the food from the oven and
take it to the serving table. However, with larger,
denser food, the standing time may be as long
as 10 minutes.
Stirring, turning foods
Stirring and turning foods spreads heat quickly
•
to the center of the dish and avoids overcooking
at the outer edges of the food.
continued on next page
37
Page 38

COOKING GUIDE
MICROWAVE COOKING TIPS (CONT.)
Arranging food
For best results, place food evenly on the plate.
You can do this in several ways:
If you are cooking several items of the same
•
food, such as baked potatoes, place them in a
ring pattern for uniform cooking.
When cooking foods of uneven shapes or
•
thickness, such as chicken breasts, place the
smaller or thinner area of the food towards the
center of the dish where it will be heated last.
Layer thin slices of meat on top of each other.
•
When you cook or reheat whole fish, score the
•
skin – this prevents cracking.
Do not let food or a container touch the top or
•
sides of the oven. This will prevent possible
arcing.
Using aluminum foil
Metal containers should not be used in a microwave
oven. There are, however, some exceptions. If you
have purchased food which is prepackaged in an
aluminum foil container, refer to the instructions on
the package. When using aluminum foil containers,
cooking times may be longer because microwaves
will only penetrate the top of the food.
If you use aluminum containers without package
instructions, follow these guidelines:
Place the container in a glass bowl and add some
•
water so that it covers the bottom of the container,
not more than 1⁄4 inch high. This ensures even
heating of the container bottom.
Always remove the lid to avoid damage to
•
the oven.
Use only undamaged containers.
•
Do not use containers taller than 3⁄4 inch.
•
Container must be half filled.
•
To avoid arcing, there must be a minimum 1⁄4 inch
•
between the aluminum container and the walls of
the oven and also between two aluminum
containers.
Always place the container on the turntable.
•
Reheating food in aluminum foil containers usually
•
takes up to double the time compared to reheating
in plastic, glass, china, or paper containers. The
time when food is ready will vary depending upon
the type of container you use.
Let food stand for 2 to 3 minutes after heating so
•
that heat is spread evenly throughout container.
Cooking you should not do in your
microwave oven
Do not do canning of foods in the oven. Closed
•
glass jars may explode, resulting in damage to
the oven or possible personal injury.
Do not use the microwave oven to sterilize objects
•
(baby bottles, etc.). It is difficult to keep the oven at
the high temperature needed for safe sterilization.
38
Page 39

QUESTIONS AND ANSWERS
QUESTIONS
Can I operate my microwave oven without the
turntable or turn the turntable over to hold a
large dish?
Can I use a rack in my microwave oven so that I
may reheat or cook on two levels at a time?
Can I use either metal or aluminum pans in my
microwave oven?
Is it normal for the turntable to turn in
either direction?
Sometimes the door of my microwave oven appears wavy. Is this normal?
What are the humming noises that I hear when my
microwave oven is operating?
ANSWERS
No. If you remove or turn over the turntable, you
will get poor cooking results. Dishes used in
your oven must fit on the turntable.
You can use a rack only if the rack is supplied
with your microwave oven. If you use a rack not
supplied with the microwave oven, you can get
poor cooking performance and/or arcing.
You can use aluminum foil for shielding (use
small, flat pieces), small skewers, and shallow
foil trays (if tray is not taller than 3⁄4 inch deep and
half filled with food to absorb microwave energy).
Never allow metal to touch walls or door. (For more
information, see “Using aluminum foil” in the
“Cooking Guide” section.)
Yes. The turntable rotates clockwise or counterclockwise, depending on the rotation of the
motor when the cooking cycle begins.
This appearance is normal and does not affect the
operation of your oven.
You hear the sound of the transformer when the
magnetron tube cycles on.
Why does the dish become hot when I microwave
food in it? I thought that this should not happen.
What does “standing time” mean?
Why does steam come out of the air exhaust vent?
Can I pop popcorn in my microwave oven?
How do I get the best results?
As the food becomes hot it will conduct the heat
to the dish. Be prepared to use hot pads to
remove food after cooking.
“Standing time” means that food should be
removed from the oven and covered for additional
time to allow it to finish cooking. This frees the
oven for other cooking.
Steam is normally produced during cooking. The
microwave oven has been designed to vent this
steam out the vents.
Yes. Pop packaged microwave popcorn
following manufacturer’s guidelines or use the
sensor POPCORN pad. Do not use regular paper
bags. Use the “listening test” by stopping the
oven as soon as the popping slows to a “pop”
every 1 or 2 seconds. Do not repop unpopped
kernels. Do not pop popcorn in glass cookware.
39
Page 40

TROUBLESHOOTING
Most cooking problems often are caused by little things you can find and fix without tools of any
kind. Check the lists below and on the next page before calling for assistance or service.
If you still need help, see the “Requesting Assistance or Service” section on page 42.
MICROWAVE OVEN DOES NOT WORK
PROBLEM
Nothing works.
The microwave oven
will not run.
COOKING TIMES
PROBLEM
Food is not cooked
enough.
CAUSE
The power supply cord is not plugged into a live circuit with the proper volt-
•
age. (See the “Electrical requirements” on page 6 and “Electrical connection”
on page 10.)
A household fuse has blown or a circuit breaker has tripped.
•
The electric company has had a power failure.
•
You are using the oven as a timer. Touch OFF/CANCEL to cancel the
•
Minute Timer.
The door is not firmly closed and latched.
•
You did not touch START/ENTER.
•
You did not follow directions exactly.
•
An operation that you set earlier is still running. Touch OFF/CANCEL to
•
cancel that operation.
CAUSE
The electric supply to your home or wall outlets is low or lower than normal.
•
Your electric company can tell you if the line voltage is low. Your electrician
or service technician can tell you if the outlet voltage is low.
The cook power is not at the recommended setting. Check the “Microwave
•
cooking guide” section on page 34.
You have not allowed enough cooking time for the amount of food being
•
cooked. Larger amounts of food need longer cooking times.
The display shows a time
counting down but the
oven is not cooking.
40
You have set the controls as a minute timer. Touch OFF/CANCEL to
•
cancel the Minute Timer.
Page 41
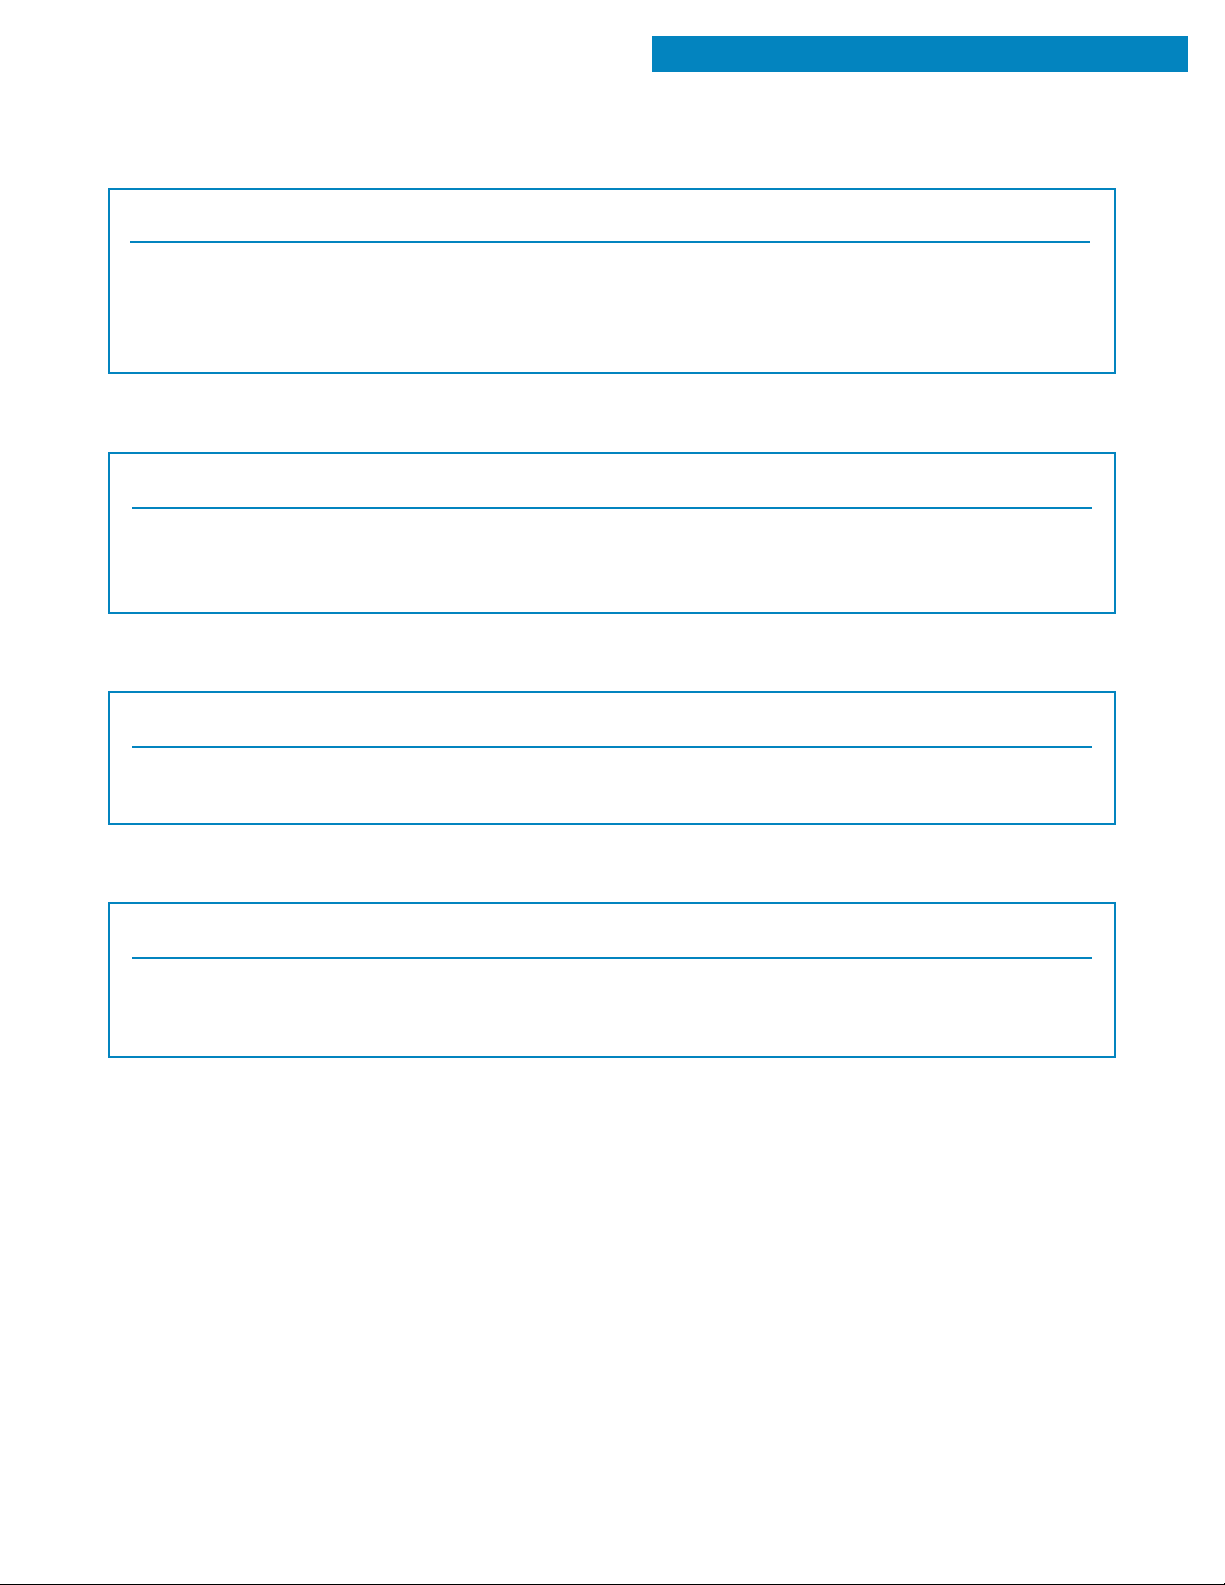
TURNTABLE
TROUBLESHOOTING
PROBLEM
The turntable will
not turn.
TONES
PROBLEM
You do not hear the
programming or endof-cycle tone.
FAN PROBLEMS
PROBLEM
The fan seems to be
running slower than usual.
CAUSE
The turntable is not correctly in place. It should be correct-side up.
•
The support is not operating correctly. Remove the turntable and restart the
•
oven. If the support still does not move, call an authorized service technician
for repair. Cooking without the turntable can give you poor results.
CAUSE
You have not entered the correct command.
•
You have turned off the tone. See “Audible signals” on page 13 and “Using
•
PERSONAL CHOICE” section on page 14.
CAUSE
The oven has been stored in a cold area. The fan will run slower until the
•
oven warms up to normal room temperature.
DISPLAY MESSAGES
PROBLEM
The display is scrolling
“PLEASE SET TIME
OF DAY”.
If none of these items are causing your problem, see the “Requesting Assistance or Service” section on page 42.
CAUSE
There has been a power interruption. Reset the clock. (See the “Setting the
•
clock” section on page 15.)
41
Page 42
REQUESTING ASSISTANCE OR SERVICE
To avoid unnecessary service calls, please check the “Troubleshooting” section. It may save you
the cost of a service call. If you still need help, follow the instructions below.
IF YOU NEED ASSISTANCE OR SERVICE
Call the Whirlpool Consumer Assistance
Center toll free at 1-800-253-1301.
Our consultants are available to
assist you.
When calling:
Please know the purchase date, and
the complete model and serial number of your
appliance (see the “A Note to You” section). This
information will help us better respond to your
request.
Our consultants provide assistance with:
Features and specifications on our full line
•
of appliances
Installation information
•
FOR FURTHER ASSISTANCE
If you need further assistance, you can write to
Whirlpool with any questions or concerns at:
Whirlpool Brand Home Appliances
Consumer Assistance Center
c/o Correspondence Dept.
2000 North M-63
Benton Harbor, MI 49022-2692
Use and maintenance procedures
•
Accessory and repair parts sales
•
Specialized customer assistance (Spanish speak-
•
ing, hearing impaired, limited vision, etc.)
Referrals to local dealers, service companies, and
•
repair parts distributors
Whirlpool service technicians are trained to fulfill
the product warranty and provide after-warranty
service, anywhere in the United States.
To locate the authorized Whirlpool service company
in your area, you can also look in your telephone
directory Yellow Pages.
Please include a daytime phone number in your
correspondence.
42
Page 43

INDEX
This index is alphabetical. It contains all the topics included in this manual, along with the page(s)
on which you can find each topic.
TOPIC PAGE
ALUMINUM FOIL .......................................................38
AUDIBLE SIGNALS .................................................... 13
BUILT-IN KITS ........................................................... 14
CARING FOR YOUR MICROWAVE OVEN ................ 33
CHARTS
Auto cook ...............................................................23
Auto defrost................................................ 24, 25, 26
Heating/reheating ................................................... 35
Meat cooking ..........................................................34
Poultry cooking ...................................................... 34
Sensor cook ........................................................... 30
Sensor reheat .........................................................32
Weight conversion .................................................. 27
CONTROL PANEL ............................................... 12, 13
ADD MINUTE ..........................................................28
Audible signals ....................................................... 13
AUTO COOK ..........................................................23
AUTO DEFROST .................................................... 24
Child lock................................................................ 13
CLOCK SET............................................................ 15
Cooking at different cook powers ..........................19
Cooking at high cook power .................................. 18
Cooking in stages................................................... 21
COOK POWER ...........................................19, 20, 22
COOK TIME ................................................ 18, 20, 21
Interrupting cooking ............................................... 13
Minute timer ........................................................... 16
MORE/LESS ...........................................................28
Number pads ..........................................................13
OFF/CANCEL ......................................................... 13
PERSONAL CHOICE .............................................. 14
SENSOR COOK ..................................................... 30
SENSOR POPCORN ..............................................32
SENSOR REHEAT ..................................................32
START/ENTER........................................................ 13
WARM HOLD ......................................................... 29
TOPIC PAGE
ELECTRICAL REQUIREMENTS ............................. 6, 10
ERROR SIGNALS....................................................... 13
GROUNDING INSTRUCTIONS ....................................6
HOW YOUR MICROWAVE OVEN WORKS ............. 7-8
INSTALLATION INSTRUCTIONS .................................5
PARTS AND FEATURES
Cooking guide label................................................ 11
Door open button ...................................................11
Door safety lock system ......................................... 11
Light........................................................................ 11
Magnetron .......................................................... 7, 39
Model and serial number plate ............................... 11
Turntable .......................................... 7, 10, 11, 33, 39
Vents (exhaust & air intake openings) ...................... 5
Window .................................................................. 11
QUESTIONS AND ANSWERS.................................... 39
RACK ......................................................................... 39
RADIO INTERFERENCE............................................... 8
REQUESTING ASSISTANCE OR SERVICE ............... 42
SAFETY ........................................................... 3-4, 9-10
STANDING TIME ............................................27, 37, 39
TESTING YOUR DINNERWARE OR COOKWARE ...... 9
TESTING YOUR MICROWAVE OVEN ......................... 8
TIPS
Cooking ..............................................................8, 37
Defrosting .........................................................24, 27
Popcorn .................................................................. 32
TROUBLESHOOTING .......................................... 40-41
WARRANTY ............................................................... 44
43
Page 44
WARRANTY
WHIRLPOOL® MICROWAVE OVEN
LENGTH OF WARRANTY
FULL ONE-YEAR
WARRANTY
FROM DATE
OF PURCHASE
LIMITED FOUR-YEAR
WARRANTY
SECOND THROUGH
FIFTH YEAR FROM
DATE OF PURCHASE
WHIRLPOOL WILL NOT PAY FOR
A. Service calls to:
1. Correct the installation of your microwave oven.
2. Instruct you how to use your microwave oven.
3. Replace house fuses or correct house wiring.
4. Replace owner-accessible light bulbs.
B. Repairs when your microwave oven is used in other than normal, single-family household use.
C. In-home service. Your microwave oven must be taken to an authorized Whirlpool service company,
except when your microwave oven is installed over an approved Whirlpool oven using an approved
built-in kit. (See the “Built-In kits” section for a list of approved built-in kits.)
D. Damage to your microwave oven caused by accident, misuse, fire, flood, acts of God, or use of
products not approved by Whirlpool.
E. Any labor costs during limited warranty.
F. Repairs to parts or systems resulting from unauthorized modifications made to the appliance.
WHIRLPOOL WILL PAY FOR
FSP® replacement parts and repair labor to correct defects in materials or
workmanship. Service must be provided by an authorized Whirlpool
service company.
FSP replacement magnetron tube on microwave ovens if defective in
materials or workmanship.
9/97
WHIRLPOOL CORPORATION SHALL NOT BE LIABLE FOR INCIDENTAL OR CONSEQUENTIAL
DAMAGES. Some states do not allow the exclusion or limitation of incidental or consequential damages,
so this exclusion or limitation may not apply to you. This warranty gives you specific legal rights, and you
may also have other rights which vary from state to state.
Outside the United States, a different warranty may apply. For details, please contact your authorized
Whirlpool dealer.
If you need service, first see the “Troubleshooting” section of this book. After checking “Troubleshooting,”
additional help can be found by checking the “Requesting Assistance or Service” section or by calling our
Consumer Assistance Center telephone number, 1-800-253-1301, from anywhere in the U.S.A.
PART NO. 3828W5A0589/4359605
© 1997 Whirlpool Corporation ® Registered Trademark/TM Trademark of Whirlpool, U.S.A. Printed in Korea
11/97
 Loading...