

Page 1
Instructions for use
MBF 303
1
Page 2

Content
Page
Before installing this appliance 3
Electrical connection 4
Before you operate the appliance 4
Child safety / Empty oven start protection 5
Standard accessories 5
Optional accessorie 5
Control panel 6
Symbol description 6
Appliance overview 6
Important when using your microwave oven 7
Auto Light function 8
Auto Fan function 8
Optional clock display 8
Timer function 9
Cooking interruption 10
Time and power 10
Jet start function 11
Manual defrost function 11
Auto defrost function 12
Grill function 13
Grill in combination with microwaves 14
Auto Add function 15
Crisp function 15
Auto crisp function 16
Menu function 17
Oven Maintenance 18
Hood Maintenance 18
Service 19
Data for test heating performance 20
Technical specifications 20
2
Page 3

Before installing this appliance
Use care when handling.
Ensure the oven cavity is empty before mounting.
Ensure that the wall on which the appliance is to be mounted
on, is strong enough to hold the weight of this appliance (see
the Technical specifications).
IMPORTANT!
This appliance is designed to be mounted over electrical or
gas cooker ranges only! The distance between the cooker
range and bottom part of this appliance must be at least 430
mm for electrical cooker ranges and at least 500 mm for gas
cooker ranges.
The manufacturer must be contacted for the minimum
mounting distance where:
Electrical range:
* The cooker range has more than 4 hob elements.
* The two rear elements exceed a rating of 2 kW per ele-
ment.
* The two front hob elements exceed a rating of 1.5 kW per
element.
Gas range:
* The gas burner develop more than 3.2 kw per burner
* The cooker range develop more than 10 kw in total.
Evacuation should not be through a flue used for the evacuation of other vapours or burnt gas, that is through a pipe used
as a flue for open flame sources.
If you are installing the appliance to an unused flue for the
evacuation of vapour’s or burnt gas, we recommend that you
request the advice and approval of a competent technician
before making the installation.
If the cooker hood is used together with other appliances
which consume the air in the room (e.g. gas, diesel oil or
coal appliances, water-heaters, boilers) remember that the
hood aspires air from the room which may therefore not be
sufficient for burning.
Ensure that the appliance is not damaged before mounting it
on the wall.
Cooker hoods and other appliances requiring a flue, can
only be used together safely if there is a maximum depression of 0.04 bar in room which prevents the reabsorbing of
the burnt gases. This is possible only if the combustion air is
evacuated through non-closing apertures such as doors,
windows, wall boxes for the supply and evacuation of air or
similar technical devices such as reciprocal blocking devices
or similar. If you are not certain call a qualified technician.
Note: For best function keep the kitchen windows closed
when using the fan. If not you have no negative pressure in
the kitchen. But one window in an adjacent room ought to be
open.
The internal recirculation cooker hood – with charcoal filter
is in no way dangerous.
For evacuation use flexible aluminium pipes or sheet plate
pipes which are resistant to corrosion.
Do not use inflammable plastic pipes. Always ensure that the
evacuation channels and pipes are as short as possible.
Do not mount the pipes at right angles. They must always be
curved and should be fitted into the flue at an upward angle.
The diameter of the pipe must not narrow towards the top.
The performance of the fan will be reduced with small
diameter pipes.
External evacuation:
The flange has a Ø 120 mm opening so that, evacuation pipes
with Ø 120 mm can be mounted.
IMPORTANT!
Check that all material for fixing the appliance is supplied in
the package.
Follow the supplied separate mounting instructions when
mounting the appliance on the wall.
Internal recirculation
The cooker hood is used with the internal recirculation system
when there is no pipe or opening on the external wall. In the
case of internal recirculation, the Air deflector and optional
charcoal filter must be installed for the absorption of the
cooking vapours. (see maintenance and accessories)
The manufacturers are not liable for any problems caused
by the user’s failure to observe the above instructions.
3
Page 4
Electrical connection
Prior to connecting, check that the voltage on the rating plate
corresponds to the voltage in your home.
The earthing of this appliance is compulsory by law. The
manufacturer will accept no responsibility for injury to persons
or damage to objects arising from the non-observance of this
requirement.
In the case of a permanent connection, the appliance should
be installed by a qualified technician.
WARNING!
THIS APPLIANCE MUST BE EARTHED!
Before you operate the appliance
Please read the instructions and guarantee information and
keep for future reference.
Please complete the guarantee card and
send to our Service Department.
Make sure that the appliance is not
damaged. Check that the oven door
closes firmly against the door support and
that the internal door seal is not damaged. Clean inside oven
with a soft, damp cloth.
If the filter is damaged it must be replaced. Do not use the
extractor hood without the filter. It is not designed for such
operation.
It is advisable to switch on the extractor hood a few minutes
before starting cooking on the stove and then to leave it running
for approximately 10 minutes afterwards to ensure that all
odours are extracted.
Always run the extractor hood with the drawer fully pulled
out during cooking on the kitchen range.
The oven can be operated only if the oven door is firmly
closed.
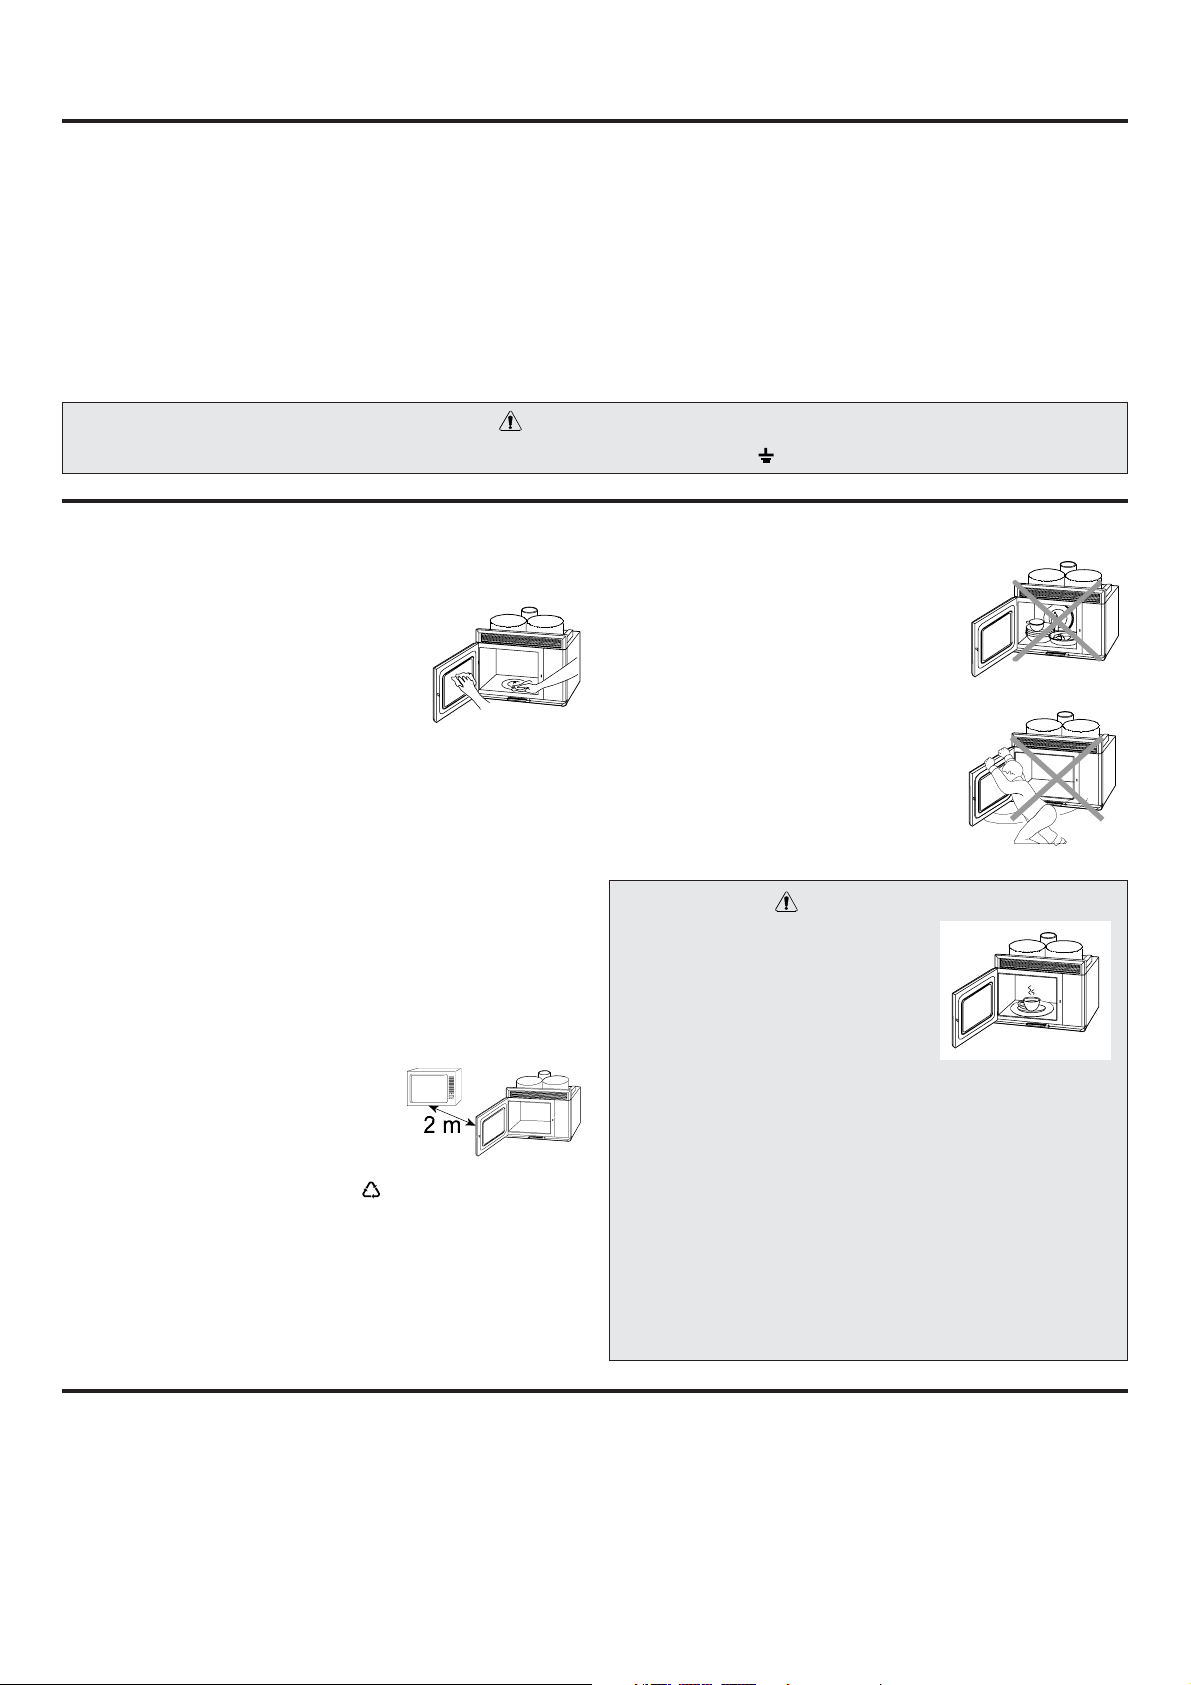
Poor television reception and radio
interference may result if the oven is
located close to a TV, radio or aerial.
The packaging material is recyclable and
marked with the symbol for recycling .
Do not operate this appliance if it has a damaged mains cord
or plug, if it is not working properly, or if it has been damaged or
dropped. Electrical shock, fire or other hazards may result.
Important!
A permanent connection requires the installation of a separating device. The separating device must have an omnipolar
contact opening of more than 3 mm including LS switches,
safety valves and relays. The separate device must be connected directly to the terminal.
The manufacturers are not liable for any problems caused by
the user’s failure to observe the above instructions.
Do not use the cavity for storage purposes.
Do not leave paper products, cooking
utensils, or food in the cavity when not in
use.
Never lean on the door or allow a child to
swing on it when the door is open. Injury
could result.
Do not use the drawer as a shelf or
unloading area after cooking. It is not
designed to withstand heavy weights or
hot vessels.
WARNING!
The oven should not be operated
without food in the oven when using
microwaves. Operation in this manner
is likely to damage the appliance.
If you practice operating the oven, put
a glass of water inside. The water will
absorb the microwave energy and the oven will not be
damaged.
Never prepare ”flambé” dishes under the cooker hood!
Never use an open flame under the hood. The use of an
unprotected flame is dangerous for the filters and could
cause fires.
Never leave the pan alone when frying foods. The cooking
oil can easily flare up. This is a potential fire hazard!
The manufacturers refuse to accept any responsibility
for damage to the hood or its catching on fire because of
failure to observe the above instructions.
4
Page 5
Child safety / Empty oven start protection
This oven has an automatic child safety function which is
activated one minute after the oven has returned to “stand by“.
The oven is in “stand by“ when the 24 hour Clock is displayed
or if the Clock has not been set, when the display is blank.
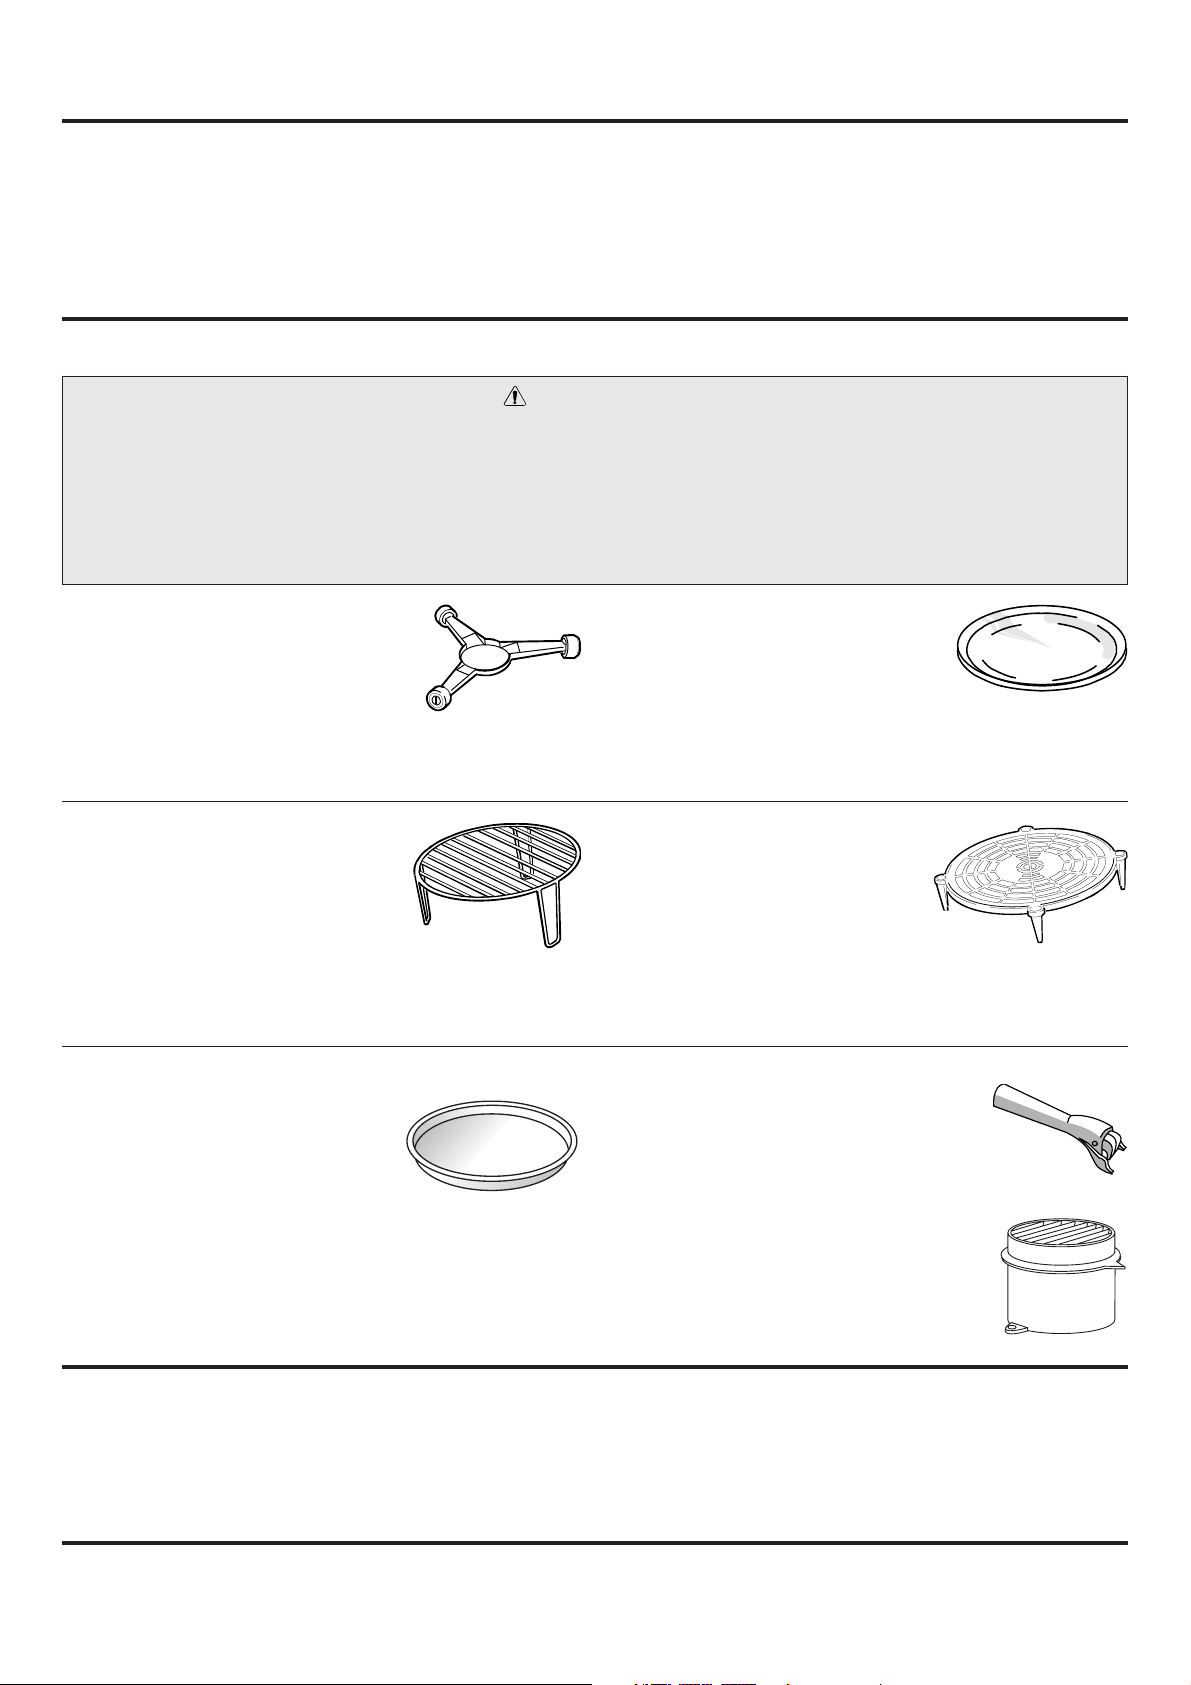
Accessories
CAUTION!
There are a number of accessories available on the market.
Before you buy, make sure they are suitable for microwave
use.
When you put food in the microwave oven, ensure that food,
food supports or covering do not come in direct contact with
any of the internal walls or the ceiling of the cavity.
Turn table support
Use the Turn table support under the
Glass Turn-table. Never put other utensils
than the Glass Turn-table directly on the
Turn table support. The Turn table support
may be cleaned in dishwashers.
* Fit the Turn table support on its locator in the oven.
The door must be opened and closed e.g. putting food into it,
before the safety lock is released. If you try to operate the oven
without putting food into it the display will display “door“
indicating that you must open and close the door before
operating the oven.
This is especially important with accessories made of
metal or metal parts. If accessories containing metal come
in contact with the internal walls or the ceiling, while the oven
is in operation, sparking will occur and the oven will be
damaged.
Always ensure that the turntable is able to turn freely before
starting the oven.
Glass turn-table
Use the Glass Turn-table with all
cooking methods. The Glass Turn-table
collects the dripping juices and food
particles that otherwise would stain and
soil the interior of the oven. The Glass Turn-table may be
cleaned in dishwashers.
* Place the Glass Turn-table on the Turn table support.
Grill-grid
Use the Grill-grid to place the food close
to the Grill element. Always place the
Grill-grid on the Glass Turn-table for
support and collecting the dripping
juices. You may damage the oven if you
place the Grill-grid directly on the bottom of the oven. Use oven
mitts when removing the hot Grill-grid. The Grill-grid may be
cleaned in dishwashers.
Crisp-plate
Place the food directly on the Crispplate. Always use the Glass Turn-table
as support when using the Crisp-plate.
The Crisp-plate may be preheated
before use. Use oven mitts or the
supplied special Crisp handle when
removing the hot Crisp-plate. The Crisp-plate can be cleaned
in mild, detergent water. Heavily soiled areas can be cleaned
with a scouring sponge and a mild cleanser.
Do not use steel-wool pads. They will scratch the surface.
Optional accessorie
Two plate stacker
The Two plate stacker is excellent for
two level reheating. Simply place one
plate on the Glass Turn-table and a
second plate on the Two plate stacker
above. The Two plate stacker may be
cleaned in dishwashers.
Do not use together with the Grill or Crisp.
Crisp handle
Use the supplied special Crisp handle to
remove the hot Crisp plate from the oven.
The Crisp handle may be cleaned in dishwashers.
Air deflector
The internal recirculation Air deflector is
used when you have chosen to utilize the
internal recirculation option.
Charcoal filter
The charcoal filter effectively absorbs the vapours from the
kitchen range. It must be replaced at regular intervals and can
be obtained via your local dealer.
5
Page 6

Control panel
Power bar. Displays the set power level.
Digital display. This display includes a 24
hour clock, timer function and indicator
symbols to tell you the time of day, cooking
time, power level, selected food classes and
timer status.
Auto defrost button. Use this button to select
the desired food class before defrosting food.
Micro button. Press this button to set the
desired power level.
Grill button. Use this button to select the grill
function.
Add a little bit more button. Use this button
when you want to cook just a little bit more to
finish.
Start / Jet Start button. Press this button to
automatically start with the maximum power
level and the cooking time set to 30 seconds.
Each additional press increases the cooking
time by 30 seconds. This button also works
as a normal start button after setting a
function.
Weight indicator. Indicates that the display
is displaying weight instead of time.
Clock button. Use this button to select the
24 hour clock and set the time of day.
Timer button. Use this button to select the
independent timer function
Auto weight crisp button. Use this button to
select the desired food class before crisping
with the Crisp plate.
Adjust knob. Use this knob to set the
cooking time, time of day or weight of food to
be defrosted and to set the timer.
Crisp button. Use this button when cooking
with the Crisp plate (manually).
Memory buttons. Use these buttons to store
your favourite settings. All functions can be
stored for easy access.
Stop button. Use this button to stop or reset
any of the oven functions.
Maximum - Medium - Minimum fan speed
button
Symbol description
Clock symbol
Defrost symbol
Timer symbol
Crisp symbol
Appliance overview
Ventilation openings
Food class guide
Door glass
Door seal
Grill symbol
Add a little bit more symbol
Menu symbol
Weight symbol
Fan symbol
Microwave working symbol
Function finished symbol
Timer finished symbol
Start symbol
Stop symbol
Service label
Mains cord
Cabinet
Control panel
Door latches
Rating plate
6
Drawer
Door locks
Turn table drive
Page 7
Important when using your microwave oven
Do not heat, store or use flammable
materials in or near the oven. Fumes can
create a fire hazard or explosion.
Use this appliance only for its intended use
as described in this manual.
Do not use corrosive chemicals or vapours in this appliance.
This type of oven is specifically designed to heat or cook food. It
is not designed for industrial or laboratory use.
Do not over-cook food. Fire could result.
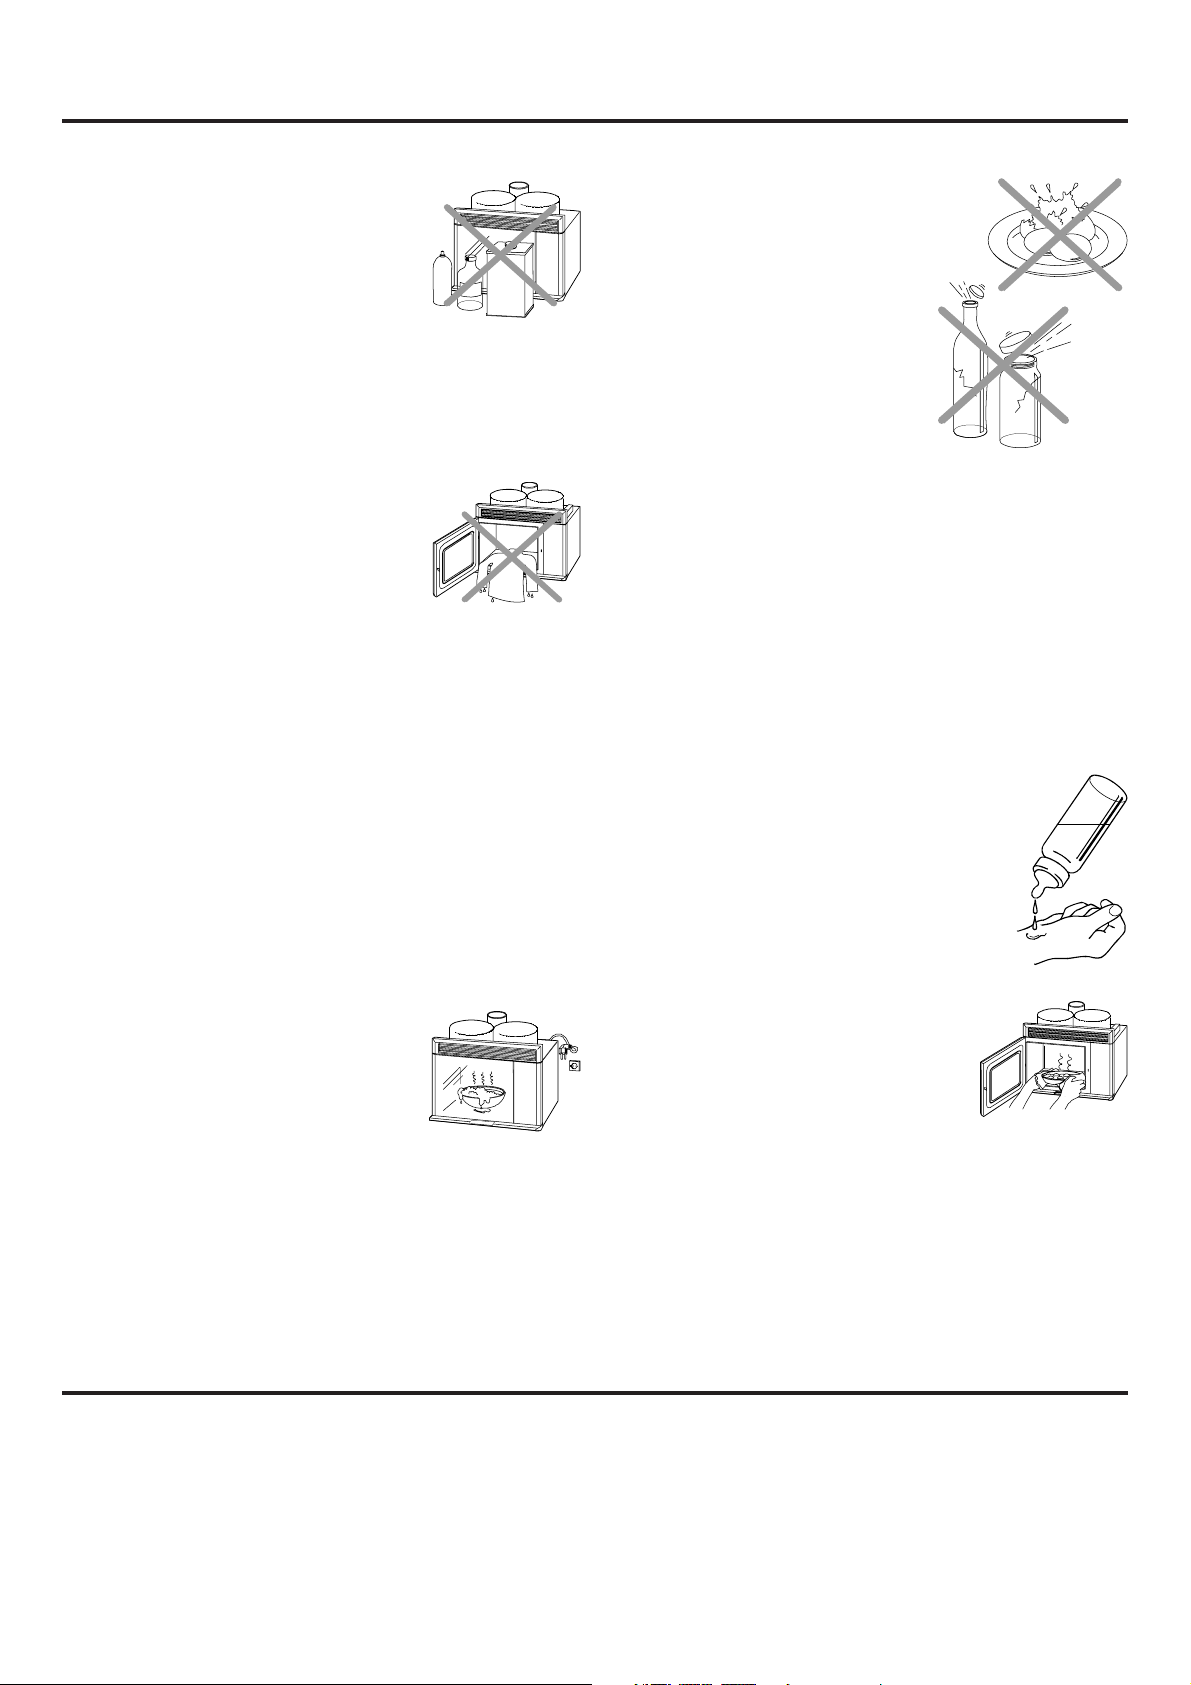
Do not use your microwave oven for drying
textiles, paper, spices, herbs, wood,
flowers, fruit or other combustible materials. Fire could result.
Do not leave the oven unattended, especially when using
paper, plastic or other combustible materials in the cooking
process. Paper can char or burn, and some plastics can melt if
used when heating foods. As with any appliance, close supervision is necessary when used by children.
Do not use your microwave oven for
cooking or reheating whole eggs with
or without shell.
Do not use your microwave oven
for heating food or liquids in
airtight sealed containers. The
pressure increases and may cause
damage when opening or may
explode.
Some foods which has a low water
content E.g. oil, chocolate and some pastries with sweet
fillings, must be heated carefully.
Do not use your microwave oven for deep frying, because you
cannot control the oil temperature.
One of the major advantages of microwave ovens is the short
cooking time. Therefore, do not exceed recommended times
for cooking or re-heating food.
Always refer to a microwave cookbook for details. Especially, if
cooking or reheating food that contains alcohol.
Remove wire twist-ties from paper or plastic bags before
placing bag in the oven.
If the Grill function is not used regularely, there is a risk of
fire, due to the possible buildup of foodparticles and fat,
beneath the grillelement. To reduce this risk, the Grill only
function should be run for 10 minutes once a month to clean
the elements.
If material inside / outside the oven should
ignite, keep oven door closed, turn the oven
off and disconnect the power cord or shut
off power at the fuse or circuit breaker
panel.
When heating liquids, e.g. beverages or water in your microwave oven, overheating the liquid beyond boiling point can
occur without evidence of bubbling. This could result in a
sudden boil over of the hot liquid.
To prevent this possibility the following steps should be taken:
1. Avoid using straight-sided containers with narrow necks.
2. Stir the liquid before placing the container in the oven and let
the teaspoon remain in the container.
3. After heating, allow to stand for a short time, stirring again
before carefully removing the container from the oven.
After heating baby food or liquids in a baby
bottle, always stir and check the temperature
before serving. This will ensure that the heat is
evenly distributed and the risk of scalding or
burns can be avoided.
Ensure the Lid and the Teat is removed before
heating!
Use hot pads. Microwave energy does not
heat containers, but the hot food does. Heat
from the Grill will cause container and oven
parts to become hot. Also the Crisp-plate
always becomes very hot when used.
Use oven mitts when touching containers, oven parts, and pan
after cooking to prevent burns.
7
Page 8
Auto Light function
The hood has an automatic start Light function which is
activated when you pull the drawer.
The Light is turned off when you push the drawer to it’s inner
position.
Auto Fan function
The hood has an automatic start fan function which is activated
when you pull the drawer to it’s full length. The fan always
starts with the fan speed set to minimum.
The fan speed is regulated with the 3
fan speed buttons.
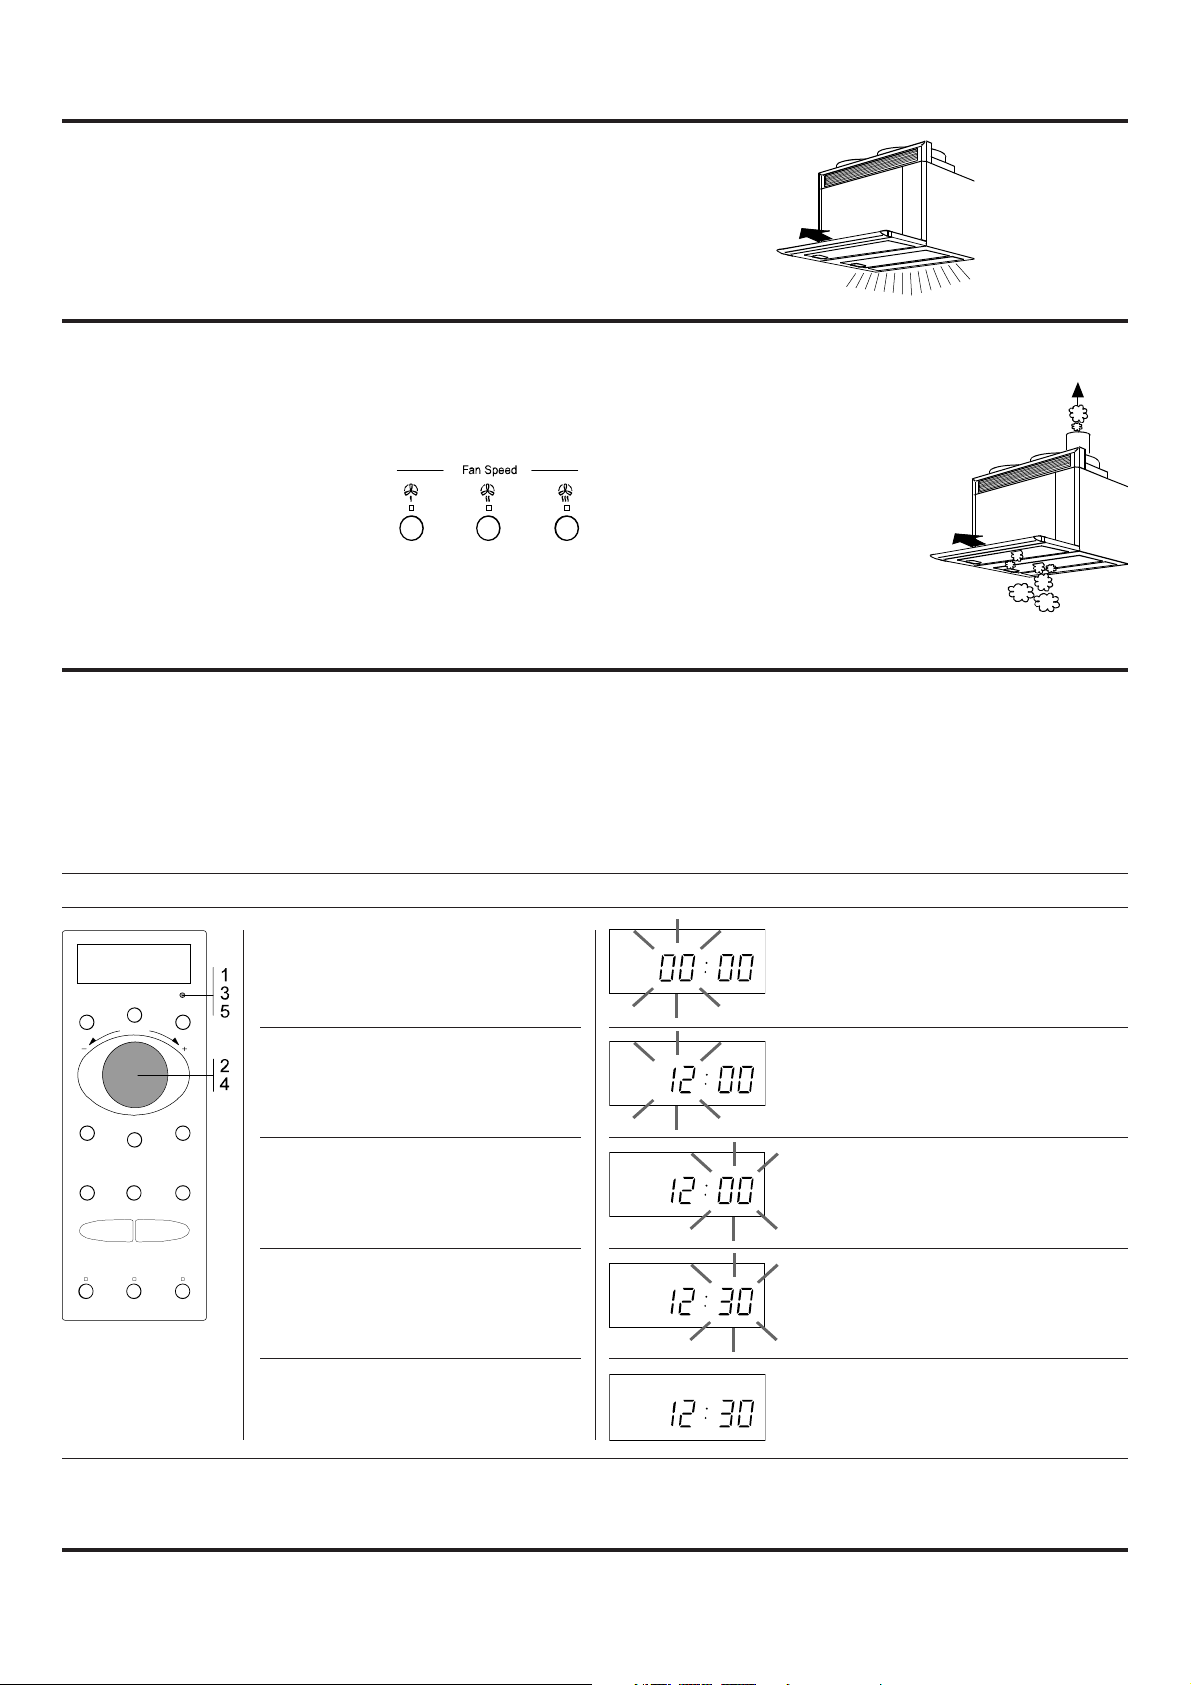
Optional clock display
When the appliance is first plugged in or after a power failure,
the display is blank. The facility is available, if required, to have
a 24 hour digital Clock display. If the Clock function is not
programmed into the oven then the display will remain blank
until the cooking time is set.
User action Oven reaction
1. Press the CLOCK button. * The two left hand figures (hours)
Note:
All cooking generates heat, especially when
using your cooker range. Sometimes the
heat can build up underneath the fan if it
is not turned on already. Inside the fan
is a small heat sensor which will
automatically activate the fan function
if the heat becomes to great. This is a
built in feature of this oven in order to
protect it from becoming to hot. The
fan will automatically shut off when the
temperature has decreased sufficiently.
Keep the door open during setting the Clock. This gives you 10
minutes to finish the setting of the Clock.
If the door is kept shut, each step must be accomplished
within 30 seconds. If not, the oven returns to “stand by“ and you
will have to start again.
flicker.
2. Turn the ADJUST knob to set the
hours. Stop when the correct hour
has been reached.
3. Press the CLOCK button again. * The two right hand figures (minutes)
4. Turn the ADJUST knob to set the
minutes. Stop when the correct
minute has been reached.
5. Press the CLOCK button again. * The Clock operates.
Note:
If you wish to remove the Clock from the display once it has been set, simply press the Clock button again and then press the Stop
button. To reinstall the Clock, follow the above procedure.
8
* The set hours will continue to flicker
flicker.
* The set minutes will continue to flicker.
Page 9

Timer function
The Timer function is completely independent of all other
functions and can be used at any time regardless of whether
the oven is currently cooking or not. It enables you to quickly set
a time without affecting your cooking.
The Timer is easy to use even while another function is in
operation. To do this, simply follow the below procedure, while
the oven is in operation.
User action Oven reaction
1. Press the TIMER button. * 5 seconds is displayed.
2. Turn the ADJUST knob to set the
TIMER.
3. Press the START button. * The Timer is displaying the set Timer
The Timer function is useful when you need an “egg clock” as
reminder or measuring the standing time for such items as a
big roast, or chicken.
Use the Timer function when the cookbook recommends a
standing time after cooking.
* The Timer indicator is lit.
time counting down.
* The Timer symbol is lit.
When the time has elapsed a special acoustic signal sounds and the Timer switches off.
Note:
The time can easily be increased by turning the Adjust knob
after the Timer button has been pressed.
One press on the Timer button displays how much time is left
on the Timer. The Timer is displayed for 3 seconds and the
display then returns to displaying the cooking time.
If you are currently cooking, the Timer symbol will flash during
the cooking.
Stop the Timer by turning the Adjust knob to zero. To stop the
Timer when it is operating in the background of another
function, you must first recall the Timer to the foreground by
pressing the Timer button and then turn the Adjust knob to zero.
The Timer symbol is then removed and the cooking time is
displayed counting down.
9
Page 10

Cooking interruption
To interrupt the cooking process:
If you wish to check, stir or turn the food just
open the door and the cooking process
automatically stops. When the door is opened
the cooking time and functions remain set for
10 minutes to indicate that the cooking /
reheating has been interrupted. If you open the door please
consider the following:
To restart the cooking process:
Close the door and press the START button
once.
Note: The cooking process continues from
where it was interrupted if the START button is
pressed once. Pressing the START button
twice also increases the time by 30 seconds.
If you don’t want to continue cooking:
Remove the food, close the door and press the STOP button
Time and power
User action Oven reaction
1. Press the POWER button repeatedly
to select a desired Power level.
Continuously pressing the POWER
button simply steps the Power level
rapidly up to maximum power and
starts at 0 W again. Release the
button when the correct level has
been reached.
If you don’t interrupt the cooking process:
When the cooking process is finished, the oven will
beep once every minute for 10 minutes, unless the
door is opened or the STOP button is pressed.
Note: It is possible to change both Time and power during
cooking except when using the Auto functions
Continued cooking:
When the cooking process is finished, the oven keeps the
current settings for 10 minutes unless the STOP button is
pressed. This enables you to continue cooking simply by first
pressing the AUTO ADD a little bit more button and then the
START button. You may also continue cooking simply by
pressing the START button a few times. In this case the oven
only increases the time by 30 seconds in each press. All other
settings remain the same.
Note: The oven keeps the settings for only 30 seconds if the
door is opened and then closed after the cooking is finished.
* The Microwave working symbol is lit.
2. Turn the ADJUST knob until the
required time is indicated.
3. Press the START button. * The Microwave working symbol
Note:
Once the cooking process has been started the time can
easily be increased in 30 second steps by pressing the Start
button. Each press increases the time with 30 seconds. You
may also alter the time by turning the Adjust knob to increase or
decrease the time.
Pressing the Power button once during cooking displays the
current Power level for 3 sec. Pressing more than once
changes the Power level to a new setting.
flashes.
* The cooking time is displayed count-
ing down
When the cooking time has elapsed an
acoustic signal sounds and the cooking
process is switched off.
Hint:
The most used power level when cooking
or reheating is 750 W. This is also the
default setting when pressing the POWER
button or turning the Adjust knob. If 750 W
is required in your recipe, all you need to do is to set the time
with the Adjust knob and press the Start button. The oven is
automatically working with the default power level.
10
Page 11

Jet start function
Pressing the Jet Start button, the time is increased in 30
second steps and the oven automatically starts with maximum
power. Pressing the Jet Start button once during normal
cooking simply increases the time by 30 seconds in each
press. The power is not affected.
Use this function for quick reheating of foods such as clear
soups, coffee, tea or other foods with high water content.
User action Oven reaction
1. Press the JET START button. * The Microwave working symbol
If you open and then close the door during normal cooking
(cooking interruption), then restarting by pressing the Jet Start
button once does not affect the set Time and Power. Pressing
the Jet Start button again increases the time by 30 seconds in
each press.
flashes.
* The Power level bar is scrolling.
* The cooking time is displayed count-
ing down.
When the cooking time has elapsed an
acoustic signal sounds.
Manual defrost function
Manual Defrost function (160 W) is used for food items that
should only be slightly heated but not completely defrosted.
How to use the manual defrost function
Follow the procedure for “Time and Power” and choose
160 W when defrosting.
When softening ice-cream or butter you should choose 90 W.
Use this function when defrosting very small items (less than
50 grams) such as a single bun or biscuit. This function is also
to be used for such foods as shellfish, berries, soups and
ready made foods.
Check and inspect the food regularly. Experience will give you
the times needed for various amounts.
11
Page 12

Auto defrost function
Your microwave oven has a special automatic defrosting
function, which provides you with good end results. The oven
needs to know the type of food to be defrosted and the net
weight of the food. Five food classes have been designed into
your oven and they cover the whole spectrum of food. Each
BREAD
* Buns
* Rolls
* Bread loaf
* Biscuits
VEGETABLES
* Broccoli
* Cauliflower
* Mixed
vegetables
IMPORTANT!
When using the automatic defrost function, the weight to be
entered is the net weight in grams meaning only the weight
of the food, the vessel excluded.
The Auto defrost function gives best results, if the food is at
-18°C and the food to be defrosted is taken directly from the
freezer.
If the food is warmer than deep-freeze temperature (-18°C)
e.g. is stored in the freezing compartment of the refrigerator,
which is not a three star, the defrosting time calculated by the
oven will be too long and you may risk over-cooking the food.
subsequent press will select the next food class.
Auto Defrost is used for defrosting of raw, parboiled, pre-
cooked food and bread.
MEAT
* Pork chops
* Steaks
* Roasts
* Minced meat
Choose in that case lower weight of the food and by that
shorter defrosting time. Choose also lower weight of the food
to be defrosted, if the food is stored outside the freezer for
times up to 20 minutes.
Defrost by time and power if the food is stored outside the
freezer for more than 20 minutes and for defrosting readymade food. Standing time always improves the result.
Small pieces of aluminium foil may be used to shield e.g.
chicken wings, leg tips and fish-tails but the foil must not
touch the side of the oven as damage may occur.
FISH
* Cod steaks
* Plaice fillets
* Trout
POULTRY
* Chicken,
whole or in
pieces
* Turkey
User action Oven reaction
1. Press the AUTO DEFROST button. * The display now shows weight in
grams (gr.) and the first of the five food
classes is indicated.
2. Continue to press the AUTO DE-
FROST button to select the food
class needed
3. Turn the ADJUST knob to set the
weight of the food to be defrosted.
4. Press the START button. * The defrosting process begins.
* The Microwave working symbol
flashes.
* The defrosting time is displayed
counting down
When the Defrost program is finished an
acoustic signal is heard
12
Page 13

Grill function
When using the Grill you don’t need any browning agents such
as gravy browning, soy sauce or powder forms to enhance the
appearance. The Grill which is placed in the ceiling of the oven
compartment, will quickly give a nice brown surface to the food.
For best results reposition food and turn over half way through
cooking.
Do not leave the oven door open for long periods when the
Grill is in operation as the temperature will drop.
User action Oven reaction
1. Press the GRILL button. * 5 sec is displayed.
2. Turn the ADJUST knob until the
required time is indicated.
3. Press the START button. * The Grill symbol is flickering.
Important!
Ensure that the utensils you use are heat resistant and oven
proof before grilling with them. Plastics, paper, or wood are not
recommended.
Do not use plastic utensils when
grilling. They will melt.
Always place the Grill-grid on the Glass
Turn-table to collect the dripping juices.
* The Grill symbol is lit.
* The cooking time is displayed count-
ing down.
When the cooking time has elapsed an
acoustic signal sounds and the cooking
process is switched off.
Note:
Pressing the Grill button during cooking switches the Grill element on and off. The timer will continue to count down when the Grill
element is turned off.
13
Page 14

Grill in combination with microwaves
Power level Suitable foods
90 - 160 W Large cuts of meat
160 - 350 W Fish
350 - 500 W Poultry
500 - 650 W Gratins
How to choose the correct power level
During Grilling you can switch the Microwaves on/off simply by
pressing the Power button. The Max. possible microwave
power level when using the Grill is limited( see technical
specifications). You may also switch the Grill element on/off by
pressing the Grill button.
Important!
Ensure that the utensils you use are oven proof and allow
microwaves to pass through them before Grilling with microwaves combined.
User action Oven reaction
1. Press the GRILL button.
2. Press the POWER button repeatedly
to select a desired Power level.
Continuously pressing the Power
button simply steps the Power level
rapidly up to max. level and starts at
0 W again. Release the button when
the correct level has been reached.
3. Turn the ADJUST knob until the
required time is indicated.
4. Press the START button. * The Microwave symbol flashes.
* 5 sec is displayed.
* The Grill symbol is lit.
* The Microwave symbol is lit.
* The Grill symbol is flickering.
* The cooking time is displayed count-
ing down.
When the cooking time has elapsed an
acoustic signal sounds and the cooking
process is switched off.
14
Page 15

Auto Add function
Sometimes when the cooking is finished, you find upon
checking the food, that it needs just a little bit more to finish off
properly. The Auto Add function then provides you with the
possibility to continue cooking just a little bit more in order to
achieve the best result.
The principle of the Auto Add function is to keep the current
settings and calculate a small percentage of the previously
used cooking time. It then continues to cook with the new
cooking time.
The cooking time you obtain when pressing the AUTO ADD
button is not the same every time. It depends on the cooking
time you just used and the chosen function.
Crisp function
Do not place any utensils on the Crisp-plate since it will very
soon become very hot and is likely to cause damage to the
utensil.
Always place the Crisp-plate on the
Glass turn-table.
The Crisp-plate will give foods such as
pizzas and pies a nice crisp, brown bottom surface. Use this
function to refresh and crisp pre-cooked pizzas and other
dough based foods. Use it also to fry bacon and eggs, sausages, hamburgers etc.
Place foods directly on the Crisp-plate. Brush the Crisp-plate
with oil before use. This will make it easier to remove foods
from the plate and to clean it after use.
The oven is automatically working with Microwaves and Grill in
order to heat the Crisp-plate. This way the Crisp-plate will
The oven remembers the last used cooking setting for 1
minute after the Clock is displayed again. The Auto Add function is only possible to use during this minute. If you press the
AUTO ADD button after the minute has passed, nothing
happens.
You use the Auto Add function by simply pressing the Auto
Add button after the cooking is finished and then the start
button.
rapidly reach its working temperature and begin to brown and
crisp your food. The Crisp-plate may be preheated before use.
CAUTION!
The oven and the crisp-plate becomes very hot when
using this function. Use oven mittens or the special Crisp
handle supplied when removing the hot
Crisp-plate.
Do not touch the ceiling beneath the Grill
element.
Ensure that the Crisp-plate is properly placed in the middle
of the Glass Turn-table.
Note:
It is not possible to change or switch on/off the Power level or
Grill when using the Crisp function.
User action Oven reaction
1. Press the CRISP button. * 5 sec is displayed
* The Grill symbol is lit
* The Crisp symbol is lit
* The Microwave symbol is lit.
2. Turn the ADJUST knob until the
required time is indicated.
3. Press the START button. * The Microwave symbol flashes.
* The Grill symbol flashes
* The cooking time is displayed count-
ing down
When the cooking time has elapsed an
acoustic signal sounds and the cooking
process is switched off.
15
Page 16

Auto crisp function
Your microwave oven has an automatic Crisp function for
frozen ready made foods. This function enables you to quickly
reheat your food in one step from frozen to serving temperature.
The oven needs to know the type of food to be crisped and the
net weight of the food. Four food categories have been designed into your oven. They will provide you with good end
results. Each subsequent press will select the next food
category.
If the weight is less than recommended weight:
Use the manual “Crisp function” to crisp the food manually.
Experience will give you the correct time for your favourite small
amount foods.
Potato products
(150 - 400 g)
* French fries
* Pommes chateau
* Croquette potatoes
Pizza’s
(150 - 400 g)
IMPORTANT!
Take the frozen food directly from the freezer and place it on
the crisp plate.
Do not place any containers or wrappings on the Crisp plate!
Only the food is to be placed on the Crisp plate.
The Auto Crisp gives best results, if the food is at -18°C and
the food to be Auto Crisped is taken directly from the freezer.
If the food is warmer than deep-freeze temperature (-18°C)
e.g. is stored in the freezing compartment of the refrigerator,
which is not a three star, the Auto Crisp time calculated by the
If the weight is greater than recommended weight:
Divide the food into two or more pieces and proceed to Auto
Crisp each piece separately. If it’s not possible to divide the
food, you must use the manual “Crisp function” to crisp the
food manually. With greater amounts it is necessary to stir or
turn the food during Crisping and this is best done with the
“manual Crisp function”.
Auto Crisp is used only for frozen ready made foods.
Please note that a few minutes standing time always improves
the result.
Quiche & pastries
(150 - 400 g)
oven will be too long and you may risk over-cooking the food.
Choose in that case lower weight of the food and by that
shorter Auto Crisp time. Choose also lower weight of the
food to be Auto Crisped, if the food is stored outside the
freezer for times up to 20 minutes.
If the food is stored outside the freezer for more than 20
minutes you shall choose the manual “Crisp function” to
crisp the food manually. Experience will give you the correct
times needed.
Chicken
(150 - 400 g)
* Chicken quarters
* Chicken nuggets
User action Oven reaction
1. Press the AUTO CRISP button. * The display now shows weight in
grams (gr.) and the first of the four food
categories is indicated.
2. Continue to press the AUTO CRISP
button to select the food categories
needed.
3. Turn the ADJUST knob to set the
weight of the food to be Auto
Crisped.
4. Press the START button. * The cooking process begins.
* The Microwave working symbol
flashes.
* The Auto Crisp time is displayed
counting down.
When the Auto Crisp program is finished an
acoustic signal is heard
Note:
It is not possible to change or switch on/off the Power level or Grill when using the Auto Crisp function.
16
Page 17

Menu function
The Menu function provides you with an easy way to quickly
recall a preferred setting or combination of functions. Simply
press a Menu button and then the Start button.
The principle of the Menu function is to store whatever function and setting that is currently displayed.
When the appliance is plugged in or after a power failure, your
oven menus will have stored the following:
M1 - 1 minute and 750 W
M2 - 3 minutes and 750 W
User action: Oven reaction:
1. Press one of the MENU buttons. * The Menu content is then shown on
2. Press the START button. * The oven operates.
The two menus are fully re-programmable. To re-program a
Menu, select a function and make the necessary settings. Keep
the Menu button pressed until an acoustic signal is heard. You
may re-program the menus as many times as you wish.
the digital display.
When the memorised program has ended
the oven stops automatically and an acoustic
signal is heard.
How to re-programme a menu
Let’s say we wish to cook some items for 1 minute at Power Level 650 W.
1. Turn the ADJUST knob until one
minute is displayed.
2. Press the POWER button until 650
W is displayed.
3. Press one of the MENU buttons until
an acoustic signal is heard. (Approximately 2 seconds).
4. Press the STOP button.
The Menu has now been programmed. To check what is
stored, simply press the Menu button again and the Menu
content is shown on the display.
Note: When new values are stored in the Menu the old Menu
content is erased.
17
Page 18

Maintenance
Oven
IMPORTANT!
Before any maintenance operation, disconnect the
appliance from the electricity! This is done by disconnecting the plug or in the case of a permanent installed appliance, disconnect the fuse.
Your Hood Microwave oven has a stainless steel interior.
Unlike the painted steel interiors found in most other microwave ovens, the surface will not chip, rust or corrode.
Cleaning is the only maintenance normally
required. It must be carried out with the
microwave oven disconnected.
Clean frequently all deposits from contaminated surfaced.
Do not use metal scouring pads on the inside of the oven
cavity. They will scratch the surface.
At regular intervals, especially if spillovers have occurred,
remove the turn-table, the turn-table support and wipe clean the
base of the oven.
This oven is designed to operate with the turn-table in place.
Do not operate the microwave oven when the turn-table is
removed for cleaning.
Use a mild detergent, water and a soft cloth to clean the
interior surfaces, front and rear of the door and the door
opening.
Do not allow grease or food particles to build up around the
door.
For stubborn soil, boil a cup of water in the oven
for 2 or 3 minutes. Steam will soften the soil.
Odours inside the oven can be eliminated
by placing a cup of water with lemon juice
added into the oven and boiling the mixture.
The Grill element does not need cleaning since the intense
heat will burn off any splashes, but the ceiling beneath it may
need regular cleaning. This should be done with warm water,
detergent and a sponge.
If the Grill is not used regularly, it should be run for 10 minutes
a moth to burn off any splashes, in order to reduce the risk of
fire.
Important:
The door seals and the door seal areas must be regularly
inspected for damage. If these areas are damaged the appliance should not be operated until it has been repaired by a
service technician trained by the manufacturer.
WARNING!
Abrasive cleansers, steel-wool pads, gritty wash cloths,
etc., can damage the control panel, and the interior and
exterior oven surfaces. Use a sponge with a mild detergent
or a paper towel with spray glass cleaner. Apply spray
glass cleaner to a paper towel.
Do not spray directly on the oven.
Only use damp cloths when cleaning in particular the
ventilation grid.
Grease filters
The grease filters capture the greases
from the cooking fumes and need to be
cleaned at a regular basis. The more
often the better they work. The grease
filters are made of several layers of
stretched aluminium. Wash them in hot
soapy water or in a dishwasher (60’C)
once a month.
How to remove the grease filters.
a. Extract the drawer to it’s full length.
b. Pull the handle down to release the
filter from it’s mounted position.
Changing the lamp
a. Disconnect the appliance from the
electricity.
b. Unscrew fixing screws of the lamp
cover.
c. Replace the damaged lamp with one
of the same power:
Before calling for repair service because the hood fails to light
up. Please check that the lamp is fitted tightly.
Hood
Carbon Filter (optional)
This is not washable and can
not be reused. – Replace every
6 months with a fresh one.
Mounting of the Carbon Filters
(2 pcs)
a. Extract the drawer to its full
length.
b. Release the grease filters.
c. Fit first aside on the proper seats
2.
d. Then fix the carbon filters on the
centre of the hood using the hooks 1.
e. Refit the grease filters.
Dismounting of the Carbon Filter
Unhook the carbon filters from their housing pushing hooks 1.
ATTENTION!
Failure to observe the rules for cleaning the appliance and
changing and cleaning the filters may cause fires.
Therefore, we recommend observing these instructions.
18
Page 19

Service
If the appliance does not work, do not make a service call until
you have made the following checks:
* The Turn-table and turn-table support is in place.
* The Plug is properly inserted in the wall socket.
* The Door is properly closed.
* Check your Fuses and make sure that there is power
available.
* Drawer extracted when using the hood, fan or light.
* Wait for ten minutes and then try to operate the appliance
once more.
This is to avoid unnecessary calls for which you will be
charged. When calling for Service, please give the serial
number and type number of the oven (see Service label).
If you need service
Whirlpool has a national network of authorised engineers and
authorised service companies. Whirlpool service technicians
are trained to fulfil the product warranty and provide after warranty service, anywhere in Europe. To locate the authorised
Whirlpool service company in your area, call your local dealer
or look in your telephone directory under:
Important:
If the mains cord needs replacing it should be replaced by the
original mains cord which is available via our service organisation. The mains cord must only be replaced by a trained service
technician.
WARNING!
Service only to be carried out by a trained service techni-
cian. It is hazardous for anyone other than a trained person
to carry out anyservice or repair operationwhich involves
the removal of any cover which gives protection against
exposure to microwave energy.
Do not remove any cover.
Appliance - household - major, service
& repair - See: Whirlpool Appliances or
Authorised Whirlpool Service
(Example: XYZ Service Co.)
ENVIRONMENTAL HINTS
The packing box may be fully recycled
as confi rmed by the recycling symbol.
Follow local disposal regulations.
Keep potentially hazardous
packaging (plastic bags, polystyrene
etc.) out of the reach of children.
This appliance is marked according to the
European directive 2002/96/EC on Waste
Electrical and Electronic Equipment (WEEE). By
ensuring this product is disposed of correctly,
you will help prevent potential negative
consequences for the environment and human
health, which could otherwise be caused by
inappropriate waste handling of this product.
The symbol on the product,
or on the documents
accompanying the product,
indicates that this appliance may
not be treated as household
waste. Instead it shall be
handed over to the applicable
collection point for the
recycling of electrical and
electronic equipment.
Disposal must be carried out in accordance
with local environmental regulations for waste
disposal.
For more detailed information about
treatment, recovery and recycling of this
product, please contact your local city offi ce,
your household waste disposal service or the
shop where you purchased the product.
Before scrapping, cut off the mains cord so
that the appliance cannot be connected to the
mains.
19
Page 20

Data for test of heating performance
in accordance with IEC 705.
The International Electrotechnical Commission, SC 59H, has developed a standard for comparative testing of heating performance of different microwave ovens. We recommend the following for this oven:
MBF 303
Test Amount
A 750 g 9 min 750 W Pyrex 3.220.87
B 475 g 5 min 750 W Pyrex 3.827.80
C 900 g 15 min 750 W Pyrex 3.838.80
Defrosting, minced meat 500 g
Approx .
time
14 1/2 min on auto
Power level Container
Pyrex 3.838.80 Place on a
plastic plate
Technical specifications
Type number
Supply voltage
Power consumption
Fuse
For other countries
Lighting
Microwave power
Grill power
Defrost food class table
1 - 4
5
Auto crisp food class table
1
2 - 4
Timer
Dimens ions:
Outer dimensions:
Oven compartment:
Wei ght:
MBF 303
230 V/50 Hz
2550 W
16 A
16 A (10 A)
1 x PL 11 W
Microwave power (acc. to IEC705. 1000 g water)
900 W
900 W
Weight
interval
50-500 g 25 g
500- 800 g 50 g
800-2000 g 100 g Evacuation Recirculation
50-500 g 25 g 1 (Min) 170 m³/h 160 m³/h
500- 800 g 50 g 2 (Med) 290 m³/h 220 m³/h
800-3000 g 100 g 3 (Max) 360 m³/h 240 m³/h
Weight interval
150-400 g
150-400 g
Steps
Fanperfomance according to DIN 44971
(Flue Ø 120 mm)
Speed
Electronic
H X W X D
540 x 598 x 340
200 x 340 x 290 20 L
36 Kg
Capacity
20
Page 21

212223
Page 22

Page 23

Page 24

24
4619 694 29351
Whirlpool Sweden AB
 Loading...