

Page 1
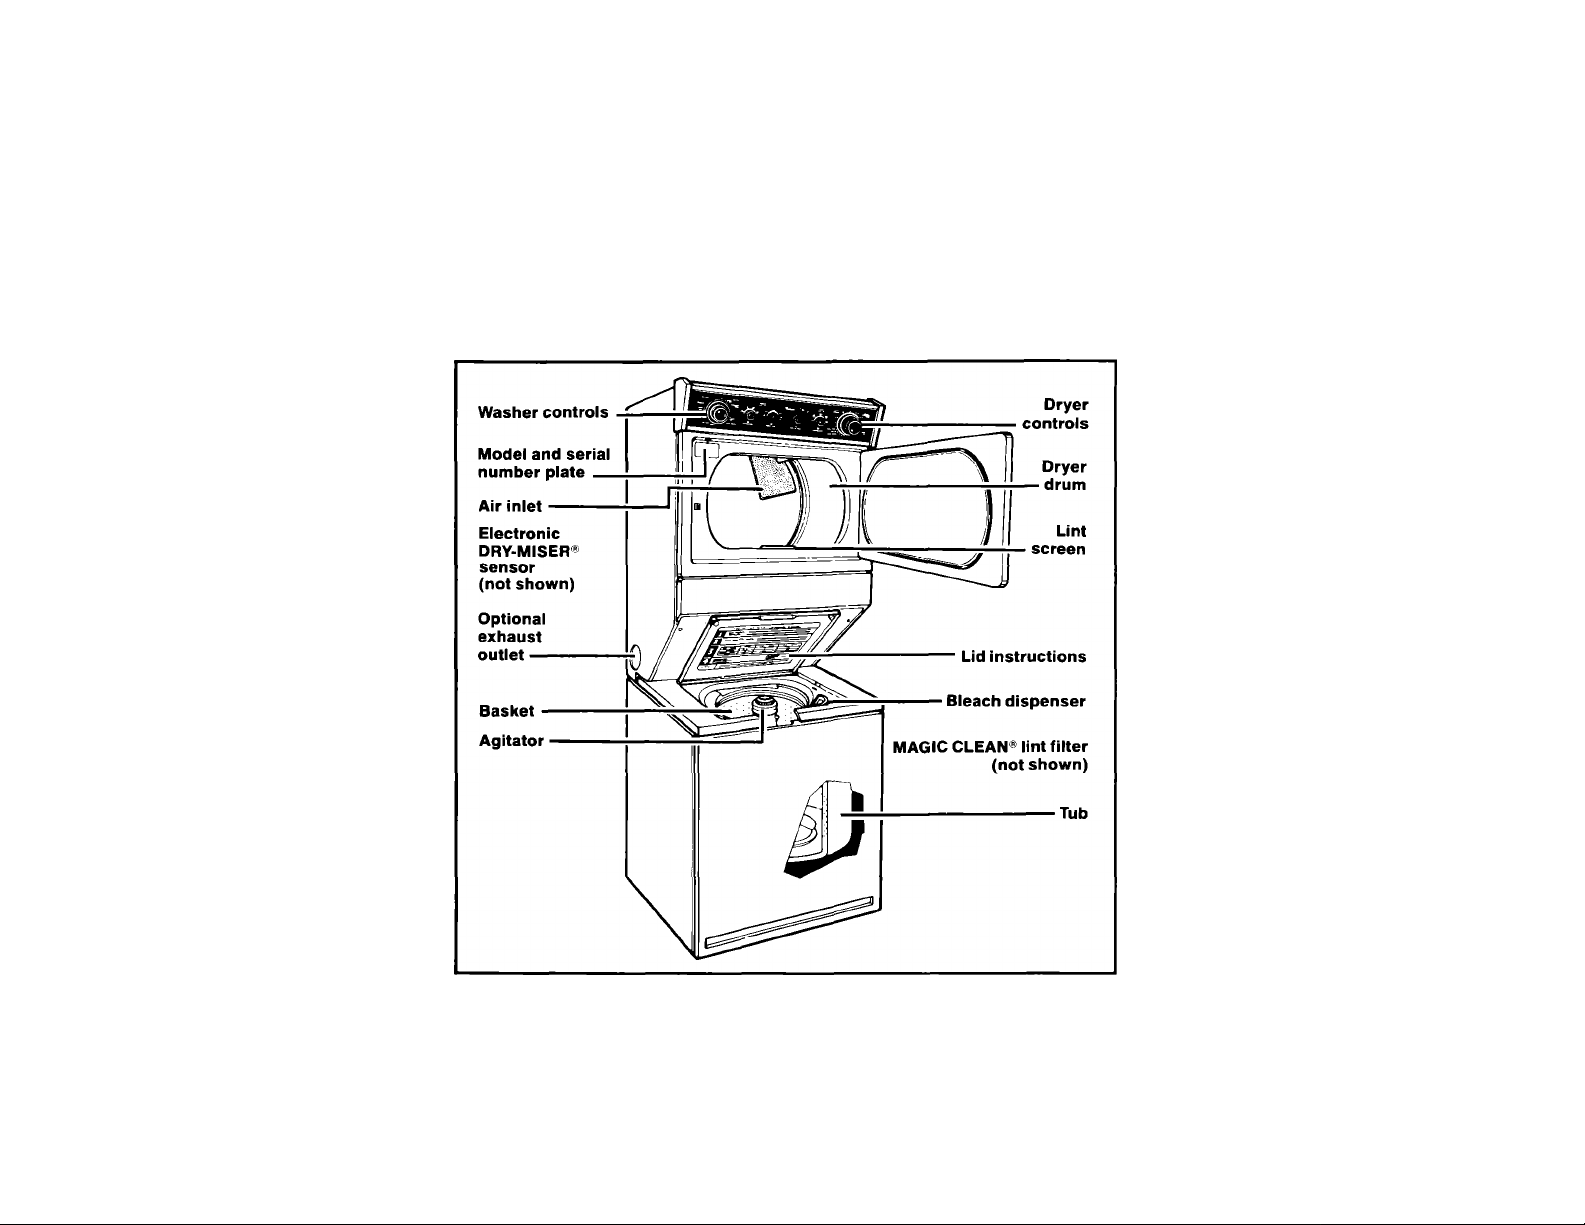
AVhirlpciol
/ HomeAppliances
Use & Care Guide
LARGE CAPACITY THIN TWIN®
AUTOMATIC WASHER DRYER
LT7000XT LT7004XT LT7100XT
LT7000XV LT7004XV LT7100XV
Page 2

Contents
.........
18-19
Page
3
6-7
11
11-12
12
12
13
14
15
15
15
15
Important Safety
Instructions
Additional safety instructions
and your responsibilities ... 4
Loading Suggestions
Loading ....................................... 5
Load sizes and water levels .. 5
Washer Operating
instructions
Starting your washer
What happens in each cycle .. 7-10
Other Operating Instructions
Rinse and spin
Drain and spin........................... 11
Soak cycle................................. 11
Pre-wash cycle
Liquid bleach dispenser
Liquid fabric softener
dispenser
MAGIC CLEAN* * lint filter .... 12
Dryer Operating Instructions
Starting your dryer
The automatic cycles
Timed drying cycle..................... 15
Using damp dry
Using TUMBLE PRESS® .... 15
Fluff air cycle
End-of-cycle signal
Gentle heat
Lint Removal.......................16-17
If You Need Service or
Assistance
Whirlpool Thin Twin*
Warranty................................ 20
©1989 Whirlpool Corporation
If your Thin Twin has a Consumer Buy
Guide label, remove it. It will be easier
to remove before the washer is used. To
remove any remaining glue;
• Rub briskly with thumb to make a ball,
then remove.
or
• Soak area with iiquid hand dishwash
ing detergent before removing glue as
described above.
Do not use sharp instruments,
rubbing alcohol, flammable fluids or
abrasive cleaners. These can damage
the finish. See 'Important Safety
Instructions” on page 3.
2
..............................
...............
.........................
.....................
........................
....................
..........
.........................
......................
.............
...............................
..........................
NOTE: Do not remove any permanent
instruction labels inside the dryer.
You should wipe out the dryer drum
with a damp cloth before using to re
move dust from storing or shipping.
Thank you for buying a Whirlpool ap
pliance. Please complete and mail the
Owner Registration Card provided with
this product. Then complete the form
below. Have this information ready if
you need service or call with a question.
• Copy model and serial numbers from
plate (next to dryer drum opening)
and the purchase date from the sales
slip.
• Keep this book, the Laundry Guide
and the sales slip in a handy place.
Model Number
Serial Number
Purchase Date
Service Company Phone Number
FOR YOUR SAFETY
If you smell gas:
1. Open windows.
2. Don’t touch electrical
switches.
3. Extinguish any open
flame.
4. Immediately call your
gas supplier.
FOR YOUR SAFETY
Do not store or use gas
oline or other flammable
vapors and liquids in the
vicinity of this or any
other appliance. The
fumes can create a fire
hazard or explosion.
Page 3

Important Safety Instructions
^WARNING
• Read all instructions before
using the Thin IWin.
• NEVER wash or dry items cleaned,
washed, soaked in or spotted with
wax, paint, gasoline or flammable
fluids in the Thin Twin. The fumes
can create a FiRE HAZARD or EX
PLOSION. ALWAYS hand launder
and air dry fabrics containing these
materials.
• NEVER allow children to operate,
play with, or crawl inside the Thin
Twin. Close supervision of children is
necessary when the Thin Twin is
used near children.
• When discarding an old Thin Twin,
ALWAYS remove the lid and door to
prevent accidental entrapment.
• NEVER reach into the Thin Twin
until all the motion stops. If the lid is
opened while the washer basket is
spinning, the basket will automati
cally stop in a few seconds.
• DO NOT install or store Thin Twin
where it will be exposed to the
weather.
• DO NOT tamper with the controls.
• You are responsible for making
sure that your Thin TWin is
installed, repaired and parts
replaced by a qualified person.
To reduce the risk of fire, eiectric shock, or in
jury to persons when using your Thin Twin, fol
low basic precautions, including the following:
- SAVE THESE INSTRUCTIONS -
• NEVER use or store flammable
fluids (dry-cleaning solvents,
gasoline, kerosene) in or near your
Thin Twin. Do not add flammable
fluids to the wash water. These
substances give off vapors that
can create a FIRE HAZARD or
EXPLOSION
• Use only dryer fabric softeners
specifically labeled as not being
harmful to the dryer.
• FIRE HAZARD and DAMAGE to
materials can result from:
- drying rubber, rubber-like and
heat sensitive materials with heat.
- allowing lint to build-up inside
the dryer or exhaust system cleaning should be done by a
qualified person.
• Clean lint screen before or after
each load.
• If hot water has not been used
recently (usually 2 weeks or longer),
hydrogen gases may build up in
the water heater and the hot water
pipes. HYDROGEN GAS IS
EXPLOSIVE. To prevent injury or
damage, before using your washer,
turn on all hot water faucets and al
low water to run for several minutes.
This will allow gases to escape. DO
NOT smoke or use any open flame
near the faucet while it is open.
• DO NOT let dust, paper, rags, lint,
chemicals, etc. pile up, around or
under the Thin Twin.
• The Thin Twin must be electrically
grounded. See the Installation
Instructions.
Page 4
Important Safety Instructions
Continued
Additional safety instructions
and your responsibilities
• ALWAYS shut off the gas valve
before leaving on vacation.
• ALWAYS unplug the power supply
cord before attempting to service the
Thin Twin. Shut off GAS VALVE if
yours is a gas dryer.
• DO NOT machine wash or dry glass
fiber materials. Small particles can
stick to fabrics laundered in following
loads and cause skin irritation.
• HAZARDOUS FUMES can be
formed if chlorine bleach is used in
the same wash as ammonia or acids
such as vinegar or rust remover.
• ALWAYS store detergent, laundry
aids and other materials in a cool, dry
place where children can’t reach them
- in a locked cabinet if possible.
• ALWAYS read and follow instructions
on packages of detergent and laundry
aids - especially warnings and
precautions.
• NEVER operate the Thin Twin if...
- it is not working right.
- it is damaged.
- parts are missing.
- all panels are not in place.
• You are responsible for making
sure that your Thin Twin:
- is properly maintained.
- is properly installed and
leveled in a well ventilated room on
a floor that can support the weight.*
- is located in an area where the tem
perature is above 45°F (7.2°C)
because the dryer will not operate
properly at cold temperatures and
freezing temperatures can damage
the washer.
- is connected to the proper electrical
supply, outlet, water supply, plumb
ing fixtures, drain and dryer
exhausting system.*
- is not installed against drapes or
curtains.*
- is used only for jobs normally
expected of home aufomatic
Thin Twins.
'Refer to the Installation Instructions for
complete information.
When not washing, keep both water
faucets turned off. This takes the pres
sure off the water inlet valve and hoses.
Page 5

Loading Suggestions
Loading
MIXED LOAD PERMANENT
2 double or 1
king size sheet
4 pillowcases
6 T-shirts
6 pair shorts
2 shirts 2 slacks
2 blouses 3 shirts
6 handkerchiefs 2 pillowcases
PRESS
1 double sheet
1 tablecloth
1 dress
1 blouse
1 ! /
1 •
j ■ 1
□
\ ' 1
HEAVY WORK
CLOTHES
2 pair pants 2 tops
3 shirts
1 coverall
3 pair jeans
TOWELS DELICATES
8 bath towels 2 camisoles
8 hand towels 4 slips
10 wash cloths 4 panties
1 bathmat 2 bras
KNITS
2 slacks
4 blouses
4 shirts
2 dresses
2 nighties
Load sizes and water levels
For best cleaning results, the load must
be able to move freely in the water. Too
big a load or too little water can cause
wear or tearing of load items.
-----
EX LARGE
(17.3 gals./65.5 L)*
------
MEDIUM
(13.4gals./50.8 L)*
-----
EX SMALL
(9.5 gals./36.0 L)*
‘Approximate fill with load.
NOTE: Do not overload washer.
Page 6
Washer Operating Instructions
The drawings in this book may vary slightly from your Thin Twin model. They are
designed to show the different features of all the models covered by this book.
NOTE: Your model may not include all the features shown.
Starting your washer
Be sure to measure and add detergent, then place a sorted load in the washer before
starting it.
1. Select a load size
• Position the Load Size Selector at the
setting that describes the size of load
you want to wash.
LAHGE
»ir« LARGE
Jt Preset
WATER LEVEL
• The selector can be set anywhere on
or between EX SMALL (a few small
items) and EX LARGE (a full load).
• To change the water level after the
washer has started to fill, turn the
selector to RESET then to the desired
water level.
NOTE: For best washing results, items
should move freely In the washer. Do
not overload the washer or choose a
water level that Is too low for your wash
load.
For best results with permanent
press clothes, use the EX LARGE water
level.
Reduce wash time when using EX
SMALL or SMALL water level settings.
Loads with only a few small items need
less wash time for best results.
7^V
TEMPERATURE
2. Select water temperature
• Match the water temperature to
the type of fabric and soils being
washed.
• The top temperature is the wash
selection and the bottom tempera
ture is the rinse selection.
NOTE: Use warm wash water with
the PERMANENT PRESS or KNITS
GENTLE Cycles.
For heavily soiled permanent press
or knit clothes, pre-wash or pre-soak
before washing in warm wafer.
ALWAYS use cold rinse water for
permanent press fabrics.
Page 7

IE-WASH 4
3. Select cycle and wash time
Start the washer
• Push the Cycle Control Knob and turn
it to the right.
• Stop on the number or indicator mark
in the wash cycie you want. These
indicate the minutes of wash time.
• Start the washer by pulling out the
Cycle Control Knob. The washer will
fill to the selected water level with the
selected wash temperature. After fill
ing, the washer wiil agitate for the se
lected number of minutes.
• To stop the washer at any time, push
in the Cycle Control Knob. To restart
the washer, pull out the Cycle Control
Knob.
What happens in each cycle
Each cycle has different agitation and
spin speeds designed for different kinds
of fabrics.
Numbers on the dial in each cycle are
the minutes of wash agitation time.
When the Cycle Control Knob is set
to a number and pulied out, the washer
fills before agitation and timing starts.
After agitation starts, the knob turns
clockwise until it points to OFF and the
cycle ends.
Gentle Wash System
For better fabric care in the REGULAR
and PERMANENT PRESS Cycles, the
agitation speed is reduced during the
last few minutes of wash agitation time.
NOTE: You may hear the sound of
water spraying during the spin parts of
some cycles. In some cycles, water is
sprayed on the spinning ioad to help
with the rinsing.
The washer will pause briefly
throughout each cycle. These pauses
are normal. They allow for the reversing
of the motor, normal washer operation
and the cool-down portion of the
PERMANENT PRESS Cycle.
Page 8
Washer Operating Instructions
Continued
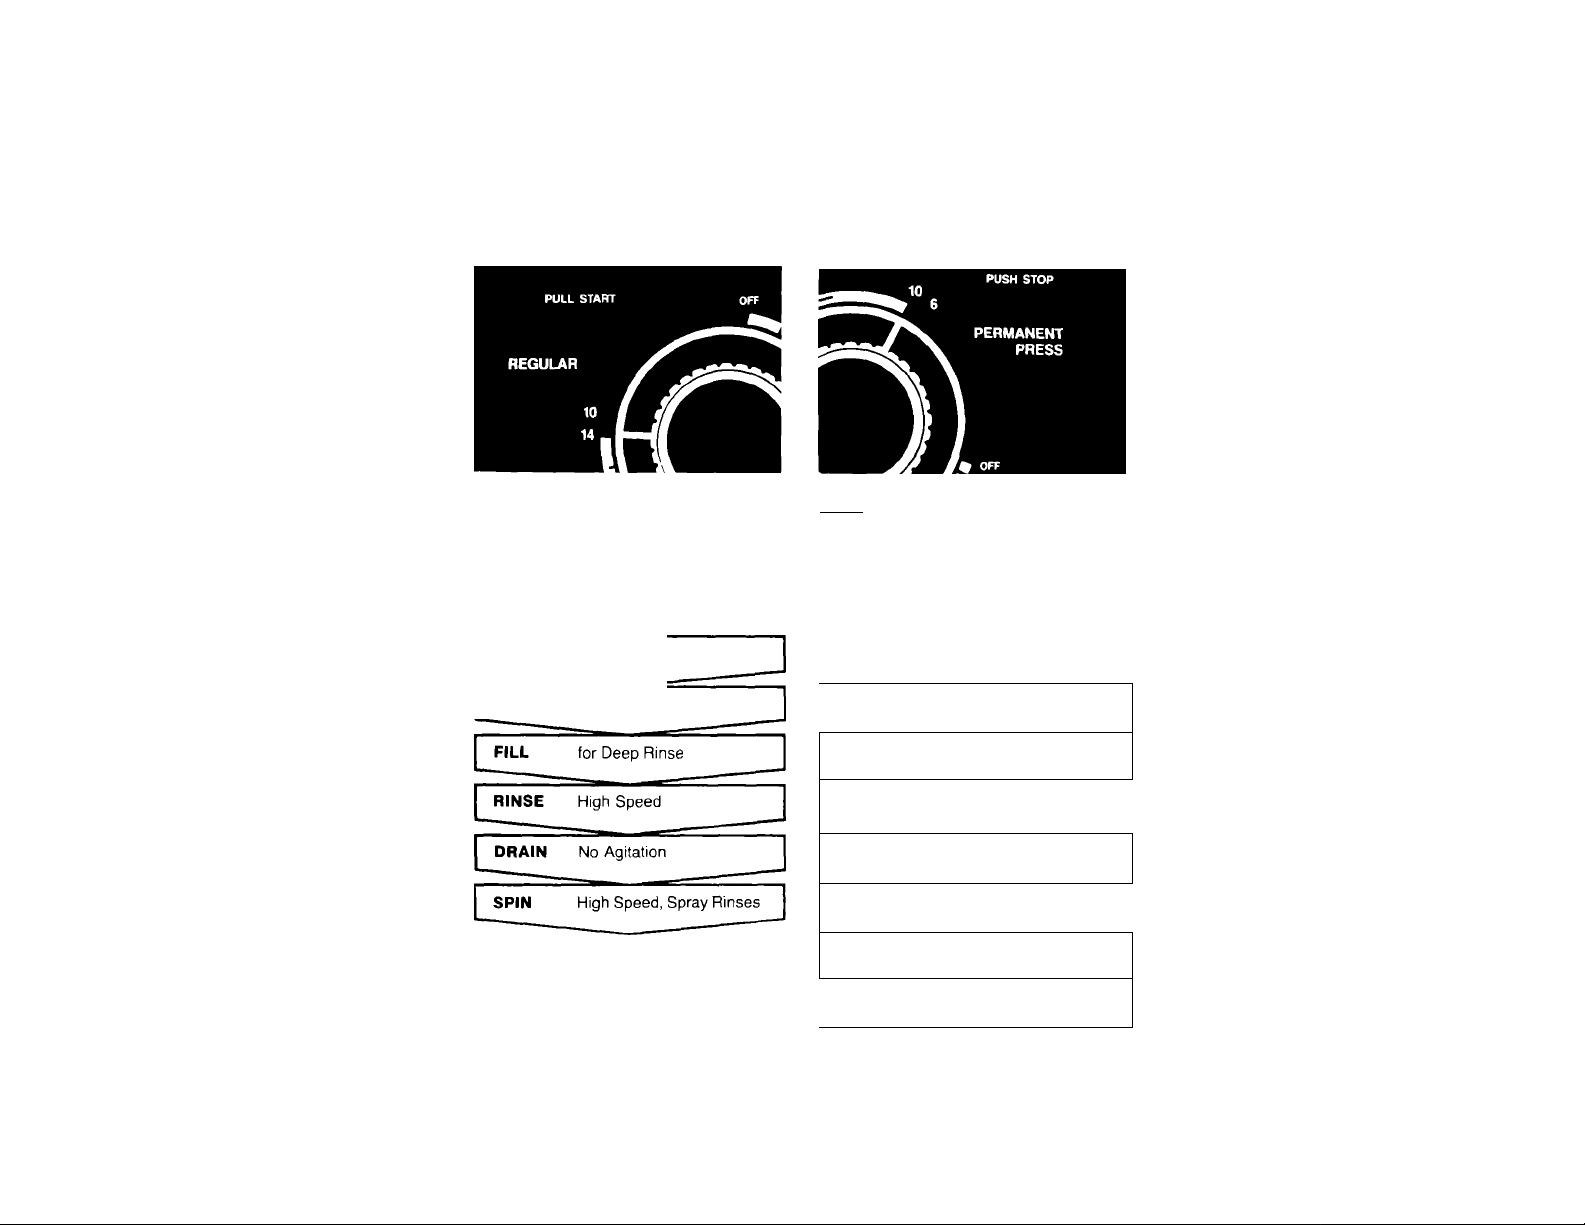
Regular Cycle
A cycle for sturdily constructed fabrics
that are moderately to heavily soiled.
FILL
WASH 6 Minutes Low Speed
DRAIN No Agitation
SPIN High Speed
to Selected Level
WASH 8-2 Minutes High Speed
Permanent Press Cycle
A cycle designed for lightly to moder
ately soiled permanent press and some
synthetic fabrics. The cool-down rinse
helps keep wrinkles from setting into
these items.
[ FILL
WASH 6-2 Minutes High Speed
WASH 4 Minutes Low Speed
PARTIAL DRAIN (Pause)
1_REFILL COOL-DOWN
to Selected Level
WASH
DRAIN
SPIN
FILL
RINSE High Speed
1 DRAIN
SPIN
High Speed
No Agitation
Low Speed
for Deep Rinse
No Agitation
Low Speed, Spray Rinses
_____________
___________
NOTE; Always use cold rinse water
for permanent press fabrics.
J
|
Page 9
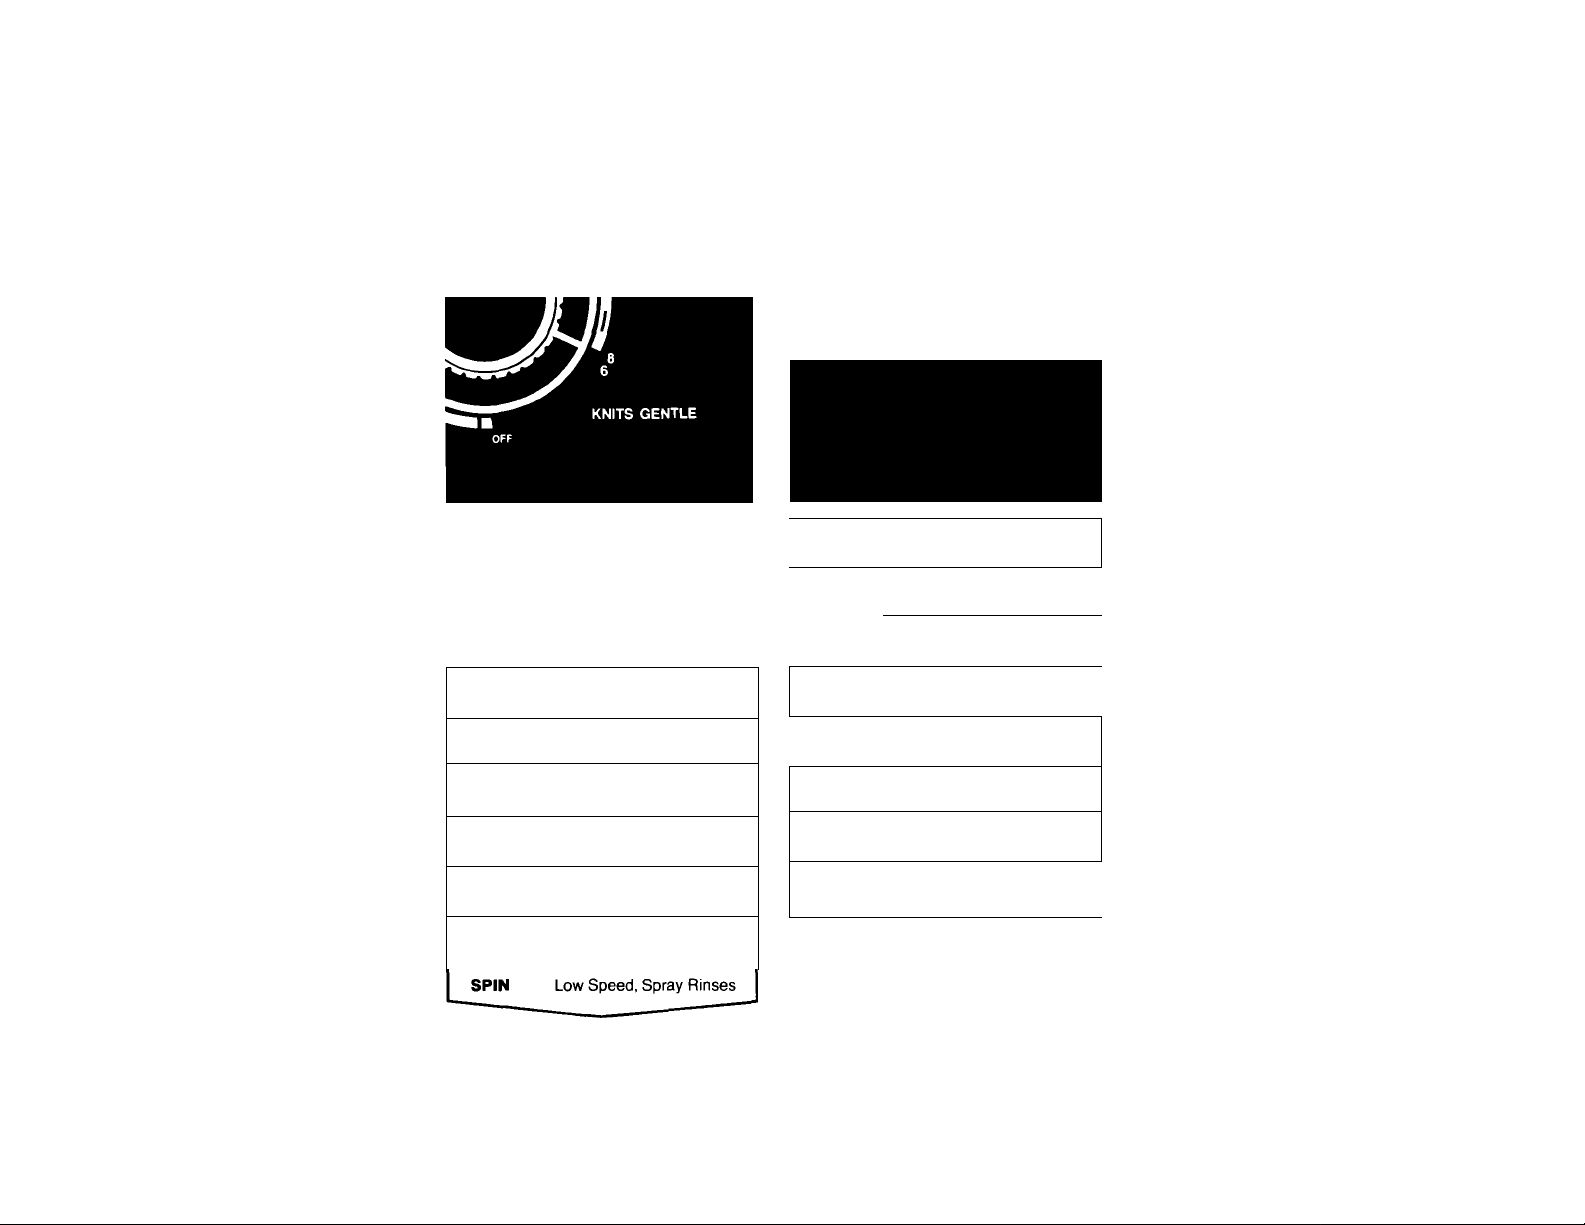
Knits Gentle Cycle
A cycle that gently washes and spins
moderately to lightly soiled delicate
items and washable knits.
Soak and Pre-Wash Cycles
Brief periods of agitation and soak time
help remove heavy soils and certain
stains that need extra pretreatment.
Use recommended amount of detergent
or pre-soak additive. The SOAK Cycle
should always be followed by a wash
cycle.
OFF
FILL to Selected Level
WASH 4-2 Minutes Low Speed
ASOAK 2 Minutes No Agitation
WASH
DRAIN No Agitation
SPIN Low Speed
FILL
RINSE
DRAIN
2 Minutes Low Speed
for Deep Rinse
Low Speed
No Agitation
AIndicates that machine is pausing
for a brief soak period.
PRE WAS H 4
FILL
[ WASH 2 Minutes High Speed |
SOAK
I PRE-WASH setting begins here.
WASH 4 Minutes High Speed |
DRAIN
[ SPIN High Speed |
WASHER STOPS Seiect Wash Cycle J
SOAK 14
to Selected Level
8 Minutes No Agitation |
________
No Agitation
NOTE: The pre-wash setting starts the
washer at the second wash period.
Special care is needed when soaking
or pre-washing laundry. See the Laun
dry Guide for proper use of this cycle.
J
Page 10
Washer Operating Instructions
Continued
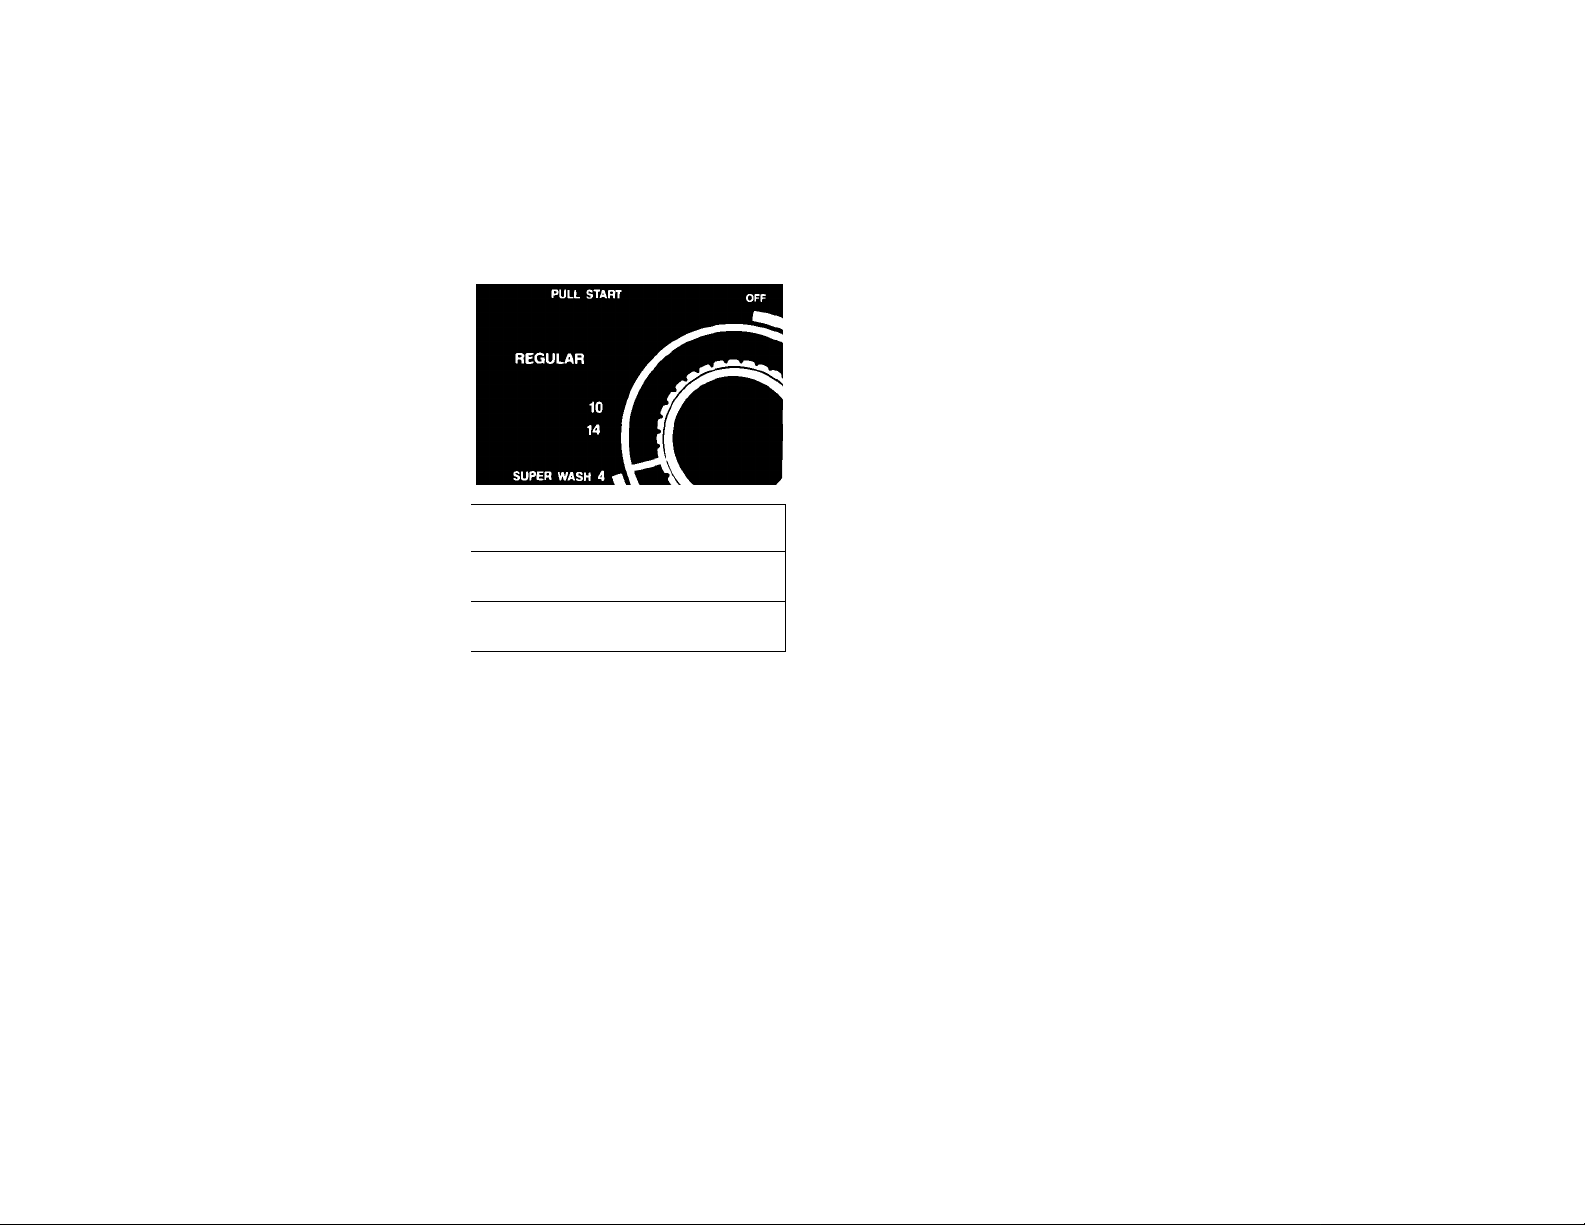
Super Wash Cycle
Use for washing heavily soiled loads
that require maximum soil removal.
Double the amount of detergent recom
mended when using the SUPER WASH
Cycle.
FILL ^
WASH
1 PARTIAL DRAIN No Agitation__________|
1 REFILL
to Selected Level
4 Minutes High Speed |
to Selected Level 1
_________
After the partial drain, the washer
automatically refills and goes Into the
REGULAR Cycle. Be sure to use
enough detergent for the double wash.
J
10
Page 11
other Operating Instructions
Rinse and spin
When using extra detergent for heavily
soiled clothes, or washing special-care
items, you may want an extra rinse
and spin.
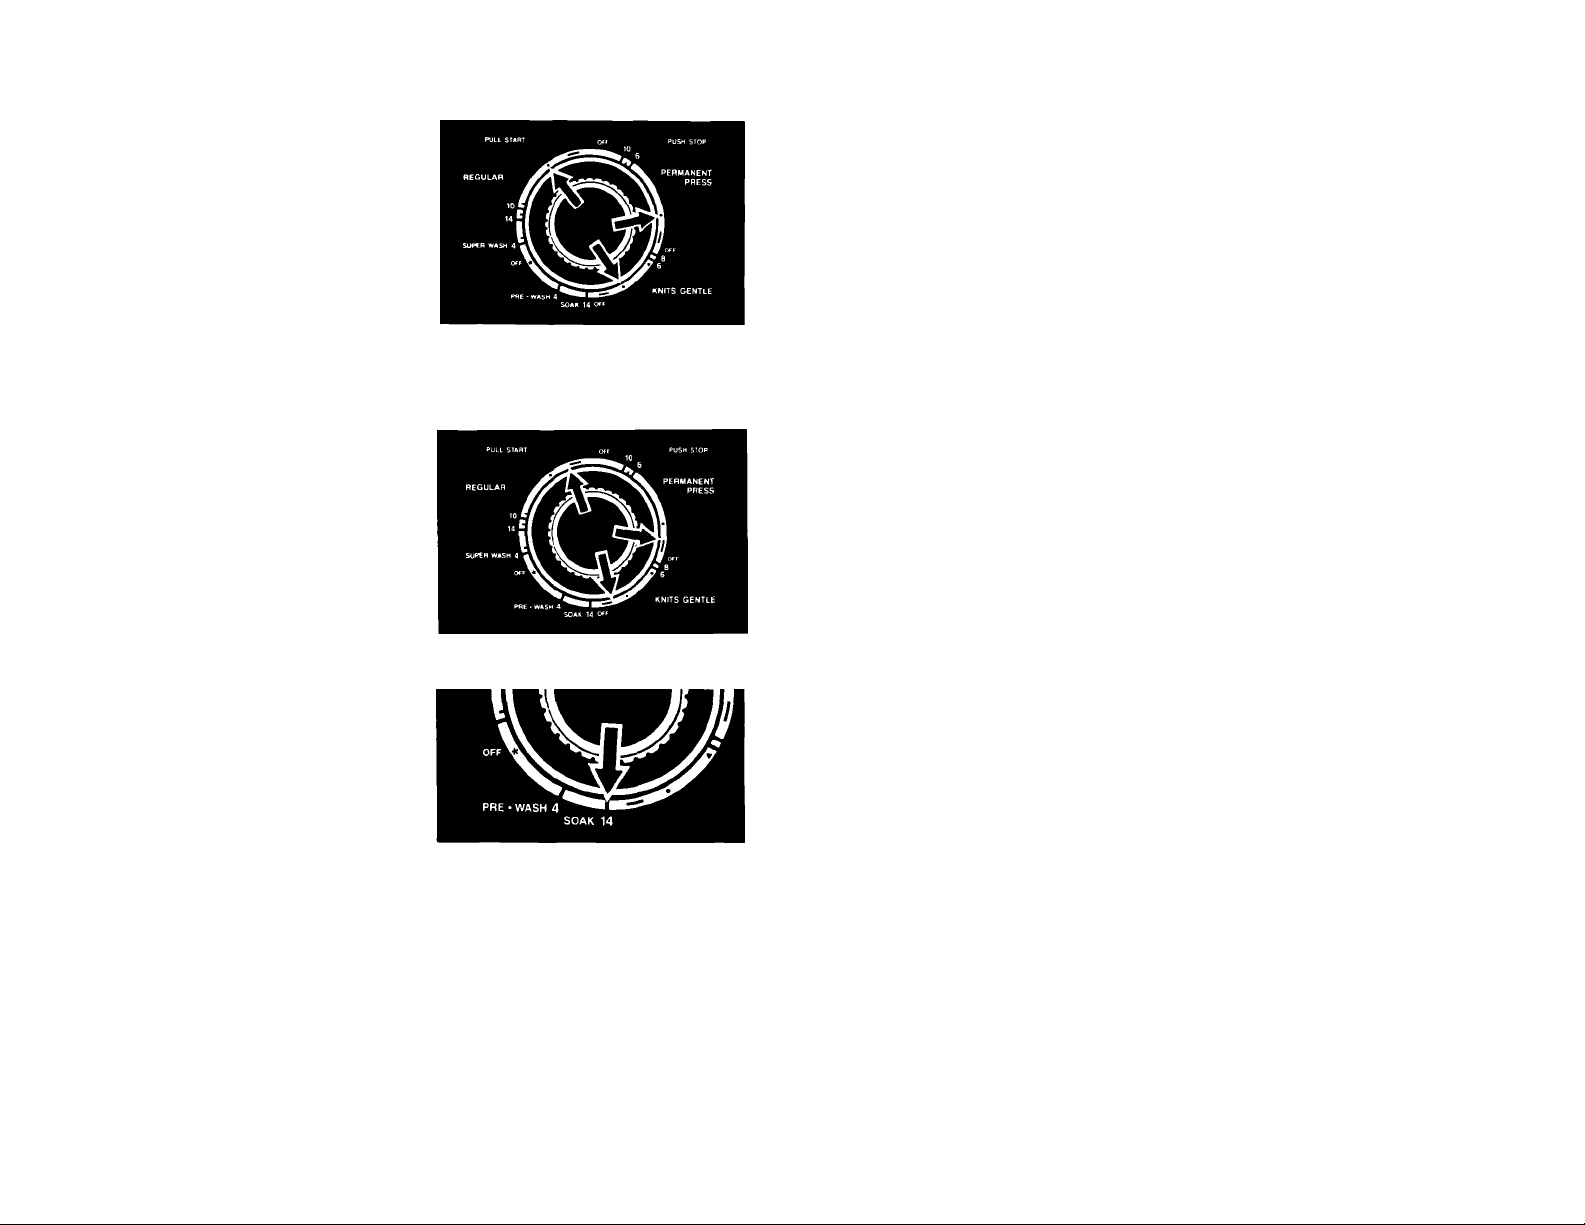
1. Push Cycle Control Knob in.
2. Turn clockwise to one of the dots on
the dial, as illustrated.
3. Pull Cycle Control Knob out. The
washer will fill to selected level,
agitate 2-4 minutes depending on
the cycle selected, drain and spin.
Drain and spin
A drain and spin may help shorten
drying times for some heavy fabrics or
special-care items by removing excess
water.
1, Push Cycle Control Knob in.
2, Turn clockwise to any bar just
before an OFF area on the dial,
as illustrated.
3, Pull Cycle Control Knob out. The
washer will drain and spin.
Soak cycle
For best results, use warm water for
soaking stained iaundry. Hot water can
set stains.
1. Use recommended amount of
pre-soak product or detergent.
2. Push Cycle Control Knob in.
3. Turn clockwise to point to the
number next to SOAK.
4. Pull the Cycle Control Knob out.
The washer will start.
5. When the cycle is over, add
detergent for the next selected wash
cycle. The SOAK Cycle should al
ways be followed by a wash cycle.
NOTE: See the Laundry Guide for
additional soaking information.
Pre-wash cycle
For best results, use warm water for
pre-washing stained laundry. Hot water
can set stains.
11
Page 12
Other Operating Instructions
Continued
1. Use recommended amount of
pre-soak product or detergent.
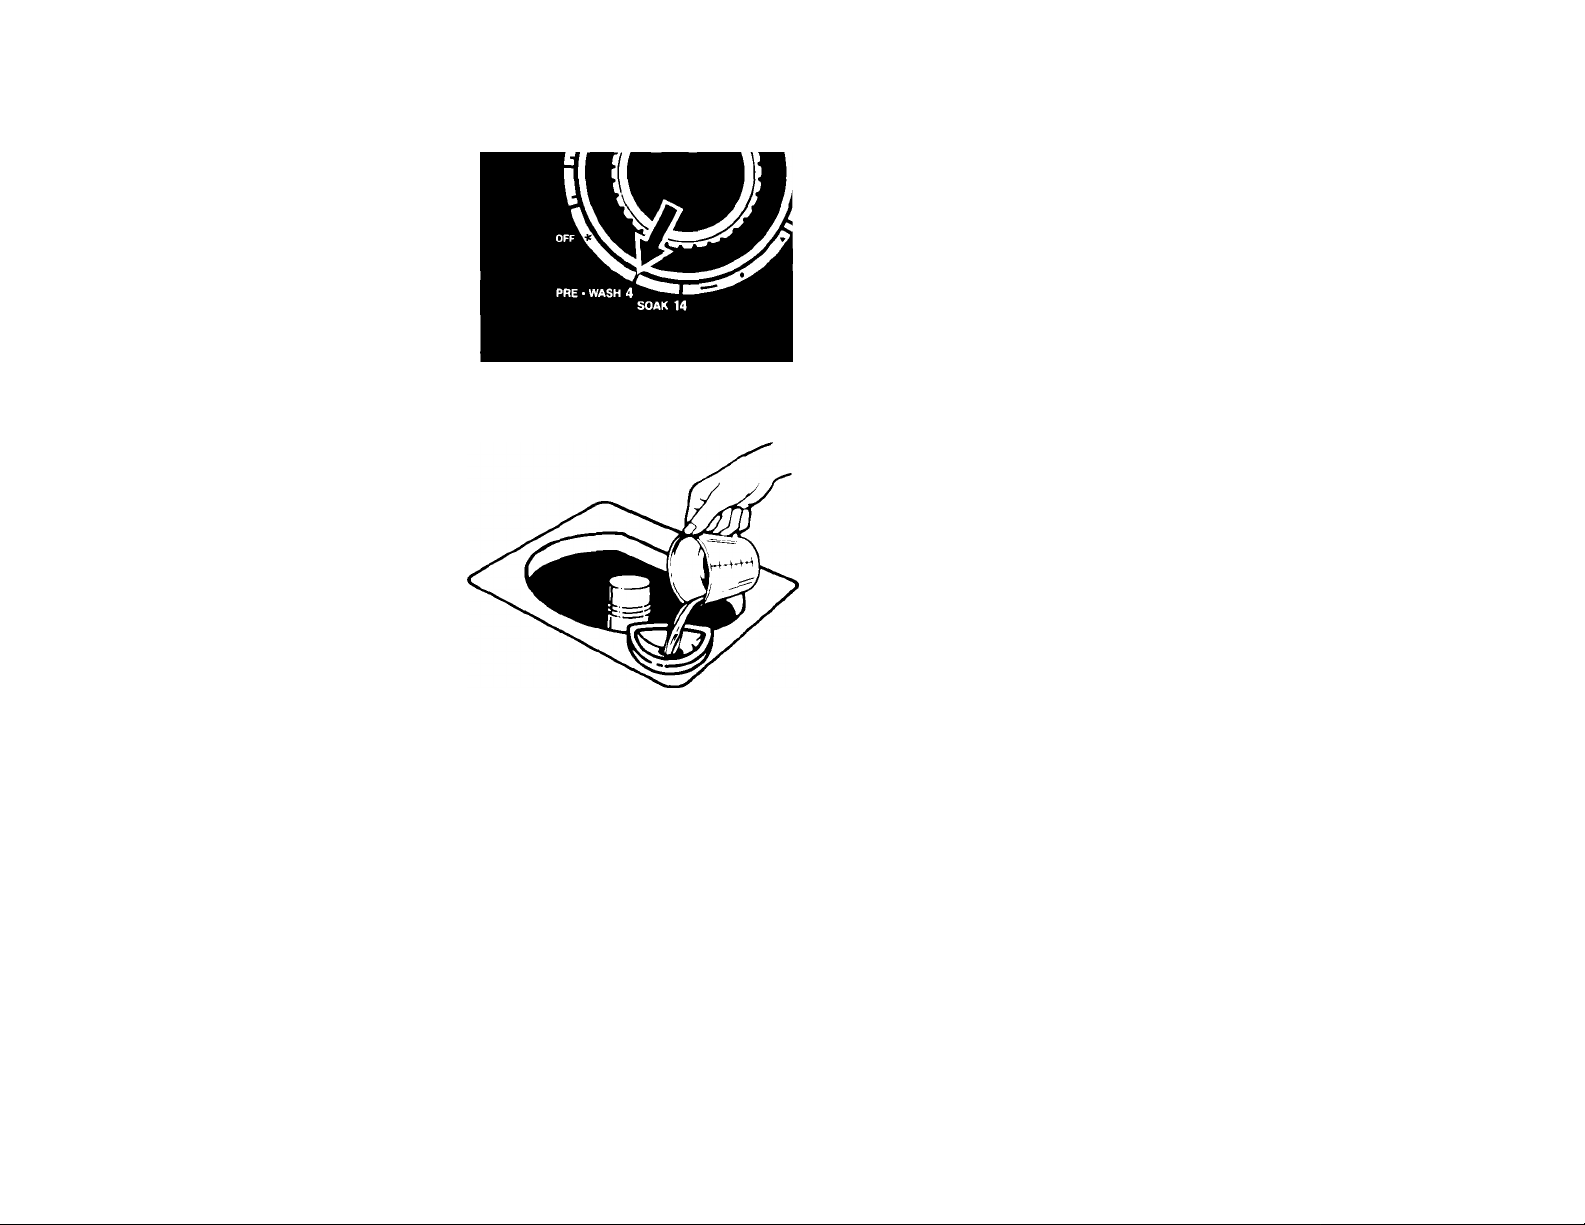
2. Push Cycle Control Knob in.
3. Turn clockwise to point to the
number next to PRE-WASH.
4. Pull the Cycle Control Knob out.
The washer will start.
5. When the cycle is over, add
detergent for the next selected wash
cycle. The PRE-WASH Cycle should
always be followed by a wash cycle.
NOTE: See the Laundry Guide for
additional pre-washing information.
Liquid bleach dispenser
Always measure bleach. Do not guess.
Never use more than 1 cup (250ml) for
a full load. Use less with lower water
level settings. Follow directions on
bottle for safe use. Use a cup with a
pouring spout to avoid spilling.
1. Load the washer first.
2. Pour measured bleach carefully into
dispenser. Do not let bleach splash,
drip or run down into washer basket.
Undiluted bleach will damage any
fabric it touches.
3. Start the washer. Bleach will be
diluted automatically during the
wash part of the cycle.
12
Liquid fabric softener dispenser
A liquid fabric softener dispenser is
available for the washer. To order,
write to:
Whirlpool Corporation
Attention: Customer Service Dept.
1900 Whirlpool Drive
LaPorte, IN 46305
and order the LT7000XT fabric softener
dispenser, Part No. 3350834.
MAGIC CLEAN " lint filter
The lint filter in your washer cleans
itself. Collected lint is drained away with
the wash and rinse water.
If your washer drains into a tub,
remove any lint collected in the drain or
strainer.
Page 13
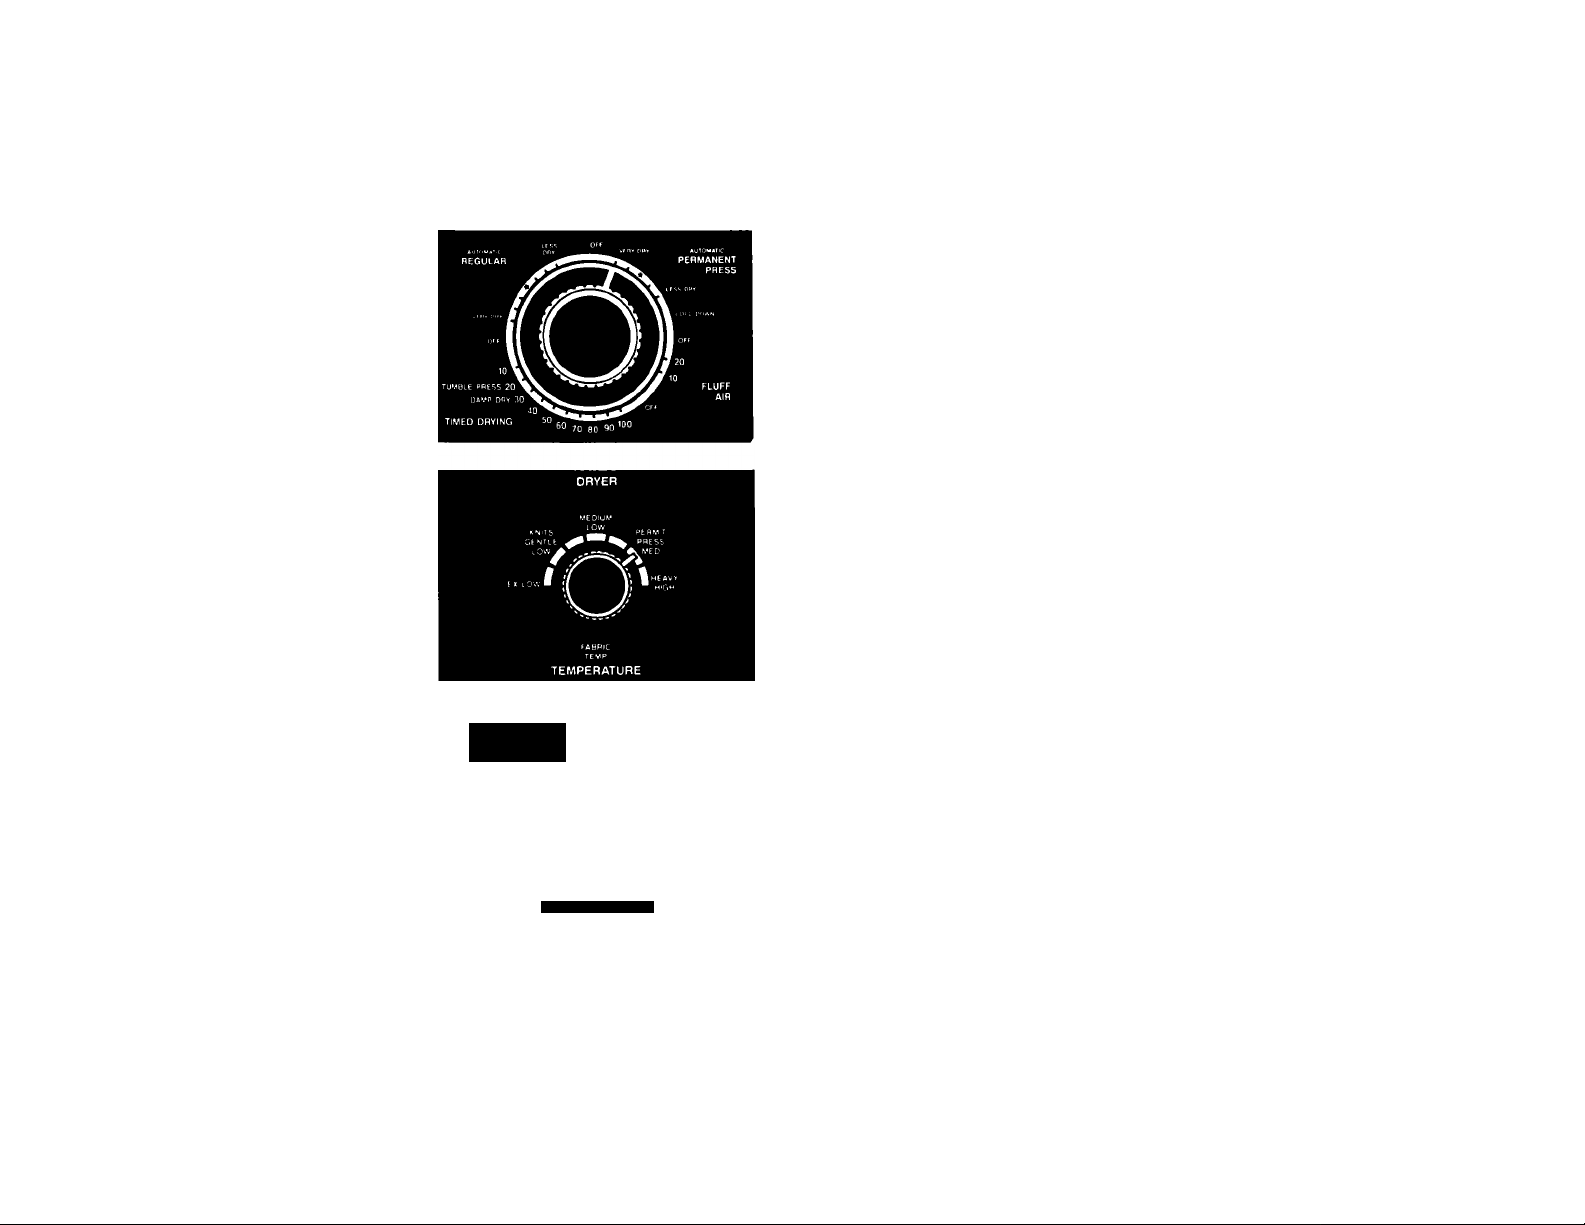
Dryer Operating Instructions
Starting your dryer
Before starting your dryer, be sure laundry is sorted and loaded properly. Make sure
the door is tightly closed.
1. Select a cycle and time by turning
the Cycle Control Knob either way to
point to the cycle and time setting
you want.
2. Set the Temperature Selector on or between any desired temperature settings.
Whi^pool
PUSH TO START
3. Push the Start Button to start the
set drying cycle and time settings.
4. To stop and restart the dryer:
• Open the door or turn the Cycle Con
trol Knob to OFF to stop the dryer.
• Close the door, select a cycle (if nec
essary) and push the Start Button to
restart the dryer.
5. To change the setting at any time,
turn the Cycle Control Knob either
way to point to a new time setting.
The Cycle Control Knob should
point to an OFF area when the dryer
is not in use. If the dryer is stopped
before the cycle is finished, turn the
Cycle Control Knob to an OFF area.
13
Page 14
Dryer Operating Instructions
Continued
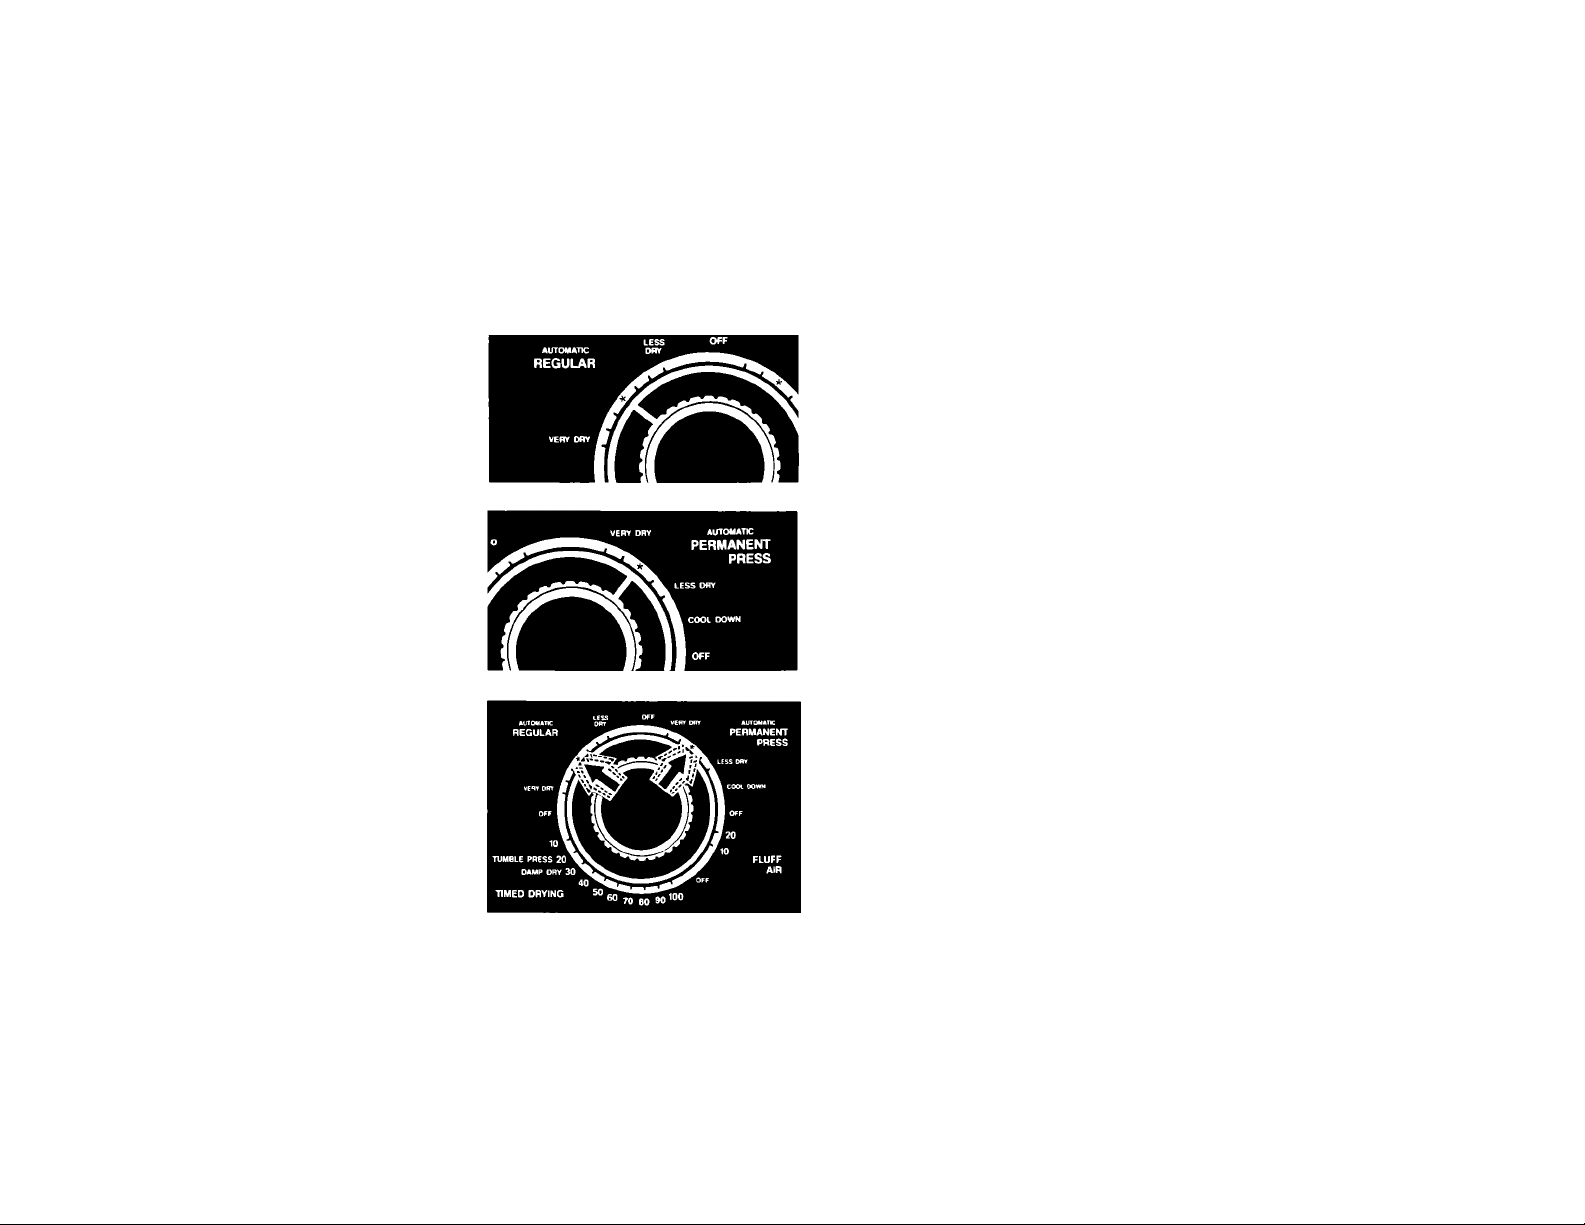
The automatic cycles
The automatic cycles allow you to
select the degree of dryness you prefer
for the clothes being dried.
The electronic DRY-MISER* control
is an electronic sensor that determines
the amount of moisture in the clothes.
The dryer automatically shuts off when
the proper dryness is reached.
Use AUTOMATIC REGULAR to dry
heavy and mediumweight cotton items.
The load tumbles without heat during
the last 8 minutes. This helps make the
load easier to handle.
Use AUTOMATIC PERMANENT
PRESS to dry permanent press, knits
and other synthetic items. The load
tumbles without heat during the last 13
minutes. This helps keep wrinkles from
setting in and makes the load easier
to handle.
14
For the first few loads, set the Cycle
Control Knob to point to an * in either
automatic cycle. When the dryer stops,
feel the dried items.
• If items are drier than you like, use a
setting to the right of the * the next
time you dry a similar load.
• If items are not as dry as you like, use
a setting to the left of the * the next
time you dry a similar load.
The Cycle Control Knob will not move
until the clothes load is almost dry, or
the Cool-Down portion of the cycle has
been reached. After the Cool-Down
portion is complete, the Cycle Control
Knob automatically moves to an OFF
area and tumbling stops.
NOTE: Overdrying can cause
shrinkage, static cling and damage to
some fabrics.
Page 15

TIMED DRYING cycle
Use the TIMED DRYING Cycle for any
load you want to dry by time.
• Turn the Cycle Control Knob to the
number of minutes you want.
• The last 8 minutes of this cycle
are without heat. This helps make
the load easier to handle.
Using DAMP DRY
Use this setting to dry damp items that
do not require an entire drying cycle, or
to dry items to damp level. (Two exam
ples are heavy cottons, such as jeans,
which you do not want to become stiff,
or cotton clothes which are easier to
press when damp.)
1. Set the Cycle Control Knob on
DAMP DRY in the PERMANENT
PRESS Cycle.
2. Push the Start Button.
The dryer tumbles the load with heat
for 22 minutes, then without heat for
8 minutes.
Using TUMBLE PRESS®
The TUMBLE PRESS setting removes
wrinkles from clothing that has been
packed in a suitcase or closet, and from
items not removed from the dryer at the
end of a cycle.
The load will tumble in heated air for
12 minutes. The heat shuts off and the
dryer continues to tumble for 8 minutes.
For best results, put only a few items
at a time in this cycle. As soon as the
dryer stops, put items on hangers or
fold them.
FLUFF AIR cycie
^WARNING
Fire Hazard
Do not dry plastic or rubber items
with heat. Use AIR setting, or line
dry. Failure to do so could result
in fire or damaged items.
The dryer does not heat when the Cycle
Control Knob is set in FLUFF AIR. This
cycle can be used to fluff or air dry bed
ding, plastic tablecloths, foam rubber
pillows, stuffed toys, sneakers, etc.
1. Turn the Cycle Control Knob to the
number of minutes you want in
FLUFF AIR.
2. Push the Start Button.
End-of-cycle signal
The dryer sounds a signal to let you
know when the cycle is finished. The
signal cannot be turned off and is
not adjustable.
The signal is helpful when you are
drying permanent press, synthetic and
other items that should be taken out
as soon as the dryer stops.
Gentle heat
The dryer automatically reduces the
heat during the last few minutes of each
drying cycle, before cool-down. This
helps prevent overdrying.
15
Page 16
Dryer Operating Instructions
Continued
Selecting a cycle
TYPE OF LOAD
Cottons and linens
EXTRA HEAVY - Bedspreads, mattress pads, quilts
HEAVYWEIGHT - Towels, jeans, corduroys, work clothes
MEDIUMWEIGHT - Sheets, pillowcases, cotton, underwear, diapers
LIGHTWEIGHT - Batistes, organdies, lingerie
Permanent press, synthetics and blends
HEAVYWEIGHT - Work clothes, jackets, raincoats
MEDIUMWEIGHT - Shirts, play clothes, sheets, slacks
LIGHTWEIGHT - Lingerie, blouses, dresses
Knits
HEAVYWEIGHT - Cottons, rayons, blends, T-shirts, slacks, shirts
LIGHTWEIGHT - Synthetic (polyester, acrylic, etc.) and blends,
lingerie, blouses, dresses
Delicate fabrics
Sheer curtains (2 or 3 panels), gauze, lace, etc.
SUGGESTED
CYCLE
AUTOMATIC REGULAR
AUTOMATIC
PERMANENT PRESS
AUTOMATIC
PERMANENT PRESS
AUTOMATIC
PERMANENT PRESS
Awarning
Do not dry rubber, plastic and other heatsensitive materials with heat. Failure to follow
this precaution couid result in fire or damage.
Rubber, plastic, heat sensitive fabrics
FOAM RUBBER - Pillows, bras, stuffed toys
PLASTIC - Shower curtains, tablecloths
RUBBER-BACKED RUGS
OLEFIN, POLYPROPYLENE, SHEER NYLON
Lint Removal
16
Fire Hazard
FLUFF AIR
20 minutes
20 minutes
20 minutes
15-20 minutes
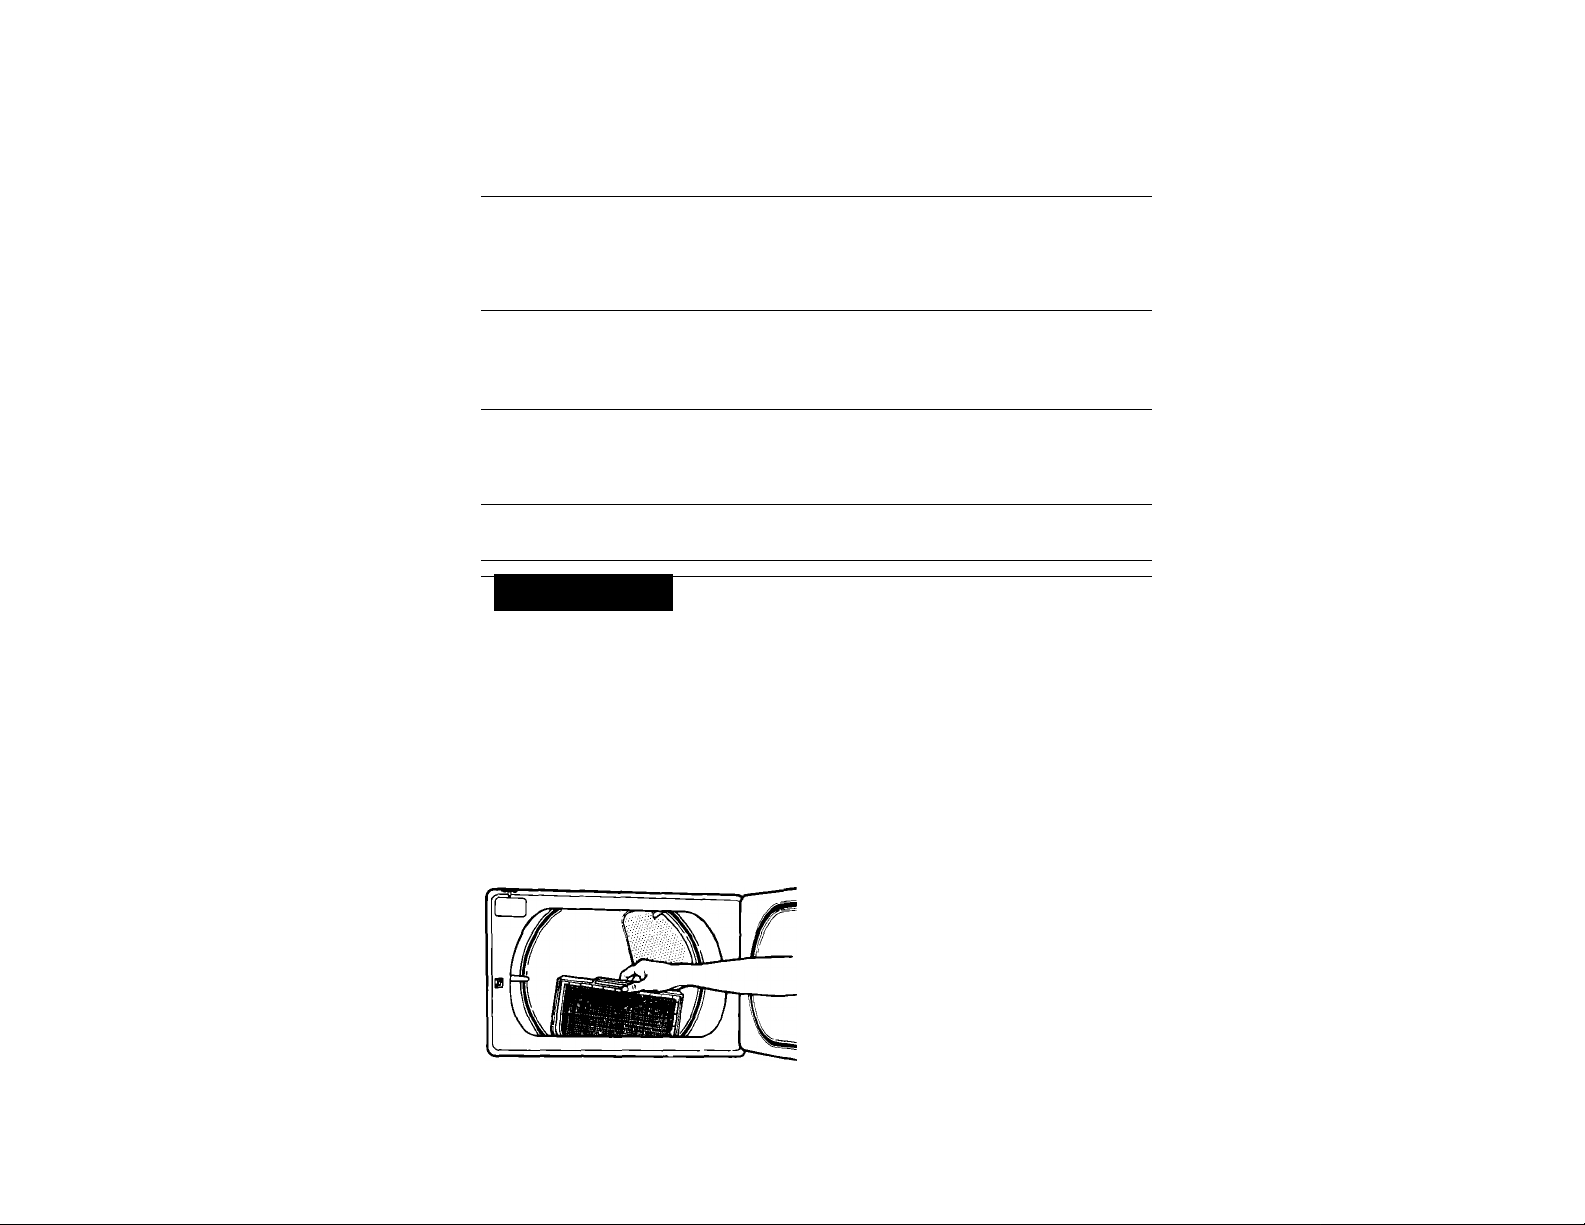
Clean the lint screen before each load.
The lint screen is located at the front
of the dryer door opening. To clean:
1. Lift screen straight up.
2. ROLL lint off the screen with your
fingers. DO NOT rinse or wash
the screen.
3. Replace the screen.
Page 17
Heat Inlet
duct
Electrical
supply
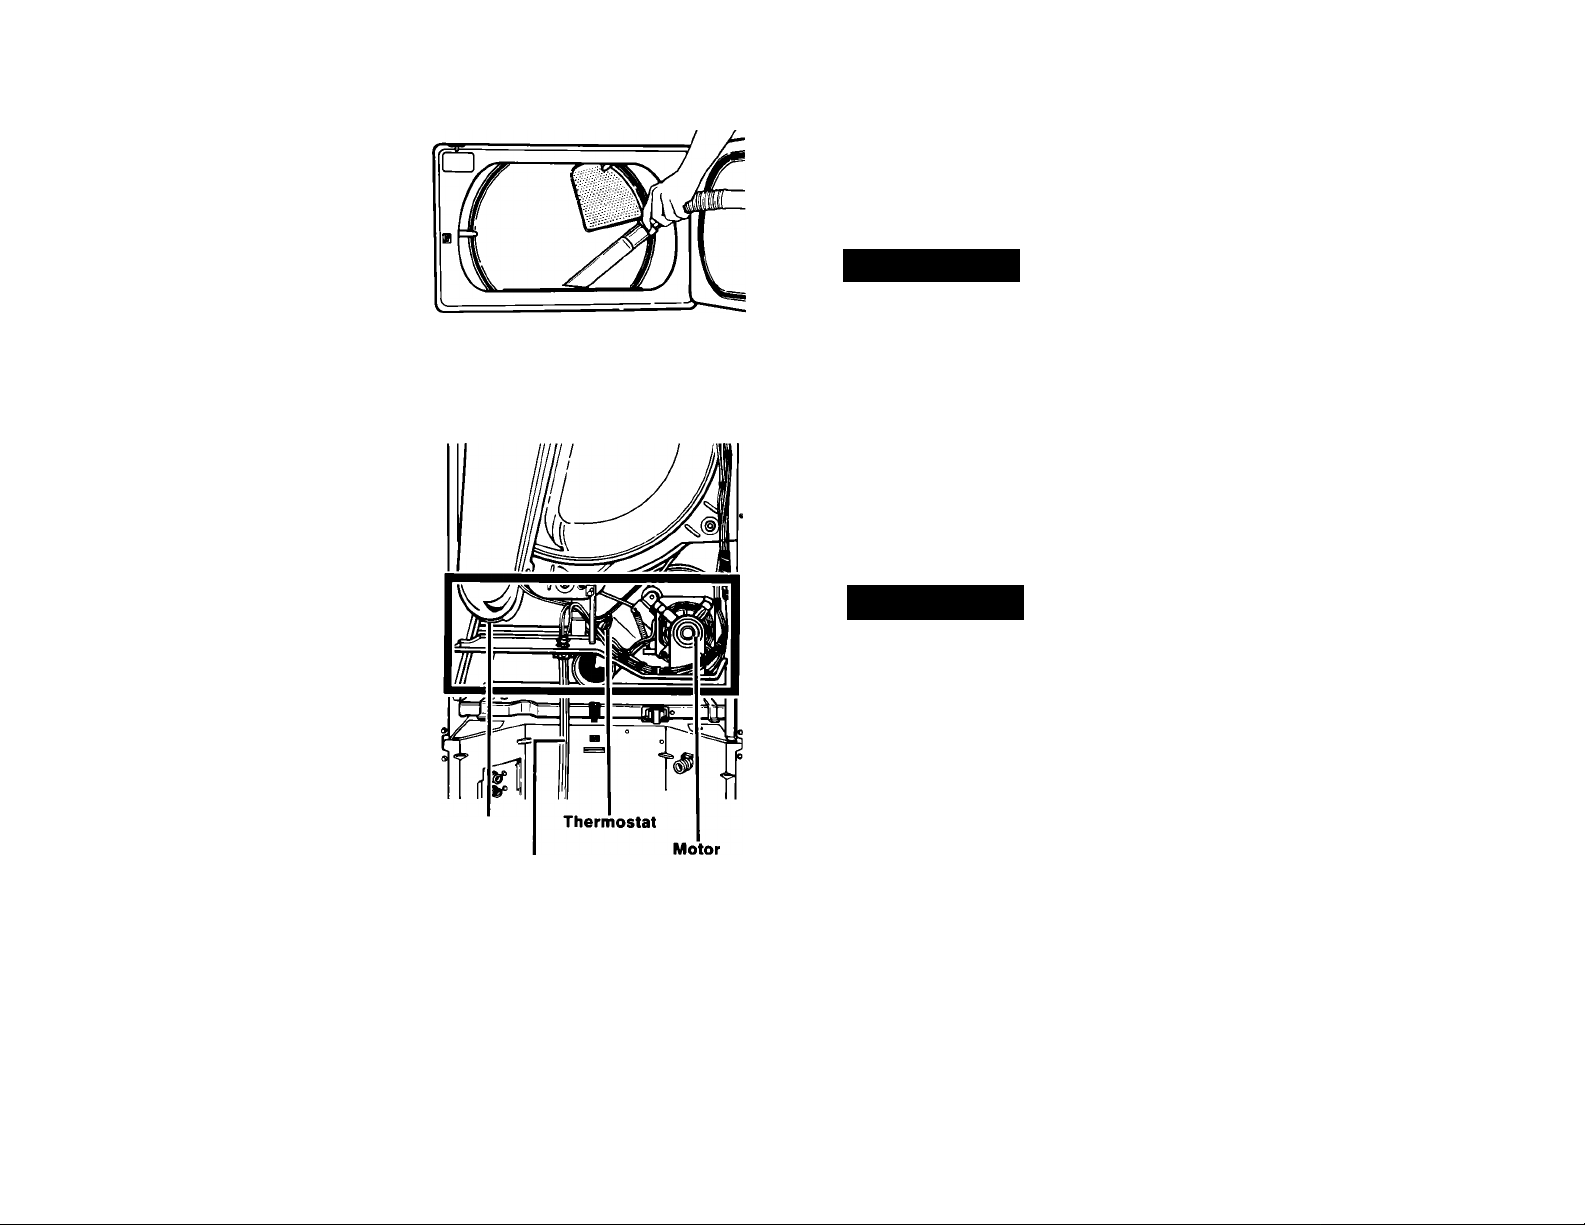
Clean lint gathered in screen area.
Periodically remove the dryer lint
screen and vacuum the opening. Use
the long, thin attachment (crevice tool)
on your vacuum cleaner.
^WARNING
Fire Hazard
Do not run the dryer with the lint
screen loose, damaged, blocked
or missing. Doing so can cause
overheating, damage and be a fire
hazard.
Clean lint gathered inside the dryer.
Lint can gather inside the dryer and
create a FIRE HAZARD. This lint
should be removed at least every
2 to 3 years, or more often,
depending on dryer usage.
Awarning
Electrical Shock and
Personal Injury Hazard
• Unplug the power supply cord
or turn off the electrical power
before lint removal.
• Do not put hands inside the
cabinet.
• More than one person is
required to lift, tilt or move the
washer/dryer because of its
weight and size.
Failure to do so could result
in electrical shock, injury or
damage.
Cleaning should be done only by a
qualified person.
1. Unplug unit from electrical supply
or turn off electrical power.
2. Remove back panel from dryer.
3. Avoid touching wires and thermostats.
4. Remove lint from boxed-in area with
a soft brush or vacuum cleaner.
5. Replace back panel, reconnect and
level the Thin Twin.
17
Page 18

If You Need Service Or Assistance...
We suggest you follow these steps:
1. Before calling for assistance...
Performance problems often result from
little things you can find and fix yourself
without tools of any kind.
If your washer does not fill:
• Is the power supply cord plugged into
a live circuit with the proper voltage?
• Are both water faucets open?
• Have you checked your home’s main
fuses or circuit breaker box?
• Are the water supply hoses kinked?
• Is the Cycle Control Knob set and
pulled out?
If your washer does not spin:
• Is the lid closed?
• Is the power supply cord plugged into
a live circuit with the proper voltage?
• Have you checked your home’s main
fuses or circuit breaker box?
If your washer drains at the
wrong time:
• The drain hose should be at least 28
inches above the floor and secured.
• The drain hose should not fit tightly in
the drain pipe.
• Make sure that the Cycle Control
Knob is pointing to a number in the
cycle.
Make sure the drain hose is higher
than the water level in the washer.
If it isn’t...
• The washer may seem to be draining
during wash and rinse cycles.
• Water can siphon out. (See Installa
tion Instructions.)
If your washer stops during
a cycle:
• Remember, the washer pauses briefly
at different times in each cycle. These
pauses are normal.
If your dryer does not run:
• Is the power supply plugged into a live
circuit with the proper voltage?
• Is the door closed tightly?
• Did you push the START Button?
• Have you checked your home's main
fuses or circuit breaker box?
If your dryer does not heat:
• The FLUFF AIR setting is without
heat.
• The last few minutes of heated cycle
settings are without heat.
• An electric dryer uses a circuit breaker
or 2 fuses. If one fuse is blown, the
dryer may run, but not heat.
If drying time seems too long:
• Is the gas turned on? If not, turn the
Cycle Control Knob to OFF. Turn on
gas. Wait 5 minutes. Reset controls
and start.
• Is the lint screen clean? See page 16
of this book for cleaning instructions.
• Is exhaust system clean? Cleaning
should be done by a qualified person.
2. If you need assistance*...
Call Whirlpool COOL-LINE^ serv
ice assistance telephone number.
Dial free from anywhere in the U.S.:
1-800-253-1301
and talk with one of our trained consul
tants. The consultant can instruct you in
how to obtain satisfactory operation
from your appliance or, if service is nec
essary, recommend a qualified service
company in your area.
18
Page 19

3. If you need service*...
Whirlpool has a
y i” nationwide network
WhlTlpool of authorized
SERVICE Whirlpool®“ service
companies.
Whirlpool service technicians are trained
to fulfill the product warranty and provide
after-warranty service, anywhere in the
United States. To locate the authorized
Whirlpool service company in your area,
call our COOL-LINE® service assistance
telephone number (see Step 2) or look in
your telephone directory Yellow Pages
under:
APPLIANCES - HOUSEHOLD - ELECTRICAL APPLIANCES -
MAJOR - SERVICE A REPAIR MAJOR - REPAIRING A PARTS
4. If you have a problem*...
Call our COOL-LINE service assistance
telephone number (see Step 2) and talk
with one of our consultants, or if you
prefer, write to:
Mr. Donald Skinner
Director of Consumer Relations
Whirlpool Corporation
2000 M-63
Benton Harbor, Ml 49022
Please include a daytime phone
number in your correspondence.
OR
WASHING MACHINES, DRYERS
A IRONERS-SERVICING
WHIRLPOOL APPLIANCES
AUTHORIZED WHIRLPOOL SERVICE
SERVICE COMPANIES
XYZ SERVICE CO
123 MAPLE 999-9999
5. If you need FSP®
replacement parts*...
FSP is a registered trademark of
Whirlpool Corporation for quality parts.
Look for this symbol of quality when
ever you need a replacement part for
your Whirlpool appliance. FSP replace
ment parts will fit right and work right,
because they are made to the same
exacting specifications used to build
every new Whirlpool appliance.
To locate FSP replacement parts
in your area, refer to Step 3 or call the
Whirlpool COOL-LINE service
assistance number in Step 2.
6. If you are not satisfied with
how the problem was solved*...
• Contact the Major Appliance
Consumer Action Panel (MACAP).
MACAP is a group of independent
consumer experts that voices con
sumer views at the highest levels of
the major appliance industry.
• Contact MACAP only when the
dealer, authorized servicer or
Whirlpool have failed to resolve
your problem.
Major Appliance Consumer
Action Panel
20 North Wacker Drive
Chicago, IL 60606
• MACAP will in turn inform us of
your action.
'When requesting assistance, please
provide: model number, serial number,
date of purchase, and a complete
description of the problem. This infor
mation is needed in order to better
respond to your request.
19
Page 20
Whirlpoor Thin Twin’ Warranty
LENGTH OF WARRANTY
FULL ONE-YEAR
WARRANTY
From Date of Purchase
LIMITED FIVE-YEAR
WARRANTY
From Date of Purchase
LIMITED TEN-YEAR
WARRANTY
From Date of Purchase
WHIRLPOOL WILL NOT PAY FOR
A. Service calls to:
1. Correct the installation of the washer/dryer.
2. Instruct you how to use the washer/dryer.
3. Replace house fuses or correct house wiring or plumbing.
4. Replace light bulbs.
B. Repairs when washer/dryer is used in other than normal, single-family
household use.
C. Pick up and delivery. This product is designed to be repaired in
the home.
D. Damage to washer/dryer caused by accident, misuse, fire, flood, acts of
God or use of products not approved by Whirlpool.
E. Any labor costs during the limited warranties.
WHIRLPOOL WILL PAY FOR
FSP® replacement parts and repair labor to
correct defects in materials (including top and lid
rust) or workmanship. Service must be provided
by an authorized Whirlpool®“ service company.
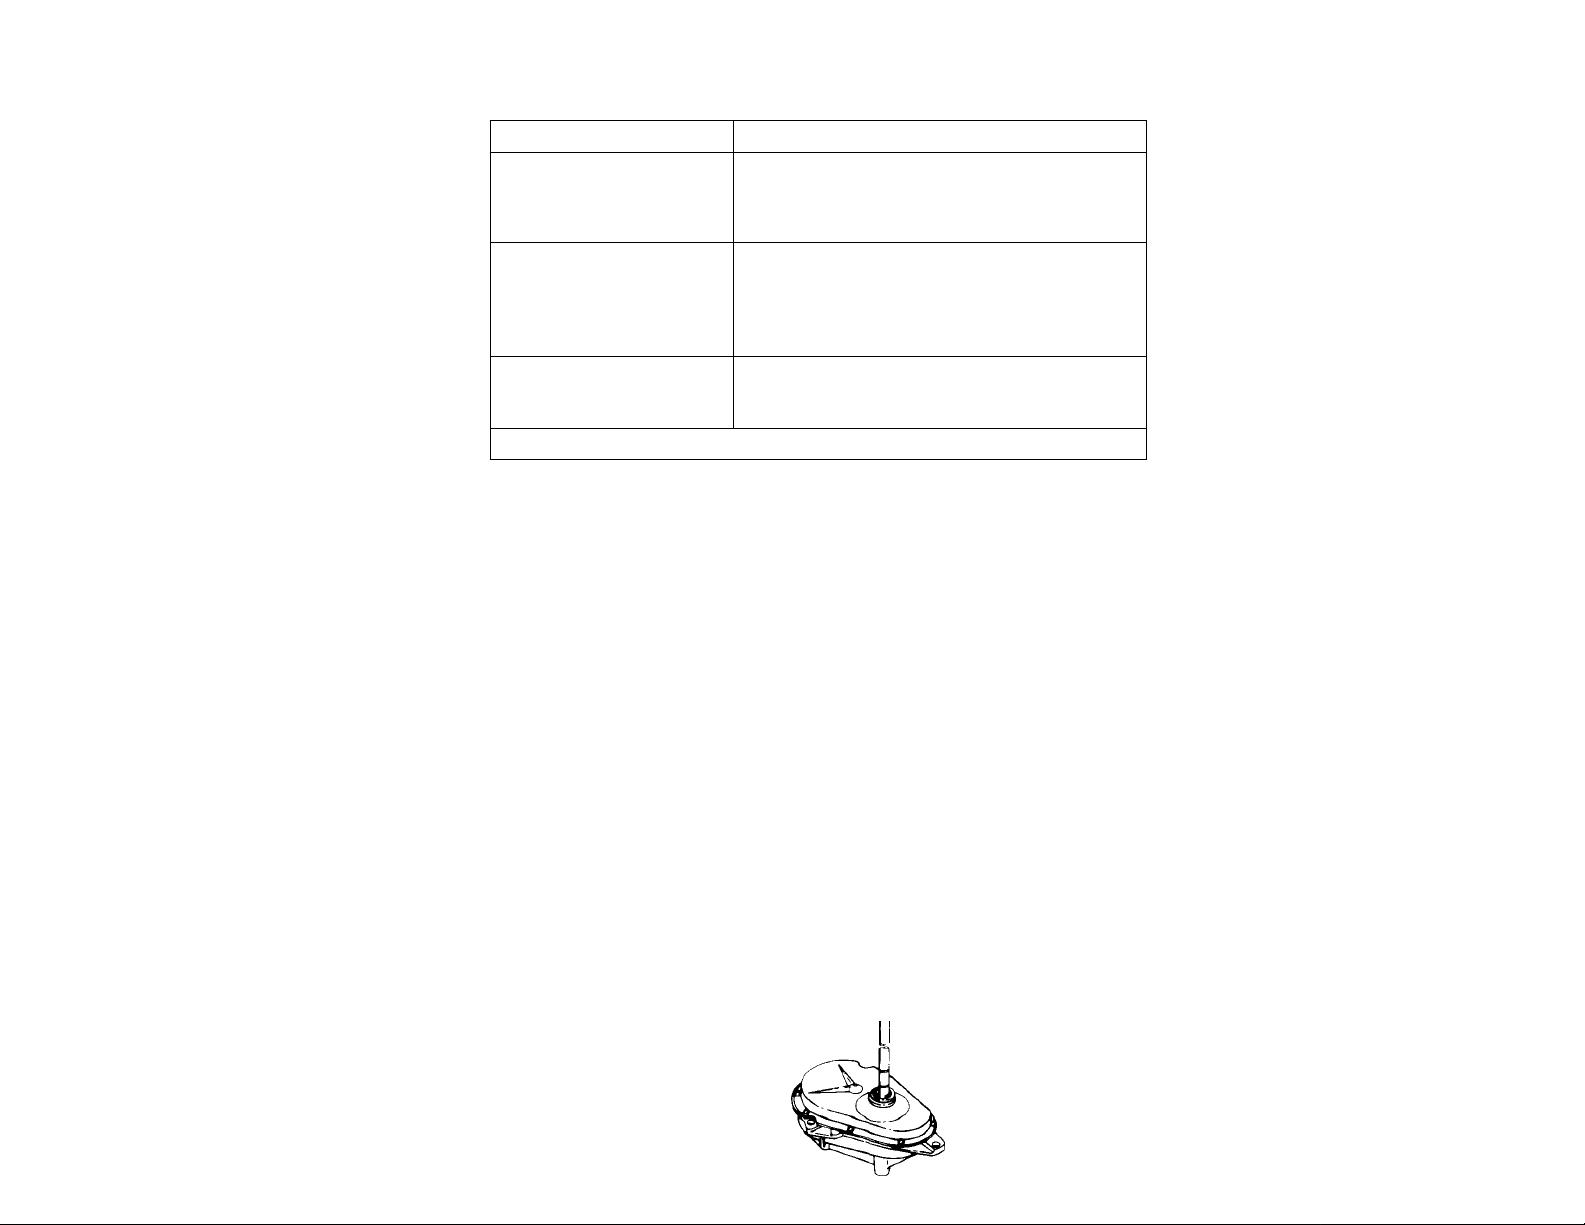
FSP replacement parts for any part of
gearcase assembly if defective in materials
or workmanship. The gearcase assembly
is shown below.
FSP replacement parts for any top and lid rust.
FSP replacement of outer tub should it crack, or
fail to contain water, due to defective materials
or workmanship.
TT002
WHIRLPOOL CORPORATION SHALL NOT BE LIABLE FOR INCIDENTAL OR
CONSEQUENTIAL DAMAGES. Some states do not allow the exclusion or limitation
of incidental or consequential damages so this limitation or exclusion may not
apply to you. This warranty gives you specific legal rights, and you may aiso have
other rights which vary from state to state.
Outside the United States, a different warranty may appiy. For details, please
contact your franchised Whirlpool distributor or military exchange.
If you need service, first see the “Service and Assistance” section of this book.
After checking "Service and Assistance," additional help can be found by calling
our COOL-LINE® service assistance telephone number, 1-800-253-1301, from
anywhere in the U.S.
Gearcase assembly ^
covered by your
warranty
Part No. 3390220
©1989 Whirlpool Corporation Printed in U.S.A.
 Loading...