

Whirlpool LT7004XV User Manual
AWiiríiMM)!
Home^K Appliances
Use & Care Guide
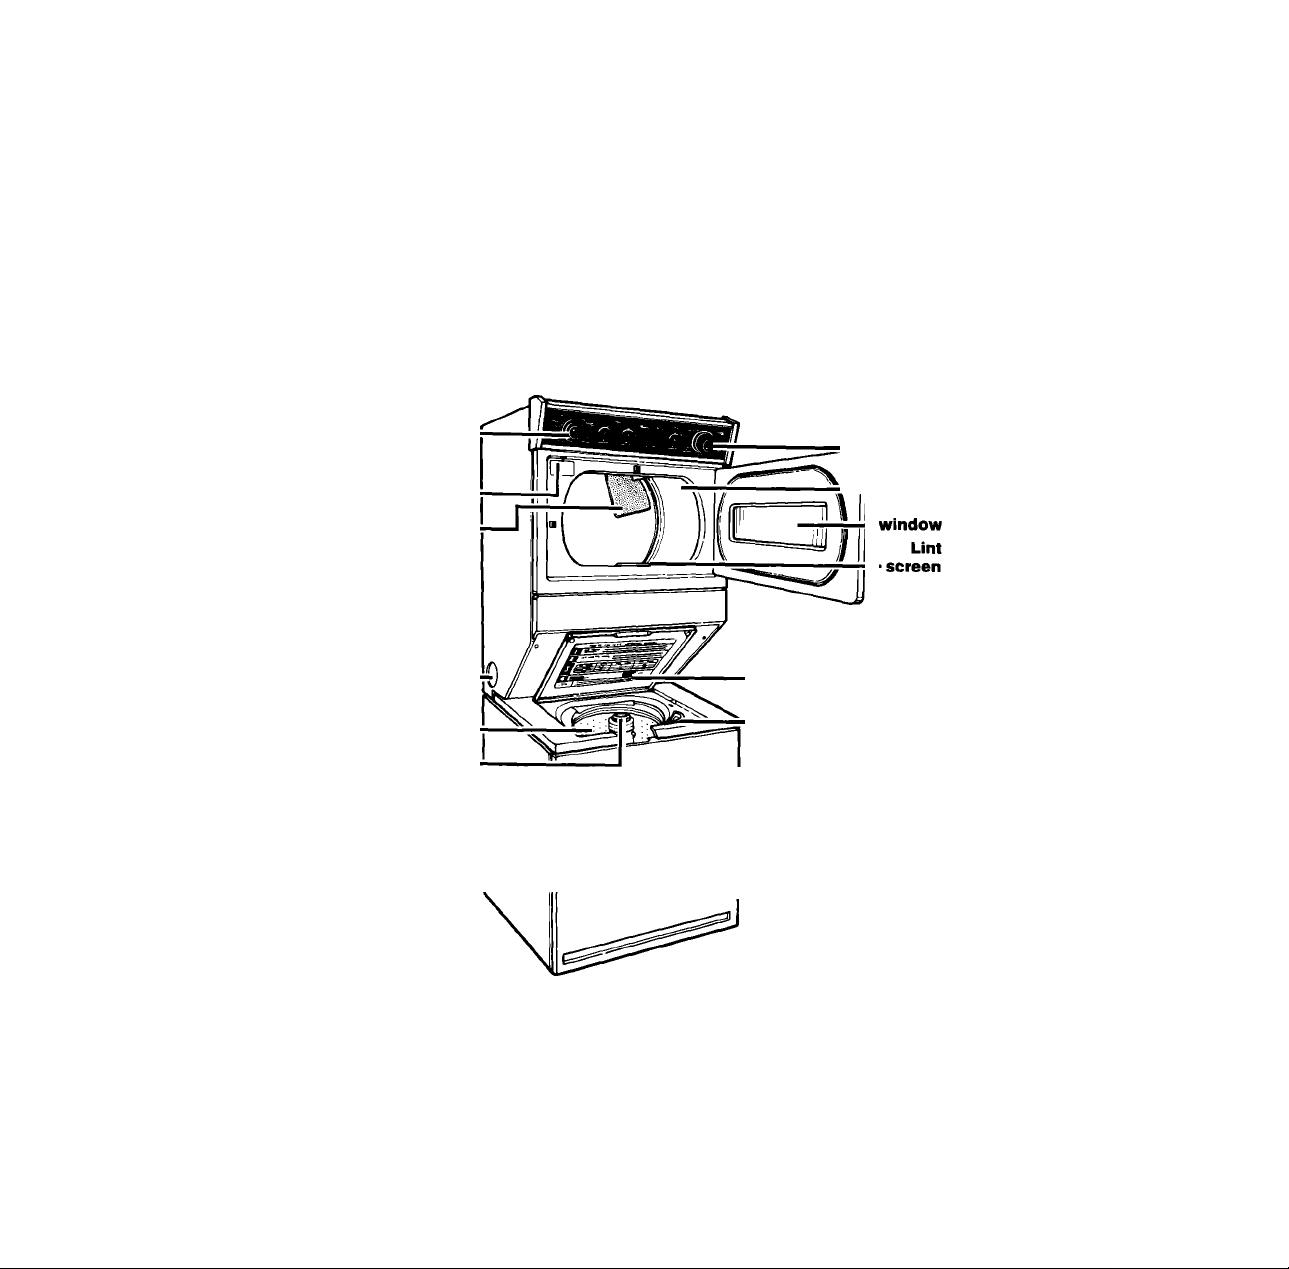
Washer controls •
Model and serial
number plate
Air inlet •
Electronic
DRY-MISER«^
sensor
(not shown)
Optional
exhaust
outlet
BasketAgitator.
-------
-----------
Dryer
— controls
I Dryer
drum
Dryer
Dryer
light
(not shown)
Lid instructions
~ Bleach dispenser
MAGIC CLEAN® lint filter
(not shown)
■Tub
ß
LARGE CAPACITY THIN TWIN®
AUTOMATIC WASHER DRYER
LT7000XV LT7004XV LT7100XV

Contents
Page
Important Safety
Instructions
Additional safety instructions
and your responsibilities ... 4
Loading Suggestions
Loading
Load sizes and water levels .. 5
Washer Operating Instructions
Starling your washer
What happens in each cycle .. 7
Other Operating Instructions
Rinse and spin
Drain and spin......................... 11
Soak cycle
Pre-wash cycle
Liquid bleach dispenser
Liquid fabric softener
MAGIC CLEAN® lint filter .... 13
Dryer Operating Instructions
Starting your dryer
The automatic cycles
Timed drying cycle
Using damp dry....................... 16
Using TUMBLE PRESS® .... 16
Fluff air cycle........................... 16
End-of-cycle signal................. 16
Gentle heat system
Selecting a cycle
Changing the dryer light
Lint Removai And Cieaning.. 19
Cleaning the dryer window ... 20
If You Need Service Or
Assistance
Whirlpooi Thin IVrin®
Warranty
©1990 Whirlpool Corporation
If your Thin Twin has a Consumer Buy
Guide label, remove it. It will be easier
to remove before the washer is used. To
remove any remaining glue:
• Rub briskly with thumb to make a ball,
then remove.
or
• Soak area with liquid hand dishwash
ing detergent before removing glue as
described above.
Do not use sharp instruments,
rubbing alcohol, flammable fluids or
abrasive cleaners. These can damage
the finish. See “Important Safety
Instructions" on page 3.
2
.....................................
.....................................
...............
.......................
...............................
.......................
dispenser.............................. 12
.................
.............
.................
................
.....................
....................................
.......................................
....
...
11
11
11
12
14
15
16
16
17
18
21
24
* •
NOTE: Do not remove any permanent
3
instruction labels inside the dryer.
with a damp cloth before using to re
move dust from storing or shipping.
5
6
You should wipe out the dryer drum
Thank you for buying a Whirlpool ap
pliance. Please complete and mail the
Owner Registration Card provided with
this product. Then complete the form
below. Have this information ready if
you need service or call with a question.
• Copy model and serial numbers from
plate (next to dryer drum opening)
and the purchase date from the sales
slip.
• Keep this book, the Laundry Guide
and the sales slip in a handy place.
Model Number
Serial Number
Purchase Date
Service Company Phone Number
FOR YOUR SAFETY
If you smell gas:
1. Open windows.
2. Don’t touch electrical
switches.
3. Extinguish any open
flame.
4. Immediately call your
gas supplier.
FOR YOUR SAFETY
Do not store or use gas
oline or other flammable
vapors and liquids in the
vicinity of this or any
other appliance. The
fumes can create a fire
hazard or explosion.

Important Safety Instructions
^WARNING
• Read all Instructions before
using the Thin TWin.
• NEVER wash or dry items cleaned,
washed, soaked in or spotted with
wax, paint, gasoline or flammable
fluids in the Thin Twin. The fumes
can create a FIRE HAZARD or EX
PLOSION. ALWAYS hand launder
and air dry fabrics containing these
materials.
• NEVER allow children to operate,
play with, or crawl inside the Thin
Twin. Close supervision of children is
necessary when the Thin Twin is
used near children.
• When discarding an old Thin Twin,
ALWAYS remove the lid and door to
prevent accidental entrapment.
• NEVER reach into the Thin Twin
until all the motion stops. If the lid is
opened while the washer basket is
spinning, the basket will automati
cally stop in a few seconds.
• DO NOT install or store Thin Twin
where it will be exposed to the
weather.
• DO NOT tamper with the controls.
• You are responsible for making
sure that your Thin Twin is
installed, repaired and parts
replaced by a qualified person.
To reduce the risk of fire, electric shock, or in
jury to persons when using your Thin Twin, fol
low basic precautions, including the following:
- SAVE THESE INSTRUCTIONS -
• NEVER use or store flammable
fluids (dry-cleaning solvents,
gasoline, kerosene) in or near your
Thin Twin. Do not add flammable
fluids to the wash water. These
substances give off vapors that
can create a FIRE HAZARD or
EXPLOSION.
• Use only dryer fabric softeners
specifically labeled as not being
harmful to the dryer.
• FIRE HAZARD and DAMAGE to
materials can result from:
- drying rubber, rubber-like and
heat sensitive materials with heat.
- allowing lint to build-up inside
the dryer or exhaust system cleaning should be done by a
qualified person.
• Clean lint screen before or after
each load.
• If hot water has not been used
recently (usually 2 weeks or longer),
hydrogen gases may build up in
the water heater and the hot water
pipes. HYDROGEN GAS IS
EXPLOSIVE. To prevent injury or
damage, before using your washer,
turn on all hot water faucets and al
low water to run for several minutes.
This will allow gases to escape. DO
NOT smoke or use any open flame
near the faucet while it is open.
• DO NOT let dust, paper, rags, lint,
chemicals, etc. pile up, around or
under the Thin Twin.
• The Thin Twin must be electrically
grounded. See the Installation
Instructions.
Important Safety Instructions
Continued
Additional safety instructions and your responsibilities
• ALWAYS shut off the gas valve
before leaving on vacation.
• ALWAYS unplug the power supply
cord before attempting to service the
Thin Twin. Shut off GAS VALVE if
yours is a gas dryer.
• DO NOT machine wash or dry glass
fiber materials. Small particles can
stick to fabrics laundered in following
loads and cause skin irritation.
• HAZARDOUS FUMES can be
formed if chlorine bleach is used in
the same wash as ammonia or acids
such as vinegar or rust remover.
• ALWAYS store detergent, laundry
aids and other materials in a cool, dry
place where children can’t reach them
- in a locked cabinet if possible.
• ALWAYS read and follow instructions
on packages of detergent and laundry
aids - especially warnings and
precautions.
• NEVER operate the Thin Twin if...
- it is not working right.
- it is damaged.
- parts are missing.
- all panels are not in place.
• You are responsible for making
sure that your Thin Twin:
- is properly maintained.
- is properly installed and
leveled in a well ventilated room on
a floor that can support the weight.*
- is located in an area where the tem
perature is above 45'"F (7.2°C)
because the dryer will not operate
properly at cold temperatures and
freezing temperatures can damage
the washer.
- is connected to the proper electrical
supply, outlet, water supply, plumb
ing fixtures, drain and dryer
exhausting system.*
- is not installed against drapes or
curtains.*
- is used only for jobs normally
expected of home automatic
Thin Twins.
*Refer to the Installation Instructions for
complete information.
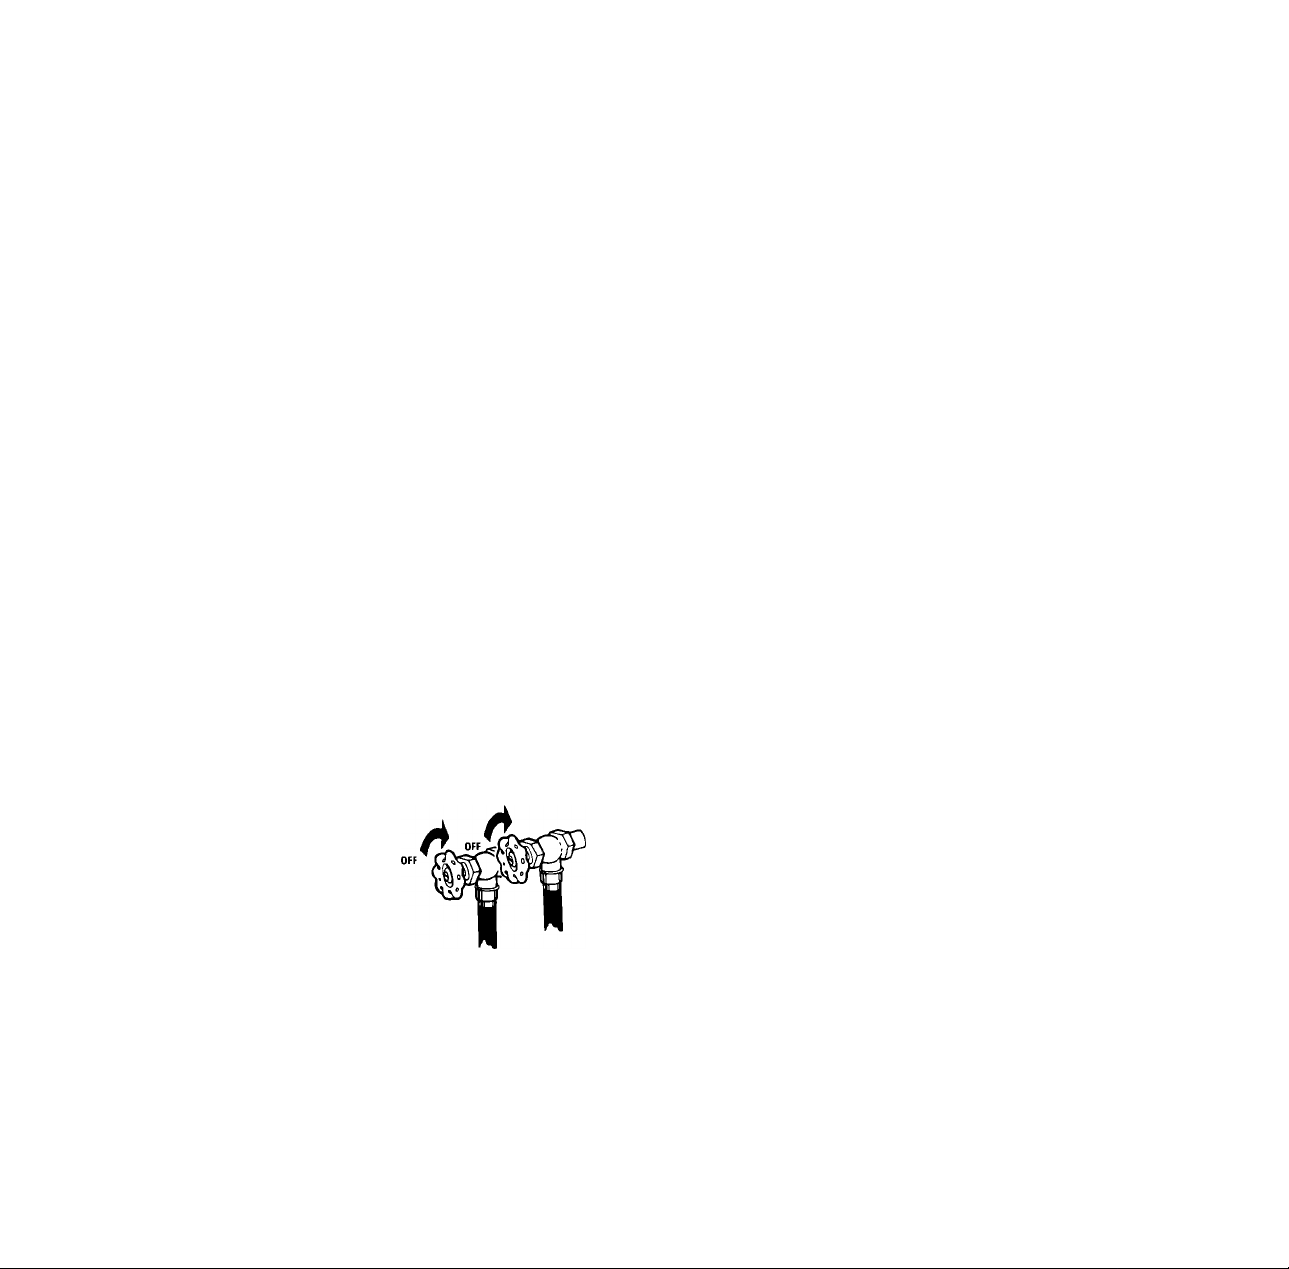
When not washing, keep both water
faucets turned off. This takes the pres
sure off the water inlet valve and hoses.

Loading Suggestions
Loading
1 !
1 ■ j
MIXED LOAD
2 double or 1
king size sheet
4 pillowcases
6 T-shirts
6 pair shorts
2 shirts
2 blouses
6 handkerchiefs
HEAVY WORK
CLOTHES
2 pair pants
3 shirts
1 coverall
3 pair jeans
TOWELS
8 bath towels
8 hand towels
10 wash cloths
1 bathmat
PERMANENT
PRESS
1 double sheet
1 tablecloth
1 dress
1 blouse
2 slacks
3 shirts
2 pillowcases
KNITS
2 slacks
2 tops
4 blouses
4 shirts
2 dresses
DELICATES
2 camisoles
4 slips
4 panties
2 bras
2 nighties
Load sizes and water levels
□
' 1
\
f
■ 1
For best cleaning results, the load must
be able to move freely in the water. Too
big a load or too little water can cause
wear or tearing of load items.
----
EX LARGE
(17.3gals./65.5 L)*
------
MEDIUM
(13.4gals./50.8 L)*
----
EX SMALL
(9.5 gals./36.0 L)*
‘Approximate fill with load.
NOTE: Do not overload washer.
Washer Operating Instructions
The drawings in this book may vary slightly from your Thin Twin model. They are
designed to show the different features of all the models covered by this book.
NOTE: Your model may not include all the features shown.
Starting your washer
Be sure to measure and add detergent, then place a sorted load in the washer before
starting It.
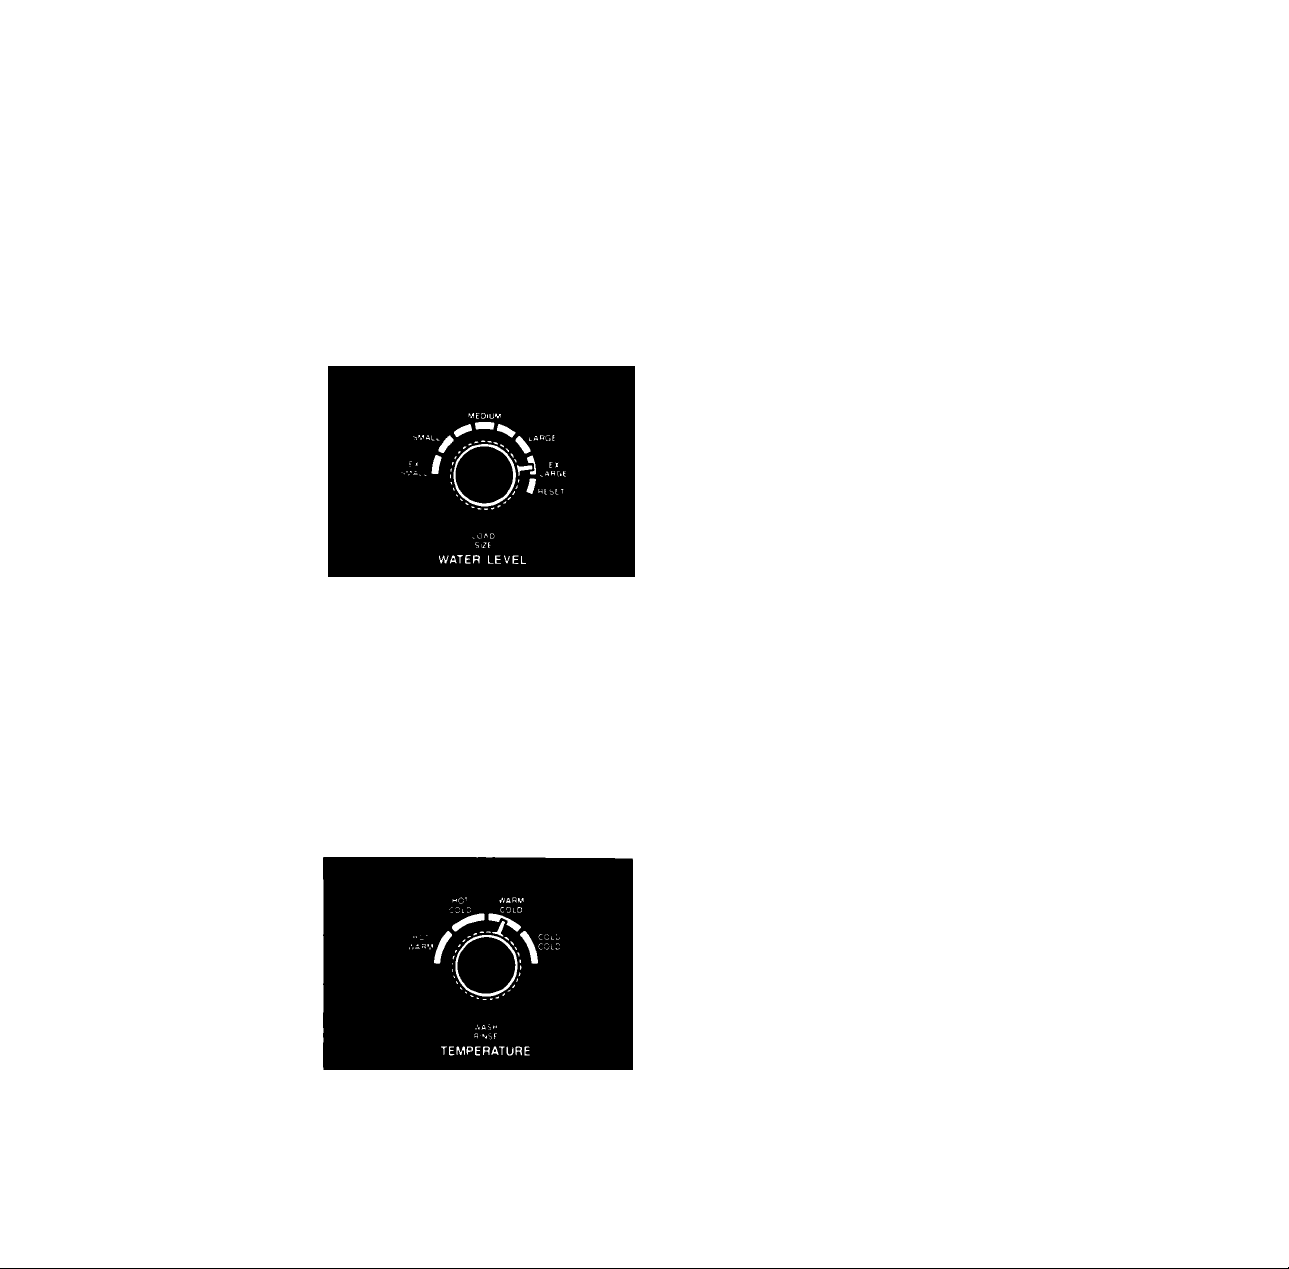
1. Select a load size
• Turn the knob to point at a setting that
describes the size of load you want
to wash.
• Set the knob anywhere on or between
EX SMALL (a few small items) and
EX LARGE (a full load).
• To change the water level after the
washer has started to fill, turn the
knob to RESET, then to the desired
water level.
NOTE: For best washing results, items
should move freely in the washer. Do
not overload the washer or choose a
water level that is too low for your wash
load.
For best results with permanent
press clothes, use the EX LARGE water
level.
Reduce wash time when using EX
SMALL or SMALL water level settings.
Loads with only a few small items need
less wash time for best results.
* •
2. Select water temperature
• Match the water temperature to
the type of fabric and soils being
washed.
• The top temperature is the wash
selection and the bottom tempera
ture is the rinse selection.
NOTE: Use warm wash water with
the PERMANENT PRESS or KNITS
GENTLE Cycles.
For heavily soiled permanent press
or knit clothes, pre-wash or pre-soak
before washing in warm water.
ALWAYS use cold rinse water tor
permanent press fabrics.
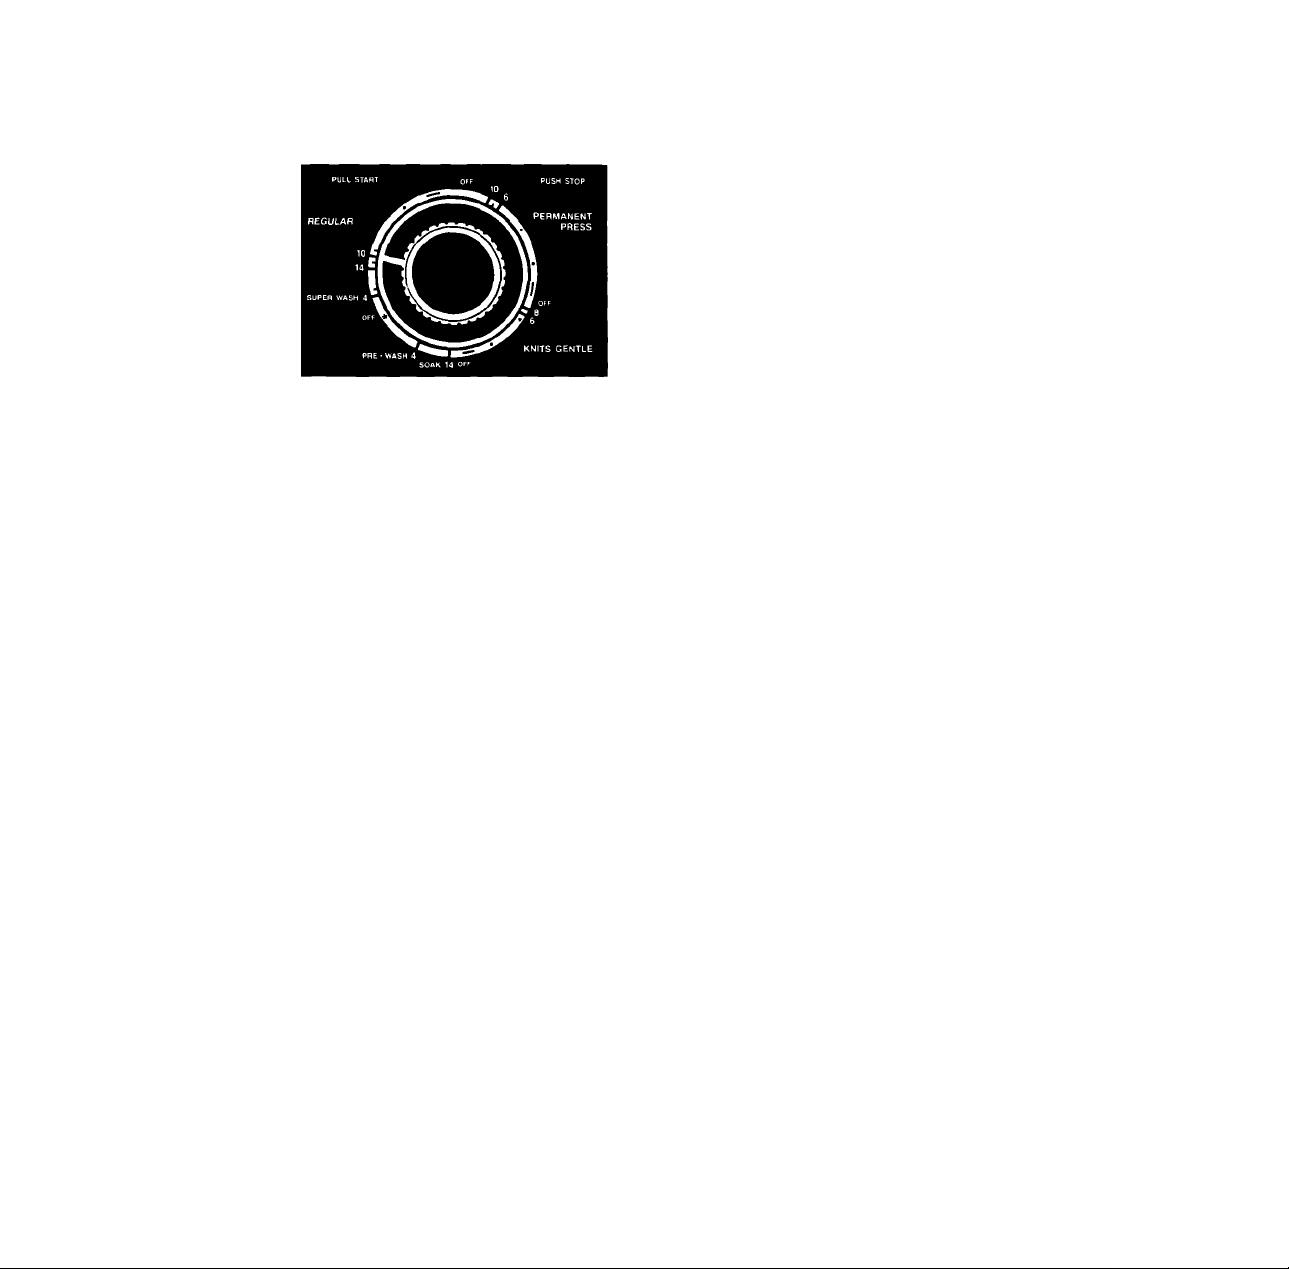
3. Select cycle and wash time
Start the washer
• Push in the Cycle Control Knob and
turn it clockwise.
• Stop when the indicator on the knob’s
outer ring points to the number in the
wash cycle you want. The numbers
are minutes of wash time.
• Start the washer by pulling out the
Cycle Control Knob. The washer will
fill to the selected water level with the
selected wash water temperature.
After filling, the washer will agitate for
the selected number of minutes.
• To stop the washer at any time,
push in the Cycle Control Knob. To
restart the washer, pull out the
Cycle Control Knob.
What happens in each cycle
Each cycle has different agitation and
spin speeds designed for different kinds
of fabrics.
Numbers on the dial in each cycle are
the minutes of wash agitation time.
When the Cycle Control Knob is set
to a number and pulled out, the washer
fills before agitation and timing starts.
After agitation starts, the knob turns
clockwise until it points to OFF and the
cycle ends.
The washer will pause briefly
throughout each cycle. These pauses
are normal. They allow for the reversing
of the motor, normal washer operation
and the cool-down portion of the
PERMANENT PRESS Cycle.
NOTE: You may hear the sound of
water spraying during the spin parts of
some cycles. In some cycles, water is
sprayed on the spinning load to help
with the rinsing.
Gentle Wash System
For better fabric care in the REGULAR
and PERMANENT PRESS Cycles, the
agitation speed is reduced during the
last few minutes of wash agitation time.
Washer Operating Instructions
Continued
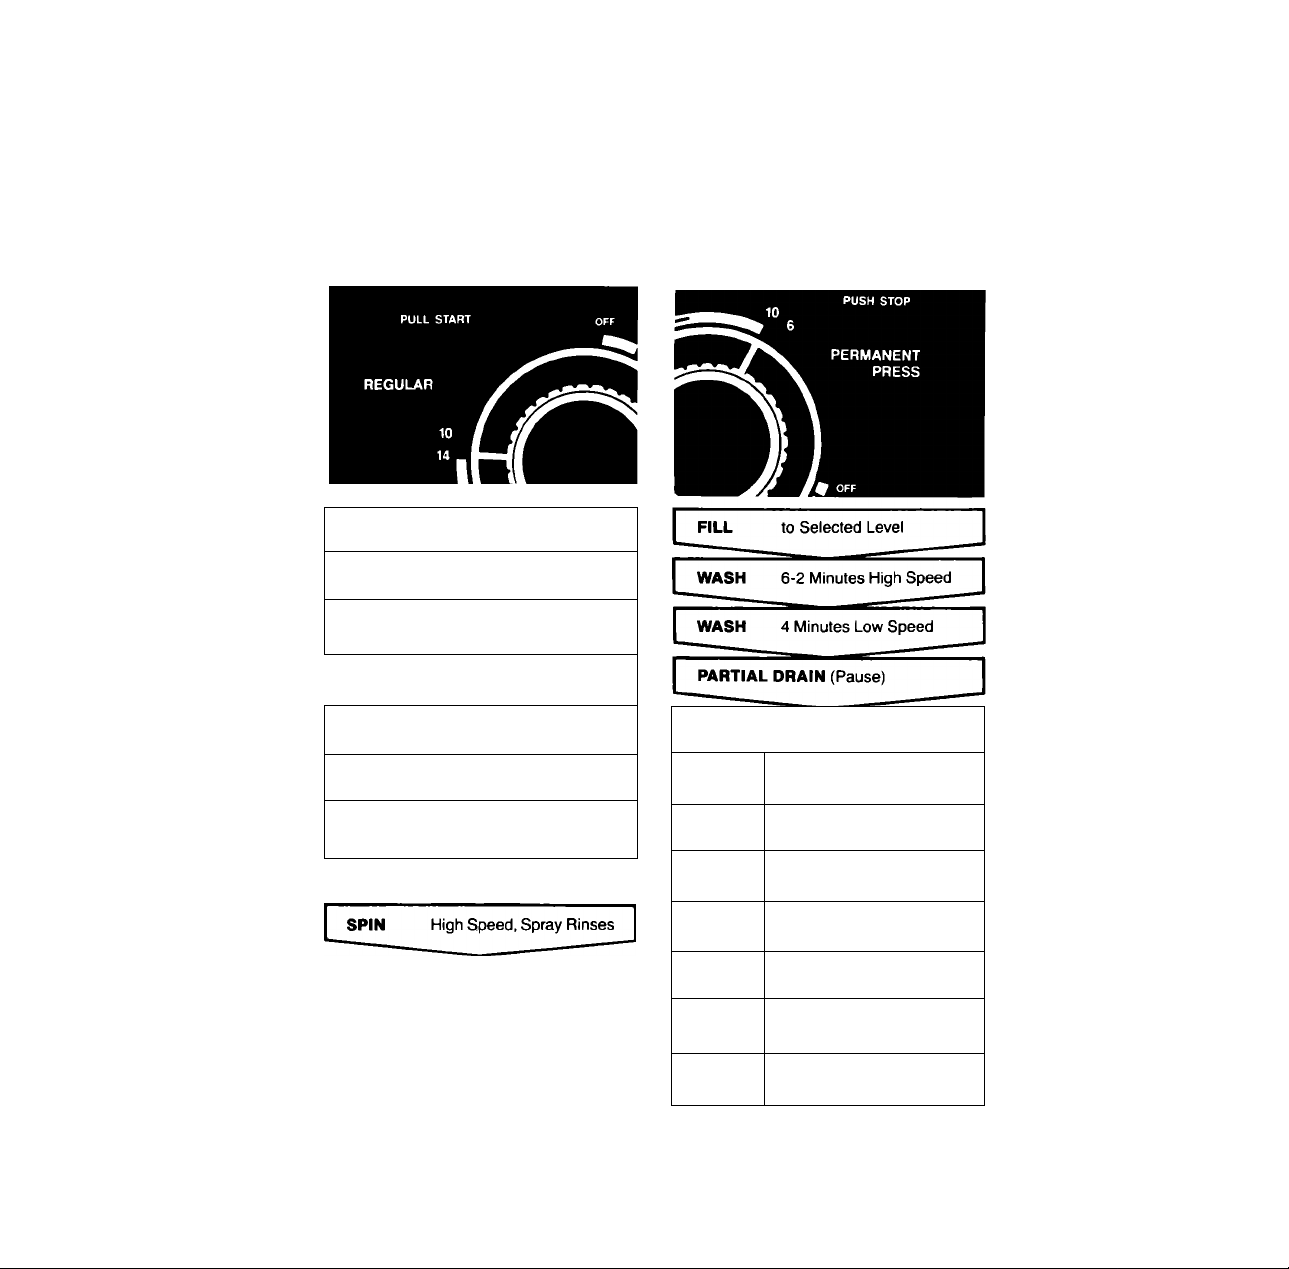
Regular Cycle
A cycle for sturdily constructed fabrics
that are moderately to heavily soiled.
FILL
[ WASH 8-4 Minutes High Speed
[ WASH
[ DRAIN
[ SPIN
to Selected Level
6 Minutes Low Speed
No Agitation
High Speed
Permanent Press Cycle
A cycle designed for lightly to moder
ately soiled permanent press and some
synthetic fabrics. The cool-down rinse
helps keep wrinkles from setting into
these items.
REFILL COOL-DOWN
[ FILL
y RINSE
DRAIN No Agitation
for Deep Rinse
High Speed
WASH High Speed
DRAIN
SPIN Low Speed
FILL
RINSE
DRAIN
SPIN Low Speed, Spray Rinses
No Agitation
(or Deep Rinse
High Speed
No Agitation
NOTE: Always use cold rinse water
for permanent press fabrics.
 Loading...