

Page 1
use&care guide
AUTOMATIC
WASHER
Design 2000®
Large Capacity
Model
LA6300XP
rowa ve O ven s. T ras h Co mpa ct or s, Ro om Ai r Con di ti on ers . De hum id if ier s, A uto ma tic W as he rs. C lo the s Dry er s, F ree ze rs, R ef nge ra to r-F re ez
Page 2
Parts and features
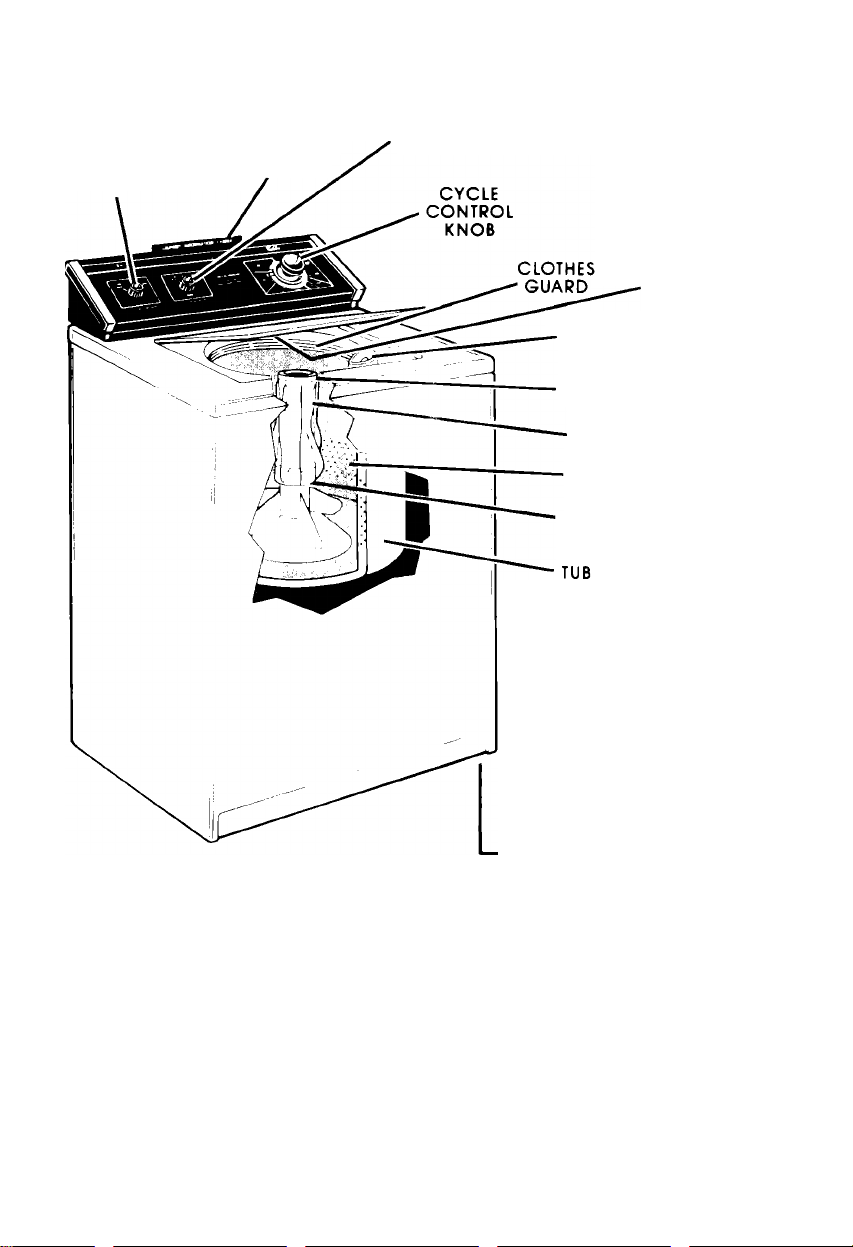
LOAD
SIZE
SELECTOR
LAUNDRY
INFORMATION
CENTER
TEMPERATURE
SELECTOR
MODEL
AND SERIAL
NUMBER PLATE
(not shown)
LIQUID BLEACH
DISPENSER
LIQUID FABRIC
SOFTENER DISPENSER
AGITATOR
BASKET
LINT FILTER
(Not Shown)
Remove the Consumer
Buy Guide label. It will be
easier to remove before
the washer is used.
You should wipe out the
basket with a damp cloth
before using to remove
dust from storing or
shipping.
Copy your Model and Serial !\umbers here
When youneed service or call with a__________________________
question, have this intormatlon ready
1. Complete Model and Serial Num
bers (from plate under the lid near the
hinge).
2. Purchase date from sales slip
Copy this information in these spaces
Keep this book in the Laundry Informa
tion Center with your "Laundry Guide,"
sales slip and warranty
There Is no warranty registration to return, Prool-of-purchase is all
that is required for in-warranty service.
Model Number
Serial Number
Purchase Date
Service Company
Phone Number
Page 3

Your responsibilities
Read this 'Use and Care Guide”
and your "Laundry Guide” care
fully for important use and safety
information
You are personally responsible
for making sure that your
washer...
• is installed by a qualified installer,
• is properly installed and
leveled on a floor that can
support the weight."
• is connected to the right kind
of outlet, electric supply, water
supply and drain
• is properly grounded,
• IS used only for jobs normally
expected of home automatic
washers
• is properly maintained,
• is protected from the weather
and kept where the tempera
ture will not fall below freezing,
• IS not run by children or anyone
unable to operate it properly,
' See the "Installation Instructions"
for complete information.
Contents
PARTS AND FEATURES
YOUR RESPONSIBILITIES
SAFETY FIRST........................
STARTING YOUR WASHER
WHAT HAPPENS IN EACH
CYCLE
.......................................
OTHER OPERATING
INSTRUCTIONS
Fora Rinse and Spin.............
Fora Drain and Spin
For a Soak or Pre-Wash .,.,
Liquid Bleach Dispenser ..
Fabric Softener Dispenser.
Cleaning the Lint Filter .,,,
CARING FOR YOUR WASHER
Winterizing..............................
IF YOU NEED SERVICE OR
ASSISTANCE.............................
1. Before Calling for
Assistance
2, If You Need Assistance .
3, If You Need Service ,...
4, If You Flave a Problem ..
........................
...............
..........................
Safety first
ALWAYS unplug the power sup
ply cord before attempting to
service the washer.
NEVER put flammobie fluids (drycieaning soivents, gasoiine, ker
osene) into your washer. NEVER
use them near your washer.
ALWAYS hand launder or air dry
fabrics treated with fiammable
fluids before putting them into
your washer.
NEVER put your hands into the
washer until all motion stops. If
the lid is opened while the bas
ket is spinning, the basket wilt
automatically stop in a few
seconds.
DO NOT ailow children to
operate or play with the washer.
ALWAYS store detergent, laundry
aids and other materials in a
cool, dry place where children
can’t reach them - in a locked
cabinet, if possible.
ALWAYS read and follow instruc
tions on packages of detergent
and laundry aids - especially
warnings and precautions.
HAZARDOUS FUMES can be
2
formed if chlorine bleach is used
3
in the same wash as ammonia
3
or acids such as vinegar or rust
4
remover.
DO NOT machine wash glass
6
fiber materials. Small particles
can stick to fabrics washed in
10
following loads and cause skin
10
irritation.
10
SPECIAL CAUTION: If hot water
10
has not been used recently (usu
11
ally two weeks or longer), explo
11
sive hydrogen gases may build
11
up in the water heater and hot
12
water pipes. To prevent injury or
13
damage, turn on all hot water
faucets and allow water to run
14
for several minutes. This will
allow gases to escape. Do not
14
smoke or use any open flame
15
near the faucet while it is open.
15
15
- SAVE THESE INSTRUCTIONS -
©1985 Whirlpool Corporation
Page 4
Starting your washer
Before starting
your washer:
1 Measure and add detergent
2 Place sorted load in washer
3 Start washer
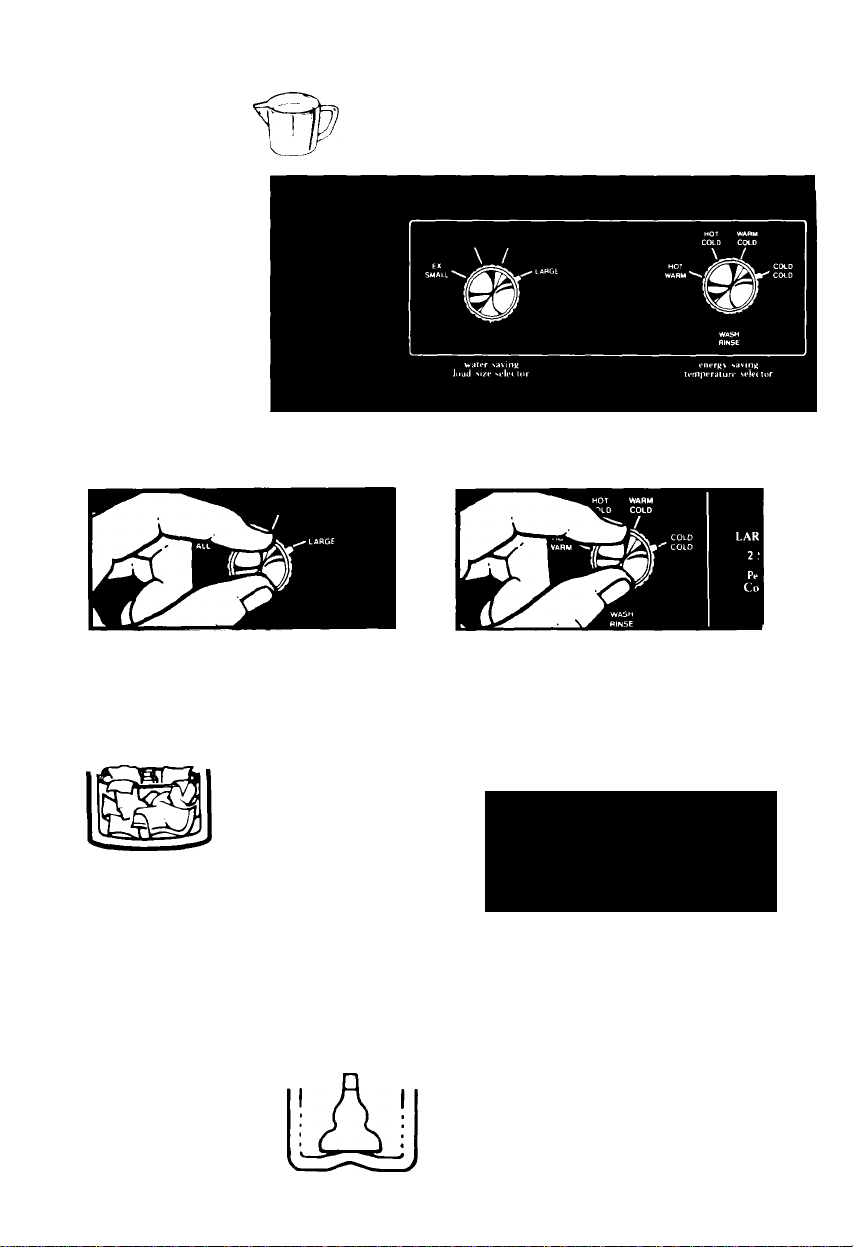
Select a
1. LOAD SIZE
• Turn the knob to point at a setting
that describes the size of load you
want to wash
• Set the knob anywhere on or
between EX SMALL (a few items)
and LARGE (a full load).
DO NOT LOAD
ABOVE CLOTHES GUARD
NOTC: Use the LARGE water level
for best permanent press results.
Select WATER
2. TEMPERATLRES
Match the wash water temperature
to the type of fabrics and soils being
washed.
Recommended wash femperatures
can be found in your "Laundry Guide”
IMPORTANT: Use warm water
with the PERM’T PRESS or KNITS/
GENTLE cycles. For heavily
soiled permanent press or knit
clothes, pre-wash or pre-soak
before washing in warm wafer.
LOAD SIZES AND WATER LEVELS
For best cleaning results, the
load must be able to move freely
in the water. Too big a load or too
little water can cause wear or
tearing of load items.
LARGE (17.3gals./65.5L)*
•Approximate
fill with load.
- (14.7 gals./55.7 L)*
- (12.1 gals./45.8 L)*
EX SMALL (9.5 gals./36.0 L)*
CAUTION:
DO NOT
OVERLOAD WASHER.
Page 5
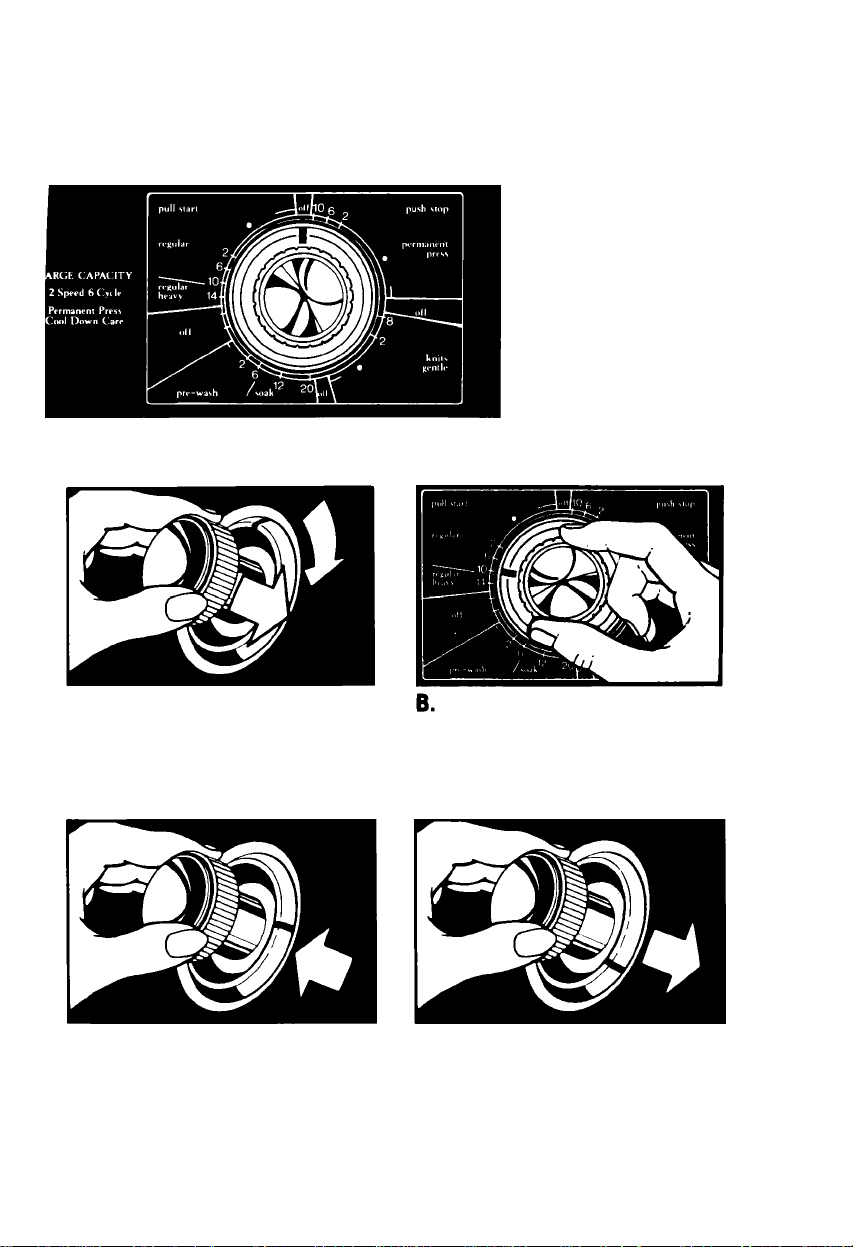
Select CYCLE and WASH TIME;
3. Start the washer
A. Push in the Control Knob and
turn it to the right. It must be
pushed in and turned only
clockwise.
Stop on a number in the cycle
you want. The numbers are min
utes of wash time. The drawing
shows 10 minutes of agitation in
the REGULAR Cycle.
C. start the washer by pulling out D. To stop the washer at any time
the Control Knob. The washer
will fill to the level you set with
wash water of the selected
temperature. After filling, the
washer will agitate for the
selected number of minutes
push in the Control Knob. To
restart the washer, pull out the
Control Knob.
Page 6
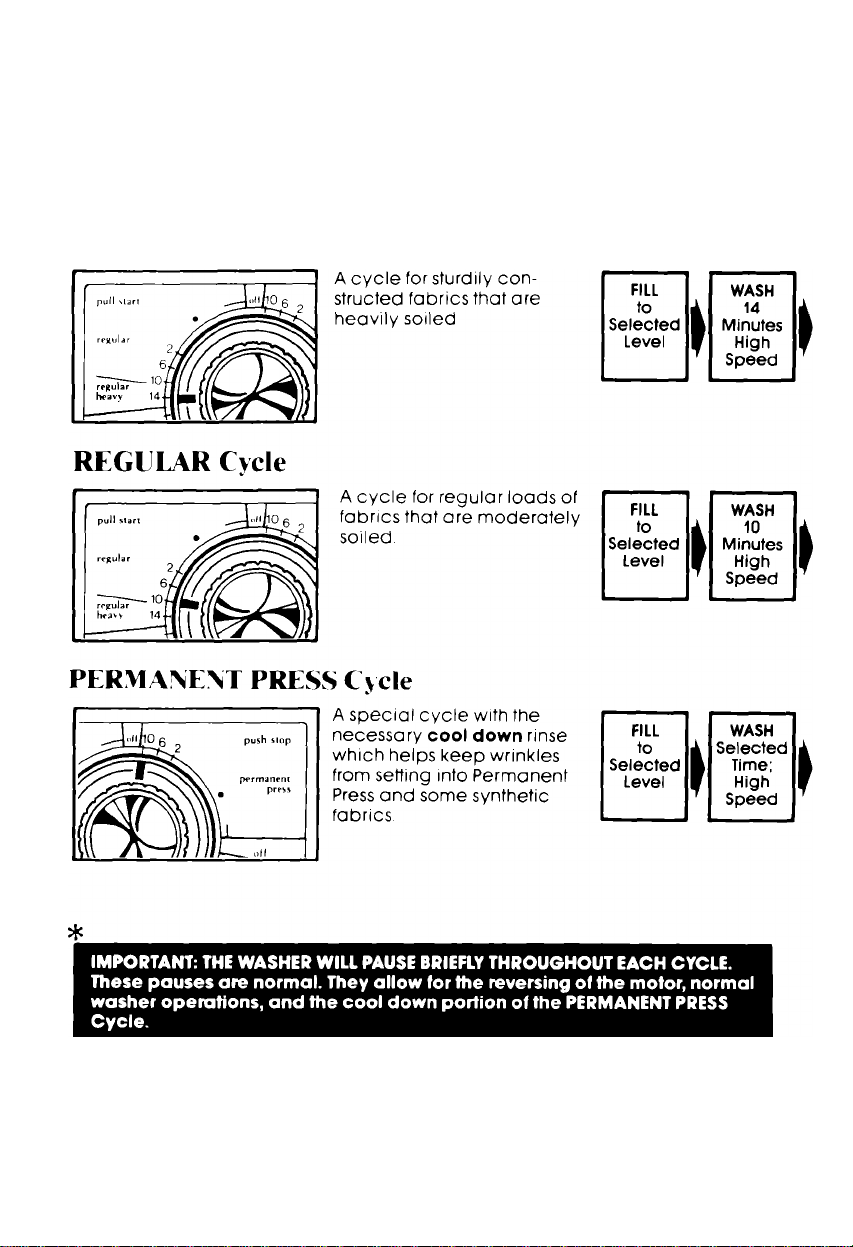
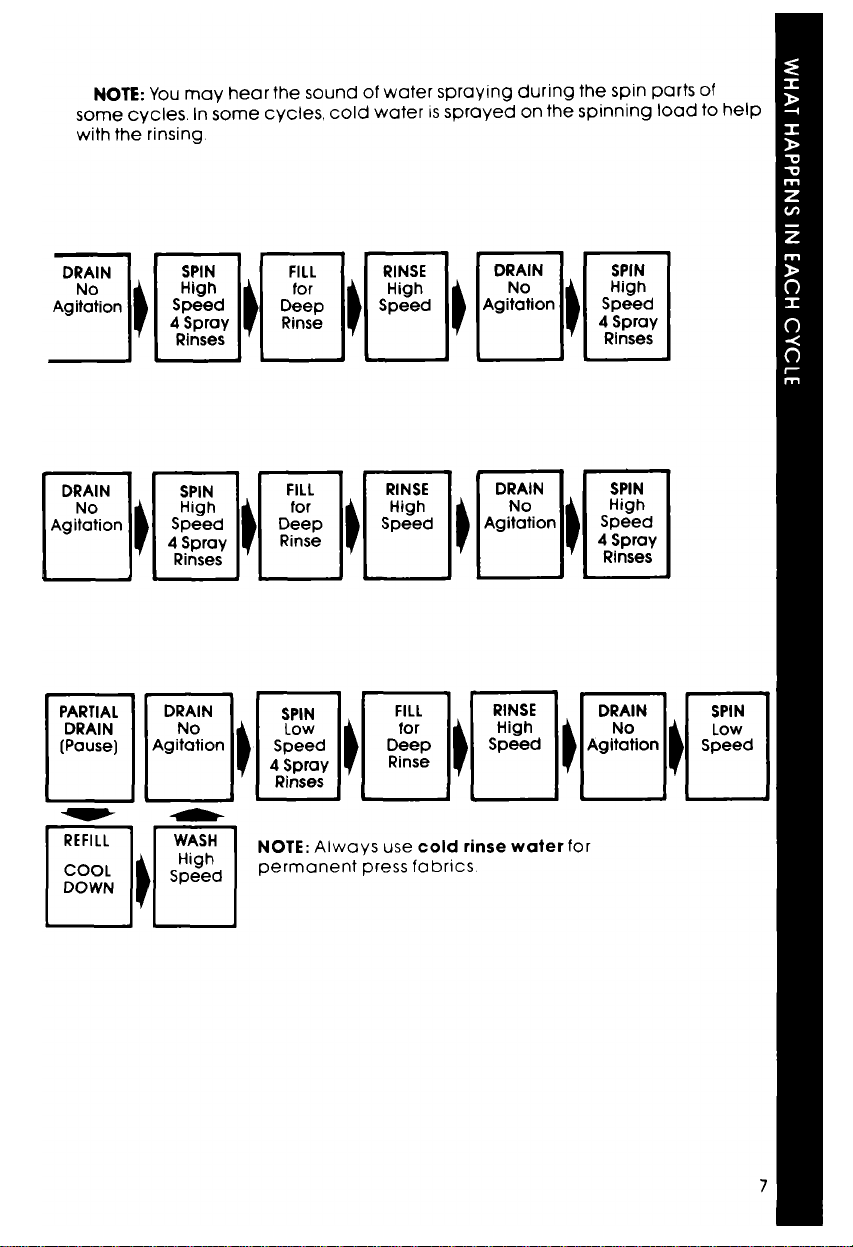
What happens in each cycle
Each cycle has different agitation and spin speeds designed for different
kinds of fabrics. Numbers on the dial in each cycle are the minutes of WASH
agitation time.
When the Cycle Control Knob is set to a number and pulled out, the washer
fills before agitation and timing starts After agitation starts, the knob turns clock
wise until it points to OFF and the cycle ends
REGULAR HEAVY Cycle
Page 7
Page 8
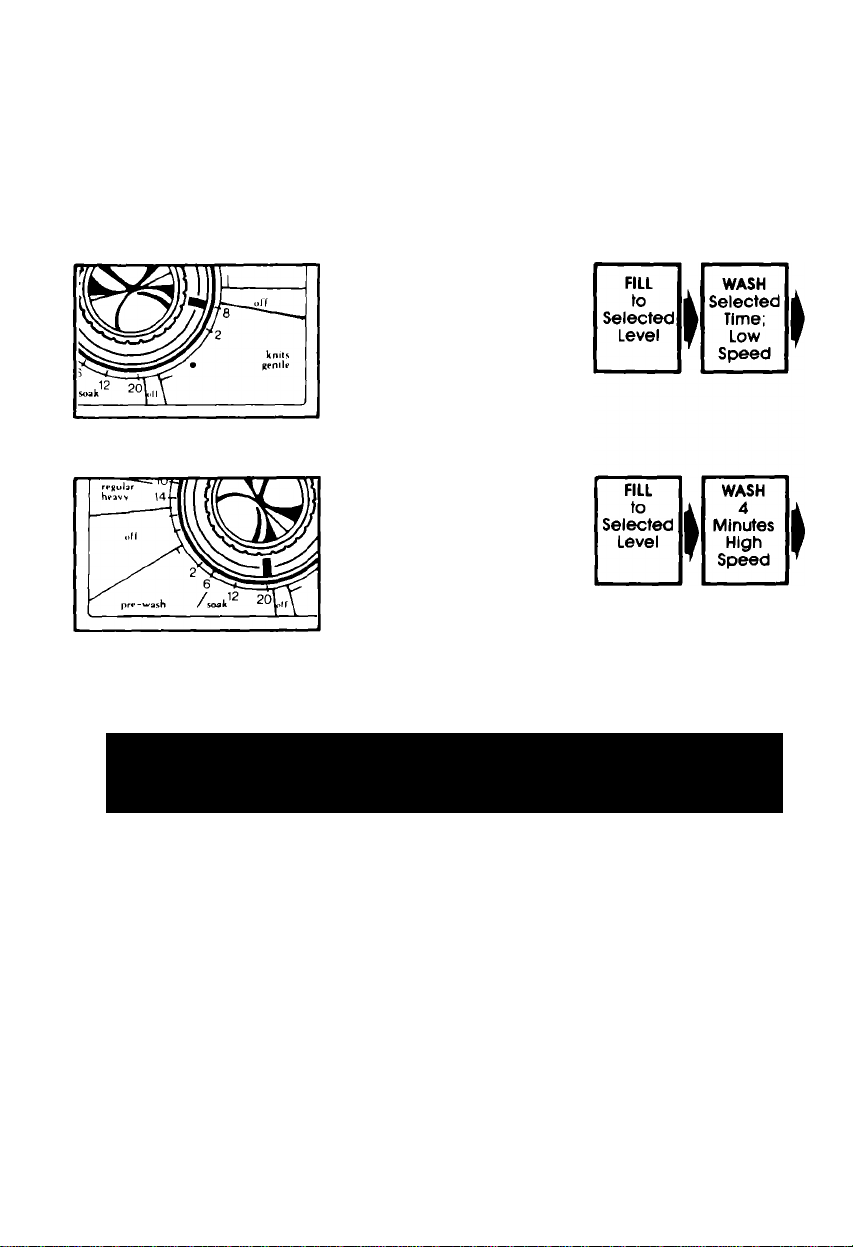
KINITS/GENTLE Cycle
A cycle that gently washes
and spins delicate items
and washable knits.
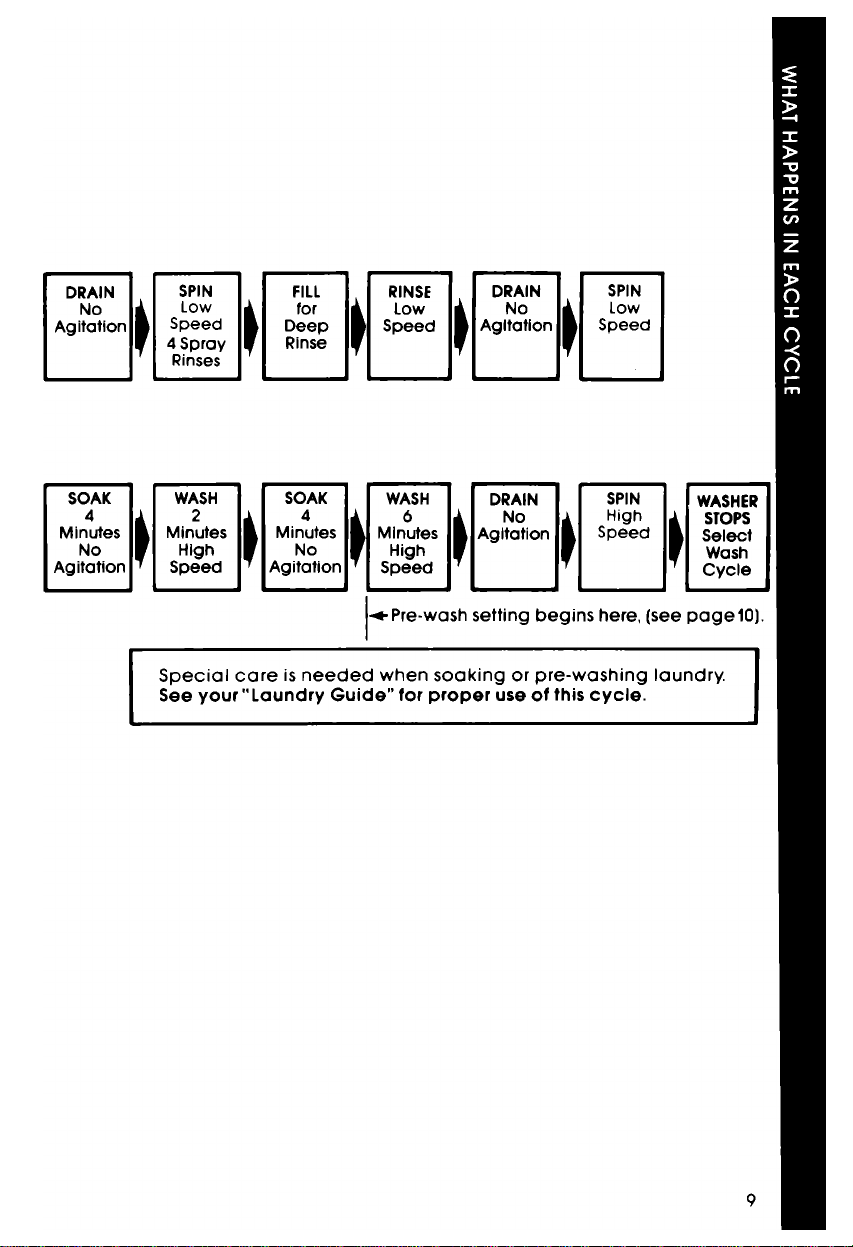
SOAK AND PRE-WASH Cycles
Brief periods of agitation
and soak time help remove
heavy soils and certain
stains that need extra
pretreatment. Use recom
mended amount of
detergent or pre-soak
additive The SOAK Cycle
should always be fol
lowed by a Wash Cycle.
*1
IMPORTANT: THE WASHER WILL PAUSE BRIEELT THROUGHOUT EACH CYCLE.
These pauses are normal. They allow for fhe reversing of fhe mofor, normal
washer operafions, and fhe cool down porfion of fhe PERMANENT PRESS
Cycle.
Page 9
Page 10
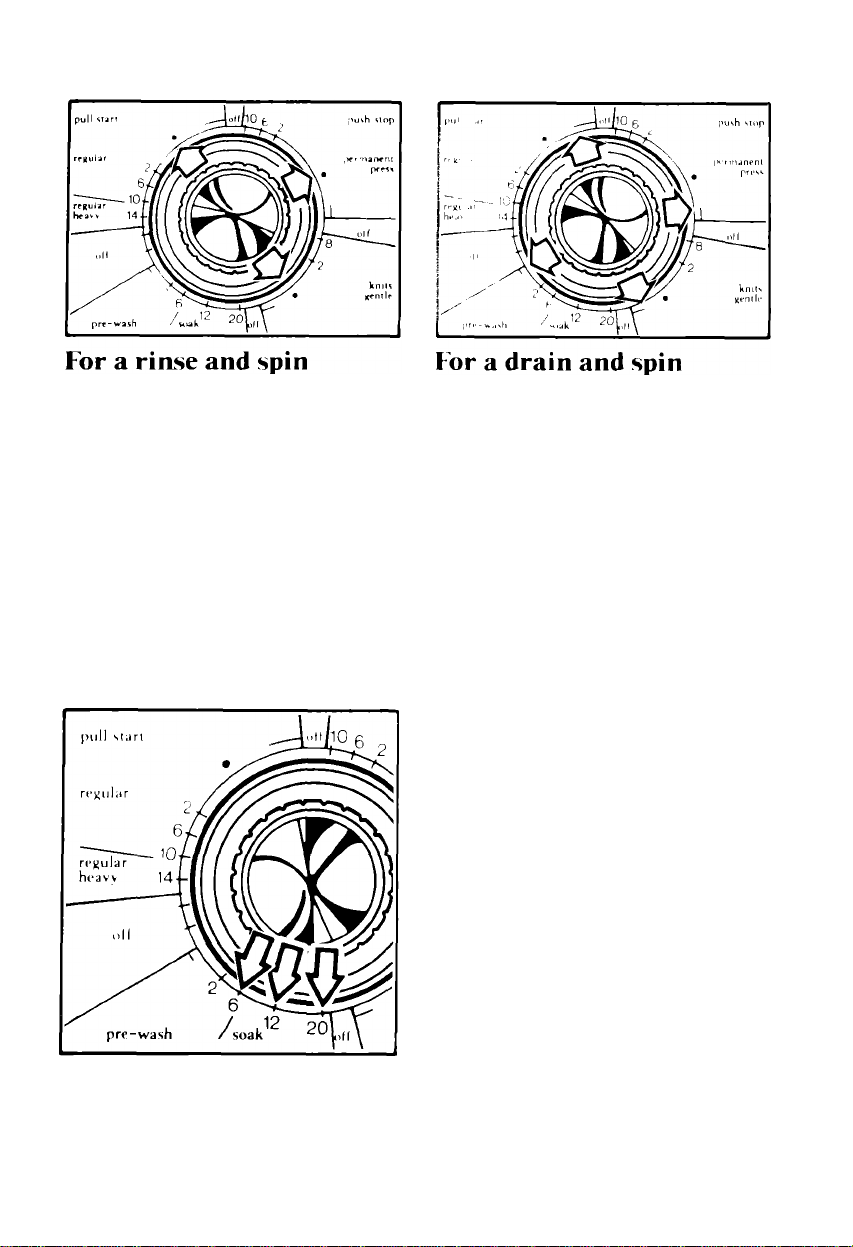
Other operating instructions
You may need an extra rinse and
spin for heavily soiled loads which
need more detergent (Extra de
tergent can require an extra rinse.)
• Push Control Knob in
• Turn clockwise to any • on the dial
See above drawing.
• Pull Control Knob out
• The washer will fill to selected
level; agitate 2 minutes; drain
and spin.
For agitation and spin speeds in each cycle, see pages 6 -9.
For a soak or pre-wash
Your washer can be set to drain
and spin out water
• Push Control Knob in
• Turn clockwise to the bar |ust before
OFF in any cycle See above
drawing.
• Pull Control Knob out
• The washer will drain and spin.
For best results, use warm water
for soaking or pre-washing stained
aundry Hot water can set stains.
• Use recommended dmount of
detergent or pre-sook product
• Push Control Knob in,
• Turn clockwise to point at a number
in the SOAK Cycle...use the 6-minutes
mark for a pre-wash.*
• Pull Control Knob out to start washer,
• When the cycle Is over, add de
tergent for the next selected wash
cycle The SOAK Cycle should
always be followed by a Wash
Cycle.
• Set the washer and start the next
selected wash cycle.
Important: See additional care intormatlon on page 7 of your
“Laundry Guide.”
■ To start soak or pre-wash with agitation, the Cycle Control Knob must point to
a number in the SOAK Cycle, as indicated by the arrows.
10
Page 11
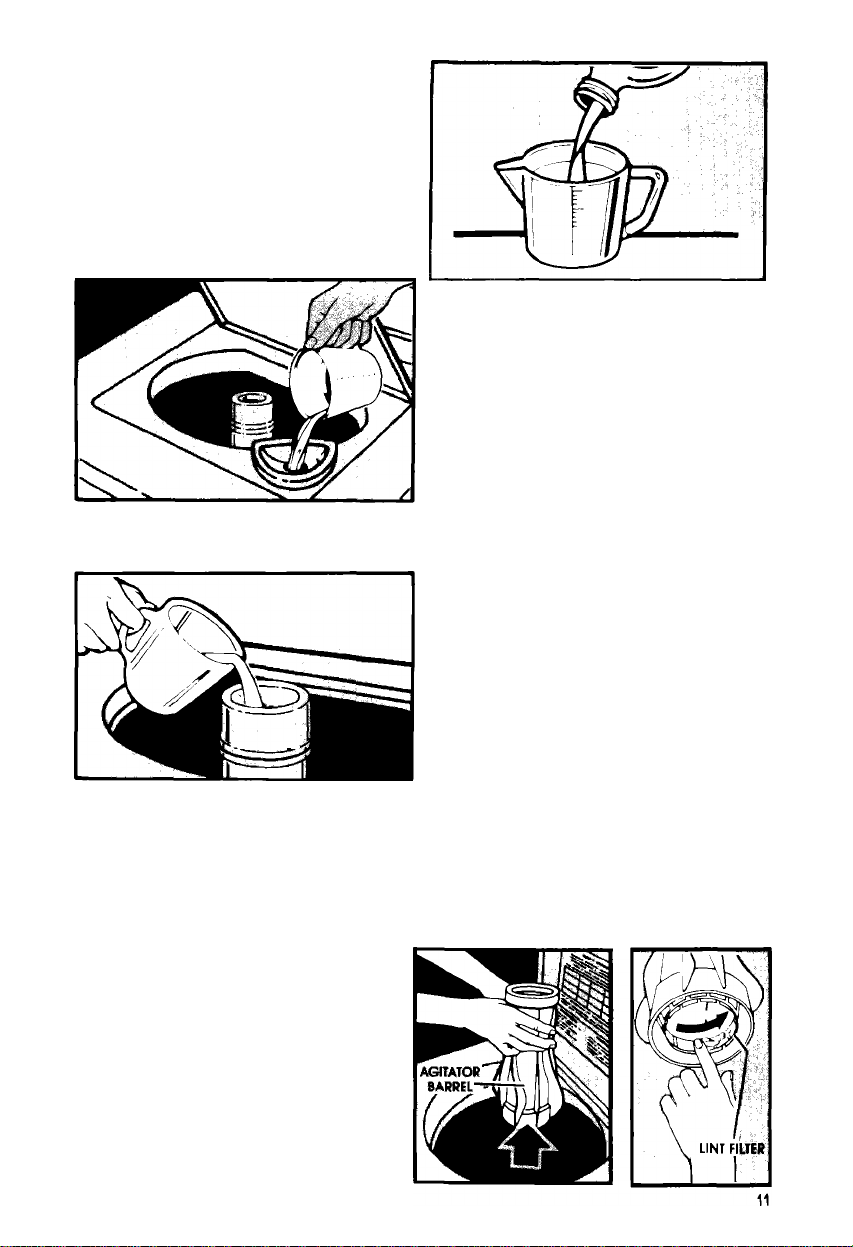
Liquid bleach disperLser
Always measure bleach. Do not
guess Never use more than 1 cup
(250 mL] for a full load. Use less with
lower water level settings. Follow
directions on bottle tor safe use. Use
a cup with a pouring spout to avoid
spilling
1. Load the washer first
2. Pour measured bleach carefully
into dispenser DO NOT let bleach
splash, drip or run down into the
washer basket Undiluted bleach
will damage any fabric it touches.
3. Start the washer. Bleach will be
diluted automatically during the
wash part of the cycle
For more information on bleaching, see 'Laundry Guide" page 11.
Liquid fabric softener dispenser
4. Dilute fabric softener with hot
water. Add enough hot water to fill
the dispenser up to the opening.
5. Start the washer. Diluted liquid fab
ric softener will be added to the
load during the deep rinse portion
of the cycle.
NOTE: Do not stop the washer
during this time. If you do. the
softener will mix with the remaining
soapy wash water. This will cause
1. Add detergent and load to the stains. Do not put detergent in the
Posket liquid fabric softener dispenser.
2. Add liquid fabric softener to 6. It dispenser needs cleaning, flush
the dispenser using the amount vvifh hot water. NOTE: Do not wash
recommended on the bottle clothes with dispenser removed.
3. Avoid dripping or spilling any fab
ric softener on the load
Cleaning the lint filter
Clean filter after every load for best
filtering results. Note: The load type
will vary the amount of lint build-up.
To clean:
• Lift off the agitator barrel.
• Wash or wipe the filter clean in the
bottom of the agitator barrel. The
filter is not removable.
• Replace the agitator barrel and
snap into place.
Page 12
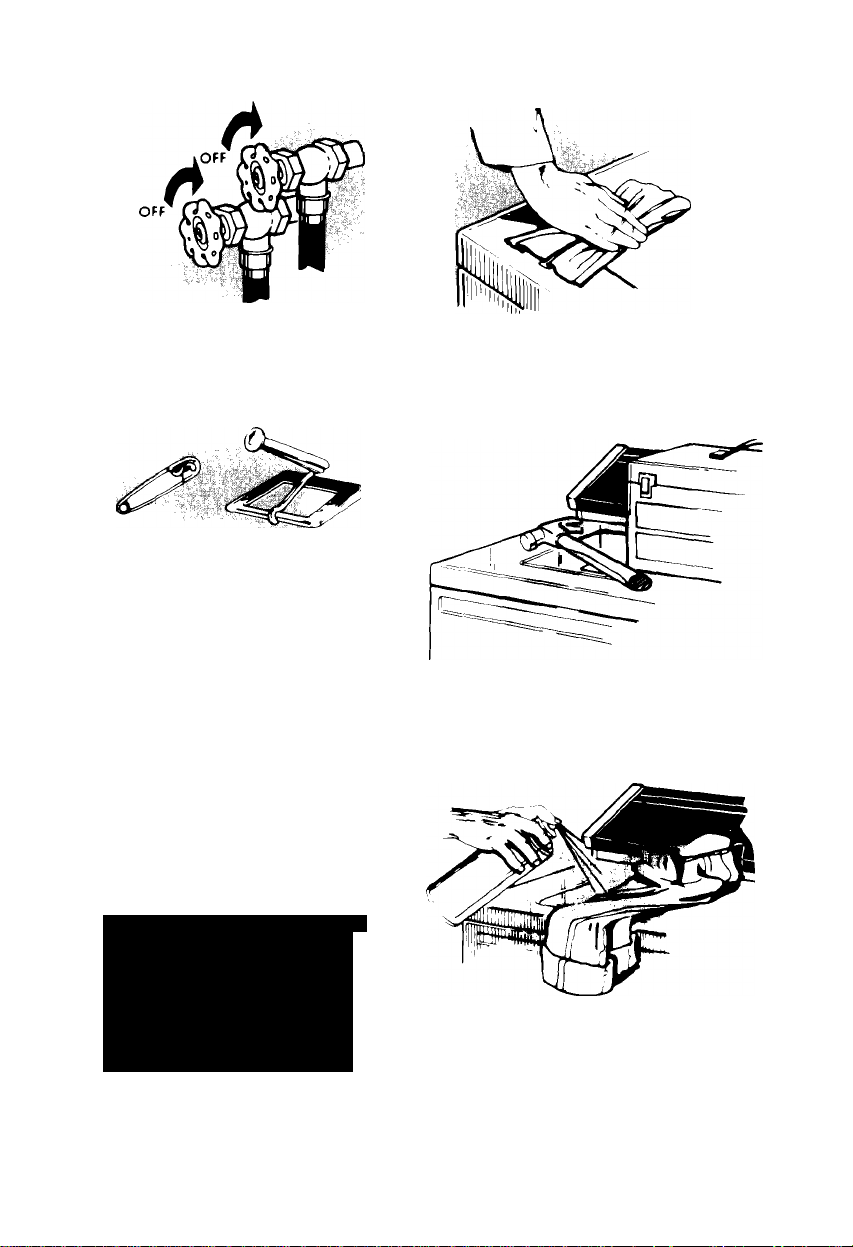
Caring for your washer
WHEN NOT WASHING, keep both
water faucets turned off. This takes
the pressure off the water inlet valve
and hoses.
REMOVE SHARP OBJECTS such as pins,
buckles, etc., from clothes before
washing. Close metal zippers.
ARER WASHING, use a soft dry cloth
to wipe the outside and inside dry.
Leave the lid up until the basket is dry.
Wipe up spills right away. Spills can
dull or damage the finish.
SHARP OR HEAVY OBJECTS should
never be put on or in the washer.
Check pockets for bolts, nuts,
tools, etc.
NEVER USE THE WASHER TO..
• store wet or dry laundry.
• soak for more than 2 hours
• soak withchlorine bleach
• soak with vinegar or other
acids
• soak or store urine soaked
clothes
12
SOME PRETREATMENT PRODUCTS
can damage washer and dryer dials,
consoles and finishes. Do not use
these products on or near your
washer or dryer.
Page 13
Service or performance problems caused by the use of any producf
nof manufacfured by Whirlpool Corporation are the responsibility of
the manufacturer of that product.
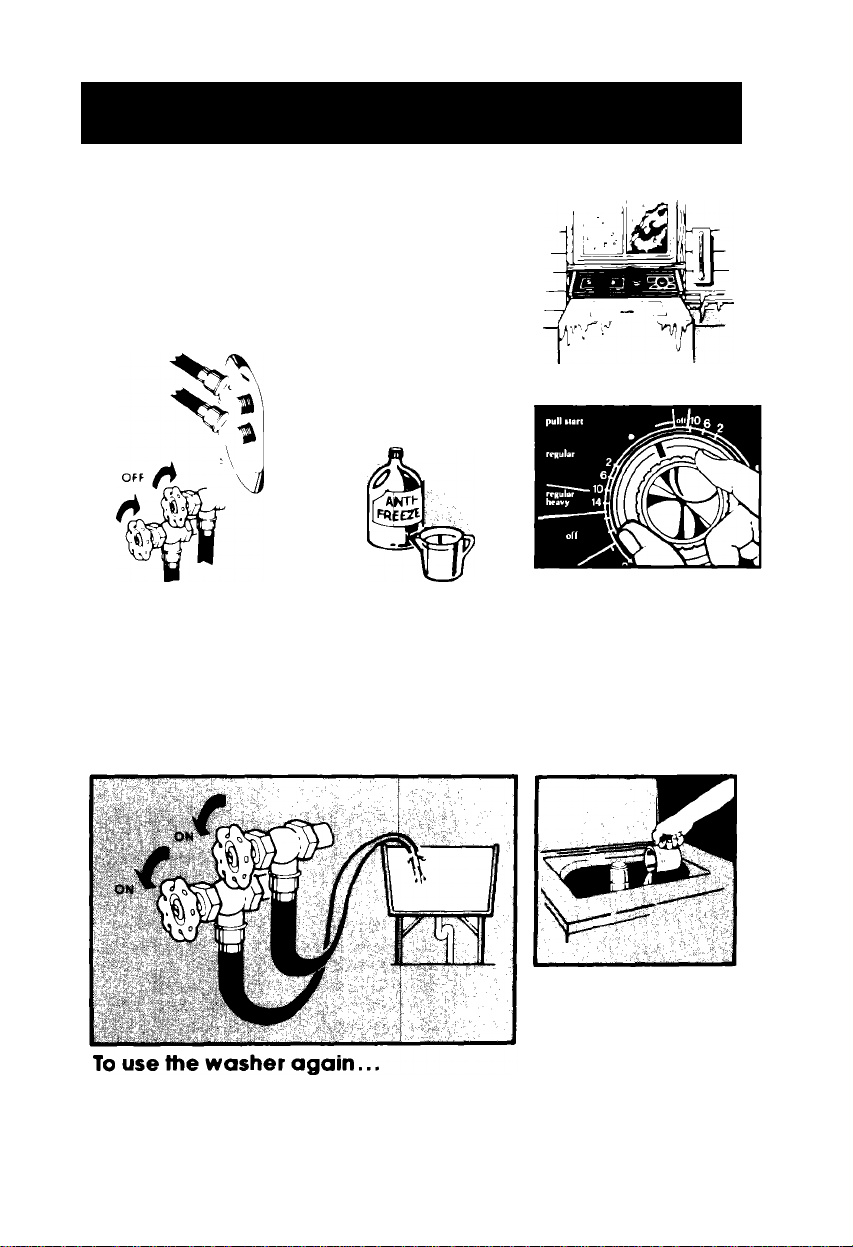
Winterizing
Because some water stays in the washer, treez-
ing can cause a lot of damage. If your washer is
stored or moved during the cold weather...
1. Shut oft both water
faucets. Discon
nect and drain
water inlet hoses.
1. Flush water pipes and hoses.
2. Connect hoses to the washer.
3. Turn on the water faucets.
2. Put a quart of
automobile-fype
antifreeze in the
basket.
3. Set the washer for a
DRAIN and SPIN
(see page 10). Let it
run for about 30
seconds to mix the
antifreeze and
water.
4. Run the washer
through a com
plete cycle with
one cup of deter
gent to clean out
the antitreeze,
13
Page 14
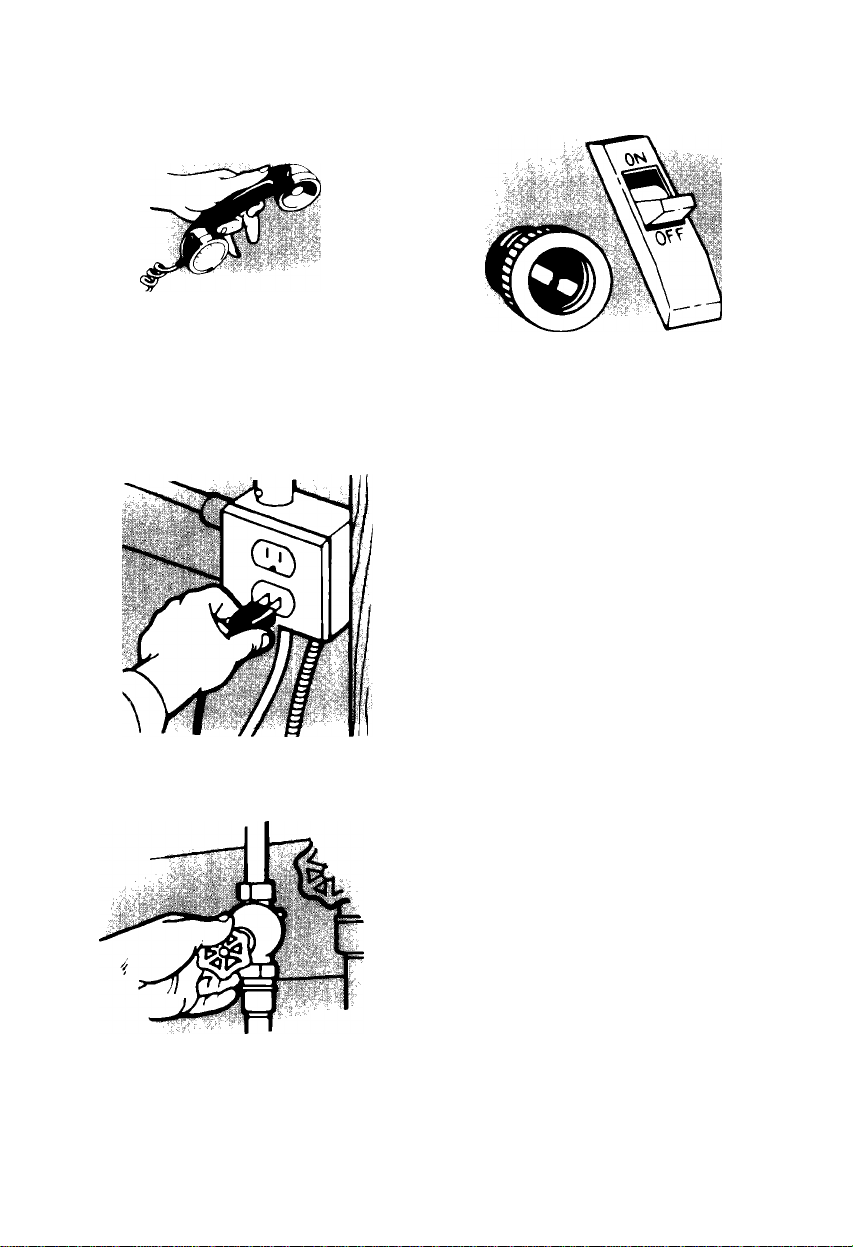
If you need service or assistance, we suggest
you follow these four steps:
1. Before calling
for a^ssistance.. ■
Performance problems often re
sult from little things you can find
and fix yourself without tools of any
kind.
IF YOUR WASHER DOES NOT FILL;
Is the power supply cord plugged
into a live circuit with the proper
voltoge?
' Are both water fauoets open?
• Have you checked your home’s
main fuses or circuit breaker box?
• Have you oheoked the electric
company for a power failure?
• Are the water supply hoses kinked?
• Is the Cycle Control Knob set and
pulled out?
IF YOUR WASHER DOES NOT SPIN
• Is the lid closed?
• Is the power supply cord plugged
into a live circuit with the proper
voltage?
• Have you checked your home's
moin fuses or circuit breaker box?
IF YOUR WASHER STOPS
DURING A CYCLE:
• Remember, the washer pauses
briefly at different times in each
cycle These pauses are normal
IF WASHER FILLS AND DRAINS
WITHOUT RUNNING:
• Make sure that the Cycle Control
Knob IS pointing to a number in
the cycle
MAKE SURE THE DRAIN HOSE IS
HIGHER THAN THE WATER LEVEL IN
THE WASHER. IF IT ISN’T...
• The washer may seem to be
draining during wash and rinse
cycles.
• Water can siphon out (See "In
stallation Instructions")
14
Page 15

2. If you need assistance \.
Call Whirlpool COOL-LINE serv
ice assistance telephone number.
Dial tree trom;
Continental U.S. .(800)253-1301
Michigan
.................
(800)632-2243
Alaska & Hawaii (800) 253-1121
andfalkwithoneofour trained Con
sultants, The Consultant can instruot
you in howtoobtainsatisfaotoryop-
eration from your appliance or, it
service is necessary, recommend a
qualified service company in your
area
3. If you need service
Whirlpool has
a nationwide net
work of franchised
TECH-CARE" Serv
reC//CA/?£
FRANCHISED SERVICE
ice technicians are trained to fulfill
the product warranty and provide
after-warranty service, anywhere m
the United States, To locate TECH
CARE service in your area, call our
COOL-LINE service assistance tele
phone number (see Step 2) or look in
your telephone directory Yellow
Pages under
ice Companies
TECH-CARE serv
4. If you have a problem*...
Call our COOL-LINE service as
sistance telephone number (see
Step 2) and talk with one of our Con
sultants, or if you prefer, write to;
Mr, Stephen E. Upton
Senior Vice President
Whirlpool Corporation
Administrative Center
2000 US-33 North
Benton Harbor, Ml 49022
f you must call or write, please pro
vide model number, serial number,
date of purchase, and a complete
description of the problem. This in
formation IS needed in order to bet
ter respond to your request tor
assistance.
▲ FSP IS a registered trademark
ol Whirlpool Corporation for
quality parts. Look for this
symbol of qualify whenever
you need a replacement part
for your Whirlpool appliance.
FSP replacement parts
will fit right and work right, because they are
made to the same exacting specifications
used to build every new Whirlpool appliance.
APPLIANCES - HOUSEHOLD- ELECTmCALAPPLIANCES-
MAJOfl-SERVICE & REPAIR MAJOR - REPAIRING & PARTS
WHIRLPOOL APPLIANCES WHIRLPOOL APPLIANCES
franchised TECH-CARE SERVICE FRANCHISED TECH-CARE SEFTVICE
SERVICE COf^PASIES SERVICE COMPANIES
XYZ SERVICE CO XYZ SERVICE CO
123 Maple
...................
WASHING MACHINES. DRYERS
WHIRLPOOLAPPLIANCES
XYZ SERVICE CO
OR
999-9999 123 Maple........................ 999-9999
OR
& inONERS - SERVICING
franchised tech-care SERVICE
SERVICE COMPANIES
123 Maple
.......................
999-9999
15
Page 16

AVhirlpool
Making your world a little easier.
Part No. 387409 Rev. A
®j1985 Whirlpool Corporation
omal ic W ash er s. Cl ot he s D ry er s. Fr ee zer s, B etr ig er ato r Fr eez er s, Ic e Ma ker s, D ish wa sh ers , Bu ilt -I n Ove ns a nd Su rf ace U nit s, R an ges . Mic
Home ^ Appliances
Printed in U.S.A.
 Loading...