

Whirlpool KSCX 3610 IX INSTRUCTION FOR USE
KSCX 3610
Instructions for use


1 Product description 4
2 Important notes 8
Important information for the correct disposal of the product
in accordance with EC directive 2002/96/EC 8
Building-in 9
3 Before first use 11
4 Using for the first time 12
5 Preparing coffee (using coffee beans) 13
6 Changing the quantity of coffee in the cup 15
7 Regulating the coffee mill 15
8 Preparing espresso coffee using ground coffee
(instead of beans) 16
9 Hot water delivery 17
10 Preparing cappuccinos (using steam) 17
11 Cleaning and maintenance 18
12 Changing and setting the menu parameters 20
13 Changing the language 22
14 Meaning of messages and what to do 23
15 Problems that can be resolved before calling
the Customer Care Centre 24
After-Sales Service 26
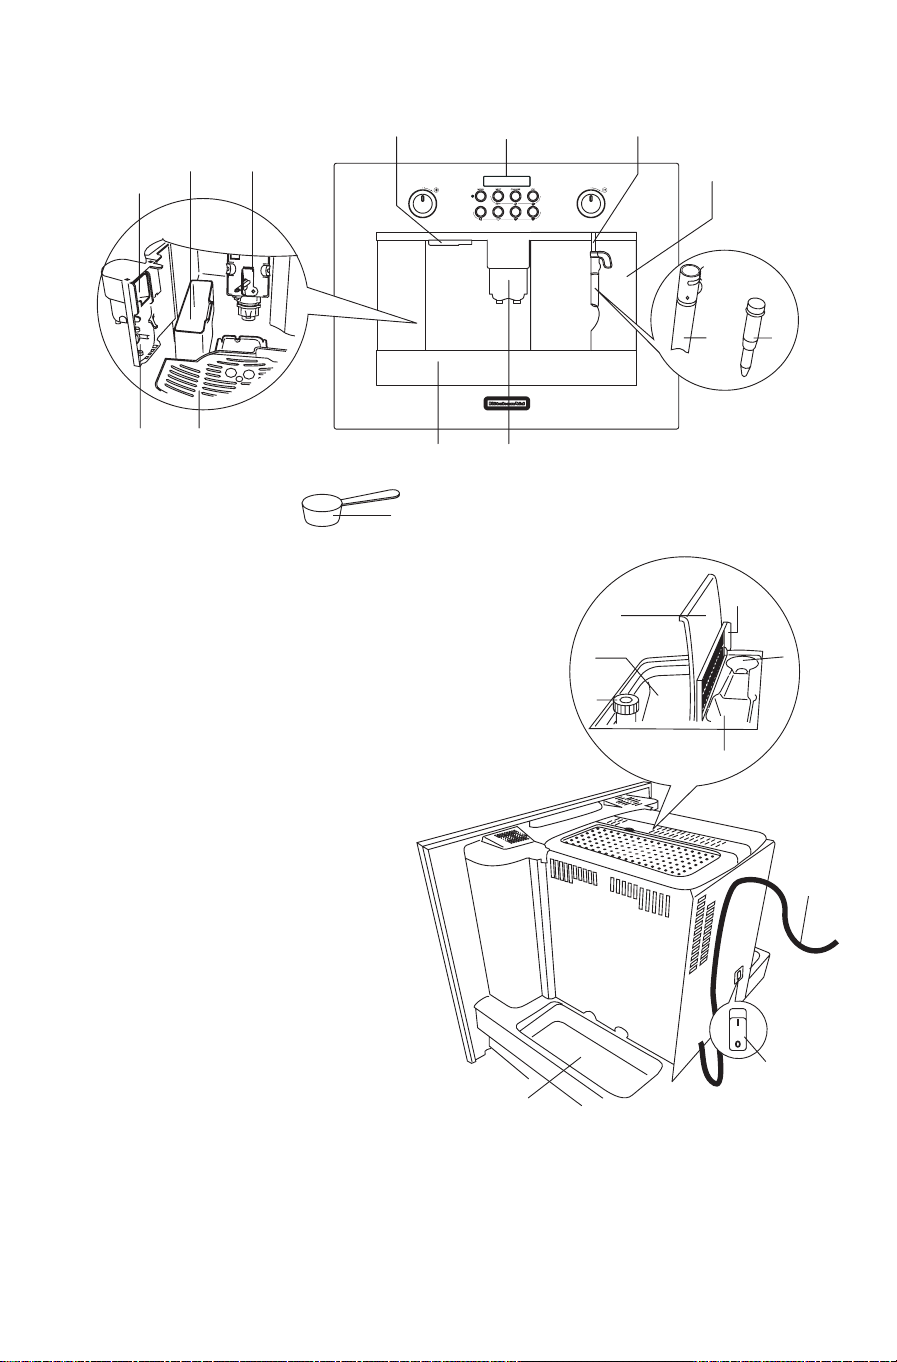
A. Main ON/OFF switch
B. Lights
C. Steam spout
D. Water tank (removable)
E. Cup tray
F. Drip tray (removable)
G. Service door
H. Coffee spout (adjustable in height)
I. Control panel
J. Bean container lid
K. Central ground coffee lid
L. Infuser
M. Power cable
N. Cappuccino maker (removable)
O. Cappuccino maker nozzle
(removable)
P. Measure for pre-ground coffee
Q. Coffee grounds container
(removable)
R. Grinding coarseness regulator
S. Coffee beans container
T. Compartment for measure
U. Ground coffee funnel
V. Mobile drawer
W. Accessories holder
1 Product description
4
LQ
V
EG
I
F
P
H
CB
D
N
O
K
J
S
T
R
U
M
A
W
1 Product description
5
1234
5678
9101112
14 15 1613
1 Product description
6
17 18 19 20
21 22 23 24
25 26
27

1 Product description
7
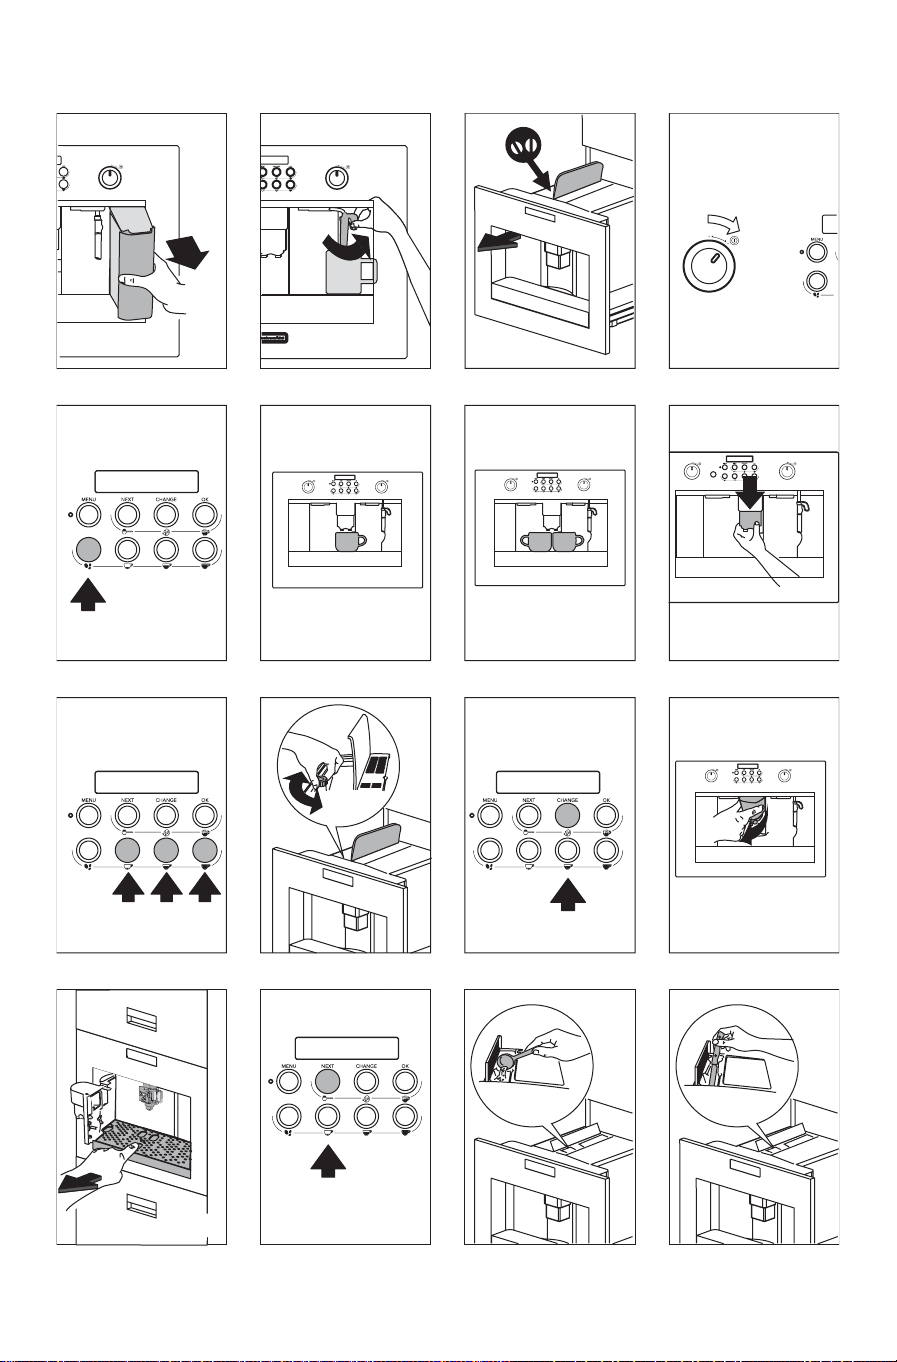
Control Panel
1. Display
2. Appliance ON/OFF knob
3. Coffee taste selection button
4. One or two cups short coffee button
5. One or two cups standard coffee button
6. One or two cups long coffee button
7. Button to select ground coffee or, if the MENU
light is on, to display the next parameter on the
menu
8. Button to select hot water or OK to confirm
9. Button to rinse the appliance or, if the MENU
light is on, to change the menu parameters
10. Button to activate or deactivate menu
parameter setting mode (MENU)
11. MENU light
12. Steam knob
To use the knobs,
turn them clockwise…
then release.
They work just like a
switch.

8
READ THESE INSTRUCTIONS CAREFULLY AND
KEEP FOR FUTURE CONSULTATION!
• This appliance is designed to "make espresso
coffee" and "heat drinks". Use with care to avoid
scalds from the water and steam jets or through
incorrect use.
• This appliance is intended for domestic use only.
Any other use is considered improper and thus
dangerous.
• Do not hang to the appliance when it is
extracted.
• The manufacturer is not liable for damage
caused by improper, incorrect or unreasonable
use of the appliance.
• When using the appliance, do not touch the hot
surfaces. Use the knobs or handles.
• Never touch the appliance with any wet part of
the body or operate it with bare feet.
• The appliance is not intended for use by
persons (including children) with reduced
physical, sensory or mental capabilities, or lack
of experience and knowledge, unless they have
been given supervision or instruction concerning
use of the appliance by a person responsible for
their safety. Children should be supervised to
ensure that they do not play with the appliance.
• In the event of failure or malfunction, unplug the
appliance from the mains and do not tamper
with it in any way. If it requires repair, contact
an authorised service centre only and ask for
original spare parts to be used. Failure to
respect the above could reduce the safety of
the appliance.
• This appliance may be installed above a
conventional built oven provided it is fitted with
a cooling blower on the top side. The nominal
power of the oven shall not be more than 3Kw.
• Do not rest objects containing liquids,
inflammable or corrosive materials; use the
accessories holder to contain coffee accessories
(for example coffee measure). Do not rest big
objects that may block the movement of the
appliance or unstable objects.
• Avoid exposing the appliance to atmospheric
agents.
• The parts which could come into contact with
coffee or milk conform to the provisions of the
EEC directive 1935/2004 relating to materials
suitable for contact with foodstuffs.
• This appliance conforms to EC directive
2004/108/EC on Electromagnetic Compatibility
(EMC).
2 Important notes
Important information for the correct disposal of the product in
accordance with EC directive 2002/96/EC
This appliance is marked according to the European directive 2002/96/EC on Waste Electrical and
Electronic Equipment (WEEE).
By ensuring this product is disposed of correctly, you will help prevent potential negative consequences for
the environment and human health, which could otherwise be caused by inappropriate waste handling of
this product.
The symbol on the product, or on the documents accompanying the product, indicates that this
appliance may not be treated as household waste. Instead it shall be handed over to the applicable
collection point for the recycling of electrical and electronic equipment.
Disposal must be carried out in accordance with local environmental regulations for waste disposal.
For more detailed information about treatment, recovery and recycling of this product, please contact
your local city office, your household waste disposal service or the shop where you purchased the
product.
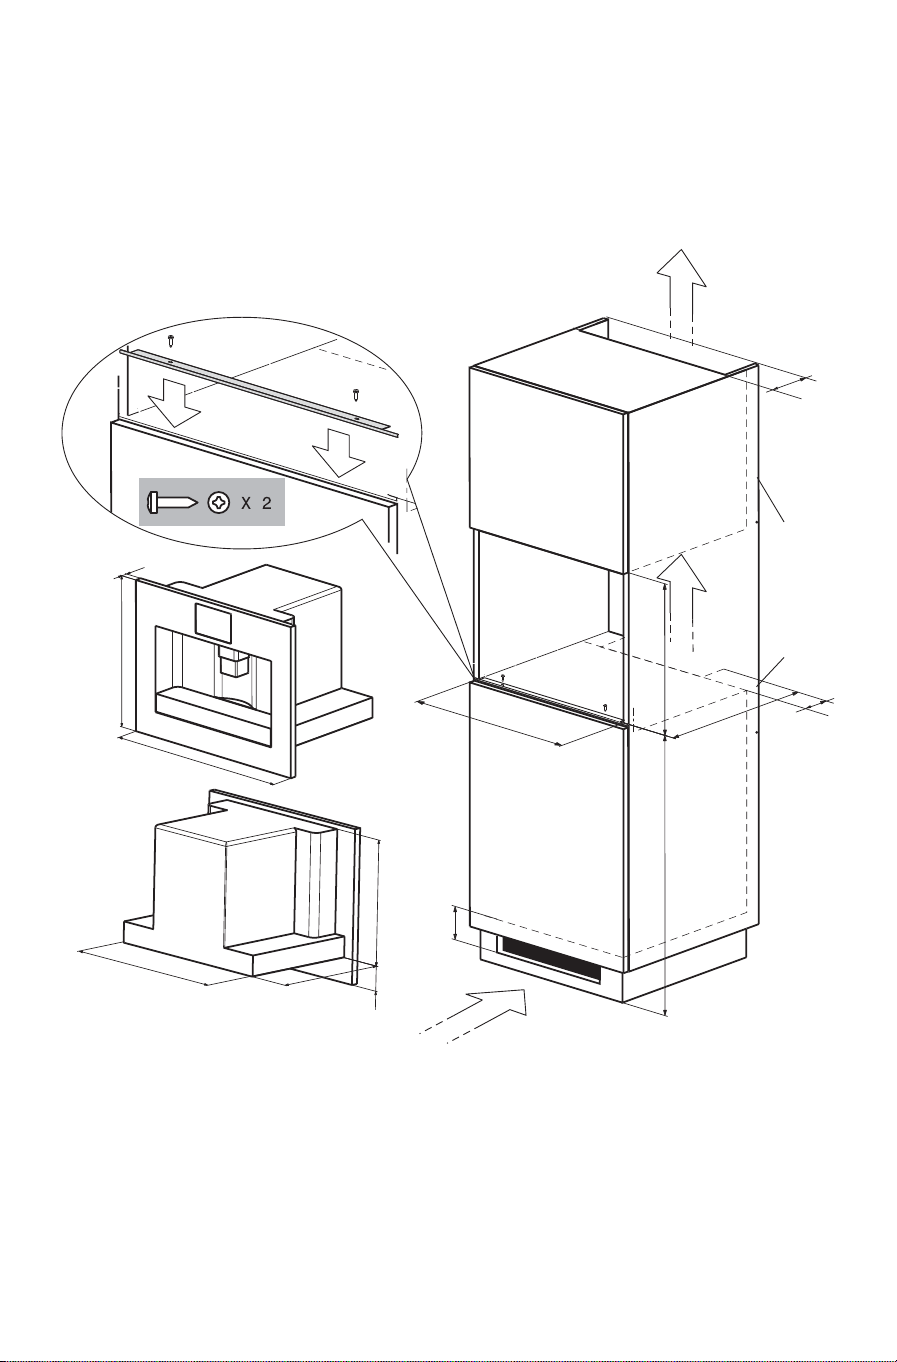
Building-in
9
Please check the minimum measures (mm) necessary to the proper installation of the appliance.
The coffee maker must be installed in a column unit, which must in turn be securely fixed to the wall with
standard brackets.
ATTENTION:
• Important: the appliance should be disconnected from the mains during installation or
maintenance work.
• The kitchen units coming into direct contact with the appliance must be heat resistant (min. 80°C).
• To ensure correct ventilation, leave an opening at the bottom of the unit (following the sizes in the
drawing).
Fasten metal strip
using the two screws.
Minimum distance
ventilation passageway
Min.
80
20
455
450
450
560
595
850
368
80
Min.
5
27
61
3
74
550
Min.
Min.
50
 Loading...