

Whirlpool HB D11 S PROGRAM CHART

GB
HB D11 S HOTPLATE OPERATION INSTRUCTIONS
Rapid Cast Iron Plate Ø 180
1.
Rapid Cast Iron Plate Ø 145
2.
Power indicator lights
3.
Cooking zone control knob
4.
Cooking zone control knob
5.
• To use the hob turn the knob(s) counter clockwise and
position at the required power setting.
• To switch off the hob return the knob(s) to position
• The hob is provided with 2 indicator lights showing
.
“0”
when the cooking zones are hot.
Make sure that the voltage indicated on the rating
plate corresponds to the mains voltage. The technical
data stated on the rating plate underneath the hob are
also provided below:
ELECTRICAL CONNECTION
Supply voltage
230 ~ +
Conductors: number and
size
HO5 RR-F 3 x 1.5 mm
DIMENSIONS OF COOKING HOB AND WORKTOP (mm)
Knob
(1 - 6)
1-2
2
3
3-4
4
4-5
6
Table for use of the cooking zones
For melting (butter, chocolate)
To keep food warm and to heat small
quantities of liquids
To heat larger quantities, whip creams and
sauces
Slow boiling, e.g.: boiled vegetables,
spaghetti, soups, continuing steam cooking
of roasts, stews
For all types of frieds foods, chops, steaks,
cooking without lid, e.g.: risotto
Browning meats, roast potatoes, fried fish
and to boil large quantities of water
Quick frying, steaks in steak pan, etc.
Type PLATD 230 V - 50 Hz 3.2 kW
PROTECTING THE ENVIRONMENT
Disposal of packaging
• The packaging material is entirely recyclable, and is
marked with the recycling symbol .
• Do not dispose of the various packaging materials
carelessly, but do so responsibly and in full compliance
with local authority regulations governing waste
disposal.
Disposal of old household appliances
• This appliance is marked according to the European
directive 2002/96/EC on Waste Electrical and
Electronic Equipment (WEEE). By ensuring this product
is disposed of correctly, you will help prevent potential
negative consequences for the environment and human
health.
The symbol on the product, or on the documents
accompanying the product, indicates that this appliance
may not be treated as household waste. Instead it shall
be handed over to the applicable collection point for
the recycling of electrical and electronic equipment.
Dispose of in accordance with local standards governing
waste disposal.
For further information on the treatment, recovery and
recycling of this product, contact the relevant local
2
authority, household waste collection service, or the
outlet at which the product was purchased.
Energy saving
• Use pots and pans with the bottom diameter equal to,
or slightly larger than that of the cooking zones.
• Only use flat-bottomed pots and pans.
• If possible, keep pot lids on when cooking.
• Cook vegetables, potatoes, etc. with little water in
order to cut down cooking time.
• A pressure cooker allows you to save even more
energy and time.
• Avoid touching the hob with parts of the body when
wet and never use when barefoot.
• This appliance is not intended for use by persons
(including children) with reduced physical, sensory or
mental capabilities or lack of experience and knowledge
unless they have been given initial supervision or
instruction concerning use of the appliance by a person
responsible for their safety.
•
Avoid children contact with
- the hob in general to avoid physical injury.
During and immediately after operation, the hob can
reach very high temperatures;
- packaging (bags, polystyrene, metal parts etc.);
- the hob to be scrapped.
• After use, ensure that the knobs are in position
• Make sure that the electrical wires of other electrical
appliances near the hob do not come into contact with
hot parts.
• Always supervise cooking when using large quantities of
grease or oil. Oil and grease can overheat and set fire!
• Do not use the hob surface as a support or work
surface
• Never place plastic, aluminium foil, cloths, paper, etc.
on or near the hotplates. /cooking zones when still hot.
:
.
“0”
BEFORE USING THE COOKING HOB
Before use, remove the following:
- adhesive labels on the top of the hob;
- protective card and plastic film;
- Check whether the hob has been damaged during
transport. If in doubt, contact the After Sales centre.
CLEANING AND MAINTENANCE
Important:
water or steam cleaning equipment.
• Clean the hob when it is cool, after each use. This will
• Clean the electric plates with a cloth moistened with
• Never use water directly for cleaning the electric plates
• Do not allow food residue to dry on the plates.
• Do not use abrasive products, chloride based
• The hob should be treated periodically with a
never clean the appliance with high pressure
prevent the build-up of dirt and make cleaning easier.
water and salt, and polish with a cloth moistened with
oil.
to avoid the formation of rust.
corrosives, oven-cleaner spray or pan scourers for
cleaning the plates.
commercially available proprietary products according
to the specific instructions.
STAINLESS STEEL TOPS
WARNINGS
• Never operate the hotplates under no load (without
recipients).
• Avoid whenever possible spillage of liquids on the
hotplates when still warm.
• The hob is designed exclusively for domestic use to
cook food. Any other use is prohibited. The
manufacturer declines all liability for inappropriate use
or incorrect settings of controls.
• Avoid exposure of the hob to atmospheric agents.
• Any repairs or operations must be performed
exclusively by an authorised technician.
• Prolonged use of the hob may alter the colour of the
hotplates due to the high temperatures reached.
• Stainless steel parts must be cleaned with a sponge
soaked in soapy water or other suitable non-abrasive
products.
• Dry with a soft cloth.
• Acid substances such as lemon juice, tomato, vinegar or
similar, make the surface opaque if not removed for a
long time.
ENAMELLED TOPS
• Enamelled parts must be cleaned with a sponge soaked
in soapy water or other suitable non-abrasive products.
• Dry with a soft cloth.
• Acid substances such as lemon juice, tomato, vinegar or
similar, make the surface opaque if not removed for a
long time.
5019 619 01059
To get full satisfaction from the hob, please read these instructions carefully and keep them for future consultation.
TROUBLESHOOTING GUIDE
The hob does not work:
- Check for the presence of mains electrical power.
- Set the knob to
ensure that the fault has been remedied.
“0”
and switch on the hob again to
The hob does not turn off:
- disconnect the hob immediately by disconnecting the
power cable from the socket.
ACCESSORIES:
• The glass cover can be ordered via the After Sales
Service, with the code: AMC 966 NB (New Black) AMC
966 MR (Mirror)
INSTALLATION
Recommendations
Important: Before any installation or maintenance
operation, disconnect the hob from the mains power
supply.
• Electrical connections must be made before connecting
the appliance to the electricity supply.
• Installation must be performed by a qualified technician
according to the manufacturer's instructions and current
local regulations.
• After unpacking the hob, check that there has been no
damage during transport.
nearest dealer or Authorised After Sales Service.
Preparation of fitted cabinet
• Perform all required cuts on the work top before
inserting the appliance. Carefully remove all chips or
residue which could impair efficient operation of the
appliance.
• The hob must be recessed in a work top with a
thickness of min. 30 and max. 50 mm.
• Insert a separator panel at a minimum distance of
20 mm from the bottom of the hob, so that it is not
accessible to the user.
• If the hob is to be fitted above an oven, the latter must
be produced by the same manufacturer and equipped
with a cooling system.
• Never place other materials between the hob and oven
(e.g. cross-members, insulation, etc.).
• If the hob is to be installed next to a column unit, leave a
distance of at least 100 mm from the edge hob.
• Make an opening in the worktop, observing the
dimensions specified.
• Fit the seal supplied onto the hob (if not already
present), after carefully cleaning the application surface.
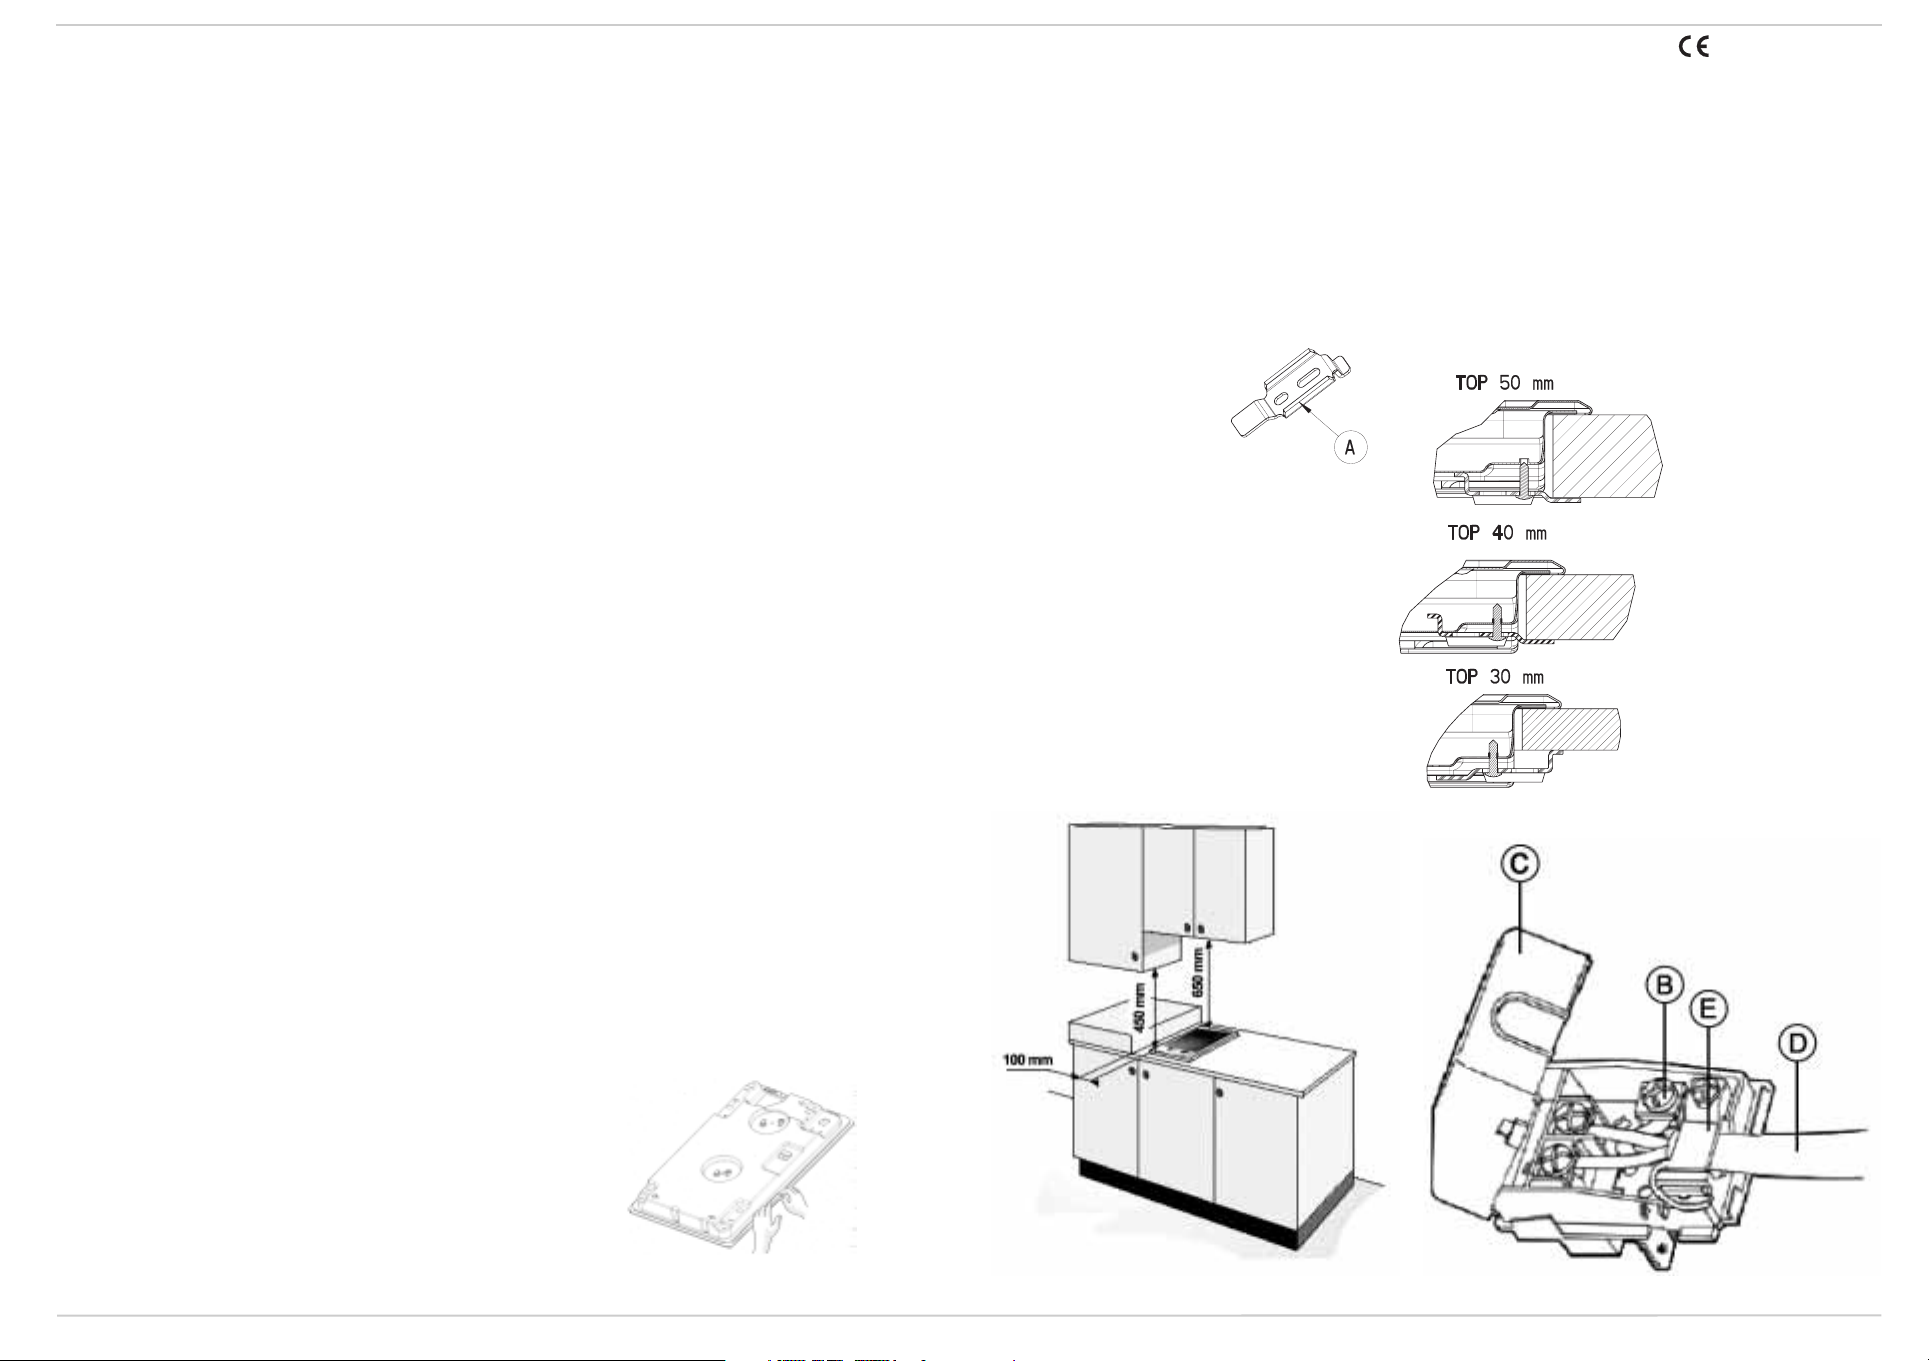
ASSEMBLY:
After having cleaned the perimeter surface, apply the
supplied gasket to the hob as shown in the figure.
If in doubt, contact the
AFTER-SALES SERVICE
Before contacting After-Sales Service:
• See if you can solve the problem yourself with the help
of the suggestions given in chapter “Troubleshooting
Guide”.
If after the above checks the fault persists, contact the
nearest After-sales Service.
Please give:
• a brief description of the fault;
• the type and exact model of the hob;
• the service number (i.e., the number that follows the
word SERVICE on the rating plate, located under the
hob). The service number is also indicated on the
warranty booklet;
• your full address;
• your telephone number and area code.
If any repairs are required, please contact an
After-sales Service
will be used and repairs carried out correctly).
Failure to comply with these instructions may
compromise the safety and quality of the product.
Important:
protection film applied.
Ensure that the opening made in the worktop to house the
hob corresponds to the dimensional drawing specifications,
within the relative tolerances.
Never force the hob into the worktop.
•
1.
NOTE:
permit its upward extraction.
2.
3.
before installing the hob, remove any plastic
For installation
supplied.
Position the hob in the work top opening made respecting
the dimension indicated on first page.
The power supply cable must be long enough to
To secure the hob, use the brackets
Fit the brackets into the relevant bores shown by the
arrow and fasten them by means of their screws in
accordance with the tickness of the work top.
(see fig. 1).
(to guarantee that original spare parts
, use the relative brackets and screws
authorised
(A)
provided with it.
Electrical connection
• Regulations require that the appliance is earthed.
• The electrical connection must be made by a qualified
technician according to the manufacturer's instructions
and current local regulations.
• The installer is responsible for the correct electrical
connection of the appliance and the observance of the
relative safety standards.
• To comply with directives governing safety, during
installation use a single-pole switch with a minimum gap
between contacts of 3 mm.
• Do not use multiple plug adapters or extension leads.
• After installation, electrical parts must not be accessible.
Connection to the electrical mains
Note:
the yellow/green earthing wire
connected to the screw. If the power cable is not yet
connected:
• strip approx. 70 mm of sheath from the power supply
cable
• strip approx. 10 mm of sheath from the wires
• Open the terminal board
by means of a suitable tool.
• Insert the power cable
the wires to the terminal board.
• Close the terminal board cover.
• After the electrical connection, insert the hob from the
above and secure on the fixing brackets as shown in
figure 1).
(D)
(B)
must be
(C)
by pressing the side tabs
in clamp
(E)
and connect
Declaration of conformity
• This cooktop is suitable for contact with foodstuffs and
complies with EEC (CE) Regulation n. 1935/2004.
• This cooking hob has been designed to be used only for
cooking Any other use (such as heating a room) is
improper and dangerous
• This cooking hob has been designed, constructed and
marketed in compliance with:
- safety objectives of the “Low Voltage” Directive
2006/95/CE (which replaces 73/23/CEE and
subsequent amendments);
- protection requirements of EEC Directive “EMC”
89/336;
- requirements of EEC Directive 93/68.
Fig. 1
Fig. 2
Fig. 3
 Loading...