

Whirlpool GVW930RVS/P01, GVW920RVS/P01, GVW920ONY/P01, GVW935ONY/P01, GVW965ONY/P01 User Manual
...
INSTRUCTIONS FOR USE
BEFORE USING THE DISHWASHER/CONNECTIONS
ELECTRICAL CONNECTION
PRECAUTIONS AND GENERAL
RECOMMENDATIONS
HOW TO FILL THE SALT CONTAINER
HOW TO FILL THE RINSE AID DISPENSER
HOW TO FILL THE DETERGENT DISPENSER
CARE AND MAINTENANCE
9

BEFORE USING THE DISHWASHER/
CONNECTIONS
1. Removing the packaging and controls:
After unpacking, make sure that the dishwasher
is undamaged and that the door closes correctly.
If in doubt, contact a qualified technician or your
local retailer.
• Keep the packaging materials (plastic bags,
polystyrene parts, etc.) out of reach of children,
as they are potentially dangerous.
• This dishwasher has been factory tested to ensure
it functions correctly.
Such testing may leave slight water marks that will
disappear with the first wash.
2. Water and electrical connections:
All water and electrical connections must be
carried out by a qualified technician in compliance
with the manufacturer's instructions (refer to the
enclosed installation booklet) and current local
safety regulations.
The appliance must only be used in the household
for the prescribed uses.
Do not use the dishwasher if it has been damaged
in transit. Consult your local retailer or our
After-Sales Service.
(Refer to the separate installation
instructions booklet)
3. Water inlet and drain:
• Observe any special regulations issued by your local
Water Board.
Water supply pressure: 0.3 - 10 bar.
• Make sure the inlet and drain hoses are kink-free
and are not crushed.
• If the hose length is not sufficient, please contact
your local dealer or our After-Sales Service.
• The inlet hose must be securely clamped to the
water tap to prevent leaks.
• The inlet water temperature varies according to
the model installed. Inlet hose marked “25°C Max”:
maximum temperature 25°C.
All other models: maximum temperature 60°C.
• When installing the appliance, make sure the drain
water discharges correctly (if necessary, remove
the wire gauze from the sink siphon).
• Fix the drain hose to the spigot with a clamp to
prevent it from coming off during operation.
For appliances with water-stop system only: If the
water connections are made correctly, the waterstop system safeguards your home against damage
caused by flooding.
4. Electrical connection:
• Closely adhere to local Electricity Board
regulations.
• Voltage information is shown on the rating plate
mounted inside the door on the right hand side.
• The appliance must be earthed as prescribed by law.
• Do not use extension leads or multiple adapters.
• Before carrying out maintenance, disconnect the
mains plug.
• If necessary, the power cable may be replaced with
one the same obtained from our After-Sales
Service. The power cable must only be replaced by
a qualified technician.
Warning for models provided with LCD
display:
The mains plug must be positioned in an easily
accessible place.
• For Austria: if the apparatus is series connected to
a fault current switch, this must be sensitive to the
pulsating current.
10
ELECTRICAL CONNECTION
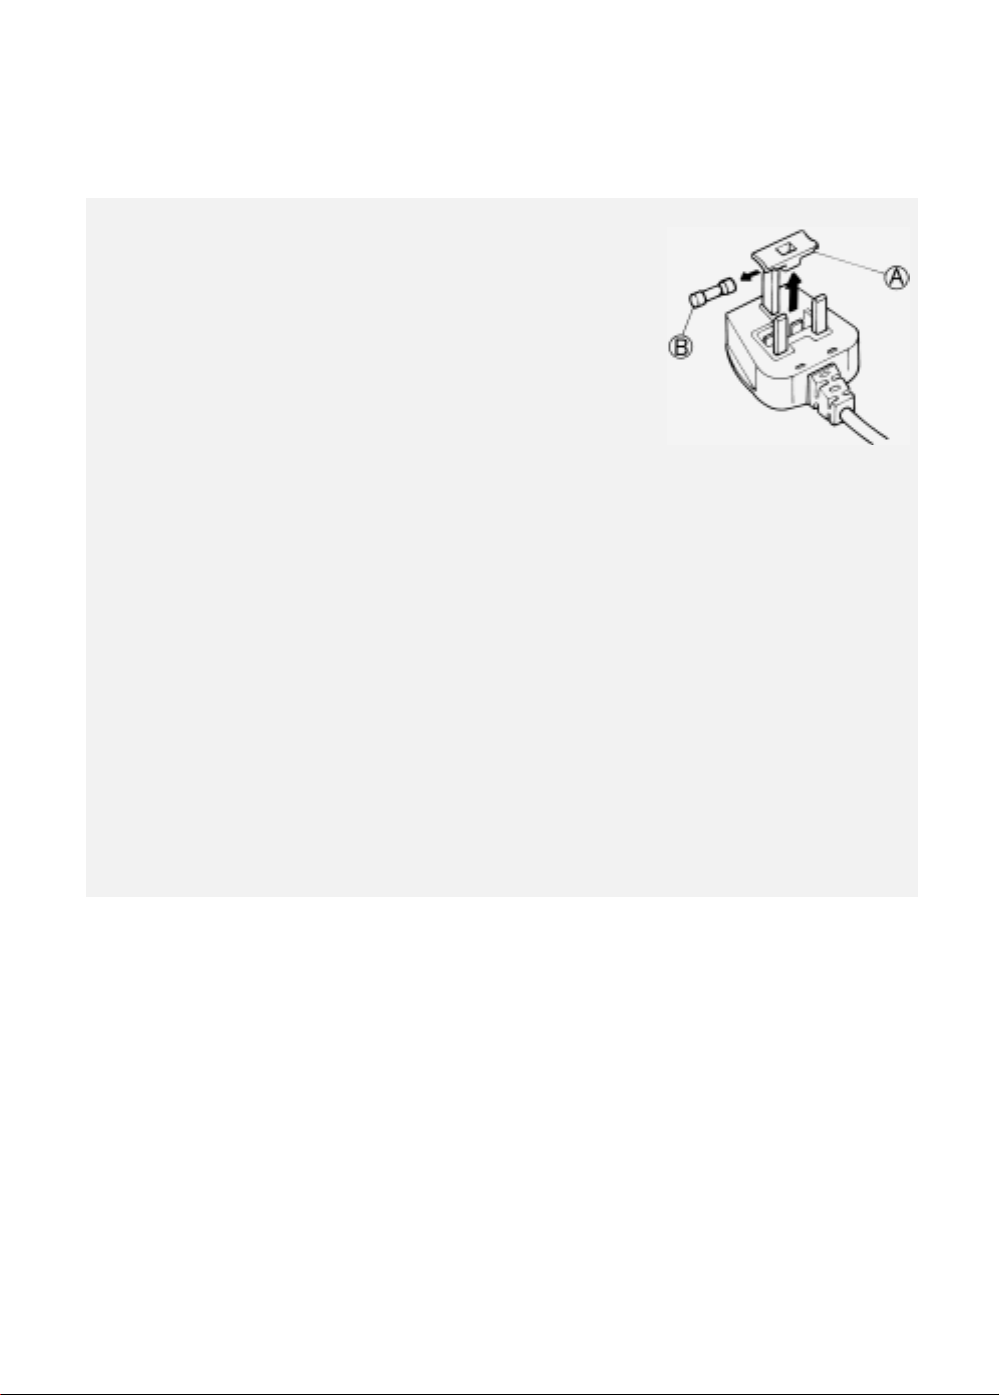
1) For Great Britain only
Warning - this appliance
must be earthed
Fuse replacement
If the mains lead of this appliance
is fitted with a
BS 1363A 13amp fused plug, to
change a fuse in this type of plug
use an A.S.T.A. approved fuse to
BS 1362 type and proceed as
follows:
Remove the fuse cover (A) and
1.
fuse (B).
Fit replacement 13A fuse into fuse
2.
cover.
Refit both into plug.
3.
Important:
The fuse cover must be refitted
when changing a fuse and if the
fuse cover is lost the plug must
not be used until a correct
replacement is fitted.
Correct replacement are
identified by the colour insert or
the colour embossed in words on
the base of the plug.
Replacement fuse covers are
available from your local electrical
store.
2) For the Republic of
Ireland only
The information given in respect of
Great Britain will frequently apply,
but a third type of plug and socket is
also used, the 2-pin, side earth type.
3) Socket outlet / plug
(valid for both countries)
If the fitted plug is not suitable for
your socket outlet, Please contact
Whirlpool Service for further
instruction. Please do not attempt to
change plug yourself. This procedure
needs to be carried out by a qualified
Whirlpool technician in compliance
with the manufactures instructions
and current standard safety
regulations.
11
 Loading...