

Page 1
DISHWASHER
Model GU970
Use & Care Guide
For questions about features, operation/performance
parts, accessories or service, call:
or visit our website at...
www.whirlpool.com
Table of Contents ........................................... 2
1-800-253-1301
.
8275178
Page 2
TABLE OF CONTENTS
DISHWASHER SAFETY .................................................................3
Before Using Your Dishwasher....................................................4
PARTS AND FEATURES................................................................5
START-UP GUIDE ..........................................................................6
Using Your New Dishwasher .......................................................6
Stopping Your Dishwasher ..........................................................6
DISHWASHER LOADING.............................................................. 6
Loading Suggestions ...................................................................6
Loading Top Rack........................................................................7
Loading Bottom Rack ..................................................................7
Loading Silverware Basket ..........................................................8
DISHWASHER USE.......................................................................9
Detergent Dispenser ....................................................................9
Rinse Aid Dispenser...................................................................10
Dishwasher Efficiency Tips ........................................................11
Cycle Selection Charts...............................................................11
Canceling a Cycle ......................................................................12
Changing a Cycle or Setting ......................................................12
Adding Items During a Cycle .....................................................12
Option Selections.......................................................................13
Cycle Status Indicators..............................................................13
Drying System............................................................................14
Overfill Protection Float..............................................................14
WASHING SPECIAL ITEMS.........................................................14
DISHWASHER CARE ...................................................................15
Cleaning......................................................................................15
Drain Air Gap..............................................................................15
Storing........................................................................................15
TROUBLESHOOTING ..................................................................16
FILTER MODULE..........................................................................18
ASSISTANCE OR SERVICE.........................................................18
WARRANTY ..................................................................................20
2
Page 3
DISHWASHER SAFETY
Your safety and the safety of others are very important.
We have provided many important safety messages in this manual and on your appliance. Always read and obey all
safety messages.
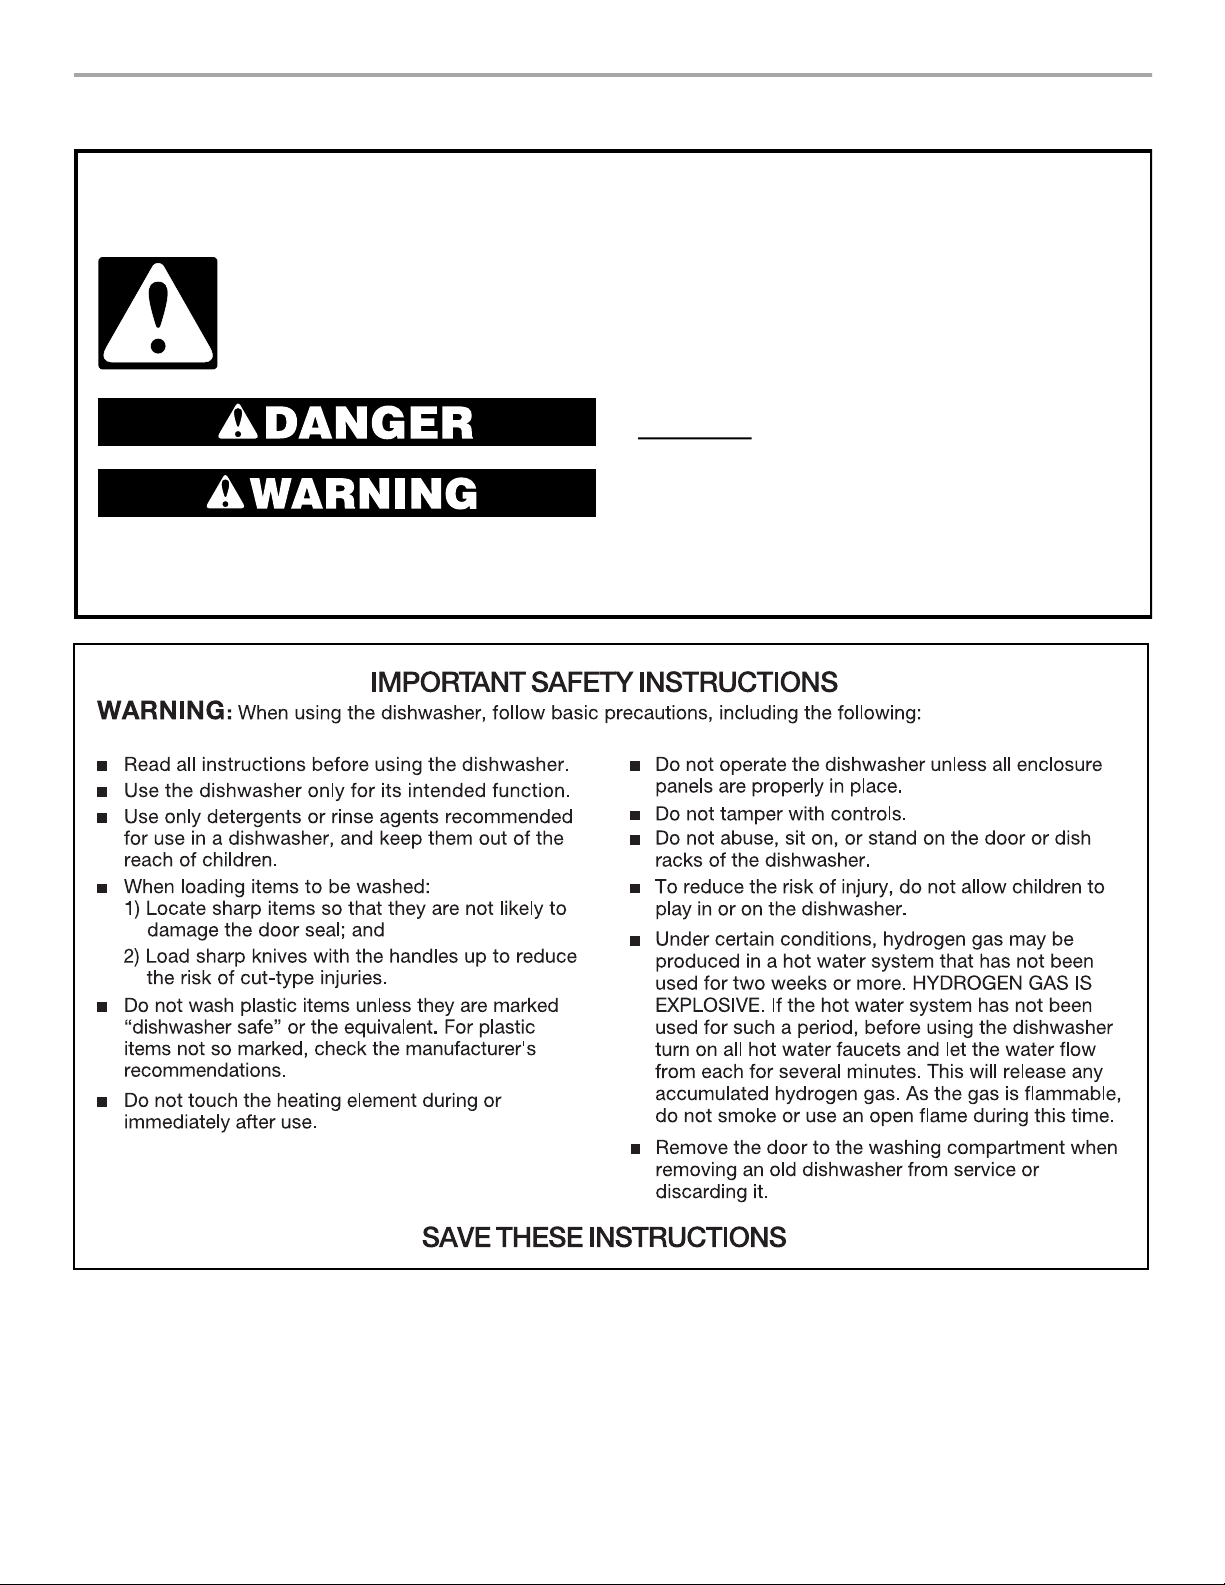
This is the safety alert symbol.
This symbol alerts you to potential hazards that can kill or hurt you and others.
All safety messages will follow the safety alert symbol and either the word “DANGER” or
“WARNING.” These words mean:
You can be killed or seriously injured if you don't
immediately follow instructions.
can be killed or seriously injured if you don't
You
follow instructions.
All safety messages will tell you what the potential hazard is, tell you how to reduce the chance of injury, and tell you
what can
happen if the instructions are not followed.
3
Page 4

Before Using Your Dishwasher
Tip Over Hazard
Do not use dishwasher until completely installed.
Do not push down on open door.
Doing so can result in serious injury or cuts.
Electrical Shock Hazard
Electrically ground dishwasher.
Connect ground wire to green ground connector
in terminal box.
Do not use an extension cord.
Failure to follow these instructions can result in
death, fire, or electrical shock.
■
Install where dishwasher is protected from the elements.
Protect against freezing to avoid possible rupture of fill valve.
Such ruptures are not covered by the warranty. See “Storing”
in the “Dishwasher Care” section for winter storage
information.
■
Install and level dishwasher on a floor that will hold the
weight, and in an area suitable for its size and use.
■
Remove all shipping plugs from hoses and connectors (such
as the cap on the drain outlet) before installing. See
Installation Instructions for complete information.
4
Page 5
PARTS AND FEATURES
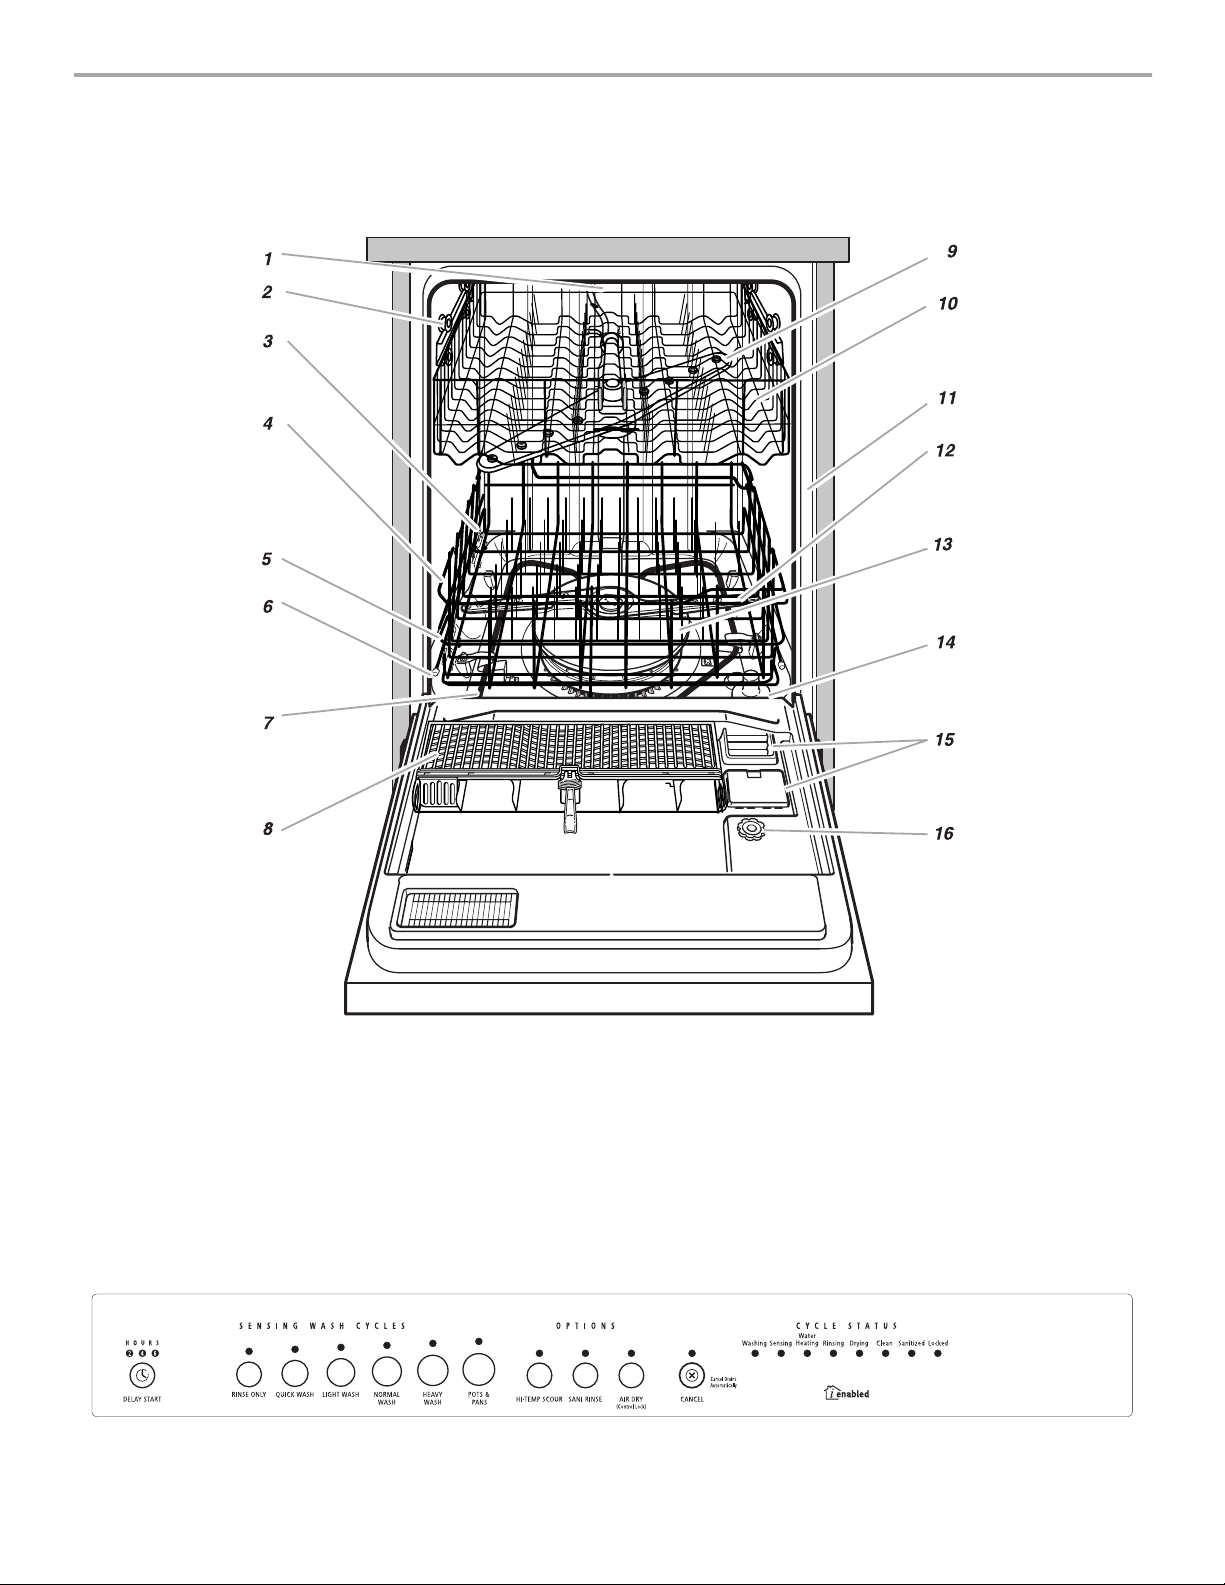
Upper level wash
1.
Adjustable top rack
2.
Fold-down tines
3.
Water inlet opening [in tub wall]
4.
Bottom rack
5.
Control Panel
Rack bumper
6.
Heating element
7.
ANYWARE™ silverware basket
8.
Top spray arm
9.
Extra-capacity fold-down shelves
10.
Model and serial number label
11.
Lower spray arm
12.
POWER CLEAN™ filter module
13.
Overfill protection float
14.
Detergent dispenser
15.
Rinse aid dispenser
16.
5
Page 6
START-UP GUIDE
Before using your dishwasher, remove all packaging materials.
Read this entire Use and Care Guide. You will find important
safety information and useful operating tips.
Using Your New Dishwasher
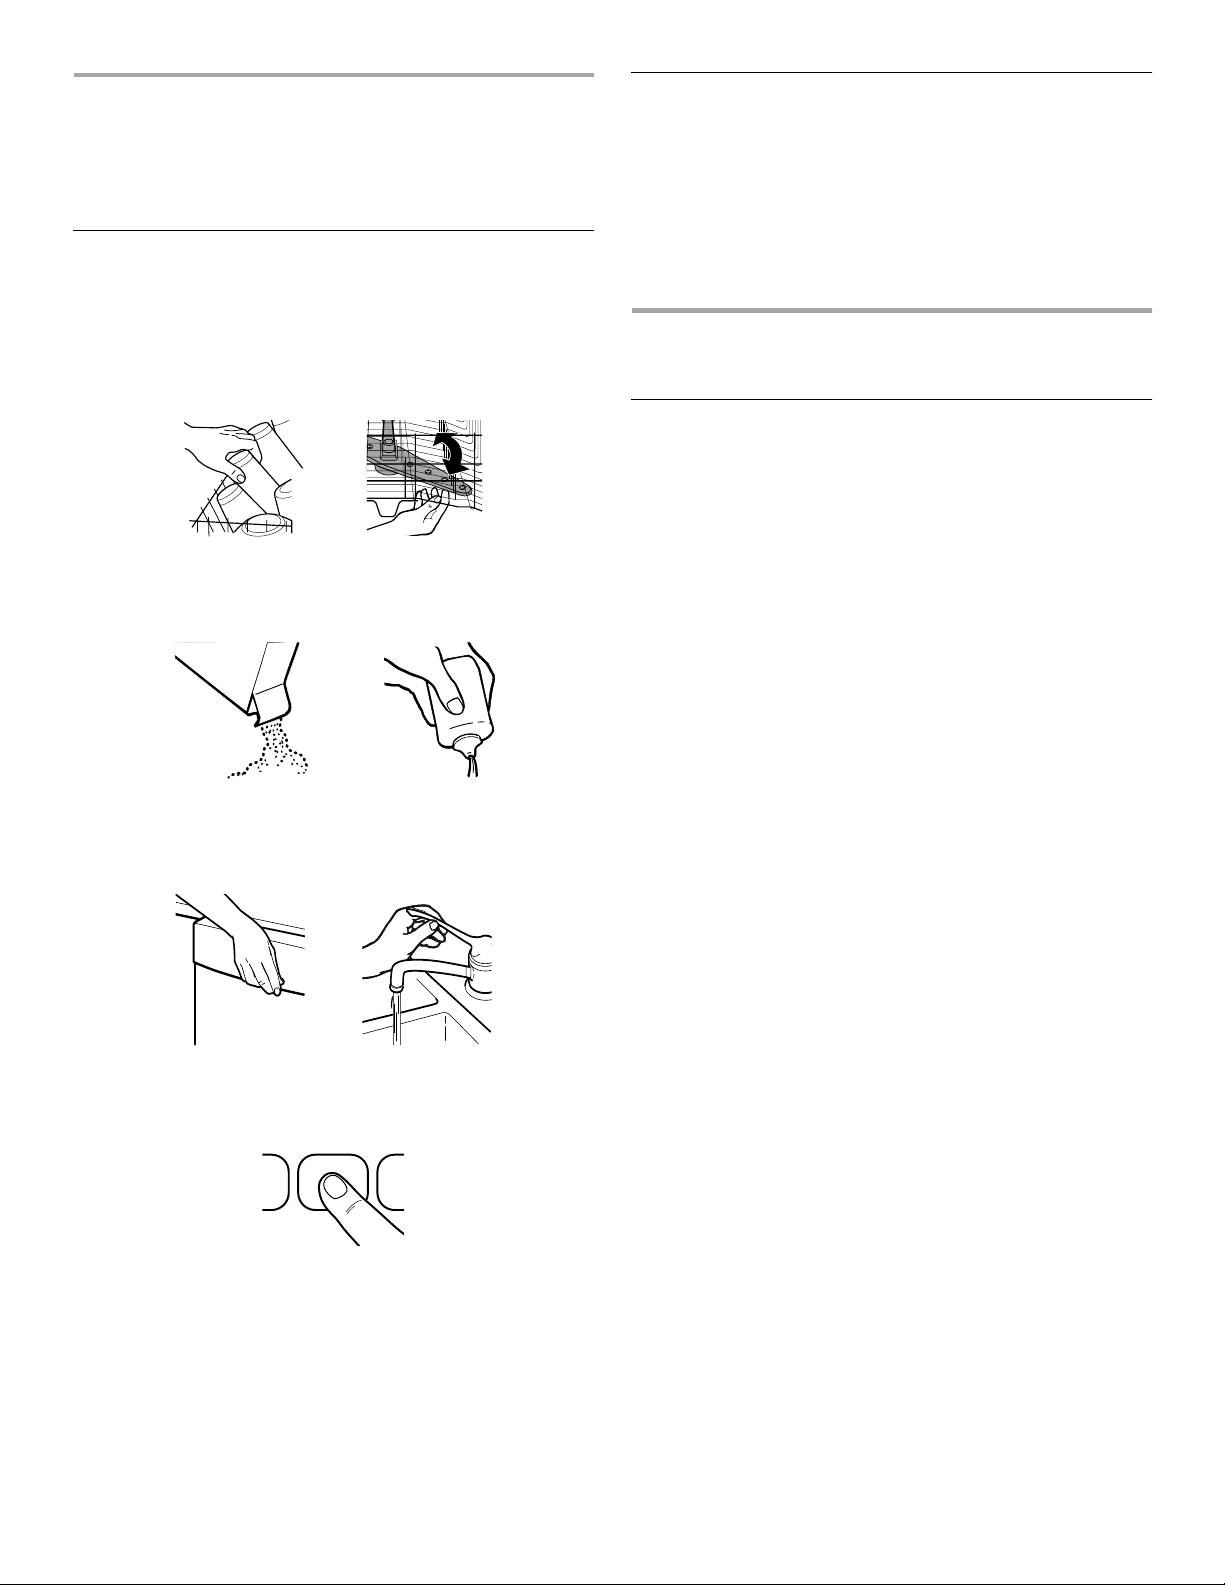
Scrape large food soil and hard items (toothpicks or bones)
1.
from dishes.
Properly load the dishwasher. (See “Dishwasher Loading.”)
2.
Make sure nothing prevents the spray arm(s) from spinning
freely.
Add detergent and check the rinse aid dispenser. Add rinse
3.
aid if needed. (See “Dishwasher Use.”)
Push door firmly closed. The door latches automatically. Run
4.
hot water at the sink nearest your dishwasher until the water
is hot. (See “Dishwasher Efficiency Tips.”) Turn off water.
Select the desired cycle and options. (See “Dishwasher
5.
Use.”)
Stopping Your Dishwasher
You can stop your dishwasher anytime during a cycle.
Open the door slightly.
1.
Wait for the spraying action to stop. Then open the door all
2.
the way, if needed.
Close the door to continue the cycle.
OR
Press CANCEL. A 2-minute drain starts.
DISHWASHER LOADING
Loading Suggestions
■
Remove leftover food, bones, toothpicks and other hard
items from the dishes. It is not necessary to rinse the dishes
before putting them into the dishwasher. The wash module
removes food particles from the water. The module contains a
chopping device which will reduce the size of food items.
NOTE:
enter the wash module, you might hear chopping, grinding,
crunching, or buzzing sounds. These sounds are normal
when hard items enter the module. Do not let metallic items
(such as pot handle screws) get into the wash module.
Damage can occur.
■
It is important for the water spray to reach all soiled surfaces.
■
Load dishes so they are not stacked or overlapping, if
possible. For best drying, water must be able to drain from all
surfaces.
■
Make sure pot lids and handles, pizza pans, cookie sheets,
etc., do not interfere with the spray arm rotation.
■
Run a rinse cycle to keep dishes moist if you do not plan to
wash them soon. Foods such as eggs, rice, pasta, spinach,
and cooked cereals may be hard to remove if they are left to
dry over a period of time.
Quiet operating tips
To avoid thumping/clattering noises during operation:
■
Make sure lightweight load items are secured in the racks.
■
Make sure pot lids and handles, pizza pans, cookie sheets,
etc., do not touch interior walls or interfere with the rotation of
the spray arm.
■
Load dishes so they do not touch one another.
NOTE:
dishwasher operation to prevent noise transfer through drains.
If hard items such as fruit seeds, nuts, and egg shells
For built-in models, keep sink drain plugs closed during
The dishwasher starts filling when you press a cycle. You can
select options as the machine is filling.
6
Page 7
Loading Top Rack
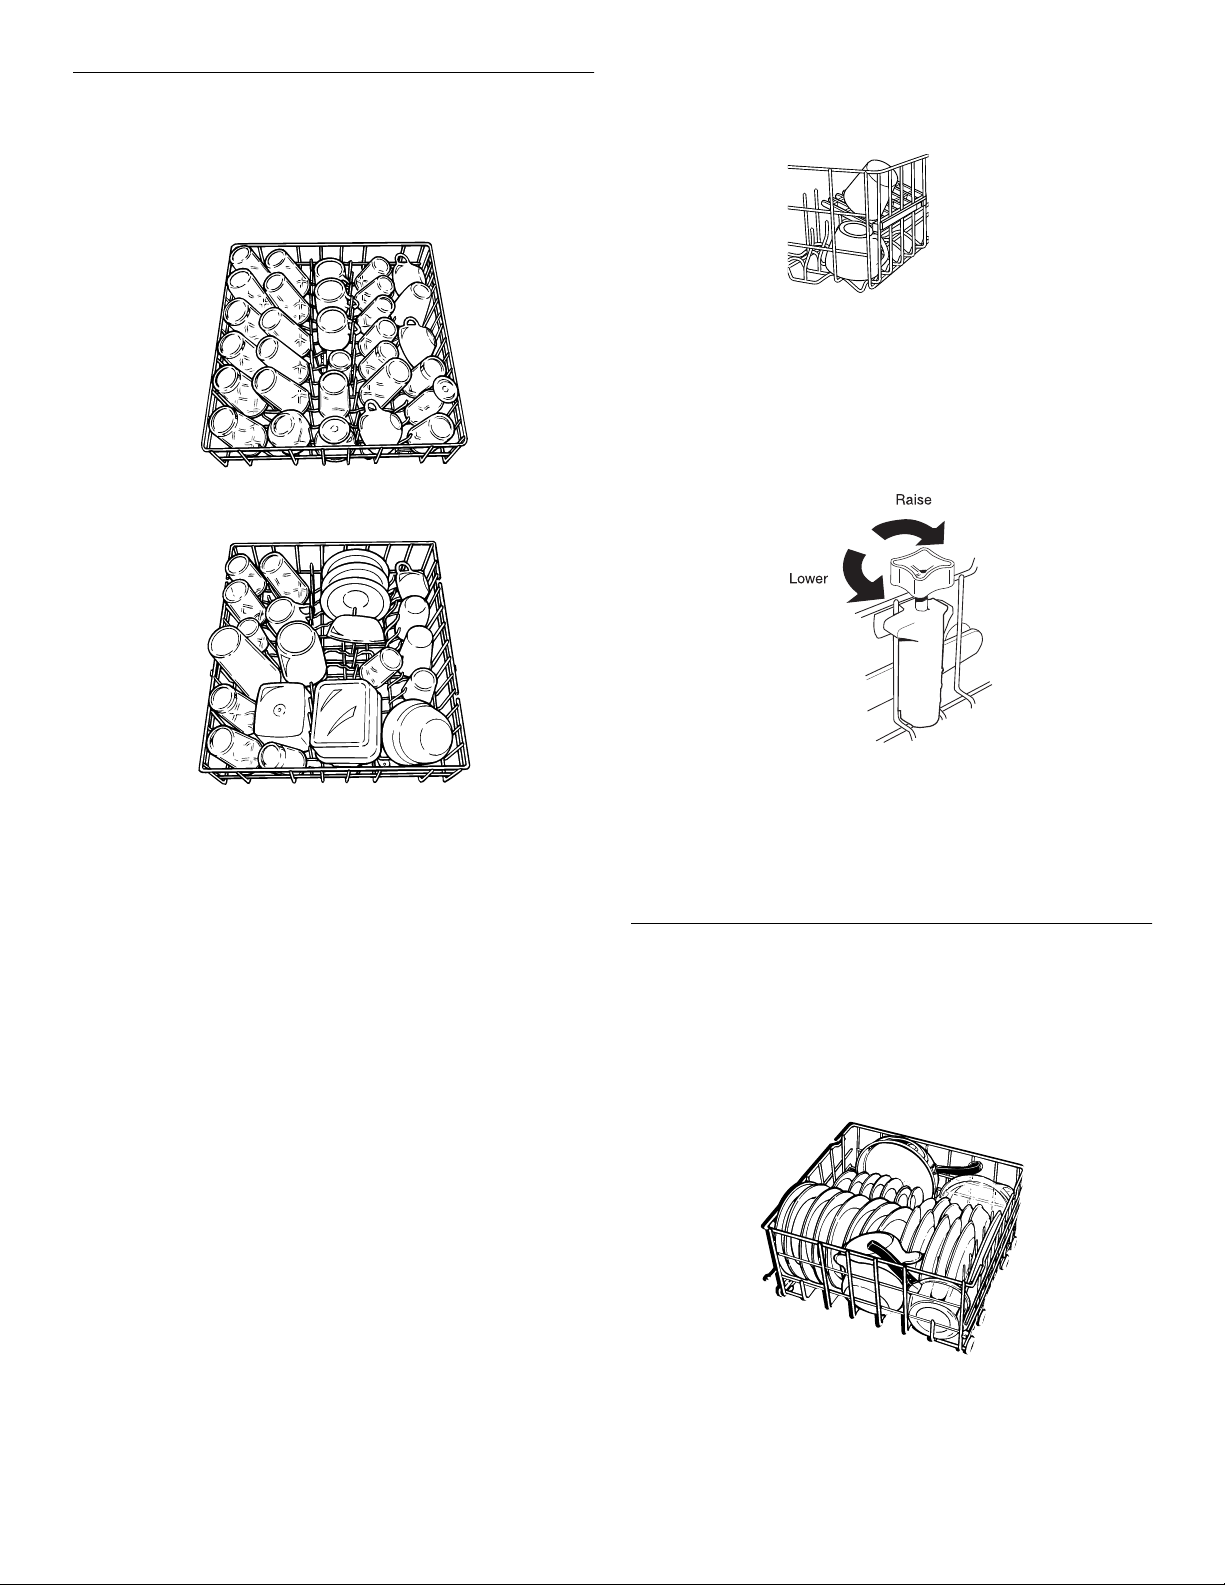
The top rack is designed for cups, glasses, and smaller items.
(See recommended loading patterns shown.)
The features on your dishwasher rack may vary from the
NOTE:
drawings shown.
Cup and glass load
Extra-capacity fold-down shelves
Fold down the extra shelf on the right side of the top rack to hold
additional cups, or long items such as utensils and spatulas.
Adjustable top rack
You can raise or lower the top rack to fit tall items in either the top
or bottom rack. One adjuster is located on each side of the top
rack.
To adjust the top rack
Hold the top rack with one hand near the adjuster.
1.
Mixed load
■
Place items so open ends face down for cleaning and
draining.
■
Load glasses in top rack only. The bottom rack is not
designed for glasses. Damage can occur.
■
Place cups and glasses in the rows between tines. Placing
them over the tines can lead to breakage.
■
China, crystal, and other delicate items must not touch each
other during dishwasher operation. Damage may occur.
■
Load plastic items in the top rack only. Only plastic items
marked “dishwasher safe” are recommended.
■
Load plastic items so the force of the spray does not move
them during the cycle.
■
To avoid chipping, do not let stemware touch other items.
■
Small bowls, pans, and other utensils can be placed in the
top rack. Load bowls in the center section for best stability.
With the other hand, turn the knob clockwise to raise a side
2.
of the rack.
Turn the knob counterclockwise to lower a side of the rack.
3.
Repeat the steps for the remaining adjuster as needed. The 2
adjusters can be turned separately or together to raise or lower
the top rack. The top rack does not have to be level.
Loading Bottom Rack
The bottom rack is designed for plates, pans, casseroles, and
utensils. Items with cooked-on or dried-on food should be loaded
with soiled surfaces facing inward to the spray. (See
recommended loading patterns shown.)
The features on your dishwasher rack may vary from the
NOTE:
drawings shown.
Mixed load
7
Page 8
■
Do not load glasses, cups, or plastic items in the bottom
rack. Load small items in the bottom rack only if they are
secured in place.
■
Load plates, soup bowls, etc., between tines and facing
inward to the spray.
■
Overlap the edges of plates for large loads.
■
Load soup, cereal, and serving bowls in the rack in a variety
of ways depending upon their size and shape. Load bowls
securely between the rows of tines. Do not nest bowls
because the spray will not reach all surfaces.
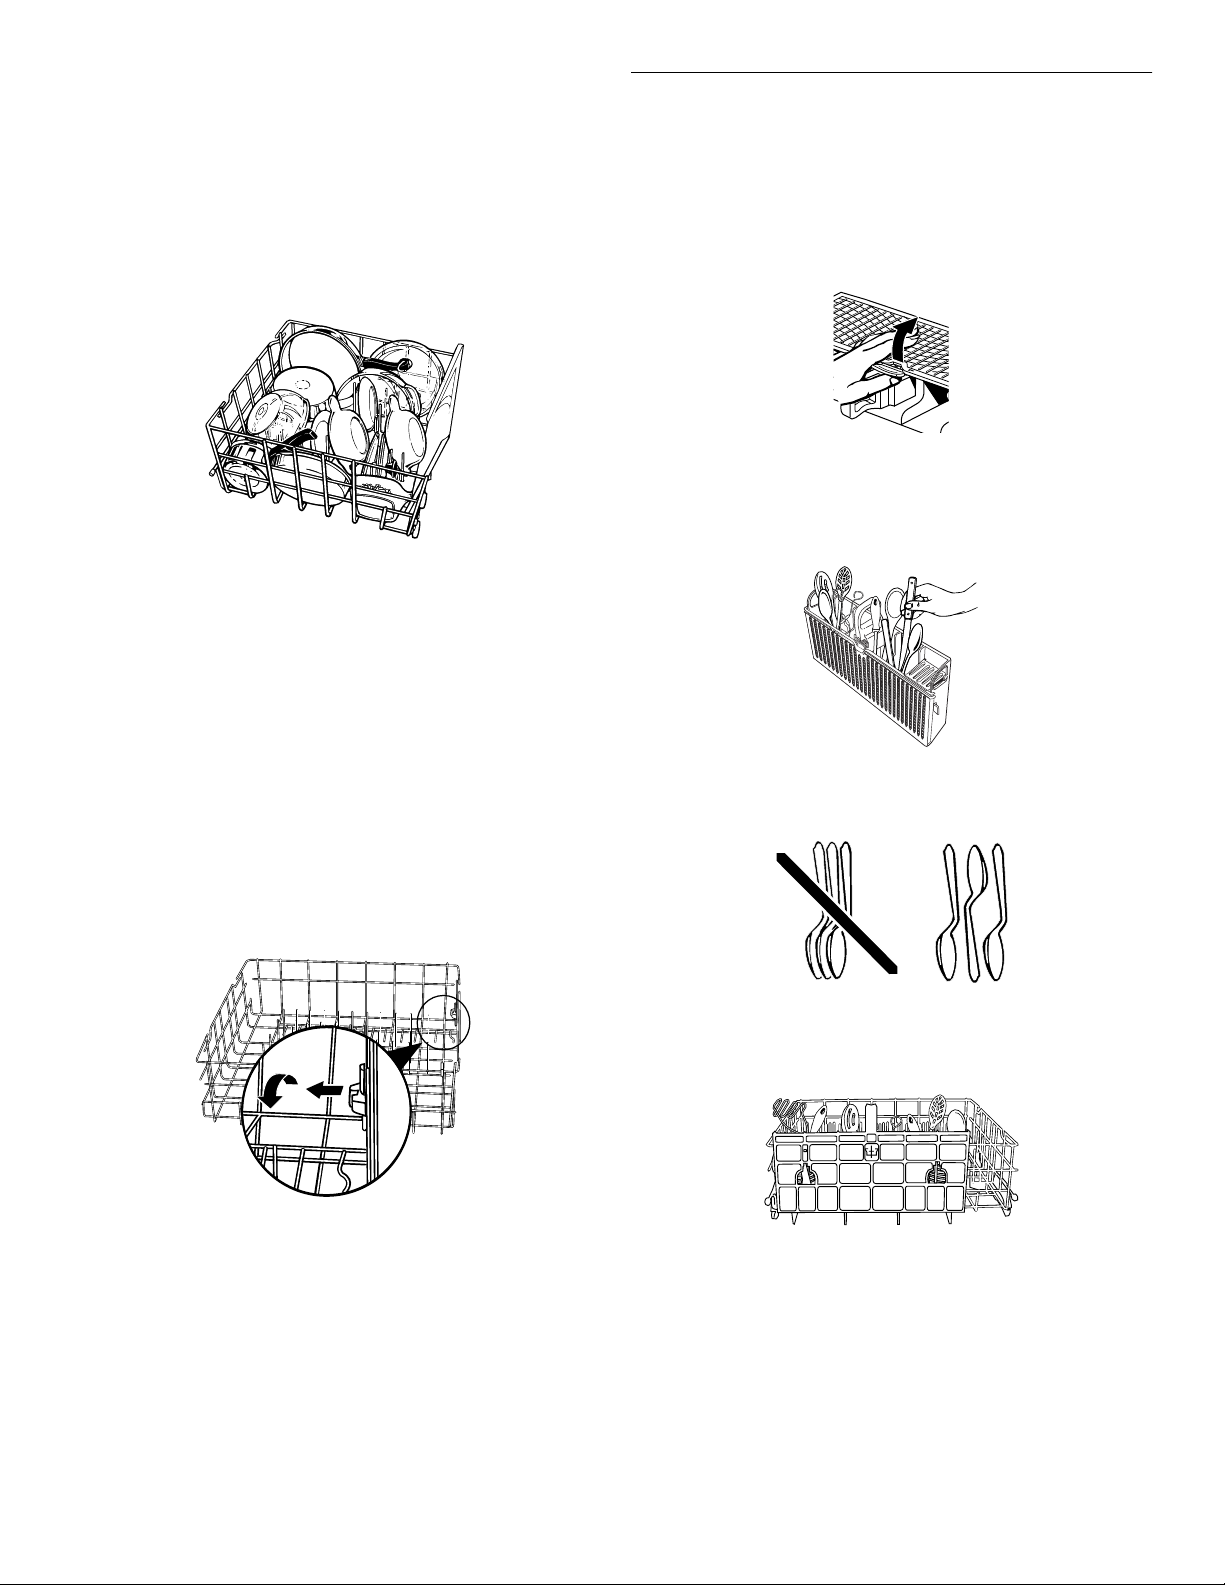
Utensil load
■
Load cookie sheets, cake pans, and other large items at the
sides and back. Loading such items in front can keep the
water spray from reaching the detergent dispenser and
silverware basket.
■
Secure heavily soiled cookware face down in the rack.
■
Make sure pot handles and other items do not stop rotation
of the spray arm(s). The spray arm(s) must move freely.
■
Do not load items between the bottom rack and the side of
the dishwasher tub because they might block the water inlet
opening.
NOTE:
If you have removed the bottom rack for unloading or
cleaning, replace it with the bumpers in front.
Loading Silverware Basket
Load the silverware basket while it is in the dishwasher or take
the basket out for loading on a counter or table.
Unload or remove the basket before unloading the racks
NOTE:
to avoid spilling water droplets on the silverware.
To open the silverware basket
Unlock the latch.
Be sure the cover is completely latched before pulling out
NOTE:
the bottom rack and before closing the dishwasher door.
■
Place small items such as baby bottle caps, jar lids, corncob
holders, etc., in the section(s) with hinged cover(s). Close the
cover to hold small items in place.
■
Mix items in each section of the basket with some pointing up
and some down to avoid nesting. Spray cannot reach nested
items.
Fold-down tines
You can fold down one row of tines at the back of the bottom
rack.
Grasp the tip of the tine that is in the tine holder.
1.
Gently pull the tine out of the tine holder.
2.
Lay the row of tines down in the rack to make room for larger
3.
dishes, bowls, pots, pans or roasters.
IMPORTANT:
Always load sharp items (knives, skewers, etc.)
pointing down.
■
The silverware basket can be hung on the door or on the
bottom rack (see illustration).
The silverware basket can also be placed inside the bottom
rack.
8
Page 9
To remove the basket from the door
Grasp the silverware basket by the handle. Slide it toward the
1.
top of the door.
DISHWASHER USE
Detergent Dispenser
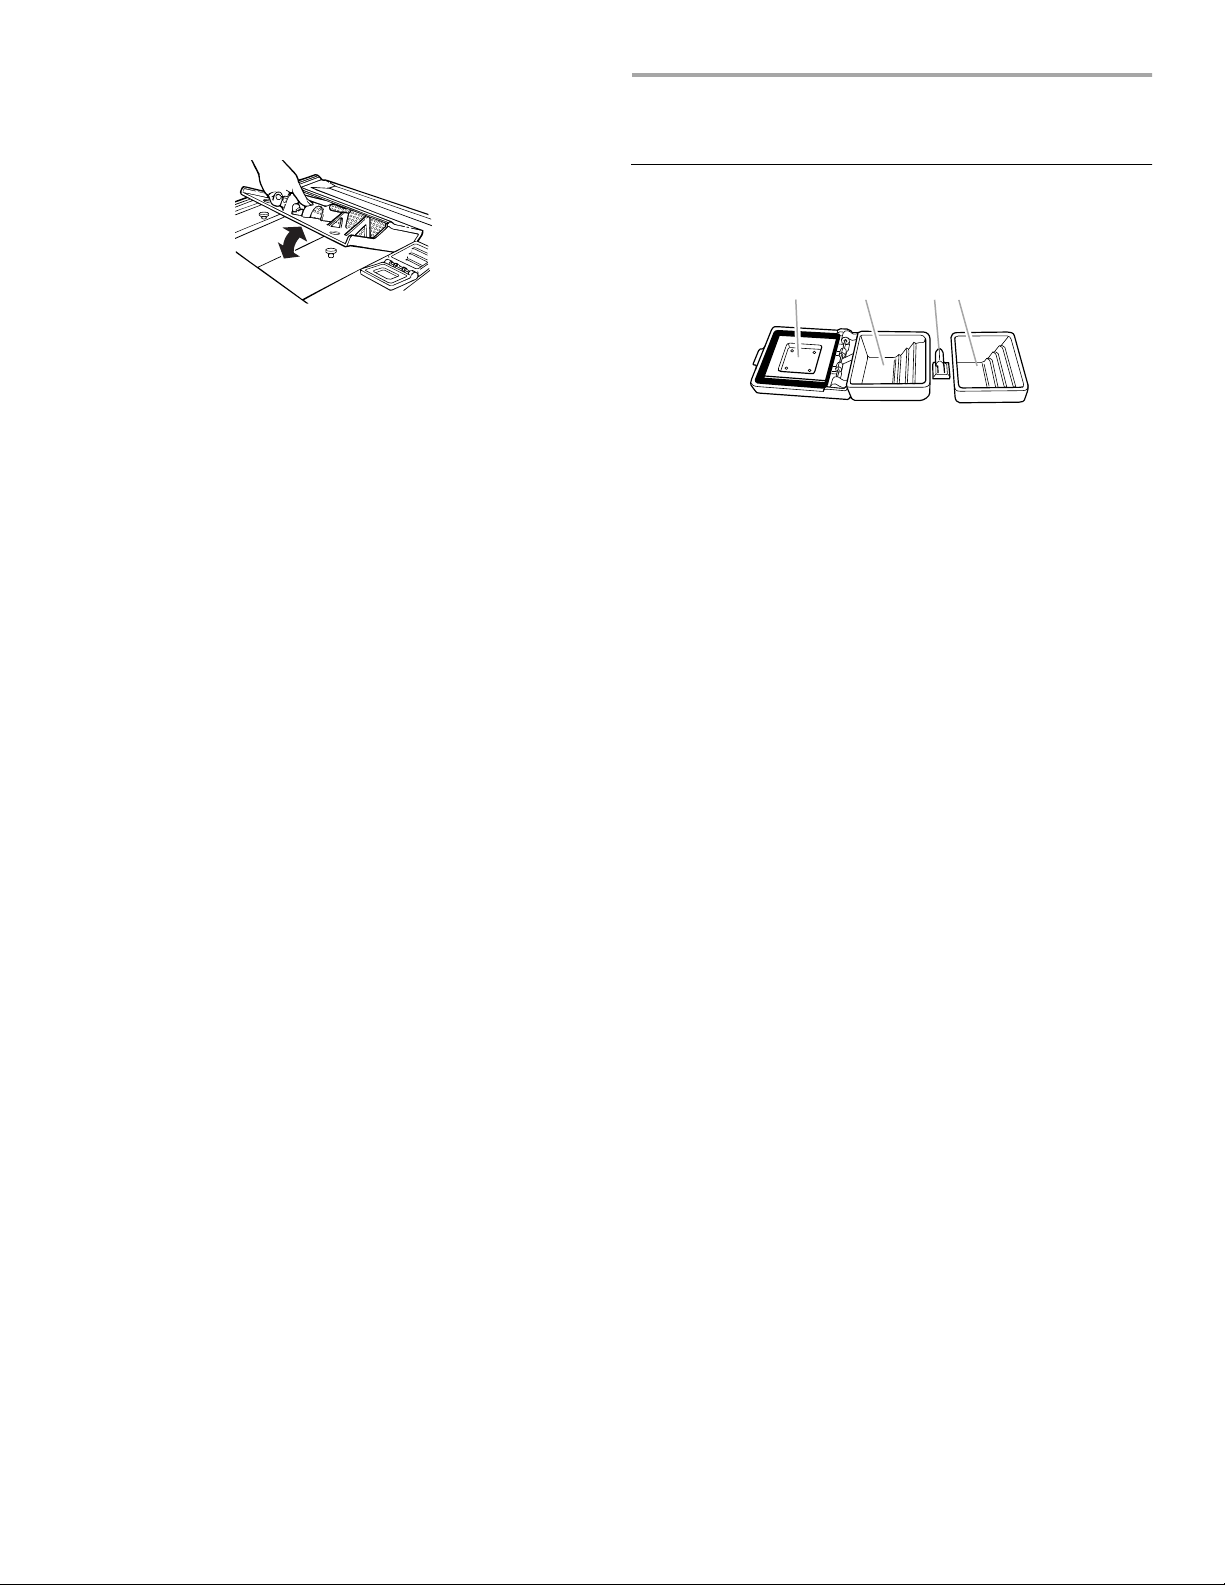
The detergent dispenser has 2 sections. The Pre-Wash section
empties detergent into the dishwasher when you close the door.
Lift the basket off the holding buttons.
2.
To replace the basket in the door
Set the silverware basket on the holding buttons.
1.
Slide the basket toward the bottom of the door until it locks
2.
into place.
NOTES:
■
Do not load silver or silver-plated silverware with stainless
steel. These metals can be damaged by contact with each
other during washing.
■
Some foods (such as salt, vinegar, milk products, fruit juices,
etc.) can pit or corrode silverware. Run a rinse cycle if you do
not have a full load to wash immediately.
1
The Main Wash section automatically empties detergent into the
dishwasher during the main wash. (See the “Cycle Selection
Charts.”)
■
Use automatic dishwashing detergent only. Other detergents
can produce excessive suds that can overflow out of the
dishwasher and reduce washing performance.
■
Add detergent just before starting cycle.
■
Store tightly closed detergent in a cool, dry place. Fresh
automatic dishwasher detergent results in better cleaning.
Do not use detergent with a rinse cycle.
NOTE:
23
1. Cover
2. Main Wash section
3. Cover latch
4. Pre-Wash section
4
Filling the dispenser
If the dispenser cover is closed, open the cover by pushing
1.
the Cover latch.
Fill the Main Wash section with detergent. See “How Much
2.
Detergent to Use.”
Close the Main Wash dispenser cover. Fill the Pre-Wash
3.
section if needed.
It is normal for the cover to open partially when dispensing
detergent.
Use both sections for cycles with 2 washes. Use only the
NOTE:
covered section for cycles with 1 wash. See the “Cycle Selection
Charts” for more details.
How much detergent to use
■
The amount of detergent to use depends on the hardness of
your water and the type of detergent. If you use too little,
dishes won’t be clean. If you use too much in soft water,
glassware will etch.
■
Water hardness can change over a period of time. Find out
your water’s hardness by asking your local water department,
water softener company, or county extension agent.
■
Different brands of dishwasher detergent have different
amounts of phosphorus for softening water. If you have hard
water and use a detergent with a phosphorous content of
less than 8.7%, you might need to use more detergent, or use
a detergent with a phosphorous content higher than 8.7%.
9
Page 10
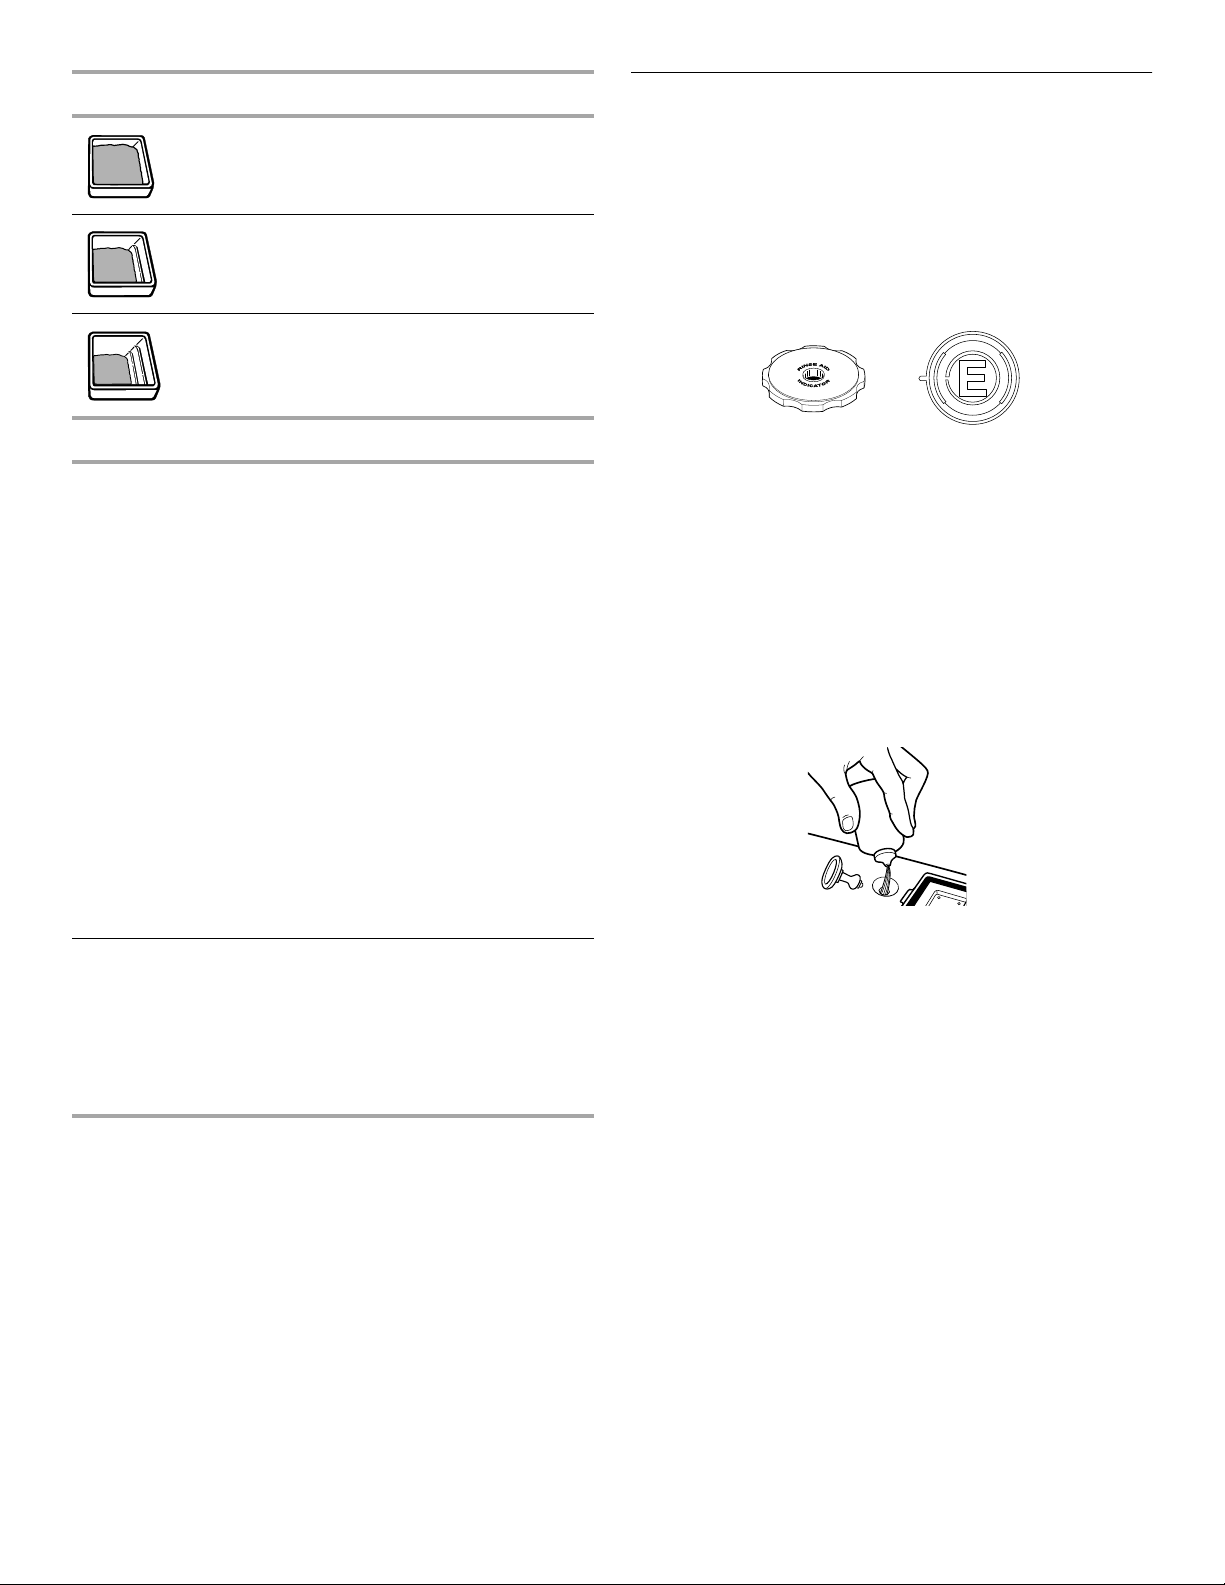
Where to fill
Top of 3rd step (3 tbs or 45 g)
Rinse Aid Dispenser
Rinse aids prevent water from forming droplets that can dry as
spots or streaks. They also improve drying by allowing water to
drain off of the dishes during the final rinse by releasing a small
amount of the rinse aid into the rinse water. Your dishwasher is
designed to use a liquid rinse aid. Do not use a solid or bar-type.
Top of 2nd step (2 tbs or 30 g)
Top of 1st step (1 tb or 15 g)
Water Hardness Amount of Detergent
Soft to Medium
Hard Water
0 to 6 grains per
gallon
For normally soiled loads
■
Fill the Main Wash section to the
top of the 2nd step (2 tbs or 30 g)
■
Fill the Pre-Wash section to the
top of the 2nd step (2 tbs or 30 g)
Add only 1 tb or 15 g of
NOTE:
detergent to both sections if dishes
are pre-rinsed or the water is very
soft (0 to 2 grains per gallon).
For baked on soil loads
■
Fill the Main Wash section to the
top of the 2nd step (2 tbs or 30 g)
■
Fill the Pre-Wash section to the
top of the 2nd step (2 tbs or 30 g)
For heavily soiled loads
■
Fill the Main Wash section to the
top of the 3rd step (3 tbs or 45 g)
■
Fill the Pre-Wash section to the
top of the 3rd step (3 tbs or 45 g)
Checking the dispenser
Check the center of the Fill Indicator cap. Clear means it needs
filling.
OR
Or you can remove the Fill Indicator cap. If an “E” is visible, the
dispenser is empty.
Filling the dispenser
The rinse aid dispenser holds 6 oz (175 mL) of rinse aid. Under
normal conditions, this will last for about three months. You do
not have to wait until the dispenser is empty to refill it. Try to keep
it full, but be careful not to overfill it.
Make sure the dishwasher door is completely open.
1.
Remove the Fill Indicator cap.
2.
Add rinse aid. Fill to the smallest opening in the lower part of
3.
the dispenser. Overfilling can cause the rinse aid to leak out,
and could cause oversudsing.
Medium to Hard
Water
7 to 12 grains per
gallon
For normally soiled and
heavily soiled loads
■
Fill the Main Wash section to the
top of the 3rd step (3 tbs or 45 g)
■
Fill the Pre-Wash section to the
top of the 2nd step (2 tbs or 30 g)
if needed
Fill amounts shown are for standard powdered detergent.
NOTE:
Amounts may vary if you use liquid or concentrated powdered
detergent. Follow instructions on the package when using liquid
dishwasher detergent or concentrated powdered detergent.
Clean up any spilled rinse aid with a damp cloth.
4.
Replace the Fill Indicator cap. Close tightly.
5.
10
Page 11
Dishwasher Efficiency Tips
Hot water dissolves and activates the dishwashing detergent.
Hot water also dissolves grease on dishes and helps glasses dry
spot-free. For best dishwashing results, water should be 120°F
(49°C) as it enters the dishwasher. Loads may not wash as well if
the water temperature is too low. Water that is too hot can make
some soils harder to remove and cause certain detergent
ingredients not to function. If your water heater is located far from
the dishwasher, it may be necessary to run the hot water at the
faucet closest to the dishwasher to minimize the amount of cold
water in the water line.
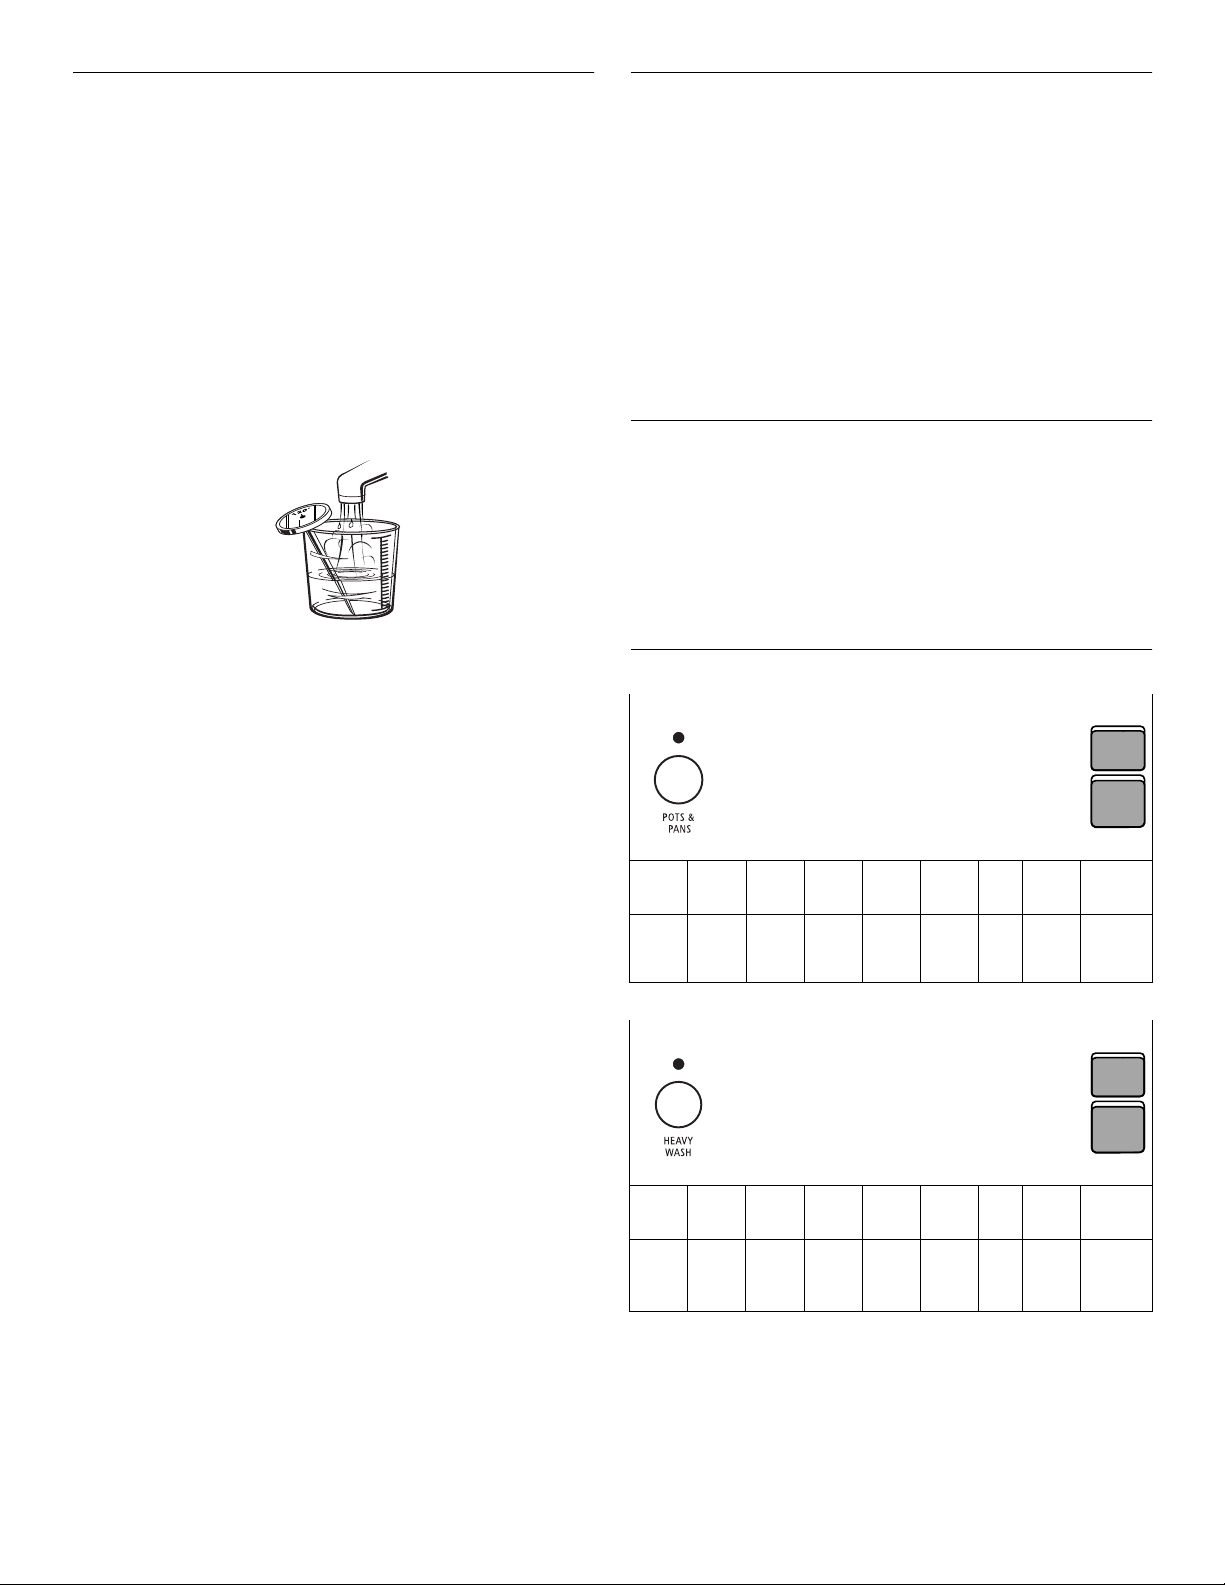
To check water temperature
Run hot water at the faucet closest to your dishwasher for at
1.
least 1 minute.
Place a candy or meat thermometer in a glass measuring
2.
cup.
Check the temperature on the thermometer as the water is
3.
running into the cup.
■
To save water, energy and time, do not rinse dishes before
putting them into the dishwasher.
■
Use a low energy, quick, or short cycle whenever possible.
These cycles use less hot water and energy than a normal
cycle.
■
Use a delay feature (on some models) to run your dishwasher
during off-peak hours. Local utilities recommend avoiding
heavy usage of energy at certain times of day.
■
During the summer, run your dishwasher at night. This
reduces daytime heat buildup in the kitchen.
■
Use the energy-saving dry option whenever possible. Allow
longer drying times (overnight) when using these options. Use
a rinse aid to improve drying.
■
Use cycles or options that add extra heat to the wash or rinse
portion of the cycle only when needed.
■
Run your dishwasher with full loads. Run a rinse cycle after
meals until the dishwasher is full.
■
If your home is equipped with a water softener, you may want
to avoid starting the dishwasher during the regeneration of
the softener, as this may contribute to poor wash
performance.
Cycle Selection Charts
Select the wash cycle and options desired. The dishwasher starts
filling once you press a cycle, unless you select a delay wash.
You can select an option as the machine is filling.
Your electronic dishwasher senses the soil level on your dishes.
Soil level determines the length of some cycles, the amount of
heat added to a wash or rinse, and the number of washes and
rinses in a cycle.
Cycle time depends upon the soil on the dishes, and water usage
may be higher for large amounts of soil. If dishes are lightly
soiled, cycle time will be as shown.
After a wash cycle, the dishwasher remembers the options used
and uses the same options in the next wash cycle unless new
options are selected or Cancel/Drain is selected.
A “●” shows what steps are in each cycle. Your model may have
some or all of the cycles shown.
Temperatures indicate where extra heat is added.
Water usage is shown in
Cycle time includes dry time. An asterisk ( * ) by the cycle time
indicates the cycle time might be longer depending on the
temperature of the water entering the dishwasher. The cooler the
water, the longer the cycle time. If the water is already hot
enough, the cycle time will be as shown.
Use this cycle for hard-toclean, heavily-soiled pots,
pans, casseroles, and
regular tableware.
Pre-
Rinse Main
Wash
135°F
(57°C)
●
Wash
140°F
(60°C)
● ●
Use this cycle for loads
with heavy food soil.
Pre-
Rinse Main
Wash
● ● ●
Wash
U.S.
Rinse
Rinse
gallons/liters.
†
†
Final
Rinse
140°F
(60°C)
● ●
Final
Rinse
140°F
(60°C)
● ●
Purge
Purge
Use both
detergent
dispenser
sections.
Dry Time
(min)
87*
Light
Soil
Use both
detergent
dispenser
sections.
Dry Time
(min)
72*
Light
Soil
Water
Usage
(gal/L)
8.6-10.8/
32.7-40.9
Water
Usage
(gal/L)
6.9-10.8/
26.1-40.9
11
Page 12
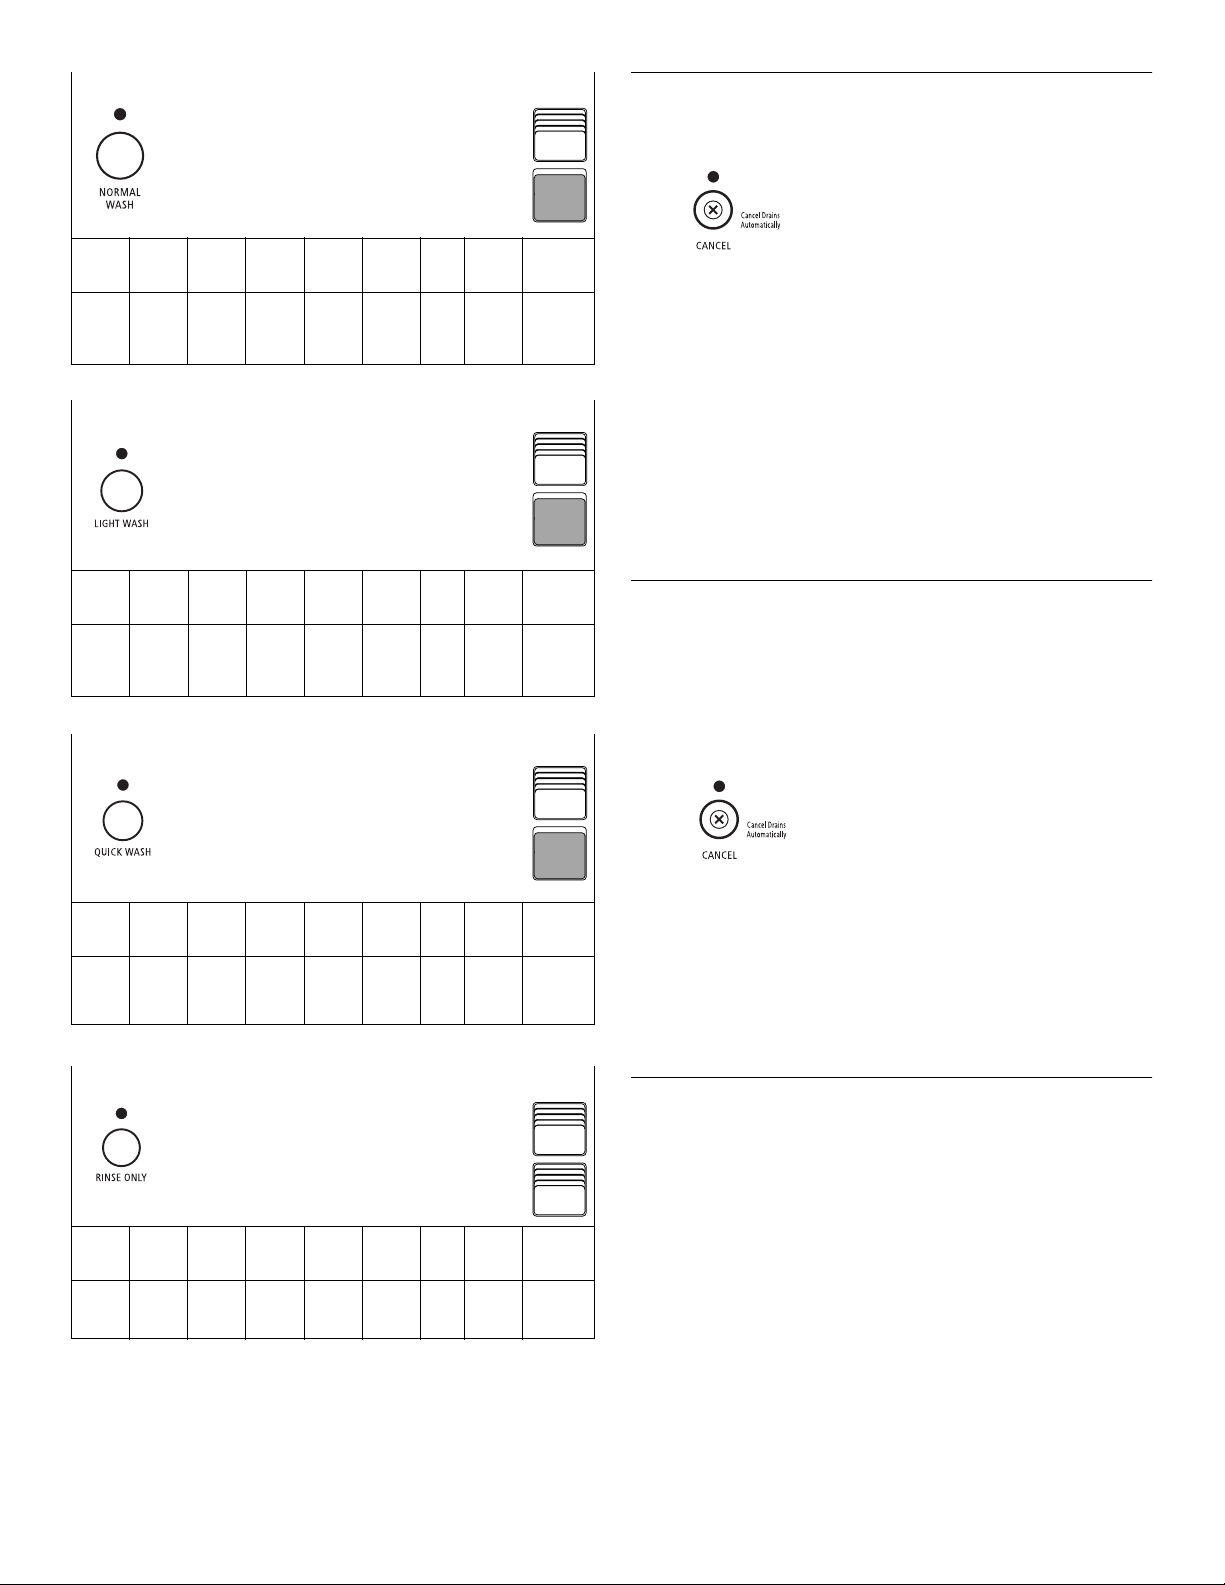
Use this cycle for loads
with normal amounts of
food soil. (The energyusage label is based on
this cycle.)
Use
covered
detergent
dispenser
section.
Canceling a Cycle
Anytime during a cycle, press
Pre-
Wash
Rinse Main
Wash
● ●
Rinse
Purge
†
Final
Rinse
140°F
(60°C)
● ●
Dry Time
(min)
61*
Light
Soil
Use this cycle for prerinsed or lightly soiled or
for china and crystal
loads. The cycle uses a
single wash and gentle
Use
covered
detergent
dispenser
section.
dry. The heating element
cycles on and off.
Pre-
Wash
Rinse Main
Wash
● ●
Rinse
Purge
†
Final
Rinse
130°F
(54°C)
● ●
Dry Time
(min)
58*
Light
Soil
Use this cycle for prerinsed or lightly soiled
loads which do not
require drying. No drying
options are available for
Use
covered
detergent
dispenser
section.
this cycle. The cycle uses
a single wash.
Pre-
Wash
Rinse Main
Wash
● ●
Rinse
Purge
†
Final
Rinse
140°F
(60°C)
●
Dry Time
(min)
26*
Light
Soil
Use this cycle for rinsing
dishes, glasses, and
silverware that will not be
washed right away.
Pre-
Rinse Main
Wash
†
A small amount of water runs through the pump to
Wash
Rinse
●
Purge
†
Final
Rinse
Do not use
detergent
with this
cycle.
Dry Time
(min)
10
Light
Soil
remove soil particles.
Water
Usage
(gal/L)
4.8-8.6/
17.4-32.7
Water
Usage
(gal/L)
4.8-8.6/
17.4-32.7
Water
Usage
(gal/L)
4.8-6.9/
18.2-26.1
Water
Usage
(gal/L)
2.2-4.3/
8.2-16.4
CANCEL glows. The dishwasher pauses for about 5 seconds and
starts a 2-minute drain (if needed). Let the dishwasher drain
completely. The light goes off when the dishwasher finishes the
drain.
To stop the drain
You can press CANCEL again to stop the drain immediately.
Remember to drain the dishwasher before starting a new cycle.
A small amount of water remains in the dishwasher. This
NOTE:
is normal.
To clear the indicators
Press CANCEL before starting the dishwasher to clear all options
and cycles.
Changing a Cycle or Setting
During the first minute of a cycle
Press a new cycle and/or options.
After the first minute of a cycle
Press
1.
CANCEL glows. The dishwasher pauses for 5 seconds and
starts a 2-minute drain (if needed). Let the dishwasher drain
completely.
Check the detergent dispensers. If the main wash cup has
2.
opened and the detergent washed away, refill the cups as
needed.
Close the door.
3.
Press a new cycle and/or options.
4.
Adding Items During a Cycle
You can add an item anytime before the main wash starts. Open
the door and check the detergent dispenser. If the main wash
section is still closed, you can add items.
To add items
Lift up the door latch to stop the cycle. Wait for the spraying
1.
action to stop before opening the door.
Open the door. If the main wash detergent dispenser is still
2.
closed, add the item.
Close the door, but do not latch it. Wait 30 seconds for the air
3.
in the dishwasher to warm up. This reduces the amount of
moisture escaping from the vent when restarting a cycle.
Close the door firmly until it latches. The dishwasher resumes
4.
the cycle after about a 5-second pause.
12
Page 13
Option Selections
You can customize your cycles by pressing an option. If you
change your mind, press the option again to turn the option off.
Select a different option if desired.
You can change an option anytime before the selected option
begins. For example, you can press an unheated drying option
any time before drying begins.
After a wash cycle, the dishwasher remembers the options used
and uses the same options in the next wash cycle, unless you
select new options or press CANCEL.
Hi-Temp Scour
Select this high-temperature option for improved cleaning of
heavily-soiled dishes. Selecting this option adds heat, water and
time to the wash cycle. Heating the water helps improve washing
results.
The Pots & Pans cycle, with the Hi-Temp Scour feature, is
recommended for baked-on soil.
NOTE:
Wash, Heavy Wash, and Pots & Pans.
SANI RINSE™ Option
Select this option to raise the water temperature in the final rinse
to approximately 155°F (68°C) for 10 minutes. The SANI RINSE™
option adds heat and time to the cycle. In the Normal Wash,
Heavy Wash, and Pots & Pans cycles, this high-temperature rinse
sanitizes your dishes and glassware in accordance with the NSF
Protocol P153 Sanitization and Cleaning Performance of
Household Spray-Type Dishwashers.
The Hi-Temp Scour feature is an option with Normal
Delay Start
Use Delay Start to run your dishwasher at a later time or during
off-peak hours. You can add items to the load anytime during the
delay countdown. After adding items, close the door firmly until it
latches. The delay countdown will not continue if the door is not
latched.
To delay the start
Close the door.
1.
Press DELAY START 1 time for a 2-hour delay, 2 times for a 4-
2.
hour delay, or 3 times for a 6-hour delay.
Select a wash cycle and option.
3.
The number glows above Delay Start. The dishwasher starts the
cycle in the selected number of hours. If you do not press a cycle
within 30 seconds, the Delay Start indicator turns off.
NOTES:
■
To cancel the delay and cycle, press CANCEL.
■
To cancel the delay and start the cycle, press DELAY START
until “6” glows. Then press DELAY START one more time. The
delayed cycle starts.
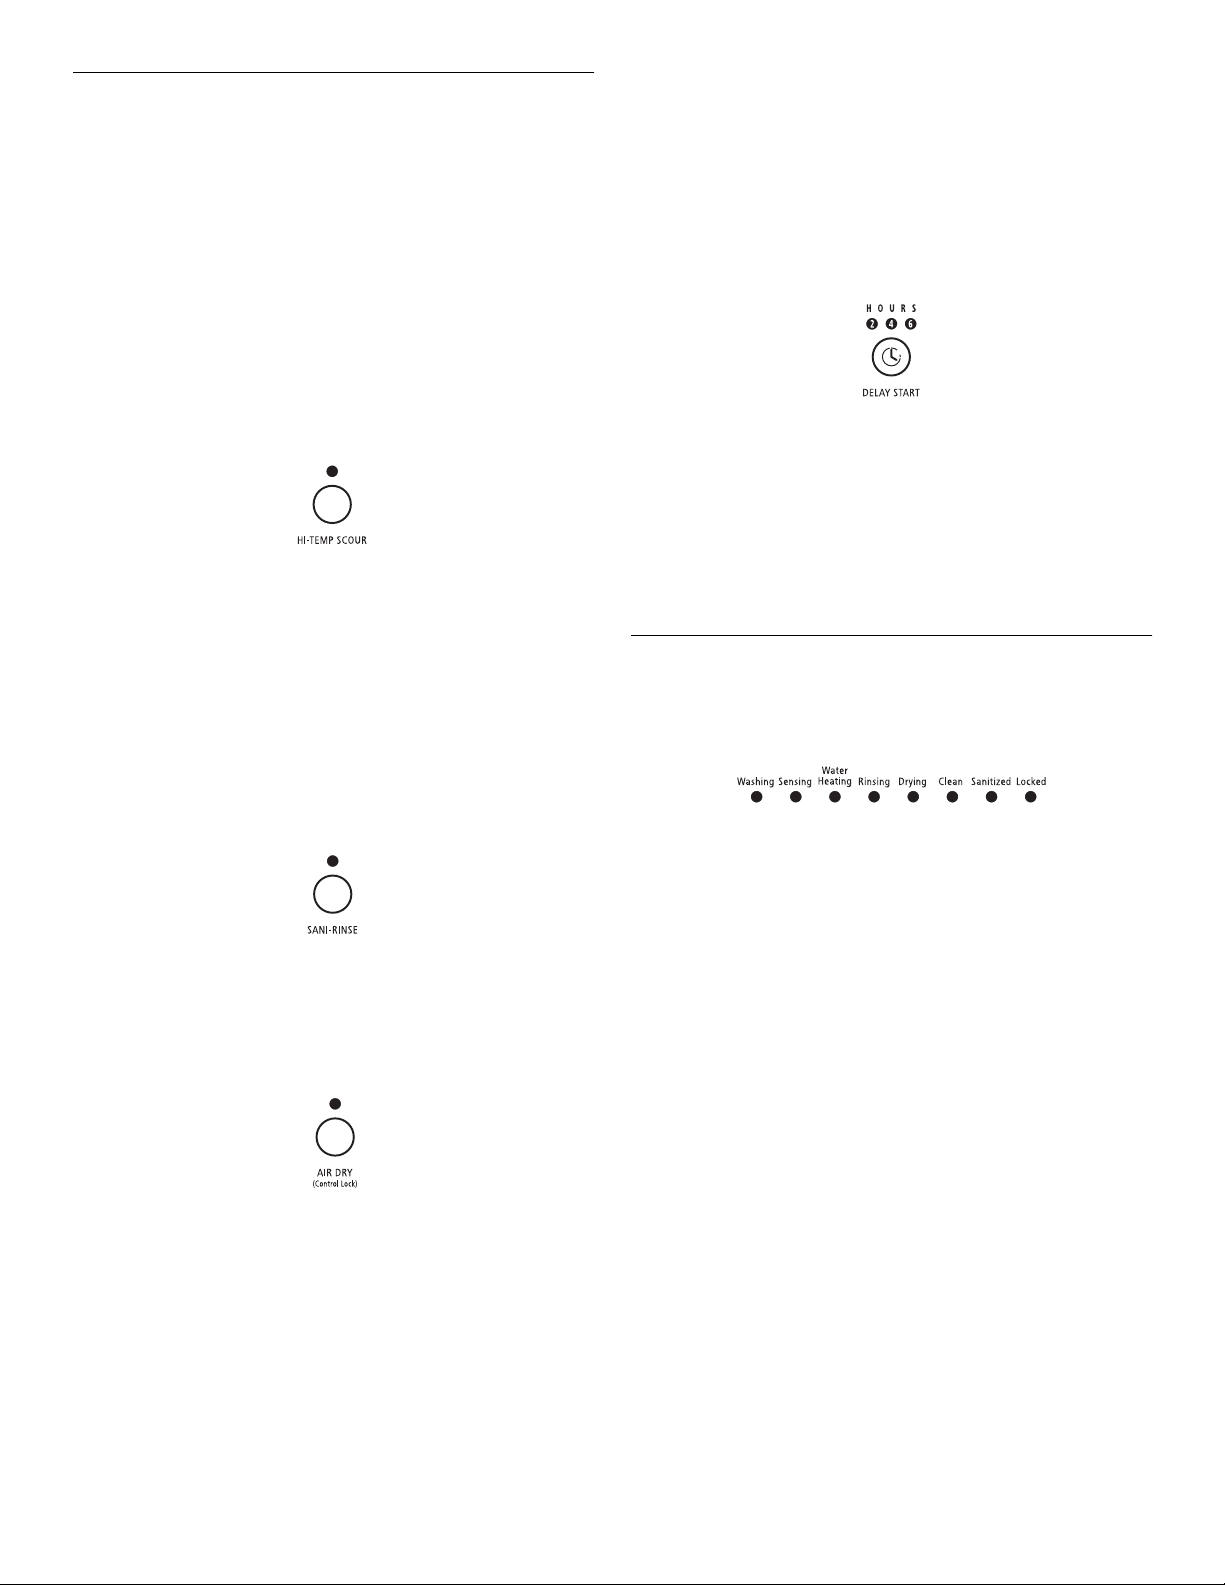
Cycle Status Indicators
Follow the progress of your dishwasher with the Cycle Status
Indicators.
NOTE:
Heavy Wash, and Pots & Pans cycles.
Use the SANI RINSE™ option with the Normal Wash,
Air Dry
Select this option to dry dishes without heat and save energy.
The dishes take longer to dry and some spotting can occur.
For best drying, use a liquid rinse aid. Some items (such as
plastics) may need towel drying.
The dishwasher automatically heats the air in the
NOTE:
dishwasher during the “dry” portion of the cycle unless you
select AIR DRY.
Sensing
Your dishwasher senses the soil level on the dishes. Soil level
determines the length of some cycles, the amount of heat added
to the wash or rinse, and the cycle needed for the load. Sensing
glows during the soil sensing parts of the cycle. Wash action
continues while sensing occurs.
Water Heating
Water Heating glows whenever water is heated during a cycle.
Wash or rinse action continues as the water heats.
Clean
Clean glows when a cycle is finished. The light turns off when you
open the door or press CANCEL.
Sanitized
If you select the SANI RINSE™ option, Sanitized glows when the
SANI RINSE™ cycle is finished. If your dishwasher did not
properly sanitize your dishes, the light flashes at the end of the
cycle. This can happen if the cycle is interrupted. The light goes
off when you open the door.
13
Page 14
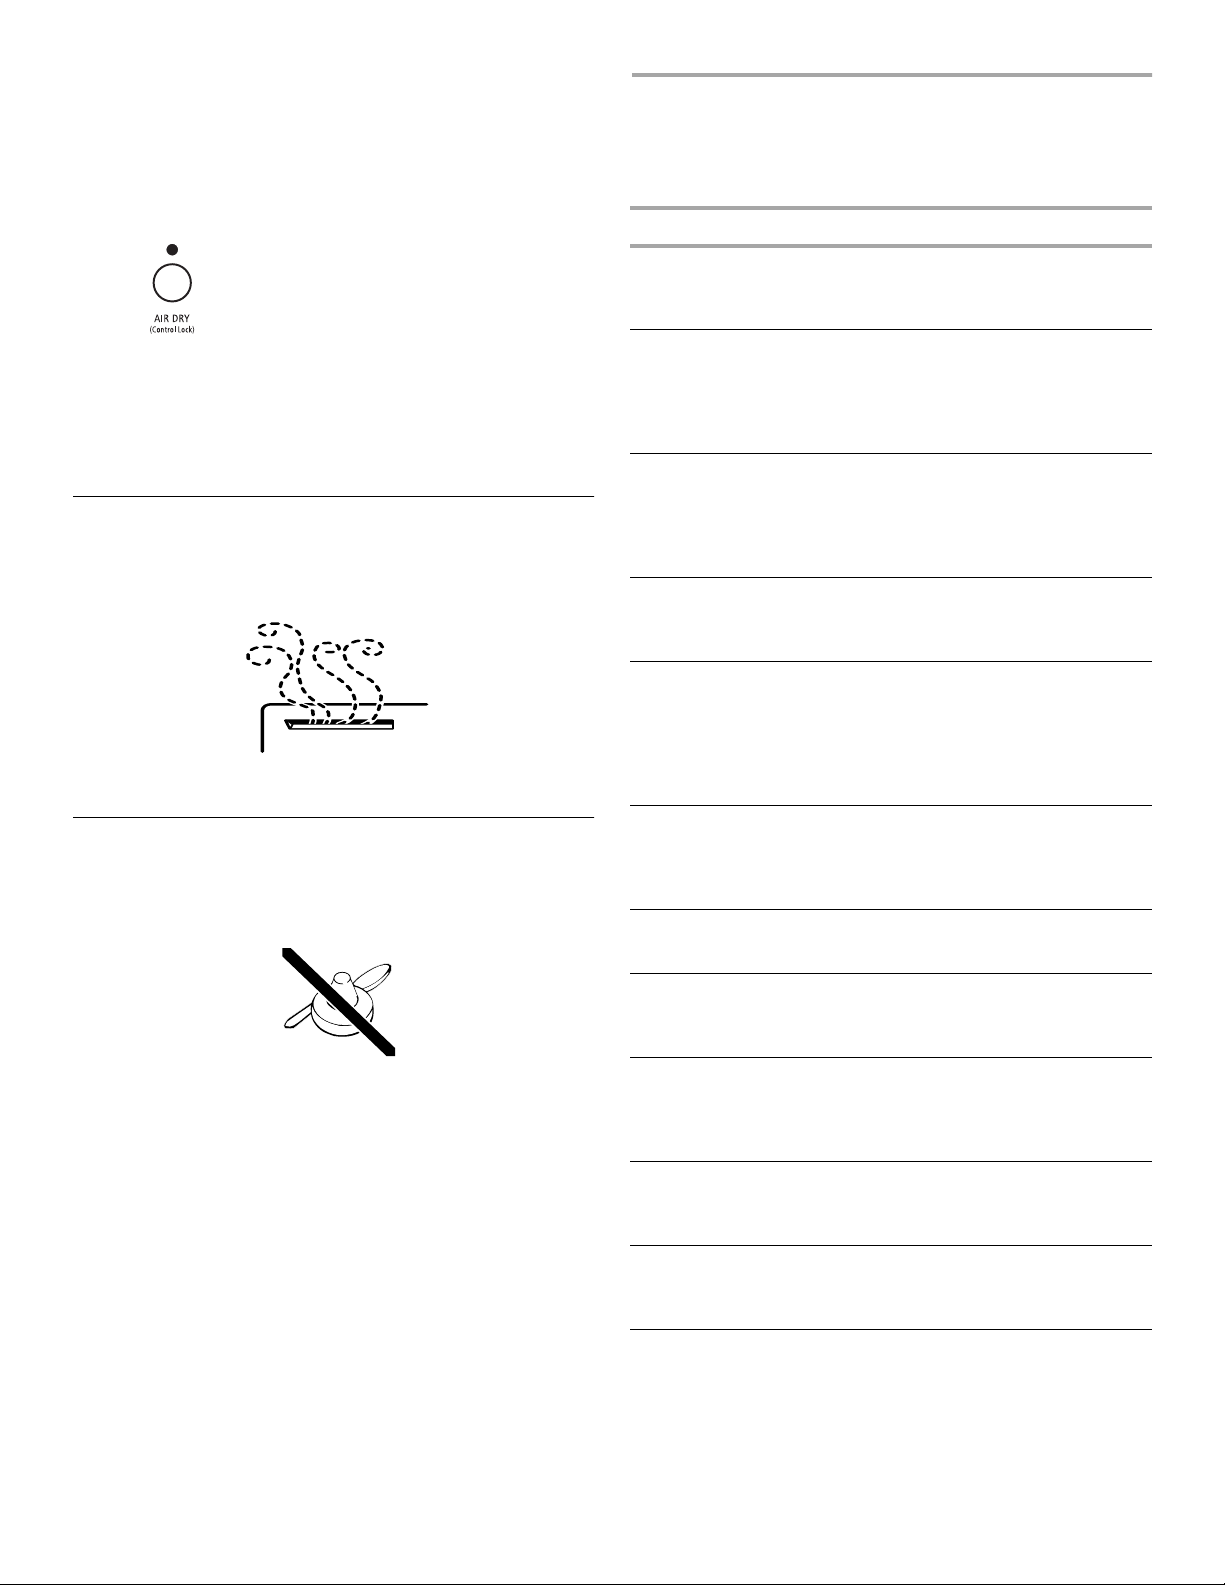
Locked
Use Locked to prevent unintended use of the dishwasher. You
can also use the Locked feature to prevent unintended cycle or
option changes during a cycle.
When Locked is lit, all buttons are disabled.
NOTE:
To lock the controls
Press and hold
WASHING SPECIAL ITEMS
If you have doubts about washing a particular item, check with
the manufacturer to see if it is dishwasher safe.
Material Dishwasher Safe?/Comments
for 5 seconds. Locked glows. If you press any pad while your
dishwasher is locked, the light flashes 3 times.
To unlock the controls
Press and hold AIR DRY for 5 seconds until the light turns off.
The dishwasher door can be opened while the controls
NOTE:
are locked.
Drying System
During drying, you can see steam escaping through the vent at
the upper left corner of the door. This is normal as the heat dries
your dishes.
IMPORTANT:
during drying.
The vapor is hot. Do not touch the vent
Overfill Protection Float
The overfill protection float (in the front right corner of the
dishwasher tub) keeps the dishwasher from overfilling. It must be
in place for the dishwasher to operate.
Aluminum
Disposable
Aluminum
Bottles and Cans
Cast Iron
China/
Stoneware
Crystal
Gold
Yes
High water temperature and detergents
can affect finish of anodized aluminum.
No
Do not wash throwaway aluminum pans
in the dishwasher. These might shift
during washing and transfer black marks
to dishes and other items.
No
Wash bottles and cans by hand. Labels
attached with glue can loosen and clog
the spray arms or pump and reduce
washing performance.
No
Seasoning will be removed and iron will
rust.
Yes
Always check manufacturer’s
recommendations before washing.
Antique, hand-painted, or over-the-glaze
patterns may fade. Gold leaf can discolor
or fade.
Yes
Check manufacturer’s recommendations
before washing. Some types of leaded
crystal can etch with repeated washing.
No
Gold-colored flatware will discolor.
Check under the float for objects that may keep the protector
from moving up or down.
14
Glass
Hollow-Handle
Knives
Pewter, Brass,
Bronze
Disposable
Plastics
Plastics
Yes
Milk glass yellows with repeated
dishwasher washing.
No
Handles of some knives are attached to
the blade with adhesives which can
loosen if washed in the dishwasher.
No
High water temperatures and detergent
can discolor or pit the finish.
No
Cannot withstand high water
temperatures and detergents.
Yes
Always check manufacturer’s
recommendations before washing.
Plastics vary in their capacity to withstand
high temperatures and detergents. Load
plastics in top rack only.
Page 15
Material Dishwasher Safe?/Comments
Stainless Steel
Sterling Silver or
Silver Plate
Yes
Run a rinse cycle if not washing
immediately. Prolonged contact with food
containing salt, vinegar, milk products, or
fruit juice can damage finish.
Yes
Run a rinse cycle if not washing
immediately. Prolonged contact with food
containing salt, acid, or sulfide (eggs,
mayonnaise, and seafood) can damage
finish.
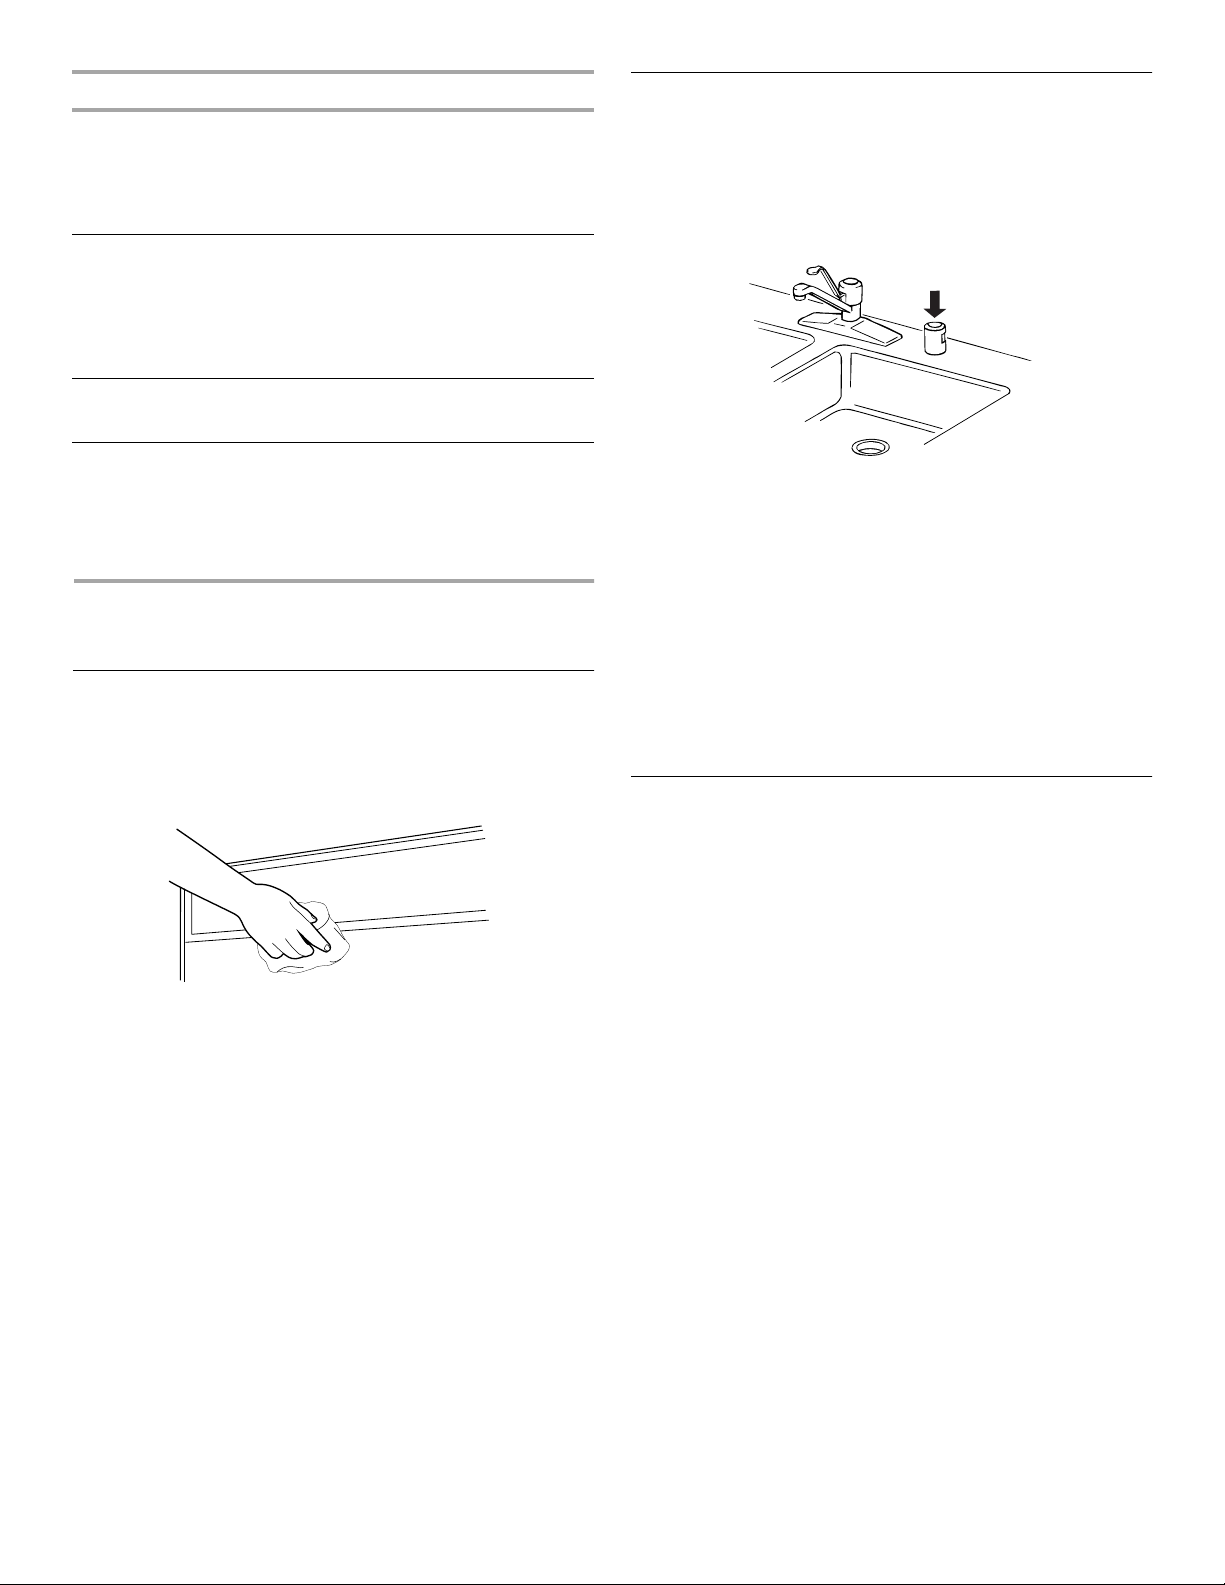
Drain Air Gap
Check the drain air gap anytime your dishwasher isn’t draining
well.
Some state or local plumbing codes require the addition of a
drain air gap between a built-in dishwasher and the home drain
system. If a drain is clogged, the drain air gap protects your
dishwasher from water backing up into it.
Tin
Wooden Ware
No
Can rust.
No
Wash by hand. Always check
manufacturer’s instructions before
washing. Untreated wood can warp,
crack, or lose its finish.
DISHWASHER CARE
Cleaning
Cleaning the exterior
In most cases, regular use of a soft, damp cloth or sponge and a
mild detergent is all that is necessary to keep the outside of your
dishwasher looking nice and clean.
Cleaning the interior
Hard water minerals can cause a white film to build up on the
inside surfaces, especially just beneath the door area.
Do not clean the dishwasher interior until it has cooled. Wear
rubber gloves. Do not use any type of cleanser other than
dishwasher detergent because it may cause foaming or sudsing.
To clean interior
Make a paste with powdered dishwasher detergent on a damp
sponge and clean.
OR
Use liquid automatic dishwasher detergent and clean with a
damp sponge.
OR
See the vinegar rinse procedure in “Spotting and filming on
dishes” in “Troubleshooting.”
Run a normal cycle with detergent after cleaning the
NOTE:
interior.
The drain air gap is usually located on top of the sink or
countertop near the dishwasher. To order a drain air gap, contact
your local dealer; or in the U.S.A., call the Customer Interaction
Center and ask for Part Number 300096.
The drain air gap is an external plumbing device that is
NOTE:
not part of your dishwasher. The warranty provided with your
dishwasher does not cover service costs directly associated with
the cleaning or repair of the external drain air gap.
To clean the drain air gap
Clean the drain air gap periodically to ensure proper drainage of
your dishwasher. Follow the cleaning instructions provided by the
manufacturer. With most types, you lift off the chrome cover.
Unscrew the plastic cap. Then check for any soil buildup. Clean if
necessary.
Storing
Storing for the summer
Protect your dishwasher during the summer months by turning
off the water supply and power supply to the dishwasher.
Winterizing your dishwasher
Protect your dishwasher and home against water damage due to
freezing water lines. If your dishwasher is left in a seasonal
dwelling or could be exposed to near freezing temperatures, have
your dishwasher winterized by authorized service personnel.
15
Page 16

TROUBLESHOOTING
First try the solutions suggested here and possibly avoid
the cost of a service call...
Dishwasher is not operating properly
■
Dishwasher does not run or stops during a cycle
Is the door closed tightly and latched?
Is the right cycle selected? Refer to the “Cycle Selection
Charts.”
Is there power to the dishwasher? Has a household fuse
blown or circuit breaker tripped?
Has the motor stopped due to an overload? The motor
automatically resets itself within a few minutes. If it does not
restart, call for service.
Is the water shut-off valve (if installed) turned on?
■
Dishwasher will not fill
Is the overfill protection float able to move up and down
freely? Press down to release.
■
Water remains in the dishwasher
Is the cycle complete?
■
Detergent remains in the covered section of the
dispenser
Is the cycle complete?
Is the detergent lump-free? Replace detergent if necessary.
Is the bottom rack installed properly with the bumpers in the
front? Refer to the “Parts and Features” section. Reinstall the
rack if necessary.
■
White residue on the front of the access panel
Was too much detergent used? Refer to the “Detergent
Dispenser” section.
Is the brand of detergent making excess foam? Try a different
brand to reduce foaming and eliminate buildup.
■
Odor in the dishwasher
Are dishes washed only every 2 or 3 days? Run a rinse cycle
once or twice a day until you have a full load.
Does the dishwasher have a new plastic smell? Run a vinegar
rinse as described in “Spotting and filming on dishes” later in
this Troubleshooting guide.
■
Condensation on the kitchen counter (built-in models)
Is the dishwasher aligned with the countertop? Moisture from
the vent in the dishwasher console can form on the counter.
Refer to the Installation Instructions for more information.
Dishes are not completely clean
■
Food soil left on the dishes
Is the dishwasher loaded correctly? Refer to the “Dishwasher
Loading” section.
Is the water temperature too low? For best dishwashing
results, water should be 120°F (49°C) as it enters the
dishwasher. Refer to the “Dishwasher Efficiency
Tips” section.
Did you use the correct amount of fresh detergent? Use
recommended dishwasher detergents only. Refer to the
“Detergent Dispenser” section. Never use less than 1 tb (15 g)
per load. Detergent must be fresh to be effective. Store
detergent in a cool, dry area. Heavy soil and/or hard water
generally require extra detergent.
Is detergent caked in dispenser? Use fresh detergent only. Do
not allow detergent to sit for several hours in a wet dispenser.
Clean dispenser when caked detergent is present.
Is the pump or spray arm clogged by labels from bottles and
cans? If you wash bottles and cans in your dishwasher, check
for labels clogging the pump or spray arm.
Is the home water pressure high enough for proper
dishwasher filling? Home water pressure should be 20 to 120
psi (138 to 828 kPa) for proper dishwasher fill. A booster
pump on the water supply can be added if pressure is too
low.
Are high suds slowing the wash arm? Never use soap or
laundry detergents. Use recommended dishwasher
detergents only.
■
Dishwasher door will not close
Is the bottom rack in backwards? The rack bumpers must
face the dishwasher door.
Spots and stains on dishes
■
Spotting and filming on dishes
Is your water hard or is there a high mineral content in your
water? Conditioning the final rinse water with a liquid rinse
aid helps eliminate spotting and filming. Keep the rinse aid
dispenser filled.
Is the water temperature too low? For best dishwashing
results, water should be 120°F (49°C) as it enters the
dishwasher. Refer to the “Dishwasher Efficiency
Tips” section.
Did you use the correct amount of effective detergent? Use
recommended dishwasher detergents only. Refer to the
“Detergent Dispenser” section. Never use less than 1 tb (15 g)
per load. Detergent must be fresh to be effective. Store
detergent in a cool, dry area. Heavy soil and/or hard water
generally require extra detergent.
Is the home water pressure high enough for proper
dishwasher filling? Home water pressure should be 20 to 120
psi (138 to 828 kPa) for proper dishwasher fill. A booster
pump on the water supply can be added if pressure is too
low.
16
Page 17

To remove spots and film from dishes, try a white
NOTE:
vinegar rinse. This procedure is intended for occasional use
only. Vinegar is an acid and using it too often could damage
your dishwasher.
Wash and rinse dishes. Use an air-dry or an energy-
1.
saving dry option. Remove all silverware or metal items.
Put 2 cups (500 mL) white vinegar in a glass or
2.
dishwasher-safe measuring cup on the bottom rack.
Run the dishwasher through a complete washing cycle
3.
using an air-dry or an energy-saving dry option. Do not
use detergent. Vinegar will mix with the wash water.
■
Silica film or etching (silica film is a milky, rainbowcolored deposit; etching is a cloudy film)
Sometimes there is a water/chemical reaction with certain
types of glassware. This is usually caused by some
combination of soft or softened water, alkaline washing
solutions, insufficient rinsing, overloading the dishwasher,
and the heat of drying. It might not be possible to prevent the
problem, except by hand washing.
To slow this process use a minimum amount of detergent but
not less than 1 tb (15 g) per load. Use a liquid rinse aid and
underload the dishwasher to allow thorough rinsing. Silica
film and etching are permanent and cannot be removed. Do
not use heated drying.
■
White spots on cookware with non-stick finish
Has the dishwasher detergent removed cookware
seasoning? Reseason cookware after washing in the
dishwasher.
■
Brown stains on dishes and dishwasher interior
Does your water have high iron content? Rewash dishes
using 1-3 tsp (5-15 mL) of citric acid crystals added to the
covered section of the detergent dispenser. Do not use
detergent. Follow with a Normal wash cycle with detergent. If
treatment is needed more often than every other month, the
installation of an iron removal unit is recommended.
■
Black or gray marks on dishes
Are aluminum items rubbing dishes during washing?
Disposable aluminum items can break down in the
dishwasher and cause marking. Hand wash these items.
Remove aluminum markings by using a mild abrasive cleaner.
■
Orange stains on plastic dishes or dishwasher interior
Are large amounts of tomato-based foods on dishes placed
in the dishwasher? Stains can gradually fade over time.
Regular use of heated drying will slow fading. Stains will not
affect dishwasher performance. Regular use of a rinse cycle
and an air-dry or energy-saving dry option will reduce the
likelihood of staining.
Dishes do not dry completely
■
Dishes are not dry
Did you load your dishwasher to allow proper water
drainage? Do not overload. Refer to the “Dishwasher
Loading” section. Use a liquid rinse aid to speed drying.
Are the plastics wet? Plastics often need towel drying.
Is the rinse aid dispenser empty? Refer to the “Rinse Aid
Dispenser” section.
Did you use an air-dry or energy-saving dry option? Use a
heated drying option for dryer dishes.
Dishes are damaged during a cycle
■
Chipping of dishes
Did you load the dishwasher properly? Load the dishes and
glasses so they are stable and do not strike together from
washing action. Minimize chipping by moving the rack in and
out slowly.
Antiques, feather-edged crystal, and similar types of
NOTE:
china and glassware might be too delicate for automatic
dishwashing. Wash by hand.
Noises
■
Grinding, grating, crunching or buzzing sounds
A hard object has entered the wash module (on some
models). When the object is ground up, the sound should
stop.
17
Page 18
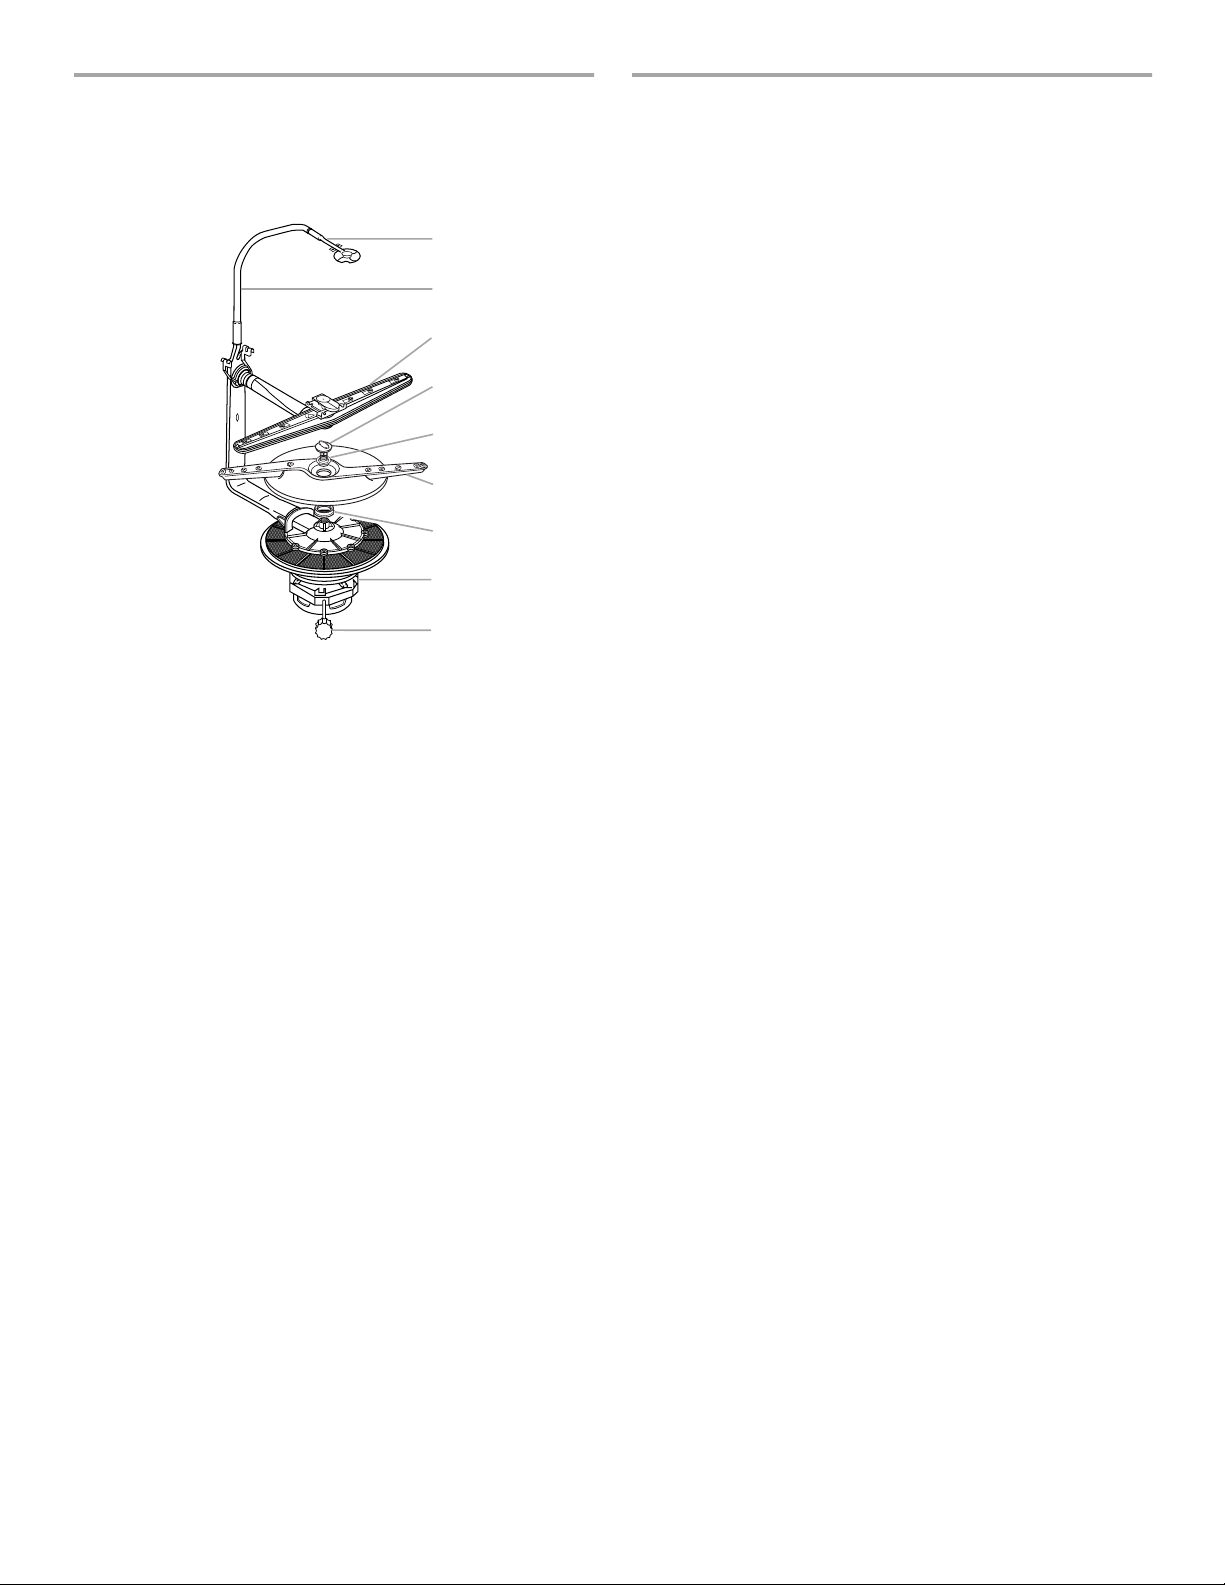
FILTER MODULE
2
3
4
5
6
7
8
9
ASSISTANCE OR SERVICE
The washing system parts covered by your warranty are
shown below.
1
1. Top spray
2. Water tube
3. Upper spray arm
4. Nut
5. Bearing
6. Lower spray arm
7. Seal
8. Filter module and motor
9. Tuned sound absorber
Before calling for assistance or service, please check
“Troubleshooting.” It may save you the cost of a service call. If
you still need help, follow the instructions below.
When calling, please know the purchase date and the complete
model and serial number of your appliance. This information will
help us to better respond to your request.
If you need replacement parts
If you need to order replacement parts, we recommend that you
only use FSP
and work right because they are made with the same precision
used to build every new WHIRLPOOL
Call the Whirlpool Customer Interaction Center
toll free:
Our consultants provide assistance with:
■
Features and specifications on our full line of appliances.
■
Installation information.
■
Use and maintenance procedures.
■
Accessory and repair parts sales.
■
Specialized customer assistance (Spanish speaking, hearing
impaired, limited vision, etc.).
■
Referrals to local dealers, repair parts distributors, and
service companies. Whirlpool designated service technicians
are trained to fulfill the product warranty and provide afterwarranty service, anywhere in the United States.
To locate the Whirlpool designated service company in your
area, you can also look in your telephone directory Yellow
Pages.
®
factory specified parts. These parts will fit right
®
appliance.
1-800-253-1301.
For further assistance
If you need further assistance, you can write to us with any
questions or concerns at:
Whirlpool Brand Home Appliances
Customer Interaction Center
553 Benson Road
Benton Harbor, MI 49022-2692
Please include a daytime phone number in your correspondence.
18
Page 19

Notes
19
Page 20
WHIRLPOOL GOLD
ONE-YEAR FULL WARRANTY
For one year from the date of purchase, when this dishwasher is operated and maintained according to instructions attached to or
furnished with the product, Whirlpool Corporation will pay for FSP
workmanship. Service must be provided by a Whirlpool designated service company.
SECOND YEAR LIMITED WARRANTY ON POWER CLEAN™ SYSTEM
In the second year from the date of purchase, when this dishwasher is operated and maintained according to instructions attached to or
furnished with the product, Whirlpool Corporation will pay for FSP
washing system (see “Filter Module”), if defective in materials or workmanship.
DISHWASHER WARRANTY
®
replacement parts and repair labor to correct defects in materials or
®
replacement parts for any part of the POWER CLEAN™ filter module
®
SECOND THROUGH FIFTH YEAR LIMITED WARRANTY ON ELECTRONIC CONTROL SYSTEM
AND NYLON-COATED DISHRACKS
In the second through fifth years from the date of purchase, when this dishwasher is operated and maintained according to instructions
attached to or furnished with the product, Whirlpool Corporation will pay for FSP
®
replacement parts for the following components if
defective in materials or workmanship: the electronic control system, the upper and lower dishracks (for models with nylon-coated
dishracks).
TWENTY-YEAR FULL WARRANTY ON DURAPERM™ TUB AND INNER DOOR
For twenty years from the date of purchase, when this dishwasher is operated and maintained according to instructions attached to or
furnished with the product, Whirlpool Corporation will pay for FSP
®
replacement parts and repair labor for the DURAPERM™ tub and/or
inner door should either fail to contain water, if defective in materials or workmanship. Service must be provided by a Whirlpool
designated service company.
Whirlpool Corporation will not pay for:
Service calls to correct the installation of your dishwasher, to instruct you how to use your dishwasher, or to replace house fuses or
1.
correct house wiring or plumbing.
Repairs when your dishwasher is used in other than normal, single-family household use.
2.
Damage resulting from accident, alteration, misuse, abuse, fire, flood, acts of God, improper installation, or installation not in
3.
accordance with local electrical and plumbing codes, or use of products not approved by Whirlpool Corporation.
Any labor costs during the limited warranty periods.
4.
Replacement parts or repair labor costs for units operated outside the United States.
5.
Pickup and delivery. This product is designed to be repaired in the home.
6.
Repairs to parts or systems resulting from unauthorized modifications made to the appliance.
7.
WHIRLPOOL CORPORATION SHALL NOT BE LIABLE FOR INCIDENTAL OR CONSEQUENTIAL DAMAGES.
Some states do not allow the exclusion or limitation of incidental or consequential damages, so this exclusion or limitation may not
apply to you. This warranty gives you specific legal rights and you may also have other rights which vary from state to state.
Outside the 50 United States, this warranty does not apply. Contact your authorized Whirlpool dealer to determine if another
warranty applies.
If you need service, first see “Troubleshooting.” Additional help can be found by checking “Assistance or Service,” or by calling our
Customer Interaction Center at
1-800-253-1301
Center, 553 Benson Road, Benton Harbor, MI 49022-2692.
, from anywhere in the U.S.A. or write: Whirlpool Corporation, Customer Interaction
6/01
Keep this book and your sales slip together for future
reference. You must provide proof of purchase or installation
date for in-warranty service.
Write down the following information about your dishwasher to
better help you obtain assistance or service if you ever need it.
You will need to know your complete model number and serial
number. You can find this information on the model and serial
number label/plate, located on your appliance as shown in “Parts
and Features.”
Dealer name____________________________________________________
Address ________________________________________________________
Phone number __________________________________________________
Model number __________________________________________________
Serial number __________________________________________________
Purchase date __________________________________________________
8275178
© 2002 Whirlpool Corporation.
All rights reserved. ® Registered Trademark/TM Trademark of Whirlpool, U.S.A.
Printed in U.S.A.
7/02
 Loading...