

Page 1
Use And Care
GUIDE
A Note to You ........................ 2
Cooktop Safety ..................3-5
Parts and Features ............... 6
Using Your Cooktop ............. 7
Caring for Your
Cooktop ...............................10
GAS SEALED BURNER GLASS COOKTOP
TO THE INSTALLER: PLEASE LEAVE THIS
INSTRUCTION BOOK WITH THE UNIT.
TO THE CONSUMER: PLEASE READ AND KEEP
3191747
Troubleshooting ................. 13
Requesting
Assistance
or Service ............................ 14
Warranty .............................. 16
In the U.S.A. for assistance or service,
call the Consumer Assistance Center.
1-800-253-1301
www.whirlpool.com
MODEL GL8856EB
1
Page 2

A Note to You
Thank you for buying a WHIRLPOOL® appliance.
The Whirlpool Brand is committed to designing quality products that consistently perform for you to make your
life easier. To ensure that you enjoy years of trouble-free operation, we developed this Use and Care Guide. It is
full of valuable information about how to operate and maintain your appliance properly and safely. Please read it
carefully.
Also, please complete and mail the Product Registration Card provided with your appliance. The card helps us
notify you about any new information on your appliance.
Please record your model’s information.
Whenever you call to request service for
your appliance, you need to know your
complete model number and serial number.
You can find this information on the model
and serial number label/plate (see diagram in the
“Parts and Features” section).
Please also record the purchase date of
your appliance and your dealer’s name,
address, and telephone number.
Keep this book and the sales slip together in a safe place for future reference.
It is important for you to save your sales receipt showing the date of purchase.
Proof of purchase will assure you of in-warranty service.
Model Number ___________________________________
Serial Number ___________________________________
Purchase Date ___________________________________
Dealer Name ____________________________________
Dealer Address __________________________________
Dealer Phone ____________________________________
Our Consumer Assistance Center number is
toll-free.
To find detailed product information, the location of the nearest Whirlpool dealer or authorized servicer,
to pruchase an accessory item, or register your appliance on-line, please visit our Web site at
1-800-253-1301
www.whirlpool.com
2
Page 3
Cooktop Safety
Your safety and the safety of others is very important.
We have provided many important safety messages in this manual and on your appliance. Always read and
obey all safety messages.
This is the safety alert symbol.
This symbol alerts you to hazards that can kill or hurt you and others.
All safety messages will be preceded by the safety alert symbol and the word “DANGER” or
“WARNING.” These words mean:
You will be killed or seriously injured if you don’t
wDANGER
wWARNING
All safety messages will identify the hazard, tell you how to reduce the chance of injury, and tell you what can
happen if the instructions are not followed.
IMPORTANT SAFETY INSTRUCTIONS
follow instructions.
You can be killed or seriously injured if you don’t
follow instructions.
Gas cooktops have been thoroughly tested for safe and efficient operation. However, as with any appliance,
there are specific installation and safety precautions which must be followed to ensure safe and satisfactory
operation.
WARNING: If the information in this manual is not followed exactly, a fire or
explosion may result causing property damage, personal injury or death.
– Do not store or use gasoline or other flammable vapors and liquids in the vicinity
of this or any other appliance.
– WHAT TO DO IF YOU SMELL GAS:
• Do not try to light any appliance.
• Do not touch any electrical switch; do not use any phone in your building.
• Immediately call your gas supplier from a neighbor’s phone. Follow the gas
supplier’s instructions.
• If you cannot reach your gas supplier, call the fire department.
– Installation and service must be performed by a qualified installer, service
agency or the gas supplier.
continued on next page
3
Page 4
Cooktop Safety
General
• Install or locate the cooktop only in accordance
with the provided Installation Instructions. The
cooktop must be installed by a qualified installer.
The cooktop must be properly connected to the
proper gas supply and checked for leaks. The
cooktop must also be properly connected to the
electrical supply and grounded.
• Gas fuels and their use in appliances can cause
minor exposures to benzene, formaldehyde,
carbon monoxide, and soot, primarily from incomplete combustion. Significant exposure to these
substances could cause cancer or reproductive
harm. Properly adjusted burners with a blue, rather
than a yellow, flame will minimize incomplete
combustion. Venting with a hood or an open
window will further minimize exposure.
• Do not store things children might want above the
cooktop. Children could be burned or injured while
climbing on it.
• Do not leave children alone or unattended in the
area where the cooktop is in use. They should
never be allowed to sit or stand on any part of the
cooktop. They could be burned or injured.
• Do not operate the cooktop if it is damaged or not
working properly.
• Do not use the cooktop for warming or heating the
room. Persons could be burned or injured, or a fire
could start.
• Use the cooktop only for its intended use as
described in this manual.
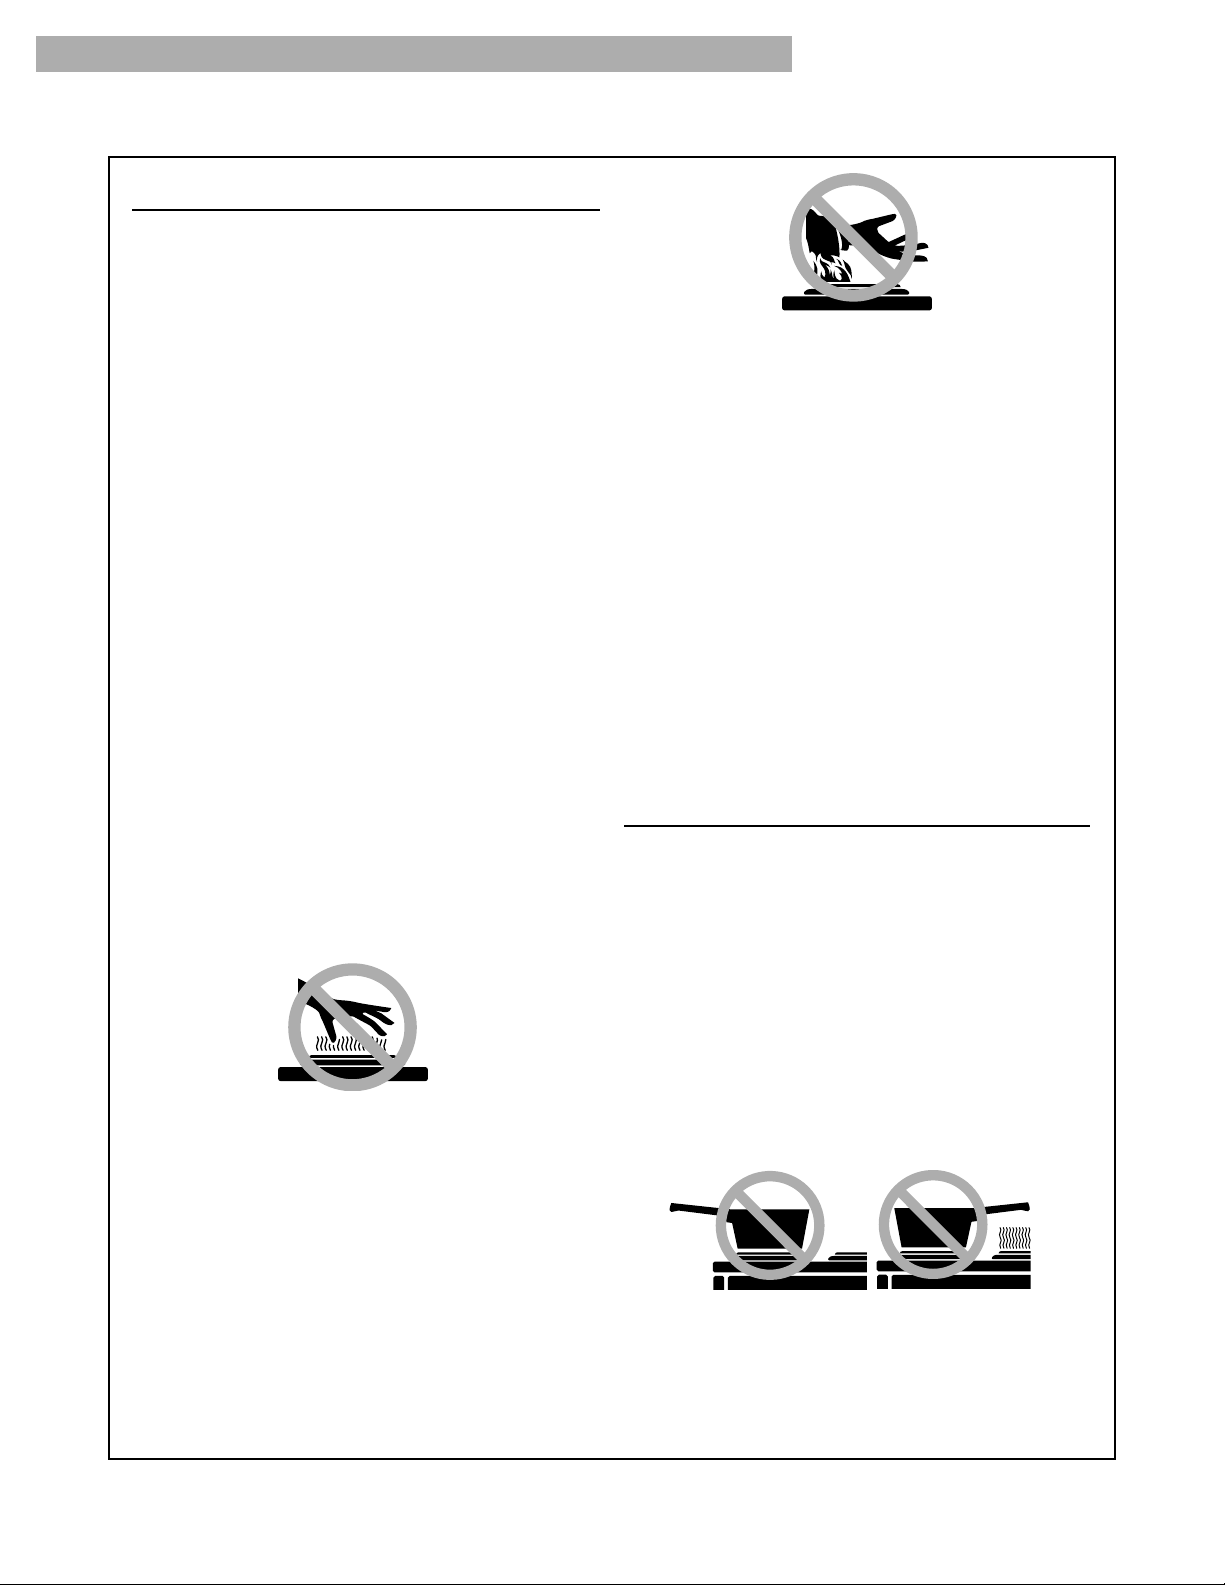
• Do not touch surface burners or areas near
surface burners. Areas near surface burners
become hot enough to cause burns. During and
after use, do not touch, or let clothing or other
flammable materials contact surface burners or
areas near surface burners until they have had
sufficient time to cool.
• Do not wear loose or hanging garments when
using the cooktop. They could ignite if they touch
an open flame and you could be burned.
• Use only dry pot holders. Moist or damp pot
holders on hot surfaces could result in burns from
steam. Do not let pot holder touch an open flame.
Do not use a towel or bulky cloth for a pot holder.
It could catch on fire.
• Do not heat unopened containers. They could
explode. The hot contents could cause burns and
container particles could cause injury.
• Do not store flammable materials on or near the
cooktop. The fumes could create an explosion
and/or fire hazard.
• Never use a match or other flame to look for a gas
leak. Explosion and injury could result.
• Know where your main gas shutoff valve is
located.
When using the cooktop
• Make sure the cookware you use is large enough
to contain food and avoid boilovers and spillovers.
Heavy splattering or spillovers left on a cooktop
could ignite and burn you. Pan size is especially
important in deep fat frying.
• Check to be sure glass cookware is safe for use
on the cooktop. Only certain types of glass, glassceramic, ceramic, earthenware, or other glazed
cookware are suitable for cooktops without
due to the sudden change in temperature.
• Never leave surface burners unattended at high
heat settings. A boilover could result and cause
smoking and greasy spillovers that could ignite.
breaking
• Turn pan handles inward, but not over other
surface burners. This will help reduce the chance
of burns, igniting of flammable materials, and spills
due to bumping of the pan.
• Do not use decorative covers or trivets over the
surface burners.
4
Page 5
Cooktop Safety
Grease
• Grease is flammable. Do not allow grease to
collect around cooktop. Wipe spillovers
immediately.
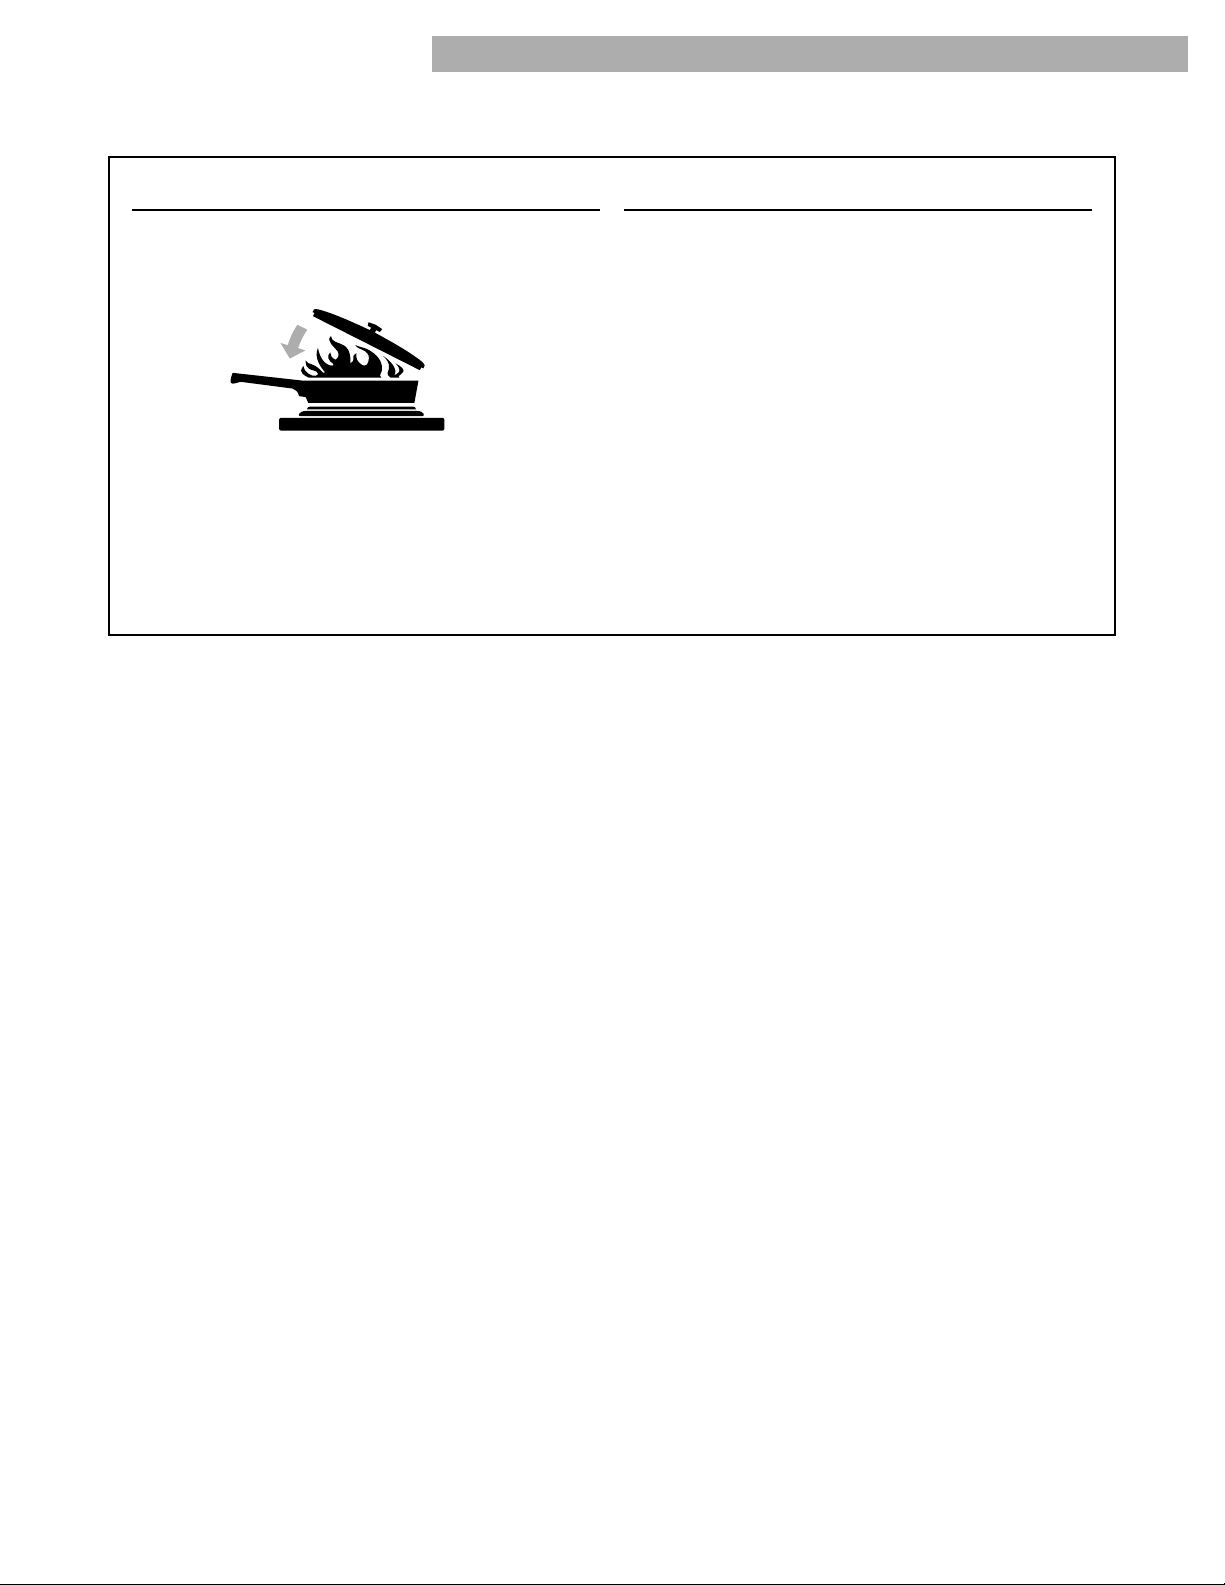
• Do not use water on grease fires. Never pick up
a flaming pan. Smother flaming pan by covering
with a well-fitting lid, cookie sheet, or flat tray.
Flaming grease outside of pan can be extinguished
with baking soda or , if available, a multipurpose dry
chemical or foam-type extinguisher.
– SAVE THESE INSTRUCTIONS –
Care and cleaning
• Do not repair or replace any part of the cooktop
unless specifically recommended in this manual.
All other servicing should be referred to a qualified
technician.
• Any additions, changes, or conversions required in
order for this appliance to satisfactorily meet the
application needs must be made by a Whirlpool
service company or Qualified Agency.
• Disconnect the electrical supply and the gas supply
at the shutoff valve near the cooktop before servicing
the cooktop.
5
Page 6
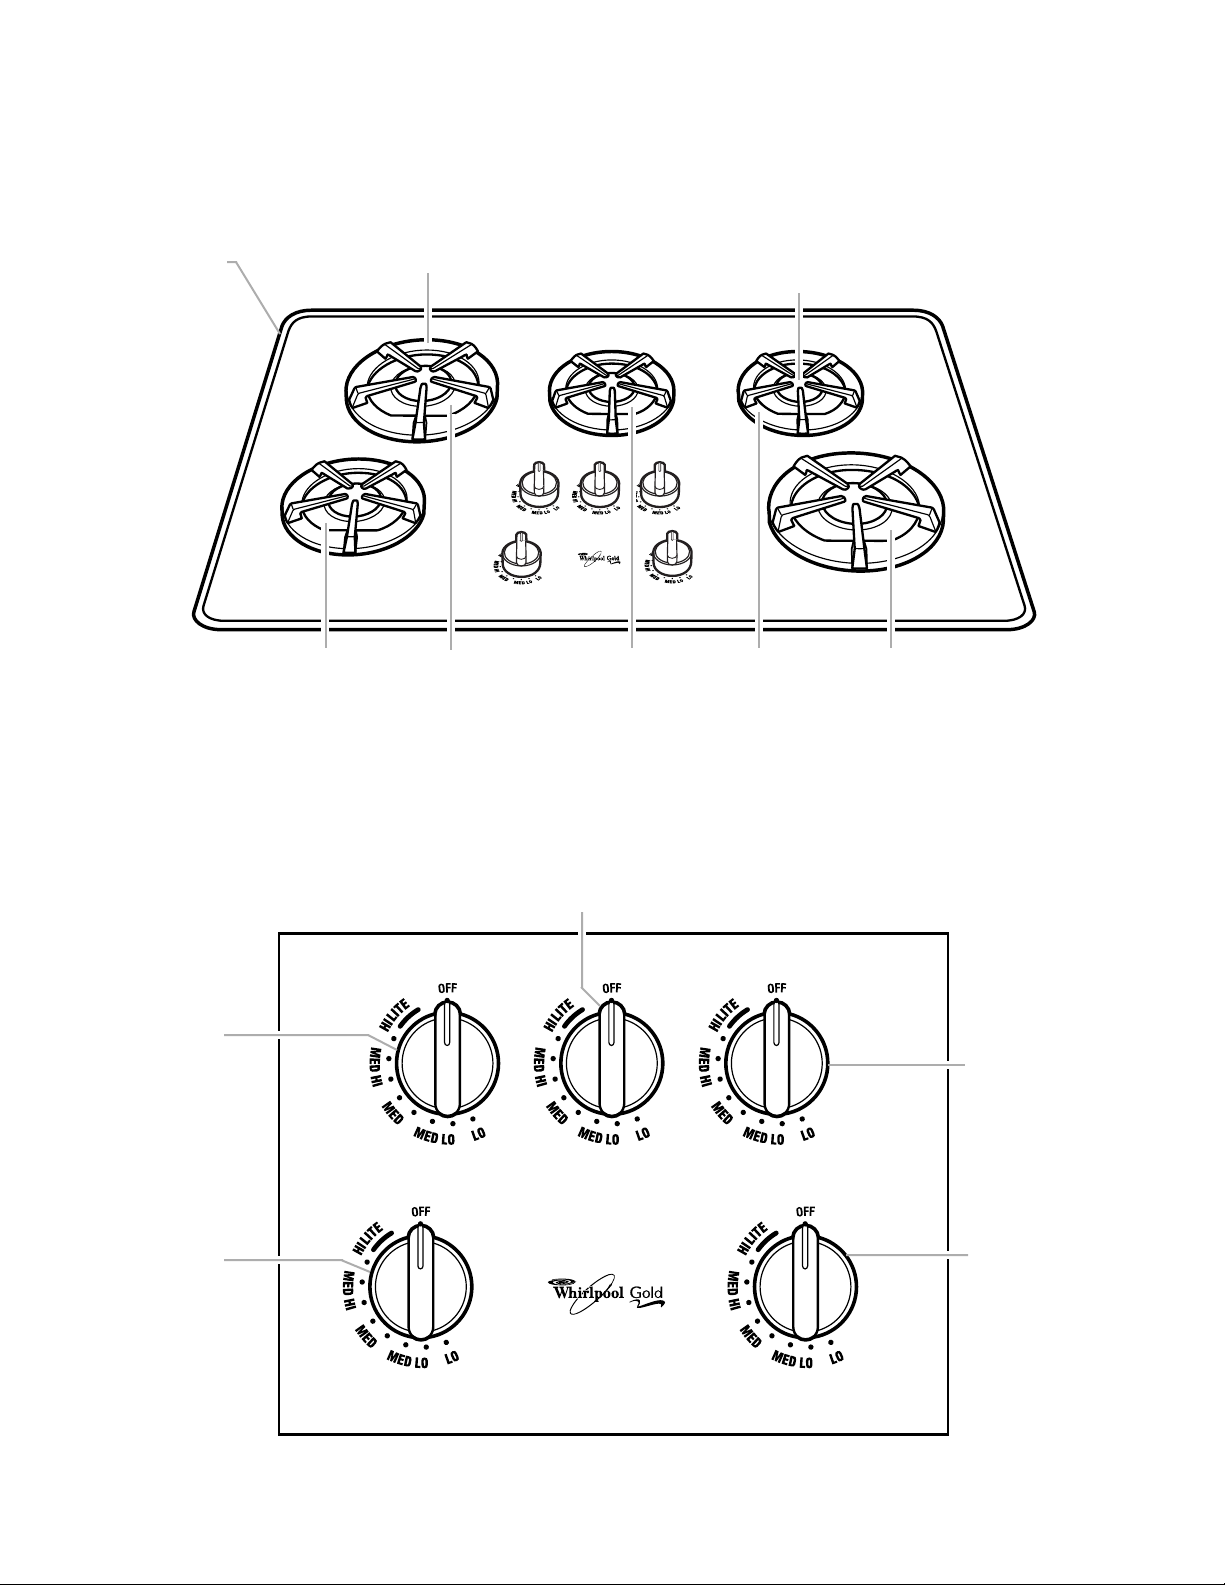
Getting to Know Your Cooktop
Parts and Features
Model and serial
number plate
(under cooktop)
(p. 2)
6,000 BTU
burner
(pp. 10, 11, 12)
Surface burner grate
(p. 10)
Control panel
10,000 BTU
burner
(pp. 10, 11, 12)
6,000 BTU
burner
(pp. 10, 11, 12)
Surface burner cap
(pp. 10, 11, 12)
6,000 BTU
burner
(pp. 10, 11, 12)
10,000 BTU
burner
(pp. 10, 11, 12)
Left rear burner
control knob
(pp. 8, 10)
Left front burner
control knob
(pp. 8, 10)
Center rear burner
control knob
(pp. 8, 10)
Right rear burner
control knob
(pp. 8, 10)
Right front burner
control knob
(pp. 8, 10)
6
Page 7
Using Your Cooktop
Using Your Cooktop
Using the surface burners
Your cooktop has sealed gas burners with an
electric ignition system. The sealed burners spread
the heat evenly across the bottom of the cookware
and provide infinite heat control.
IMPORTANT: Your cooktop is factory-set for
use with Natural Gas. If you wish to use L.P. gas,
L.P. Gas Conversion Kit No. 814428 is available
from your authorized Whirlpool servicer. The
conversion must be done by a qualified service
technician.
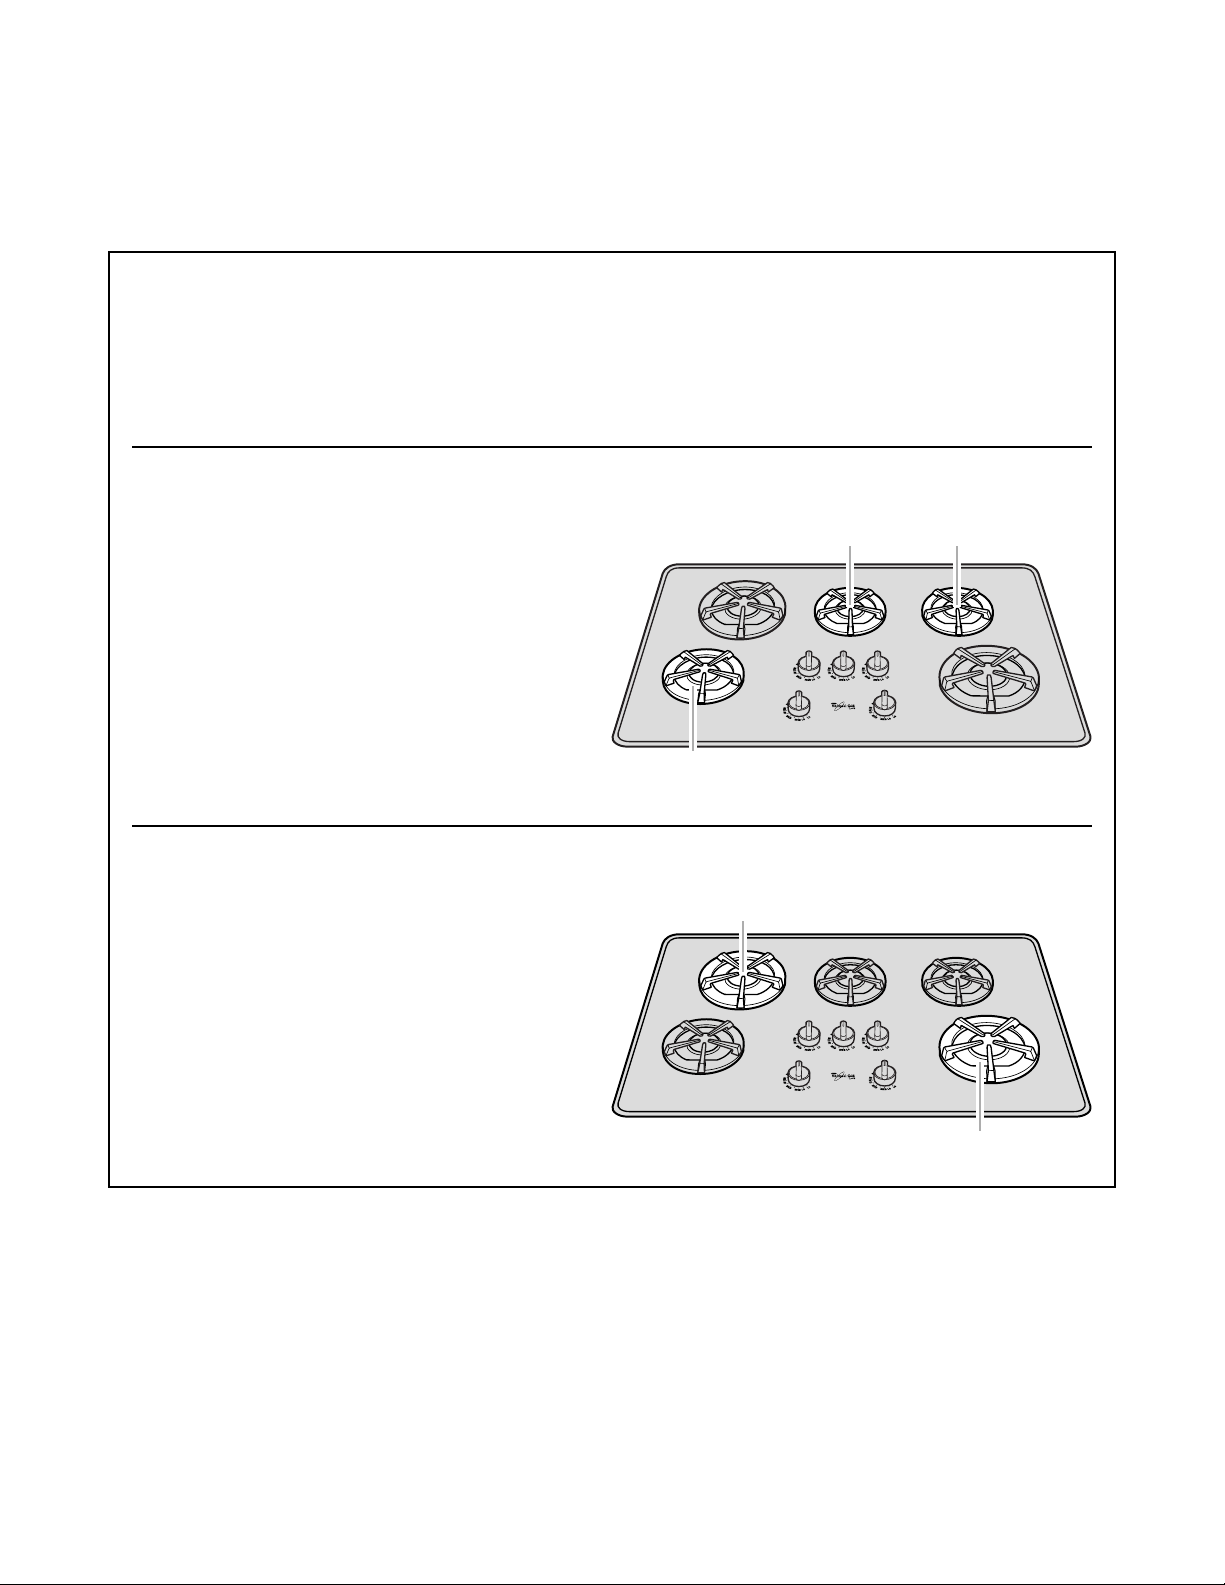
When to use the left front, right rear, or center burners:
Use these burners for simmering, or for cooking
smaller quantities of food requiring small cookware.
6,000 BTU
burner
6,000 BTU
burner
When to use the left rear and right front burners:
Use these burners for cooking large quantities
of food, deep-fat frying, or cooking with large
cookware.
10,000 BTU
burner
6,000 BTU
burner
10,000 BTU
burner
7
Page 8
Using Your Cooktop
Using the surface burners (cont.)
NOTE: Do not leave empty cookware, or cookware
wWARNING
which has boiled dry, on a hot surface burner. The
cookware could overheat causing damage to the
cookware or cooking product.
Burner heat settings
Use the following chart as a guide.
Fire Hazard
Do not let the burner flame extend beyond
the edge of the pan.
Turn off all controls when not cooking.
Failure to follow these instructions can
result in death or fire.
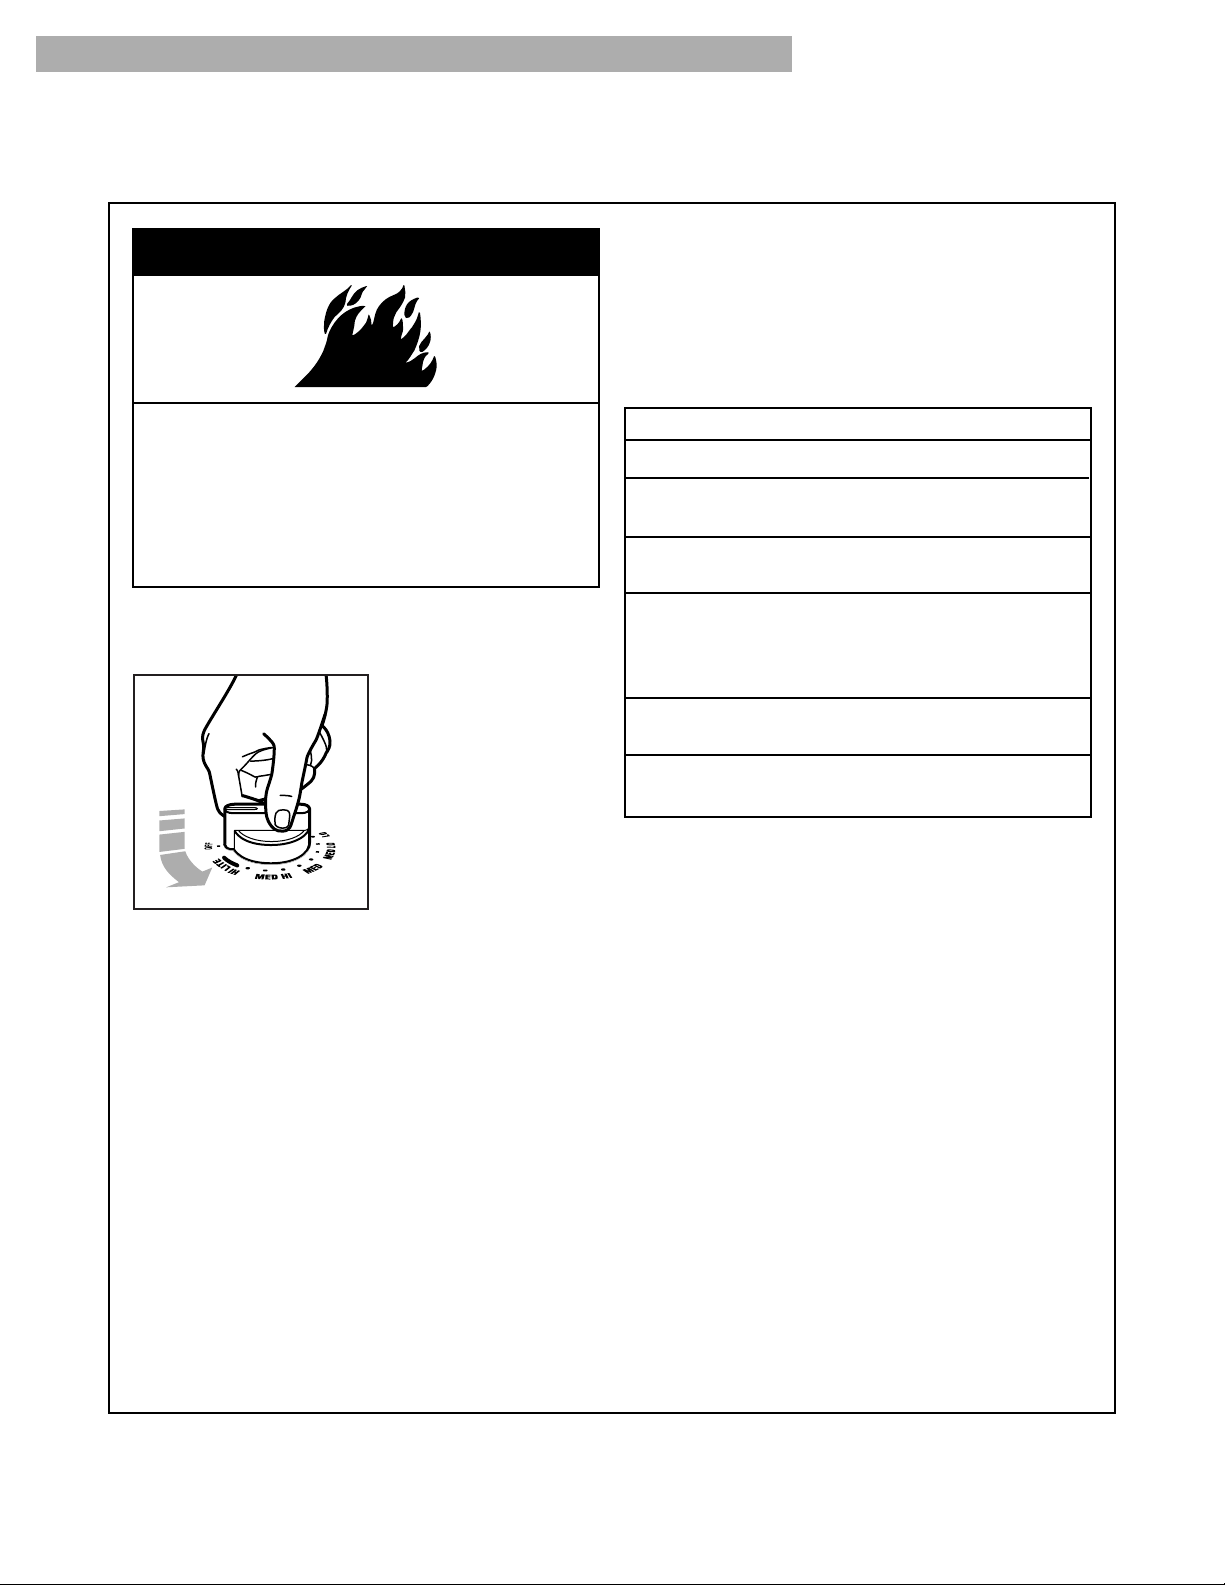
Using the control knobs
• Push in the control knob and turn it to the LITE
position. The clicking
sound is the ignitor
sparking. Visually
check that the burner
has lit.
• After the burner lights,
turn the control knob to
the desired setting. You
can set the control knob
anywhere between the
high and low settings.
NOTES:
• The ignitors may click a number of times before
the burner lights. This is normal.
• All five burner ignitors will spark no matter which
burner you are using.
• Check the burner to see if it has lit. If the burner
does not ignite, listen for the clicking sound. If you
do not hear the ignitor click, turn the burner off.
Check that the service cord is placed firmly in the
wall receptacle. Check for a tripped circuit breaker
or blown fuse.
Check that the control knob is pressed completely
down on the valve shaft. If the spark ignitor still
fails to operate, call your nearest authorized
Whirlpool servicer.
Proper grounding is necessary for the electrical
system to work correctly. A qualified electrician
should check the wall receptacle to see if it is
grounded correctly.
SETTING
LITE
HI
MED HI
MED
MED LO
LO
RECOMMENDED USE
• To light the burner.
• To start food cooking.
• To bring liquid to a boil.
• To hold a rapid boil.
• To quickly brown or sear food.
• To maintain a slow boil.
• To fry poultry or meat.
• To make pudding, sauce or
gravy.
• To stew or steam food.
• To simmer food.
• To keep food warm.
• To melt chocolate or butter.
Energy saving tips
Preheat your pans only when recommended and
•
for the shortest time possible.
Start your food on a higher heat setting, then turn
•
the control to a lower setting to finish cooking.
Place a filled pan on the burner grate before
•
turning on the surface burner.
8
Page 9
Using the surface burners (cont.)
Using Your Cooktop
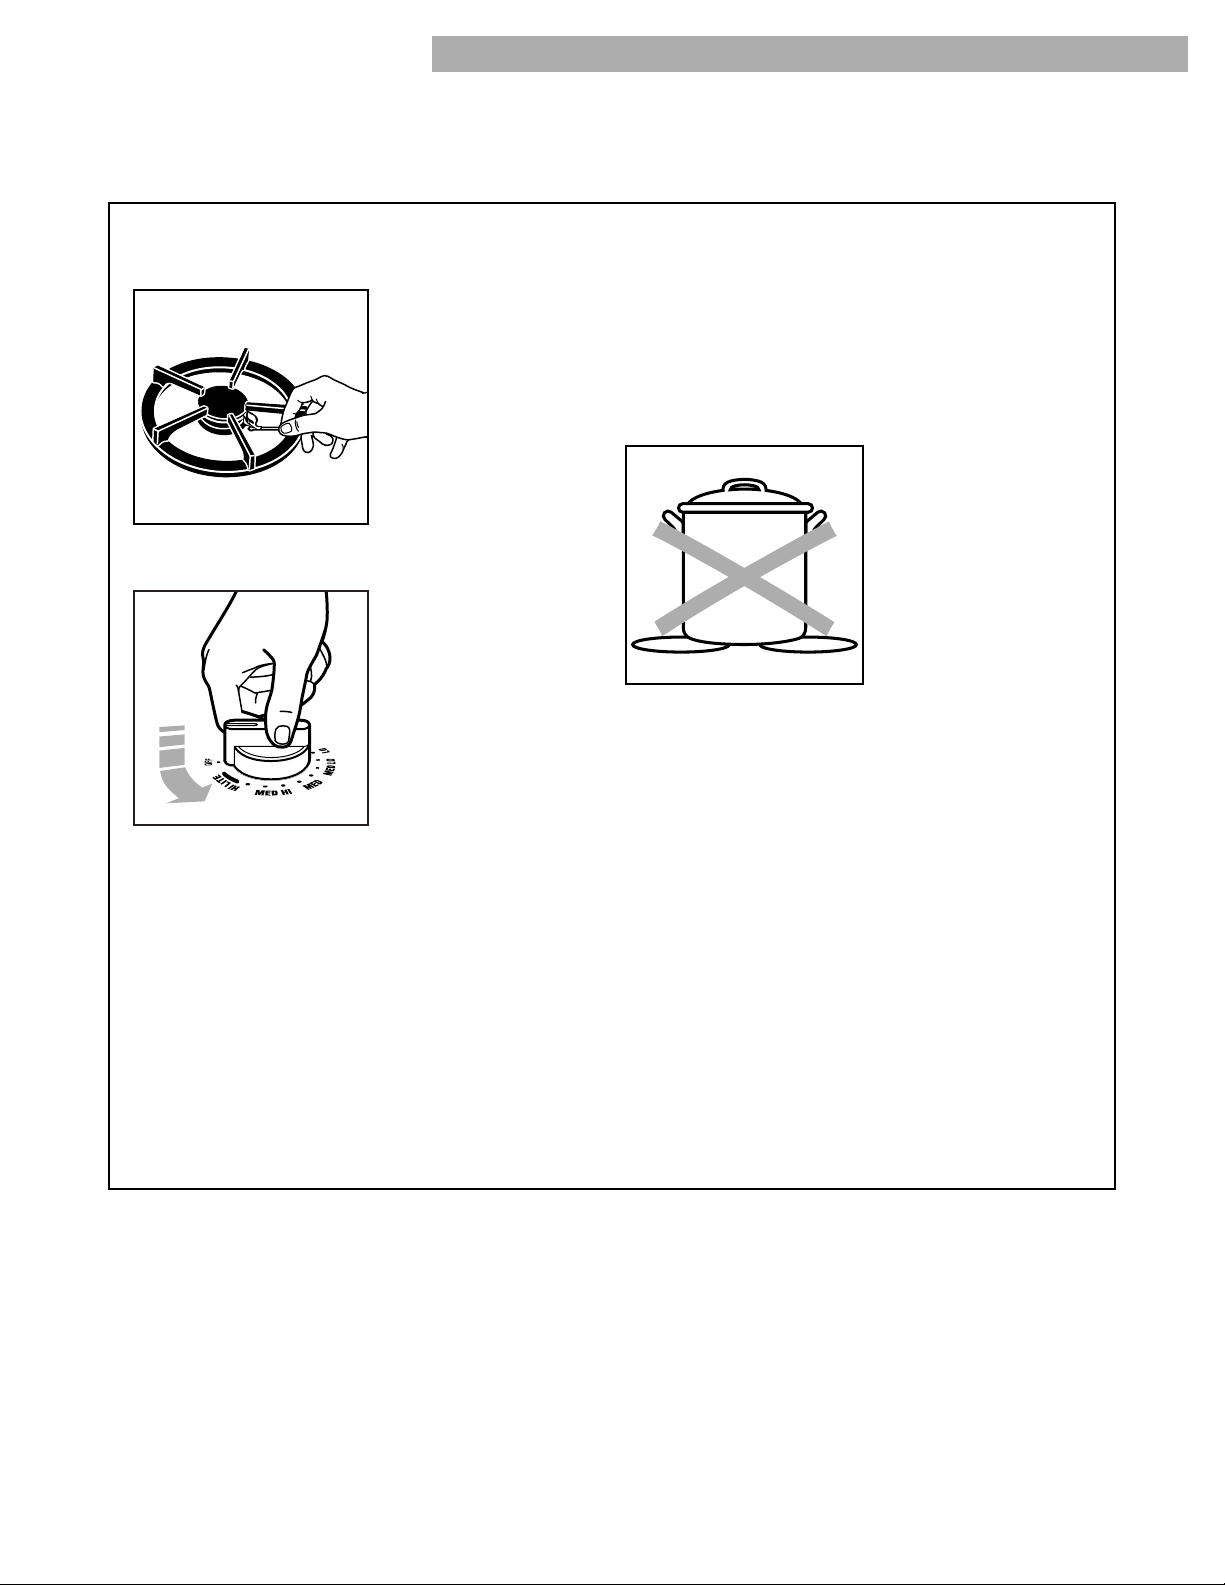
In case of a prolonged power failure
Surface burners can be manually lighted.
• Hold a lit match near a
burner and turn the
control knob to the HI
position.
Now you can adjust the flame height.
• After the burner lights,
turn the control knob to
the desired setting.
Home canning information
The large diameter of most water-bath or pressure
canners combined with high heat settings for long
periods of time can cause damage to the cooktop.
To protect your cooktop:
• For best results, use a canner which can be
centered over the surface burner.
• Do not place your canner on 2 surface burners at
the same time.
Start with hot water.
•
This reduces the time
the control is set on
high. Reduce the heat
setting to the lowest
position needed to
maintain a boil or
required pressure
levels in a pressure
canner.
•
Refer to your canner manual for specific instructions.
For up to date information on canning, contact your
local US Government Agricultural Department
Extension Office or companies who manufacture
home canning products.
Cookware tips
• The pan should have a flat bottom, straight sides,
and a well-fitting lid.
• Choose medium to heavy gauge (thickness)
cookware.
• The pan material (metal or glass) affects how
quickly and evenly the pan heats.
• When using glass or ceramic cookware, check
to make sure it is suitable for use on surface
burners.
• To avoid tipping, make sure pots and pans are
centered on the grates.
9
Page 10
Caring for Your Cooktop
wWARNING
Explosion Hazard
Do not store flammable materials such as gasoline near this appliance.
Doing so can result in death, explosion, or fire.
Cleaning chart
Use this chart to get specific information on cleaning your cooktop. Before cleaning, always make sure all
controls are off and the cooktop is cool.
PART
Control knobs
Surface burner
grates and caps
Surface burners
Tempered glass
surface
HOW TO CLEAN
• Turn the knobs off and pull them straight away from the control panel.
• Wash the knobs with a sponge and warm, soapy water. Rinse and dry them
well. Do not soak them. Do not use steel wool or gritty cleansers, which
can damage the finish of the knobs.
• Replace the knobs. Make sure all knobs are turned off.
• Clean as soon as they become dirty and when they are cool enough
to handle.
• Wash with a mildly abrasive plastic scrubbing pad and warm, soapy water.
Rinse and dry well.
• For stubborn stains, clean with a scrubbing pad and/or a powdered cleanser
and water. Repeat these cleaning steps as needed.
• See the “Sealed surface burners and cooktop” section for cleaning
instructions.
• Remove the grates.
• Wash the surface with a sponge and warm, soapy water or paper towel and
spray glass cleaner. Wipe with clean water and dry thoroughly. Use a
nonabrasive, plastic scrubbing pad on heavily soiled areas.
• Do not use steel wool, abrasives, or harsh cleansers. They may damage
the finish.
• If you use soap or detergent solutions, wipe thoroughly to prevent filmy
residue.
10
NOTE: When cleaning the cooktop with knobs removed, DO NOT allow water
to run down inside the cooktop.
• Replace the grates.
Page 11
Caring for Your Cooktop
Sealed surface burners and cooktop
Cleaning the surface burners
• You should routinely remove and clean the burner
caps. Always clean the burner caps after a
spillover. Keeping the burner caps clean prevents
improper ignition and an uneven flame.
• For the proper flow of gas and ignition of the
burner, DO NOT ALLOW SPILLS, FOOD, CLEANING AGENTS, OR ANY OTHER MATERIAL TO
ENTER THE GAS TUBE OPENING.
• Gas must flow freely through the gas tube
opening for the burner to light properly. You must
keep this area free of any soil and protect it from
boilovers or spillovers. ALWAYS keep the burner
cap in place whenever a surface burner is in use.
• Let the cooktop cool before cleaning.
• Do not use oven cleaners, bleach, or rust
removers.
• Do not obstruct the flow of combustion and
ventilation air.
• If the knobs are removed while cleaning, be careful
not to spill liquids through the holes in the control
area.
• Be careful not to allow moisture to collect in the
control area. Moisture can cause the ignitor
switches to fail.
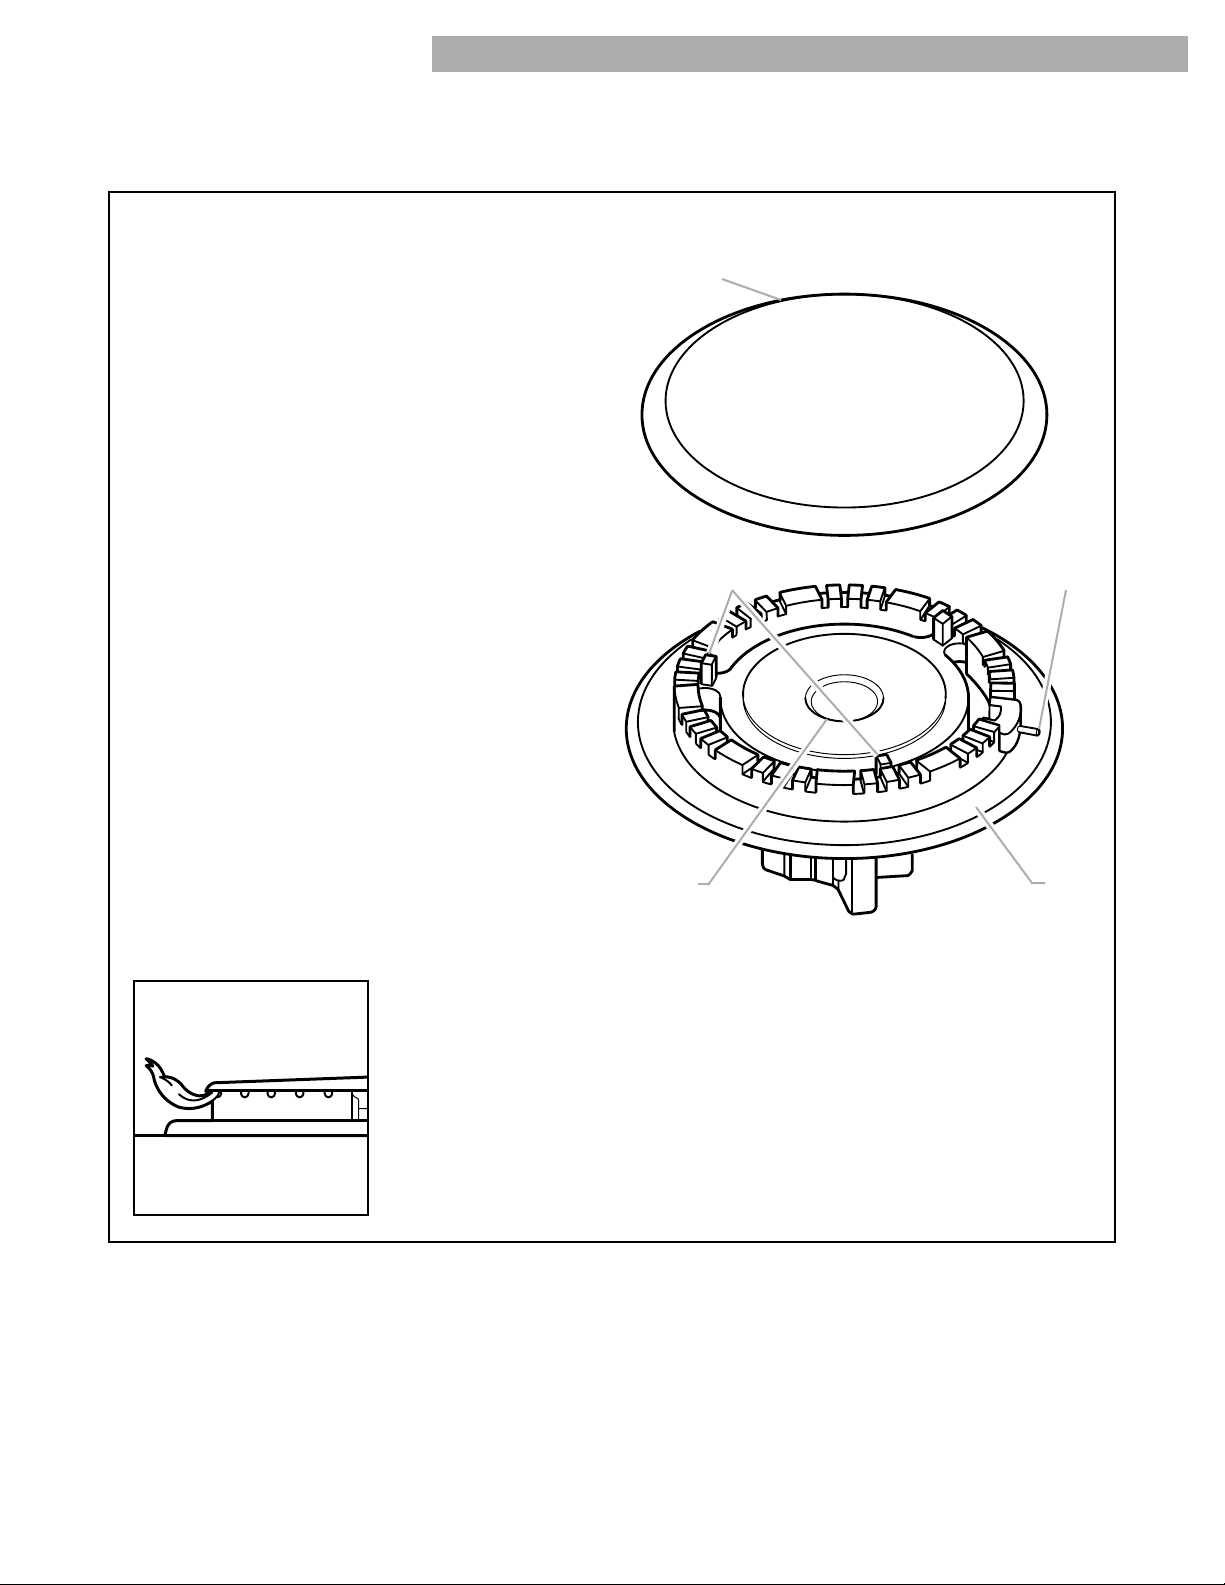
Cast-iron
burner cap
Alignment pins
Gas tube
opening
Ignitor
Burner
base
• Occasionally check the burner flames for proper
size and shape as
shown. A good flame
is blue in color. If the
flames are uneven, you
may need to clean the
burners.
11
Page 12
Caring for Your Cooktop
Sealed surface burners and cooktop (cont.)
To clean the burners:
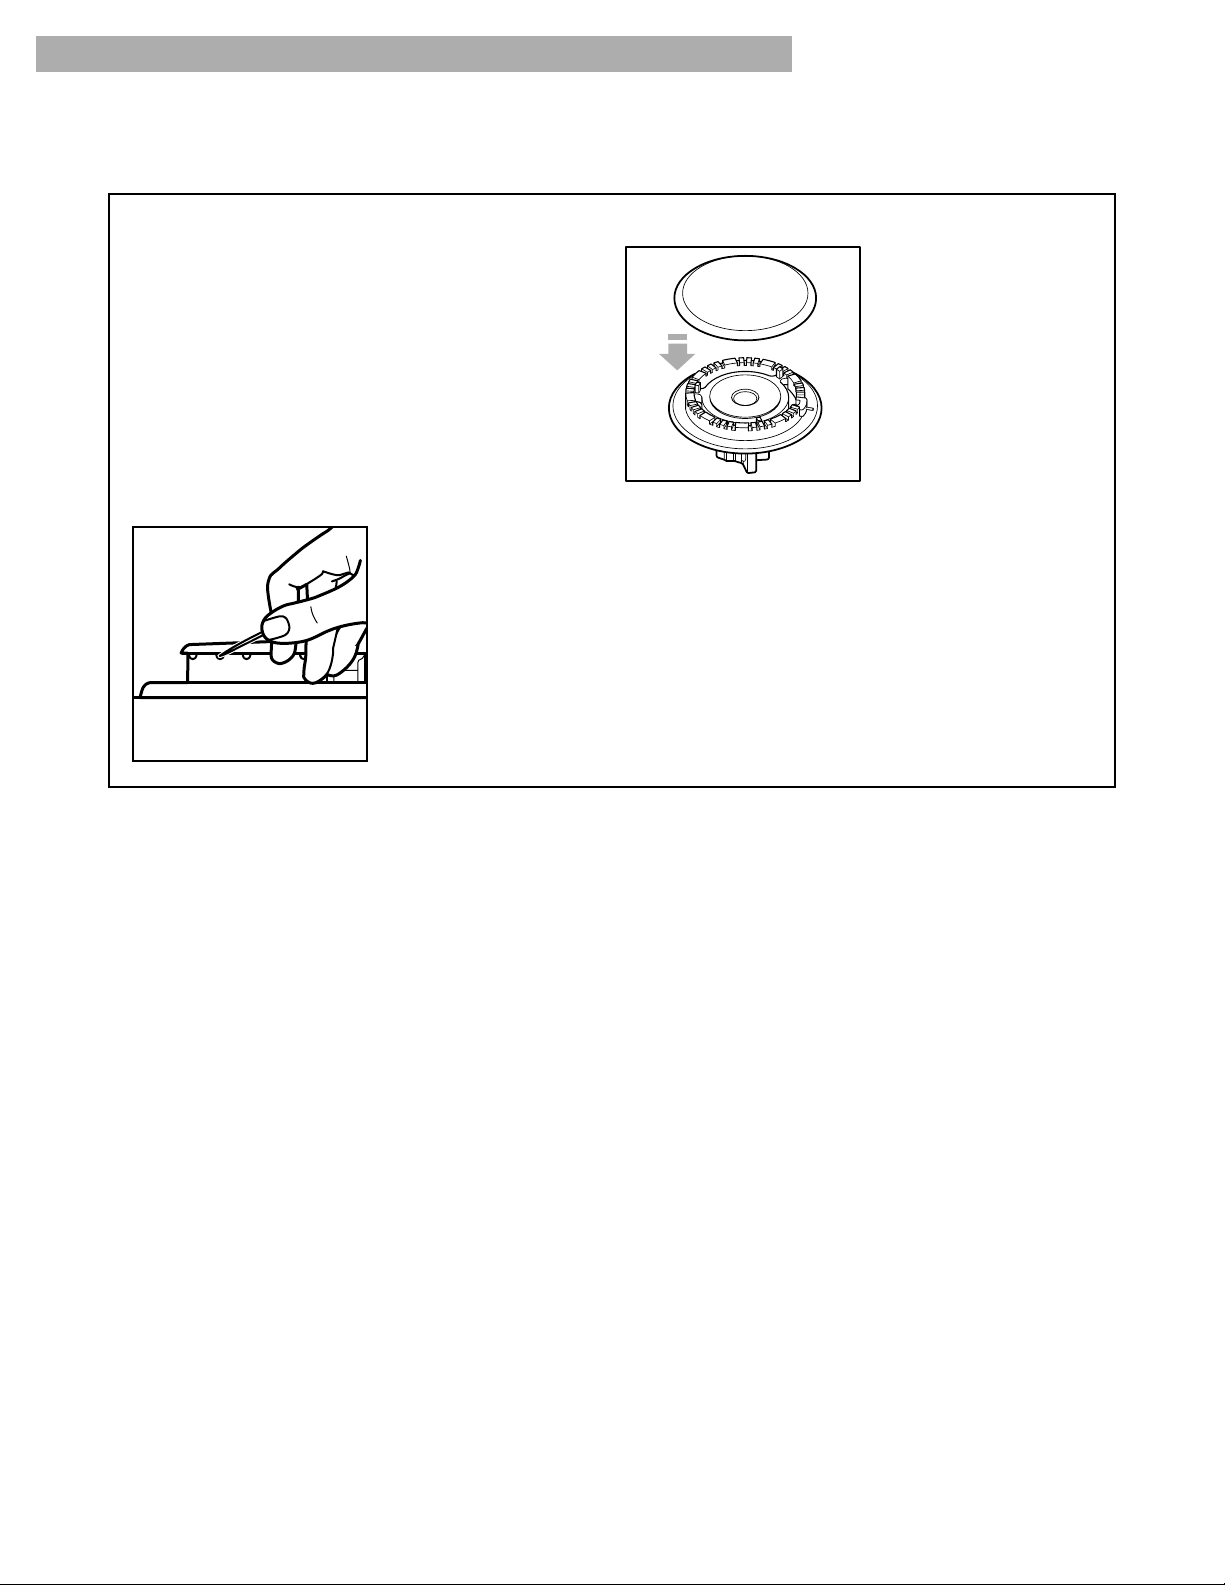
1. Pull the burner caps straight up from the
burner base.
2. Clean the burner caps with warm, soapy water
and a sponge. You can also clean the caps with
a mildly abrasive plastic scrubbing pad and
powdered cleanser. Do not clean the burner caps
in a dishwasher or self-cleaning oven.
3. If the gas tube opening has become soiled or
clogged, use a cotton swab or a soft cloth to clean
the area.
4. If the ports are clogged, clean them with a
straight pin. Do not
enlarge or distort the
port. Do not use a
wooden toothpick.
If the burner needs to be
adjusted, call a qualified
technician for service.
5. After cleaning the gas tube opening and ports,
replace the burner caps.
To replace the burner
caps, make sure the
alignment pins on the
burner base are properly
aligned with the cap.
6. Turn on the burner to see if it will light. If the burner
does not light after you have cleaned it, contact an
authorized Whirlpool service technician. Do not
service the sealed burner yourself.
12
Page 13

Troubleshooting
Most cooking problems often are caused by little things you can find and fix without tools of any kind.
Check the lists below before calling for assistance or service. If you still need help, see “Requesting
Assistance or Service” on page 14.
Cooktop does not work
PROBLEM
Nothing works
CAUSE
• The cooktop is not wired into a live circuit with proper voltage.
• The cooktop is not properly connected to the gas supply. Contact an autho-
rized Whirlpool service technician to reconnect the cooktop to the gas supply.
(See the Installation Instructions.)
• You have blown a household fuse or tripped a circuit breaker.
• The control knob is not set correctly. Push in the control knobs before
turning them.
Surface burners
PROBLEM
The burner fails to light
The burner flames are
uneven
The burner flames lift off
the ports, are yellow, or
are noisy when turned off
CAUSE
• You have blown a household fuse or tripped a circuit breaker.
• The burner ports may be clogged. Clean them with a straight pin. (See page 12.)
• The burner ports may be clogged. Clean them with a straight pin. (See page 12.)
• The burner needs cleaning. (See page 12.)
• The air/gas mixture is incorrect. Contact an authorized Whirlpool service
technician to check the air/gas mixture or see the Installation Instructions.
The burner makes a
popping noise when on
• The burner is wet from washing. Let it dry.
Cooking results
PROBLEM
Cooking results are
not what you expected
CAUSE
• You are using a pan that is not the correct type or size. Refer to a reliable
cookbook or recipe for the recommended pan type and size.
• The flame size does not fit the cookware being used.
• The flow of combustion and/or ventilation air to the cooktop is blocked.
• The cooktop is not level. (See the Installation Instructions.)
13
Page 14

Requesting Assistance or Service
Before calling for assistance or service, please check “Troubleshooting” section. It may save you
the cost of a service call. If you still need help, follow the instructions below.
If you need assistance or service
Call the Whirlpool Consumer Assistance
Center toll free at 1-800-253-1301.
Our consultants are available to
assist you.
When calling:
Please know the purchase date, and
the complete model and serial number of your
appliance (see the “A Note to You” section).
This information will help us better respond to
your request.
Our consultants provide assistance with:
Features and specifications on our full line
•
of appliances
Installation information
•
Use and maintenance procedures
•
Accessory and repair parts sales
•
Specialized customer assistance (Spanish speak-
•
ing, hearing impaired, limited vision, etc.)
Referrals to local dealers, service companies, and
•
repair parts distributors
Whirlpool service technicians are trained to fulfill
the product warranty and provide after-warranty
service, anywhere in the United States.
To locate the authorized Whirlpool service company
in your area, you can also look in your telephone
directory Yellow Pages.
If you need replacement parts
If you need to order replacement parts, we recommend that you only use FSP
parts. FSP replacement parts will fit right and work
right, because they are made to the same exacting
specifications used to build every new
WHIRLPOOL
®
appliance.
®
factory authorized
To locate FSP replacement parts in your area, call
our Consumer Assistance Center telephone number
or your nearest authorized service center.
For further assistance
If you need further assistance, you can write to
Whirlpool with any questions or concerns at:
Whirlpool Brand Home Appliances
Consumer Assistance Center
Whirlpool Corporation
c/o Correspondence Dept.
2000 North M-63
Benton Harbor, MI 49022-2692
14
Please include a daytime phone number in your
correspondence.
Page 15

WHIRLPOOL
Gas Cook top
Warrant y
®
LENGTH OF WARRANTY
FULL ONE-YEAR
WARRANTY
FROM DATE OF
PURCHASE
WHIRLPOOL WILL NOT PAY FOR
A. Service calls to:
1. Correct the installation of your cooktop.
2. Instruct you how to use your cooktop.
3. Replace house fuses or correct house wiring or plumbing.
B. Repairs when your cooktop is used in other than normal, single-family household use.
C. Pickup and delivery. Your cooktop is designed to be repaired in the home.
D. Damage to your cooktop caused by accident, misuse, fire, flood, acts of God, or use
of products not approved by Whirlpool.
E. Repairs to parts or systems resulting from unauthorized modifications made to
the appliance.
WHIRLPOOL CORPORATION SHALL NOT BE LIABLE FOR INCIDENTAL OR CONSEQUENTIAL
DAMAGES. Some states do not allow the exclusion or limitation of incidental or consequential
damages, so this exclusion or limitation may not apply to you. This warranty gives you specific legal
rights, and you may also have other rights which vary from state to state.
Outside the United States, a different warranty may apply. For details, please contact your
authorized Whirlpool dealer.
If you need assistance or service, first see the “Troubleshooting” section of this book. After checking
“Troubleshooting,” additional help can be found by checking the “Requesting Assistance or Service”
section. Call our Consumer Assistance Center at 1-800-253-1301 from anywhere in the U.S.A.
WHIRLPOOL WILL PAY FOR
FSP* replacement parts and repair labor to correct defects
in materials or workmanship. Service must be provided by
an authorized Whirlpool service company.
1/98
16
3191747
© 1998 Whirlpool Corporation
® Registered Trademark of Whirlpool, U.S.A.
Printed in U.S.A.
2/98
 Loading...