

Whirlpool EL5030V, EL6050V, EL4030V User Manual
UseAndCare
A Note To You
PartsAnd Features 4
2
Operating
Instructions 5
Caaig For Your
13
Laundry Guide 17
If You Need Assistance
orsen/ice
Warranty 24
Cdl TW-FREE Wh babotts or
common& %8004-ROPER
20
LARGE CAPACITY ELECTRIC AND GAS DRYERS
MODELS EL4030V GL4030V
EL5030V GL5030V
EL6050V GL6050V
A Note To You
Thank you for buying a Roper appliance.
You have purchased a quality, B&&&S home appliance. Years of engineering experience have gone
into its manufacturing. To ensure that you will enjoy many years of trouble-free operation, we have
developed this Use and Care Guide. It is full of valuable information on how to operate and maintain
your appliance property and safely. Please read it carefully. Also, please complete and mail the Cwnership Registration Card provided with your appliance.
Your safety is important to us.
This guide contains safety symbols and statements. Please pay special attention to these symbols and
folbw any instructions given. Here is a brief explanation of the use of each symbol.
This symbol will help alert you to such dangers as
personal injury, burns, fire and electrbal shock
This symbol will help you avoid actions which
could cause product damage (scratches, dents,
etc.) and damage to your personal property.
Our TOLL-FREE number, l-60044-ROPER (l-800-447-6737), is
available 24 hours a day.
lf you ever have a question concerning your appliance’s operation, or if you need service, feel free to
call us for help. When calling, you will need to know your appliance’s complete model number and serial
number. You can find this information on the model and serial number label (see diagram for your model
on page 4 or 5). For your convenience, we have included a handy place below for you to record these
numbers, the purchase date from the sales slip and your dealer’s name and telephone number. Keep
this bode and the sales slip together in a safe place for future reference.
Model Number
!%lal Number
Purchase Date
FOR YOUR SAFETY
If you smell gas:
1. Open wlndows.
2. Don’t touch electrlcal switches.
3. Extlngulsh any open flame.
4. lmmedlately call your gas
suppller.
Dealer Name
Dealer Phone
FOR YOUR SAFETY
Do not store or use gasollne or
other flammable vapors and
llqulds In the vlclnlty of thls or
any other appliance. The fumes
can create a flre hazard or
exploslon.
2
ImDortant Safetv Instructions
To reduce the risk of fire, electrical shock, or injury to persons when
using your dryer, follow basic precautions, including the following:
l Read all InstructIons before using the
dryer.
l NEVER dry items deaned, washed, soaked
in or spotted with wax, paint, gasoline or
flammable fluids in the dryer. The fumes can
create a FIRE HAZARD or EXPLOSION.
ALWAYS hand launder and air dry fabrics
containing these materials.
l NEVER allow children to operate, play with
or crawl inside the dryer. Close supervision
of children is necessary when the dryer is
used near children.
l DO NOT reach into a dryer if the drum is
moving.
l When discarding an old dryer, ALWAYS
remove the door to prevent accidental
l You are r88pOnSible for maklng 8ur8 that
your dryer is installed, repaired and has parts
replaced by a qualified person.
l Use only fabric softeners specifically labeled
as not being harmful to the dryer.
. RRE HAZARD and DAMAGE to materials
can result from:
-drying rubber, rubber-like and heat sensitive
materials with heat.
-allowing lint build-up inside the dryer or
exhaust system. Cleaning should be done
periodically by a qualified person.
l Clean lint screen before or after each load.
l DO NOT let dust, lint, paper, rags, chemicals,
etc. pile up around or under the dryer.
entrapment. l Dryer must be electrically grounded. See the
. DO NOT install or store dryer where it will be
Installation Instructions.
exposed to the weather.
l DO NOT tamper with the controls.
- SAVE THESE INSTRUCTlOf4S -
Additional safety instructions and your
responsibilities
. NEVER operate the dryer if:
-II is not working right (i.e. noisy,
too hot).
-it is damaged.
-parts are missing (i.e. door latch).
-all panels are not in place.
-the lint screen is loose, damaged or
missing.
l ALWAYS shut off the gas valve before
leaving on vacation if you have a gas dryer.
l ALWAYS unplug the power supply cord or
turn off electrical power before attempting to
service the dryer. Shut off GAS VALVE if
you have a gas dryer.
l You 8re responsible for maklng 8ur8 that
your dryer:
-is properly maintained.
-is property installed and leveled on a floor
that can support the weigM in a well
ventilated mm.*
- is located in an area where the temperature
is above 45OF (7°C).
- is conneded to the proper outlet and
electrical supply.’
- is properly connected to fuel and exhaust
systems.’
- is not installed against drapes or curtains.’
- is used only for jobs normally expected of
home cbthes dryers.
- is not used by anyone unable to operate it
PropedY.
*See the Installation Instructions for complete
information.
3
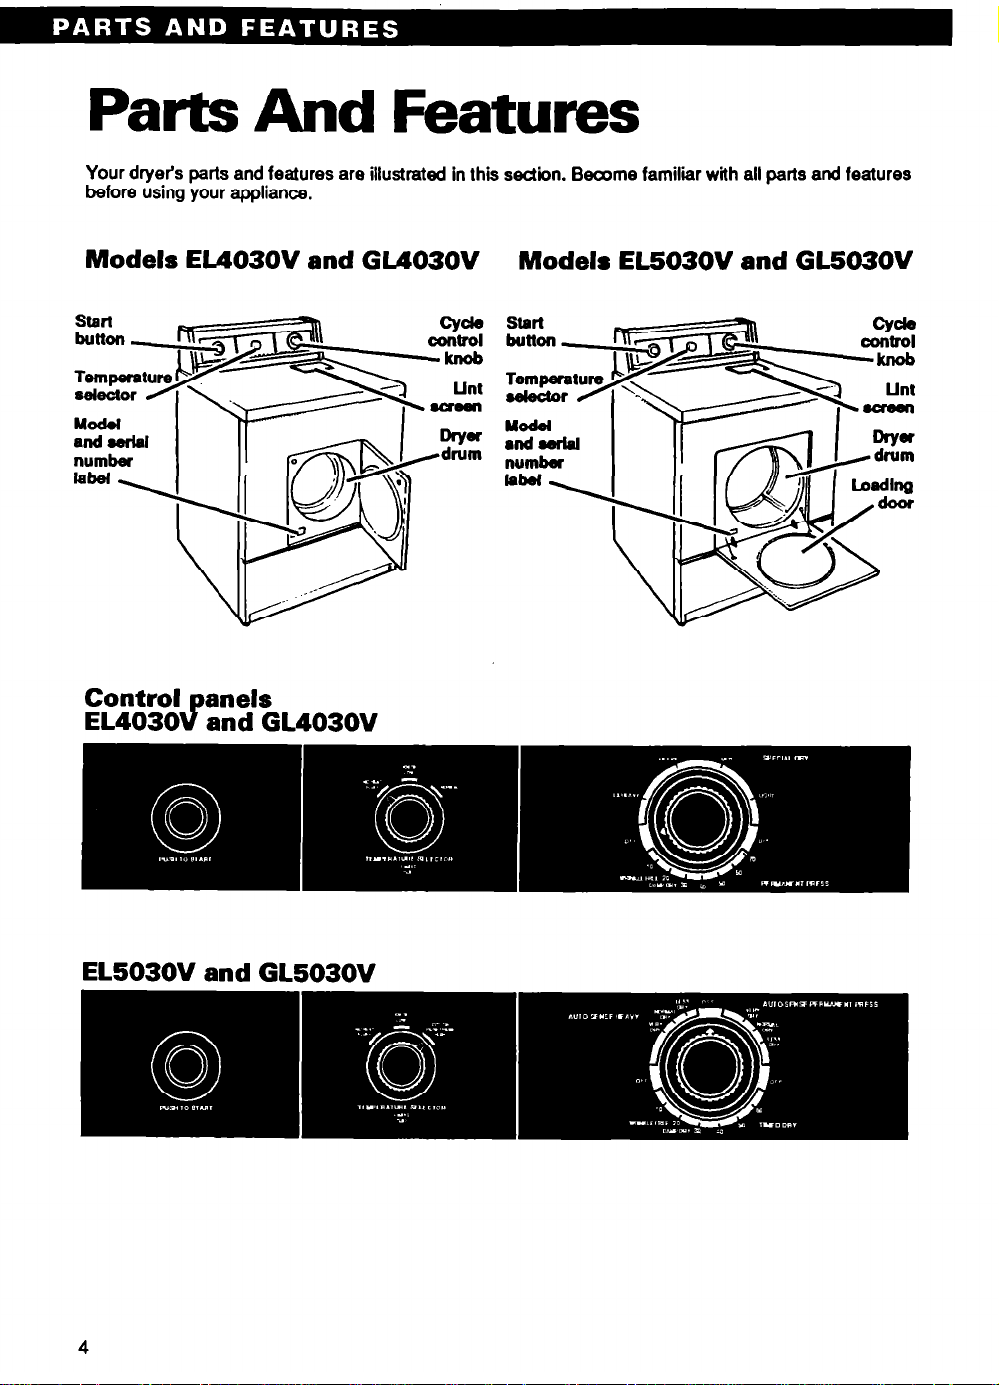
Parts And Features
Your dryer’s parts and features are illustrated in this section. B-me familiar with all parts and features
before king your appliance.
Models EL4030V and GL403OV
Control panels
EL4030V and GL403OV
Models EWOBOV and GL503OV
EL5030V and GL503OV

Models EL6050V and GL605OV
Control panel
EL6050V and GL605OV
Operating Instructions
I
In This Section
I
Starting your dryer .-. --ll........l ---I6
CydesEL4O3OV and GL402OV M............... --.Q
Gydeo-ELWOV, QL503OV, EIAOSOV and GL605OV .@
lJ8lng mlnkla free..-....,.,.---...---.10
Your Roper dryer is designed for ease of operation and maximum drying efficiency. This section gives
you important information for efficient and safe use of your dryer.
NOTE: Do not remove any permanent instruction labels inside the dryer. You should wipe out the dryer
drum with a damp cloth before using to remove dust from storing or shipping.
ff your dryer has a Consumer Buy Guide label, remove it. lt will be easier to remove before the dryer is
used. To remove any remaining glue:
l Rub briskly with thumb to make a ball, then
remove.
OR
l Soak area with liquid hand dishwashing
detergent before removing glue as described
above.
POW
lJslngdampdry,-- -...--I ----11
Pa*
The no hsat fluff cycle3 or Mting ,----.l 1
End-ofeyde l lgnnl ..---,-e--w.-12
osntb halt 8y8tem -..--~-~~.--...12
Do not use sharp instruments, rubbing alcohol,
flammable fluids or abrasive cleaners. These can
damage the finish. See ‘Important Safety
Instructions’ on page 3.
I
5
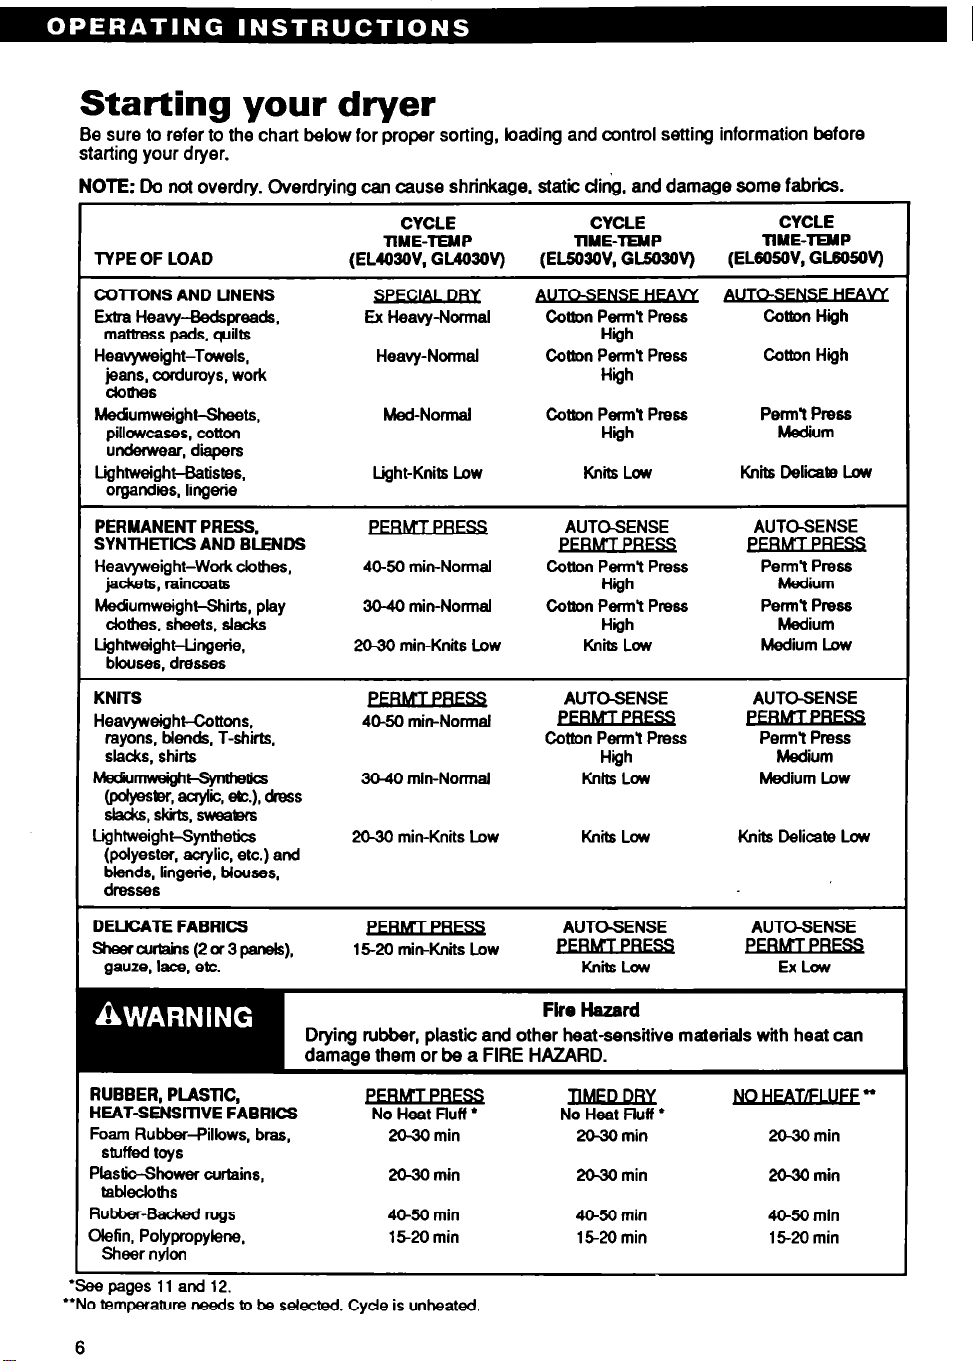
Starting your dryer
Be sure to refer to the chart below for proper sorting, loading and control setting information before
starting your dryer.
NOTE: Do not overdry. Overdrying can cause shrinkage, static din& and damage some fabrics.
TYPE OF LOAD
COITONS AND LINENS
Extra Heavy-5edspreads.
mattress pads, quilts
Heavyweight-Towels,
jeans, ccrduroys, work
dOltWS
M&umweightShwts,
pillowcases, cotton
underwear, diirs
Lightweight-Satistes,
organdiis, lingerie
PERMANENT PRESS,
SYNTHETICS AND BLENDS
Heavyweight-Work clothes,
jackek, raincoak
Mediumweight-Shirts, play
dcthes. sheets, slacks
Lightweight-Lingerie,
blouses, dresses
KNITB
Heavyweight-Cottons,
myons. bknds. T-shirts.
skJcs,~shirts
lvlediumweigh~r
(Pd&s~*-Yl~‘-s
CYCLE
TIME-TEMP
(EL403OV, GL403OV)
SI’FCM’ DW
Ex Heavy-Normal
Heavy-Normal Cotton Perm’t Press
Mad-Normal cotton Perm’t Press
Light-Knits Low Knits Lclw
PFRK PR’=SS
CYCLE
TIME-TEMP
(ELSMOV, GL503OV)
AUTOSENSE-
Cotton Perm’t Press
High
High
High
AUTOSENSE
PFRW PR’=sS
40-50 min-Normal
30-40 min-Normal
2%30 min-Knits Low
PFRW PRFSS
40-50 min-Normal
30-40 min-Normal
Cotton Penn? Press
High
Cc&n Perm’t Press
High
Knik Low
AUTO-SENSE
PFRM PRFSS
titb3n
Penn? Press
High
Knik Low
CYCLE
TIME-TEMP
(ELt%lW, GL6OSOV)
Cotton High
Cotton High
Pwm’t Press
Medium
Knik Deliite Low
AUTO-SENSE
PFRm PRFSS
Penn1 Press
Medium
Pemtl Press
Medium
Medium Low
AUTO-SENSE
PFRm f’R’=SS
Perml Press
Medium
Medium Low
Lightwe~ght&nthetics
(potyester, acrylic, etc.) and
blends, lingerie, blouses,
dmsses
DEUCATE FABRICS
Sheefcunains(2or3penets),
gauze, lace. etc.
RUBBER, PLASTIC,
HEAT-SENSITIVE FABRICS
Foam RubberPillows, bras,
stuffed toys
Plastic-Shower curtains,
b3M6CJOUlS
Rubber-Backed rugs
3lefin, Polypropylene.
Sheer nylon
6
20-30 min-Knits Low
PFRM PRFSS
15-20 min-Knits Low
Fire Hazard
Drying rubber,
plastic
and
other heat-sensitive materials with heat can
damage them or be a FIRE HAZARD.
PFRM PRFSS
SeleCtEd.
No Heat Fluff
2o-30 min 2040 min 2o-30 min
20-30 min 2030 min 2040 min
4MO min 4&50 min
1520 min 15-20 min 16-20 min
Cyde is unheated.
l
Knik Low
AUTMNSE
PFRM PRFSS
Knik Lovv
NoHeatFtuff’
Knik Delicate Low
AUTOSENSE
PFRM pR’=SS
EXLOW
NO”
4060 min
EL403OV and GLM3OV
EL503OV and Gl503OV
EL60!5OV and GUO5OV
7

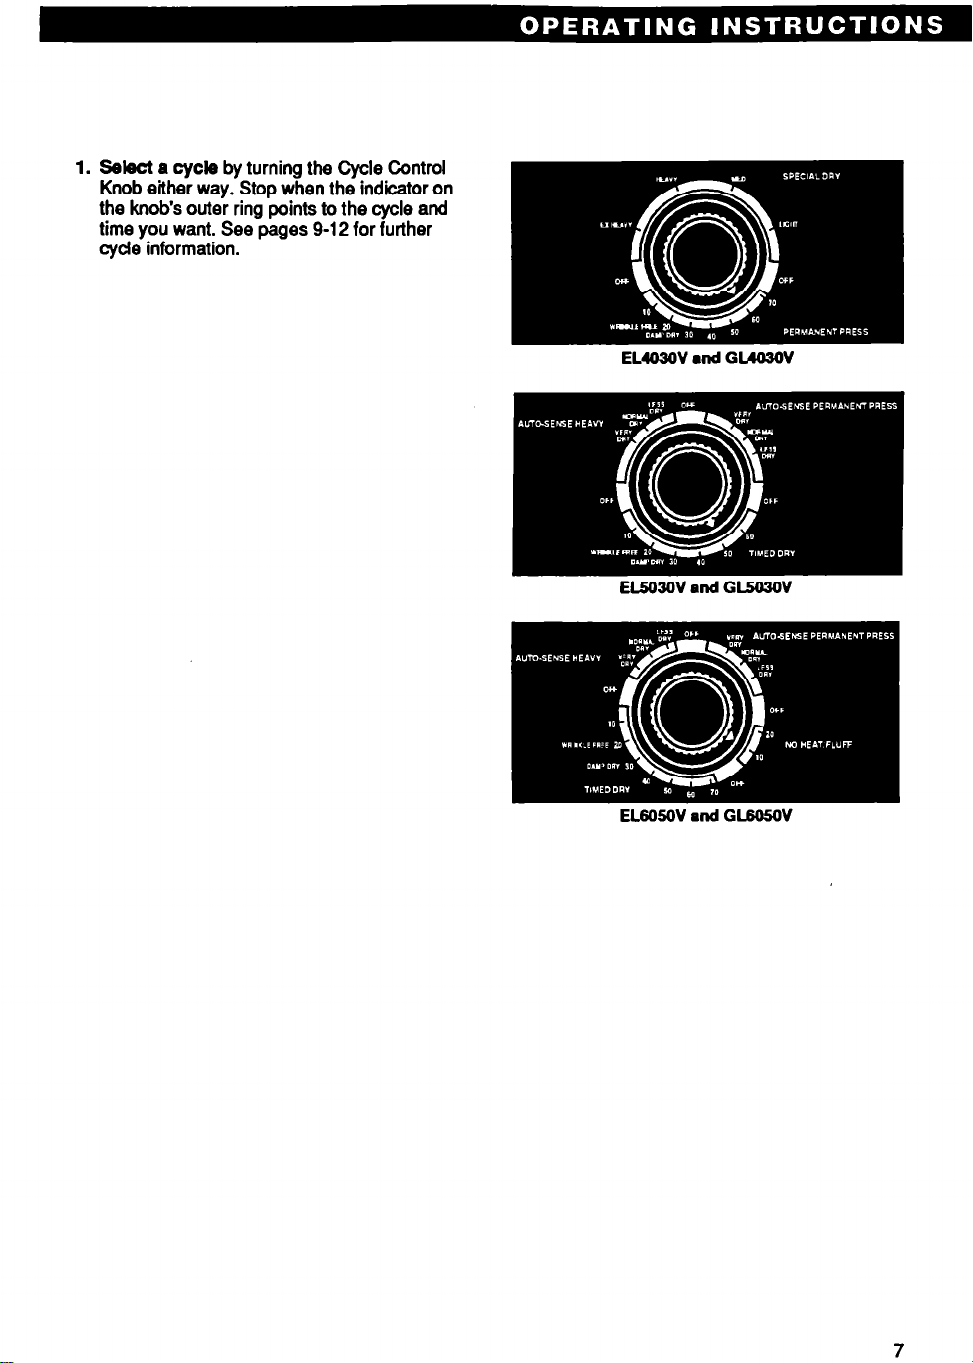
3. Push the Start Button to start the dryer.
To stop and restart the dryer:
l Open the door or turn the Cycle Control Knob
to OFF to stop the dryer.
l Cbse the door, select a cycle (if necessary)
and push the Start Button to restart the dryer.
To change the cycle and/or time, turn the Cycle
Control Knob either way to point to a new setting.
The Cycle Control Knob should point to an OFF
area when the dryer is not in use. If the dryer is
stopped before the cycle is finished turn the
Cycle Control Knob to an OFF area.
EL503OV and Gl5030V
EL6OSOV l nd GMOSOV
6
 Loading...