

Whirlpool EL02CCXPB00 User Manual
®
REFRIGERATOR USE & CARE GUIDE
MANUAL DE USO Y CUIDADO DEL REFRIGERADOR
GUIDE D’UTILISATION ET D’ENTRETIEN DU RÉFRIGÉRATEUR
Table of Contents / Índice / Table des matières
ASSISTANCE OR SERVICE ............................ 1
REFRIGERATOR SAFETY............................... 2
INSTALLATION INSTRUCTIONS ................... 3
REFRIGERATOR USE ..................................... 5
REFRIGERATOR CARE................................... 6
TROUBLESHOOTING...................................... 7
WARRANTY...................................................... 8
AYUDA O SERVICIO TÉCNICO...................... 9
SEGURIDAD DEL REFRIGERADOR .............. 9
INSTRUCCIONES DE INSTALACIÓN .......... 10
USO DE SU REFRIGERADOR ...................... 13
CUIDADO DE SU REFRIGERADOR............. 13
SOLUCIÓN DE PROBLEMAS....................... 14
GARANTÍA...................................................... 15
ASSISTANCE OU SERVICE .......................... 16
SÉCURITÉ DU RÉFRIGÉRATEUR................ 16
INSTRUCTIONS D’INSTALLATION.............. 17
UTILISATION DU RÉFRIGÉRATEUR ........... 20
ENTRETIEN DU RÉFRIGÉRATEUR ............. 21
DÉPANNAGE.................................................. 22
GARANTIE...................................................... 23
Assistance or Service
If you need assistance or service, first see the “Troubleshooting”
section. Additional help is available by calling our Customer
Interaction Center at 1-800-253-1301 from anywhere in the
U.S.A., or write:
Whirlpool Corporation
Customer Interaction Center
553 Benson Road
Benton Harbor, MI 49022-2692
In Canada, for installation and service call, 1-800-807-6777.
For assistance call 1-800-461-5681 Monday to Friday 8:00 a.m. 6:00 p.m. (EST), Saturday 8:30 - 4:30 p.m. (EST), or write:
Whirlpool Canada Inc.
Customer Interaction Center
1901 Minnesota Court
Mississauga, Ontario L5N 3A7
Information may also be obtained by visiting our website at
www.whirlpool.com.
In Canada, visit www.whirlpool.com/canada.
Please include a daytime phone number in your correspondence.
Keep this book and your sales slip together for future
reference. You must provide proof of purchase or installation
date for in-warranty service.
Write down the following information about your appliance to help
you obtain assistance or service if you ever need it. You will need
to know your complete model number and serial number. You can
find this information on the model and serial number label, located
on the inside wall of the refrigerator compartment.
Dealer name____________________________________________________
Serial number __________________________________________________
Address ________________________________________________________
Phone number __________________________________________________
Model number __________________________________________________
Purchase date __________________________________________________
2300242
®
REFRIGERATOR SAFETY
Your safety and the safety of others are very important.
We have provided many important safety messages in this manual and on your appliance. Always read and obey all safety
messages.
This is the safety alert symbol.
This symbol alerts you to potential hazards that can kill or hurt you and others.
All safety messages will follow the safety alert symbol and either the word “DANGER” or “WARNING.”
These words mean:
You can be killed or seriously injured if you don't immediately
DANGER
WARNING
All safety messages will tell you what the potential hazard is, tell you how to reduce the chance of injury, and tell you what can
happen if the instructions are not followed.
IMPORTANT SAFETY INSTRUCTIONS
WARNING:
■
Plug into a grounded 3 prong outlet.
■
Do not remove ground prong.
■
Do not use an adapter.
■
Do not use an extension cord.
■
Disconnect power before servicing.
■
Replace all panels before operating.
To reduce the risk of fire, electric shock, or injury when using your refrigerator, follow these basic precautions:
SAVE THESE INSTRUCTIONS
follow instructions.
can be killed or seriously injured if you don't
You
instructions.
■
Remove doors from your old refrigerator.
■
Use nonflammable cleaner.
■
Keep flammable materials and vapors, such as gasoline,
away from refrigerator.
■
Use two or more people to move and install refrigerator.
follow
Proper Disposal of Your Old Refrigerator
WARNING
Suffocation Hazard
Remove doors from your old refrigerator.
Failure to do so can result in death or brain damage.
IMPORTANT: Child entrapment and suffocation are not problems
of the past. Junked or abandoned refrigerators are still dangerous
– even if they will sit for “just a few days.” If you are getting rid of
your old refrigerator, please follow these instructions to help
prevent accidents.
Before you throw away your old refrigerator or freezer:
■ Take off the door(s).
■ Leave the shelves in place so that children may not easily
climb inside.
2
INSTALLATION INSTRUCTIONS
Unpack the Refrigerator
WARNING
Excessive Weight Hazard
Use two or more people to move and install
refrigerator.
Failure to do so can result in back or other injury.
NOTE: Do not install the refrigerator near an oven, radiator, or
other heat source, in a location with prolonged exposure to direct
sunlight, nor in a location where the temperature will fall below
55°F (13°C).
IMPORTANT: Allow the refrigerator to stand upright for a
minimum of 2 hours after unpacking it and before plugging it into
the electrical outlet. See “Electrical Requirements.” This allows
the refrigerant to settle properly and prevents damage to the
cooling system.
Remove Packaging Materials
■ Remove and properly dispose of packaging materials.
Remove tape and glue residue from surfaces before turning
on the refrigerator. Rub a small amount of liquid dish soap
over the adhesive with your fingers. Wipe with warm water
and dry.
■ Do not use sharp instruments, rubbing alcohol, flammable
fluids, or abrasive cleaners to remove tape or glue. These
products can damage the surface of your refrigerator. For
more information, see “Refrigerator Safety.”
When Moving Your Refrigerator:
Your refrigerator is heavy. When moving the refrigerator
for cleaning or service, be sure to protect the floor.
Always pull the refrigerator straight out when moving it.
Do not wiggle or “walk” the refrigerator when trying to move
it, as floor damage could occur.
Clean Before Use
After you remove and properly dispose of all packaging materials,
clean the inside of your refrigerator before using it. See the
cleaning instructions in “Refrigerator Care.”
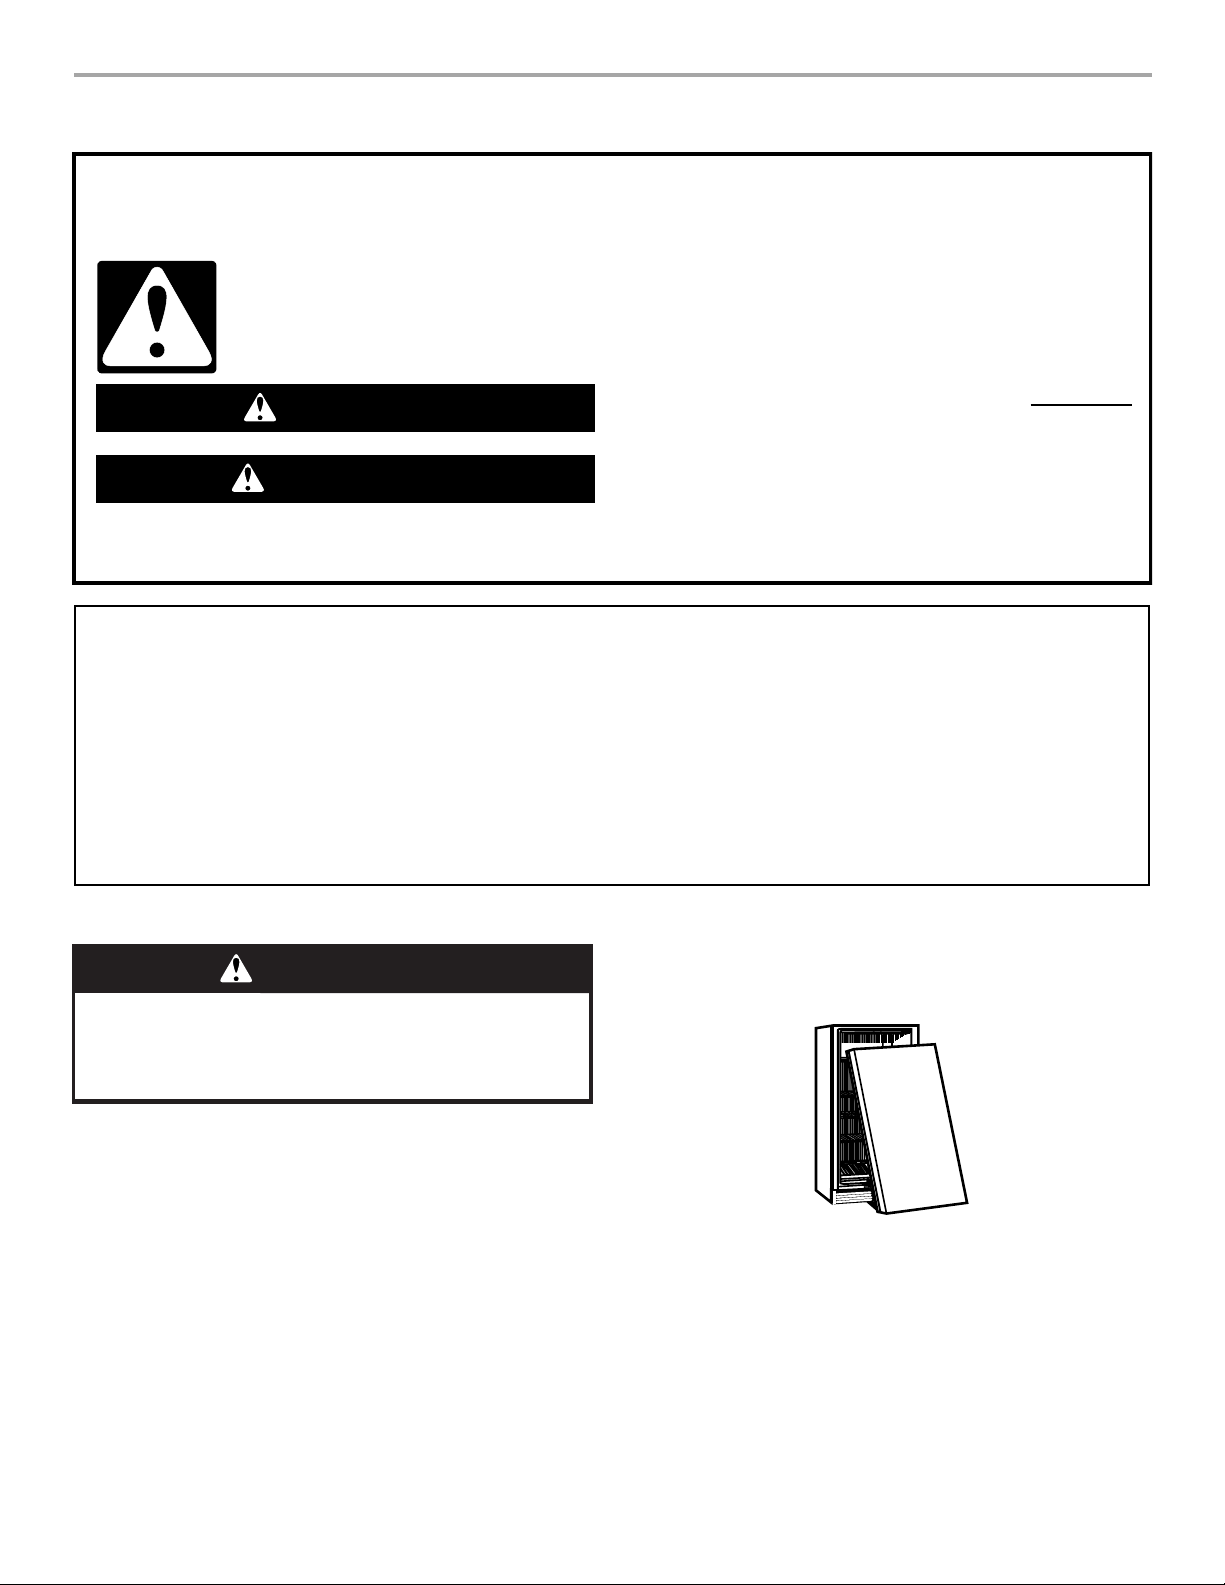
Location Requirements
WARNING
315/16" (10 cm)
5" (13 cm)
Electrical Requirements
WARNING
Electrical Shock Hazard
Plug into a grounded 3 prong outlet.
Do not remove ground prong.
Do not use an adapter.
Do not use an extension cord.
Failure to follow these instructions can result in death,
fire, or electrical shock.
Explosion Hazard
Keep flammable materials and vapors, such as
gasoline, away from refrigerator.
Failure to do so can result in death, explosion, or fire.
Allow at least 5" (13 cm) of air space on each side of the
refrigerator and 3¹⁵⁄₁₆" (10 cm) of air space at the top of the
refrigerator. If the hinge side is against a wall, leave extra space so
the door can open wider.
Before you move your refrigerator into its final location, it is
important to make sure you have the proper electrical connection.
Recommended Grounding Method
A 115 Volt, 60 Hz., AC only 15 or 20 amp fused, grounded
electrical supply is required. It is recommended that a separate
circuit serving only your refrigerator be provided. Use an outlet
that cannot be turned off by a switch. Do not use an
extension cord.
NOTE: Before performing any type of installation, cleaning, or
removing a light bulb, turn the refrigerator control to 0 and then
disconnect the refrigerator from the electrical source. When you
are finished, reconnect the refrigerator to the electrical source and
reset the control to the desired setting.
3
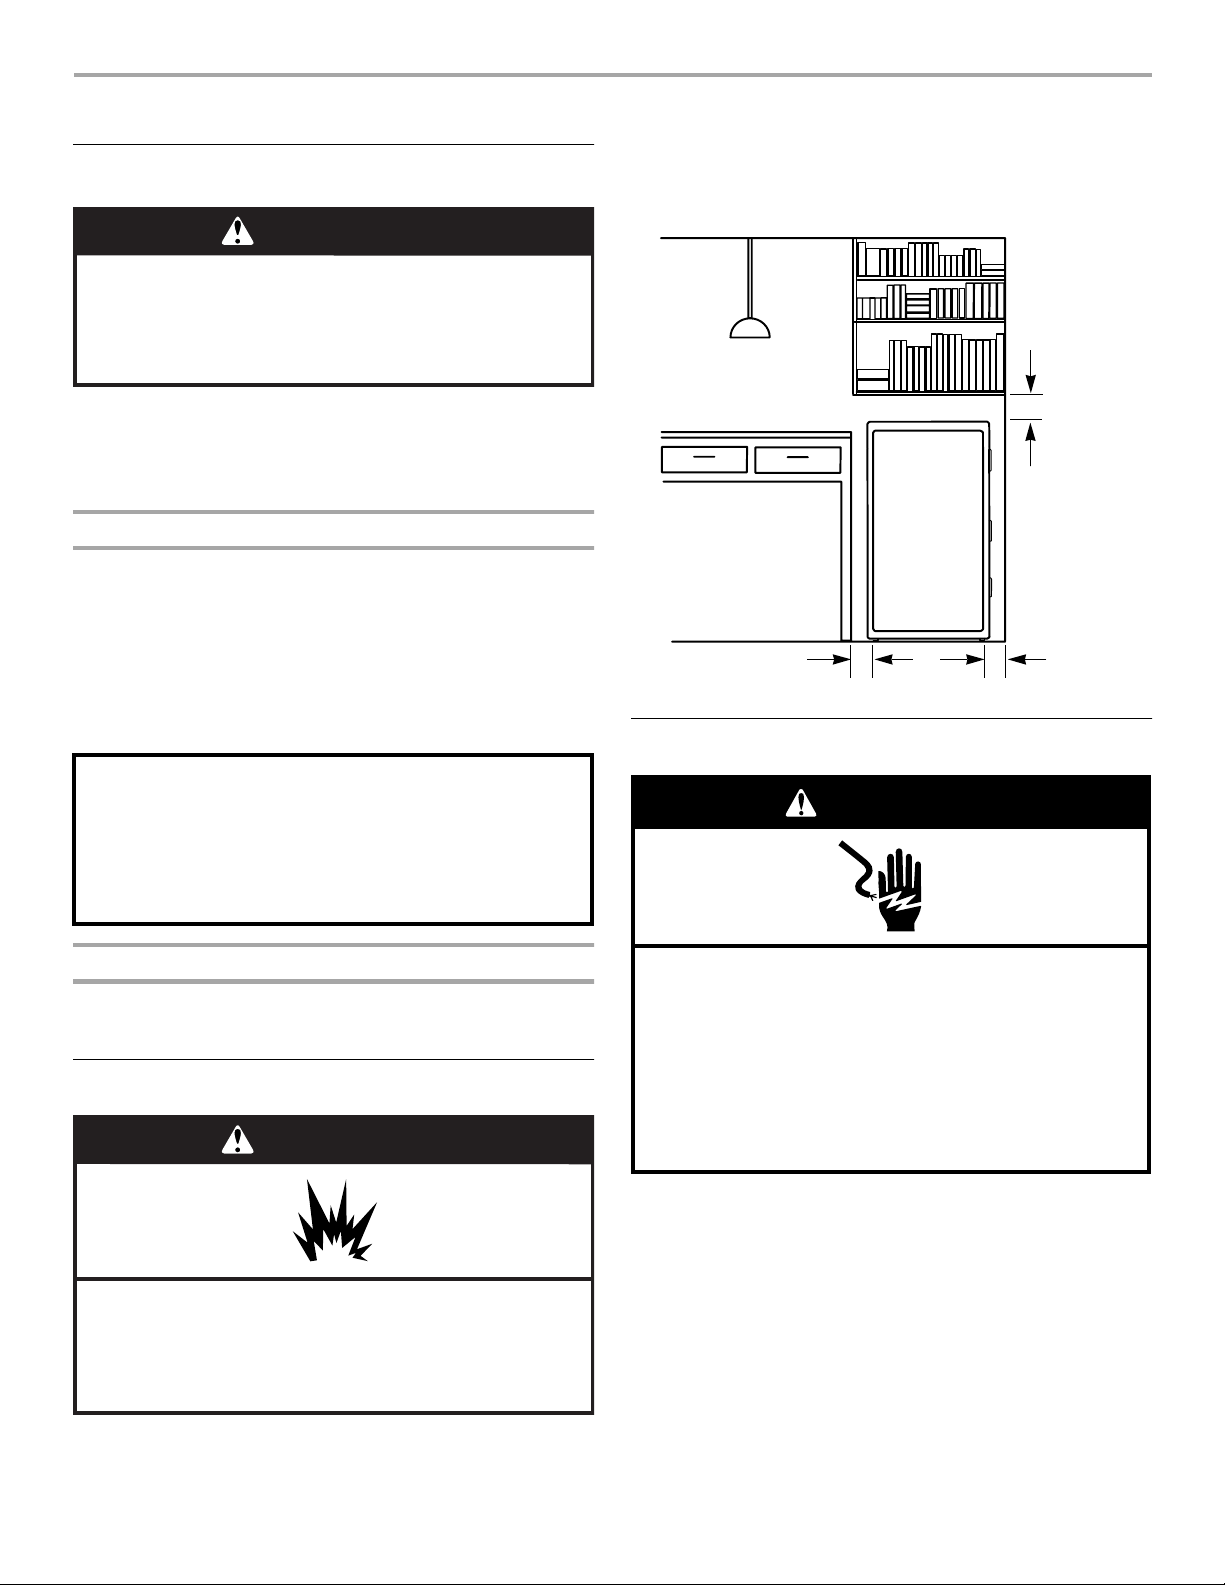
Reverse the Door Swing
B
A
A
WARNING
Excessive Weight Hazard
Use two or more people to move and install
refrigerator.
Failure to do so can result in back or other injury.
TOOLS NEEDED: ⁵⁄₁₆" hex-head socket wrench, flat-blade
screwdriver, flat 2" (5 cm) putty knife.
IMPORTANT: Before you begin, turn the refrigerator control to 0.
Unplug refrigerator or disconnect power. Remove food and all
loose items from the inside of the refrigerator.
Remove the Door
1. Unplug refrigerator or disconnect power.
2. Use the putty knife to pry up and remove the hinge cover.
A
6. Lift the door up and off of the bottom hinge. Place on a soft or
padded surface to avoid scratching.
7. Use the putty knife to remove the hinge hole plug and move it
to the opposite side of the refrigerator as shown.
A. Hinge hole plug
Reverse the Hinges
1. Lay the refrigerator on its side on the floor. Make sure the
surface is not abrasive to avoid scratching.
IMPORTANT: Never lay the refrigerator on its back or top.
Doing so could cause damage to the compressor.
2. Remove the ⁵⁄₁₆" screws from the bottom hinge. Keep these
screws for later use.
A. Hinge cover
3. Remove the ⁵⁄₁₆" screws from the top hinge. Keep these
screws for later use.
A
A.
⁵⁄₁₆
" screws
B. Top hinge
4. Remove the top hinge. Keep all parts together.
5. Use the putty knife to remove the door hinge hole plug and
move it to the opposite side of the door as shown.
A
A. Door hinge hole plug
A
B
C
D
A. Bottom hinge pin
B. Leveling leg
C. Bottom hinge
D.
⁵⁄₁₆
" screws
3. Remove the bottom hinge. Keep all parts together.
4. Unscrew the leveling leg from the opposite side of the bottom
of the refrigerator.
5. Insert the leveling leg in the middle screw hole of the “old”
location of the bottom hinge. You may need to use a
screwdriver to clear out the hole.
A. Leveling leg
4
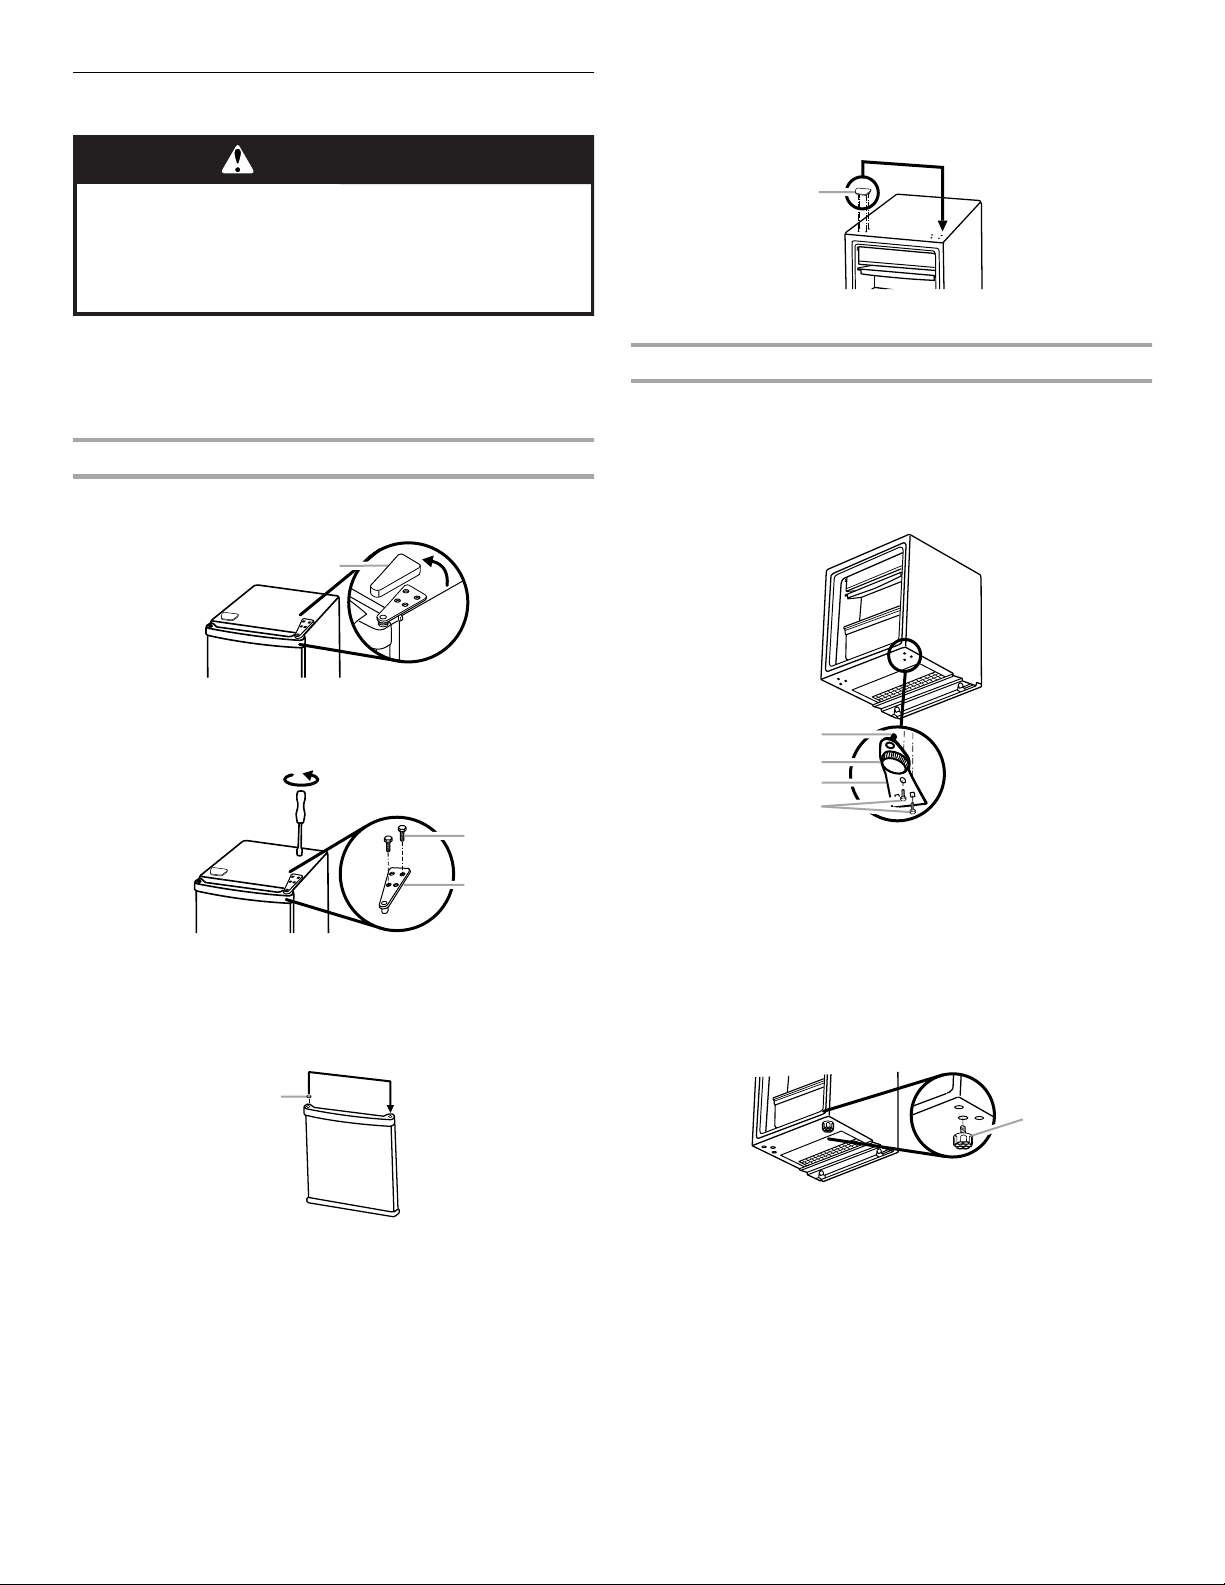
6. Use the socket wrench and ⁵⁄₁₆" screws to install the bottom
hinge on the opposite side of the refrigerator.
NOTE: Do not tighten the screws completely.
A
B
C
D
A. Bottom hinge pin
B. Leveling leg
C. Bottom hinge
⁵⁄₁₆
" screws
D.
7. Stand the refrigerator upright.
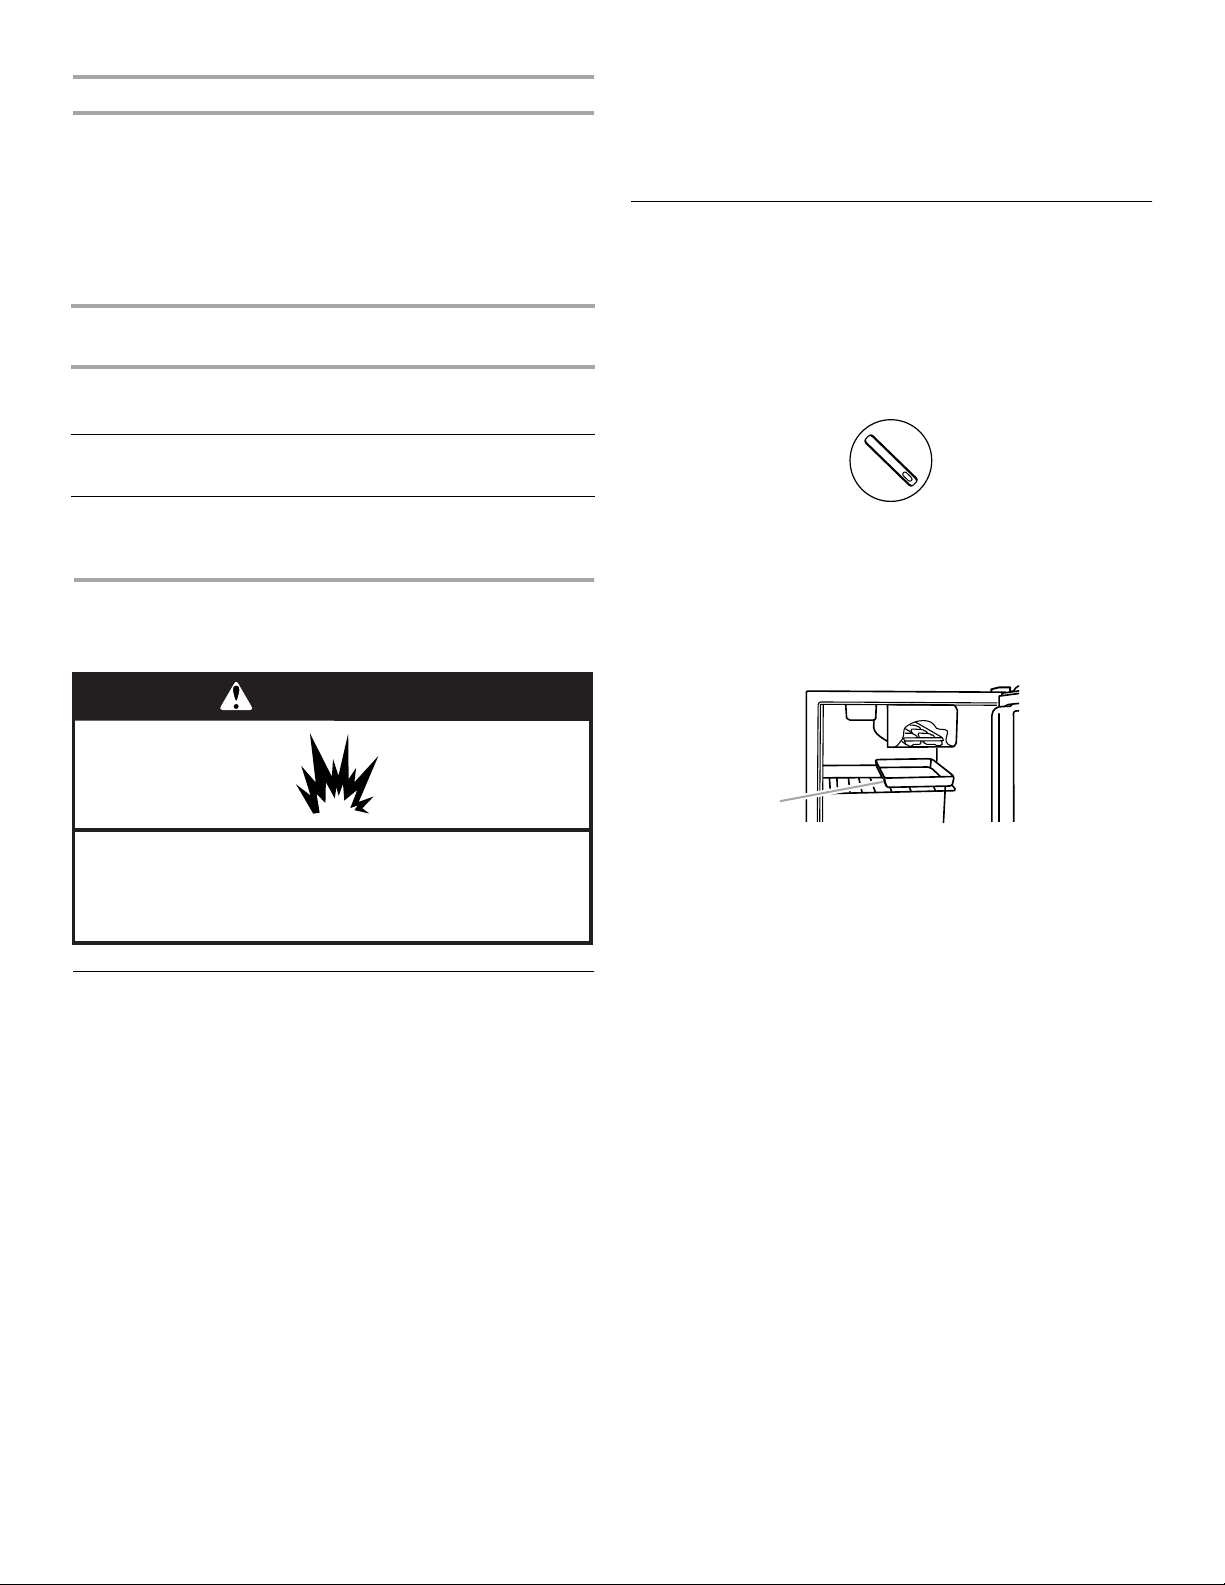
Adjust the Door Closing
Your refrigerator has two adjustable leveling legs in the front. If
your refrigerator seems unsteady or you want the door to close
easier, adjust the refrigerator's tilt using these instructions.
1. Move the refrigerator into its final location.
2. Lower the leveling legs just enough to lift the cabinet up and
off of the floor.
3. Adjust the leveling legs to level the refrigerator:
■ Turn the leveling leg to the right to lower that side of the
refrigerator.
■ Turn the leveling leg to the left to raise that side of the
refrigerator.
Replace the Door
1. Replace the door on the bottom hinge pin.
2. Tighten the bottom hinge screws the rest of the way.
3. While holding the door in the closed position, install the ⁵⁄₁₆"
screws in the top hinge on the side opposite its original
location.
NOTE: Do not tighten the screws completely.
A
B
A.
⁵⁄₁₆
" screws
B. Top hinge
4. Be sure that the door is level with the top of the refrigerator.
Then tighten the screws the rest of the way.
5. Replace the hinge cover.
6. Adjust the leveling legs to level the refrigerator. See “Adjust
the Door Closing.”
7. Plug in refrigerator or reconnect power.
4. Check with a level.
5. Open and close the door to make sure that it closes as easily
as you like.
REFRIGERATOR USE
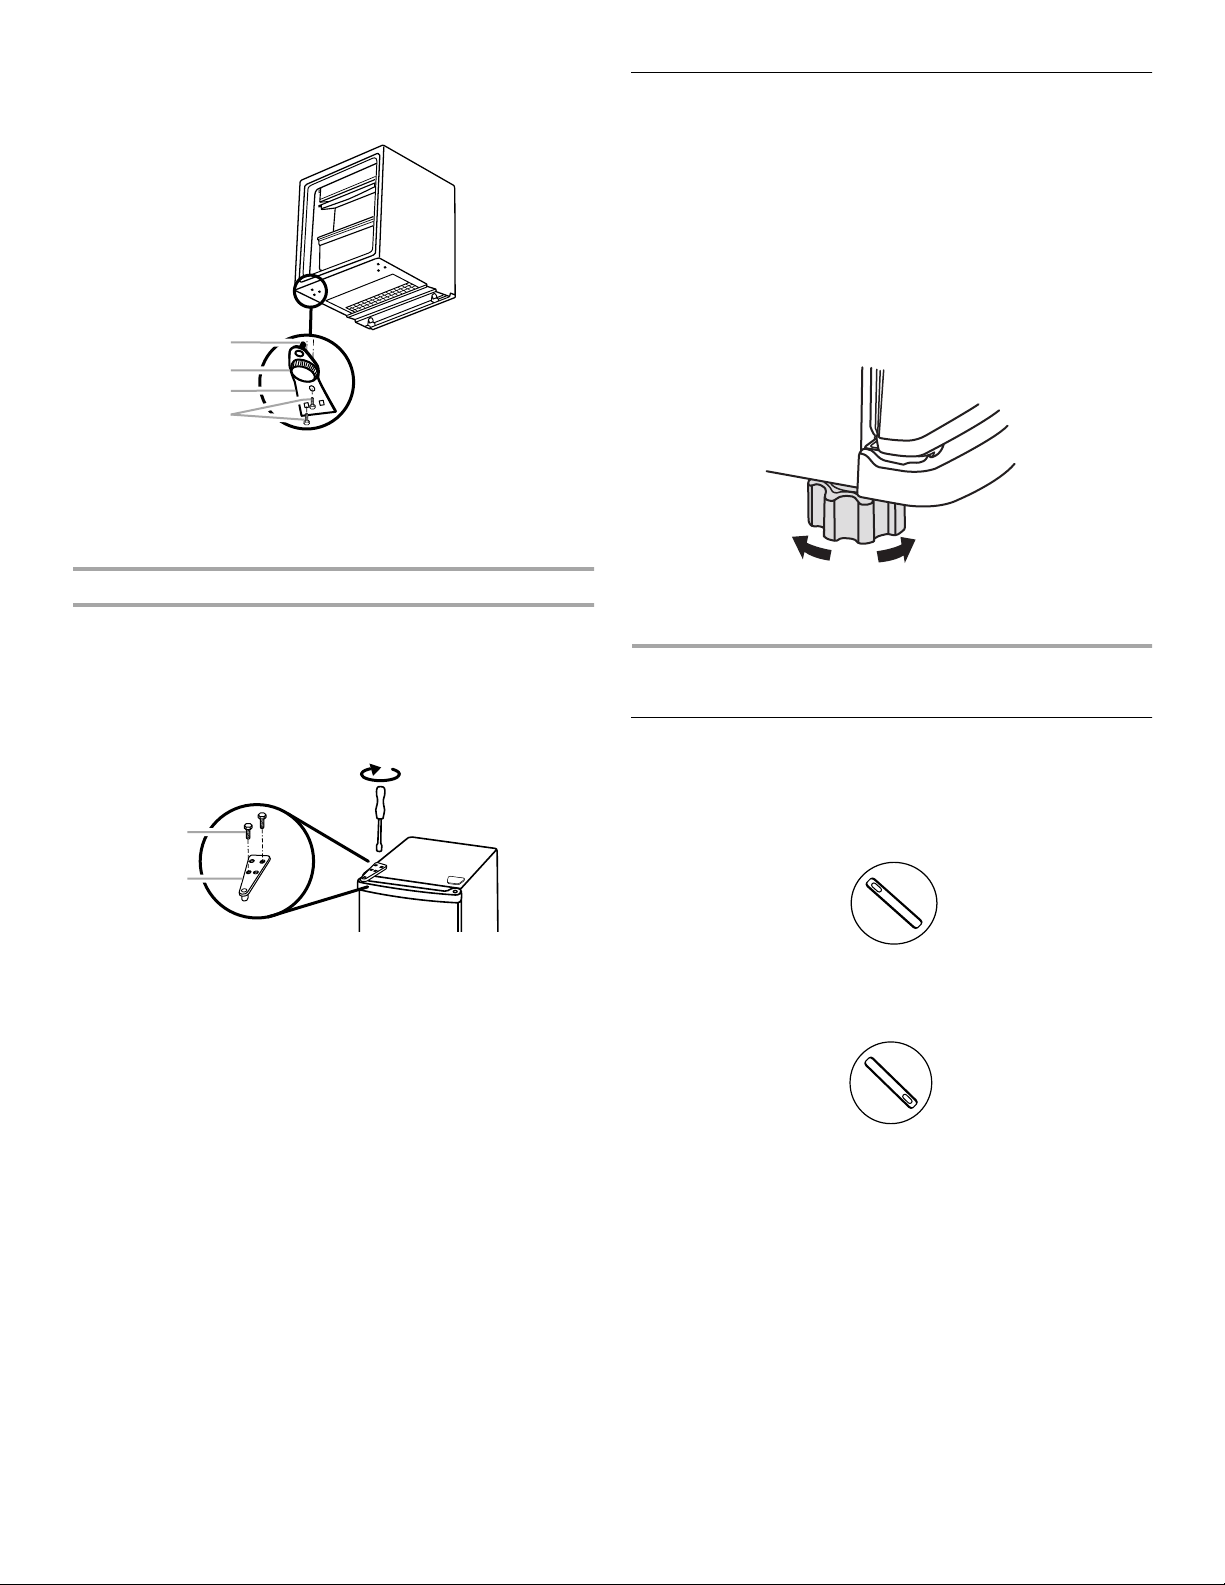
Using the Control
The refrigerator control is located on the inside of your refrigerator.
For your convenience, your refrigerator control is preset at the
factory. When you first install your refrigerator, make sure that the
control is still preset to the mid-setting as shown.
5
4
3
2
NOTE: To turn your refrigerator off, turn the refrigerator control
to 0. Your product will not cool when the refrigerator control is set
to 0.
4
3
2
6
7
0
1
5
6
7
0
1
5
Adjusting the Control
Give your refrigerator time to cool down completely before adding
food. It is best to wait 24 hours before you put food into the
refrigerator. The control is set correctly when milk or juice is as
cold as you like. Move the dial one setting at a time and wait
24 hours between adjustments.
IMPORTANT: If you add food before the refrigerator has cooled
completely, your food may spoil. Turning the control to a higher
(colder) than recommended setting will not cool the compartment
any faster.
Setting Recommended for Room
Te mp e ra tu r e
1
(Minimum)
4
(Medium)
7
(Maximum)
Refrigerator empty
Occasional door opening
Refrigerator partially
loaded
Refrigerator full
Frequent door opening
Up to 65° (18°C)
From 65°F to 85°F
(18°C to 30°C)
Above 85°F (30°C)
REFRIGERATOR CARE
4. Replace the removable parts.
5. Plug in refrigerator or reconnect power.
6. Set the control to the maximum setting for 24 hours, and then
adjust the control to the desired setting. Give the refrigerator
and freezer time to cool down completely before adding food.
See “Using the Control.”
Defrost and Clean the Freezer
Defrost and clean the freezer when the ice thickness is ¹⁄₅" (5 mm).
In high-humidity areas, the freezer may need more frequent
defrosting and cleaning.
NOTE: Do not use abrasive cleaners on your freezer. Do not use
cleaning waxes, concentrated detergents, bleaches, or cleaners
containing petroleum on plastic parts. Damage can occur.
1. Turn the refrigerator control to 0.
5
4
3
2
2. Unplug refrigerator or disconnect power.
3. Remove all food from the refrigerator and freezer
compartments. Store it in a cooler with ice, in an additional
refrigerator-freezer, or in a cool area.
4. Place the defrost drain pan under the freezer compartment
prior to defrosting. Water from the freezer will flow into the
defrost drain pan.
6
7
0
1
WARNING
Explosion Hazard
Use nonflammable cleaner.
Failure to do so can result in death, explosion, or fire.
Clean the Refrigerator
Clean the refrigerator about once a month to prevent odors from
building up. Wipe up spills immediately.
1. Unplug refrigerator or disconnect power.
2. Remove all removable parts from inside, such as shelves,
crispers, etc.
3. Hand wash, rinse, and dry removable parts and interior
surfaces thoroughly. Use a clean sponge or soft cloth and a
mild detergent in warm water.
■ Do not use abrasive or harsh cleaners such as window
sprays, scouring cleansers, flammable fluids, cleaning
waxes, concentrated detergents, bleaches or cleansers
containing petroleum products on plastic parts, interior
and door liners or gaskets. Do not use paper towels,
scouring pads, or other harsh cleaning tools. These can
scratch or damage materials.
■ To help remove odors, you can wash interior walls with a
mixture of warm water and baking soda (2 tbs. to 1 qt.
[26 g to .95 L] of water).
A
A. Defrost drain pan
5. Leave the refrigerator door open until the ice melts.
6. Place a pan of hot water in the freezer with the door open to
speed melting. Directing air from an electric fan into the
freezer will also help. Do not place the fan or any electrical
device in freezer.
NOTE: Check the drain pan frequently to avoid water
overflow. Have a second pan handy for easier emptying.
7. Use a plastic scraper to remove frost.
NOTE: Do not use an ice pick, knife, or other sharp-pointed
tool to defrost the freezer. Damage can occur.
8. Empty the drain pan and dry it well. Wipe water from walls
with a towel or sponge.
9. Wash the inside walls of the freezer with a solution of mild
detergent in warm water or 2 tbs. (26 mg) baking soda to 1 qt.
(0.95 L) warm water. Do not use abrasive or harsh cleaners.
10. Replace the drain pan.
11. Plug in refrigerator or reconnect power.
12. Set the control to the maximum setting for 24 hours, and then
adjust the control to the desired setting. Give the refrigerator
and freezer time to cool down completely before adding food.
See “Using the Control.”
6

TROUBLESHOOTING
Try the solutions suggested here first in order to avoid the cost of an unnecessary service call.
Refrigerator Operation
The refrigerator will not operate
■ Power cord unplugged? Plug into a grounded 3 prong outlet.
■ Is outlet working? Plug in a lamp to see if the outlet is
working.
■ Household fuse blown or circuit breaker tripped? Replace
the fuse or reset the circuit breaker.
■ Is control on? Make sure the refrigerator control is on. See
“Using the Control.”
■ New installation? Allow 24 hours following installation for the
refrigerator to cool completely.
NOTE: Adjusting the temperature control to coldest setting
will not cool the refrigerator more quickly.
The motor seems to run too much
Your new refrigerator may run longer than your old one due to its
high-efficiency compressor and fans. The unit may run even
longer if the room is warm, a large food load is added, the door is
opened often, or if the door has been left open.
The refrigerator seems noisy
Refrigerator noise has been reduced over the years. Due to this
reduction, you may hear intermittent noises from your new
refrigerator that you did not notice from your old model. Below are
listed some normal sounds with explanations.
■ Pulsating - fans/compressor adjusting to optimize
performance.
■ Hissing/Rattling - flow of refrigerant, movement of water
lines, or from items placed on top of the refrigerator.
■ Popping - contraction/expansion of inside walls, especially
during initial cool-down.
■ Water running/dripping - may be heard when water melts
during defrosting and runs into the drain pan.
The door will not close completely
■ Door blocked open? Move food packages away from door.
■ Bin or shelf in the way? Push bin or shelf back in the correct
position.
The door is difficult to open
■ Gaskets dirty or sticky? Clean gaskets and contact surfaces
with mild soap and warm water. Rinse and dry with soft cloth.
Temperature and Moisture
Temperature is too warm
■ New installation? Allow 24 hours following installation for the
refrigerator to cool completely.
■ Door opened often or left open? Allows warm air to enter
refrigerator. Minimize door openings and keep door fully
closed.
■ Large load of food added? Allow several hours for
refrigerator to return to normal temperature.
■ Control set correctly for the surrounding conditions?
Adjust the control a setting colder. Check temperature in
24 hours. See “Using the Control.”
There is interior moisture buildup
NOTE: Some moisture build-up is normal.
■ Humid room? Contributes to moisture build-up.
■ Door opened often or left open? Allows humid air to enter
refrigerator. Minimize door openings and keep door fully
closed.
7

WHIRLPOOL® REFRIGERATOR WARRANTY
ONE-YEAR FULL WARRANTY ON REFRIGERATOR
For one year from the date of purchase, when this refrigerator (excluding the water filter) is operated and maintained according to
instructions attached to or furnished with the product, Whirlpool Corporation will pay for FSP
to correct defects in materials or workmanship. Service must be provided by a Whirlpool designated service company.
On models with a water filter: 30 day limited warranty on water filter. For 30 days from the date of purchase, when this filter is operated
and maintained according to instructions attached to or furnished with the product, Whirlpool Corporation will pay for replacement
parts to correct defects in materials and workmanship.
SECOND THROUGH FIFTH YEAR FULL WARRANTY ON SEALED REFRIGERATION SYSTEM PARTS AS LISTED
In the second through fifth years from the date of purchase, when this refrigerator is operated and maintained according to instructions
attached to or furnished with the product, Whirlpool Corporation will pay for FSP
defects in materials or workmanship in the sealed refrigeration system. These parts are: compressor, evaporator, condenser, dryer, and
connecting tubing. Service must be provided by a Whirlpool designated service company.
Whirlpool Corporation will not pay for:
1. Service calls to correct the installation of your refrigerator, to instruct you how to use your refrigerator, to replace house fuses or
correct house wiring or plumbing, to replace light bulbs, or replacement water filters other than as noted above.
2. Repairs when your refrigerator is used in other than normal, single-family household use.
3. Pickup and delivery. Your refrigerator is designed to be repaired in the home.
4. Damage resulting from accident, alteration, misuse, abuse, fire, flood, improper installation, acts of God, or use of products not
approved by Whirlpool Corporation or Whirlpool Canada Inc.
5. Any food loss due to product failure.
6. Repairs to parts or systems resulting from unauthorized modifications made to the appliance.
7. Replacement parts or repair labor costs for units operated outside the United States or Canada.
8. In Canada, travel or transportation expenses for customers who reside in remote areas.
®
replacement parts and repair labor costs to correct
®
replacement parts and repair labor costs
WHIRLPOOL CORPORATION AND WHIRLPOOL CANADA INC. SHALL NOT BE LIABLE
FORINCIDENTALORCONSEQUENTIALDAMAGES
Some states or provinces do not allow the exclusion or limitation of incidental or consequential damages, so this exclusion or limitation
may not apply to you. This warranty gives you specific legal rights, and you may also have other rights which vary from state to state or
province to province.
Outside the 50 United States and Canada, this warranty does not apply. Contact your authorized Whirlpool dealer to determine
if another warranty applies.
If you need service, first see the “Troubleshooting” section of this book. After checking “Troubleshooting,” additional help can be found
by checking the “Assistance or Service” section or by calling the Whirlpool Customer Interaction Center, 1-800-253-1301 (toll-free),
from anywhere in the U.S.A. In Canada, contact your Whirlpool Canada Inc. designated service company or
call 1-800-807-6777.
8/01
8
 Loading...