

Whirlpool EHT182VKW Use & Care Manual
TKifl 01
2
NO-FROST REFRIGERATOR-FREEZER
USC
and
Cars
Guide
_ -- ~ -
Please read
this Use and
Care Guide
before you do
anything else...
It will help You get the longest useful life your refrigerator
can give.
It tells you how to start your
refrigerator, clean it, move
shelves and adjust controls. It
even tells You what to do if you
hear strange sounds or think
something is wrong.
Treat Your new refrigerator
with care. Use it only to do what
home refrigerators are de-
signed to do. It will pay you
back with the Years of service
it was built to give.
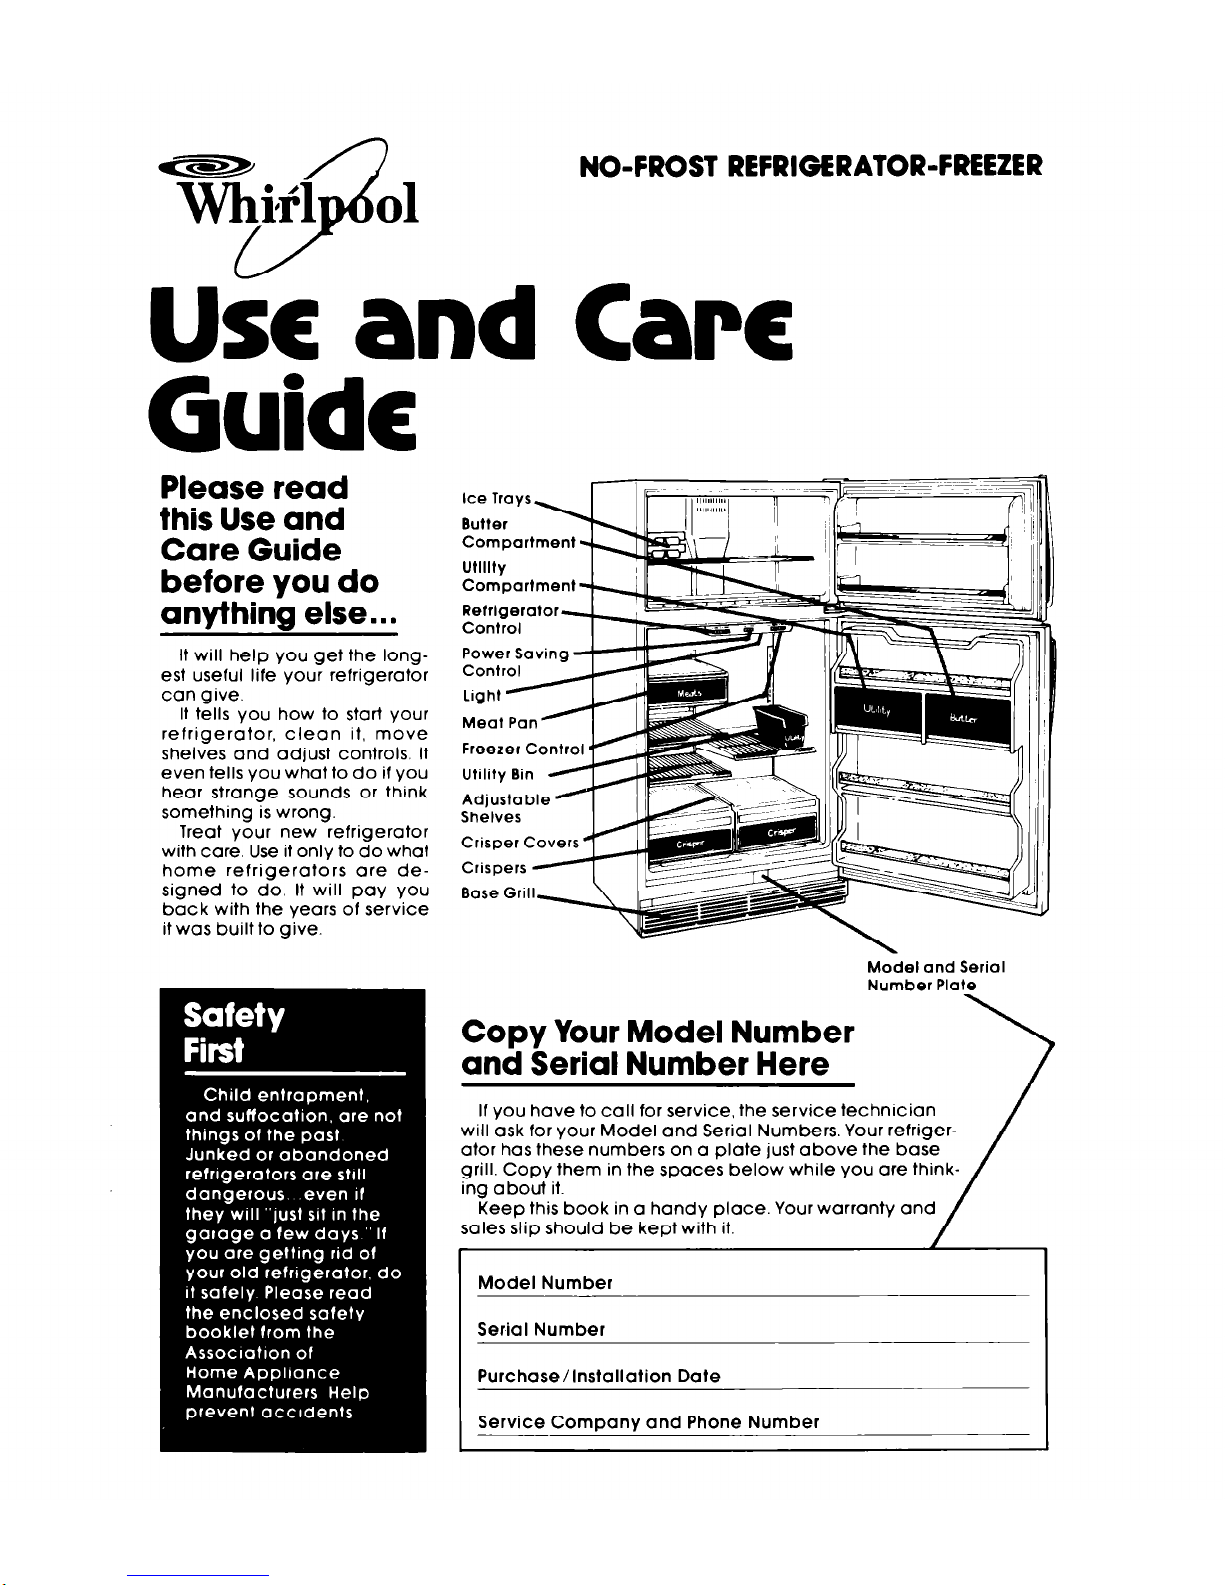
Model and Serial
Number Plate
Copy Your Model Number
and Serial Number Here
If You have to call for service, the service technrcian
will ask for Your Model and Serial Numbers. Your refrigerator has these numbers on a plate just above the base
grill. Copy them in the spaces below while you are thinking a bout it.
Keep this book in a handy place. Your warranty and
sales slip should be kept with it.
Model Number
Serial Number
Purchase/Installation Date
Service Company and Phone Number
Before you plug it in
IMPORTANT
This IS the only fine print you’ll find In this booklet
Please read it to be sure you use your refrlgerotor
properly
We bulid refrigerators to last, but we can’t cortrol how they are used Before ustng your refrlgerator ~OIJ are personally responsible for making
sure that It
l
IS Installed and leveled on o floor that WIII hold
the weight. and In an area sultoble for Its size
and use
l
IS connected only to the right kind of outlet with
the right electric supply and grounding
l
IS used only for jobs expected of home
refrtgerotors
l
IS properly maintained
l
IS
out of the weather
l
IS used In an area where the room temperature
WIII not fall below 55 F (13 C)
l
IS
not run where there are explosive fumes
l
IS
not used by children or others who may not
understand how It should be used
l
IS not loaded with fo& before it has time to get
properly cold
but
do you want It
Raise
-f!P
Lower
Right
to Raise,
Left to Lower
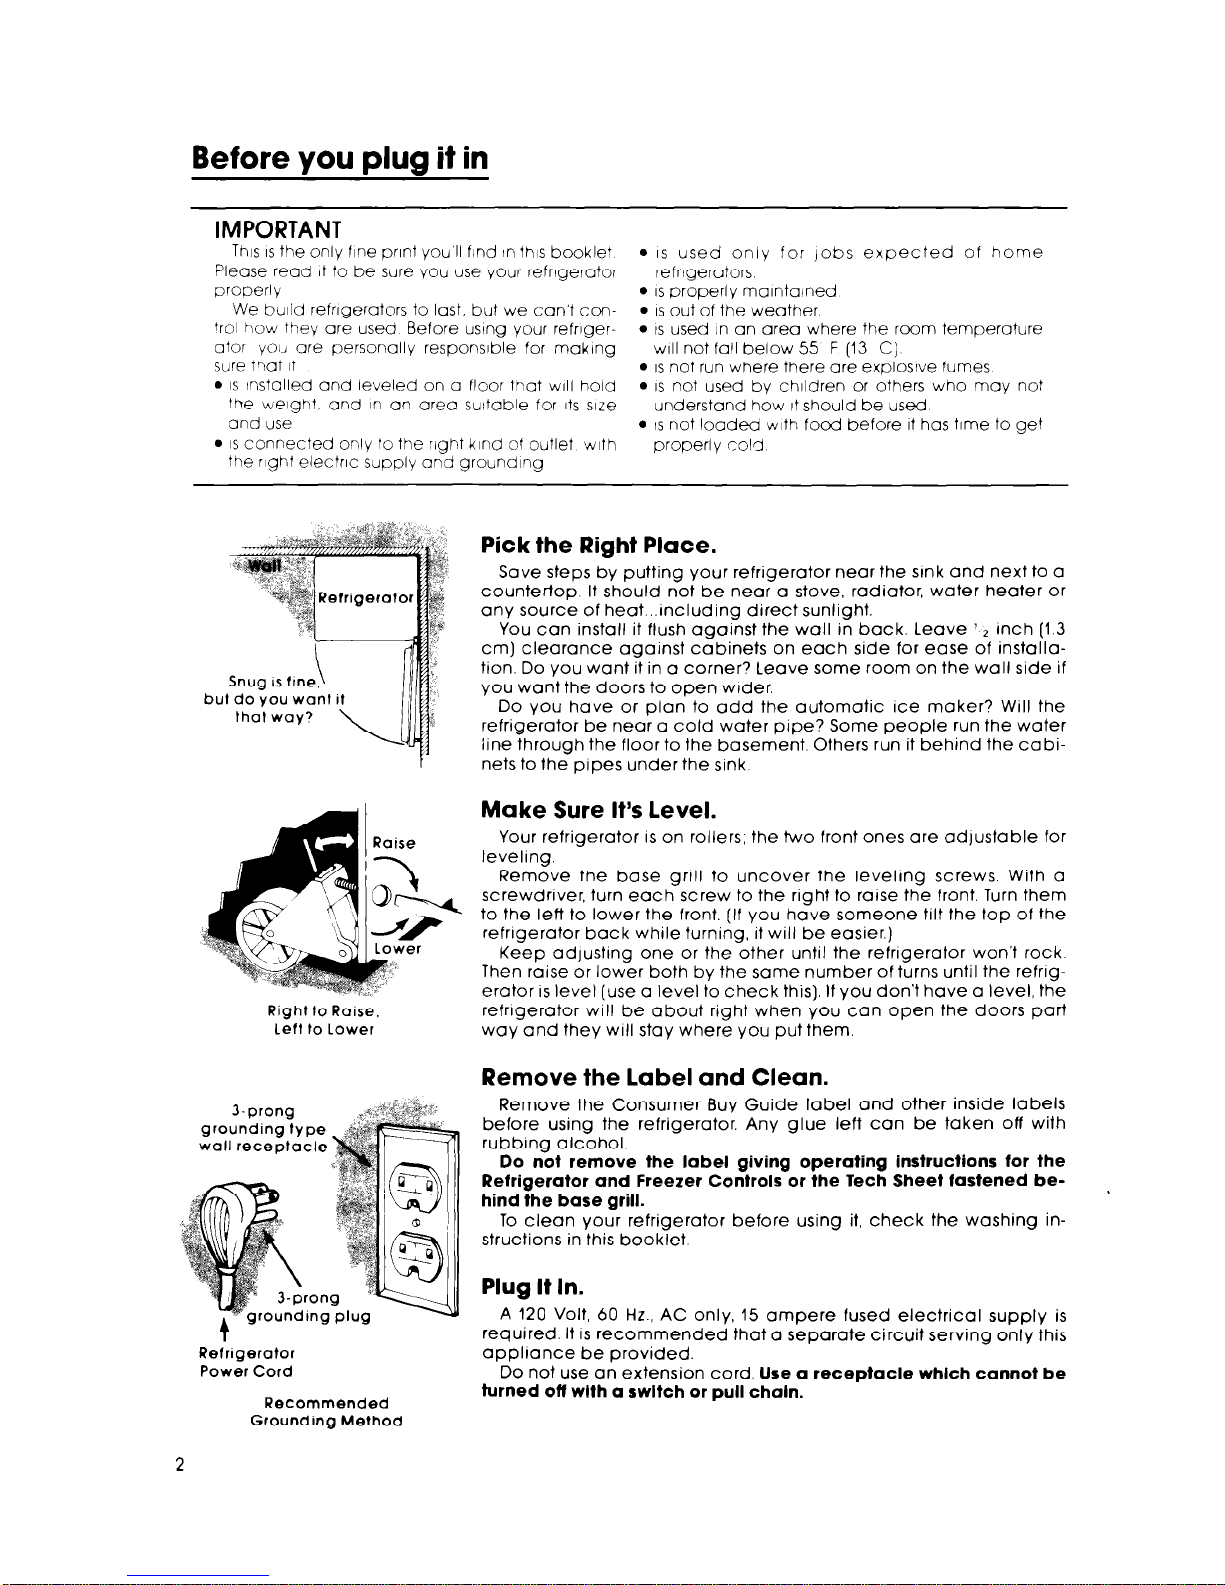
wall receptacle
Refngerator
Power Cord
Recommended
Grounding Method
Pick the Right Place.
Save steps by putting Your refrigerator near the sink and next to a
countertop. It should not be near a stove, radiator, water heater or
any source of heat...lncluding direct sunlight.
You can install it flush against the wall in back. Leave 1 z Inch (1.3
cm) clearance against cabinets on each side for ease of installation. Do You want it in a corner? Leave some room on the wall side if
you want the doors to open wider.
Do You have or plan to add the automatic Ice maker? Will the
refrigerator be near a cold water pipe? Some people run the water
iine through the floor to the basement. Others run it behind the cabinets to the pipes under the sink.
Make Sure It’s level.
Your refrigerator
IS
on rollers, the two front ones are adjustable for
leveling.
Remove the base grill to uncover the leveling screws. With a
screwdriver, turn each screw to the right to raise the front. Turn them
to the left to lower the front. (If You have someone tilt the top of the
refrigerator back while turning, it will be easier.)
Keep adjusting one or the other until the refrigerator won’t rock
Then raise or lower both by the same number of turns until the refrigerator
IS
level (use a level to check this). If you don’t have a level, the
refrigerator will be about right when You can open the doors part
way and they will stay where you put them.
Remove the label and Clean.
Remove the Consumer Buy Guide label and other inside labels
before using the refrigerator. Any glue left can be taken off with
rubbing alcohol.
Do not remove the label giving operating instructions for the
Refrigerator and Freezer Controls or the Tech Sheet fastened behind the base grill.
To clean your refrigerator before using it, check the washing instructions in this booklet.
Plug It In.
A 120 Volt, 60 Hz., AC only, 15 ampere fused electrical supply is
required. It
IS
recommended that a separate circuit serving only this
appliance be provided.
Do not use an extension cord. Use a receptacle which cannot be
turned off wlth a switch or pull chain.
2
Cleaning your refrigerator
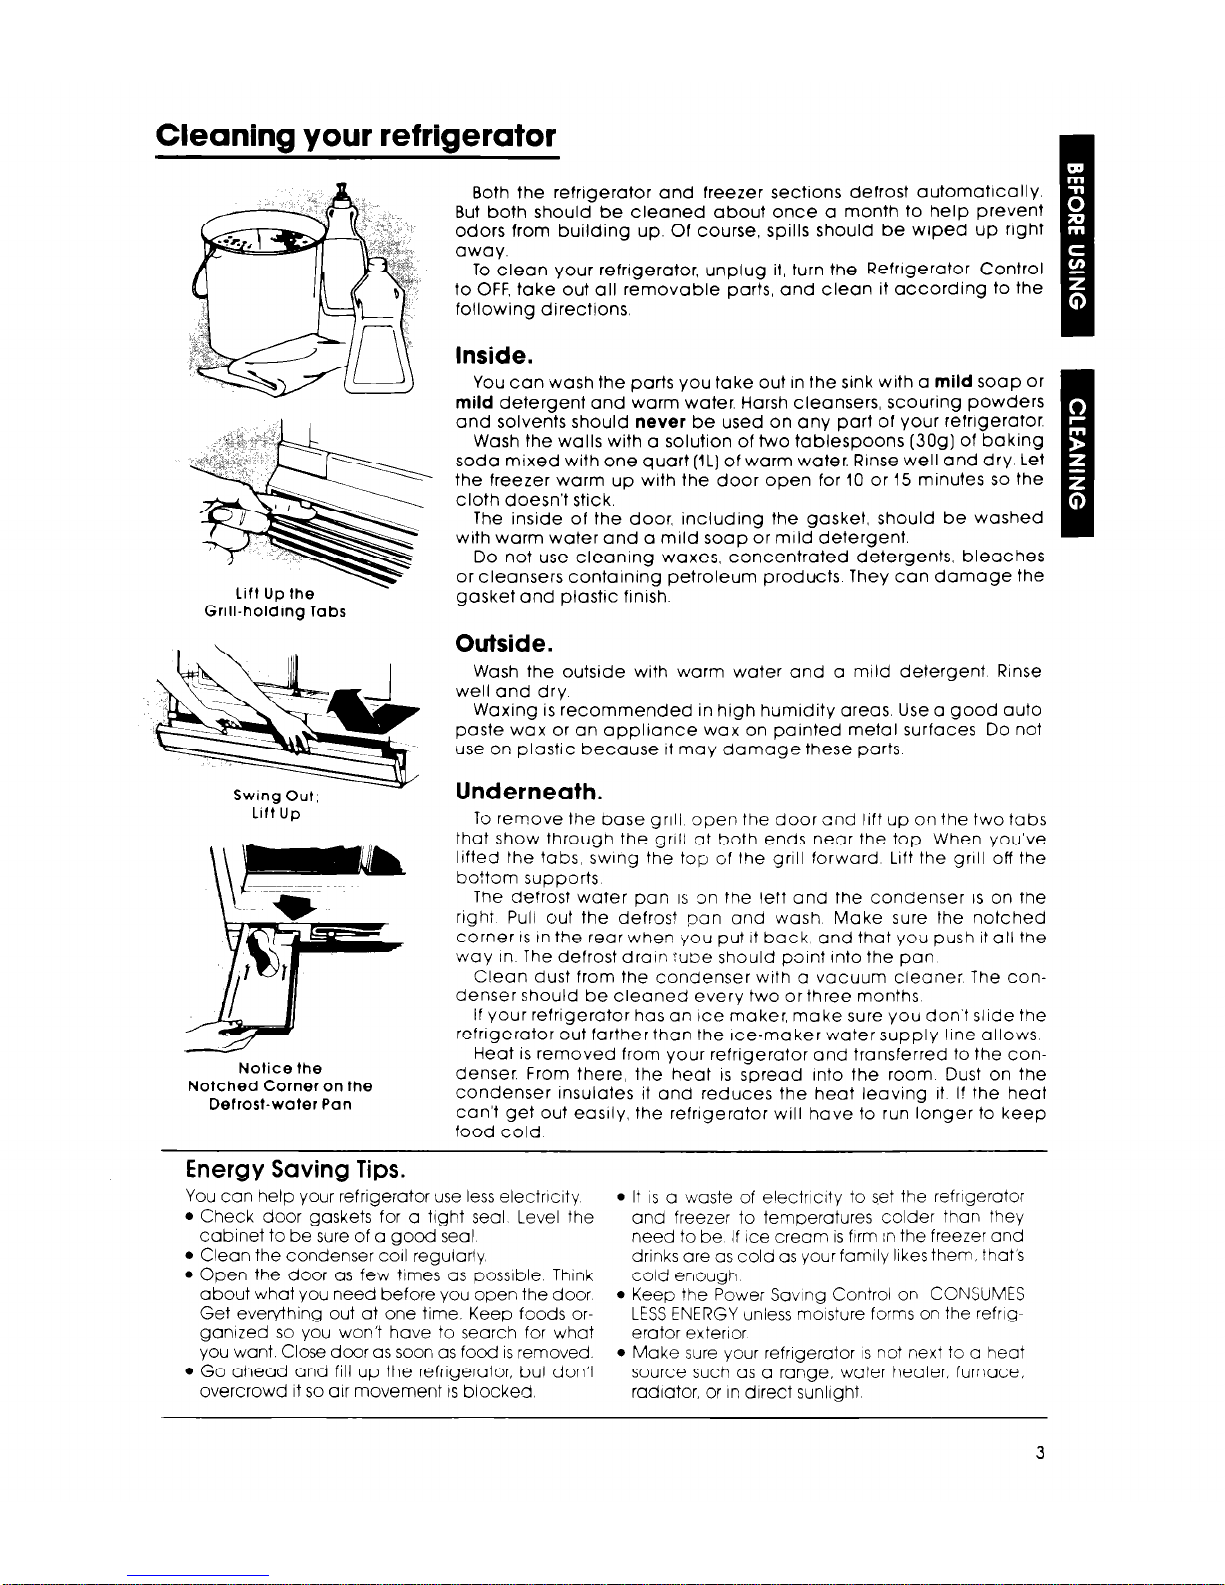
Lift UD the
Grill-holding labs
Swing Out,
LiftUp
\\ ”
Notice the
Notched Corner on the
Defrost-water Pan
Both the refrigerator and freezer sections defrost automatlcallv.
But both should
be
cleaned about once a month to help Prevent
odors from builaing up. Of course, spills should be wiped up right
away.
To clean Your refrigerator, unplug it, turn the Refrrgerator Control
to OFF, take out all removable parts, and clean it according to the
following directions.
Inside.
You can wash the parts You take out In the sink wrth a mild soap or
mild detergent and warm water. Harsh cleansers, scouring powders
and solvents should never be used on any part of Your refrigerator.
Wash the walls with a solution of two tablespoons (309) of baking
soda mixed with one quart (IL] of warm water. Rinse well and dry Let
the freezer warm up with the door open for 10 or 15 minutes so the
cloth doesn’t stick.
The inside of the door, including the gasket, should be washed
wtth warm water and a mild soap or mild detergent.
Do not use cleaning waxes, concentrated detergents, bleaches
or cleansers containing petroleum products They can damage the
gasket and plastic finish.
Outside.
Wash the outside with warm water and a mild detergent Rinse
well and dry
Waxing is recommended in high humidity areas. Use a good auto
paste wax or an appliance wax on painted metal surfaces Do not
use on plastic because It may damage these parts
Underneath.
To remove the base grlli open the door and lift up on the two tabs
that show through the grill at both ends near the top When You’ve
lifted the tabs, swung the top of the grill forward Lift the grrll off the
bottom supports
The defrost water pan IS on the left and the condenser IS on the
right Pull out the defrost pan and wash Make sure the notched
corner IS In the rear when You put It back and that You push it all the
way in The defrost drain Tube should point Into the pan
Clean dust from the condenser with a vacuum cleaner The con-
denser should be cleaned every two or three months
If your refrigerator has an Ice maker, make sure You don’t slide the
refrigerator out farther than the Ice-maker water supply line allows
Heat is removed from Your refrigerator and transferred to the condenser. From there, the heat is spread Into the room Dust on the
condenser insulates it and reduces the heat leaving It If the heat
Can’t get out easily, the refrigerator will have to run longer to keep
food cold
Energy Saving Tips.
You can help Your refrigerator use less electrlclty
l
Check door gaskets for a tight seal Level the
cabinet to be sure of a good seal
l
Clean the condenser
co11
regularly
l
Open the door as few times as possible. Think
about what You need before You open the door
Get everything out at one time. Keep foods organzed so You won’t have to search for wha?
You want. Close door as soon as food is removed.
l
Go ahead and fill up the refrigerator, but don’t
overcrowd it so air movement IS blocked.
l
It IS a waste of electricity to set the refrigerator
and freezer to temperatures colder than they
need to be If Ice cream is ftrm In the freezer and
drinks are as cold as Your family likes them. that’s
cold enough
l
Keep the Power Saving Control on CONSUMES
LESS ENERGY unless moisture forms on the refrigerator exterior
l
Make sure Your refrigerator IS not next to a heat
source such as a range, water heater, furnace,
radiator. or in direct sunlight
.
.
0
.
Ill
I
3
Using your refrigerator
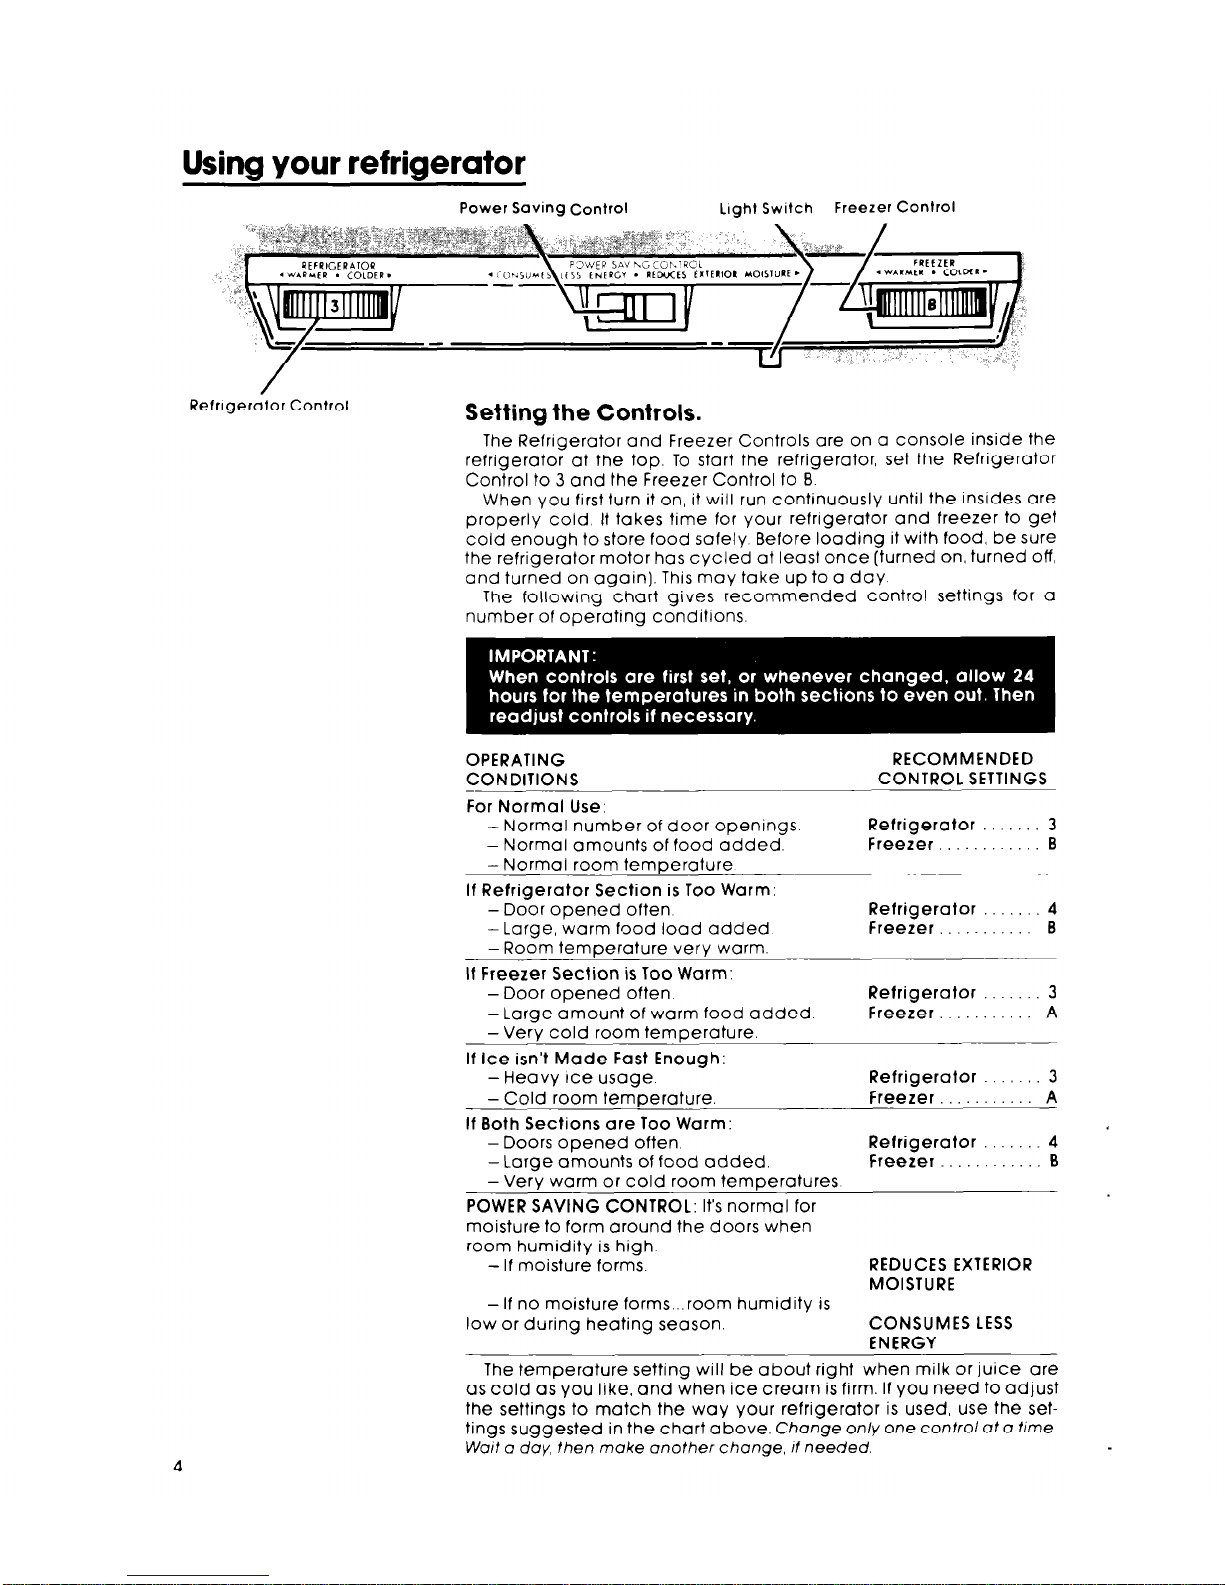
Power Saving
Control
Light Switch
Freezer Control
Refrlgerdtor Control
Setting the Controls.
The Refrigerator and Freezer Controls are on a console inside the
refrigerator at the top.
To
start the refrigerator, set the Refrigerator
Control to 3 and the Freezer Control to B.
When you first turn it on, it will run continuously until the insides are
properly cold It takes time for your refrigerator and freezer to get
cold enough to store food safely. Before loading it with food, be sure
the refrigerator motor has cycled at least once (turned on, turned off
and turned on again). This may take up to a day.
The following chart gives recommended control settings for a
number of operating conditions.
OPERATING
CONDITIONS
-
For Normal Use:
RECOMMENDED
CONTROL SETTINGS
- Normal number of door openings
- Normal amounts of food added.
-Normal room temperature
Refrigerator 3
Freezer,, B
If Refrigerator Section is Too Warm:
-Door opened often.
Refrigerator 4
-Large, warm food load added
Freezer.. B
- Room temperature very warm.
It Freezer Section is Too Warm:
-Door opened often.
Refrigerator 3
-Large amount of warm food added
Freezer. A
-Very cold room temperature.
If Ice isn’t Made Fast Enough:
-Heavy Ice usage
Refrigerator 3
- Cold room temperature.
freezer.. A
If Both Sections are Too Warm:
-Doors opened often.
Refrigerator 4
-Large amounts of food added.
Freezer B
- Very warm or cold room temperatures
POWER SAVING CONTROL: It’s normal for
moisture to form around the doors when
room humidity is high
- If moisture forms.
REDUCES EXTERIOR
MOISTURE
-If no moisture forms...room humidity is
low or during heating season.
CONSUMES LESS
ENERGY
The temperature setting will be about right when milk or juice are
as cold as you like, and when ice cream is firm. If
you need to adjust
the settings to match the way your refrigerator is used, use
the
set-
tings suggested in the chart above.
Chonge only one control of a time.
Wait CJ day, then make onother change, II needed.
 Loading...