

Whirlpool EH15VSXL User Manual
CHEST FREEZER
Whirlpool
Use and Саге
Guide
Safety
First
Child entrapment,
and suftocation, are not
things ot the past.
Junked or abandoned
treezers are still dan
gerous...even if they will
“just sit in the garage a
few days.”
If you are getting rid
of your old freezer, do it
safely. Please read the
enclosed safety book
let from the Association
of Home Appliance
Manufacturers. Help
prevent accidents.
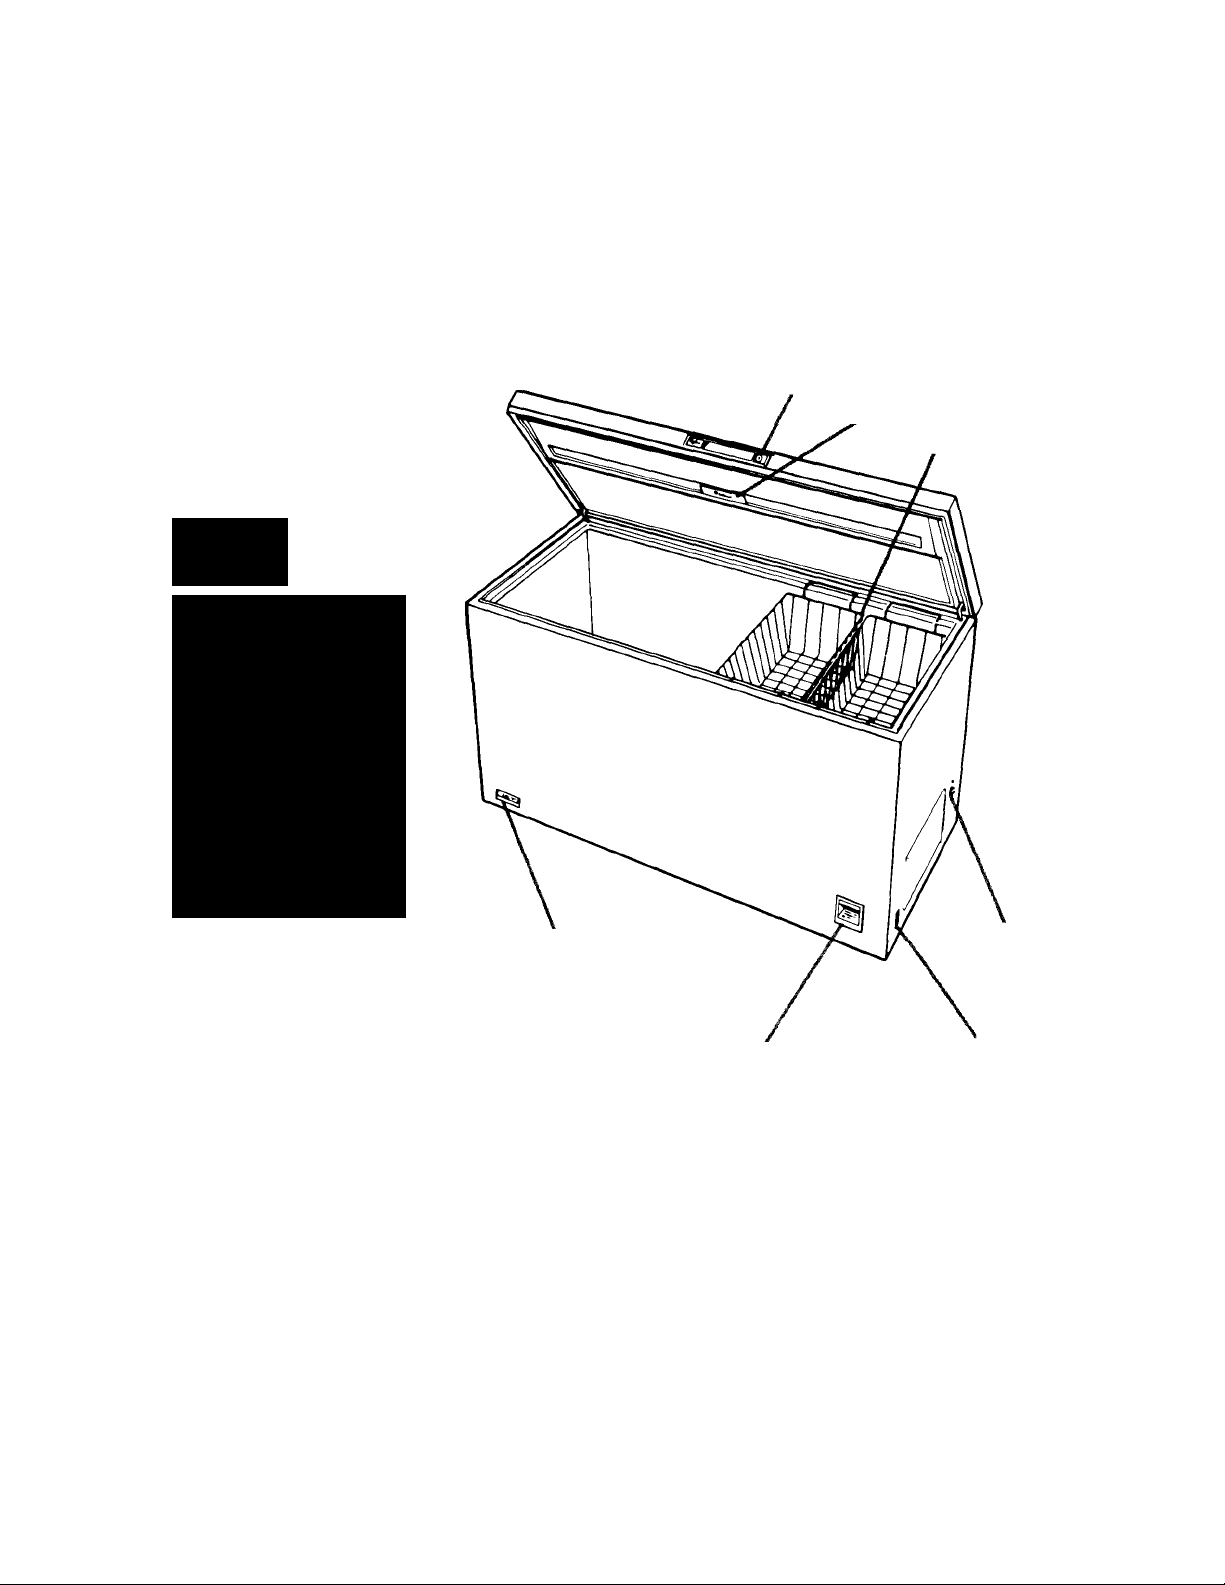
Defrost Water
Drain Cover
Model EH18VSXL
Model EH15VSXL
Key-Eject Lock
Interior Light
Baskets
Cold Control
Copy Your Model Number and Serial Number Here
When you need service, or
call with a question, have
this information ready:
1. Complete Model and Se
rial Numbers (from the plate
on the lower right side of the
cabinet).
2. Purchase date from sales
slip.
Copy this information in
these spaces. Keep this
book, your warranty and
sales slip together in a handy
place.
Model Number
Serial Number
Purchase Date
Service Company and Telephone Number
Temperature
Alarm Switch
Model and Serial
Number Plate
Before you plug it in
Before using your freezer, you ore personally
responsible for making sure thaf it...
• is installed and leveled on a floor that will
hold the weight, and in an area suitable for
its size and use.
• is connected only to the right kind of outlet,
with the right electric supply and grounding
(see below).
• is used only for jobs expected of home
freezers.
• is not near an oven, radiator or other heat
source.
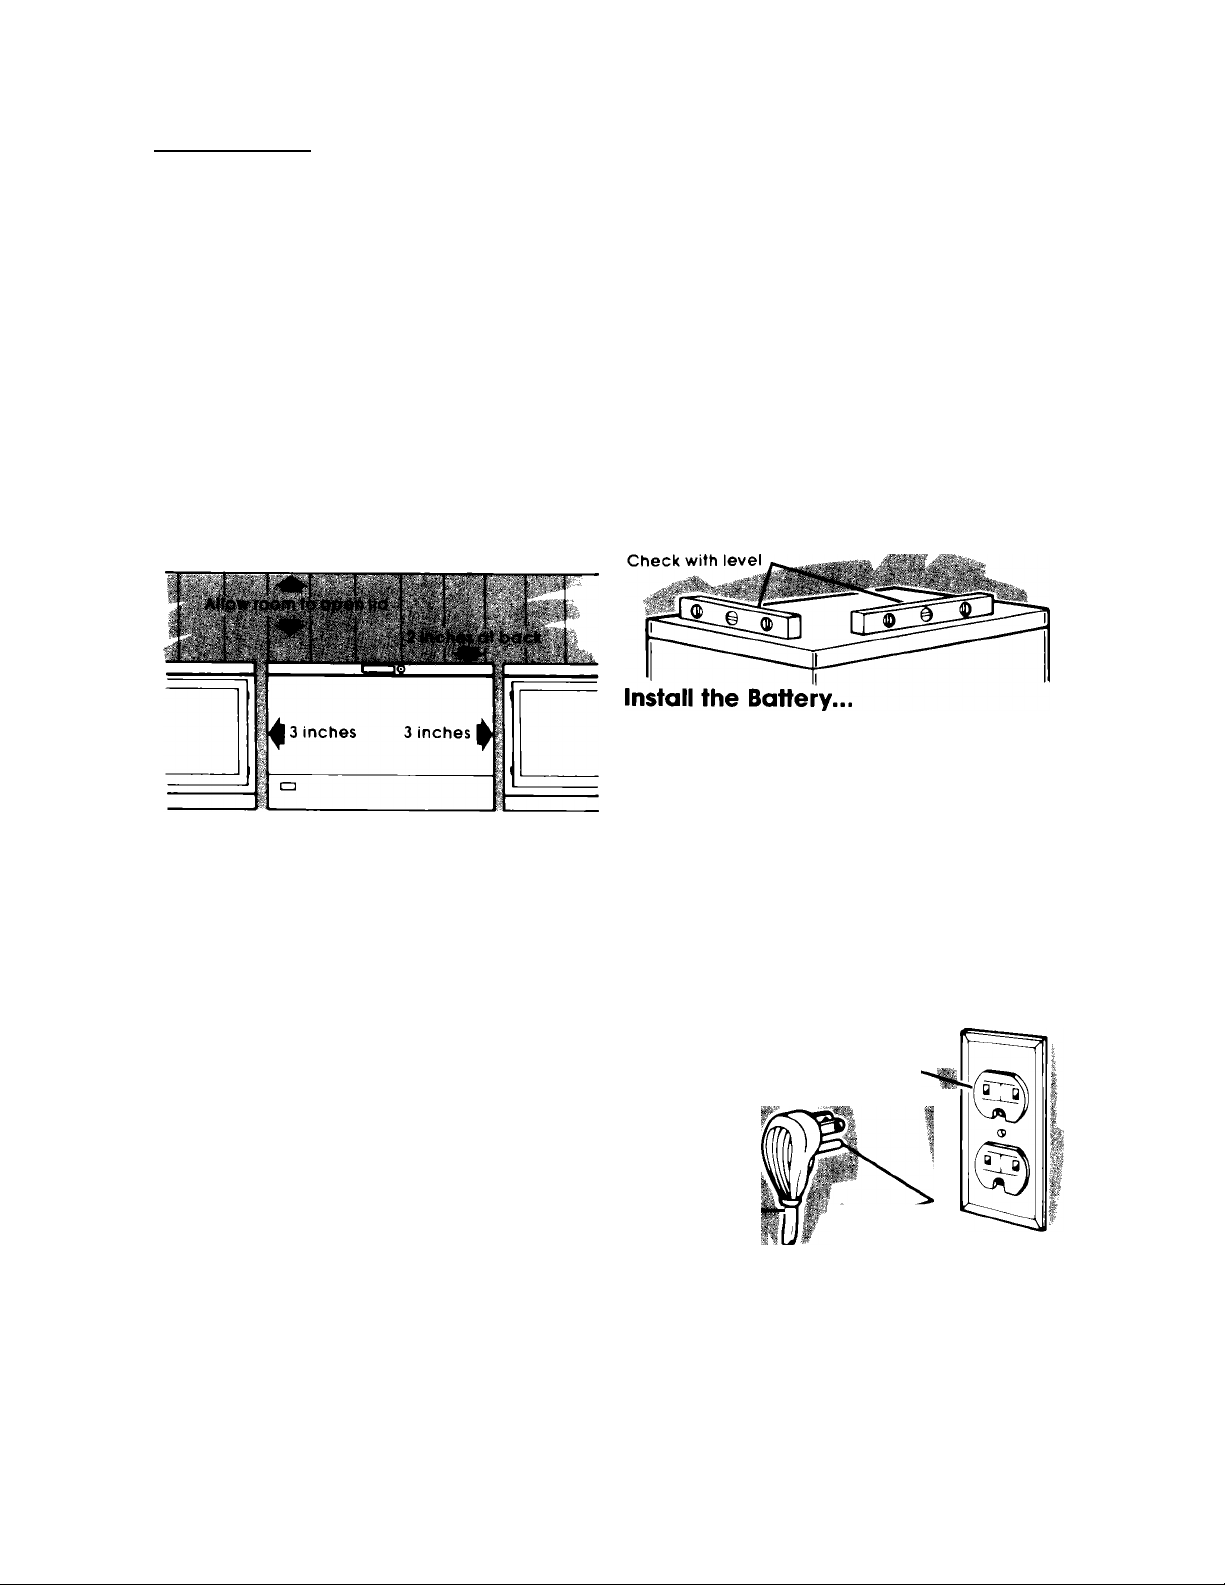
Install Properly...
1. Check the strength of the floor. It should hold
weight of fully loaded freezer.
2. Allow at least 3 inches (7.5 cm) air space on
all sides of freezer and 2 inches (5 cm) at
back. Leave room at top for lid to open all the
way.
3. If should not be necessary to remove the lid
during installation. If, for any reason, the hinges
need adjustment, see your authorized
WHIRLPOOL dealer.
4. Do not cover the freezer with items such as
blankets, sheets, tablecloths, etc.
Remove Sales Label...
Remove the Consumer Buy Guide label before
using the freezer. Remove any left over glue with
rubbing alcohol.
• is properly maintained.
• is in a dry sheltered area.
• is used in an area where the room tempera
ture will not exceed 110°F (43.3 C).
• is not run where there are explosive fumes.
• is not used by children or others who may not
understand how it should be used.
• is not loaded with food before it has time to
get properly cold.
Level Chest Freezer...
from end to end and front to back so that the lid
will seal properly .
You will find the freezer key and a 9-volt al
kaline battery packed inside the freezer. Install
the battery by following instructions on page 4.
The Temperature Alarm will sound a continu
ous tone ifthe Temperature Alarm Switch is in the
ON or TEST position. Move the switch to OFF until
the freezer is cold. Then move it to ON.
Install the Defrost Drain Cover...
Packed inside the freezer is the Defrost Drain
Cover and a hose adapter. Keep the hose
adapter in a handy place to use when defrost
ing the freezer. Install the Defrost Drain Cover
over the opening in the lower left, front corner of
your freezer.
Plug It In...
3-prong grounding
type wall receptacle
Note: DO NOT REMOVE the Care and Ser
vice label on the inside lid. This permanent
label provides immediate information
should it be needed. Do not remove Tech
Sheet permanently attached to back of
cabinet.
Clean It...
Clean your freezer before using it See clean
ing instructions on page 5.
2
Freezer
power cord
Recommended Grounding Method
A 120 Volt, 60 Hz., AC only, 15 ampere fused
elecfrical supply is required. It is recommended
that a separate circuit serving only this appli
ance be provided. The receptacle should not
be controlled by a wall switch or pull chain.
Attach retaining clip over power cord plug
from the literature package inside your freezer.
Do not use an extension cord.
3-prong
grounding plug
Using your freezer
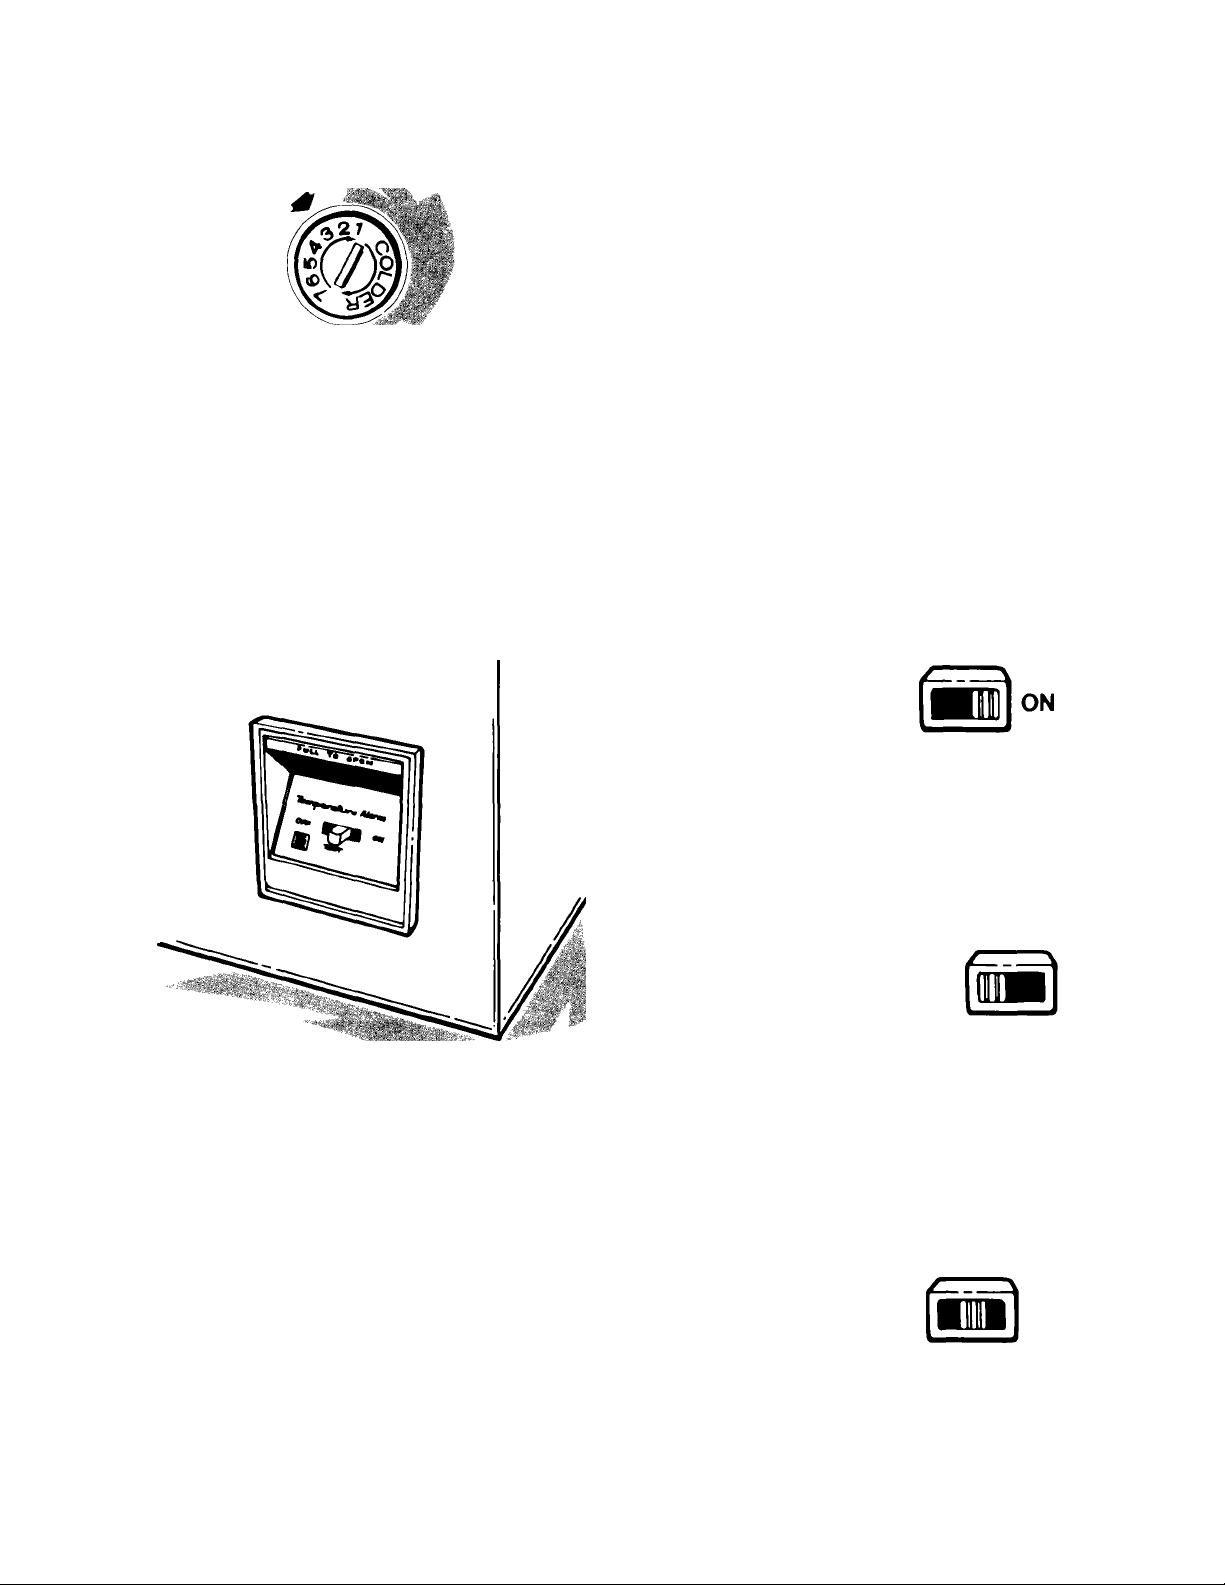
Setting the Cold Control...
1. Insert a coin in the slot of the Cold Control to
turn it.
2. Turn control to Number 3, This setting will main
tain zero zone temperatures under normal op
erating conditions
Adjusting Cold Control...
• Turn control to higher number for colder
temperatures
• Turn to lower number tor less cold temperatures
Temperature Alarm.
Cooling Freezer First...
• Allow freezer to cool 6 to 8 hours before filling
with frozen food.
• Let it cool overnight before adding large
amount of unfrozen food.
Note: When freezer is first started the compressor
will run constantly until the cabinet is cooled. It
may take up to 6 to 8 hours or longer, depending
on room temperature and the number of times
the freezer lid is opened.
After the cabinet is cooled the compressor will
turn on and off as needed to keep freezer at
proper temperature.
The outside of your freezer may feel warm. This
Is normal. The freezer's design and main function
is to remove heat from packages ahd air space
inside the freezer. This heat is transferred to the
room air so the walls of the freezer may be warm.
When the Temperature
Alarm Switoh is ON, the
Temperature Sensor in the
freezer senses freezer tem
perature. If the temperature becomes too warm,
the Temperature Alarm is desighed to sound a
continuous tone.
You will hear a different sound if the battery is
aboutto wearout.Thealarm isdesighed ta beep
(chirp) every 30 to 60 seconds to indicate a fail
ing battery.
The Temperature Alarm (located on the lower
right front of the freezer) works together with an
electronic Temperature Sensor (located inside
the freezer - sensing freezer temperature) to
alert the user to an abnormal condition which
has caused freezer temperature to rise to a level
which may be unsafe far frozen food storage. It is
designed to sound a continuous tone if the
freezer becomes warm.
Freezer temperature may become too warm
if...
• The lid is not tightly closed.
• The lid has been opened too many times, or
has been left open too long.
• The Cold Control is not set correctly.
• A large food load has been added.
• The freezer is disconnected.
• There has been a power failure, or a circuitbreaker is tripped or a fuse blown.
If the Temperature Alarm
sounds a continuous tone OFF
and the Temperature
Alarm switch is ON, move
the switch to OFF.
Make sure you know why the freezer became
too warm. If the problem is serious (power failure)
and service or assistance is needed, see page
8. If the problem is simple (lid open, freezer un
plugged) correct it. Move the switch back to ON
when the freezer is cold again.
Check the battery often
by moving the Tempera
ture Alarm Switoh to the
Test position. The alarm
should sound a continuous
tone, regardless of freezer
temperature. If the alarm doesn't sound a tone
with the switch in the TEST position, replace the
battery immediately.
TEST
 Loading...