

Whirlpool CET9000GQ Quick Start Guide
Quick Start Guide
Setting Up and Using Your High-Efciency
Commercial Stacked Washer/Dryer
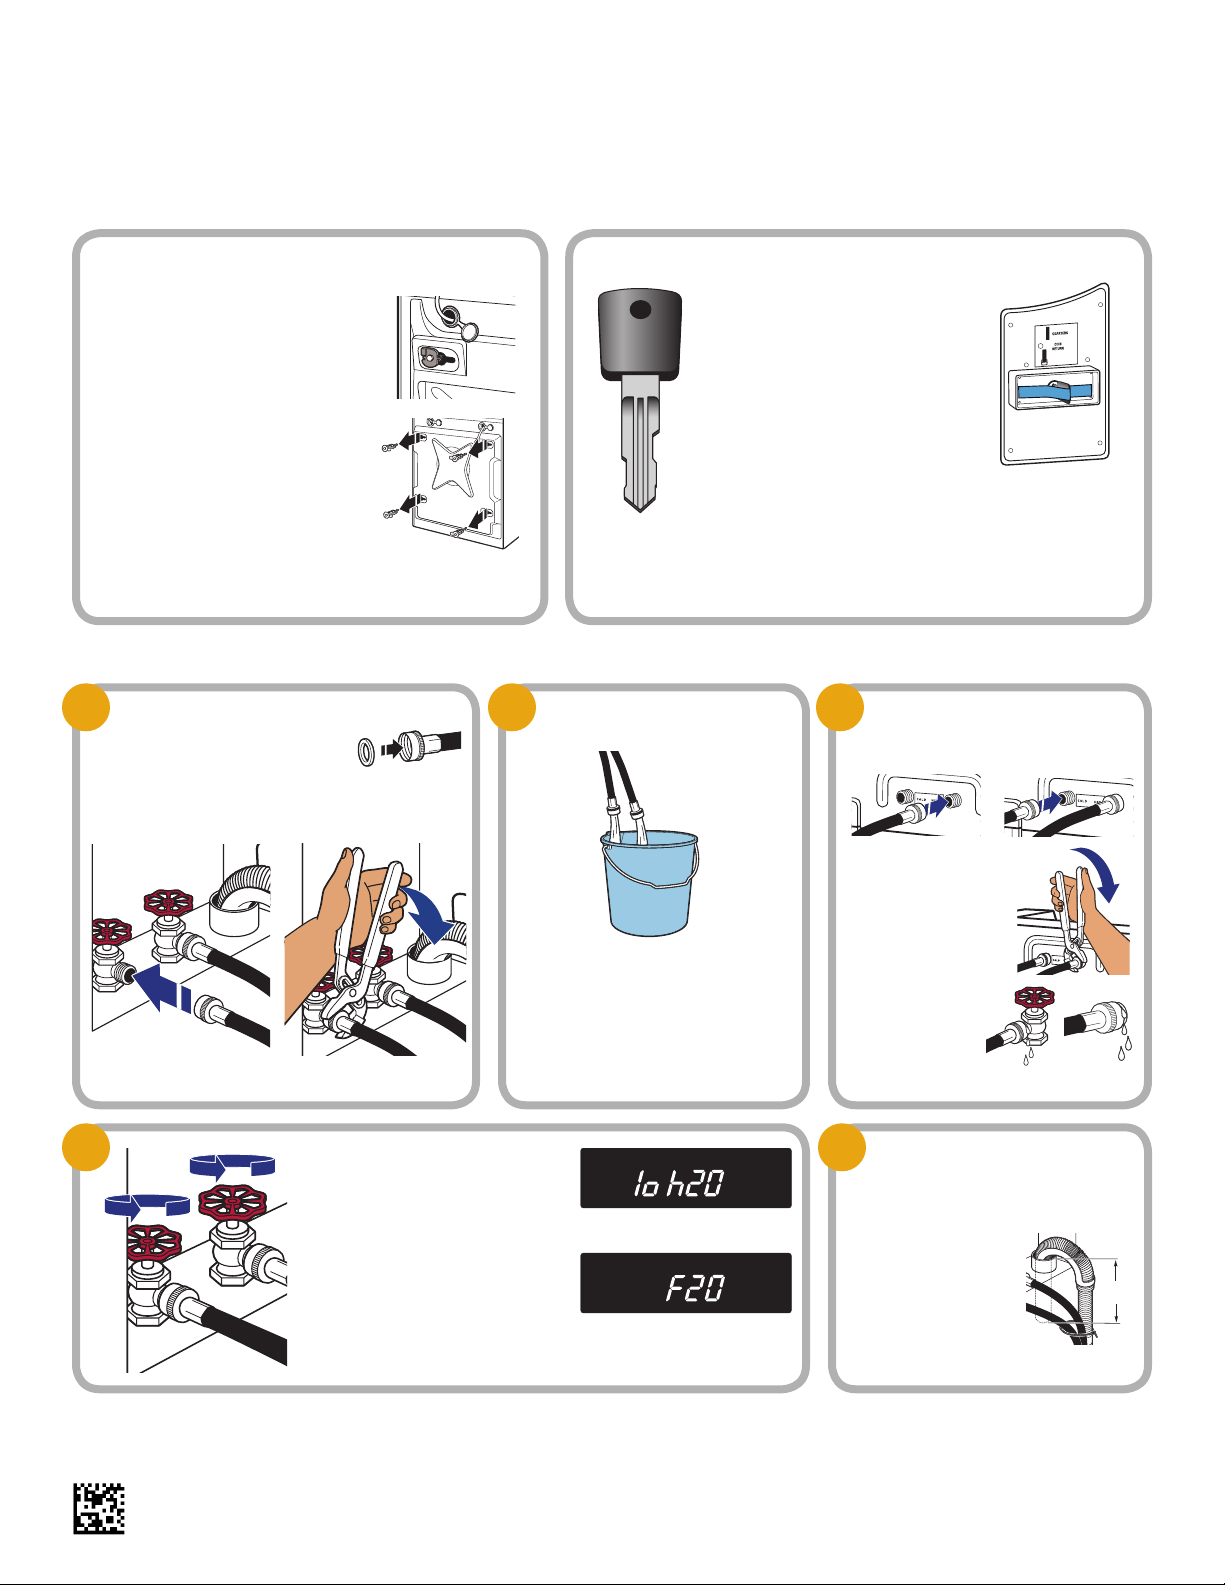
REMOVING SHIPPING BOLTS
Position the washer/dryer so that the rear
is within approximately 3 feet (900 mm)
of its nal location.
Keep the washer/dryer in
the upright position; using
a 1/2" wrench, loosen each
of the four shipping bolts
on the rear panel. Once
each bolt is loose, move
it to the center of the
hole and completely pull
out the bolt, including
the plastic spacer. Discard
the bolts and spacers. Close the bolt holes
with the four transport bolt hole plugs.
KEY AND COIN BOX*
LOCATION OF KEY
Coin box key (shown) comes
taped to coin box lock.
Document the key code
(engraved on coin box key)
in a safe place.
If key is lost, contact
1-800-221-0982 x200 or
x154 for replacement
(not covered by warranty). Have key code
handy; otherwise, a locksmith will have
to drill out coin box and a replacement
coin box (part no. W11190039) will have
to be installed.
*Applies only to select models.
CONNECTING WATER/SECURING DRAIN HOSE
CONNECT NEW INLET HOSES
1
TO FAUCETS
Insert new hose washers
(in separate bag) into each end of
inlet hoses. Firmly seat washers into
couplings.
Do not overtighten or use tape or
sealants when attaching to faucets.
CLEAR WATER LINES
2
Make sure that both hot
and cold water hoses are
connected to the correct
faucets. The washer will
not operate unless both
hoses are connected.
CONNECT INLET HOSES
3
TO WASHER AND
CHECK FOR LEAKS
Do not
overtighten
or use tape
or sealants
when attaching
to washer.
Turn on
faucets and
check for
leaks at both ends of hoses.
4
Make sure that the washer/dryer is level (see the “Leveling Stacked Washer/Dryer” section in the
Installation Instructions). Run a wash cycle to verify that the washer is working correctly and has no
leaks at faucets and inlet hoses.
IMPORTANT:
Make sure that water
faucets are turned on
fully before using the
washer for the rst time.
If there is no/low water
pressure to the washer,
the display will scroll “lo h2O”. To clear, open
and close the washer door.
and/or
Install and secure the
5
drain hose in a manner
that will avoid it coming
out of or leaking from the
plumbing/drain.
Do not seal or
put more than
4.5" (114 mm)
of the drain hose
into drainpipe or standpipe.
W11189593A
W11189594A - SP
114 mm
(41/2")
(114 mm)
4½"

Quick Start Guide
SETTING UP THE WASHER/DRYER
Plug in washer/dryer
or connect power.
“SYNC” will be
displayed for less
than 1 minute.
Fire Hazard
Never place items in the washer that
are dampened with gasoline or other
flammable fluids.
No washer can completely remove oil.
Do not dry anything that has ever had any
type of oil on it (including cooking oils).
Doing so can result in death, explosion,
or fire.
For coin drop use,
match the wash price
on the display to the
number of coin 1s for
Regular cycle price
Wash price Regular cycle price
(number of coin 1s)
and the Value of coin 1.
See the Installation Instructions for programming details.
CHANGING COIN DROP
PRICING (Applies only
to select models)
Refer to Installation
Instructions for
detailed instructions
located in the
washer/dryer.
NOTE: Coin box needs
to be emptied frequently
to avoid jams and damage.
Value of coin 1
(number of nickels)
For a suggested setup, see the “User & Set-Up Instructions” section of the Installation Instructions.
NOTE: To minimize the potential of oversudsing, follow this recommended setup:
• Add a two-minute prewash length (see the “User & Set-Up Instructions” section of the
Installation Instructions).
IMPORTANT WASH TIPS
• Shake out clothing prior to loading.
• Zip all zippers.
• Use the recommended amount
of HE detergent.
• If a detergent pod is used, toss it into the
wash drum, not into the dispenser.
W11189593A
W11189594A - SP
©2017 All rights reserved.
12/17
• Use chlorine bleach only.
• Fabric softener must be diluted.
NOTE: The washer remains locked for the entire
wash cycle.
 Loading...