

Page 1
CB60 DC 7 Segments PRODUCT SHEET
GB
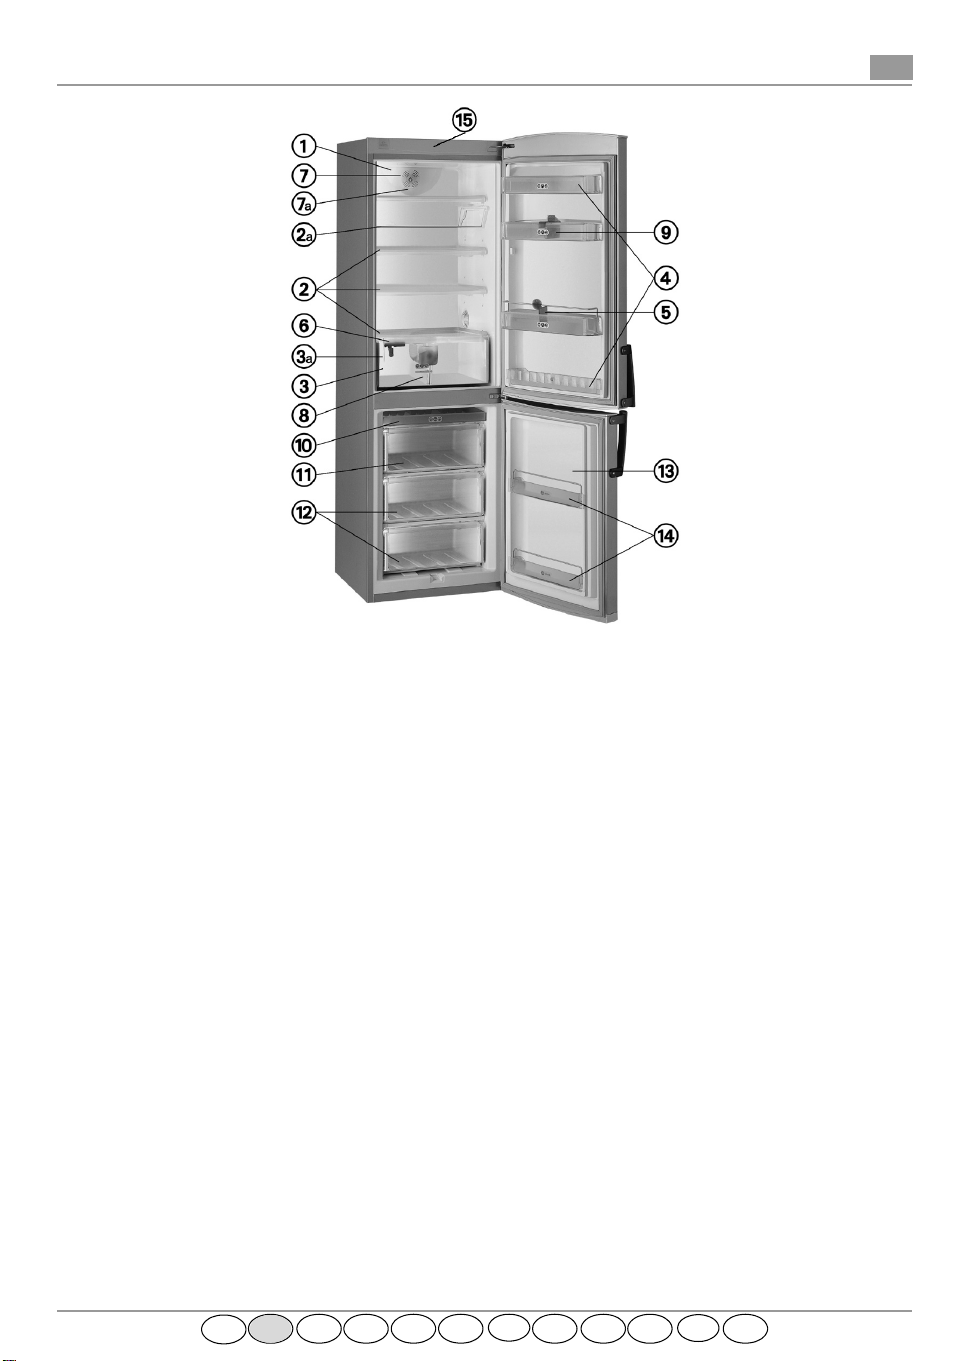
A. Refrigerator Compartment
Light
1.
Shelves/Shelf area
2.
Bottle holder (depending on model)
2a.
Crisper drawer
3.
Moisture control
3a.
Door trays
4.
Removable bottle holder
5.
Rating plate (at the side of the crisper drawer)
6.
Fan
7.
Fan intake area
7a.
Crisper drawer divider
8.
Divider
9.
The fan gives more even temperature distribution inside the refrigerator compartment, thus allowing better
conservation of stored food.
Important:
An electronic device switches the fan on when necessary.
DO NOT obstruct the fan intake area (7a) with food.
Note:
All shelves, door trays and racks are removable.
Important: Refrigerator/freezer accessories must not be washed in a dishwasher.
The fan is electrically powered.
The number of shelves and shape of accessories may vary, depending on the model.
B. Freezer compartment
Rack for ice cube trays or ice packs (depending on
10.
model)
Upper basket (area for freezing)
11.
Baskets for storing frozen food
12.
Freezer compartment door
13.
Freezer compartment door trays (for pizza or other
14.
frozen food with a short term of storage)
C. Control panel
Control panel with 7 segment
15.
F NL E P
GB
D
I
I
GR N FINS
DK
Page 2
IMPORTANT:
• If food is placed in the refrigerator before the appliance has cooled completely, it may deteriorate.
• A built-in exterior moisture control continuously guards against moisture build-up on the front edges; Do not
be alarmed if these edges sometimes feel warm to the touch.
• The inside light switches on when the refrigerator door is opened. After 10 minutes of door opening the light
switches off.
HOW TO OPERATE THE APPLIANCE
Electrical connection (see installation manual)
When the appliance is connected to the power supply, the display lights up, the acoustic alarm sounds and the red
LED blinks, indicating that the freezer has not yet reached the optimal temperature for storage of foodstuffs.
Press the Alarm mute button
Only place food in the freezer once the alarm indicator has stopped blinking.
While the appliance is working to reach the factory-set temperature, the alarm led blinks , the acoustic alarm
sounds and the set temperature blinks. This indicates that the appliance has not yet reached the optimal
temperature for storage of foodstuffs.
The led will stop flashing when the freezer compartment reaches a temperature below -12°C, the display will
show the temperature -18°C, at which point food can be loaded into the freezer compartment.
After being switched on, the refrigerator needs from 2 to 3 hours to reach the correct temperature to
store a typical volume of food in the refrigerator compartment.
(REF. 14)
on the control panel to deactivate the acoustic alarm.
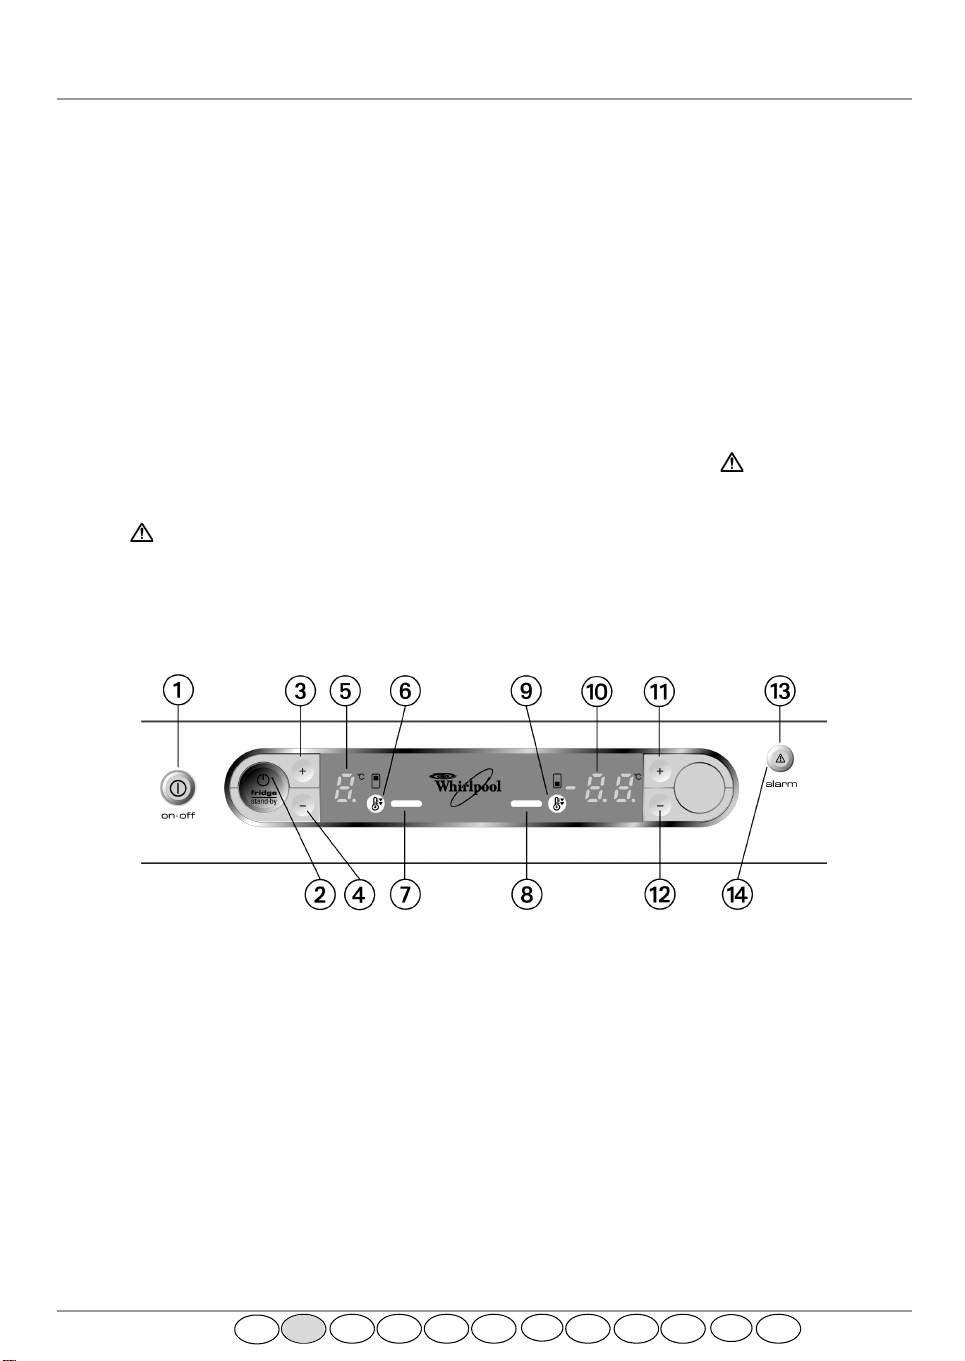
CONTROL PANEL DESCRIPTION
Compartment ON / OFF, menu, selection and confirmation buttons:
Appliance ON/OFF button
1.
Refrigerator compartment ON/OFF button
2.
Refrigerator compartment temperature increase button
3.
Refrigerator compartment temperature decrease button
4.
Refrigerator compartment temperature setting
5.
Fast cooling function indicator
6.
Fast cooling function ON/OFF button
7.
Fast freeze function ON/OFF button
8.
Fast freeze function indicator
9.
Freezer compartment temperature setting
10.
Freezer compartment temperature increase button
11.
Freezer compartment temperature decrease button
12.
Alarm symbol, generally in association with an acoustic alarm
13.
Acoustic alarm mute button
14.
5019 637 33149
F NL E P
GB
D
I
I
GR N FINS
DK
Page 3

GUIDE TO SELECTING FUNCTIONS
Freezer compartment temperature
Shows the freezer compartment temperature setting.
Freezer compartment temperature selection and control
To change the internal temperature press the “freezer compartment temperature increase button”
(REF. 11)
until the desired value is reached.
The temperature inside the freezer compartment can be adjust between -18ºC and -24ºC.
Fast freezing
This function must be activated before freezing fresh food. To select the function, press the “fast freeze
function ON/OFF button”
The function is automatically disabled after 24 hours, or can be manually disabled by repeating the same
procedure.
Refrigerator compartment temperature
Shows the refrigerator compartment temperature setting.
Refrigerator compartment temperature selection and control
To change the internal temperature press the “refrigerator compartment temperature increase button”
(REF. 3)
until the desired value is reached.
The temperature inside the refrigerator compartment can be adjust between +2ºC and +8ºC.
Fast cooling
This function should be selected before refrigerating fresh food. To select the function, press the “fast
cooling function ON/OFF button”
The function is automatically disabled after 6 hours, or can be manually disabled by repeating the same
procedure.
and the “freezer compartment temperature decrease button”
(REF. 8)
and the “refrigerator compartment temperature decrease button”
, a yellow LED will light up
(REF. 7)
, a yellow LED will light up
(REF. 9)
.
(REF. 6)
(REF. 12)
(REF. 4)
on the control panel
on the control panel
.
“Half Load” function
When the freezer is only partially full, put all the food in the central basket and set the freezer
compartment temperature to -18°C or select the HL function with the freezer temperature selector (on
some models only).
Refrigerator compartment alarms
An acoustic alarm sounds when the refrigerator door has been left open for more than 2 minutes; To mute
the acoustic alarm, press the specific button
Power failure alarm
The maximum temperature reached during a power failure flashes on the freezer display. The alarm
symbol lights up and the acoustic alarm sounds at the same time.
The alarm is activated when:
• a prolonged power failure takes place, causing the internal temperature of the freezer to increase to
values that cannot guarantee safe storage of food.
To disable the alarm press “alarm” button, after which the pre-set temperature will appear on
the display.
evaluate the state of the stored food.
Note:
Operation alarms
Depending on the malfunctioning site some letters could be displayed on the fridge or freezer
compartment display. Call After-sales-Service and specify the alarm code.
5019 637 33149
(REF. 14)
F NL E P
GB
D
or close the door again.
I
GR N FINS
I
DK
Page 4

Appliance ON/OFF button (REF. 1)
This button turns off the whole appliance. To turn the appliance back on, press the button again.
Remember that this operation does not disconnect the appliance from the power supply.
ON/OFF button for refrigerator compartment (REF. 2)
This function turns off the refrigerator only, while the freezer compartment continues to operate
normally. To turn the appliance back on, press the button again.
Remember that this operation does not disconnect the appliance from the power supply.
GENERAL NOTICES
The ambient air temperature, the frequency of opening the door and the position of the appliance can affect
Note:
the internal temperatures of the appliances. These factors must be taken into account when setting the appliance.
REPLACING THE LIGHT BULB
Always disconnect the refrigerator from the power supply before replacing any light bulbs.
Next:
• Remove the light cover.
• Pull the bulb towards the outside of the lamp holder.
• Check the bulb and if necessary, replace it.
• Assembly the light cover back pushing it in its place.
This appliance is equipped special unscrewed bulb.
This bulb is available only from our Aft er-Sale service. Replace using
Do not leave not covered bulbs.
Warning:
After removing the light cover in order to cleaning, unplug the appliance at first. Use only slightly wet
washcloth. Do not touch the bulbs. Keep special precautions.
maximum 15W bulb.
5019 637 33149
F NL E P
GB
D
I
I
GR N FINS
DK
 Loading...