

Page 1

MACHINE OPERATION
Sort laundry according to care
symbols
Do not tumble dry
Suitable for tumble drying at low temperatures
Suitable for tumble drying
Preparing laundry
Loading dryer
Selecting programme
Selecting options
(if available)
Starting dryer
Programme end -
unloading dryer
Switching dryer off
Additional information (including troubleshooting and service) can be found in the individual chapters of the
Instructions for Use.
Sort laundry by:
Material thickness: whenever there is greater load than the dryer can handle,
separate laundry according to weight (e.g. dry towels and thin underwear
separately).
Type o f mat erial: cotton (linen); synthetic textiles (easy care).
Degree of drying: cupboard dry, iron dry, etc.
Do not tumble dry: nylon stockings, delicate embroidery, fabrics with metallic
decorations, bulky items such as pillows.
Check that all fastenings are closed and that pockets are empty. Please ensure that
there are no lighters in the laundry. Turn laundry inside out.
Place laundry loosely in the drum to achieve equal drying throughout.
Then close the door.
Select the drying programme required by turning the programme selector knob
(for information, refer to programme table).
Select the option required by pressing the corresponding button. The indicator
lamp above the relevant button lights up to confirm your selection. A fast blinking
lamp indicates a wrong selection is made (incompatible options). Press the button
again to cancel the option.
The drying programme is started by pressing the “Start (Pause)” button.
The relevant indicator lamp lights up.
Changing programme selection: if the programme selected is changed during
drying, the dryer stops. The “Start (Pause)” indicator lamp flashes. To operate the
new programme, press the “Start (Pause)” button again.
Interrupting programme: to interrupt a drying cycle, press the “Start (Pause)”
button and open the door. Wait at least 5 minutes, to allow the laundry to cool
down, before you unload the dryer. For your safety the drying cycle stops
automatically if you open the door. To restart, after door opening, close the door
and press the “Start (Pause)” button again.
Warn ing: never stop a tumble dryer before the end of the drying cycle, unless all
items are quickly removed and spread out so that the heat is dissipated.
The final part of a drying cycle occurs without heat (cool down cycle) to ensure that
the items reach a lower temperature to avoid wrinkling.
Anticrease: if the laundry is not removed at the end of the drying cycle, an
automatic anti-crease cycle will operate for maximum 15 min (by choosing the
option “Anticrease” this time can be extended up to 12 hours). The drum rotates to
prevent the laundry from creasing.
End: take the laundry out of the dryer. The drying process is complete and the anticrease phase has been reached (active).
Cleaning the door filter after every cycle: open door, pull door filter up and out of machine and open it. Brush lint using a
soft brush or your fingertips. Close door filter and push firmly back into place.
Emptying water container: pull container out by the handle and empty. Replace the container when empty by pushing it
completely back into place.
Please note: only use additives/plastic items specified as dryer safe and rinse items that have been treated with stain remover
thoroughly in plenty of water before drying. Never dry rubber objects or objects stained with vegetable oils in the dryer.
The Manufacturer is not liable for any damage to laundry resulting from inadequate or incorrect fabric care instructions which
have been provided with the garment or article.
Set the programme selector knob to “Off” (“O”).
1
Page 2
2
Cotton
Synthetics
Special programmes
Airing
Drying
times
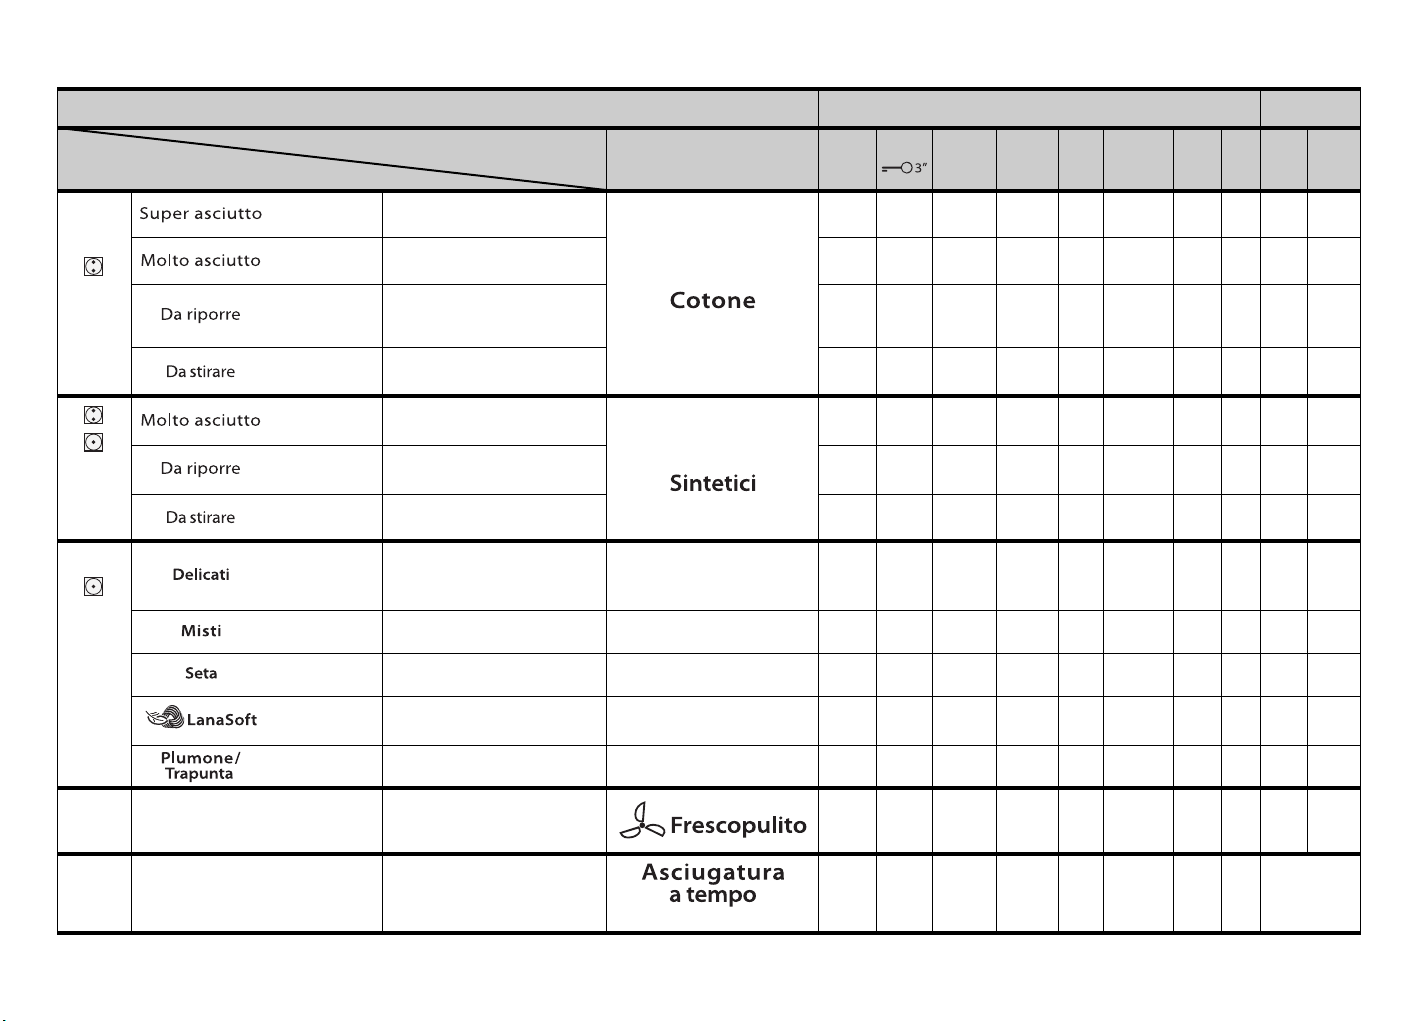
Programmes / Drying levels
Overview of programmes
Extra dry
Cupboard dry +
Cupboard dry *
Iron dry *
Cupboard dry +
Cupboard dry *
Iron dry
Delicate plus
Mixed load
Silk
Wool finish
Down
Multi-layered, thick laundry such as: terry
towels, terry towelling bath robes.
Terry towels, dry towels, bed linen,
underwear.
Similar types of laundry which do not
require ironing such as: dry towels,
bed linen, underwear, baby clothes,
T-shirt s, cotton socks.
Laundry which requires ironing such
as: bed and table linen, dry towels,
T-shirts, polo shirts, work clothes.
Laundry with thick, multi-layered
areas such as: bed and table linen,
track suits, anoraks, blankets.
Laundry which does not require
ironing such as: shirts, blouses,
T-shirt s, spor tswear.
Laundry which requires ironing such as:
trousers, dresses, skirts, shirts, blouses.
Low drying intensity for delicates and
items such as: trousers, dresses, shirts,
blouses.
T-shirt s, blou ses, tow els, un derw ear,
sportswear.
Blouses, shirts and T-shirts.
For aerating and loosening woollen
textiles such as: hats, sweaters, scarfs,
gloves. Not for drying woollen textiles.
Sleeping bags, trousers, vests.
Type of textile
Fabr ics
Cotton or linen hot wash/
coloured laundry
Max. 7 kg
Synthetic, mixed fibre or cotton
easy care (ironing not required)
Laundry made from synthetic
fibres, such as polyamide, nylon,
Laundry that contains downs
laundry
Max. 3.5 kg
polyacrylic, etc.
2.5 kg
Cotton - synthetic blend
3.5 kg
Tex til es m ade of s ilk
Max. 2.5 kg
Tex til es m ade o f wo ol
1 kg
3 kg
Finish i n
Fine ciclo
ritardato
Key lock Additional
reverse
Wave
Motion
Options
Anticrease
Antipiega
Gentle
Gentile
Dryness
level
Livello di
asciugatura
Reset
Annulla
Pause
Pausa
Approximate
drying times
Very
wet
load
X X X X X X X X 190 140
X X X X X X X X 165 125
X X X X X X X X 155 110
X X X X X X X X 135 90
X X X X X X X X 80 70
X X X X X X X X 65 60
X X X X X X X X 55 50
X X X X X X X X 80 60
X X X X X X X X 130 100
X X X X X X X X 65 50
X X X X — — X X 6 6
X X X X — — X X 120 120
Wet
load
Laundry is aired, refreshed and loosen
up for 30 minutes without heating.
Completes drying (suitable for all
fabrics).
All textiles.
* Test programmes according to EN 61121, tested with maximum rated load capacity.
— X — — — — X X — —
X X X X — — X X 10’ - 180’
10’ - 180’
Page 3
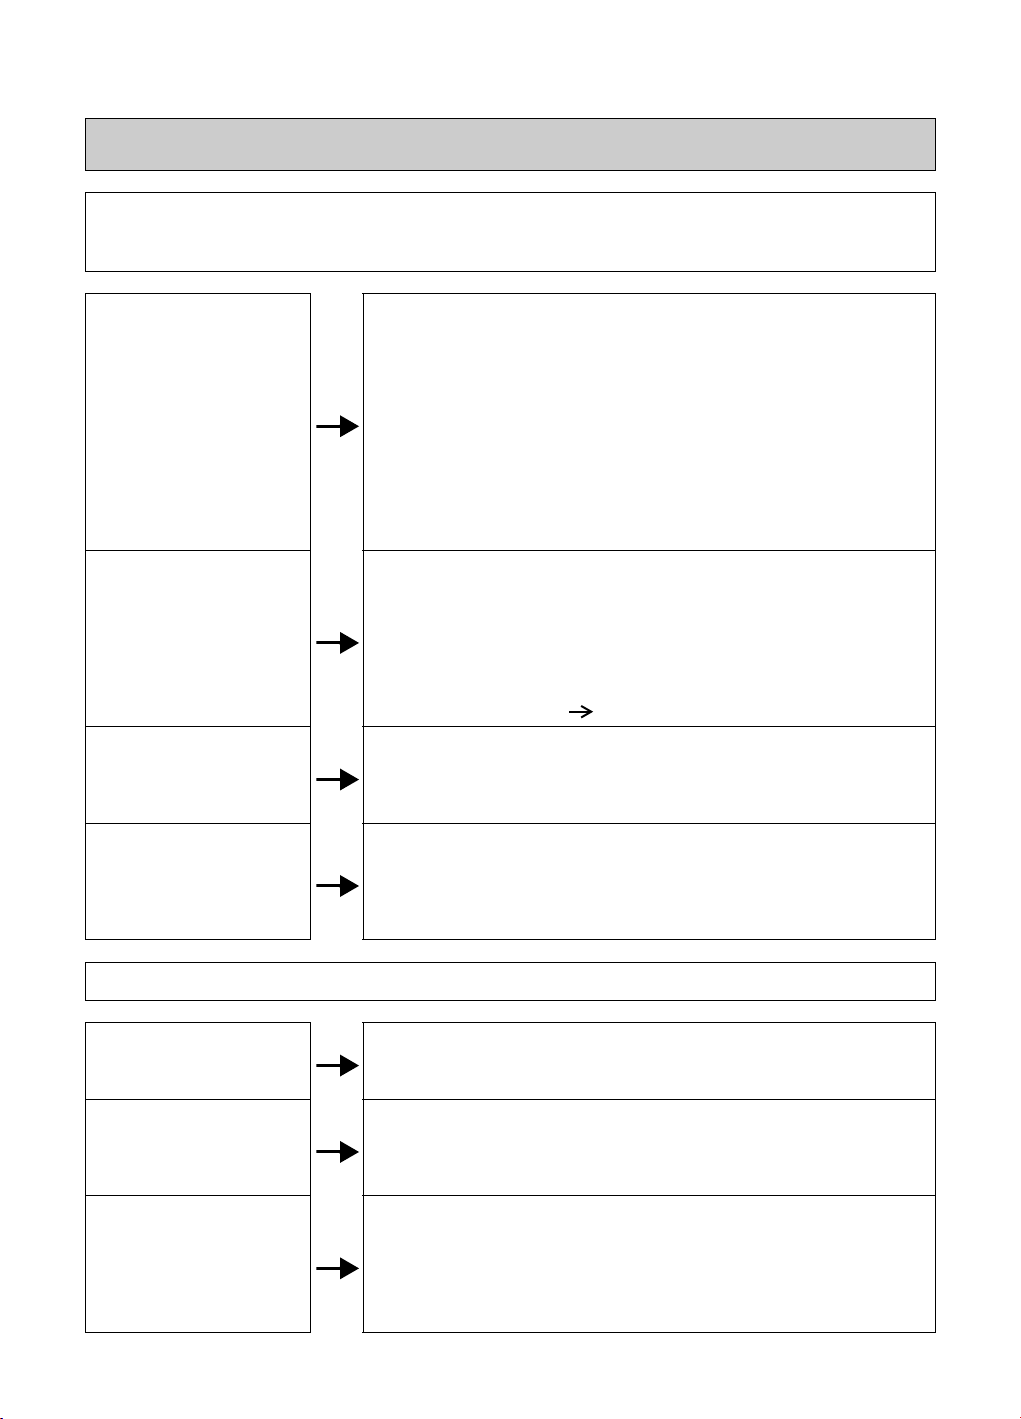
HOW TO PROCEED IF...
...you want to check the dryer yourself first: (If your machine is not functioning correctly, please
check the following points before calling the customer service - also refer to relevant chapter in the
Instructions for Use)
• Has the correct drying programme been selected?
• Has the cycle been interrupted (door opening, full water container)?
• Was the inserted laundry too wet (washing machine spin speed less than
1000 rpm)?
• Is the door filter dirty (filter indicator light on)?
Drying takes too long/
Laundry is not dry enough
The dryer does not operate
(after a power failure,
always press the “Start
(Pause)” button)
• Is the bottom filter dirty (for more information, refer to the Instructions for Use)?
• Is the room temperature too high?
• Is the “End” and “Anticrease” indicator lamp lighting up? The drying cycle
is complete and the laundry can be taken out.
• If the drying result does not meet your expectation, select a more dry
programme or use the dryness adjustment option (if available) to
optimize the drying result.
• Is the plug properly inserted into the mains electricity socket?
• Is there a power failure?
• Has the fuse blown?
• Is the door properly closed?
• Has a drying programme been selected?
• Has the “Start (Pause)” button been pressed?
• Has the start delay option been selected?
• Is the dryer overloaded? Please remove a part of the load.
Door filter, water container
or bottom filter indicator
lamp on
Water droplets underneath
the dryer
• Is the door filter clean?
• Is the water container empty?
• Has the water container been inserted correctly?
• Is the bottom filter clean and inserted correctly?
• Has the bottom filter been inserted correctly?
• Have all lint on the bottom filter seal and the door seal been wiped away?
• Has the water container been inserted correctly?
• If the direct drain connection is used, is it tight?
• Is the dryer levelled?
...you want to care of and clean your dryer:
Clean the door filter at the
end of every cycle
Empty the water container
at the end of every drying
cycle
Clean the bottom filter
every fifth cycle
• Brush lint using a soft brush or your fingertips.
• Close the filter.
• Push the filter back into place.
• Pull the handle to remove the water container.
• Empty the water container.
• Replace the water container when empty by pushing it completely back
in place.
• Clean the bottom filter under running water.
• Remove all fluffs from the seals.
• Clean the bottom filter housing (for further information see chapter
“Cleaning the Bottom Filter” in the Instructions for Use).
• See the Instructions for Use for further information how to clean the
bottom filter.
3
Page 4
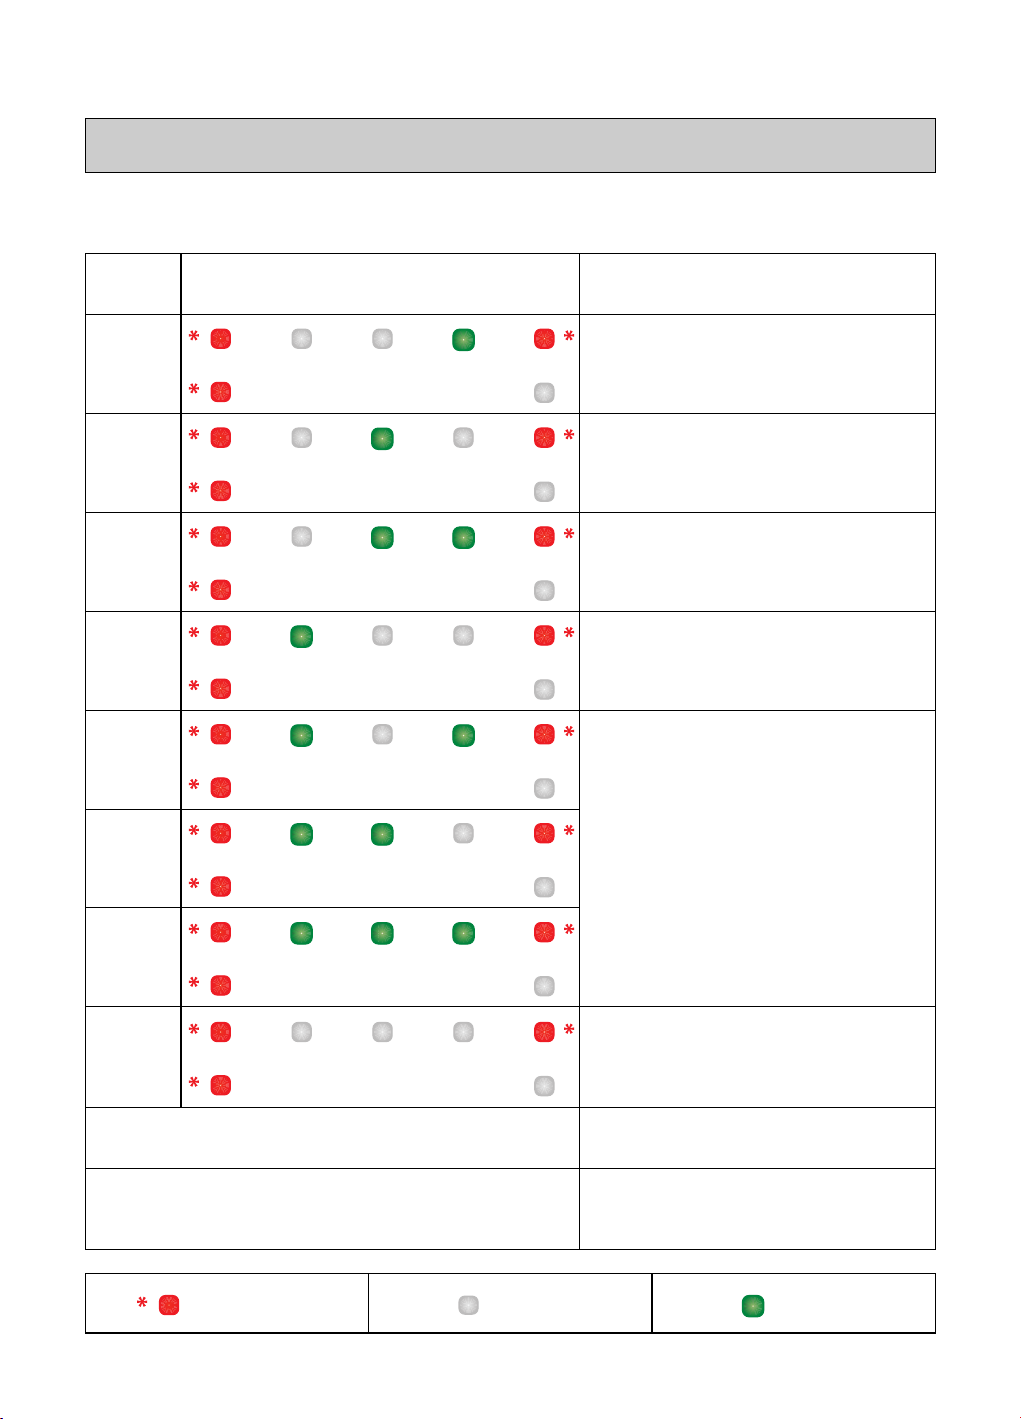
FAILURE CODES
In case of a malfunction of the dryer, one the following failure codes could be displayed.
Depending on the model of your dryer, the failure can be displayed in letters or by different
blinking lamps.
Failure
code
F01 Please call the After-Sales Service.
F02 Please call the After-Sales Service.
F03 Please call the After-Sales Service.
F04 Please call the After-Sales Service.
F05
F06
Lamps failure code
Check needed by customer before
Service call
Turn OFF the dryer. Unplug the dryer.
Assure that the ambient temperature is
between 5°C and 35°C. Wait for 1 hour.
Plug the dryer again and restart the dryer.
If the failure occurs again, please call the
After-Sales Service.
F07
F10 – F24
Start lamp is blinking 2 times per second when it is
pressed
Bottom filter lamp is blinking or door filter lamp is
blinking 2 times per second when Start (Pause) button
is pressed
Lamp blinking Lamp Off Lamp On
4
Turn OFF the dryer. Unplug the dryer. Wait
for 30 minutes. Plug the dryer again and
restart the dryer. If the failure occurs again,
please call the After-Sales Service.
Assure that the door is correctly closed
and bottom filter correctly positioned.
Assure that the bottom filter is correctly
positioned.
Page 5
Before using the machine, please also read the Instructions For Use carefully!
GB
AZA-HP 7040
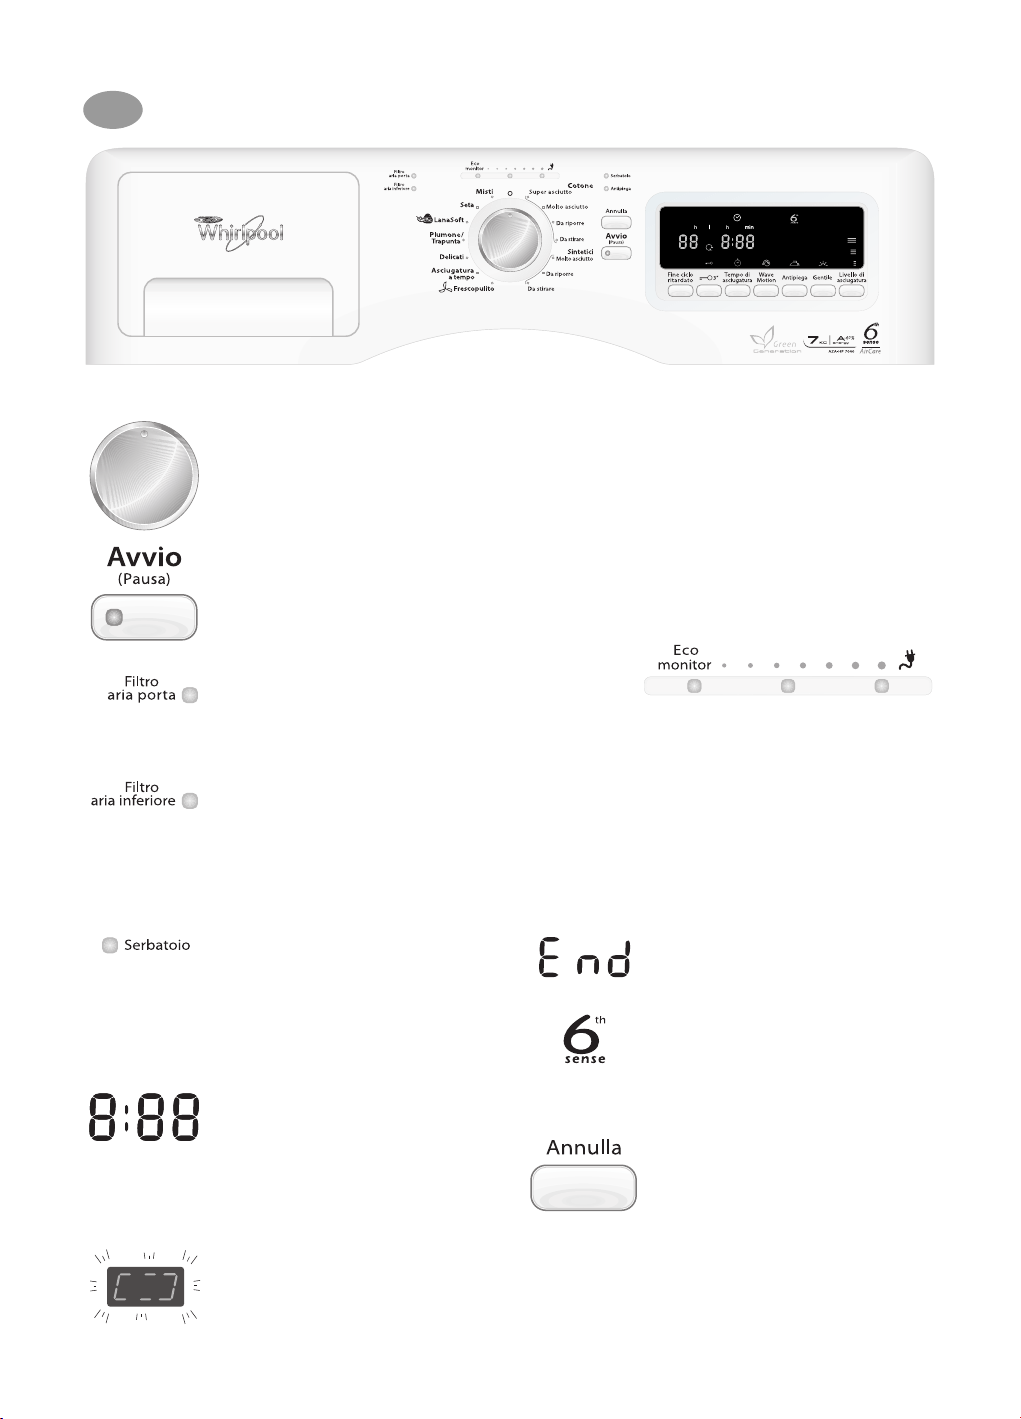
Indicator lamps and Options
Programme selector knob
The drying programme is selected by
turning this knob. The “Start (Pause)”
indicator lamp flashes.
“Start (Pause)” button
The drying programme is started by
pressing this button. The indicator
lamp lights up.
Door filter
The indicator lamp lights up when the
door filter needs to be cleaned.
Clean the door filter at the end of
every drying cycle.
Bottom filter
This indicator lamp lights up when the
bottom filter needs to be cleaned.
This indicator lamp is blinking, when
the bottom filter is not correctly
positioned. Please take care that the
bottom filter is correctly inserted and
the handle is fully engaged.
Quick Reference Guide
Eco Monitor
The “Eco Monitor” gives you a rough
feedback about the energy
consumption of the selected
programme. This function will not
work for a time based programme.
As soon as you turn the programme
selector to any humidity steered
programme, the “Eco Monitor” lamps
will indicate the expected energy
consumption.
The three indicators show the degree
of consumption: the less energy your
programme setting is forecasted to
consume, the less indicators will light
up. This depends on the programme,
initial moisture and options selected,
and also on the size of the load. For
that reason, the forecasted degree of
energy consumption may adapt when
the tumble dryer detects the load size.
Water container
The indicator lamp lights up when the
water container needs to be emptied.
The drying cycle is automatically
interrupted. Empty the container and
restart the drying program.
Empty the water container after
every drying cycle.
“Remaining time” display
Depending on the programme selected
a default drying time is displayed. After
start of cycle the time displayed is
corrected depending on the volume,
type and moisture of the laundry.
The drying time specified is a
calculated value which will be
updated during the drying cycle.
The blinking lines indicate that the
calculation is running. The remaining
time will be updated.
End
The drying programme is finished.
Please unload the dryer.
Overdry protection/6th Sense
The indicator lights up when a
humidity controlled programme is
selected, to indicate the activated
protection function.
Reset
During the selection phase of the
programme, pressing this button will
switch off all settings of selected
options. During running drying cycle
the pressing of the button will stop the
cycle and set the dryer back in
selection mode.
The button needs to be pressed for 3
seconds.
5
Page 6
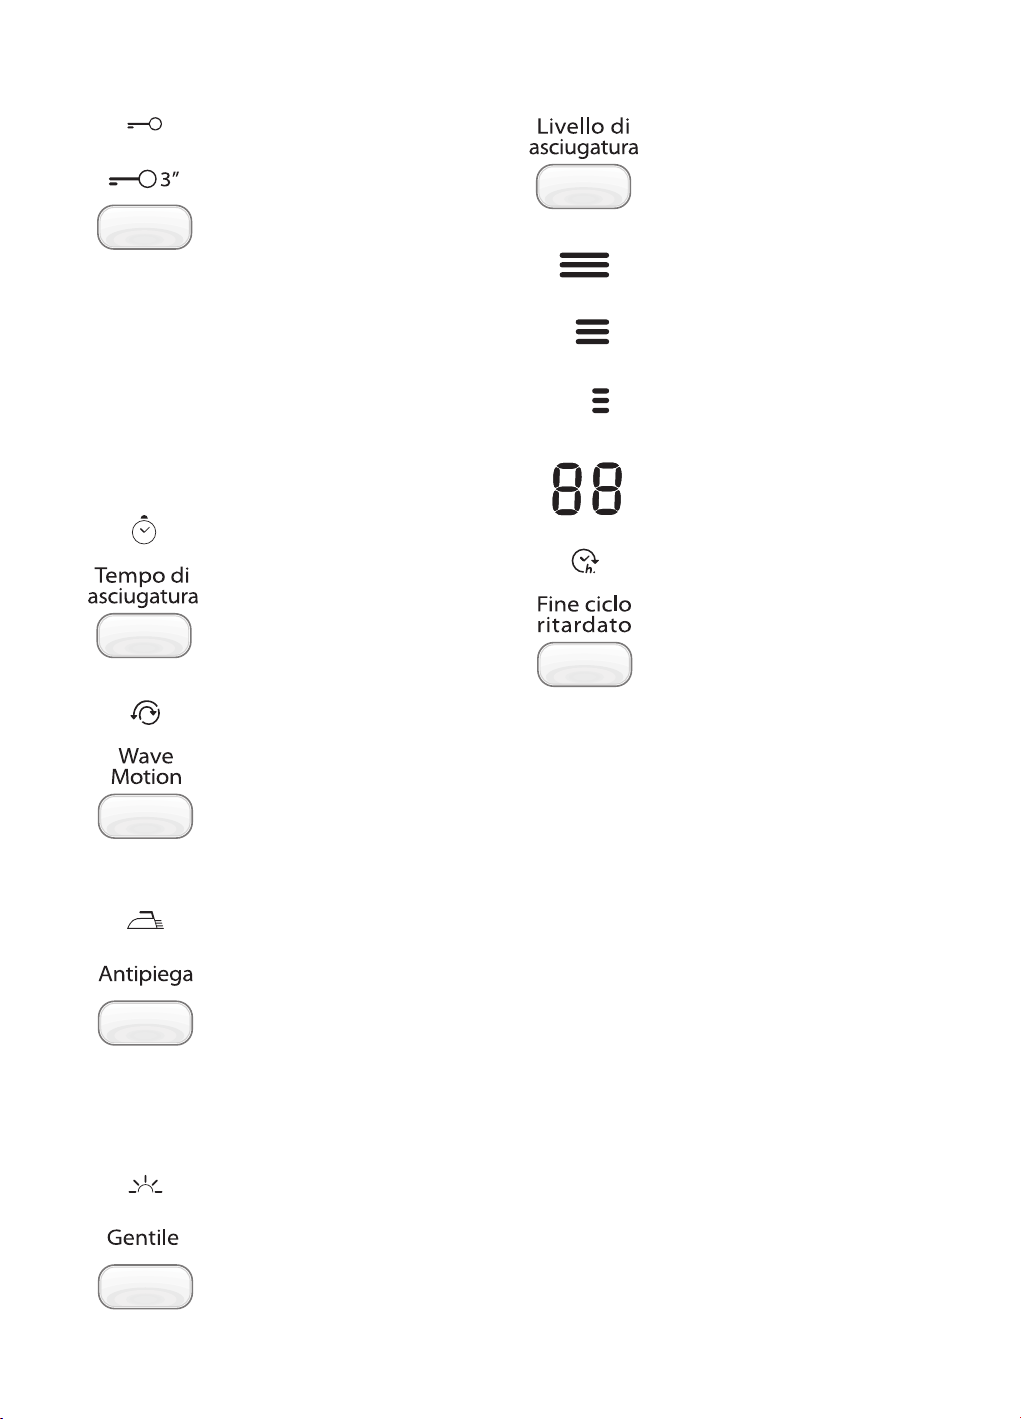
Key lock
For child protection reasons, this
option can be used to lock all
functions of the user interface.
To activate this option, the button
needs to be pressed for 3 seconds,
until the “key” symbol at the display
appears. To deactivate this option,
press the button until the “key”
symbol disappears.
The key lock function is still active
even when the selector knob is turned
to “off” position or the door is opened.
The function has to be deactivated.
Dry time adjustment
Turn the programme selector knob to
“Drying Time” position. Press the
button “Drying time” to select the
duration of cycle in ten minutes steps
up to 180 minutes.
Additional reverse
With this option the drum will turn
during the drying cycle more often
against the main turning direction
than in a normal cycle. This will
improve the evenness of laundry
drying.
Anticrease
This option can be chosen to reduce
wrinkling, when the laundry is not
unloaded directly after end of the
cycle. The drum turns from time to
time for maximum 12 hours. It can be
interrupted at any time by switching
off the dryer. This option deactivates
the “Buzzer” function, if it is activated.
Gentle
Selecting this option will reduce the
drying temperature. This option
cannot be selected when the option
“Rapid” is selected.
Dryness level
By selecting this option you can adjust
the dryness level of the laundry. After
the selection of the desired
programme you can choose the
dryness level by pressing the button.
Pressing 1 time you select a more dry
level
or
Pressing 2 times you select a less dry
level
or
Pressing 3 times you select again
normal dry level.
Finish in
With this function you can postpone your
programme to complete at a later time:
press the button to select in how many
hours the programme shall be finished.
• Thus, it allows you to have your
laundry ready at a particular time and
to profit from more favourable
energy rates during the night, for
example.
• The “Finish in” function can be
selected in full hour time segments
(1 to 24 h). When you press the
button, the shortest possible time
will be displayed; keep on pressing
the button to loop through all the
available times. To remove it again,
set the index of the programme
selector knob to the “Off” position.
• When you have selected the desired
“Finish in” time, press “Start (Pause)”
- the countdown will begin.
• During the countdown, you can still
modify the option setting (select or
deselect options).
• Sometimes the programme may
finish before the selected “Finish in”
time has expired (e.g. for small
loads). In this case, the dryer will
tumble the laundry regularly to keep
it fresh, until the selected “Finish in”
time has expired. During tumbling,
the display will show an animation.
The tumbling phase can be stopped
at any time either by pressing any
button, by rotating the programme
selector or by opening the door.
5019 307 01586
(Subject to technical modifications)
6
 Loading...