

Page 1
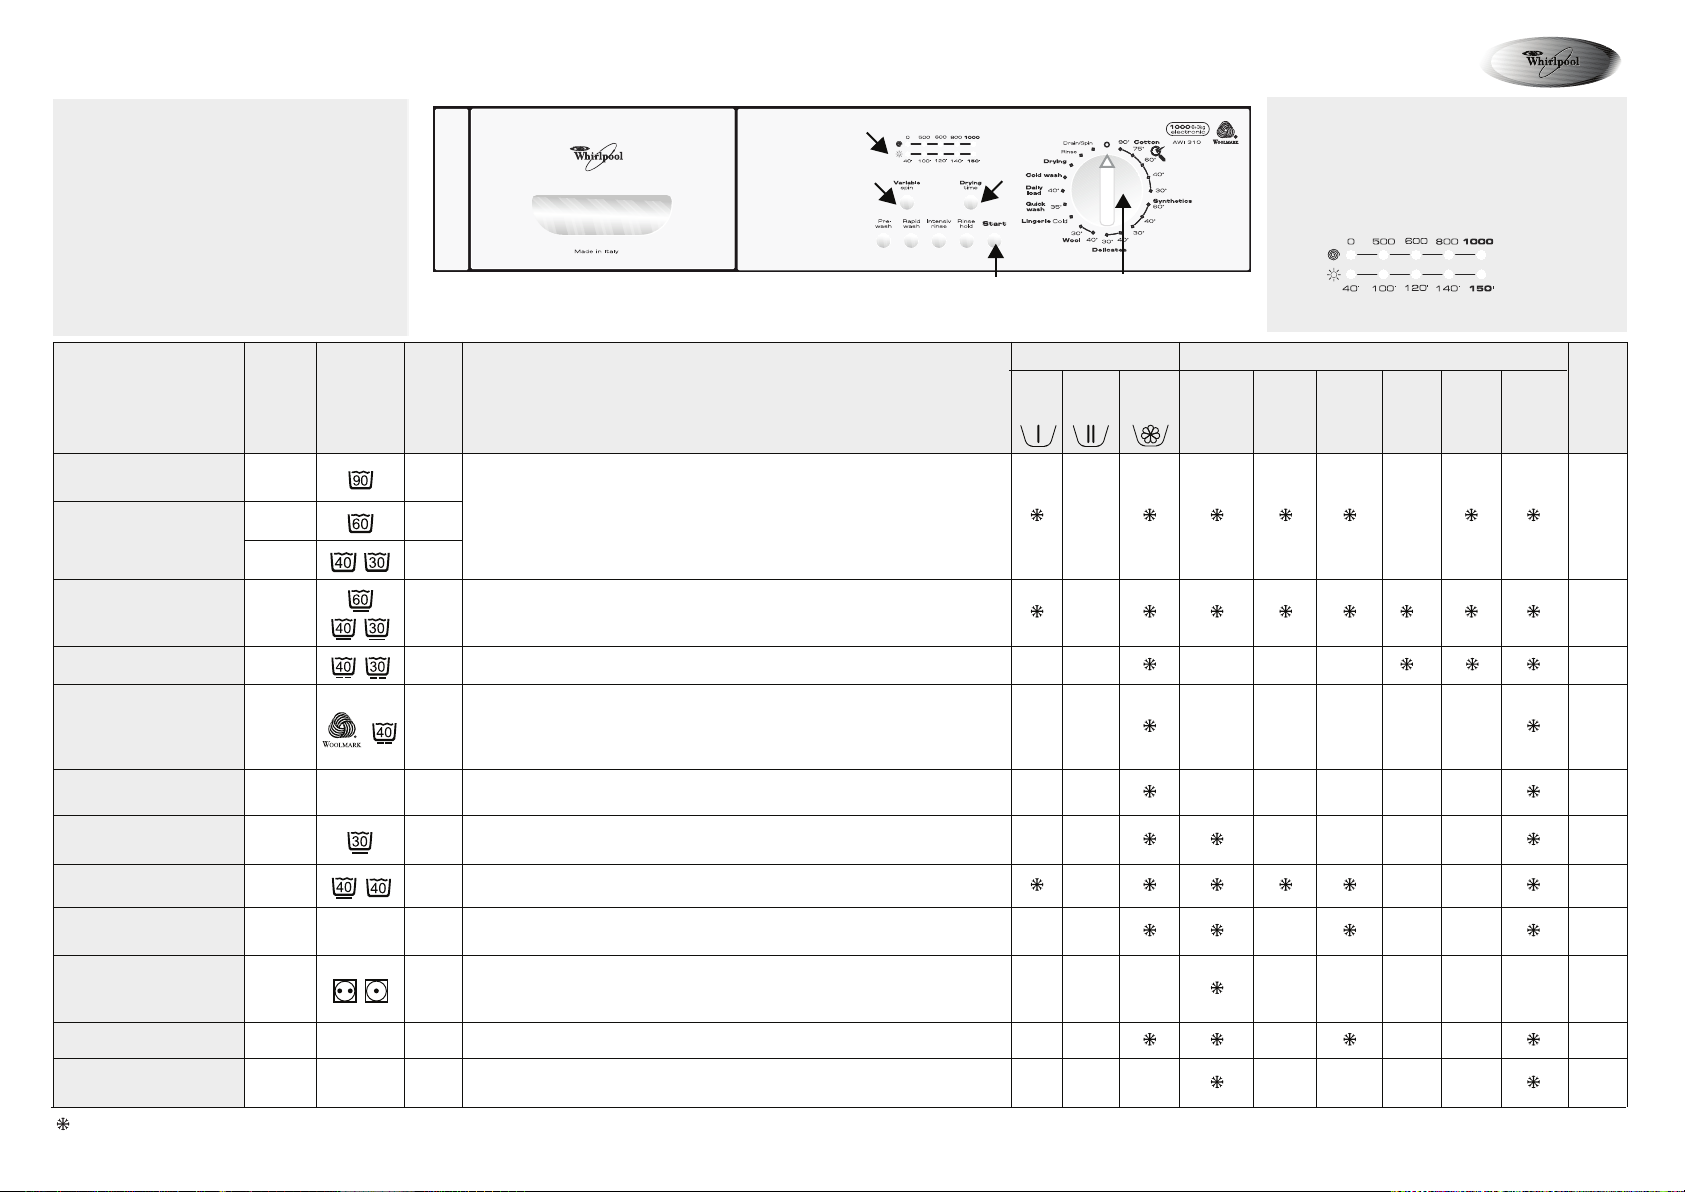
AWI 310
程序表
H
G
}
E. 程序選擇旋鈕
F.「開始」按鈕
T
G.「脫水轉速選擇」按鈕
T.「乾衣時間」按鈕
H. 轉速及乾衣指示燈
程序
白色純棉質 / 抗菌
棉質
合成纖維
纖幼衣物
羊毛
貼身衣物
速洗
溫度
75 - 90 °C
60 °C
30 - 40 °C
30 - 60 °C
30 - 40 °C
30 - 40 °C
— —
35 °C
護理標簽
最大
洗衣量
公斤
6.0
6.0
6.0
3.0
3.0
1.5
3.0
3.0
I
衣物類型 / 備註
- 關於溫度的選擇,請遵從護理標簽上的製造商建議
一般至非常骯髒之床單、桌布及內衣褲、毛巾、襯衫等棉麻衣物。
溫度80°C以上,此程序可消滅細菌,確保衣物衛生。
細菌消滅效能通過2001年11月NF EN 13697標準的類似方式測試。
一般至非常骯髒之襯衫、罩衫等滌綸(迪奧綸、特雷維拉)、
錦綸(貝龍、尼龍) 或混棉織物。
窗簾與質料纖幼之連身裙、半截裙及襯衫等衣物。
只可洗滌有羊毛標記並標明可機洗的羊毛衣物。
此程序(40°C)經國際羊毛局測試及認可,適合手洗之衣物。
窗簾、手洗之絲質及羊毛衣物,只適用於冷水。
適合穿著時間短之外衣等棉質、滌綸、錦綸及混棉織物。
F
洗衣劑 及 添加劑
預洗
—
—
—
—
E
I. 選擇功能按鈕
特別功能
主洗 柔順劑
是
是
是
是
是
是 最高
乾衣
時間
—
預洗
深層
過水
———
— ———
— ——
— ——
延遲
脫水
—
—
—
—
速洗
脫水
轉速
選擇
最高
脫水
轉速
轉/分鐘
最高
800
500
800
800
1)
1)
1)
1)
日日洗
冷水洗
乾衣
過水
排水 / 脫水
:可選擇 / 是:須放入洗衣劑
1) 為更好地護理衣物,此程序的脫水轉速被受限制。
40 °C
— —
—
— —
— —
輕微到一般肮髒之棉質和/或合成纖維衣物。
4.0
6.0
輕微肮髒之棉質和/或合成纖維衣物,只適用於冷水。
3.0
乾衣能處理之棉質程序(3公斤)/合成纖維程序(1.5公斤)
6.0
與「棉質」程序的最後一次過水及最後脫水相同。
6.0
此程序進行強力脫水。 與「棉質」程序的脫水步驟相同。
此洗衣機之“羊毛”清洗程序經由 The Woolmark Company 認可,適合有可機洗羊毛標誌的衣物使用。
請依照衣物上的清洗指示及洗衣機生產商所提供之洗衣指引。(Cert. No. M0402-M0403-M0404-M0405)。
是
是
—
— — —
— —
— — —
—
— —
—
——
—
惠而浦乃美國惠而浦 Whirlpool, U.S.A. 的註冊商標。
—
—
——
——
最高
最高
— ———
最高
最高
Page 2
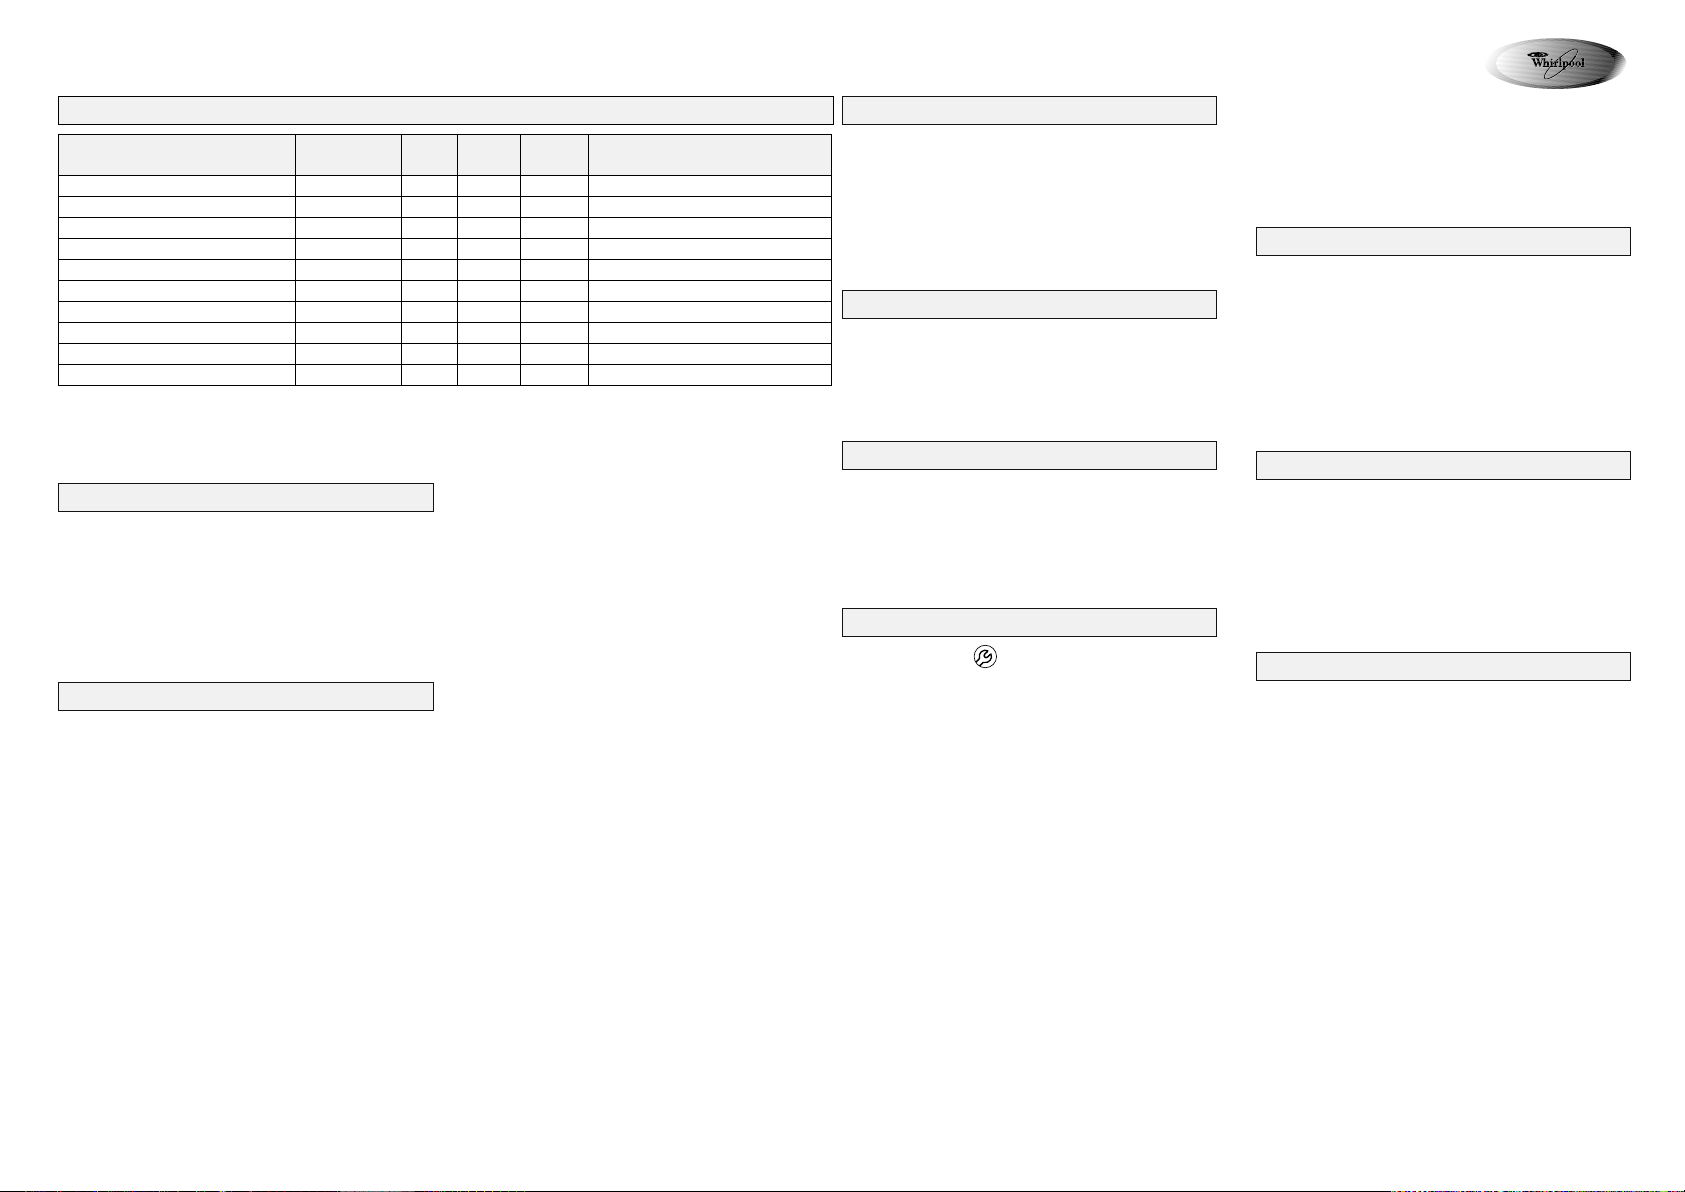
水電消耗資料表
程序
白色純棉質 / 抗菌
棉質
棉質加「節能」
***
棉質
合成纖維
合成纖維
日日洗
速洗
纖幼衣物
羊毛
上表中的能源消耗資料,是根據 IEC/EN 60 456 標準所規定的正常條件下測量而獲得。供水壓力和溫度以及洗衣量和衣物類型的
不同,各家庭的能源消耗與上表中的資料可能會有不同。
*
時間顯示器可能與表中所列數值有所偏差,因為剩餘時間按洗衣時的家庭實際情況計算。
**
為在水泵排水前降低水溫,主洗步驟結束時會加入一些冷水。
***
能源標簽的參考程序。
溫度
(°C)
90 6.0 60** 1.70
75 6.0 60 1.33
60 6.0 57 0.94
40 6.0 57 0.69
60 3.0 44** 0.88
40 3.0 44 0.43
40 4.0 40 0.39
35 3.0 37 0.27
30 3.0 50 0.22
40 1.5 54 0.39
添加洗衣劑,關閉機門並選擇程序
按前頁所示和「使用說明書」中的「洗衣劑及
添加劑」一章所述添加洗衣劑。
洗衣量 耗水量 耗電量
(公斤)
(公升)
(千瓦/小時)
大約程序時間
(小時:分鐘)
2:09
2:05
2:07
1:51
1:51
1:39
1:28
0:41
0:53
0:50
「深層過水」按鈕
· 注入額外的清水,循環沖洗時間會延長。
· 此選擇特別適用於軟性水質地區,清洗嬰兒
*
衣物,及有助敏感症之人士。
1. 將程序選擇旋鈕轉到所需程序。
2. 程序預設的轉速會於顯示器亮起;如欲更改
轉速,請按「脫水轉速選擇」按鈕更改。
「延遲脫水」按鈕
· 衣物保留在最後一次過水的水中,不進行最
後脫水步驟,以防衣物起皺及變色。
選擇所需的特別功能
按下所需的任何特別功能按鈕時,相應的指示
燈會發亮。
如果程序與附加功能的組合不可能時,指示燈
會自動熄滅。
不適當的功能組合會被自動取消。
「預洗」按鈕
· 僅適用於非常骯髒的衣物(含泥沙、粗粒)。
洗衣時間約增加15分鐘。
· 當啟動預洗程序時,切勿使用液體洗衣劑。
「速洗」按鈕
· 綿質及合成纖維程序在速洗時會省卻預洗及
一次過水程序,故可縮短洗衣時間。
· 注水量增加,配合輕柔的旋轉洗滌。
· 建議採用「合成纖維」、「日日洗」或「纖幼
衣物」程序時選擇此功能。
· 當延遲脫水或只想排水時,此功能特別有用。
· 如選擇了「延遲脫水」,切勿讓衣物浸泡過久。
備註:程序步驟顯示器的「防皺」指示燈發
亮時,程序在「延遲脫水」時停止。
「開始」按鈕旁邊的指示燈會閃爍。
結束「延遲脫水」功能:
· 按下「開始」按鈕,洗衣機將運行到當前洗
衣程序的最後脫水步驟時自動結束程序。
「脫水轉速選擇」按鈕
· 每一程序均有一個預設最高的脫水轉速。
· 按此按鈕以另設脫水轉速。
· 如選擇的脫水轉速為「0」,最後一次脫水將
會取消,但過水時的中途脫水仍會保留。只
會進行排水。
乾衣時間
當使用自動洗衣程序,按此按鈕選擇乾衣時間
(於清洗完畢時)或於自選程序選擇「乾衣」程序
(於手洗衣物時)。
需在自選程序選擇「乾衣」程序時,脫水轉速
最低為800轉/分鐘。當乾衣程序啟動時,
程序指示燈會發亮。
程序表
打開水龍頭並按下「開始」按鈕。「開始 」按
鈕旁邊的指示燈發亮。
洗衣程序指示燈會順序顯示正進行之洗衣階段;
從左至右為預洗,洗衣,過水,排水/脫水,完成。
「開門」指示燈
當結束洗衣程序後,「完成」指示燈發亮表示可
以打開機門。洗衣程序運行期間,機門保持鎖
閉,決不能強行打開。如在洗衣程序運行期間
您急需打開機門,請參閱「結束前取消(重設)運
行中的程序」。
紅色顯示燈
「維修」指示燈
「維修」指示燈的發亮可能是由一個電子元件的
故障所引至。 請參閱「使用說明書」的「故障排
除指引」;如果故障依然存在,請聯絡我們的星
級服務中心。
「清理過濾器」指示燈
廢水未泵出。檢查排水軟管是否扭曲或過濾器
是否需要清潔;在後一種情況請查閱「使用說
明書」(「拆除過濾器」)。
「入水喉關閉」指示燈
洗衣機無水供應或供應不足。打開水龍頭把程序
選擇旋鈕調校到「關機/0」位置,並重新設定程
序;如指示燈仍顯示,請查閱「使用說明書」中
的「故障排除指引」。
「開門」指示燈
「開門」指示燈的發亮可能是洗衣門仍未關上,可
再次關上,關上後把程序選擇旋鈕調校到「關機/ 0」
位置並重新設定程序;如指示燈仍顯示,請查閱
「使用說明書」中的「故障排除指引」。
洗衣程序結束
· 洗衣程序結束後,洗衣順序指示燈會發亮,
表示機門門鎖已開啟。
1. 將程序選擇旋鈕轉到「關機/0」位置。
2. 關閉水龍頭。
3. 打開機門並取出衣物。
4. 讓機門微開,令洗衣鼓吹乾。
程序開始後改變程序及 / 或特別功能
1. 把程序選擇旋鈕調校到「關機/0」位置。
2. 選擇新程序和任何特別功能,如需要時也可
選另一脫水轉速。
3. 再次按下「開始」按鈕。新程序在先前的程
序中斷之處繼續進行。此程序無需添加洗衣
劑。
結速前取消(重設)運行中的程序
· 把程序選擇旋鈕調校到「關機 /0」位置,並
選擇「排水/脫水」以便機門被打開前排走所
有留在機內的水。。
惠而浦乃美國惠而浦 Whirlpool, U.S.A. 的註冊商標。
Page 3
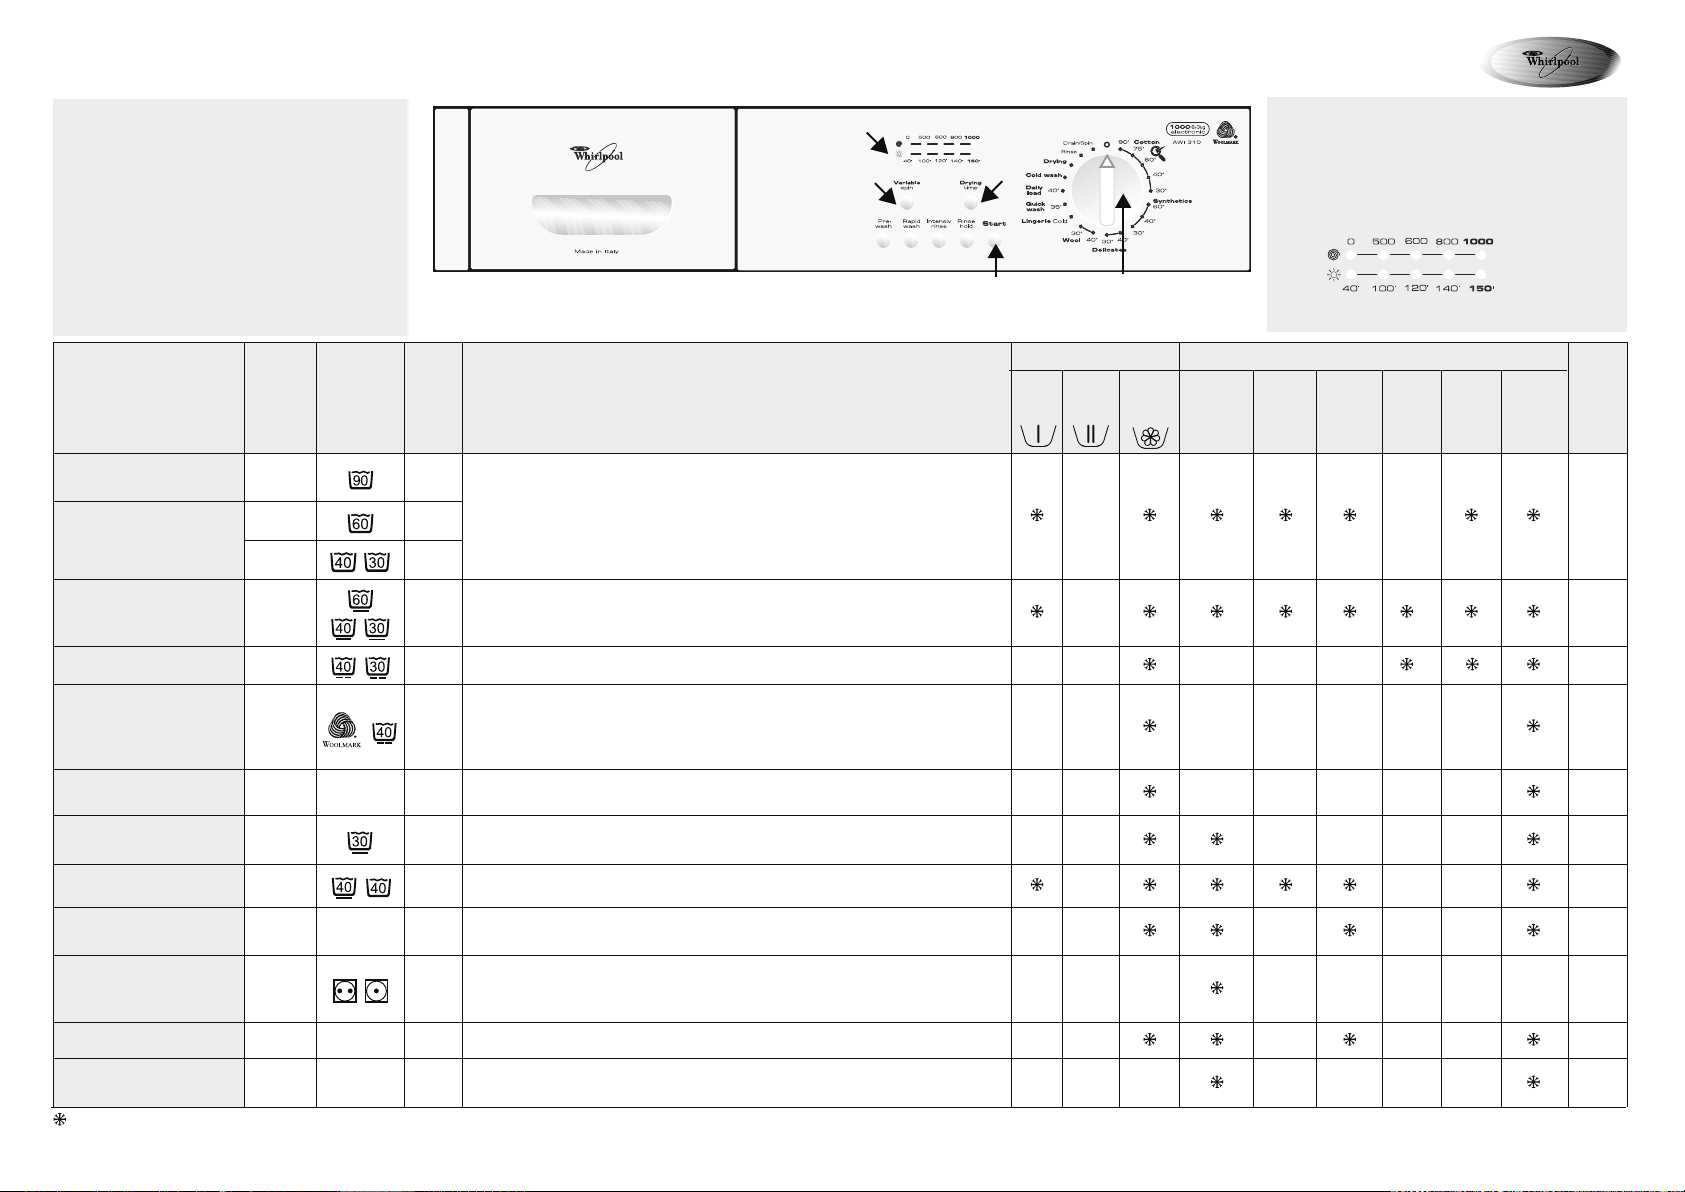
T
PAWI 310
R
GOR
MMA
H
RAHCE
E. Programme selector
F. “Start” button
G. “Variable spin” button
G
T
T. “Drying time” button
H. Spin speed indicator
/ Drying time indicator
}
Programme
White Cotton
Antibacterial
Cotton
Synthetics
Delicates
Wool
Lingerie
Quick wash
Tempe-
rature
75 - 90 °C
60 °C
30 - 40 °C
30 - 60 °C
30 - 40 °C
30 - 40 °C
— —
35 °C
Care
Labels
Max.
Load
- For temperature selection, respect the manufacturer’s recommendations on
kg
the care label
Normally to heavily soiled bed linen, table linen and underwear,towels,
6.0
shirts etc. made of cotton and linen.
At a temperature of 80°C or more,this programme eliminates bacteria,
6.0
ensuring sanitization of your laundry. The bacteria removal efficiency has
been tested following a similar methodology to the NF EN 13697
6.0
standard of Nov.2001.
Normally soiled blouses, shirts, overalls etc. made of polyester (Diolen,
3.0
Trevira), polyamide (Perlon, Nylon) or blends with cotton.
3.0
Curtains and delicate clothing, skirts, shirts and blouses.
Only woollens labelled with the Woolmark and identified as machine
washable.
1.5
This programme (40°C) is tested and approved by The Woolmark
Company for handwashable wool.
3.0
Curtains and delicate clothing in wool or silk only washable in cold water.
Outer clothing worn for short periods and made of cotton, polyester,
3.0
polyamide and cotton blends.
Type of wash/Notes
I
F
E
I. Optional function buttons
Detergents and additives Special functions
Pre-
Main
wash
—
—
—
—
Softener
wash
Yes
Yes
Yes
Yes
Yes
Yes Max.
Drying
time
—
Pre-
wash
Intensive
rinse
———
— ———
— ——
— ——
Rinse
hold
—
—
—
—
Rapid
wash
Variable
spin
Max.
spin
speed
rpm
Max.
800
500
800
800
1)
1)
1)
1)
Daily load
Cold wash
Drying
Rinse
Drain/Spin
: optional / Yes : dosing required
1)
For improved garment care, spin speed is restricted in these programmes.
40 °C
— —
—
— —
— —
4.0
6.0
3.0
6.0
6.0
Slightly to normally soiled garments made of cotton and/or synthetics.
Slightly soiled garments in cotton and/or synthetics washable only in cold
water.
Drying can be carried out using the “Cotton“ programme (with dry
laundry load of 3 kg) or the “Synthetics” programme (with dry laundry
load of 1.5 kg).
Same as the last rinse and the final spin in the “Cotton” programme.
Inthisprogrammespinning is intensive.Sameasthe spin cycleinthe“Cotton”
programme.
The “wool”programme of this washing machinehas been approved by TheWoolmark Companyfor the washing
of garments labelled as “machine washable”. Follow the instructions given on the label sewn on the garment and
the instructions supplied by the washing-machine manufacturer. (Cert. no. M0402-M0403-M0404-M0405).
Yes
Yes
—
— — —
— —
— — —
—
— —
—
——
—
Whirlpool is a registered trademark of Whirlpool USA
—
—
——
——
Max.
Max.
— ———
Max.
Max.
Page 4

CONSUMPTION DATA
Programme
Temperature
(°C)
Load
(kg)
Water
White Cotton / Antibacterial 90 6.0 60
Energy
(l)
(kWh)
1.70 2:09
**
Approx. programme duration
(hours : minutes)
*
Cotton 75 6.0 60 1.33 2:05
Cotton with “Eco”
***
60 6.0 57 0.94 2:07
Cotton 40 6.0 57 0.69 1:51
Synthetics 60 3.0 44
0.88 1:51
**
Synthetics 40 3.0 44 0.43 1:39
Dailywash 40 4.0 40 0.39 1:28
Quickwash 35 3.0 37 0.27 0:41
Delicates 30 3.0 50 0.22 0:53
Wool 40 1.5 54 0.39 0:50
Consumption values were measured in normalized conditions in compliance with standard IEC/EN 60 456. In domestic use,consumption data
may vary with respect to the values in the table in relation to the water supply pressure and temperature, the load and the typ
The time indicated on the display (if present) can deviate from the values in the table, because it takes into account the household
*
conditions applicable at that time.
To reduce the water temperature, some cold water is added at the end of the main wash cycle, before the pump drains the water out.
**
Reference programme for energy label.
***
ADD DETERGENTS, CLOSE THE DOOR
AND SELECT THE PROGRAMME
Add detergent as indicated on the front page and as
described in the chapter “Detergent and Additives”
in the Instructions for Use.
1. Turn the
programme selector
to the desired
“Intensive rinse” button
• More water is added and the rinse cycle is
prolonged.
• This option is particularly suitable for areas with
very soft water, washing baby linen, and helps
people with allergies.
e of wash.
programme.
2. The indicator of the predefined
lights up; in case you want to set another spin
speed, press the “Variable spin” button.
SELECT ANY DESIRED OPTION
Press the button(s) of any required option(s) - the
respective indicator lights up.
When the combination of programme and
additional option(s) is not possible,
the indicators switch off automatically. Unsuitable
combinations of options are deselected automatically.
“Prewash” button
• Only for heavilysoiled loads (e.g.sand, granulardirt).
Increases the cycle time by approx. 15 minutes.
• Do not use liquid detergent for the main wash
when activating the prewash option.
“Rapid wash” button
• Allows you reduce the wash times of the
“Cotton” and “Synthetics” programmes; with
this option selected the machine does one less
rinse and disables the prewash function.
• Increases the water quantity and the clothes are
spun very gently.
spin speed
“Rinse hold” button
• The laundry remains in the last rinse water
without the final spin cycle, to avoid creasing and
prevent colours from changing.
• This option is particularly recommended for the
“Synthetics”, “Dailywash” or “Delicates”
programmes.
• It is particularly useful if you want to postpone
spinning to a later time, or if you want to drain only.
• If you select “Rinse hold”, do not leave the
laundry to soak for too long.
The programme stops to “Rinse hold” at
Note:
the time the “Rinse Hold” light in the programme
sequence indicator is on. The indicator next to
the
“Start”
button flashes.
To terminate the “Rinse hold” option:
• Press the
“Start”
button; the programme will
terminate automatically with the final spin cycle
for the preset wash programme.
“Variable spin” button
• Every programme has a predefined maximum
spin speed.
• Press the button to set another spin speed.
• If spin speed “0” is selected, the final spin is
cancelled but intermediate spin peaks remain
during rinse. The water is drained out only.
DRYING TIME
Press the button to select the drying time, in
automatic mode (at end of wash cycle) or in manual
mode, selecting the “Drying” programme (with
hand-washed laundry). In the latter case it is
necessary to spin at a speed of at least 800 rpm. The
set time is that indicated by the light on; when they
are all off drying is not carried out.
PROGRAMME START
Open the tap and press the
next to the
“Start”
button lights up. The
“Start”
. The indicator
programme sequence indicator shows the current
programme stage,running fromleft to right through
Prewash/Wash, Rinse, Spin/Drain, End.
“DOOR OPEN” INDICATOR
The “Start” button flashes when the wash cycle has
completed indicating that the door can now be
opened. As long as a wash programme is running,
the door remains locked and must not be forced
open. In case you have an urgent need to open it
during a running programme, refer to “Cancel
(Reset) a running programme before the end”.
RED INDICATORS
“Service” indicator
Lighting up of the “Service” indicator can be caused by
a fault in an electrical component. Refer to the
“Troubleshooting Guide”in the Instructionsfor Use; If
the fault persists, contact our After-Sales Service.
“Clean pump” indicator
The water is not pumped out. Check whether the
drain hose is kinked or the filter must be cleaned; in
the latter case refer to the Instructions for Use
(“Removing the filter”).
“Door open” indicator
Lighting up of the indicator could be caused by the
door not being properly closed. Try closing it again.
Turn the programme selector to “Off/O” and reset
the programme. If the indicator remains on, refer to
the “Troubleshooting Guide” in the Instructions for
Use.
PROGRAMME END
• The “Start” button flashing indicates that the
programme has finished and the door is
unlocked.
1. Turn the programme selector to the “Off/O”
position.
2. Close the water tap.
3. Open the door and unload the machine.
4. Leave the door ajar to allow the drum to dry.
CHANGING PROGRAMME AND/OR
OPTIONS AFTER PROGRAMME START
1. Turn the programme selector to “Off/O”.
2. Select the new programme, any options and
another spin speed if you want.
3. Press the
“Start”
button again. The new
programme resumes the wash programme from
where the previous one was interrupted. Do not
add detergent for this programme.
CANCEL (RESET) A RUNNING
PROGRAMME BEFORE THE END
• Reset by turning the programme selector to
“Off/O” and select the “Drain Spin”
programme to remove the water remaining in
the bowl before the door can be opened.
Whirlpool is a registered trademark of Whirlpool USA
Page 5

Page 6

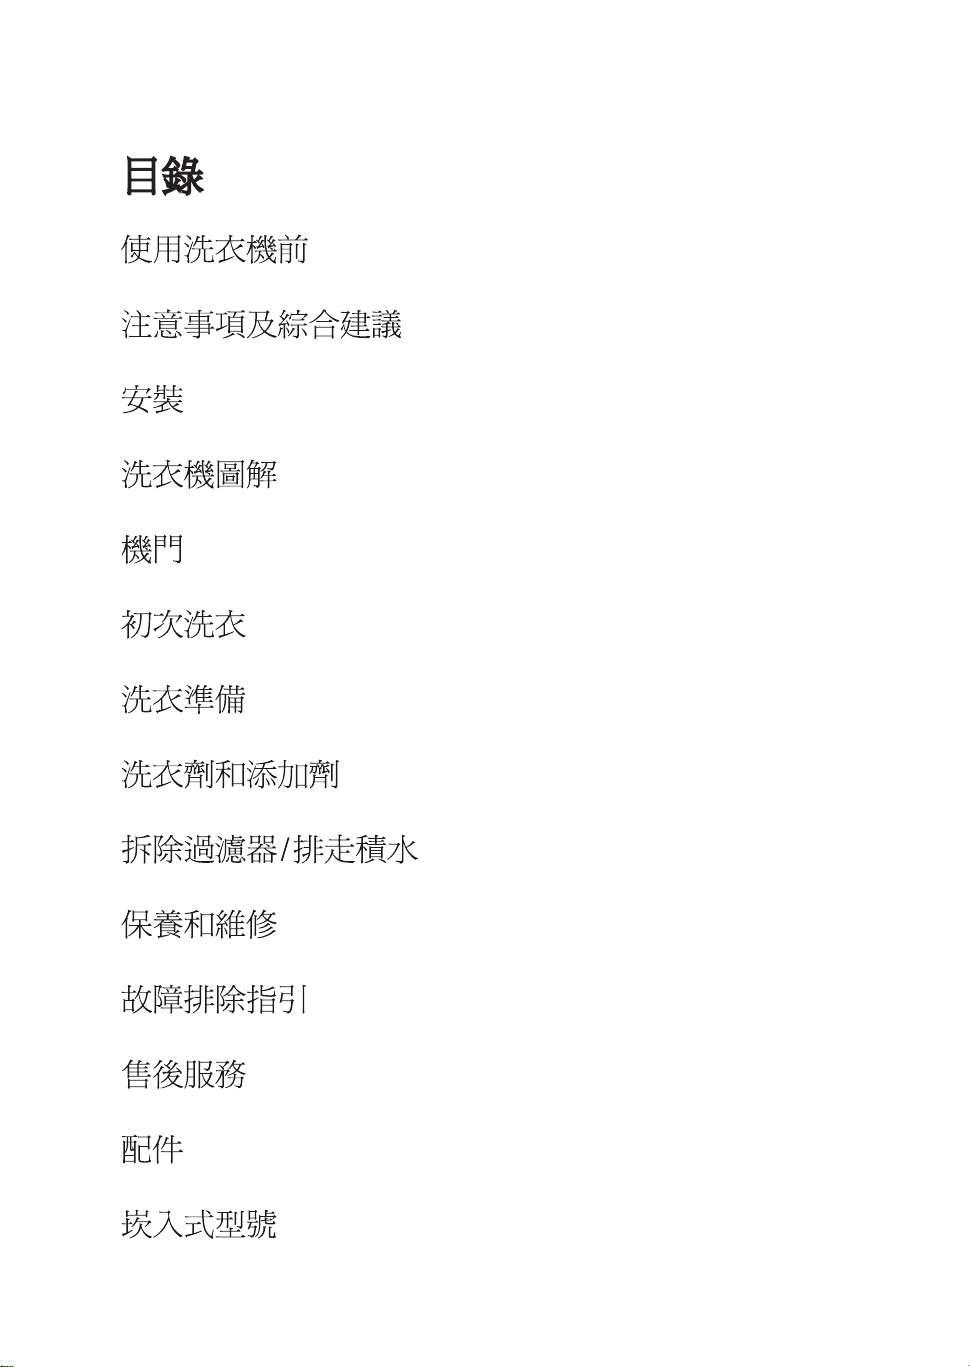
CONTENTS
BEFORE USING THE WASHING MACHINE
PRECAUTIONS AND GENERAL
RECOMMENDATIONS
INSTALLATION
DESCRIPTION OF THE WASHING MACHINE
DOOR
BEFORE THE FIRST WASH CYCLE
PREPARATION OF THE WASHING
DETERGENTS AND ADDITIVES
REMOVING THE FILTER/DRAINING
RESIDUAL WATER
CARE AND MAINTENANCE
TROUBLESHOOTING GUIDE
AFTER-SALES SERVICE
ACCESSORIES
BUILT-IN MODELS
Page 7

BEFORE USING THE WASHING MACHINE
•
1.Removing the packaging and inspection
•
After unpacking, make sure that the washing
machine is undamaged. If in doubt, do not use the
washing machine. Contact After-Sales Service or
your local retailer.
•
Check that the accessories and supplied parts are
all present.
•
Keep the packaging materials (plastic bags,
polystyrene parts, etc.) out of reach of children,
as they are potentially dangerous.
•
If the appliance was exposed to the cold before
delivery, keep it at room temperature for a few
hours before operating.
2.Remove the transport bolts
•
The washing machine is fitted with transport
bolts to avoid any possible damage to the interior
during transport. Before using the washing
machine, it is imperative that the transport bolts
are removed.
•
After their removal, cover the openings with the
4 enclosed plastic caps.
3.Install the washing machine
•
You are advised not to install the appliance in a
room where the temperature could drop to
below 0°C.
•
Given the weight of the appliance, attention must
be paid to safety standards when it is being moved.
•
When positioning the appliance, make sure that
the power cable is not kinked or compressed and
that it can be easily accessed if required.
•
Remove the protective film from the control
panel (if available on your model).
•
Move the appliance without carrying it by the
worktop.
•
Install the appliance on a solid and level floor
surface, preferably in a corner of the room.
•
Make sure that all four feet are stable and resting
on the floor and then check that the washing
machine is perfectly level (use a spirit level).
•
In case of wooden or so-called “floating floors”
(for instance certain parquet or laminate floors),
place the appliance on a 60 x 60 cm sheet of
plywood at least 3 cm in thickness which is
secured to the floor.
4.Water supply
•
Connect the water supply inlet hose in
accordance with the regulations of your local
water company.
•
Water supply: Cold water only (unless
•
Water tap: 3/4” threaded hose
•
Water pressure
(flow pressure): 100-1000 kPa (1-10 bar).
otherwise indicated on
the programme chart)
connector”
Use only new hoses to connect the washing
machine to the water supply. Used hoses must
not be used and should be discarded,
5.Drain
•
Connect the drain hose to the siphon or hook it
over the edge of a sink by means of the “U” bend
supplied.
•
If the washing machine is connected to an
integrated drainage system, ensure the latter is
equipped with a vent to avoid simultaneous
loading and draining of water (siphoning effect).
6.Electrical connections
•
Electrical connections must be carried out by a
qualified technician in compliance with the
manufacturer’s instructions and current standard
safety regulations.
•
Voltage, power consumption and electrical
protection data are supplied on the inside of the
appliance door.
•
The washing machine must be connected
exclusively by means of a socket with an earth
connection in accordance with current
regulations. The washing machine must be
earthed by law. The manufacturer declines all
liability for possible damage to property or injury
to persons or pets deriving from failure to
observe the a/m directions.
•
Do not use extension leads or multi sockets.
•
Before any maintenance on the washing machine
disconnect it from the mains supply.
•
After installation, access to the mains plug or to
disconnection from mains supply must be
ensured at all times via a double-pole switch.
•
Do not operate the washing machine if it has
been damaged during transport. Inform the
After-Sales Service.
•
Mains cable replacement is only to be carried out
by After-Sales Service.
•
Use the appliance only for domestic washing and
for its intended applications.
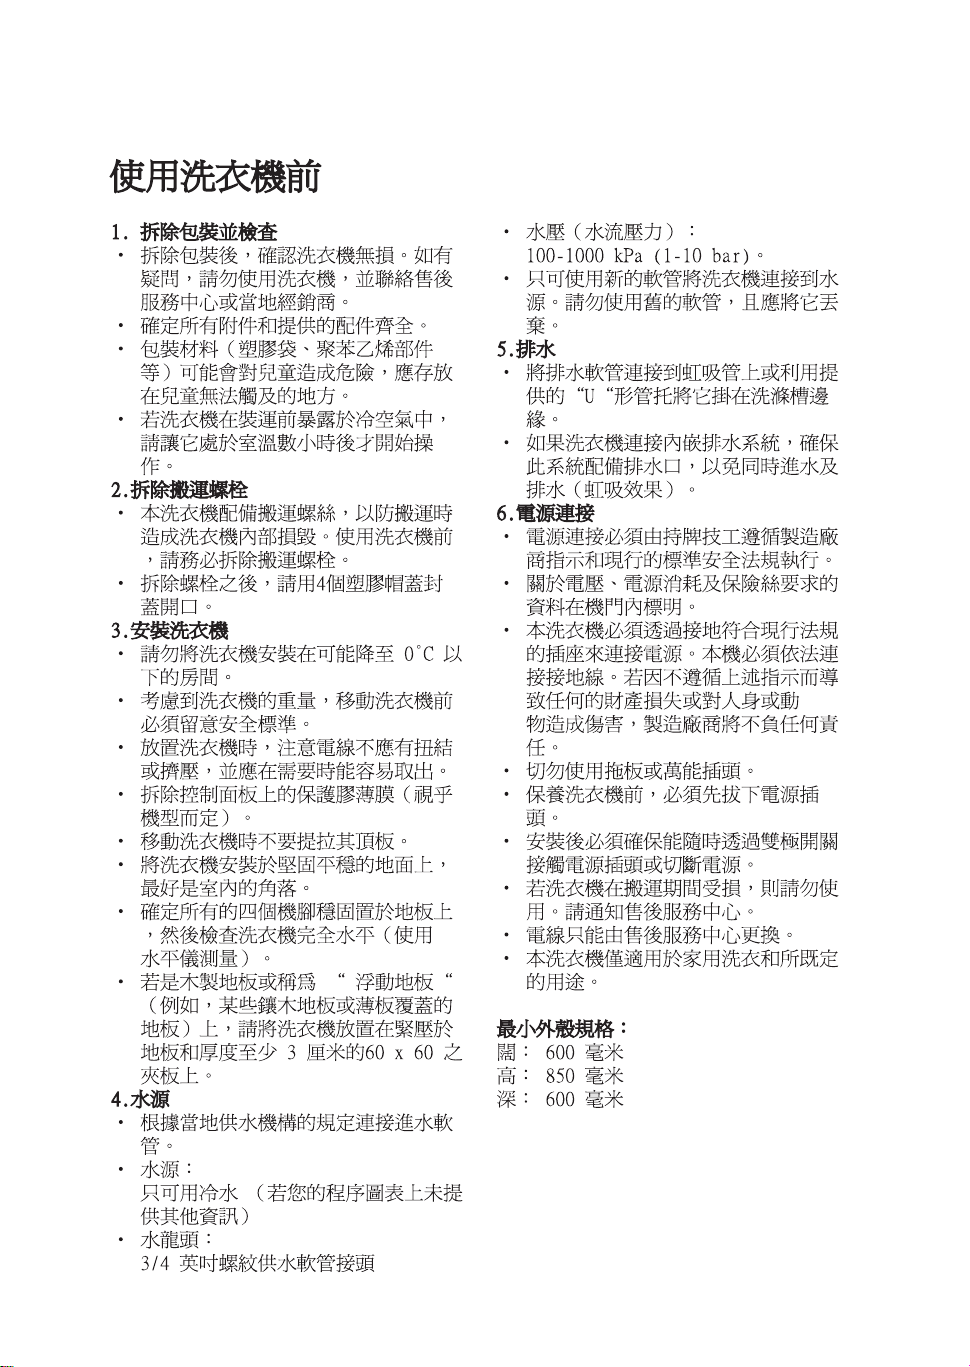
Minimum housing dimensions:
Width: 600 mm
Height: 850 mm
Depth: 600 mm
GB 2
Page 8
PRECAUTIONS AND GENERAL
RECOMMENDATIONS
1.Packing
•
The packaging material is entirely recyclable, and
marked with the recycling symbol . Adhere
to local regulations when disposing of packaging
material.
2.Disposing of packaging and scrapping
old washing machines
•
The appliance is built from reusable materials. It
must be disposed of in compliance with current
local waste disposal regulations.
•
Before scrapping, remove all detergent residues
and cut off the power cable so that the washing
machine is made unusable.
•
This appliance is marked according to European
Directive 2002/96/EC on Waste Electrical and
Electronic Equipment (WEEE).
By ensuring that this product is disposed of
correctly, you will help prevent potential
negative consequences for the environment and
human health.
The symbol on the product, or on the
documents accompanying the product, indicates
that this appliance may not be treated as
household waste. Instead it shall be handed over
to the applicable collection point for the recycling
of electrical and electronic equipment.
Disposal must be carried out in accordance with
local environmental regulations for waste
disposal.
For more detailed information about treatment,
recovery and recycling of this product, please
contact your local city office, your household
waste disposal service or the shop where you
purchased the product.
3.Safety Instructions
•
The washing machine can only be used indoors.
•
Do not store flammable fluids near the appliance.
•
If you want to place a dryer on top of your
washing machine, first contact our After-Sales
Service or your specialist dealer to verify if this is
possible. Placing a dryer on your washing
machine is only admitted by using an appropriate
stacking kit available through our After-Sales
Service or your specialist dealer.
•
Do not leave the appliance plugged in when not
in use.
•
Turn off the tap when not in use.
•
Before any cleaning and maintenance switch off
the machine or disconnect it from the mains.
•
Never open the door forcibly or use it as a step.
•
Children must not be allowed to play with the
washing machine or to climb into the drum.
•
If necessary, the power cable may be replaced
with an identical one obtained from our AfterSales Service. The power cable must only be
replaced by a qualified technician.
For washer/dryer models
•
Do NOT dry items that have been washed or
treated with chemical stain removers, cooking
oil, petroleum, acetone, alcohol, petrol, paraffin,
white spirit, wax.
Remove these substances by means of a hot wash
with abundant detergent before drying.
•
Do NOT dry items made from foam rubber,
latex, raincoats, waterproof fabrics, rubber
airbeds, printed objects, clothes or pillows filled
with foam rubber. These materials could melt
and damage other items in the wash or damage
the appliance.
4.Advice on saving energy
•
To achieve the best use of energy, water,
detergent and time use the recommended
maximum load size.
•
Do not exceed the recommended dosages on
the detergent packet.
•
The Eco Flap - a special system in the outlet prevents detergent loss from the drum to avoid
detergent loss into the environment.
•
Use the “Pre-wash” programme for heavily
soiled laundry only. Use a programme with no
“Pre-wash” cycle for slightly or normally soiled
items; You save on water, energy and time as a
result.
•
Before using the washing machine, treat laundry
with a stain remover or soak dry stained items in
water so as to avoid having to use high
temperature wash programmes.
•
Save energy by using a 60° C instead of a 95° C
wash programme or a 40° C instead of a 60° C
wash programme.
•
Save energy and time by selecting a high spin
speed to reduce the water content in laundry
before using a drying programme (for machines
with adjustable spin speed).
5.EC Declaration of Conformity
•
The appliance conforms to the following
European Standards:
73/23/EEC Low voltage directive
89/336/EEC EMC Directive
93/68/EC CE Marking Directive .
GB 3
Page 9
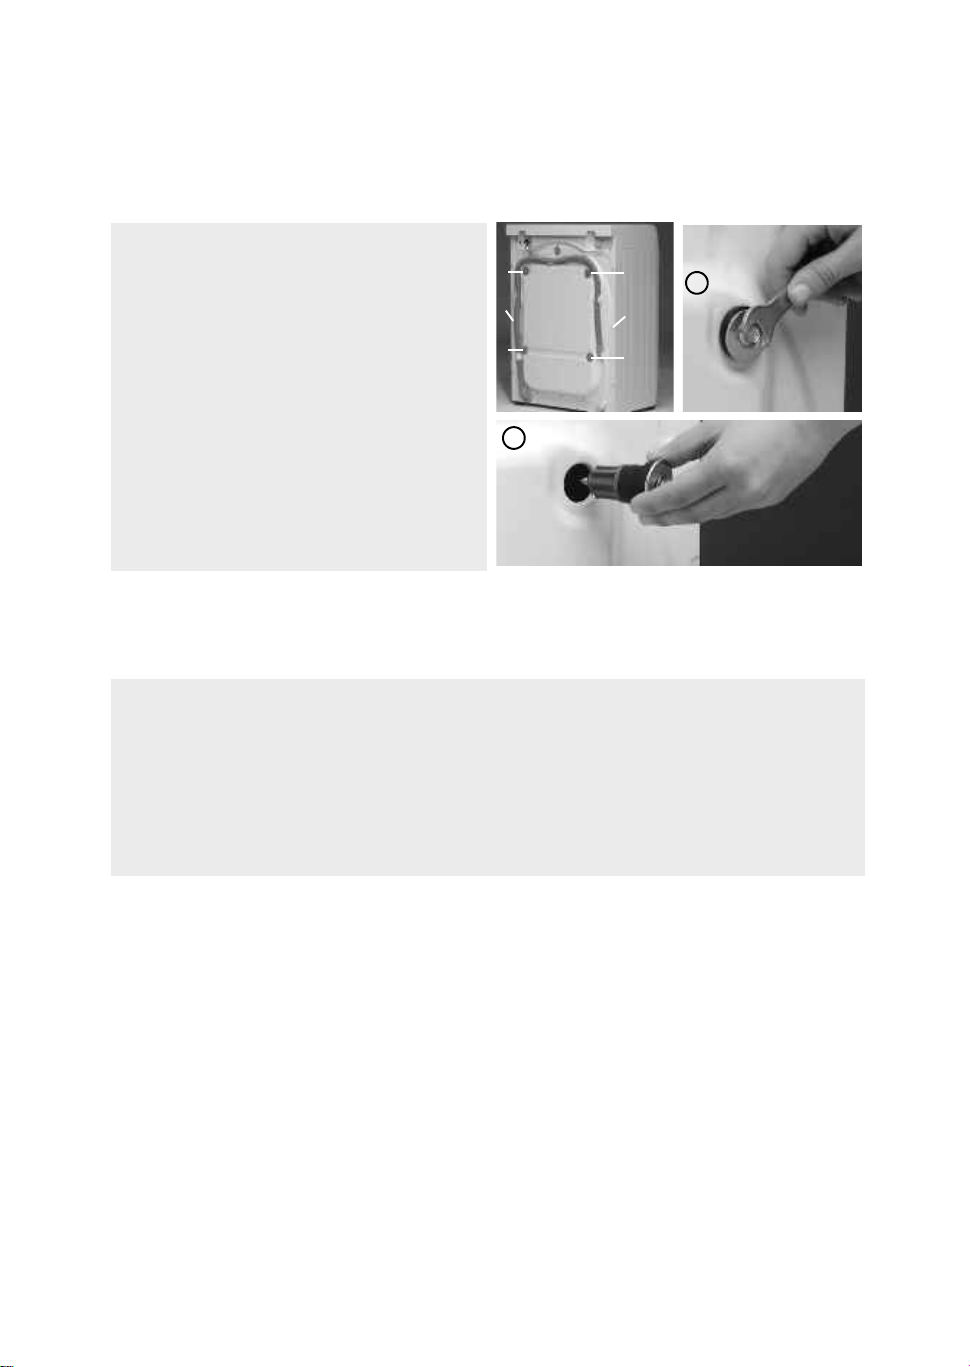
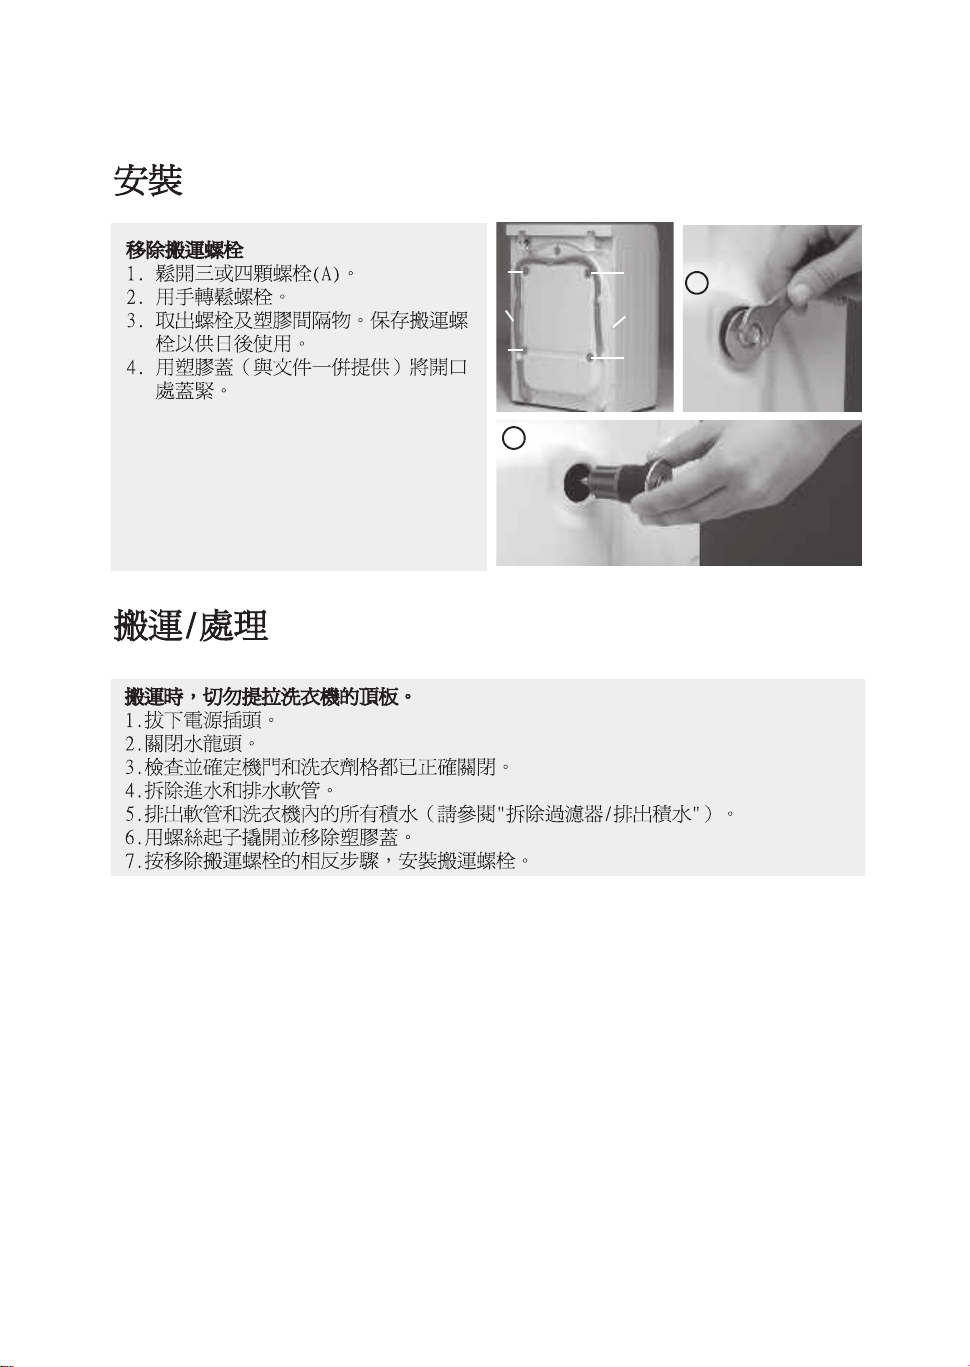
INSTALLATION
Remove the transport bolts
1.
Loosen the three or four bolts (A).
2.
Unscrew the bolts by hand.
3.
Take hold of the bolts and plastic spacers and
remove them. Keep the transport safety bolts for
possible future use.
4.
Close the holes with the plastic covers (supplied
with the documents).
A
A
B
A
A
B
A
1
4
TRANSPORT/HANDLING
Never lift the appliance by the worktop when transporting.
1.
Unplug the appliance.
2.
Shut off the water tap.
3.
Check that the door and detergent dispenser are properly closed.
4.
Remove the water supply and drain hose from the domestic connection.
5.
Remove any water remaining in the hoses and the appliance (see “Removing The Filter/Draining
Residual Water”).
6.
Pry off the plastic covers with a screwdriver and remove them.
7.
Insert the transit screws following the removal procedure in reverse.
GB 4
Page 10
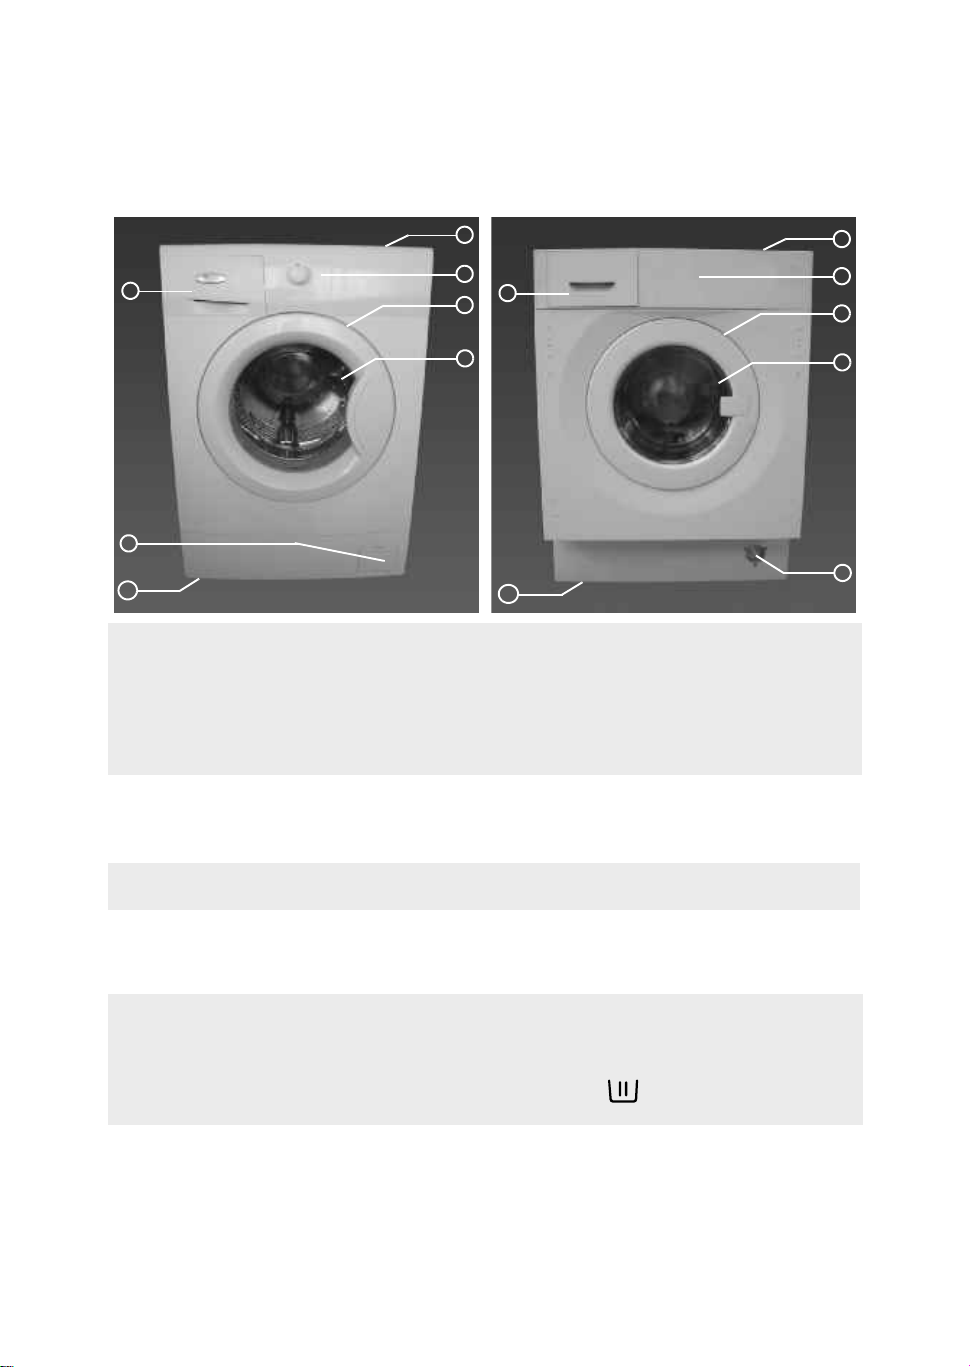
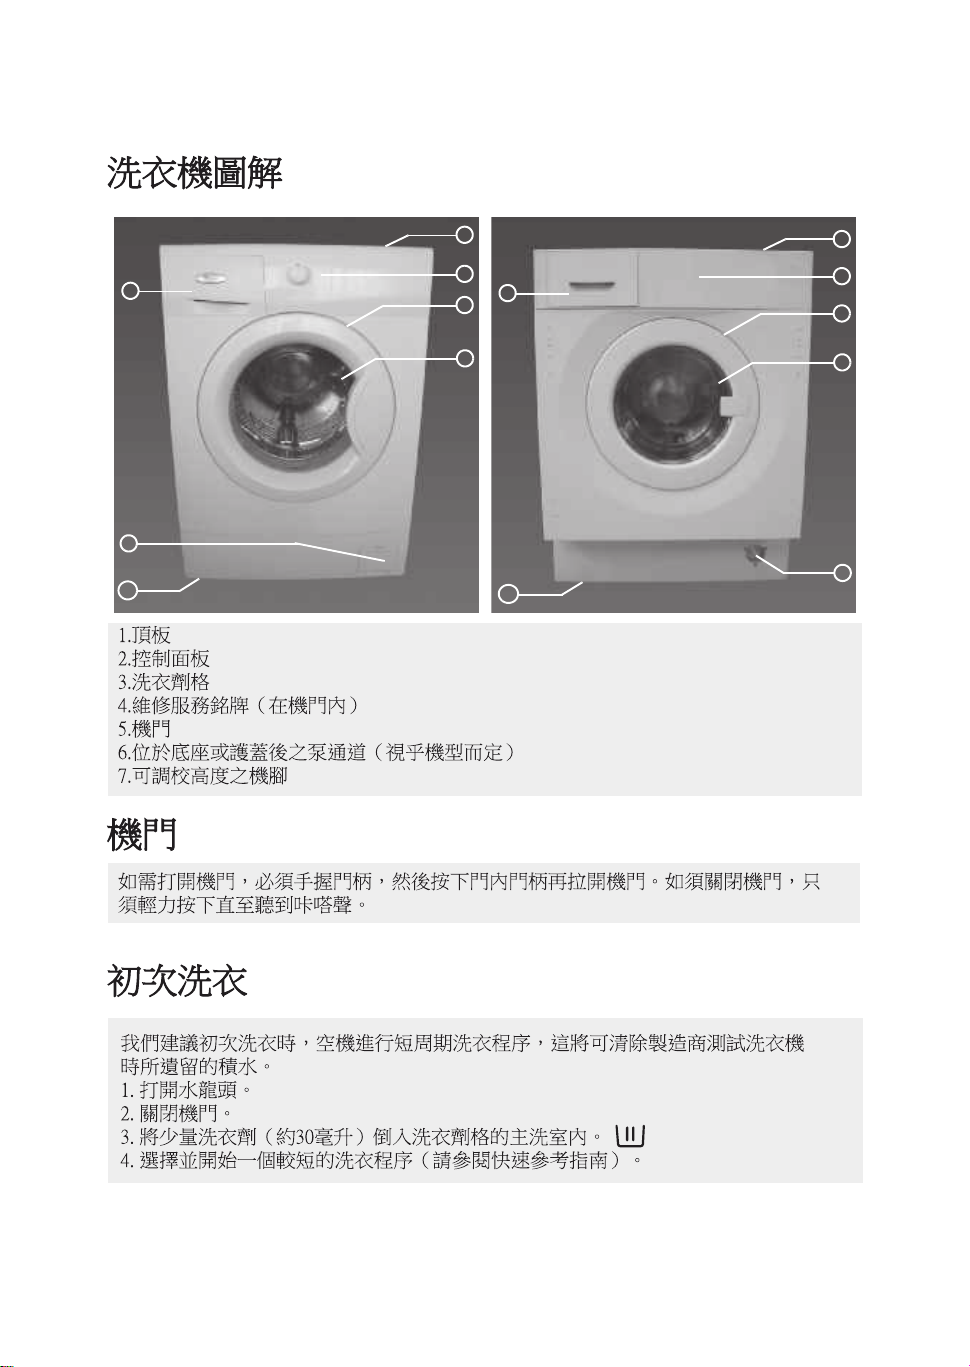
DESCRIPTION OF THE WASHING MACHINE
1
3
6
7
1.
Worktop
2.
Control panel
3.
Detergent drawer
4.
After-Sales Service sticker (inside door)
5.
Door
6.
Pump access behind plinth or cover (depending on the model)
7.
Adjustable feet
2
3
4
5
7
1
2
4
5
6
DOOR
To open the door, hold the door handle, press the inside handle (if available on your model) and pull the
door. Close the door by pressing it without excessive force until it clicks shut.
BEFORE THE FIRST WASH CYCLE
To remove any residual water used in testing by the manufacturer, we recommend that you carry out a
short wash cycle without laundry.
1.
Turn on the water supply tap.
2.
Close the door.
3.
Pour a little detergent (about 30 ml) into the main wash chamber of the detergent dispenser.
4.
Select and start a short programme (see separate “Programme Chart”).
GB 5
Page 11

PREPARATION OF THE WASHING
1.Sort the load according to...
• Type of fabric / care label symbol
Cottons, mixed fibres, easy care/synthetics,
wool, handwash items.
• Colour
Separate coloured and white items. Wash new
coloured items separately.
•Loading
Wash items of different sizes in the same load to
improve washing efficiency and distribution in the
drum.
• Delicates
Wash small items (e.g. nylon stockings, belts etc.)
and items with hooks (e.g. bras) in a washbag or
pillow case with a zip fastener. Always remove
curtain glides or wash curtains with the glides
inside a cotton bag.
2.Empty all pockets
Coins, safety pins etc. can damage your laundry
as well as the appliance drum and tub.
3.Fasteners
Close zips and fasten buttons or hooks; loose
belts or ribbons should be tied together.
Stain removal
•
Blood, milk, eggs etc. are generally removed by
the automatic enzyme phase of the programme.
•
For stains made by red wine, coffee, tea, grass,
fruit etc. add a stain remover to the main wash
chamber of the detergent dispenser.
•
Pre-treat heavily-soiled areas with stain remover
if necessary.
Dyeing and bleaching
•
Only use dyes and bleaches that are suitable for
washing machines.
•
Follow the manufacturer’s instructions.
•
Plastic and rubber parts of the washing machine
can be stained by dyes or bleaches.
LOADING THE LAUNDRY
1.
Open the door.
2.
Unfold the laundry and place it loosely in the
drum. Observe the load sizes given in the quick
reference guide.
Note:
Overloading the machine reduces the
wash efficiency and encourages creasing.
3.
Close the door.
DETERGENTS AND ADDITIVES
Keep detergents and additives in a dry
place out of the reach of children.
The type of detergent depends on:
•
type of fabric (cottons, easy care/synthetics,
delicate items, wool).
Note:
•
•
•
Remarks:
•
•
•
•
•
•
Use only specific detergents for wool.
Colour.
washing temperature.
Degree and type of soiling.
Whitish residues on dark fabrics are due to the
insoluble water softeners in modern phosphatefree detergents. If you notice this problem, shake
or brush the affected items or use a liquid
detergent.
Use only detergents and additives specifically
produced for domestic washing machines.
When using descaling agents, dyes or bleaches
for the pre-wash, make sure that they are
suitable for use in domestic washing machines.
Descalers could contain products which could
damage your washing machine.
Do not use any solvents (e.g. turpentine,
benzine). Do not wash fabrics in the machine
which have been treated with solvents or
flammable liquids.
Do not use liquid detergent for the main wash
when having activated the “prewash” option (if
available on your model).
Do not use liquid detergents when activating the
“Start Delay” function (if available on your
washing machine).
Dosage
Follow the dosage recommendations on the
detergent pack. They depend on:
•
Degree and type of soiling
•
size of wash full load: follow the detergent
manufacturer’s instructions;
half load: 3/4 the amount used for a full load;
minimum load (about 1 kg):
1/2 the dose recommended for a full load
•
water hardness in your area (request information
from the water company). Soft water requires
less detergent than hard water (refer to the
water hardness table in the operating
instructions).
Note:
Too much detergent can result in excess foam
formation, which reduces washing efficiency.
If the washing machine detects too much foam, it
may prevent spinning. Insufficient detergent may
result in grey laundry in time and also calcifies the
heating system, drum and hoses.
GB 6
Page 12
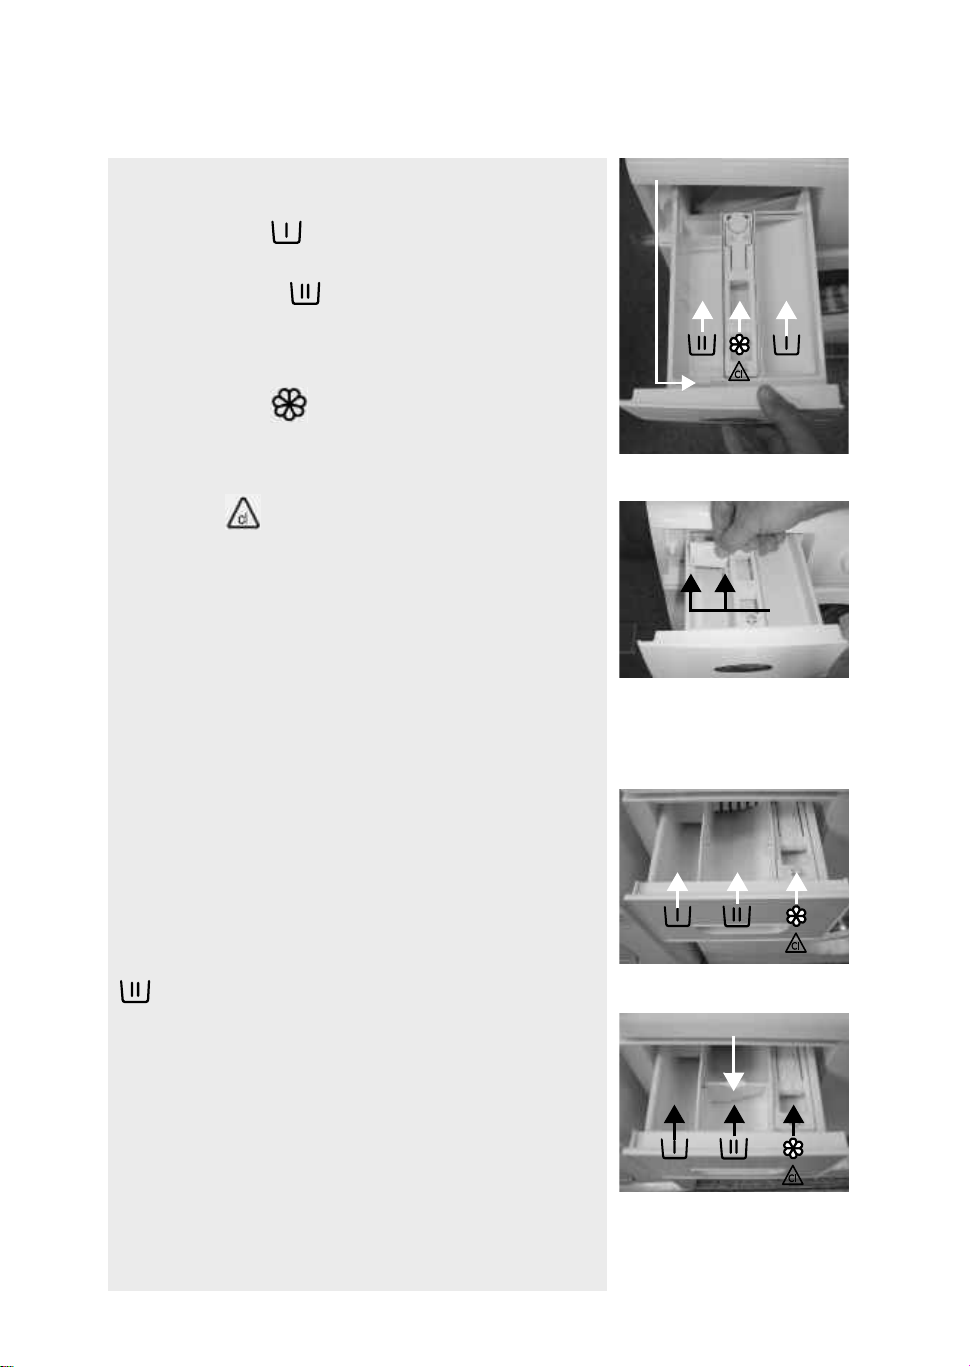
Pouring in the detergents and additives
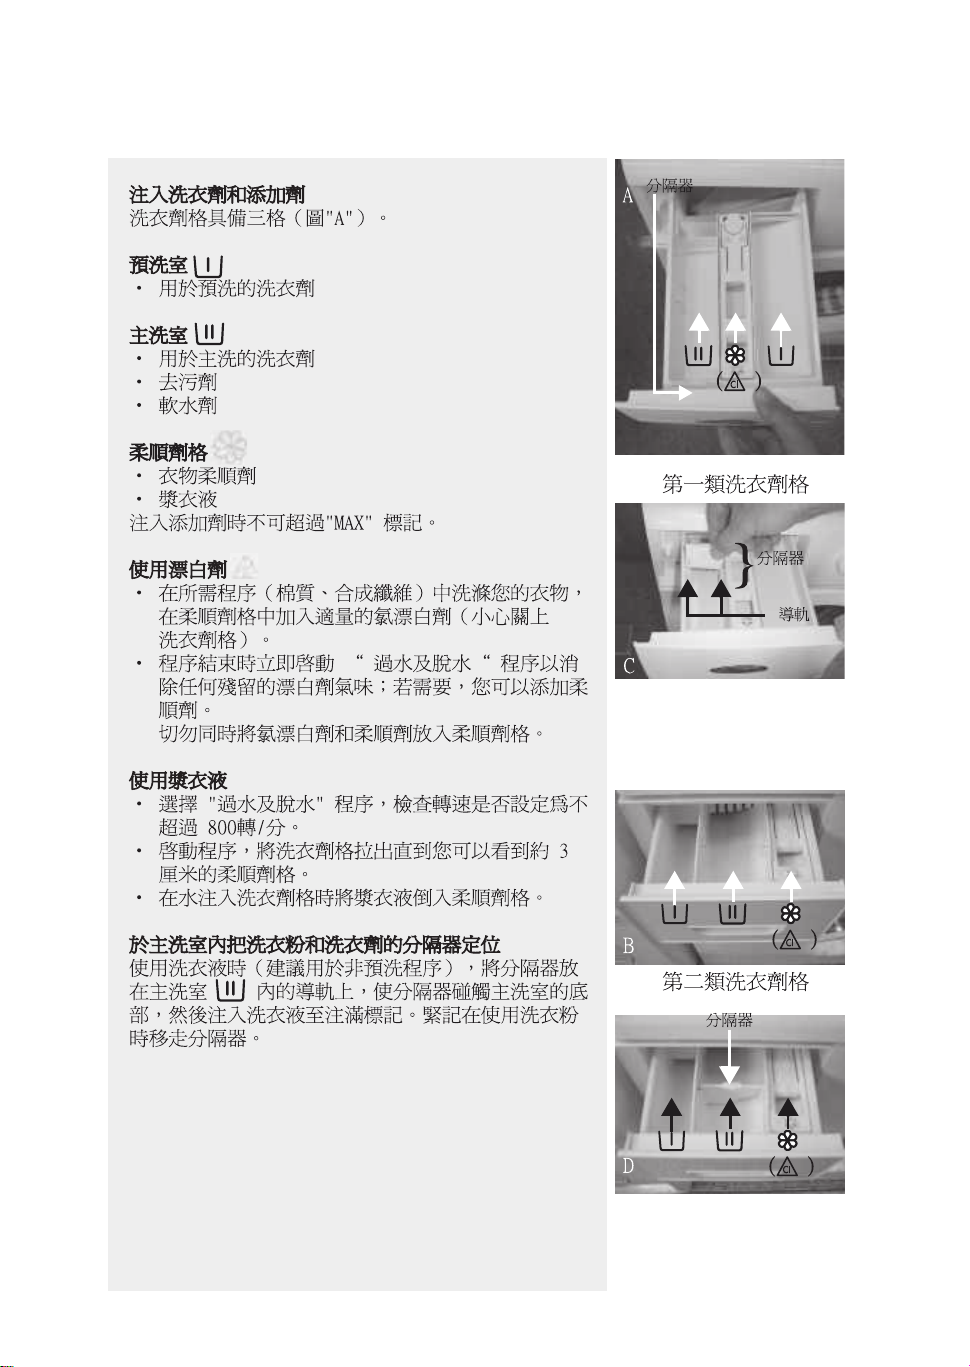
The detergent drawer has three chambers (fig. “A”).
Prewash Chamber
• Detergent for the prewash
Main Wash Chamber
• Detergent for the main wash
• Stain remover
• Water softener
Softener Chamber
• Fabric Softener
• Liquid starch
Pour additives only up to the “MAX” mark”.
Using bleach
• Wash your laundry with the desired programme (Cotton,
Synthetics), adding an appropriate amount of bleach to the
SOFTENER chamber (close the detergent dispenser carefully)
• Immediately after the end of the programme, start the “Rinse and
Spin” programme to eliminate any residual bleach smell; if you
want, you can add softener.
Never put both chlorine bleach and softener into the softener
chamber at the same time.
Using starch
• Select the “Rinse and Spin” programme and check that the spin
speed is set to not more than 800 rpm.
• Start the programme, pull out the detergent dispenser so that you
can see approximately 3 cm of the softener chamber.
• Pour the starch solution prepared into the softener chamber
while the water is running into the detergent dispenser.
Separator
A
Type 1 basin
C
()
Separator
}
Rails
Position the liquid detergent separator in the main
wash chamber.
When you use a liquid detergent (recommended for non pre-wash
programmes), position the separator in the main wash chamber
on the guides so that it touches the bottom of the chamber
then pour in the detergent until it reaches the full mark.
Remember to remove the separator when you use a powder
detergent.
GB 7
B
Type 2 basin
D
()
Separator
()
Page 13
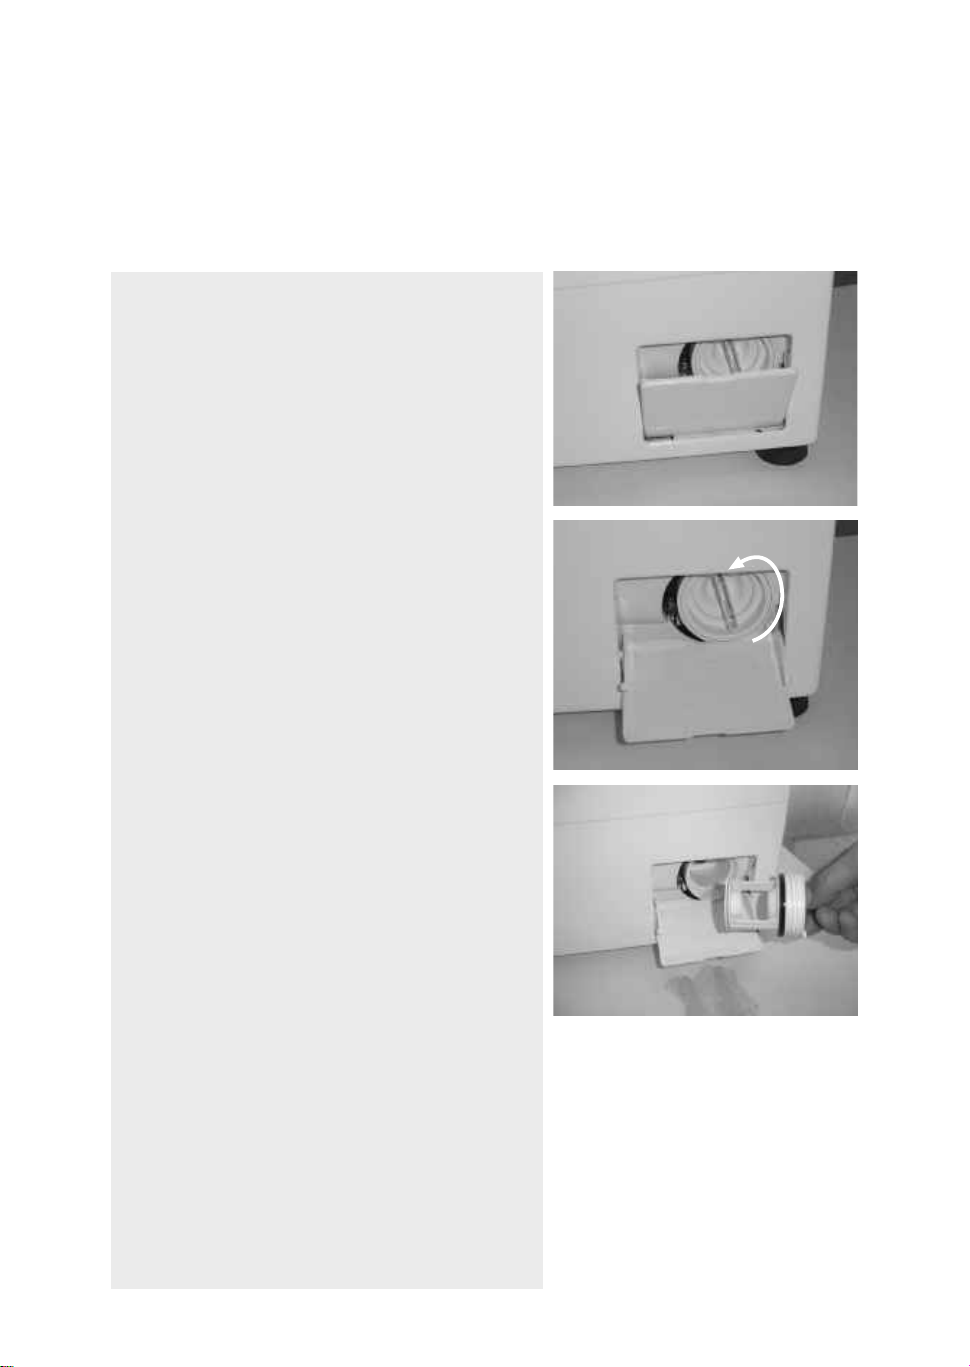
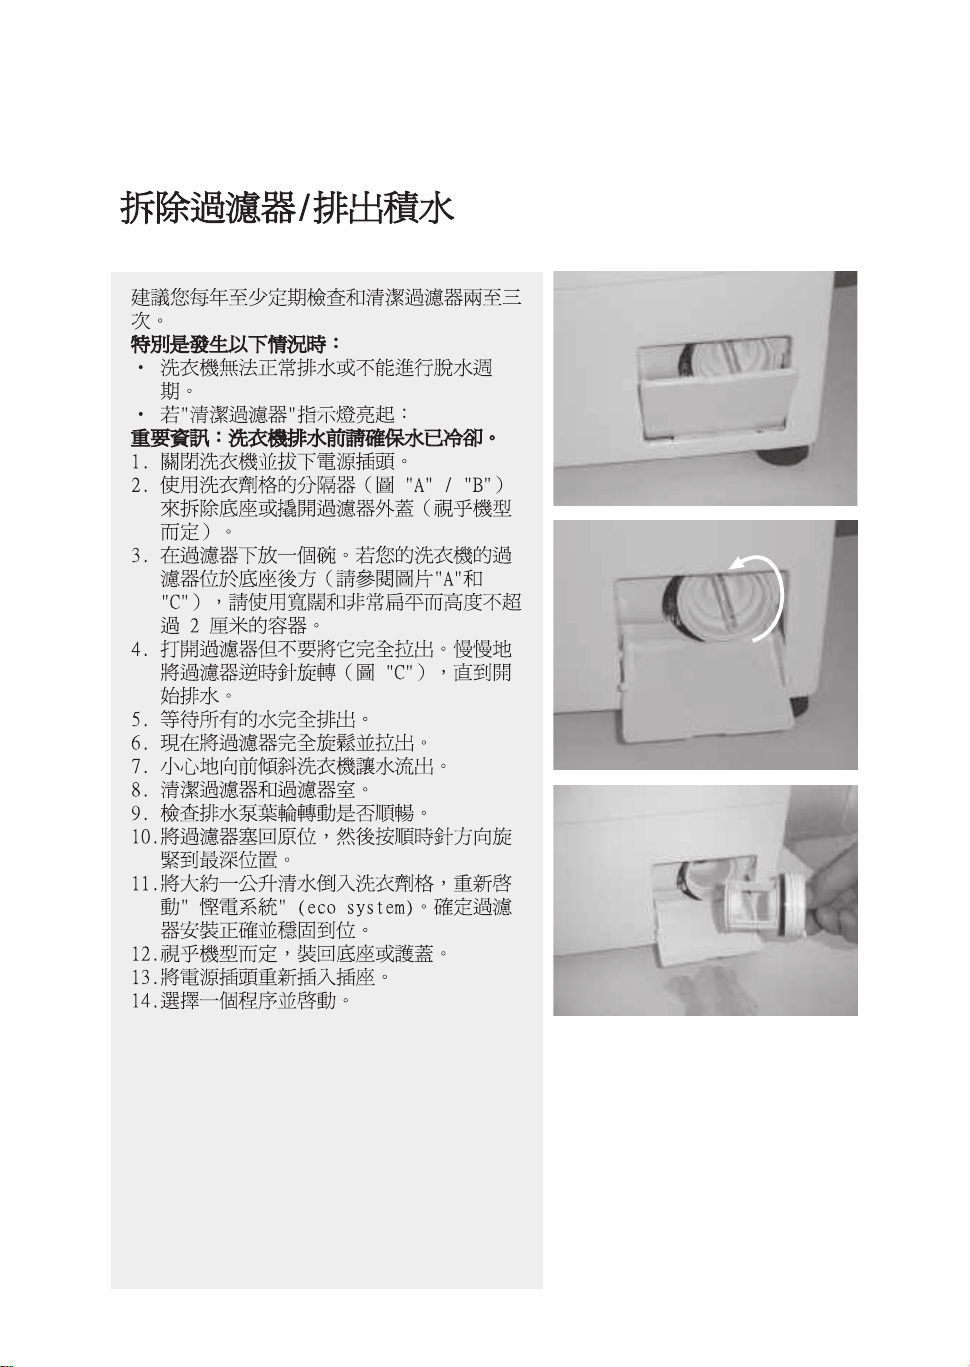
REMOVING THE FILTER/DRAINING
RESIDUAL WATER
We recommend that you check and clean the filter
regularly, at least two or three times a year.
Especially:
•
If the appliance does not drain correctly or if single spin
cycles do not take place.
•
If the “Clean filter” indication lights up:
IMPORTANT: make sure the water has cooled
before draining the appliance.
1.
Switch off the appliance and unplug it.
2.
Remove the plinth or open the cover (depending on
the model) by using the separator of the detergent
dispenser (fig. A/B).
3.
Place a bowl beneath the filter. If the filter is located
behind the plinth (see pictures “A” e “C”), use a wide
and very flat container with a maximum height of 2 cm.
4.
Open the filter but do not remove it completely.
Slowly turn the filter counterclockwise (fig. C) until the
water begins to drain out.
5.
Wait until all the water has drained.
6.
Now unscrew the filter completely and extract it.
7.
Tilt the appliance forwards carefully to allow the water
to flow out.
8.
Clean the filter and the filter chamber.
9.
Check that the pump impeller can still rotate.
10.
Re-insert the filter and screw it in clockwise as far as it
will go.
11.
Pour about 1 l of water into the detergent dispenser to
reactivate the ecosystem”. Check that the filter is
inserted properly and securely.
12.
Reinstall the plinth or the cover, depending on the
model.
13.
Plug in the appliance again.
14.
Select a programme and start it.
A
B
C
GB 8
Page 14
CARE AND MAINTENANCE
Appliance exterior and control panel
•
Can be washed down with a soft, damp cloth.
•
A little neutral detergent (non abrasive) can also
be used
•
Dry with a soft cloth.
Appliance internal parts
•
After each wash, leave the door open for some
time to allow the inside of the appliance to dry.
•
If you never or seldom wash your laundry at
90°C, we recommend to occasionally run a 90°C
programme without laundry, adding a small
amount of detergent, to keep the interior of the
appliance clean.
Door seal
•
Clean with a damp cloth when necessary.
•
Check the condition of the door seal regularly.
Filter
•
Check and clean the filter regularly, at least two
or three times a year (see “Removing the filter /
Draining residual water”)
Water supply hose
•
Check the hose regularly for brittleness and
cracks.
•
Regularly check and clean the mesh filter inside
the inlet hose (see “Cleaning the mesh filter in
the water supply hose(s)”).
Do not use flammable fluids for cleaning the appliance.
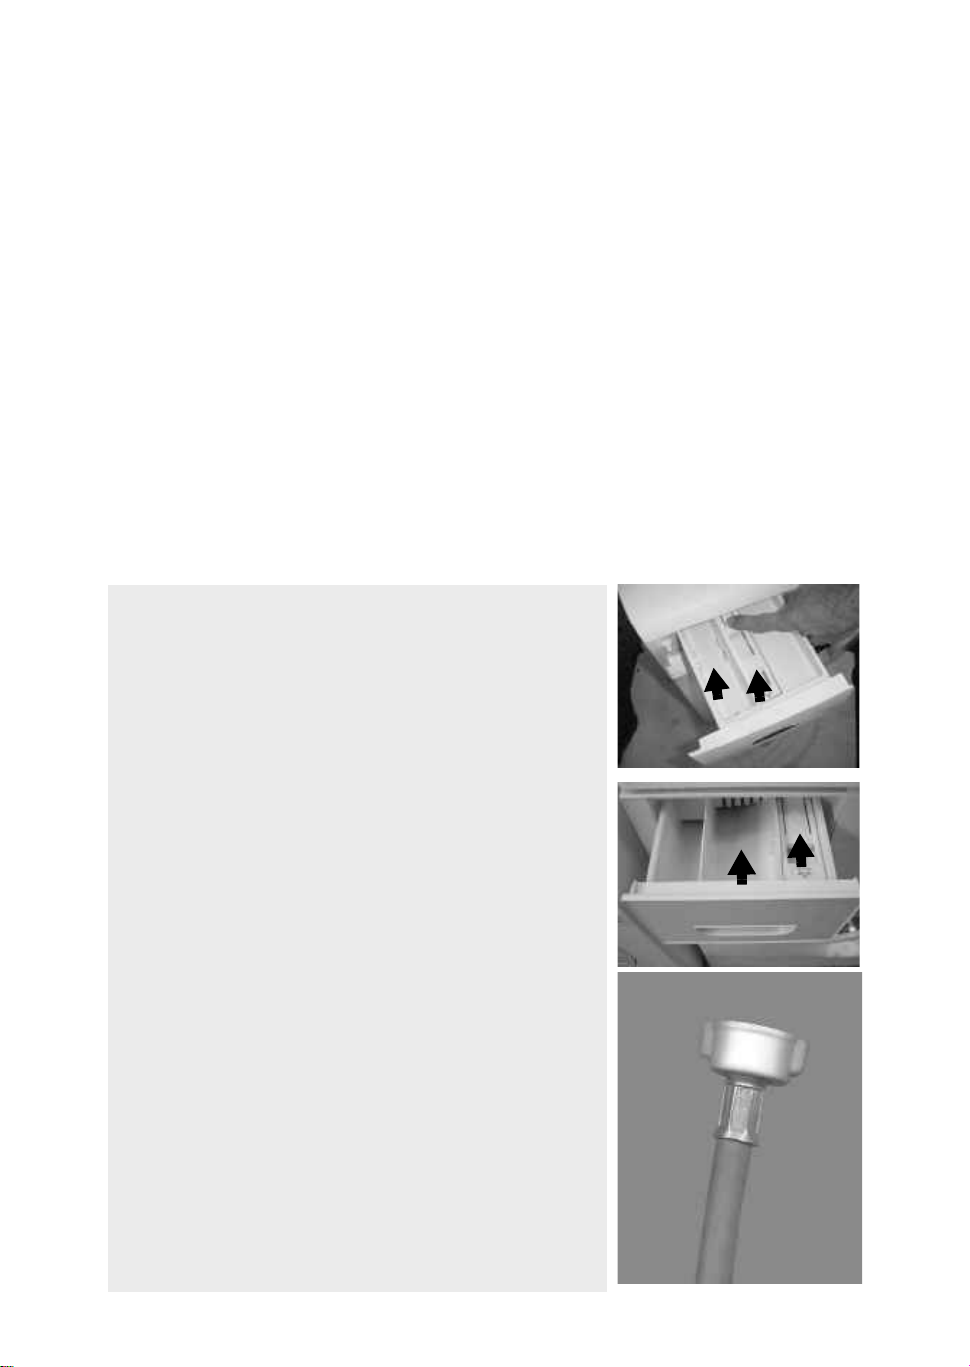
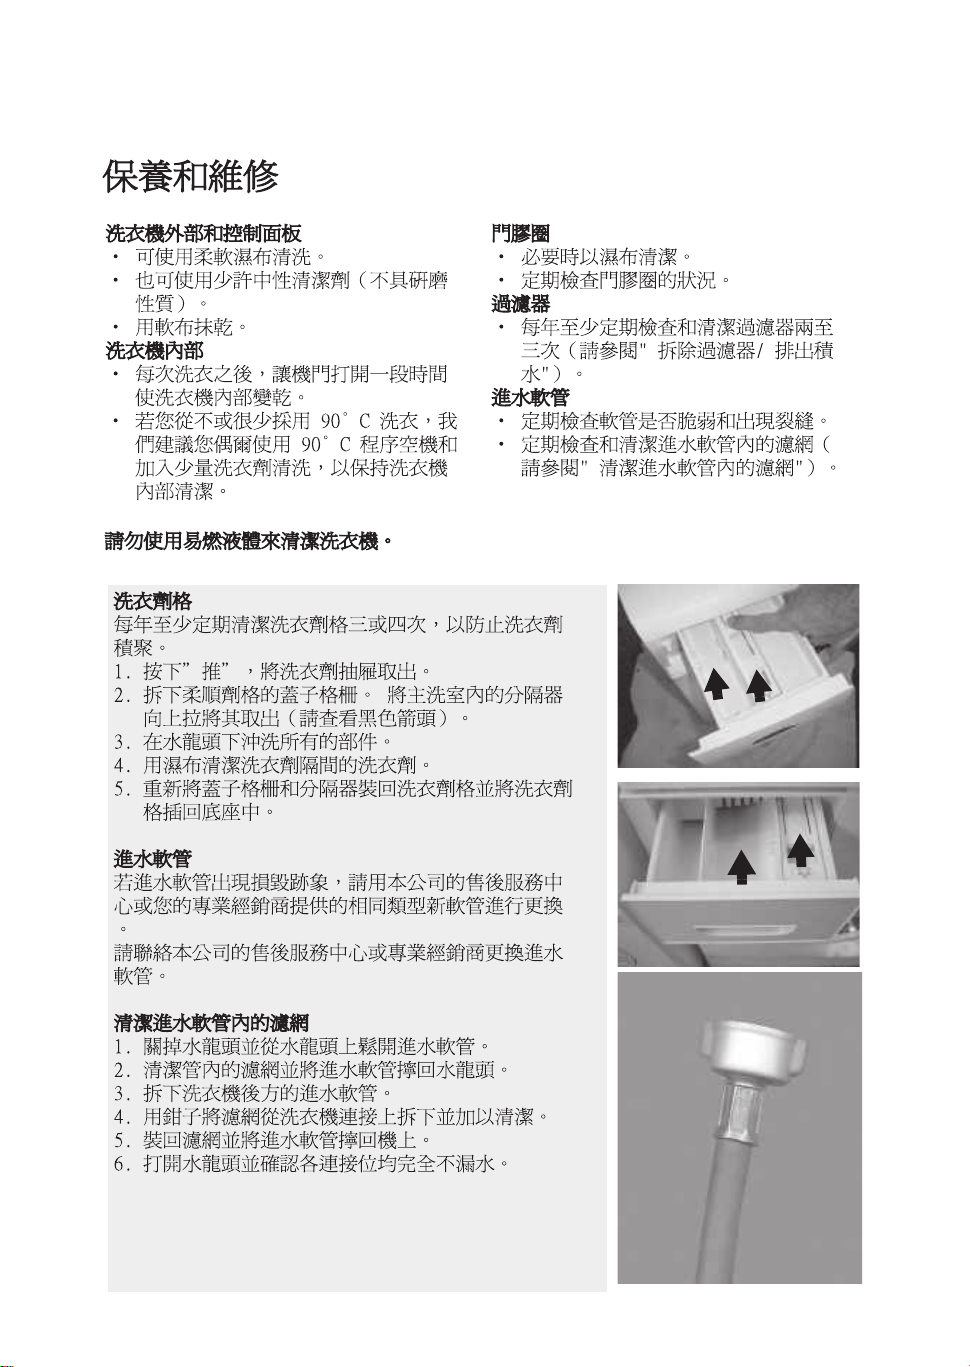
Detergent drawer
Clean the detergent dispenser regularly, at least three or
four times a year to prevent a build-up of detergent.
1.
Press “PUSH” and extract the dispenser drawer.
2.
Remove the cover grid from the fabric softener compartment.
Remove the separator from the main wash compartment by
pulling it upwards (see dark arrows).
3.
Wash all the parts under running water.
4.
Clean detergent from the dispenser with a damp cloth.
5.
Refit the separator and the cover grid in the detergent dispenser
and fit the dispenser back inside its housing.
Inlet hose
If a supply hose shows a damage, replace it by a new hose of the
same type, available through our After-Sales Service or your
specialist dealer.
Contact our After-Sales Service team or specialist dealer to obtain a
replacement hose.
Cleaning the mesh filter in the water supply hose(s)
1.
Close the tap and loosen the inlet hose on the tap.
2.
Clean the internal mesh filter and screw the water inlet hose back
onto the tap.
3.
Now unscrew the inlet hose on the rear of the washing machine.
4.
Pull off the mesh filter from the washing machine connection
with universal pliers and clean it.
5.
Refit the mesh filter and screw the inlet hose on again.
6.
Turn on the tap and check that the connections are water-tight.
GB 9
A
Page 15
TROUBLESHOOTING GUIDE
The appliance is fitted with automatic safety functions that detect faults at an early stage and allow the safety
system to react appropriately. These faults are frequently so minor that they can be dealt with a few minutes.
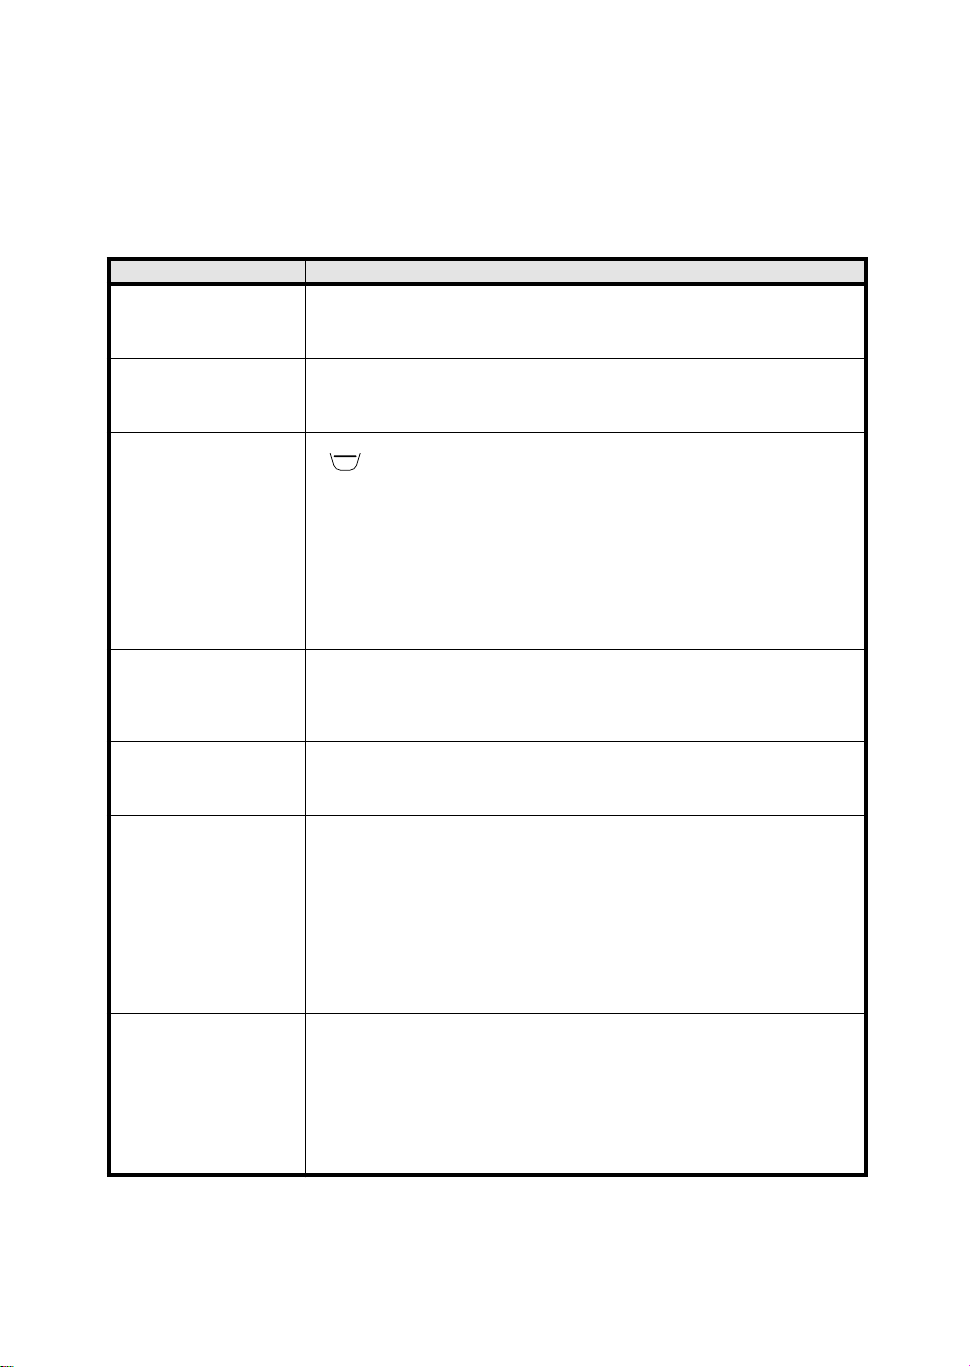
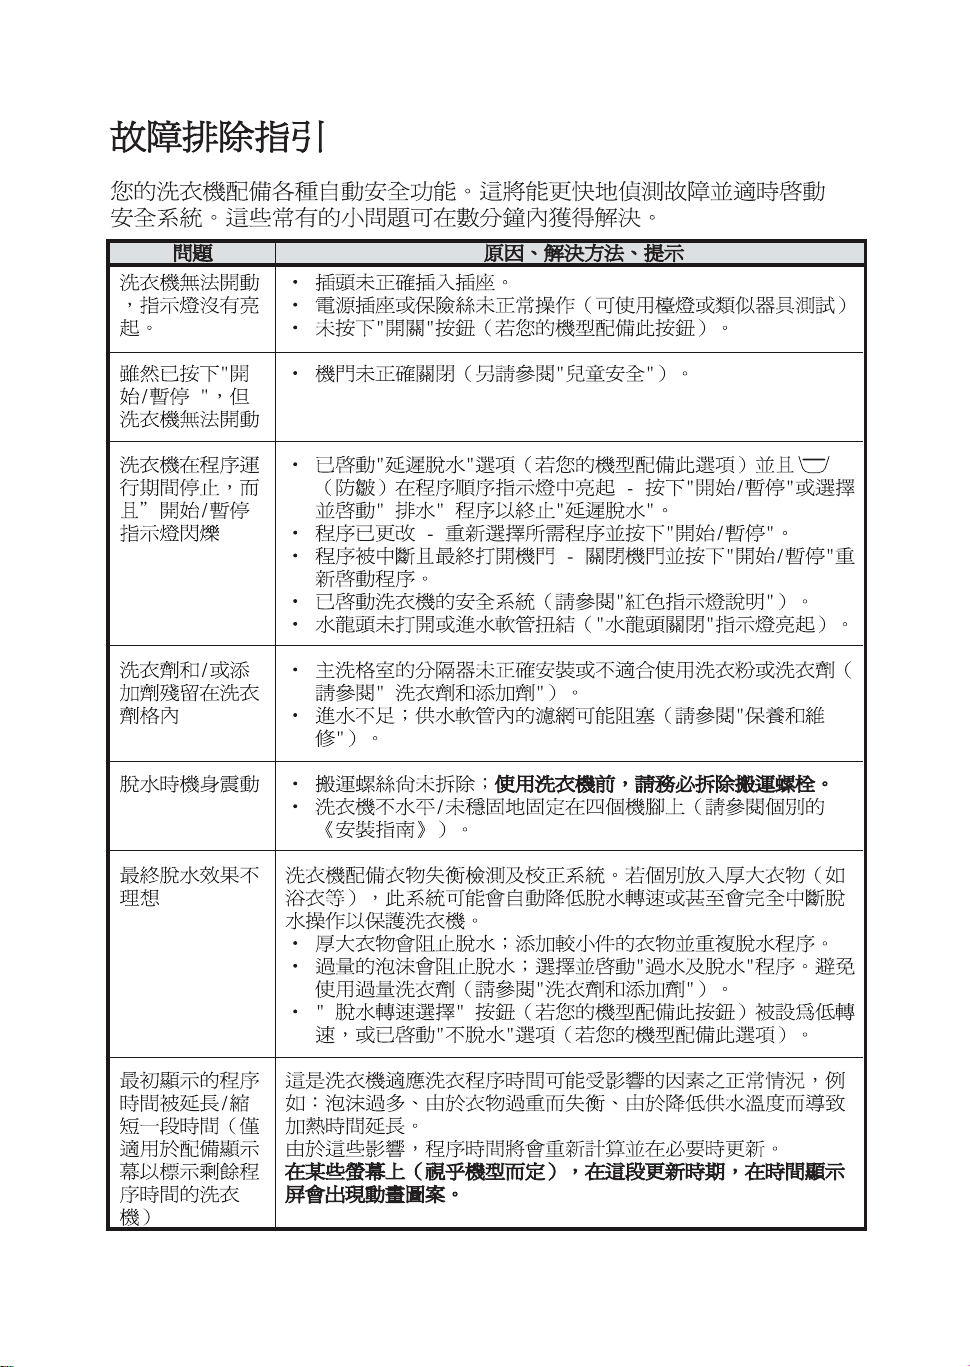
Problem Causes, Solutions, Suggestions
The machine will not
turn on and no lamps
are lit
The machine will not
start even though the
“Start” button has been
pressed
The machine stops
during the programme
and the “Start” light
flashes
The dispenser contains
detergent and/or
additive residue
The washing machine
vibrates during the spin
cycle
Final spin results are
poor
The programme time
initially shown on the
display can be
lengthened/shortened
by a given amount of
time (only on appliances
with a display indicating
remaining programme
time)
•
The plug has not been properly inserted in the socket.
•
The socket or fuse is faulty (use another lamp or electrical device to test the
socket).
•
The “On/Off” switch (if present) has not been pressed.
•
The door has not been closed correctly.
•
The “Rinse Hold” function (if present) is turned on and the Anticrease light
goes on in the programme sequence indicator; terminate “Rinse Hold”
by pressing the
programme.
•
the programme has been changed: select the new programme and press
“Start”
•
The programme has been interrupted and the door opened: close the door
and re-start the programme by pressing
•
The appliance's safety system has been activated (see “Description of red
indications”).
•
The water tap is not open or the water inlet hose is kinked (“Water tap
closed” indication lights up).
•
The separator in the main wash chamber has not been correctly fitted or is
not suitable for the use of powder and liquid detergents (see “Detergents and
additives”).
•
The water level is insufficient; the mesh filters of the water supply may be
blocked (see “Care and maintenance”).
•
The transport bolts have not been removed;
is imperative that the transport bolts are removed.
•
The appliance is not level/not standing firmly on all four feet (see separate
“Installation Guide”).
The washing machine has an imbalance detection and correction system. If
individual heavy items are loaded (e.g. bathrobes), this system may reduce the
spin speed automatically or even interrupt the cycle in order to protect the
washing machine .
•
Heavy items may prevent the spin cycle from being carried out; add small
items and repeat the spin cycle.
•
The excessive formation of foam may prevent the spin cycle from being
carried out; select and start the “Rinse & Spin” programme. Avoid using
excessive amounts of detergent (see “Detergents and additives”).
•
The “Variable Spin” button (if present) has been set to a low spin speed or
the “No Spin” option (if present) has been activated.
It is normal for the washing machine to adjust to factors that might affect the
duration of the wash cycle, e.g. the excessive formation of foam, an
unbalanced load of very heavy items or extended heating time due to a low
water temperature.
For reasons like these, the wash time is recalculated and up-dated if necessary.
On some displays (depending on the model), an animation appears
during such update periods.
“Start”
.
button or by choosing and starting the “Drain”
“Start”
.
Before using the machine, it
GB 10
Page 16
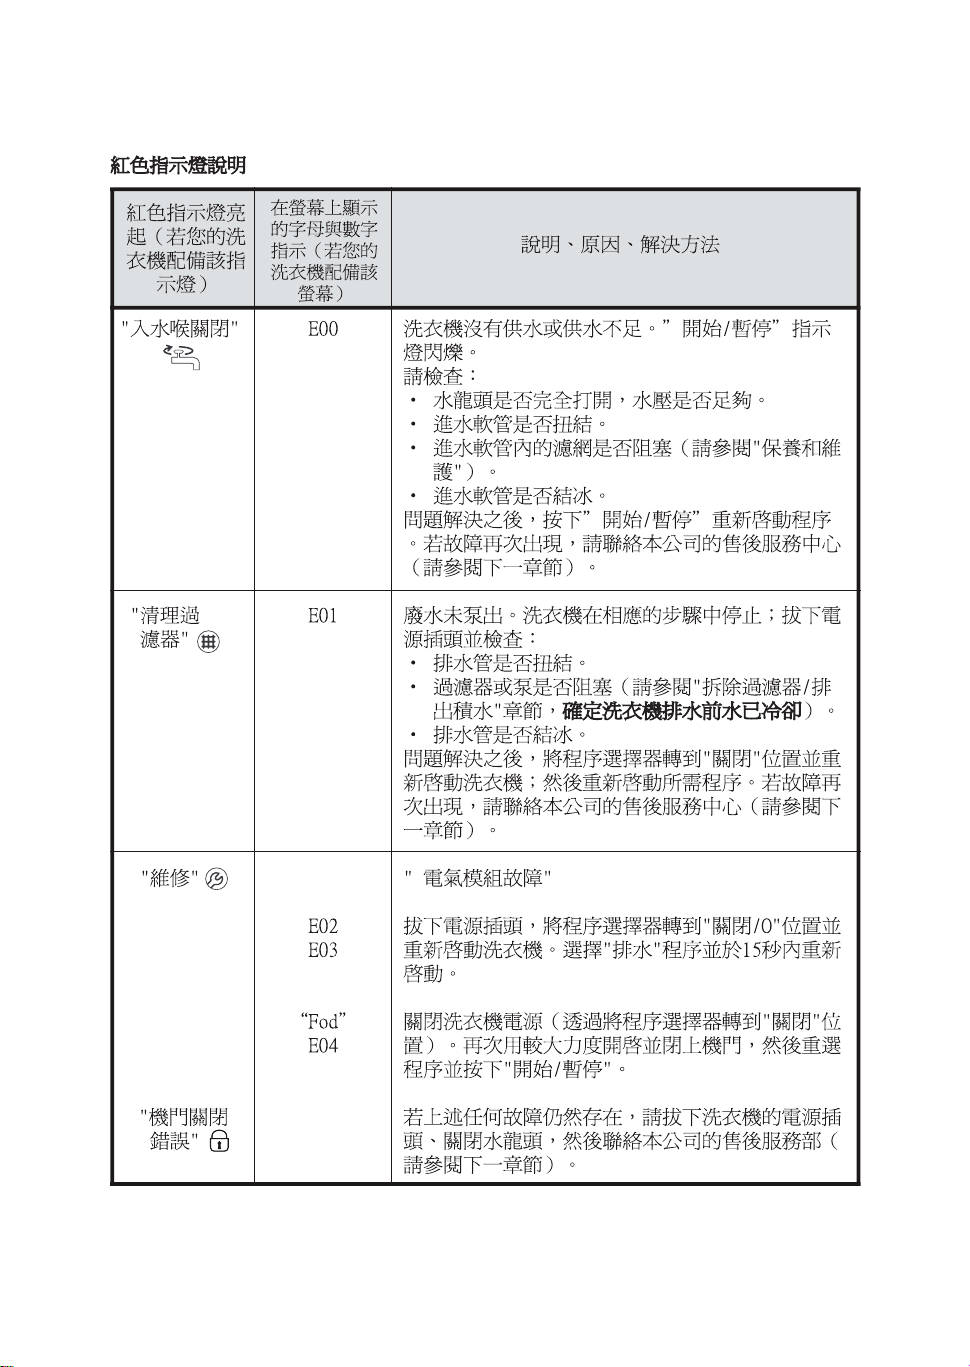
Description of red indications
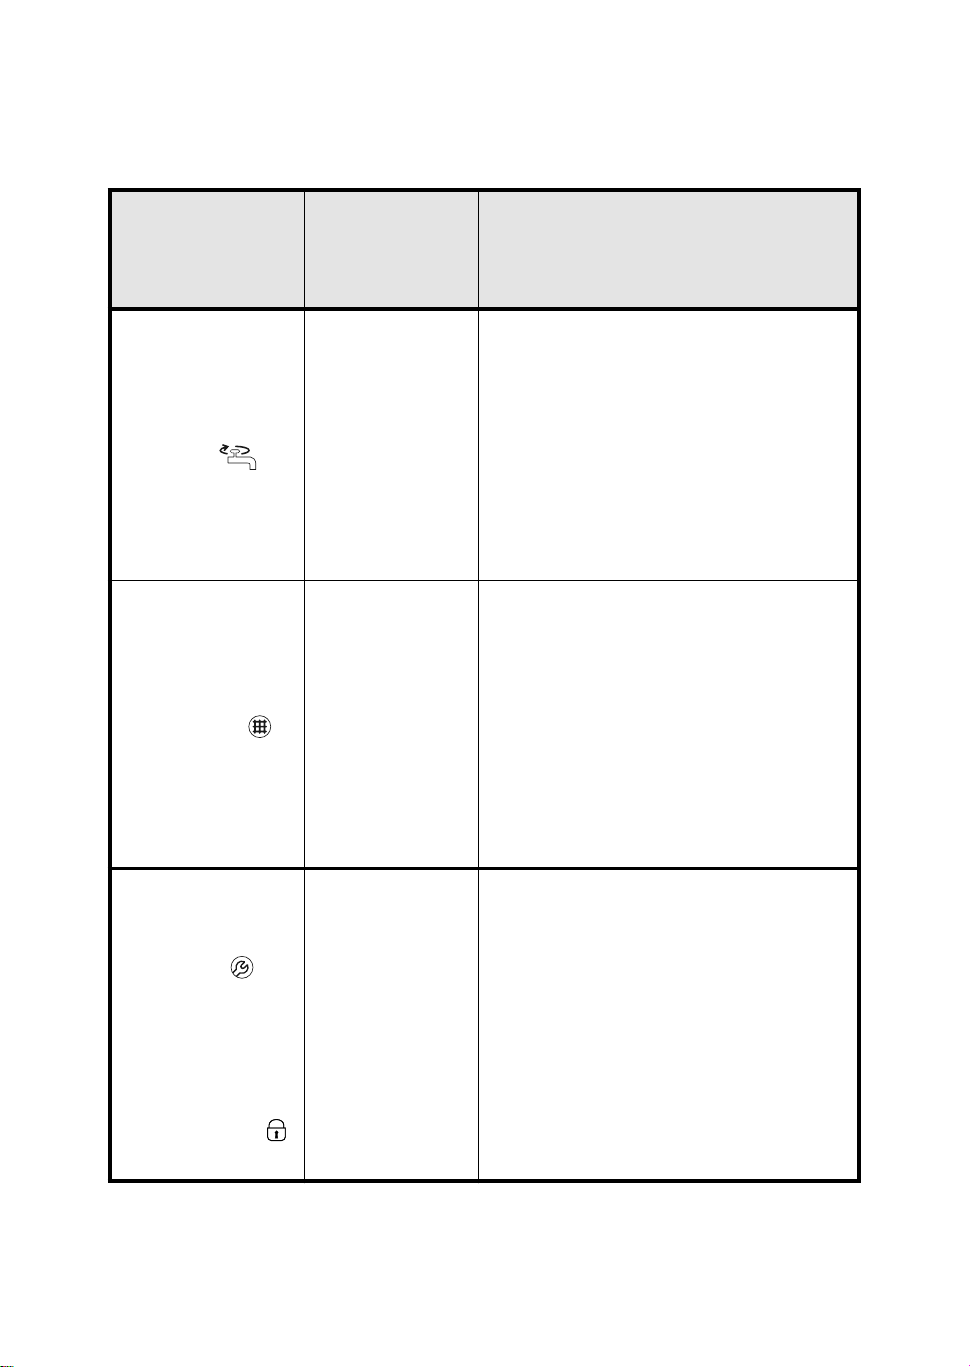
The red light
will go on
(if fitted to the
appliance)
“Water Tap
Closed”
“Clean Pump”
Alphanumeric
indications shown
on the display
(on models fitted
with them)
E00
E01
Description
Cause
Solutions
The appliance has insufficient or no water supply.
The “Start” light goes on.
Check that:
• The water tap is fully open and the water pressure
is sufficient.
• The water supply hose is kinked.
• the mesh filters of the water supply could be
blocked (see “Care and maintenance”.
• The water hose is frozen up.
When the problem has been resolved, re-start the
programme by pressing the “Start” button. If the
fault occurs again, contact the After-Sales Service
[see next chapter).
The water is not pumped out of the washing
machine. The appliance stops in mid programme;
unplug the appliance and check if:
• there are kinks in the drain hose.
• the filter or pump is blocked (see chapter
“Removing The Filter/Draining Residual Water”;
make sure the water has cooled before
draining the appliance).
• the water in the water inlet hose is frozen.
When you have resolved the problem, turn the
programme selector to “Off/O” to reset the
appliance; next re-start the desired programme. If
the fault occurs again, contact the After-Sales
Service [see next chapter).
“Service”
Door locking error
E02
E03
“Fod”
E04
“Electrical module fault”
Unplug the appliance and turn the programme
selector to “Off/O”, then turn the appliance ON
again. Select the “Drain/Spin” programme and restart within 15 seconds.
Turn the appliance OFF by turning the programme
selector to “Off/O”; Open and close the door again
with more force then reselect the programme and
press “Start”.
If any of the faults described above persists, unplug
the appliance, turn off the water supply and contact
our After-Sales Service (see next chapter).
GB 11
Page 17
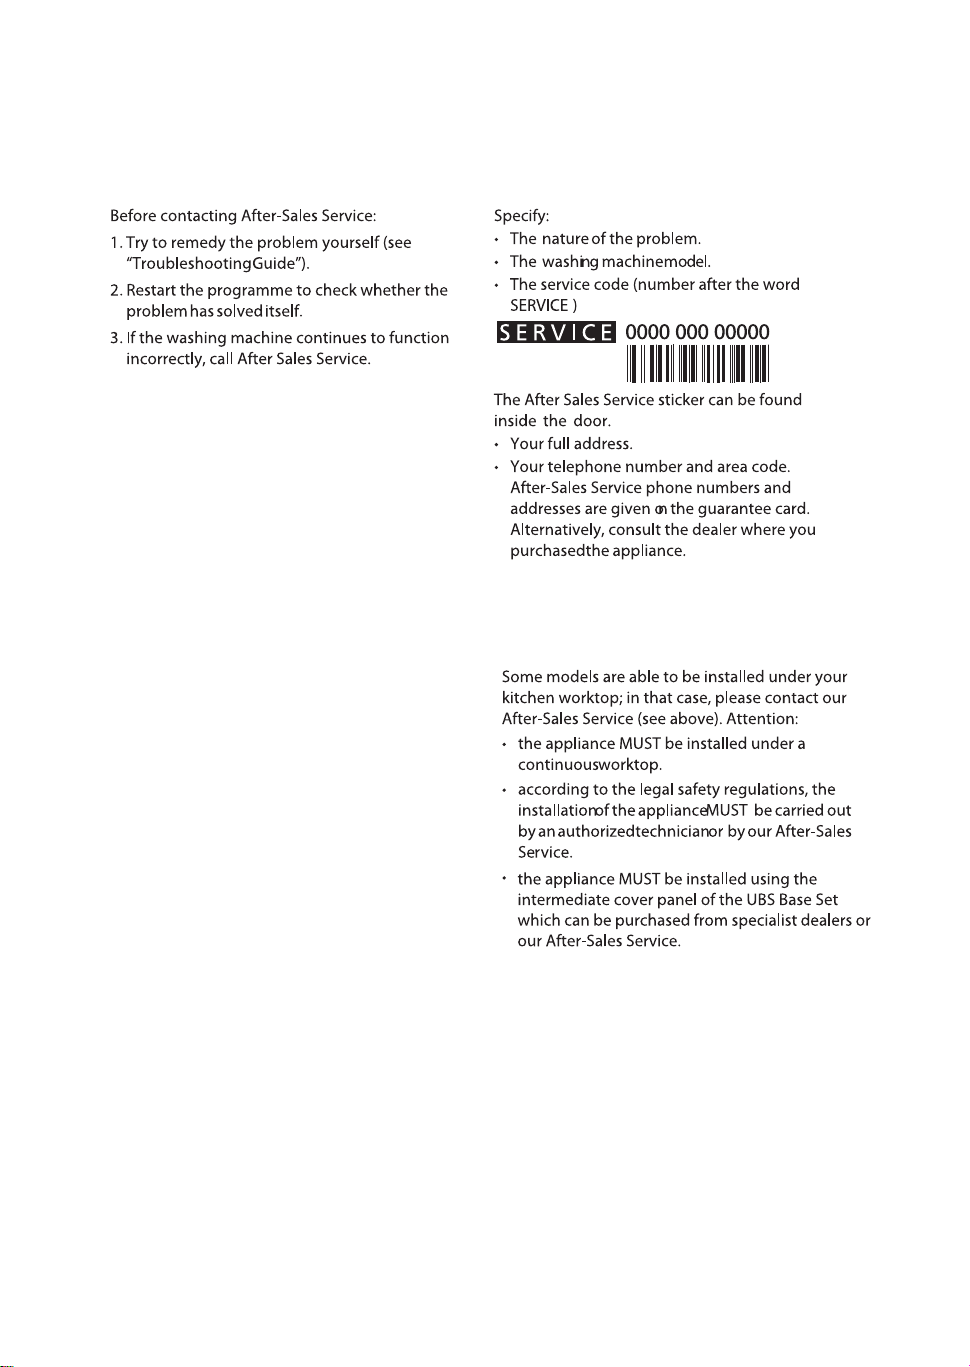
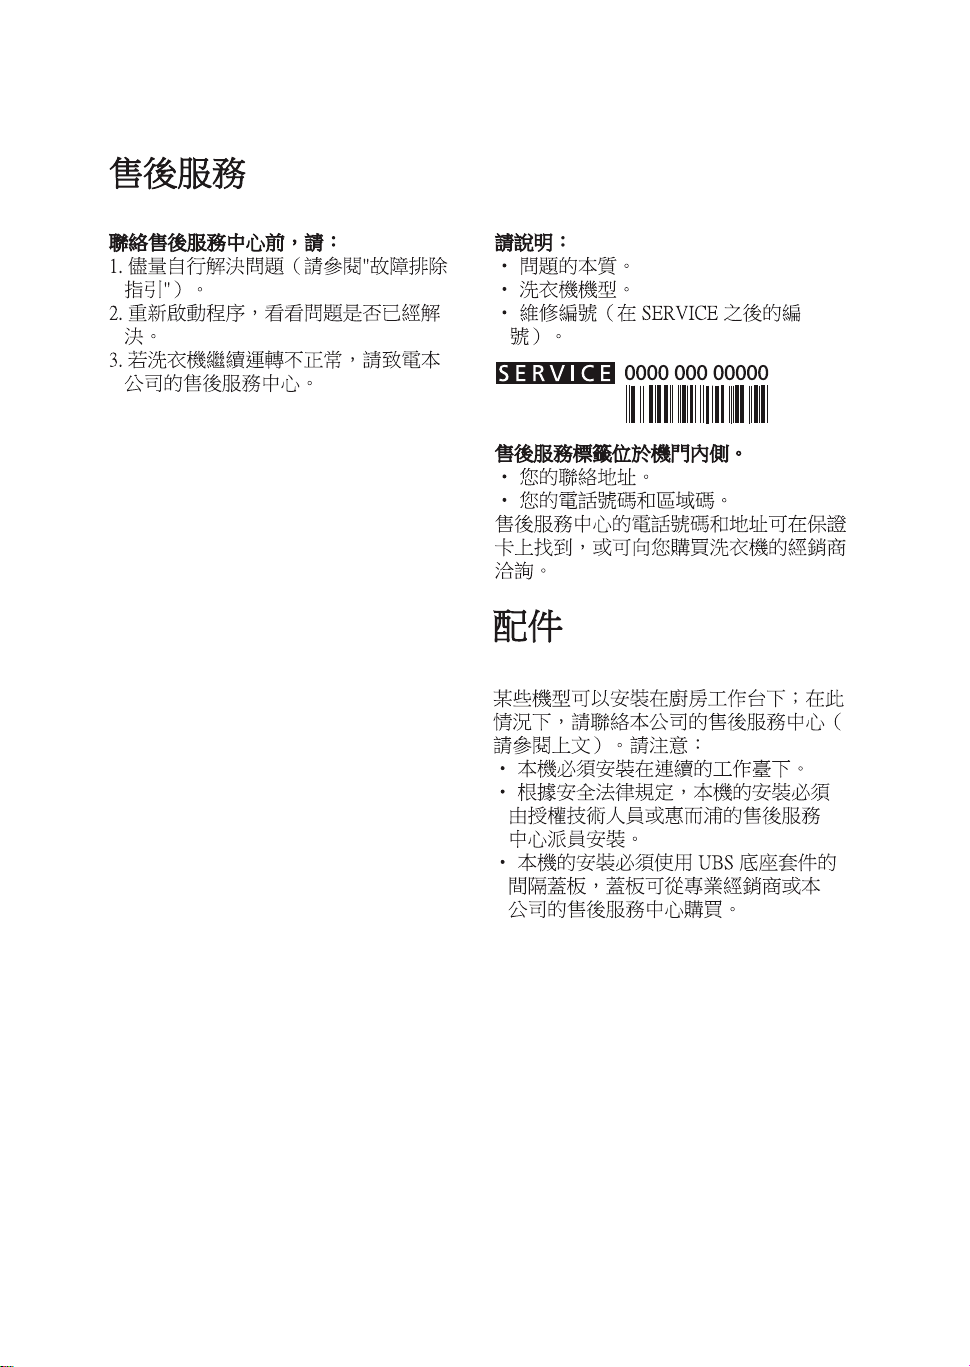
AFTER-SALES SERVICE
ACCESSORIES
GB 12
Page 18
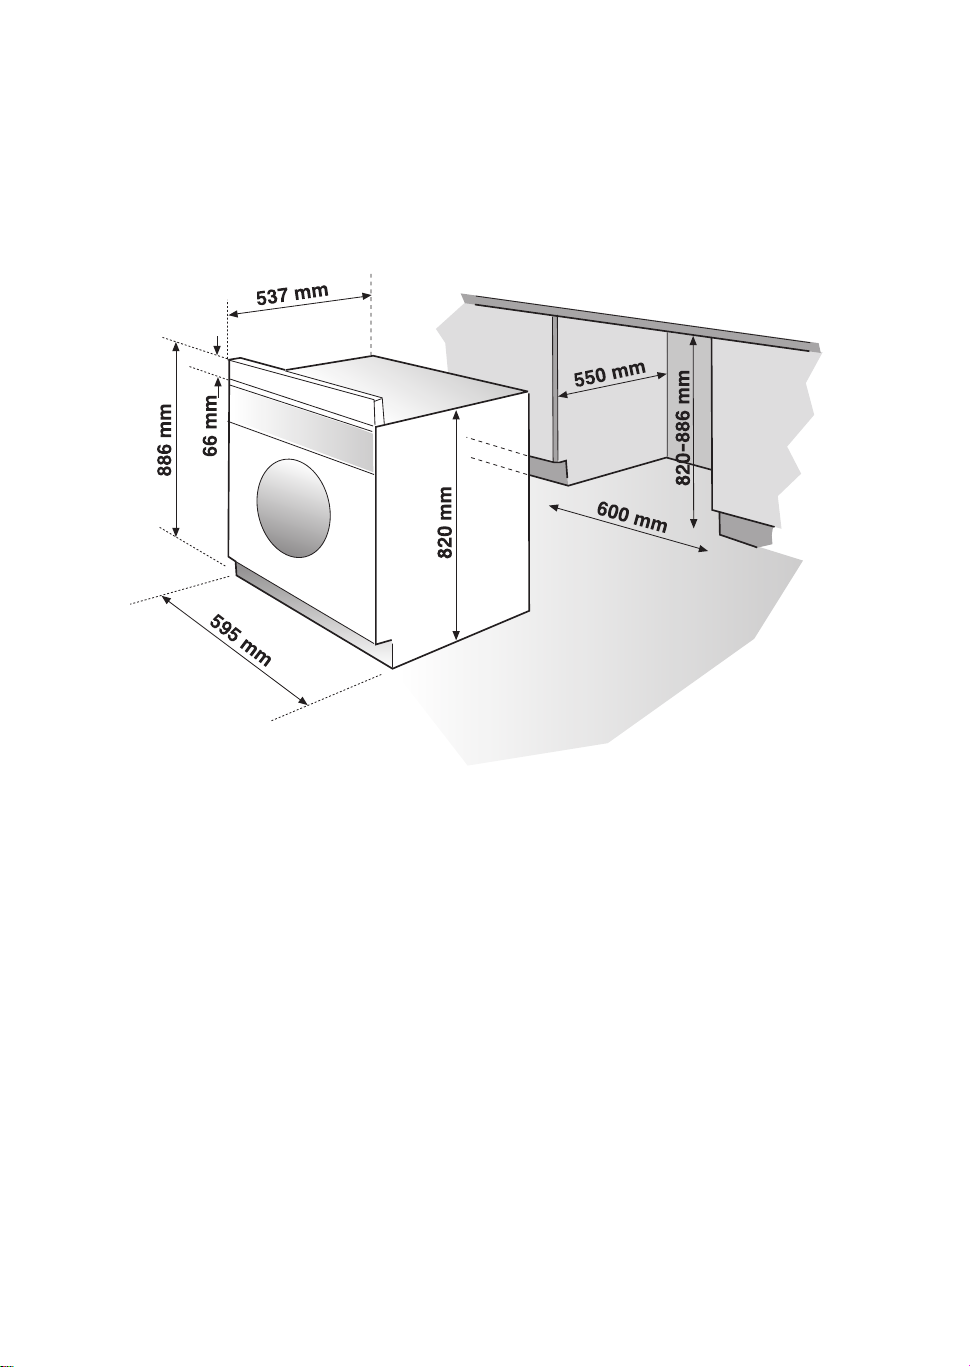
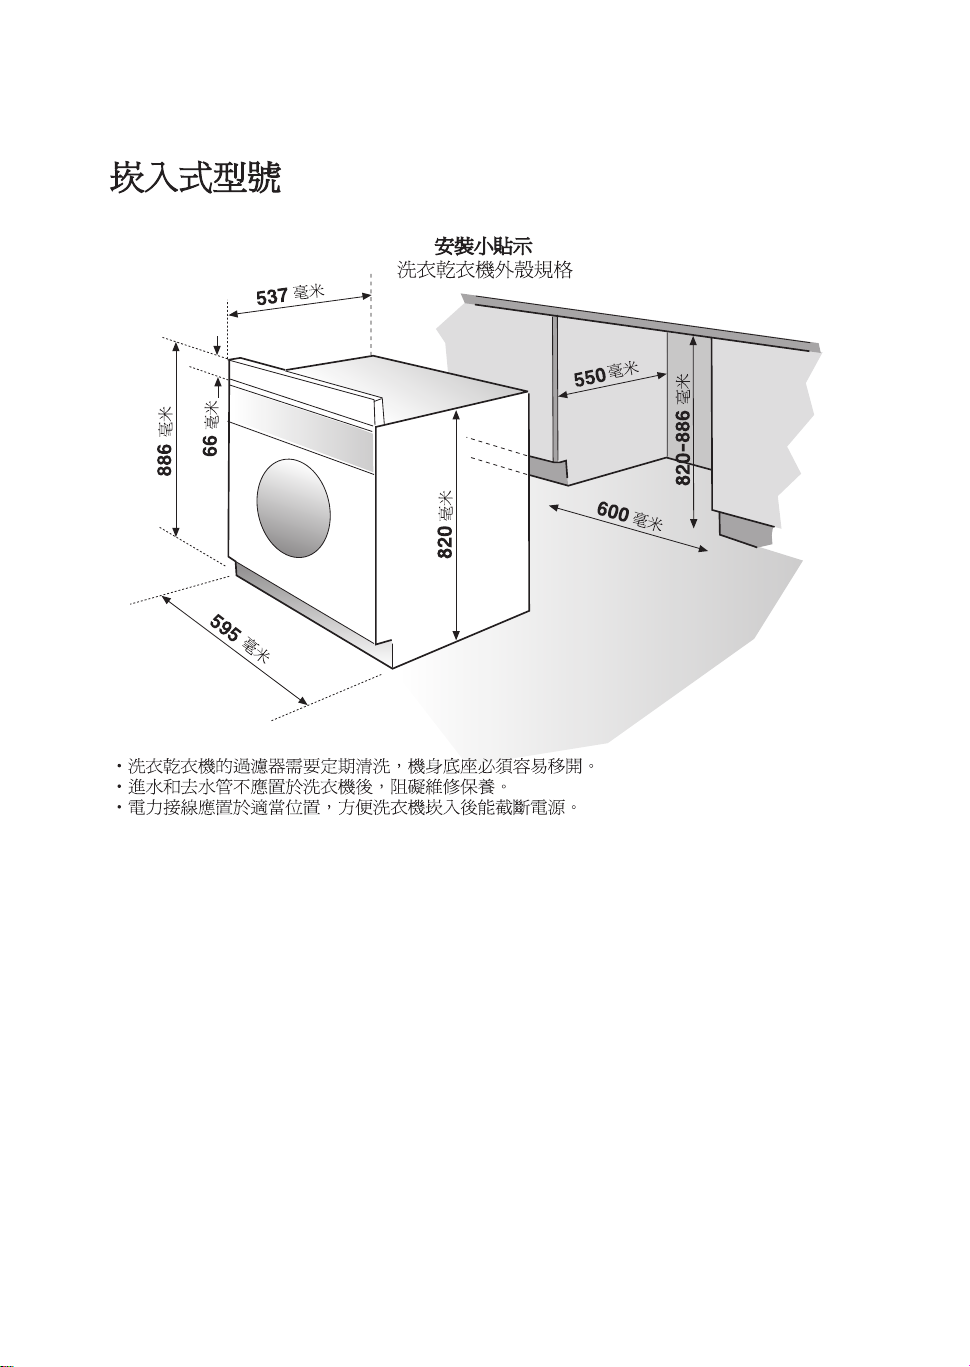
BUILT-IN MODELS
INSTALLATION TIPS
Washer dryer housing dimensions:
•
Due to the need for the washer dryer filter to be cleaned periodically the plinth should be easily
removable.
•
For easy care and maintenance water supply and drain should not be positioned behind the appliance.
•
The electrical connections should be positioned so that the appliance can be disconnected when fitted in
position.
GB 13
Page 19
FITTING A DÉCOR DOOR TO THE APPLIANCE
The appliance front part has been fitted to accommodate the hinges so that the door can be opened either
from the left or from the right hand side.
Proceed as follows:
1.Screw the hinges onto the décor door, if a dummy drawer front is also being used ensure it to be fastened
to the top edge of the door. Ensure the gap between door and drawer matches the units either side.
2.Fix the two hinge plate
Note: an 8mm box spanner can be used to screw the thread cutting screws into position.
3.Fasten the two magnetic catches to the opposite side to the hinges and ensure the metal straps are
fastened to the back of the door.
4.Locate the hinges on the door into the two hinge plates on the appliance.
5.If adjustment is necessary this can be achie
screws (horizontal).
s to the front of the washer dryer using the two plastic backing pieces.
ved by either the hinge plates (vertical) or by the hinge fixing
FITTING A FULL HEIGHT DOOR
If a full height door is to be fitted (no dummy drawer front is being used) a top hinge hole has to be drilled
in the door.
The distance between the two hinge hole centres is 360 - 384mm and the distance from the edge of the
door is 21.5mm.
The hinge hole should be max 12mm deep and its diameter 35mm: make sure you do not drill through the
door.
The two fixing holes for the hinge screws are 2mm.
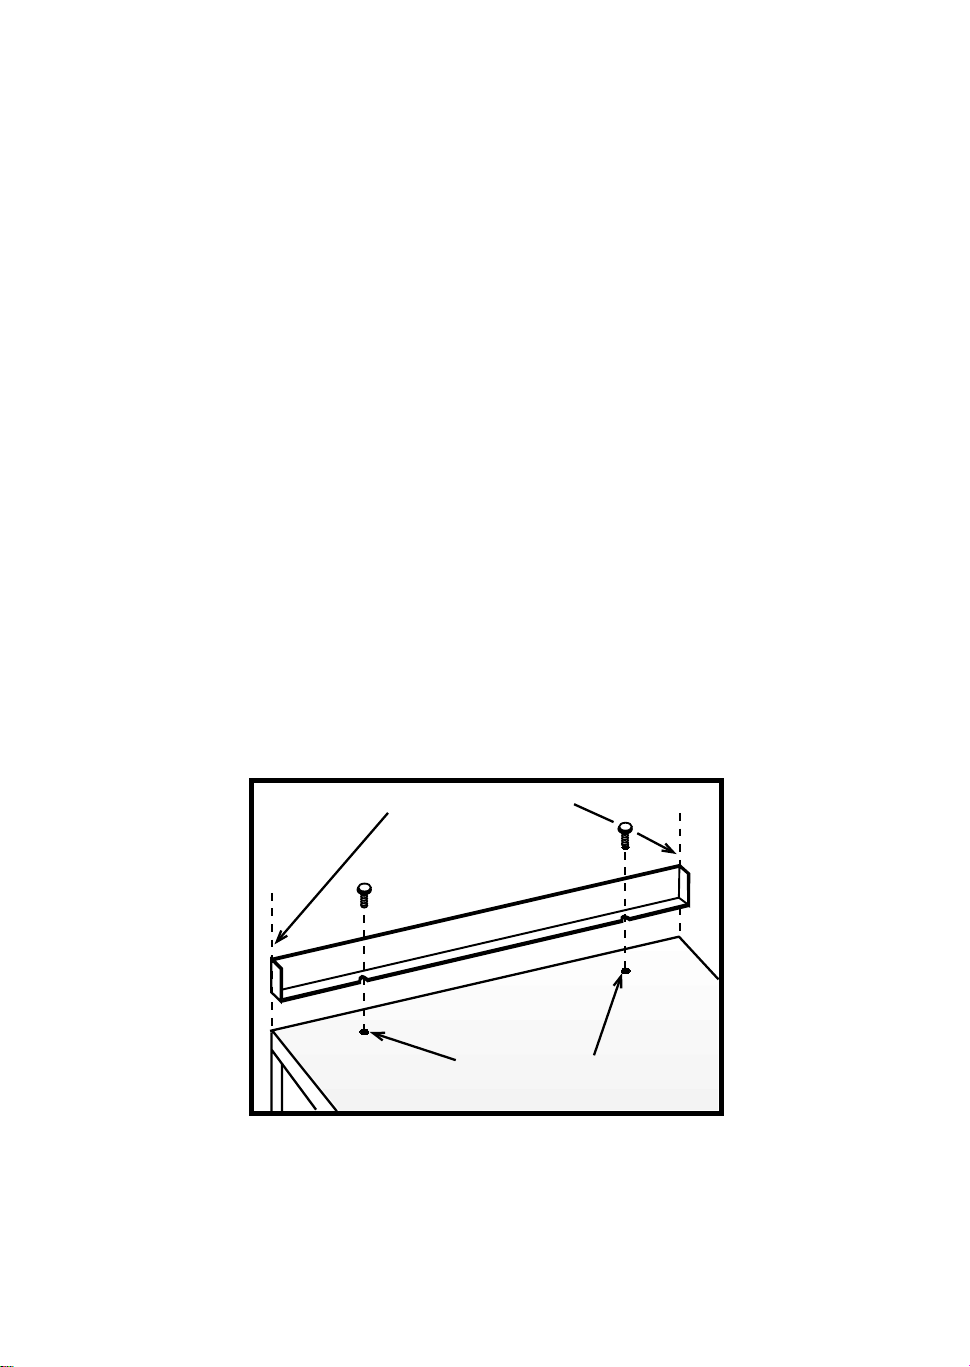
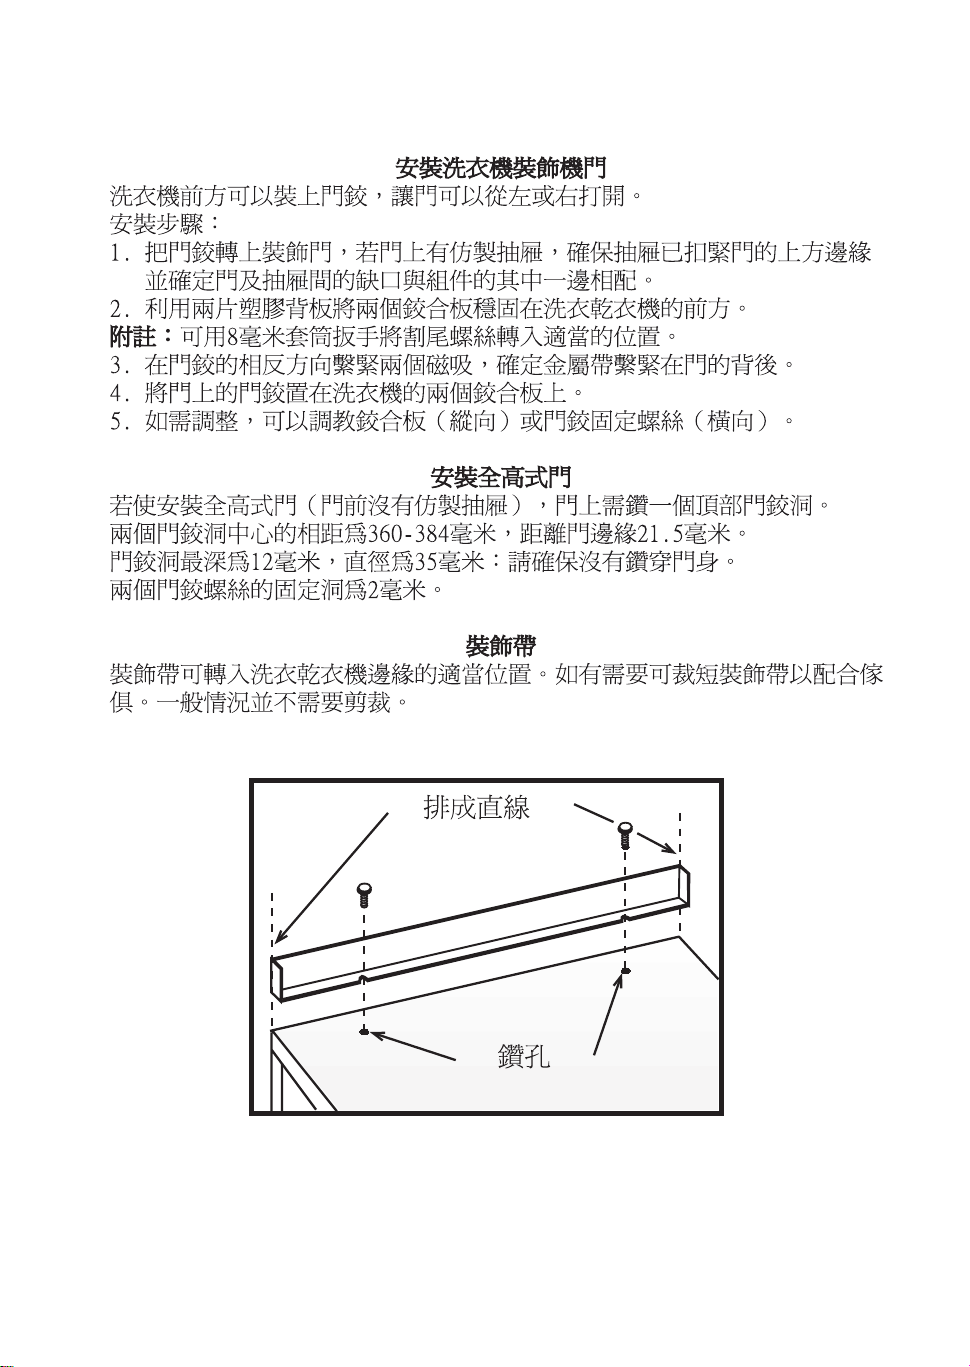
DÉCOR STRIP
A décor strip can be screwed into position on the edge of the washer dryer. If needed, the strip can be cut
to be adjusted to your furniture but normally this will not be necessary.
TO LINE UP
TO DRILL
GB 14
Page 20
Page 21
234
Page 22
Page 23
ABA
A
B
1
A
A
4
Page 24
1
1
3
6
7
3
4
5
7
2
2
4
5
6
5
Page 25
678
Page 26
Page 27
A
B
C
Page 28
A
9
Page 29
10111213GB 14
Page 30
Page 31
Page 32
Page 33
Page 34

Page 35
GB CN
SM2536 Stampa TLF 30/11/2007 461307415
 Loading...